
READY,
SET, PRO
USER MANUAL
PACERMINI PRO PORTABLE TREADMILL

HELLO THERE.
Joel and I are athletes who suffered from
severe ACL injuries a few months apart.
We purchased multiple pieces of wellness
equipment for our in-home rehab but were
left disappointed and frustrated by wellness
and recovery devices that made big promises
but gave no support, no well-thought-out
plan to follow, and no results. And that’s how
Lifepro came about, and why the Endurance
Training collection was created — we’ve set
out to change all of that. It’s why every piece
of equipment bearing our name not only
undergoes rigorous scrutiny to make sure it
delivers on power and efficacy, but comes with
built-in support from our ‘guiding angels’
and a built-in lifetime warranty so that
you’re never left hanging.
Welcome to Lifepro.
We’re in this together now.
Aerobic exercise has
enormous benefits
for your body, brain,
and mental health.
At least 75 minutes
of vigorous aerobic
exercise, such as
walking or running
on a treadmill, are
recommended each
week for optimal
health.
Not everyone can afford to hire a personal trainer or a team of professionals to help
them feel and look their best. But the good news is: you don’t have to. Lifepro brings
the gym to you.
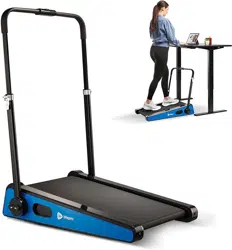
With the Lifepro PacerMini Pro Portable Treadmill, you can build cardiovascular
fitness, strength, and stamina from the comfort of your own home or office. The
low-decibel motor is designed specifically for in-home use. The PacerMini comes
fully assembled and sets up within minutes, without the need for tools or hardware.
The PacerMini Pro is small but mighty. Unlike most small portable treadmills that can
only be used while sitting, the PacerMini Pro has a max weight load of 220 pounds,
so it can also be used just like a standard-sized treadmill. It’s lightweight and
portable, so you can use it at home, in the office, or both. Use it with a standing desk
and burn calories and boost your fitness while you work! The handlebar folds down
easily, allowing you to tuck PacerMini Pro under a bed or desk for out-of-the-way
storage.
The PacerMini Pro treadmill has a speed range of 0.5–3.0 mi/hr and a set incline
of 7 degrees to optimally tone your gluteus and hamstring muscles. You can track
calories, total steps, and workout time to help achieve your fitness goals. The
PacerMini Pro comes with a remote control so you can easily control your pace. Walk
or jog your way to better cardiovascular fitness, and start to see results in as few
as 15–20 minutes a day.
Whether you’re getting back into endurance training after starting a family or
career or someone who has never done cardio before, the Lifepro PacerMini Pro has
everything you’ll need to boost your metabolism and increase stamina.
Redefine your workouts and experience the
transformative power of the Lifepro PacerMini Pro:
Increase strength and stability: improves muscle tone and core strength.
Regulate weight: boosts your heart rate and burns calories.
Boost your metabolism: encourages your body to burn fat faster.
Decrease your stress: increases serotonin and decreases cortisol.
Lower blood pressure: improves circulation.
Develop stronger bones: increases bone density.
Check out the information in this manual for ways to get started using
your PacerMini Pro Portable Treadmill. Next, be sure to visit our website
pacerminipro.lifeprofitness.com for access to our FREE library of workout videos
which demonstrate how to easily incorporate the PacerMini Pro into your fitness
routine.
Endurance Training Collection 5

Not everyone can afford to hire a personal trainer or a team of professionals to help
them feel and look their best. But the good news is: you don’t have to. Lifepro brings
the gym to you.
With the Lifepro PacerMini Pro Portable Treadmill, you can build cardiovascular
fitness, strength, and stamina from the comfort of your own home or office. The
low-decibel motor is designed specifically for in-home use. The PacerMini comes
fully assembled and sets up within minutes, without the need for tools or hardware.
The PacerMini Pro is small but mighty. Unlike most small portable treadmills that can
only be used while sitting, the PacerMini Pro has a max weight load of 220 pounds,
so it can also be used just like a standard-sized treadmill. It’s lightweight and
portable, so you can use it at home, in the office, or both. Use it with a standing desk
and burn calories and boost your fitness while you work! The handlebar folds down
easily, allowing you to tuck PacerMini Pro under a bed or desk for out-of-the-way
storage.
The PacerMini Pro treadmill has a speed range of 0.5–3.0 mi/hr and a set incline
of 7 degrees to optimally tone your gluteus and hamstring muscles. You can track
calories, total steps, and workout time to help achieve your fitness goals. The
PacerMini Pro comes with a remote control so you can easily control your pace. Walk
or jog your way to better cardiovascular fitness, and start to see results in as few
as 15–20 minutes a day.
Whether you’re getting back into endurance training after starting a family or
career or someone who has never done cardio before, the Lifepro PacerMini Pro has
everything you’ll need to boost your metabolism and increase stamina.
Redefine your workouts and experience the
transformative power of the Lifepro PacerMini Pro:
Increase strength and stability: improves muscle tone and core strength.
Regulate weight: boosts your heart rate and burns calories.
Boost your metabolism: encourages your body to burn fat faster.
Decrease your stress: increases serotonin and decreases cortisol.
Lower blood pressure: improves circulation.
Develop stronger bones: increases bone density.
Check out the information in this manual for ways to get started using
your PacerMini Pro Portable Treadmill. Next, be sure to visit our website
pacerminipro.lifeprofitness.com for access to our FREE library of workout videos
which demonstrate how to easily incorporate the PacerMini Pro into your fitness
routine.
Endurance Training Collection 5

FIRST STEPS
UNPACKING THE COMPONENTS
1. Remove the folded treadmill and accessories from the shipping box
and inspect all items for shipping damage.
2. Compare the contents to the items listed in WHAT’S IN THE BOX on
the next page.
3. Read carefully through this user manual and all safety instructions
before setting up and using the PacerMini Pro.
4. Follow the steps in the 5-MINUTE SETUP GUIDE on page 9 to set up
your treadmill.
5. Go to pacerminipro.lifeprofitness.com and register your product
within 14 days of purchase to activate your lifetime warranty.
CAUTION:
• Always use proper lifting techniques, the shipping box is quite heavy.
CUSTOMER SUPPORT
If you have any questions about setting up or using your PacerMini Pro,
we’re here to help. Call or email us, and an experienced customer
support representative will be happy to assist you: (800) 563-6604
or support@lifeprofitness.com.
Endurance Training Collection 7
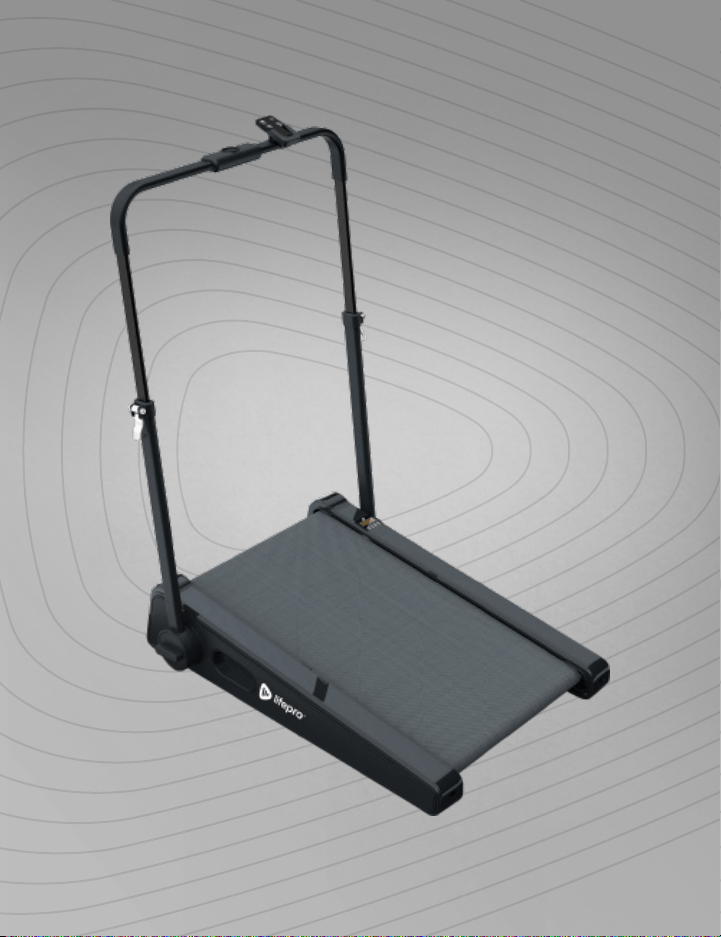
PACERMINI PRO
PORTABLE TREADMILL
ENDURANCE TRAINING
G
D
E
A B
F
C
G
D
E
A B
F
C
G
D
E
A B
F
C
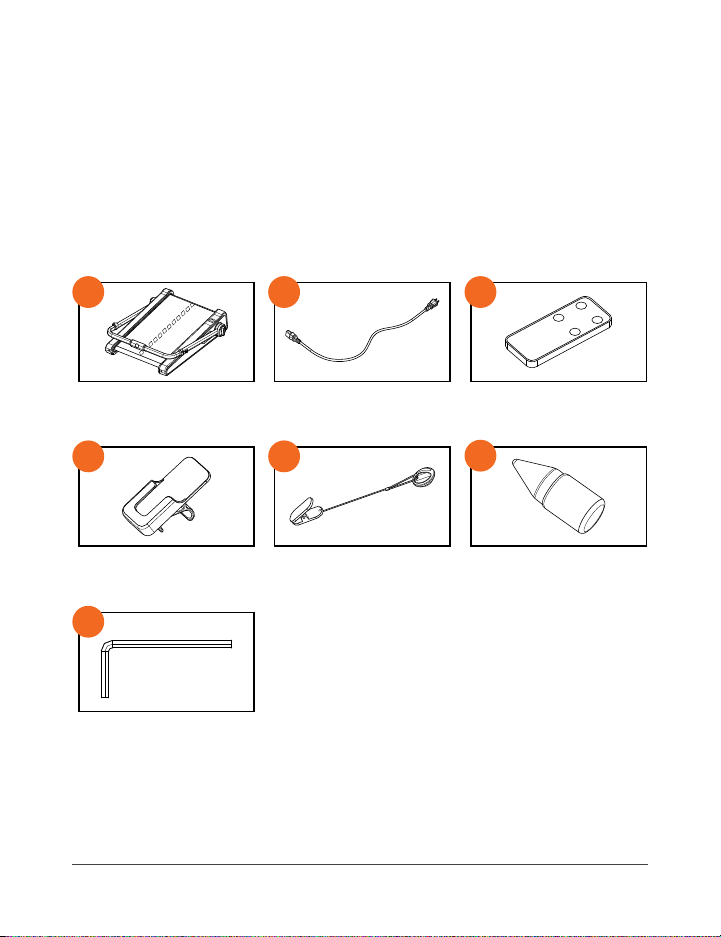
Folded Treadmill
Remote Control Holder
Hex Key
Power Cord
Safety Key
Remote Control
Lubricating Oil
WHAT’S IN THE BOX
6 PacerMini Pro User Manual Lifepro
FIRST STEPS
UNPACKING THE COMPONENTS
1. Remove the folded treadmill and accessories from the shipping box
and inspect all items for shipping damage.
2. Compare the contents to the items listed in WHAT’S IN THE BOX on
the next page.
3. Read carefully through this user manual and all safety instructions
before setting up and using the PacerMini Pro.
4. Follow the steps in the 5-MINUTE SETUP GUIDE on page 9 to set up
your treadmill.
5. Go to pacerminipro.lifeprofitness.com and register your product
within 14 days of purchase to activate your lifetime warranty.
CAUTION:
• Always use proper lifting techniques, the shipping box is quite heavy.
CUSTOMER SUPPORT
If you have any questions about setting up or using your PacerMini Pro,
we’re here to help. Call or email us, and an experienced customer
support representative will be happy to assist you: (800) 563-6604
or support@lifeprofitness.com.
Endurance Training Collection 7
PACERMINI PRO
PORTABLE TREADMILL
ENDURANCE TRAINING
G
D
E
A B
F
C
G
D
E
A B
F
C
G
D
E
A B
F
C
Folded Treadmill
Remote Control Holder
Hex Key
Power Cord
Safety Key
Remote Control
Lubricating Oil
WHAT’S IN THE BOX
6 PacerMini Pro User Manual Lifepro
Endurance Training Collection 9 8 PacerMini Pro User Manual Lifepro
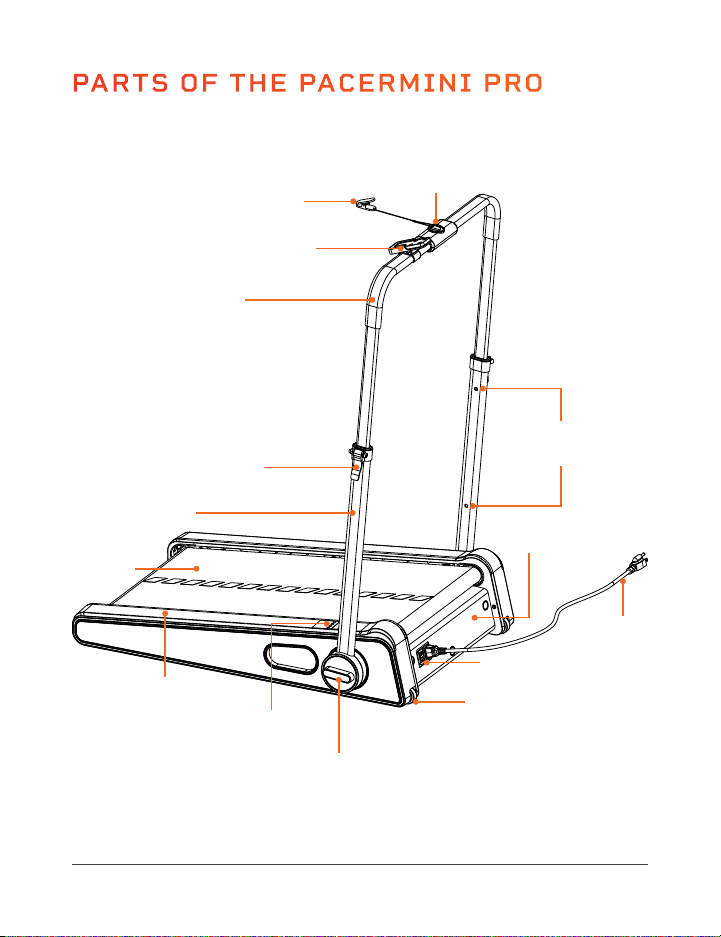
PARTS OF THE PACERMINI PRO
Handlebar
Running
Belt
Display
Panel
Safety Key
Handlebar
Frame
Latching Lever
(Left & Right)
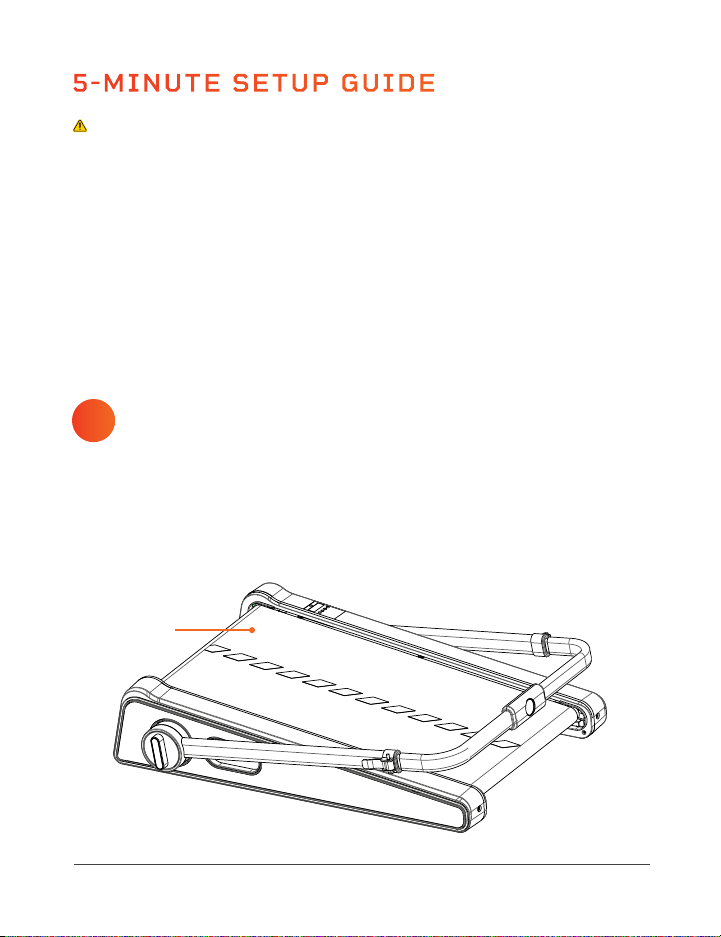
5-MINUTE SETUP GUIDE
LAY OUT THE TREADMILL
AND COMPONENTS
1. Place the folded treadmill body (A) on the floor.
2. Gather the power cord (B), remote control (C), remote control
holder (D), safety key (E), and bottle of lubricating oil (F) and place
them nearby. You will not need the hex key (G).
Figure 1
SETUP NOTES
• Setup on a flat, sturdy floor.
• Ensure the space is free of obstructions.
1
WARNING
• Adult setup is required. Keep children away during setup.
• Always keep the bottle of lubricating oil out of reach of children to avoid
accidental ingestion.
• Properly dispose of all packaging especially plastic bags, which can
present a suffocation hazard to small children, before assembly.
• Always use proper lifting techniques, the treadmill is quite heavy.
Remote Control
& Holder
Power Switch
Motor
Housing
Transport Wheel
(Left & Right)
Adjustment Holes
(Upper & Lower)
Locking
Knob
FRONT
REAR
Safety Key Port
Foot Rails
(Left & Right)
Power
Cord
A
Endurance Training Collection 9 8 PacerMini Pro User Manual Lifepro
PARTS OF THE PACERMINI PRO
Handlebar
Running
Belt
Display
Panel
Safety Key
Handlebar
Frame
Latching Lever
(Left & Right)
5-MINUTE SETUP GUIDE
LAY OUT THE TREADMILL
AND COMPONENTS
1. Place the folded treadmill body (A) on the floor.
2. Gather the power cord (B), remote control (C), remote control
holder (D), safety key (E), and bottle of lubricating oil (F) and place
them nearby. You will not need the hex key (G).
Figure 1
SETUP NOTES
• Setup on a flat, sturdy floor.
• Ensure the space is free of obstructions.
1
WARNING
• Adult setup is required. Keep children away during setup.
• Always keep the bottle of lubricating oil out of reach of children to avoid
accidental ingestion.
• Properly dispose of all packaging especially plastic bags, which can
present a suffocation hazard to small children, before assembly.
• Always use proper lifting techniques, the treadmill is quite heavy.
Remote Control
& Holder
Power Switch
Motor
Housing
Transport Wheel
(Left & Right)
Adjustment Holes
(Upper & Lower)
Locking
Knob
FRONT
REAR
Safety Key Port
Foot Rails
(Left & Right)
Power
Cord
A
Endurance Training Collection 11 10 PacerMini Pro User Manual Lifepro
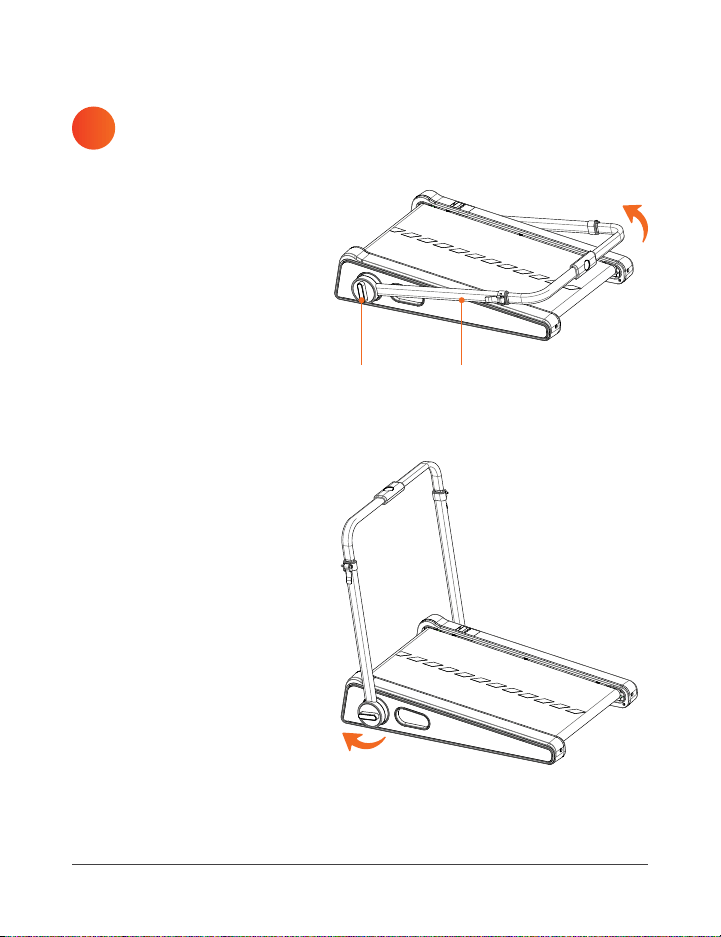
RAISE THE
HANDLEBAR FRAME
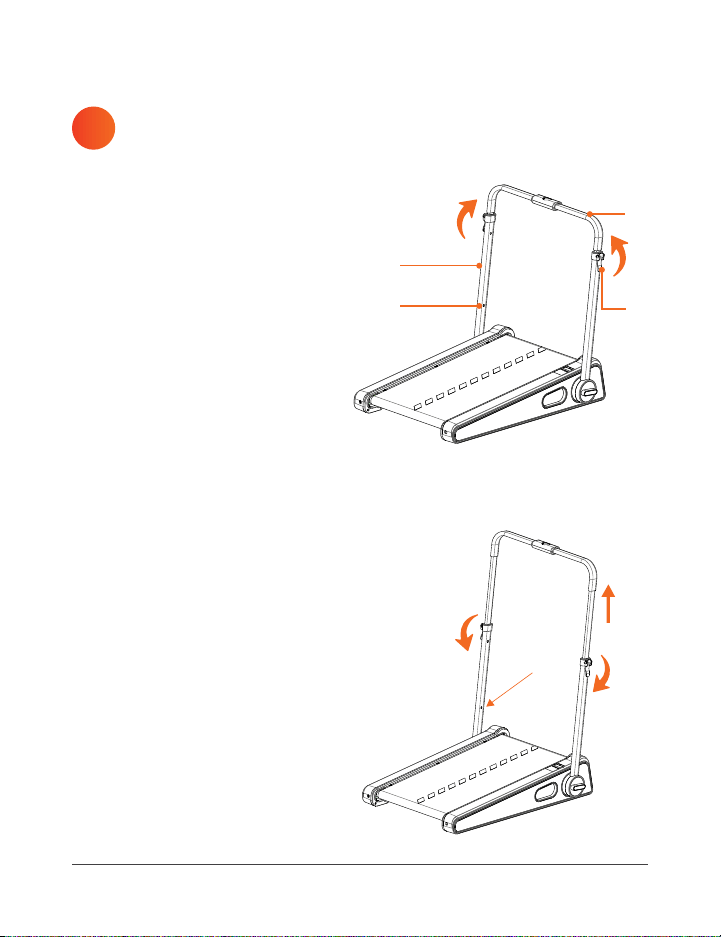
ADJUST THE HANDLEBAR HEIGHT
TO THE LOW OR HIGH POSITION
2 3
The PacerMini Pro has two
height-adjustment holes (J)
on each side of the handlebar
frame (I) which allow the
handlebar to be adjusted to two
heights: low and high.
1. Lift the right and left
latching levers (K). See
Figure 4.
2. Pull the handlebar (L) up
until you hear a click. The
handlebar is now in the low
position.
3. If you wish to raise the
handlebar to the high
position: press the metal
adjustment buttons into the
height-adjustment holes (J)
and pull the handlebar (L)
up until you hear a click. The
handlebar is now in the high
position. See Figure 5.
4. Ensure both adjustment
buttons are engaged in the
adjustment holes (J).
5. Press down the latching
levers (K) to lock the
handlebar height. See
Figure 5.
Figure 5
1. Rotate the left and
right locking knobs (H)
counterclockwise at the
same time to allow the
handlebar frame (I) to
rotate. See Figure 2.
2. With both locking knobs
loosened, pull the
handlebar frame (I) up and
towards the front of the
treadmill.
3. Once the correct position
is achieved, tighten the
locking knobs (H) by
turning them clockwise.
See Figure 3.
Figure 3
FRONT
IH
Figure 2
K
FRONT
J
L
I
Figure 4
Endurance Training Collection 11 10 PacerMini Pro User Manual Lifepro
RAISE THE
HANDLEBAR FRAME
ADJUST THE HANDLEBAR HEIGHT
TO THE LOW OR HIGH POSITION
2 3
The PacerMini Pro has two
height-adjustment holes (J)
on each side of the handlebar
frame (I) which allow the
handlebar to be adjusted to two
heights: low and high.
1. Lift the right and left
latching levers (K). See
Figure 4.
2. Pull the handlebar (L) up
until you hear a click. The
handlebar is now in the low
position.
3. If you wish to raise the
handlebar to the high
position: press the metal
adjustment buttons into the
height-adjustment holes (J)
and pull the handlebar (L)
up until you hear a click. The
handlebar is now in the high
position. See Figure 5.
4. Ensure both adjustment
buttons are engaged in the
adjustment holes (J).
5. Press down the latching
levers (K) to lock the
handlebar height. See
Figure 5.
Figure 5
1. Rotate the left and
right locking knobs (H)
counterclockwise at the
same time to allow the
handlebar frame (I) to
rotate. See Figure 2.
2. With both locking knobs
loosened, pull the
handlebar frame (I) up and
towards the front of the
treadmill.
3. Once the correct position
is achieved, tighten the
locking knobs (H) by
turning them clockwise.
See Figure 3.
Figure 3
FRONT
IH
Figure 2
K
FRONT
J
L
I
Figure 4
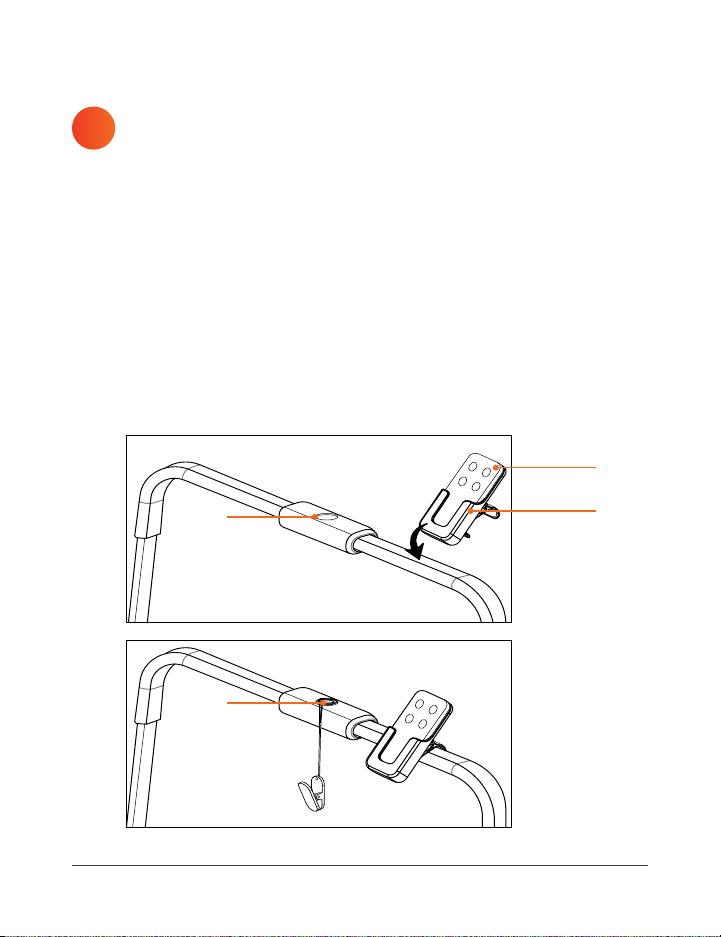
INSTALL THE REMOTE
CONTROL AND SAFETY KEY
1. Gather the remote control (C), remote control holder (D), and safety
key (E).
2. Remove the back of the remote control. Pull the plastic tab covering
the battery terminals to remove it. Replace the back of the remote.
3. Clip the remote controller holder (G) to the top of the handlebar (E),
facing towards the running belt. See Figure 6.
4. Insert the remote control into the holder.
5. Place the magnetic end of the safety key (E) in the magnetic safety key
port (M) in the center of the handlebars.
4
Figure 6
C
D
12 PacerMini Pro User Manual Lifepro
LUBRICATE THE
RUNNING BELT
1. Before using your PacerMini Pro treadmill for the first time, you must
lubricate the running belt. Follow the steps in LUBRICATING THE
RUNNING BELT on pages 26–27. You will need the bottle of lubricating
oil (F).
INSTALL THE
POWER CORD
1. Plug the female end of the power cord (B) into the jack on the side of
the treadmill next to the power switch (N).
5
6
Figure 7
Endurance Training Collection 13
E
M
B
N

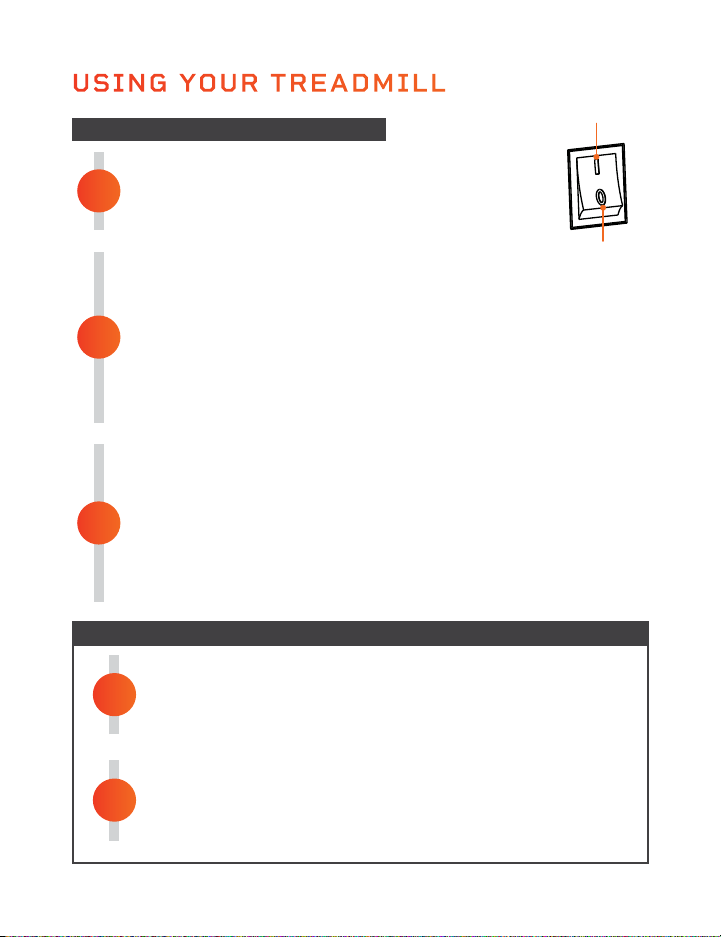
USING YOUR TREADMILL
POWER ON THE PACERMINI PRO
1. Plug the power cord into a grounded electrical outlet.
2. Flip the Power switch on the side to the ON position. The
display will light up and all values will be set to zero.
POWER OFF AND UNPLUG THE PACERMINI PRO
1. Press the Power button on the remote control.
2. Remove the magnetic safety key and store it in a separate location.
3. Flip the Power switch to the OFF position. Unplug the power cord.
2
1
GET ON THE TREADMILL
1. Stand with your feet on the foot rails on either side of the running belt.
Do not stand on the running belt.
2. Press the Power button on the remote control. Then press the Start/
Stop button. Wait for the countdown.
3. Hold onto the handlebar with both hands.
4. Place your feet, one at a time, on the running belt only after it has begun
to move at a consistent, low speed of 1 mi/hr or less.
GET OFF THE TREADMILL
1. Press the Start/Stop button to stop the running belt.
2. Wait until the treadmill has come to a complete stop before getting
off the treadmill.
3
2
1
PLACE THE MAGNETIC SAFETY KEY
The safety key cuts power to the treadmill if you fall or an emergency occurs.
See
USING THE MAGNETIC SAFETY KEY on page 14.
1. Place the magnetic end of the safety key on the round magnetic port
on the handlebar.
2. Clip the other end of the safety key securely to your clothing.
3. Give the clip a tug to make sure it won’t release from your clothing.
The safety key MUST be in place before the treadmill can be operated.
STARTING THE TREADMILL
STOPPING THE TREADMILL
IMPORTANT SAFETY INFORMATION
USING THE MAGNETIC SAFETY KEY
The safety key MUST be in place before the treadmill can be used.
The error code “- - -” will show on the display until the safety key is in place on the
magnetic port on the handlebar. If the safety key is removed from its port during
training, the treadmill will stop automatically and cannot be restarted until the safety
key is back in position.
WHAT TO DO IN AN EMERGENCY
WARNING: You must wear the safety key clipped to your clothing every time you
use the treadmill.
• Stop training immediately if you realize that you cannot keep up with the pace, if
you start feeling sick, or if any other emergency arises.
• Pull the cord to remove the safety key from its port; this will cause the treadmill to
stop immediately.
• As the treadmill stops, hold onto the handlebars firmly with both hands and place
your feet on the non-skid foot rails on each side of the running belt.
• If you trip during training, you can hold onto the handlebar with both hands as you
put your feet on the foot rails on either side of the running belt. Alternately, as
the treadmill is very small and low to the ground, you can step off the side of the
treadmill to the ground.
• You should practice how to quickly and safely get off the running belt several times
so that you will know what to do if an emergency arises.
• Make sure that all third parties are familiar with the safety instructions and that
they always use the safety key correctly while training.
DISABLING THE TREADMILL FOR SAFETY
To prevent the treadmill from being used by unauthorized users, always remove the
safety key when you have finished training. Keep the safety key stored in a separate
place, out of the reach of unauthorized people, especially children.
DURING EXERCISE
• Keep your body and head facing forward at all times.
• Never attempt to turn around on the treadmill while the running belt is moving.
• Make sure to breathe regularly and calmly during exercise.
• Stay hydrated before, during, and after exercise.
• Wear light, comfortable clothing and well-fitting athletic shoes. Do not wear loose
clothing that could become caught in the treadmill and result in falling or injury.
• Check your pulse regularly and stop if it becomes too high.
14 PacerMini Pro User Manual Lifepro Endurance Training Collection 15
Off Position
On Position
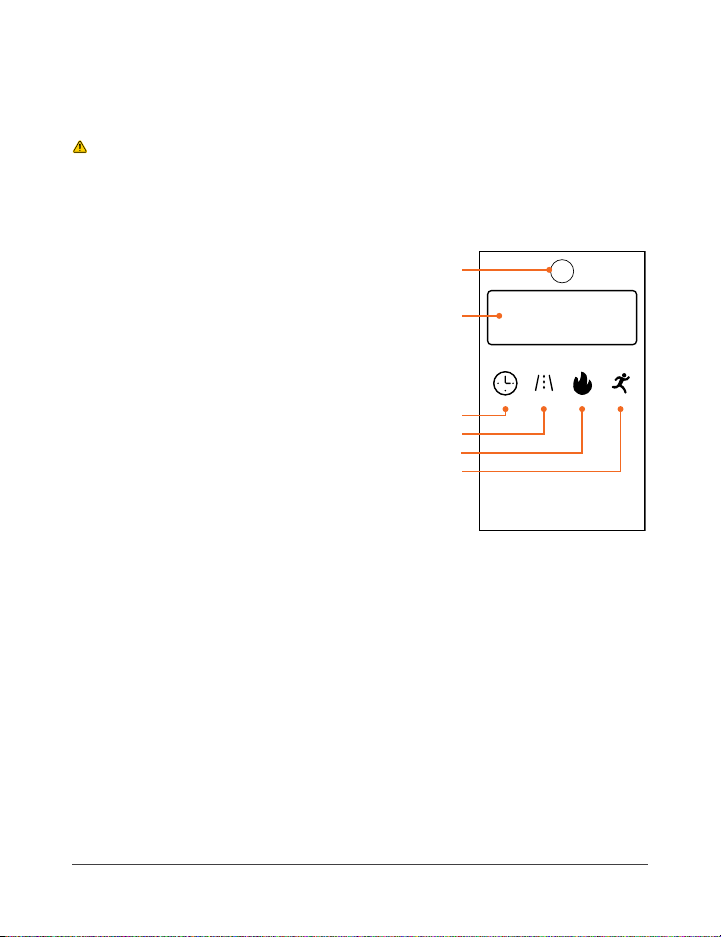
USING THE DISPLAY PANEL
The display panel is located on the top of the right foot rail.
CAUTION:
• Do not stare down at the display panel for long periods while the running
belt is moving to avoid injury or falling.
• It’s best not to stand on the display panel.
1. Infrared Receiver: Receives the signal
from the remote control. Do not cover or
block the receiver.
2. Display Window: Displays “OFF” when
the power is on but a workout has not
begun. Displays a “3-2-1” countdown
upon pressing the Start/Stop button
to begin a workout. After a workout
begins, alternates between time, speed,
calories, and steps.
3. Time Indicator: The LED will light up
when the running time elapsed (0 to 30
minutes) is displayed. The working time
is 30 minutes. After 30 minutes the
treadmill will stop automatically. Press
the Start/Stop button to begin a new
workout session.
4. Speed Indicator: The LED will light up when the speed (0.5 to
3.0 mi/hr) is displayed.
5. Calorie Indicator: The LED will light up when the number of calories
burned (1 to 999.9 calories) is displayed.
6. Step Indicator: The LED will light up when the approximate number of
steps (1 to 999 steps) is displayed.
Time Speed Calorie
Step
1
2
3
4
5
6
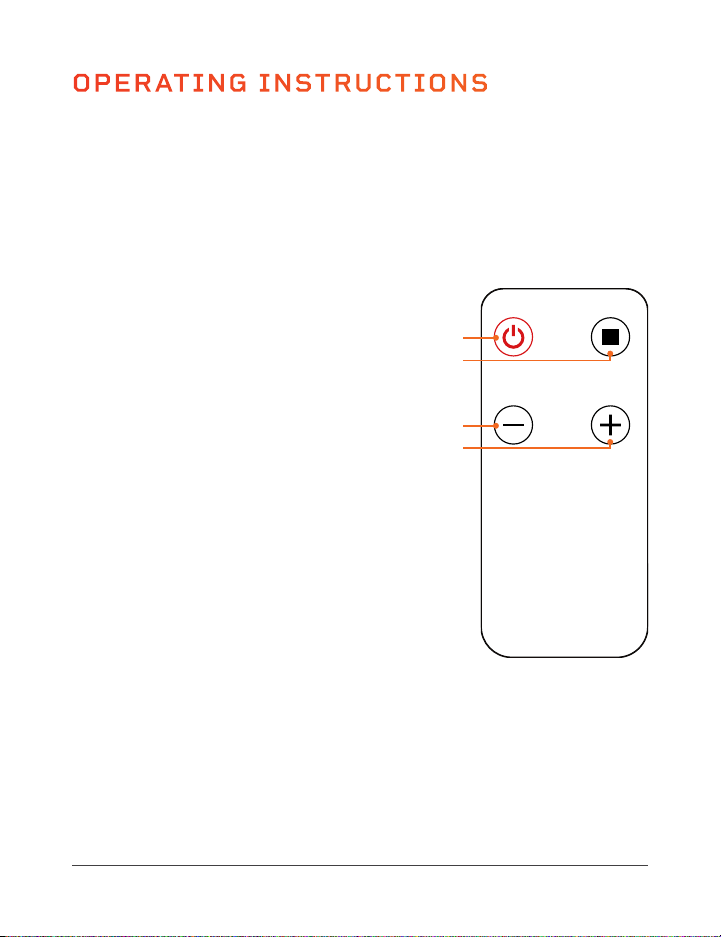
OPERATING INSTRUCTIONS
Please read the operating instructions before using the PacerMini Pro.
Keep this manual for reference.
USING THE REMOTE CONTROL
For best results, point the remote control directly at the receiver on the
display panel from no more than 4 feet away.
1. Power Button: Press the button to
power the PacerMini Pro on and off.
2. Start/Stop Button: Press the button
to start or stop running-belt movement.
A 3-second countdown shows on the
display panel before the belt begins to
move. The working time is 30 minutes.
3. Speed - Button: Use the button to
decrease the speed, in 0.1 mi/hr
increments, from 0.5 to 3.0 mi/hr.
4. Speed + Button: Use the button
to increase the speed, in 0.1 mi/hr
increments, from 0.5 to 3.0 mi/hr.
NOTE: When the treadmill is stopped and
no buttons are pressed for 10 minutes, the
PacerMini Pro automatically enters sleep
mode until the Power button is pressed
again.
Power
Speed- Speed+
Start/Stop
1
2
3
4
16 PacerMini Pro User Manual Lifepro Endurance Training Collection 17
USING THE DISPLAY PANEL
The display panel is located on the top of the right foot rail.
CAUTION:
• Do not stare down at the display panel for long periods while the running
belt is moving to avoid injury or falling.
• It’s best not to stand on the display panel.
1. Infrared Receiver: Receives the signal
from the remote control. Do not cover or
block the receiver.
2. Display Window: Displays “OFF” when
the power is on but a workout has not
begun. Displays a “3-2-1” countdown
upon pressing the Start/Stop button
to begin a workout. After a workout
begins, alternates between time, speed,
calories, and steps.
3. Time Indicator: The LED will light up
when the running time elapsed (0 to 30
minutes) is displayed. The working time
is 30 minutes. After 30 minutes the
treadmill will stop automatically. Press
the Start/Stop button to begin a new
workout session.
4. Speed Indicator: The LED will light up when the speed (0.5 to
3.0 mi/hr) is displayed.
5. Calorie Indicator: The LED will light up when the number of calories
burned (1 to 999.9 calories) is displayed.
6. Step Indicator: The LED will light up when the approximate number of
steps (1 to 999 steps) is displayed.
Time Speed Calorie
Step
1
2
3
4
5
6
OPERATING INSTRUCTIONS
Please read the operating instructions before using the PacerMini Pro.
Keep this manual for reference.
USING THE REMOTE CONTROL
For best results, point the remote control directly at the receiver on the
display panel from no more than 4 feet away.
1. Power Button: Press the button to
power the PacerMini Pro on and off.
2. Start/Stop Button: Press the button
to start or stop running-belt movement.
A 3-second countdown shows on the
display panel before the belt begins to
move. The working time is 30 minutes.
3. Speed - Button: Use the button to
decrease the speed, in 0.1 mi/hr
increments, from 0.5 to 3.0 mi/hr.
4. Speed + Button: Use the button
to increase the speed, in 0.1 mi/hr
increments, from 0.5 to 3.0 mi/hr.
NOTE: When the treadmill is stopped and
no buttons are pressed for 10 minutes, the
PacerMini Pro automatically enters sleep
mode until the Power button is pressed
again.
Power
Speed- Speed+
Start/Stop
1
2
3
4
16 PacerMini Pro User Manual Lifepro Endurance Training Collection 17
STEP 4 - FOLD THE HANDLEBAR FRAME
1. Rotate the left and right locking
knobs counterclockwise.
2. With both locking knobs loosened,
pull the handlebar frame down
towards the back of the treadmill.
3. Tighten the locking knobs by turning them clockwise.
STEP 5 - CHECK AND READY FOR STORAGE
1. Check to ensure that the treadmill is securely locked in the folded
position before moving or storing it.
2. The treadmill can now be moved and stored out of the way.
MOVING THE TREADMILL
The PacerMini Pro has wheels on the front of it to make it easier to move.
To move the treadmill:
1. Fold up the treadmill as instructed on the previous page. Ensure that
the power cord and all accessories are removed.
2. Grab the back of the treadmill and lift it onto the transport wheels at
the front of the treadmill.
3. The treadmill can now be easily rolled to its new location.
STORING THE TREADMILL
It’s best to store the treadmill flat in a closet, or under a bed, table, or
desk. Take care not to place any heavy objects on top of the treadmill.
• Never store the treadmill on its side as it can easily tip and fall.
• Store the magnetic safety key separately to prevent unauthorized use,
especially by children.
• Store in a cool, dry, indoor location.
• Do not store in direct sunlight, in a high-temperature or high-moisture
environment, or near heat sources.
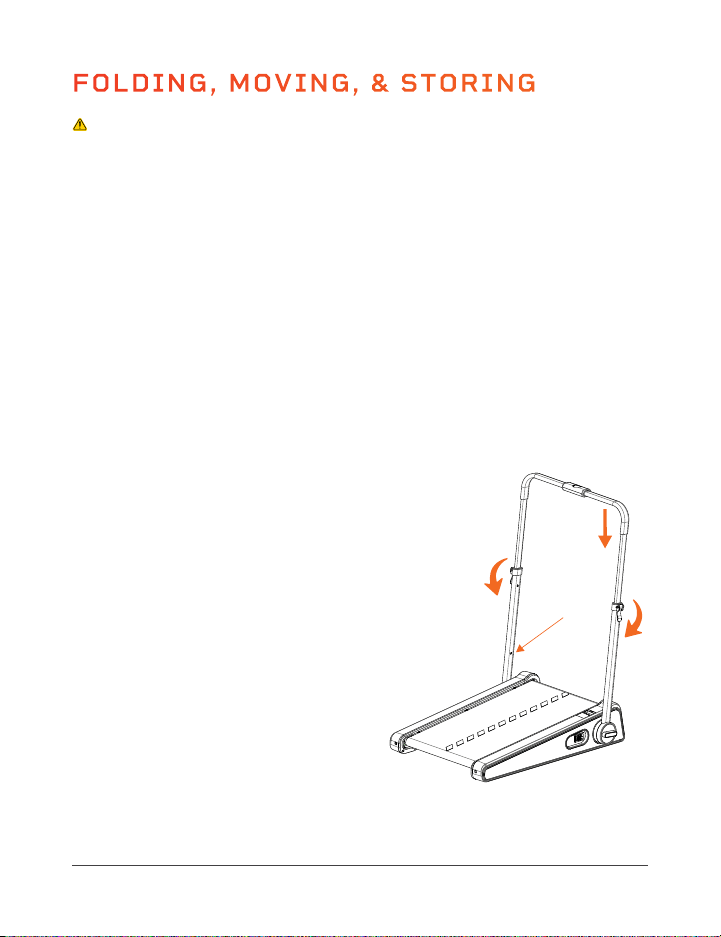
FOLDING, MOVING, & STORING
CAUTION
• Always power OFF the treadmill at the Power switch and unplug the
power cord before folding, moving, storing, or setting up.
• Never allow children to fold, set up, or move the treadmill.
• Always ensure there are no children, pets, or objects in the way when
moving the treadmill.
• Never operate the treadmill in its folded state.
• Children must never climb on or play near the folded treadmill.
• Never store the treadmill on its side as it can easily tip and fall.
• Store the magnetic safety key separately to prevent unauthorized use,
especially by children.
FOLDING THE TREADMILL
STEP 1 - TURN OFF POWER
1. Flip the Power switch at the
front of the treadmill to the OFF
position.
2. Unplug the power cord from the
electrical outlet.
STEP 2 - REMOVE ACCESSORIES
1. Remove the remote control,
remote control holder, and safety
key from the handlebar.
2. Remove the power cord.
STEP 3 - LOWER THE HANDLEBAR
1. Lift each latching lever.
2. Push the two metal adjustment
buttons into the adjustment holes
on the handlebar frame and push
down on the handlebar until it is in
the lowest position.
3. Press down the latching levers.
18 PacerMini Pro User Manual Lifepro Endurance Training Collection 19

STEP 4 - FOLD THE HANDLEBAR FRAME
1. Rotate the left and right locking
knobs counterclockwise.
2. With both locking knobs loosened,
pull the handlebar frame down
towards the back of the treadmill.
3. Tighten the locking knobs by turning them clockwise.
STEP 5 - CHECK AND READY FOR STORAGE
1. Check to ensure that the treadmill is securely locked in the folded
position before moving or storing it.
2. The treadmill can now be moved and stored out of the way.
MOVING THE TREADMILL
The PacerMini Pro has wheels on the front of it to make it easier to move.
To move the treadmill:
1. Fold up the treadmill as instructed on the previous page. Ensure that
the power cord and all accessories are removed.
2. Grab the back of the treadmill and lift it onto the transport wheels at
the front of the treadmill.
3. The treadmill can now be easily rolled to its new location.
STORING THE TREADMILL
It’s best to store the treadmill flat in a closet, or under a bed, table, or
desk. Take care not to place any heavy objects on top of the treadmill.
• Never store the treadmill on its side as it can easily tip and fall.
• Store the magnetic safety key separately to prevent unauthorized use,
especially by children.
• Store in a cool, dry, indoor location.
• Do not store in direct sunlight, in a high-temperature or high-moisture
environment, or near heat sources.
FOLDING, MOVING, & STORING
CAUTION
• Always power OFF the treadmill at the Power switch and unplug the
power cord before folding, moving, storing, or setting up.
• Never allow children to fold, set up, or move the treadmill.
• Always ensure there are no children, pets, or objects in the way when
moving the treadmill.
• Never operate the treadmill in its folded state.
• Children must never climb on or play near the folded treadmill.
• Never store the treadmill on its side as it can easily tip and fall.
• Store the magnetic safety key separately to prevent unauthorized use,
especially by children.
FOLDING THE TREADMILL
STEP 1 - TURN OFF POWER
1. Flip the Power switch at the
front of the treadmill to the OFF
position.
2. Unplug the power cord from the
electrical outlet.
STEP 2 - REMOVE ACCESSORIES
1. Remove the remote control,
remote control holder, and safety
key from the handlebar.
2. Remove the power cord.
STEP 3 - LOWER THE HANDLEBAR
1. Lift each latching lever.
2. Push the two metal adjustment
buttons into the adjustment holes
on the handlebar frame and push
down on the handlebar until it is in
the lowest position.
3. Press down the latching levers.
18 PacerMini Pro User Manual Lifepro Endurance Training Collection 19
TRAINING RECOMMENDATIONS
BEFORE BEGINNING TRAINING
If you have not done endurance or cardio training for a long time, you should
make an appointment with your physician for a checkup and to discuss
your training goals. This is especially important for people who are over 35,
overweight, or have heart/circulatory problems.
TRAINING RECOMMENDATIONS
HYDRATION
Adequate hydration is essential before, during, and after exercise. During a
training session of 30 minutes, it is possible to lose up to 4 cups of liquid.
You should drink about 1.5 cups 30 minutes before beginning exercise.
Take care to maintain balanced hydration during the workout.
TRAINING FREQUENCY
Experts recommend endurance training 3–4 days a week to keep your
cardiovascular system fit. The more you train, the faster you will achieve
your training goals. However, it is important to plan sufficient breaks,
to give your body enough time for rest and recovery. After each training
session, you should take at least one day off.
EXERCISE INTENSITY
Many beginners make the mistake of training too intensely. If your goal is
to run a marathon, your training intensity will certainly be high. However,
most people have training goals such as weight reduction, cardiac/exercise
training, or stress reduction, and therefore should exercise at a lower
intensity. We recommend aiming for the appropriate target heart rate for
your particular training goal. See PULSE AND HEART RATE on the previous
page for more information.
DURATION OF INDIVIDUAL TRAINING SESSIONS
For optimal endurance or weight-reduction training, the duration of each
training session should be 25–60 minutes. Beginners and those who have
not exercised regularly for a long time should start with short training
sessions of 10 minutes or less in the first week and slowly increase your
training duration from week to week.
20Age
200
150
130
110
195
146
127
107
100%
75%
65%
55%
of maximum heart rate
of maximum heart rate
of maximum heart rate
of maximum heart rate
190
143
124
105
185
139
120
102
180
135
117
99
175
131
114
96
170
128
111
94
165
124
107
91
160
120
104
88
155
116
101
85
150
113
98
83
145
109
94
80
140
105
91
77
135
101
88
74
100
98
85
72
25 30 35 40 45 50 55 60 65 70 75 80 85 90
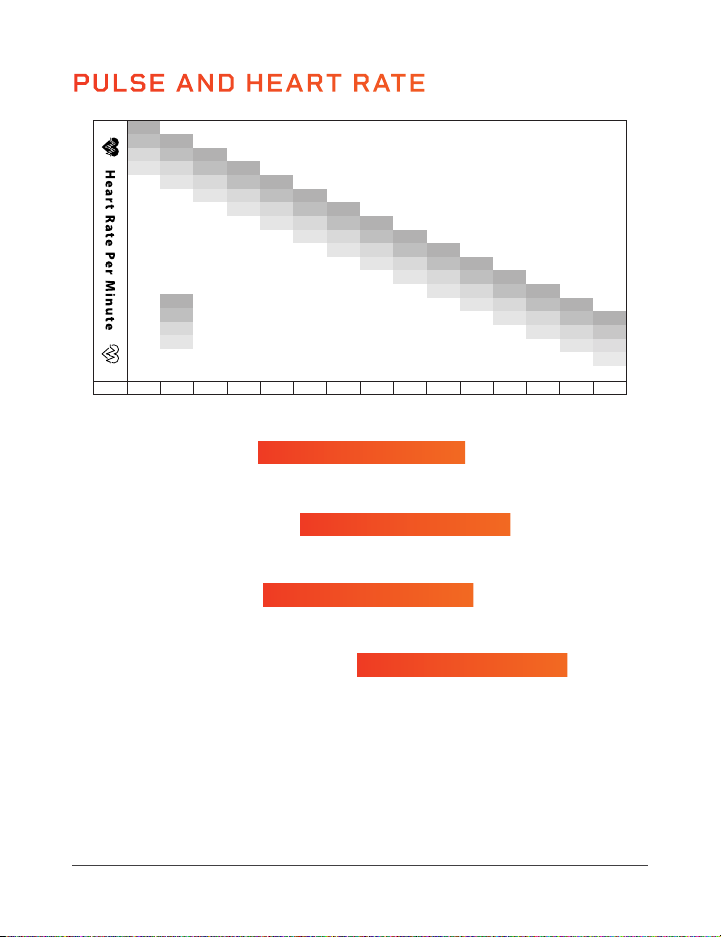
PULSE AND HEART RATE
Calculate your target heart rate when training based on your fitness goals:
MAXIMUM HEART RATE
This value represents your maximum heart rate (“max HR”) and serves as a basis from
which to calculate your training heart rate.
HEALTH & WELLNESS TRAINING
• Ideal for people who are overweight, older, beginners, or who do not exercise often.
• Burn approx. 4–6 calories per minute to produce energy in this zone.
FAT BURNING TRAINING
• Ideal for athletes and sports people who aim to lose weight.
• Burn approx. 6–10 calories per minute to produce energy in this zone.
CONDITIONING & FITNESS TRAINING
• Ideal for athletes and sports people who want to improve their stamina and/or
conditioning.
• Burn approx. 10–12 calories per minute to produce energy in this zone.
For best results, calculate the average value of the selected target zone (see chart above):
• Health & Wellness: target zone average = 55% of max HR (max HR x 0.55)
• Fat Burning: target zone average = 65% of max HR (max HR x 0.65)
• Conditioning & Fitness: target zone average = 75% of max HR (max HR x 0.75)
Target Zone = 70-80% of Max HR
Target Zone = 50-60% of Max HR
220 - Your Age = Max Heart Rate
Target Zone = 60-70% of Max HR
20 PacerMini Pro User Manual Lifepro Endurance Training Collection 21

TRAINING RECOMMENDATIONS
BEFORE BEGINNING TRAINING
If you have not done endurance or cardio training for a long time, you should
make an appointment with your physician for a checkup and to discuss
your training goals. This is especially important for people who are over 35,
overweight, or have heart/circulatory problems.
TRAINING RECOMMENDATIONS
HYDRATION
Adequate hydration is essential before, during, and after exercise. During a
training session of 30 minutes, it is possible to lose up to 4 cups of liquid.
You should drink about 1.5 cups 30 minutes before beginning exercise.
Take care to maintain balanced hydration during the workout.
TRAINING FREQUENCY
Experts recommend endurance training 3–4 days a week to keep your
cardiovascular system fit. The more you train, the faster you will achieve
your training goals. However, it is important to plan sufficient breaks,
to give your body enough time for rest and recovery. After each training
session, you should take at least one day off.
EXERCISE INTENSITY
Many beginners make the mistake of training too intensely. If your goal is
to run a marathon, your training intensity will certainly be high. However,
most people have training goals such as weight reduction, cardiac/exercise
training, or stress reduction, and therefore should exercise at a lower
intensity. We recommend aiming for the appropriate target heart rate for
your particular training goal. See PULSE AND HEART RATE on the previous
page for more information.
DURATION OF INDIVIDUAL TRAINING SESSIONS
For optimal endurance or weight-reduction training, the duration of each
training session should be 25–60 minutes. Beginners and those who have
not exercised regularly for a long time should start with short training
sessions of 10 minutes or less in the first week and slowly increase your
training duration from week to week.
20Age
200
150
130
110
195
146
127
107
100%
75%
65%
55%
of maximum heart rate
of maximum heart rate
of maximum heart rate
of maximum heart rate
190
143
124
105
185
139
120
102
180
135
117
99
175
131
114
96
170
128
111
94
165
124
107
91
160
120
104
88
155
116
101
85
150
113
98
83
145
109
94
80
140
105
91
77
135
101
88
74
100
98
85
72
25 30 35 40 45 50 55 60 65 70 75 80 85 90
PULSE AND HEART RATE
Calculate your target heart rate when training based on your fitness goals:
MAXIMUM HEART RATE
This value represents your maximum heart rate (“max HR”) and serves as a basis from
which to calculate your training heart rate.
HEALTH & WELLNESS TRAINING
• Ideal for people who are overweight, older, beginners, or who do not exercise often.
• Burn approx. 4–6 calories per minute to produce energy in this zone.
FAT BURNING TRAINING
• Ideal for athletes and sports people who aim to lose weight.
• Burn approx. 6–10 calories per minute to produce energy in this zone.
CONDITIONING & FITNESS TRAINING
• Ideal for athletes and sports people who want to improve their stamina and/or
conditioning.
• Burn approx. 10–12 calories per minute to produce energy in this zone.
For best results, calculate the average value of the selected target zone (see chart above):
• Health & Wellness: target zone average = 55% of max HR (max HR x 0.55)
• Fat Burning: target zone average = 65% of max HR (max HR x 0.65)
• Conditioning & Fitness: target zone average = 75% of max HR (max HR x 0.75)
Target Zone = 70-80% of Max HR
Target Zone = 50-60% of Max HR
220 - Your Age = Max Heart Rate
Target Zone = 60-70% of Max HR
20 PacerMini Pro User Manual Lifepro Endurance Training Collection 21
TRAINING DOCUMENTATION
To stay motivated and to evaluate the success of your training, create a
training plan before beginning a new exercise routine. In your plan,
document data from each training session, such as distance, training time,
and pulse, as well as data, such as body weight, blood pressure, resting
heart rate (measured in the morning right after waking up), and how you
feel during exercise. See the example training plan below.
EXAMPLE WEEKLY TRAINING PLAN
Day Date
Exercise
Duration
Number of
Steps
Calories
Burned
Pulse
Rate
Notes
Mon.
Tues.
Wed.
Thurs.
Fri.
Sat.
Sun.
Weekly Totals:
TRAINING INSTRUCTIONS
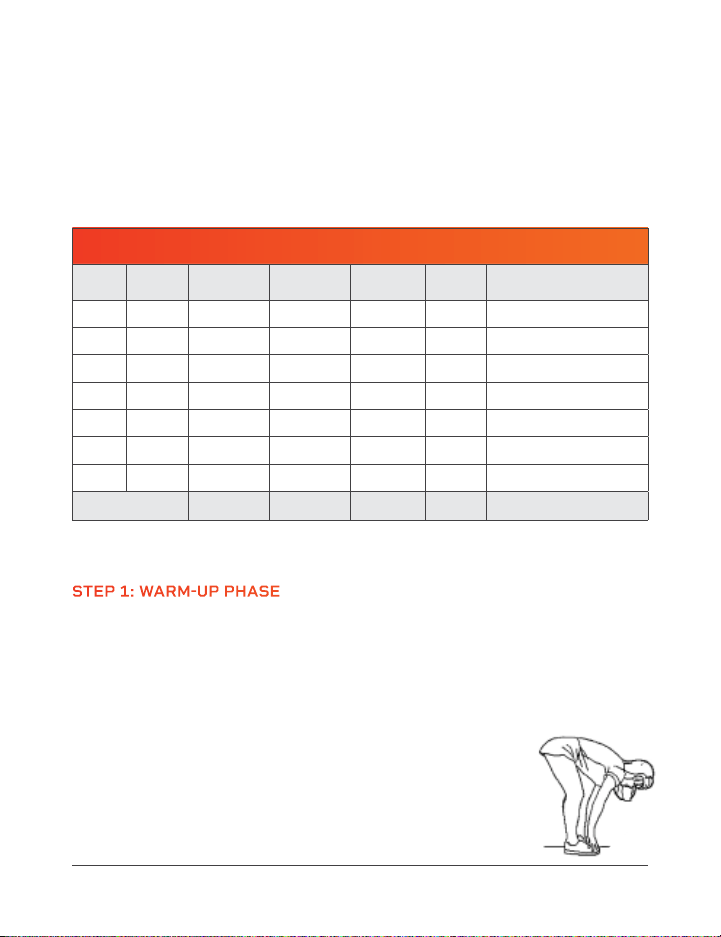
STEP 1: WARM-UP PHASE
Spend about 5 minutes doing warm-up stretches before exercising; this
prevents pulled muscles and other exercise injuries. Stretching helps get
your blood flowing and loosen your muscles so they are ready for exercise.
While doing the following stretches, do not force or jerk your muscles,
and most importantly, if it hurts: STOP. After stretching, continue your
warm-up by walking on the treadmill for 3–5 minutes at a low speed.
TOUCH YOUR TOES
1. Bend your knees slightly. Let your back and shoulders
relax as you bend over and try to touch your toes.
2. Hold the stretch for 10–15 seconds. Repeat 3 times.
22 PacerMini Pro User Manual Lifepro Endurance Training Collection 23
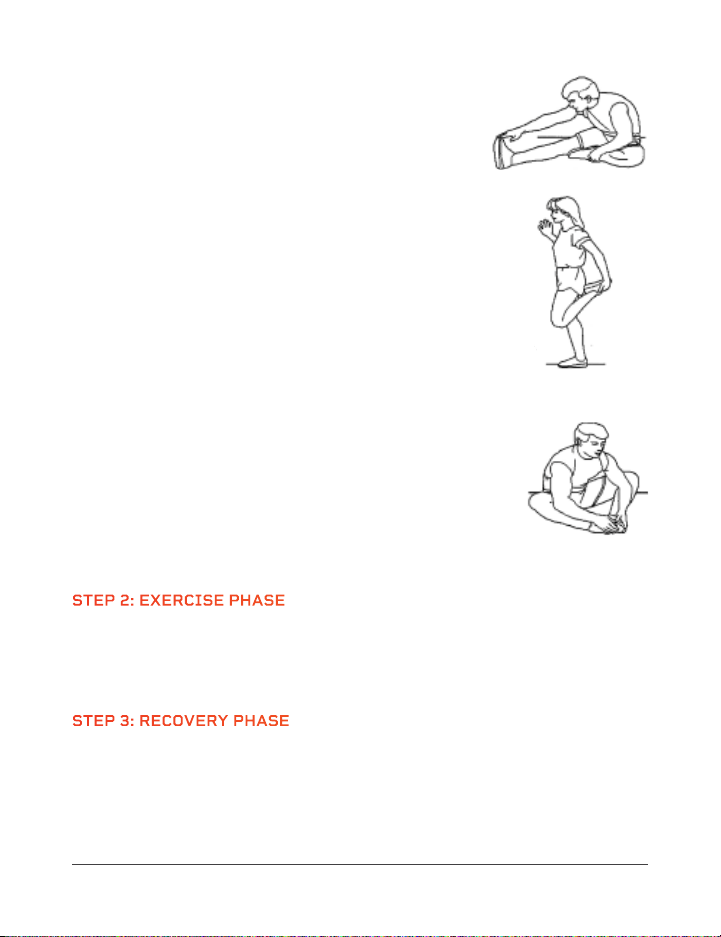
STRETCH YOUR LEGS, CALVES, AND GLUTES
1. Sit on the floor or on a cushion. Place your left
foot against your right inner thigh.
2. Bend toward your right foot and try to touch
your toes.
3. Hold the stretch for 10–15 seconds.
4. Switch legs and repeat. Stretch each leg 3 times.
STRETCH YOUR QUADS
1. Place your right hand on a wall or a table to help with
balance.
2. With your left hand, grab your left ankle. Pull your
heel in toward your buttocks.
3. Hold the stretch for 10–15 seconds.
4. Switch legs and repeat. Stretch each leg 3 times.
STRETCH YOUR GROIN AND INNER THIGH MUSCLES
1. Sit on the floor or a cushion with your knees bent
and the soles of your feet together.
2. Hold your ankles and bend forward at your hips.
3. Hold the stretch for 10–15 seconds. Repeat
3 times.
STEP 2: EXERCISE PHASE
During the exercise phase, you’re building muscle and stamina and
improving your cardiovascular health slowly over time. The most important
thing is to always listen to your body. If you are tired or sore, slow down or
stop training.
STEP 3: RECOVERY PHASE
After exercising, it’s important to give your body time to cool down and
recover. Walk on the treadmill for another 3–5 minutes at a low speed.
Then, spend 5 minutes completing the above stretches to continue cooling
down your muscles. Be careful not to force or jerk your muscles as you
stretch.
TRAINING DOCUMENTATION
To stay motivated and to evaluate the success of your training, create a
training plan before beginning a new exercise routine. In your plan,
document data from each training session, such as distance, training time,
and pulse, as well as data, such as body weight, blood pressure, resting
heart rate (measured in the morning right after waking up), and how you
feel during exercise. See the example training plan below.
EXAMPLE WEEKLY TRAINING PLAN
Day Date
Exercise
Duration
Number of
Steps
Calories
Burned
Pulse
Rate
Notes
Mon.
Tues.
Wed.
Thurs.
Fri.
Sat.
Sun.
Weekly Totals:
TRAINING INSTRUCTIONS
STEP 1: WARM-UP PHASE
Spend about 5 minutes doing warm-up stretches before exercising; this
prevents pulled muscles and other exercise injuries. Stretching helps get
your blood flowing and loosen your muscles so they are ready for exercise.
While doing the following stretches, do not force or jerk your muscles,
and most importantly, if it hurts: STOP. After stretching, continue your
warm-up by walking on the treadmill for 3–5 minutes at a low speed.
TOUCH YOUR TOES
1. Bend your knees slightly. Let your back and shoulders
relax as you bend over and try to touch your toes.
2. Hold the stretch for 10–15 seconds. Repeat 3 times.
22 PacerMini Pro User Manual Lifepro Endurance Training Collection 23
STRETCH YOUR LEGS, CALVES, AND GLUTES
1. Sit on the floor or on a cushion. Place your left
foot against your right inner thigh.
2. Bend toward your right foot and try to touch
your toes.
3. Hold the stretch for 10–15 seconds.
4. Switch legs and repeat. Stretch each leg 3 times.
STRETCH YOUR QUADS
1. Place your right hand on a wall or a table to help with
balance.
2. With your left hand, grab your left ankle. Pull your
heel in toward your buttocks.
3. Hold the stretch for 10–15 seconds.
4. Switch legs and repeat. Stretch each leg 3 times.
STRETCH YOUR GROIN AND INNER THIGH MUSCLES
1. Sit on the floor or a cushion with your knees bent
and the soles of your feet together.
2. Hold your ankles and bend forward at your hips.
3. Hold the stretch for 10–15 seconds. Repeat
3 times.
STEP 2: EXERCISE PHASE
During the exercise phase, you’re building muscle and stamina and
improving your cardiovascular health slowly over time. The most important
thing is to always listen to your body. If you are tired or sore, slow down or
stop training.
STEP 3: RECOVERY PHASE
After exercising, it’s important to give your body time to cool down and
recover. Walk on the treadmill for another 3–5 minutes at a low speed.
Then, spend 5 minutes completing the above stretches to continue cooling
down your muscles. Be careful not to force or jerk your muscles as you
stretch.

WHAT CAN HAPPEN IF THERE IS A LACK OF MAINTENANCE?
There is friction between the running belt and the running deck when
in use. Any kind of friction creates wear which reduces the life of your
treadmill. By lubricating between the running belt and the running deck
with the included lubricating oil, this friction is reduced, thus increasing the
life of both parts. If the treadmill runs dry, the running deck will get hot,
and the surface of the running deck and the running belt may be damaged
or destroyed. Friction can also lead to a static charge which can discharge
on contact with the frame. This is not only unpleasant but can also destroy
the treadmill’s electronics.
CLEANING & GENERAL MAINTENANCE
• Use a slightly damp cloth to wipe any dirt or moisture from the product
after each use. You may use a small amount of mild soap or detergent,
as needed. Dry the cleaned areas thoroughly.
• Do not use abrasive, corrosive, solvent, or chemical cleaners or harsh
detergents to clean the product.
• Inspect for visible damage before use. Do not use if damaged or
malfunctioning.
• Only use with the original parts and accessories provided by the
manufacturer.
• Never open the motor hood unless instructed to do so by an authorized
service representative. Servicing other than the procedures in this manual
should be performed by an authorized service representative only.
DAMAGE CAUSED BY NEGLECT OR LACK OF MAINTENANCE AND CARE
IS EXCLUDED FROM THE WARRANTY.
Endurance Training Collection 25
MAINTENANCE AND CARE
WARNING: Switch off the power and remove the power cord from the
electrical outlet before performing any care, cleaning, maintenance, repair,
or similar work on your treadmill. Only when all work is fully completed may
the treadmill be reconnected to an electrical outlet and powered on.
BEFORE FIRST USE OR AFTER A LONG BREAK FROM TRAINING
Make sure that there is a continuous film of lubricant on the running deck.
If this is not the case, then use the included bottle of lubricating oil to
apply a lubricant film. See LUBRICATING THE RUNNING BELT on page 26.
MAINTENANCE & CLEANING INTERVALS
WIPE DOWN THE TREADMILL: AFTER EACH USE
Wipe down after every use. Clean only with a damp cloth.
CHECK THE LUBRICATION OF THE RUNNING BELT: ONCE A WEEK
If your regular inspection shows that there is no longer enough lubrication,
lubricate the belt immediately and shorten the inspection interval
accordingly. Please see LUBRICATING THE RUNNING BELT on page 26 for
instructions. If the treadmill has been in storage for a long time, check
whether there is still enough lubricant present.
CHECK THE ALIGNMENT OF THE RUNNING BELT: ONCE A WEEK
The alignment of the running belt must be checked regularly. If you notice
that the belt is running to one side, this must be corrected immediately.
Please see ADJUSTING THE RUNNING BELT on page 28.
WHY IS MAINTENANCE OF MY TREADMILL SO IMPORTANT?
In order to enjoy using your treadmill for many years, it is important to
regularly and consistently do basic maintenance. The maintenance interval
will depend very much on how often you use your treadmill, and therefore
the intervals may need to be shorter than specified.
24 PacerMini Pro User Manual Lifepro

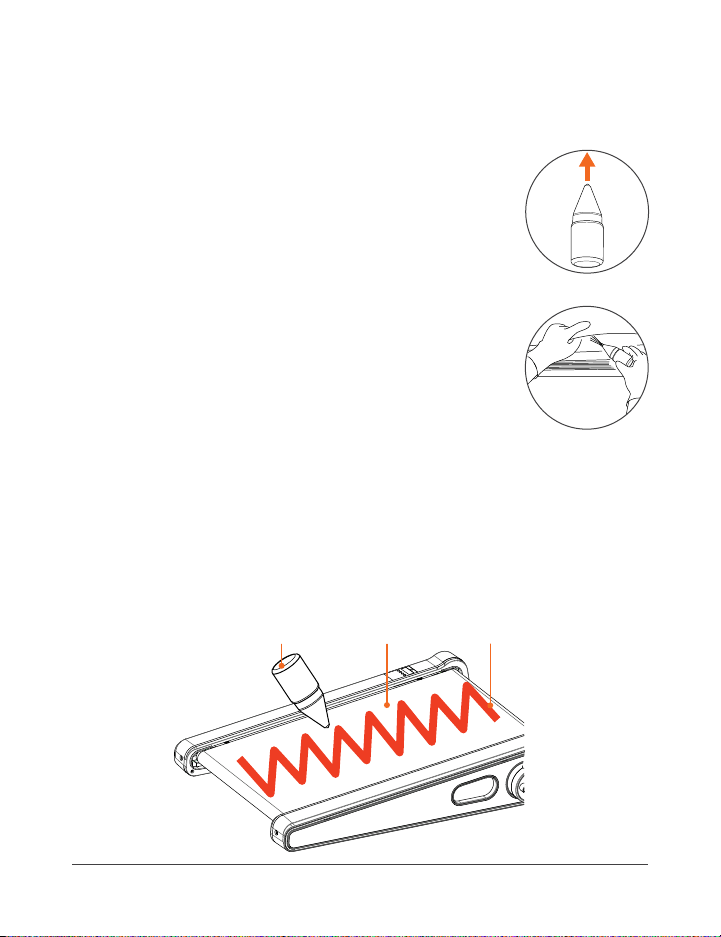
NOTE: Only use the included bottle of silicone lubricating oil to lubricate
the running belt. Do not use any other kinds of lubricants or silicone sprays.
HOW TO LUBRICATE THE RUNNING BELT
1. Make sure that the treadmill is switched off and
unplugged, and that the belt is no longer moving.
2. Remove the lid from the bottle of lubricating oil.
Carefully remove the protective paper covering from
its top. Replace the lid. See Figure 1.
3. Pull the small applicator tip up to open the bottle.
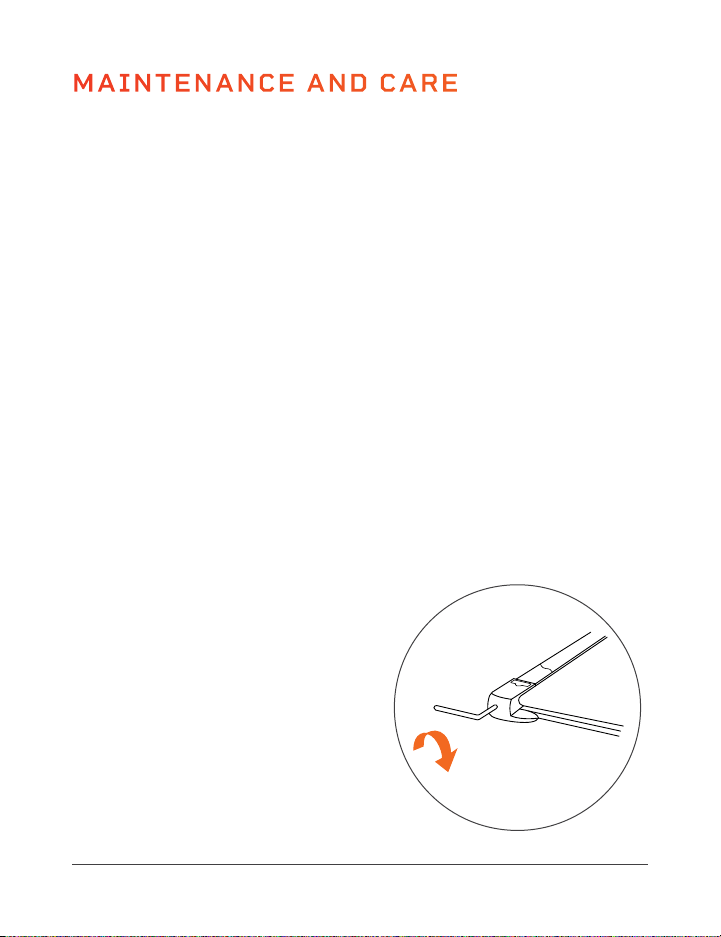
4. Lubrication must be applied under the belt. Lift one
side of the belt high enough that you can reach under
it with the end of the applicator tip. See Figure 2.
5. Apply lubricating oil under the belt in a zig-zag
pattern, from the front to the back of the treadmill.
See Figure 3.
6. Do not apply more than 2–3 ml of oil. If too much oil is
applied it can lead to the running belt slipping. If this occurs, use a dry
cloth to remove the excess oil from the running deck.
7. After applying the lubrication, let the running belt run without any load
(no one on the treadmill) at a speed of 2.5 mi/hr for 5 minutes to evenly
distribute the lubricating oil.
Zig-zag Line
of Silicone Oil
Running
Belt
Bottle of
Silicone Oil
Figure 3
Endurance Training Collection 27
MAINTENANCE AND CARE
WARNING:
• Switch off the power and remove the power cord from the electrical
outlet before lubricating the running belt.
• Keep the bottle of lubricating oil out of reach of children and pets at all
times to prevent accidental ingestion. In case of ingestion, contact your
physician or local poison control center immediately.
LUBRICATING THE RUNNING BELT
The most important maintenance for a treadmill is regular, timely
lubrication and care and maintenance of the running belt.
• The running belt must be lubricated if a significant increase in friction is
noted. This will be apparent if the belt makes jerking movements during
training.
• Insufficient lubrication and the resulting increase in friction will
inevitably lead to an increase in wear and cause damage to the
treadmill’s running belt, deck, motor, and circuit board.
• How often you use the treadmill will generally determine how often
you must perform maintenance. Typically, treadmills will only need to
be lubricated every few months. However, as use-time will vary greatly
from person to person, we recommend you keep a maintenance log and
set a specific day each week in the first 6 months of use to check the
lubrication of the running belt.
• To check the belt lubrication, lift the front third of the belt and feel with
your hand for lubrication under the belt. If lubrication is present, then
write “OK” next to the date in your maintenance log. If there is little
or no lubrication present, then lubricate the belt and record it in your
maintenance log accordingly. Over time, you will be able to see how often
lubrication is needed.
NOTE: Even if you choose not to keep a maintenance log, you must check
the lubrication of the running belt at least once a week.
• If the treadmill is not used for a long period, you must check the
lubrication of the belt before use and lubricate it if necessary.
26 PacerMini Pro User Manual Lifepro
Figure 2
Figure 1
NOTE: Only use the included bottle of silicone lubricating oil to lubricate
the running belt. Do not use any other kinds of lubricants or silicone sprays.
HOW TO LUBRICATE THE RUNNING BELT
1. Make sure that the treadmill is switched off and
unplugged, and that the belt is no longer moving.
2. Remove the lid from the bottle of lubricating oil.
Carefully remove the protective paper covering from
its top. Replace the lid. See Figure 1.
3. Pull the small applicator tip up to open the bottle.
4. Lubrication must be applied under the belt. Lift one
side of the belt high enough that you can reach under
it with the end of the applicator tip. See Figure 2.
5. Apply lubricating oil under the belt in a zig-zag
pattern, from the front to the back of the treadmill.
See Figure 3.
6. Do not apply more than 2–3 ml of oil. If too much oil is
applied it can lead to the running belt slipping. If this occurs, use a dry
cloth to remove the excess oil from the running deck.
7. After applying the lubrication, let the running belt run without any load
(no one on the treadmill) at a speed of 2.5 mi/hr for 5 minutes to evenly
distribute the lubricating oil.
Zig-zag Line
of Silicone Oil
Running
Belt
Bottle of
Silicone Oil
Figure 3
Endurance Training Collection 27
MAINTENANCE AND CARE
WARNING:
• Switch off the power and remove the power cord from the electrical
outlet before lubricating the running belt.
• Keep the bottle of lubricating oil out of reach of children and pets at all
times to prevent accidental ingestion. In case of ingestion, contact your
physician or local poison control center immediately.
LUBRICATING THE RUNNING BELT
The most important maintenance for a treadmill is regular, timely
lubrication and care and maintenance of the running belt.
• The running belt must be lubricated if a significant increase in friction is
noted. This will be apparent if the belt makes jerking movements during
training.
• Insufficient lubrication and the resulting increase in friction will
inevitably lead to an increase in wear and cause damage to the
treadmill’s running belt, deck, motor, and circuit board.
• How often you use the treadmill will generally determine how often
you must perform maintenance. Typically, treadmills will only need to
be lubricated every few months. However, as use-time will vary greatly
from person to person, we recommend you keep a maintenance log and
set a specific day each week in the first 6 months of use to check the
lubrication of the running belt.
• To check the belt lubrication, lift the front third of the belt and feel with
your hand for lubrication under the belt. If lubrication is present, then
write “OK” next to the date in your maintenance log. If there is little
or no lubrication present, then lubricate the belt and record it in your
maintenance log accordingly. Over time, you will be able to see how often
lubrication is needed.
NOTE: Even if you choose not to keep a maintenance log, you must check
the lubrication of the running belt at least once a week.
• If the treadmill is not used for a long period, you must check the
lubrication of the belt before use and lubricate it if necessary.
26 PacerMini Pro User Manual Lifepro
Figure 2
Figure 1
IF THE BELT IS RUNNING TO THE RIGHT OF CENTER:
1. Start up the running belt at a constant speed of 1.5 mi/hr.
2. Use the provided hex key to turn the right adjustment screw, located at
the back end of the treadmill, ¼ turn clockwise.
3. Let the treadmill run at a constant speed of 1.5 mi/hr for about
2 minutes.
4. If the running belt is now running in the center of the running deck, the
adjustment was successful. If the belt is still off-center, repeat steps
1–3 until the belt is running in the center.
NOTE: If the belt cannot be adjusted, please contact a support
representative immediately.
RE-TENSIONING THE RUNNING BELT
If the running belt begins to jolt or skid noticeably during operation, the
belt is too loose and must be re-tensioned. The running belt is re-tensioned
using the same adjustment screws used when adjusting the belt, located at
the back end of the treadmill.
1. Start up the running belt and let it run at a constant speed of 1.5 mi/hr.
2. Use the provided hex key to turn one adjustment screw, then the other,
½ turn clockwise.
3. Alternately, if the belt is too tight, you will feel excessive resistance or
pausing. In this case, use the provided hex key to turn one adjustment
screw, then the other, ½ turn counterclockwise.
Endurance Training Collection 29
MAINTENANCE AND CARE
ADJUSTING THE RUNNING BELT
To assure the longest service life possible, the running belt should always
be kept running straight along the center of the running deck. Therefore, it
is important to examine the belt before each training session to see if it is
straight and running in the center of the deck or if it has changed position.
Possible reasons for the running belt changing position are:
• The ground on which the treadmill is standing is either uneven or at an
incline.
• Personal running style (for example, distribution of weight to one side,
in- or out-turned feet).
NOTE: If the running belt has become so displaced that it is rubbing along
one of the foot rails, this will cause friction and damage the running belt.
Damage caused by failure to make adjustments to the belt or insufficient
adjustments will not be covered by the warranty.
HOW TO ADJUST THE RUNNING BELT
IF THE BELT IS RUNNING TO THE LEFT OF CENTER:
1. Start up the running belt at a constant speed of 1.5 mi/hr.
2. Use the provided hex key to turn
the left adjustment screw, located
at the back end of the treadmill,
¼ turn clockwise.
3. Let the treadmill run at a constant
speed of 1.5 mi/hr for about
2 minutes.
4. If the running belt is now running
in the center of the running deck,
the adjustment was successful. If
the belt is still off-center, repeat
steps 1–3 until the belt is running
in the center.
28 PacerMini Pro User Manual Lifepro

through improper use, failure to follow the instructions and warnings
in this manual, improper assembly,
neglect, or inadequate or improper
maintenance of this product.
• It is the responsibility of the owner to ensure that all users of this
product are adequately informed of all warnings and cautions.
• Use this product only as instructed in this manual.
WARNING: CHOKING HAZARD
Children under 3 years old can choke or suffocate on small parts required
for the assembly of this product. Keep children away during assembly.
Adult assembly is required.
WARNING
To reduce the risk of serious injury or death:
• Excessive exercise or overexertion can be damaging to your health.
Always exercise within the target heart rate and time limits
recommended by your doctor.
• Drink plenty of fluids before, during, and after your session to avoid
dehydration. When you are dehydrated, your body cannot properly cool
itself, which may result in heat exhaustion. Heat exhaustion can lead to
heatstroke if left untreated, which can be fatal.
• Stop exercising immediately at the first sign of discomfort, and consult
your doctor if you experience any of the following symptoms: dizziness
or lightheadedness, sleepiness, cold or clammy skin, headache, nausea,
muscle cramping, irregular heartbeat, or shortness of breath.
• Do not use the product near swimming pools or other bodies of water.
• Adult assembly required. Keep children away during assembly. Children
are forbidden from assembling, disassembling, folding, or moving the
product.
• This product is for adult use only. Do not allow children or pets to use;
this product is not a toy.
• Keep the safety key stored in a separate location to prevent
unauthorized use of the treadmill, especially by children.
• Keep children and pets away from the product and accessories at all
times. Never leave children unattended in the same room with the
product.
• Keep the bottle of lubricating oil out of reach of children and pets at all
times to prevent accidental ingestion. In case of ingestion, contact your
physician or local poison control center immediately.
Endurance Training Collection 31
SAFETY INSTRUCTIONS
Keep this manual in a safe place for future reference.
Before using this product, read all safety warnings and assembly and
operating instructions. Failure to do so may result in burns, fire, electric
shock, serious injury or death, or damage to the product or property.
CONTRAINDICATIONS
• Users should consult with a medical professional before beginning a new
exercise program. Your physician should assist you in determining the
heart rate zone that is appropriate for your age and physical condition.
Your physician can help determine if you have any physical limitations
that could create a health risk or prevent you from properly using
this product; some exercise programs or fitness products may not be
appropriate for all people.
• Consult your physician before using this product if you:
• Are over the age of 35 or have pre-existing health conditions.
• Have orthopedic conditions, spinal injuries, osteoporosis, fractures,
herniated or slipped discs, chronic back pain, sciatica, or other
conditions or disorders affecting the back or spinal column.
• Have joint pain, disorders, or conditions, including arthritis, rheumatoid
arthritis,
and knee pain, previous knee injury, or previous surgery.
• Have a heart or vascular condition, hypertension, blood clots, or if you
are taking medication that affects heart rate.
• Have a pacemaker, artificial heart, or other medical implant.
• Are or may be pregnant, have recently had surgery, or have cancer or
malignant tumors.
• Experience dizziness or balance impairments or if you are taking drugs
that affect balance.
DISCLAIMER
• The health benefits suggested or implied in this manual, other product
literature, and company website are not certified or endorsed by any
regulatory authority or medical institute.
• The use of this product is entirely at the user’s discretion. Please
read all instructions and safety information carefully before using this
product. We assume no responsibility and expressly disclaim any and
all liability for personal injury, or property damage or loss sustained
30 PacerMini Pro User Manual Lifepro

• Make sure to adjust the height of the handlebars according to your
height.
• Always increase or decrease the speed slowly.
• Do not use accessories not approved by the manufacturer.
• Remote control battery is non-rechargeable; only replace with the same
type of battery: 3V CR2032.
• Do not use outdoors. This product is intended for indoor use only.
NOTICE
• The product is intended for in-home use only. Do not use the product in
any commercial, rental, institutional, or therapeutic setting.
• Dispose of the product, accessory, and batteries according to local and
federal regulations.
• Keep sharp objects away from the product to avoid damaging it.
Endurance Training Collection 33
• This product is not intended for use by people with reduced physical,
sensory, or mental capabilities unless supervised by a responsible adult.
CAUTION
To reduce the risk of minor or moderate injury, or damage to the product or
property:
• Do not allow more than one person to use the product at a time.
• Do not exceed the maximum weight-load capacity of 220 lbs.
• Always inspect the product for damaged, worn, or loose bolts,
nuts, or knobs before each use. Do not use if damaged, worn, rusty,
malfunctioning, or missing bolts, nuts, or knobs. Do not use the product
again until the problem has been fixed.
• Never use the product while under the influence of drugs or alcohol. Do
not use during or immediately after eating or when you feel tired. Do not
use if injured, ill, or if you have a fever.
• Use the product only on a flat, sturdy, non-slip floor. Place in a location
away from traffic where it will not create a tripping hazard.
• Ensure adequate clear space around the product during use (at least
seven feet on all sides). Remove any obstacles or objects in the area, in
case of falls or accidents.
• Plug the treadmill into a dedicated socket that is not shared with any
other devices.
• Only an adult may move, fold, or set up the product.
• Never attempt to turn around on the treadmill while the running belt is
moving.
• Do not perform other activities while using the product to avoid
accidents or injury.
• Always properly warm up before exercise and cool down after exercise to
prevent sports injuries.
• Keep hair, hands, feet, and clothing away from moving parts.
• Never insert your fingers or objects into any opening.
• Always wear appropriate athletic clothing and shoes. Appropriate
clothing should be comfortable and allow you to move freely.
• Remove items, especially sharp objects, from your pockets before using.
• Do not wear baggy or loose clothing or clothing with drawstrings or ties
that could get snagged and cause injury or falling.
• Do not wear jewelry, belts, or other accessories that could get snagged
and cause injury or falling.
32 PacerMini Pro User Manual Lifepro
FCC STATEMENT
This device complies with part 15 of the FCC Rules. Operation is subject to the
following two conditions: (1) this device may not cause harmful interference, and (2)
this device must accept any interference received, including interference that may
cause undesired operation.
NOTE: Changes or modifications not expressly approved by the party responsible for
compliance could void the user’s authority to operate the equipment.
NOTE: This equipment has been tested and found to comply with the limits for a
Class B digital device, pursuant to part 15 of the FCC Rules. These limits are designed
to provide reasonable protection against harmful interference in a residential
installation. This equipment generates, uses and can radiate radio frequency
energy and, if not installed and used in accordance with the instructions, may cause
harmful interference to radio communications. However, there is no guarantee that
interference will not occur in a particular installation. If this equipment does cause
harmful interference to radio or television reception, which can be determined
by turning the equipment off and on, the user is encouraged to try to correct the
interference by one or more of the following measures:
• Reorient or relocate the receiving antenna.
• Increase the separation between the equipment and receiver.
• Connect the equipment into an outlet on a circuit different from
that to which the receiver is connected.
• Consult the dealer or an experienced radio/TV technician for help.

PROBLEM
POSSIBLE
REASON
HOW TO RESOLVE
Treadmill is not
working.
No power.
Plug the power cord into an
electrical outlet.
Power switched off. Flip the Power switch ON.
Magnetic safety key is
not in position.
Place the safety key in place on the
magnetic port on the handlebar.
Treadmill has entered
sleep mode.
Press the Power button to exit
sleep mode.
Short circuit. Contact customer support.
Fuse burned out. Contact customer support.
Remote
control is not
functioning.
Battery is installed
incorrectly in the battery
compartment.
Ensure the battery is inserted
correctly, with the + side of the
battery contacting the + terminal.
Remote control is too
far away from the
infrared receiver
Point the remote at the infrared
receiver on the display panel, from
no more than 4 feet away.
Remote control is dead.
Remove the old battery and replace
it with a new 3V CR2032 battery.
Display panel is
not functioning
Display broken. Contact customer support.
Handlebar
shakes
Locking lever is loose. Push the lever down to tighten it.
Lock knob is loose.
Tighten the locking knob by turning
it clockwise.
Running belt is
not smooth.
Not enough lubrication.
Lubricate the belt with the included
oil. See
LUBRICATING THE
RUNNING BELT
on page 26.
Running belt too tight.
Adjust the belt. See
ADJUSTING
THE RUNNING BELT
on page 28.
Running belt is
skidding.
Running belt too loose.
Adjust the belt. See
ADJUSTING
THE RUNNING BELT
on page 28.
TROUBLESHOOTING & ERROR CODES
Quickly troubleshoot simple issues you might experience with the
PacerMini Pro using the following tables.
Please contact a customer support representative for additional
assistance when needed at: support@lifeprofitness.com or
(800) 563-6604. Please do not attempt to repair the device.
ERROR
CODE
POSSIBLE REASON HOW TO RESOLVE
- - -
No signal from the magnetic
safety key.
Check that the safety key is in
position on the magnetic port
on the handlebar.
E2 Control board is defective. Contact customer support.
E4
Ground cable or controller is
damaged.
Contact customer support.
E5 Overcurrent protection initiated.
Flip Power switch off and then
on again.
E6 Motor error. Contact customer support.
E7 Communication wire error. Contact customer support.
E8 Overload protection initiated.
Flip Power switch off and then
on again.
E10 Voltage is or was too high.
Flip Power switch off and then
on again.
E11 Voltage is too low, or no voltage.
Flip Power switch off and then
on again.
34 PacerMini Pro User Manual Lifepro Endurance Training Collection 35

LIFETIME
WARRANTY
Lifepro creates quality, durable exercise
products and we stand by that quality
with a lifetime warranty on all of our
products. If your PacerMini Pro ever
breaks (and we doubt it will), we’ll send
you replacement parts and show you
how to repair it. If your PacerMini Pro
cannot be repaired, we’ll replace it—free
of charge. Register your PacerMini Pro
at pacerminipro.lifeprofitness.com to
activate your warranty within 14 days
of purchase.
PRODUCT
SPECIFICATIONS
PACERMINI PRO
PORTABLE TREADMILL
ENDURANCE TRAINING
MADE IN CHINA
UNIT SPECS
Running Surface: 27.6” L × 15.7” W
Setup Size: 32.7” L × 25.0” W × 41.0” H
Folded Size: 32.7” L × 25.0” W × 7.0” H
Net Weight: 46.0 lb
Maximum Weight Load: 220 lb
Power: 0.5 Hp
Voltage: 110 V
Speed: 0.5–3 mi/hr
Decibel Rating: <60 dB
Operating Temperature: 41–104 °F
Storage Temperature: 20–104 °F
Certifications: CE, EMC, LVD
36 PacerMini Pro User Manual Lifepro Endurance Training Collection 37

FROM OUR ENDURANCE TRAINING COLLECTION
38 PacerMini Pro User Manual Lifepro
With the Lifepro Rove Elliptical Machine, you can build cardiovascular
fitness and muscle strength from the comfort of your home or office. Use
the Rove while sitting on the couch watching TV, while reading a book, or
while working at the office. The Rove is small and portable enough to take
with you to work and fits right under your desk!
The Rove improves blood circulation, muscle tone, and flexibility. Eight
pedal resistance levels allow you to create custom elliptical workouts. On
the lowest resistance level, workouts would be equivalent to a leisurely
walk or jog in the park. Increasing the pedal resistance allows you to
create more intense workouts, similar to walking or running up a steep hill.
Just sit back, relax, and let your legs do the work! See results in just 15–20
minutes a day.
Treadmills can be noisy when used on the second floor, especially when
used on hard flooring. A treadmill mat is a simple solution for reducing
noise and vibration, and they also help prevent the treadmill from moving
on hard flooring. Treadmill mats also protect flooring from potential
damage or discoloration, and they help prevent dirt, dust, and carpet fibers
from getting into the underside of your treadmill. Treadmill mats are also
essential if you have deep carpet, as long carpet fibers can impede motor
ventilation and cause the motor to overheat.
The PacerMini Pro treadmill mat is 39.4”×27.5×0.25” and is made from
PVC foam. Visit the lifepro website, lifeprofitness.com, to order a treadmill
mat for your PacerMini Pro today!
ROVE
ELLIPTICAL MACHINE
TREADMILL MAT
FOR PACERMINI PRO PORTABLE TREADMILL
ROVE BENEFITS
• Improve cardiovascular
fitness
• Increase stamina
• Regulate metabolism and
lose weight
• Decrease stress
Endurance Training Collection 39
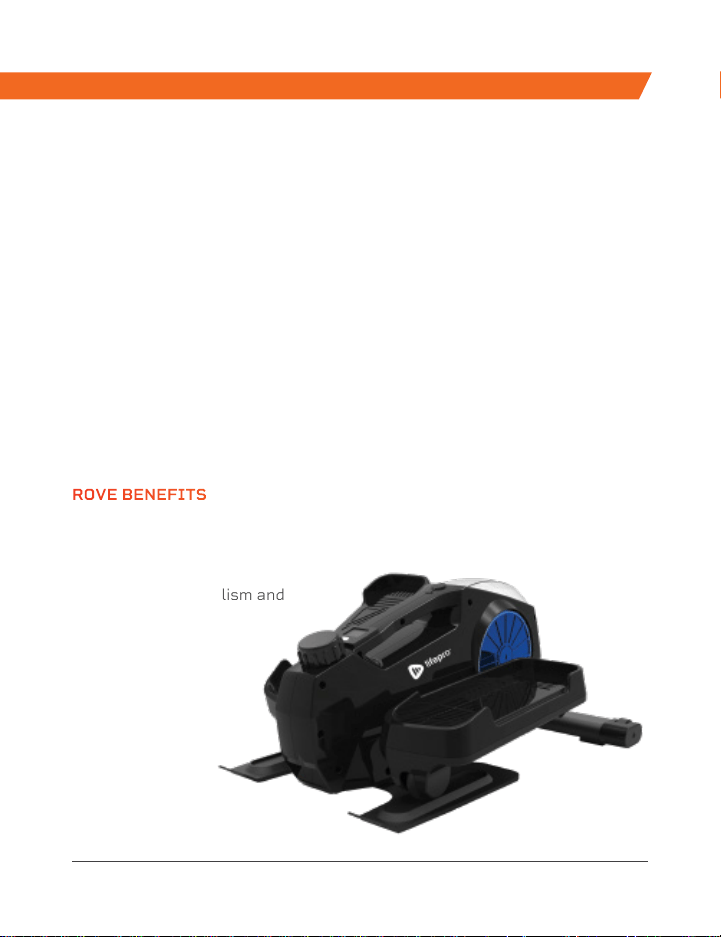