Loading ...
Loading ...
Loading ...
ENGLISH
5
NOTICE: Under certain conditions, with the
charger plugged into the power supply, the charger
can be shorted by foreign material. Foreign materials
of a conductive nature, such as, but not limited to,
grinding dust, metal chips, steel wool, aluminum
foil or any buildup of metallic particles should be
kept away from the charger cavities. Always unplug
the charger from the power supply when there is no
battery pack in the cavity. Unplug the charger before
attempting toclean.
Charging a Battery
BLACK+DECKER chargers are designed to charge
BLACK+DECKER batterypacks.
NOTE: To ensure maximum performance and life of lithium
ion battery packs:
• Charge the battery pack fully before firstuse.
• Recharge discharged batteries as soon as possible
after everyuse.
• Do not discharge batteriesfully.
The supplied charger offers three possible ways to charge
your battery.
-Cup charging
-Wall mounted cup charging
-Unit wall mounted charging
Standard cup charging (Fig. B)
1. Plug the charger into an appropriate outlet before
inserting the batterypack 16 .
2. Insert the battery pack into the cup charger 19 .
3. The green LED will flash indicating that the battery is
beingcharged.
4. The completion of charge is indicated by the green LED
remaining on continuously. The pack is fully charged
and may be used at this time or left on thecharger.
Wall mounted battery charging (Fig. B)
1. Mark the location of the charging station screw holes on
the wall (within reach of an electrical outlet for charging
the vacuum while it is on the charging station20 .
2. Secure the charging station20 to the wall using
appropriate screws and plugs for the type of wall, and
weight of the appliance.
3. Install the cup charger into the charging station (Fig. B).
Ensure it is locked into place before proceeding.
NOTE: To remove the cup charger from the charging
base pull out on the retaining tabs 21 and lift the cup
charger 19 out.
4. Plug the charger into an appropriate outlet before
inserting the batterypack.
5. Slide the battery pack 16 onto the charging station.
Fig. B
20
19
21
16
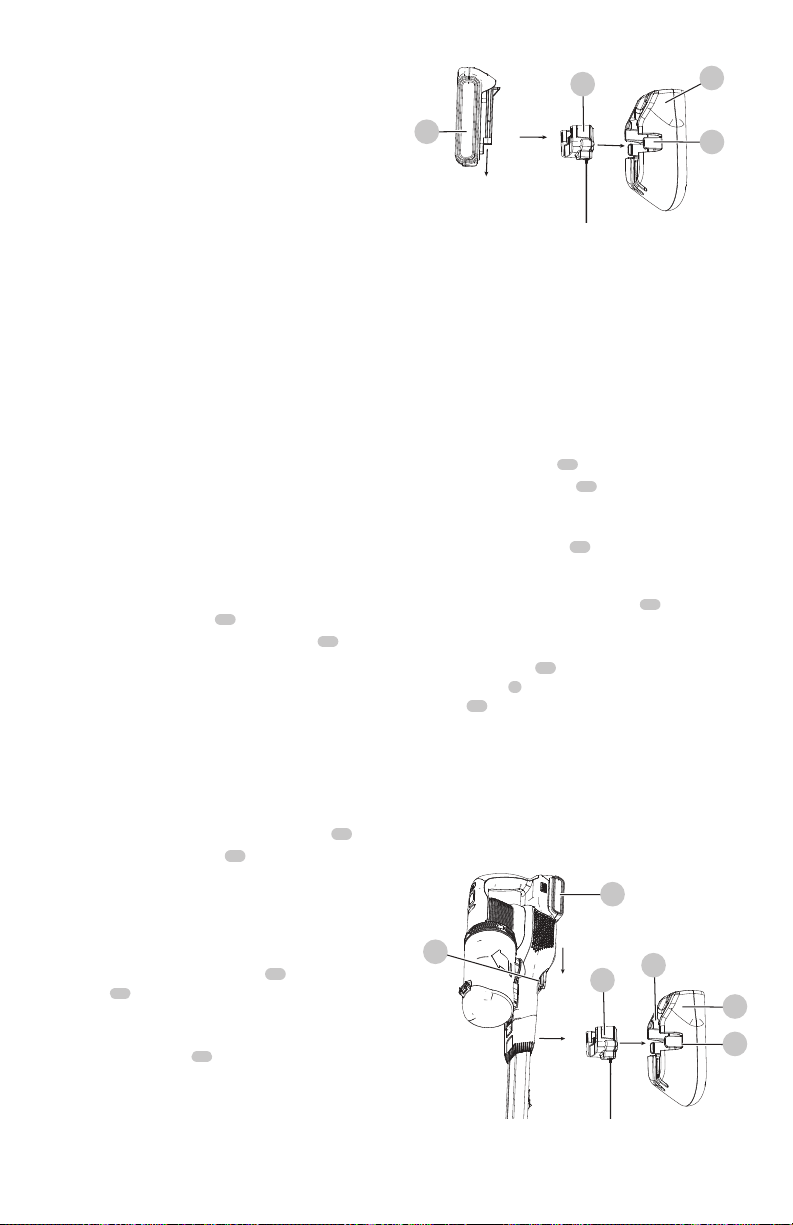
Wall mounted vacuum storage and
battery charging (Fig. C)
The product can be attached to a wall to provide a
convenient storage and charging point for the appliance.
When mounting to a wall, make sure the mounting method
is suitable for the wall type and is appropriate to the weight
of the appliance.
1. Mark the location of the charging station screw holes
on the wall (at a height that allows the unit to hang
without hitting the floor and within reach of an
electrical outlet for charging the vacuum while it is on
the charging station20 .
2. Fix the charging station20 to the wall using
appropriate screws and plugs for the type of wall, and
weight of the appliance.
3. Install the cup charger 19 into the charging station (Fig
C.). Ensure it is locked into place before p roceeding.
NOTE: To remove the cup charger from the charging
base pull out on the retaining tabs 21 and lift the cup
charger out.
4. Plug the charger into an appropriate outlet.
5. With the battery 16 installed on the vacuum slide the
charge port 6 ,located on the vacuum base, onto the
slots 33 of the charging station.
6. The white LED on the vaccum will flash indicating that
the battery is beingcharged.
7. The white LEDs will illuminate in segments, displaying
the state of chargein the battery
8. The completion of charge is indicated by the white LEDs
will turn off. The pack is fully charged and may be used
at this time or left on thecharger.
Fig. C
6
20
21
19
16
33
Loading ...
Loading ...
Loading ...