Loading ...
Loading ...
Loading ...
ENGLISH
9
• Install the dust canister onto the vacuum, until it clicks
firmly intoposition.
Fig. M
26
27
10
28
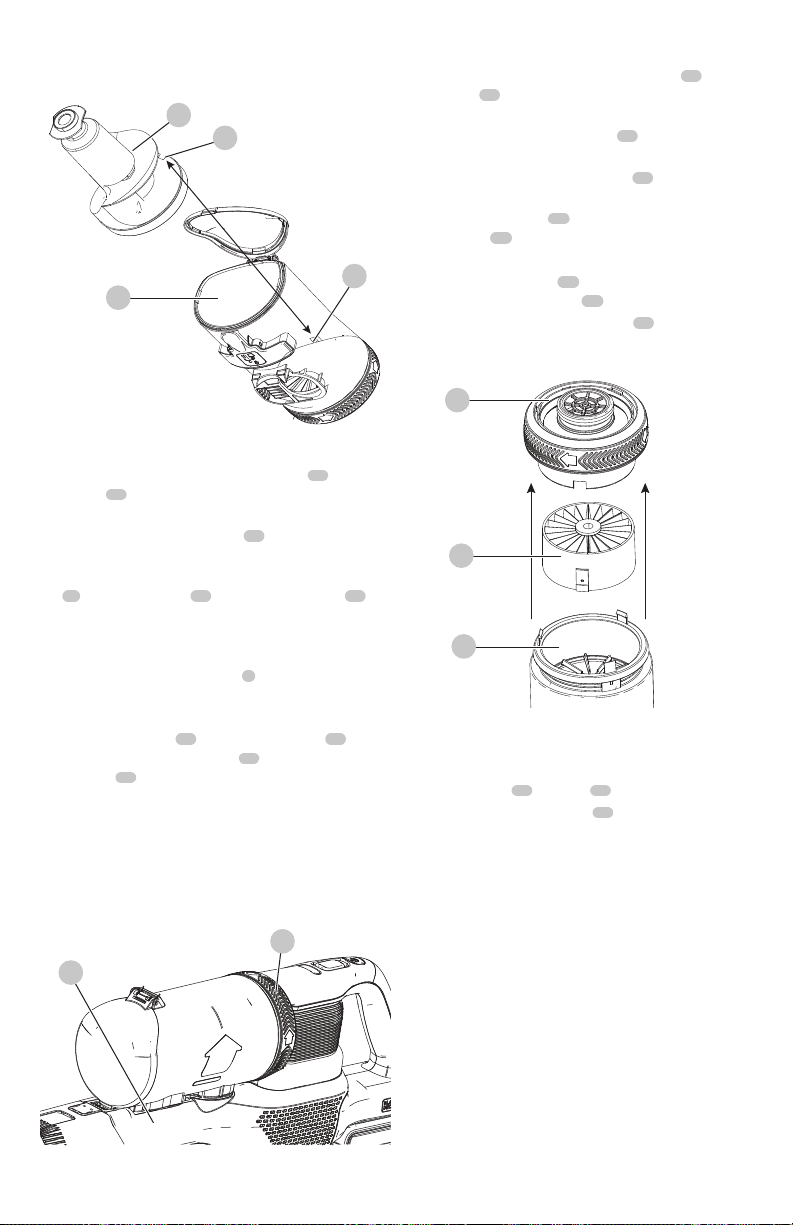
Filter Agitator (Fig. K, L, N)
• Lift and remove the lift away dust canister 10 from the
chassis 23 as shown in FigureK.
• Place the dust canister over a trash bin and press the
dust canister lid release button 24 to empty the dust
canister as shown in FigureL.
• Use your index finger and thumb to pinch the pre-filter
26 , pull the pre-filter 26 from the dust canister 10 as
shown in Fig. M.
NOTE: The filter housing fits snuggly in the dust canister
and may be difficult to remove at first.
• Rotate the filter agitator wheel 9 five to ten revolutions
over a trash bin to remove excessive dust from the filter.
• Empty the dust canister into a trash bin.
• Install the pre-filter 26 into the dust canister 10
ensuring the dust canister tab 27 aligns with the pre-
filter slot 28 as shown in Fig.M.
• Install the dust canister onto the vacuum, until it clicks
firmly intoposition.
IMPORTANT: Maximum dust collection will only be
obtained with clean filters and an empty dust canister.
If dust begins to fall back out of the product after it is
switched off, this indicates that the dust canister is full and
requiresemptying.
Fig. N 9
23
Removing filter (Fig. K, L, O)
• Lift and remove the lift away dust canister 10 from the
chassis 23 as shown in FigureK.
• Place the dust canister over a trash bin and press the
dust canister lid release button 24 to empty the dust
canister as shown in FigureL.
• Grasp the agitator wheel housing 29 and pull up
to remove.
• Remove the filter 30 , from the agitator wheel
housing 29 as shown in Fig. O.
• Shake off or lightly brush any loose dust from the filter.
• Install the the filter 30 , into the
agitator wheel housing 29 .
• Install the agitator wheel housing 29 onto the dust
canister, until it clicks firmly intoposition.
Fig. O
10
29
30
Cleaning the filters
• Once the filter and pre-filter are removed from the dust
canister shake off or lightly brush any loose dust from
the pre-filter 26 and filter 30 .
• Rinse out the dust canister 10 with warm soapywater.
• Wash the filters with warm soapy water.
• Ensure the filters are completely dry before refitting.
• Follow instructions in the Removing pre-filter and
Removing filter sections for assembly instructions.
• IMPORTANT: Maximum dust collection will only be
obtained with clean filters and an empty dust canister.
If dust begins to fall back out of the product after it is
switched off, this indicates that the dust canister is full
and requiresemptying.
• Wash the filters regularly using warm, soapy water and
ensure that it is completely dry before using again. The
cleaner the filter is, the better the product will perform.
• It is very important that the filters are completely dry
and correctly in position beforeuse.
Loading ...
Loading ...
Loading ...