
PWC301
PW60L00
PRESSURE WASHER
LIMPIADOR A PRESIÓN


1 Description......................................... 4
1.1 Purpose.............................................................. 4
1.2 Overview........................................................... 4
2 Introduction.......................................4
3 General power tool safety
warnings.............................................4
4 Symbols on the product.................... 6
5 Risk levels...........................................6
6 Environmentally safe battery
disposal...............................................6
7 Proposition 65....................................7
8 Installation......................................... 7
8.1 Unpack the machine.......................................... 7
8.2 Install the spray wand........................................7
8.3 Install the high pressure hose.............................8
8.4 Connect the water supply to the machine..........8
8.5 Install the battery pack.......................................9
8.6 Remove the battery pack................................... 9
9 Operation........................................... 9
9.1 Use the spray gun.............................................. 9
9.2 Install the nozzle................................................9
10 Install the detergent tank................10
11 Start the machine............................ 10
12 Stop the machine............................. 10
13 Maintenance.....................................11
13.1 Nozzle maintenance.........................................11
14 Transportation and storage............ 11
14.1 Move the machine............................................11
14.2 Store the machine.............................................11
15 Troubleshooting............................... 11
16 Technical data..................................12
17 Limited warranty............................ 13
18 Exploded view..................................14
3
English
EN
1 DESCRIPTION
1.1 PURPOSE
The machine is used to used to clean vehicles, boats,
buildings, porches, decks, patios, and driveways.
For domestic use only, not for professional use, and for
operation at temperature above 32°F (0°C).
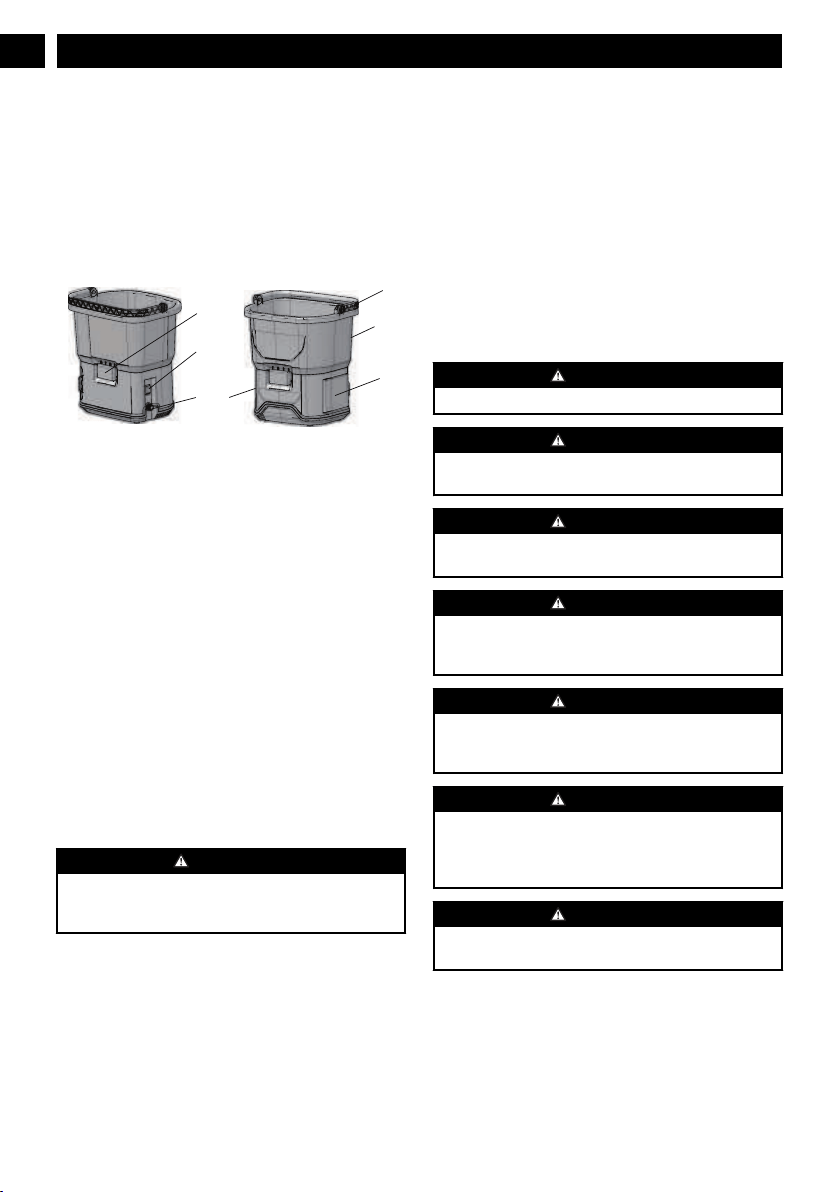
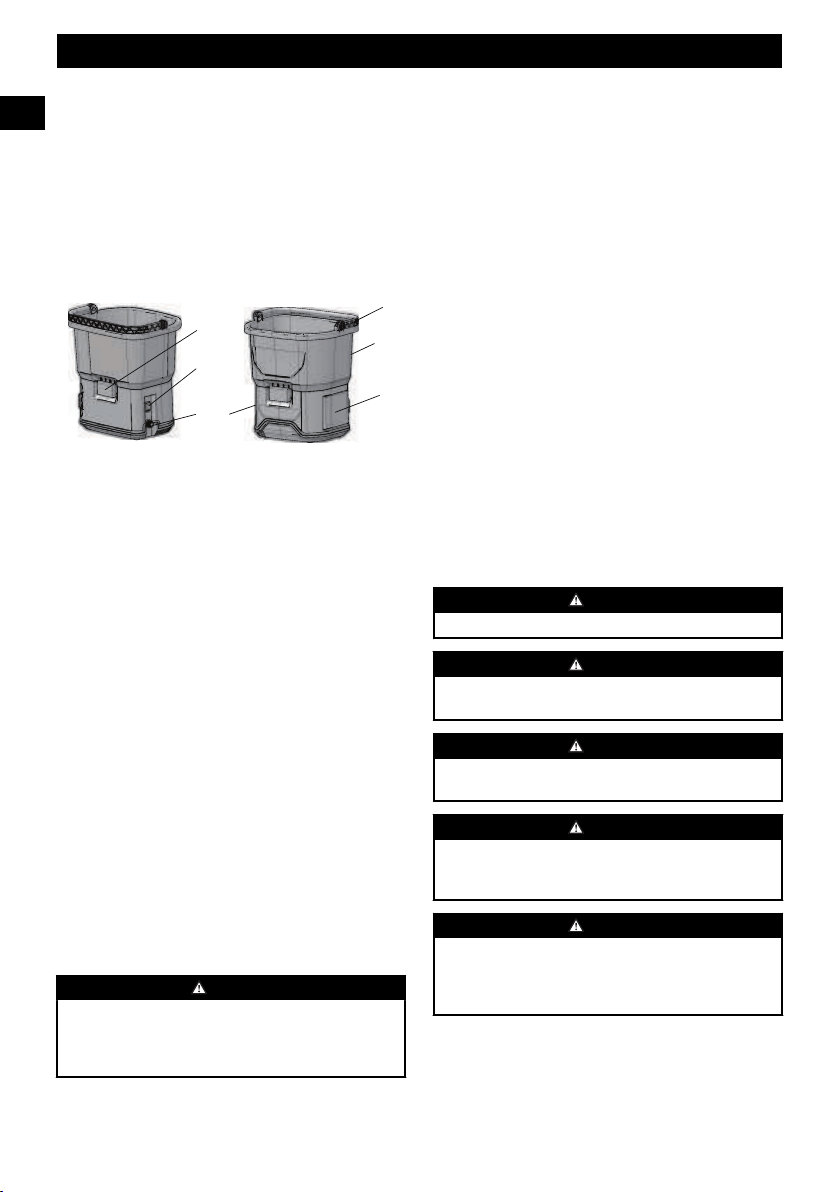
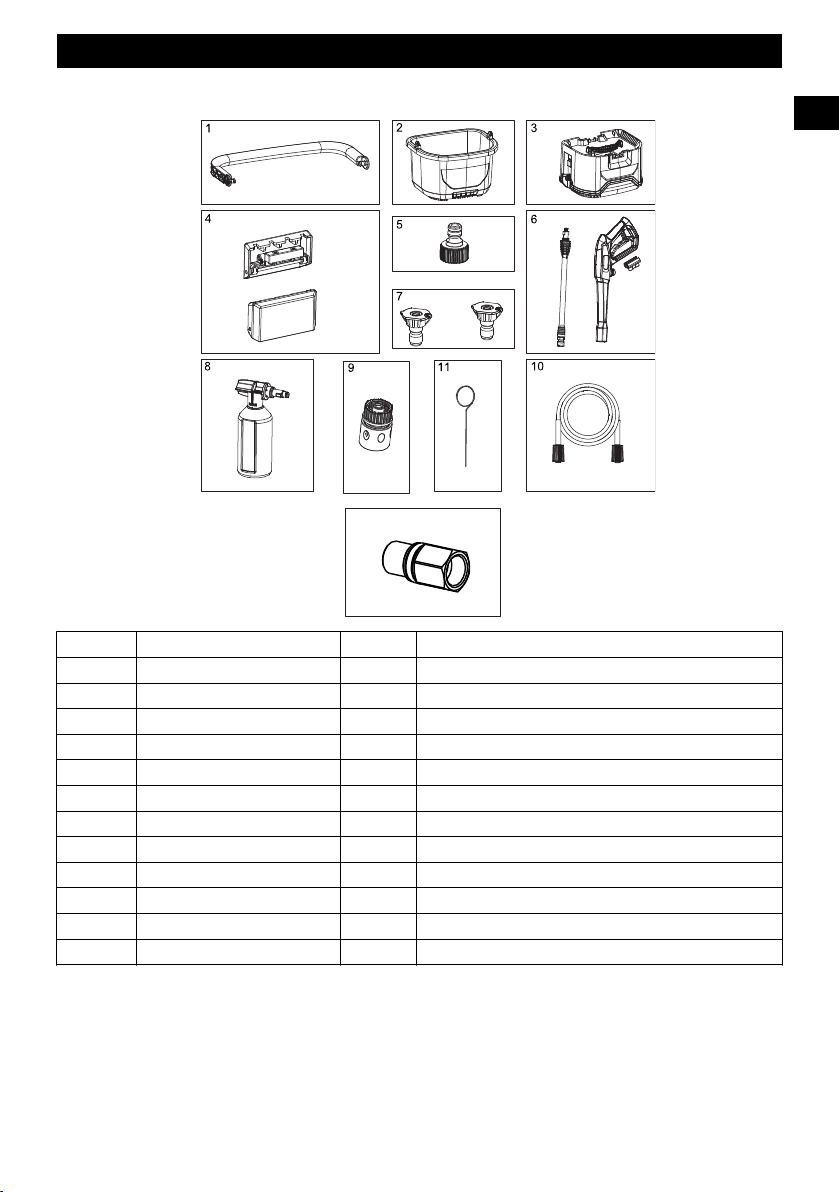
1.2 OVERVIEW
1
4
7
6
5
2
3
1
Handle
2
Power switch
3
Water outlet
4
Bucket
5
Bucket buckle
6
Base
7
Battery door
8
Spray wand
9
Spray gun
10
Gun trigger
11
High pressure hose
12
Adapter
13
Inlet coupler
14
Trigger safety button
15
Garden hose
16
Water Inlet
17
Water Inlet connector
18
Battery release button
19
Nozzle
20
Cleaning tool
21
Detergent tank
2 INTRODUCTION
Your product has been engineered and manufactured to high
standards for dependability, ease of operation, and operator
safety. When properly cared for, it will give you years of
rugged, trouble-free performance.
3 GENERAL POWER TOOL
SAFETY WARNINGS
WARNING
Read all safety warnings and all instructions. Failure to
follow the warnings and instructions may result in electric
shock, fire and/or serious injury.
Save all warnings and instructions for future reference.
The term “power tool” in the warnings refers to your battery-
operated (cordless) power tool.
• Learn the machine's applications and limitations as well
as the specified potential hazards related to this tool by
studying this manual.
• Follow the maintenance instructions specified in this
manual.
• Never operate the machine with any guard or cover
removed or damaged.
• Do not operate the machine under the influence of drugs,
alcohol, or any medication.
• Do not wear loose clothing, gloves, neckties, or jewellery.
They can get caught and draw you into moving parts.
• Rubber gloves and non-skid footwear are recommended
when working outdoors. Also wear protective hair
covering to contain long hair. Wear footwear that will
protect your feet and improve your grip on slippery
surfaces.
• Always wear safety glasses with side shields.
• Don't overreach or stand on unstable support. Keep
proper footing and balance at all times.
• Don't overtilt the unit.
WARNING
Risk of explosion – Do not spray flammable liquids.
WARNING
Water that has passed through backflow preventers is
considered to be nonpotable.
WARNING
Do not use the appliance if a battery or important parts are
damaged.
WARNING
For battery operated machines, always turn off switch and
remove the battery from the appliance when leaving the
machine unattended.
WARNING
High pressure jets can be dangerous if subject to misuse.
The jet must not be directed at persons, animals, electrical
devices, or the machine itself.
WARNING
This Appliance has been designed for use with the cleaning
agent supplied or recommended by the manufacturer. The
use of other cleaning agents or chemicals may adversely
affect the safety of the appliance.
WARNING
Don’t use the appliance within range of persons unless they
wear protective clothing.
• Do not direct the jet against yourself or others in order to
clean clothes or footwear.
• Remove the battery pack before carrying out user
maintenance.
• To ensure appliance safety, use only original spare parts
from the manufacturer or approved by the manufacturer.
4
English
EN

WARNING
To reduce the risk of electrocution, keep all connections dry
and off the ground.
• To reduce the risk of injury, the machine shall not be used
by children or untrained personnel. keep children and
bystanders away. All bystanders should wear safety
glasses and be kept a safe distance from work area.
This appliance is not intended for use by persons (including
children) with reduced physical, sensory or mental
capabilities, or lack of experience and knowledge, unless they
have been given supervision or instruction concerning use of
the appliance by a person responsible for their safety.
Children should be supervised to ensure that they do not play
with the appliance.
• Use correct product. Don’t force product or attachment to
do a job it was not designed for. Don’t use it for a purpose
not intended.
• Use only recommended accessories. The use of improper
accessories may cause risk of injury.
• Never leave product running unattended. Turn power off.
Don’t leave product until it comes to a complete stop.
• Keep the motor free of grass, leaves, or grease to reduce
the chance of a fire hazard.
• Keep product dry, clean, and free from oil and grease.
Always use a clean cloth when cleaning. Never use brake
fluids, gasoline, petroleum-based products, or any
solvents to clean product.
• Check the work area before each use. Remove all objects
such as rocks, broken glass, nails, wire, or string which
can be thrown or become entangled in the machine.
• Do not use product if switch does not turn it off. Have
defective switches replaced by an authorized service
center.
• Avoid dangerous environments. Don’t expose to rain.
Keep work area well lit.
• Before starting any cleaning operation, close doors and
windows. Clear the area to be cleaned of debris, toys,
outdoor furniture, or other objects that could create a
hazard.
• Keep the motor away from flammable and other
hazardous materials.
• Check bolts and nuts for looseness before each use. A
loose bolt or nut may cause serious motor problems.
• Before storing, allow the motor to cool.
• When servicing use only identical replacement parts. Use
of any other parts may create a hazard or cause product
damage.
• ONLY use cold water.
• Make sure minimum clearance of 3 feet (1 meter) is
maintained from combustible materials.
• Hold the gun and wand securely with both hands.
• Expect the gun to move when the trigger is pulled due to
reaction forces. Failure to do so could cause loss of
control and injury to yourself and others.
• Prevent unintentional starting. Ensure the switch is in the
off-position before connecting to battery pack, picking up
or carrying the appliance. Carrying the appliance with
your finger on the switch or energizing appliance that
have the switch on invites accidents.
• Disconnect the battery pack from the appliance before
making any adjustments, changing accessories, or storing
appliance. Such preventive safety measures reduce the
risk of starting the appliance accidentally.
• For use only with CH60DP01/CH60R00/CAC801 and
other CAC series charger
• For use only with LB6025/LB605/LB604/ LB602 and
other BAC series battery.
• When battery pack is not in use, keep it away from other
metal objects, like paper clips, coins, keys, nails, screws
or other small metal objects, that can make a connection
from one terminal to another. Shorting the battery
terminals together may cause burns or a fire.
• Do not use a battery pack or appliance that is damaged or
modified. Damaged or modified batteries may exhibit
unpredictable behavior resulting in fire, explosion or risk
of injury.
• Do not expose a battery pack or appliance to fire or
excessive temperature. Exposure to fire or temperature
above 265°F (130°C) may cause explosion.
• Follow all charging instructions and do not charge the
battery pack or appliance outside of the temperature range
specified in the instructions. Charging improperly or at
temperatures outside of the specified range may damage
the battery and increase the risk of fire.
• Have servicing performed by a qualified repair person
using only identical replacement parts. This will ensure
that the safety of the product is maintained.
• Do not modify or attempt to repair the appliance or the
battery pack (as applicable) except as indicated in the
instructions for use and care.
• Recharge only with the charger specified by the
manufacturer. A charger that is suitable for one type of
battery pack may create a risk of fire when used with
another battery pack.
• Use appliances only with specially designated battery
packs. Use of any other battery packs may create a risk of
injury and fire
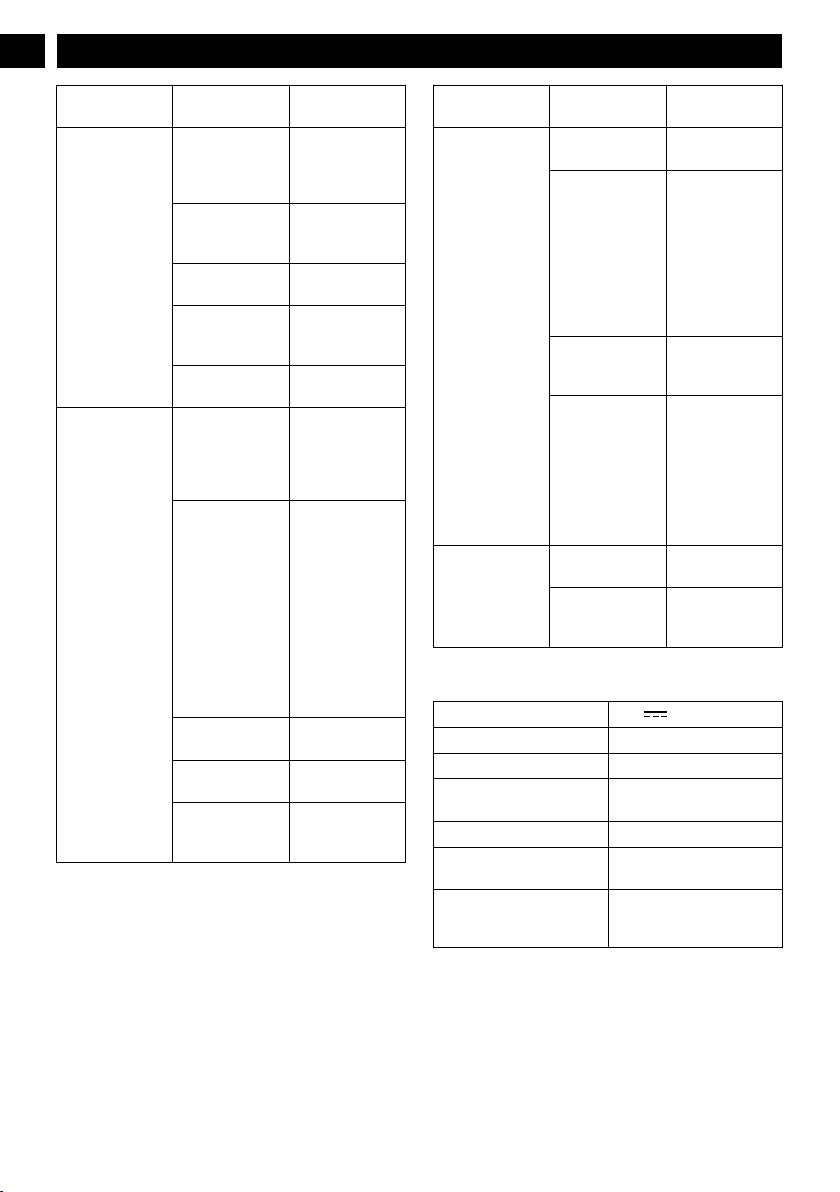
• The recommended ambient temperature range:
Item Temperature
Appliance storage
temperature range
-4°F (-20°C) - 158°F(70°C)
Appliance opera-
tion temperature
range
32°F (0°C) - 104°F(40°C)
Battery charging
temperature range
39°F (4°C) - 113°F(40°C)
Charger operation
temperature range
39°F (4°C) - 113°F(40°C)
5
English
EN
Battery storage
temperature range
1 year: 32°F (0°C) - 73°F(23°C)
3 months: 32°F (0°C)
-113°F(45°C)
1 months: 32°F (0°C)
-140°F(60°C)
Battery discharg-
ing temperature
range
6.8°F (-14°C) - 113°F(45°C)
• Save these instructions. Refer to them frequently and use
them to instruct other users. If you lend someone this
product, lend them these instructions also.
WARNING
High pressure hoses, fittings and couplings are important for
the safety of the appliance. Use only hoses, fittings and
couplings recommended by the manufacturer.
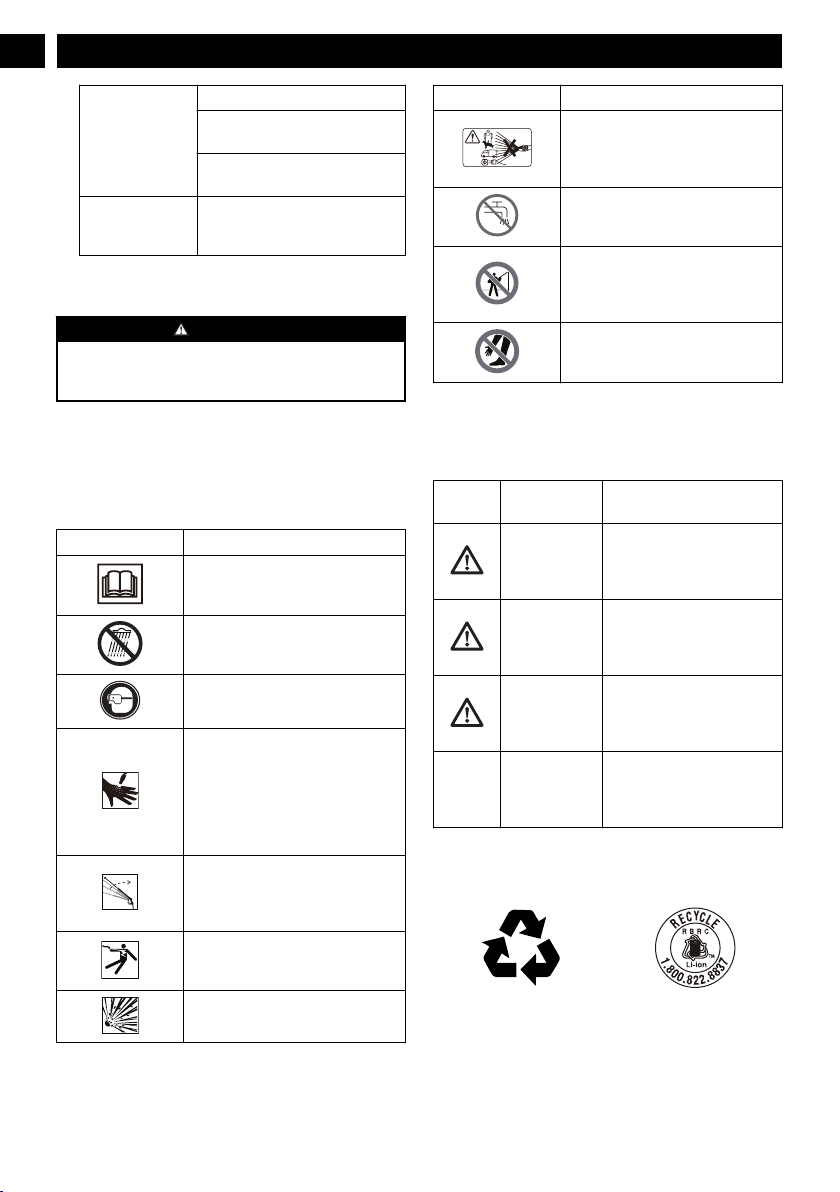
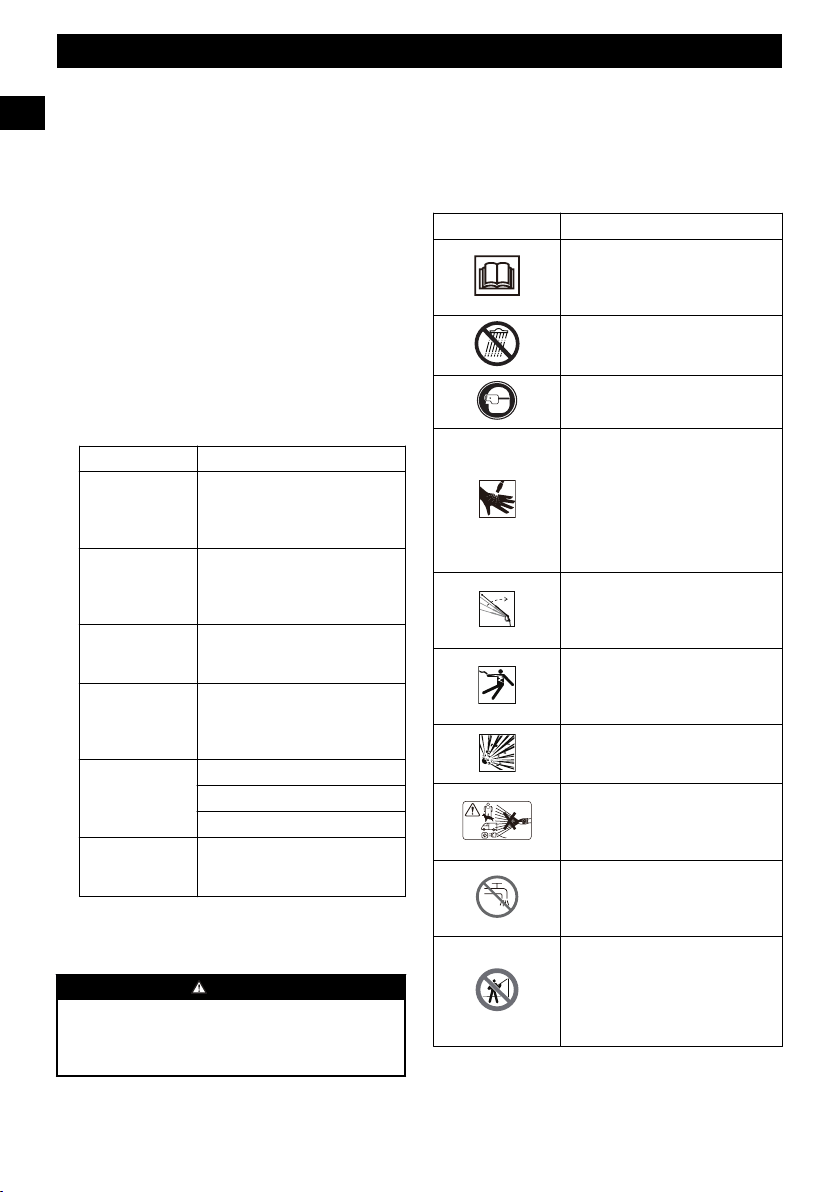
4 SYMBOLS ON THE PRODUCT
Some of the following symbols may be used on this tool.
Please study them and learn their meaning. Proper
interpretation of these symbols will allow you to operate the
tool better and safer.
Symbol Explanation
To reduce the risk of injury, user must
read and understand operator’s man-
ual before using this product.
Do not expose the product to rain or
moist conditions.
Wear eye protection.
To reduce the risk of injection or in-
jury, never direct a water stream to-
wards people or pets or place any
body part in the stream. Leak ing ho-
ses and fittings are also capable of
causing injection injury. Do not hold
hoses or fittings.
To reduce the risk of injury from
kickback, hold the spray lance se-
curely with both hands when the ma-
chine is on.
Failure to use in dry conditions and to
observe safe practices can result in
electric shock.
Fuel and its vapours are explosive
and can cause severe burns or death.
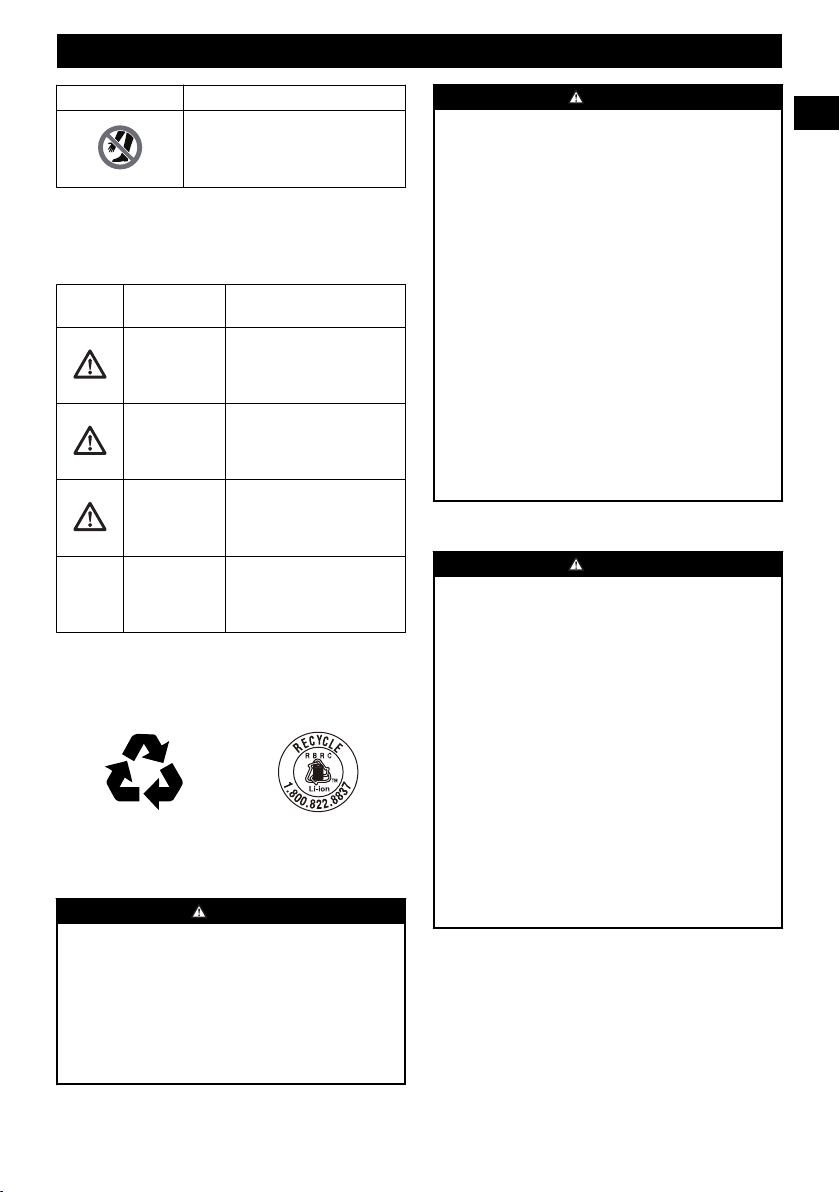
Symbol Explanation
Warning! Never point the gun to hu-
man, animals, the machine body,
power supply or any electric applian-
ces.
Appliance not suitable for connection
to the drinking water mains without
backflow preventer.
Only use cleaning deck on flat, hori-
zontal surfaces. Never lift cleaning
deck from the cleaning surface while
operating the pressure washer.
Keep hands and feet away from the
cleaning deck while the pressure
washer is running.
5 RISK LEVELS
The following signal words and meanings are intended to
explain the levels of risk associated with this product.
SYM-
BOL
SIGNAL MEANING
DANGER Indicates an imminently haz-
ardous situation, which, if not
avoided, will result in death
or serious injury.
WARNING Indicates a potentially hazard-
ous situation, which, if not
avoided, could result in death
or serious injury.
CAUTION Indicates a potentially hazard-
ous situation, which, if not
avoided, may result in minor
or moderate injury.
CAUTION (Without Safety Alert Sym-
bol) Indicates a situation that
may result in property dam-
age.
6 ENVIRONMENTALLY SAFE
BATTERY DISPOSAL
The toxic and corrosive materials below are in the batteries
used in this machine: Lithium-Ion, a toxic material.
6
English
EN
WARNING
Discard all toxic materials in a specified manner to prevent
contamination of the environment. Before discarding
damaged or worn out Li-ion battery, contact your local
waste disposal agency, or the local Environmental
Protection Agency for information and specific instructions.
Take the batteries to a local recycling and/or disposal center,
certified for lithium-ion disposal.
WARNING
If the battery pack cracks or breaks, with or without leaks,
do not recharge it and do not use. Discard it and replace
with a new battery pack. DO NOT TRY TO REPAIR IT! To
prevent injury and risk of fire, explosion, or electric shock,
and to avoid damage to the environment:
• Cover the terminals of the battery with heavy-duty
adhesive tape.
• DO NOT try to remove or destroy any of the battery
pack components.
• DO NOT try to open the battery pack.
• If a leak develops, the released electrolytes are
corrosive and toxic. DO NOT get the solution in the
eyes or on skin, and do not swallow it.
• DO NOT put these batteries in your regular household
trash.
• DO NOT incinerate.
• DO NOT put them where they will become part of any
waste landfill or municipal solid waste stream.
• Take them to a certified recycling or disposal center.
7 PROPOSITION 65
WARNING
This product contains a chemical known to the state of
California to cause cancer, birth defects or other
reproductive harm. Some dust created by power sanding,
sawing, grinding, drilling, and other construction activities
contains chemicals known to cause cancer, birth defects or
other reproductive harm. Some examples of these chemicals
are:
• Lead from lead-based paints;
• Crystalline silica from bricks and cement and other
masonry products;
• Arsenic and chromium from chemically treated lumber.
Your risk of exposure to these chemicals varies depending
on how often you do this type of work. To reduce your
exposure to these chemicals, work in a well-ventilated area,
and work with approved safety equipment, such as dust
masks that are specially designed to filter out microscopic
particles.
Save these instructions.
8 INSTALLATION
8.1 UNPACK THE MACHINE
WARNING
Make sure that you correctly assemble the machine before
use.
WARNING
• If parts of the machine are damaged, do not use the
machine.
• If you do not have all the parts, do not operate the
machine.
• If parts are damaged or missing, contact the service
center.
1. Open the package.
2. Read the documentation provided in the box.
3. Remove all the unassembled parts from the box.
4. Remove the machine from the box.
5. Discard the box and packing material in compliance with
local regulations.
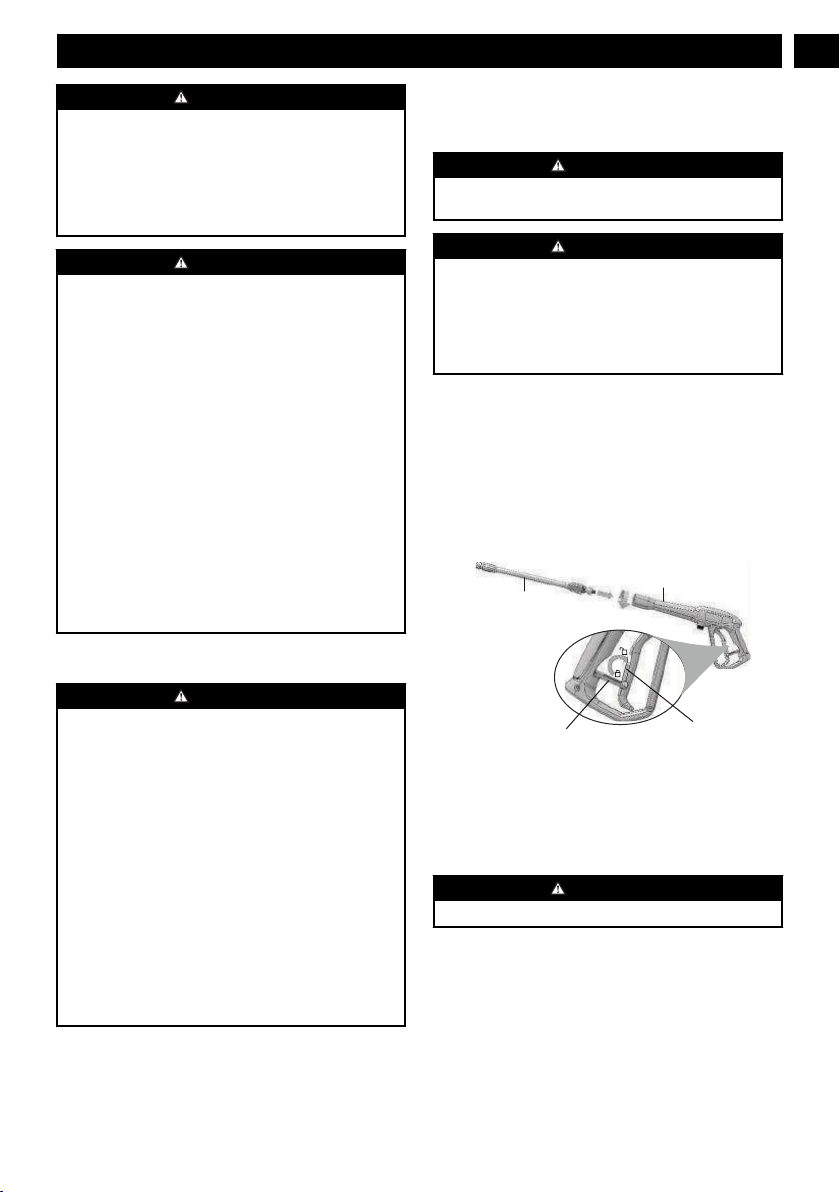
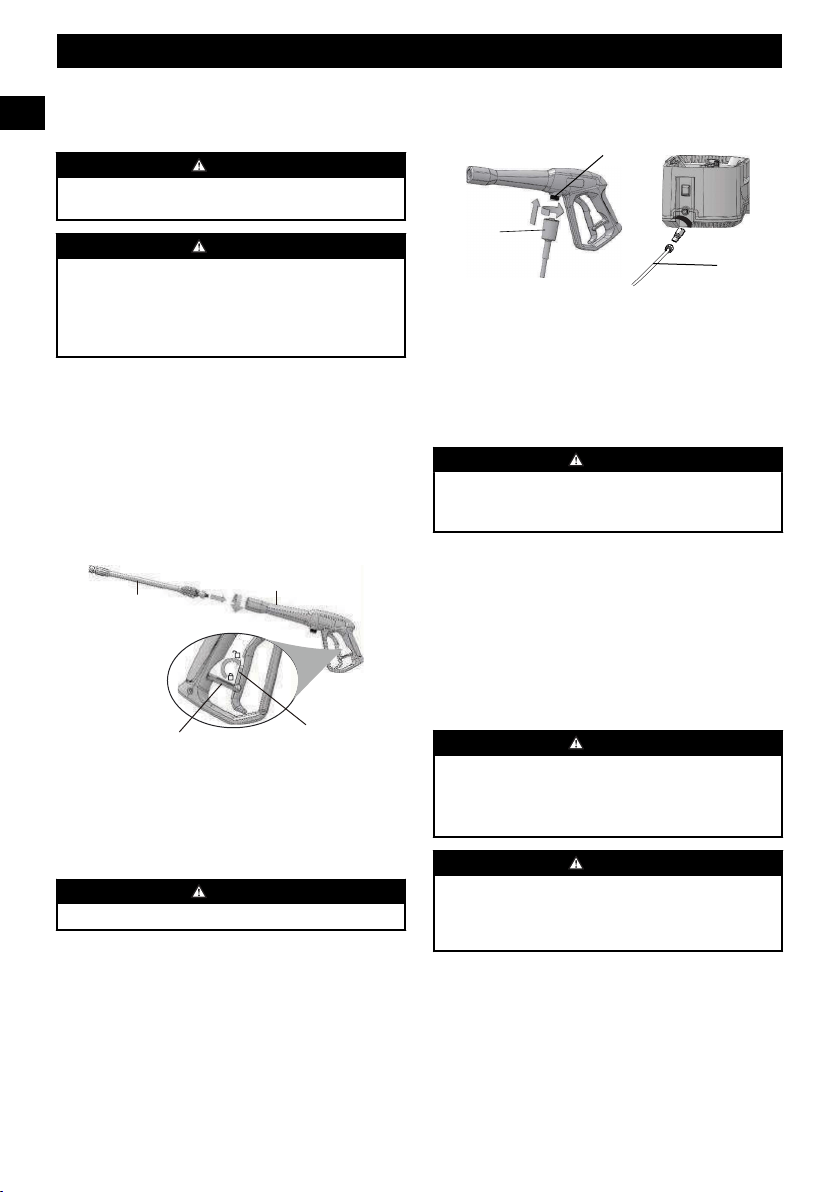
8.2 INSTALL THE SPRAY WAND
10
8
9
14
1. Push the end of the spray wand (8) into the gun handle
handle (9)..
2. Turn the spray wand (8) clockwise until the tabs lock into
position.
3. Ensure the trigger lock (14) out is in the unlocked
position.
WARNING
Make sure that the connection has no leakage.
7
English
EN
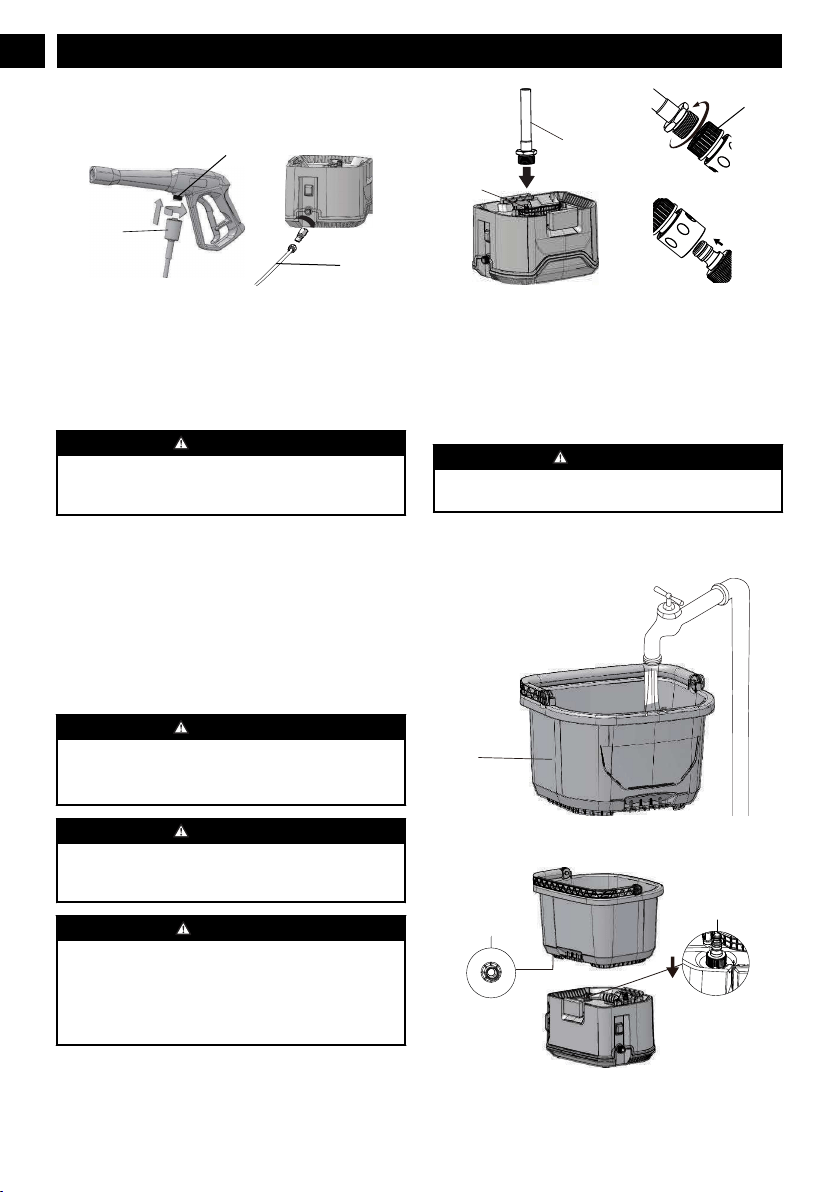
8.3 INSTALL THE HIGH PRESSURE
HOSE
11
13
11
1. Push one end of the high pressure hose (11) into the inlet
coupler (13).
2. Before installing the included high pressure hose (11),
thread the priming valve onto the pressure washer outlet
and rotate clockwise until tightened.
3. Once installed, thread one end of the included high
pressure hose and tighten onto the valve.
WARNING
• Small amounts of water exiting the valve as pressure
washer priming valve is normal. This is needed to bleed
the system from air.
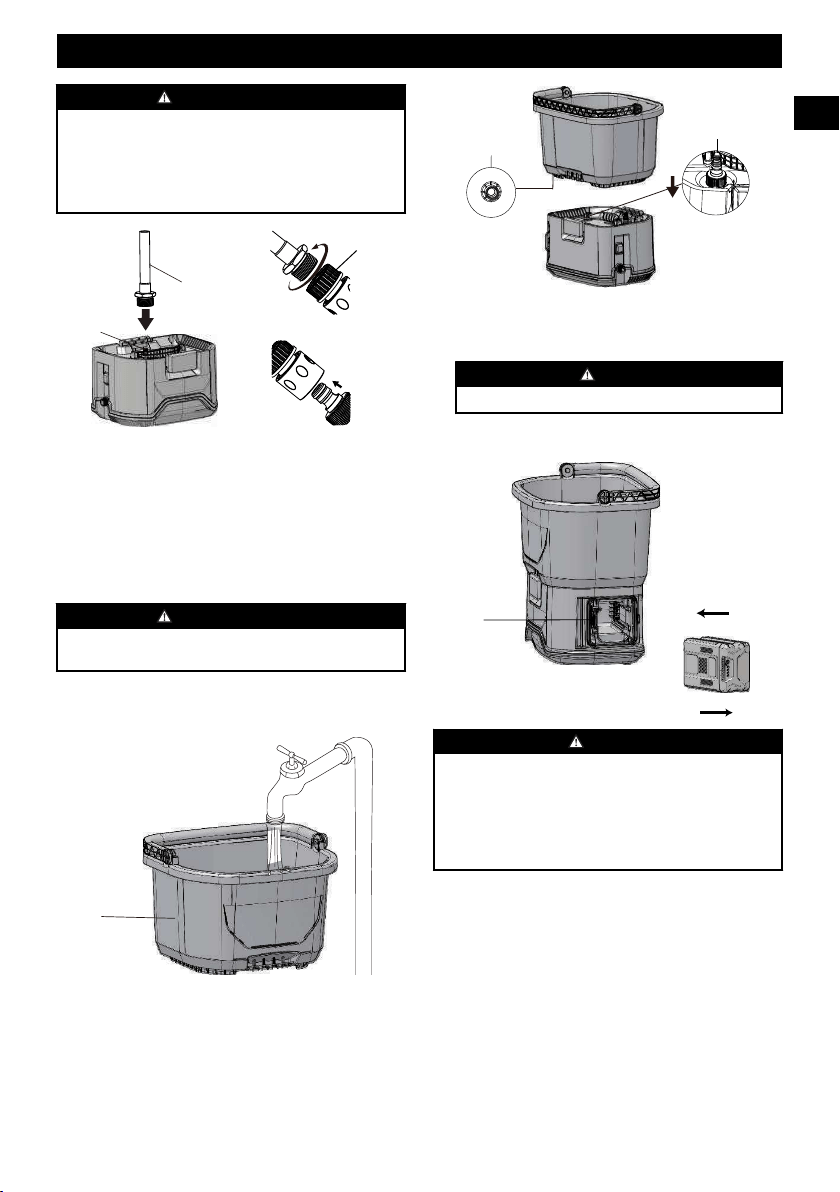
8.4 CONNECT THE WATER SUPPLY
TO THE MACHINE
The machine works only when there is water in the bucket or
the base is connected with a water supply. When there is no
water connected, push the power switch to stop the machine.
8.4.1 CONNECT THE WATER SUPPLY TO
THE MACHINE
WARNING
• The water supply must come from the water main
• Do not use hot water
• Do not use water from ponds or lakes
WARNING
Follow local regulations when you connect the garden hose
to the water supply. Direct connection through a receiver
tank or backflow preventer is usually permitted.
CAUTION
Inspect the filter in the water inlet connector before you
connect the garden hose
• If the filter is damaged, do not use the machine until the
filter is replaced.
• If the filter is dirty, clean the filter.
15
16
12
1. Uncoil the garden hose (15) (not included).
2. Thread adapter (12) to the male garden hose (15).
3. Pull back the adaptor collar and attach to the male
connector (16) on the machine.
4. Turn the water supply off.
5. Let the water flow through the garden hose (15) for 30
seconds.
CAUTION
There must be a minimum of 10 feet of free hose between
the water inlet and the water supply.
8.4.2 INSTALL THE BUCKET
1. Add water to the bucket (4).
4
2. Align the water inlet connector (17) with the water inlet
(16).
17
16
3. Install the bucket (4) onto the base.
8
English
EN
4. Lift and push down the bucket buckles to fix the bucket
(4) to the base.
WARNING
Pull the bucket buckles to unlock the bucket.
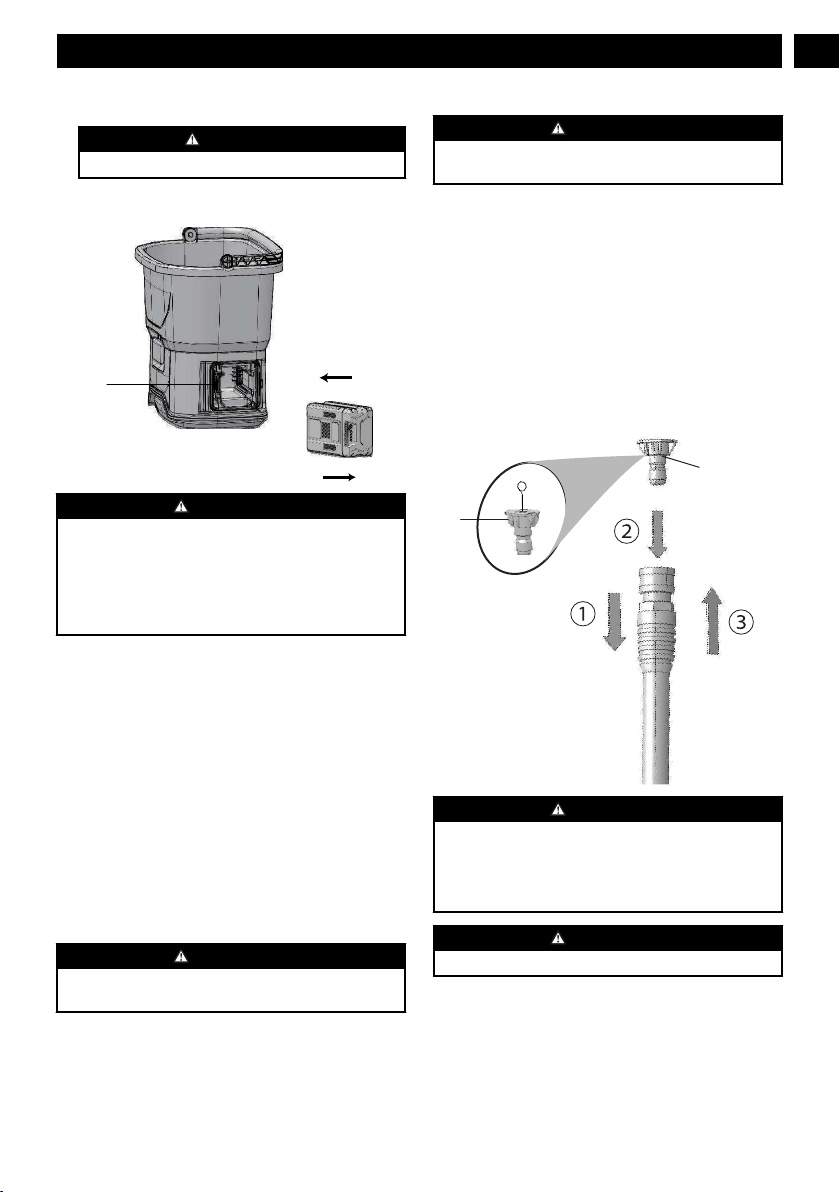
8.5 INSTALL THE BATTERY PACK
18
WARNING
• If the battery pack or charger is damaged, replace the
battery pack or the charger.
• Stop the machine and wait until the engine stops before
you install or remove the battery pack.
• Read, know, and do the instructions in the battery and
charger manual.
1. Open the battery door.
2. Align the lift ribs on the battery pack with the grooves in
the battery compartment.
3. Push the battery pack into the battery compartment until
the battery pack locks into place.
4. When you hear a click, the battery pack is installed.
5. Close the battery door.
8.6 REMOVE THE BATTERY PACK
1. Open the battery door.
2. Push and hold the battery release button (18).
3. Remove the battery pack from the machine.
9 OPERATION
WARNING
Make sure that all the connections are tight and have no
leakage before operation.
9.1 USE THE SPRAY GUN
WARNING
For safe control, keep your hands on the spray gun and
wand at all times.
• Pull and hold the spray gun trigger (10) to start the
machine.
• Release the spray gun trigger (10) to stop water flow
through the nozzle (19).
9.1.1 UNLOCK THE GUN TRIGGER
• Push backward the trigger safety button (14).
9.1.2 LOCK THE GUN TRIGGER
• Push forward the trigger safety button (14).
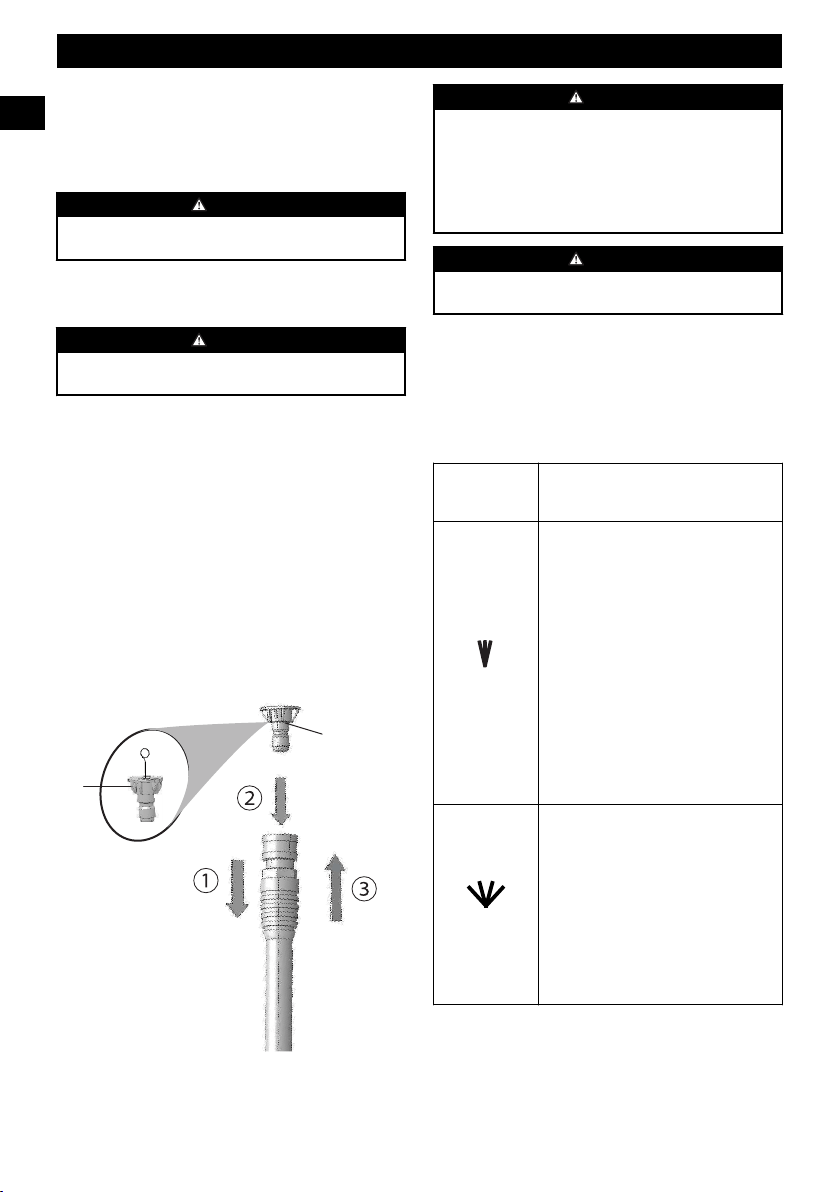
9.2 INSTALL THE NOZZLE
20
19
WARNING
Before you change the nozzle:
1. Pull the spray gun trigger (10) to release water pressure.
2. Lock the trigger safety button (14) on the gun.
3. Stop the mahcine.
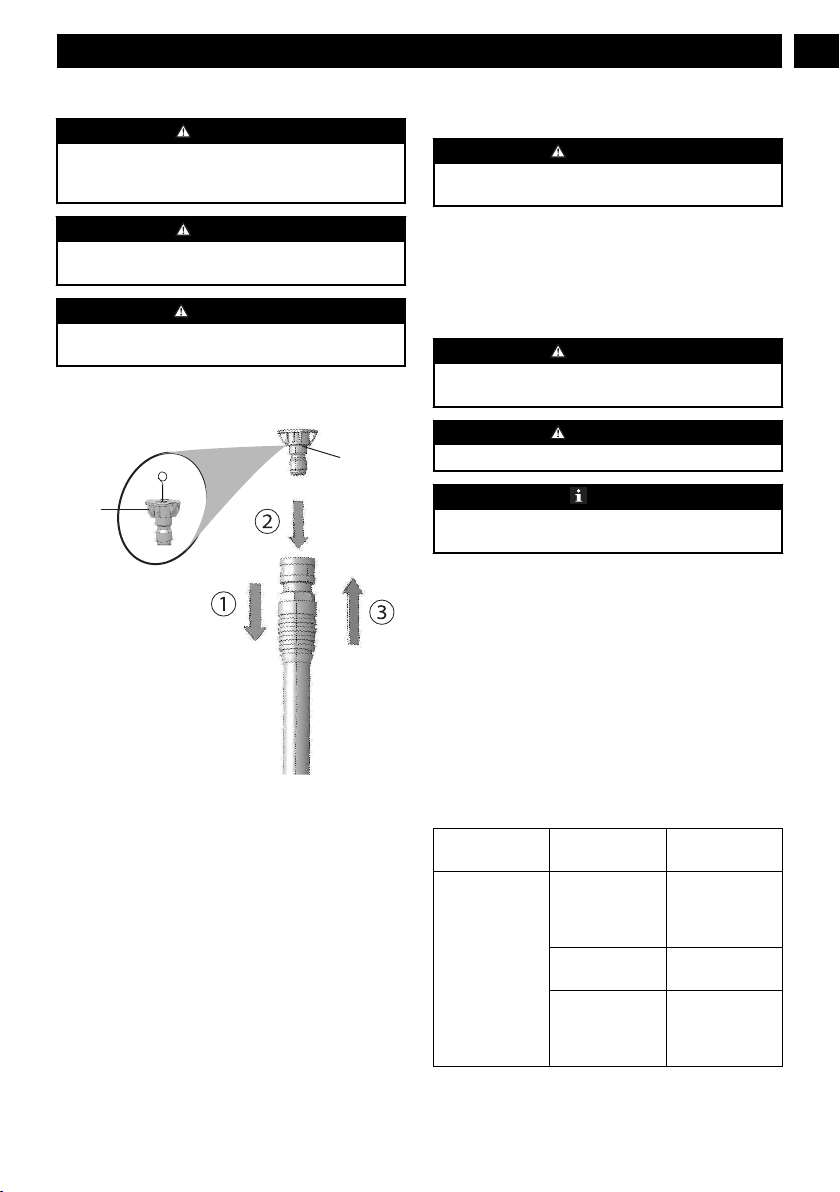
WARNING
Do not point the spray wand (8) at your face or others'.
1. Pull back the quick-connect collar on the spray wand (8).
2. Install the nozzle (19) onto the spray wand (8).
3. Release the quick-connect collar to attach the nozzle (19).
9
English
EN
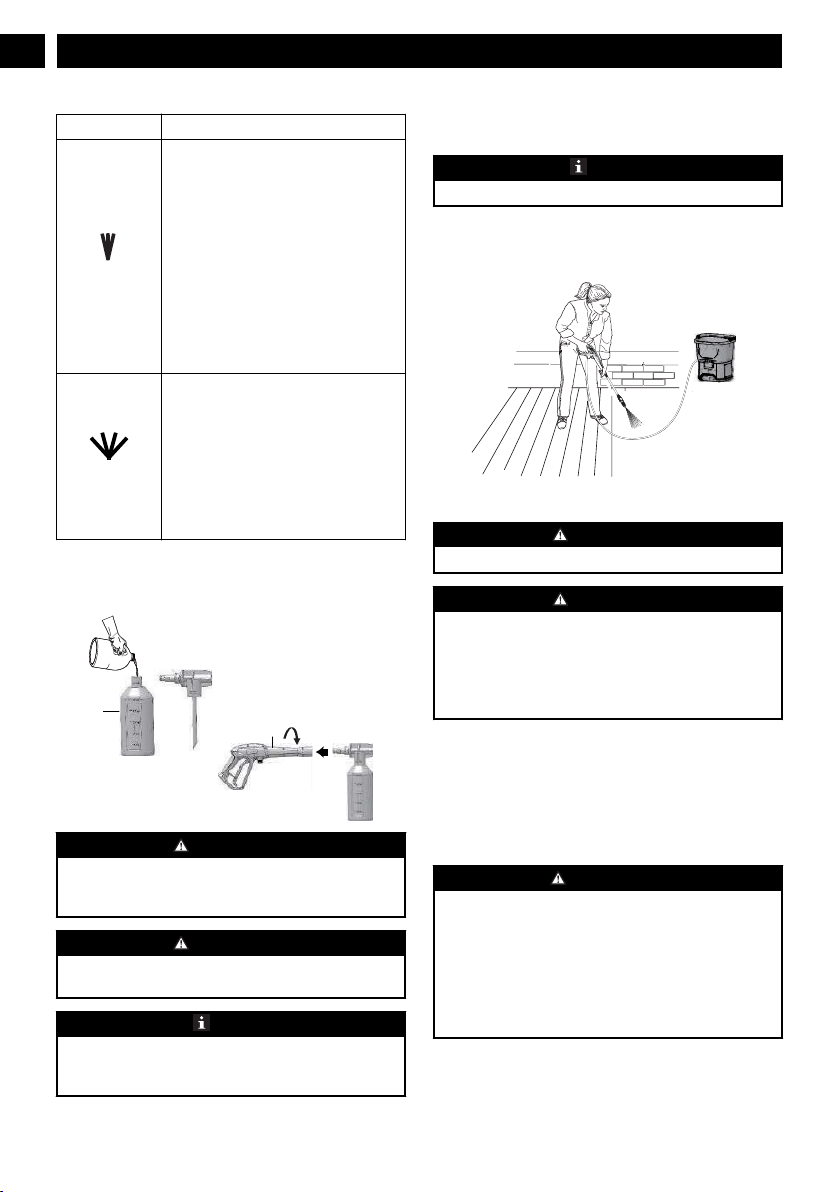
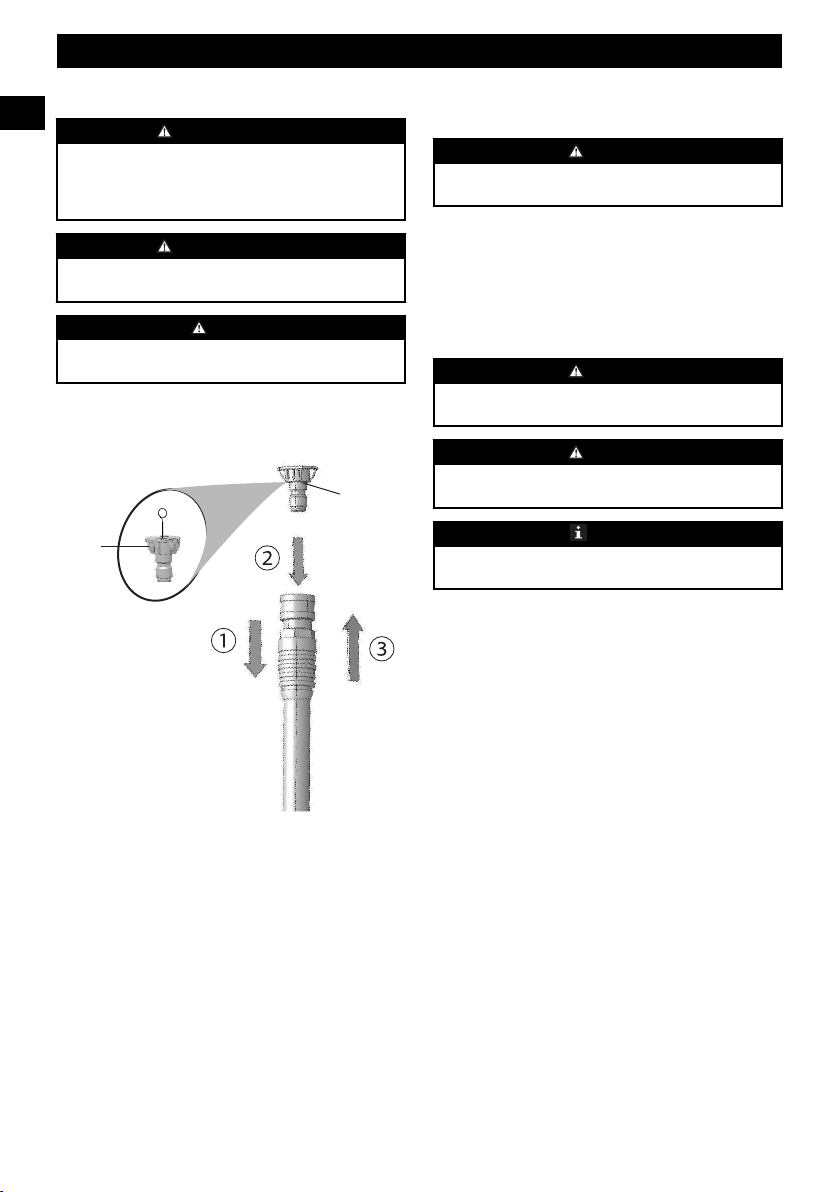
9.2.1 NOZZLE TYPE
SPRAY TIP APPLICATION
15
O
Yellow - Narrow fan tip (15° )
• The yellow pressure washer tip pro-
vides high versatility with its 15 de-
gree angle tip. Referred to as the
washing tip, because it provides ade-
quate pressure to remove dirt from
surfaces, but is designed to not dam-
age many surfaces. This pressure
washer tip is designed for “sweep-
ing” foliage or debris given its wide
angle. This tip is versatile due to its
wide area of cleaning and strong
pressure application.
40
O
White - Wide fan tip (40° )
• The white 40 degree tip, referred to
as the “fan” tip creates the widest
area of cleaning with relatively low
pressure. This pressure washer tip is
best used for light or delicate clean-
ing applications. It is recommended
for light cleaning on wood decks and
other soft or delicate surfaces.
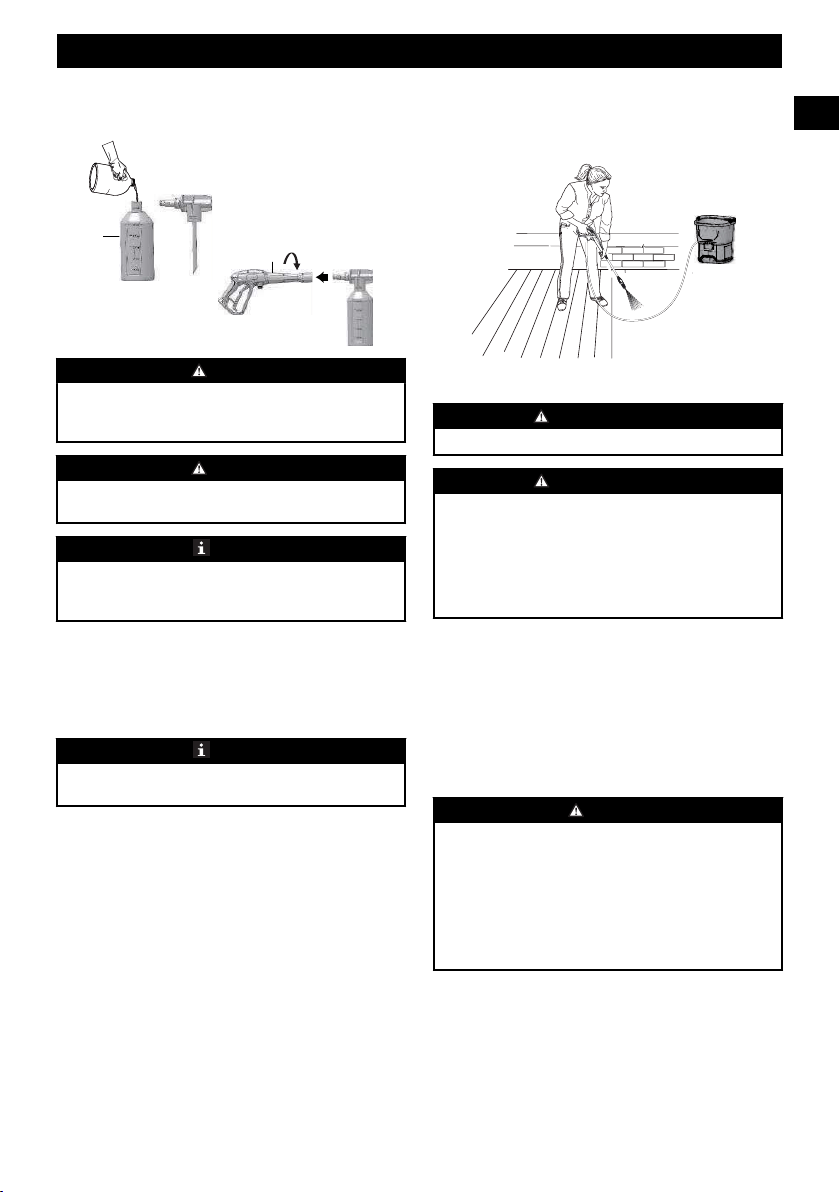
10 INSTALL THE DETERGENT
TANK
9
WARNING
Do not use household detergents, acids, alkalines, bleaches,
solvents, flammable material, or industrial grade solutions,
which can do damage to the pump.
WARNING
Do the instructions on the solution bottle to prepare
detergent.
NOTE
If it is necessary, use a funnel to prevent the spill of
detergent. Clean and dry the spilled detergent when you fill
it.
1. Put the detergent into the detergent tank (21).
2. Install the detergent tank onto the spray gun (9).
3. Turn counter-clockwise the spray gun (9) to tighten.
NOTE
Do not let detergent dry on the surface to prevent streaks.
11 START THE MACHINE
CAUTION
Do not operate without the water supply connected.
CAUTION
Before you start the machine:
1. Turn the water supply on.
2. Pull the spray gun trigger (10) to release air pressure.
3. If a stable stream of water come into view, release the
gun trigger (10).
1. Set the power switch to the “ON” ( | ) position.
2. Pull the spray gun trigger (10).
12 STOP THE MACHINE
1. Release the spray gun trigger (10).
2. Set the power switch to the "OFF" (O) position.
WARNING
If you do not use the machine:
• Stop the machine.
• Turn the water supply off.
• Remove the battery pack.
• Pull the spray gun trigger (10) to release the remaining
pressure from the machine.
• Lock the trigger safety button (14).
10
English
EN
21
13 MAINTENANCE
CAUTION
Do not let brake fluids, gasoline, petroleum-based materials
touch the plastic parts. Chemicals can cause damage to the
plastic, and make the plastic unserviceable.
CAUTION
Do not use strong solvents or detergents on the plastic
housing or components.
WARNING
Remove the battery pack from the machine before
maintenance.
13.1 NOZZLE MAINTENANCE
20
19
If there is too much pump pressure, the nozzle can become
clogged, you can feel a pulsing sensation while you pull the
gun trigger.
13.1.1 REMOVE THE NOZZLE
1. Remove the nozzle (19) from the spary wand (8).
13.1.2 CLEAN THE NOZZLE
1. Use a straight paper clip or cleaning tool (20) to clean the
spray tip.
2. Flush and clean the unwanted materials out of the nozzle
(19) with the garden hose (15).
3. Install the clean nozzle (19) to the spray wand (8).
14 TRANSPORTATION AND
STORAGE
WARNING
Remove the battery pack from the machine before
transportation and storage.
14.1 MOVE THE MACHINE
• Point the spray wand in a safe direction.
• Only hold the machine with the handgrip.
14.2 STORE THE MACHINE
WARNING
Make sure that the gun, the high pressure hose and the
pump are dry.
WARNING
Make sure that children cannot come near the machine.
NOTE
Use a recommended pump protector to prevent cold
weather damage during storage in winter.
• Disconnect the garden hose from machine.
• Wind the high pressure hose.
• Clean housing and the plastic components with a moist
and soft cloth.
• Make sure that the machine does not have loose or
damaged parts. If it is necessary, do these steps/
instructions:
• replace the damaged parts.
• tighten the bolts.
• speak to a person of an approved service center.
• Store the machine in a dry, isolated and frost-free area.
15 TROUBLESHOOTING
PROBLEM POSSIBLE
CAUSE
SOLUTION
The motor does
not start.
The power switch
is off.
Set the power
switch to the
“ON” ( | ) posi-
tion.
You do not install
the battery pack.
Install the battery
pack.
The power switch
is on, but you do
not pull the gun
trigger.
Pull the gun trig-
ger.
11
English
EN
PROBLEM POSSIBLE
CAUSE
SOLUTION
The machine does
not get high pres-
sure.
The diameter of
garden hose is too
small.
Replace with a 1”
(25 mm) or 5/8”
(16 mm) garden
hose.
The garden hose is
blocked.
Make sure that the
garden hose is free
from blockage.
The water supply
is not sufficient.
Open the water
suppy fully.
You do not install
the nozzle onto the
spray wand.
Install the nozzle
onto the spray
wand.
The water inlet fil-
ter is blocked.
Clean the filter in
warm water.
The output pres-
sure varies high
and low.
The water supply
is not sufficient.
Open water suppy
fully. Make sure
the garden hose is
free from block-
age.
The pump absorbs
air.
1. Make sure that
the hoses and
fittings are not
damaged.
2. Turn the ma-
chine off.
3. Pull the gun
trigger until a
stable flow of
water comes
out through
the nozzle.
The water inlet fil-
ter is clogged.
Clean the filter in
warm water.
The battery pack is
out of power.
Charge the battery
pack.
The gun, hose or
nozzle are calci-
fied.
Operate distilled
vinegar through
detergent tank.
PROBLEM POSSIBLE
CAUSE
SOLUTION
The motor buzzes,
but you can not
start the machine.
The battery pack is
out of power.
Charge the battery
pack.
The system has re-
maining pressure.
1. Stop the ma-
chine.
2. Pull the gun
trigger on
spray wand to
release pres-
sure
3. Start the ma-
chine.
You do not use the
machine for a long
time.
Speak to a person
of an approved
service center.
There is remaining
friction in compo-
nents. You can
hear a hum.
1. Disconnect the
water supply.
2. Turn the ma-
chine on for 2
or 3 seconds.
3. Repeat the
above step for
several times.
There is no water. The water supply
is off.
Turn the water
supply on.
The garden hose is
blocked.
Make sure that the
garden hose is free
from blockage.
16 TECHNICAL DATA
Rated Voltage 60 V
Rated Pressure 1800 PSI
Rated Water Flow 1.0 GPM
Maximum Water Inlet Tem-
perature
104°F (40°C)
Weight(without battery pack) 17.6 Ibs (8 kg)
Battery pack model LB6025/LB605/LB604/
LB602 and other BAC series
Charger model CH60DP01/CH60R00/
CAC801 and other CAC
series
12
English
EN

17 LIMITED WARRANTY
Greenworks hereby warranties this product, to the original
purchaser with proof of purchase, for a period of four (4)
years against defects in materials, parts or workmanship.
Greenworks, at its own discretion will repair or replace any
and all parts found to be defective, through normal use, free
of charge to the customer. This warranty is valid only for
units which have been used for personal use that have not
been hired or rented for industrial/commercial use, and that
have been maintained in accordance with the instructions in
the owners’ manual supplied with the product from new.
ITEMS NOT COVERED BY WARRANTY:
1. Any part that has become inoperative due to misuse,
commercial use, abuse, neglect, accident, improper
maintenance, or alteration; or
2. The unit, if it has not been operated and/or maintained in
accordance with the owner's manual; or
3. Normal wear, except as noted below;
4. Routine maintenance items such as lubricants, blade
sharpening;
5. Normal deterioration of the exterior finish due to use or
exposure.
HELPLINE:
Warranty service is available by calling our toll-free helpline,
at 1-855-345-3934.
TRANSPORTATION CHARGES:
Transportation charges for the movement of any power
equipment unit or attachment are the responsibility of the
purchaser. It is the purchaser’s responsibility to pay
transportation charges for any part submitted for replacement
under this warranty unless such return is requested in writing
by Greenworks.
USA address:
Greenworks Tools
P.O. Box 1238
Mooresville, NC 28115
13
English
EN

18 EXPLODED VIEW
No. Part No. Qty Description
1 R0200316-00 1 Bucket handle
2 R0200317-00 1 Upper housing
3 R0200318-00 1 Lower housing
4 R0200319-00 1 Lock catch
5 R0200320-00 1 Water inlet connector
6 R0200321-00 1 Gun
7 R0200322-00 1 Nozzle
8 R0200323-00 1 Detergent tank
9 R0200324-00 1 Adapter
10 R0200325-00 1 High pressure hose
11 R0200326-00 1 Cleaning tool
14
English
EN
12
12 C1103056-00 1 Priming valve

1 Descripción.......................................16
1.1 Finalidad.......................................................... 16
1.2 Perspectiva general..........................................16
2 Introducción.....................................16
3 Advertencias generales de
seguridad para herramientas
eléctricas...........................................16
4 Símbolos en el producto..................18
5 Niveles de riesgo.............................. 19
6 Eliminación de batería segura
para el medio ambiente...................19
7 Propuesta 65.....................................19
8 Instalación........................................20
8.1 Desembalaje de la máquina............................. 20
8.2 Instalación de la varilla pulverizadora.............20
8.3 Instalación de la manguera de alta presión......20
8.4 Conexión del suministro de agua a la
máquina........................................................... 20
8.5 Instalación de la batería................................... 21
8.6 Retirada de la batería....................................... 21
9 Funcionamiento...............................22
9.1 Uso de la pistola pulverizadora....................... 22
9.2 Instalación de la boquilla.................................22
10 Instalación del depósito de
detergente.........................................23
11 Puesta en marcha de la máquina... 23
12 Detención de la máquina................ 23
13 Mantenimiento.................................24
13.1 Mantenimiento de la boquilla..........................24
14 Transporte y almacenamiento........24
14.1 Traslado de la máquina....................................24
14.2 Almacenamiento de la máquina...................... 24
15 Solución de problemas.................... 25
16 Datos técnicos.................................. 26
17 Garantía limitada............................26
18 Vista despiezada.............................. 27
15
Español
ES
1 DESCRIPCIÓN
1.1 FINALIDAD
La máquina se utiliza para limpiar vehículos, barcos,
edificios, porches, terrazas, patios y calzadas.
Indicada solo para el uso doméstico, no apta para el uso
profesional ni para funcionamiento a temperaturas superiores
a 32°F (0°C).
1.2 PERSPECTIVA GENERAL
1
4
7
6
5
2
3
1
Asa
2
Interruptor de
encendido
3
Salida de agua
4
Cubo
5
Hebilla del cubo
6
Base
7
Puerta de la batería
8
Varilla pulverizadora
9
Pistola pulverizadora
10
Gatillo de la pistola
11
Manguera de alta
presión
12
Adaptador
13
Acoplamiento de
entrada
14
Botón de seguridad
del gatillo
15
Manguera de jardín
16
Entrada de agua
17
Conector de entrada
de agua
18
Botón de desbloqueo
de la batería
19
Boquilla
20
Herramienta de
limpieza
21
Depósito de
detergente
2 INTRODUCCIÓN
Su producto ha sido diseñado y fabricado bajo criterios de
máxima fiabilidad, facilidad de funcionamiento y seguridad
del operario. Por lo tanto, si lo cuida como corresponde,
seguirá proporcionándole un rendimiento sólido y sin
contratiempos durante muchos años.
3 ADVERTENCIAS GENERALES
DE SEGURIDAD PARA
HERRAMIENTAS
ELÉCTRICAS
AVISO
Lea todas las advertencias de seguridad y todas las
instrucciones. El incumplimiento de las advertencias e
instrucciones puede provocar descargas eléctricas,
incendios o lesiones graves.
Guarde todas las advertencias e instrucciones para su consulta
posterior.
El término “herramienta eléctrica” empleado en las
advertencias se refiere a su herramienta eléctrica con
funcionamiento a batería (inalámbrica).
• Gracias a este manual conocerá las aplicaciones y
limitaciones de la máquina, así como los peligros
potenciales específicos relacionados con esta herramienta.
• Siga las instrucciones de mantenimiento especificadas en
este manual.
• Nunca utilice la máquina con las protecciones o cubiertas
retiradas o si han sufrido daños.
• No utilice la máquina bajo la influencia de drogas,
alcohol o cualquier medicamento.
• No lleve ropa suelta, guantes, corbatas o joyas. Pueden
quedar atrapados y arrastrarle hacia las piezas móviles.
• Se recomienda el uso de guantes de goma y calzado
antideslizante cuando trabaje al aire libre. Lleve también
una protección capilar para sujetar el cabello largo. Lleve
calzado que proteja los pies y mejore el agarre en
superficies resbaladizas.
• Asimismo, siempre debe llevar gafas de seguridad con
protectores laterales.
• No se estire ni se suba sobre un soporte inestable.
Mantenga en todo momento una postura adecuada y el
equilibrio.
• No incline en exceso la unidad.
AVISO
Riesgo de explosión – No pulverice líquidos inflamables.
AVISO
El agua que ha atravesado los dispositivos de prevención de
reflujo se considera no potable.
AVISO
No utilice el aparato si hay daños en una batería o en piezas
importantes.
AVISO
Para las máquinas que funcionan a batería, apague siempre
el interruptor y retire la batería del aparato cuando deje la
máquina desatendida.
AVISO
Los chorros a alta presión pueden ser peligrosos si se
utilizan incorrectamente. El chorro no debe dirigirse a
personas, animales, dispositivos eléctricos ni a la propia
máquina.
16
Español
ES

AVISO
Este aparato se ha diseñado para su uso con el producto de
limpieza suministrado o recomendado por el fabricante. El
uso de otros productos de limpieza o sustancias químicas
puede afectar negativamente a la seguridad del aparato.
AVISO
No utilice el aparato dentro del alcance de personas a menos
que lleven indumentaria protectora.
• No dirija el chorro contra usted ni otras personas para
limpiar ropa o calzado.
• Retire la batería antes de llevar a cabo el mantenimiento
del usuario.
• Para garantizar la seguridad del aparato, utilice
únicamente piezas de repuesto originales del fabricante o
aprobadas por el fabricante.
AVISO
Para reducir el riesgo de electrocución, mantenga todas las
conexiones secas y alejadas del suelo.
• Para reducir el riesgo de lesiones, la máquina no debe ser
utilizada por niños o personal sin formación. Mantenga
alejados a los niños y transeúntes. Todos los transeúntes
deben llevar gafas de seguridad y mantenerse a una
distancia segura de la zona de trabajo.
Este aparato no debe ser utilizado por personas (niños
incluidos) con una discapacidad física, sensorial o mental, o
que no tengan experiencia ni conocimientos, a menos que
hayan recibido supervisión o instrucción sobre el uso del
aparato por una persona responsable de su seguridad.
Supervise siempre a los niños para asegurarse de que no
jueguen con el aparato.
• Utilice el producto correcto. No fuerce el producto o el
accesorio para hacer un trabajo para el que no se ha
diseñado. No lo utilice para un fin distinto al previsto.
• Utilice únicamente los accesorios recomendados. La
utilización de accesorios inadecuados puede dar lugar a
un riesgo de lesiones.
• Nunca deje el producto desatendido cuando esté en
marcha. Apague la alimentación. No deje el producto
hasta que se haya detenido totalmente.
• Mantenga el motor limpio de hierba, hojas o grasa para
reducir el riesgo de incendio.
• Mantenga el producto seco, limpio y sin restos de aceite y
grasa. Para la limpieza utilice siempre un paño limpio.
Nunca utilice líquidos de frenos, gasolina, productos a
base de petróleo o cualquier otro disolvente para limpiar
el producto.
• Compruebe la zona de trabajo antes de cada uso. Retire
todos los objetos, como piedras, trozos de cristal, clavos,
alambres o cuerdas que puedan salir despedidos o
enredarse en la máquina.
• No utilice el producto si el interruptor no lo apaga. Los
interruptores defectuosos deben ser sustituidos por un
centro de servicio autorizado.
• Evite los entornos peligrosos. No exponga a la lluvia.
Mantenga bien iluminada la zona de trabajo.
• Antes de iniciar cualquier operación de limpieza, cierre
las puertas y las ventanas. La zona a limpiar debe estar
libre de residuos, juguetes, mobiliario de exterior u otros
objetos que puedan suponer un peligro.
• Mantenga el motor alejado de materiales inflamables y
otros materiales peligrosos.
• Compruebe que los pernos y las tuercas no estén flojos
antes de cada uso. Un perno o una tuerca que se ha
aflojado puede producir problemas graves en el motor.
• Deje que el motor se enfríe antes de almacenar.
• Cuando realice tareas de servicio, utilice únicamente
piezas de repuesto idénticas. El uso de cualquier otra
pieza puede generar un riesgo o producir daños en el
producto.
• Utilice ÚNICAMENTE agua fría.
• Asegúrese de que los materiales combustibles se
mantengan alejados un mínimo de 3 pies (1 metro).
• Sostenga la pistola y la varilla firmemente con ambas
manos.
• No debe sorprenderle que la pistola se mueva al apretar el
gatillo debido a las fuerzas de reacción. En caso de
sorpresa podría perder el control y provocar lesiones a
usted mismo y a otras personas.
• Evite el arranque accidental. Asegúrese de que el
interruptor esté en la posición de apagado antes de
conectar a la batería y al coger o transportar el aparato. El
transporte del aparato con el dedo en el interruptor o la
conexión de un aparato que tiene el interruptor activado
fomenta los accidentes.
• Desconecte la batería del aparato antes de realizar ajustes,
cambiar accesorios o almacenarlo. Estas medidas de
seguridad preventivas reducen el riesgo de que el aparato
se ponga en marcha accidentalmente.
• Para uso únicamente con el cargador CH60DP01/
CH60R00/CAC801 y otras series CAC.
• Para uso únicamente con la batería LB6025/LB605/
• Cuando la batería no esté en uso, manténgala alejada de
otros objetos metálicos como clips, monedas, llaves,
clavos, tornillos u otros objetos metálicos pequeños que
puedan hacer una conexión entre los terminales. El
cortocircuito de los terminales de la batería puede
provocar quemaduras o un incendio.
• No utilice una batería o un aparato que haya sufrido
daños o modificaciones. Las baterías dañadas o
modificadas pueden exhibir un comportamiento
impredecible que puede dar lugar a un incendio, una
explosión o un riesgo de lesiones.
• No exponga una batería o un aparato al fuego ni a
temperaturas excesivas. La exposición al fuego o a una
temperatura superior a 265°F (130°C) puede provocar
una explosión.
17
Español
ES
LB604/LB602 y otras series BAC.
• Siga todas las instrucciones de carga y no cargue la
batería o el aparato fuera del intervalo de temperatura
especificado en las instrucciones. La carga incorrecta o a
temperaturas fuera del intervalo especificado puede dañar
la batería y aumentar el riesgo de incendio.
• Solicite a un técnico de reparación cualificado que realice
las tareas de servicio utilizando únicamente piezas de
repuesto idénticas. Esto garantizará el mantenimiento de
la seguridad del producto.
• No modifique ni intente reparar el aparato o la batería
(según corresponda), excepto lo indicado en las
instrucciones de uso y cuidado.
• Recargue solo con el cargador especificado por el
fabricante. Un cargador adecuado para un tipo de batería
puede dar lugar a un riesgo de incendio cuando se usa con
otra batería.
• Utilice los aparatos únicamente con las baterías
designadas especialmente. El uso de cualquier otra batería
puede dar lugar a un riesgo de lesiones e incendio.
• El intervalo de temperatura ambiente recomendado:
Elemento Temperatura
Intervalo de tem-
peratura de alma-
cenamiento del
aparato
-4°F (-20°C) - 158°F (70°C)
Intervalo de tem-
peratura de funcio-
namiento del apar-
ato
32°F (0°C) - 104°F (40°C)
Intervalo de tem-
peratura de carga
de la batería
39°F (4°C) - 113°F (40°C)
Intervalo de tem-
peratura de funcio-
namiento del car-
gador
39°F (4°C) - 113°F (40°C)
Intervalo de tem-
peratura de alma-
cenamiento de la
batería
1 año: 32°F (0°C) - 73°F (23°C)
3 mes: 32°F (0°C) - 113°F (45°C)
1 mes: 32°F (0°C) - 140°F (60°C)
Intervalo de tem-
peratura de descar-
ga de la batería
6,8°F (-14°C) - 113°F (45°C)
• Conserve estas instrucciones. Consúltelas con frecuencia
y utilícelas para instruir a otros usuarios. Si presta este
producto a otra persona, también debe prestarle estas
instrucciones.
AVISO
Las mangueras, los racores y los acoplamientos de alta
presión son importantes para la seguridad del aparato.
Utilice únicamente mangueras, racores y acoplamientos
recomendados por el fabricante.
4 SÍMBOLOS EN EL PRODUCTO
En esta herramienta pueden utilizarse algunos de los
siguientes símbolos. Le rogamos que los estudie y aprenda su
significado. La interpretación correcta de estos símbolos le
permitirá manejar la herramienta mejor y de manera más
segura.
Símbolo Explicación
Para reducir el riesgo de lesiones, el
usuario debe leer y entender el man-
ual del operario antes de utilizar este
producto.
No exponga el producto a la lluvia o
a condiciones de humedad.
Lleve protección ocular.
Para reducir el riesgo de inyección o
lesión, nunca dirija un chorro de agua
hacia personas o animales, ni coloque
ninguna parte del cuerpo delante del
chorro. Las fugas en las mangueras y
los racores también pueden provocar
lesiones por inyección. No sujete las
mangueras ni los racores.
Para reducir el riesgo de lesiones por
retroceso, sujete firmemente la lanza
con ambas manos cuando la máquina
esté encendida.
Si no se utiliza en condiciones secas
y no se respetan prácticas seguras,
pueden producirse descargas eléctri-
cas.
El combustible y sus vapores son ex-
plosivos y pueden producir quemadu-
ras graves o incluso la muerte.
¡Advertencia! Nunca apunte la pisto-
la hacia personas, animales, el cuerpo
de la máquina, la fuente de alimenta-
ción o cualquier aparato eléctrico.
El aparato no es adecuado para la
conexión a la red de agua potable sin
un dispositivo de prevención de reflu-
jo.
Utilice la plataforma de limpieza úni-
camente sobre superficies planas y
horizontales. Nunca levante la plata-
forma de limpieza de la superficie de
limpieza mientras esté utilizando el
limpiador a presión.
18
Español
ES
Símbolo Explicación
Mantenga las manos y los pies aleja-
dos de la plataforma de limpieza
mientras el limpiador a presión esté
en funcionamiento.
5 NIVELES DE RIESGO
Las siguientes indicaciones y significados tienen como fin
explicar los niveles de riesgo asociados a este producto.
SÍMBO-
LO
INDICACIÓN SIGNIFICADO
PELIGRO Indica una situación de peli-
gro inminente que, de no evi-
tarse, provocará lesiones
graves o incluso la muerte.
ADVERTEN-
CIA
Indica una situación de peli-
gro potencial que, de no evita-
rse, podría provocar lesiones
graves o incluso la muerte.
PRECAUCIÓN Indica una situación de peli-
gro potencial que, de no evita-
rse, puede provocar lesiones
leves o moderadas.
PRECAUCIÓN (Sin símbolo de alerta sobre
seguridad) Indica una situa-
ción que puede provocar da-
ños materiales.
6 ELIMINACIÓN DE BATERÍA
SEGURA PARA EL MEDIO
AMBIENTE
Los materiales tóxicos y corrosivos que figuran a
continuación se encuentran en las baterías utilizadas en esta
máquina: Ion de litio, un material tóxico.
AVISO
Deseche todos los materiales tóxicos de una manera
especificada para evitar la contaminación del medio
ambiente. Antes de desechar una batería de ion de litio
dañada o agotada, contacte con la agencia local de
eliminación de residuos o con la agencia de protección
ambiental local para obtener información e instrucciones
específicas. Lleve las baterías a un centro de reciclaje o
eliminación local, certificado para la eliminación de ion de
litio.
AVISO
Si la batería se agrieta o se rompe, con o sin fugas, no la
recargue ni la utilice. Deséchela y sustitúyala por una
batería nueva. ¡NO INTENTE REPARARLA! Para evitar
lesiones y riesgos de incendio, explosión o descarga
eléctrica, y para evitar daños al medio ambiente:
• Cubra los terminales de la batería con cinta adhesiva
resistente.
• NO intente retirar o destruir ninguno de los
componentes de la batería.
• NO intente abrir la batería.
• Si se produce una fuga, los electrolitos liberados son
corrosivos y tóxicos. NO deje que la solución entre en
contacto con los ojos o la piel, y no la ingiera.
• NO deseche estas baterías con la basura doméstica
normal.
• NO incinere.
• NO lleve las baterías a lugares donde formarán parte de
vertederos de residuos o flujos de residuos sólidos
urbanos.
• Llévelas a un centro de reciclaje o eliminación
certificado.
7 PROPUESTA 65
AVISO
Este producto contiene una sustancia química conocida en
el estado de California como causante de cáncer, defectos
de nacimiento u otros daños reproductivos. El polvo
generado por el lijado eléctrico, el serrado, el esmerilado, la
perforación y otras actividades de construcción contiene
sustancias químicas que se sabe que son causantes de
cáncer, defectos de nacimiento u otros daños reproductivos.
Algunos ejemplos de estas sustancias químicas son:
• Plomo de pinturas con base de plomo;
• Sílice cristalina de ladrillos y cemento y otros productos
de albañilería;
• Arsénico y cromo de la madera tratada químicamente.
El riesgo de exposición a estas sustancias químicas varía
según la frecuencia con la que realice este tipo de trabajo.
Para reducir su exposición a estas sustancias químicas,
trabaje en una zona bien ventilada y trabaje con equipos de
seguridad aprobados, como máscaras antipolvo, que estén
especialmente diseñadas para filtrar partículas
microscópicas.
Conserve estas instrucciones.
19
Español
ES
8 INSTALACIÓN
8.1 DESEMBALAJE DE LA MÁQUINA
AVISO
Asegúrese de montar correctamente la máquina antes del
uso.
AVISO
• Si las piezas de la máquina presentan daños, no utilice
la máquina.
• Si no tiene todas las piezas, no utilice la máquina.
• Si faltan piezas o hay piezas dañadas, contacte con el
centro de servicio.
1. Abra el embalaje.
2. Lea la documentación que se proporciona en la caja.
3. Retire todas las piezas sin montar de la caja.
4. Retire la máquina de la caja.
5. Deseche la caja y el material de embalaje de conformidad
con los reglamentos locales.
8.2 INSTALACIÓN DE LA VARILLA
PULVERIZADORA
10
8
9
14
1. Introduzca el extremo de la varilla pulverizadora (8) en la
empuñadura de la pistola (9).
2. Gire la varilla pulverizadora (8) en sentido horario hasta
que las pestañas se bloqueen en su posición.
3. Asegúrese de que el desbloqueo del gatillo (14) esté en la
posición desbloqueada.
AVISO
Asegúrese de que la conexión no tenga fugas.
8.3 INSTALACIÓN DE LA MANGUERA
DE ALTA PRESIÓN
11
13
11
1. Introduzca un extremo de la manguera de alta presión
(11) en el acoplamiento de entrada (13).
2. Antes de instalar la manguera de alta presión incluida
(11), enrosque la válvula de cebado en la salida del
limpiador a presión y gire en sentido horario hasta que
quede apretada.
3. Una vez instalada, enrosque un extremo de la manguera
de alta presión incluida y apriete en la válvula.
AVISO
• Es normal que salgan pequeñas cantidades de agua de la
válvula de cebado del limpiador a presión. Esto es
necesario para purgar el aire del sistema.
8.4 CONEXIÓN DEL SUMINISTRO DE
AGUA A LA MÁQUINA
La máquina funciona únicamente cuando hay agua en el cubo
o la base está conectada a un suministro de agua. Cuando no
haya agua conectada, pulse el interruptor de encendido para
detener la máquina.
8.4.1 CONEXIÓN DEL SUMINISTRO DE
AGUA A LA MÁQUINA
AVISO
• El suministro de agua debe provenir de la red de
abastecimiento de agua
• No utilice agua caliente
• No utilice agua de estanques o lagos
AVISO
Siga los reglamentos locales cuando conecte la manguera de
jardín al suministro de agua. Normalmente se permite la
conexión directa a través de un depósito receptor o un
dispositivo de prevención de reflujo.
20
Español
ES
PRECAUCIÓN
Inspeccione el filtro en el conector de entrada de agua antes
de conectar la manguera de jardín
• Si el filtro está dañado, no utilice la máquina hasta que
sustituya el filtro.
• Limpie el filtro si está sucio.
15
16
12
1. Desenrolle la manguera de jardín (15) (no se incluye).
2. Adaptador de rosca (12) a la manguera de jardín macho
(15).
3. Tire hacia atrás del collarín adaptador y fije en el
conector macho (16) de la máquina.
4. Desconecte el suministro de agua.
5. Deje que el agua fluya por la manguera de jardín (15)
durante 30 segundos.
PRECAUCIÓN
Debe haber un mínimo de 10 pies (3 m) de manguera libre
entre la entrada de agua y el suministro de agua.
8.4.2 INSTALACIÓN DEL CUBO
1. Añada agua al cubo (4).
4
2. Alinee el conector de entrada de agua (17) con la entrada
de agua (16).
17
16
3. Instale el cubo (4) en la base.
4. Levante y empuje hacia abajo la hebilla del cubo para
fijar el cubo (4) en la base.
AVISO
Tire de la hebilla del cubo para desbloquear el cubo.
8.5 INSTALACIÓN DE LA BATERÍA
18
AVISO
• Si la batería o el cargador ha sufrido daños, sustituya la
batería o el cargador.
• Detenga la máquina y espere hasta que el motor se pare
antes de instalar o retirar la batería.
• Debe leer, conocer y seguir las instrucciones del manual
de la batería y el cargador.
1. Abra la puerta de la batería.
2. Alinee las nervaduras de elevación de la batería con las
ranuras del compartimento de la batería.
3. Introduzca la batería en el compartimento de la batería
hasta que encaje en su posición.
4. Cuando escuche un clic, la batería está instalada.
5. Cierre la puerta de la batería.
8.6 RETIRADA DE LA BATERÍA
1. Abra la puerta de la batería.
21
Español
ES
2. Pulse y mantenga pulsado el botón de desbloqueo de la
batería (18).
3. Retire la batería de la máquina.
9 FUNCIONAMIENTO
AVISO
Asegúrese de que todas las conexiones estén apretadas y no
tengan fugas antes del funcionamiento.
9.1 USO DE LA PISTOLA
PULVERIZADORA
AVISO
Para un control seguro, mantenga las manos en la pistola
pulverizadora y la varilla en todo momento.
• Apriete y mantenga apretado el gatillo de la pistola
pulverizadora (10) para poner en marcha la máquina.
• Suelte el gatillo de la pistola pulverizadora (10) para
detener el flujo de agua por la boquilla (19).
9.1.1 DESBLOQUEO DEL GATILLO DE LA
PISTOLA
• Empuje hacia atrás el botón de seguridad del gatillo (14).
9.1.2 BLOQUEO DEL GATILLO DE LA
PISTOLA
• Empuje hacia delante el botón de seguridad del gatillo
(14).
9.2 INSTALACIÓN DE LA BOQUILLA
20
19
AVISO
Antes de cambiar la boquilla:
1. Apriete el gatillo de la pistola pulverizadora (10) para
liberar la presión de agua.
2. Bloquee el botón de seguridad del gatillo (14) en la
pistola.
3. Pare la máquina.
AVISO
No apunte la varilla pulverizadora (8) hacia su propia cara o
la de otras personas.
1. Tire hacia atrás del collarín de conexión rápida de la
varilla pulverizadora (8).
2. Instale la boquilla (19) en la varilla pulverizadora (8).
3. Suelte el collarín de conexión rápida para fijar la boquilla
(19).
9.2.1 TIPO DE BOQUILLA
PUNTA DE
PULVERIZA-
CIÓN
APLICACIÓN
15
O
Amarillo - Punta en abanico estrecha
(15°)
• La punta amarilla del limpiador a
presión ofrece una gran versatilidad
con su punta en ángulo de 15 grados.
Se la denomina punta de lavado, por-
que proporciona la presión adecuada
para eliminar la suciedad de las su-
perficies, pero se ha diseñado para no
dañar numerosas superficies. Esta
punta del limpiador a presión se ha
diseñada para "barrer" el follaje o los
residuos dado su amplio ángulo. Esta
punta es versátil gracias a su amplia
zona de limpieza y aplicación de
fuerte presión.
40
O
Blanca - Punta en abanico ancha (40°)
• La punta blanca de 40 grados, de-
nominada punta "en abanico", genera
la zona más amplia de limpieza con
una presión relativamente baja. Esta
punta del limpiador a presión es idó-
nea para aplicaciones de limpieza li-
gera o delicada. Se recomienda para
la limpieza ligera en cubiertas de ma-
dera y otras superficies suaves o deli-
cadas.
22
Español
ES
10 INSTALACIÓN DEL DEPÓSITO
DE DETERGENTE
9
AVISO
No utilice detergentes domésticos, ácidos, alcalinos, lejías,
disolventes, materiales inflamables o soluciones para uso
industrial que puedan dañar la bomba.
AVISO
Siga las instrucciones de la botella de solución para preparar
el detergente.
NOTA
En caso necesario, utilice un embudo para evitar el derrame
de detergente. Limpie y seque el detergente derramado
durante el llenado.
1. Ponga el detergente en el depósito de detergente (21).
2. Instale el depósito de detergente en la pistola
pulverizadora (9).
3. Gire la pistola pulverizadora en sentido antihorario (9)
para apretar.
NOTA
No deje que el detergente se seque sobre la superficie para
evitar trazas.
11 PUESTA EN MARCHA DE LA
MÁQUINA
PRECAUCIÓN
No utilice sin el suministro de agua conectado.
PRECAUCIÓN
Antes de poner en marcha la máquina:
1. Conecte el suministro de agua.
2. Apriete el gatillo de la pistola pulverizadora (10) para
liberar la presión de aire.
3. Cuando observe un chorro de agua estable, suelte el
gatillo de la pistola (10).
1. Sitúe el interruptor de encendido en la posición de
encendido ( | ).
2. Apriete el gatillo de la pistola pulverizadora (10).
12 DETENCIÓN DE LA MÁQUINA
1. Suelte el gatillo de la pistola pulverizadora (10).
2. Sitúe el interruptor de encendido en la posición “OFF”
(O).
AVISO
Si no utiliza la máquina:
• Detenga la máquina.
• Desconecte el suministro de agua.
• Retire la batería.
• Apriete el gatillo de la pistola pulverizadora (10) para
liberar la presión restante de la máquina.
• Bloquee el botón de seguridad del gatillo (14).
23
Español
ES
21
13 MANTENIMIENTO
PRECAUCIÓN
No permita que líquidos de frenos, gasolina y otros
derivados del petróleo toquen las piezas de plástico. Las
sustancias químicas pueden dañar el plástico y hacer que
quede inservible.
PRECAUCIÓN
No utilice disolventes o detergentes fuertes en la carcasa o
los componentes de plástico.
AVISO
Retire la batería de la máquina antes de realizar tareas de
mantenimiento.
13.1 MANTENIMIENTO DE LA
BOQUILLA
20
19
Si hay demasiada presión de la bomba, la boquilla puede
obstruirse y puede sentirse una sensación de pulsación
mientras aprieta el gatillo de la pistola.
13.1.1 RETIRADA DE LA BOQUILLA
1. Retire la boquilla (19) de la varilla pulverizadora (8).
13.1.2 LIMPIEZA DE LA BOQUILLA
1. Utilice un clip de papel recto o la herramienta de limpieza
(20) para limpiar la punta de pulverización.
2. Elimine y limpie los materiales no deseados de la
boquilla (19) con la manguera de jardín (15).
3. Instale la boquilla limpia (19) en la varilla pulverizadora
(8).
14 TRANSPORTE Y
ALMACENAMIENTO
AVISO
Retire la batería de la máquina antes del transporte y el
almacenamiento.
14.1 TRASLADO DE LA MÁQUINA
• Apunte la varilla pulverizadora en una dirección segura.
• Sujete la máquina únicamente por la empuñadura.
14.2 ALMACENAMIENTO DE LA
MÁQUINA
AVISO
Asegúrese de que la pistola, la manguera de alta presión y la
bomba estén secas.
AVISO
Asegúrese de que los niños no puedan acercarse a la
máquina.
NOTA
Utilice un protector de bomba recomendado para evitar
daños por el frío durante el almacenamiento en invierno.
• Desconecte la manguera de jardín de la máquina.
• Enrolle la manguera de alta presión.
• Limpie la carcasa y los componentes de plástico con un
paño húmedo y suave.
• Asegúrese de que la máquina no tenga piezas sueltas o
dañadas. Si es necesario, siga estos pasos/estas
instrucciones:
• sustituya las piezas dañadas.
• apriete los pernos.
• hable con una persona de un centro de servicio
aprobado.
• Almacene la máquina en un lugar seco, aislado y donde
no hiele.
24
Español
ES

15 SOLUCIÓN DE PROBLEMAS
PROBLEMA POSIBLE CAU-
SA
SOLUCIÓN
El motor no se
pone en marcha.
El interruptor de
encendido está de-
sconectado.
Sitúe el interruptor
de encendido en la
posición “ON”
( | ).
No ha instalado la
batería.
Instale la batería.
El interruptor de
encendido está ac-
tivado, pero no ha
apretado el gatillo
de la pistola.
Apriete el gatillo
de la pistola.
La máquina no al-
canza alta presión.
El diámetro de la
manguera de jar-
dín es demasiado
pequeño.
Sustituya por una
manguera de jar-
dín de 1” (25 mm)
o 5/8” (16 mm).
La manguera de
jardín está obstrui-
da.
Asegúrese de que
la manguera de
jardín no tenga
ninguna obstruc-
ción.
El suministro de
agua es insufi-
ciente.
Abra totalmente el
suministro de
agua.
No ha instalado la
boquilla en la var-
illa pulverizadora.
Instale la boquilla
en la varilla pul-
verizadora.
El filtro de entrada
de agua está ob-
struido.
Limpie el filtro
con agua templa-
da.
PROBLEMA POSIBLE CAU-
SA
SOLUCIÓN
La presión de sali-
da varía entre alta
y baja.
El suministro de
agua es insufi-
ciente.
Abra totalmente el
suministro de
agua. Asegúrese
de que la man-
guera de jardín no
está obstruida.
La bomba absorbe
aire.
1. Asegúrese de
que las man-
gueras y los
racores no ten-
gan daños.
2. Apague la má-
quina.
3. Apriete el ga-
tillo de la pis-
tola hasta que
salga un flujo
estable de
agua por la bo-
quilla.
El filtro de entrada
de agua está ob-
struido.
Limpie el filtro
con agua templa-
da.
La batería se ha
agotado.
Cargue la batería.
La pistola, la man-
guera o la boquilla
están calcificadas.
Haya funcionar
con vinagre desti-
lado en el depósito
de detergente.
25
Español
ES

PROBLEMA POSIBLE CAU-
SA
SOLUCIÓN
El motor zumba,
pero no puede po-
ner en marcha la
máquina.
La batería se ha
agotado.
Cargue la batería.
Queda presión en
el sistema.
1. Detenga la
máquina.
2. Apriete el ga-
tillo de la pis-
tola en la var-
illa pulveriza-
dora para lib-
erar la presión
3. Ponga en
marcha la má-
quina.
No ha utilizado la
máquina durante
un periodo de
tiempo prolonga-
do.
Hable con una per-
sona de un centro
de servicio apro-
bado.
Queda fricción en
los componentes.
Se escucha un
zumbido.
1. Desconecte el
suministro de
agua.
2. Encienda la
máquina du-
rante 2 o 3 se-
gundos.
3. Repita el paso
anterior varias
veces.
No hay agua. El suministro de
agua está desco-
nectado.
Conecte el sumi-
nistro de agua.
La manguera de
jardín está obstrui-
da.
Asegúrese de que
la manguera de
jardín no tenga
ninguna obstruc-
ción.
16 DATOS TÉCNICOS
Tensión nominal 60 V
Presión nominal 1800 PSI
Caudal nominal de agua 1.0 GPM
Temperatura máxima de en-
trada de agua
104°F (40°C)
Peso (sin batería) 17.6 Ibs (8 kg)
Modelo de batería LB6025/LB605/LB604/
LB602 y otras series BAC
Modelo de cargador CH60DP01/CH60R00/
CAC801 y otras series CAC
17 GARANTÍA LIMITADA
Por la presente Greenworks garantiza este producto, al
comprador original con el comprobante de compra, durante
un periodo de cuatro (4) años frente a defectos en materiales,
piezas o mano de obra. A su entera discreción Greenworks
reparará o sustituirá cualquiera y todas las piezas que resulten
ser defectuosas, con un uso normal, sin coste alguno para el
cliente. Esta garantía es válida únicamente para unidades que
se hayan utilizado para uso personal que no han sido
arrendadas o alquiladas para uso industrial/comercial y cuyo
mantenimiento se ha realizado de acuerdo con las
instrucciones del manual del propietario suministrado con el
producto nuevo.
ARTÍCULOS NO CUBIERTOS POR LA GARANTÍA:
1. Cualquier pieza que no funcione debido a mal uso, uso
comercial, abuso, negligencia, accidente, mantenimiento
inadecuado o alteración; o
2. La unidad, si no ha sido utilizada o mantenida de acuerdo
con el manual del propietario; o
3. Desgaste normal, excepto en lo indicado a continuación;
4. Artículos de mantenimiento de rutina tales como
lubricantes, afilado de cuchillas;
5. Deterioro normal del acabado exterior debido al uso o la
exposición.
LÍNEA DE ASISTENCIA TELEFÓNICA:
Puede contactar con el servicio de garantía llamando a
nuestra línea de asistencia telefónica gratuita, a
1-855-345-3934.
COSTES DE TRANSPORTE:
Los costes de transporte por el desplazamiento de cualquier
unidad o accesorio de equipos eléctricos son responsabilidad
del comprador. Es responsabilidad del comprador pagar los
costes de transporte de cualquier pieza enviada para su
sustitución bajo esta garantía, a menos que dicha devolución
sea solicitada por escrito por Greenworks.
Dirección en EE.UU.:
Greenworks Tools
P.O. Box 1238
Mooresville, NC 28115
26
Español
ES
18 VISTA DESPIEZADA
Nº Nº pieza Cant. Descripción
1 R0200316-00 1 Asa del cubo
2 R0200317-00 1 Carcasa superior
3 R0200318-00 1 Carcasa inferior
4 R0200319-00 1 Cierre de bloqueo
5 R0200320-00 1 Conector de entrada de agua
6 R0200321-00 1 Pistola
7 R0200322-00 1 Boquilla
8 R0200323-00 1 Depósito de detergente
9 R0200324-00 1 Adaptador
10 R0200325-00 1 Manguera de alta presión
11 R0200326-00 1 Herramienta de limpieza
27
Español
ES
12
12 C1103056-00 1 Válvula de cebado

