
www.SQUATZ.com
2
Before use, please read this manual carefully to ensure correct operation.
KEEP THIS MANUAL FOR FUTURE REFERENCE.
Features:
• Easy to Use and Easy to Store
• Foldable Cushions and Foldable Bench
• Space Saver Workout Station Machine
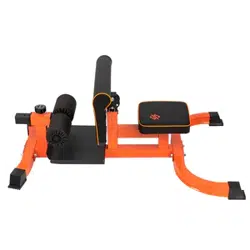
• Design to Train Abs, Thighs, and Glutes
• Help to Build Muscle, Strength, Balance, Durability, and Flexibility
• Made of Premium and Quality Material
• Made of Heavy-Duty Steel Main Frame
• Adjustable Foam Foot Holder
• Comfortable and Adjustable Rear Cushion for Feet and Legs
• Large Steel Non-Slip Footplate
• Adjustable Design Workout Station that Fits Dierent Body Shapes
What’s in the Box:
• Maine Frame
• Front Foot
• Hind Foot
• Cushion
• Pedal
• Fist Plate
• (2) Foam
• Seat Adjustment Rod
• Fist Plate Adjustment Rod
Technical Specs:
• Construction Material: Steel Tube
• Weight Capacity: 440.9 Lbs.
• Item Weight: 27.5 Lbs.
• Product Dimensions (L x W x H): 42.5" x 28" x 22" -inches
• Foam Adjustment Rod
• (3) Elastic Latch
• (4) Screw (10x70)
• (4) Nut
• (8) Gasket
• (12) Screw (8x20)
• (12) Gasket
• Bolt
THIS PRODUCT COMES WITH A COMPLETE DIGITAL TRAINING PROGRAM!
DOWNLOAD THE SQUATZ APP TO START TRAINING!

www.SQUATZ.com
3
PARTS IDENTIFICATION
1. Main Frame 2. Front foot
3. Hind foot 4. Cushion 5. Pedal 6. Fist plate
7. Foam (*2) 8. Seat adjustment rod 9. Fist plate adjustment rod
10. Foam adjustment rod 11. Elastic latch (*3)
a. screw (10*70)*4 / gasket*8 / nut*4 b. Screw(8*20)*12/ gasket*12 c. Bolt

3
2
www.SQUATZ.com
4
ASSEMBLY INSTRUCTIONS
1. Install the pedal 5 on main frame 1,assemble and x with screw and gasket.
2. Install front foot 2and hind foot 3on main frame1respectively, assemble
and x with screw, gasket and nut.
Attention: The curved front and hind foot face the outside of the main frame.
1
5
b x4
a x2 a x2

www.SQUATZ.com
5
3. A: Assemble the seat adjustment rod8 and cushion4using screw and gasket.
B: Insert the assembled seat adjustment rod into the main frame1,turn the
elastic latch clockwise into the seat adjustment rod to x.
4. A: Assemble the st plate adjustment rod 9 and st plate 6 using screw and
gasket.
B: Inset the assembled st plate adjustment rod into the main frame 1 turn
the elastic latch clockwise into the st plate adjustment rod to x.
11
(Rotate counterclockwise 3-4
circles,pull the latch outward,
the st adjustment rod can be
adjusted up and down, turn the
latch clockwise to lock and x.
8
4
b
A
11
B
6
9
b
(Rotate counterclockwise 3-4 circles, pull the
latch outward, the seat adjustment rod can
be adjusted up and down, turn the latch
clockwise to lock and x.)
B
A

www.SQUATZ.com
6
11
(Rotate counterclockwise 3-4 circles,pull the
latch outward, the foam adjustment rod can be
adjusted up and down, turn the latch clockwise
to lock and x.
5. A: Put the foam 7 into the foam rod 10.
B: Insert the assembled foam adjustment rod into the main frame 1,turn the
elastic latch clockwise into the foam adjustment rod.
6. Insert the bolt into the st plate adjustment rod, dierent positions can
adjust the gradient of the st plate.
7
10
A
B
c

www.SQUATZ.com
7