USER MANUAL
HOMEVIZ Robotic Vacuum Cleaner G1
V1.0

CONTENTS
WHAT'S IN THE BOX
PRODUCT INTRODUCTION
INSTALLATION INSTRUCTIONS
OPERATION INSTRUCTIONS
DAILY CARE
BASIC PARAMETERS
TROUBLESHOOTING
COMMON PROBLEMS
SPECIAL PROMPTS
SERVICE RESTRICTION
CONTACT US
01
02
05
09
16
22
23
24
25
25
28
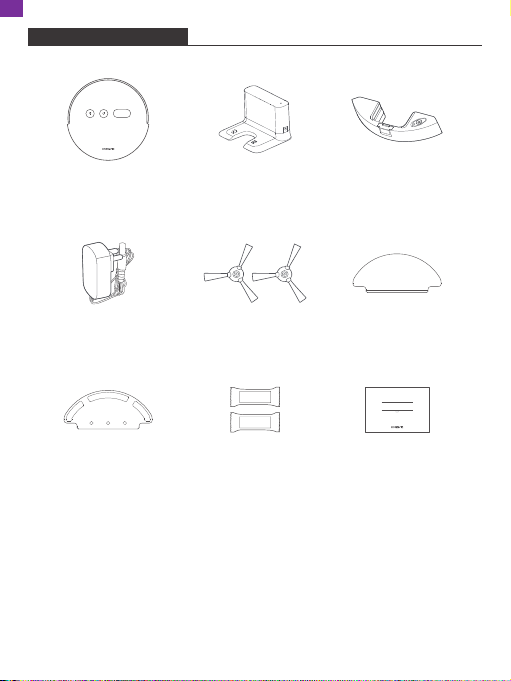
WHAT'S IN THE BOX
Quick Start Guide
HOMEVIZ Robotic Vacuum Cleaner G1
V1.0
Main Device *1 Charging Base *1 Water Tank *1
Adapter *1 Side Brush *2
Rag Holder Board *1 Aroma Stick *2
Rag *2
Before using the product, please check whether the package contains the
following items, if there is any loss, please contact customer service.
Quick Start Guide *1
1
EN
PRODUCT INTRODUCTION
1
1
2
3
4
4
3
4
2
3
4
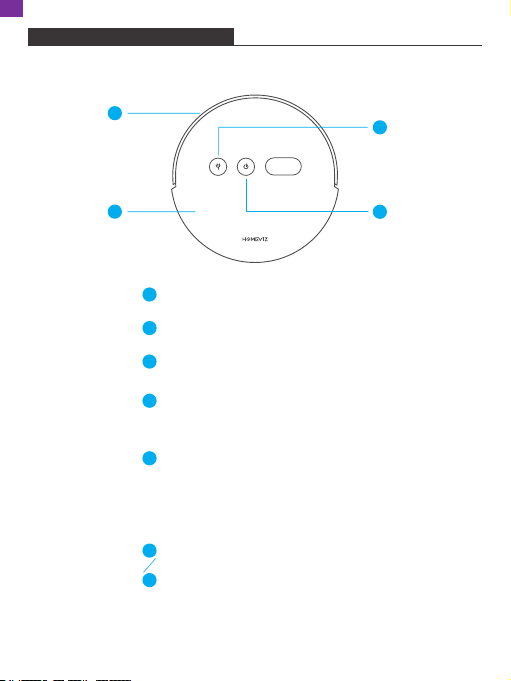
Auto-recharge Button
Short Press: start the auto-recharge.
Power on, off/Whole House Cleaning
Short Press: Start/Stop Cleaning
Long Press: hold for 3 seconds for power on/off
· Main Device
Front Bumper
Top Cover
Power Indicator Lamp Color
Steady white light: works normally
White light blinking: enter the network configuration mode
Yellow light blinking: recharging/low battery
Yellow light breathing: charging
Red light blinking: error state
Network Configuration
In the power-on state, press and hold “Smart
Recharge”+”Power on/off” at the same time
for 3 seconds to enter the network
configuration.
2
EN
7
9
5
1
2
5
4
6
8
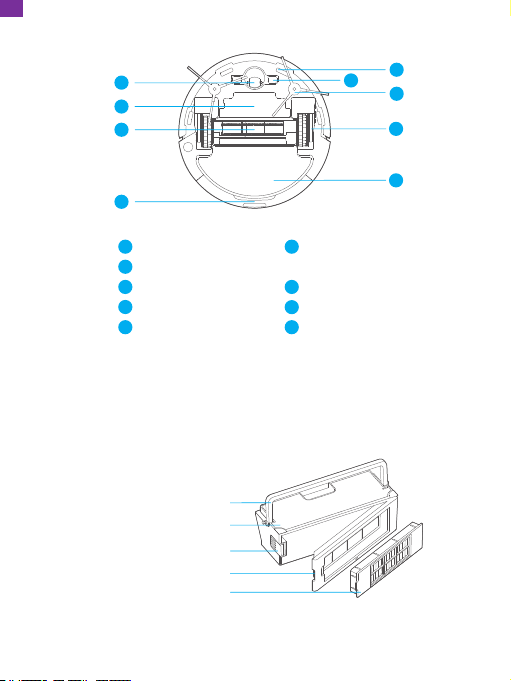
· Dust Bin Components
1
2
3
4
5
Universal Wheel
Battery Cover
Rolling Brush
Water Tank
Cliff Sensor
6
7
8
9
Main Device
Charging Pole Piece
Side Brush
Driving Wheel
Rag
Dust Bin Handle
Dust Bin
Dust Bin Release Button
Dust Bin Cover Board
HEPA Component
3
EN
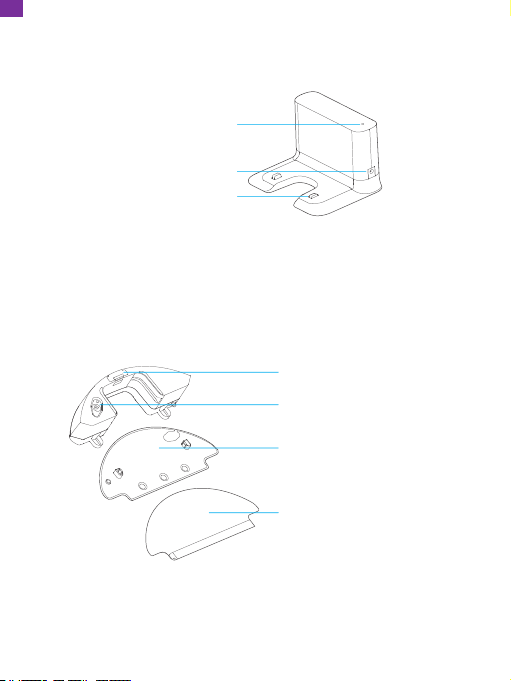
· Charging Base
· Water Tank Component
Charging Connector
Rag
Charging Indicator
DC Power Jacket
Water Tank Release Button
Water Tank Seal Cover
Rag Holder Board
4
EN
INSTALLATION INSTRUCTIONS
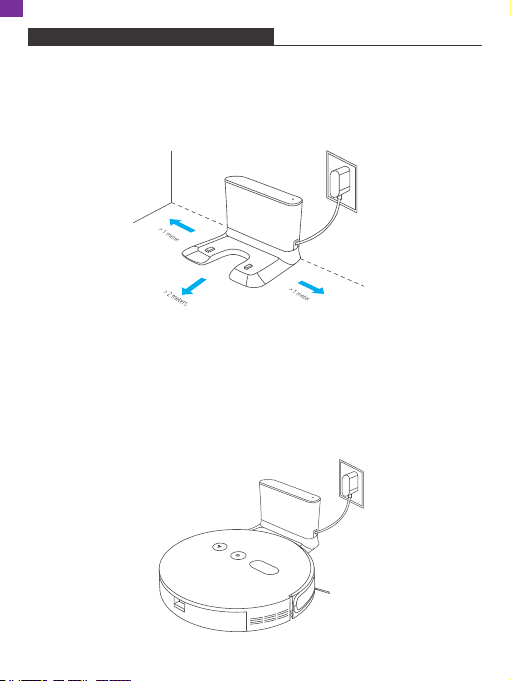
1. Set the Charging Base
Place the charging base on a flat surface against a wall.
Note: Ensure a space of at least 1.0 m/3.3 ft on both sides of the charging base, and
a space of at least 2.0 m/6.6 ft in front. Do not put the charging base near the objects
with strong reflective surfaces such as mirrors.
2. Power on and Charge
To charge, manually align the charging pole piece at the bottom of the device with
the terminal of the charging stand.
Charging Mode A:
Put the whole device on the charging base directly.
5
EN
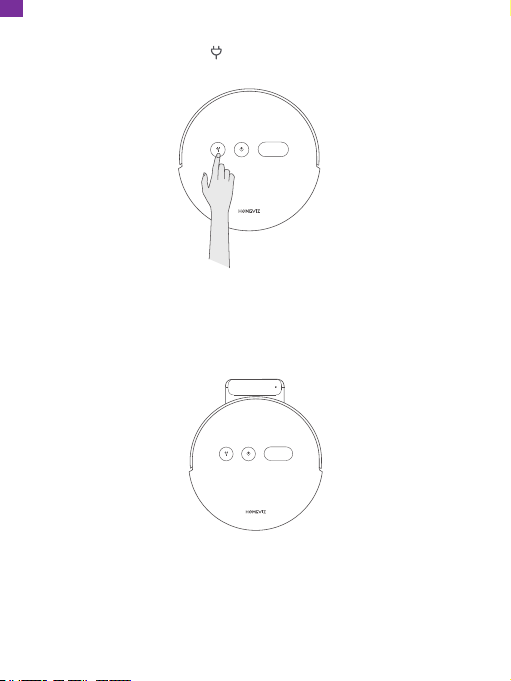
Charging Mode B:
In the power-on mode, press the button on the device or click the App recharge
button, the machine will be auto-recharged.
Automatic Charging:
The device will start searching the charging base to charge automatically when it
completes cleaning or under low battery state. Keep the charging base in power-on
state, or the device may fail to find the charging base.
Note:
Hold and press the power button to turn off the device if not used for long term.
Charge the device as soon as possilbe when it runs out of power.
This product can only use the respective adapter and charging dock equipped with
the Homeviz.
Battery can not be removed, please contact [email protected] to maintain or
replace.
6
EN
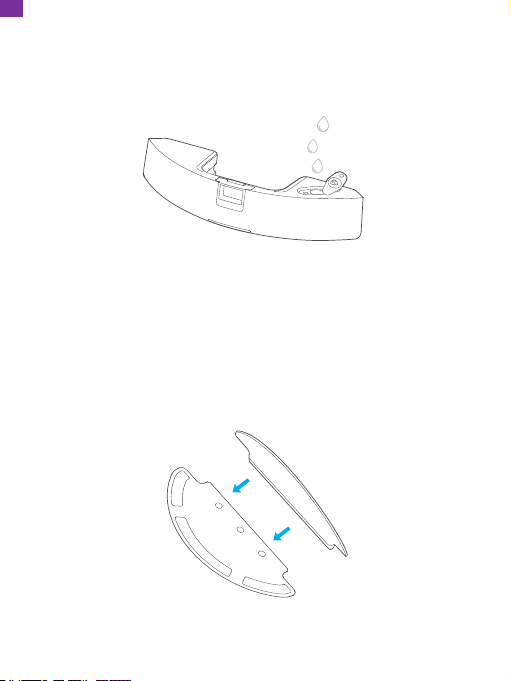
3. Install Water Tank
1) Add Water
water into the water tank and buckle the plug.
2) Rag Assembly
Put the pocket on one end of the rag into the rag holder board, and then stick the
rag to the magic sticker of the rag holder board.
7
EN

3) Rag Holder Board Assembly
Insert the rag holder board into the slot at both ends of the water tank according to
the figure.
4) Install Water Tank
Press the water tank release button and install the water tank into the main device.
8
EN
OPERATION INSTRUCTIONS
1. Power On/Off
① It will automatically turn on when the main device is on the charging base.
② It cannot be turned off when the main device is on the charging base.
③ Press and hold the POWER button to shut it down when the main device is
stationary, and a voice prompt will be given.
④ Press and hold the POWER button, the power indicator will light up, and the main
device will be turned on, and you will hear a voice prompt after the power-on is
completed.
3. Device Recharge
① When the main device finished cleaning, there will be a voice prompt “Cleaning
completed, enter the recharging mode”, and it will recharge automatically.
② When the power of the device is less than 20% during cleaning, the main device
will automatically recharge.
③ When the battery of the main device runs out and shuts down automatically, you
can manually put it on the charging base. Make sure that the charging connector
is in good contact.
2. Cleaning
① Press the POWER button in the power-on state, there will be a voice prompt
“Whole house cleaning starts”.
② Press the button in the power-on state, there will be a voice prompt “Enter
the recharging mode”.
③ Open the app and enter the device page, tap on the “Start cleaning” button to
start cleaning task, there will be a voice prompt “Whole house cleaning starts”.
④ Open the app and enter the device page, tap on the button to start recharging
task, there will be a voice prompt “Enter the recharging mode”.
Note:
The cleaning function cannot be activated when the battery is too low.
9
EN
4. Distribution Network and Firmware Upgrade
Scan the QR code on the device to download the app, and long press the button
and POWER button to enter the reset Wifi Internet work configuration mode device
will be turned on, and you will hear a voice prompt after the power-on is completed.
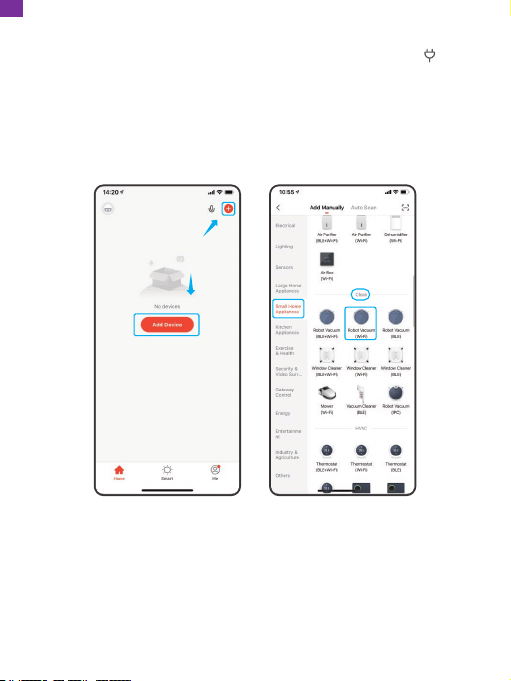
① Open the Tuya Smart app and tap "+" in the upper right corner or "Add Device".
② Choose "Add Manually" and "Small Home Appliances". Scroll down and choose
"Robot Vacuum (Wi-Fi)" in the "Clean" section.
OR
10
EN
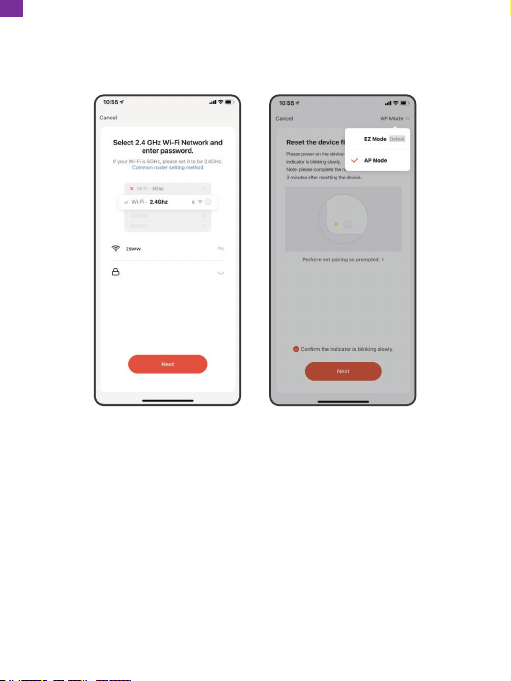
③ Select a 2.4 GHz Wifi network and enter the password, then tap "Next".
④ Choose "AP Mode" in the upper right corner, then confirm that the indicator light
is blinking slowly.
11
EN

⑤ Connect your phone to the device's hotspot. The Wifi name starts with "SmartLife"
followed by "-xxxx".
xxxxx
12
EN
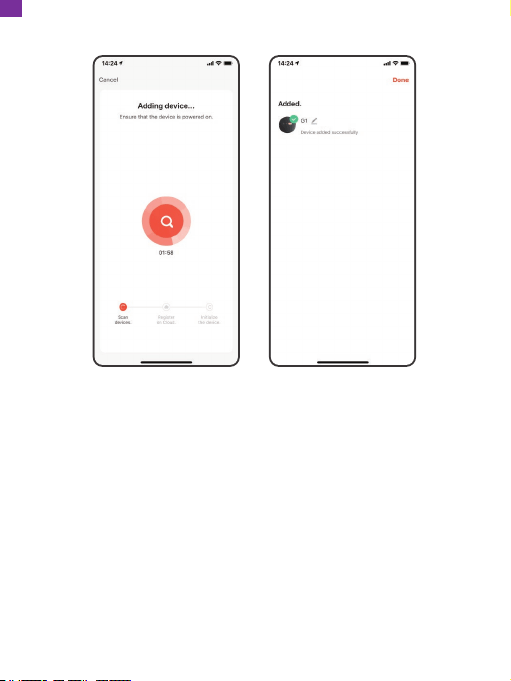
⑥ After connecting, go back to the TuyaSmart app and wait for its response.
The device firmware can be directly inquired and upgraded through the app. Make
sure that the device is charged, and the battery level is not less than 30% when
upgrading. Please refer to instructions in the app for the upgrade steps.
Note:
① Follow the prompts in the app to configure the network once completed
download. After the main device is connected to the network, you can use the APP
to remotely start the cleaning and reservation functions.
Click the device that you added. In this interface, you can select different cleaning
modes and check the cleaning time and power consumption of the device. Tap
"More" and "Adhesion" to adjust the scale of the suction ability, and choose "Water
Control" to adjust the water tank level.
② The main device does not support 5G band Wi-Fi network currently.
13
EN

5. Pause
① Press the POWER button to pause the device, press again, cleaning continues.
② Press the stop cleaning button on the app to pause the device, and press start
cleaning button to continue.
6. Sleep Mode
If there is no operation for more than 3 minutes in the standby state, the main
device automatically enters sleep mode, and during sleep, it can be awakened by
pressing the buttons on the device or the app.
Note:
① The main device does not enter sleep mode when it is charged on the charging
base.
② It will automatically shut down when the power is less than 10% in sleep mode.
③ The main device will automatically shut down if there is no operation for 30
minutes.
7. Cleaning Preference
Choose Off, Quiet, Standard, Strong, and Max modes on the phone app, default is
standard mode.
8. State of Accident
During the motion of the main device, fault occurs, button light starts rapidly flashing
red, accompanied by a voice indication. Ways to solve emergency problems, see:
“Troubleshooting”.
Note:
The main device goes into sleep mode automatically if there is no operation for 3
minutes in the fault condition.
14
EN
9. Mopping Mode
Install the rag holder board on the main device, default is I-shaped cleaning and
mopping route.
The water output can be adjusted through the app, which are:
① Low mode;
② Middle mode;
③ High mode.
11. DND Mode
In Do Not Disturb mode, the main device will not respond to reservation cleaning
and actively broadcast voices. Do Not Disturb mode configured to 22:00 to 07:00 by
default. You can use the mobile APP to turn it off.
12. Reservation Cleaning
Use the mobile app to set the schedule cleaning time, and the unit will automatically
start cleaning at a selected time, and automatically return to base to recharge after
cleaning.
13. Spot Cleaning
The machine starts sweeping clockwise in a spiral manner from the starting point. Its
algorithm is cleaning zone 0.5m * 0.5m around the device. When the maximum
radius is reached, it returns to the starting point in a counterclockwise direction in a
spiral manner. When the spiral sweep encounters an obstacle, it turns back to the
starting point in a counterclockwise direction.
10. Add Water to the Water Tank or Wash Rag
If you need to add water or clean the rag to the main device during the cleaning
process, press the button first, and then remove the water tank after pausing.
After adding water or cleaning the rag, replace the water tank and the rag, and
press the button to continue working.
15
EN
DAILY CARE
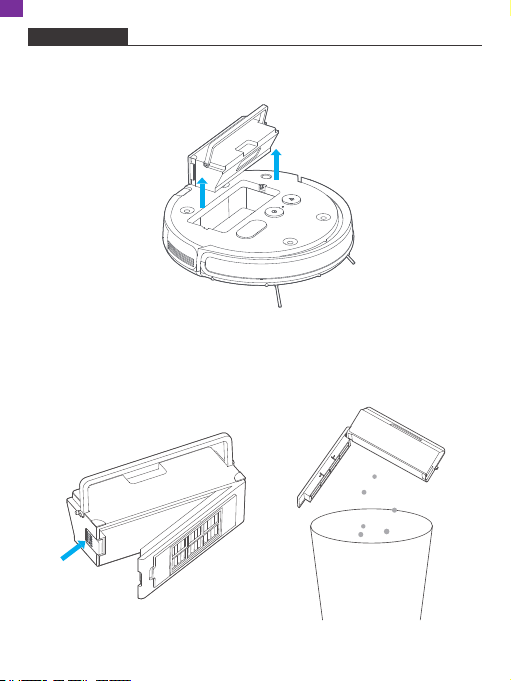
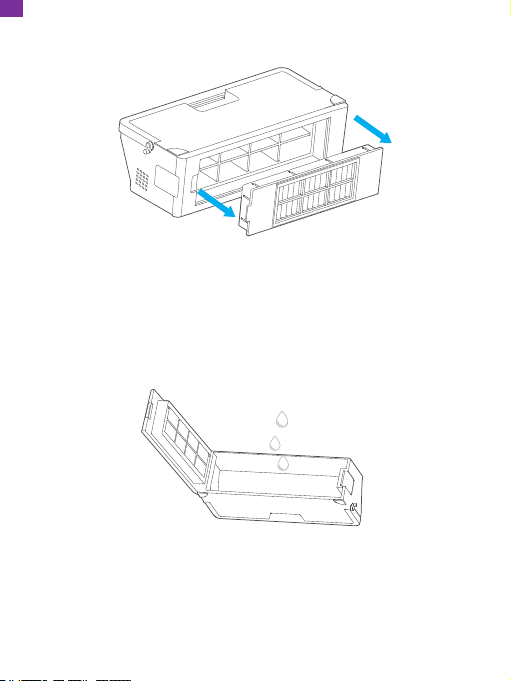
1. Dust Bin
1) Remove the flip cover and lift the handle to take out the dust bin.
2) Press the dust bin button as shown in the figure, open the front cover, and
empty trash from the dust bin.
16
EN
3) Remove and change a filter grid, as illustrated.
4) Open the dust bin, rinse it and the cover.
Note:
Filter grid cannot be washed with water, please tap to remove the dust.
Note:
Hang up the dust bin, HEPA and filter components, keep them dry to ensure
the service life.
It is recommended to change filter grid every 3 months to ensure cleaning efficiency.
17
EN
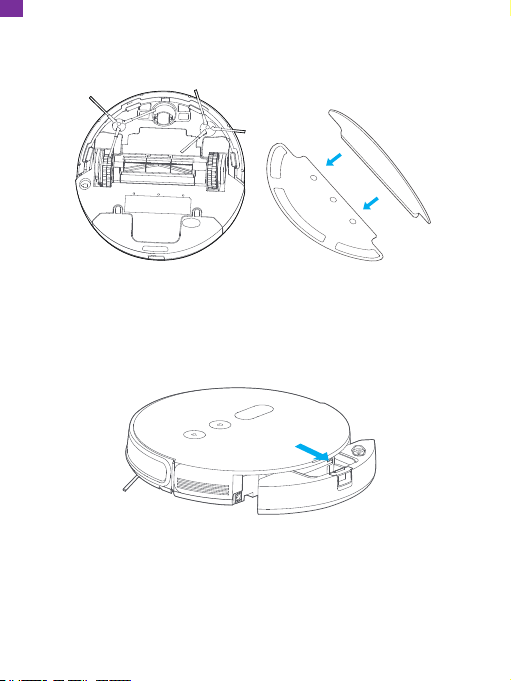
2. Water Tank Components
1) Remove the rag and the rag holder board, rinse and hang up the rag.
2) Press the water tank release button to take out the components.
18
EN

3) Drain the remaining water from the water tank, wipe the tank components and
hang them up.
3. Side Brush
Check the condition of the side brush from time to time to see if it is damaged or
entangled with foreign objects. Use a cleaning tool or a cloth to clean the side brush.
Replace it in time when the side brush is damaged and cannot be used.
Notice that L (left) and R (right) correspond to each other.
19
EN

4. Rolling Brush
5. Other Components
1) Irregularly use a cleaning tool or a dry soft cloth to gently wipe the charging pole
pieces and sensor window on the chassis of the device.
Note:
Because the cutting rolling brush components cannot be replaced by yourself,
please contact the customer service at [email protected] for help if there is any
problem.
Charging Pole Pieces
Infrared Sensor
20
EN
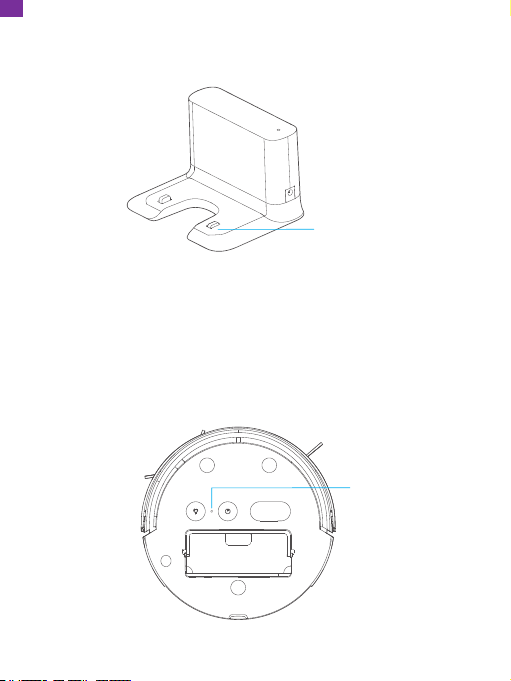
2) Clean the charging connector of the charging base and charging connector with a
dry cleaning tool or a soft cloth.
3) Reset Switch
When using the device, if encountered system stuck, no response or other
problems, and the power button and APP cannot be used to recover, you can open
the flip cover and press the reset button to force the device to shut down.
Reset Button
Charging Connector
21
EN

BASIC PARAMETERS
1. Main Device Parameters
Dimensions
Weight
Rated Voltage
Rated Power
L340*W340*H80mm
3.4kg
14.8V
65W
2. Charging Base Parameters
Dimensions
Rated Input
Rated Output
Rated Frequency
L164*W133*H104mm
20V-0.5A
20V-0.5A
50/60Hz
3. The Name and Contents of Harmful Substances
Parts
Plastic
Metal
Circuit Board
Other Metal Parts
Standard Parts (screws/washers, etc.)
Harmful Substances
Pb
O
O
O
O
O
Hg
O
O
O
O
O
Cd
O
O
O
O
O
Cr VI
X
O
O
X
X
PBB
O
O
O
O
O
PBDE
O
O
O
O
O
22
EN
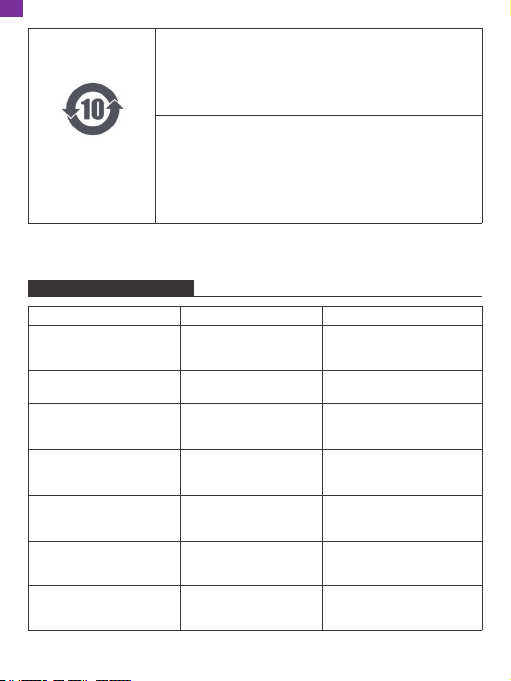
TROUBLESHOOTING
Hazardous Substance
Restriction Sign
Environmental protection use period of 10 years
It means that the harmful substances contained in this product
will not leak or change, and the normal use of this product
according to the product manual will not cause serious pollution
to the environment or cause serious damage to the person or
property of the user.
Arrow cycle sign
It means that this part can be recycled. It should not be
discarded after its expiration date or after being repaired and
unable to work normally. Please hand it over to a formal
recycling channel and a company qualified for disposal of waste
electrical and electronic products. For the correct method of
disposal, please refer to the national or local regulations on the
disposal of old electrical and electronic products.
Fault 01 Robot is tilted,
please place the robot on a
ground level to restart.
The device was picked up
during cleaning.
Put the device on the ground.
Prompt Tone Failure Cause Solution
Fault 02 Please insert the
dust bin and filter.
The dust bin is removed. Put the dust bin back into the
main device.
Fault 03 Please remove the
obstacles around and try
again.
The device can be stuck. Put the device in a new
location and run.
Fault 04 Abnormal main
brush, please check and
clean the main brush.
The main brush is blocked
for more than 3s.
Check whether the main brush
is entangled by foreign objects
and clean the entanglement.
Fault 05 Abnormal left wheel,
please check and clean the
left wheel.
The left wheel is blocked. Check whether the left wheel
is blocked by foreign objects
and clean them.
Fault 06 Abnormal right
wheel, please check and
clean the right wheel.
The right wheel is blocked. Check whether the right wheel
is blocked by foreign objects
and clean them.
Fault 07 Please wipe clean
the cliff sensor and move to
a new location to start.
The cliff sensor is
continuously triggered for
more than 6s.
Check whether the cliff sensor
is blocked by foreign objects
and clean them.
23
EN

COMMON PROBLEMSCOMMON PROBLEMS
Fault 08 Abnormal side
brush, please check and
clean the side brush.
The side brush is tangled
and blocked for more than
12s.
Check whether the side brush
is entangled by the thread and
clean the entanglement.
1. Unable to boot. The power is low, charge it on the charging base before
using. The ambient temperature is too low (below 0°C) or too
high (above 50°C).
6. Reduced cleaning ability
or dust falling.
The dust bin is full/the HEPA components have been blocked
/the roller brush is entangled by foreign matter, please clean.
2. Unable to start cleaning. The power is low, charge it on the charging base before
using.
5. Abnormal noises during
cleaning.
The roller brush, side brush or left/right wheel may be
entangled with foreign objects, please clean it after shutdown.
3. Unable to recharge. There are too many obstacles near the charging base. Please
place the charging base in an open area. The main device is
too far away from the charging base. Put the main device
near the charging base.
8. Unable to return to the
charging base after
partial cleaning/moving
the position.
The main device will regenerate the map after spot cleaning
or long-distance moving. It may not be able to automatically
recharge if the charging stand is too far away. Please
manually put the main device back into the charging base.
7. Unable to connect to
Wifi.
Make sure that the phone and the main device are in the
Wifi coverage area and the signal is good; reset the Wifi
according to the Quick Start Guide before pairing (make sure
to operate under the 2.4G Wifi ring wall in strict accordance
with the APP prompts).
4. Abnormal performances. Restart after shut down.
Problem Solution
Fault 09 Please check and
remove the foreign objects
from the collision sensor
Trigger collision
continuously for more than
12s.
Check whether the front
bumper can rebound
normally.
Fault 10 Abnormal fan,
please check and clean the
filter.
The fan is locked for more
than 3s (the current is
greater than the locked-
rotor threshold
Clean up dust bin, HEPA
components.
24
EN
SPECIAL PROMPTS
9. Unable to charge. Make sure there is enough space around the charging base,
and there is no dust and obstructions on the surface of the
charging connector on the charging base.
10. Reservation cleaning
does not work.
Please confirm that the device is connected to the Internet.
Otherwise, the scheduled cleaning task cannot be
synchronized.
11. The main device is
always offline.
Please ensure that the device is successfully configured to
the network and is always within the Wifi coverage.
Note:
① If the above methods cannot solve the problem, please press the reset switch to
restart the device.
② If restarting does not solve the problem, please contact 301-670-7335 for
consultation.
Please clean up the cables and debris scattered on the ground before starting the
sweeper, and remove shaky, fragile, valuable and potentially dangerous items to
avoid being entangled, stuck, dragged or knocked over by the main device, which
may cause personal or property damage.
If you use this product in a suspended environment, be sure to add a protective
fence to prevent the main device from accidentally falling and causing personal or
property damage.
If you use this product in a suspended environment, please be sure to add a
protective fence to prevent the main engine from accidentally falling down and
causing personal or property damage
SERVICE RESTRICTION
Main device and accessories related using restriction warning
1. Do not disassemble, repair or modify the device by yourself, otherwise the
product will be damaged and cause danger.
2. Do not use this product in an environment where fire or explosion may occur.
25
EN

Main device and accessories related using restriction notice
1. Be sure to rinse with clean water immediately if the battery leakage comes into
contact with your skin or clothes to avoid potential personal safety hazards.
2. Do not use the rechargeable battery of this product on other equipment. The
battery is only applicable to smart vacuum cleaner.
3. To avoid danger, it is forbidden to charge or continue to use when the battery
outer box is deformed and the electrolyte flows out.
4. Do not apply strong impact to the battery or throw the battery, otherwise it will
cause leakage heating or rupture.
5. Do not disassemble the battery pack, otherwise it will break the battery pack and
the electrolyte will flow out, causing fire, explosion or other dangers.
3. Use only the original power adapter, otherwise it may cause damage to the
product and fire.
4. Do not stand or sit on the product, otherwise it may damage the product or cause
a fall.
5. When dust adheres to the metal part of the power plug, be sure to wipe it with a
dry cloth.
6. The power adapter uses 100-240V AC voltage, please insert the plug correctly into
the socket and avoid the touch of children.
7. Do not wash and soak the main device and electronic accessories, otherwise it will
cause short circuit damage.
8. Please do not damage the processing power cord, do not put heavy objects, heat,
pull or bend the power cord.
9. When the product is running and cleaning, please pay attention to the safety of
children and elders at home to avoid tripping and causing danger. Do not touch
the wheels and side brushes with your hands to avoid being twisted and injuring.
(Especially for young children.)
10. Do not use the product outdoors for it’s an indoor household product.
11. Do not contact the battery contacts with metal or conductive materials,
otherwise it may cause a short circuit.
26
EN

Main device and accessories related using restriction risk
1. Be sure to use a dedicated power adapter, otherwise it will cause leakage heating
or rupture.
2. Do not short-circuit the battery or disassemble the battery, otherwise it will cause
leakage heating or rupture.
3. Do not transport or store with metal objects such as necklaces, hairpins, etc.,
otherwise it will cause leakage heating or rupture due to a short circuit.
4. Do not throw the battery into fire or heat the battery, otherwise it will cause
leakage heating or rupture.
Main device and accessories related using restriction notice
1. If abnormal overheating is found during charging, stop using it immediately,
otherwise it will cause leakage heating or rupture.
2. In order to extend the battery life, please unplug the battery when it is not in use
for a long time and place it in a cool and dry environment, otherwise it may cause
leakage heating or rupture.
3. Do not immerse in water or contact with liquid, otherwise it will cause leakage
heating or rupture.
4. Please stop using it when there is any abnormality (such as discoloration or
deformation), otherwise it will cause leakage heating or rupture.
5. The electrodes must be partially insulated with adhesive tape when recycled or
discarded.
6. If the battery leaks, please wipe it with a dry cloth, recycle it in time, or discard it.
7. Place the recycled batteries in battery recycling bins or hazardous waste bins set
up in communities, hotels, schools, large shopping malls and supermarkets, which
will be collected by professional recycling agencies.
27
EN

Main device and accessories related using restriction notice
1. Do not touch with wet hands, otherwise it may cause electric shock.
2. Do not place this product in places where it is easy to drop, such as tables, chairs,
and high tables in the room.
3. The product is a precision electronic device. Avoid prolonged exposure to
sunlight.
5. Do not place the product near cigarette butts, lighters and other open flames.
6. Please clean the product after charging.
7. Before use, carefully check whether the power adapter has been connected with
the socket, otherwise it will cause damage to the device.
8. Before using the product, please remove all the vulnerable items on the ground,
such as glasses, lamps, and objects that may be entangled in the side brushes
and suction channels, such as wires and curtains.
9. When the trash box is full, please empty the trash before using the device.
10. Do not use the device to clean construction waste.
11. The operating temperature range of this product is 0 degrees Celsius to 40
degrees Celsius. Do not use it at high or low temperature.
12. Please remove the battery from the device before scrapping the product. When
removing the battery, make sure that the product is not connected to the power
source. Please recycle the waste battery safely and environmentally friendly.
For any inquiries about HOMEVIZ products, please feel free to contact us.
We will respond within 24 hours.
Tel: 301-670-7335 (US)
Email: [email protected]
Official website: www.homeviz.net
CONTACT US
28
EN