Loading ...
Introduction MonogramTM refrigerators are designed to blend into the kitchen cabinetry.
Through aseries of product and trim kit choices, the MonogramTM refrigerator
can be beautifully integrated into the kitchen.
All models require field-installed custom panels. Lexan@ and Stainless Steel Panel
Kits are available. Custom Trim kits for handles, 3/4” thick panels and dispenser
trim are also available. Order these from your Monogram dealer.
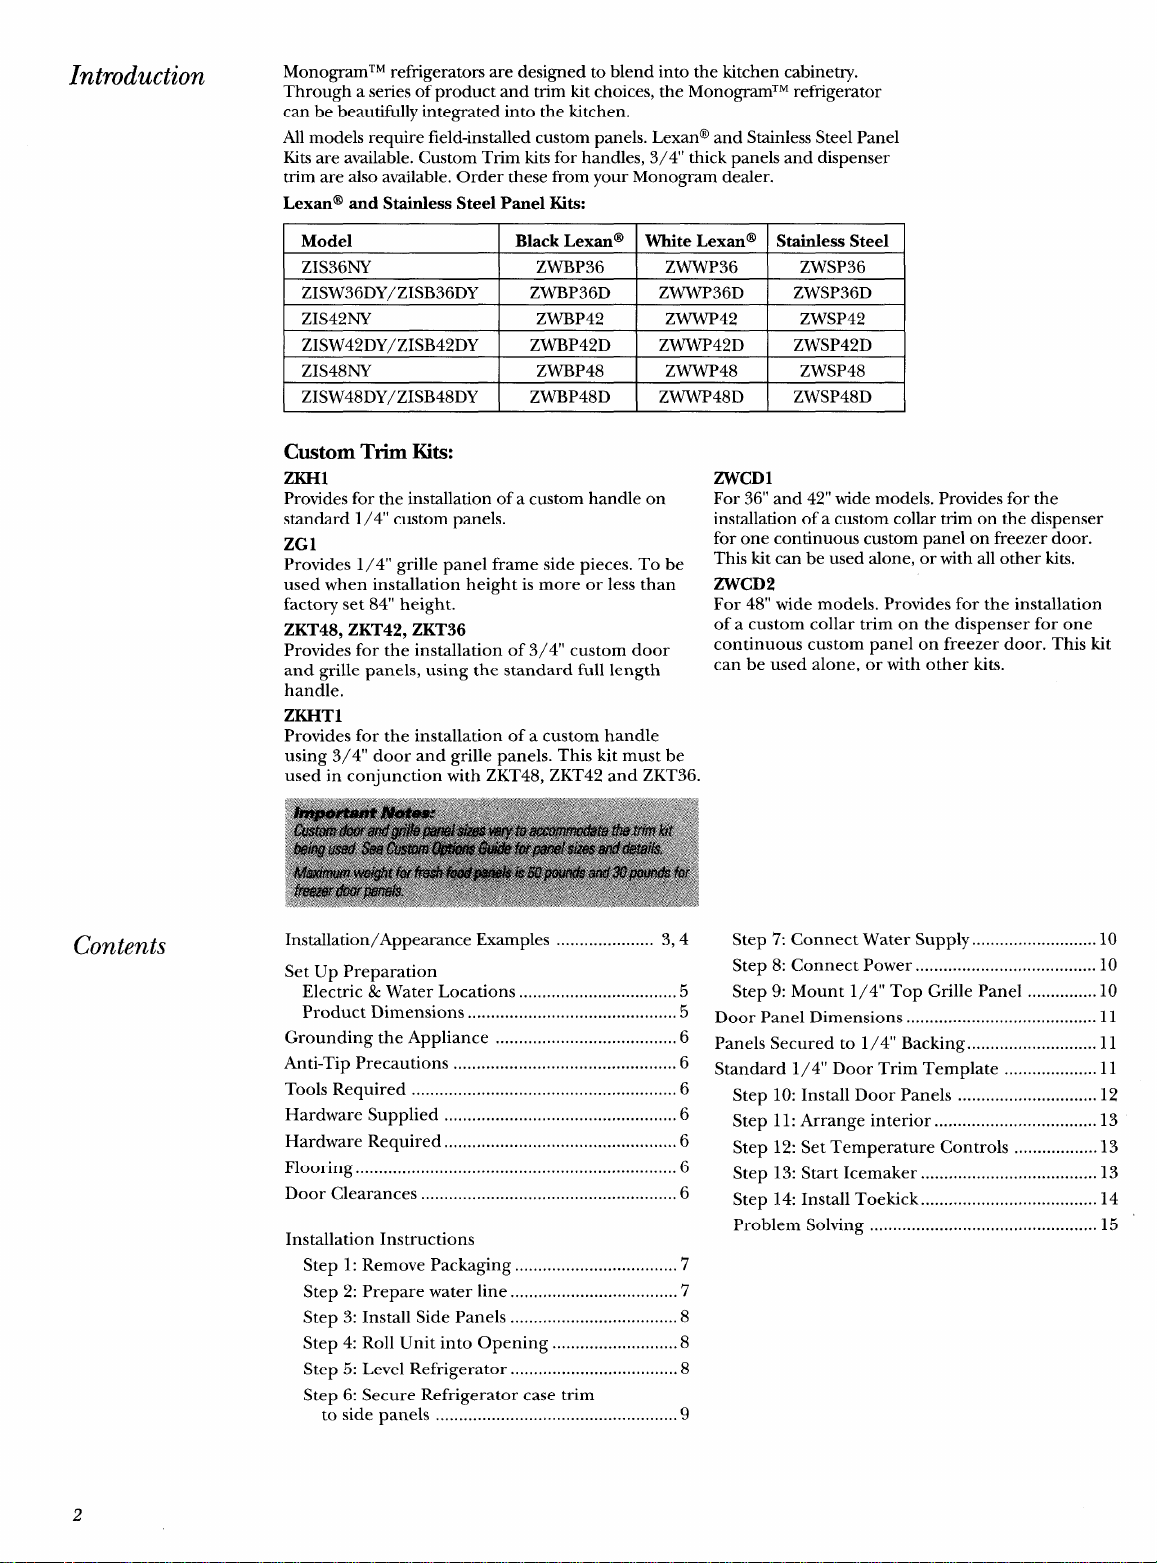
Lexan@ and Stainless Steel Panel Kits:
Model Black Lexan@ White Lexan@ Stainless Steel
ZIS36NY ZWBP36 ZWWP36 ZWSP36
ZISW36DY/ZISB36DY ZWBP36D ZWWP36D ZWSP36D
ZIS42NY ZWBP42 ZWWP42 ZWSP42
ZISW42DY/ZISB42DY ZWBP42D ZWWP42D ZWSP42D
ZIS48NY ZWBP48 ZWWP48 ZWSP48
ZISW48DY/ZISB48DY ZWBP48D ZWWP48D ZWSP48D
Contents
Custom Trim Kits:
ZKH1
Provides for the installation of acustom handle on
standard 1/4” custom panels.
ZG1
Provides 1/4” grille panel frame side pieces. To be
used when installation height is more or less than
factory set 84” height.
ZKT48, ZKT42, ZKT36
Provides for the installation of 3/4” custom door
and grille panels, using the standard full length
handle.
ZKHT1
Provides for the installation of acustom handle
using 3/4” door and grille panels. This kit must be
used in conjunction with ZKT48, ZKT42 and ZKT36.
Installation/Appearance Examples ..................... 3,4
Set Up Preparation
Electric &Water Locations ..................................5
Product Dimensions .............................................5
Grounding the Appliance .......................................6
Anti-Tip Precautions ................................................6
Tools Required .........................................................6
Hardware Supplied ..................................................6
Hardware Required ..................................................6
Flooring .....................................................................6
Door Clearances .......................................................6
Installation Instructions
Step 1: Remove Packaging ...................................7
Step 2: Prepare water line ....................................’7
Step 3: Install Side Panels ....................................8
Step 4: Roll Unit into Opening ...........................8
Step 5: Level Refrigerator ....................................8
Step 6: Secure Refrigerator case trim
to side panels ....................................................9
ZWCD1
For 36” and 42” wide models. Provides for the
installation of acustom collar trim on the dispenser
for one continuous custom panel on freezer door.
This kit can be used alone, or with all other kits.
ZWCD2
For 48” wide models. Provides for the installation
of acustom collar trim on the dispenser for one
continuous custom panel on freezer door. This kit
can be used alone, or with other kits.
Step 7: Connect Water Supply ...........................10
Step 8: Connect Power ....................................... 10
Step 9: Mount 1/4” Top Grille Panel ...............10
Door Panel Dimensions .........................................11
Panels Secured to 1/4” Backing ............................11
Standard 1/4” Door Trim Template .................... 11
Step 10: Install Door Panels ..............................12
Step 11: Arrange interior ...................................13
Step 12: Set Temperature Controls ..................13
Step 13: Start Icemaker ......................................l3
Step 14: Install Toekick ......................................l4
Problem Solving .................................................15
2
Loading ...
Loading ...
Loading ...