

12/15 Amp Motor
Electric Chain Saw
Operator’s manual
Model: CSE12-M
CSE15-M
For customer support, please call 1-800-261-3981 or send email to:
SAVE THIS MANUAL FOR FUTURE REFERENCE.
TM
2 WWW.SENIXTOOLS.COM
TABLE OF CONTENTS
SAFETY...................................................................2
KNOW YOUR UNIT..............................................10
INCLUDED PARTS...............................................10
SPECIFICATIONS*...............................................10
CHAIN SAW PREPARATION................................11
OPERATION.........................................................13
SAWING TECHNIQUES ......................................15
MAINTENANCE AND ADJUSTMENTS................17
PARTS...................................................................20
WARRANTY...........................................................21
The purpose of safety symbols is to attract
your attention to possible dangers. The safety
symbols, and their explanations, deserve
your careful attention and understanding.
The safety warnings DO NOT by themselves
eliminate any danger. The instructions or
warnings they give are not ubstitutes for
proper accident prevention measures.
Signals an EXTREME hazard.Failure to obey
a safety DANGER symbol WILL result in
serious injury or death to yourself or to others.
Crude oil, gasoline, diesel fuel and other
petroleum products can expose
you to chemicals including toluene and
benzene, which are known to the State of
California to cause cancer
and birth defects or other reproductive
harm. These exposures can occur in and
DURXQGRLO¿HOGVUH¿QHULHVFKHPLFDO
SODQWVWUDQVSRUWDQGႋRUDJHRSHUDWLRQV
such as pipelines, marine terminals, tank
trucks and other facilities and equipment.
For more information go to:
www.P65Warnings.ca.gov/petroleum.
Signals a SERIOUS hazard. Failure to obey
a safety WARNING symbol CAN result in
serious injury to yourself or to others.
This product contains a
FKHPLFDONQRZQWRWKHႋDWHRI&DOLIRUQLD
to cause cancer, birth defects or other
reproductive harm. Drilling, sawing,
sanding or machining wood products can
H[SRVH\RXWRZRRGGXႋDVXEႋDQFH
known to the State of California to cause
FDQFHU$YRLGLQKDOLQJZRRGGXႋRUXVHD
GXႋDVNRURWKHUVDIHJXDUGVIRUSHUVRQDO
protection. For more information go to
www.P65Warnings.ca.gov/woods.
Signals a MODERATE
hazard. Failure to obey a safety CAUTION
symbol MAY result in property damage or
injury to yourself or to others.
NOTE: Advises you of information or
instructions vital to the operation or
maintenance of the equipment.
CALIFORNIA PROPOSITION 65
DANGER:
WARNING:
WARNING:
WARNING:
CAUTION:
%(685(WRUHDGDQGXQGHUႋDQGDOO
LQႋUXFWLRQVLQWKLVPDQXDOEHIRUHXVLQJ
this electric Chain Saw. Failure to follow
DOOLQႋUXFWLRQVOLႋHGEHORZPD\UHVXOWLQ
HOHFWULFVKRFN¿UHDQGRUVHULRXVSHUVRQDO
injury.
WARNING:
SAFETY

3WWW.SENIXTOOLS.COM
7RDYRLGPLႋDNHVWKDWFRXOGFDXVH
serious injury, DO NOT connect the
Chain Saw to the power source until the
IROORZLQJLQႋUXFWLRQVKDYHEHHQUHDGDQG
XQGHUႋRRG
WARNING:
:KHQXVLQJWKHXQLWDOOVDIHW\LQႋUXFWLRQV
PXႋEHIROORZHG3OHDVHUHDGWKHVH
LQႋUXFWLRQVEHIRUHRSHUDWLQJWKHXQLWLQ
order to ensure the safety of the operator
DQGDQ\E\ႋDQGHUV3OHDVHNHHSWKHVH
LQႋUXFWLRQVIRUODWHUXVH
IMPORTANT SAFETY
INSTRUCTIONS
WARNING!
5HDGDOOVDIHW\ZDUQLQJVDQGLQႋUXFWLRQV
Failure to follow the warnings and
QႋUXFWLRQVPD\UHVXOWLQHOHFWULFVKRFN
¿UHDQGRUVHULRXVLQMXU\
READ ALL INSTRUCTIONS
BEFORE OPERATING
For location and purchase information call
1-800-261-3981.
WARNING:
keep these instructions for later use.
• Read the instructions carefully. Be familiar
with the controls and proper use of the unit.
• DO NOT operate this unit
• 5HDGWKHLQႋUXFWLRQVFDUHIXOO\ Be
familiar with the controls and proper use of
the unit.
• DO NOT operate this unit when tired, ill
RUXQGHUWKHLQÀXHQFHRIDOFRKROGUXJVRU
Consider the work area environment. Use
extreme caution when cutting small size
brush and saplings because the slender
material may catch the saw chain and
EHZKLSSHGWRZDUG\RXRUSXOO\RXRႇ
balance. DO NOT operate a chain saw in
DWUHHXQOHVVVSHFL¿FDOO\WUDLQHGWRGRVR
When cutting a limb that is under tension
be alert for spring back so that you will not
EHႋUXFNZKHQWKHWHQVLRQLQWKHZRRG
¿EHUVLVUHOHDVHG
WARNING:
medication.
• Never allow children to operate the
unit. Teens must be trained, accompanied
and supervised by an adult. Never allow
adults to operate the unit without proper
instruction.
• $OOJXDUGVDQGVDIHW\DWWDFKPHQWVPXႋ
EHLQႋDOOHGSURSHUO\EHIRUHRSHUDWLQJ
the unit.
• Inspect the unit before use. Replace
damaged parts. Check for fuel leaks. Make
sure all fasteners are in place and secure.
Replace parts that are cracked, chipped, or
damaged in any way. DO NOT operate the
unit with loose or damaged parts.
• Be aware of risk of injury to the head,
hands and feet.
• Carefully inspect the area before
ႋDUWLQJWKHXQLW Remove rocks, broken
glass, nails, wire, string and other objects
that may be thrown or become entangled
with the unit.
• &OHDUWKHDUHDRIFKLOGUHQE\ႋDQGHUV
and pets; keep them outside a 50-foot
(15 m) radius, at a minimum. Even then,
they are still at risk from thrown objects.
Encourage bystanders to wear eye
protection. If you are approached, stop the
unit immediately.
• Squeeze the throttle control and check that
it returns automatically to the idle position.
0DNHDOODGMXႋPHQWVRUUHSDLUVEHIRUH
using the unit.
• DO NOT change the engine governor
settings or overspeed the engine.
• This unit is intended for occasional,
household use only.
WHILE OPERATING
• Wear safety glasses or goggles
that meet current ANSI/ ISEA Z87.1
ႋDQGDUGVDQGDUHPDUNHGDVVXFK
Wear ear/hearing protection when
operating this unit. Wear a face mask or
dust mask if the operation is dusty.
• Wear heavy long pants, boots, gloves and
a long sleeve shirt. DO NOT wear loose
clothing, jewelry, short pants, sandals or go
barefoot. Secure hair above shoulder level.
• Use the unit only in daylight or good
DUWL¿FLDOOLJKW
• $YRLGDFFLGHQWDOႋDUWLQJ Be in the
starting position whenever pulling the
starter rope. The operator and unit must be
in a stable position while starting. Refer to

4 WWW.SENIXTOOLS.COM
ON/OFF SWITCH.
• Use the right tool. Only use this tool for
its intended purpose.
• Always hold the unit with both hands when
RSHUDWLQJ.HHSD¿UPJULSRQERWKKDQGOHV
or grips.
• DO NOT overreach. Always keep proper
footing and balance. Take extra care when
working on stairs, steep slopes or inclines.
To avoid serious injury, DO NOT operate
the unit while on a ladder or a roof.
• Keep hands, face, and feet away from all
moving parts. DO NOT touch or try to stop
moving parts.
• DO NOTWRXFKWKHHQJLQHRUPXIÀHU7KHVH
parts get extremely hot from operation,
even after the unit is turned off.
• DO NOT operate the unit faster than the
speed needed to do the job. DO NOT run
the unit at high speed when not in use.
• DO NOT force the unit. It will do a better,
safer job when used at the intended rate.
• $OZD\VႋRSWKHXQLWZKHQRSHUDWLRQ
is delayed or when walking from one
location to another.
• Before setting the unit down, always MAKE
SURE the engine is off and all moving parts
have stopped.
• If you strike or become entangled with a
foreign object, stop the unit immediately
and check for damage. DO NOT operate
the unit before repairing damage. DO NOT
operate the unit with loose or damaged
parts.
• Unplug the unit for maintenance or
repair.
• Use only original equipment
manufacturer (OEM) replacement parts
and accessories for this unit. Use of any
other parts or accessories could lead to
serious injury to the user, or damage to the
unit, and void the warranty.
• Keep the unit clean. Carefully remove
vegetation and other debris that could
block moving parts.
• 7RUHGXFH¿UHKD]DUGNHHSDLUYHQWV
free from grass, leaves or excessive
grease.
• ,IWKHXQLWႋDUWVWRYLEUDWHDEQRUPDOO\
ႋRSWKHXQLWLPPHGLDWHO\ Inspect the unit
for the cause of the vibration. Vibration is
generally an indicator of trouble.
'RQRWSHUPLW¿QJHUVWRXFKWKHWHUPLQDOV
RISOXJZKHQLQႋDOOLQJRUUHPRYLQJWKH
extension cord from the plug.
ELECTRICAL SAFETY
WARNING!
1. Double insulated tools are equipped
with a polarized plug (one blade is
wider than the other and will require
the use of a polarized extension
cord.7KH&KDLQ6DZ¶VSOXJZLOO¿WLQWR
a polarized extension cord only one
ZD\,IWKHSOXJGRHVQRW¿WIXOO\LQWRWKH
extension cord, reverse the plug. If the
SOXJVWLOOGRHVQRW¿WREWDLQDFRUUHFW
polarized extension cord. A polarized
extension cord will require the use of a
SRODUL]HGZDOORXWOHW7KLVSOXJZLOO¿WLQWR
the polarized wall outlet only one way.
,IWKHSOXJGRHVQRW¿WIXOO\LQWRWKHZDOO
outlet, reverse the plug. If the plug still
GRHVQRW¿WFRQWDFWDTXDOL¿HGOHFWULFLDQ
to install the proper outlet. Do not
change or alter the equipment plug,
extension cord receptacle, or extension
cord plug in any way.
2. Double insulation eliminates the need
for the three-wire grounded power cord
and grounded power supply system.
Applicable only to Class II (double-
insulated) tools. This Chain Saw is a
double insulated tool.
Circuit Interrupter) protection should be
provided on all circuits or outlets to be
used for electric chain saws and lawn
and garden power tools. Receptacles are
available having built-in GFCI protection
and should be used for this measure of
protection.
WARNING!
• Double insulation DOES NOT take the
place of normal safety precautions when
operating this tool.
*XDUGDJDLQႋHOHFWULFVKRFN3UHYHQW
body contact with grounded surfaces.
For example: metal pipes, wire fences.
3. BEFORE plugging in the tool, BE SURE
that the outlet voltage supplied is within
the voltage marked on the tool’s data
plate. DO NOT use ‘AC only” rated tools
with a DC power supply.
5WWW.SENIXTOOLS.COM
4. DO NOT expose tools to rain or wet
conditions or use electric tools in
wet or damp locations. Water entering
an electric tool will increase the risk of
electric shock.
5. If operating an electric tool in damp
locations is unavoidable, ALWAYS USE
a Ground Fault Circuit Interrupter to
supply power to your tool. ALWAYS
WEAR electrician’s rubber gloves and
footwear in damp conditions.
6. To reduce the risk of electric shock,
use only with an extension cord intended
for outdoor use, such as an extension
cord of cord type: SW-A, SOW-A, STW-A,
STOW-A, SJW-A, SJOW-A, SJTW-A. or
SJTOW-A.
7. INSPECT tool cords for damage. Have
damaged tool cords repaired at an
authorized Service Center. BE SURE to
stay constantly aware of the cord location
and keep it well away from the cutting
blade.
8. DO NOT abuse the extension cord.
NEVER use the cord to carry the tool by
or to pull the plug from the outlet. Keep
cord away from heat, oil, sharp edges or
moving parts. Replace damaged cords
immediately. Damaged cords increase the
risk of electric shock.
EXTENSION CORDS
Use a proper extension cord. ONLY use
cords listed by underwriters Laboratories
(UL). Other extension cords can cause a drop
in line voltage, resulting in a lo--ss of power
and overheating of tool.
For this tool an AWG (American Wire Gauge)
size of a least 14-gauge is recommended for
an extension cord of 25-ft. or less in length.
Use 12-gauge for an extension cord of 50-
ft. Extension cords 100-ft. or longer are not
recommended.
Remember, a smaller wire gauge size has
greater capacity than a larger number
(14-gauge wire has more capacity than
16-gauge wire; 12-gauge wire has more
capacity than 14-gauge). When in doubt use
the smaller number.
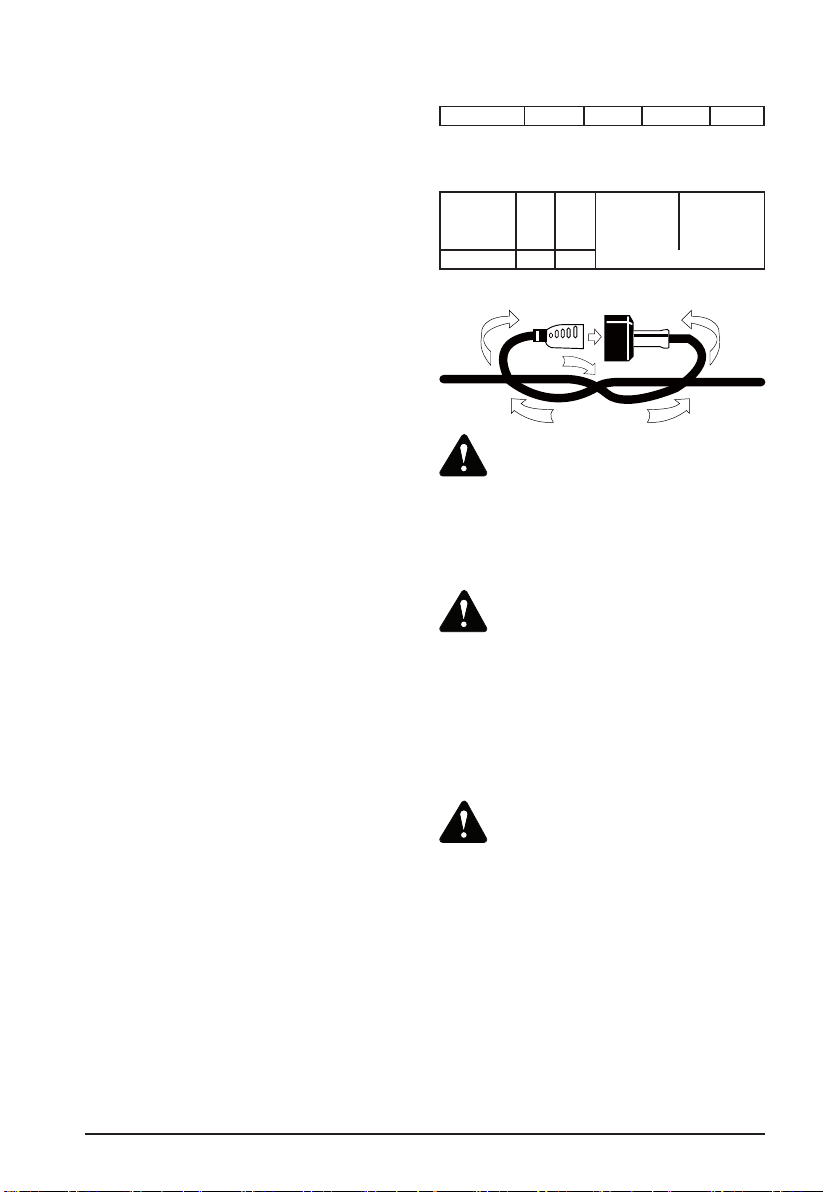
EXTENSION CORDS
Ampere Rating
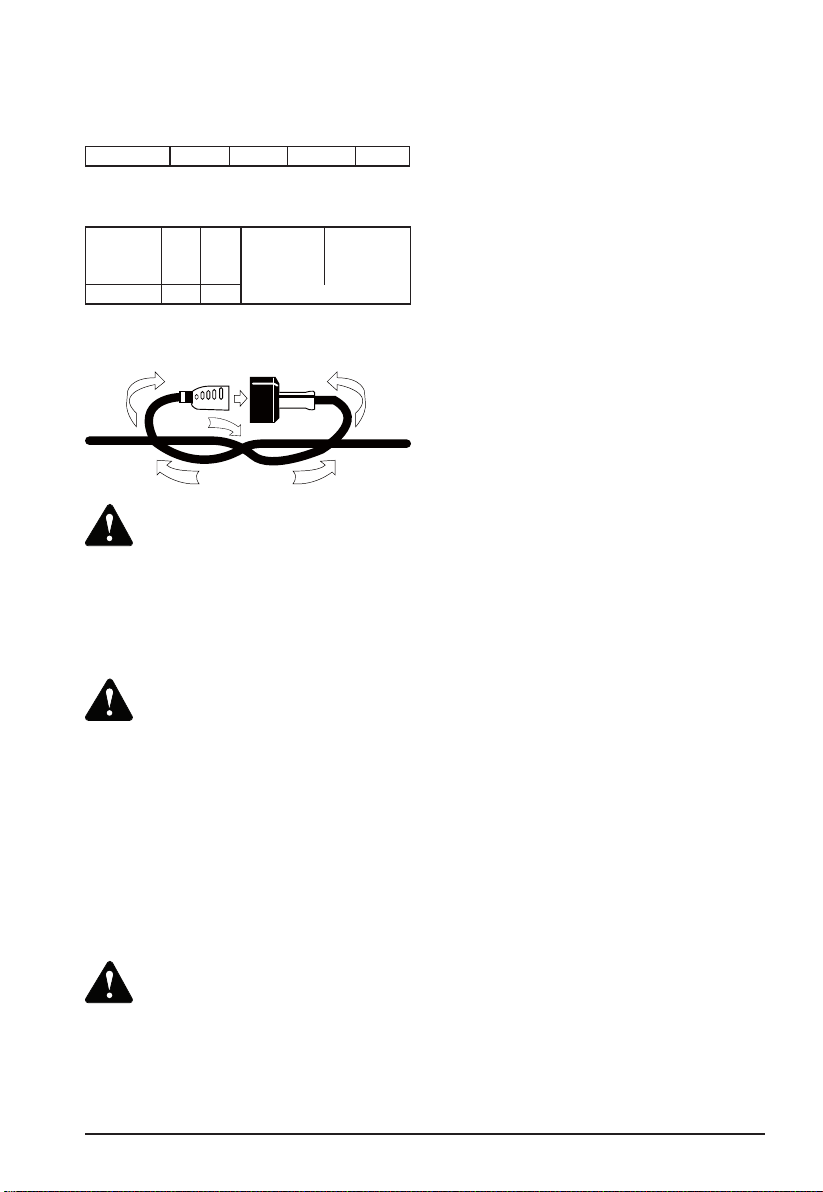
Securing extension cord
Volts Total length of cord in feet
More than/Not more than AWG
120 V 25 50 100 150
0-6
6-10
10-12
18
18
16
16
16
16
16
14
14
14
12
12
12-16 14 12 Not recommended
GENERAL POWER TOOL SAFETY
WARNINGS
Keep the extension cord clear of the work
area. Position the cord so that it will not
get caught on bushes, hedges, tree trunks,
ODZQPRZHUVRURWKHUREႋUXFWLRQVZKLOH
you are working with the Chain Saw.
Check extension cords before each use. If
damaged replace immediately. Never use
tool with a damaged cord since touching
the damaged area could cause electrical
shock, resulting in serious injury.
Read all safety warnings and all instructions.
Failure to follow the warnings and instructions
PD\UHVXOWLQHOHFWULFVKRFN¿UHDQGRU
serious injury.
Save all warnings and instructions for future
reference. The term “power tool” in the
warnings refers to your mains-operated
(corded) power tool or battery-operated
(cordless) power tool.
CAUTION:
WARNING:
WARNING:

6 WWW.SENIXTOOLS.COM
1. Work area safety
a. Keep work area clean and well lit.
Cluttered or dark areas invite accidents.
b. DO NOT operate power tools in explosive
atmospheres, such as in the presence of
ÀDPPDEOHOLTXLGVJDVHVRUGXVW3RZHU
tools create sparks which may ignite the
dust or fumes.
c..HHSFKLOGUHQDQGE\ႋDQGHUVDZD\
while operating a power tool. Distractions
can cause you to lose control.
2. Electrical Safety
a. 3RZHUWRROSOXJVPXႋPDWFKWKHRXWOHW
Never modify the plug in any way. DO
NOT use any adapter plugs with earthed
JURXQGHGSRZHUWRROV8QPRGL¿HGSOXJV
and matching outlets will reduce risk of
electric shock.
b. Avoid body contact with earthed or
grounded surfaces, such as pipes,
radiators, ranges and refrigerators.
There is an increased risk of electric shock
if your body is earthed or grounded.
c. DO NOT expose power tools to rain or wet
conditions. Water entering a power tool will
increase the risk of electric shock.
d. DO NOT abuse the cord. Never use the
cord for carrying, pulling or unplugging the
power tool. Keep cord away from heat, oil,
sharp edges or moving parts. Damaged or
entangled cords increase the risk of electric
shock.
e. When operating a power tool outdoors,
use an extension cord suitable for
outdoor use. Use of a cord suitable for
outdoor use reduces the risk of electric
shock.
f. If operating a power tool in a damp
location is unavoidable, use a residual
current device (RCD) protected supply.
Use of an RCD reduces the risk of electric
shock.
3. Personal Safety
a. Stay alert, watch what you are doing
and use common sense when operating
a power tool. DO NOT use a power tool
ZKLOH\RXDUHWLUHGRUXQGHUWKHLQÀXHQFH
of drugs, alcohol or edication. A moment of
inattention while operating power tools may
result in serious personal injury.
b. Use personal protective equipment.
$OZD\VZHDUH\HSURWHFWLRQ3URWHFWLYH
equipment such as dust mask, non-
skid safety shoes, hard hat, or hearing
protection used for appropriate conditions
will reduce personal injuries.
c. 3UHYHQWXQLQWHQWLRQDOႋDUWLQJ Ensure
the switch is in the off-position before
connecting to power source and/or battery
pack, picking up or carrying the tool.
&DUU\LQJSRZHUWRROVZLWK\RXU¿QJHURQWKH
switch or energising power tools that have
the switch on invites accidents.
d. 5HPRYHDQ\DGMXႋLQJNH\RUZUHQFK
before turning the power tool on. A
wrench or a key left attached to a rotating
part of the power tool may result in
personal injury.
e. DO NOT overreach. Keep proper
footing and balance at all times. This
enables better control of the power tool in
unexpected situations.
f. Dress properly. DO NOT wear loose
clothing or jewellery. Keep your hair,
clothing and gloves away from moving
parts. Loose clothes, jewellery or long hair
can be caught in moving parts.
g. If devices are provided for the
FRQQHFWLRQRIGXႋH[WUDFWLRQDQG
collection facilities, ensure these are
connected and properly used. Use of
dust collection can reduce dust-related
hazards.
4. Power Tool Use and Care
a. DO NOT force the power tool. Use the
correct power tool for your application. The
correct power tool will do the job better and
safer at the rate for which it was designed.
b. DO NOT use the power tool if the switch
GRHVQRWWXUQLWRQDQGRႇ Any power
tool that cannot be controlled with the
switch is dangerous and must be repaired.
c. Disconnect the plug from the power
source and/or the battery pack from
the power tool before making any
DGMXႋPHQWVFKDQJLQJDFFHVVRULHV
RUႋRULQJSRZHUWRROVSuch preventive
safety measures reduce the risk of starting
the power tool accidentally.
d. Store idle power tools out of the reach
of children. DO NOT allow persons
unfamiliar with the power tool or these
instructions to operate the power tool.
3RZHUWRROVDUHGDQJHURXVLQWKHKDQGVRI
untrained users.

7WWW.SENIXTOOLS.COM
e. Maintain power tools. Check for
misalignment or binding of moving parts,
breakage of parts and any other condition
that may affect the power tools operation.
If damaged, have the power tool repaired
before use. Many accidents are caused by
poorly maintained power tools.
f. Keep cutting tools sharp and clean.
3URSHUO\PDLQWDLQHGFXWWLQJWRROVZLWK
sharp cutting edges are less likely to bind
and are easier to control.
g. Use the power tool, accessories and
tool bits etc. in accordance with these
LQႋUXFWLRQVWDNLQJLQWRDFFRXQWWKH
working conditions and the work to
be performed. Use of the power tool for
operations different from those intended
could result in a hazardous situation.
5. Service
a. Have your power tool serviced by a
TXDOL¿HGUHSDLUSHUVRQXVLQJRQO\
identical replacement parts. This will
ensure that the safety of the power tool is
maintained.
CHAIN SAW SAFETY WARNINGS
• Keep all parts of the body away from
the saw chain when the chain saw is
operating. Before you start the chain saw,
make sure the saw chain is not contacting
anything. A moment of inattention
while operating chain saws may cause
entanglement of your clothing or body with
the saw chain.
• Always hold the chain saw with your
right hand on the rear handle and your
left hand on the front handle. Holding
the chain saw with a reversed hand
FRQ¿JXUDWLRQLQFUHDVHVWKHULVNRISHUVRQDO
injury and should never be done.
NOTE: For chain saws designed with the
chain bar on the left side, the reference to
“right hand” and “left hand” positioning is
reversed.
• Hold the power tool by insulated
gripping surfaces only. The saw chain
may contact hidden wiring or its own cord.
Saw chains contacting a “live” wire may
make exposed metal parts of the power
tool “live” and could give the operator an
electric shock.
• Wear safety glasses and hearing
protection. Further protective equipment
for head, hands, legs and feet is
recommended. Adequate protective
FORWKLQJZLOOUHGXFHSHUVRQDOLQMXU\E\À\LQJ
debris or accidental contact with the saw
chain.
• DO NOT operate a chain saw in a tree.
Operation of a chain saw while up in a tree
may result in personal injury.
• Always keep proper footing and operate
WKHFKDLQVDZRQO\ZKHQႋDQGLQJRQ
¿[HGVHFXUHDQGOHYHOVXUIDFH Slippery
or unstable surfaces such as ladders may
cause a loss of balance or control of the
chain saw.
• When cutting a limb that is under
tension be alert for spring back. When
WKHWHQVLRQLQWKHZRRG¿EUHVLVUHOHDVHG
the spring loaded limb may strike the
operator and/or throw the chain saw out
of control.
• Use extreme caution when cutting
brush and saplings. The slender
material may catch the saw chain and
be whipped toward you or pull you off
balance.
• Carry the chain saw by the front
handle with the chain saw switched
RႇDQGDZD\IURP\RXUERG\ When
transporting or storing the chain saw
DOZD\V¿WWKHFKDLQEDUFRYHU3URSHU
handling of the chain saw will reduce the
likelihood of accidental contact with the
moving saw chain.
• )ROORZLQႋUXFWLRQVIRUOXEULFDWLQJ
chain tensioning and changing
accessories. Improperly tensioned or
lubricated chain may either break or
increase the chance for kickback.
• Keep handles dry, clean, and free from
oil and grease. Greasy, oily handles are
slippery causing loss of control.
• Cut wood only. DO NOT use chain saw
for purposes not intended. For example:
DO NOT use chain saw for cutting plastic,
masonry or non-wood building materials.
Use of the chain saw for operations
different than intended could result in a
hazardous situation.
Causes and Operator Prevention of
Kickback Kickback may occur when the nose
or tip of the chain bar touches an object, or
when the wood closes in and pinches the
saw chain in the cut. Tip contact in some

8 WWW.SENIXTOOLS.COM
cases may cause a sudden reverse reaction,
kicking the chain bar up and back towards the
RSHUDWRU3LQFKLQJWKHVDZFKDLQDORQJWKH
top of the chain bar may push the chain bar
rapidly back towards the operator. Either of
these reactions may cause you to lose control
of the saw which could result in serious
personal injury. DO NOT rely exclusively upon
the safety devices built into your saw. As a
chain saw user, you should take several steps
to keep your cutting jobs free from accident
or injury. Kickback is the result of tool misuse
and/or incorrect operating procedures or
conditions and can be avoided by taking
proper precautions as given below:
• 0DLQWDLQD¿UPJULSwith thumbs and
¿QJHUVHQFLUFOLQJWKHFKDLQVDZKDQGOHV
with both hands on the saw and position
your body and arm to allow you to resist
kickback forces. Kickback forces can
be controlled by the operator, if proper
precautions are taken. DO NOT let go of
the chain saw.
• DO NOT overreach and DO NOT cut
above shoulder height. This helps
prevent unintended tip contact and
enables better control of the chain saw in
unexpected situations.
• Only use replacement bars and chains
VSHFL¿HGE\WKHPDQXIDFWXUHUIncorrect
replacement bars and chains may cause
chain breakage and/or kickback.
• Follow the manufacturer’s sharpening
DQGPDLQWHQDQFHLQႋUXFWLRQVIRUWKH
saw chain. Decreasing the depth gauge
height can lead to increased kickback.
SAVE THESE INSTRUCTIONS

9WWW.SENIXTOOLS.COM
SAFETY ALERT SYMBOL
Indicates danger, warning or caution.
May be used in conjunction with other
symbols or pictographs.
KEEP BYSTANDERS AWAY
WARNING: Keep all bystanders,
especially children and pets, at least 50
feet (15 m) from the operating area.
WARNING: DO NOT expose to rain.
WARNING: Contact of the chain bar tip
with any object should be avoided.
WARNING: Tip contact can cause the
chain bar to move suddenly upward
and backward, which can cause serious
injury.
WARNING: Always use two hands
when operating the chain saw.
GUARD AGAINST ELECTRIC SHOCK
3UHYHQW ERG\ FRQWDFW ZLWK HDUWKHG RU
grounded surfaces (e.g. metal railings,
lamp-posts, etc.). Electric safety can
be further improved by using a high-
sensitivity (30 mA/30mS) Residual
Current Device (RCD).
READ OPERATOR’S MANUAL
WARNING:Read the operator’s
manual(s) and follow all warnings and
safety instructions. Failure to do so can
result in serious injury to the operator
and/or bystanders.
READ OPERATOR’S MANUAL
WARNING: The use of an RCD
or other circuit breaker unit does not
release the operator of your chainsaw
from the safety practices given in this
user manual.
WEAR EYE AND HEARING PROTECTION
WARNING:Thrown objects and
loud noise can cause severe eye injury
and hearing loss. Wear eye protection
meeting current ANSI / ISEA Z87.1
standards and ear protection when
operating this unit. Use a full face shield
when needed.
WEAR DUST MASK
Wear breathing protection.
WEAR HAND PROTECTION
Wear heavy duty work gloves to protect
hands.
WEAR FOOT PROTECTION
Wear boots with slip-resistant and
puncture-resistant soles.
WARNING: Failure to keep your hands
away from the blade will result in
serious personal injury.
WARNING: Remove plug from
the mains immediately if the cable is
damaged or cut.
WARNING: Thrown objects can
ricochet and result in personal injury or
property damage.
CLASS II CONSTRUCTION
Double-Insulation. When servicing, use
only identical replacement parts.
This operator’s manual describes safety and international symbols and pictographs that may
appear on this product. Read the operator’s manual for complete safety, assembly, operating and
maintenance and repair information.
SAFETY & INTERNATIONAL SYMBOLS
10 WWW.SENIXTOOLS.COM
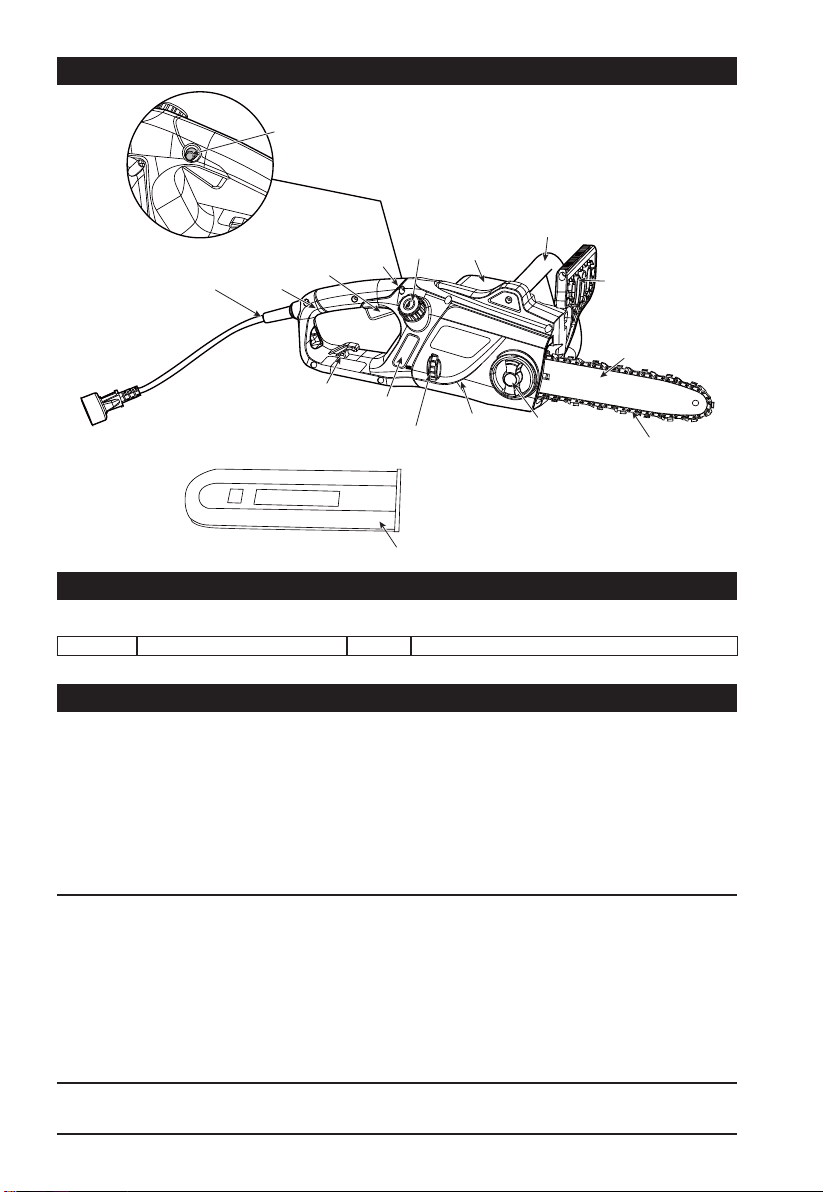
Power Cord
& Plug
Extension Cord
Retainer
Oil Level
Indicator
Chain
Tensioning
Wheel
Cover
Bar Adjustment
Locking Knob
Guide Bar
Saw Chain
Front Handle Guard
Front Handle
Motor
Housing
Oil
Tank
Cap
Main
Housing
Main
Handle
Switch
Trigger
ON/OFF
Safety Button
Chain/Bar/Blade Protective Cover
KNOW YOUR UNIT
SPECIFICATIONS*
Rated Voltage...............................................................................................................120V~60Hz
Rated current............................................................................................................................15A
Motor type..............................................................................................................Universal Motor
1RORDGVSHHG530
Maximum chain speed.......................................................................................................13.5 m/s
Oil tank capacity....................................................................................................5.81 oz. (170 ml)
Saw bar model...............................................................................18 inch, 180SDEA041, Oregon
6DZFKDLQPRGHO´PP3-;2UHJRQ
Weight...............................................................................................................12.33 lbs. (5.59 kg)
$OOVSHFL¿FDWLRQVDUHEDVHGRQWKHODWHVWSURGXFWLQIRUPDWLRQDYDLODEOHDWWKHWLPHRISULQWLQJ
We reserve the right to make changes at any time without notice.
INCLUDED PARTS
Quantity Item Quantity Item
1 Operator’s Manual 1
&KDLQ%DU%ODGH3URWHFWLYH&RYHU
Rated Voltage...............................................................................................................120V~60Hz
Rated current............................................................................................................................12A
Motor type..............................................................................................................Universal Motor
1RORDGVSHHG530
Maximum chain speed.......................................................................................................13.5 m/s
Oil tank capacity....................................................................................................5.81 oz. (170 ml)
Saw bar model...............................................................................16 inch, 160SDEA041, Oregon
6DZFKDLQPRGHO´PP3-;2UHJRQ
Weight.................................................................................................................11.24 lbs. (5.1 kg)

11WWW.SENIXTOOLS.COM
1. Check the chain tension by pulling the saw
chain away from the chain bar. A properly
tensioned chain should have roughly 1/8
inch (3 mm) of distance between itself and
the bar guide (Fig. 1).
2. If adjustments are needed, loosen the bar
adjustment locking knob one full turn.
3. To adjust the saw chain tension, rotate the
chain tensioning wheel (Fig. 2). Rotating
the wheel upwards increases the tension
while rotating it downwards decreases
tension. A properly tensioned chain should
have no sag (Fig. 3) and should only be
CHAIN SAW PREPARATION
UNPACKING
TENSIONING THE CHAIN
WARNING!
WARNING!
WARNING!
WARNING!
If any part of the Chain Saw is missing or
damaged, do not connect the Chain Saw
to the power source until the damaged
part is repaired or replaced.
Unplug chain saw from power source
EHIRUHDGMXႋLQJVDZFKDLQWHQVLRQ
Cutting edges on chain are sharp. Use
protective gloves when handling chain.
ALWAYS Maintain proper chain tension.
A loose chain will increase the risk of
kickback. A loose chain may jump out of
chainbar groove. This may injure operator
and damage chain. A loose chain will
cause chain, chain bar, and sprocket to
wear rapidly. The chain life of the saw
FKDLQPDLQO\GHSHQGVXSRQVXႈFLHQW
lubrication and correct tensioning. Avoid
tensioning the chain if it is hot, as this
will cause the chain to become over
tensioned when it cools down.
The Chain Saw comes fully assembled,
including the Chain/Chain Bar Assembly. DO
NOT discard box or packing material until all
parts are examined.
NOTE: Chain and Bar Oil is not included.
<RXPXVW¿OOWKH&KDLQ6DZZLWK
bar&chain oil BEFORE use.
NOTE: Remove the Chain/Bar/Blade
3URWHFWLYH&RYHUEHIRUHXVH
able to be pulled 1/8 inch (3 mm) away
from the chain bar of the saw.
4. Once the chain is properly tensioned,
tighten the bar adjustment locking knob.
DO NOT over-tension the chain: this will
lead to excessive wear and reduces the life
of both the bar and chain.
NOTE: The saw chain must be tensioned
properly in order to ensure safe
operation. The chain tension is optimal
if the saw chain can be lifted 1/8
inch (3 mm) from the center of the
chain bar. Since the saw chain heats
up during operation, its length can
WKHUHIRUHÀXFWXDWH&KHFNWKHFKDLQ
tension every 10 minutes of operation
and adjust as necessary, particularly
for new saw chains. Slacken the saw
chain after the work is completed
since it shortens when cooling down.
In doing so, you can elongate the
chain’s life and prevent damage.
1/8” (3 mm)
Fig. 1
Fig. 2
Fig. 3
12 WWW.SENIXTOOLS.COM
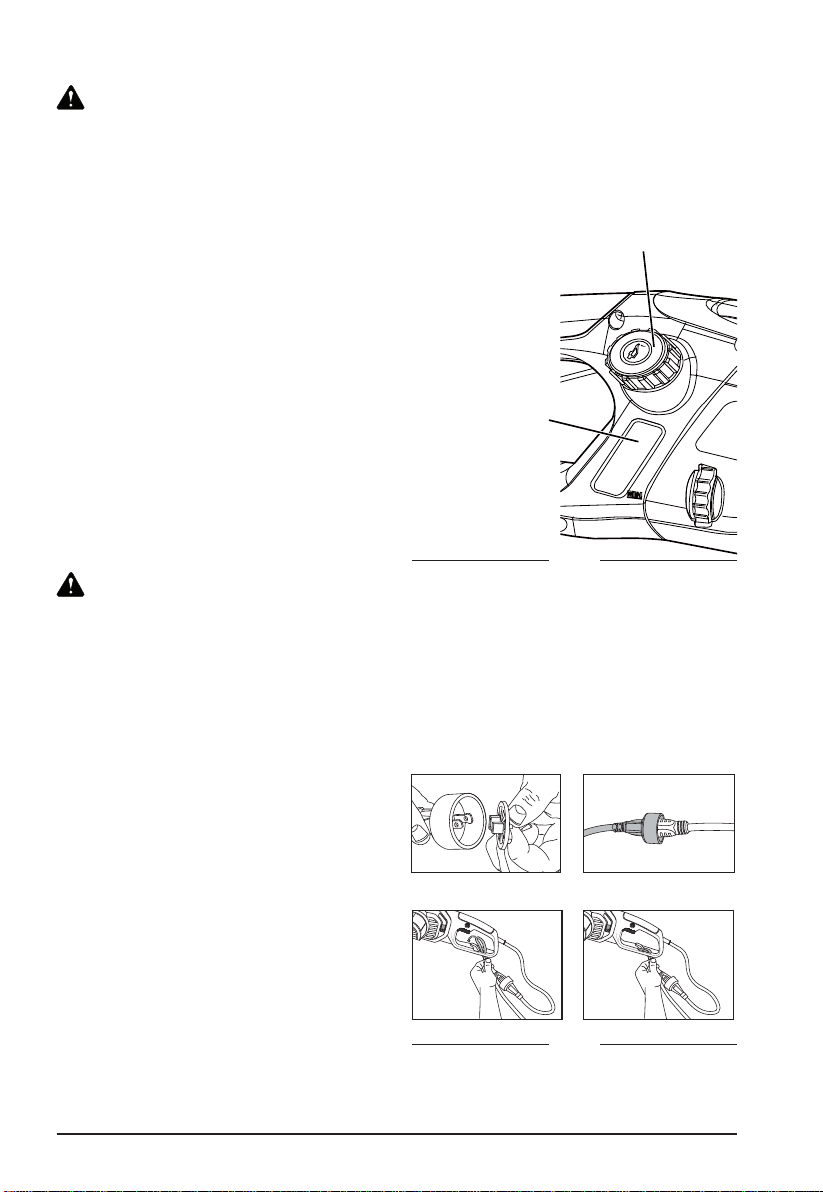
FILLING THE AUTO OIL SYSTEM
ATTACHING THE EXTENSION CORD
CAUTION!
CAUTION!
The chain saw is NOTVXSSOLHG¿OOHGZLWK
RLO,WLVHVVHQWLDOWR¿OOZLWKRLOEHIRUHXVH
Never operate the chain saw without chain
oil or at an empty oil tank level, as this will
result in extensive damage to the product.
Chain life and cutting capacity depends on
optimum lubrication. Therefore, the chain is
automatically oiled during operation via the
oil outlet.
To prevent oil leakage, ensure machine is left
LQDKRUL]RQWDOSRVLWLRQRLO¿OOHUFDSXSULJKW
when not in use. Use only the recommended
oil to avoid damage to the chain saw. Never
use recycled/old oil. Use of non approved oil
will invalidate the warranty.
Remove the plug safety cap (Fig. 5). Insert
the extension cord socket into the chain saw
plug.
An extension cord retainer is attached to the
handle to reduce strain on the cord (Fig. 5).
To use the cord retainer, double the extension
cord as shown, about a foot from the end,
DQGLQVHUWLWLQWRWKHHQGRIWKHUHWDLQHU3ODFH
the loop formed by doubling the cord over the
hook. Gently tug on the cord to ensure that it
LV¿UPO\VLWXDWHGLQWKHUHWDLQHU
Keep the extension cord clear of operator,
unit, and any obstacles at all times. Do not
expose the cord to heat, oil, water, or sharp
edges.
This chain saw features an auto-oiling system
to keep the chain and chain bar properly
lubricated. The oil level indicator shows the
remaining oil in the chain saw. If the oil level
GHFUHDVHVWREHORZRQHTXDUWHUFDSDFLW\UH¿OO
it with the proper bar and chain oil.
7R¿OOWKHRLOUHVHUYRLU
1. Remove the oil cap (Fig. 4). Fill the
reservoir with bar and chain oil (SAE30)
until the oil level has reached full capacity.
3XWWKHRLOFDSEDFNRQ0DNHVXUHWR
check the oil level after every 10 minutes of
use. Unplug the chain saw before checking
RLOOHYHOVRU¿OOLQJWKHRLOUHVHUYRLU
Oil Cap
Oil Level Indicator
Fig. 4
Fig. 5
Completed

13WWW.SENIXTOOLS.COM
1. In order to ensure safe work, DO NOT
operate the saw above shoulder height.
3RVLWLRQWKHFRUGVRWKDWLWZLOOQRWEH
caught on branches and the like, during
cutting.
3. Never stand below a branch that is being
sawed.
4. Exercise caution when sawing both
branches under tension or branches that
are splintering.
5. Make sure to safe guard against the risk of
LQMXU\IURPIDOOLQJEUDQFKHVDQGÀ\LQJZRRG
projectiles.
6. If the machine is in operation, keep persons
OPERATION
PREPARATION
PREVENTING KICKBACK
ON/OFF SWITCH
SAFETY WARNINGS
WARNING!
CHAIN SAW: Before beginning work, inspect
the chain saw for damage to the housing,
the extension cord, the saw chain and the
chain bar. Never use an obviously damaged
machine.
OIL TANK:&KHFNWKH¿OOOHYHORIWKHRLOWDQN
$OVRFKHFNZKHWKHUWKHUHLVVXI¿FLHQWRLO
available while working. Never operate
the saw if there is no oil or the oil level has
dropped below the minimum oil level mark
in order to prevent damage to the chain
VDZ2QDYHUDJHDQRLO¿OOLQJLVVXI¿FLHQWIRU
approximately 10 minutes of cutting operation
(depending the duration of pauses and the
density of the work piece).
SAW CHAIN: Check the tension of the
saw and the condition of the blades. The
sharper the saw chain is, the easier and more
manageable operations will be. The same
applies to chain tension. Check the tension
every 10 minutes of operation to maximize
safety. New saw chains in particular are
subject to changes due to the heat created by
operation.
PROTECTIVE CLOTHING: Make absolutely
VXUHWRZHDUWKHDSSURSULDWHFORVH¿WWLQJ
protective clothing such as protective pants,
gloves and safety shoes. Wear a safety
helmet with integrated hearing protection and
a face guard to provide protection against
falling and recoiling branches.
DO NOT cut down trees in high wind
conditions. This can result in injury and
should only be performed by a trained
professional.
Before each use, check the following items to
ensure safe working conditions.
The term kickback refers to when the saw
suddenly jumps up and back. This is usually
caused by the work piece coming into contact
with the chain bar tip or the clamping of the
saw chain.
A kickback generates an abrupt powerful
force. The saw usually reacts in an
uncontrolled manner, creating the possibility
of injury to the user.
The danger of a kickback is greatest when
attempting to cut near or with the chain
EDUWLS$OZD\VDSSO\WKHVDZDVÀDWO\DV
possible in order avoid a loss of control during
operation.
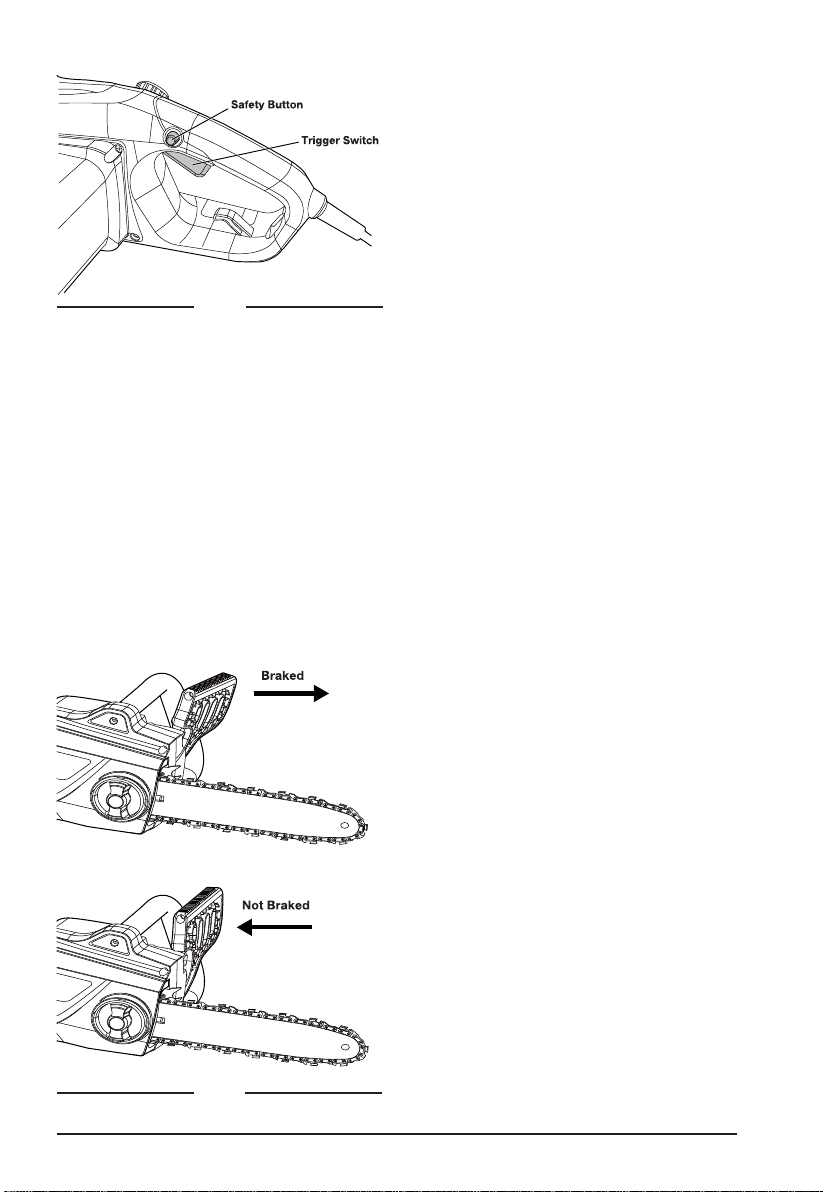
To turn the tool ON: press the safety button
and then squeeze the trigger (Fig. 6). After
the tool has started, you can release the
safety switch without turning the tool off.
To turn the tool OFF: release the trigger
switch (Fig. 6).
and animals away from the danger area.
7 The machine is not protected against
electric shock when coming into contact
with high-voltage lines. Maintain a minimum
clearance of 30 feet from current-carrying
power lines to avoid life-threatening electric
shock.
8. When working on an incline, always stand
above or to the side of the branch being
sawed.
9. Allow the chain to cut for you. Keep the
saw running at full speed for the entire
duration of the cut.First-time user should,
as a minimum practice, cutting logs on a
saw-horse or cradle.
14 WWW.SENIXTOOLS.COM
Fig. 6
3XVKIURQWKDQGJXDUGIRUZDUGDQGWU\WR
start the chain saw. The chain must not
start.
2. To deactivate the kickback brake, release
On/Off switch 3 and pull hand guard
backwards.
KICKBACK BRAKE
The kickback brake is a safety mechanism
activated by the front hand guard. When
kickback occurs, the saw chain stops
immediately (Fig. 7).
The following function check should be
carried out before each use. The purpose of
the chain brake testing is to reduce the
possibility of injury due to kickback:
Fig. 7

15WWW.SENIXTOOLS.COM
Fig. 8
Fig. 9
SAWING TECHNIQUES
• Saw off the lower branches on the tree
¿UVW%\GRLQJVRLWLVHDVLHUIRUWKHFXW
branches to fall to the ground.
• At the end of the cut, the weight of the saw
suddenly increases for the user since it is
no longer being supported by a branch.
There is a risk of losing control of the saw,
so make sure to stay alert during the entire
sawing operation.
• Only pull the saw out of a cut while the saw
is running. By doing so, you prevent the
chain from jamming in the wood.
• DO NOT saw with the tip of the chain bar.
DO NOT saw into the branch formations
(where the tree branches outwards).
This will impede the tree’s ability to heal.
• For sawing off smaller branches, place the
stop face of the saw on the branch. This
prevents unwanted movements of the saw
at the beginning of the cut. While applying
light pressure, guide the saw through the
branch from top to bottom.
)RUVDZLQJRIIODUJHUEUDQFKHV¿UVWPDNH
a relief cut. Saw through 1/3 of the branch
diameter from the bottom to top using the
top side of the chain bar. Then saw from
top to bottom for the other 2/3 using the
bottom side of the chain bar. Saw off longer
branches in sections in order to maintain
control over the location of impact.
IMPORTANT: It is recommended that
¿UVWWLPHXVHUVKRXOGDVD
minimum practice, cutting logs
on a saw-horse or cradle.
FELLING A TREE
When bucking and felling operations are
being performed by two or more persons at
the same time, the felling operations should
be separated from the bucking operation by a
distance of at least twice the height of the tree
being felled.
Trees should not be felled in a manner that
would endanger any person, strike any utility
line or cause any property damage. If the tree
does make contact with any utility line, the
FRPSDQ\VKRXOGEHQRWL¿HGLPPHGLDWHO\
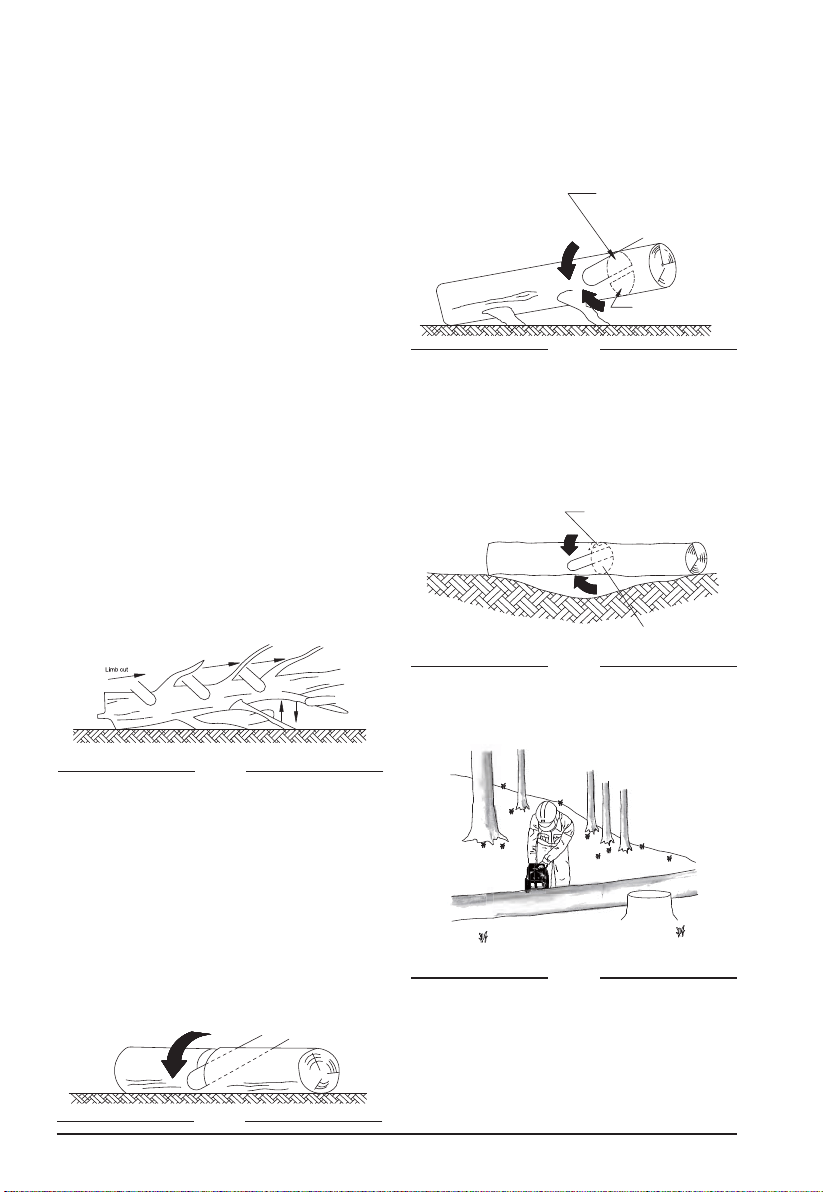
The chain saw operator should keep on
the uphill side of the terrain as the tree is
likely to roll or slide downhill after it is felled.
necessary before cuts are started.
The escape path should extend back and
diagonally to the rear of the expected line of
fall (Figure 8).
Before felling is started, consider the
natural lean of the tree, the location of
larger branches and the wind direction to
judge which way the tree will fall. Remove
dirt, stones, loose bark, nails, staples and
wire from the tree. Make the notch 1/3 the
diameter of the tree, perpendicular to the
direction of falls (Figure 9).
0DNHWKHORZHUKRUL]RQWDOQRWFKLQJFXW¿UVW
This will help to avoid pinching either the saw
chain or the chain bar when the second notch
is being made.
Danger zone
Escape
route
Escape
route
Description of felling: escape routes
Felling direction
Danger zone
Direction of fall
Notch
50 mm
Felling back cut
Hinge
Description of felling: undercutting
50 mm
16 WWW.SENIXTOOLS.COM
Log supported along the entire length
Cut from top (overbuck). Avoid cutting earth.
2nd cut overbuck (2/3 diameter)
to meet 1st cut (to avoid pinching)
1st cut underbuck
(1/3 diameter)
to avoid splintering
Log supported one end
2nd cut underbuck (2/3 diameter)
to meet 1st cut (to avoid pinching)
Log supported both ends
1st cut overbuck (1/3 diameter)
to avoid splintering
Bucking a log
Stand on uphill side when cutting because log may roll
FELLING BACK A CUT
LIMBING A TREE
BUCKING A LOG
Make the felling back cut at least 50 mm
higher than the horizontal notching cut (Figure
9). Keep the felling back cut parallel to the
horizontal notching cut. Make the felling back
cut so enough wood is left to act as a hinge.
The hinge wood keeps the tree from twisting
and falling in the wrong direction. DO NOT
cut through the hinge.
As the felling gets close to the hinge, the tree
should begin to fall. If there is any chance
that the tree may not fall in desired direction
or it may rock back and bind the saw chain,
stop cutting before the felling back cut is
complete and use wedges of wood, plastic or
aluminium to open the cut and drop the tree
along the desired line of fall.
When the tree begins to fall remove the chain
saw from the cut, stop the motor, put the
chain saw down, then use the retreat path
planned. Be alert for overhead limbs falling
and watch your footing.
Limbing is removing the branches from a
fallen tree. When limbing leave larger lower
limbs to support the log off the ground.
Remove the small limbs in one cut (Figure 10).
Branches under tension should be cut from
the bottom up to avoid binding the chain saw.
When the log is supported on one end,cut 1/3
the diameter from the underside (underbuck)
)LJXUH7KHQPDNHWKH¿QLVKHGFXWE\
RYHUEXFNLQJWRPHHWWKH¿UVWFXW
When the log is supported on both ends,
cut 1/3 the diameter from the top (overbuck)
)LJXUH7KHQPDNHWKH¿QLVKHGFXW
by underbucking the lower 2/3 to meet the
¿UVWFXW
When bucking on a slope always stand on the
uphill side of the log (Figure 14).
Bucking is cutting a log into lengths. It is
LPSRUWDQWWRPDNHVXUH\RXUIRRWLQJLV¿UP
and your weight is evenly distributed on both
feet. When possible, the log should be raised
and supported by the use of limbs, logs or
chocks. Follow the simple directions for easy
cutting. When the log is supported along its
entire length, it is cut from the top (overbuck)
(Figure 11).
To maintain complete control when cutting
through a log, release the cutting pressure
near the end of the cut without relaxing your
grip on the chain saw handles. Don’t let the
chain contact the ground. After completing the
cut, wait for the saw chain to stop before you
move the chain saw. Always stop the motor
before moving from tree to tree.
Fig. 10
Fig. 13
Fig. 14
Fig. 11
Fig. 12
Keep work off ground. Leave support limbs until log is cut.
Tree limbing
17WWW.SENIXTOOLS.COM
MAINTENANCE AND ADJUSTMENTS
• Clean the moulded plastic housing of the
chain saw using a soft brush and clean
cloth.
• DO NOT use water, solvents or polishes.
• Remove all debris, especially from the
motor cooling vents.
• Remove and brush clean the cover plate,
chain and chain bar after 1 to 3 hours of
use.
• Clean the area under the cover plate, the
drive sprocket and chain bar assembly
using a soft brush.
• Clean oil outlet with a clean cloth.
• If the chain saw is to be stored for a longer
period of time, clean chain and chain bar.
• STORE IN A SECURE, DRY PLACE OUT
OF THE REACH OF CHILDREN.
• DO NOT place other objects on the chain
saw.
• To prevent oil leakage, ensure machine is
left in a horizontal position.
• When storing machine in original packaging
the oil tank must be completely emptied.
CLEANING/STORAGE
CHECKING THE AUTOMATIC
CHAIN LUBRICATION
LUBRICATE SPROCKET
SHARPENING THE SAW CHAIN
Regularly check the functionality of the
automatic chain lubrication in order to prevent
overheating and the subsequent damage
to the chain bar and saw chain associated
with it. For this purpose, align the chain bar
tip against a smooth surface (board, cut-in
of a tree) and allow the chain saw to run.
If an increasing amount of oil appears, the
automatic chain lubrication functions properly.
Keep chain sharp. Your saw will cut faster
and more safely. A dull chain will cause undue
sprocket, guide bar, chain, and motor wear.
If you must force chain into wood and cutting
creates only sawdust with a few large chips,
then chain is dull.
3XUFKDVHDQHZFKDLQKDYH\RXUFKDLQ
VKDUSHQHGSURIHVVLRQDOO\DWDTXDOL¿HG
service center, or sharpen the chain
yourself using a proper sharpening kit. The
height difference between the cutting tip and
the ridge is the depth gauge setting (Fig. 16).
When you sharpen the cutting tip, the depth
gauge setting between the tip and the side
plate ridge will decrease. To maintain optimal
FXWWLQJSHUIRUPDQFHWKHULGJHKDVWREH¿OHG
down to achieve the recommended depth
gauge setting.
ON/OFF SWITCH
WARNING!
WARNING!
Wear heavy duty gloves when performing any
maintenance or service to this tool.
Always unplug the tool before performing any
service or maintenance on this tool.
Unplug chain saw from power source before
servicing. Severe injury or death could occur
from electrical shock or body contact with
moving chain. Cutting edges on chain are
sharp. Use protective gloves when handling
chain.
NOTE: It is not necessary to remove the
chain or bar when lubricating the sprocket.
1. Clean the bar and sprocket.
2. Using a grease gun, insert the tip of the
gun into the lubrication hole and inject
grease until it appears at the outside edge
of the sprocket tip (Fig. 15).
3. To rotate the sprocket release the chain
stop and pull the chain by hand until the
ungreased side of the sprocket is in line
with the grease hole. Repeat the lubrication
procedure.
Fig. 15
18 WWW.SENIXTOOLS.COM
A
B
C
D
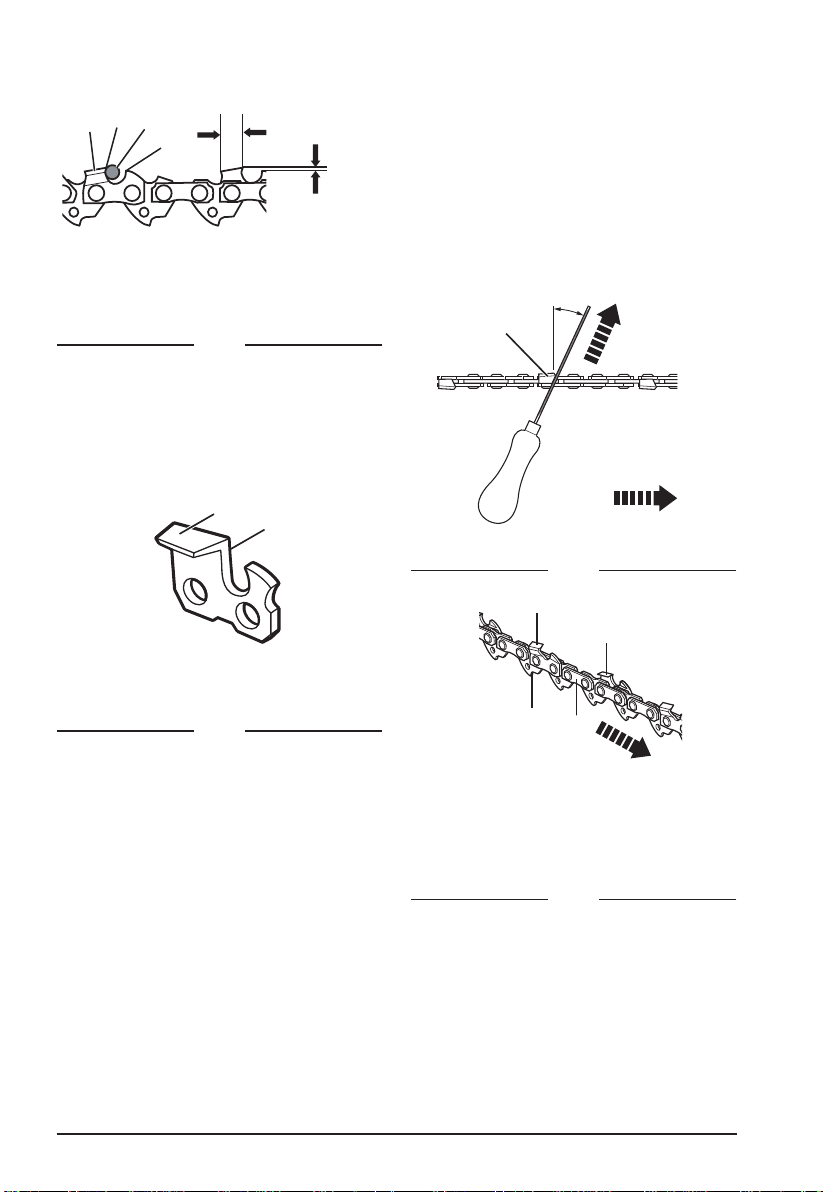
Cutter
Length
Depth Gauge
Setting 0.025 in.
A - Top Plate
B - Cutting Tip
C - File Position
D - Ridge
Fig. 16
Fig. 17
Fig. 18
Fig. 19
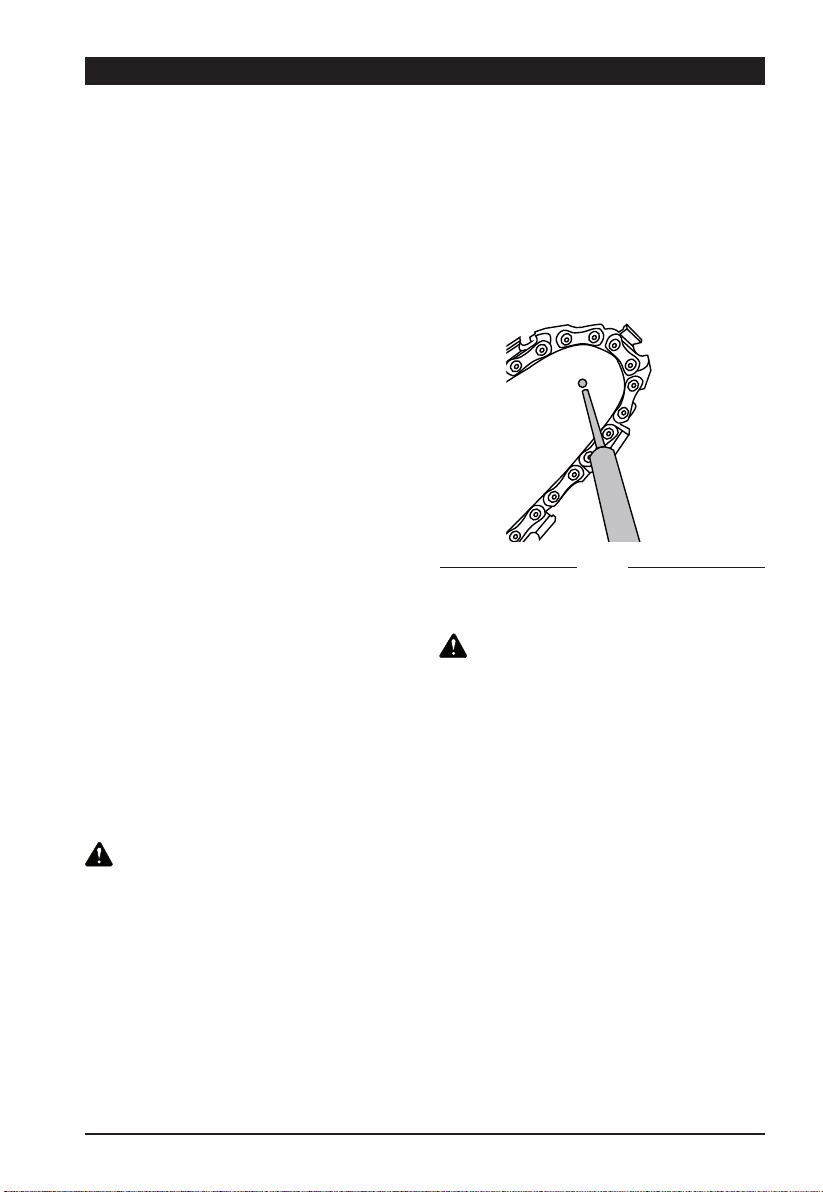
To sharpen the chain:
1. Using protective gloves, ensure the chain is
correctly tensioned on the guide bar.
8VHDURXQG¿OHZLWKDGLDPHWHUWLPHV
the cutting tooth depth. Make sure 20% of
WKH¿OHGLDPHWHULVDERYHWKHFXWWHU¶VWRS
plate (Fig. 17).
3. File at an angle perpendicular to the bar,
and at an angle of 25° to the direction of
travel (Fig. 18).
4. File each tooth from the inside towards
RXWVLGHRQO\)LOHRQHVLGHRIWKHFKDLQ¿UVW
then turn the saw around and repeat the
process.
• Sharpen each tooth equally by using the
same number of strokes.
• Keep all cutter lengths equal (Fig. 19).
Each time the cutting tip is sharpened the
cutting length is reduced. When the cutter
length is reduced to 0.16 inch (4 mm), the
chain is worn out and should be replaced.
• The depth gauge setting is also reduced
with each sharpening. Every 5 sharpenings
127($¿OHJXLGHLVDYDLODEOHIURPPRVW
chainsaw retailers and is the easiest way to
KROGWKH¿OHDWWKHFRUUHFWSRVLWLRQ
B
A
A - Top Plate
B - Side Plate
use a depth gauge measuring tool to check
the height between the cutting tip and the
ridge (Fig. 16). When necessary, use a
ÀDW¿OHWR¿OHGRZQWKHULGJHWRDFKLHYH
the .025 inch depth gauge setting. Depth
gauge measuring tools are available from
most chainsaws retailers.
• If the saw is not functioning properly, take
LWWRDTXDOL¿HGFKDLQVDZVHUYLFHFHQWHUWR
have the saw inspected. Use only identical
parts as listed in this manual.
25°
A
SAW CHAIN DIRECTION
Sharpening Angle
FILE
DIRECTION
Outside
Inside
A - Left-hand Cutter
A
B
C
D
A - Right-hand Cutter
B - Left-hand Cutter
C - Bumper Drive Link
D - Tie Strap
SAW CHAIN DIRECTION

19WWW.SENIXTOOLS.COM
Locking Knob
REPLACING THE SAW CHAIN
AND CHAIN BAR
REPLACING THE POWER CORD
If the supply cord of this power tool is
damaged, it must be replaced by a specially
prepared cord. Inspect the power cord and
plug often. If damaged, have replaced by a
TXDOL¿HGVHUYLFHGHDOHU
WARNING!
APPROVED SAW BAR/SAW CHAIN:
WARNING!
Do not connect the chain saw to extension
cord and power source before it is completely
assembled. Always use gloves when handling
the chain.
Replace chain when cutters are too worn
to sharpen or when chain breaks. Only use
replacement chain noted in this manual.
Always include new drive sprocket when
replacing chain. This will maintain proper
driving of chain.
When handling saw chains, always wear
protective gloves.
Model Number CSE15-M
Saw Bar:
Oregon, 18 inch,
180SDEA041
Saw Chain:
Oregon, 18” (457 mm),
3-;
3ODFHWKHVDZERG\RQD¿UPDQGOHYHO
surface.
2. Rotate the bar adjust locking knob
counterclockwise (Fig. 20) to remove the
cover from the saw’s body.
3. Wearing protective gloves, wrap the saw
chain around the chain bar, making sure
that the teeth are aimed in the direction of
rotation. The chain should be properly set
in the slot running along the entire outside
edge of the chain bar.
3ODFHWKHVDZFKDLQDURXQGWKHVSURFNHW
(Fig. 21) while lining up the slot in the chain
bar with the internal bolt at the base of the
saw and the chain tensioning pin in the
chain bar’s pin hole (Fig. 18). The chain
tensioning pin may need adjustment to
properly align with the hole in the chain bar.
Use the chain tensioning wheel to adjust its
ORFDWLRQXQWLOLW¿WVLQWKHFKDLQEDU
5. Turn the chain tensioning wheel to
preliminarily tighten the chain bar enough
Fig. 20
Internal Bolt
Chain Tensioning Pin
Sprocket
Fig. 21
Fig. 22
Model Number CSE12-M
Saw Bar:
Oregon, 16 inch,
160SDEA041
Saw Chain:
Oregon, 16” (406 mm),
3-;
that it stays in place. While holding the bar
still, place the cover back onto the saw.
Make sure the tab properly lines up with
the slot on the body of the saw (Fig. 22).
Lock the cover in place with the cover
locking knob by turning it clockwise until it
engages. Adjust the chain tension.

20 WWW.SENIXTOOLS.COM
PARTS
No. Part # Description Qty.
1 202028000087 Bar Adjustment Locking Knob 1
2 199001000490 Cover Assembly 1
3 207340100049 Retaining Ring 1
4 201035000003 Sprocket 1
16 199123000421 Oil Tank Cap Assembly 1
56 205001000098 Guide Bar 1
57 205001000022 Saw Chain 1
58 202009000168 Bar Sheath 1
Model: CSE12-M / CSE15-M

21WWW.SENIXTOOLS.COM
WARRANTY
2-year limited warranty on all Senix E series outdoor electric powered equipment.
FOR TWO YEARS from the original date of retail purchase this Senix product is warranted
against defects in materials or workmanship on power tools. Defective product will receive free
repair.*
This warranty does not cover normal wear of parts and components such as cutting chain, line
or blades nor does this warranty cover product transportation cost for warranty or service.
$Q\LPSOLHGZDUUDQW\JUDQWHGXQGHUVWDWHODZLQFOXGLQJZDUUDQWLHVRIPHUFKDQWDELOLW\RU¿WQHVV
for a particular purpose, are limited to three years from the date of purchase on power tools and
chargers and seven years on batteries. The manufacturer is not responsible for direct, indirect,
incidental or consequential damages. Some states and provinces do not allow limitations on
how long an implied warranty lasts and/or do not allow the exclusion or limitation of incidental
damages, so the above limitations and exclusions may not apply to you. This warranty gives
\RXVSHFL¿FOHJDOULJKWVDQG\RXPD\DOVRKDYHRWKHUULJKWVZKLFKYDU\IURPVWDWHWRVWDWHRU
province to province.
The YAT USA declines any responsibility in regard to civil liability arising from abusive use or not
in conformity with proper use and maintenance of the machine as described in the operator’s
manual.
YAT USA is not responsible for direct, indirect, incidental or consequential damages.
After the purchase, the manufacturer recommends proper maintenance of the machine and to
read the operator’s manual before using the machine.
*Original purchase receipt may be required for proof of purchase
For customer service contact us toll free at 1-800-261-3981 or Senixtools.com.
YAT USA, Inc. 6441 Hendry Road, Suite A, Charlotte, NC 28269
LIMITED TWO-YEAR WARRANTY
Additional Limitations
Warranty is subject to the following conditions:
• Warranty applies to the original purchaser at retail and is not transferrable*
• Warranty Registration at www.senixtools.com
7KHWRROKDVQRWEHHQPLVXVHGDEXVHGQHJOHFWHGDOWHUHGPRGL¿HGRUUHSDLUHGE\DQ\RQH
other than an authorized servicecenter
• Only genuine Senix accessories have been used with or on this product
• The tool has been subjected to normal wear and tear
• The tool has not been used for trade or professional purposes
• The tool has not been used for rental purposes
• This warranty only covers defects arising under normal usage and does not cover any
malfunction, failure or defect resulting from misuse, abuse (including overloading the product,
exposure to water or rain) accidents, neglect or lack of proper installation and improper
maintenance or storage.
To locate your nearest Senix service provider call toll free at 800-261-3981 or email us at

Motosierra eléctrica con
motor de 12/15 amperios
Manual del operador
Modelo: CSE12-M
CSE15-M
Si desea ponerse en contacto con el Servicio al cliente, llame al número 1-800-261-3981 o envíe un email a:
&216(59((67(0$18$/3$5$&2168/7$6)8785$6
TM
23WWW.SENIXTOOLS.COM
ÍNDICE
SEGURIDAD.........................................................23
CONOZCA SU HERRAMIENTA ….......................32
PIEZAS INCLUIDAS ...........................................32
ESPECIFICACIONES*..........................................32
PREPARACIÓN DE LA MOTOSIERRA................35
FUNCIONAMIENTO..............................................35
TÉCNICAS DE ASERRADO ….............................37
MANTENIMIENTO Y AJUSTES............................39
PIEZAS..................................................................42
GARANTÍA............................................................43
(O¿QGHHVWRVVtPERORVHVDWUDHUVX
atención a posibles peligros. Los símbolos
de seguridad y sus explicaciones merecen
toda su atención y entendimiento. Las
advertencias sobre seguridad NO eliminan
los peligros por sí mismas. Las instrucciones
o advertencias no sustituyen la toma
de medidas apropiadas para prevenir
accidentes.
Indica peligro GRAVE. El no seguimiento
de un símbolo de ADVERTENCIA PUEDE
ocasionar lesiones graves al usuario o a
terceros.
(ႋDGRGH&DOLIRUQLDVDEHTXHHႋH
producto contiene un producto químico
que causa cáncer, defectos de nacimiento
XRWURVGDxRVDOVLႋHPDUHSURGXFWLYR
Perforar, aserrar, lijar o manufacturar
productos de madera le puede exponer
DOSROYRGHPDGHUDXQDVXႋDQFLDTXH
HO(ႋDGRGH&DOLIRUQLDVDEHTXHFDXVD
cáncer. Evite inhalar el polvo de madera
o use una máscara u otras salvaguardas
como protección personal. Para más
información consulte
www.P65Warnings.ca.gov/woods.
/($\HQWLHQGDWRGDVODVLQႋUXFFLRQHV
GHHႋHPDQXDODQWHVGHXVDUHႋD
motosierra eléctrica. De no observarse
WRGDVODVLQႋUXFFLRQHVSURSRUFLRQDGDV
a continuación, podrían producirse
descargas eléctricas, fuegos y/o lesiones
físicas graves.
Indica peligro MODERADO. El no
seguimiento de un símbolo de PRECAUCIÓN
PODRÍA ocasionar daños a la propiedad o
lesiones al usuario o a terceros.
NOTA: Le advierte de la existencia de
información o instrucciones vitales para el
funcionamiento o mantenimiento del equipo.
PROPOSICIÓN 65 DE
CALIFORNIA
ADVERTENCIA:
ADVERTENCIA:
ADVERTENCIA:
PRECAUCIÓN:
Indica un peligro EXTREMO. El no
VHJXLPLHQWRGHXQVtPERORGH3(/,*52
OCASIONARÁ lesiones graves o la muerte
del usuario o de terceros.
PELIGRO:
(ႋHSURGXFWRSXHGHH[SRQHUDOXVXDULR
DVXႋDQFLDVTXtPLFDVHQWUHHOODV
al petróleo, gasolina, diésel y otros
productos derivados del petróleo que el
(ႋDGRGH&DOLIRUQLDVDEHTXHSURGXFHQ
cáncer, defectos de nacimiento u otros
GDxRVDOVLႋHPDUHSURGXFWLYR(ႋDV
exposiciones pueden ocurrir en, y entorno
DFDPSRVGHSHWUyOHRUH¿QHUtDVSODQWDV
químicas, operaciones de transporte y
almacenamiento, tales como tuberías,
WHUPLQDOHVPDUtWLPRVFDPLRQHVFLႋHUQD
\RWUDVLQႋDODFLRQHV\HTXLSRV3DUDPiV
información consulte: www.P65Warnings.
ca.gov/petroleum.
¡ADVERTENCIA!
SEGURIDAD
24 WWW.SENIXTOOLS.COM
Para no cometer errores que podrían
causar lesiones graves, NO conecte la
motosierra a la fuente de alimentación
KDႋDTXHKD\DOHtGR\HQWHQGLGRODV
VLJXLHQWHVLQႋUXFFLRQHV
ADVERTENCIA:
Tenga en cuenta el entorno de trabajo.
Extreme las precauciones al cortar
UDPDVRUHWRxRVSHTXHxRVSRUTXHHO¿QR
PDWHULDOSRGUtDREႋUXLUODPRWRVLHUUD\
VDOLUGHVSHGLGRKDFLDXႋHGRKDFHUOH
perder el equilibrio. NO opere la
motosierra para cortar un árbol a menos
TXHKD\DVLGRHVSHFt¿FDPHQWHHQWUHQDGR
para hacerlo. Al cortar una rama bajo
WHQVLyQSUHႋHDWHQFLyQDOUHERWHSDUD
que no le golpee al liberarse la tensión de
ODV¿EUDV
ADVERTENCIA:
/HDWRGDVODVDGYHUWHQFLDVHLQႋUXFFLRQHV
de seguridad. De no observarse todas
ODVLQႋUXFFLRQHVSURSRUFLRQDGDV
a continuación, podrían producirse
descargas eléctricas, fuegos y/o lesiones
físicas graves.
ADVERTENCIA:
Al utilizar la herramienta debe seguir
WRGDVODVLQႋUXFFLRQHVGHVHJXULGDG/HD
HႋDVLQႋUXFFLRQHVDQWHVGHXWLOL]DUOD
herramienta para asegurar la seguridad
del operador y espectadores. Conserve
HႋDVLQႋUXFFLRQHVSDUDFRQVXOWDUODVHQ
el futuro.
MEDIDAS IMPORTANTES DE SEGURIDAD
ADVERTENCIA:
LEA TODAS LAS INSTRUCCIONES ANTES
DE UTILIZAR LA HERRAMIENTA
3DUDREWHQHULQIRUPDFLyQVREUHXELFDFLyQ\
compras, llame al número 1-800-261-3981.
• Lea las instrucciones con atención.
Conozca los controles y el uso correcto de
la herramienta.
• NO opere la herramienta si está cansado,
HQIHUPRREDMRODLQÀXHQFLDGHODOFRKRO
drogas o remedios.
• Nunca permita que los niños utilicen la
herramienta. Los adolescentes deben
recibir entrenamiento, estar acompañados
y supervisados por un adulto. Nunca
permita que ningún adulto opere la
herramienta sin las instrucciones
adecuadas.
• Todas las protecciones y accesorios de
seguridad deben estar correctamente
instalados antes de utilizar la herramienta.
• Examine la herramienta antes de
utilizarla. Reemplace las piezas
dañadas. Compruebe si presenta
fugas de combustible. Compruebe que
WRGDVODV¿MDFLRQHVHVWiQHQVXOXJDU\
¿UPHV5HHPSODFHODVSLH]DVTXHHVWpQ
agrietadas, rotas o dañadas en modo
alguno. NO opere la herramienta con
SLH]DVÀRMDVRGDxDGDV
3UHVWHDWHQFLyQDOULHVJRGHOHVLRQHVDOD
cabeza, manos y pies.
• Examine con atención el área de trabajo
antes de poner la herramienta en
funcionamiento.
Retire piedras, vidrio quebrado, clavos,
cables, cuerdas y demás objetos que
podrían salir despedidos o enredarse en la
herramienta.
• Despeje el área de niños, espectadores y
PDVFRWDV0DQWpQJDORVDXQUDGLRGH
pies (15 m) como mínimo. Aun así, están
en peligro de que los alcance un objeto
GHVSHGLGR3LGDDORVHVSHFWDGRUHVTXH
lleven protección ocular. Si se le acerca
alguien, detenga la herramienta de
inmediato.
• Apriete el control de aceleración y
compruebe que vuelve automáticamente
a la posición de inactividad. Realice todos
los ajustes o reparaciones antes de usar la
herramienta.
12FDPELHODFRQ¿JXUDFLyQGHOFRQWURODGRU
del motor ni lo exceda en velocidad.
• Este aparato solo está diseñado para un
XVRGRPpVWLFRRFDVLRQDO
25WWW.SENIXTOOLS.COM
MIENTRAS ESTÁ EN FUNCIONAMIENTO
• Use anteojos de seguridad conformes
FRQORVHႋiQGDUHV$16,,6($=
y que lleven dicho marcaje. Use
protecciones auditivas para operar este
aparato. Utilice una mascarilla antipolvo si
la tarea que va a realizar crea polvo.
• Lleve pantalones robustos y largos, botas,
guantes y una camisa de manga larga.
NO use ropa holgada, joyas, pantalones
cortos, sandalias o vaya descalzo. Amarre
su cabello por encima de los hombros.
• Use la herramienta cuando haya
VX¿FLHQWHOX]QDWXUDORFRQXQDEXHQD
OX]DUWL¿FLDO
• (YLWHSXHႋDVHQPDUFKDDFFLGHQWDOHV
Ubíquese en posición de comienzo
de tarea siempre que tire del cordón
de puesta en marcha. El operador y la
herramienta deben estar en posición
estable al ponerla en marcha. Consulte la
VHFFLyQ,17(5583725'((1&(1','2
$3$*$'2
• Use la herramienta adecuada. 8VHHႋD
KHUUDPLHQWDVRORSDUDVX¿Q
• Sujete la herramienta siempre con ambas
PDQRVFXDQGRODHVWpRSHUDQGR0DQWHQJD
XQDJDUUH¿UPHFRQDPEDVPDQRR
agarres.
• NO se estire demasiado. Mantenga
siempre una posición adecuada y
equilibrada.
3UHVWHHVSHFLDODWHQFLyQDOWUDEDMDUHQ
escalones, pendientes pronunciadas o
OXJDUHVLQFOLQDGRV3DUDHYLWDUOHVLRQHV
graves, NO opere la herramienta mientras
está sobre una escalera de mano o tejado.
• Mantenga las manos, el rostro y los pies
alejados de todas las partes móviles. NO
toque o trate de detener las partes móviles.
• NO toque el motor o el silenciador. Estas
partes alcanzan altas temperaturas durante
el funcionamiento de la herramienta, e
incluso cuando está apagada.
• NO opere la herramienta a más velocidad
de la necesaria para realizar el trabajo.
NO haga funcionar la herramienta a alta
YHORFLGDGFXDQGRQRODHVWpXWLOL]DQGR
• NO fuerce la herramienta. Si la utiliza a
la velocidad para la que está hecha, la
herramienta realizará un trabajo mejor y
más seguro.
• Detenga siempre la herramienta cuando
se demora la operación o cuando
camina de una ubicación a otra.
• Antes de colocar la herramienta en el
suelo, COMPRUEBE siempre que el motor
está completamente apagado y que todas
las partes móviles se detuvieron.
• Si golpea o se enreda con un objeto
extraño, apague inmediatamente la
herramienta y compruebe si sufrió daños.
NO opere la herramienta antes de reparar
el daño. NO opere la herramienta con
SLH]DVÀRMDVRGDxDGDV
• Desenchufe la herramienta para
realizarle operaciones de mantenimiento
o reparaciones.
• 8VHVRORSLH]DVGHUHSXHႋR\
accesorios originales del fabricante
(OEM). El uso de otras piezas o accesorios
podría causar lesiones graves al usuario,
daños al aparato y anular la garantía.
• Mantenga la herramienta limpia. Retire
con cuidado la vegetación y residuos que
podrían bloquear las partes móviles.
• Para disminuir el peligro de fuegos,
mantenga las ranuras de ventilación
OLEUHVGHSDႋRKRMDVRJUDVDH[FHVLYD
• Si el aparato comienza a vibrar de modo
anómalo, detenga la herramienta de
inmediato. Examine la herramienta para
conocer la causa de la vibración. Las
vibraciones generalmente indican que tiene
un problema.
No deje que dedos toquen los terminales
GHOHQFKXIHDOLQႋDODURUHWLUDUOD
alargadera de corriente del tomacorriente.
SEGURIDAD ELÉCTRICA
ADVERTENCIA:
1. Las herramientas con doble
DLVODPLHQWRHႋiQHTXLSDGDVFRQXQ
enchufe polarizado, una clavija es
más ancha que la otra, y requieren
utilizarse con una alargadera de
corriente polarizada. El enchufe de la
motosierra encaja en una alargadera
de corriente polarizada solo en una
dirección. Si el enchufe no encaja en
la alargadera de corriente, gírelo. Si
aun así el enchufe no encaja, busque
una alargadera de corriente polarizada.
Una alargadera de corriente polarizada
solo se conecta a un tomacorriente
polarizado. Este enchufe encajará en
el tomacorriente polarizado en una
sola dirección. Si el enchufe no encaja
en la alargadera de corriente, gírelo.

26 WWW.SENIXTOOLS.COM
Si aun así no encaja, consulte con un
HOHFWULFLVWDFDOL¿FDGRSDUDTXHLQVWDOH
un tomacorriente apropiado. No cambie
o altere el enchufe, receptáculo de la
alargadera de corriente o enchufe de la
alargadera de corriente en modo alguno.
2. El aislamiento doble elimina la necesidad
de utilizar un cable de alimentación de
tres cables y un sistema de suministro
HOpFWULFRFRQWRPDDWLHUUD$SOLFDEOHVROR
a herramientas de Clase II (con doble
aislamiento). Esta motosierra es una
herramienta con doble aislamiento.
Se debe proporcionar protección DGFCI
(Interruptor de circuito de falla a tierra)
en todos los circuitos o salidas que se
utilizarán para sierras eléctricas de cadena
\KHUUDPLHQWDVHOpFWULFDVSDUDSDႋR\
jardín. Hay receptáculos disponibles con
protección GFCI integrada y se deben
utilizar como medida de protección.
ADVERTENCIA:
(ODLVODPLHQWRGREOH12HVVXႋLWXWLYR
de las medidas de precaución normales
TXHVHGHEHQWRPDUDORSHUDUHႋD
herramienta.
• Protección contra descargas
eléctricas: Evite el contacto corporal
FRQVXSHU¿FLHVFRQWRPDDWLHUUD3RU
ejemplo, tuberías de metal o vallas
metálicas.
3. ANTES de enchufar la herramienta,
COMPRUEBE que el voltaje del
tomacorriente se corresponde con el
PDUFDGRHQODHWLTXHWDGHHVSHFL¿FDFLRQHV
de la herramienta. NO use herramientas
FODVL¿FDGDVFRPRVROR&$FRQXQ
suministro de corriente CC.
4. NO exponga la herramienta a la lluvia o
a la humedad, y no la utilice en lugares
mojados o húmedos. El agua que entra
HQXQDKHUUDPLHQWDHOpFWULFDDXPHQWDUiHO
ULHVJRGHGHVFDUJDHOpFWULFD
5. Si operar la herramienta eléctrica
en lugar húmedo es inevitable, USE
SIEMPRE un interruptor de circuito
de falla a tierra para alimentar la
herramienta. UTILICE SIEMPRE
guantes de goma y calzado de
HOHFWULFLႋDFXDQGRXWLOLFHODKHUUDPLHQWD
en lugares húmedos.
6. Para disminuir el riesgo de descargas
eléctricas, use únicamente una alargadera
de corriente para exteriores, tales como los
siguientes tipos: SW-A, SOW-A, STW-A,
STOW-A, SJW-A, SJOW-A, SJTW-A. o
SJTOW-A.
7. EXAMINE los cables de la herramienta
para observar si presentan daños. Los
cables dañados los debe reparar un centro
GHVHUYLFLRFHUWL¿FDGRASEGÚRESE de
conocer la ubicación del cable en todo
PRPHQWR\PDQWpQJDORELHQDOHMDGRGHOD
cuchilla de corte.
8. NO maltrate el cable. NUNCA use el
cable para transportar la herramienta ni
tire del mismo para desenchufarlo del
tomacorriente. Mantenga el cable alejado
GHOFDORUDFHLWHERUGHV¿ORVRVRSDUWHV
móviles. Reemplace de inmediato los
cables dañados. Los cables dañados o
enredados aumentan el riesgo de descarga
HOpFWULFD
ALARGADERAS DE CORRIENTE
Utilice una alargadera de corriente
adecuada. Utilice SOLO cables listados
por Underwriters Laboratories (UL). Otras
alargaderas de corriente provocarán una
caída en el voltaje de la línea, lo que resultará
HQSpUGLGDGHSRWHQFLD\VREUHFDOHQWDPLHQWR
de la herramienta.
3DUDHVWDKHUUDPLHQWDVHUHFRPLHQGDXQD
alargadera de corriente de un tamaño AWG
(Calibre de Cable Americano) del al menos
calibre 14 para alargaderas de corriente
de 25 pies (7,62 m) o menos de longitud.
Utilice un calibre 12 para una alargadera de
corriente de 50 pies (15,24 m) de longitud. No
se recomienda el uso de alargaderas de 100
pies (30,48 m) o de mayor longitud.
Recuerde, un cable de menor calibre
posee mayor capacidad que uno de mayor
calibre (un cable de calibre 14 tiene más
capacidad que un cable de calibre 16. Un
cable de calibre 12 tiene más capacidad que
uno de calibre 14). En caso de duda, use un
cable de número menor.
27WWW.SENIXTOOLS.COM
Calibre mínimo para alargaderas
de corriente
Amperaje
Cómo asegurar una alargadera de
corriente
Voltios
Longitud total del
cable en pies y metros
Más de/no más de AWG
0-6
6-10
10-12
18
18
16
16
16
16
16
14
14
14
12
12
12-16 14 12 No recomendado
ADVERTENCIAS GENERALES
SOBRE SEGURIDAD PARA
HERRAMIENTAS ELÉCTRICAS
Mantenga la alargadera de corriente fuera
del área de trabajo. Coloque el cable
de modo que no pueda engancharse
HQDUEXႋRVVHWRVWURQFRVGHiUERO
FRUWDGRUDVGHSDႋRXRWUDVREႋUXFFLRQHV
PLHQWUDVHႋiRSHUDQGRODPRWRVLHUUD
Examine las alargaderas de corriente
DQWHVGHFDGDXVR6LHႋXYLHUDQGDxDGDV
reemplácelas de inmediato.
Nunca utilice una herramienta con el cable
dañado ya que si entra en contacto con
dicha área podría sufrir una descarga
eléctrica y lesiones graves.
Lea todas las advertencias e instrucciones
de seguridad. De no observarse todas las
instrucciones proporcionadas a continuación,
SRGUtDQSURGXFLUVHGHVFDUJDVHOpFWULFDV
fuegos y/o lesiones físicas.
ATENCIÓN:
ADVERTENCIA:
ADVERTENCIA:
120 V 25 50 100 150
Conserve todas las instrucciones y
advertencias para futuras consultas.
(OWpUPLQR³KHUUDPLHQWDHOpFWULFD´HQODV
DGYHUWHQFLDVVHUH¿HUHDVXKHUUDPLHQWD
HOpFWULFDRSHUDGDFRQFRUULHQWHFDEOHDGD
RDVXKHUUDPLHQWDHOpFWULFDRSHUDGDFRQ
baterías (inalámbrica).
1. Seguridad en el área de trabajo
a. Conserve el área de trabajo limpia y
bien iluminada. Las áreas desordenas
invitan a los accidentes.
b. NORSHUHKHUUDPLHQWDVHOpFWULFDVHQ
ambientes explosivos, como ante la
presencia de líquidos, gases o polvos
LQÀDPDEOHV/DVKHUUDPLHQWDVHOpFWULFDV
generan chispas que pueden hacer arder
el polvo o los vapores.
c. Mantenga a los niños y espectadores
DOHMDGRVPLHQWUDVHႋpRSHUDQGRXQD
herramienta eléctrica. Las distracciones
pueden hacer que pierda el control.
2. Seguridad eléctrica
a. Los enchufes de las herramientas
eléctricas deben coincidir con el
tomacorriente. 1XQFDPRGL¿TXH
el enchufe de ninguna manera. NO
use ningún enchufe adaptador con
KHUUDPLHQWDVHOpFWULFDVSXHVWDVD
WLHUUD/RVHQFKXIHVVLQPRGL¿FDU\ORV
tomacorrientes coincidentes reducirán el
ULHVJRGHGHVFDUJDHOpFWULFD
b. (YLWHHOFRQWDFWRFRQVXSHU¿FLHV
SXHႋDVDWLHUUDFRPRWXEHUtDV
radiadores, cocinas o refrigeradores.
+D\XQULHVJRPD\RUGHGHVFDUJDHOpFWULFD
si su cuerpo está a tierra.
c. NOH[SRQJDODVKHUUDPLHQWDVHOpFWULFDVD
la lluvia o a condiciones húmedas. El agua
TXHLQJUHVDDXQDKHUUDPLHQWDHOpFWULFD
DXPHQWDUiHOULHVJRGHGHVFDUJDHOpFWULFD
d. NO maltrate el cable. Nunca use el cable
para transportar, desenchufar o tirar de la
KHUUDPLHQWDHOpFWULFD0DQWHQJDHOFDEOH
DOHMDGRGHOFDORUDFHLWHERUGHV¿ORVRV
o partes móviles. Los cables dañados o
enredados aumentan el riesgo de descarga
HOpFWULFD
e. Cuando opere una herramienta eléctrica
al aire libre, use una alargadera de
corriente para uso en exteriores. El uso
de un cable apto para exteriores reduce el
ULHVJRGHGHVFDUJDHOpFWULFD

28 WWW.SENIXTOOLS.COM
f. Si no puede evitar operar una
herramienta eléctrica en un lugar
K~PHGRXVHXQVXPLQLႋURHOpFWULFR
protegido mediante un dispositivo
de corriente residual (DCR) El uso de
un DCR reduce el riesgo de descarga
HOpFWULFD
3. Seguridad personal
a. 0DQWpQJDVHDOHUWDSUHႋHDWHQFLyQD
ORTXHHႋiKDFLHQGR\XVHHOVHQWLGR
común cuando opere una herramienta
eléctrica. NO use una herramienta
HOpFWULFDPLHQWUDVHVWpFDQVDGRREDMROD
LQÀXHQFLDGHDOFRKROGURJDVRUHPHGLRV
Un momento de descuido durante la
RSHUDFLyQGHKHUUDPLHQWDVHOpFWULFDV
puede provocar una lesión personal grave.
b. Use equipos de protección personal.
Siempre use protección para la vista. Los
equipos de protección que utilice para las
condiciones adecuadas, como mascarillas
antipolvo, zapatos de seguridad
antideslizantes o protección auditiva,
reducirán las lesiones personales.
c. Evite arranques accidentales. Asegúrese
TXHHOLQWHUUXSWRUHVWpHQODSRVLFLyQGH
OFF (apagado) antes de conectar la fuente
de energía y/o el bloque de baterías,
recoger la herramienta o transportarla.
7UDQVSRUWDUKHUUDPLHQWDVHOpFWULFDVFRQ
el dedo en el interruptor o energizar
KHUUDPLHQWDVHOpFWULFDVFRQHOLQWHUUXSWRU
encendido, invita a accidentes.
d. 5HWLUHFXDOTXLHUOODYHGHDMXႋHDQWHVGH
encender la herramienta eléctrica. Una
OODYHTXHVHKD\DGHMDGR¿MDGDDXQDSDUWH
JLUDWRULDGHODKHUUDPLHQWDHOpFWULFDSXHGH
dar como resultado una lesión personal.
e. 12VHHႋLUHGHPDVLDGRFRQWDOGH
alcanzar. Mantenga su posición de pie
y su equilibrio en todo momento. Esto
permite un mejor control de la herramienta
HOpFWULFDHQVLWXDFLRQHVLQHVSHUDGDV
f. 9tႋDVHFRUUHFWDPHQWH12 vista ropa
suelta ni use joyas.
Mantenga su cabello, ropa y guantes
alejados de las partes móviles. La ropa
suelta, las joyas o el cabello largo pueden
atascarse en las partes móviles.
g. 6LVHVXPLQLႋUDQGLVSRVLWLYRVSDUDOD
FRQH[LyQGHLQႋDODFLRQHVGHH[WUDFFLyQ
y colección de polvo, asegúrese
TXHHႋpQFRQHFWDGRV\TXHVHXVHQ
correctamente. El uso del colector
de polvo puede reducir los peligros
relacionados con el polvo.
4. Uso y cuidado de la
herramienta eléctrica
a. NO fuerce la herramienta eléctrica. Use
ODKHUUDPLHQWDHOpFWULFDSDUDVXDSOLFDFLyQ
/DKHUUDPLHQWDHOpFWULFDFRUUHFWDKDUi
mejor y más seguro el trabajo a la
velocidad para la que ha sido diseñada.
b. NO use la herramienta eléctrica si el
interruptor no la enciende y apaga.
&XDOTXLHUKHUUDPLHQWDHOpFWULFDTXHQR
pueda ser controlada con el interruptor es
peligrosa y debe repararse.
c. Desconecte el enchufe de la fuente de
energía y/o del bloque de baterías de
la herramienta eléctrica antes de hacer
FXDOTXLHUDMXႋHFDPELDUDFFHVRULRVR
guardar la herramienta. Tales medidas de
seguridad preventivas reducen el riesgo de
TXHODKHUUDPLHQWDHOpFWULFDVHHQFLHQGD
accidentalmente.
d. Almacene las herramientas que no
HႋiQHQXVRIXHUDGHODOFDQFHGHORV
niños. NO permita que personas no
IDPLOLDUL]DGDVFRQODKHUUDPLHQWDHOpFWULFD
o con estas instrucciones operen la
KHUUDPLHQWD/DVKHUUDPLHQWDVHOpFWULFDV
son peligrosas en manos de usuarios sin
capacitación.
e. Realice un mantenimiento a las
herramientas eléctricas. 9HUL¿TXHVLKD\
una mala alineación o si hay una traba
de las partes móviles, ruptura de partes y
cualquier otro problema que pueda afectar
ODRSHUDFLyQGHODVKHUUDPLHQWDVHOpFWULFDV
6LVHGDxDUHSDUHODKHUUDPLHQWDHOpFWULFD
antes de usarla. Muchos accidentes son
FDXVDGRVSRUKHUUDPLHQWDVHOpFWULFDVFRQ
mal mantenimiento.
f. &RQVHUYHOLPSLDV\D¿ODGDVODV
herramientas de corte. Las herramientas
de corte con un mantenimiento adecuado
son menos propensas a trabarse y son
más fáciles de controlar.
g. Use la herramienta eléctrica y cualquier
accesorio y brocas, etc. según se indica
HQHႋDVLQႋUXFFLRQHVWRPDQGRHQ
cuenta las condiciones del trabajo y la
tarea a realizar.
(OXVRGHODKHUUDPLHQWDHOpFWULFDSDUD
operaciones distintas de las previstas

29WWW.SENIXTOOLS.COM
HႋpVREUHXQDVXSHU¿FLH¿MDVHJXUD
y nivelada. 6XSHU¿FLHVUHVEDORVDVR
inestables, como escaleras de pie, pueden
FDXVDUXQDSpUGLGDGHHTXLOLEULRRFRQWURO
de la motosierra.
• &XDQGRFRUWHXQDUDPDTXHHႋpEDMR
WHQVLyQHႋpDOHUWDSRUVLUHERWD
&XDQGRODWHQVLyQGHODV¿EUDVGHPDGHUD
se libera, la rama que rebota puede
golpear al operador y/o lanzar la motosierra
fuera de control.
• Use una precaución extrema cuando
corte maleza y plantones. El material
más delgado puede atrapar la cadena de
la sierra y saltar hacia usted o hacer que
pierda su equilibrio.
• Transporte la motosierra por el asa
delantera con la motosierra apagada y
alejada de su cuerpo. Cuando transporte
o guarde la motosierra, siempre inserte
la cubierta de la espada. Un manejo
adecuado de la motosierra reducirá la
probabilidad de contacto accidental con la
cadena de la sierra en movimiento.
• 6LJDODVLQႋUXFFLRQHVGHOXEULFDFLyQ
tensión de la cadena y cambio de
accesorios. Una cadena mal tensionada
o lubricada puede romperse o aumentar la
posibilidad de rebote.
• Mantenga las asas secas, limpias y sin
aceite o grasa.
Las asas grasosas son resbalosas y
FDXVDQODSpUGLGDGHFRQWURO
• Úsela solamente para cortar madera. NO
use la motosierra para otros propósitos.
3RUHMHPSORNO use la motosierra para
cortar plástico, materiales de albañilería u
otros materiales de construcción que no
sean de madera. El uso de la motosierra
para operaciones distintas de las previstas
podría dar como resultado una situación
peligrosa.
ADVERTENCIAS DE SEGURIDAD
DE LA MOTOSIERRA
• Mantenga todas las partes del cuerpo
DOHMDGDVGHODPRWRVLHUUDFXDQGRHႋp
en funcionamiento. Antes de arrancar
ODPRWRVLHUUDDVHJ~UHVHTXHQRHVWp
en contacto con nada. Un momento de
descuido mientras opera la motosierra,
puede hacer que se enrede con su ropa o
cuerpo.
• 6LHPSUHVRႋHQJDODPRWRVLHUUDFRQ
VXPDQRGHUHFKDHQHODVDSRႋHULRU\
su mano izquierda en el asa delantera.
Sostener la motosierra con las manos
opuestas aumenta el riesgo de lesión
personal y nunca debe hacerse.
NOTA:3DUDODVPRWRVLHUUDVGLVHxDGDVFRQ
la espada del lado izquierdo, la referencia
PDQRGHUHFKD\PDQRL]TXLHUGDHVWi
invertida.
• Sujete la herramienta solo por las
VXSHU¿FLHVGHDJDUUHDLVODGDV La
motosierra puede entrar en contacto con
cables ocultos o con su propio cable. Las
motosierras que entran en contacto con
XQFDEOHYLYRRFDUJDGRSXHGHQKDFHU
que las partes metálicas expuestas de la
KHUUDPLHQWDHOpFWULFDVHFDUJXHQ\GDUOHDO
RSHUDGRUXQDGHVFDUJDHOpFWULFD
• Use gafas de seguridad y protección
auditiva. Se recomienda usar equipos
adicionales para la cabeza, las manos,
las piernas y los pies. Una vestimenta
protectora adecuada reducirá las lesiones
personales causadas por escombros que
vuelen o contacto accidental con la cadena
de la sierra.
• NO opere la motosierra trepado encima
de un árbol. La operación de la motosierra
mientras está trepado encima de un
árbol puede dar como resultado lesiones
personales.
• Siempre mantenga su posición de pie
y opere la motosierra sólo cuando
podría dar como resultado una situación
peligrosa.
5. Reparaciones
a. Haga reparar su herramienta eléctrica
FRQXQUHSDUDGRUFDOL¿FDGRXWLOL]DQGR
VRODPHQWHSLH]DVGHUHSXHႋRLGpQWLFDV
Esto asegurará que se mantenga la
VHJXULGDGGHODKHUUDPLHQWDHOpFWULFD
El rebote puede ocurrir cuando la punta de la
espada toca un objeto o cuando la madera
se cierra y pincha la cadena de la sierra en
el corte.
El contacto con la punta en algunos casos
puede causar una repentina reacción inversa,
haciendo que la espada rebote y apunte
hacia el operador.
Causas y prevención de rebote por
parte del operador

30 WWW.SENIXTOOLS.COM
Si la cadena de la sierra se pincha a lo largo
de la parte superior de la espada, entonces
pVWDSRGUtDHPSXMDUODHVSDGDUiSLGDPHQWH
apuntando hacia el operador.
Cualquiera de estas reacciones podría hacer
que pierda el control de la sierra, lo que
podría causar una lesión personal grave.
NO se fíe exclusivamente de los dispositivos
de seguridad integrados en su sierra. Como
usuario de una motosierra, debe tomar varios
pasos para hacer que en sus trabajos de tala
no ocurran accidentes o lesiones.
El rebote es el resultado de un mal uso
de la herramienta y/o de procedimientos o
condiciones de operación incorrectos, los que
pueden evitarse tomando las precauciones
que se indican a continuación:
• 0DQWHQJDXQDJDUUH¿UPH con los dedos
pulgares y los demás dedos formando
un círculo alrededor de las asas de la
motosierra, con ambas manos en la
sierra, y coloque su cuerpo y brazos de tal
manera que pueda resistir las fuerzas del
rebote.
Las fuerzas del rebote puede controlarlas
el operador, si se toman las precauciones
correctas. NO suelte la motosierra.
• 12VHHႋLUHGHPDVLDGRFRQWDOGH
alcanzar, y NO corte por encima de
la altura de su hombro. Esto ayuda a
prevenir un contacto accidental con la
punta y permite un mejor control de la
motosierra en situaciones inesperadas.
• Sólo use las espadas y cadenas de
UHSXHႋRTXHHVSHFL¿TXHHOIDEULFDQWH
Un reemplazo incorrecto de las espadas
y cadenas puede causar la ruptura de la
cadena y/o un rebote.
• 6LJDODVLQႋUXFFLRQHVGHD¿ODGXUD\
mantenimiento del fabricante para la
cadena de la sierra. Reducir la altura del
indicador de profundidad puede conllevar a
un mayor rebote.
CONSERVE ESTAS
INSTRUCCIONES
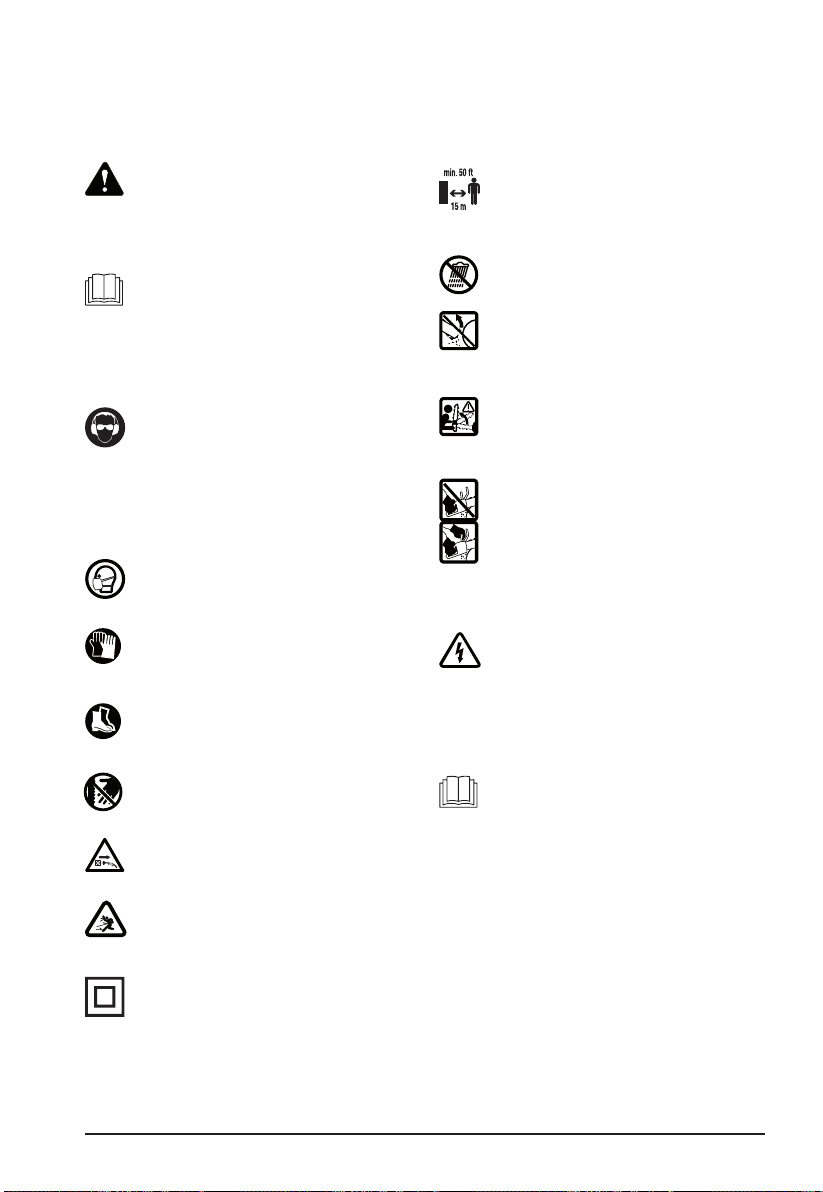
31WWW.SENIXTOOLS.COM
SÍMBOLO DE ALERTA DE
SEGURIDAD
Indica peligro, advertencia o precaución.
3XHGHXWLOL]DUVHHQFRQMXQWRFRQRWURV
símbolos o ilustraciones.
MANTENER ALEJADOS A LOS
ESPECTADORES
ADVERTENCIA: Mantenga a todos
los espectadores, especialmente a los
niños y mascotas, alejados al menos
50 pies (15 m) del área de trabajo.
ADVERTENCIA: NO exponer a la
lluvia.
ADVERTENCIA: Evite cualquier
contacto de la punta de la espada con
objetos.
ADVERTENCIA: El contacto de la
punta con un objeto puede hacer que
la espada se mueva de pronto hacia
arriba o hacia atrás y cause lesiones
graves.
ADVERTENCIA: Utilice siempre
ambas manos para operar la
motosierra.
PROTECCIÓN CONTRA
DESCARGAS ELÉCTRICAS
Evite el contacto corporal con
VXSHU¿FLHVFRQWRPDDWLHUUDSRU
ejemplo, pasamanos de metal, postes
GHOX]HWF/DVHJXULGDGHOpFWULFD
se puede mejorar aún más mediante
el uso de un dispositivo de corriente
residual (RCD) de alta sensibilidad (30
mA / 30mS).
LEA EL MANUAL DEL OPERADOR
ADVERTENCIA: Lea el manual o
manuales del operador y siga todas
las advertencias y medidas de
seguridad. De no hacerlo, el operador
y/o espectadores pueden sufrir
lesiones graves.
LEA EL MANUAL DEL OPERADOR
ADVERTENCIA: El uso de un RDC o
de otro disyuntor de corriente no exime
al operador de tomar las medidas de
seguridad indicadas en este manual.
UTILICE PROTECCIONES OCULARES Y
AUDITIVAS
ADVERTENCIA: Los objetos
despedidos y el ruido fuerte pueden
causar lesiones oculares graves y
SpUGLGDGHRtGR8WLOLFHSURWHFFLRQHV
oculares conformes con los estándares
actuales ANSI / ISEA Z87.1 y
protecciones auditivas al operar esta
herramienta. Utilice una máscara facial
completa cuando sea necesario.
UTILICE MÁSCARA ANTIPOLVO
Utilice protección respiratoria.
UTILICE PROTECCIÓN PARA LAS
MANOS
Utilice guantes de trabajo robustos
para protegerse las manos.
UTILICE PROTECCIÓN PARA LOS
PIES
Utilice botas antideslizantes con
suelas resistentes a las perforaciones.
ADVERTENCIA: Si no mantiene las
manos alejadas de la cuchilla, se
producirán lesiones personales graves
ADVERTENCIA: Retire el enchufe del
tomacorriente inmediatamente si el
cable se daña o corta.
ADVERTENCIA: Los objetos
despedidos pueden rebotar y resultar
en lesiones personales o daños a la
propiedad.
CONSTRUCCIÓN DE CLASE II
Aislamiento doble. Al reparar la
herramienta utilice únicamente piezas
GHUHSXHVWRLGpQWLFDV
Este manual del operador describe los símbolos de seguridad e internacionales e ilustraciones
TXH SXHGDQ DSDUHFHU HQ HO SURGXFWR 3RU VX FRPSOHWD VHJXULGDG OHD OD LQIRUPDFLyQ VREUH
armado, funcionamiento, mantenimiento y reparación en el manual del operador.
• SÍMBOLOS DE SEGURIDAD E INTERNACIONALES •

32 WWW.SENIXTOOLS.COM
CONOZCA SU HERRAMIENTA
ESPECIFICACIONES*
Voltaje nominal............................................................................................................120V~ 60Hz
Corriente nominal......................................................................................................................15A
Tipo de motor..........................................................................................................Motor universal
9HORFLGDGVLQFDUJD530
Velocidad máxima de la cadena........................................................................................13,5 m/s
Capacidad del tanque de aceite...........................................................................5,81 oz. (170 ml)
Modelo de la espada de aserrado.........................18 pulgadas (457 mm), 180SDEA041, Oregon
0RGHORGHODFDGHQDGHDVHUUDGRSXOJDGDVPP3-;2UHJRQ
3HVROENJ
7RGDVODVHVSHFL¿FDFLRQHVHVWiQEDVDGDVHQODLQIRUPDFLyQPiVUHFLHQWHVREUHHOSURGXFWR
disponible en el momento de la impresión. Nos reservamos el derecho de realizar cambios en
cualquier momento y sin previo aviso.
PIEZAS INCLUIDAS
Cantidad Artículo Cantidad Artículo
1 Manual del operador 1
Cubierta protectora de la cadena/espada/cuchilla
Botón de seguridad
Cable de
alimentación
y enchufe
Gatillo
interruptor
de
encendido/
apagado
Carcasa
principal
Asa
principal
Tapón del
tanque de
aceite
3URWHFFLyQ
del asa
delantera
Espada
Sierra de
cadena
Cubierta
Botón de
bloqueo
del ajuste
de la
espada
Cubierta protectora de la cadena/espada/cuchilla
Rueda de
tensionado
de cadena
Indicador
de nivel
de aceite
Retenedor
de la
alargadera
de corriente
Carcasa del
motor
Asa
delantera
Voltaje nominal............................................................................................................120V~ 60Hz
Corriente nominal......................................................................................................................12A
Tipo de motor..........................................................................................................Motor universal
9HORFLGDGVLQFDUJD530
Velocidad máxima de la cadena........................................................................................13,5 m/s
Capacidad del tanque de aceite...........................................................................5,81 oz. (170 ml)
Modelo de la espada de aserrado.........................16 pulgadas (406 mm), 160SDEA041, Oregon
0RGHORGHODFDGHQDGHDVHUUDGRSXOJDGDVPP3-;2UHJRQ
3HVROENJ
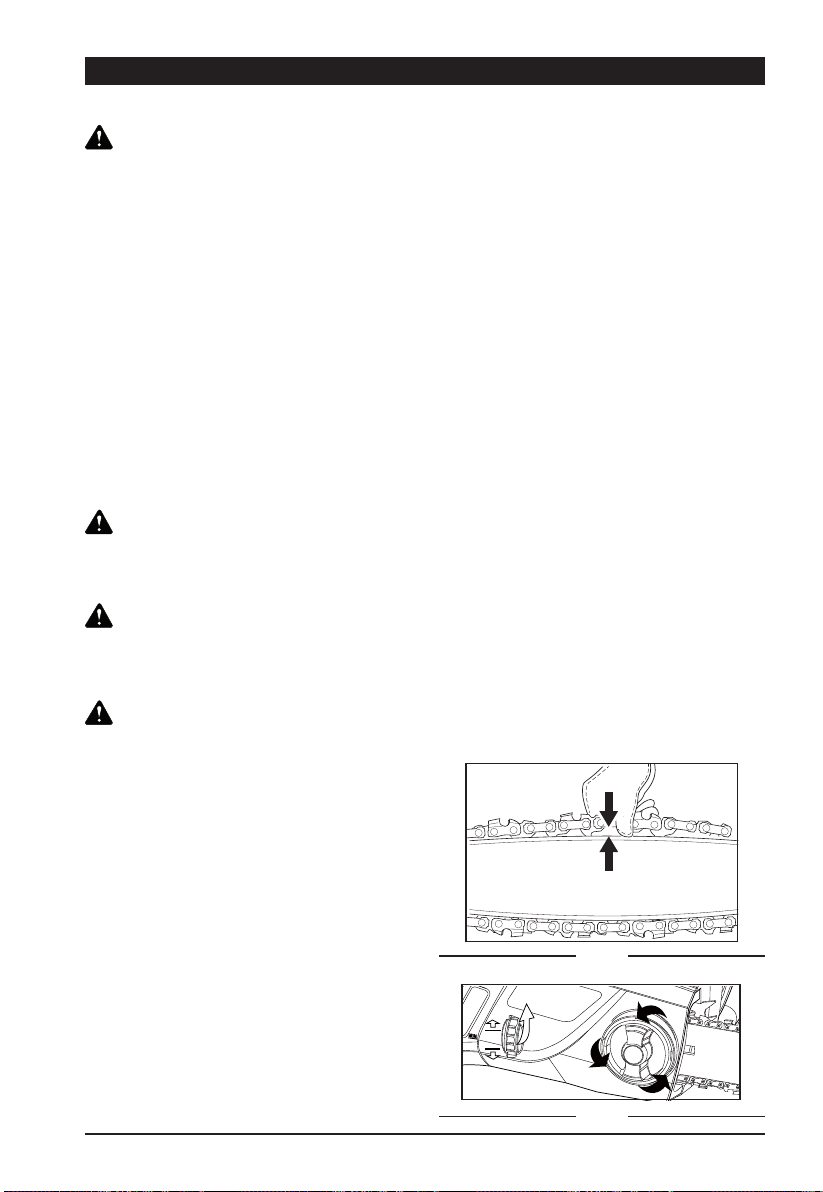
33WWW.SENIXTOOLS.COM
1. Revise la tensión de la cadena tirando
hacia fuera de ella en la espada. Una
cadena correctamente tensionada debe
tener aproximadamente 1/8 de pulgada (3
mm) de distancia entre sí misma y espada
(Figura 1).
PREPARACIÓN DE LA MOTOSIERRA
DESEMPAQUE
TENSADO DE LA CADENA
¡ADVERTENCIA!
¡ADVERTENCIA!
ADVERTENCIA!
ADVERTENCIA!
6LODVLHUUDHႋiGDxDGDRQRHႋiHQVX
lugar, no conecte la motosierra a la fuente
GHDOLPHQWDFLyQKDႋDTXHODSLH]DGDxDGD
se haya reparado o reemplazado.
Desenchufe la motosierra de la fuente de
DOLPHQWDFLyQDQWHVGHDMXႋDUODWHQVLyQ
de la cadena.
/RVERUGHVGHFRUWHGHODFDGHQDHႋiQ
D¿ODGRV8VHJXDQWHVSURWHFWRUHVSDUD
manipular la cadena.
Mantenga SIEMPRE una tensión adecuada
HQODFDGHQD8QDFDGHQDÀRMDSXHGH
aumentar el riesgo de que se produzcan
UHERWHV8QDFDGHQDÀRMDSXHGHVDOWDU
\VDOLUVHGHODUDQXUDGHODHVSDGD(ႋR
podría lesionar al operador y dañar la
FDGHQD8QDFDGHQDÀRMDSXHGHGHVJDႋDU
rápidamente la cadena, la espada y el
diente del engranaje. La vida útil de la
sierra de cadena depende principalmente
GHTXHWHQJDVX¿FLHQWHOXEULFDFLyQ\XQ
tensionado correcto. Evite tensionar la
FDGHQDFXDQGRHႋiFDOLHQWH\TXHHႋROD
sobretensionará al enfriarse.
La motosierra viene completamente
armada, incluyendo el conjunto de la
cadena/espada. NO deseche la caja o
HOPDWHULDOGHHPSDTXHKDႋDTXHKD\D
examinado todas las piezas.
NOTA: La cadena y el aceite para la espada
no están incluidos. Debe llenar la
motosierra con aceite Bar&chain (en
LQJOpV$17(6GHXWLOL]DUOD
NOTA: Retire la cubierta protectora de la
cadena/espada/cuchilla antes de usar
la herramienta.
6LIXHUDQHFHVDULRKDFHUDMXVWHVDÀRMHHO
botón de ajuste de la espada girándolo una
vuelta completa.
3DUDDMXVWDUODWHQVLyQGHODVLHUUDGH
cadena, gire la rueda de tensionado de
la cadena (Fig. 2). Al girar la rueda hacia
arriba se aumenta la tensión y al girarla
hacia abajo disminuye la tensión. Una
cadena correctamente tensionada no
debería descolgarse y sólo se debería
poder tirar de ella 1/8 de pulgada (3 mm)
de la espada.
8QDYH]TXHODFDGHQDHVWpFRUUHFWDPHQWH
tensionada, apriete el botón de bloqueo
de ajuste de la espada. NO sobretensione
la cadena: esto producirá un desgaste
excesivo y reducirá la vida útil de la espada
y la cadena.
NOTA: 3DUDTXHODKHUUDPLHQWDIXQFLRQH
de modo seguro, la cadena debe estar
correctamente tensada. La tensión de
la cadena es óptima si la cadena se
puede levantar 1/8 de pulgada (3 mm)
desde el centro de la espada. Como la
cadena se calienta durante su uso, su
ORQJLWXGSXHGHÀXFWXDU&RPSUXHEHOD
tensión de la cadena cada 10 minutos
de funcionamiento y ajústela como sea
necesario, especialmente si la sierra es
nueva.
$ÀRMHODVLHUUDGHFDGHQDDO¿QDOL]DUHO
trabajo ya que se acorta al enfriarse. Al
hacer esto, alarga la vida útil de la cadena
y evita que se dañe.
1/8” (3 mm)
Fig. 1
Fig. 2
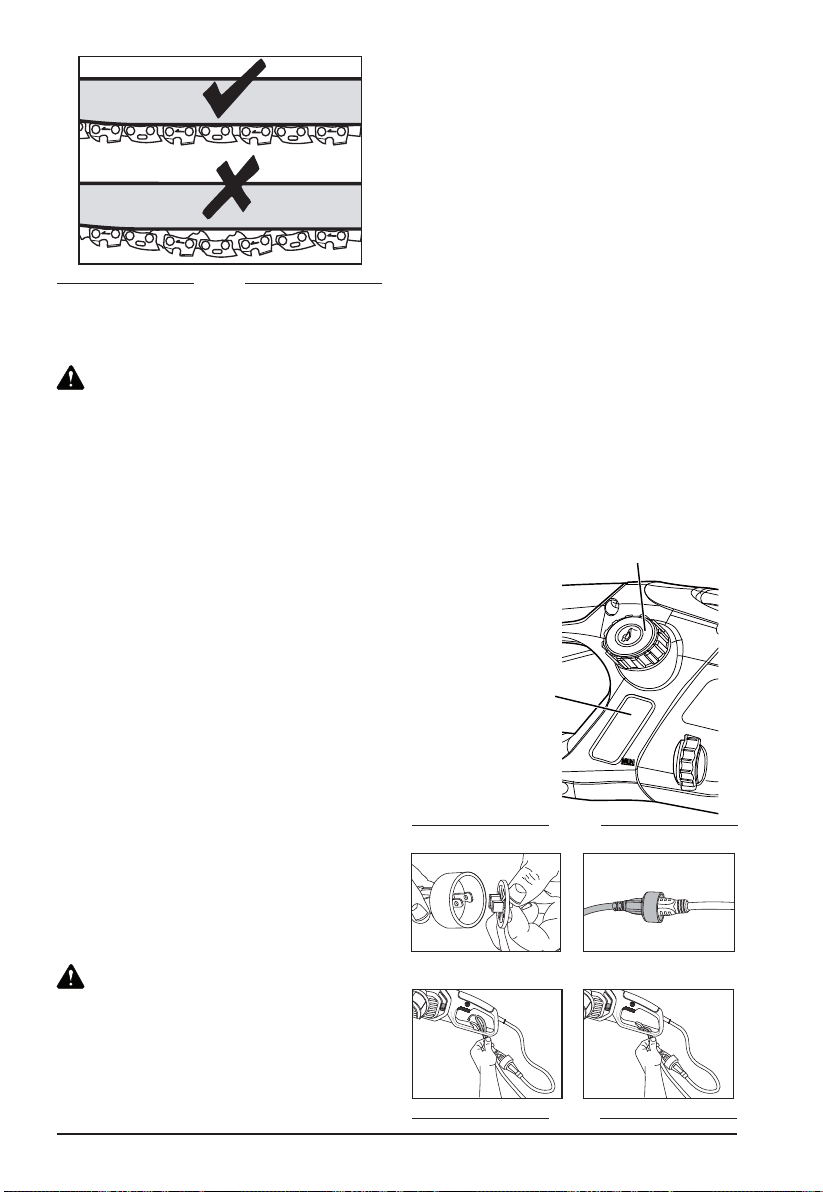
34 WWW.SENIXTOOLS.COM
Oil Cap
Oil Level Indicator
Tapón de aceite
Indicador de
nivel de aceite
Fig. 3
LLENADO DEL SISTEMA
AUTOMÁTICO DE ACEITE
CONEXIÓN A UNA ALARGADERA
DE CORRIENTE
PRECAUCIÓN:
PRECAUCIÓN:
La motosierra no se suministra llena de
aceite. Es fundamental llenarla de aceite
antes de utilizarla.
Nunca opere una motosierra sin aceite para
la cadena o con el tanque de aceite vacío ya
que esto dañaría gravemente la herramienta.
La vida útil de la cadena y su capacidad
de corte dependen de que su lubricación
VHDySWLPD3RUWDQWRODFDGHQDVHOXEULFD
automáticamente durante su funcionamiento
por medio de la salida del aceite.
Esta motosierra tiene un sistema automático
de aceite para mantener la cadena y
la espada correctamente lubricadas. El
indicador de nivel de aceite muestra el aceite
restante en la motosierra. Si el nivel de aceite
disminuye por debajo de un cuarto de su
FDSDFLGDGUHOOpQHORFRQDFHLWHDGHFXDGR
para la espada y cadena.
3DUDHYLWDUIXJDVGHDFHLWHFRPSUXHEHTXH
la herramienta está en posición horizontal
(con el tapón de llenado de aceite hacia
DUULEDFXDQGRQRHVWpXWLOL]iQGROD8WLOLFH
solo el aceite recomendado para evitar daños
a la sierra de cadena. No utilice nunca aceite
usado/reciclado.
Retire la tapa de seguridad (Fig. 5). Inserte
la toma de la alargadera de corriente en el
enchufe de la motosierra.
El asa posee un retenedor de alargadera de
corriente para reducir la tensión del cable
(Fig. 5).
3DUDXVDUHOUHWHQHGRUGHFDEOHGREOHOD
alargadera de corriente como se ilustra, a
XQRVFPGHOH[WUHPRHLQVpUWHODHQHO
extremo del retenedor. Coloque el bucle
formado al doblar el cable sobre el gancho.
7LUHFRQFXLGDGRGHOFDEOHSDUDFRQ¿UPDUTXH
HVWiELHQ¿MDGRHQHOUHWHQHGRU
Mantenga la alargadera de corriente
alejada del operador, de la herramienta y de
obstáculos en todo momento. No exponga el
FDEOHDOFDORUDFHLWHDJXDRERUGHVD¿ODGRV
3DUDOOHQDUHOWDQTXHGHDFHLWH
1. Retire el tapón del aceite (Fig. 4). Llene el
tanque con aceite para espada y cadena
(SAE30) hasta que el nivel de aceite
alcance su capacidad total.
2. Vuelva a colocar el tapón del aceite.
$VHJ~UHVHGHYHUL¿FDUHOQLYHOGHDFHLWH
cada 10 minutos de uso. Desenchufe la
PRWRVLHUUDDQWHVGHYHUL¿FDUORVQLYHOHVGH
aceite o de llenar el depósito de aceite.
Fig. 4
Fig. 5
Completed
(OXVRGHDFHLWHVQRFHUWL¿FDGRVDQXODUiQOD
garantía.
Completado

35WWW.SENIXTOOLS.COM
3DUDTXHHOWUDEDMRVHDVHJXUR12RSHUH
la sierra por encima de la altura de su
hombro.
2. La posición del cable debe ser tal que
no pueda quedar atrapado por ramas y
objetos similares durante el corte.
3. Nunca se pare bajo una rama que se está
aserrando.
4. Tenga precaución cuando sierre ambas
ramas bajo tensión o ramas que se están
astillando.
FUNCIONAMIENTO
PREPARACIÓN
CÓMO EVITAR REBOTES
INTERRUPTOR DE ENCENDIDO/
APAGADO
ADVERTENCIAS DE SEGURIDAD
¡ADVERTENCIA!
SIERRA DE CADENA: Antes de empezar
a trabajar, examine la motosierra para
comprobar si presenta daños en su carcasa,
cable de extensión, sierra de cadena y
espada. No utilice nunca una herramienta
que se ve dañada.
DEPÓSITO DE ACEITE: Revise el nivel de
llenado del tanque de aceite. Compruebe
WDPELpQPLHQWUDVWUDEDMDVLKD\VX¿FLHQWH
aceite. No utilice nunca una herramienta
sin aceite, o con aceite por debajo del nivel
mínimo, para evitar dañar la herramienta.
En promedio, un llenado de aceite es
VX¿FLHQWHSDUDDSUR[LPDGDPHQWHPLQXWRV
de operación de corte (dependiendo de la
duración de las pausas y la densidad de la
pieza que se está trabajando).
SIERRA DE CADENA: Compruebe la tensión
de la sierra y las condiciones de las cuchillas.
&XDQWRPiVD¿ODGDHVWpODVLHUUDPiVIiFLO
y manejable será la operación. Lo mismo se
aplica a la tensión de la cadena. Compruebe
la tensión cada 10 minutos de utilización para
aumentar la seguridad. Las sierras nuevas,
en particular, están sometidas a cambios
producidos por el calor que se crea durante la
utilización.
ROPA DE PROTECCIÓN: Lleve la ropa
ajustada apropiada, como pantalones
protectores, guantes y calzado de seguridad.
Use un casco de seguridad con protección
auditiva integrada y una máscara facial para
protegerse de ramas que caen o restallan.
NO corte árboles cuando haga viento. Esto
podría causar lesiones y solo debe ser
realizado por personal profesional.
Antes de cada uso, compruebe lo siguiente
para asegurar unas condiciones de trabajo
seguras.
(OWpUPLQRUHERWHVHUH¿HUHDFXDQGROD
motosierra salta hacia arriba y hacia atrás de
repente. Esto ocurre normalmente cuando
la pieza de trabajo entra en contacto con
la punta de la espada o se engancha en la
cadena.
Un rebote genera una poderosa fuerza
repentina. La motosierra normalmente
reacciona de modo incontrolado con
la posibilidad de que el usuario pueda
lesionarse.
El peligro de que se produzca un rebote
es mayor cuando trata de cortar cerca de
la punta de la espada o con ella. Aplique
siempre la sierra tan plana como sea posible
SDUDHYLWDUSpUGLGDVGHFRQWUROGXUDQWHVX
utilización.
3DUDHQFHQGHUODKHUUDPLHQWDSUHVLRQHHO
botón de seguridad y luego pulse el gatillo
(Fig. 6). Luego de haber arrancado la
herramienta, puede soltar el interruptor de
seguridad sin apagarla.
5. Asegúrese de protegerse contra el riesgo
de lesión de las ramas que caen y de los
trozos de madera que salen despedidos.
6. Si la máquina está en operación, mantenga
a las personas y animales lejos del área de
peligro.
7. La herramienta no está protegida contra
GHVFDUJDVHOpFWULFDVVLHQWUDHQFRQWDFWR
con cables de alta tensión. Mantenga un
espacio despejado mínimo de 30 pies (9
PGHORVFDEOHVHOpFWULFRVSDUDHYLWDUXQD
GHVFDUJDHOpFWULFDTXHSRQJDHQSHOLJUR
su vida.
8. Cuando trabaje en una pendiente, siempre
párese por encima o al lado de la rama que
se está aserrando.
9. Deje que la cadena corte por usted.
Mantenga la sierra encendida a la máxima
velocidad durante todo el corte. Se
recomienda que el usuario novato, como
práctica mínima, cortes troncos en un
caballete o receptáculo de aserrar.
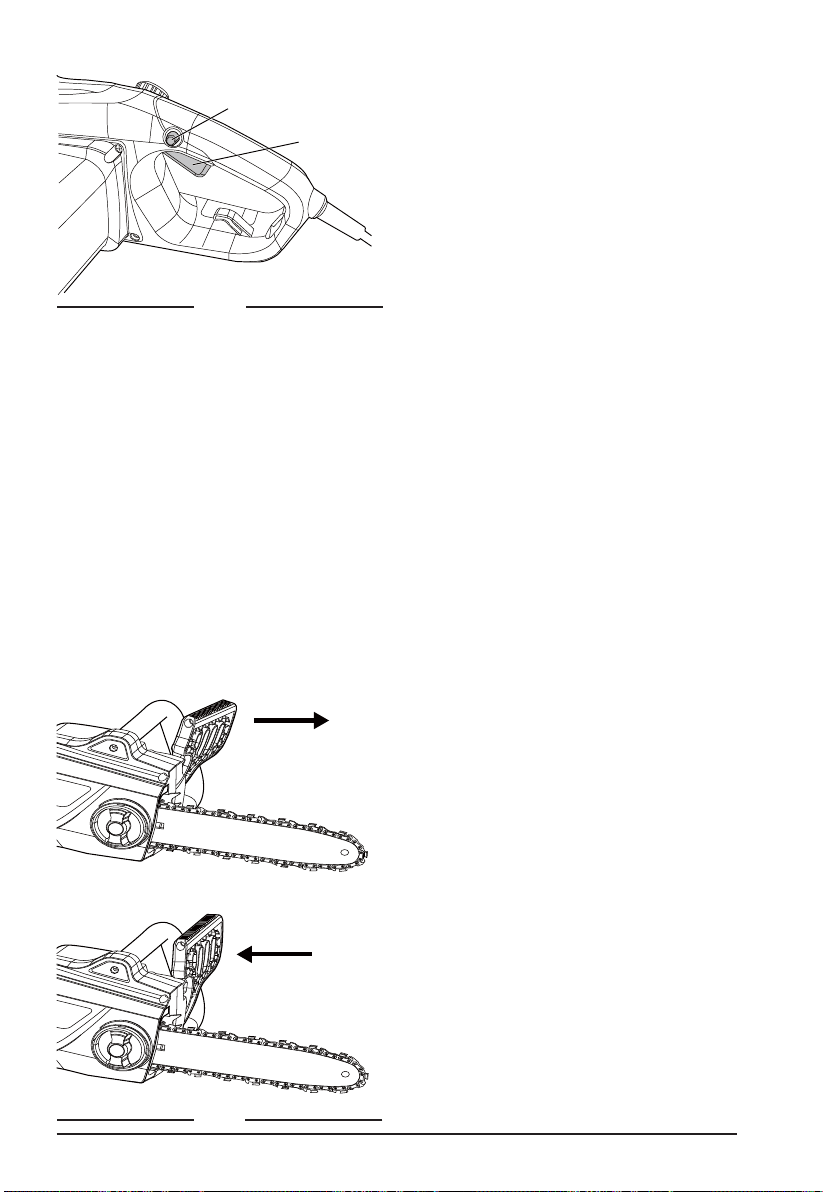
36 WWW.SENIXTOOLS.COM
Fig. 6
3UHVLRQHODSURWHFFLyQGHODPDQR
delantera hacia adelante e intente arrancar
la motosierra.
La cadena no debe arrancar.
3DUDGHVDFWLYDUHOIUHQRGHUHERWHVXHOWH
el interruptor de encendido/apagado 3
y tire de la protección de la mano hacia
atrás.
FRENO DE REBOTE
El freno de rebote es un mecanismo de
seguridad activado por la protección de la
mano delantera. Cuando ocurre un rebote, la
motosierra se detiene inmediatamente (Fig. 7).
6HGHEHUHDOL]DUODVLJXLHQWHYHUL¿FDFLyQGH
funciones luego de cada uso. El propósito de
hacer pruebas con el freno de la cadena es
reducir la posibilidad de lesión debido a un
rebote:
Fig. 7
Botón de seguridad
Interruptor
de gatillo
Frenado
No frenado
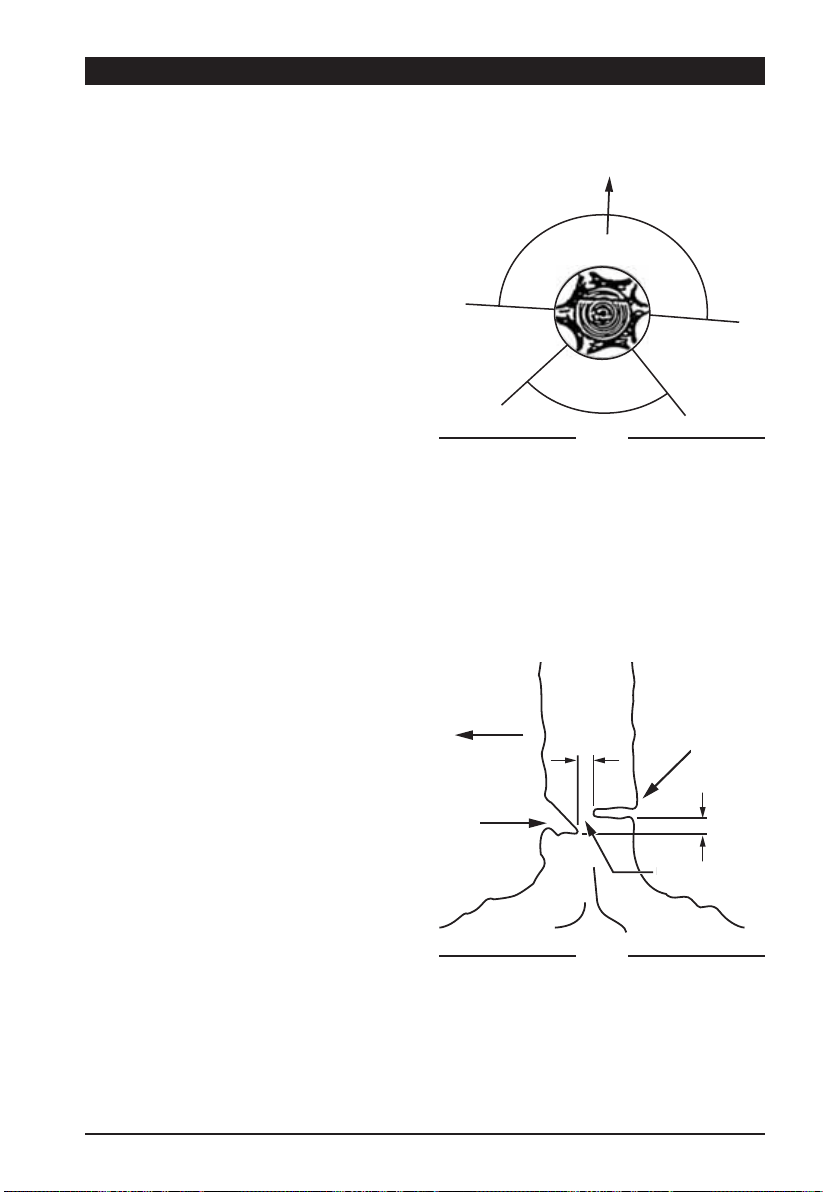
37WWW.SENIXTOOLS.COM
Realice primero el corte de cuña horizontal
inferior. Esto ayudará a evitar pinchar la
cadena de la sierra o la espada cuando se
realice la segunda muesca.
Fig. 9
Direction of fall
Notch
50 mm
Felling back cut
Hinge
Description of felling: undercutting
50 mm
Descripción de la tala: corte inferior
Dirección de
la caída
Muesca
Bisagra
Corte de tala
TÉCNICAS DE ASERRADO
• Sierre primero las ramas bajas de un árbol.
Al hacerlo así, es más fácil que las ramas
cortadas caigan al suelo.
$O¿QDOGHOFRUWHHORSHUDGRUQRWDUiTXH
el peso de la sierra aumenta de repente
puesto que ya no está soportada por la
rama. Existe el riesgo de perder el control y
por ello deberá estar alerta durante toda la
operación de aserrado.
• Saque la sierra del corte solo mientras la
sierra está rodando. Al hacerlo así, evitará
que la sierra se trabe en la madera.
• NO utilice la punta de la espada para
aserrar. NO corte formaciones de ramas
(donde nacen las ramas del árbol).
Esto impedirá que el árbol se recupere.
3DUDFRUWDUUDPDVPHQRUHVXELTXHOD
cara del stop de la sierra sobre la rama.
Esto evitará movimientos indeseados de
la sierra al principio del corte. Con una
SUHVLyQOLJHUDJXtHODVLHUUDDWUDYpVGHOD
rama desde arriba hacia abajo.
3DUDFRUWDUUDPDVPD\RUHVKDJDSULPHUR
un corte de descarga. Corte 1/3 del
diámetro de la rama desde abajo hacia
arriba usando el costado superior de la
espada. Luego, corte de arriba a abajo los
otros 2/3 usando el costado inferior de la
espada. Sierre las ramas más largas en
secciones para mantener el control sobre
el lugar del impacto.
IMPORTANTE: Se recomienda que el
usuario novato, como
práctica mínima, corte
troncos en un caballete o
receptáculo de aserrar.
TALA DE ÁRBOLES
Cuando se tronzan y talan árboles, las
operaciones las realizan dos o más personas
al mismo tiempo; las operaciones de tala
deben separarse de las de tronzado, por una
distancia mínima del doble de la altura del
árbol que se está talando.
No se deben talar los árboles de manera que
pudiera poner en peligro a alguna persona,
golpear algún servicio público o causar algún
daño a la propiedad. Si el árbol hace contacto
con cualquier línea de servicio público, se
GHEHQRWL¿FDULQPHGLDWDPHQWHDODFRPSDxtD
El operador de la motosierra debe colocarse
en la parte alta del terreno, ya que es
probable que el árbol ruede o se deslice
colina abajo luego de la tala. Necesario antes
de iniciar los cortes.
La ruta de escape debe extenderse hacia
atrás y en forma diagonal hasta la parte
Antes de iniciar la tala, tome en cuenta la
inclinación natural del árbol, la ubicación de
las ramas más grandes y la dirección del
YLHQWRSDUDMX]JDUKDFLDTXpGLUHFFLyQFDHUi
el árbol. Retire la tierra, piedras, corteza
suelta, clavos, grapas y alambres del árbol.
Realice la muesca 1/3 del diámetro del árbol,
perpendicular a la dirección de la caída
(Figura 9).
CORTE DE TALA
Realice el corte de tala al menos 50 mm más
alto que el corte de muesca horizontal (Figura
9). Mantenga el corte de tala paralelo al corte
posterior de la línea de caída esperada del
árbol (Figura 8).
Fig. 8
Danger zone
Escape
route
Escape
route
Description of felling: escape routes
Felling direction
Danger zone
Descripción de la tala: rutas de escape
Dirección de la tala
Zona de peligro
Zona de peligro
Ruta de escape
Ruta de escape
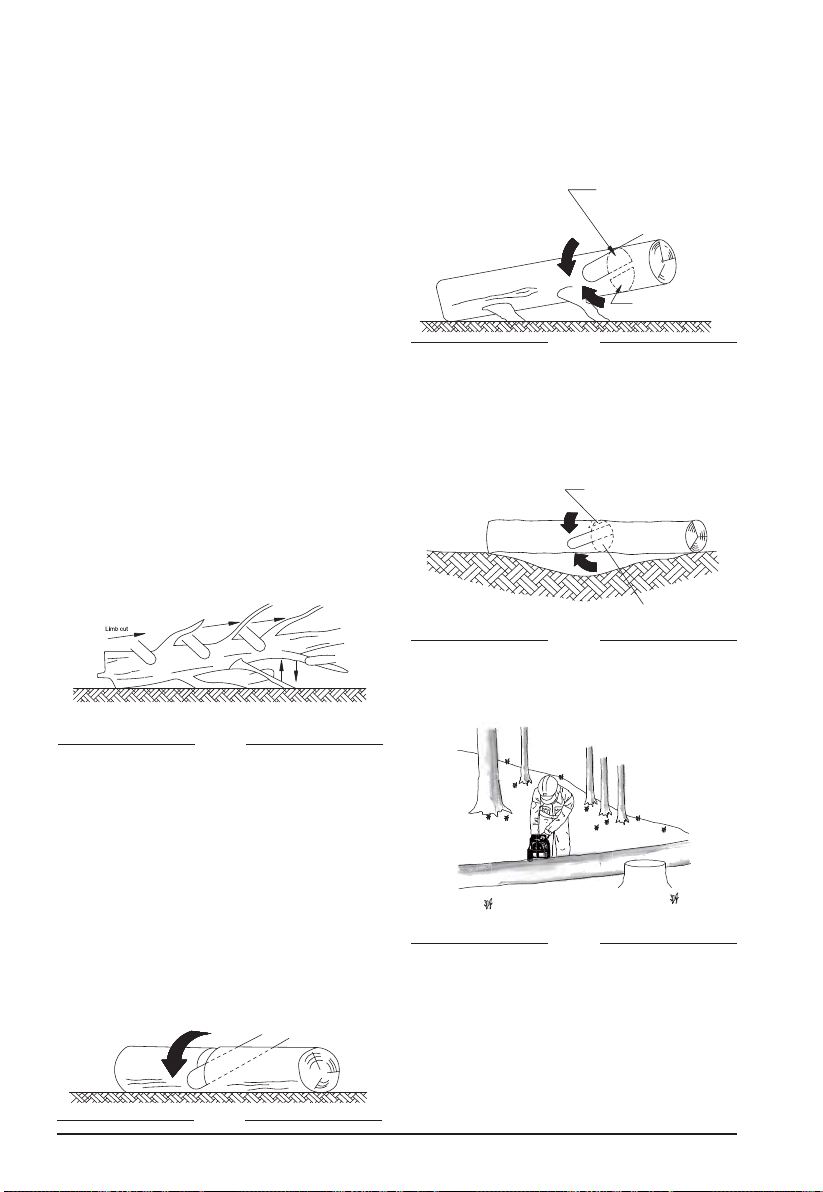
38 WWW.SENIXTOOLS.COM
2nd cut underbuck (2/3 diameter)
to meet 1st cut (to avoid pinching)
Log supported both ends
1st cut overbuck (1/3 diameter)
to avoid splintering
Fig. 13
Tronco soportado en ambos extremos
3ULPHUFRUWHGHVGHDUULED
(1/3 de diámetro) para
evitar el astillado
Segundo corte tronzando desde abajo (2/3 de diámetro) para
llegar hasta el primer corte (y evitar el pinchado)
2nd cut overbuck (2/3 diameter)
to meet 1st cut (to avoid pinching)
1st cut underbuck
(1/3 diameter)
to avoid splintering
Log supported one end
Bucking a log
Stand on uphill side when cutting because log may roll
Fig. 14
Tronzado de un tronco
3iUHVHHQHOODGRGHODSDUWHDOWDFXDQGR
corte porque el tronco puede rodar
Log supported along the entire length
Cut from top (overbuck). Avoid cutting earth.
Fig. 11
Tronco soportado a lo largo de toda la longitud (tronzado
desde arriba). Evite cortar el suelo.
DESRAME DE UN ÁRBOL
TRONZADO DE UN TRONCO
El desrame consiste en retirar las ramas de
un árbol caído. Cuando realice al desrame,
deje las ramas inferiores más largas para que
soporten el árbol por encima del suelo. Retire
las ramas pequeñas de un corte (Figura 10).
Las ramas bajo tensión deben cortarse
de abajo hacia arriba para evitar trabar la
motosierra.
Cuando el tronco está soportado en un
extremo, corte 1/3 del diámetro del lado
inferior (tronzado desde abajo) (Figura 12).
/XHJRUHDOLFHHOFRUWH¿QDOWURQ]DQGRGHVGH
arriba para llegar hasta el primer corte.
Cuando el tronco está soportado en ambos
extremos, corte 1/3 del diámetro desde arriba
(tronzado desde arriba) (Figura 13). Luego
UHDOLFHHOFRUWH¿QDOWURQ]DQGRGHVGHDEDMRORV
2/3 inferiores para llegar hasta el primer corte.
Cuando tronce sobre una pendiente, siempre
debe pararse en el lado de la parte alta del
tronco (Figura 14).
El tronzado consiste en cortar un tronco
en longitudes. Es importante asegurarse
TXHVXSRVLFLyQGHSLHHVWp¿UPH\VXSHVR
uniformemente distribuidos en ambos pies.
En lo posible, el tronco debe estar elevado
y soportado con el uso de ramas, troncos o
calzas. Siga las instrucciones simples para un
corte fácil. Cuando el tronco está soportado a
lo largo de toda su longitud, se corta desde la
parte superior (tronzado desde arriba)
(Figura 11).
3DUDPDQWHQHUHOFRQWUROFRPSOHWRFXDQGR
FRUWHDWUDYpVGHXQWURQFRVXHOWHODSUHVLyQ
GHOFRUWHFHUFDGHO¿QDOGHOPLVPRVLQUHODMDU
su agarre en las asas de la motosierra. No
deje que la cadena haga contacto con el
suelo. Luego de terminar el corte, espere
a que la cadena de la sierra se detenga
antes de que mueva la motosierra. Siempre
detenga el motor antes de pasar de un árbol
a otro.
Fig. 10
Keep work off ground. Leave support limbs until log is cut.
Tree limbing
Desrame de un árbol
Mantenga el trabajo fuera del suelo. Deje las ramas
GHVRSRUWHKDVWDTXHHOWURQFRHVWpFRUWDGR
Fig. 12
Tronco soportado en un extremo
Segundo corte tronzando
desde arriba (2/3 de diámetro)
para llegar hasta el primer
corte (y evitar el pinchado)
3ULPHUFRUWH
desde abajo (1/3
de diámetro) para
evitar el astillado
de muesca horizontal. Realice el corte de
WDODSDUDTXHTXHGHPDGHUDVX¿FLHQWHTXH
actúe de bisagra. La madera de bisagra evita
que el árbol se tuerza y caiga en la dirección
HTXLYRFDGD12FRUWHDWUDYpVGHODELVDJUD
A medida que la tala se acerca a la bisagra,
el árbol debería comenzar a caerse. Si hay
alguna posibilidad de que el árbol no vaya a
caer en la dirección deseada o que se tuerza
y trabe la cadena de la sierra, deje de cortar
antes de completar el corte de tala y se cuñas
de madera, plástico o aluminio para abrir
el corte y dejar caer el árbol en la dirección
deseada.
Cuando el árbol comience a caer, retire la
motosierra del corte, pare el motor, coloque la
motosierra en el suelo y luego use la ruta de
HVFDSHSODQHDGD(VWpDOHUWDSRUODVUDPDV
DpUHDV\REVHUYHSRUGyQGHFDPLQD
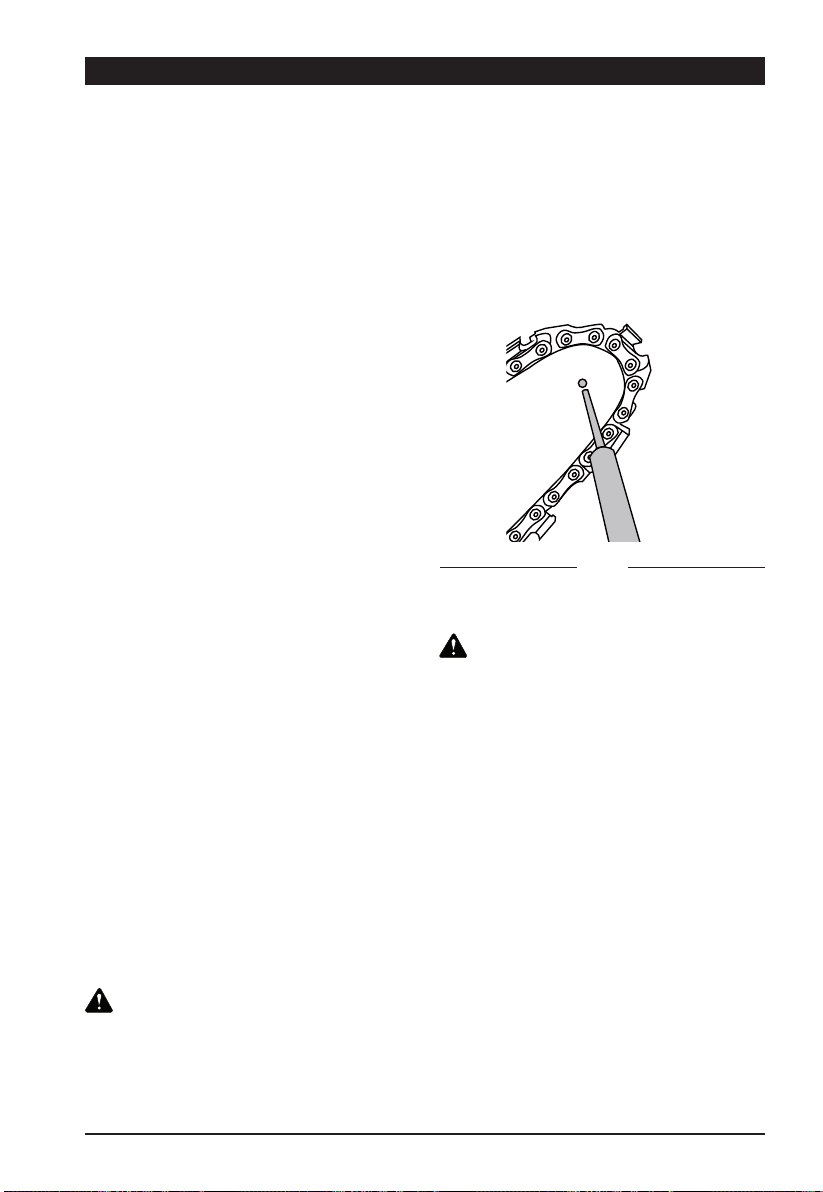
39WWW.SENIXTOOLS.COM
MANTENIMIENTO Y AJUSTES
• Limpie la carcasa de plástico moldeado
de la motosierra con un cepillo suave y un
paño limpio.
• NO use agua, disolventes o pulidores.
• Retire todos los residuos, especialmente
de las ranuras de ventilación del motor.
• Retire y cepille la cubierta de la placa, la
FDGHQD\ODHVSDGDGHVSXpVGHKRUDV
de uso.
• Limpie la zona ubicada debajo de
la cubierta de la placa, el piñón de
transmisión y el conjunto de la sierra de
cadena con un cepillo suave.
• Limpie la salida del aceite con un paño
limpio.
• Si va a almacenar la motosierra por un
largo periodo de tiempo, limpie la cadena y
la espada.
• ALMACENE LA HERRAMIENTA EN
LUGAR SECO, SEGURO Y FUERA DEL
ALCANCE DE LOS NIÑOS.
• NO coloque otros objetos sobre la
motosierra.
3DUDHYLWDUIXJDVGHDFHLWHFRORTXHOD
herramienta en posición horizontal.
• Al almacenar la herramienta en su
empaque original, el tanque del aceite
debe estar completamente vacío.
LIMPIEZA/ALMACENAMIENTO
COMPROBACIÓN DE LA
LUBRICACIÓN AUTOMÁTICA DE
LA CADENA
LUBRICACIÓN DEL ENGRANAJE
AFILADO DE LA SIERRA DE
CADENA
Compruebe con regularidad que la
lubricación automática de la cadena funciona
para evitar sobrecalentamientos y daños
consiguientes a la espada y a la sierra de
cadena.
3DUDHOORDOLQHHODSXQWDGHODHVSDGDFRQ
XQDVXSHU¿FLHOLVDWDEOHURFRUWHGHXQiUERO
y deje funcionar la motosierra.
Si aparece una cantidad en aumento de
aceite, quiere decir que la lubricación
automática funciona correctamente.
0DQWHQJDODFDGHQDD¿ODGD6XFDGHQD
cortará más rápidamente y de modo más
VHJXUR8QDFDGHQDVLQD¿ODUSXHGHFDXVDU
desgastes indebidos en el engranaje, espada,
cadena y motor. Si fuerza la cadena en la
madera y el corte crea solo polvo de madera
y unas cuentas astillas de gran tamaño, la
FDGHQDQRHVWiD¿ODGD
Compre una cadena nueva, lleve la cadena
SDUDTXHODD¿OHXQSURIHVLRQDOHQXQFHQWUR
GHVHUYLFLRFHUWL¿FDGRRDItOHODXVWHGPLVPR
FRQXQNLWGHD¿ODGRDSURSLDGR/DGLIHUHQFLD
en altura entre la punta de corte y la cresta
HVODFRQ¿JXUDFLyQGHOFDOLEUHGHSURIXQGLGDG
(Fig. 16).
&XDQGRD¿OHODSXQWDGHFRUWHOD
ADVERTENCIA:
ADVERTENCIA:
Al realizar operaciones de mantenimiento o
reparaciones a esta herramienta. Desenchufe
la herramienta antes de realizarle cualquier
tipo de reparación o mantenimiento.
Desenchufe la motosierra de la fuente de
alimentación antes de realizarle operaciones
de mantenimiento. Si se producen descargas
HOpFWULFDVRHOFXHUSRHQWUDHQFRQWDFWRFRQ
una cadena móvil, se pueden sufrir lesiones
graves o fatales. Los bordes de corte de
ODFDGHQDHVWiQD¿ODGRV8VHJXDQWHV
protectores para manipular la cadena.
NOTA: No es necesario retirar la cadena o la
espada para lubricar el engranaje.
1. Limpie la espada y el engranaje.
2. Con una pistola de lubricación, inserte
ODSXQWDGHODSLVWRODHQHORUL¿FLRGH
lubricación e inyecte grasa hasta que
aparezca en el borde externo del piñón
(Fig. 15).
3DUDJLUDUHOHQJUDQDMHVXHOWHODFDGHQD\
tire de la cadena con la mano hasta que el
FRVWDGRQRHQJUDVDGRGHOHQJUDQDMHHVWp
HQOtQHDFRQHORUL¿FLRGHHQJUDVH5HSLWD
el procedimiento de lubricación.
Fig. 15
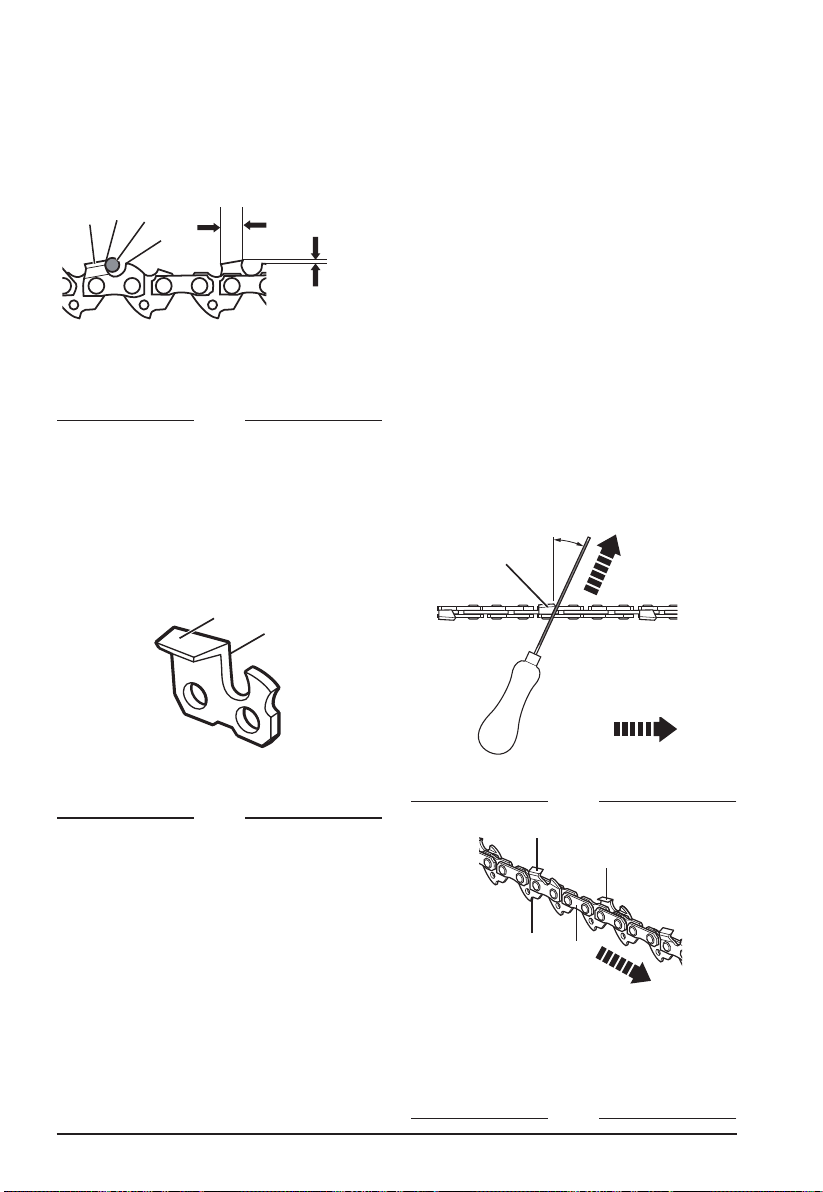
40 WWW.SENIXTOOLS.COM
3DUDD¿ODUODFDGHQD
1. El uso de guantes protectores asegura que
la cadena está correctamente tensionada
en la espada.
2. Use una lima redonda con un diámetro 1,1
veces la profundidad del diente de corte.
Asegúrese de que el 20% del diámetro de
la lima está por encima de la placa superior
(Fig. 17).
Cuando la longitud de corte se reduce
a 0,16 pulgadas (4 mm), la cadena está
desgastada y hay que reemplazarla.
/DFRQ¿JXUDFLyQGHOFDOLEUHGHSURIXQGLGDG
VHUHGXFHWDPELpQFRQFDGDD¿ODGR
&DGDD¿ODGRVXVHXQDKHUUDPLHQWD
de medición del calibre de profundidad
YHUL¿FDUODDOWXUDGHODSXQWDGHFRUWH\GH
la cresta (Fig. 16). Cuando sea necesario,
use una lima plana para limar la cresta
\DOFDQ]DUXQDFRQ¿JXUDFLyQGHOFDOLEUH
de profundidad de 0,025 pulgadas (0,635
mm).
Las herramientas de medición del
calibre de profundidad están disponibles
en la mayoría de los distribuidores de
motosierras.
• Si la sierra no funciona correctamente,
OOpYHODDXQFHQWURGHVHUYLFLRFHUWL¿FDGR
para que la examinen. Utilice solo partes
LGpQWLFDVDODVOLVWDGDVHQHVWHPDQXDO
FRQ¿JXUDFLyQGHOFDOLEUHGHSURIXQGLGDG\GH
ODFUHVWDGHODSODFDODWHUDOGLVPLQXLUiQ3DUD
mantener un desempeño óptimo de corte,
la cresta tiene que limarse para que alcance
ODFRQ¿JXUDFLyQGHOFDOLEUHGHSURIXQGLGDG
recomendada.
Fig. 19
A
B
C
D
A - Right-hand Cutter
B - Left-hand Cutter
C - Bumper Drive Link
D - Tie Strap
SAW CHAIN DIRECTION
DIRECCIÓN DE LA MOTOSIERRA
$&RUWDGRUGLHႋUR
A - Cortador zurdo
C - Enlace del amortiguador
D - Correa de amarre
Fig. 18
25°
A
SAW CHAIN DIRECTION
Sharpening Angle
FILE
DIRECTION
Outside
Inside
A - Left-hand Cutter
DIRECCIÓN
DEL AFILADO
Fuera
Dentro
DIRECCIÓN DE LA
MOTOSIERRA
A - Cortador zurdo
ÈQJXORGHD¿ODGR
A
B
C
D
Cutter
Length
Depth Gauge
Setting 0.025 in.
A - Top Plate
Tip
C - File Position
D - Ridge
Longitud del cortador
&RQ¿JXUDFLyQGHO
calibre de profundidad
0,025 pulgadas (0,635 mm).
A - Placa superior
B - Punta de corte
C - Posición de la lima
'&UHႋD
Fig. 16
B
A
A - Top Plate
B - Side Plate
A - Placa superior
B - Placa lateral
Fig. 17
3. Lime a un ángulo perpendicular a la
espada, y a un ángulo de 25° en dirección
al movimiento (Fig. 18).
4. Lime cada diente de dentro hacia fuera
solamente. Lime un costado de la cadena
primero y luego gírela y repita el proceso.
$¿OHFDGDGLHQWHGHPRGRXQLIRUPH
aplicando el mismo número de limados.
• Mantenga todas las longitudes de corte
iguales (Fig. 19). Cada vez que la punta
GHFRUWHVHD¿ODODORQJLWXGGLVPLQX\H
NOTA: Una guía de lima se puede adquirir
en la mayoría de los distribuidores de
motosierras y es el modo más sencillo de
mantener la lima en posición correcta.
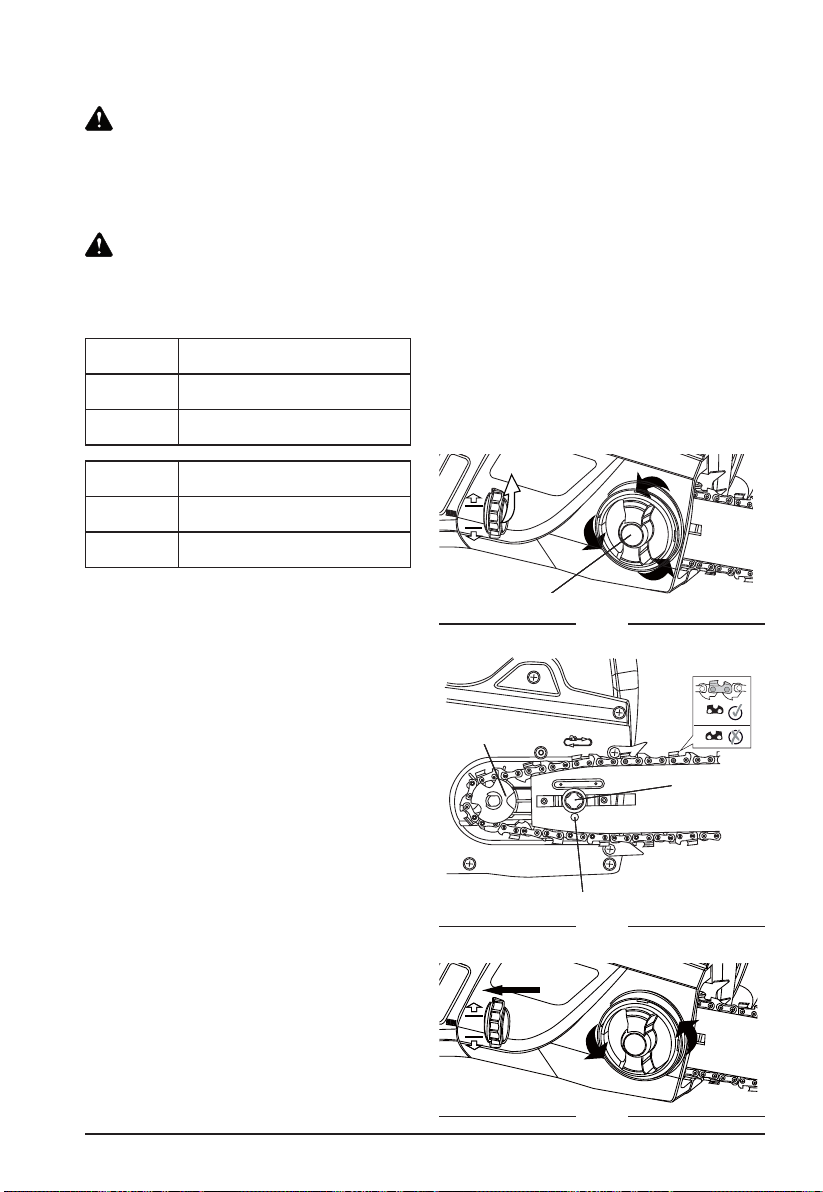
41WWW.SENIXTOOLS.COM
REEMPLAZO DE LA SIERRA DE
CADENA Y ESPADA
REEMPLAZO DEL CABLE DE
ALIMENTACIÓN
Si el cable de esta herramienta se daña,
deberá ser reemplazarlo con un cable
especialmente preparado. Examine con
frecuencia el cable de alimentación y el
enchufe. Si presentan daños, los debe
UHHPSOD]DUXQVHUYLFLRWpFQLFRFHUWL¿FDGR
ADVERTENCIA:
ESPADA/CADENA CERTIFICADAS:
¡ADVERTENCIA!
No conecte la motosierra a una alargadera
de corriente y a una fuente de alimentación
antes de que haya sido completamente
armada. Utilice siempre guantes para
manipular la cadena.
Reemplace la cadena cuando los cortadores
HVWiQGHPDVLDGRGHVJDVWDGRVSDUDD¿ODUVH
o cuando la cadena se rompa. Utilice solo
las cadenas de repuesto indicadas en
este manual. Incluye siempre un piñón de
transmisión al reemplazar la cadena. Esto
mantendrá el movimiento adecuado de la
cadena.
3DUDPDQLSXODUVLHUUDVGHFDGHQDXVH
siempre guantes.
Número de
modelo
CSE15-M
Espada:
Oregon, 18 pulgadas (457 mm),
180SDEA041
Sierra de
cadena:
Oregon, 18 pulgadas (457 mm),
3-;
1. Coloque el cuerpo de la sierra sobre una
VXSHU¿FLH¿UPH\QLYHODGD
2. Gire el botón de ajuste de la espada en
sentido antihorario (Fig. 20) para sacar la
cubierta de la motosierra.
3. Use guantes protectores para envolver la
sierra de cadena alrededor de la espada
comprobando que cada uno de los dientes
apunta en la dirección de rotación. La
sierra deberá estar correctamente colocada
en la ranura que rodea todo el borde de la
espada.
4. Coloque la cadena de la sierra alrededor
del piñón (Fig. 21) mientras alinea la ranura
en la espada con el perno interno en la
base de la sierra y el pin de tensión de la
FDGHQDHQHORUL¿FLRGHOSLQGHODHVSDGD
(Figura 18). El pin de tensión de la cadena
podría necesitar ajustes para alinearse
FRUUHFWDPHQWHFRQHORUL¿FLRGHODHVSDGD
Use la rueda de tensión de la cadena para
ajustar su ubicación hasta que quepa en la
espada.
Locking Knob
Fig. 20
Botón de bloqueo
Fig. 22
5. Gire la rueda de tensión de la cadena
para ajustar preliminarmente la espada lo
VX¿FLHQWHSDUDTXHODFDGHQDSHUPDQH]FD
en su lugar. Mientras sujeta la espada para
que no se mueva, coloque la cubierta en la
sierra. Asegúrese que la lengüeta se alinee
correctamente con la ranura en el cuerpo
de la sierra (Fig. 22).
Bloquee la cubierta en su lugar girando el
botón de bloqueo de la cubierta en sentido
horario hasta que se enganche. Ajuste de
la tensión de la cadena.
Internal Bolt
Chain Tensioning Pin
Sprocket
Fig. 21
3LxyQ
3HUQRLQWHUQR
3LQGHWHQVLRQDGRGHFDGHQD
Número de
modelo
CSE12-M
Espada:
Oregon, 16 pulgadas (406 mm),
160SDEA041
Sierra de
cadena:
Oregon, 16 pulgadas (406 mm),
3-;
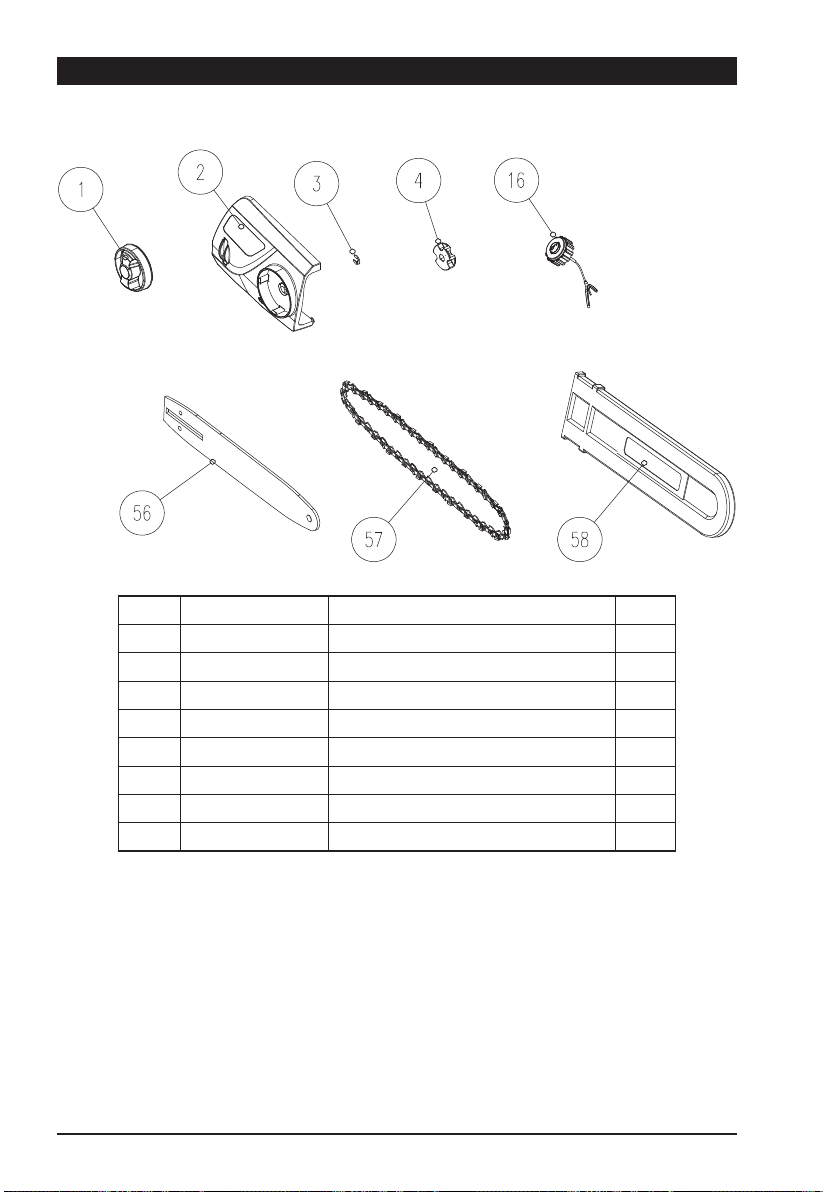
42 WWW.SENIXTOOLS.COM
PIEZAS
Modelo: CSE12-M / CSE15-M
Nº N.º de pieza Descripción
Cant.
1 202028000087 Botón de bloqueo del ajuste de la espada 1
2 199001000490 Conjunto de la cubierta 1
3 207340100049 Aro de retención 1
4 201035000003 3LxyQ 1
16 199123000421 Conjunto del tapón del tanque de aceite 1
56 205001000098 Espada 1
57 205001000022 Sierra de cadena 1
58 202009000168 Funda de la espada 1

43WWW.SENIXTOOLS.COM
GARANTÍA
*DUDQWtDOLPLWDGDGHDxRVSDUDWRGRVORVHTXLSRVDHOpFWULFDVGHODVHULH6HQL[(
DURANTE DOS AÑOS a partir de la fecha original de compra, este producto Senix está
JDUDQWL]DGRFRQWUDGHIHFWRVGHPDWHULDOHVRPDQRGHREUDHQKHUUDPLHQWDVHOpFWULFDV/RV
productos defectuosos serán reparados de modo gratuito.
Esta garantía no cubre el desgaste normal de piezas y componentes tales como, la sierra de
corte, línea o cuchillas, ni cubre el costo de transporte bajo garantía o servicio.
Cualquier garantía implícita otorgada bajo la ley estatal, incluidas las garantías de
comerciabilidad o idoneidad para un propósito particular, está limitada a tres años desde
ODIHFKDGHFRPSUDHQKHUUDPLHQWDVHOpFWULFDV\FDUJDGRUHV\VLHWHDxRVHQEDWHUtDV(O
fabricante no es responsable por daños directos, indirectos, incidentales o consecuentes.
Algunos estados y provincias no permiten limitaciones sobre la duración de una garantía
implícita y/o no permiten la exclusión o limitación de daños incidentales, por lo que es posible
que las limitaciones y exclusiones anteriores no sean aplicables en su caso. Esta garantía
OHSURSRUFLRQDGHUHFKRVOHJDOHVHVSHFt¿FRVVLQSHUMXLFLRGHRWURVGHUHFKRVTXHOHVVHD
aplicables, los cuales varían entre estados o provincias.
YAT USA declina toda responsabilidad con respecto a la responsabilidad civil derivada de un
XVRDEXVLYRRTXHQRHVWpHQFRQIRUPLGDGFRQHOXVR\HOPDQWHQLPLHQWRDGHFXDGRVGHOD
herramienta según se describe en el manual del operador.
YAT USA no es responsable por daños directos, indirectos, incidentales o consecuentes.
'HVSXpVGHODFRPSUDHOIDEULFDQWHUHFRPLHQGDHOPDQWHQLPLHQWRDGHFXDGRGHODKHUUDPLHQWD
y leer el manual del operador antes de usarla.
(VSRVLEOHTXHVHUHTXLHUDXQUHFLERGHFRPSUDRULJLQDOFRPRFRPSUREDQWHGHFRPSUD3DUD
servicio al cliente contáctenos gratis llamando al número 1-800-261-3981 o Senixtools.com.
YAT USA, Inc. 6441 Hendry Road, Suite A, Charlotte, NC 28269.
GARANTÍA LIMITADA DE DOS AÑOS
Limitaciones adicionales
La garantía está sujeta a las condiciones siguientes:
• La garantía es aplicable al comprador original al por menor y no es transferible*
• Registre la garantía en www.senixtools.com
/DKHUUDPLHQWDQRKDVLGRPDOXWLOL]DGDPDOWUDWDGDGHVFXLGDGDDOWHUDGDPRGL¿FDGDR
reparada por nadie que no sea un centro de servicio autorizado.
• Solo se han utilizado accesorios originales Senix con este producto o en el mismo.
• La herramienta ha sufrido un desgaste normal.
• La herramienta no ha sido utilizada por motivos comerciales o profesionales
• La herramienta no ha sido utilizada por motivos de alquiler
• Esta garantía solo cubre defectos que aparecen durante el uso normal y no cubre ningún mal
funcionamiento, falla o defecto resultante de un mal uso, abuso (incluyendo sobrecarga del
producto, exposición al agua o lluvia) accidentes, negligencia o falta de instalación adecuada
y mantenimiento o almacenamiento incorrectos.
3DUDFRQRFHUODXELFDFLyQGHVXVHUYLFLR6HQL[PiVFHUFDQROODPHJUDWLVDOQ~PHUR
3981 o envíe un email a [email protected].
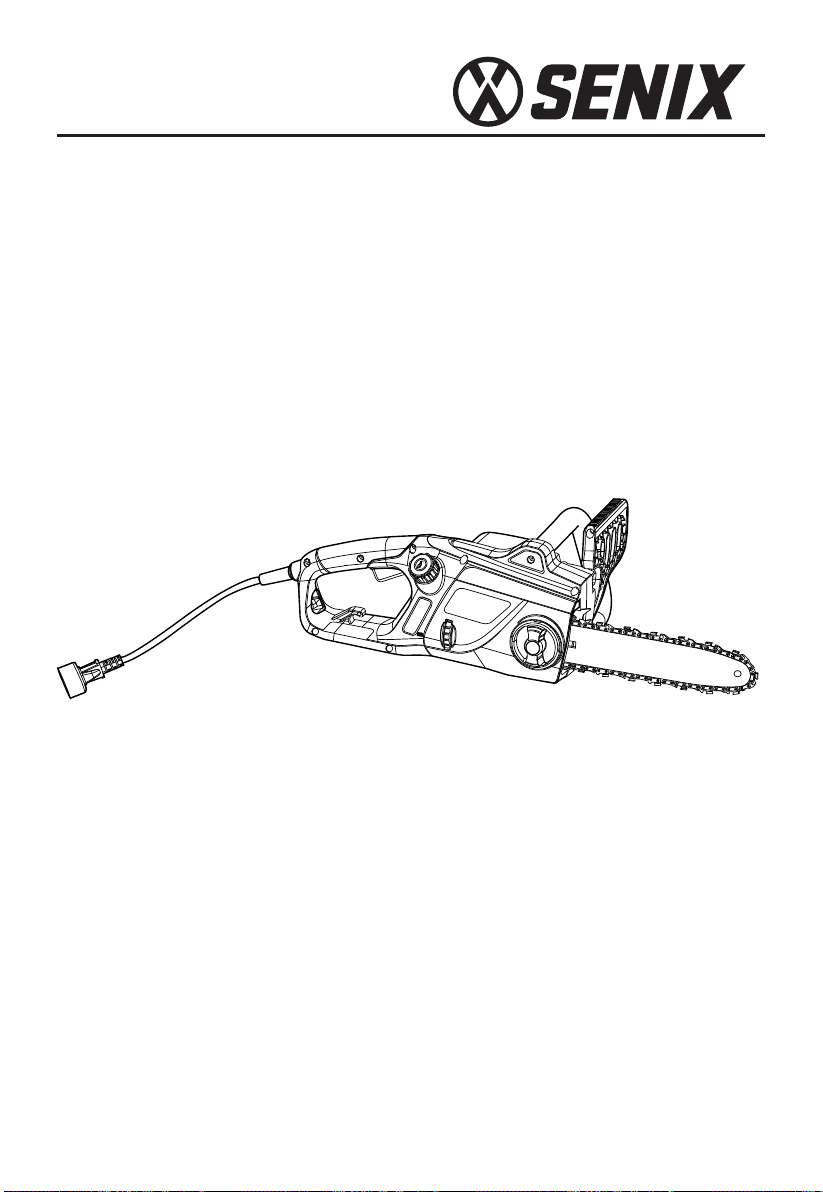
Scie à chaîne électrique
de 12/15 ampères
0DQXHOGHO¶RSpUDWHXU
Modèle : CSE12-M
CSE15-M
3RXUMRLQGUHOHVHUYLFHG¶DVVLVWDQFHDX[FRQVRPPDWHXUVYHXLOOH]FRPSRVHURXHQYR\H]XQFRXUULHOj
*$5'(=&(0$18(/32857287(5e)e5(1&(8/7e5,(85(
TM
45WWW.SENIXTOOLS.COM
TABLE DES MATIÈRES
SÉCURITÉ................................................................45
DESCRIPTION DE VOTRE APPAREIL....................54
COMPOSANTS INCLUS..........................................54
SPÉCIFICATIONS*...................................................54
PRÉPARATION DE LA SCIE À CHAÎNE..................55
FONCTIONNEMENT.................................................57
TECHNIQUES DE SCIAGE......................................59
ENTRETIEN ET RÉGLAGES.....................................62
DESCRIPTION DES PIÈCES....................................65
GARANTIE................................................................66
/HEXWGHVV\PEROHVGHVpFXULWpHVWG¶DWWLUHU
votre attention aux dangers potentiels. Les
V\PEROHVGHVpFXULWpHWOHXUVH[SOLFDWLRQV
exigent votre attention soigneuse et votre
FRPSUpKHQVLRQ/HVDYHUWLVVHPHQWV
GHVpFXULWpN’ÉLIMINENT PAS EN
SOI les dangers. Les consignes ou les
DYHUWLVVHPHQWVYpKLFXOpVQHVRQWSDVGHV
substituts pour des mesures convenables de
SUpYHQWLRQGHVDFFLGHQWV
Indique un danger EXTRÊME. Le non-
UHVSHFWG¶XQV\PEROHGHVpFXULWp'$1*(5
ENTRAÎNERA des blessures graves, voire un
GpFqVGHYRXVPrPHRXG¶DXWUHVSHUVRQQHV
Le pétrole brut, l’essence, le carburant
diesel et d’autres produits pétroliers
peuvent vous exposer à des produits
chimiques, y compris le toluène et
le benzène, signalés dans l’état de
Californie pour causer le cancer et
des malformations congénitales ou
d’autres problèmes de reproduction.
Ces expositions peuvent se produire
dans et autour des gisements de pétrole,
UDႈQHULHVXVLQHVGHSURGXLWVFKLPLTXHV
opérations de transport et d’entreposage
comme les pipelines, les terminaux
portuaires, les camions-citernes et autres
LQႋDOODWLRQVHWpTXLSHPHQW3RXUSOXV
d’informations, veuillez consulter :
www.P65Warnings.ca.gov/petroleum.
DANGER :
AVERTISSEMENT :
SÉCURITÉ
N.B. : vous informe de renseignements
ou de consignes d’une importance vitale
pour le fonctionnement ou l’entretien de
O¶pTXLSHPHQW
PROPOSITION 65 DE L’ÉTAT DE
CALIFORNIE
Indique un danger GRAVE. Le non-
respect d’un symbole de sécurité
AVERTISSEMENT PEUT provoquer
des blessures graves à vous-même ou
d’autres personnes.
AVERTISSEMENT :
Ce produit contient un produit chimique
signalé dans l’état de Californie pour
causer le cancer, des malformations
congénitales ou d’autres problèmes de
reproduction. Le perçage, le sciage, le
ponçage ou l’usinage de produits en
bois peut vous exposer à de la poussière
GHERLVXQHVXEႋDQFHVLJQDOpHGDQV
l’état de Californie pour causer le cancer.
Évitez l’inhalation de poussière de bois,
ou utilisez un masque antipoussières ou
d’autres mesures de sauvegarde pour
assurer la protection personnelle. Pour
plus d’informations, veuillez consulter
www.P65Warnings.ca.gov/woods.
AVERTISSEMENT :
LQGLTXHXQGDQJHU02'e5e/HQRQUHVSHFW
G¶XQV\PEROHGHVpFXULWpMISE EN GARDE
POURRAIT provoquer des dommages
PDWpULHOVRXGHVEOHVVXUHVjYRXVPrPHVRX
d’autres personnes.
MISE EN GARDE :
46 WWW.SENIXTOOLS.COM
Étudiez l’environnement de la zone
de travail. Soyez très prudent lors de
la coupe de broussailles et de jeunes
arbres de petite taille, car le matériel
mince peut s’accrocher dans la chaîne
de la scie et être envoyé vers vous ou
déséquilibrer. NE FAITES PAS fonctionner
une scie à chaîne lorsque vous vous
trouvez sur un arbre à moins d’avoir été
IRUPpVSpFLDOHPHQWjFHWWH¿Q/RUVGH
la coupe d’une branche sous tension,
IDLWHVDWWHQWLRQDXUHWRXUGHFHOOHFLD¿Q
que vous ne soyez pas frappé une fois
TXHODWHQVLRQGDQVOHV¿EUHVGXERLVHႋ
relâchée.
AVERTISSEMENT :
3RXUpYLWHUGHVHUUHXUVTXLSRXUUDLHQW
provoquer des blessures graves, NE PAS
EUDQFKHUODVFLHjFKDvQHjODVRXUFH
G¶DOLPHQWDWLRQMXVTX¶jFHTXHOHVFRQVLJQHV
VXLYDQWHVDLHQWpWpOXHVHWFRPSULVHV
AVERTISSEMENT :
3RXUGHVUHQVHLJQHPHQWVVXUOHV
emplacements et les achats, veuillez
composer 1-800-261-3981.
Lisez toutes les précautions de sécurité et
WRXWHVOHVLQႋUXFWLRQV/HQRQUHVSHFWGHV
SUpFDXWLRQVGHVpFXULWpHWGHVLQႋUXFWLRQV
peut être à l’origine d’électrocutions,
d’incendies ou de blessures graves.
AVERTISSEMENT :
ASSUREZ-VOUS de lire et de comprendre
toutes les consignes dans ce mode
d’emploi avant d’utiliser cette scie à
chaîne électrique. Le non-respect de
toutes les consignes détaillées ci-
dessous peut être à l’origine de décharges
électriques, d’incendies ou de blessures
graves.
AVERTISSEMENT :
Lors de l’utilisation de l’appareil, toutes
les consignes de sécurité doivent être
REVHUYpHV9HXLOOH]OLUHFHVLQႋUXFWLRQV
DYDQWGHIDLUHIRQFWLRQQHUO¶DSSDUHLOD¿Q
de veiller à la sécurité de l’opérateur
et de tout passant. Veuillez garder ces
consignes pour référence ultérieure.
INSTRUCTIONS IMPORTANTES
DE SÉCURITÉ
AVERTISSEMENT :
VEUILLEZ LIRE TOUTES LES
CONSIGNES AVANT D’UTILISER
LA SCIE
• Veuillez lire les consignes attentivement.
,OIDXWELHQFRQQDvWUHOHVFRPPDQGHVHWOD
bonne utilisation de l’appareil.
• NE FAITES PAS fonctionner cet appareil
ORUVTXHYRXVrWHVIDWLJXpPDODGHRXVRXV
les effets de l’alcool, des drogues ou d’un
PpGLFDPHQW
• Ne permettez jamais aux enfants de faire
fonctionner l’appareil. Les adolescents
GRLYHQWrWUHIRUPpVDFFRPSDJQpVHW
VXUYHLOOpVSDUXQDGXOWH1HSHUPHWWH]
jamais aux adultes de faire fonctionner
l’appareil sans avoir reçu les bonnes
consignes.
• Tous les dispositifs de protection et les
DFFHVVRLUHVGHVpFXULWpGRLYHQWrWUH
ELHQLQVWDOOpVDYDQWGHIDLUHIRQFWLRQQHU
l’appareil.
,QVSHFWH]O¶DSSDUHLODYDQWGHSURFpGHU
jVRQXWLOLVDWLRQ5HPSODFH]OHVSLqFHV
HQGRPPDJpHV9pUL¿H]V¶LO\DGHVIXLWHV
de carburant. Assurez-vous que toutes
OHVDWWDFKHVVRQWLQVWDOOpHVHWVpFXULVpHV
5HPSODFH]OHVSLqFHVTXLVRQW¿VVXUpHV
pEUpFKpHVRXHQGRPPDJpHVGHTXHOTXH
PDQLqUHTXHFHVRLW1¶87,/,6(=3$6
O¶DSSDUHLOV¶LOFRQWLHQWGHVSLqFHVPDO¿[pHV
RXHQGRPPDJpHV
6R\H]FRQVFLHQWGHVULVTXHVGHEOHVVXUHj
ODWrWHDX[PDLQVHWDX[SLHGV
• Inspectez soigneusement la zone de travail
DYDQWGHGpPDUUHUO¶DSSDUHLO
(QOHYH]OHVURFKHVOHYHUUHFDVVpOHV
FORXVOHV¿OVpOHFWULTXHVOHV¿FHOOHVHW
G¶DXWUHVREMHWVTXLSRXUUDLHQWrWUHODQFpV
RXV¶HPPrOHUGDQVO¶DSSDUHLO
eORLJQH]OHVHQIDQWVOHVSDVVDQWVHW
OHVDQLPDX[GRPHVWLTXHVௗDVVXUH]XQH

47WWW.SENIXTOOLS.COM
zone d’exclusion de 15 m (50 pieds), au
PLQLPXP0rPHjFHWWHGLVWDQFHLOH[LVWH
QpDQPRLQVXQULVTXHGHSURMHFWLOHVSRXU
OHVSHUVRQQHVjSUR[LPLWp(QFRXUDJH]
OHVSDVVDQWVjSRUWHUGHVOXQHWWHVGH
protection. Si les gens s’approchent de
YRXVDUUrWH]O¶DSSDUHLOLPPpGLDWHPHQW
• Appuyez sur la manette de commande
GHSXLVVDQFHHWYpUL¿H]TX¶HOOHUHWRXUQH
DXWRPDWLTXHPHQWjODSRVLWLRQGH
ralenti. (ႇHFWXH]WRXVOHVUpJODJHVRX
réparations avant d’utiliser l’appareil.
• NE CHANGEZ PAS OHVUpJODJHVGX
OLPLWHXUGHUpJLPHHWHPSrFKH]OHPRWHXU
de faire de la survitesse.
• &HWDSSDUHLOQ¶HႋSUpYXTXHSRXUXQH
XWLOLVDWLRQGRPHႋLTXHRFFDVLRQQHOOH
PENDANT L’UTILISATION
3RUWH]GHVOXQHWWHVGHVpFXULWpFRQIRUPHV
aux normes ANSI/ISEA Z87.1 en vigueur
HWPDUTXpHVFRPPHWHOOHV3RUWH]XQH
protection auditive pendant l’utilisation
GHFHWDSSDUHLO3RUWH]XQpFUDQIDFLDORX
un masque antipoussières si la tâche est
SRXVVLpUHXVH
3RUWH]XQSDQWDORQORQJHWpSDLVGHV
ERWWHVGHVJDQWVHWXQHFKHPLVHj
PDQFKHVORQJXHV1(3257(=3$6GHV
YrWHPHQWVDPSOHVGHVELMRX[XQSDQWDORQ
court ou des sandales et ne travaillez
pas pieds nus. Attachez vos cheveux au-
GHVVXVGHVpSDXOHV
• Utiliser l’appareil uniquement en plein jour
RXDYHFXQERQpFODLUDJHDUWL¿FLHO
eYLWH]OHGpPDUUDJHDFFLGHQWHO3ODFH]
YRXVGDQVODSRVLWLRQGHGpPDUUDJH
chaque fois que vous tirez sur le câble
GHGpPDUUHXU/¶RSpUDWHXUHWO¶DSSDUHLO
GRLYHQWrWUHGDQVXQHSRVLWLRQVWDEOH
SHQGDQWOHGpPDUUDJH&RQVXOWH]ODVHFWLRQ
©ௗ,QWHUUXSWHXU0DUFKH$UUrWௗª
• Utilisez le bon outil. Utilisez uniquement cet
RXWLOSRXUO¶XVDJHSUpYX
7HQH]WRXMRXUVO¶DSSDUHLOjGHX[PDLQV
pendant l’utilisation. Tenez fermement les
GHX[DQVHVRXSRLJQpHV
1¶(66$<(=3$6G¶DWWHLQGUHGHVHQGURLWV
GLI¿FLOHVG¶DFFqV&RQVHUYH]WRXMRXUVXQH
SRVLWLRQVWDEOHHWXQERQpTXLOLEUH
)DLWHVSUHXYHGHSUXGHQFHVXSSOpPHQWDLUH
quand vous travaillez sur des escaliers ou
GHVSHQWHVUDLGHV3RXUpYLWHUGHJUDYHV
EOHVVXUHV1()$,7(63$6IRQFWLRQQHU
l’appareil lorsque vous vous trouvez sur
XQHpFKHOOHRXXQWRLW
eORLJQH]OHVPDLQVOHYLVDJHHWOHVSLHGV
GHWRXWHSLqFHPRELOH1(728&+(=3$6
HWQ¶HVVD\H]SDVG¶DUUrWHUOHVSLqFHVHQ
mouvement.
1(728&+(=3$6OHPRWHXURXOH
SRWG¶pFKDSSHPHQW&HVFRPSRVDQWV
GHYLHQQHQWH[WUrPHPHQWFKDXGVSHQGDQW
O¶XWLOLVDWLRQPrPHDSUqVO¶DUUrWGH
l’appareil.
1¶87,/,6(=3$6O¶DSSDUHLOjXQHYLWHVVH
VXSpULHXUHjFHOOHQpFHVVDLUHSRXUUpDOLVHU
OHWUDYDLO1()$,7(63$6IRQFWLRQQHU
O¶DSSDUHLOjKDXWHYLWHVVHTXDQGYRXVQH
l’utilisez pas.
1()25&(=3$6O¶DSSDUHLO,OVHUDSOXV
HI¿FDFHHWSOXVVpFXULWDLUHVLYRXVO¶XWLOLVH]
jODYLWHVVHSRXUODTXHOOHLODpWpFRQoX
$UUrWH]WRXMRXUVO¶DSSDUHLOTXDQGOHWUDYDLO
est interrompu ou quand vous vous
GpSODFH]G¶XQHQGURLWjO¶DXWUH
• Avant de mettre l’appareil par terre,
ASSUREZ-VOUS toujours que le moteur
HVWFRXSpHWTXHWRXWHVOHVSLqFHVHQ
mouvement ne bougent plus.
• Si vous heurtez ou enroulez un corps
pWUDQJHUGDQVO¶DSSDUHLODUUrWH]O¶DSSDUHLO
LPPpGLDWHPHQWHWYpUL¿H]OHVGRPPDJHV
pYHQWXHOV1()$,7(63$6IRQFWLRQQHU
O¶DSSDUHLODYDQWGHUpSDUHUOHVGRPPDJHV
1¶87,/,6(=3$6O¶DSSDUHLOV¶LOFRQWLHQWGHV
SLqFHVPDO¿[pHVRXHQGRPPDJpHV
'pEUDQFKH]O¶DSSDUHLOSRXUOHVWkFKHV
G¶HQWUHWLHQRXGHUpSDUDWLRQ
• Utilisez uniquement des pièces et des
accessoires de rechange du fabricant
d’origine pour cet appareil. L’utilisation
de toute autre pièce et tout accessoire
SRXUUDLWHQWUDvQHUGHJUDYHVEOHVVXUHVGH
l’utilisateur, ou endommager l’appareil, et
annuler la garantie.
• L’appareil doit rester propre. Retirez avec
SUpFDXWLRQODYpJpWDWLRQHWOHVDXWUHVGpEULV
qui pourraient bloquer les pièces mobiles.
3RXUUpGXLUHOHVULVTXHVG¶LQFHQGLHYHLOOH]
jFHTXHOHVpYHQWVQHVRLHQWSDVREVWUXpV
par de l’herbe, des feuilles ou des couches
de graisse excessives.
6LO¶DSSDUHLOFRPPHQFHjYLEUHUGHIDoRQ
DQRUPDOHDUUrWH]OHLPPpGLDWHPHQW
,QVSHFWH]O¶DSSDUHLOSRXULGHQWL¿HUODFDXVH
GHODYLEUDWLRQ(QUqJOHJpQpUDOHXQH
vibration indique qu’il y a un problème.

48 WWW.SENIXTOOLS.COM
Un dispositif de protection de disjoncteur
GLႇpUHQWLHOGHIXLWHjODWHUUH'')7
doit être fourni pour tous les circuits et
toutes les prises à utiliser pour les scies à
chaîne électriques et les outils électriques
de jardinage. Des prises à DDFT sont
disponibles à la vente et devraient être
utilisées pour assurer cette mesure de
protection.
AVERTISSEMENT:
• La double isolation NE REMPLACE PAS
le respect des précautions normales en
matière de sécurité pendant l’utilisation
de cet outil.
• Prévenez les décharges électriques :
Évitez tout contact corporel avec des
3. AVANT de brancher l’outil, VEILLEZ À
CE QUE la tension fournie par la prise se
WURXYHGDQVODSODJHGHVWHQVLRQVPDUTXpH
VXUODSODTXHVLJQDOpWLTXHGHO¶RXWLO
1¶87,/,6(=3$6G¶RXWLOVGRQWODVRXUFH
d’alimentation est uniquement en courant
alternatif avec une source d’alimentation en
courant continu.
1¶(;326(=3$6OHVRXWLOVjODSOXLH
ou aux conditions humides, et n’utilisez
SDVOHVRXWLOVpOHFWULTXHVGDQVGHV
HPSODFHPHQWVPRXLOOpVRXKXPLGHV/D
SUpVHQFHG¶HDXGDQVXQRXWLOpOHFWULTXH
DXJPHQWHOHULVTXHGHGpFKDUJHpOHFWULTXH
6LYRXVGHYH]XWLOLVHUXQRXWLOpOHFWULTXH
dans un endroit humide, UTILISEZ
728-2856XQGLVMRQFWHXUGLIIpUHQWLHOGH
IXLWHjODWHUUHSRXUDOLPHQWHUYRWUHRXWLO
3257(=728-2856GHVJDQWVHWGHV
chaussures isolants de caoutchouc dans
des conditions humides.
3RXUUpGXLUHOHULVTXHGHGpFKDUJH
pOHFWULTXHjQ¶XWLOLVHUTX¶DYHFXQHUDOORQJH
DGDSWpHjXQHXWLOLVDWLRQH[WpULHXUHWHOOH
qu’une rallonge des types suivants : SW-
A, SOW-A, STW-A, STOW-A, SJW-A,
SJOW-A, SJTW-A. ou SJTOW-A.
,163(&7(=OHVFRUGRQVG¶RXWLOSRXUOD
SUpVHQFHG¶HQGRPPDJHPHQW)DLWHV
UpSDUHUOHVFRUGRQVG¶RXWLOVHQGRPPDJpV
SDUXQVHUYLFHDSUqVYHQWHDJUpp9(,//(=
À rester constamment au courant de
O¶HPSODFHPHQWGXFRUGRQHWWHQH]OHELHQj
O¶pFDUWGHODODPHGHFRXSH
1(0$/75$,7(=3$6ODUDOORQJH1(
75$163257(=-$0$,6O¶RXWLOSDUVRQ
FRUGRQHWQHGpEUDQFKH]MDPDLVOD¿FKH
en tirant sur le cordon. N’exposez pas
OHFRUGRQjODFKDOHXUjGHVKXLOHVj
GHVDUrWHVYLYHVRXjGHVSLqFHVHQ
PRXYHPHQW5HPSODFH]LPPpGLDWHPHQW
OHVFRUGRQVHQGRPPDJpV/HVFRUGRQV
HQGRPPDJpVDXJPHQWHQWOHULVTXHGH
GpFKDUJHpOHFWULTXH
1. Les outils à double isolation sont dotés
G¶XQH¿FKHSRODULVpHXQHODPHHႋSOXV
large que l’autre et exigera l’utilisation
d’une rallonge polarisée). /D¿FKHGHOD
VFLHjFKDvQHUHQWUHUDGDQVXQHUDOORQJH
SRODULVpHG¶XQHVHXOHPDQLqUH6LOD¿FKH
ne rentre pas complètement dans la
UDOORQJHLQYHUVH]OD¿FKH6LOD¿FKHQH
rentre toujours pas, obtenez une bonne
UDOORQJHSRODULVpH8QHUDOORQJHSRODULVpH
exigera l’utilisation d’une prise murale
SRODULVpH&HWWH¿FKHUHQWUHUDGDQVOD
SULVHPXUDOHSRODULVpHGDQVXQVHXOVHQV
6LOD¿FKHQHUHQWUHSDVFRPSOqWHPHQW
GDQVODSULVHPXUDOHLQYHUVH]OD¿FKH6L
OD¿FKHQHUHQWUHWRXMRXUVSDVFRQWDFWH]
XQpOHFWULFLHQDJUppSRXULQVWDOOHUXQH
bonne prise murale. Ne changez pas ou
QHPRGL¿H]SDVOD¿FKHGHO¶pTXLSHPHQW
ODSULVHGHODUDOORQJHRXOD¿FKHGHOD
rallonge de quelque manière que ce soit.
/DGRXEOHLVRODWLRQpOLPLQHOHEHVRLQG¶XQ
cordon d’alimentation et d’un système
G¶DOLPHQWDWLRQjWURLV¿OVDYHFPLVHj
la terre. Ne s’applique qu’aux outils de
&ODVVH,,jGRXEOHLVRODWLRQ&HWWHVFLHj
FKDvQHHVWXQRXWLOjGRXEOHLVRODWLRQ
surfaces mises à la terre. Par exemple :
WX\DXWHULHFO{WXUHVHQ¿OVGHIHU
Ne permettez pas aux doigts de toucher
OHVERUQHVGHOD¿FKHORUVGHO¶LQႋDOODWLRQ
ou de l’enlèvement de la rallonge de la
¿FKH
SÉCURITÉ ÉLECTRIQUE
AVERTISSEMENT :
LES RALLONGES
Utilisez une rallonge convenable. UTILISEZ
UNIQUEMENT des rallonges qui sont
KRPRORJXpHVSDU8QGHUZULWHUV/DERUDWRULHV
8//HVDXWUHVUDOORQJHVSHXYHQWHQWUDvQHU
une baisse de tension de secteur, ce qui

49WWW.SENIXTOOLS.COM
HQWUDvQHUDLWXQHSHUWHGHSXLVVDQFHHWOD
surchauffe de l’outil.
3RXUFHWRXWLOXQFDOLEUDJHDPpULFDLQ
QRUPDOLVpGHV¿OV$:*G¶DXPRLQV
HVWUHFRPPDQGpSRXUXQHUDOORQJHG¶XQH
ORQJXHXUGHPSLHGV8WLOLVH]GX¿O
de jauge 12 pour une rallonge de 15,2 m (50
SLHGV1RXVQHSUpFRQLVRQVSDVO¶XWLOLVDWLRQ
de rallonges d’une longueur de 30,5 m (100
pieds) ou plus.
5DSSHOH]YRXVTX¶XQ¿OG¶XQSOXVSHWLWMDXJH
DXQHSOXVJUDQGHFDSDFLWpTX¶XQ¿ODX[
MDXJHVGRQWOHFKLIIUHHVWSOXVpOHYpXQ¿OGH
MDXJHDGDYDQWDJHGHFDSDFLWpTX¶XQ¿O
GHMDXJHௗXQ¿OGHMDXJHDGDYDQWDJH
GHFDSDFLWpTX¶XQ¿OGHMDXJH(QFDVGH
doute, utilisez le chiffre le plus petit.
Jauge minimum pour les
rallonges
Intensité nominale
Fixer la rallonge
Volts
Longueur totale de la rallonge en mètres
(pieds)
Plus de/pas plus que AWG
120 V 7,6 15,2 30,5 45,7
0-6
6-10
10-12
18
18
16
16
16
16
16
14
14
14
12
12
12-16 14 12 3DVUHFRPPDQGp
CONSIGNES DE SÉCURITÉ
GÉNÉRALES POUR UTILISER
L’OUTIL ÉLECTRIQUE
Conservez tous les avertissements et les
LQVWUXFWLRQVSRXUWRXWHFRQVXOWDWLRQXOWpULHXUH
/¶H[SUHVVLRQ©ௗRXWLOpOHFWULTXHௗªGDQVWRXV
OHVDYHUWLVVHPHQWVpQXPpUpVVHUpIqUHj
YRWUHRXWLOpOHFWULTXHIRQFWLRQQDQWVXUVHFWHXU
EUDQFKpRXjEDWWHULHVDQV¿O
Éloignez la rallonge de la zone de
travail. Positionnez la rallonge de façon
à ce qu’elle ne s’accroche pas dans les
buissons, haies, troncs d’arbre, tondeuses
jJD]RQRXDXWUHVREႋUXFWLRQVSHQGDQW
que vous utilisez la scie à chaîne.
MISE EN GARDE :
9pUL¿HUOHVUDOORQJHVDYDQW
chaque utilisation. Si une rallonge
HႋHQGRPPDJpHUHPSODFH]OD
immédiatement.Ne jamais utiliser l’outil
avec une rallonge endommagée, car le fait
AVERTISSEMENT :
/LVH]WRXWHVOHVSUpFDXWLRQVGHVpFXULWpHW
toutes les instructions. Le non-respect des
SUpFDXWLRQVGHVpFXULWpHWGHVLQVWUXFWLRQV
SHXWrWUHjO¶RULJLQHG¶pOHFWURFXWLRQV
d’incendies ou de blessures graves.
AVERTISSEMENT :
1. La sécurité de l’aire de travail
D 9HLOOH]jFHTXHO¶DLUHGHWUDYDLOVRLW
SURSUHHWELHQpFODLUpH/HGpVRUGUH
et le manque de lumière favorisent les
accidents.
E 1¶87,/,6(=3$6G¶RXWLOVpOHFWULTXHV
GDQVXQPLOLHXSUpVHQWDQWXQULVTXH
G¶H[SORVLRQSDUH[HPSOHHQSUpVHQFH
de liquides, de gaz ou de poussières
LQÀDPPDEOHV/HVRXWLOVpOHFWULTXHV
FUpHQWGHVpWLQFHOOHVTXLSRXUUDLHQW
HQÀDPPHUOHVSRXVVLqUHVRXOHVYDSHXUV
F *DUGH]jGLVWDQFHOHVHQIDQWVHWOHV
passants pendant l’utilisation d’un outil
pOHFWULTXH,OVSRXUUDLHQWYRXVGLVWUDLUHHW
vous faire faire une fausse manœuvre.
2. LA SÉCURITÉ ÉLECTRIQUE
D /HV¿FKHVGHVRXWLOVpOHFWULTXHVGRLYHQW
correspondre aux prises murales. Ne
PRGL¿H]MDPDLVOD¿FKHGHTXHOTXH
PDQLqUHTXHFHVRLW1¶87,/,6(=3$6
GH¿FKHVG¶DGDSWDWLRQDYHFGHVRXWLOV
pOHFWULTXHVPLVjODWHUUHPLVjOD
PDVVH'HV¿FKHVQRQPRGL¿pHVHWGHV
prises de courant qui leur correspondent
UpGXLURQWOHULVTXHGHGpFKDUJH
pOHFWULTXH
E eYLWH]WRXWFRQWDFWFRUSRUHODYHF
GHVVXUIDFHVPLVjODWHUUHSDUH[
tuyauterie, radiateurs, cuisinières et
UpIULJpUDWHXUV/HULVTXHGHGpFKDUJH
de toucher la zone endommagée pourrait
provoquer une décharge électrique, ainsi
entraînant de graves blessures.

50 WWW.SENIXTOOLS.COM
pOHFWULTXHHVWSOXVJUDQGVLYRWUHFRUSV
est en contact avec la terre.
F 1¶(;326(=3$6OHVRXWLOVpOHFWULTXHVj
ODSOXLHRXDX[FRQGLWLRQVPRXLOOpHV/D
SUpVHQFHG¶HDXGDQVXQRXWLOpOHFWULTXH
DXJPHQWHOHULVTXHGHGpFKDUJH
pOHFWULTXH
G 1(0$/75$,7(=3$6OHFRUGRQ1H
WUDQVSRUWH]MDPDLVO¶RXWLOpOHFWULTXHSDU
VRQFRUGRQHWQHGpEUDQFKH]MDPDLVOD
¿FKHHQWLUDQWVXUOHFRUGRQ1¶H[SRVH]
SDVOHFRUGRQjODFKDOHXUjGHVKXLOHV
jGHVDUrWHVYLYHVRXjGHVSLqFHVHQ
PRXYHPHQW/HVFRUGRQVHQGRPPDJpV
RXHQFKHYrWUpVDXJPHQWHQWOHULVTXHGH
GpFKDUJHpOHFWULTXH
H 3HQGDQWO¶XWLOLVDWLRQG¶XQRXWLOpOHFWULTXHj
O¶H[WpULHXUXWLOLVH]XQHUDOORQJHDGDSWpH
jXQHXWLOLVDWLRQH[WpULHXUH/¶XWLOLVDWLRQ
G¶XQHUDOORQJHDGDSWpHjXQHXWLOLVDWLRQ
H[WpULHXUHUpGXLWOHULVTXHGHGpFKDUJH
pOHFWULTXH
I 6LYRXVGHYH]XWLOLVHUXQRXWLOpOHFWULTXH
dans un endroit humide, utilisez une
VRXUFHG¶DOLPHQWDWLRQSURWpJpHSDUXQ
GLVSRVLWLIGLIIpUHQWLHOjFRXUDQWUpVLGXHO
(DDR). L’utilisation d’un dispositif DDR
UpGXLWOHULVTXHGHGpFKDUJHpOHFWULTXH
3. La sécurité personnelle
D 3HQGDQWO¶XWLOLVDWLRQG¶XQRXWLOpOHFWULTXH
restez alerte, concentrez-vous sur votre
travail et faites preuve de bon sens.
1¶87,/,6(=3$6XQRXWLOpOHFWULTXHVL
YRXVrWHVIDWLJXpRXVRXVO¶LQÀXHQFHGH
GURJXHVG¶DOFRRORXGHPpGLFDPHQWV
Un instant d’inattention lors de l’utilisation
G¶RXWLOVpOHFWULTXHVSHXWHQWUDvQHUGHV
blessures graves.
E 8WLOLVH]GHO¶pTXLSHPHQWGHSURWHFWLRQ
LQGLYLGXHOOH3RUWH]WRXMRXUVGHV
OXQHWWHVGHSURWHFWLRQ'HO¶pTXLSHPHQW
GHVpFXULWpWHOTXHOHVPDVTXHV
antipoussières, les chaussures de
VpFXULWpDQWLGpUDSDQWHVOHVFDVTXHVGXUV
RXOHVSURWHFWLRQVDXGLWLYHVXWLOLVpHVGDQV
GHVFRQGLWLRQVDSSURSULpHVUpGXLURQWOHV
blessures corporelles.
F eYLWH]OHVGpPDUUDJHVDFFLGHQWHOV$YDQW
de brancher la source d’alimentation ou
G¶LQVpUHUODEDWWHULHGDQVO¶RXWLOUDPDVVHU
l’outil ou le transporter, assurez-vous que
VRQLQWHUUXSWHXUHVWHQSRVLWLRQ©ௗ2))ௗª
$UUrW/HIDLWGHWUDQVSRUWHUXQRXWLO
pOHFWULTXHDYHFOHGRLJWVXUO¶LQWHUUXSWHXU
ou de mettre sous tension un outil dont
O¶LQWHUUXSWHXUHVWHQSRVLWLRQ©ௗ21ௗª
(Marche) peut causer un accident.
G 5HWLUH]OHVFOpVGHUpJODJHDYDQWGH
PHWWUHO¶RXWLOpOHFWULTXHVRXVWHQVLRQ8QH
FOpUHVWpHDWWDFKpHjXQHSDUWLHPRELOH
GHO¶RXWLOpOHFWULTXHSRXUUDLWHQWUDvQHUGHV
blessures corporelles.
H 1¶(66$<(=3$6'¶$77(,1'5(GHV
HQGURLWVGLI¿FLOHVG¶DFFqV0DLQWHQH]XQ
ERQDSSXLHWUHVWH]HQpTXLOLEUHHQWRXW
WHPSV8QHERQQHVWDELOLWpYRXVSHUPHW
d’assurer un meilleur contrôle de l’outil
pOHFWULTXHGDQVXQHVLWXDWLRQLQDWWHQGXH
f. Habillez-vous convenablement. NE
3257(=1,YrWHPHQWVDPSOHVQLELMRX[
*DUGHUOHVFKHYHX[OHVYrWHPHQWVHWOHV
JDQWVjO¶pFDUWGHVSLqFHVPRELOHV/HV
YrWHPHQWVDPSOHVOHVELMRX[RXOHV
FKHYHX[ORQJVULVTXHQWG¶rWUHKDSSpVSDU
des pièces en mouvement.
g. Si des appareils sont fournis pour la
connexion de systèmes d’extraction et de
collection de poussières, assurez-vous
TX¶LOVVRQWELHQFRQQHFWpVHWHPSOR\pV
L’utilisation de système de collection de
SRXVVLqUHSHXWUpGXLUHOHVGDQJHUVOLpVj
la poussière.
4. L’utilisation et l’entretien
de l’outil
D 1()25&(=3$6O¶RXWLOpOHFWULTXH
8WLOLVH]O¶RXWLOpOHFWULTXHDSSURSULpjOD
WkFKH/¶RXWLODSSURSULpIRQFWLRQQHPLHX[
HWGHIDoRQSOXVVpFXULWDLUHHQUHVSHFWDQW
la vitesse de travail qui lui est propre.
E 1¶87,/,6(=3$6O¶RXWLOpOHFWULTXHVL
l’interrupteur ne le met pas en marche ou
QHSHXWO¶DUUrWHU8QRXWLOTXLQHSHXWrWUH
FRQWU{OpSDUO¶LQWHUUXSWHXUHVWGDQJHUHX[
HWGRLWrWUHUpSDUp
F 'pEUDQFKH]OD¿FKHGHODVRXUFH
d’alimentation ou retirez le bloc-batterie
GHO¶RXWLOpOHFWULTXHDYDQWG¶HIIHFWXHUXQ
UpJODJHGHFKDQJHUG¶DFFHVVRLUHRXGH
UDQJHUO¶RXWLOpOHFWULTXH'HWHOOHVPHVXUHV
GHVpFXULWpSUpYHQWLYHUpGXLVHQWOH
ULVTXHGHGpPDUUDJHDFFLGHQWHOGHO¶RXWLO
pOHFWULTXH
G 5DQJH]OHVRXWLOVpOHFWULTXHVKRUVGH
SRUWpHGHVHQIDQWV1(3(50(77(=

51WWW.SENIXTOOLS.COM
3$6DX[SHUVRQQHVTXLFRQQDLVVHQWPDO
O¶RXWLOpOHFWULTXHRXFHVFRQVLJQHVGHIDLUH
IRQFWLRQQHUO¶RXWLOpOHFWULTXH/HVRXWLOV
pOHFWULTXHVVRQWGDQJHUHX[HQWUHOHV
mains d’utilisateurs sans formation.
H 3UHQH]VRLQGHELHQHQWUHWHQLUOHVRXWLOV
pOHFWULTXHV9pUL¿H]V¶LO\DPDXYDLV
alignement ou absence de mouvement
des pièces mobiles, si des pièces sont
FDVVpHVHWWRXWHDXWUHFRQGLWLRQTXL
pourrait affecter l’utilisation de l’outil
pOHFWULTXH6LO¶RXWLOpOHFWULTXHHVW
HQGRPPDJpIDLWHVOHUpSDUHUDYDQWGH
vous en servir. De nombreux accidents
VRQWFDXVpVSDUGHVRXWLOVpOHFWULTXHVHQ
PDXYDLVpWDW
I /HVRXWLOVGHFRXSHGRLYHQWrWUHELHQ
DIIWpVHWSURSUHV/HVRXWLOVGHFRXSH
ELHQHQWUHWHQXVGRQWOHVDUrWHVVRQWELHQ
tranchantes, sont moins susceptibles de
VHFRLQFHUHWSOXVIDFLOHVjFRQWU{OHU
J 8WLOLVH]O¶RXWLOpOHFWULTXHOHVDFFHVVRLUHV
HWOHVIRUHWVHWFHQFRQIRUPLWpDYHF
ces instructions, en prenant en compte
les conditions de travail et le travail
TXLGRLWrWUHDFFRPSOL/¶HPSORLGH
O¶RXWLOpOHFWULTXHSRXUGHVRSpUDWLRQV
GLIIpUHQWHVGHFHOOHVSRXUOHVTXHOOHVLOD
pWpFRQoXSRXUUDLWHQWUDvQHUXQHVLWXDWLRQ
dangereuse.
5. Entretien
D)DLWHVHQWUHWHQLUYRWUHRXWLOpOHFWULTXH
SDUXQUpSDUDWHXUDJUppQ¶XWLOLVDQWTXH
des pièces de rechange identiques.
&HODDVVXUHUDTXHODVpFXULWpGHO¶RXWLO
pOHFWULTXHHVWPDLQWHQXH
AVERTISSEMENTS DE SÉCURITÉ
POUR LA SCIE À CHAÎNE
7HQH]ODVFLHjFKDvQHELHQpORLJQpHGHV
parties de votre corps lorsque celle-ci est
en marche. Avant de mettre en marche
ODVFLHjFKDvQHYHLOOH]jFHTX¶HOOHQH
soit en contact avec aucun objet. Vos
YrWHPHQWVSHXYHQWV¶DFFURFKHUjODVFLHj
FKDvQHRXDORUVYRWUHFRUSVSHXWV¶\FROOHU
pendant un moment d’inattention lors du
fonctionnement de l’outil.
7HQH]WRXMRXUVODSRLJQpHDUULqUHGHOD
VFLHjFKDvQHDYHFYRWUHPDLQGURLWHHWOD
SRLJQpHDYDQWDYHFYRWUHPDLQJDXFKH
eYLWH]G¶LQYHUVHUODSRVLWLRQGHVPDLQV
car ceci pourrait augmenter le risque de
EOHVVXUHHWQHGRLWMDPDLVrWUHIDLW
1%3RXUOHVVFLHVjFKDvQHFRQoXHV
DYHFOHJXLGHFKDvQHVXUOHF{WpJDXFKH
WRXWHUpIpUHQFHDXSRVLWLRQQHPHQWGHOD
©ௗPDLQGURLWHௗªHWGHOD©ௗPDLQJDXFKHௗªHVW
LQYHUVpH
7HQH]O¶RXWLOpOHFWULTXHSDUVHVVXUIDFHV
GHSULVHLVROpHVXQLTXHPHQW/DFKDvQH
de la scie peut entrer en contact avec un
FkEODJHGLVVLPXOpRXVRQSURSUHFkEOH/HV
FKDvQHVGHODVFLHTXLHQWUHQWHQFRQWDFW
avec un câble conducteur peuvent rendre
FRQGXFWULFHVOHVSLqFHVHQPpWDOGHO¶RXWLO
pOHFWULTXHHWFDXVHUDLQVLXQHGpFKDUJH
pOHFWULTXHjO¶RSpUDWHXU
3RUWH]GHVOXQHWWHVGHVpFXULWpHWGHV
SURWqJHRUHLOOHV'HVpTXLSHPHQWVGH
SURWHFWLRQVXSSOpPHQWDLUHVSRXUODWrWH
les mains, les jambes et les pieds sont
UHFRPPDQGpV3RUWH]GHVYrWHPHQWV
GHSURWHFWLRQDGDSWpVD¿QGHUpGXLUHOHV
ULVTXHVGHEOHVVXUHSDUGHVGpEULVYRODQWV
RXG¶pYLWHUXQFRQWDFWDFFLGHQWHODYHFOD
FKDvQHGHVFLH
e9,7(='()$,5()21&7,211(5ODVFLH
jFKDvQHORUVTXHYRXVYRXVWURXYH]VXUXQ
DUEUH)DLUHIRQFWLRQQHUXQHVFLHjFKDvQH
WRXWHQKDXWG¶XQDUEUHSHXWHQWUDvQHUGHV
blessures corporelles.
• Gardez toujours une bonne assise et ne
IDLWHVIRQFWLRQQHUODVFLHjFKDvQHTXH
ORUVTXHYRXVrWHVGHERXWVXUXQHVXUIDFH
¿[HVpFXULVpHHWSODQH/HVVXUIDFHV
glissantes ou instables telles que les
pFKHOOHVSHXYHQWHQWUDvQHUXQHSHUWH
G¶pTXLOLEUHRXGHFRQWU{OHGHODVFLHj
FKDvQH
• Lors de la coupe d’une branche sous
tension, faites attention au retour de celle-
FL/RUVTXHODWHQVLRQGHV¿EUHVGHERLV
HVWUHOkFKpHODEUDQFKHVHPEODEOHjXQ
UHVVRUWSHXWIUDSSHUO¶RSpUDWHXURXUHQGUH
ODVFLHjFKDvQHLQFRQWU{ODEOH
6R\H]H[WUrPHPHQWSUXGHQWORUVGHOD
coupe de la broussaille et des jeunes
arbres.
/HPDWpULDX¿QSHXWVHFRLQFHUGDQVOD
FKDvQHHWYRXVIUDSSHURXYRXVIDLUHSHUGUH
O¶pTXLOLEUH
3RUWH]ODVFLHjFKDvQHSDUODSRLJQpH
DYDQWORUVTX¶HOOHHVWHQDUUrWHWpORLJQH]

52 WWW.SENIXTOOLS.COM
la de votre corps. Lors du transport ou
GXVWRFNDJHGHODVFLHjFKDvQHWRXMRXUV
UDEDWWUHOHSURWHFWHXUGHJXLGHFKDvQH
8QHPDQLSXODWLRQDSSURSULpHGHODVFLHj
FKDvQHSHUPHWWUDGHUpGXLUHODSUREDELOLWp
GHFRQWDFWDFFLGHQWHODYHFODFKDvQHHQ
mouvement.
5HVSHFWH]OHVLQVWUXFWLRQVUHODWLYHVjOD
OXEUL¿FDWLRQjODWHQVLRQGHODFKDvQHHW
au remplacement des accessoires. Une
FKDvQHD\DQWXQHWHQVLRQLQDSSURSULpHRX
PDOOXEUL¿pHSHXWVRLWFDVVHURXDXJPHQWHU
le risque de recul.
*DUGH]OHVSRLJQpHVVqFKHVSURSUHVHW
exemptes d’huile et de graisse.
/HVSRLJQpHVFRQWHQDQWGHODJUDLVVHRX
de l’huile sont glissantes et causent une
perte de contrôle.
8QLTXHPHQWGHVWLQpHjODFRXSHGHERLV
e9,7(='¶87,/,6(5XQHVFLHjFKDvQH
jG¶DXWUHV¿QVTXHFHOOHVSUpYXHV3DU
H[HPSOHe9,7(='¶87,/,6(5XQH
VFLHjFKDvQHSRXUFRXSHUGHVPDWLqUHV
SODVWLTXHVGXPDWpULDXGHPDoRQQHULH
RXGHVPDWpULDX[GHFRQVWUXFWLRQDXWUH
TXHOHERLV/¶XWLOLVDWLRQGHODVFLHjFKDvQH
jG¶DXWUHV¿QVTXHFHOOHSUpYXHSRXUUDLW
HQWUDvQHUXQHVLWXDWLRQGDQJHUHXVH
Causes et prévention du recul de
l’opérateur
Un recul peut se produire lorsque le nez ou
OHERXWGXJXLGHFKDvQHWRXFKHXQREMHWRX
ORUVTXHOHERLVVHUHVVHUUHHWSLQFHODFKDvQH
GHODVFLHjFKDvQHGDQVODFRXSH
Dans certains cas, un contact du bout peut
SURYRTXHUXQHUpDFWLRQLQYHUVHH[WUrPHPHQW
UDSLGHSURSXOVDQWOHJXLGHFKDvQHYHUV
le haut et vers l’arrière en direction de
O¶RSpUDWHXU
8QSLQFHPHQWGHODFKDvQHGHODVFLHj
FKDvQHOHORQJGHODSDUWLHVXSpULHXUHGX
JXLGHFKDvQHSHXWUHSRXVVHUUDSLGHPHQWOH
JXLGHFKDvQHYHUVO¶RSpUDWHXU
&HVUpDFWLRQVSHXYHQWWRXWHVGHX[SURYRTXHU
XQHSHUWHGHFRQWU{OHGHODVFLHjFKDvQH
SRXYDQWHQWUDvQHUGHVEOHVVXUHVJUDYHV
SRXUO¶XWLOLVDWHXU1(&2037(=3$6
H[FOXVLYHPHQWVXUOHVGLVSRVLWLIVGHVpFXULWp
de votre scie. En tant qu’utilisateur d’une scie
jFKDvQHYRXVGHYH]SUHQGUHGHVPHVXUHV
QpFHVVDLUHVSRXUHIIHFWXHUYRVWUDYDX[GH
coupe sans accident ou blessure.
/HUHFXOHVWOHUpVXOWDWG¶XQHPDXYDLVH
utilisation de l’outil ou du non-respect des
SURFpGXUHVRXFRQGLWLRQVG¶XWLOLVDWLRQௗLO
SHXWrWUHpYLWpHQUHVSHFWDQWOHVSUpFDXWLRQV
LQGLTXpHVFLGHVVRXV
7HQH]IHUPHPHQWO¶pTXLSHPHQWOHV
SRXFHVHWOHVGRLJWVUHIHUPpVVXUOHVGHX[
SRLJQpHVGHODVFLHjFKDvQHௗYRXVGHYH]
WHQLUODVFLHjFKDvQHDYHFYRVGHX[PDLQV
HWYRWUHFRUSVHWYRVEUDVGRLYHQWrWUH
SODFpVGDQVXQHSRVLWLRQTXLYRXVSHUPHW
GHUpVLVWHUDX[IRUFHVGHUHFXO
/HVIRUFHVGHUHFXOSHXYHQWrWUHFRQWU{OpHV
SDUO¶RSpUDWHXUVLOHVSUpFDXWLRQV
QpFHVVDLUHVVRQWSULVHVe9,7(='(
/Æ&+(5ODVFLHjFKDvQH
e9,7(='(752392863(1&+(5
HQDYDQWHWGHFRXSHUjXQHKDXWHXU
DXGHVVXVGXQLYHDXGHVpSDXOHV&HOD
SHUPHWG¶pYLWHUWRXWFRQWDFWLQYRORQWDLUH
avec l’embout et permet un meilleur
FRQWU{OHGHODVFLHjFKDvQHHQFDVGH
situations inattendues.
8WLOLVH]XQLTXHPHQWGHVEDUUHVHWFKDvQHV
GHUHFKDQJHVSpFL¿pHVSDUOHIDEULFDQW/HV
EDUUHVHWFKDvQHVGHUHFKDQJHLQDGDSWpHV
peuvent provoquer une cassure ou un recul
GHODFKDvQH
5HVSHFWH]OHVLQVWUXFWLRQVUHODWLYHVj
O¶DIIWDJHHWjO¶HQWUHWLHQGHODFKDvQHGH
la scie fournies par le fabricant. Diminuer
la hauteur du limiteur de profondeur peut
HQWUDvQHUXQHDXJPHQWDWLRQGHUHFXO
CONSERVEZ CES INSTRUCTIONS
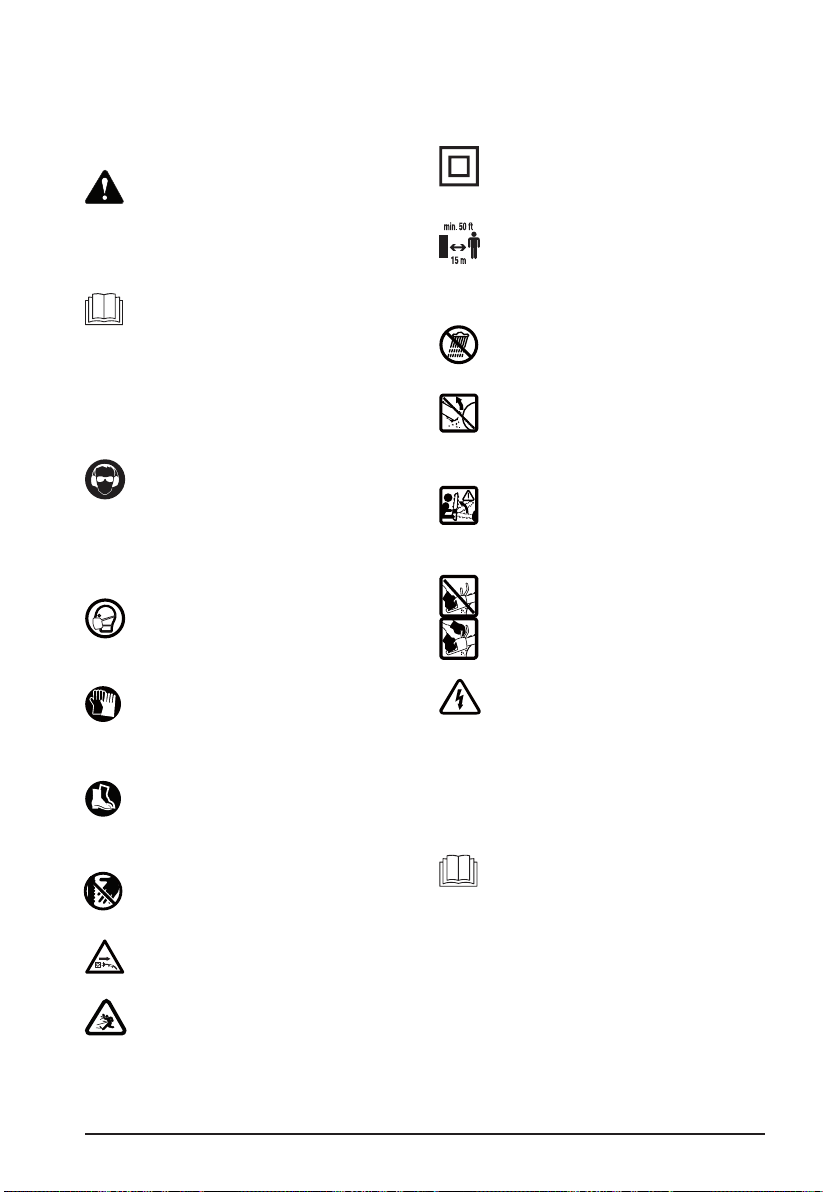
53WWW.SENIXTOOLS.COM
SYMBOLE D’AVERTISSEMENT DE
DANGER
Indique un danger, un avertissement ou
XQHPLVHHQJDUGH,OSHXWrWUHHPSOR\p
en association avec d’autres symboles
ou pictogrammes.
ÉLOIGNEZ LES PASSANTS
AVERTISSEMENT :eORLJQH]WRXVOHV
passants, en particulier les enfants
HWOHVDQLPDX[GRPHVWLTXHVjP
(50 pieds) au moins de la zone de
fonctionnement.
AVERTISSEMENT :1¶(;326(=3$6
O¶DSSDUHLOjODSOXLH
AVERTISSEMENT :eYLWH]WRXW
FRQWDFWGXERXWGXJXLGHFKDvQHDYHF
un objet.
AVERTISSEMENT : 6LO¶H[WUpPLWp
est mise en contact avec un objet,
OHJXLGHFKDvQHSHXWrWUHSURMHWp
brutalement vers le haut et vers
l’arrière, et risque de blesser
gravement l’utilisateur.
AVERTISSEMENT : Utilisez toujours
vos deux mains pour maintenir la scie
jFKDvQHZKHQRSHUDWLQJWKHFKDLQ
saw.
PRÉVENEZ LES DÉCHARGES
ÉLECTRIQUES
eYLWH]WRXWFRQWDFWFRUSRUHODYHF
GHVVXUIDFHVPLVHVjODWHUUHSDU
H[OHVEDOXVWUDGHVPpWDOOLTXHV
OHVODPSDGDLUHVHWF/DVpFXULWp
pOHFWULTXHSHXWrWUHGDYDQWDJH
DPpOLRUpHHQXWLOLVDQWXQGLVSRVLWLI
GLIIpUHQWLHOjFRXUDQWUpVLGXHO'&5j
JUDQGHVHQVLELOLWpP$P6
LISEZ LE MANUEL DE L’OPÉRATEUR
AVERTISSEMENT : Veuillez lire
OHOHVPDQXHOVGHO¶RSpUDWHXUHW
respecter tous les avertissements et
FRQVLJQHVGHVpFXULWp'DQVOHFDV
FRQWUDLUHO¶RSpUDWHXURXOHVSDVVDQWV
peuvent subir des blessures graves.
LISEZ LE MANUEL DE
L’OPÉRATEUR
AVERTISSEMENT : L’emploi d’un
DCR ou d’un autre disjoncteur ne
GLVSHQVHSDVO¶RSpUDWHXUGHYRWUHVFLH
jFKDvQHGHVSUDWLTXHVHQPDWLqUHGH
VpFXULWpSUpVHQWpHVGDQVFHPRGH
d’emploi.
PORTEZ DES PROTECTIONS
OCULAIRES ET AUDITIVES
AVERTISSEMENT :La projection
d’objets et les bruits forts peuvent
provoquer des blessures oculaires
JUDYHVHWXQHSHUWHDXGLWLYH3RUWH]
une protection oculaire conforme aux
normes ANSI/ISEA Z87.1 en vigueur,
ainsi qu’une protection auditive
pendant l’utilisation de cet appareil.
$XEHVRLQXWLOLVH]XQpFUDQIDFLDO
complet.
PORTEZ UN MASQUE
ANTIPOUSSIÈRES
3RUWH]XQDSSDUHLOGHSURWHFWLRQ
respiratoire.
PORTEZ DES GANTS DE
PROTECTION
3RUWH]GHVJDQWVGHWUDYDLOGH
IDEULFDWLRQUREXVWHD¿QGHSURWpJHUOHV
mains.
PORTEZ DES CHAUSSURES DE
SÉCURITÉ
3RUWH]GHVERWWHVPXQLHVGHVHPHOOHV
DQWLGpUDSDQWHVHWUpVLVWDQWHVDX[
perforations.
AVERTISSEMENT : Si vous ne tenez
SDVYRVPDLQVpORLJQpHVGHODODPH
vous risquez de subir de graves
blessures.
AVERTISSEMENT : 5HWLUH]OD¿FKHGX
VHFWHXULPPpGLDWHPHQWVLOHFkEOHHVW
HQGRPPDJpRXFRXSp
AVERTISSEMENT. Des objets
SURMHWpVSHXYHQ]WULFRFKHUHWHQWUDvQHU
des blessures corporelles ou des
GpJkWVPDWpULHOV
CONSTRUCTION DE CLASSE II
À double isolation. Dans le cadre de
l’entretien courant, n’utilisez que des
pièces de rechange identiques.
&HPDQXHOGHO¶RSpUDWHXUGpFULWOHVV\PEROHVGHVpFXULWpHWLQWHUQDWLRQDX[HWOHVSLFWRJUDPPHV
TXLSHXYHQW¿JXUHUVXUFHSURGXLW/LVH]OHPDQXHOGHO¶RSpUDWHXUSRXUREWHQLUO¶HQVHPEOHGHV
LQIRUPDWLRQVVXUODVpFXULWpOHPRQWDJHOHIRQFWLRQQHPHQWO¶HQWUHWLHQHWODUpSDUDWLRQ
• LA SÉCURITÉ ET LES SYMBOLES INTERNATIONAUX •
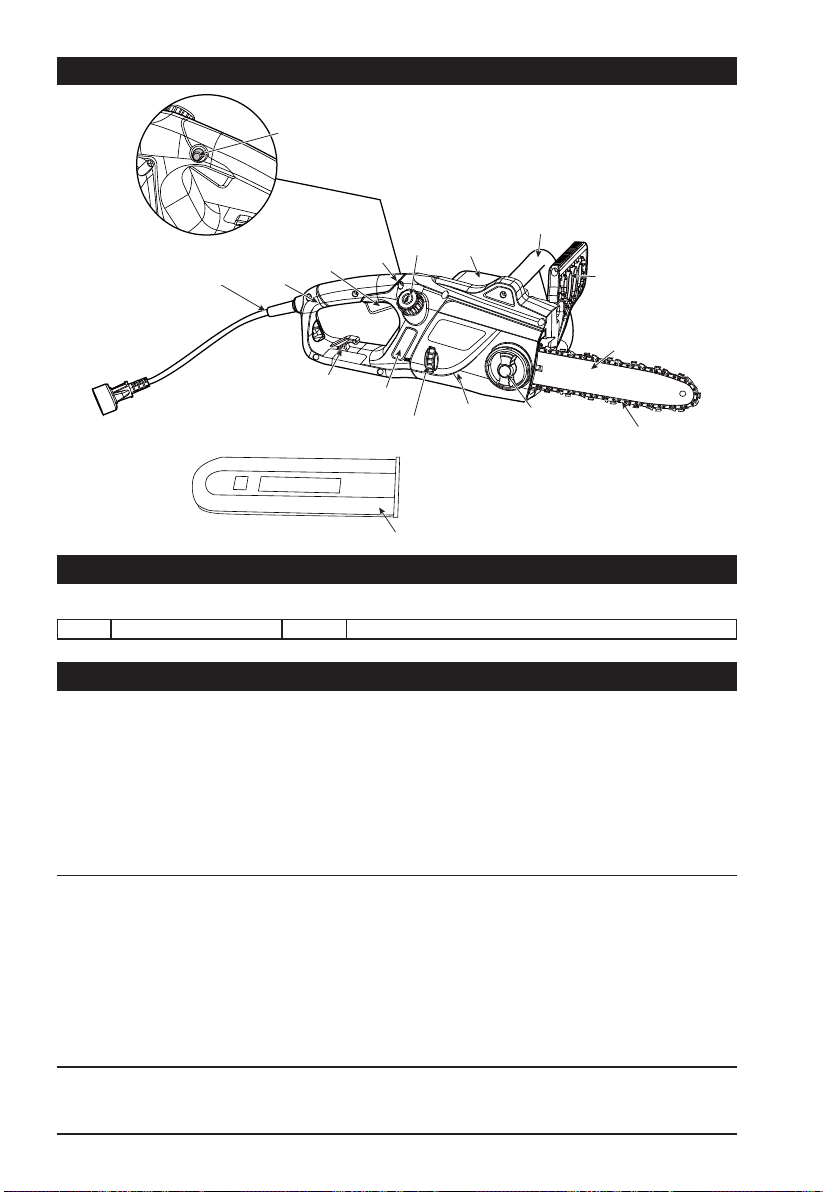
54 WWW.SENIXTOOLS.COM
DESCRIPTION DE VOTRE APPAREIL
SPÉCIFICATIONS*
Tension nominale..........................................................................................................120V~60Hz
Courant nominal........................................................................................................................15A
Type de moteur.....................................................................................................Moteur universel
9LWHVVHjYLGHWUPLQ
9LWHVVHPD[LPDOHGHODFKDvQHPV
&DSDFLWpGXUpVHUYRLUG¶KXLOHR]PO
0RGqOHGXJXLGHFKDvQHGHODVFLHSRXFHV6'($2UHJRQ
0RGqOHGHFKDvQHGHODVFLH´PP3-;2UHJRQ
3RLGVOENJ
7RXWHVOHVVSpFL¿FDWLRQVVRQWEDVpHVVXUOHVGHUQLHUVUHQVHLJQHPHQWVVXUOHSURGXLW
GLVSRQLEOHVDXPRPHQWGHO¶LPSUHVVLRQ1RXVUpVHUYRQVOHGURLWG¶DSSRUWHUGHVFKDQJHPHQWVj
WRXWPRPHQWVDQVSUpDYLV
COMPOSANTS INCLUS
4XDQWLWp$UWLFOH 4XDQWLWp $UWLFOH
1 0DQXHOGHO¶RSpUDWHXU 1
&RXYHUFOHGHSURWHFWLRQGHODFKDvQHJXLGHFKDvQHODPH
%RXWRQGHVpFXULWp
Cordon
d’alimentation
HW¿FKH
Gâchette
©ௗ21
2))ௗª
(Marche/
$UUrW
3RLJQpH
principale
Bouchon
GHUpVHUYRLU
d’huile
3URWqJH
main de la
SRLJQpH
avant
*XLGHFKDvQH
&KDvQH
3URWHFWHXU
GHFKDvQH
Bouton de
verrouillage du
UpJODJHGX
JXLGHFKDvQH
&RXYHUFOHGHSURWHFWLRQGHODFKDvQHJXLGHFKDvQHODPH
Roue
tendeuse
de la
FKDvQH
Indicateur
de niveau
d’huile
3RUWH
rallonge
%RvWLHUGX
moteur
3RLJQpH
avant
%RvWLHU
principal
Tension nominale..........................................................................................................120V~60Hz
Courant nominal........................................................................................................................12A
Type de moteur.....................................................................................................Moteur universel
9LWHVVHjYLGHWUPLQ
9LWHVVHPD[LPDOHGHODFKDvQHPV
&DSDFLWpGXUpVHUYRLUG¶KXLOHR]PO
0RGqOHGXJXLGHFKDvQHGHODVFLHSRXFHV6'($2UHJRQ
0RGqOHGHFKDvQHGHODVFLH´PP3-;2UHJRQ
3RLGVOENJ

55WWW.SENIXTOOLS.COM
9pUL¿H]ODWHQVLRQGHODFKDvQHHQWLUDQW
ODFKDvQHjO¶pFDUWGXJXLGHFKDvQH8QH
FKDvQHELHQWHQGXHGRLWDYRLUXQpFDUW
G¶HQYLURQSRXFHPPHQWUHODFKDvQH
HWOHJXLGHFKDvQH)LJ
PRÉPARATION DE LA SCIE À CHAÎNE
DÉSEMBALLAGE
TENSION DE LA CHAÎNE
AVERTISSEMENT :
AVERTISSEMENT :
AVERTISSEMENT :
AVERTISSEMENT :
/DVFLHHႋPDQTXDQWHRXHQGRPPDJpH
ne pas brancher la scie à chaîne à la
source d’alimentation jusqu’à ce que
la pièce endommagée soit réparée ou
remplacée.
Débrancher la scie à chaîne de la source
d’alimentation avant de régler la tension
de la chaîne de scie.
/HVWUDQFKDQWVGHODFKDvQHVRQWDႇWpV
Porter des gants de protection pour
manipuler la chaîne.
Il faut TOUJOURS maintenir la chaîne
tendue correctement. Une chaîne
détendue augmente le risque de recul. Une
chaîne détendue risque de sauter hors de
la rainure du guide-chaîne. Ceci pourrait
blesser l’utilisateur et endommager la
chaîne. Une chaîne détendue provoque
l’usure rapide de la chaîne, du guide-
chaîne et du pignon. La durée de vie de
la chaîne de scie dépend surtout d’une
OXEUL¿FDWLRQVXႈVDQWHHWXQHPLVHHQ
WHQVLRQFRUUHFWHeYLWH]G¶HႇHFWXHUODPLVH
HQWHQVLRQGHODFKDvQHVLHOOHHႋFKDXGH
car cela causera une surtension dans la
chaîne une fois qu’elle se refroidit.
/DVFLHjFKDvQHHVWOLYUpHHQWLqUHPHQW
PRQWpH\FRPSULVO¶DVVHPEODJHFKDvQH
JXLGHFKDvQHNE METTEZ PAS AU REBUT
ODERvWHRXOHPDWpULHOG¶HPEDOODJHMXVTX¶jFH
TXHWRXWHVOHVSLqFHVVRLHQWH[DPLQpHV
N.B. :/¶KXLOHSRXUODFKDvQHHWOHJXLGH
FKDvQHQ¶HVWSDVLQFOXVH9RXVGHYH]UHPSOLU
ODVFLHjFKDvQHDYHFGHO¶KXLOHEDUFKDLQ
$9$17GHSURFpGHUjVRQXWLOLVDWLRQ
N.B. : Enlevez le couvercle de protection
GHODFKDvQHJXLGHFKDvQHODPHDYDQWGH
l’utiliser.
2. Si on doit ajuster la tension, desserrez
OHERXWRQGHYHUURXLOODJHGXUpJODJHGX
JXLGHFKDvQHG¶XQWRXUFRPSOHW
3RXUUpJOHUODWHQVLRQGHODFKDvQHGH
scie, faites tourner la roue tendeuse de la
FKDvQH)LJ)DLUHWRXUQHUODURXHYHUV
le haut augmente la tension alors que la
IDLUHWRXUQHUYHUVOHEDVUpGXLWODWHQVLRQ
8QHFKDvQHELHQWHQGXHQHGRLWSDVÀpFKLU
)LJHWGRLWVHXOHPHQWSRXYRLUrWUHWLUpH
jSRXFHPPGXJXLGHFKDvQHGHOD
scie.
8QHIRLVODFKDvQHELHQWHQGXHVHUUH]OH
ERXWRQGHYHUURXLOODJHGXUpJODJHGXJXLGH
FKDvQH1(6857(1'(=3$6ODFKDvQH
FHODPqQHUDjGHO¶XVXUHH[FHVVLYHHW
UpGXLUDODGXUpHGHYLHGXJXLGHFKDvQHHW
GHODFKDvQH
N.B. :/DFKDvQHGHVFLHGRLWrWUHELHQWHQGXH
D¿QG¶DVVXUHUXQIRQFWLRQQHPHQW
VpFXULWDLUH/DWHQVLRQGHODFKDvQHHVW
RSWLPDOHVLODFKDvQHGHVFLHSHXWrWUH
VRXOHYpHSRXFHPPGXFHQWUH
GXJXLGHFKDvQH3XLVTXHODFKDvQH
de scie chauffe pendant l’utilisation,
VDORQJXHXUSHXWGRQFYDULHU9pUL¿H]
ODWHQVLRQGHODFKDvQHWRXWHVOHV
10 minutes de temps d’utilisation et
ajustez-la au besoin, surtout lorsqu’il
V¶DJLWG¶XQHQRXYHOOHFKDvQHGHVFLH
'pWHQGH]ODFKDvQHGHVFLHXQHIRLVOD
WkFKHFRPSOpWpHSXLVTX¶HOOHUDFFRXUFLW
lorsqu’elle refroidit. En faisant ainsi,
YRXVSRXYH]SURORQJHUODGXUpHGH
YLHGHODFKDvQHHWHPSrFKHUGHV
dommages.
1/8” (3 mm)
Fig. 1
Fig. 2
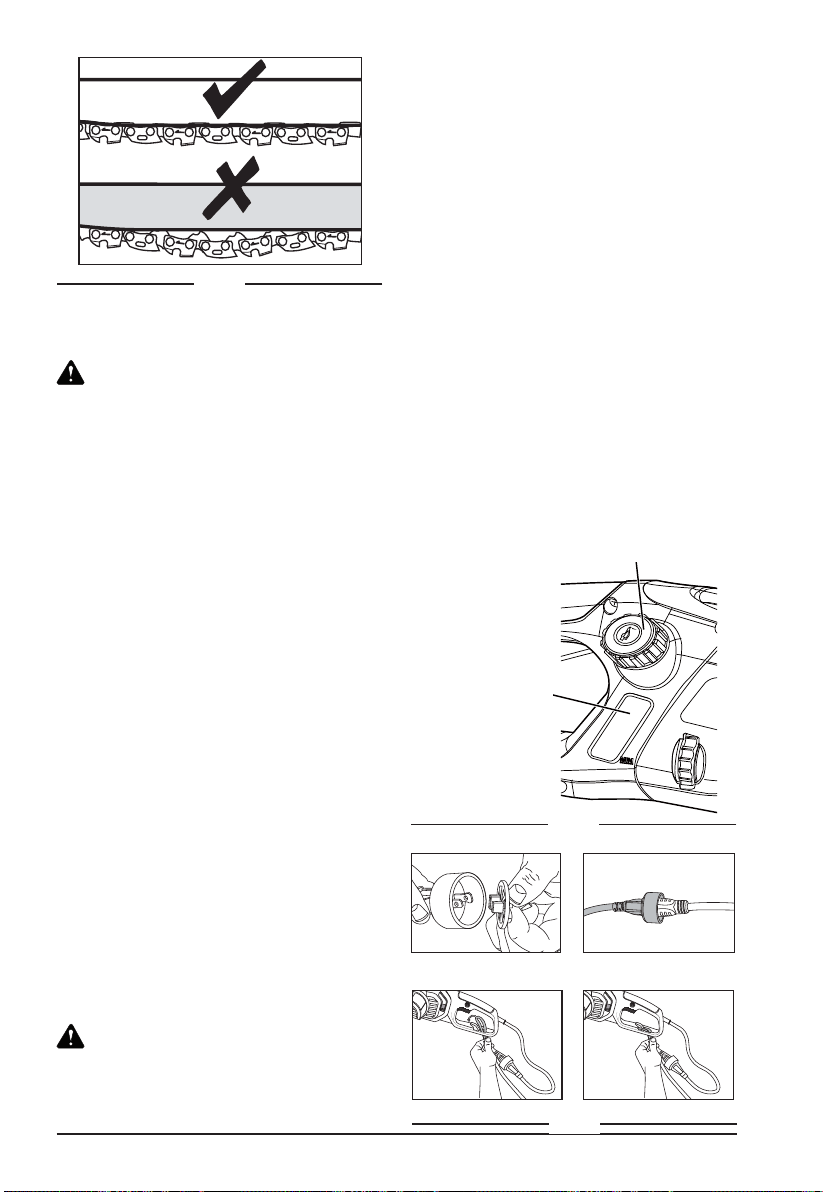
56 WWW.SENIXTOOLS.COM
Fig. 3
REMPLISSAGE DU SYSTÈME
D’HUILE AUTOMATIQUE
BRANCHEMENT DE LA RALLONGE
MISE EN GARDE :
MISE EN GARDE :
/DVFLHjFKDvQH1¶(673$6OLYUpHUHPSOLH
d’huile. Il est essentiel de la remplir d’huile
avant de l’utiliser.
1HIDLWHVMDPDLVIRQFWLRQQHUODVFLHjFKDvQH
VDQVKXLOHjFKDvQHRXORUVTXHOHUpVHUYRLU
d’huile est vide, car cela pourrait causer
de graves dommages au produit. Une
OXEUL¿FDWLRQRSWLPDOHLQÀXHQFHODGXUpHGH
YLHGHODFKDvQHHWVDFDSDFLWpGHFRXSH3DU
FRQVpTXHQWODFKDvQHHVWDXWRPDWLTXHPHQW
KXLOpHSDUODVRUWLHG¶KXLOHSHQGDQWOH
fonctionnement.
3RXUHPSrFKHUOHVIXLWHVG¶KXLOHYHLOOH]jFH
que la machine demeure dans une position
KRUL]RQWDOHERXFKRQGHUHPSOLVVDJHG¶KXLOHj
ODYHUWLFDOHORUVTXHO¶DSSDUHLOQ¶HVWSDVXWLOLVp
(QOHYH]OHERXFKRQFDFKH¿FKHGHOD¿FKH
)LJ,QVpUH]ODSULVHGHODUDOORQJHGDQVOD
¿FKHGHODVFLHjFKDvQH
8QHSRUWHUDOORQJHHVWDWWDFKpHjODSRLJQpH
SRXUUpGXLUHODWHQVLRQVXUODUDOORQJH)LJ
3RXUXWLOLVHUOHSRUWHUDOORQJHGRXEOH]OD
UDOORQJHWHOOHTX¶LOOXVWUpHjHQYLURQXQSLHG
PGXERXWHWLQVpUH]ODGDQVOHERXWGX
SRUWHUDOORQJH3ODFH]ODERXFOHIRUPpHHQ
doublant la rallonge par-dessus le crochet.
Tirez doucement sur la rallonge pour vous
DVVXUHUTX¶HOOHHVWVROLGHPHQWSODFpHGDQVOH
porte-rallonge.
*DUGH]ODUDOORQJHjO¶pFDUWGHO¶RSpUDWHXUGH
l’appareil et de tout obstacle en tout moment.
1¶H[SRVH]SDVODUDOORQJHjODFKDOHXUjGHV
KXLOHVjO¶HDXRXjGHVDUrWHVYLYHV
&HWWHVFLHjFKDvQHHVWGRWpHG¶XQV\VWqPH
GHOXEUL¿FDWLRQDXWRPDWLTXHD¿QGHJDUGHU
ODFKDvQHHWOHJXLGHFKDvQHELHQOXEUL¿pV
L’indicateur du niveau d’huile indique
FRPELHQG¶KXLOHUHVWHGDQVODVFLHjFKDvQH
6LOHQLYHDXG¶KXLOHHVWLQIpULHXUjXQTXDUWGH
ODFDSDFLWpUHPSOLVVH]OHDYHFGHO¶KXLOHj
JXLGHFKDvQHHWEDUUHDSSURSULpH
3RXUUHPSOLUOHUpVHUYRLUG¶KXLOH
(QOHYH]OHERXFKRQGHUpVHUYRLUG¶KXLOH
)LJ5HPSOLVVH]OHUpVHUYRLUDYHFGH
O¶KXLOHjJXLGHFKDvQHHWFKDvQH6$(
MXVTX¶jFHTXHOHQLYHDXG¶KXLOHDWWHLJQHOD
FDSDFLWpPD[LPDOH
5HPHWWH]OHERXFKRQGHUpVHUYRLUG¶KXLOH
$VVXUH]YRXVGHYpUL¿HUOHQLYHDX
d’huile toutes les 10 minutes d’utilisation.
'pEUDQFKH]ODVFLHjFKDvQHDYDQWGH
YpUL¿HUOHVQLYHDX[G¶KXLOHRXGHUHPSOLUOH
UpVHUYRLUG¶KXLOH
Oil Cap
Oil Level Indicator
Bouchon du
UpVHUYRLUG¶KXLOH
Indicateur de
niveau d’huile
Fig. 4
Fig. 5
Completed
&RPSOpWp
8WLOLVH]XQLTXHPHQWO¶KXLOHUHFRPPDQGpH
SRXUpYLWHUG¶HQGRPPDJHUODVFLHjFKDvQH
1¶XWLOLVH]MDPDLVG¶KXLOHUHF\FOpHYLHLOOH
/¶XWLOLVDWLRQG¶XQHKXLOHQRQDSSURXYpHDQQXOH
la garantie.

57WWW.SENIXTOOLS.COM
$¿QGHYHLOOHUjODVpFXULWpGHVWkFKHV
1¶87,/,6(=3$6ODVFLHDXGHVVXVGX
QLYHDXGHVpSDXOHV
3RVLWLRQQH]ODUDOORQJHGHIDoRQjFH
FONCTIONNEMENT
PRÉPARATIONS
PRÉVENTION DU RECUL
AVERTISSEMENTS DE SÉCURITÉ
AVERTISSEMENT :
LA SCIE À CHAÎNE : Avant de commencer
OHWUDYDLOLQVSHFWH]ODVFLHjFKDvQHSRXU
GHVGRPPDJHVDXQLYHDXGXERvWLHUGHOD
UDOORQJHGHODFKDvQHGHVFLHHWGXJXLGH
FKDvQH1¶XWLOLVH]MDPDLVXQHPDFKLQH
PDQLIHVWHPHQWHQGRPPDJpH
RÉSERVOIR D’HUILE :9pUL¿H]OHQLYHDX
GHUHPSOLVVDJHGXUpVHUYRLUG¶KXLOH9pUL¿H]
pJDOHPHQWV¶LO\DXQHTXDQWLWpVXI¿VDQWH
d’huile disponible en cours d’utilisation. Ne
IDLWHVMDPDLVIRQFWLRQQHUODVFLHjFKDvQH
VDQVKXLOHjFKDvQHRXORUVTXHOHQLYHDX
G¶KXLOHHVWLQIpULHXUjODPDUTXHGHQLYHDX
G¶KXLOHPLQLPXPD¿QGHSUpYHQLUGHV
GRPPDJHVjODVFLHjFKDvQH(QPR\HQQH
chaque remplissage d’huile durera environ
10 minutes de temps de coupe (selon la
IUpTXHQFHGHVDUUrWVHWODGHQVLWpGXERLVj
scier).
LA CHAÎNE DE SCIE :9pUL¿H]ODWHQVLRQ
GHODVFLHHWODFRQGLWLRQGHVODPHV3OXV
ODFKDvQHGHVFLHHVWDIIWpHSOXVOHV
RSpUDWLRQVVHURQWIDFLOHVHWJpUDEOHV/D
PrPHFKRVHV¶DSSOLTXHjODWHQVLRQGHOD
FKDvQH9pUL¿H]ODWHQVLRQWRXWHVOHV
minutes de temps d’utilisation pour optimiser
ODVpFXULWp/HVQRXYHOOHVFKDvQHVGHVFLH
sont particulièrement susceptibles aux
FKDQJHPHQWVSURYRTXpVSDUODFKDOHXUFUppH
par l’utilisation.
VÊTEMENTS DE PROTECTION : Il
est absolument essentiel de porter des
YrWHPHQWVGHSURWHFWLRQDMXVWpVHWDGDSWpV
tels qu’un pantalon de protection, des gants
SURWHFWHXUVHWGHVFKDXVVXUHVGHVpFXULWp
3RUWH]XQFDVTXHGHVpFXULWpGRWpG¶XQH
SURWHFWLRQDXGLWLYHLQWpJUpHHWG¶XQPDVTXH
de protection qui fournit une protection contre
les chutes de branches et leur force de recul.
N’ABATTEZ PAS les arbres dans des
conditions venteuses. Cela pourra
provoquer des blessures et doit seulement
rWUHHႇHFWXpSDUXQSURIHVVLRQQHOTXDOL¿p
$YDQWFKDTXHXWLOLVDWLRQYpUL¿H]OHVDUWLFOHV
suivants pour assurer des conditions de
WUDYDLOVpFXULWDLUHV
/¶H[SUHVVLRQ©ௗUHFXOௗªGpVLJQHOHSKpQRPqQH
G¶XQHVFLHTXLHVWVRXGDLQHPHQWSURSXOVpH
vers le haut et vers l’arrière. Le recul est
G¶KDELWXGHOHUpVXOWDWG¶XQFRQWDFWHQWUHOD
SLqFHjWUDYDLOOHUHWOHERXWGXJXLGHFKDvQH
RXG¶XQVHUUDJHGHODFKDvQHGHVFLH
Un recul produit une soudaine force
SXLVVDQWH/DVFLHUpDJLWJpQpUDOHPHQWGH
IDoRQGpVRUGRQQpHFUpDQWDLQVLODSRVVLELOLWp
GHEOHVVXUHjO¶XWLOLVDWHXU
/HULVTXHG¶XQUHFXOHVWjVRQPD[LPXP
lorsque l’utilisateur tente de couper près de
RXDYHFOHERXWGXJXLGHFKDvQH$SSOLTXH]
WRXMRXUVODVFLHDXWDQWjO¶KRUL]RQWDOHTXH
YRXVSRXYH]D¿QGHQHSDVVXELUXQHSHUWH
de contrôle pendant l’utilisation.
qu’elle ne s’accroche pas dans les
branches et autres obstacles, pendant la
coupe.
3. Ne vous mettez jamais dessous une
branche qui se fait scier.
4. Faites preuve de prudence lorsque vous
sciez les deux branches sous tension ou
GHVEUDQFKHVTXLVHIHQGHQWHQpFODWV
9HLOOH]jYRXVSURWpJHUFRQWUHOHULVTXHGH
EOHVVXUHVSURYRTXpHVSDUGHVFKXWHVGH
branches et des projectiles en bois volants.
6. Si la machine est en cours d’utilisation,
pORLJQH]OHVSHUVRQQHVHWOHVDQLPDX[GH
l’aire de danger.
/DPDFKLQHQ¶HVWSDVSURWpJpHFRQWUHOHV
GpFKDUJHVpOHFWULTXHVORUVGXFRQWDFWDYHF
les lignes haute tension. Conservez une
distance minimale de 9,1 m (30 pieds)
GHOLJQHVpOHFWULTXHVTXLWUDQVSRUWHQWGX
FRXUDQWD¿QG¶pYLWHUOHULVTXHGHGpFKDUJHV
pOHFWULTXHVSRWHQWLHOOHPHQWPRUWHOOHV
8. Lorsque l’on travaille sur une pente, il faut
WRXMRXUVVHPHWWUHSDUGHVVXVRXjF{WpGH
la branche en train de se faire scier.
/DLVVH]ODFKDvQHFRXSHUSRXUYRXV)DLWHV
IRQFWLRQQHUODVFLHjSOHLQHYLWHVVHSHQGDQW
WRXWHODGXUpHGHODFRXSH(QJXLVHG¶XQ
3RXUDVVXUHUXQHQWUDvQHPHQWPLQLPXP
OHVXWLOLVDWHXUVGpEXWDQWVGRLYHQWFRXSHU
des billes sur un chevalet de sciage.
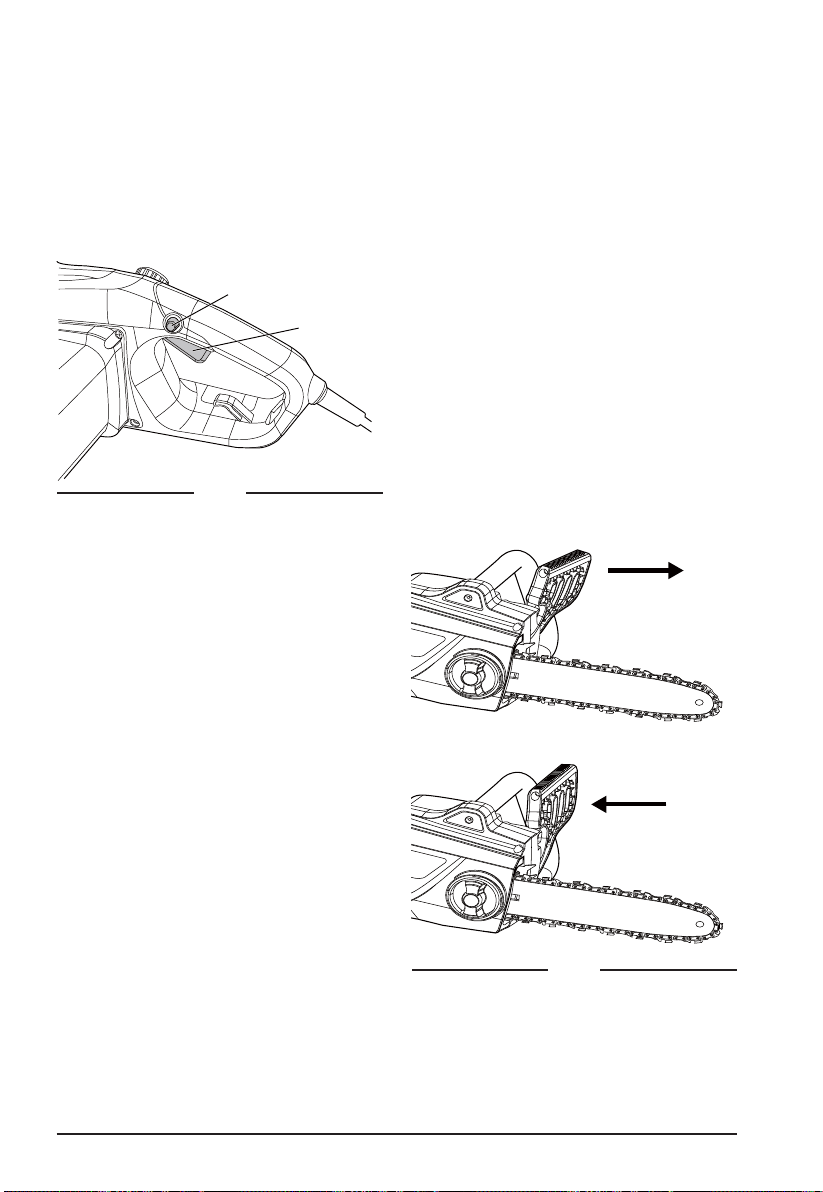
58 WWW.SENIXTOOLS.COM
,17(55837(85©ௗ212))ௗª
(Marche/Arrêt)
3RXUPHWWUHHQPDUFKHO¶RXWLODSSX\H]VXUOH
ERXWRQGHVpFXULWpHWHQVXLWHDSSX\H]VXUOD
JkFKHWWH)LJ$SUqVTXHO¶RXWLODGpPDUUp
YRXVSRXYH]UHOkFKHUOHERXWRQGHVpFXULWp
VDQVDUUrWHUO¶RXWLO
3RXUDUUrWHUO¶RXWLOUHOkFKH]ODJkFKHWWH
(Fig. 6).
3RXVVH]OHSURWqJHPDLQGHODSRLJQpH
DYDQWYHUVO¶DYDQWHWWHQWH]GHGpPDUUHUOD
VFLHjFKDvQH
/DFKDvQHQHGRLWSDVGpPDUUHU
3RXUGpDFWLYHUOHIUHLQDQWLUHERQG
UHOkFKH]O¶LQWHUUXSWHXU©ௗ212))ௗª0DUFKH
$UUrWHWWLUH]OHSURWqJHPDLQYHUVO¶DUULqUH
FREIN ANTI-REBOND
Le frein anti-rebond est un dispositif de
VpFXULWpDFWLYpSDUOHSURWqJHPDLQGHOD
SRLJQpHDYDQW/RUVTX¶XQHLQVWDQFHGH
UHFXOVHSURGXLWODFKDvQHGHVFLHDUUrWH
LPPpGLDWHPHQW)LJ
/DYpUL¿FDWLRQIRQFWLRQQHOOHVXLYDQWHGRLWrWUH
HIIHFWXpHDYDQWFKDTXHXWLOLVDWLRQ/HEXW
GHWHVWHUOHIUHLQGHODFKDvQHHVWGHUpGXLUH
OHSRWHQWLHOGHEOHVVXUHVSURYRTXpHVSDUOH
recul :
Fig. 6
Fig. 7
%RXWRQGHVpFXULWp
Gâchette
)UHLQDFWLYp
)UHLQGpVDFWLYp
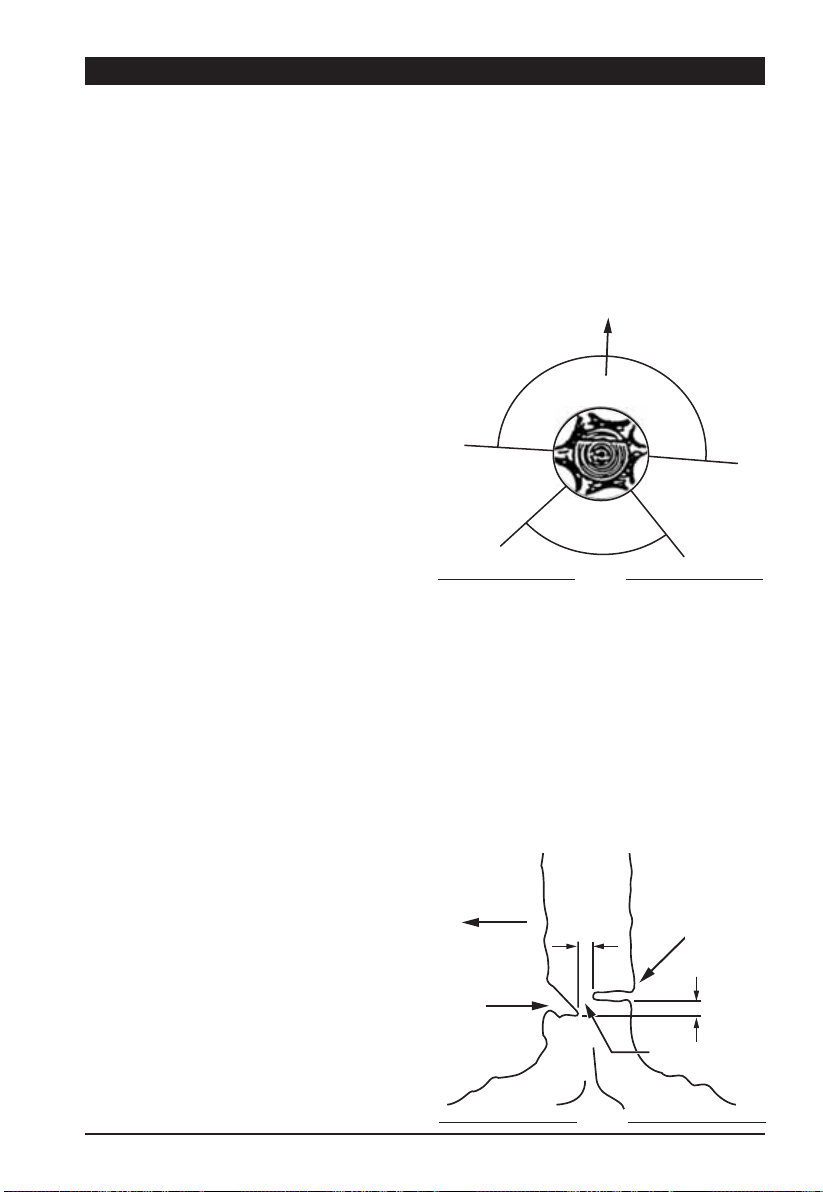
59WWW.SENIXTOOLS.COM
Fig. 9
Direction of fall
Notch
50 mm
Felling back cut
Hinge
Description of felling: undercutting
50 mm
'HVFULSWLRQGHODFRXSHG¶DUEUHV6LႉHWG¶DEDWWDJH
Direction de
la chute
Entaille
Charnière
Trait d’abattage
TECHNIQUES DE SCIAGE
6FLH]OHVEUDQFKHVLQIpULHXUHVGHO¶DUEUH
d’abord. Ce faisant, il est plus facile pour
OHVEUDQFKHVFRXSpHVGHWRPEHUDXVRO
¬OD¿QGHODFRXSHOHSRLGVGHODVFLH
augmente soudainement pour l’utilisateur
puisqu’elle n’est plus soutenue par une
branche. Il y a un risque de perte de
contrôle de la scie, alors il faut s’assurer de
UHVWHUYLJLODQWSHQGDQWWRXWHRSpUDWLRQGH
sciage.
• Ne sortez la scie d’une coupe que lorsque
ODVFLHWRXUQH(QIDLVDQWDLQVLYRXVpYLWH]
TXHODFKDvQHQHVHFRLQFHGDQVOHERLV
1(6&,(=3$6DYHFOHERXWGXJXLGH
FKDvQH1(6&,(=3$6GDQVOHVIRUPDWLRQV
GHEUDQFKHVOjRO¶DUEUHVHEUDQFKHYHUV
O¶H[WpULHXU
&HODHPSrFKHUDLWODFDSDFLWpGHO¶DUEUHj
repousser.
3RXUVFLHUOHVEUDQFKHV¿QHVSODFH]OD
VXUIDFHGHEXWpHGHODVFLHVXUODEUDQFKH
9RXVpYLWHUH]DLQVLWRXWPRXYHPHQW
LQGpVLUDEOHGHODVFLHDXGpEXWGHODFRXSH
*XLGH]ODVFLHjWUDYHUVODEUDQFKHSDUXQ
OpJHUPRXYHPHQWGHEDVHQKDXW
3RXUVFLHUGHJURVVHVEUDQFKHVSURFpGH]
jXQHFRXSHLQLWLDOH&RPPHQFH]SDU
VFLHUjO¶DLGHGHODSDUWLHVXSpULHXUHGX
JXLGHFKDvQHGHEDVHQKDXWVXUOHGX
diamètre de la branche. Avec le bas du
JXLGHFKDvQHVFLH]HQVXLWHO¶DXWUHGX
diamètre de haut en bas sur la première
coupe. Sciez les branches plus longues par
VHFWLRQVD¿QGHPLHX[FRQWU{OHUOHFKRF
IMPORTANT : (QJXLVHG¶XQHQWUDvQHPHQW
minimal, nous conseillons
DX[XWLOLVDWHXUVGpEXWDQWV
de couper des billes sur un
chevalet de sciage.
COUPE D’UN ARBRE
Si deux ou plusieurs personnes participent
aux travaux de tronçonnage et d’abattage
HQPrPHWHPSVSUpYRLUXQHVSDFHVXI¿VDQW
HQWUHOHVGLIIpUHQWHVRSpUDWLRQV,OIDXWXQH
GLVWDQFHDXPRLQVpJDOHjGHX[IRLVOD
KDXWHXUGHO¶DUEUHjDEDWWUH
/RUVGHO¶DEDWWDJHG¶XQDUEUHELHQpWXGLHU
les alentours. Ne mettre personne en
GDQJHU9HLOOHUjQHSDVKHXUWHUGHOLJQHVGH
VHUYLFHVSXEOLFVHWjQHSDVFDXVHUGHGpJkWV
PDWpULHOV6LO¶DUEUHKHXUWHXQHOLJQHGH
service public,
Avant de commencer l’abattage, prenez
en compte la force et la direction du vent,
O¶LQFOLQDLVRQHWO¶pTXLOLEUHGHO¶DUEUHHW
l’emplacement des grosses branches. Ces
IDFWHXUVLQÀXHQFHQWODGLUHFWLRQGHODFKXWH
de l’arbre. Enlevez la terre, les cailloux,
O¶pFRUFHTXLVHGpWDFKHOHVFORXVOHVDJUDIHV
HWOHV¿OVGHIHUGHO¶HPSODFHPHQWGHVFRXSHV
d’abattage sur l’arbre.
Faites une entaille de 1/3 du diamètre de
O¶DUEUHSHUSHQGLFXODLUHPHQWjODGLUHFWLRQGH
chute (Figure 9).
FRQWDFWHULPPpGLDWHPHQWOHVUHVSRQVDEOHV
/RUVGHO¶DEDWWDJHG¶XQDUEUHO¶RSpUDWHXUGH
ODVFLHjFKDvQHGRLWUHVWHUGXF{WpDPRQWGH
la pente, car il pourrait rouler ou glisser après
VDFKXWH&HTXLHVWQpFHVVDLUHDYDQWTX¶RQ
FRPPHQFHjFRXSHU
/HFKHPLQGHIXLWHGHYUDLWV¶pWHQGUHjO¶DUULqUH
et en diagonale derrière la ligne de chute
SUpYXH)LJXUH
Fig. 8
Danger zone
Escape
route
Escape
route
Description of felling: escape routes
Felling direction
Danger zone
Description de la coupe d’arbres : chemins de fuite
Direction de la chute de l’arbre
Zone de danger
Zone de danger
Chemin de fuite
Chemin de fuite
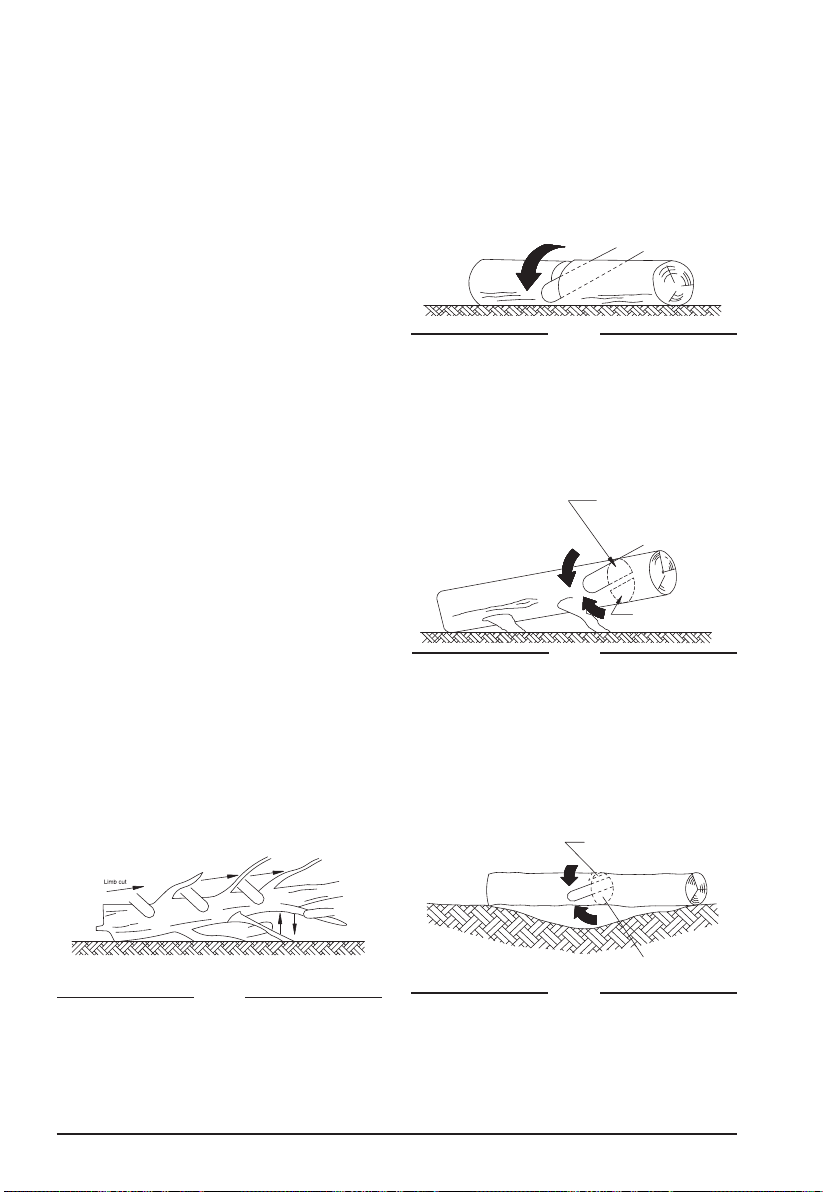
60 WWW.SENIXTOOLS.COM
Faire l’entaille horizontale la plus basse en
SUHPLHU&HODDLGHUDjpYLWHUOHSLQFHPHQWGH
ODVFLHjFKDvQHRXGXJXLGHFKDvQHORUVTXH
ODVHFRQGHHQWDLOOHHVWHIIHFWXpH
FELLING BACK A CUT
ÉBRANCHAGE
TRONÇONNAGE D’UNE BILLE
Faites le trait d’abattage d’au moins 50 mm
plus haut que l’entaille horizontale (Figure 9).
*DUGH]OHWUDLWG¶DEDWWDJHSDUDOOqOHjO¶HQWDLOOH
KRUL]RQWDOH5pDOLVH]OHWUDLWG¶DEDWWDJH
GHWHOOHVRUWHTX¶XQHJUDQGHTXDQWLWpGH
bois serve plus tard comme une charnière.
/DFKDUQLqUHGXERLVHPSrFKHO¶DUEUHGH
se tordre et de tomber dans la mauvaise
GLUHFWLRQe9,7(=GHFRXSHUjWUDYHUVOD
charnière.
Lorsque le trait d’abattage approche de la
FKDUQLqUHO¶DUEUHGRLWFRPPHQFHUjWRPEHU
S’il y a une quelconque chance que l’arbre
ne tombe pas dans la direction voulue ou
s’il risque de revenir en arrière et pincer la
FKDvQHGHVFLHDUUrWH]GHFRXSHUDYDQWTXH
OHWUDLWG¶DEDWWDJHVRLWFRPSOpWpHWXWLOLVH]GHV
coins en bois, en plastique ou en aluminium
pour ouvrir la coupe et faire tomber l’arbre le
ORQJGHODOLJQHGHFKXWHGpVLUpH
'qVTXHO¶DUEUHFRPPHQFHjWRPEHUHQOHYH]
ODVFLHjFKDvQHGXWUDLWG¶DEDWWDJHFRXSH]
OHPRWHXUSRVH]ODVFLHjFKDvQHVXUOHVROHW
HPSUXQWH]OHFKHPLQGHIXLWHSUpYX)DLWHV
attention aux branches qui peuvent tomber et
UHJDUGH]RYRXVPHWWH]OHVSLHGV
/¶pEUDQFKDJHHVWODFRXSHGHVEUDQFKHV
G¶XQDUEUHWRPEp1HUHWLUH]SDVOHVJURVVHV
branches sous l’arbre qui soutiennent le tronc
VXUpOHYp5HWLUH]OHVSHWLWHVEUDQFKHVG¶XQH
seule coupe (Figure 10).
3RXUOHVEUDQFKHVVRXVWHQVLRQHQWDPH]
O¶HQWDLOOHjSDUWLUGXGHVVRXVGHODEUDQFKH
SRXUpYLWHUOHSLQFHPHQWGHODVFLH
/RUVTXHODELOOHHVWVRXWHQXHjXQHH[WUpPLWp
FRXSH]GXGLDPqWUHjSDUWLUGXGHVVRXV
(Figure 12) Ensuite, terminez la coupe en
FRXSDQWjSDUWLUGXGHVVXVHWHQUHMRLJQDQWOD
première entaille.
Quand le billot est soutenu aux deux
ERXWVFRXSH]GXGLDPqWUHjSDUWLUGX
WURQoRQQDJHDXVRPPHW)LJXUH3DUOD
suite, terminez la coupe en tronçonnant 2/3
GXGLDPqWUHjSDUWLUGXEDVSRXUUHQFRQWUHUOD
première coupe.
Le tronçonnage d’une bille se fait en la
FRXSDQWHQWURQoRQV9HLOOHUjPDLQWHQLU
XQERQpTXLOLEUH*DUGHUOHVSLHGVpFDUWpV
5pSDUWLUOHSRLGVpJDOHPHQWVXUOHVGHX[
Log supported along the entire length
Cut from top (overbuck). Avoid cutting earth.
Fig. 11
8QHELOOHVRXWHQXHVXUWRXWHVDORQJXHXUFRXSpHjSDUWLUGX
GHVVXVeYLWH]GHFRXSHUGHODWHUUH
Fig. 10
Keep work off ground. Leave support limbs until log is cut.
Tree limbing
eEUDQFKDJH
Assurez-vous de ne pas travailler au niveau du sol. Laissez les branches
TXLVRXWLHQQHQWOHWURQFMXVTX¶jFHTXHODELOOHVRLWFRXSpH
2nd cut underbuck (2/3 diameter)
to meet 1st cut (to avoid pinching)
Log supported both ends
1st cut overbuck (1/3 diameter)
to avoid splintering
Fig. 13
Billot soutenu aux deux bouts
3UHPLqUHHQWDLOOHHQWURQoRQQDQWj
SDUWLUGXKDXWGXGLDPqWUHD¿Q
G¶pYLWHUODSURGXFWLRQG¶pFODWVGHERLV
'HX[LqPHFRXSHHQWURQoRQQDQWjSDUWLUGXEDVGXGLDPqWUHSRXU
UHQFRQWUHUODSUHPLqUHFRXSHD¿QG¶pYLWHUODSURGXFWLRQG¶pFODWVGHERLV
2nd cut overbuck (2/3 diameter)
to meet 1st cut (to avoid pinching)
1st cut underbuck
(1/3 diameter)
to avoid splintering
Log supported one end
Fig. 12
%LOOHVRXWHQXHjXQHH[WUpPLWp
HFRXSHjSDUWLUGX
dessus (2/3 du diamètre)
qui rejoint la 1re entaille
SRXUpYLWHUOHSLQFHPHQW
/DUHHQWDLOOHjSDUWLUGX
dessous (1/3 du diamètre)
D¿QG¶pYLWHUODSURGXFWLRQ
G¶pFODWVGHERLV
pieds. Autant que possible, soulevez la bille
RXOHWURQoRQDXGHVVXVGXVRO3RXUFH
faire, utiliser des branches, tronçons, cales,
HWF6XLYH]FHVFRQVLJQHVVLPSOHVD¿Q
d’assurer une coupe facile. Lorsque la bille
est soutenue sur toute sa longueur, elle est
FRXSpHjSDUWLUGXGHVVXV)LJXUH

61WWW.SENIXTOOLS.COM
Lors du tronçonnage sur une pente, tenez-
vous toujours vers le haut de la grume
(Figure 14).
/RUVGHOD©ௗUpDOLVDWLRQGHODFRXSHௗªSRXU
maintenir un contrôle complet, relâchez la
SUHVVLRQGHFRXSHSUqVGHOD¿QGHFRXSH
VDQVUHOkFKHUYRWUHSULVHVXUOHVSRLJQpHVGH
ODVFLHjFKDvQHeYLWH]GHODLVVHUODFKDvQH
WRXFKHUOHVRO$SUqVDYRLUWHUPLQpODFRXSH
DWWHQGH]TXHODFKDvQHGHVFLHVRLWDUUrWpH
DYDQWGHGpSODFHUODVFLHjFKDvQH$UUrWH]
toujours le moteur avant de passer d’un arbre
jXQDXWUH
Bucking a log
Stand on uphill side when cutting because log may roll
Fig. 14
Tronçonnage d’une bille
3HQGDQWODFRXSHWHQH]YRXVYHUVOHKDXWGHODJUXPH
puisque la bille pourrait rouler
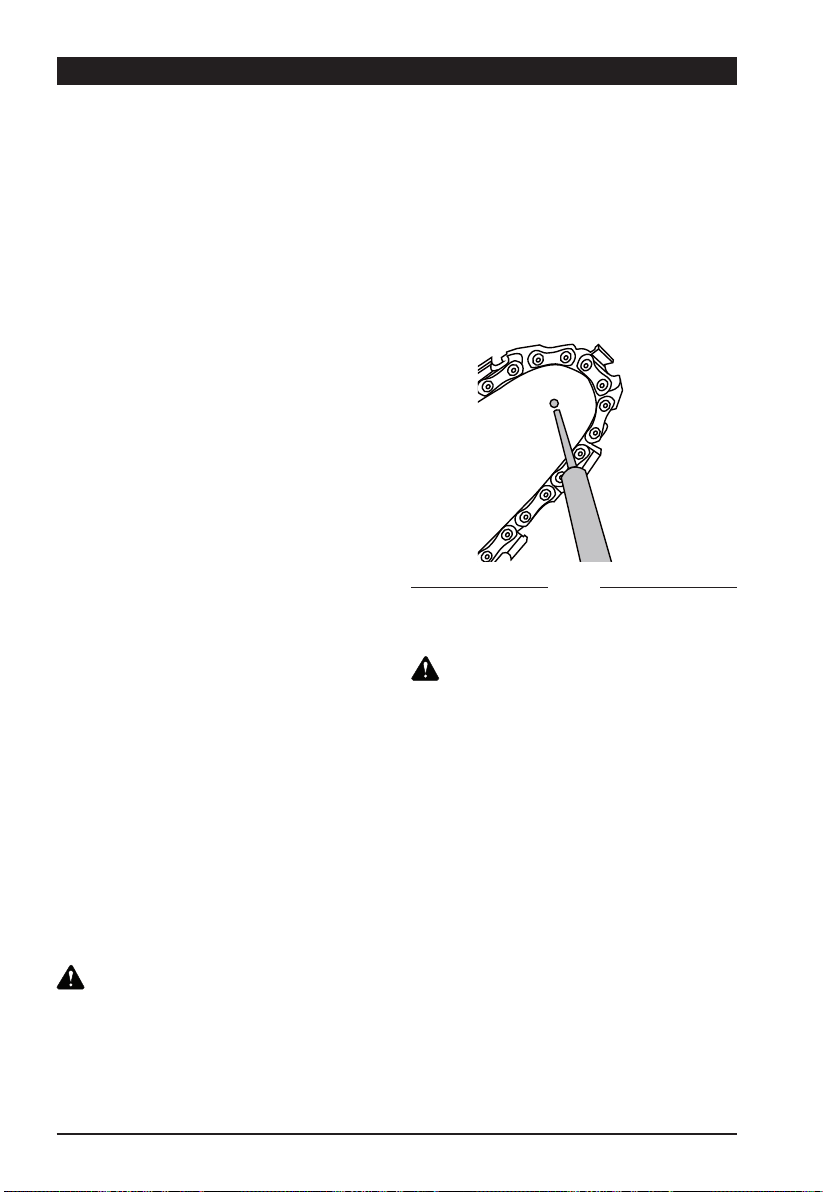
62 WWW.SENIXTOOLS.COM
ENTRETIEN ET RÉGLAGES
1HWWR\H]OHERvWLHUHQSODVWLTXHPRXOpGHOD
VFLHjFKDvQHHQXWLOLVDQWXQHEURVVHGRXFH
et un chiffon propre.
1¶87,/,6(=3$6G¶HDXGHVROYDQWVRXGH
cirage.
(QOHYH]WRXVOHVGpEULVVXUWRXWGHVIHQWHV
G¶DpUDWLRQGXPRWHXU
(QOHYH]OHFRXYHUFOHODFKDvQHHWOHJXLGH
FKDvQHHWQHWWR\H]OHVjODEURVVHDSUqV
jKHXUHVG¶XWLOLVDWLRQ
• Nettoyez la zone sous le couvercle, le
SLJQRQG¶HQWUDvQHPHQWHWO¶DVVHPEODJHGX
JXLGHFKDvQHjO¶DLGHG¶XQHEURVVHGRXFH
1HWWR\H]ODVRUWLHG¶KXLOHjO¶DLGHG¶XQ
chiffon propre.
6¶LOHVWSUpYXG¶HQWUHSRVHUODVFLHjFKDvQH
SHQGDQWXQHSpULRGHSURORQJpHQHWWR\H]OD
FKDvQHHWOHJXLGHFKDvQH
(175(326(='$1681(1'52,76(&
(76e&85,7$,5(+256'(3257e(
DES ENFANTS.
1(3/$&(=3$6G¶DXWUHVREMHWVVXUODVFLH
jFKDvQH
3RXUpYLWHUOHVIXLWHVG¶KXLOHDVVXUH]YRXV
que la machine demeure dans une position
horizontale.
• Lors de l’entreposage de la machine dans
VRQHPEDOODJHRULJLQDOOHUpVHUYRLUG¶KXLOH
GRLWrWUHFRPSOqWHPHQWYLGp
NETTOYAGE/ENTREPOSAGE
VÉRIFICATION DE LA
LUBRIFICATION AUTOMATIQUE
LUBRIFIER LE PIGNON
AFFÛTAGE DE LA CHAÎNE DE
SCIE
9pUL¿H]UpJXOLqUHPHQWODIRQFWLRQQDOLWpGHOD
OXEUL¿FDWLRQDXWRPDWLTXHGHODFKDvQHD¿Q
GHSUpYHQLUODVXUFKDXIIHHWOHVGRPPDJHV
XOWpULHXUVDXJXLGHFKDvQHHWjODFKDvQHGHOD
scie qui l’accompagneraient.
¬FHV¿QVDOLJQH]OHERXWGXJXLGHFKDvQH
contre une surface lisse (une planche, zones
HQWDLOOpHVG¶XQDUEUHHWIDLWHVIRQFWLRQQHUOD
VFLHjFKDvQH
6LGHSOXVHQSOXVG¶KXLOHDSSDUDvWOD
OXEUL¿FDWLRQDXWRPDWLTXHGHODFKDvQH
fonctionne bien.
0DLQWHQH]ODFKDvQHDIIWpH9RWUHVFLHVFLHUD
SOXVUDSLGHPHQWHWGHIDoRQSOXVVpFXULWDLUH
8QHFKDvQHpPRXVVpHSURYRTXHO¶XVXUH
SUpPDWXUpHGXSLJQRQGXJXLGHFKDvQHGH
ODFKDvQHHWGXPRWHXU6LO¶XWLOLVDWHXUHVW
FRQWUDLQWGHIRUFHUVXUODFKDvQHSRXUODIDLUH
entrer dans le bois et si le sciage ne produit
que de la sciure avec peu de gros copeaux,
F¶HVWTXHODFKDvQHHVWpPRXVVpH
$FKHWH]XQHQRXYHOOHFKDvQHIDLWHVDIIWHU
YRWUHFKDvQHSDUXQSURIHVVLRQQHOGDQV
XQFHQWUHG¶HQWUHWLHQTXDOL¿pRXDIIWH]OD
FKDvQHYRXVPrPHVHQXWLOLVDQWXQHWURXVVH
G¶DIIWDJHDSSURSULpH/DGLIIpUHQFHGH
KDXWHXUHQWUHODWrWHGHFRXSHHWO¶DUrWHHVWOD
AVERTISSEMENT:
AVERTISSEMENT :
SHQGDQWODUpSDUDWLRQRXO¶HQWUHWLHQGHFHW
DSSDUHLO'pEUDQFKH]WRXMRXUVO¶RXWLODYDQW
G¶\HIIHFWXHUWRXWHRSpUDWLRQGHUpSDUDWLRQRX
d’entretien.
$YDQWGHSURFpGHUjO¶HQWUHWLHQGpEUDQFKHU
ODVFLHjFKDvQHGHODVRXUFHG¶DOLPHQWDWLRQ
'HVEOHVVXUHVJUDYHVRXODPRUWSHXYHQWrWUH
SURYRTXpHVSDUOHVGpFKDUJHVpOHFWULTXHV
HWOHFRQWDFWGXFRUSVDYHFODFKDvQHHQ
PRXYHPHQW/HVWUDQFKDQWVGHODFKDvQHVRQW
DIIWpV3RUWHUGHVJDQWVGHSURWHFWLRQSRXU
PDQLSXOHUODFKDvQH
N.B. :,OQ¶HVWSDVQpFHVVDLUHG¶HQOHYHU
ODFKDvQHRXOHJXLGHFKDvQHSHQGDQWOD
OXEUL¿FDWLRQGXSLJQRQ
1HWWR\H]OHJXLGHFKDvQHHWOHSLJQRQ
¬O¶DLGHG¶XQHSLSHWWHGHJUDLVVDJHLQVpUHU
OHEHFGHODSLSHWWHGDQVO¶RUL¿FHGH
OXEUL¿FDWLRQHWLQMHFWHUODJUDLVVHMXVTX¶jFH
TX¶HOOHDSSDUDvWDXERUGH[WpULHXUGXERXW
du pignon (Fig. 15).
3RXUIDLUHSLYRWHUOHSLJQRQUHOkFKH]OD
EXWpHG¶DUUrWGHODFKDvQHHWWLUH]ODFKDvQH
jODPDLQMXVTX¶jFHTXHOHF{WpQRQ
JUDLVVpGXSLJQRQVRLWDOLJQpDYHFOHWURX
GHJUDLVVDJH5HSUHQGUHODSURFpGXUHGH
OXEUL¿FDWLRQ
Fig. 15
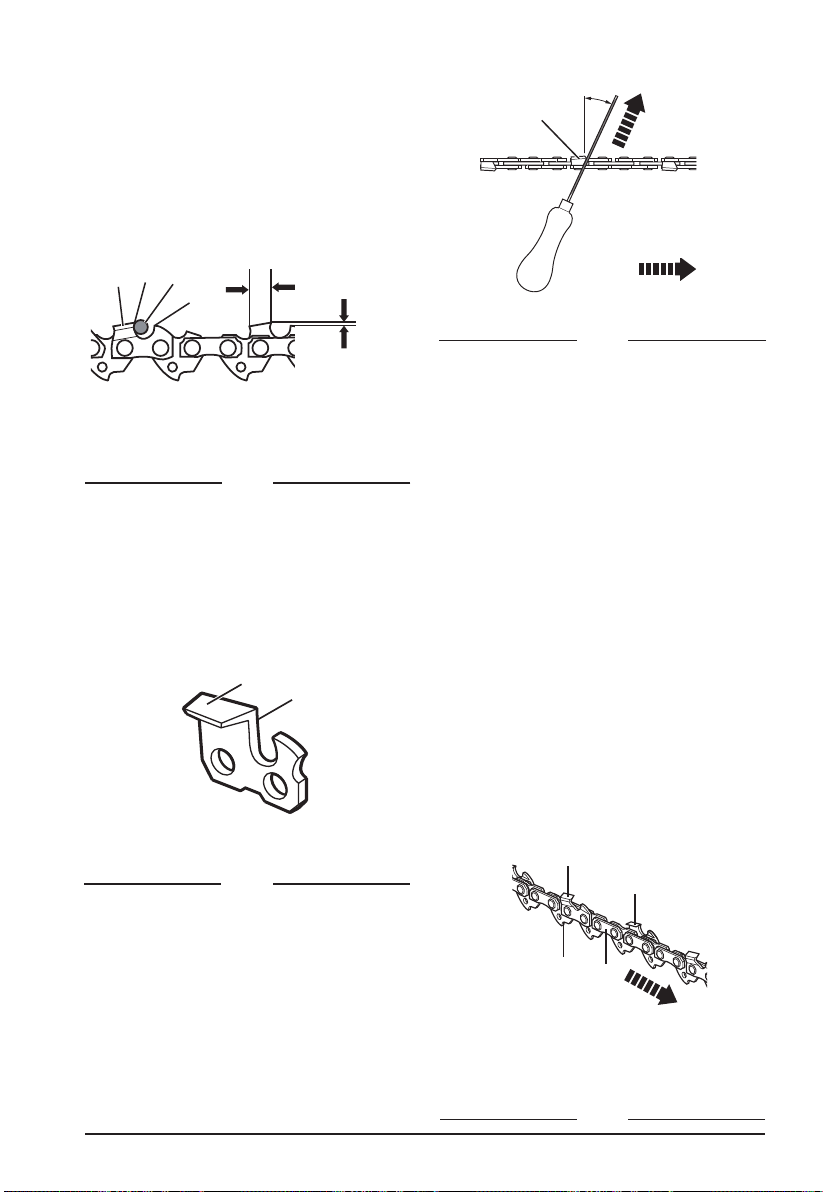
63WWW.SENIXTOOLS.COM
1. À l’aide de gants protecteurs, assurez-vous
TXHODFKDvQHHVWELHQWHQGXHVXUOHJXLGH
FKDvQH
2. Utilisez une lime ronde ayant un diamètre
de 1,1 fois la profondeur de la dent
coupante. Assurez-vous que 20 % du
diamètre de la lime est au-dessus de la
SODTXHVXSpULHXUHGHODGHQWFRXSDQWH
(Fig. 17).
/LPH]jXQDQJOHSHUSHQGLFXODLUHDXJXLGH
FKDvQHHWjXQDQJOHGHHQUHODWLRQj
ODGLUHFWLRQGXGpSODFHPHQW)LJ
4. Limez uniquement chaque dent de
O¶LQWpULHXUYHUVO¶H[WpULHXU/LPH]G¶DERUGXQ
F{WpGHODFKDvQHHWHQVXLWHUHWRXUQH]OD
VFLHHWUpSpWH]OHSURFHVVXV
1%/DSOXSDUWGHVGpWDLOODQWVGHVFLHVj
FKDvQHRIIUHQWXQJXLGHGHOLPHௗLOV¶DJLWGH
la façon la plus facile de tenir la lime selon la
bonne position.
valeur du limiteur de profondeur (Fig. 16).
/RUVTXHYRXVDIIWH]ODWrWHGHFRXSHOD
YDOHXUGXOLPLWHXUGHSURIRQGHXUHQWUHODWrWH
HWO¶DUrWHGHODSODTXHODWpUDOHGLPLQXHUD
3RXUPDLQWHQLUXQUHQGHPHQWRSWLPDOGH
FRXSHO¶DUrWHGRLWrWUHOLPpHD¿QG¶DWWHLQGUH
ODYDOHXUUHFRPPDQGpHGXOLPLWHXUGH
profondeur.
A
B
C
D
SAW CHAIN DIRECTION
SENS DE CHAÎNE DE SCIE
A - Tête de coupe à droite
B - Tête de coupe à gauche
C - Maillon entraîneur
D - Courroie d’attache
Fig. 18
25°
A
SAW CHAIN DIRECTION
Sharpening Angle
FILE
DIRECTION
Outside
Inside
A - Left-hand Cutter
SENS DE
LIMAGE
9HUVO¶H[WpULHXU
9HUVO¶LQWpULHXU
SENS DE CHAÎNE
DE SCIE
A - Tête de coupe à gauche
$QJOHG¶DႇWDJH
A
B
C
D
Cutter
Length
Depth Gauge
Setting 0.025 in.
A - Top Plate
Tip
C - File Position
D - Ridge
/RQJXHXUWDLOOpH
Valeur de limiteur de
profondeur 0,025 po.
A - Plaque supérieure
B - Tête de coupe
C - Position de la lime
D – Arête
Fig. 16
B
A
A - Top Plate
B - Side Plate
A - Plaque supérieure
B - Plaque latérale
Fig. 17
$IIWH]FKDTXHGHQWpJDOHPHQWHQXWLOLVDQW
OHPrPHQRPEUHGHFRXSV
9HLOOH]jDVVXUHUTXHWRXWHVOHVORQJXHXUV
WDLOOpHVVRQWpJDOHV)LJ&KDTXH
IRLVTXHODWrWHGHFRXSHHVWDIIWpHOD
ORQJXHXUWDLOOpHHVWUpGXLWH8QHIRLVTXH
ODORQJXHXUWDLOOpHHVWUpGXLWHjSRXFH
PPODFKDvQHHVWXVpHHWGRLWrWUH
UHPSODFpH
• La valeur du limiteur de profondeur est
pJDOHPHQWUpGXLWHjFKDTXHDIIWDJH¬
tous les 5 affûtages, utilisez un outil de
mesure des limiteurs de profondeur pour
YpUL¿HUODKDXWHXUHQWUHODWrWHGHFRXSH
HWO¶DUrWH)LJ/HFDVpFKpDQWXWLOLVH]
XQHOLPHSODWHSRXUOLPHUO¶DUrWHSRXU
atteindre la valeur de limiteur de profondeur
de 0,025 pouce.
/DSOXSDUWGHVGpWDLOODQWVGHVFLHVjFKDvQH
offrent des outils de mesure des limiteurs
de profondeur.
• Si la scie ne fonctionne pas bien, apportez-
ODGDQVXQFHQWUHG¶HQWUHWLHQTXDOL¿pD¿Q
TX¶HOOHVRLWH[DPLQpH8WLOLVH]XQLTXHPHQW
OHVSLqFHVLGHQWLTXHVWHOOHVTXHGpWDLOOpHV
dans ce manuel.
Fig. 19
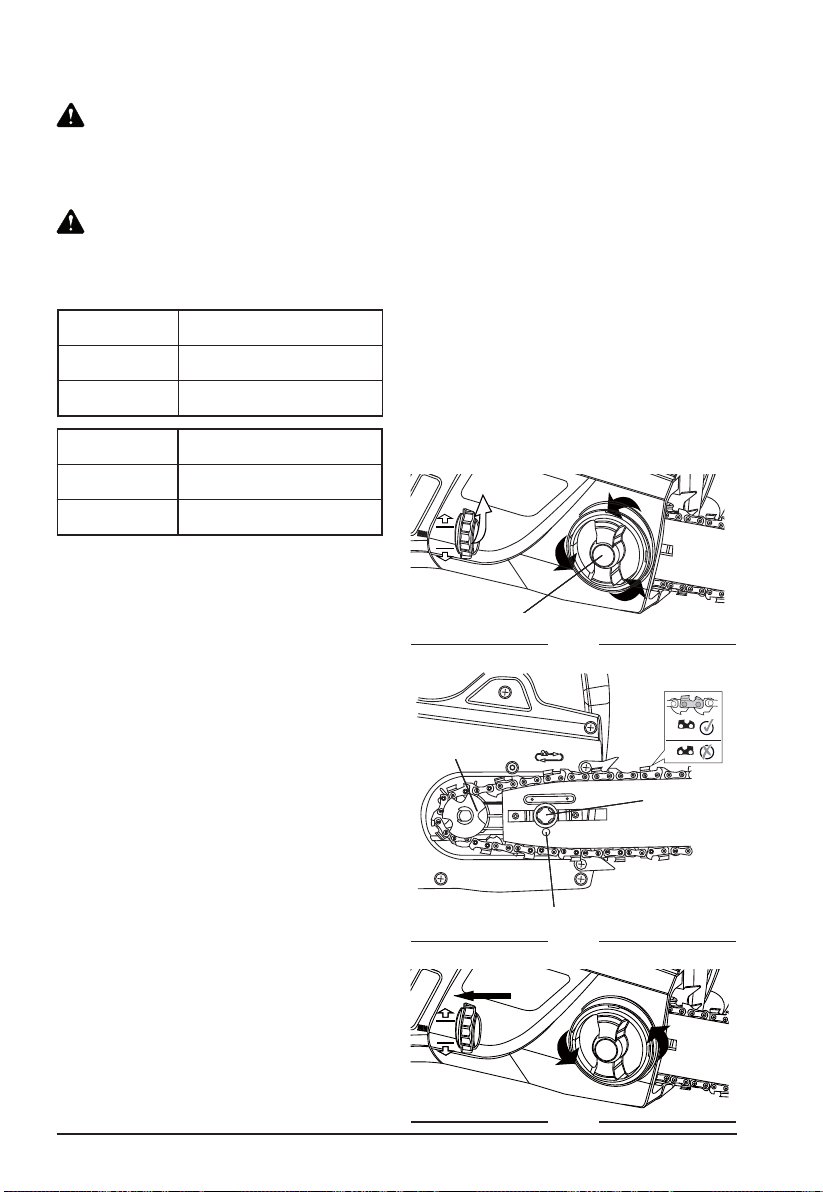
64 WWW.SENIXTOOLS.COM
REMPLACEMENT DE LA CHAÎNE
ET DU GUIDE-CHAÎNE
REMPLACEMENT DU CORDON
D’ALIMENTATION
Si le cordon d’alimentation de cet outil
pOHFWULTXHHVWHQGRPPDJpLOGRLWrWUH
UHPSODFpSDUXQFRUGRQVSpFLDOHPHQW
SUpSDUp,QVSHFWH]UpJXOLqUHPHQWOHFRUGRQ
G¶DOLPHQWDWLRQHWOD¿FKH6LO¶XQRXO¶DXWUH
HVWHQGRPPDJpIDLWHVOHUHPSODFHUSDUXQ
FHQWUHG¶HQWUHWLHQTXDOL¿p
AVERTISSEMENT :
GUIDE-CHAÎNE/CHAÎNE APPROUVÉS :
AVERTISSEMENT :
1HEUDQFKH]SDVODVFLHjFKDvQHjOD
UDOORQJHHWjODVRXUFHG¶DOLPHQWDWLRQDYDQW
TX¶HOOHVRLWFRPSOqWHPHQWPRQWpH8WLOLVH]
WRXMRXUVGHVJDQWVSRXUPDQLSXOHUODFKDvQH
5HPSODFH]ODFKDvQHXQHIRLVTXHOHVWrWHV
GHFRXSHVRQWWURSXVpHVSRXUVHIDLUHDIIWHU
RXXQHIRLVTXHODFKDvQHFDVVH8WLOLVH]
XQLTXHPHQWODFKDvQHGHUHPSODFHPHQW
LQGLTXpHGDQVFHPDQXHO
Commandez toujours un nouveau pignon
G¶HQWUDvQHPHQWORUVGXUHPSODFHPHQWGH
ODFKDvQH&HODDVVXUHUDO¶HQWUDvQHPHQW
FRQYHQDEOHGHODFKDvQH
/RUVTXHYRXVPDQLSXOH]GHVFKDvQHVGHVFLH
portez toujours des gants protecteurs.
1XPpURGX
modèle
CSE15-M
*XLGHFKDvQH
de la scie :
Oregon, 18 pouces,
180SDEA041
&KDvQHGH
la scie :
Oregon, 18” (457 mm),
3-;
3ODFH]OHERvWLHUGHODVFLHVXUXQHVXUIDFH
ferme et plane.
2. Faites tourner le bouton de verrouillage
GXUpJODJHGXJXLGHFKDvQHFRQWUHOHVHQV
des aiguilles d’une montre (Fig. 20) pour
HQOHYHUOHFRXYHUFOHGXERvWLHUGHODVFLH
3. Tout en portant des gants protecteurs,
HQURXOH]ODFKDvQHGHVFLHDXWRXUGXJXLGH
FKDvQHHQYRXVDVVXUDQWTXHOHVGHQWV
VRQWSRLQWpHVGDQVOHVHQVGHODURWDWLRQ
/DFKDvQHGRLWrWUHELHQLQVWDOOpHGDQVOD
IHQWHTXLSDUFRXUWWRXWHODSpULSKpULHGX
ERUGH[WpULHXUGXJXLGHFKDvQH
3ODFH]ODFKDvQHGHVFLHDXWRXUGXSLJQRQ
(Fig. 21) tout en alignant la fente dans le
JXLGHFKDvQHDYHFOHERXORQLQWHUQHjOD
base de la scie et le goujon de tension de
ODFKDvQHGDQVO¶RUL¿FHGXJXLGHFKDvQH
(Fig. 18). Il se peut que le goujon de
WHQVLRQGHODFKDvQHGRLYHVHIDLUHDMXVWHU
D¿QGHELHQV¶DOLJQHUDYHFO¶RUL¿FHGDQVOH
JXLGHFKDvQH8WLOLVH]ODURXHWHQGHXVHGH
ODFKDvQHSRXUDMXVWHUVRQHPSODFHPHQW
MXVTX¶jFHTX¶LOV¶HPERvWHGDQVOHJXLGH
FKDvQH
7RXUQH]ODURXHWHQGHXVHGHODFKDvQH
SRXUVHUUHUOHJXLGHFKDvQHVXI¿VDPPHQW
DXSUpDODEOHD¿QTX¶LOUHVWHHQSODFH7RXW
HQPDLQWHQDQWOHJXLGHFKDvQHHQSODFH
remettez le couvercle sur la scie. Assurez-
vous que la languette s’aligne bien avec
ODIHQWHVXUOHERvWLHUGHODVFLH)LJ
9HUURXLOOH]OHFRXYHUFOHjO¶DLGHGHVRQ
bouton de verrouillage en le tournant dans
OHVHQVGHVDLJXLOOHVG¶XQHPRQWUHMXVTX¶j
FHTX¶LOV¶HPERvWH5pJOH]ODWHQVLRQGHOD
FKDvQH
Locking Knob
Fig. 20
Bouton de verrouillage
Fig. 22
Internal Bolt
Chain Tensioning Pin
Sprocket
Fig. 21
3LJQRQ
Boulon interne
*RXMRQGHWHQVLRQGHODFKDvQH
1XPpURGX
modèle
CSE12-M
*XLGHFKDvQH
de la scie :
Oregon, 16 pouces,
160SDEA041
&KDvQHGH
la scie :
Oregon, 16” (406 mm),
3-;
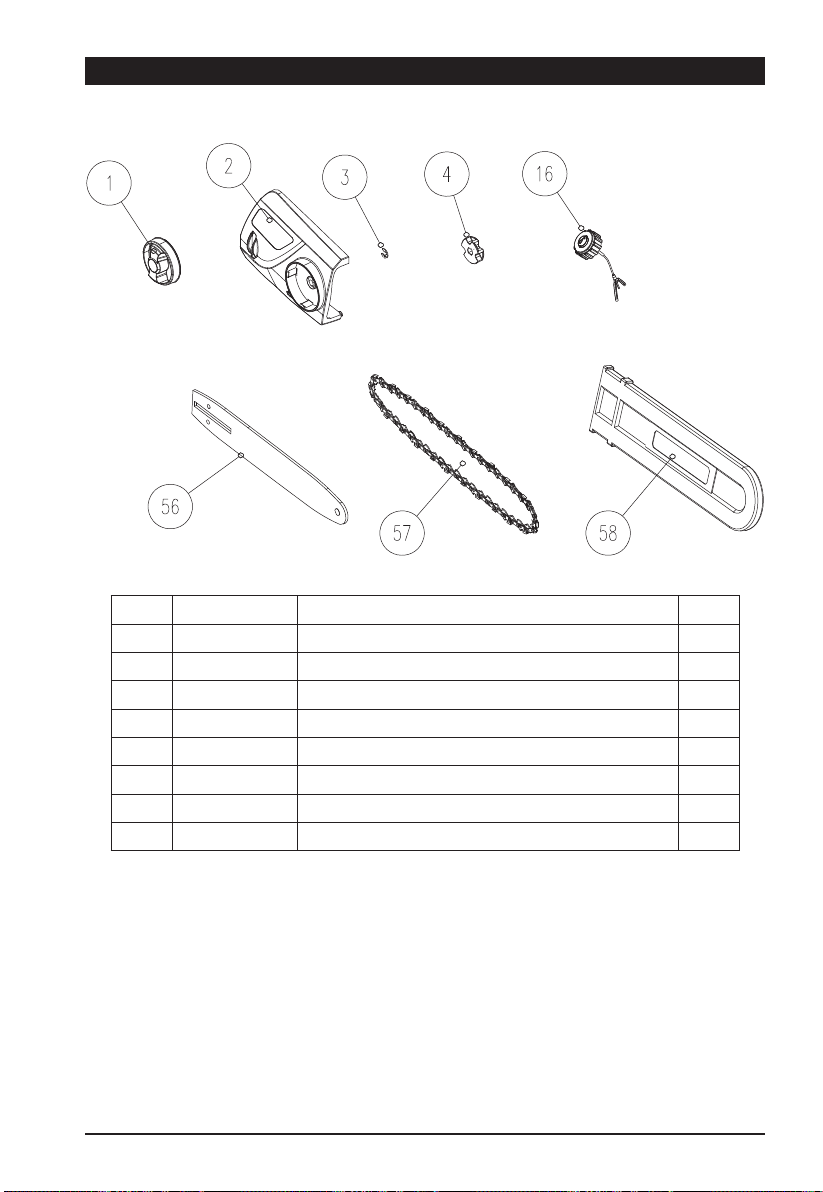
65WWW.SENIXTOOLS.COM
DESCRIPTION DES PIÈCES
Modèle : CSE12-M / CSE15-M
N° Pièce # Description
Qté
1 202028000087 %RXWRQGHYHUURXLOODJHGXUpJODJHGXJXLGHFKDvQH 1
2 199001000490 Assemblage de couverture 1
3 207340100049 Anneau de retenue 1
4 201035000003 3LJQRQ 1
16 199123000421 $VVHPEODJHGXERXFKRQGHUpVHUYRLUG¶KXLOH 1
56 205001000098 *XLGHFKDvQH 1
57 205001000022 &KDvQH 1
58 202009000168 eWXLGHJXLGHFKDvQH 1

66 WWW.SENIXTOOLS.COM
GARANTIE
*DUDQWLHOLPLWpHGHDQVVXUWRXVOHVpTXLSHPHQWVjpOHFWULTXHVGHODVpULH6HQL[(
&HSURGXLW6HQL[HVWJDUDQWL'85$17'(8;$16jFRPSWHUGHODGDWHG¶DFKDWG¶RULJLQHFRQWUH
OHVGpIDXWVGHPDWpULDX[RXGHIDEULFDWLRQVXUOHVRXWLOVpOHFWULTXHV
/HSURGXLWGpIHFWXHX[VHUDUpSDUpJUDWXLWHPHQW/HSURGXLWGpIHFWXHX[VHUDUpSDUpJUDWXLWHPHQW
&HWWHJDUDQWLHQHFRXYUHSDVO¶XVXUHQRUPDOHGHVSLqFHVHWGHVFRPSRVDQWVWHOVTXHODFKDvQH
de coupe, la ligne ou les lames, et cette garantie ne couvre pas les frais de transport du produit
pour la garantie ou l’entretien.
7RXWHJDUDQWLHLPSOLFLWHDFFRUGpHHQYHUWXGHODORLGHO¶eWDW\FRPSULVOHVJDUDQWLHVGH
TXDOLWpPDUFKDQGHRXG¶DGpTXDWLRQjXQXVDJHSDUWLFXOLHUHVWOLPLWpHjWURLVDQVjFRPSWHU
GHODGDWHG¶DFKDWGHVRXWLOVpOHFWULTXHVHWGHVFKDUJHXUV/HIDEULFDQWQ¶HVWSDVUHVSRQVDEOH
GHVGRPPDJHVGLUHFWVLQGLUHFWVDFFHVVRLUHVRXFRQVpFXWLIV&HUWDLQVpWDWVHWSURYLQFHV
Q¶DXWRULVHQWSDVOHVOLPLWDWLRQVVXUODGXUpHG¶XQHJDUDQWLHLPSOLFLWHRXQ¶DXWRULVHQWSDV
O¶H[FOXVLRQRXODOLPLWDWLRQGHVGRPPDJHVDFFHVVRLUHVHWGDQVFHFDVOHVUHVWULFWLRQVGpFULWHV
SUpFpGHPPHQWQHV¶DSSOLTXHQWSDV&HWWHJDUDQWLHYRXVGRQQHGHVGURLWVOpJDX[VSpFL¿TXHVHW
YRXVSRXYH]pJDOHPHQWDYRLUG¶DXWUHVGURLWVTXLYDULHQWG¶XQpWDWjO¶DXWUHRXG¶XQHSURYLQFHj
l’autre.
<$786$GpFOLQHWRXWHUHVSRQVDELOLWpHQPDWLqUHGHUHVSRQVDELOLWpFLYLOHUpVXOWDQWG¶XQH
XWLOLVDWLRQDEXVLYHRXQRQFRQIRUPHjXQHXWLOLVDWLRQHWXQHQWUHWLHQFRUUHFWVGHODPDFKLQHWHOOHV
TXHGpFULWHVGDQVOHPDQXHOG¶LQVWUXFWLRQV
<$786$Q¶HVWSDVUHVSRQVDEOHGHVGRPPDJHVGLUHFWVLQGLUHFWVDFFHVVRLUHVRXFRQVpFXWLIV
$SUqVO¶DFKDWOHIDEULFDQWUHFRPPDQGHXQHQWUHWLHQDSSURSULpGHODPDFKLQHHWGHOLUHOH
manuel d’instructions avant d’utiliser la machine.
8QUHoXG¶DFKDWRULJLQDOSHXWrWUHH[LJpFRPPHSUHXYHG¶DFKDW3RXUOHVHUYLFHjODFOLHQWqOH
contactez-nous gratuitement au 1-800-261-3981 ou Senixtools.com.
YAT USA, Inc. 6441 Hendry Road, Suite A, Charlotte, NC 28269
GARANTIE LIMITÉE DE DEUX ANS
Limitations supplémentaires
La garantie est sujette aux deux conditions suivantes :
/DJDUDQWLHV¶DSSOLTXHjO¶DFKHWHXURULJLQDODXGpWDLOHWQ¶HVWSDVWUDQVIpUDEOH
• Enregistrement de la garantie sur www.senixtools.com
/¶RXWLOQ¶DSDVpWpXWLOLVpLQFRUUHFWHPHQWDEXVpQpJOLJpDOWpUpPRGL¿pRXUpSDUpSDU
TXLFRQTXHDXWUHTX¶XQWHFKQLFLHQG¶XQFHQWUHG¶HQWUHWLHQDXWRULVp
6HXOVOHVDFFHVVRLUHV6HQL[DXWKHQWLTXHVRQWpWpXWLOLVpVDYHFRXVXUFHSURGXLW
/¶RXWLODpWpVRXPLVjXQHXVXUHQRUPDOH
/¶RXWLOQ¶DSDVpWpXWLOLVpjGHV¿QVFRPPHUFLDOHVRXSURIHVVLRQQHOOHV
/¶RXWLOQ¶DSDVpWpXWLOLVpjGHV¿QVORFDWLYHV
&HWWHJDUDQWLHQHFRXYUHTXHOHVGpIDXWVUpVXOWDQWG¶XQHXWLOLVDWLRQQRUPDOHHWQHFRXYUHSDV
OHVG\VIRQFWLRQQHPHQWVGpIDLOODQFHVRXGpIDXWVUpVXOWDQWG¶XQHXWLOLVDWLRQLQFRUUHFWHG¶XQ
DEXVVXUFKDUJHGXSURGXLWH[SRVLWLRQjO¶HDXRXjODSOXLHG¶XQHQpJOLJHQFHRXG¶XQGpIDXW
d’installation, d’entretien ou de stockage.
3RXUORFDOLVHUYRWUHIRXUQLVVHXUGHVHUYLFHV6HQL[OHSOXVSURFKHDSSHOH]JUDWXLWHPHQWOH
RXHQYR\H]QRXVXQFRXUULHOjVHUYLFH#VHQL[WRROVFRP

67WWW.SENIXTOOLS.COM

68 WWW.SENIXTOOLS.COM