NEED HELP? CALL US!
MAGNAVOX REPRESENTATIVESARE READYTO HELPYOUWITH ANY
QUESTIONSABOUTYOURNEW PRODUCT.WE CAN GUIDEYOUTHROUGH
CONNECTIONS, FIRST-TIMESETUP,AND ANY OFTHE FEATURES.
WE WANT YOUTO STARTENJOYINGYOURNEW PRODUCTRIGHT AWAY.
CALL US BEFORE YOU CONSIDER RETURNING THE PRODUCT.
1-800- 705-2000
OR VISIT US ON THE WEB AT WWW.MAGNAVOX.COM
IB8457EO01

Once your MAGNA VOX purchase is registered, you're eligible to receive all the privileges of owning
a MA GNA VOX product. So complete and return the Warranty Registration Card enclosed with your
purchase at once. And take advantage of these important benefits.
_r
g:]
N
Congratulations on your purchase,
and welcome to the "family!"
Dear MAGNAVOX product owner:
Thank you for your confidence in MAGNAVOX. You've selected one
of the best-built, best-backed products available today, We'll do
everything in our power to keep you happy with your purchase for
many years to come.
As a member of the MAGNAVOX "family," you're entitled to
protection by one of the most comprehensive warranties and
outstanding service networks in the industry.
What's more, your purchase guarantees you'll receive all the
information and special offers for which you qualify, plus easy
access to accessories from our convenient home shopping network.
Most importantly, you can count on our uncompromising commitment
to your total satisfaction.
All of this is our way of saying welcome-and thanks for investing in a
MAGNAVOX product.
P.S. Remember, to get the most from your MAGNAVOX
product, you must return your Warranty Registration
Card within 10 days. So please mail it to us right now!
Know these
Safetysy bo/s
CAUTION: TO SEDUCE THE RISK OFELECTRIC SHOCK* DO NOT
REMOVE COVES (O$q BACK]. NO USER, SERVICEA]]LE PARTS
INSIDE. REFER SERVICING TO QUALIFIED SERRICE PERSONNEL.
_kThis "bolt of lightning" indicates
uninsulated material within your unit
may cause an electrical shock. For the
safety of everyone in your household,
please do not remove product covering.
,_The "exclamation point "calls atten-
tion to features for which you
should read the enclosed literature
closely to prevent operating and mainte-
nance problems.
WARNING: TO PREVENT FIRE OR
SHOCK HAZARD, DO NOT EXPOSE
THIS EQUIPMENT TO RAIN OR MOI-
STURE.
CAUTION: To prevent electric shock,
match wide blade of plug to wide slot,
fully insert.
ATTENTION: Pour 6viter les choc
electriques, introduire la lame la plus
large de la fiche dans la borne corre-
spondante de la prise et pousser
jusqu'au fond.
For Customer Use
Enter below the Serial No. which is
located on the rear of the cabinet. Retain
this information for future reference.
Model No.
Serial No.
IMPORTANT SAFETY INSTRUCTIONS
Read before operating equipment
1. Read these instructions.
2. Keep these instructions.
3. Heed all warnings.
4. Follow all instructions.
5. Do not use this apparatus near water.
6. Clean only with a dry cloth.
7. Do not block any of the ventilation openings. Install in accordance
with the manufacturer's instructions.
8. Do not install near any heat sources such as radiators, heat regis-
ters, stoves, or other apparatus (including amplifiers) that produce
heat.
9. Do not defeat the safety purpose of the polarized or grounding-
type plug. A polarized plug has two blades with one wider than the
other. A grounding type plug has two blades and a third grounding
prong. The wide blade or third prong are provided for your safety.
When the provided plug does not fit into your outlet, consult an
electrician for replacement of the obsolete outlet.
10. Protect the power cord from being walked on or pinched, particu-
larly at plugs, convenience receptacles, and the point where they
exit from the apparatus.
11.Only use attachments/accessories specified by the manufacturer.
12.Use only with a cart, stand, tripod, bracket, or table specified by
the manufacturer or sold with the apparatus.When a cart
is used, use caution when moving the cart/apparatus com-
bination to avoid injury from tip-over.
13.Unplug this apparatus during lightning storms or when unused
for long periods of time.
14. Refer all servicing to qualified service personnel. Servicing is
required when the apparatus has been damaged in any way,
such as if the power-supply cord or plug is damaged, liquid has
been spilled or objects have fallen into the apparatus, or if the
apparatus has been exposed to rain or moisture, does not ope-
rate normally, or has been dropped.
15.This product may contain lead and mercury. Disposal of these
materials may be regulated due to environmental considerations.
For disposal or recycling information, please contact your local
authorities or the Electronic Industries Alliance (www.eiae.org).
16.Damage Requiring Service - The appliance should be serviced
by qualified service personnel when:
B. Objects have fallen or liquid has been spilled into the appliance;
C. The appliance has been exposed to rain;
D. The appliance does not appear to operate normally or exhibits
a marked change in performance;
E.The appliance has been dropped or the enclosure damaged.
17. Tilt/Stability - All televisions must comply with recommended
international global safety standards for tilt and stability properties
of its cabinet design.
• Do not compromise these design standards by applying excessive
pull force to the front, or top, of the cabinet, which could ultimat-
ely overturn the product.
•Also, do not endanger yourself, or children, by placing electronic
equipment/toys on the top of the cabinet. Such items could unsus-
pectingly fall from the top of the set and cause product damage
and/or personal injury.
18.Wall or Ceiling Mounting - The appliance should be mounted
to a wall or ceiling only as recommended by the manufacturer.
19. Power Lines - An outdoor antenna should be located away from
power lines.
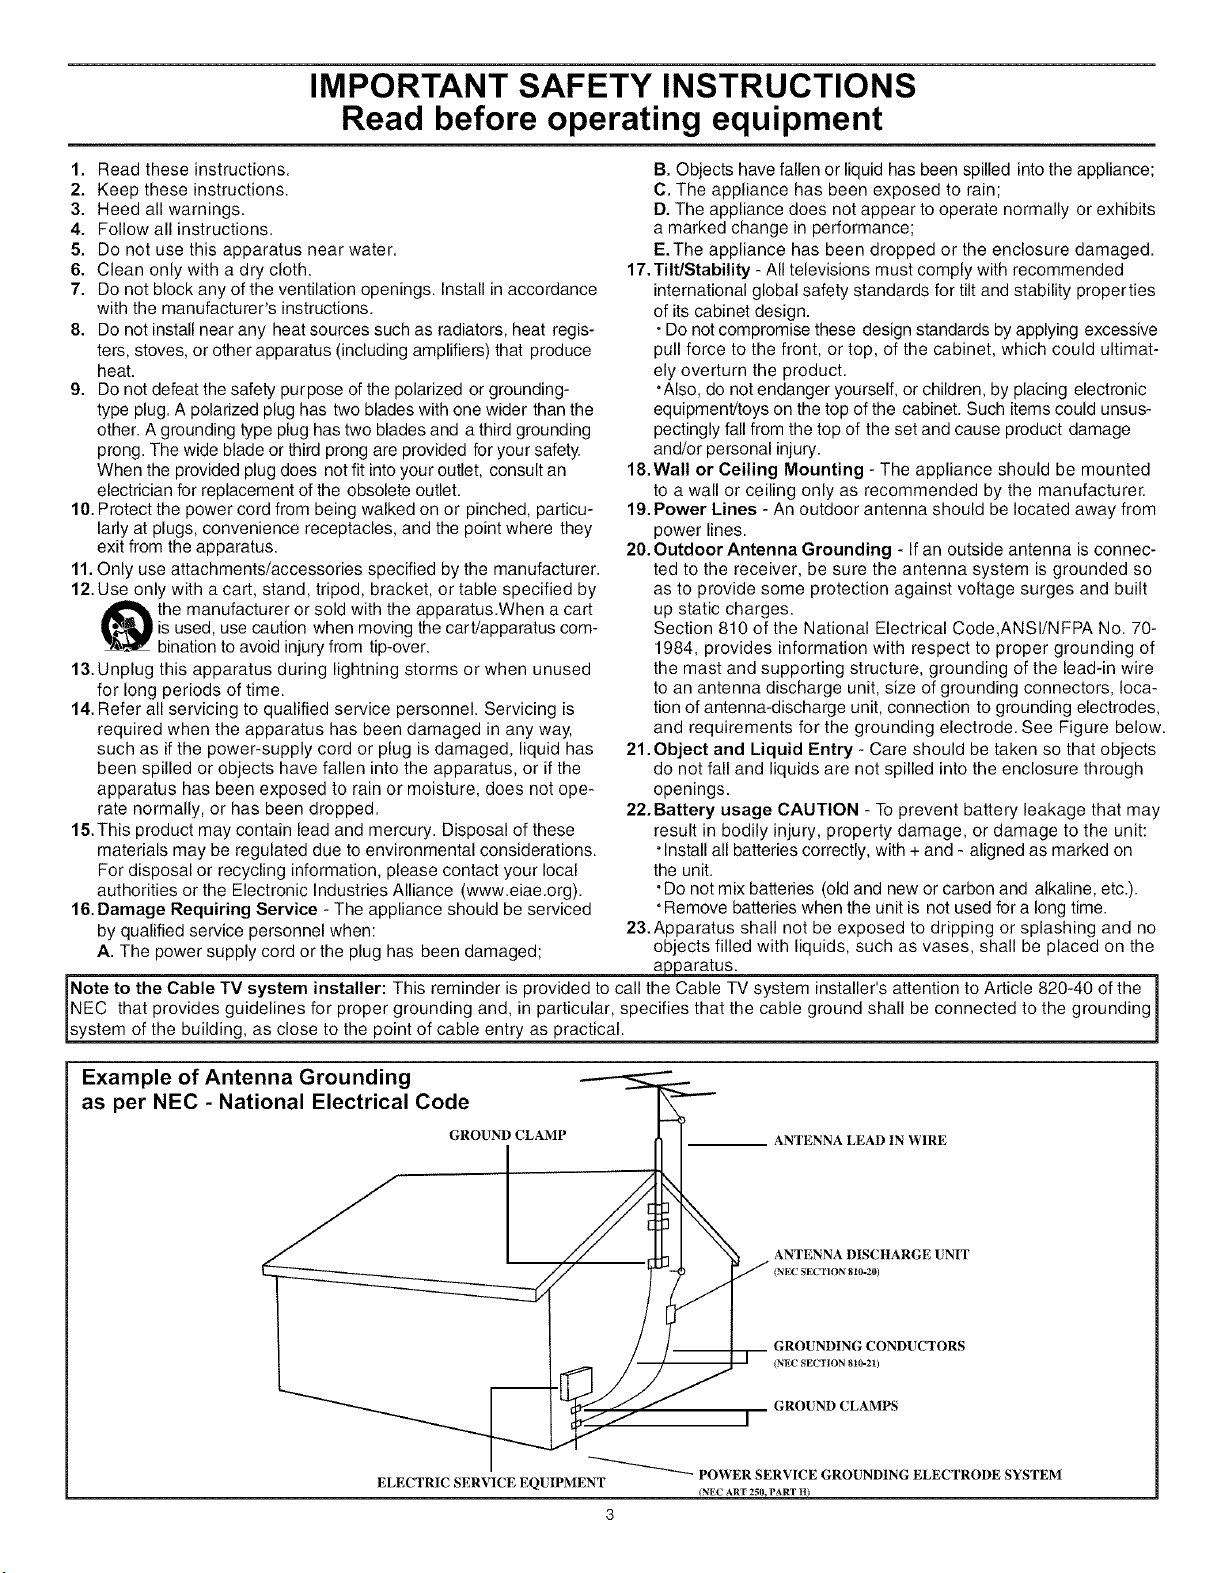
20.Outdoor Antenna Grounding - If an outside antenna is connec-
ted to the receiver, be sure the antenna system is grounded so
as to provide some protection against voltage surges and built
up static charges.
Section 810 of the National Electrical Code,ANSI/NFPA No. 70-
1984, provides information with respect to proper grounding of
the mast and supporting structure, grounding of the lead-in wire
to an antenna discharge unit, size of grounding connectors, loca-
tion of antenna-discharge unit, connection to grounding electrodes,
and requirements for the grounding electrode. See Figure below.
21 .Object and Liquid Entry - Care should be taken so that objects
do not fall and liquids are not spilled into the enclosure through
openings.
22.Battery usage CAUTION - To prevent battery leakage that may
result in bodily injury, property damage, or damage to the unit:
- Install all batteries correctly, with + and - aligned as marked on
the unit.
• Do not mix batteries (old and new or carbon and alkaline, etc.).
• Remove batteries when the unit is not used for a long time.
23.Apparatus shall not be exposed to dripping or splashing and no
A. The power supply cord or the plug has been damaged; objects filled with liquids, such as vases, shall be placed on the
__ __ apparatus:
Note to the Cable TV system installer: This reminder is provided to call the Cable TV system installer's attention to Article 820-40 of the 1
INEC that provides guidelines for proper grounding and, in particular, specifies that the cable ground shall be connected to the grounding|
_system of the building, as close to the point of cable entry as practical. ]
Example of Antenna Grounding
as per NEC - National Electrical Code
GROUND CLAMP ANTENNA LEAD 1N WIRE
-- ANTENNA DISCHARGE UNIT
(NEC SECTION 810-2)
GROUNDING CONDUCTORS
(NEC SECTION 810-2t)
GROUND CLAMPS
I
POWER SERVICE GROUNDING ELECTRODE SYSTEM
ELECTRIC SERVICE EQUIPMENT
(NEC ART 250, PART H)
3
Introduction
WelcomefTV Registration .................................... 2
Safety/precaution ................................................. 3
Table of Contents ................................................. 4
Features ............................................................... 4
Getting Started
Basic Cable TV connection .................................. 5
Basic Antenna Connection .................................. 6
Basic TV to VCR (Accessory) Connection ........... 7
Basic TV and Remote Control Operations ........... 8
Remote Control .................................................... 9
_._-_ Setup Menus
Language ........................................................... 10
TV/Cable TV ....................................................... 11
Auto Search (Setting TV Channels) .................... 12
Manual Channel Tuning ...................................... 13
Favorite Channel Setting .................................... 14
Adding or Erasing Channels .............................. 15
L_I On-screen Menus
Picture Adjustments ............................................ 16
SmartPictureTM ................................................... 17
Clock ................................................................... 18
On-Timer ............................................................ 19
Off-Timer ............................................................ 20
Closed Caption ................................................... 21
Sleep Timer ........................................................ 22
m
m
= Parental Lock
Understanding Parental Lock ............................. 23
Parental Lock Secret Code ................................ 24
Blocking Programming with Movie Ratings ........ 25
Blocking Programming with TV Ratings ............. 26
Parental Lock Blocking Options .......................... 27
Child Lock .......................................................... 28
Sound
SmartSound TM...................................................... 29
Sound Adjustments ............................................ 30
Stereo and Second Audio Program .................... 31
General Information
Helpful Hints ....................................................... 32
Care and Cleaning ............................................. 32
Glossary ............................................................. 33
Index ................................................................... 33
Factory Service Locations ............................. 34-35
Limited Warranty ................................................ 36
TM TM
SmartPicture and SmartSound are registered trade-
marks of Philips Consumer Electronics North America.
Copyright ©2003 Magnavox.AII rights reserved.
Here are a few of the special features of your
new Color Television.
Automatic Channel Programming: Quick and easy
selection of available stations.
Child Lock: Locks the buttons on the front of the TV
so it cannot be operated accidentally by young children.
Closed Captioning: Allows you to read TV program
dialog or voice conversations as on-screen text.
Off-Timer: Turns off the TV at a preset time.
On-Timer: Turns on the TV at a preset time to a de-
signated TV channel or video source.
On-screen Menus: Helpful message (in English or
Spanish) for setting TV controls.
Parental Lock: Allows you to block the viewing of
certain TV channels if you do not want your children
viewing inappropriate material.
Remote Control: Works your TV features.
Sleep Timer: Turns off the TV within an amount of
time you specify. (10-120 minutes from the current
time).
SmartPicturerM: Lets you set the picture's color,
tint, contrast, etc. for various types of programming.
Settings include Sports, Movies, Weak Signal, and
Personal, which set the picture control as you want.
SmartSound TM: Lets you set the TV's sound settings
for the current programming. Choices include Personal,
Theatre, Music, or Voice.
Standard broadcast (VHF/UHF) or Cable TV cha-
nnel capability.
Stereo Capability: Includes built-in amplifier and
twin-speaker system; allows reception of TV programs
broadcast in stereo.
ThecableTVsignal intoyour homemay
be asingle cable(75ohm)ormay include
a cableBox.In eithercase,theconnection
tothe TVis easy.
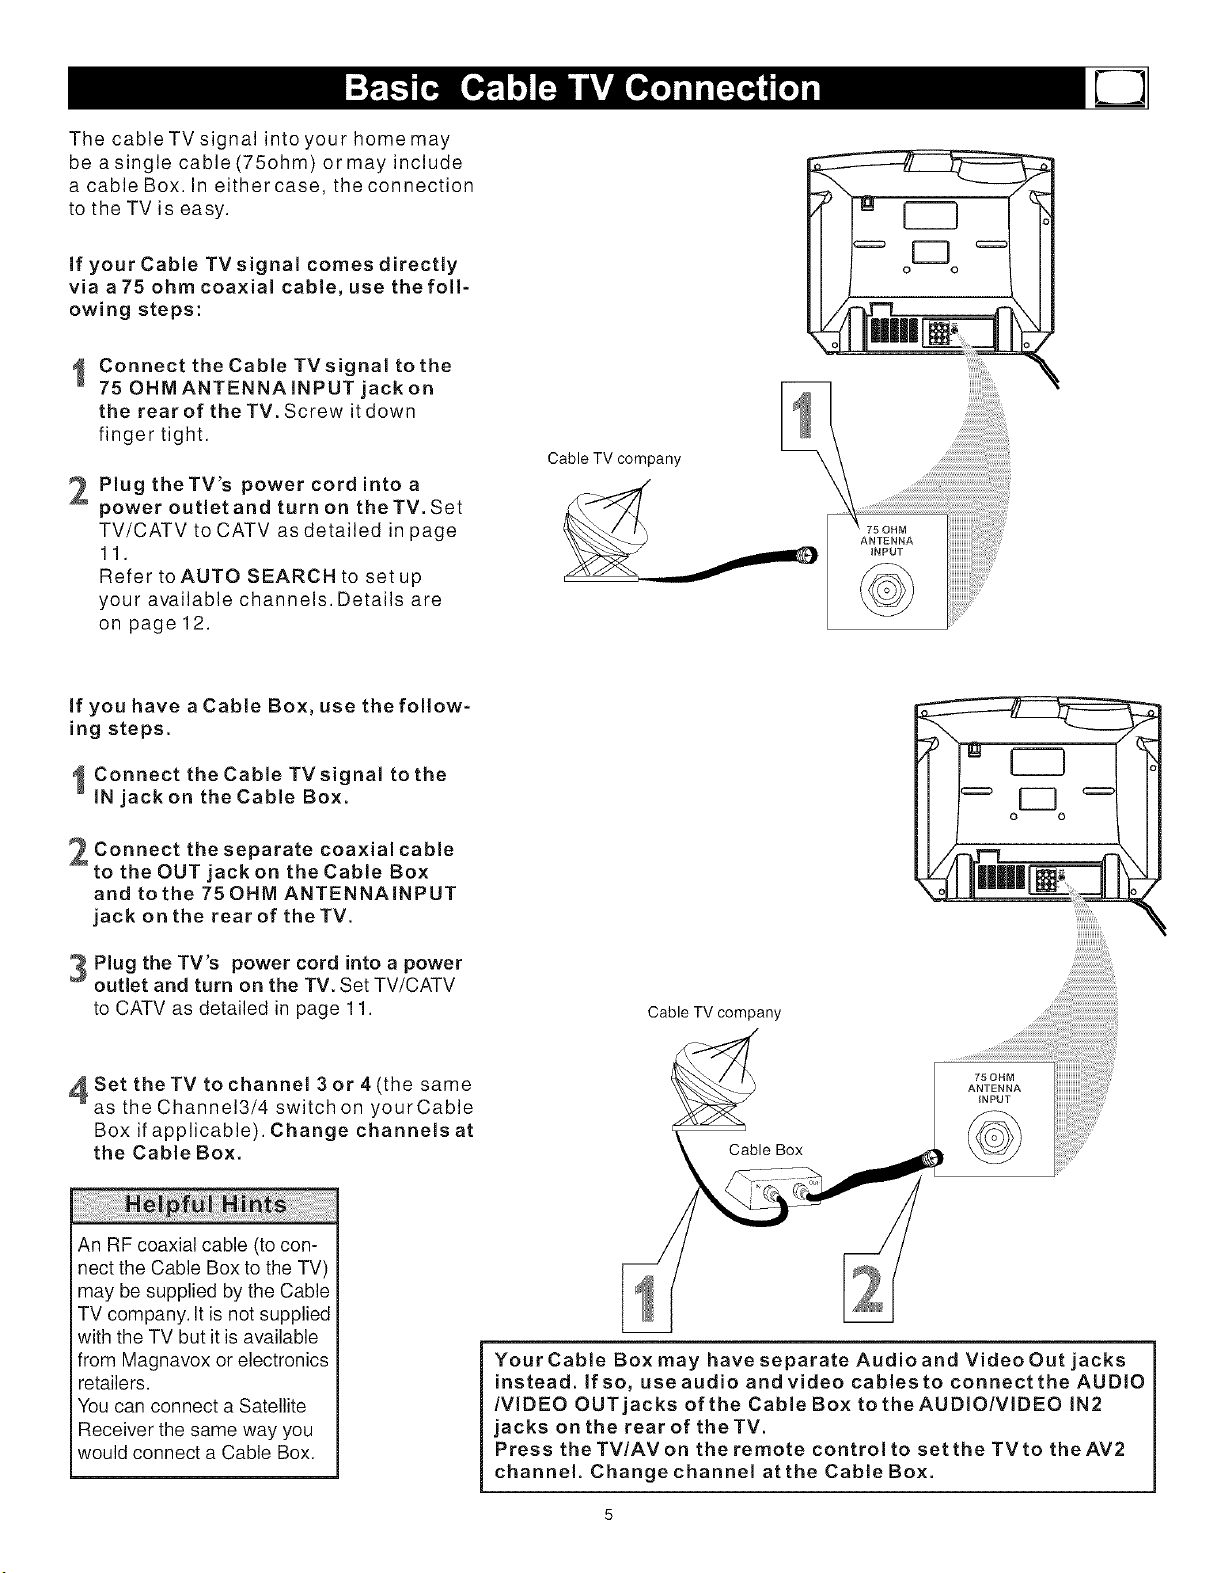
if your Cable TVsignal comes directly
via a75 ohm coaxial cable, use the foll-
owing steps:
I Connect theCable TVsignal tothe
75 OHM ANTENNA iNPUT jack on
the rear of the TV. Screw it down
finger tight.
Plug theTV's power cord into a
power outlet and turn on theTV, Set
TV/CATV to CATV as detailed in page
11.
Refer toAUTO SEARCH to setup
your available channels. Details are
on page 12.
Cable TV company
l
o o
i
\
If you have a Cable Box, use the follow-
ing steps.
ConnecttheCableTVsignaltothe
IN jack on the Cable Box.
Connect the separate coaxial cable
to the OUT jack on the Cable Box
and to the 75 OHM ANTENNAINPUT
jack on the rear of theTV.
Plug the TV's power cord into a power
outlet and turn on the TV, Set TV/CATV
to CATV as detailed in page 11.
Cable TV company
iiiiiiiiiiiih
4 Set theTV to channel 3 or 4 (the same
as the Channel3/4 switch on yourCable
Box if applicable). Change channels at
the Cable Box.
i
An RF coaxial cable (to con-
nect the Cable Box to the TV)
may be supplied by the Cable
TV company. It is not supplied
with the TV but it is available
from Magnavox or electronics
retailers.
You can connect a Satellite
Receiver the same way you
would connect a Cable Box.
75 OHM
ANTENNA
iNPUT
Your Cable Box may have separate Audio and Video Out jacks
instead. If so, use audio and video cables to connect the AUDIO
/VIDEO OUT jacks of the Cable Box to theAUDIO/VIDEO IN2
jacks on the rear of theTV.
Press theTV/AVon the remote control to set the TVto theAV2
channel. Change channel atthe Cable Box.
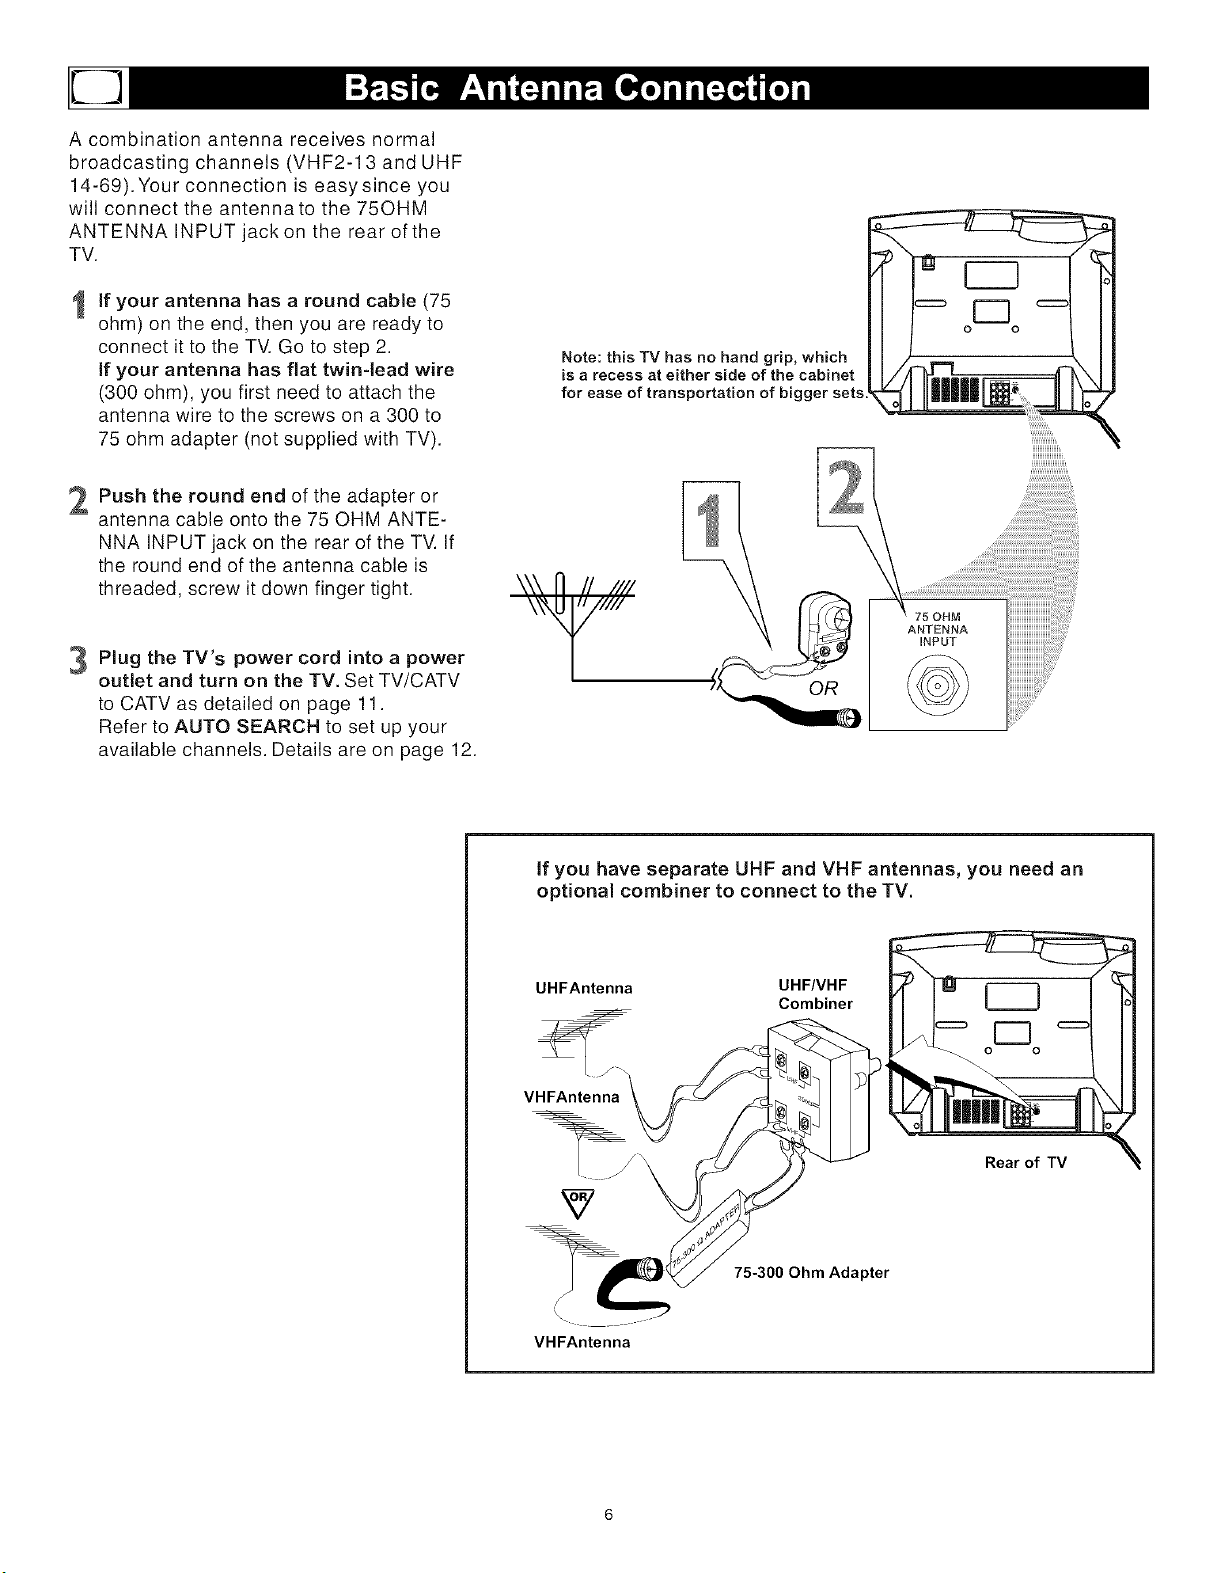
A combinationantennareceivesnormal
broadcastingchannels(VHF2-13andUHF
14-69).Yourconnectioniseasysinceyou
willconnecttheantennatothe75OHM
ANTENNAINPUTjackon therearofthe
TV.
1 If your antenna has a round cable (75
ohm) on the end, then you are ready to
connect it to the TV. Go to step 2.
if your antenna has flat twin-lead wire
(300 ohm), you first need to attach the
antenna wire to the screws on a 300 to
75 ohm adapter (not supplied with TV).
Push the round end of the adapter or
antenna cable onto the 75 OHM ANTE-
NNA INPUT jack on the rear of the TV. If
the round end of the antenna cable is
threaded, screw it down finger tight.
3 Plug the TV's power cord into a power
outlet and turn on the TV. Set TV/CATV
to CATV as detailed on page 11.
Refer to AUTO SEARCH to set up your
available channels. Details are on page 12.
Note: this TV has no hand grip, which
is a recess at either side of the cabinet
for ease of transportation of bigger sets
75 OHM
ANTENNA
INPUT
If you have separate UHF and VHF antennas, you need an
optional combiner to connect to the TV.
UHFAntenna UHF/VHF
Combiner
O O
VHFAntenna
VHFAntenna
75-300 Ohm Adapter
Rear of TV

The basic Antenna/Cable TV to Accessory
(VCR, DVD Player, etc.) to TV connection is
shown at right. For other hookups (such as
those with Cable Boxes), refer to the owner's
manual of the Cable Box or other Accessories.
I Connect ayellow video cable to the
VIDEO IN2jack on the rear of theTV
and to the VIDEO OUT jack on your
VCR (or other Accessories.)
Connectredandwhiteaudiocables
to theAUDIO IN2jacks (left and right)
on the rear of the TVand tothe
AUDIO OUT jacks on your VCR (or
other device.) Match the cable colors
to the jack colors.
Turn theTV and the VCR.
on
Press the TV/AV button on the TV's
remote control until AV2 appears in the
upper right corner of the TV screen.
When you play material on the VCR, DVD
player, etc. that is connected to the AUDIO
and VIDEO IN2 jacks on the rear of the TV,
it will appear on the TV on the AV2 channel.
Audio and video cables are
not supplied with the TV but
are available from Magnavox
or electronics retailers. Audio
cables are usually red and
white. Video cables (CVBS)
are usually yellow.
You can connect the antenna
or Cable TV signal to either
the ANTENNA IN jack on your
VCR or to the 75 OHM ANT-
ENNA INPUT jack on the TV.
If you connect it to the VCR,
choose TV channels at the
VCR. Connect it to the VCR
if you want to record TV pro-
gramming through VCR.
YourVCR may not have Audio
and Video Out jacks, but only
An RF or ANTENNA OUT jack.
Use a coaxial cable to connect
the VCR_ ANTENNAOUT jack
to the TV's 75 OHM ANTENNA
INPUT jack.
There are Component Video In jacks on
the rear of the TV. These are labeled DVD
INPUT Y, Cb and Cr and are red, blue and
green. Use these to connect a DVD player
that has Component Video Out jacks. This
will provide the best picture quality. Use
Component Video cables, which are not
supplied with the TV.
If you connect the DVD player to the DVD
jacks, set the TV toYUV channel to watch
DVDs. Press TV/AV button on the remote
so YUV appears on theTV screen.
Use either DVD or VIDEO In2 jacks, but do
not use both for the same piece of equipment.
You only need one video connection per each
accessory (DVD player, etc.).
OVO INPUT
There are AUDIO and VIDEO IN1 jacks
at the lower-right corner of the rear of the
TV set. To view material playing on equip-
ment connected here, press the TV/AV so
AVl is shown on theTV.
There is also an S-VIDEO IN1 jack in this
area. Use S-Video connection if your DVD
player, camcorder, etc. has an S-Video Out
jack. S-Video provides a clearer picture than
the standard CVBS video (the yellow jack).
Choose the AVl channel to view material
playing on equipment connected to the S-
VIDEO IN1 jack.
Use either S-VIDEO IN1 jack or VIDEO IN1
jacks. Do not use both at the same time
for the same piece of equipment.
This would interfere with the picture display.
If both are used, S-VIDEO IN1 has priority
over the yellow VIDEO IN1 jack.
1
2
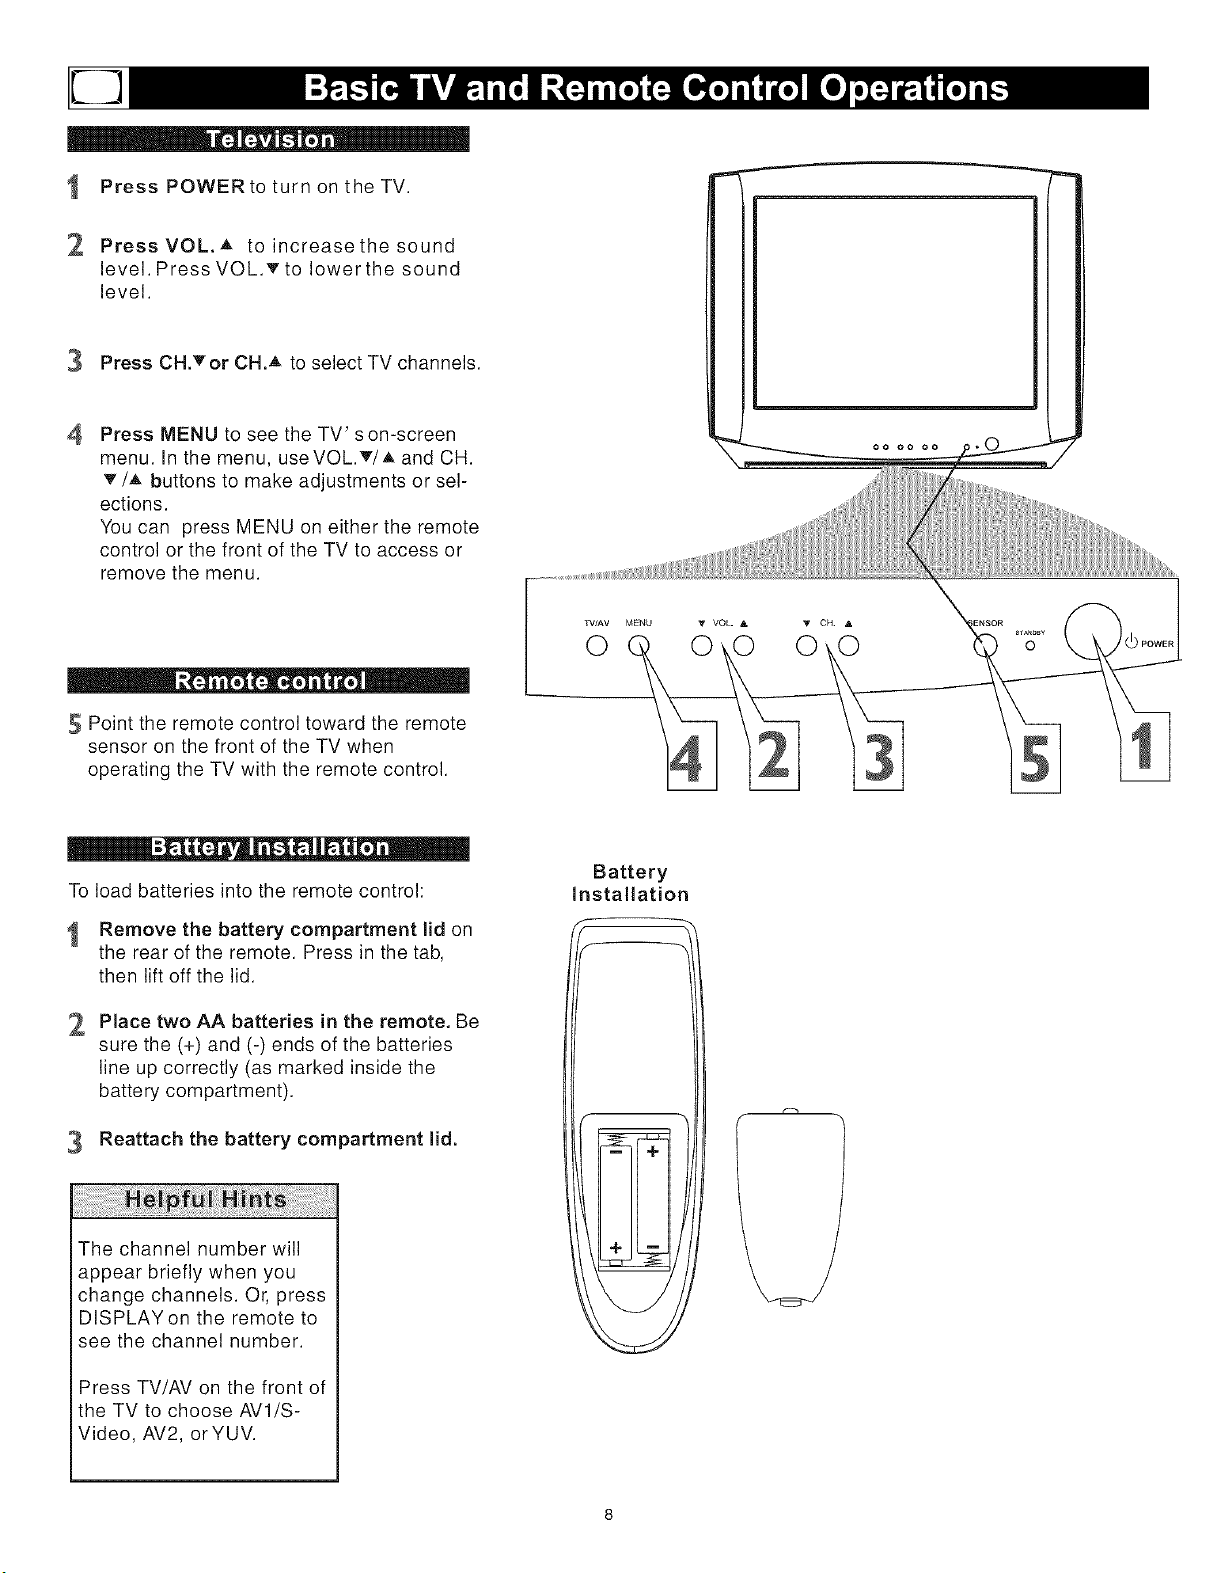
Press POWER to turn on the TV.
Press VOL. A to increase the sound
level. Press VOLT to lower the sound
level.
3 Press CH._'or CH. A to select TV channels.
4 Press MENU to see the TV' s on-screen
menu. In the menu, useVOL.T/A and CH.
• '/A buttons to make adjustments or sel-
ections.
You can press MENU on either the remote
control or the front of the TV to access or
remove the menu.
_ - IIIJ • " o| •
Point the remote control toward the remote
sensor on the front of the TV when
operating the TV with the remote control.
To load batteries into the remote control:
Remove the battery compartment lid on
the rear of the remote. Press in the tab,
then lift off the lid.
2 Place two AA batteries in the remote. Be
sure the (+) and (-) ends of the batteries
line up correctly (as marked inside the
battery compartment).
Reattach the battery compartment lid.
The channel number will
appear briefly when you
change channels. Or, press
DISPLAYon the remote to
see the channel number.
Press TV/AV on the front of
the TV to choose AVl/S-
Video, AV2, orYUV.
O
Battery
Installation
f
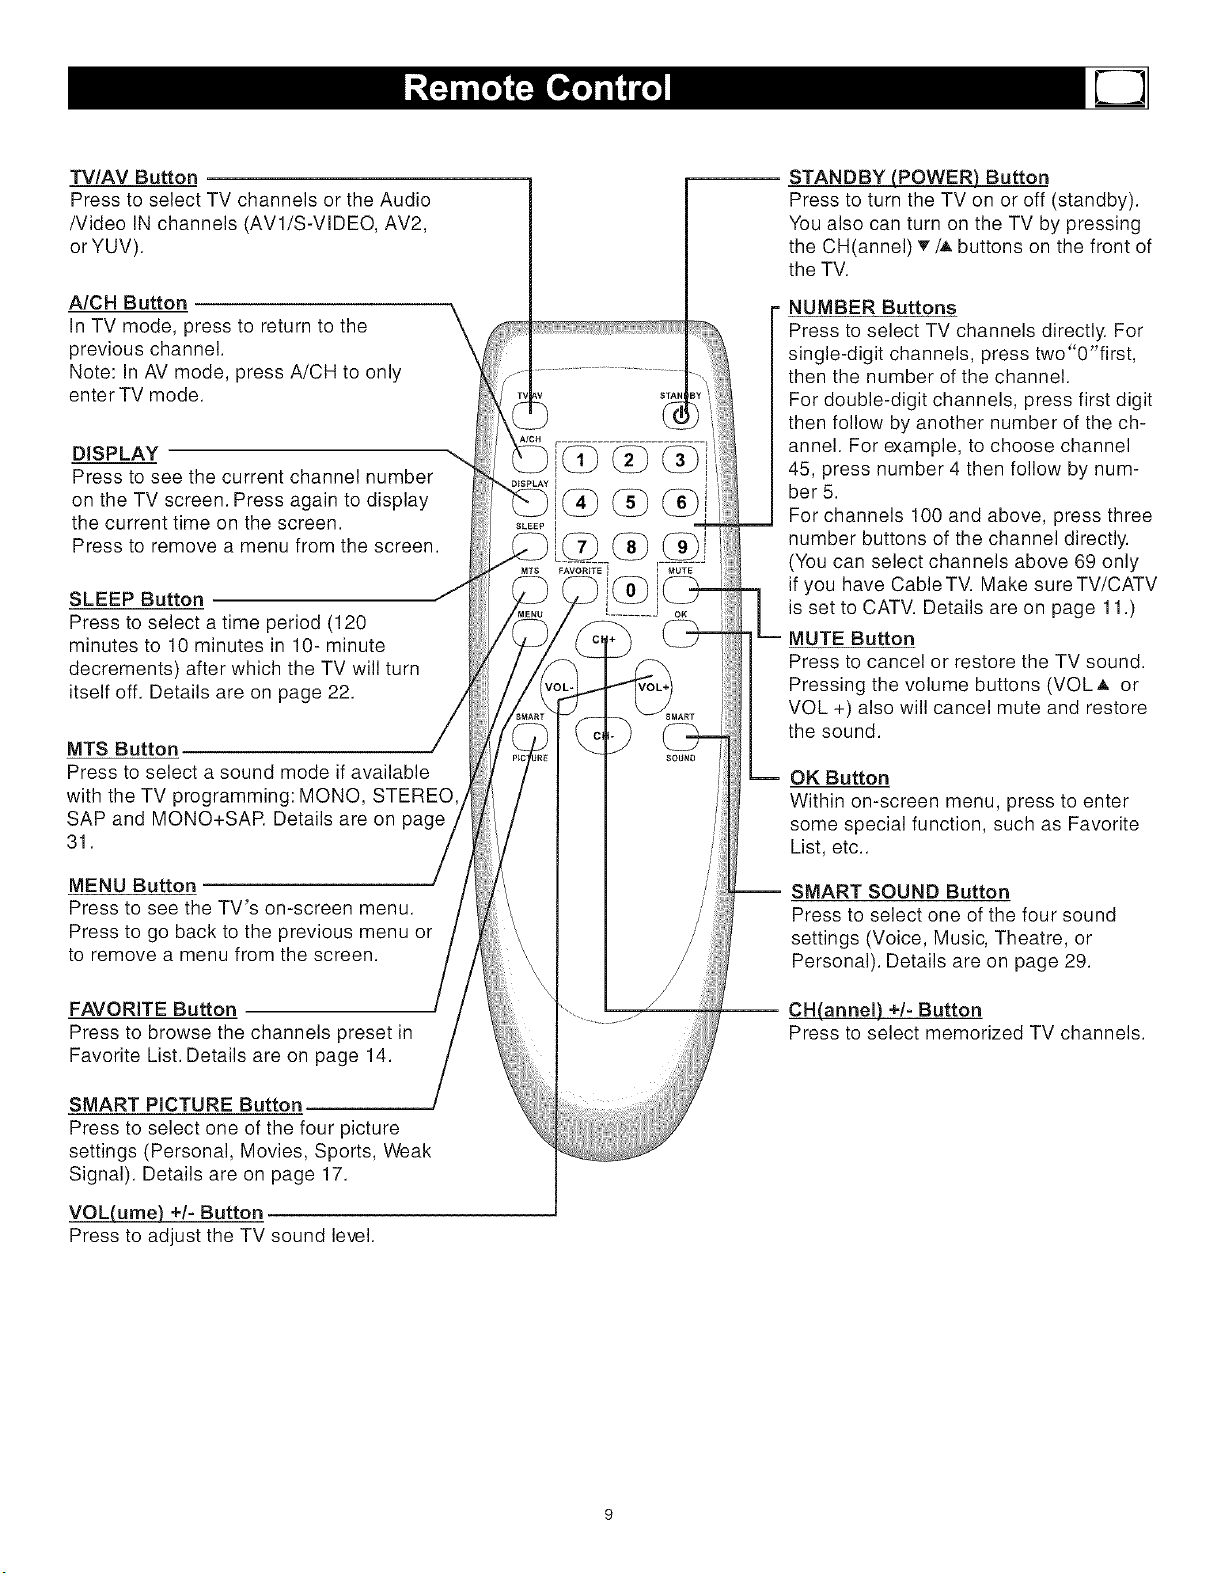
TV/AV Button
Press to select TV channels or the Audio
/Video IN channels (AV1/S-VIDEO, AV2,
orYUV).
A/CH Button
In TV mode, press to return to the
previous channel.
Note: In AV mode, press A/CH to only
enter TV mode.
DISPLAY
Press to see the current channel number
on the TV screen. Press again to display
the current time on the screen.
Press to remove a menu from the screen.
SLEEP Button
Press to select a time period (120
minutes to 10 minutes in 10- minute
decrements) after which the TV will turn
itself off. Details are on je 22.
MTS Button
Press to select a sound mode if available
with the TV programming: MONO, STEREO
SAP and MONO+SAR Details are on page
31.
MENU Button
Press to see the TV's on-screen menu.
Press to go back to the previous menu or
to remove a menu from the screen.
FAVORITE Button
Press to browse the channels preset in
Favorite List. Details are on page 14.
SMART PICTURE Button
Press to select one of the four picture
settings (Personal, Movies, Sports, Weak
Signal). Details are on page 17.
VOL(ume) +/- Button
Press to adjust the TV sound level.
\
STANDBY (POWER) Button
Press to turn the TV on or off (standby).
You also can turn on the TV by pressing
the CH(annel) _/A buttons on the front of
the TV.
NUMBER Buttons
Press to select TV channels directly. For
single-digit channels, press two"0"first,
then the number of the channel.
For double-digit channels, press first digit
then follow by another number of the ch-
annel. For example, to choose channel
45, press number 4 then follow by num-
ber 5.
For channels 100 and above, press three
number buttons of the channel directly.
(You can select channels above 69 only
if you have CableTV. Make sureTV/CATV
is set to CATV. Details are on page 11.)
MUTE Button
Press to cancel or restore the TV sound.
Pressing the volume buttons (VOLA or
VOL +) also will cancel mute and restore
the sound.
OK Button
Within on-screen menu, press to enter
some special function, such as Favorite
List, etc..
-- SMART SOUND Button
Press to select one of the four sound
settings (Voice, Music, Theatre, or
Personal). Details are on page 29.
CH(annel) +/- Button
Press to select memorized TV channels.
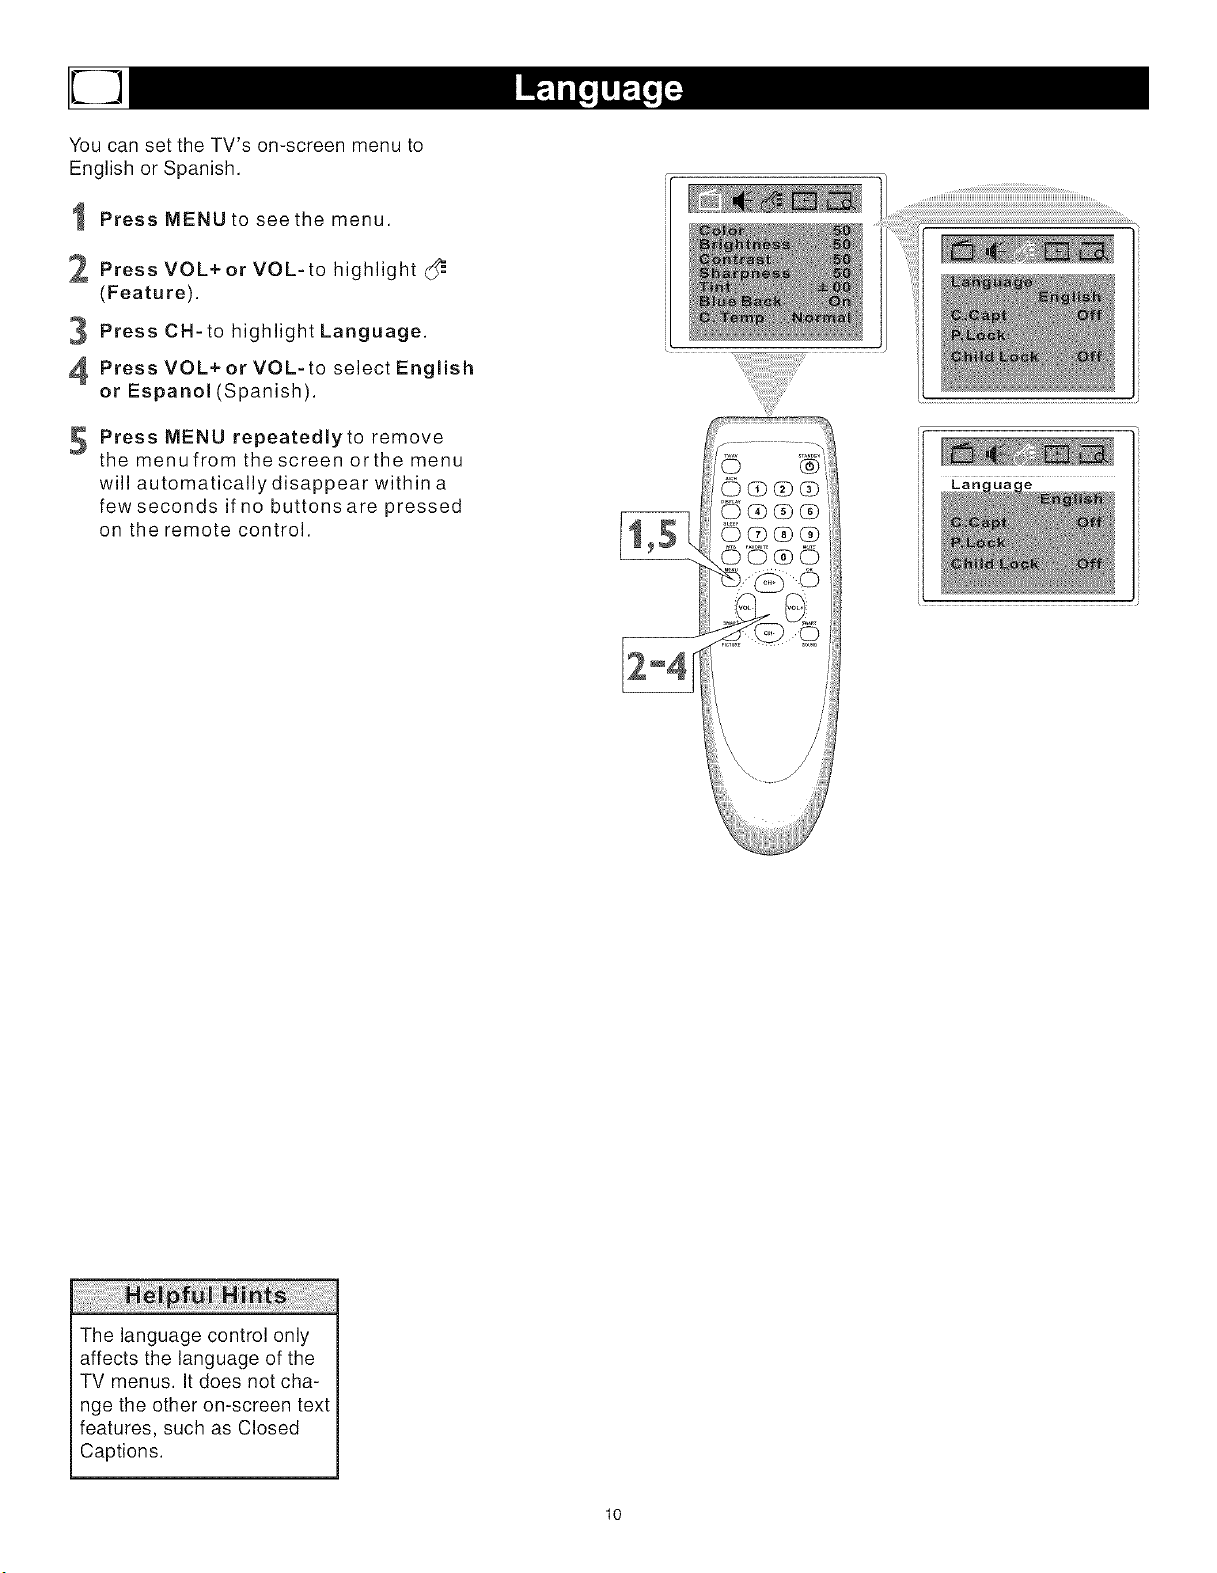
YoucansettheTV'son-screenmenuto
EnglishorSpanish.
PressMENUto seethe menu.
2 PressVOL+or VOL-to highlight
(Feature).
PressCN-tohighlightLanguage.
PressVOL+orVOL-toselectEnglish
or Espanol (Spanish).
Press MENU repeatedly to remove
the menufrom the screen orthe menu
will automatically disappear within a
few seconds if no buttons are pressed
on the remote control.
The language control only
affects the language of the
TV menus. It does not cha-
nge the other on-screen text
features, such as Closed
Captions.
10
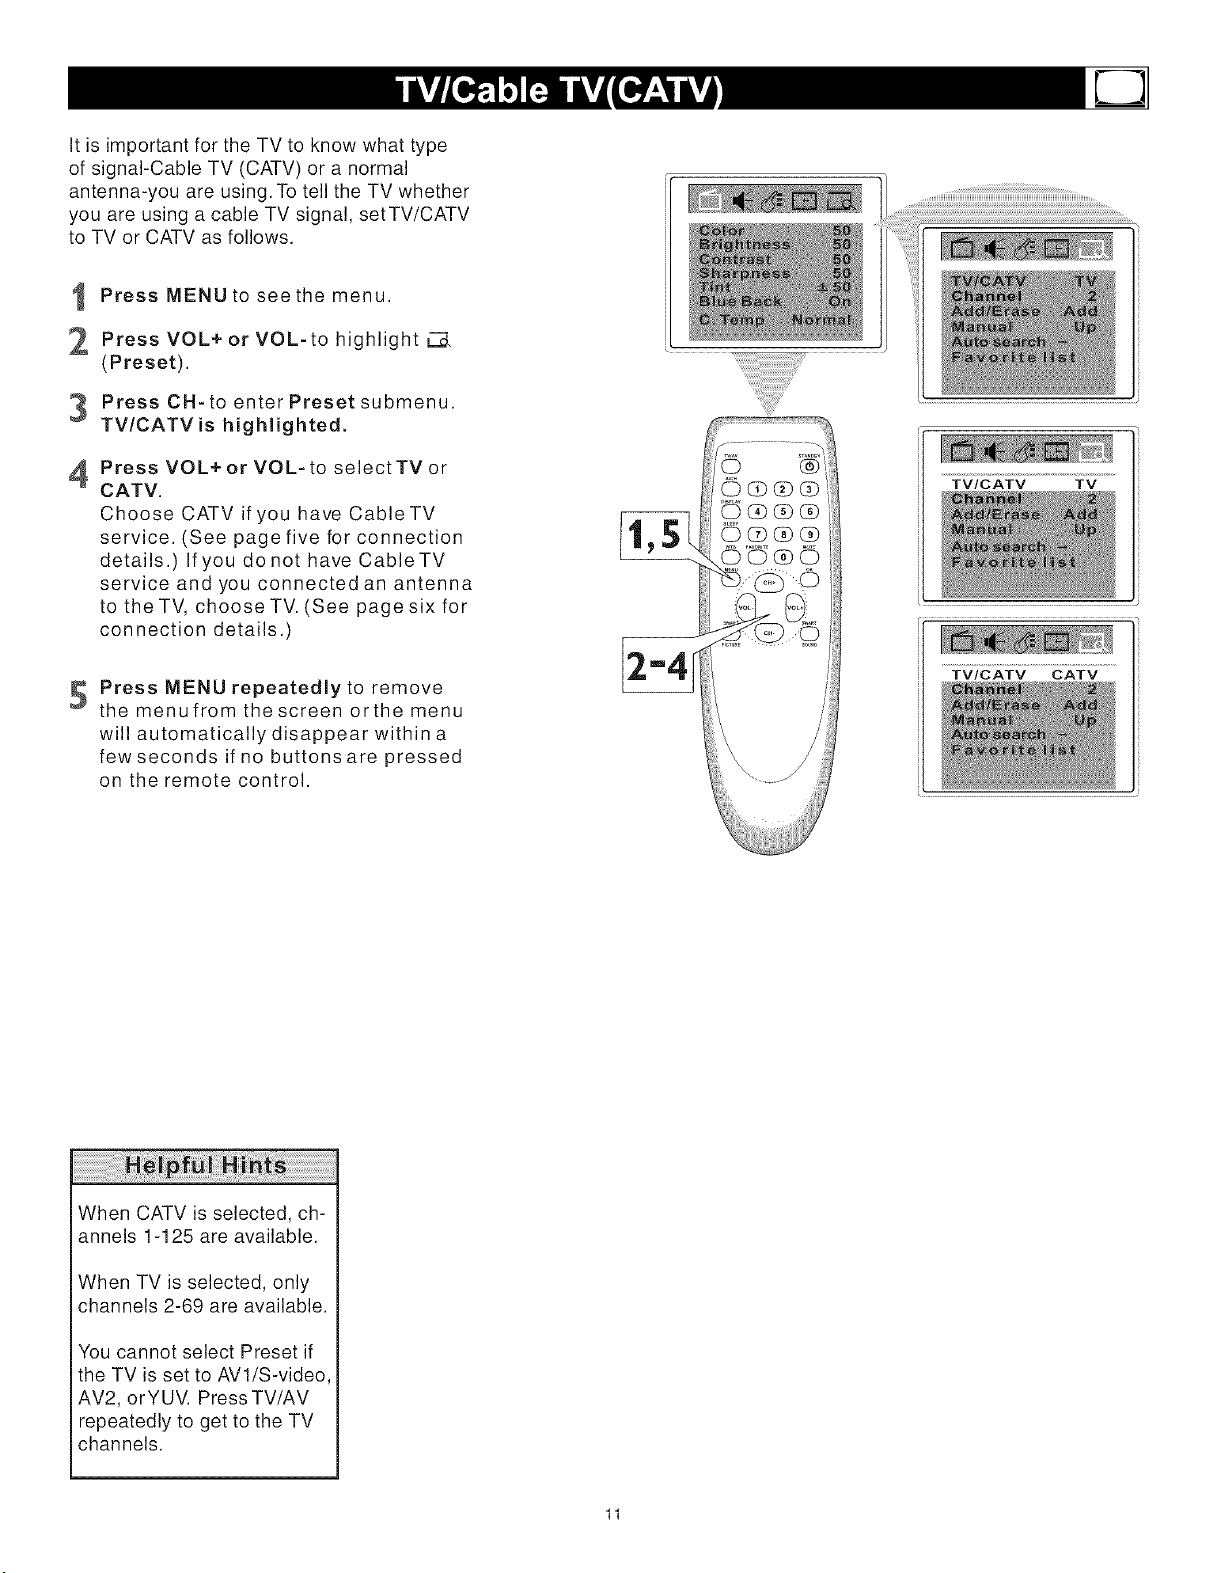
It is important for the TV to know what type
of signal-Cable TV (CATV) or a normal
antenna-you are using. To tell the TV whether
you are using a cable TV signal, setTV/CATV
to TV or CATV as follows.
Press MENU to see the menu.
2 Press VOL+ or VOL-to highlight
(Preset).
3 Press CH-to enterPresetsubmenu.
TV/CATV is highlighted.
Press VOL+or VOL-to selectTVor
CATV.
Choose CATV if you have CableTV
service. (See page five for connection
details.) Ifyou donot have CableTV
service and you connected an antenna
to the TV, choose TV. (See page six for
connection details.)
S Press MENU repeatedly to remove
themenufromthescreenorthemenu
will automatically disappear within a
few seconds if no buttons are pressed
on the remote control.
TV/CATV TV
_44
TV/CATV CATV
¸
When CATV is selected, ch-
annels 1-125 are available.
When TV is selected, only
channels 2-69 are available.
You cannot select Preset if
the TV is set to AVl/S-video,
AV2, orYUV. Press TV/AV
repeatedly to get to the TV
channels.
11
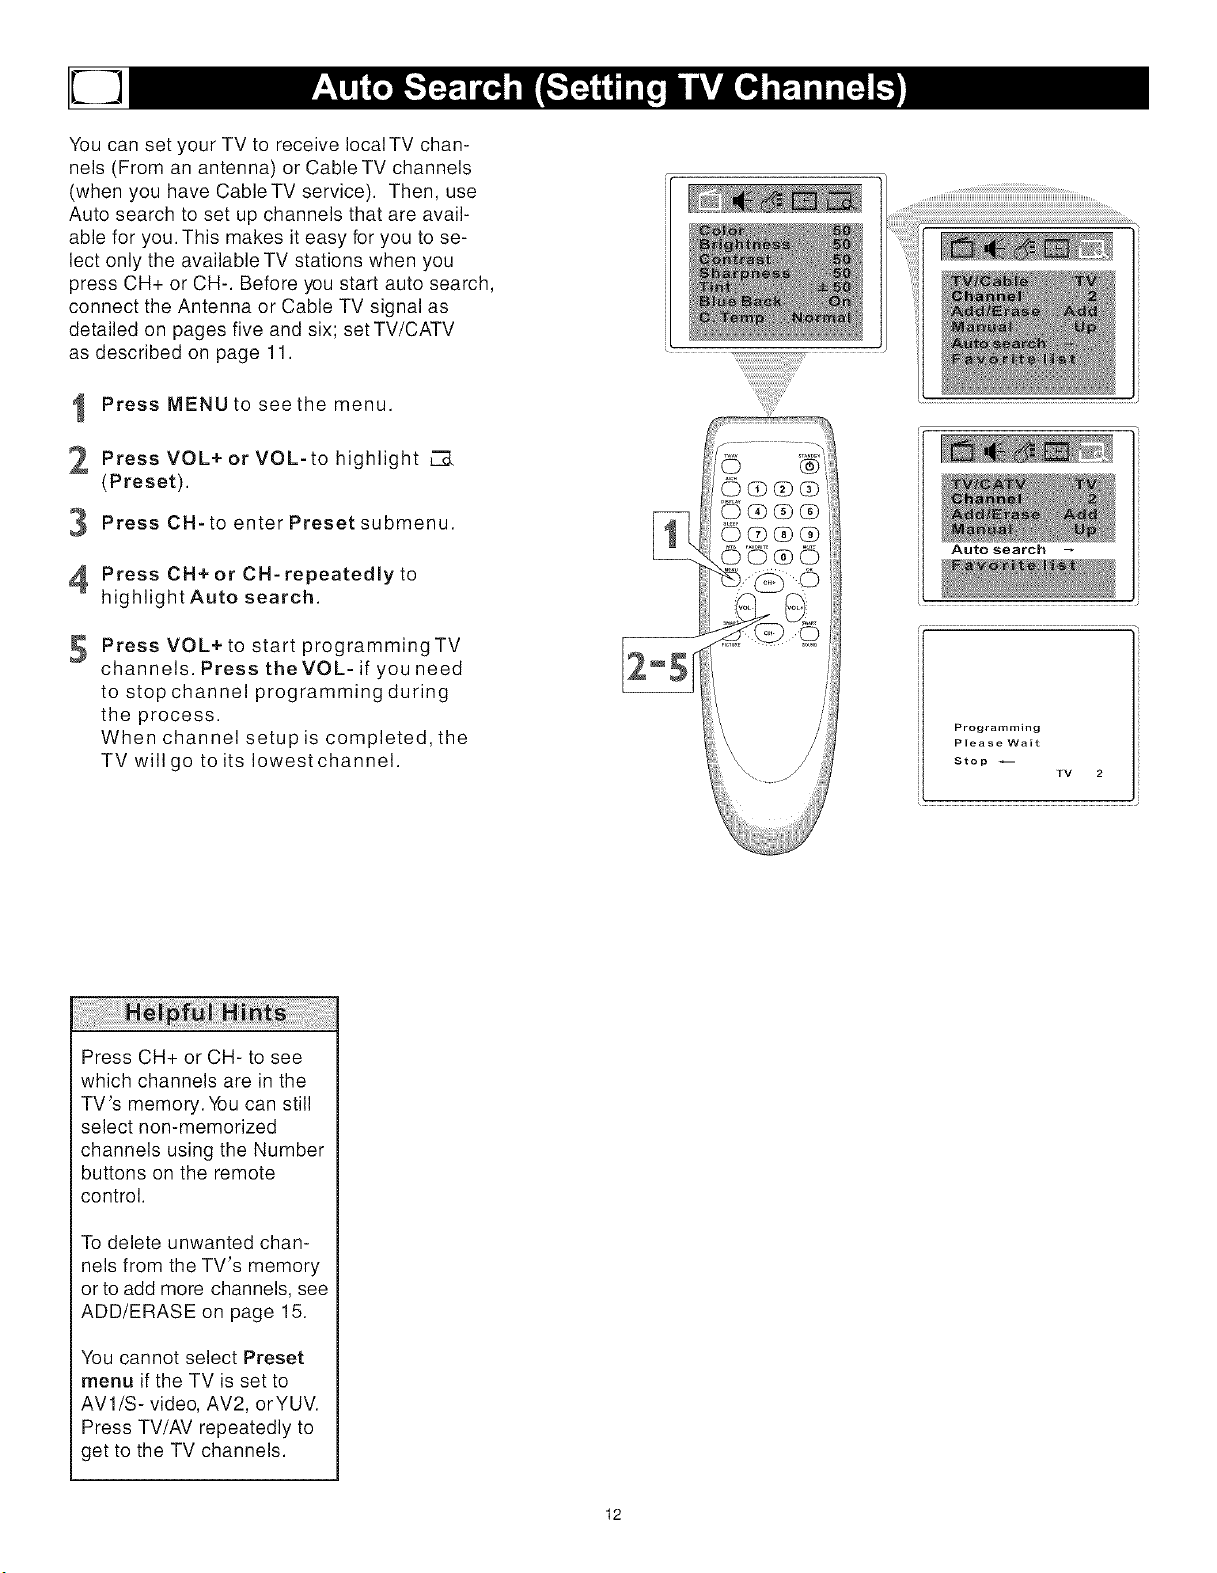
You can set your TV to receive local TV chan-
nels (From an antenna) or Cable TV channels
(when you have Cable TV service). Then, use
Auto search to set up channels that are avail-
able for you. This makes it easy for you to se-
lect only the available TV stations when you
press CH+ or CH-. Before you start auto search,
connect the Antenna or Cable TV signal as
detailed on pages five and six; set TV/CATV
as described on page 11.
I Press MENU to see the menu.
Press VOL+ or VOL-to highlight
(Preset).
PressCH-toenterPresetsubmenu.
Press CH+ or CH-repeatedly to
highlight Auto search.
5
Press VOL+ to start programmingTV
channels. Press theVOL- if you need
to stop channel programming during
the process.
When channel setup is completed, the
TV will go to its Iowestchannel.
Auto search --
Programming
Please Wait
Stop
TV 2
Press CH+ or CH- to see
which channels are in the
TV's memory. You can still
select non-memorized
channels using the Number
buttons on the remote
control.
To delete unwanted chan-
nels from the TV's memory
or to add more channels, see
ADD/ERASE on page 15.
You cannot select Preset
menu if the TV is set to
AV1/S-video, AV2, orYUV.
Press TV/AV repeatedly to
get to the TV channels.
12

Manual Channel Tuning lets you quickly select
the next available channel. For example, if you
are looking for a channel between 60 and 70,
start the search at channel 60 and go up.
Press MENU to see the menu.
2 Press VOL+ or VOL-to highlight
(Preset).
PressCH-toenterPresetsubmenu.
Press CH+or CH- repeatedly to
highlight TV/CATV.
PressVOL+orVOL-toselectTVor
CATV(whichever you have). Details
are on page 11.
6
7
8
9
Press CH+ or CH-repeatedly to
highlight Channel.
Press VOL+or VOL-to enter the
channel numberat which you want
to begin the search.
Press CN+or CH-repeatedly to
highlight Manual.
Press VOL+to start searching upward
(for example, starting atchanne160 and
going upto 61,62, 63, etc.). Press
VOL- when you find the channel you
want. This stops the search. Otherwise
the search will stop at the first available
channel.
Or, press VOL- to start searching dow-
nward (forexample, starting at channel
60 and going down to 59, 58, 57, etc.).
Press VOL+when you find the chan-
nel you want.This stops the search.
Otherwise the search will stop atthe
first available channel.
0Press repeatedly remove
MENU to
the menufrom the screen orthe menu
will automatically disappear within a
few seconds if no buttons are pressed
on the remote control.
You cannot select Preset if
the TV is set to AVl/S-video,
AV2, orYUV. Press TV/AV
repeatedly to get to the TV
channels.
13
TV/CATV CATV
Channel 60
Manual Up
or
Manual Down
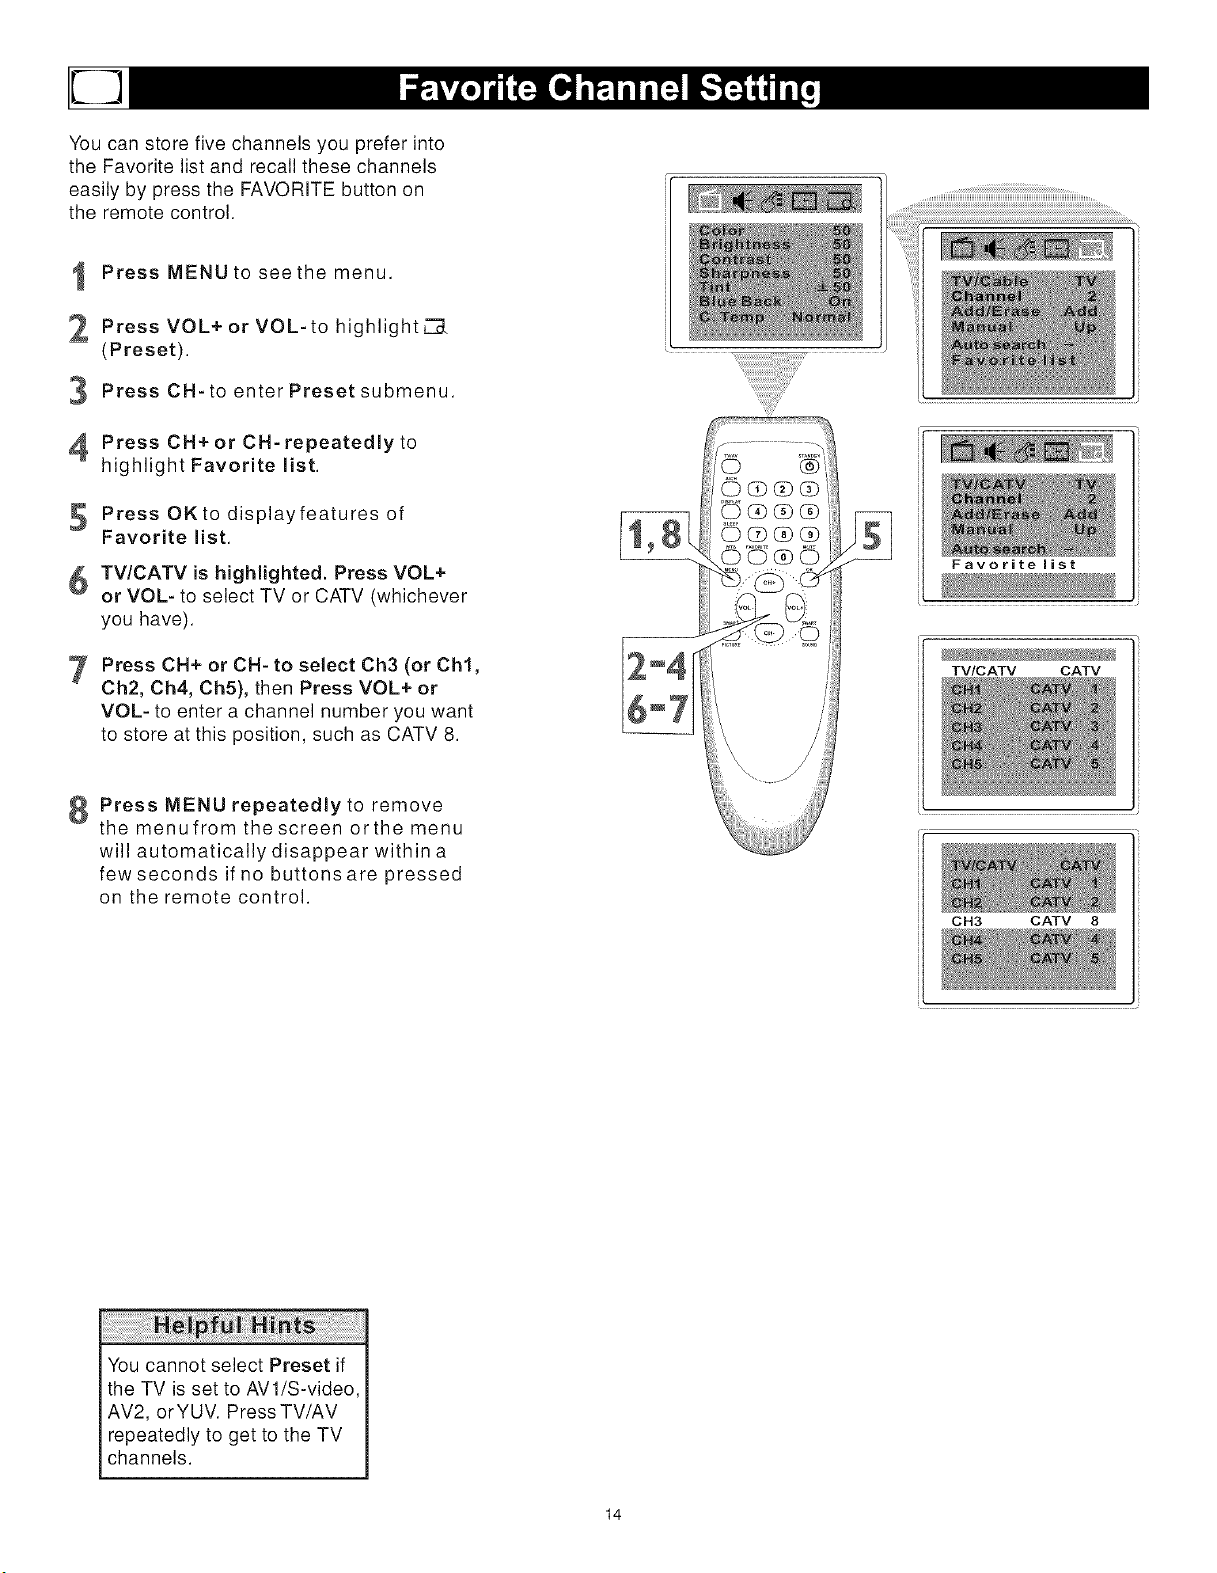
You can store five channels you prefer into
the Favorite list and recall these channels
easily by press the FAVORITE button on
the remote control.
1
2
3
4
5
6
7
Press MENU to see the menu.
Press VOL+ or VOL-to highlight _
(Preset).
Press CH-to enter Preset submenu.
Press CN+ or CN-repeatedly to
highlight Favorite list.
Press OKto displayfeatures of
Favorite list.
TV/CATV is highlighted. Press VOL+
or VOL- to select TV or CATV (whichever
you have).
Press CH+ or CH- to select Ch3 (or Chl,
Ch2, Ch4, Ch5), then Press VOL+ or
VOL- to enter a channel number you want
to store at this position, such as CATV 8.
8 Press MENU repeatedly to remove
themenufromthescreenorthemenu
will automatically disappear within a
few seconds if no buttons are pressed
on the remote control.
Favorite list
TV/CATV CATV
CH3 CATV 8
You cannot select Preset if
the TV is set to AVl/S-video,
AV2, orYUV. Press TV/AV
repeatedly to get to the TV
channels.
14
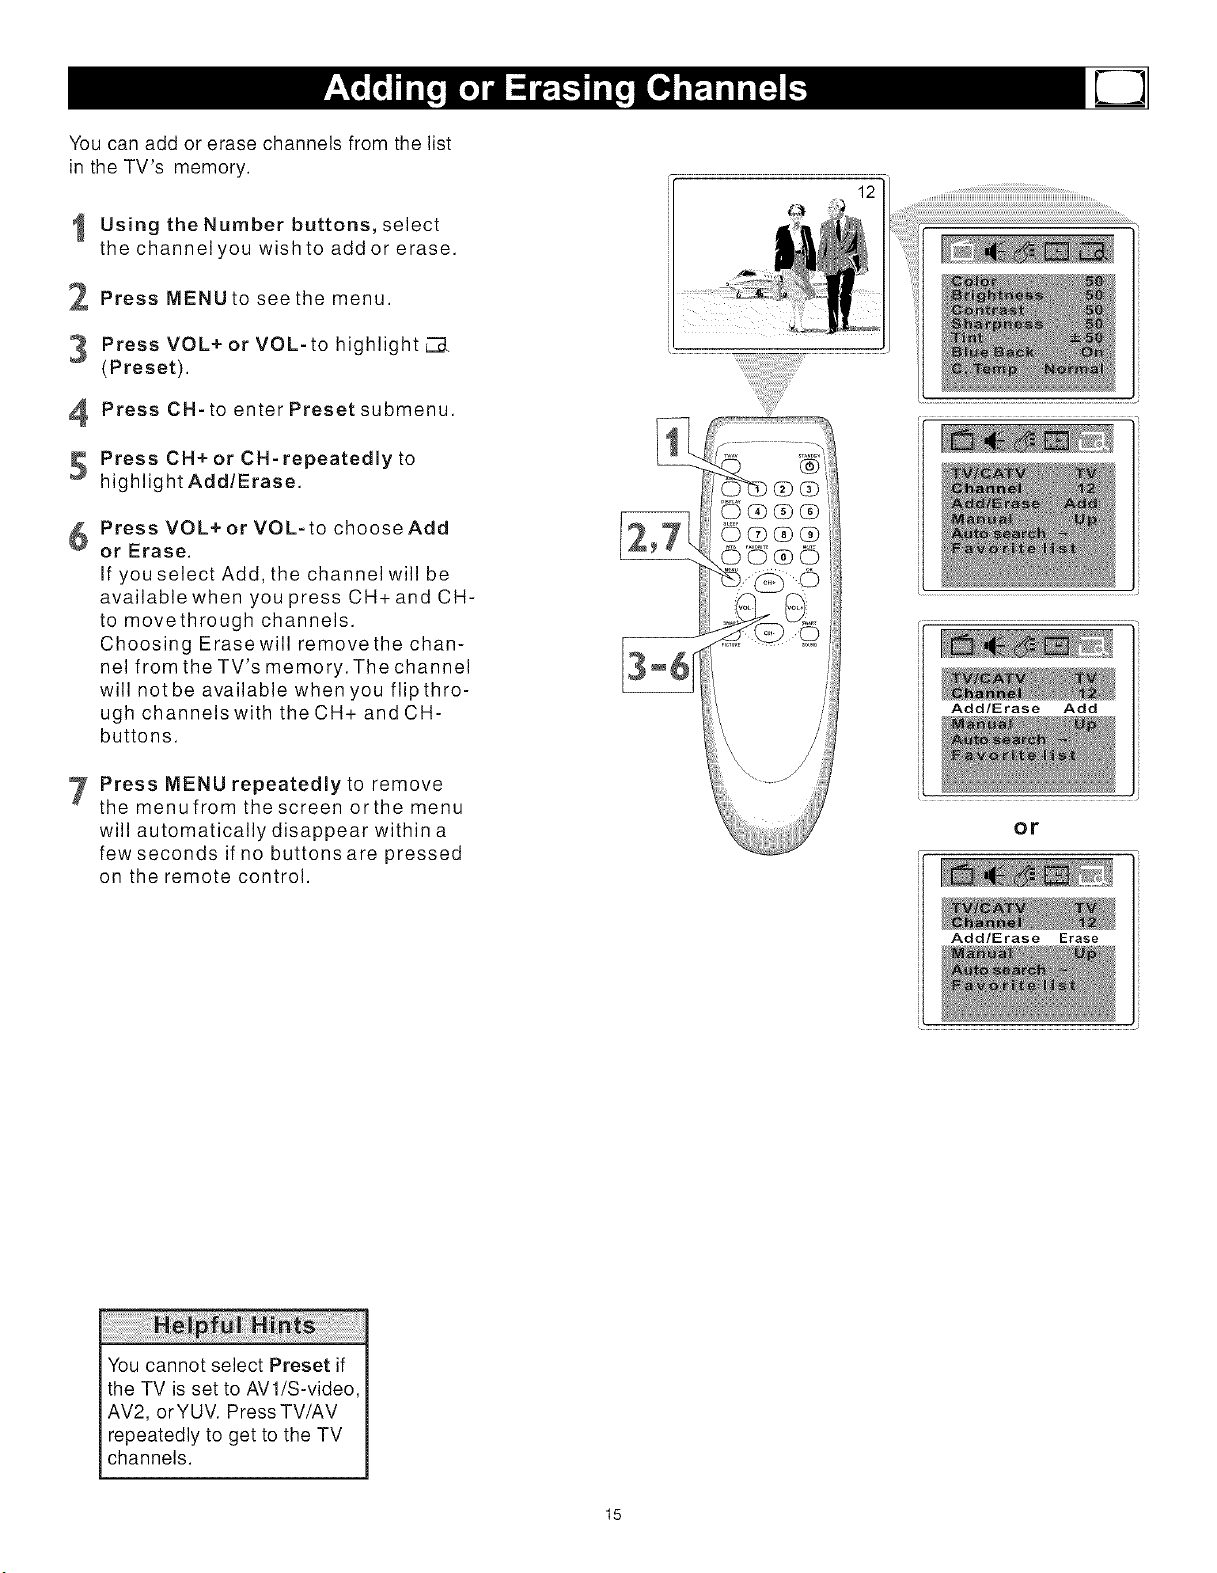
You can add or erase channels from the list
in the TV's memory.
Using the Number buttons, select
the channel you wish to add or erase.
Press MENU to see the menu.
3 Press VOL+ or VOL-to highlight L._
(Preset).
Press CH-to enterPresetsubmenu.
Press CH+ or CH-repeatedly to
highlight Add/Erase.
6 Press VOL+or VOL-to chooseAdd
or Erase.
If you select Add, the channel will be
available when you press CH+ and CH-
to movethrough channels.
Choosing Erasewill removethe chan-
nel from the TV's memory. The channel
will notbe available when you flipthro-
ugh channels with the CH+ and CH-
buttons.
Press MENU repeatedly to remove
the menufrom the screen orthe menu
will automatically disappear within a
few seconds if no buttons are pressed
on the remote control.
12
Add/Erase Add
or
Add/Erase Erase
You cannot select Preset if
the TV is set to AVl/S-video,
AV2, orYUV. Press TV/AV
repeatedly to get to the TV
channels.
15
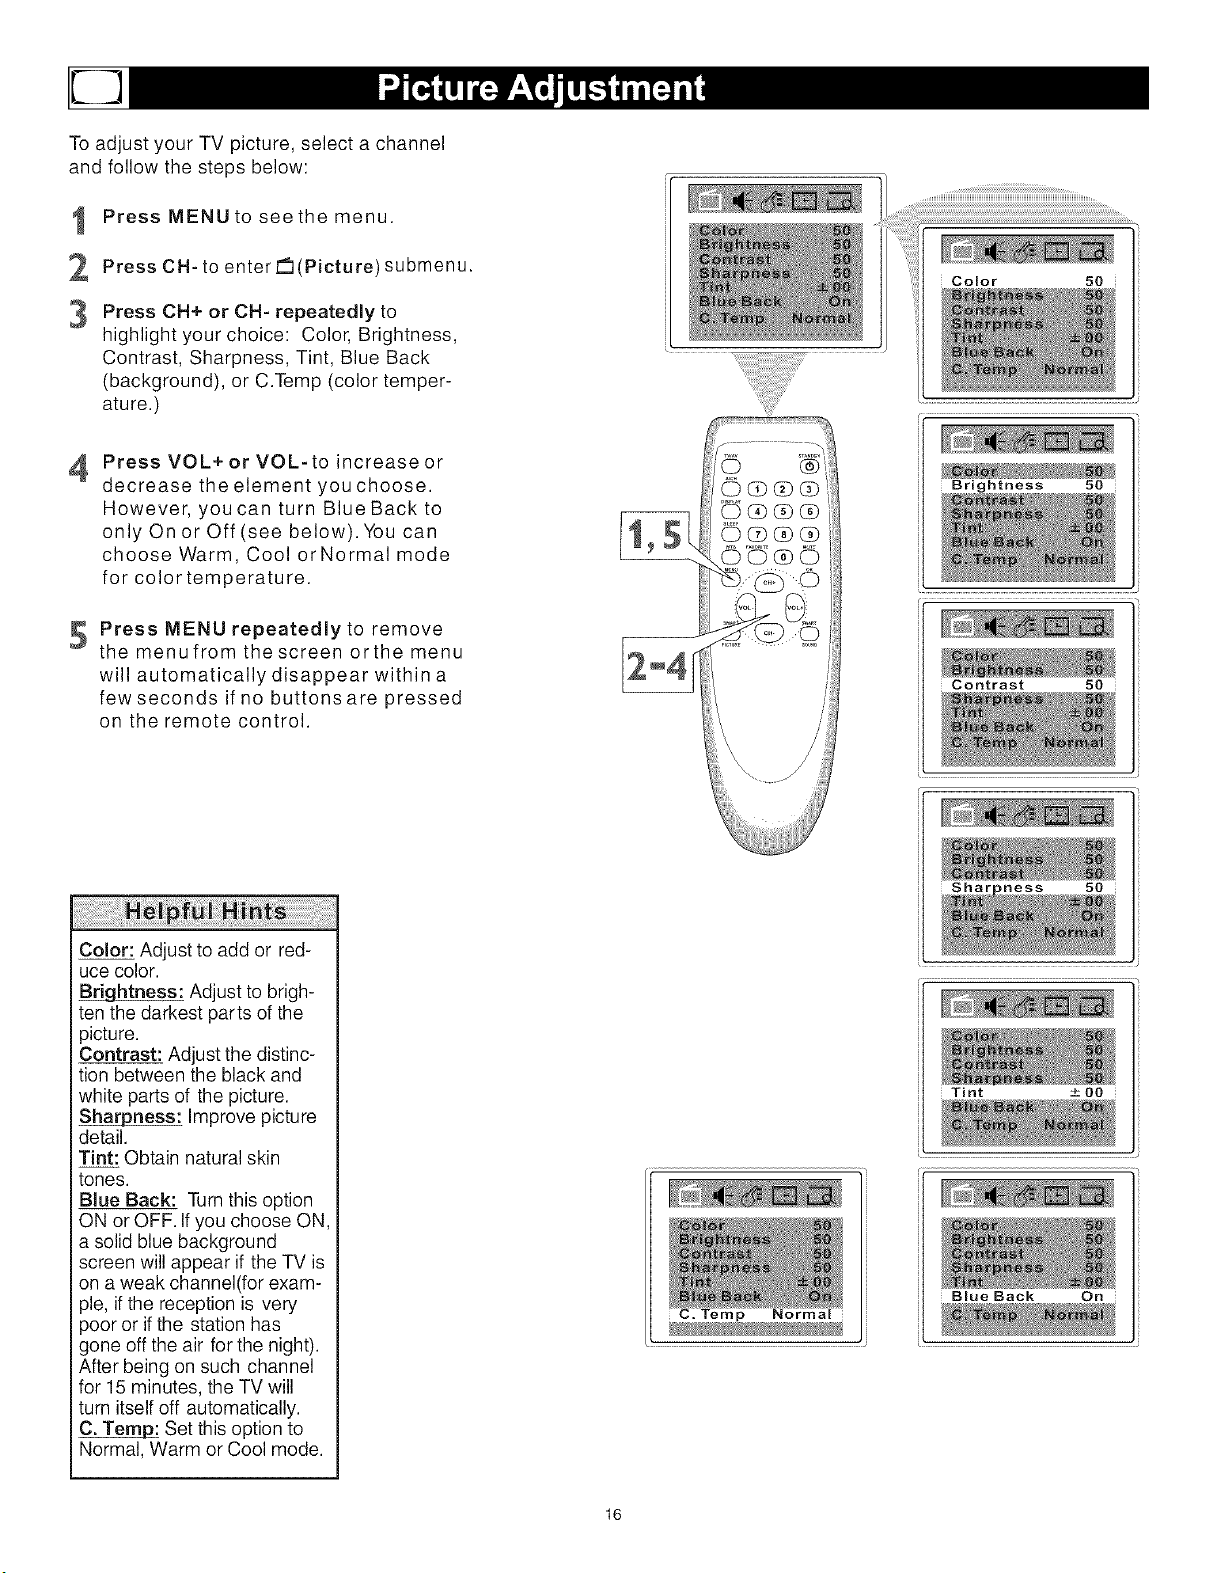
To adjust your TV picture, select a channel
and follow the steps below:
1
2
3
Press MENU to see the menu.
Press CH-to enter _(Picture) submenu.
Press CH+ or CH- repeatedly to
highlight your choice: Color, Brightness,
Contrast, Sharpness, Tint, Blue Back
(background), or C.Temp (color temper-
ature.)
4
Press VOL+ or VOL-to increase or
decrease the element you choose.
However, you can turn Blue Back to
only On or Off(see below).You can
choose Warm, Cool orNormal mode
for color temperature.
Press MENU repeatedly to remove
the menufromthescreen orthe menu
will automatically disappear within a
few seconds if no buttons are pressed
on the remote control.
Color: Adjust to add or red-
uce color.
_htness: Adjust to brigh-
ten the darkest parts of the
)icture.
Contrast: Adjust the distinc-
tion between the black and
white parts of the picture.
Sharpness: Improve picture
detail.
Tint: Obtain natural skin
tones.
Blue Back: Turn this option
ON or OFF. If you choose ON,
a solid blue background
screen will appear if the TV is
on a weak channel(for exam-
)le, if the reception is very
)oor or if the station has
gone off the air for the night).
After being on such channel
for 15 minutes, the TV will
turn itself off automatically.
Set this option to
Normal, Warm or Cool mode.
C. Temp Normal
16
Color 50
Brightness 50
.........................................................................................................................J
Contrast 50
:_ness 50
Tint + O0
Blue Back On
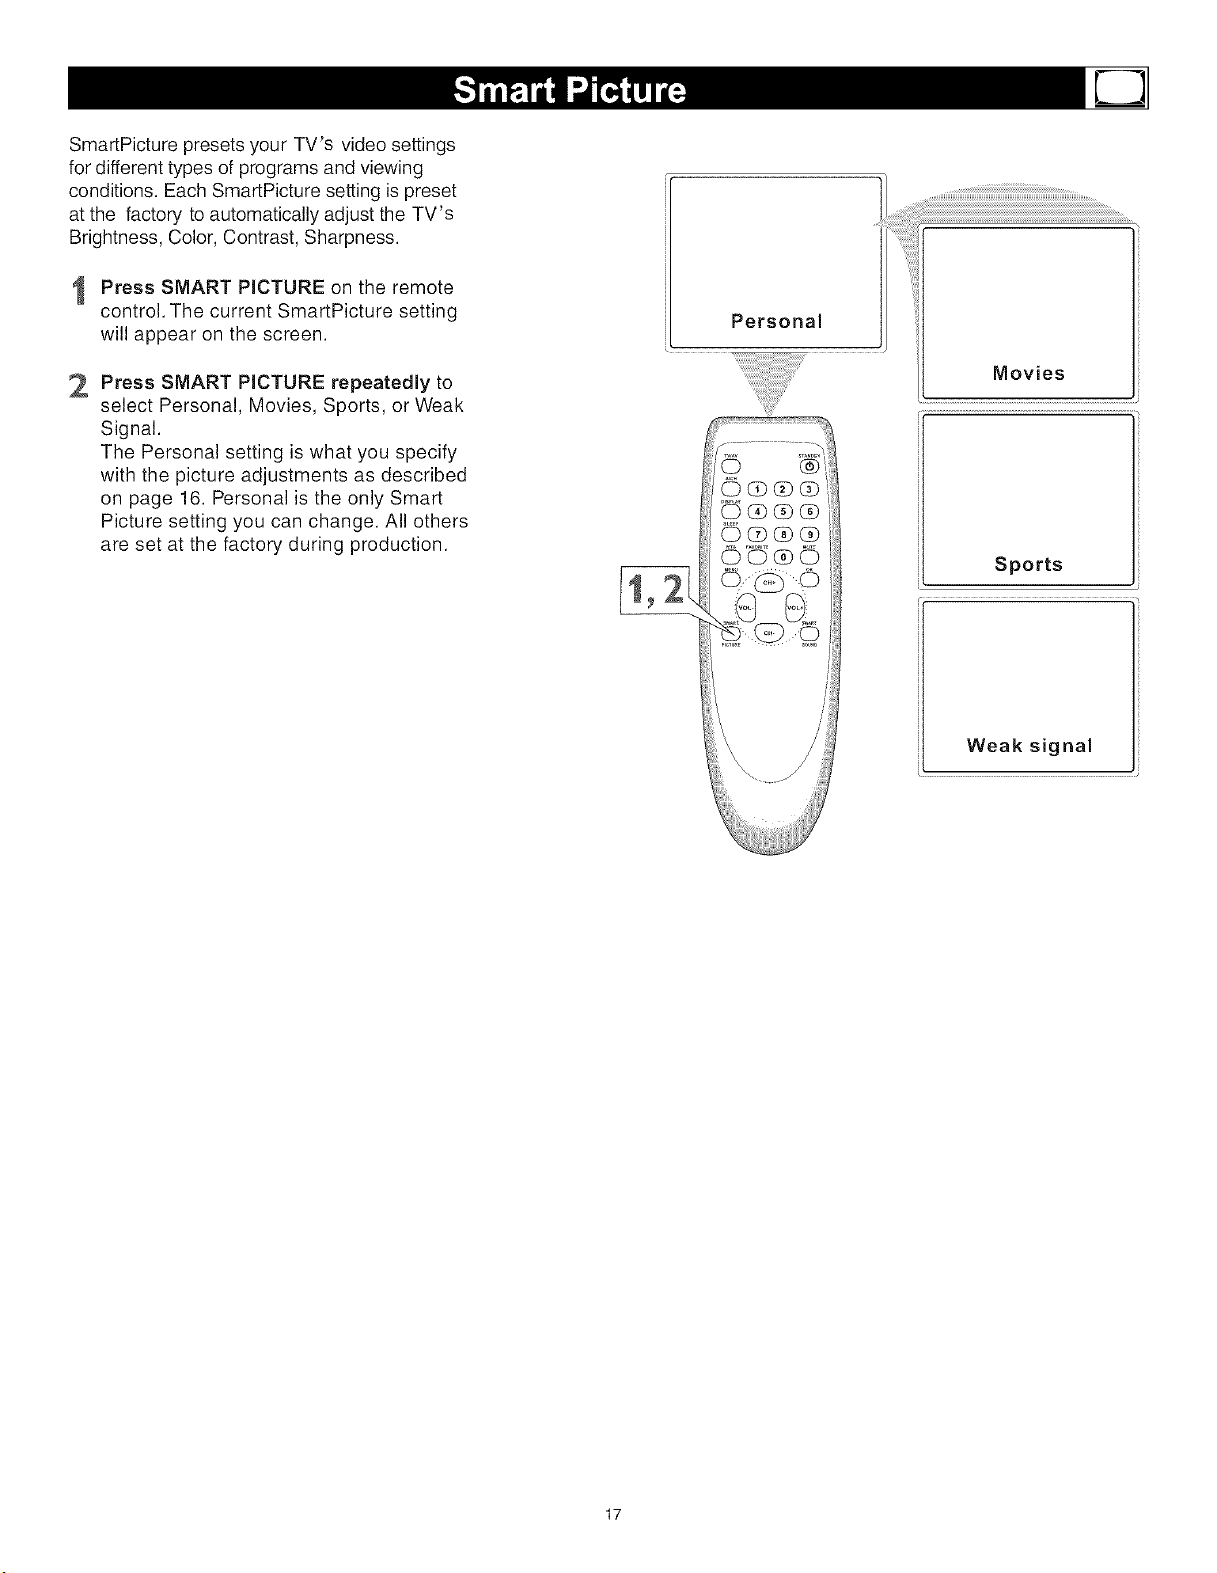
SmartPicture presets your TV's video settings
for different types of programs and viewing
conditions. Each SmartPicture setting is preset
at the factory to automatically adjust the TV's
Brightness, Color, Contrast, Sharpness.
I Press SMART PICTURE on the remote
control. The current SmartPicture setting
will appear on the screen.
2
Press SMART PICTURE repeatedly to
select Personal, Movies, Sports, or Weak
Signal.
The Personal setting is what you specify
with the picture adjustments as described
on page 16. Personal is the only Smart
Picture setting you can change. All others
are set at the factory during production.
Personal
G _(Z)G
O®db(b
....,,uuuuuuuuuuuuuuuuuuuuuuuuuuuuuuuuuuuuuuuu_,,....
Movies
Sports
Weak signal
17

Follow these steps to set your TV's clock.
Press MENU to see the menu.
2 Press VOL+ or VOL- to highlight []
(Timer).
PressCH-toenterTimersubmenu.
Press CH+ or CH-repeatedly to
highlight Clock.
Press VOL+ or VOL-to enter the cur-
rent time. Press and hold the VOL+or
VOL-tochangethetimequickyin 10
minute increments.
Press MENU repeatedly to remove
the menufrom the screen orthe menu
will automatically disappear within a
few seconds if no buttons are pressed
on the remote control.
Clock 9:30
¸
If the power fails, you must
reset the clock.
18
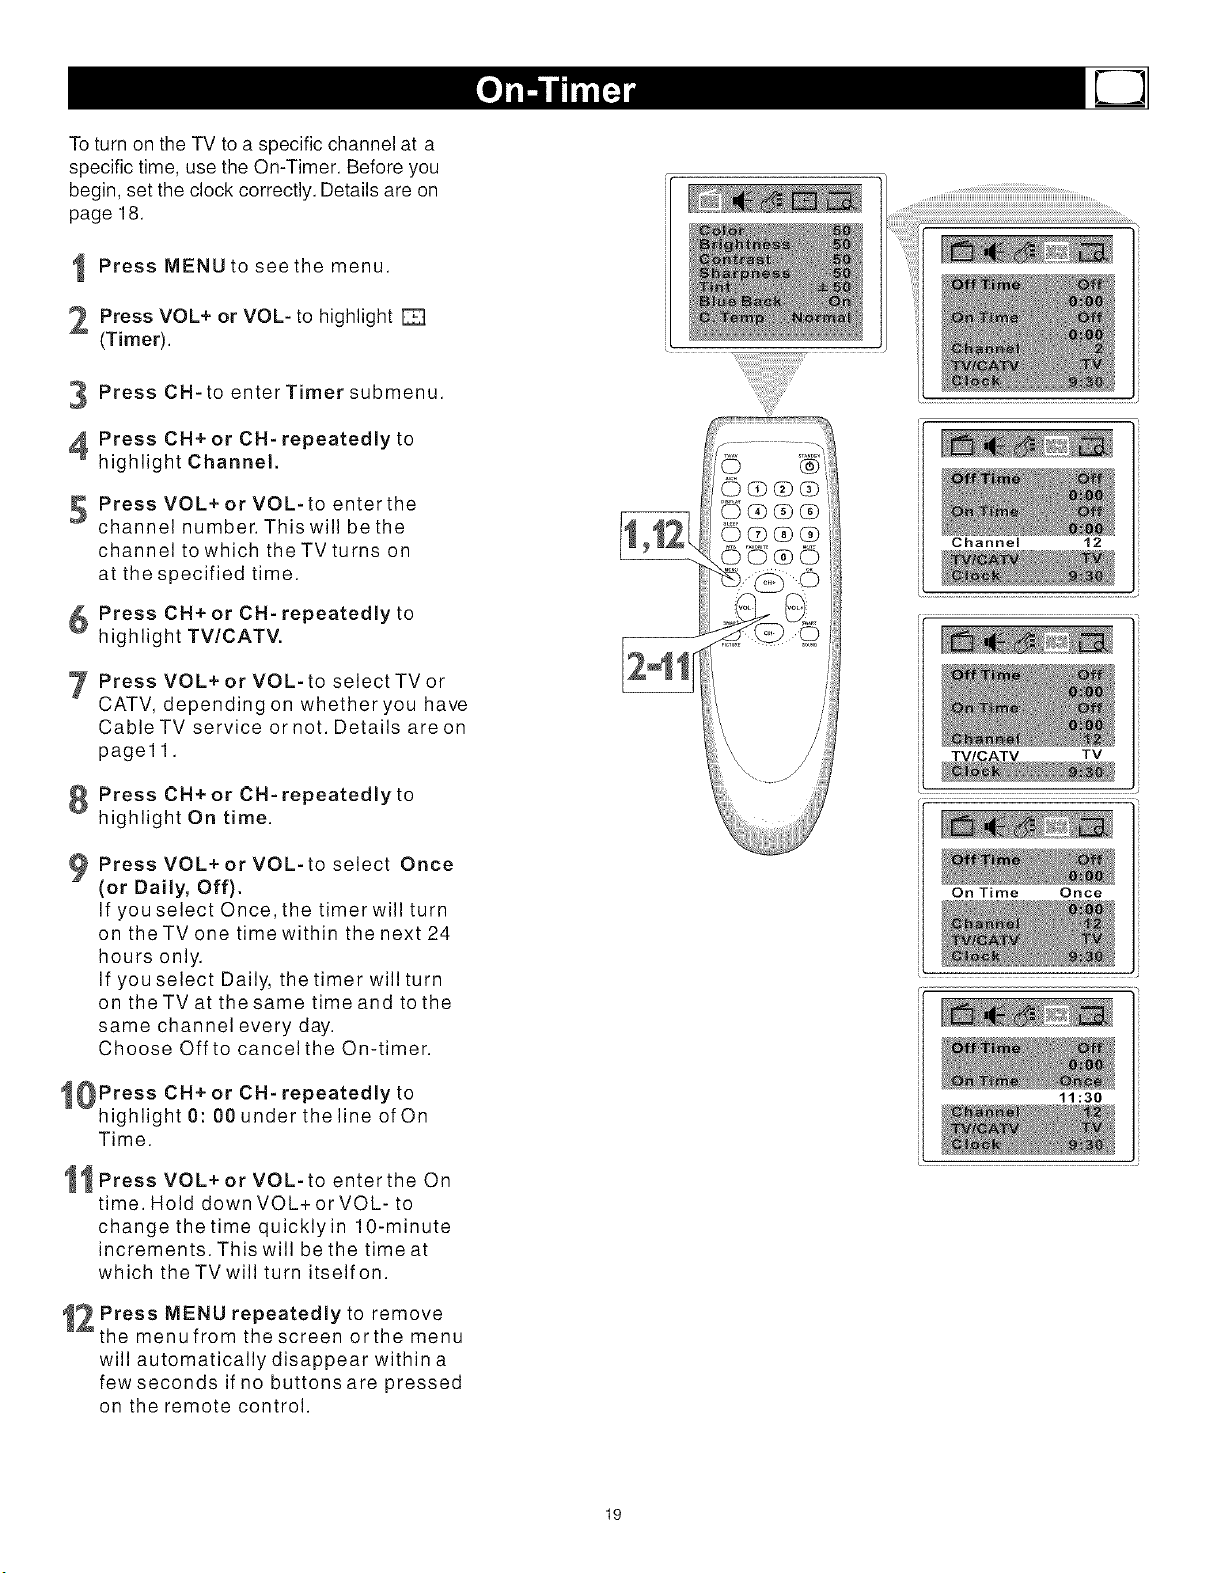
To turn on the TV to a specific channel at a
specific time, use the On-Timer. Before you
begin, set the clock correctly. Details are on
page 18.
I Press MENU to see the menu.
2 Press VOL+ or VOL- to highlight
(Timer).
PressCH-toenterTimersubmenu.
Press CH+ or CH- repeatedly to
highlight Channel.
_ PressVOL+orVOL-toenterthe
channel number. This will be the
channel to which theTVturns on
at the specified time.
Press CH+ or CH- repeatedly to
highlight TV/CATV.
Press VOL+ or VOL- to select TV or
CATV, depending on whether you have
Cable TV service or not. Details areon
page11.
Press CH+ or CH- repeatedly to
highlight On time.
PressVOL+orVOL-toselect Once
(or Daily, Off).
If you select Once, the timer will turn
on the TV one time within the next 24
hours only.
If you select Daily, the timer will turn
on the TV at the same time and to the
same channel every day.
Choose Off to cancel the On-timer.
0Press CH+ or CH- repeatedly to
highlight 0:00 under the line of On
Time.
1 Press VOL+ or VOL-to enterthe On
time. Hold down VOL+or VOL- to
change thetime quicklyin 10-minute
increments. This will be the time at
which theTVwill turn itselfon.
t2 Press MENU repeatedly to remove
the menufrom the screen orthe menu
will automatically disappear within a
few seconds if no buttons are pressed
on the remote control.
19
Channel 12
TV/CATV TV
On Time Once
11:30
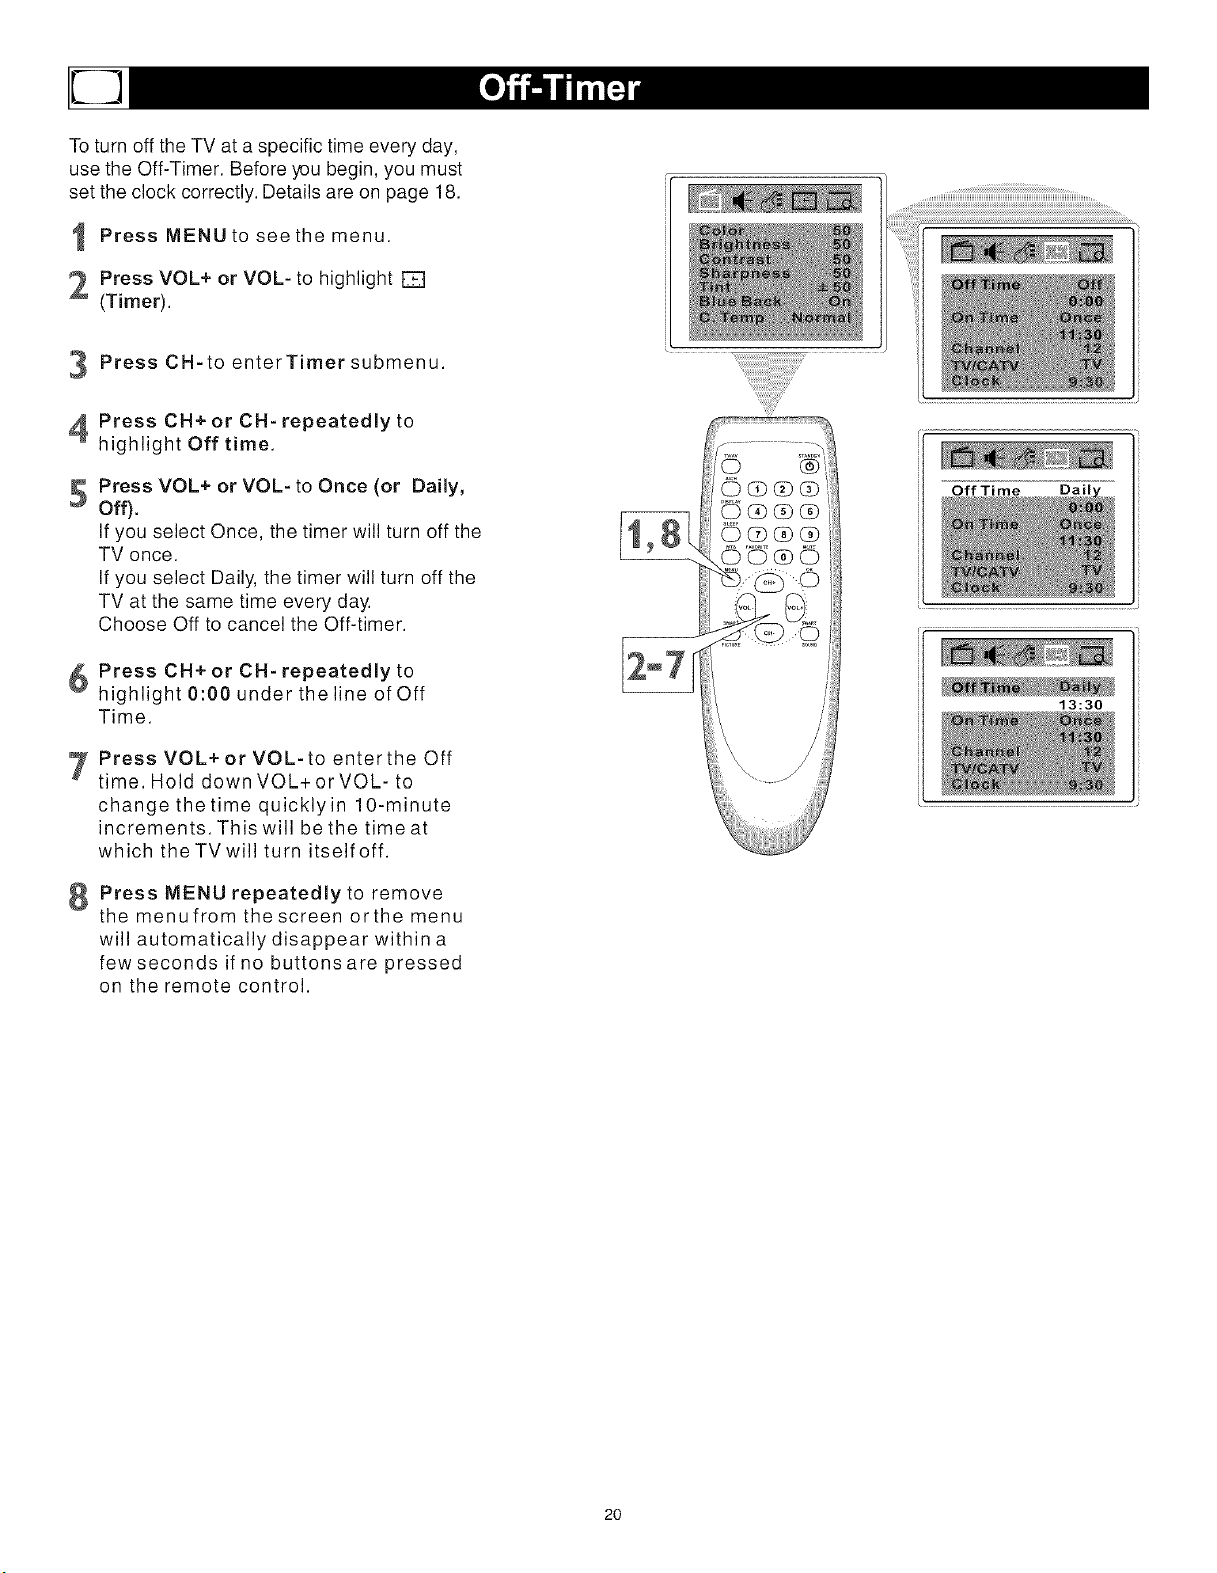
To turn off the TV at a specific time every day,
use the Off-Timer. Before you begin, you must
set the clock correctly. Details are on page 18.
I Press MENU to see the menu.
2 Press VOL+ or VOL- to highlight []
(Timer).
PressCH-toenterTimersubmenu.
Press CH+ or CH- repeatedly to
highlight Off time.
Press VOL+ or VOL- to Once (or Daily,
Off).
If you select Once, the timer will turn off the
TV once.
If you select Daily, the timer will turn off the
TV at the same time every day.
Choose Off to cancel the Off-timer.
Press CH+ or CH- repeatedly to
highlight 0:00 under the line of Off
Time.
7 PressVOL+orVOL-toentertheOff
time. Hold down VOL+ or VOL- to
change thetime quicklyin 10-minute
increments. This will be the time at
which theTVwill turn itselfoff.
Press MENU repeatedly to remove
themenufromthescreenorthemenu
will automatically disappear within a
few seconds if no buttons are pressed
on the remote control.
Off Time Dail
13:30
20

Closed captioning (CC) lets you read the voice
content of TV programs on the TV screen. Des-
igned to help the hearing impaired, on-screen
text boxes will show dialog, conversation, and
activity during TV programming.
Press MENU to see the menu.
2 Press VOL+or VOL-to highlight _==
(Feature).
Press CN-to enter Feature submenus.
PressCH+orCN-tohighlightC.Capt.
Press VOL+ or VOL-to select the
closed caption you want(Off, Cl,C2,
or C.Mute). C.Mute setsthe TV to
show closed caption when you press
MUTE. The TV volume will be disabled
until you press MUTEorVOL+ again
to restore the sound.
Press MENU repeatedly to remove
v
the menufrom the screen orthe menu
will automatically disappear within a
few seconds if no buttons are pressed
on the remote control.
Cl
Not all TV programs and
commercials are broadcast
with Closed Caption inform-
ation. Neither are all Closed
Caption modes transmitted
by a station for a closed ca-
ption program.
See your TV listings for the
stations and times of Closed
Caption shows.
21
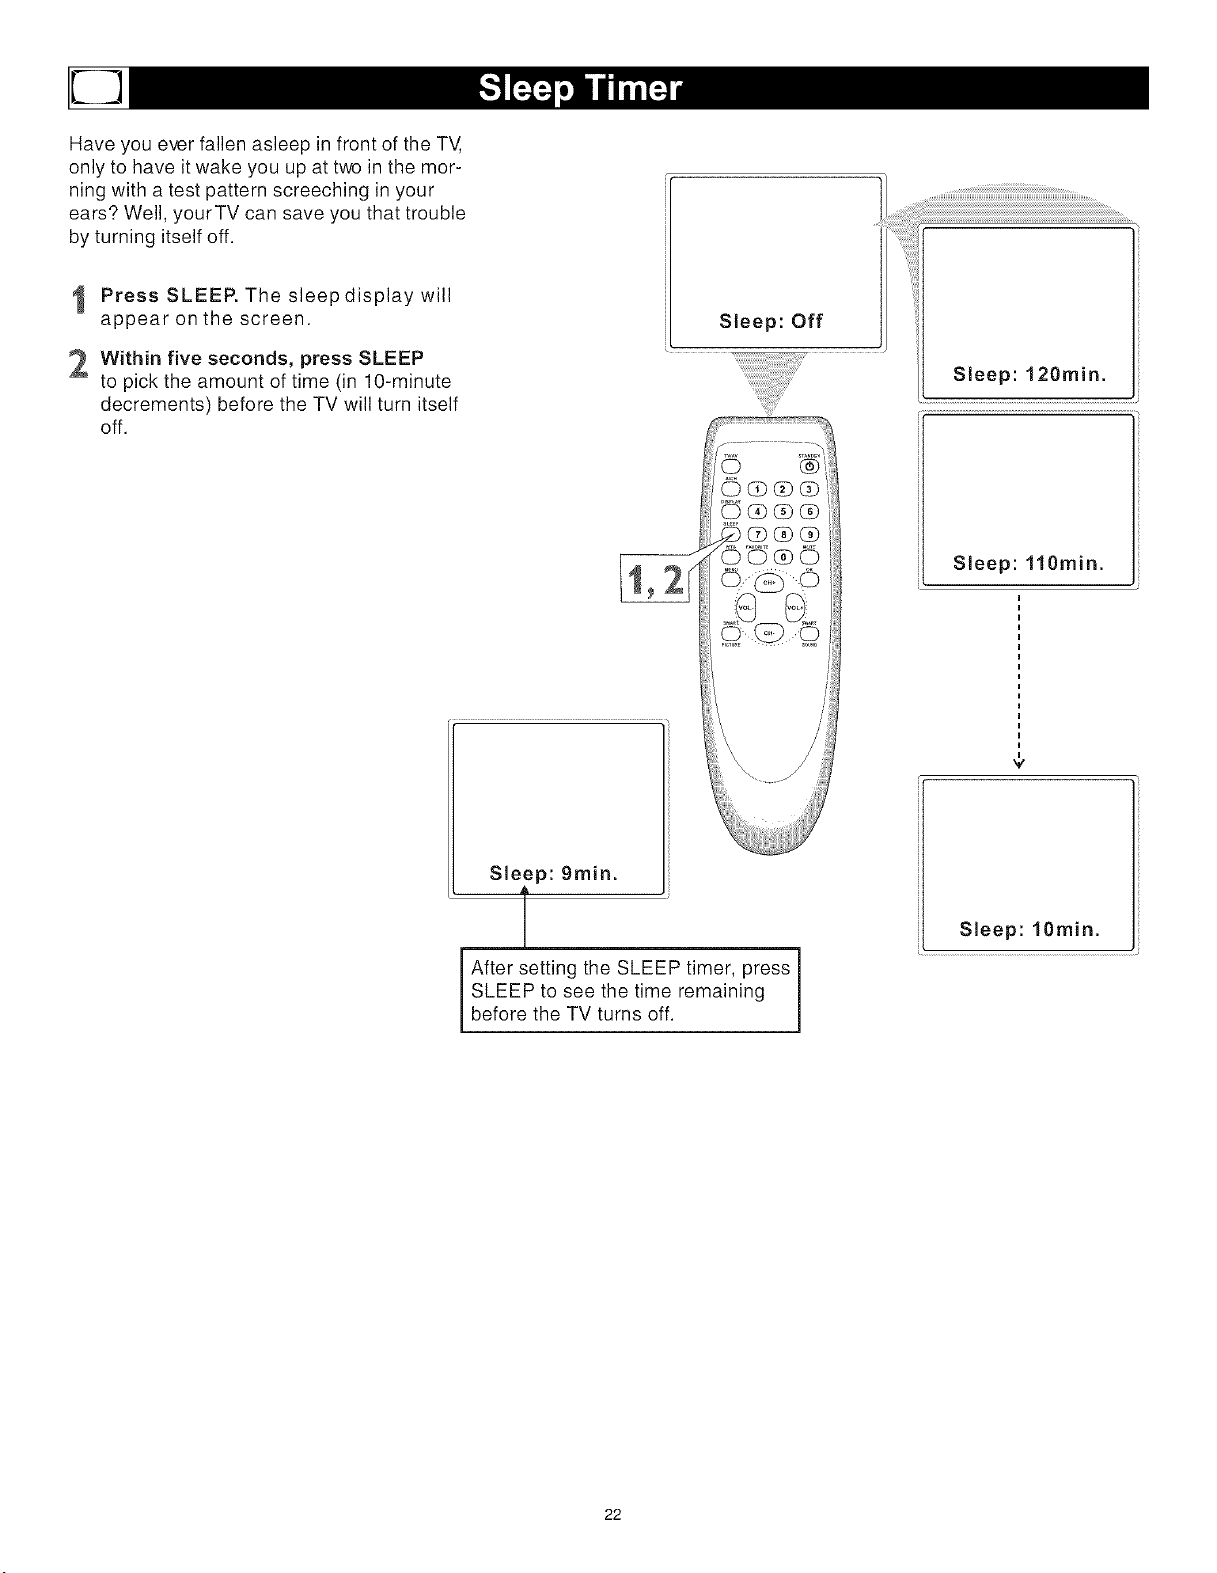
Have you ever fallen asleep in front of the TV,
only to have it wake you up at two in the mor-
ning with a test pattern screeching in your
ears? Well, yourTV can save you that trouble
by turning itself off.
Press SLEEP. The sleep display will
appear on the screen.
2 Within five seconds, press SLEEP
to pick the amount of time (in lO-minute
decrements) before the TV will turn itself
off.
Sleep: Off
Sleep: 120min.
Sleep: 110min.
Sleep: 9rain.
i After setting the SLEEP timer, press
SLEEP to see the time remaining
before the TV turns off.
v
Sleep: lOmin.
22

Parental Lock processes program
content advisories from broadcasters.
Parental Lock can respond to the
content advisories and block objecti-
onable content (offensively language,
violence, sexual situations, etc.) This
is a great feature to censor the type
of programming children watch.
Parental Lock offers various
blocking options from which to
choose:
MASTER ENABLE: this is the
"master switch" for Parental Lock.
When ON, all blocking/censoring you
have set is enabled. When off, all
blocking is disabled.
BLOCK UNRATED: All unrated
programs (based on Movies Ratings
or TV Ratings) will be blocked if this
feature is ON and MASTER ENABLE
is ON.
BLOCK NO RATING: All programming
with no content advisory data will be
blocked if this feature is ON and MAS-
TER ENABLE is ON.
After you set a secret code, you can
block up to six ratings in TV Ratings or
Movie Ratings. These ratings are set
by the Motion Pictures Association of
America and TV broadcasters.
G: General Audience - All ages
admitted. Most parents would find
this program suitable for all ages. This
type of programming contains little or
no violence, no strong language, and
little or no sexual dialog or situation.
PG: Parental Guidance Suggested -
This programming contains material
that parents may find unsuitable for
younger children. It may contain one
or more of the following: moderate
violence, some sexual situations, inf-
requent coarse language, or some
suggestive dialog.
PG-I 3: Parents Strongly Cautioned
-This programming contains material
that parents may find unsuitable for
younger children under the age of 13.
It contains one or more of the following:
violence, sexual situations, coarse lan-
guage, or suggestive dialog.
R: Restricted -This programming is
specially designed for adult. Anyone
under the age of 17 should only view
the this programming with an accom-
panying parent or adult guardian. It
contains one or more of the following:
intense violence, intense sexual situ-
ations, strong coarse language, or
intensely suggestive dialog.
NC17: No children under the age of
17 will be admitted -This type of pro-
gramming should be viewed by adults
only. It contains graphic violence, exp-
licit sex, or crude, indecent language.
X: Adult only -This type of program-
ming contains one or more of the
following: very graphic violence, very
graphic and explicit sexual acts, very
coarse and intensely suggestive
language.
TV-Y All children-Appropriate
For all children. - Designed for
a very young audience, including
children age 2-6. This type of progra-
mming is not expected to frighten
younger children.
TV-Y7 Directed to Older
Children - Designed for
children age 7 and above. It may be
appropriate for children who can
distinguish between make-believe and
reality. This programming may include
mild fantasy and comic violence (FV
or Fantasy violence).
TV-G General Audience-Most
Parents would find this progra-
mming suitable for all ages - This type
of programming contains little or no
violence, no strong language, and little
or no sexual dialog or situation.
TV-PG Parents Guidance
Cautioned - Contains material
that parents may find unsuitable for
younger children. This type of progra-
mming contains one or more of the
following: moderate violence(V), some
sexual situations(S), infrequent coarse
language (L), or some suggestive
dialog (D).
TV-14 Parents Strongly
Cautioned - Contains material
that parents may find unsuitable for
children under 14 years of age. This
type of programming contains one or
more of the following: intense violence
(V), intense sexual situations(S), strong
coarse language (L), or intensely sug-
gestive dialog (D).
TV-MA Mature Audience only-
Specially designed to be viewed
by adults and may be unsuitable for
children under 17. This type of progra-
mming contains one or more of the
following: graphic violence (V),explicit
sexual situations(S), or crude, indecent
language (L).
23
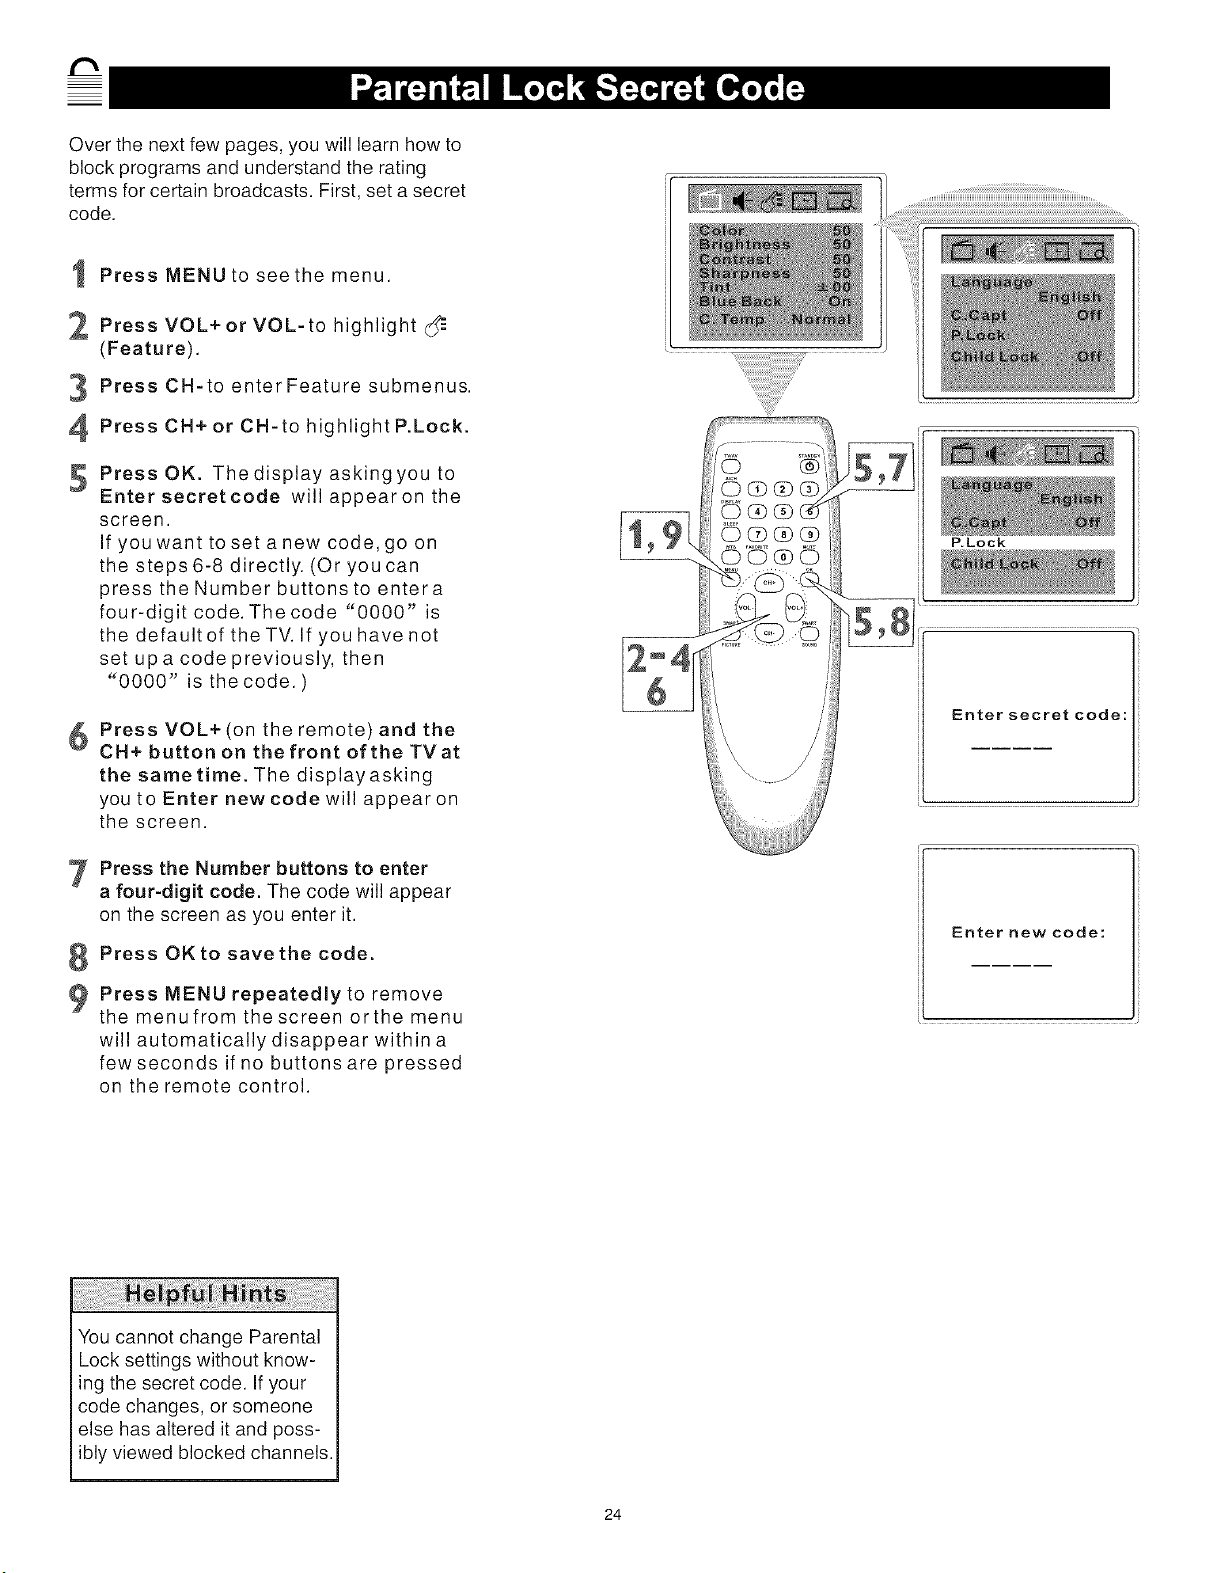
Over the next few pages, you will learn how to
block programs and understand the rating
terms for certain broadcasts. First, set a secret
code.
I Press MENU to see the menu.
Press VOL+ or VOL-to
highlight
(Feature).
Press CH-to enter Feature submenus.
PressCH+orCH-tohighlightP.Lock.
5 Press OK. Thedisplay askingyou to
Enter secretcode will appearon the
screen.
If you want to set a new code, go on
the steps 6-8 directly. (Or you can
press the Number buttons to entera
four-digit code. The code "0000" is
the default of the TV. If you have not
set up a code previously, then
"0000" is the code.)
Press VOL+ (on the remote) and the
CH+ button on the front of the TVat
the same time. The display asking
you to Enter new code will appear on
the screen.
Press the Number buttons to enter
a four-digit code. The code will appear
on the screen as you enter it.
Press OK to save the code.
Press MENU repeatedly to remove
themenufromthescreenorthemenu
will automatically disappear within a
few seconds if no buttons are pressed
on the remote control.
P.Lock
Enter secret code:
Enter new code:
You cannot change Parental
Lock settings without know-
ing the secret code. If your
code changes, or someone
else has altered it and poss-
ibly viewed blocked channels.
24
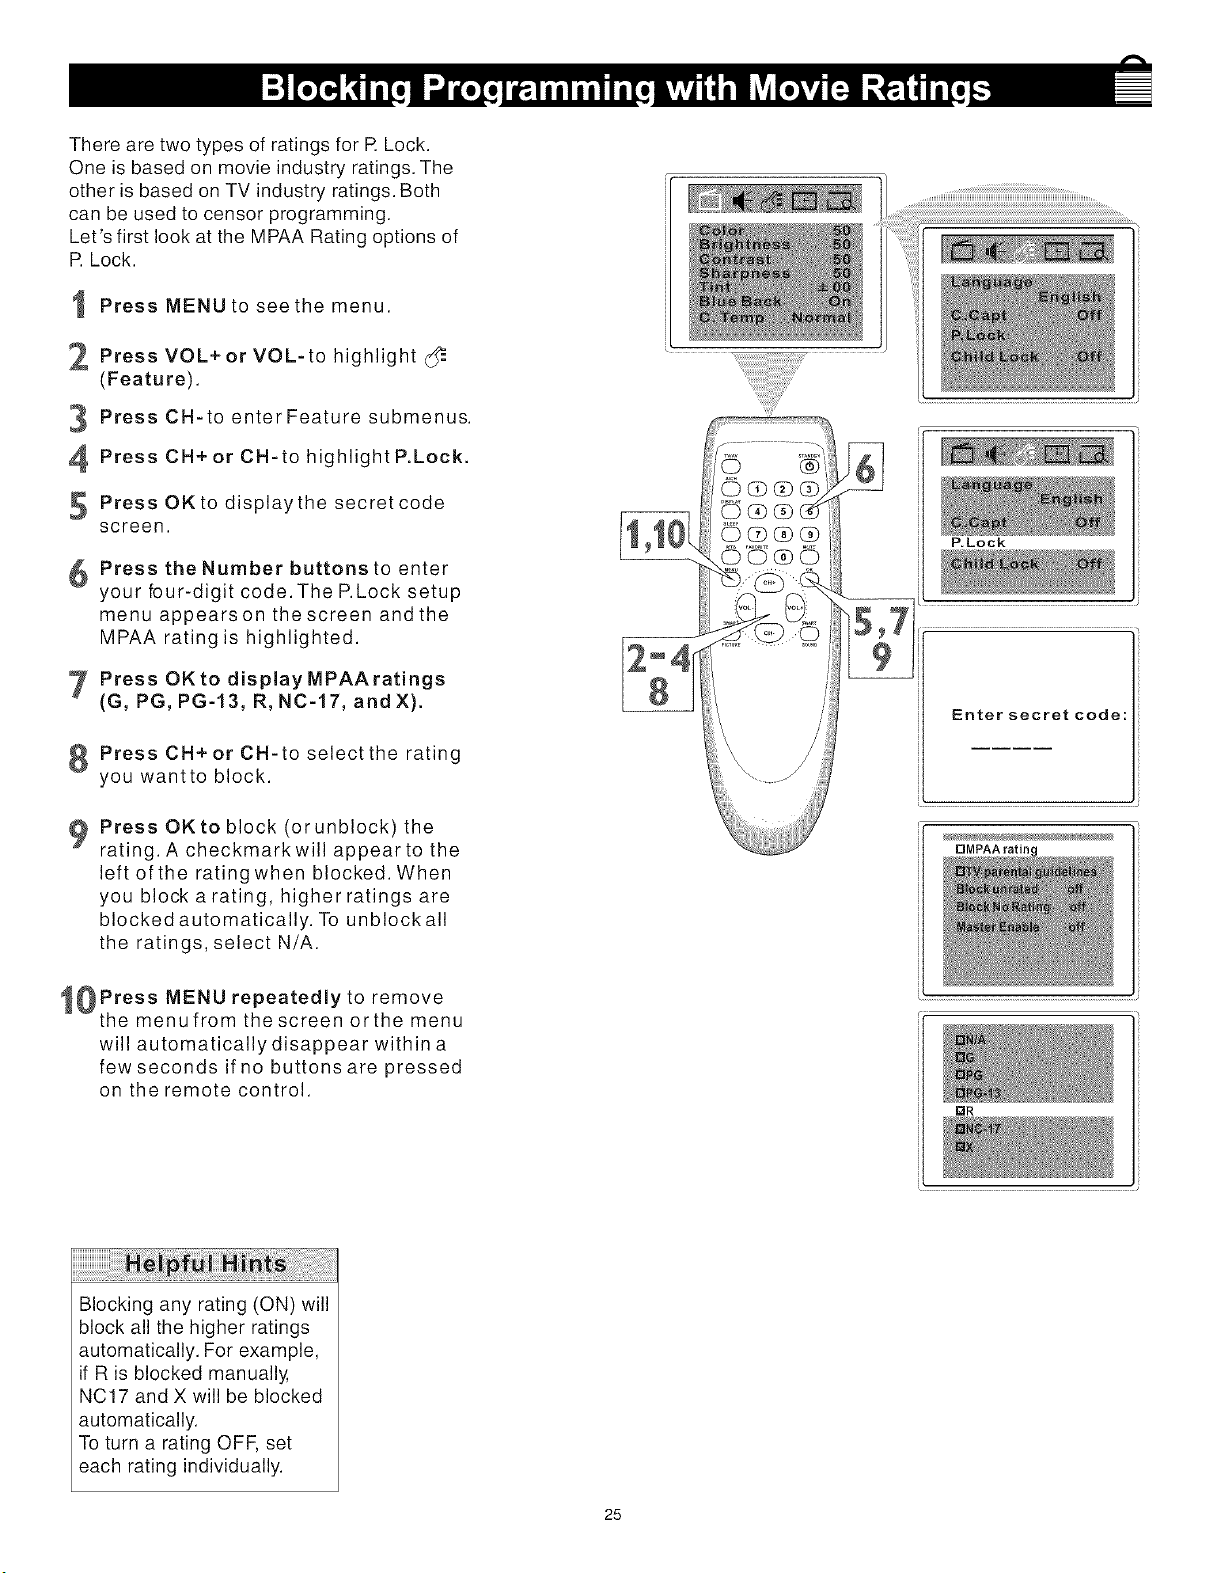
There are two types of ratings for R Lock.
One is based on movie industry ratings. The
other is based on TV industry ratings. Both
can be used to censor programming.
Let's first look at the MPAA Rating options of
R Lock.
I Press MENU to see the menu.
_, Press VOL+or VOL-to
highlight
(Feature).
Press CH-to enter Feature submenus.
PressCH+orCH-tohighlightP.Lock.
5 Press OKto displaythe secretcode
screen.
Press the Number buttons to enter
your bur-digit code. The P.Lock setup
menu appearson thescreen andthe
MPAA rating is highlighted.
Press OKtodisplayMPAAratings
(G, PG, PG-13, R, NC-17, and X).
PressCH+orCH-toselectthe rating
you wantto block.
PressOKtoblock(orunblock) the
rating. A checkmarkwill appear to the
left of the ratingwhen blocked. When
you block a rating, higher ratings are
blocked automatically. To unblockall
the ratings, select N/A.
_0Press MENU repeatedly to remove
the menufrom the screen orthe menu
will automatically disappear within a
few seconds if no buttons are pressed
on the remote control.
Blocking any rating (ON) will
block all the higher ratings
automatically. For example,
if R is blocked manually,
NC17 and X will be blocked
automatically.
To turn a rating OFF, set
each rating individually.
25
P.Lock
5,7
9
Enter secret code:
rlMPAA ratim
mR

Some program ratings are based on TV
industry ratings as described below.
Press MENU to see the menu.
2 Press VOL+ or VOL-to highlight (_
(Feature).
Press CH-to enter Feature submenus.
PressCH+orCH-tohighlightP.Lock.
Press OKto displaythe secretcode
screen.
Press the Number buttons to enter
your bur-digit code. The P.Lock setup
menu appears on the screen.
7 Press CH+or CH-to highlightTV
parental guidelines.
Press OKtodisplaytheparental
guidelines (TV-Y, TV-Y7,TV-G, TV-
PG, TV-14, or TV-MA).
PressCH+orCH-toselectarating.
0Press OK to turn the rating on or off. A
checkmark appears when the rating is
blocked. TV-Y and TV-PG can be turned
on (to block viewing) or off (to allow view-
ing)only.
TV-Y7, TV-PG, TV-14, and TV-MA can be
customized to block V (violence), F (fantasy),
S (sexual situations), L (coarse language),
or D (suggestive dialog).
To do so, continue with these steps.
11 Press CH+ or CH- to highlight Content.
2 Press OK button to enter the Content
menu.
t3 Press CH+or CH-to select a
rating,
then press VOL+.
44 Press CH+ or CH- to select the sub-
-- ratings (Fantasy-V, Violence, Sexual,
Language, or Dialog), then press OK to
block or view that sub-rating.
_ Press MENU to return tothe Parental
Guidelines screen and checkyour
settings. A checkmarkappears when
the sub-rating is blocked.
1_ Press MENU repeatedly to remove
_the menufrom the screen orthe menu
will automatically disappear within a
few seconds if no buttons are pressed
on the remote control.
26
r_M PAA ratir
[]TV-PG [] [] [] []
10
Content
Any rating will block higher
ratings automatically.
To unblock all the ratings,
select NONE.
Notes:
Blocking TV-Y, only TV-Y7
blocked automatically.
2. Blocking TV-Y7, other
rating will not change any
more.
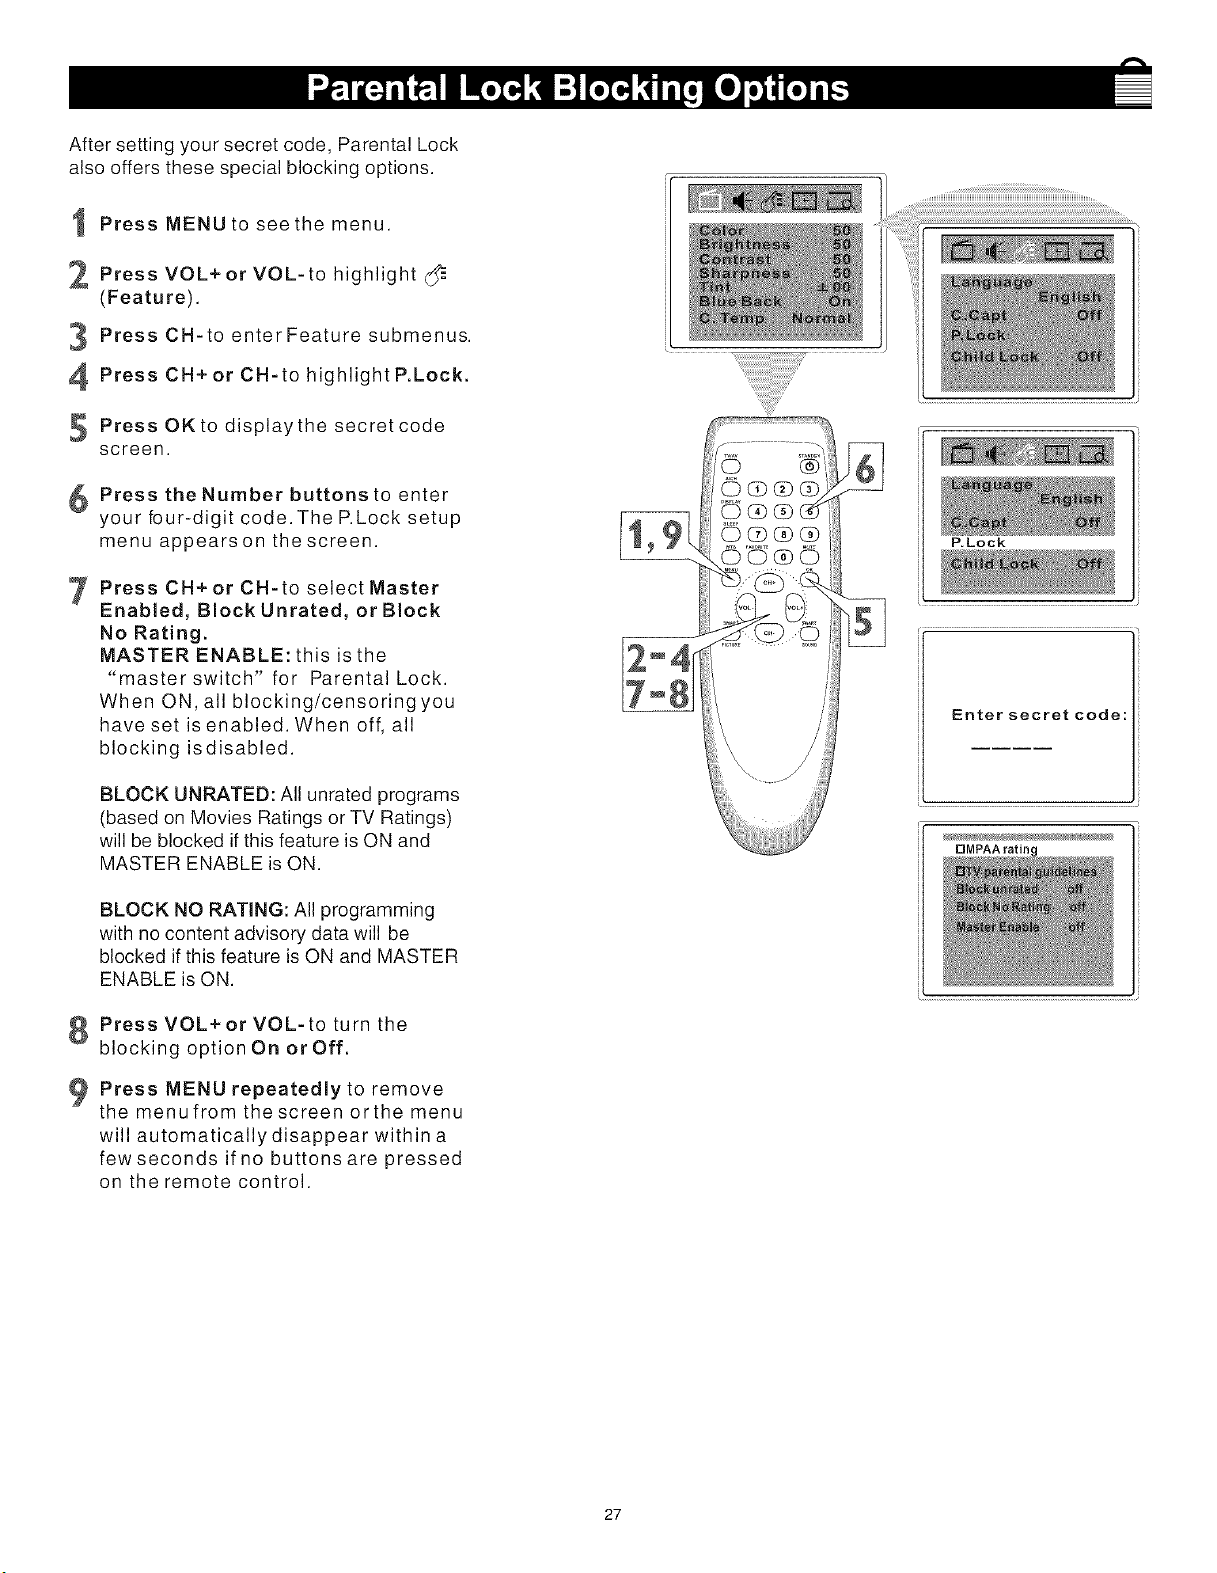
Aftersettingyoursecretcode,ParentalLock
alsooffersthesespecialblockingoptions.
PressMENUto seethe menu.
_ PressVOL+or VOL-to
highlight
(Feature).
PressCH-to enterFeaturesubmenus.
PressCH+orCH-tohighlightP.Lock.
PressOKto displaythesecretcode
screen.
Pressthe Number buttons to enter
your bur-digit code.TheP.Locksetup
menuappearson thescreen.
PressCH+orCH-toselectMaster
Enabled, Block Unrated, or Block
No Rating.
MASTER ENABLE: this is the
"master switch" for Parental Lock.
When ON, all blocking/censoringyou
have set is enabled. When off, all
blocking isdisabled.
BLOCK UNRATED: All unrated programs
(based on Movies Ratings or TV Ratings)
will be blocked if this feature is ON and
MASTER ENABLE is ON.
BLOCK NO RATING: All programming
with no content advisory data will be
blocked if this feature is ON and MASTER
ENABLE is ON.
PressVOL+orVOL-toturnthe
blocking option On or Off.
Press MENU repeatedly to remove
the menufrom the screen orthe menu
will automatically disappear within a
few seconds if no buttons are pressed
on the remote control.
P.Lock
Enter secret code:
rlMPAA ratim
27
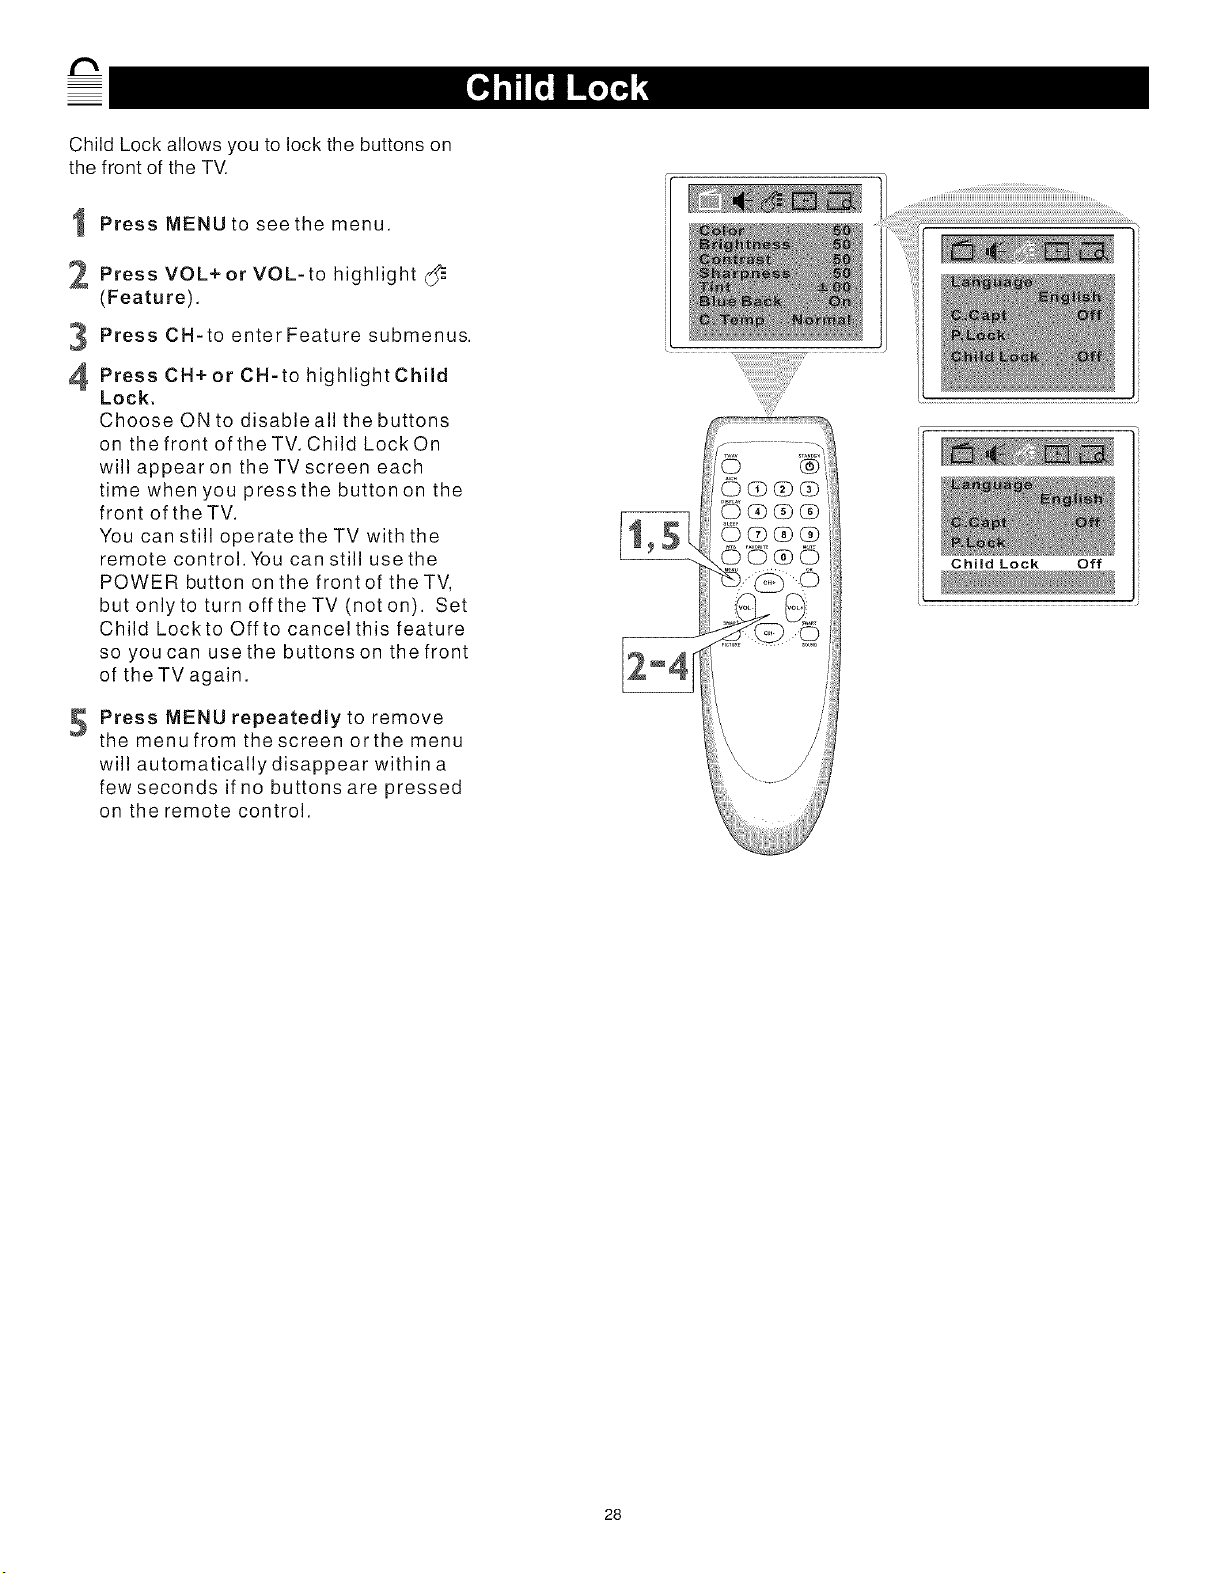
Child Lock allows you to lock the buttons on
the front of the TV.
Press MENU to see the menu.
_ Press VOL+or VOL-to
highlight
(Feature).
Press CH-to enter Feature submenus.
PressCH+orCH-to
highlight Child
Lock.
Choose ON to disable all the buttons
on the front ofthe TV. Child LockOn
will appearon the TV screen each
time when you press the button on the
front of the TV.
You can still operate the TV with the
remote control. You can still use the
POWER button on the frontof the TV,
but onlyto turn offthe TV (noton). Set
Child Lockto Off to cancel this feature
so you can use the buttons on the front
of the TV again.
Press MENU repeatedly to remove
the menu from the screen orthe menu
will automatically disappear within a
few seconds if no buttons are pressed
on the remote control.
Child Lock Off
28

SmartSound offers you four preset sound
options: Personal, Theatre, Music or Voice.
Choose the one that best suits your current
programming.
t Press MENU to see the menu.
2 Press VOL+ or VOL-to highlight'q_
(Sound).
3 Press CH-to enterSound submenus.
PressCN+orCN-tohighlightSmart
Sound.
S Press VOL+ or VOL-to select
Personal, Voice, Music, or Theatre.
Press MENU repeatedly to remove
the menufrom the screen orthe menu
will automatically disappear within a
few seconds if no buttons are pressed
on the remote control.
Snnart Sound
iiiiiiiiiiiiiiiiiiiii i!! !i
You can choose a Smart
Sound setting quickly by
pressing the SMART
SOUND button on the
remote control.
29
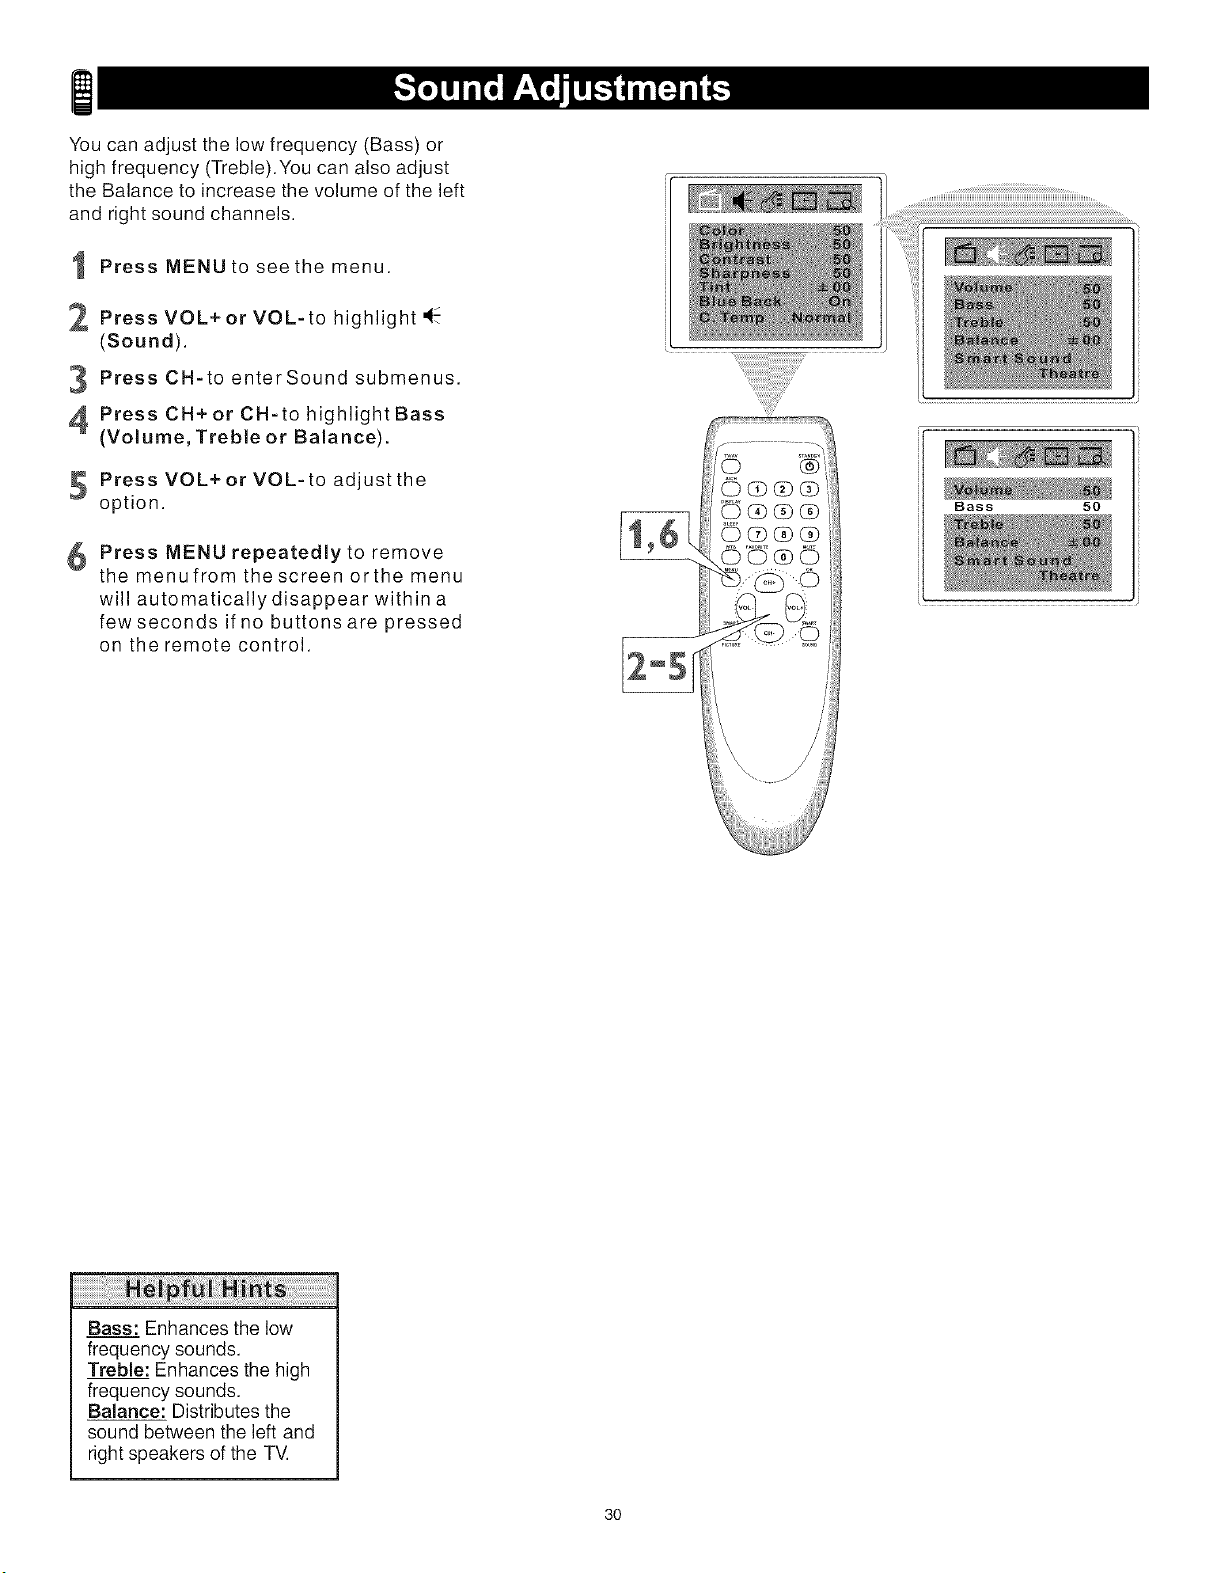
You can adjust the low frequency (Bass) or
high frequency (Treble).You can also adjust
the Balance to increase the volume of the left
and right sound channels.
Press MENU to see the menu.
2 Press VOL+ or VOL-to highlight 'q_
(Sound).
PressCH-toenterSoundsubmenus.
PressCH+orCH-tohighlightBass
(Volume, Treble or Balance).
5 Press VOL+or VOL-to adjustthe
option.
6 Press MENU repeatedly to remove
themenufromthescreenorthemenu
will automatically disappear within a
few seconds if no buttons are pressed
on the remote control.
Bass 50
Bass: Enhances the low
frequency sounds.
Treble: Enhances the high
frequency sounds.
Balance: Distributes the
sound between the left and
right speakers of the TV.
3O
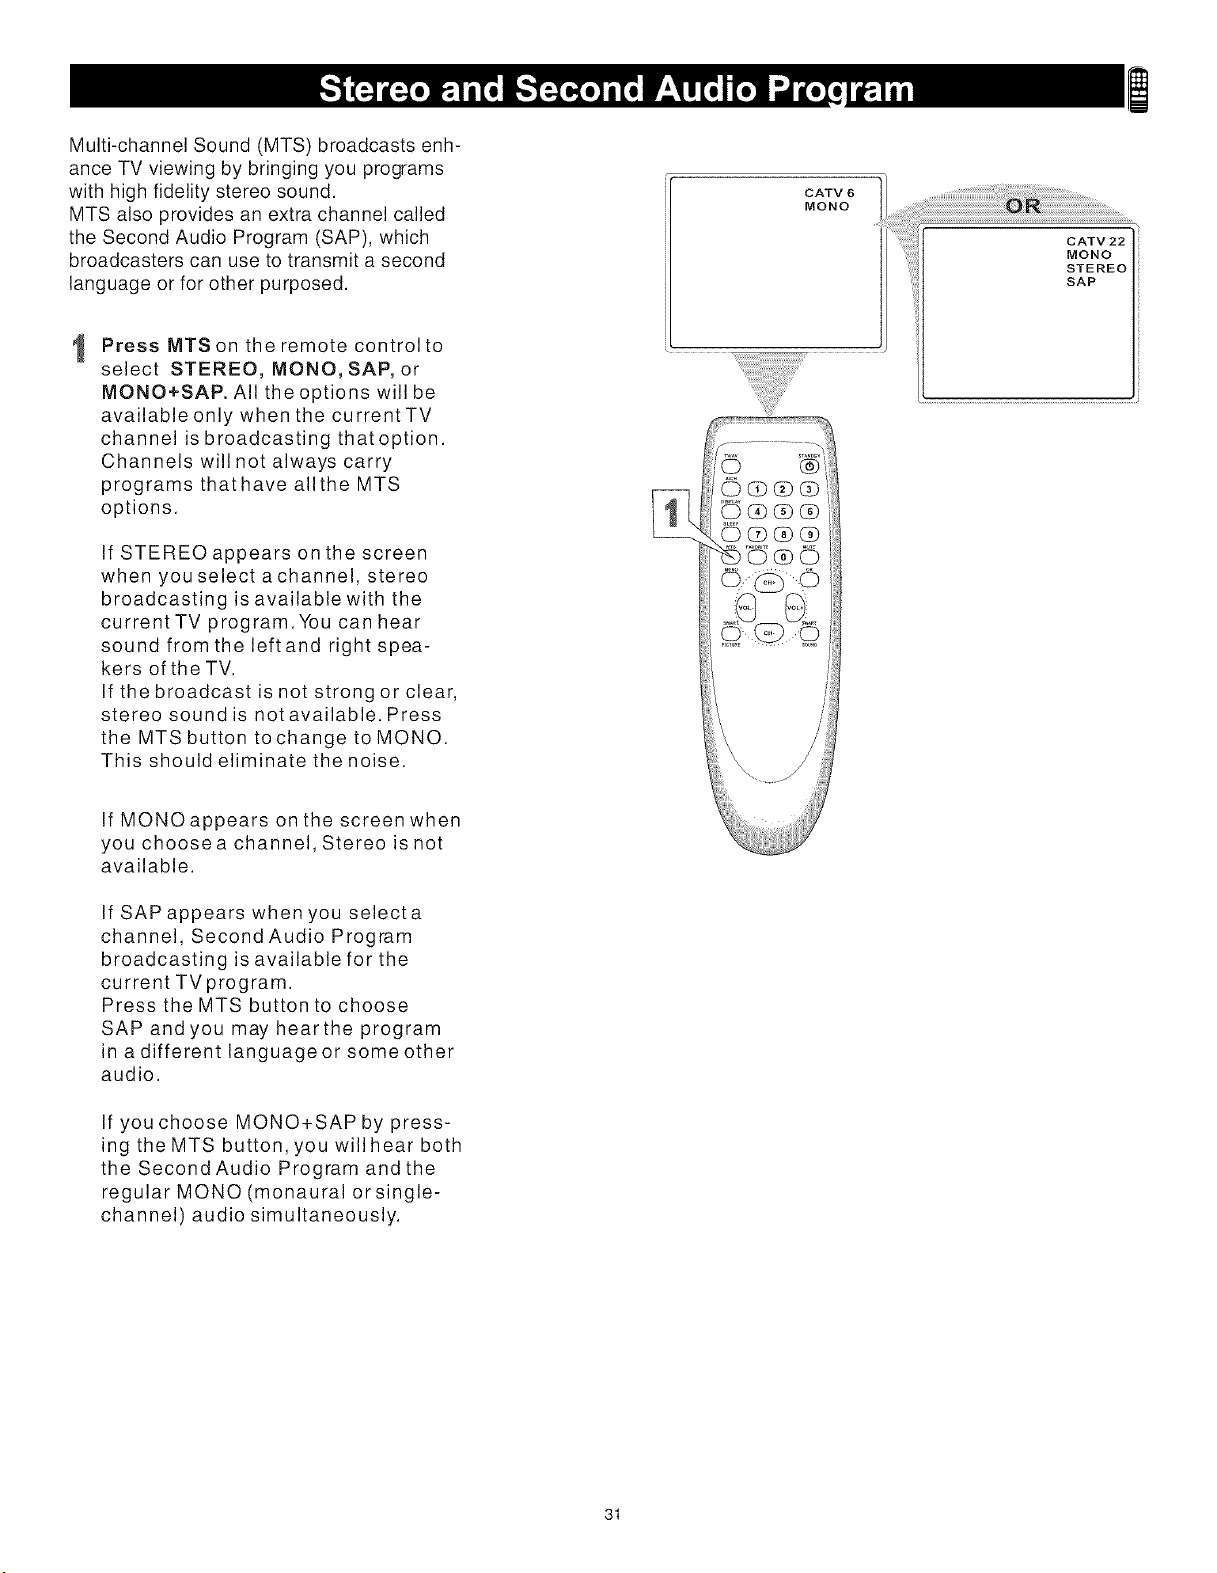
Multi-channel Sound (MTS) broadcasts enh-
ance TV viewing by bringing you programs
with high fidelity stereo sound.
MTS also provides an extra channel called
the Second Audio Program (SAP), which
broadcasters can use to transmit a second
language or for other purposed.
1
Press MTS on the remote control to
select STEREO, MONO, SAP, or
MONO+SAP. All the options will be
available only when the current TV
channel is broadcasting thatoption.
Channels will not always carry
programs thathave allthe MTS
options.
If STEREO appears on the screen
when you select achannel, stereo
broadcasting is available with the
current TV program. You can hear
sound from the leftand right spea-
kers of the TV.
If the broadcast is not strong or clear,
stereo sound is not available. Press
the MTS button tochange to MONO.
This should eliminate the noise.
CATV 6
MONO
If MONOappears on the screen when
you choosea channel, Stereo is not
available.
If SAP appears when you selecta
channel, Second Audio Program
broadcasting is available for the
current TVprogram.
Press the MTS button to choose
SAP andyou may hearthe program
in a different language or some other
audio.
If you choose MONO+SAP by press-
ing the MTS button, you will hear both
the Second Audio Program and the
regular MONO (monaural or single-
channel) audio simultaneously.
31
No Power
• Check the TV power cord. Disconnect the power cord from
the power outlet for 10 seconds, then reinsert the plug into
the outlet. Press the STANDBY button to turn on the TV
again.
• Make sure the outlet is not on a wall switch.
• Make sure a fuse has not blown at the power outlet.
No Picture
• Check the antenna or Cable TV connections. Connect the
antenna or Cable TV signal securely to the TV's 75 OHM
ANTENNA INPUT jack on the rear of the TV.
• Set TV/CATV correctly. Details are on page 11.
• Activate AUTO SEARCH to find all available channels.
Details are on page 12.
• Press TV/AV on the remote control to select TV channels
or a video source (AV1/S-VIDEO, AV2, or YUV). Use AV1
/S-VIDEO, AV2, or YUV to view material on other equipm-
ent (Camcorder, VCR, DVD Player, etc.) that is connected
to the TV's Audio and Video In jacks.
No Sound
• Press the VOL+ and VOL- buttons to adjust the volume.
• Press the MUTE button on the remote control to cancel
or restore the volume.
Remote Control does not work.
• Check the batteries. If necessary, replace them with two AA
heavy duty (zinc chloride) or alkaline batteries.
• Clean the remote control as well as the remote control sen-
sor on the front of the TV.
• Check the TV power cord. Disconnect the power cord from
the power outlet for 10 seconds, then reinsert the plug into
the outlet. Press the STANDBY button to turn on the TV
again.
• Make sure the outlet is not on a wall switch.
• Make sure a fuse has not blown at the power outlet.
• Always point the remote control toward the front of the TV
(toward the remote sensor).
TV displays wrong channel or no channels.
• Repeat channel selection.
• Add the channel number(s) into the TV's memory. Use
ADD/ERASE as described on page 15.
• Make sure TV/CATV is set correctly. Details are on page 11.
Then activate AUTO SEARCH to set up all available chan-
nels. Details are on page 12.
WARNING
screen: Do not leave fixed images on the screen for
extended periods of time.This can cause uneven aging
of the picture tube.
Normal use of the TV should involve viewing of programs that
have constantly moving or changing images. Do not leave non- •
moving images on screen for extended periods of time. Do not
display the same images too frequently; subtle "ghost"images
can be left on the picture tube. Sources of stationary images
may be Laser discs, video games, Compact Discs Interactive
(CD-i), or paused Digital Video Discs (DVDs) or videotapes.
concerning stationary images on the TV TV LOCATION
To avoid cabinet warping, cabinet color changes, and an
increased chance of TV failure, do not place the TV where
temperatures can become excessively hot (for example,
in direct sunlight or near a heating appliance).
Allow a free flow of air around the TV.
Here are some common examples of stationary images:
. DVD menus - listings of DVD content.
• Letterbox black bars - appear at the top and bottom of
the TV screen when a wide screen (16:9) movie is viewed
on a TV with standard (4:3) aspect ratio. This is available
with some DVDs.
Video-game images and scoreboards
•Television station Iogos - These cause a problem if they
are bright and stationary. Moving or low-contrast graphics
are less likely to damage the picture tube.
• Stock-market tickers - may appear at the bottom of the
TV screen if the TV programming covers this news.
, Shopping channel Iogos, pricing displays - These may
be bright and may appear constantly during the show.These
are usually in the same location on the TV screen.
CLEANING
• To avoid possible shock hazard, remove the TV's power
cord from the electrical outlet before cleaning.
• Regularly dust the TV with a dry, non-scratching duster.
When cleaning the TV, take care not to scratch or damage
the screen surface. Avoid wearing jewelry or using anything
abrasive. Do not use household cleaners. Wipe the screen
with a clean cloth dampened with water. Use even, easy,
vertical strokes when cleaning.
Gently wipe the cabinet surfaces with a clean cloth or a
sponge dampened in a solution of cool, clear water and a
mild soap or detergent. Use a clean, dry cloth to dry the
wiped surfaces.
Occasionally vacuum the vents on the rear of the TV.
" Never use thinners, insecticide sprays, or other chemicals on
or near the cabinet. They may blemish the cabinet perma-
nently.
32
Audio/Video Inputs • Jacks (standard RCA) on the rear of
the TV to which you connect accessory devices.These jacks
receive picture and sound from equipment such as a DVD
Player,VCR, Camcorder, etc..
Auto Program,Scans all available channels from regular
antenna or Cable TV signals and stores only active stations
in the TV's memory.
Closed Captioning-The broadcast feature that lets you
read the voice content of television programs on theTV
screen. Designed to help the hearing impaired, Closed
Captioning shows dialog, activity, and conversations
while a TV program is in progress.
Ill
Coaxial Cable • A single solid wire normally matched with a
metal plug (F-type) end connector that screws (or pushes)
directly onto a 75-ohm input on the television or VCR.
Menu. An on-screen list of controls available for adjustment.
On-screen Displays (OSD) • Messages that help you set up
features (color adjustment or channel programming, for exam-
ple).
Remote Control Sensor. The window or opening on the
front of the TV through which infrared remote control signals
are received.
Add/Erase Channels ....................................................... 15
Antenna Connection ......................................................... 6
Audio jacks ....................................................................... 7
Auto Search .................................................................... 12
Sound Adjustments ......................................................... 30
Battery Installation ............................................................ 8
Blue Back (background) .................................................. 16
Brightness ....................................................................... 16
Cable TV Connection ........................................................ 5
Channel Setup ................................................................ 12
Child Lock ....................................................................... 28
Cleaning .......................................................................... 32
Clock ............................................................................... 18
Closed Captions ............................................................. 21
Color ................................................................................ 16
Component Video Connections (DVD Player) ................... 7
Contrast ........................................................................... 16
DVD video in channel ....................................................... 7
DVD (Y Cb Cr) video in jacks ........................................... 7
Factory Service .......................................................... 34-35
Glossary .......................................................................... 33
Helpful Hints .................................................................... 32
Language ........................................................................ 10
Manual Channel Tuning ................................................... 13
Mono ............................................................................... 31
Ill
On-Timer ......................................................................... 19
Off-Timer ......................................................................... 20
Parental Lock
Blocking Options ........................................................ 27
Movie Ratings ............................................................. 25
Secret Code ................................................................ 24
TV Ratings .................................................................. 26
Understanding Parental Lock ...................................... 23
Picture ............................................................................. 16
Picture Adjustments ........................................................ 16
Registration ....................................................................... 2
Remote Control .............................................................. 8-9
S-Video ............................................................................. 7
Safety ................................................................................ 3
Second Audio Program (SAP) ........................................ 31
Sharpness ....................................................................... 16
Sleep Timer .................................................................... 22
SmartPicture .................................................................... 17
SmartSound .................................................................... 29
Stereo .............................................................................. 31
Tint ................................................................................... ] 6
TV/Cable TV .................................................................... ] ]
Warranty .......................................................................... 36
Y Cb Cr (DVD) video in jacks ............................................ 7
33
/
• Philadelphia/S New Jersey
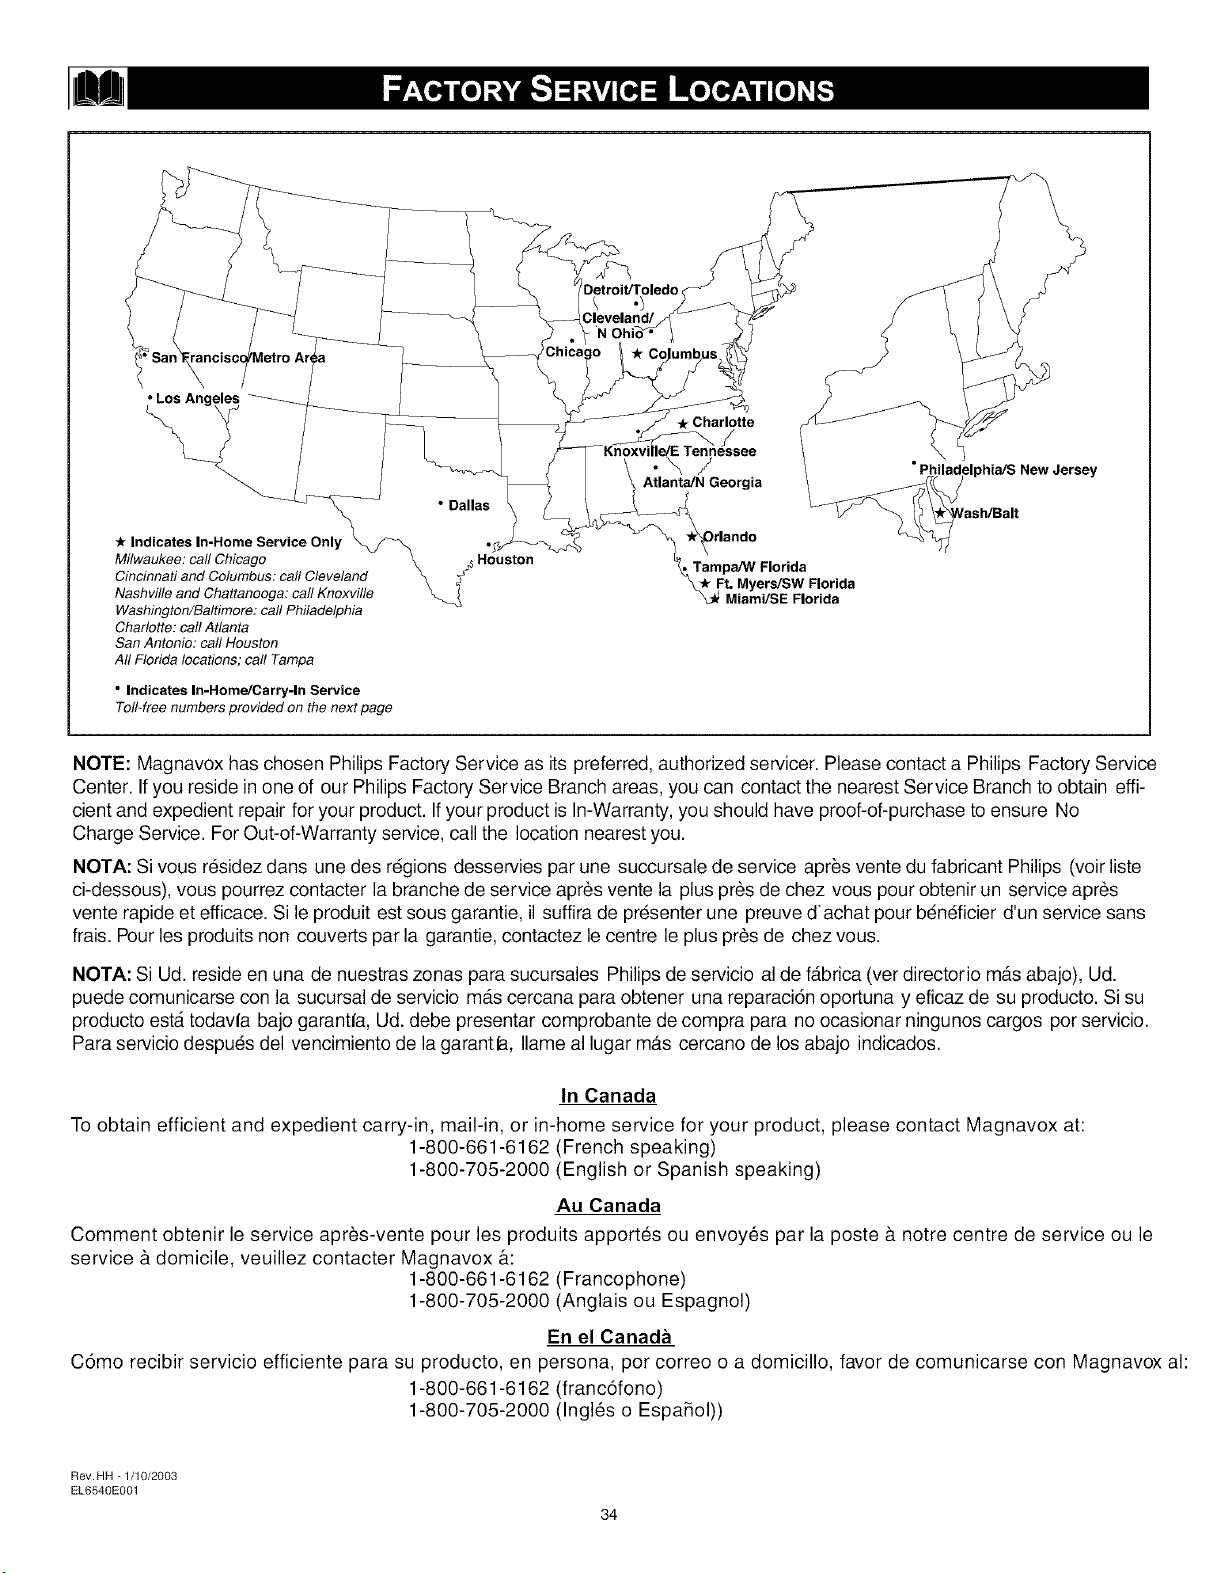
Indicates In-Home Service Only
Milwaukee: call Chicago _ _ Houston
Cincinnati and Columbus: call Cleveland \
Nashville and Chattanooga: call Knoxville _._
Washington/Baltimore: call Philadelphia
Charlotte: call Atlanta
San Antonio: call Houston
Aft Florida locations; call Tampa
• Indicates In-HomeJCarry-ln Service
TelMree numbers provided on the next page
Tampa/W Florida
Ft. Myers/SW Florida
Miami/SE Florida
NOTE: Magnavox has chosen Philips Factory Service as its preferred, authorized servicer. Please contact a Philips Factory Service
Center. If you reside in one of our Philips Factory Service Branch areas, you can contact the nearest Service Branch to obtain effi-
cient and expedient repair for your product. Ifyour product is In-Warranty, you should have proof-of-purchase to ensure No
Charge Service. For Out-of-Warranty service, call the location nearest you.
NOTA: Si vous r_sidez dans une des r6gions desservies par une succursale de service apr_s vente du fabricant Philips (voir liste
ci-dessous), vous pourrez contacter la branche de service apr6s vente la plus pr6s de chez vous pour obtenir un service apr_s
vente rapide et efficace. Si le produit est sous garantie, il suffira de presenter une preuve d'achat pour b_n_ficier d'un service sans
frais. Pour les produits non couverts par la garantie, contactez le centre le plus pros de chez vous.
NOTA: Si Ud. reside en una de nuestras zonas para sucursales Philips de servicio al de f__brica(ver directorio m__sabajo), Ud.
puede comunicarse con la sucursal de servicio m__scercana para obtener una reparaci6n oportuna y eficaz de su producto. Si su
producto est,_todavfa bajo garantfa, Ud. debe presentar comprobante de compra para no ocasionar ningunos cargos por servicio.
Para servicio despu_s del vencimiento de la garantla, Ilame al lugar m__scercano de los abajo indicados.
In Canada
To obtain efficient and expedient carry-in, mail-in, or in-home service for your product, please contact Magnavox at:
1-800-661-6162 (French speaking)
1-800-705-2000 (English or Spanish speaking)
Au Canada
Comment obtenir le service apr_s-vente pour les produits apport_s ou envoy6s par la poste & notre centre de service ou le
service & domicile, veuillez contacter Magnavox &:
1-800-661-6162 (Francophone)
1-800-705-2000 (Anglais ou Espagnol)
En el Canada
C6mo recibirservicio efficiente para su producto, en persona, porcorreo o a domicillo, favorde comunicarse con Magnavox al:
1-800-661-6162 (franc6fono)
1-800-705-2000 (Ingl6s o Espahol))
Rev.HH-1/10/2003
EL6540E001
34
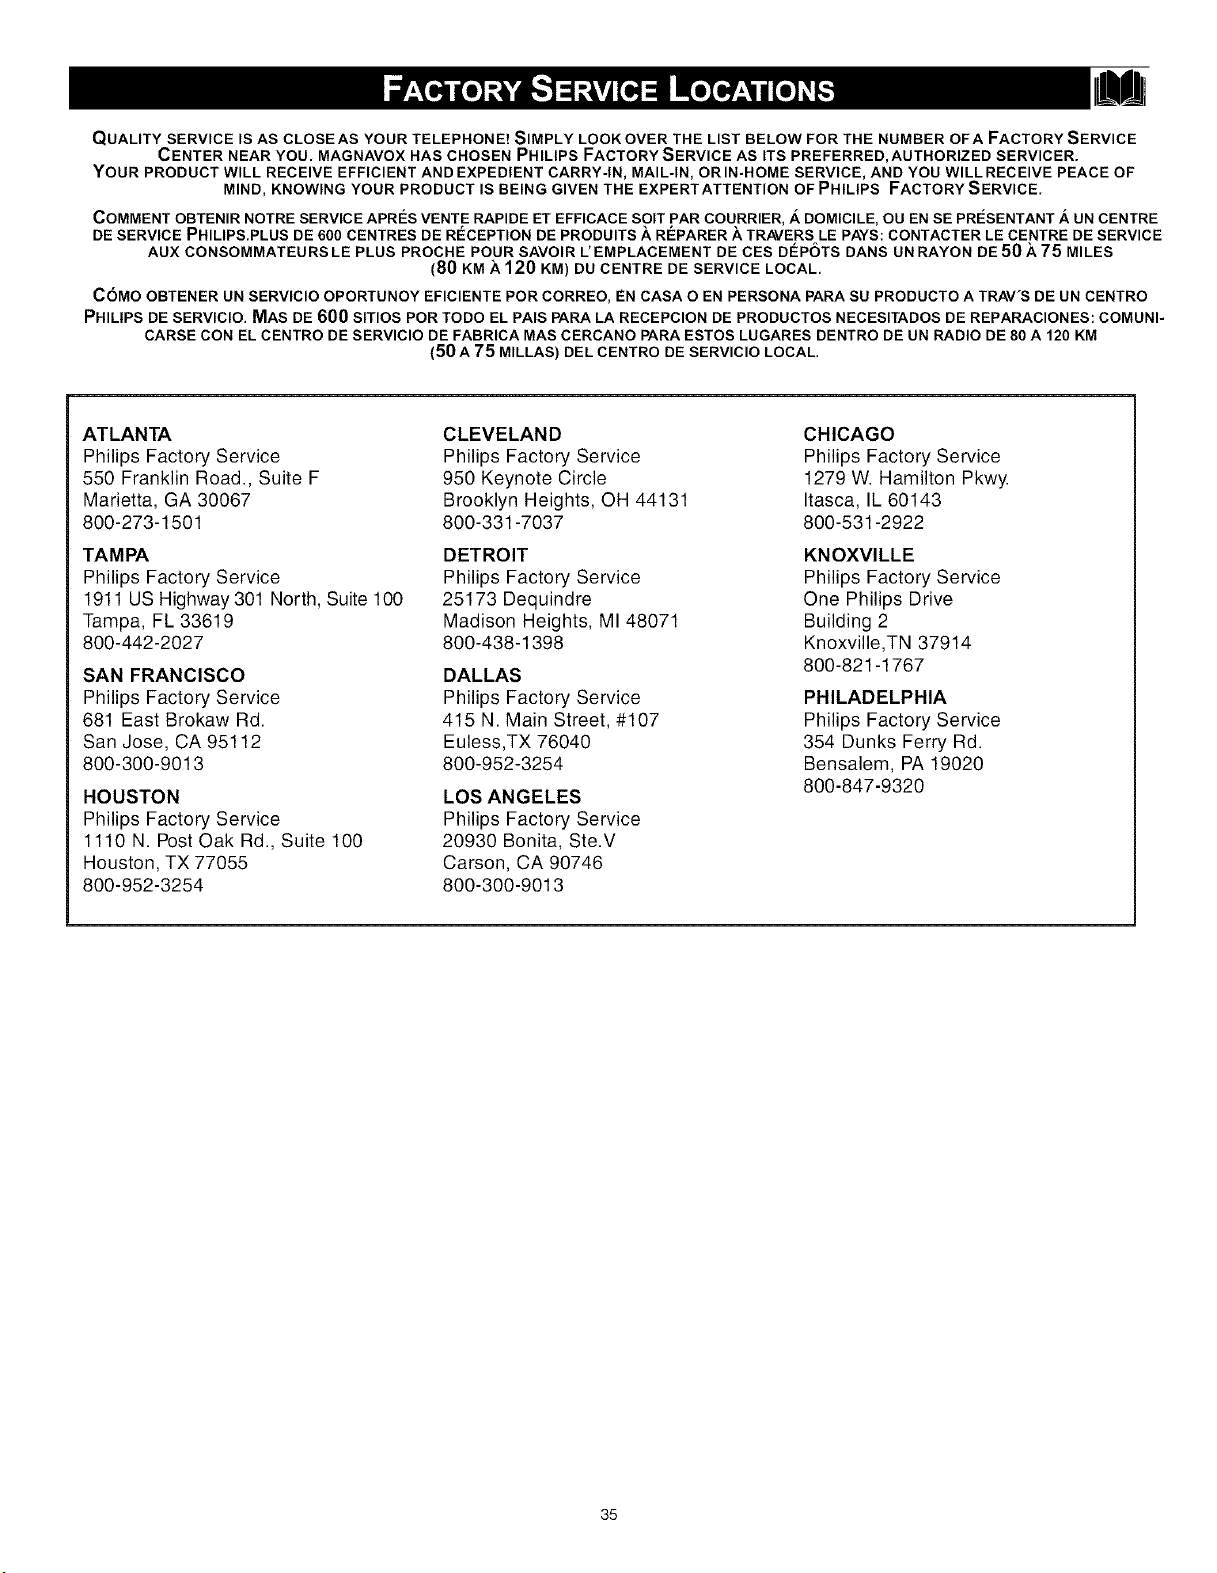
QUALITY SERVICE IS AS CLOSEAS YOUR TELEPHONE! SIMPLY LOOK OVER THE LIST BELOW FOR THE NUMBER OFA FACTORY SERVICE
CENTER NEAR YOU, MAGNAVOX HAS CHOSEN PHILIPS FACTORY SERVICE AS ITS PREFERRED, AUTHORIZED SERVICER.
YOUR PRODUCT WILL RECEIVE EFFICIENT AND EXPEDIENT CARRY-IN, MAIL-IN, OR IN-HOME SERVICE, AND YOU WILL RECEIVE PEACE OF
MIND, KNOWING YOUR PRODUCT IS BEING GIVEN THE EXPERTATTENTION OFPHILIPS FACTORYSERVICE,
COMMENT OBTENIR NOTRE SERVICE APRF'S VENTE RAPIDE ET EFFICACE SOIT PAR COURRIER, ,_, DOMICILE, OU EN SE PRF'SENTANT ,_, UN CENTRE
DE SERVICE PHILIP&PLUS DE 600 CENTRES DE RF'CEPTION DE PRODUITS ,_, RI'=PARER ,_, TRAVERS LE PAYS: CONTACTER LE CENTRE DE SERVICE
AUX CONSOMMATEURS LE PLUS PROCHE POUR SAVOIR L' EMPLACEMENT DE CES DlePOTS DANS UN RAYON DE 50 ,_, 75 MILES
(80 KM _ 120 KM)DU CENTRE DE SERVICE LOCAL,
COMO OBTENER UN SERVIClO OPORTUNOY EFIClENTE POR CORREO, EN CASA O EN PERSONA PARA SU PRODUCTO A TRAV'S DE UN CENTRO
PHILIPS DE SERVIClO. MAS DE 600 SlTIOS POR TODO EL PAlS PARA LA RECEPClON DE PRODUCTOS NECESlTADOS DE REPARAClONES: COMUNI-
CARSE CON EL CENTRO DE SERVIClO DE FABRICA MAS CERCANO PARA ESTOS LUGARES DENTRO DE UN RADIO DE 80 A 120 KM
(50 A 75 MILLAS) DEL CENTRO DE SERVIClO LOCAL.
ATLANTA
Philips Factory Service
550 Franklin Road., Suite F
Marietta, GA 30067
800-273-1501
TAMPA
Philips Factory Service
1911 US Highway 301 North, Suite 100
Tampa, FL 33619
800-442-2027
SAN FRANCISCO
Philips Factory Service
681 East Brokaw Rd.
San Jose, CA 95112
800-300-9013
HOUSTON
Philips Factory Service
1110 N. Post Oak Rd., Suite 100
Houston, TX 77055
800-952-3254
CLEVELAND
Philips Factory Service
950 Keynote Circle
Brooklyn Heights, OH 44131
800-331-7037
DETROIT
Philips Factory Service
25173 Dequindre
Madison Heights, MI 48071
800-438-1398
DALLAS
Philips Factory Service
415 N. Main Street, #107
Euless,TX 76040
800-952-3254
LOS ANGELES
Philips Factory Service
20930 Bonita, Ste.V
Carson, CA 90746
800-300-9013
CHICAGO
Philips Factory Service
1279 W. Hamilton Pkwy.
Itasca, IL 60143
800-531-2922
KNOXVILLE
Philips Factory Service
One Philips Drive
Building 2
Knoxville,TN 37914
800-821-1767
PHILADELPHIA
Philips Factory Service
354 Dunks Ferry Rd.
Bensalem, PA 19020
800-847-9320
35

COLOR TELEVISION
90 Days Free Labor
One Year Parts Exchange
This product must be carried in for service.
WHO IS COVERED?
You must have proof of purchase to receive warranty service. A sales
receipt or other document showing that you purchased the product is
considered proof of purchase.
WHAT IS COVERED?
Warranty coverage begins the day you buy your product. For 90 days
thereafter, all parts will be repaired or replaced free, and labor is free.
From 90 days to one year from the day of purchase, all parts will be
repaired or replaced free, but you pay for all labor charges. After one
year from the day of purchase, you pay for the replacement or repair
of all parts, and for all labor charges.
All parts, including repaired and replaced parts, are covered only for
the original warranty period. When the warranty on the product
expires, the warranty on all replaced and repaired parts also expires.
WHAT IS EXCLUDED?
Your warranty does not cover:
• labor charges for installation or setup of the product, adjustment
of customer controls on the product, and installation or repair of
antenna systems outside of the product.
• product repair and/or part replacement because of misuse, acci-
dent, unauthorized repair or other cause not within the control of
Magnavox.
• reception problems caused by signal conditions or cable or
antenna systems outside the unit.
• a product that requires modification or adaptation to enable it to
operate in any country other than the country for which it was
designed, manufactured, approved and/or authorized, or repair
of products damaged by these modifications.
incidental or consequential damages resulting from the product.
(Some states do not allow the exclusion of incidental or conse-
quential damages, so the above exclusion may not apply to you.
This includes, but is not limited to, prerecorded material, whether
copyrighted or not copyrighted.)
= a product used for commercial or institutional purposes.
WHERE IS SERVICE AVAILABLE?
Warranty service is available in all countries where the product is
officially distributed by Magnavox. In countries where Magnavox
does not distribute the product, the local Magnavox service orga-
niation will attempt to provide service (although there may be a
delay if the appropriate spare parts and technical manual(s) are
not readily available).
MAKE SURE YOU KEEP...
Please keep your sales receipt or other document showing proof of
purchase. Attach it to this owner S manual and keep both nearby. Also
keep the original box and packing material in case you need to return
your product.
BEFORE REQUESTING SERVICE...
Pleasecheck your owner _ manual before requesting service.
Adjustments of the controls discussed there may save you a service
call.
TO GET WARRANTY SERVICE IN U.S.A.,
PUERTO RICO, OR U.S. VIRGIN ISLANDS...
Contact a Magnavox factory service center (see enclosed list) or
authorized service center to arrange repair.
(In U.S.A., Puerto Rico, and U.S.Virgin Islands, all implied warranties,
including implied warranties of merchantability and fitness for a particu-
lar purpose, are limited in duration to the duration of this express war-
ranty. But, because some states do not allow limitations on how long
an implied warranty may last, this limitation may not apply to you.)
TO GET WARRANTY SERVICE IN CANADA...
Please contact Magnavox at:
1-800-705-2000
(In Canada, this warranty is given in lieu of all other warranties. No
other warranties are expressed or implied, including any implied war-
ranties of merchantability or fitness for a particular purpose. Magnavox
is not liable under any circumstances for any direct, indirect, special,
incidental or consequential damages, howsoever incurred, even if noti-
fied of the possibility of such damages.)
REMEMBER...
Please record below the model and serial numbers found on the
product. Also, please fill out and mail your warranty registration
card promptly. It will be easier for us to notify you if necessary.
MODEL#
SERIAL#
Magnavox, PO. Box 520890, Miami, FL 33152 (402)536-4171
EL6541E001
Printed in China 36