
Loading ...
Loading ...
Loading ...
17
Using the combination mode
Tips on using the combination mode
Please note the following points when using the combination
mode:
■ The temperature range marked on the control knob for the
oven only applies to conventional heating. When the
combination mode is used, the temperature in the oven is
higher than the temperature which was set on the control
knob.
■ If you are operating the grill gas burner on the lowest flame
setting, you must also set the lowest temperature for the oven
gas burner.
Switching on combination mode
1. Open the appliance door.
2. Switch on the oven gas burner by pressing the control knob
for the oven and turning it anti-clockwise to minimun
position
ü (on knob, between Û and 140).
The gas burner ignites.
Keep the control knob pressed for a few seconds until the
flame stabilises.
3. Carefully close the appliance door.
4. Keep the appliance door closed. After 5 minutes switch on
the grill gas burner by pressing the control knob for the grill
and turning it anti-clockwise to position
—.
The gas burner ignites.
Keep the control knob pressed for a few seconds until the
flame stabilises.
Note: Allow the appliance to heat up for 15 minutes, with the
oven cavity empty (no accessories inside).
5. After 10 minutes, carefully open the appliance door and
place the dish inside.
6. Carefully close the appliance door.
7. Using the control knob, set the desired temperature and heat
setting for both burners.
Turning on the grill, when the oven burner is already in
action
When using conventional heating, you can briefly turn on the
grill at the end of the cooking time for food and baked goods
which require more intense browning or a crisped finish (e.g.
crackling).
1. Set the oven gas control knob to the minimum position
ü (on
knob, between
Û and 140).
2. Keep the appliance door closed. Switch on the grill gas
burner by pressing the control knob for the grill and turning it
anti-clockwise to position
—.
The gas burner ignites.
Keep the control knob pressed for a few seconds until the
flame stabilises.
3. After 10 minutes, set the desired temperatures.
Turning on the oven, when the grill burner is already in
action
1. Keep the appliance door closed. Switch on the oven gas
burner by pressing the control knob for the oven and turning
it anti-clockwise to maximun position 250.
The gas burner ignites.
Keep the control knob pressed for a few seconds until the
flame stabilises.
2. Immediately after ignition, set the oven gas control knob to
the minimum position
ü (on knob, between Û and 140)).
3. After 10 minutes, set the desired temperatures.
Switching off combination mode
Turn off the grill and oven gas burners.
Using the rotary spit
The rotary spit can be used to cook joints such as rolled joints
and poultry with excellent results. The meat is roasted
thoroughly and evenly.
Use the rotary spit in conjunction with the grill or combination
mode.
Preparing joints
Place the joint as centrally as possible on the rotary spit and
secure it at both ends with the retaining clips.
You can also truss the joint with string. With poultry, bind the
ends of the wings underneath the back and the thighs against
the body. This prevents them from overbrowning.
Pierce the skin on the underside of the wings to allow the fat to
escape.
Inserting the rotary spit
ã=Risk of burns!
Never touch the hot surfaces of the cooking compartment or
the heating elements. Children must be kept at a safe distance
from the appliance at all times. Open the appliance door
carefully. Hot steam may escape.
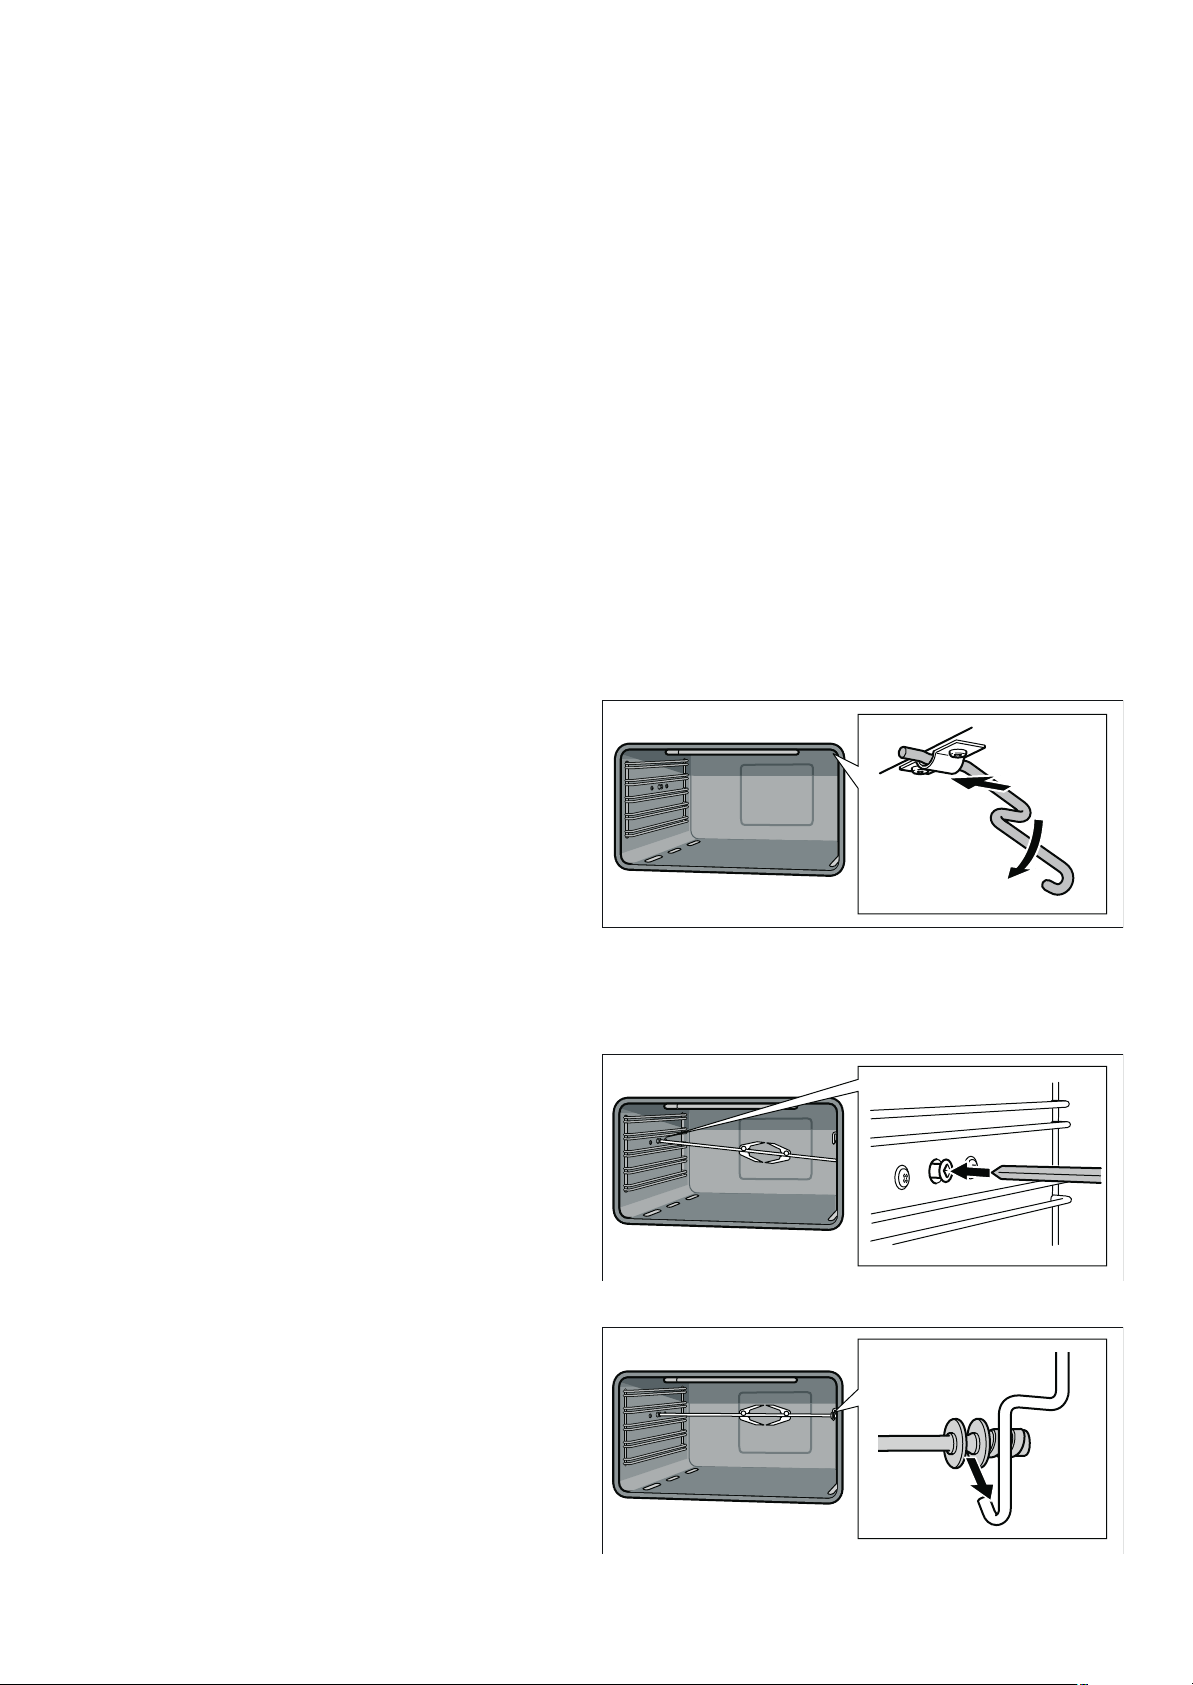
Insert the rotary spit as follows:
1. Hook the spit holder into the bracket on the ceiling of the
cooking compartment.
If you require to preheat the oven, hook in the holder before
preheating.
2. If the oven has been preheated, only attach the rotary spit if
you are using an oven cloth or wearing (thermal) oven
gloves. To attach the spit, slide one end into the recessed
adapter in the left-hand side panel of the cooking
compartment.
3. Hook the other end into the holder.
4. Pour a little water into the baking tray and slide this into shelf
position 1 to collect the drips of fat.
Loading ...
Loading ...
Loading ...