USER GUIDE
12-Channel Thermocouple Datalogger
Model TM500
2 TM500-EU-EN v1.1 12/13
Introduction
CongratulationsonyourpurchaseoftheExtechTM500Thermometer,anSDLoggerSeriesmeter.
Thismeterdisplaysandstorestemperaturereadingsfromuptotwelve(12)TypeK,J,T,R,E,orS
thermocoupletemperatureprobes.LoggeddatareadingsarestoredonanSDcardfortransfertoa
PC.Inaddition,anRS232portallowsdatastreamingtoaPC.Thismeterisshippedfullytestedand
calibratedand,withproperuse,willprovideyearsofreliableservice.PleasevisittheExtech
Instrumentswebsite(www.extech.com)tocheckforthelatestversionofthisUserGuide.
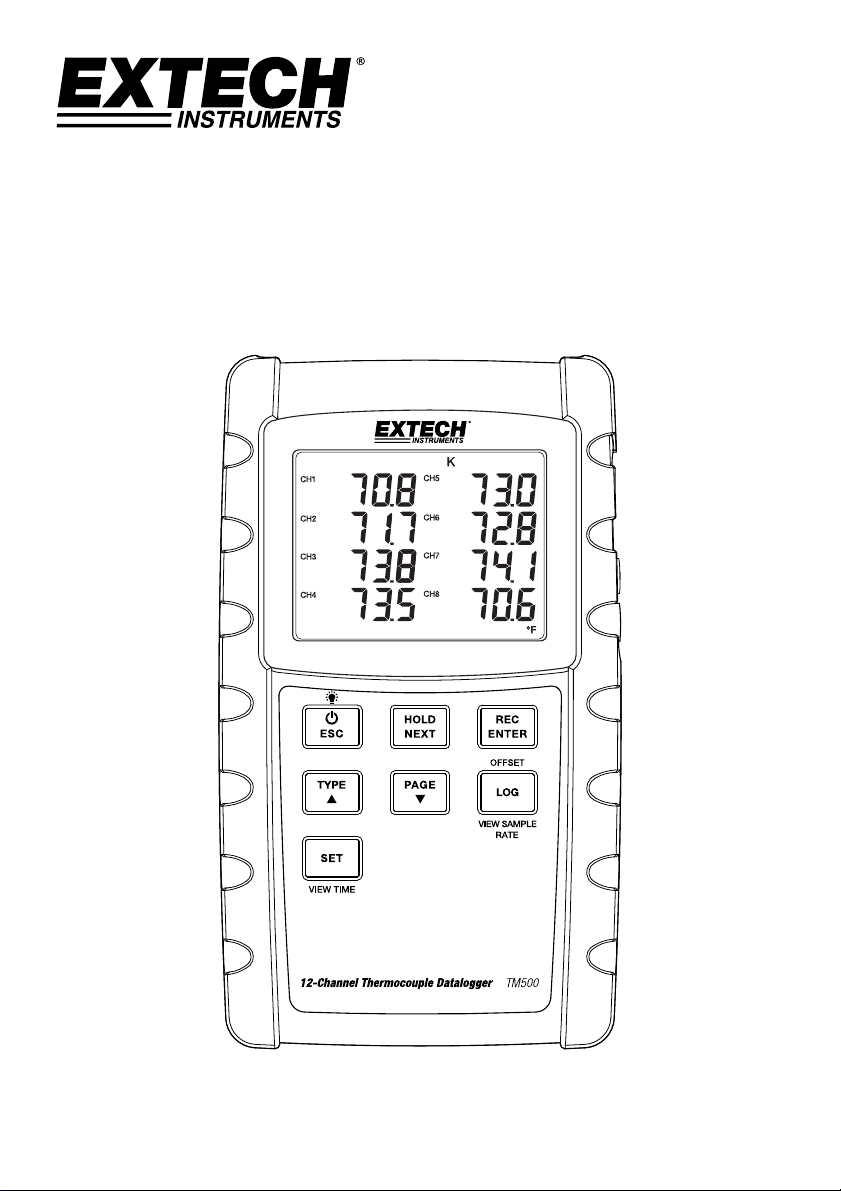
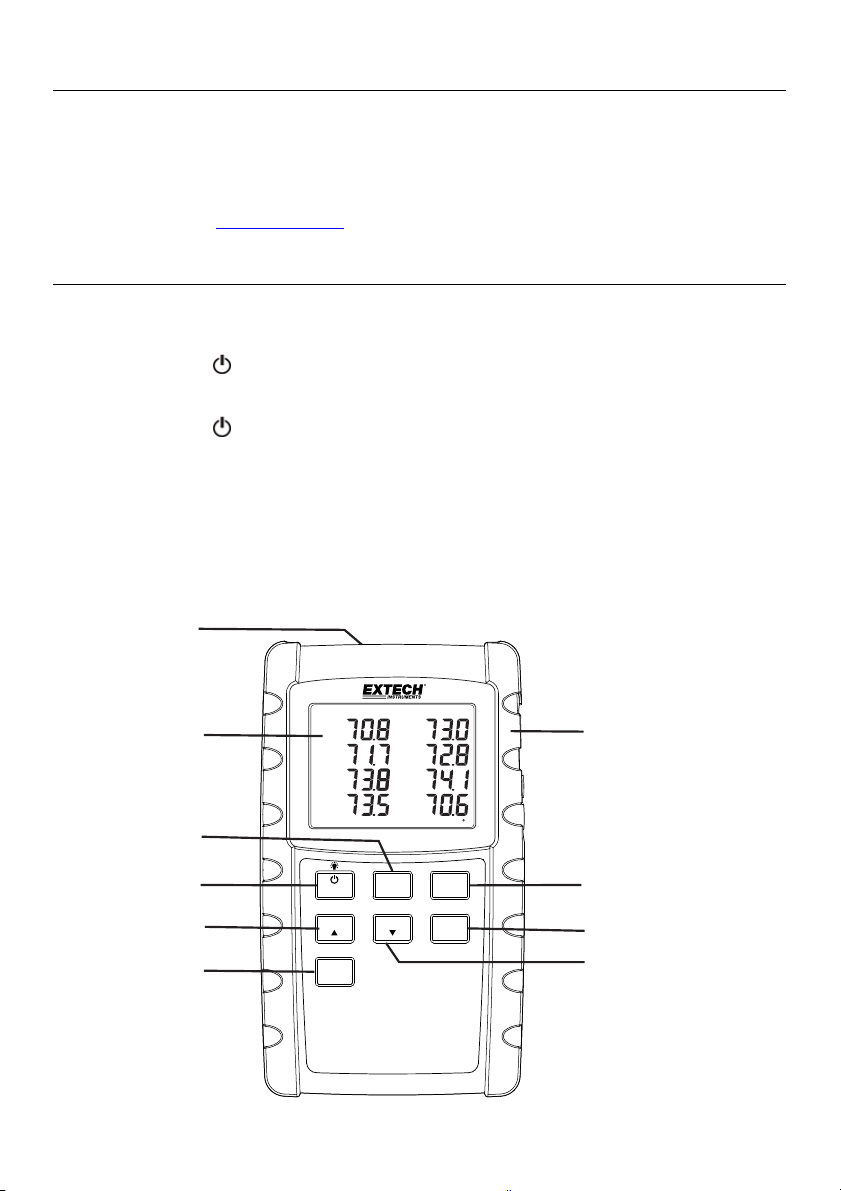
MeterDescription
1. Thermocoupleinputs
2. DCpoweradapter,SDmemoryslot,andPCinterfacejack
3. PowerON‐OFF
andBacklightkey
4. HOLDandNEXTkey
5. PowerON‐OFF
andESCkey
6. RECandENTER
7. TYPE▲key(K,J,T,R,E,orS)
8. LOGGER(Offset)key
9. SET(TimeCheck)key
10. PAGE▼key(DisplayT1‐8orT9‐12)
LOG
TYPE PAGE
SET
ESC
HOLD
NEXT
REC
ENTER
12-Channel Thermocouple Datalogger
TM500
VIEW SAMPLE
RATE
VIEW TIME
OFFSET
F
CH8
CH7
CH6
CH5
CH4
CH3
CH2
CH1
K
1
2
3
4
5
6
7
8
9
10
3 TM500-EU-EN v1.1 12/13
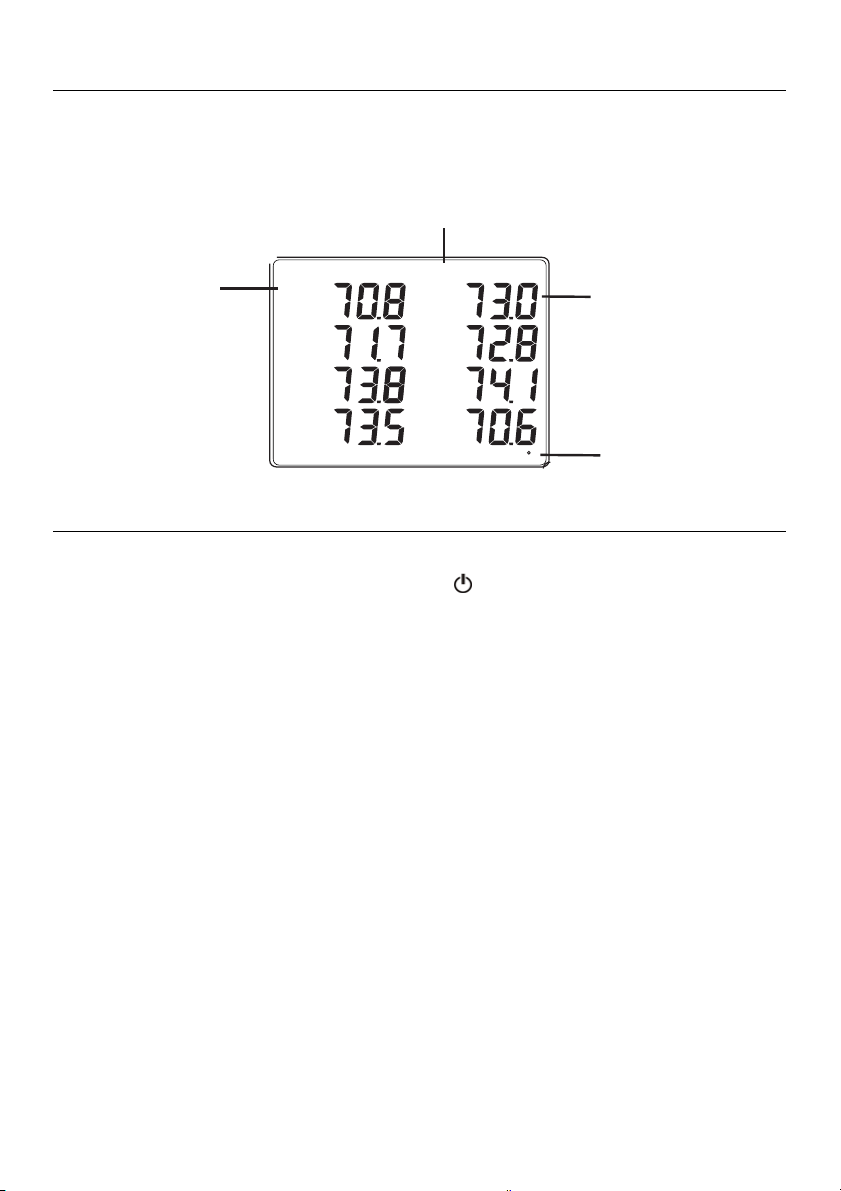
DisplayDescription
1. TemperatureChannelnumber(1–8or9–12)
2. ThermocoupleTypeindicator(K,J,T,E,R,orS)
3. Temperaturereading
4. Unitsofmeasure(C/F)
GettingStarted
PowerON‐OFF
Powerthemeterbypressingthepowerbutton .
Pressandholdthepowerbuttonforatleast3secondstopowerOFFthemeter.
Thismeterispoweredbyeight(8)1.5VDC‘AA’batteriesorbyoptionalACadaptor.Ifthe
meterwillnotswitchONpleasecheckthatfreshbatteriesareinstalledinthe
rearbattery
compartment(refertothebatteryreplacementsectionlaterinthisguide)or,inthecaseof
theACadaptor,checkthattheadaptorisconnectedcorrectlytothemeterandtoanAC
source(refertotheACPowerAdaptorsectionlaterinthisguide).
ConnectingThermocoupleSensors
ThismetercanacceptThermocoupletemperatureprobeTypesK,J,T,E,R,orS.
Connectuptotwelve(12)thermocouplestothesub‐miniaturejacksatthetopofthemeter
labeledT1throughT12.
Selectthedesiredmodeofoperation,andothersetupfeatures,intheSetup
Mode.Referto
theSetupModesectionbelow.
IMPORTANTNOTE:Thesuppliedthermocoupleprobesareuseableintherangeof‐20to+250°C
(‐4to+482°F)only;eventhoughthemetercandisplaytemperaturevaluesoutsideofthisrange.
Formeasuringoutsideoftherangespecifiedhere,pleaseobtainthermocouplesrated
accordingly.
F
CH8
CH7
CH6
CH5
CH4
CH3
CH2
CH1
K
1
2
3
4

4 TM500-EU-EN v1.1 12/13
SetupMode
Basicsettingsataglance
Toviewthecurrentconfigurationofthemeterwithregardtotime,date,anddatalogging
samplingratepresstheSETbuttonfor>4seconds.Themeterwillnowdisplaytheconfiguration
menu.TheSetuppagerevertstothetemperaturewindowinapproximately 8secondsifthere
arenobuttonpresses.
AccessingtheSetupmode
1. PressandholdtheSETbuttonforatleast4secondstoaccesstheSetupmenu.
2. PresstheNEXTbuttonmomentarilytostepthroughtheavailableparameters.
3. WhenaparameterthatistobechangedisflashingclickENTERtoenterthechangemode.
Usethearrowkeys
tochoosethesettingandpresstheENTERbuttontomakethechange.
4. Notethatthemeterautomaticallyswitchesoutofthe Setupmodeifnokeyispressed
within8seconds.
5.
TheavailableSetupparametersarelistedbelow.Additionaldetailedinformationis
providedbelowthislist:
dAtE
Settheclock(Year/Month/Date ;Hours/M inutes/Seconds)
LooP
StartandEndaloopmeasurementcycle
dEC
Setthenumericalformat;USA(decimal: 20.00)orEuropean( comma:20,00)
PoFF
Automaticpower‐off(Enableordisabletheauto‐powerofffunction)
bEEP
SetthebeepersoundON/OFF
t‐CF
Selectthetemperature unitof measure(CorF)
SP‐t
Setthedataloggersamplingrate(1to3600second s)
SdF
FormattheSDmemory card
SettingtheClockTime
1. AccessthedAtEparameter.
2. PresstheENTERbutton.
3. UsethearrowbuttonstochangetheYEARvalue.PressENTERtoconfirmsetting.
4. RepeatforMONTH,DAY,HOUR,MINUTEandSECONDS.
5. PresstheENTERbuttontoexittotheSetupmode.PressESCtoexitsetupmode.
Note:Theclockwillkeepaccuratetimeevenwhenthemeterisswitchedoff.However,ifthe
batteriesexpiretheclockwillhavetoberesetafterfreshbatteriesareinstalled.

5 TM500-EU-EN v1.1 12/13
SettingdataloggingLoopmode
Thismetercanbesettorecordtemperaturesforthesametimeeveryday.
Example–recordtemperatureseverydayfrom9:00to13:00
1.
AccesstheLooPpa ramete r .
2.
PresstheENTERbutton.
3.
SettheStartHour(0‐23 )andpressENTER.
4.
SettheStartMinuteandpress ENTER.
5.
SettheStopHourandpr ess ENTER.
6.
SettheStopMinuteandpressENTER.
7.
PresstheupordownarrowtoindicateYESandpressENTER.
8.
PresstheRECbuttonsotheRECiconisvisibleonthedisplay.Themeterisnowsetupto
recordtemperatureevery dayforthesettimewindow.
SettingdECmode‐NumericalFormat(commaordecimal)
EuropeanandUSAnumericalformatsdiffer.ThemeterdefaultstoUSAmodewhereadecimal
pointisusedtoseparateunitsfromtenths,i.e.20.00;TheEuropeanformatusesacomma,i.e.
20,00toseparateunitsfromtenths.Tochangethissetting:
1. AccessthedECparameter.
2. Usethe
arrowbuttonstoselectUSAorEUro.PressENTERtoconfirmsetting.
3. PresstheENTERbuttontoexittotheSetupmode.PressESCtoexitsetupmode.
SettingPoff‐Enabling/DisablingtheAutoPowerOFFFeature
1. AccessthePoFFparameter.
2. UsethearrowbuttonstoselectON(enable)orOFF(disable).WiththeAutoPowerOFF
featureenabled,themeterwillautomaticallyswitchOFFafter10minutesofinactivity.
3. PressENTERtoconfirmsetting.
4. PresstheENTERbuttontoexittotheSetup
mode.PressESCtoexitsetupmode.
SettheBeeperSoundONorOFF
1. AccessthebEEPparameter.
2. UsethearrowbuttonstoselectONorOFF.PressENTERtoconfirmsetting.
3. PresstheENTERbuttontoexittotheSetupmode.PressESCtoexitsetupmode.

6 TM500-EU-EN v1.1 12/13
SettheTemperatureUnitsofMeasure(°Cor°F)
1. Accessthet‐CFparameter.
2. Usethearrowbuttonstoselect°Cor°F.PressENTERtoconfirmsetting.
3. PresstheENTERbuttontoexittotheSetupmode.PressESCtoexitsetupmode.
SettingtheDataloggerSamplingTime(Rate)
1. AccesstheSP‐tparameter.
2. Usethearrowbuttonstoselectthedesiredsamplingrate.Theavailablesettingsare:
0,1,2,
5,10,30,60,120,300,600,1800,and3600seconds.Use‘0’ formanuallogg ingmode.A
samplingrate>1secondisrecommended.
3.
PresstheENTERbuttontoconfirmtheentry.
4. PresstheENTERbuttontoexittotheSetupmode.PressESCtoexitsetupmode.
SDCardFORMATTING
1. AccesstheSdFparameter.
2. UsethearrowbuttonstoselectYEStoformatthecard(selectNOtoabort).Notethatall
dataonthecardwillbelostifformattingisattempted.
3. PressENTERtoconfirmselection.
4. PressENTERagaintore‐confirm.
5. Press
theENTERbuttontoexittotheSetupmode.PressESCtoexitsetupmode.
Note:alwaysformatanewSDmemorycardbeforeuse.

7 TM500-EU-EN v1.1 12/13
Measurementsandrelatedfeatures
BasicThermocoupleMode
ThermocouplesareconnectedatthetopofthemetertothejackslabeledT1throughT12.
Selectthethermocoupletype(J,K,etc.)tomatchthethermocoupletypeused.Innormal
thermocouplemodethemeterwillsimultaneouslydisplaythetemperatureforthermocouples
T1throughT12.Dashesaredisplayedifathermocouple
isnotconnectedorifthemeasurement
isoutofrange.
DataHold
Tofreezeameasurementonthedisplay,presstheHOLDbuttonmomentarily.Themeterwill
emitabeep,thereadingwillhold,andtheHOLDiconwillswitchon.PresstheHOLDbutton
againtoreleasethedisplayandexittheDataHoldmodereturningthemetertothenormal
operatingmode.
TemperatureDisplayOFFSET
TheVPC300allowstheusertosetadisplayoffsetthatappliestoallofthethermocouple
displaysequally.Tosetthedisplayoffsetfollowthestepsbelow:
1. PressandholdtheOFFSETbutton for3secondstoreachtheoffsetscreen.The
temperatureontheleftisthecurrentlydisplayedtemperatureforChannel1andthe
temperatureontherightistheoffsettemperature
2. Use
theupanddownarrowkeystoadjustthedisplayontherighttooffsetthedisplayas
desired.
3. Whenfinished,presstheENTERbuttontostoretheoffsetandreturntonormaloperation.
4. Allofthethermocouplereadingswillnowreflecttheoffsetvalueprogrammedbythe
user.
TocleartheOFFSET,followthestepsbelow:
1. SwitchthemeterpowerOFF
2. PressandholdtheHOLDandRECbuttonswhileswitchingthemeterpowerON
3. ReleasethetwobuttonswhenthemeterswitchesON
4. PressandholdtheOFFSETbutton for5secondsandthe
displaywillshowCODE100
5. UsetheuparrowbuttontochangefromCODE100toCODE125andthenpressENTER
6. UsethearrowbuttonstoselectYESorNOandthenpressENTER
7. IfYESisselected,themeterwillclearthepreviouslyprogrammedoffset.
IfNOisselected,
themeterwillretaintheoffsetprogrammedbytheuser.
MAX‐MINReadings
Foragivenmeasurementsession,thismetercanrecordthehighest(MAX)andthelowest(MIN)
readingsforlaterrecall.
1. PresstheRECbuttonmomentarilytoaccessthismodeofoperation(RECiconappears)
2. ThemeterisnowrecordingtheMAXandMINreadings.
3. PresstheRECbutton
againtoviewthecurrentMAXreadings(MAXiconappears).The
readingsonthedisplayarenowthehighestreadingsencounteredsincetheRECiconwas

8 TM500-EU-EN v1.1 12/13
switchedon(whentheMAX‐MINbuttonwasfirstpressed).TodeletetheMAXvalue,press
theHOLDbutton.ThedisplaywillshowjusttheRECicon.
4. PresstheRECbuttonagain toviewthecurrentMINreadings(MINiconappears).The
readingsonthedisplayarenowthelowest
readingsencounteredsincetheRECiconwas
switchedon(whentheMAX‐MINbuttonwasfirstpressed).TodeletetheMINvalue,press
theHOLDbutton.ThedisplaywillshowjusttheRECicon.
5. ToexittheMAX‐MINmode,pressandholdtheRECbuttonforatleast
1.5seconds.The
meterwillbeep,theREC‐MAX‐MINiconswillswitchoff,theMAX‐MINmemorywillclear,
andthemeterwillreturntothenormaloperatingmode.
DisplayBacklight
ToturnthedisplaybacklightONorOFF,pressthebacklight buttonmomentarily.Themeter
willbeepwhenswitchingthebacklightONorOFFunlessthebeeperisdisabledasdescribedin
theSetupModesectionofthisuserguide.
TimeCheck
MomentarilypresstheSETbuttonandthemeterscurrentDateandTimewillappearinthe
lowerleftcornerofthedisplay.
SamplingTimeCheck
Wheninnormalmode,presstheLOGGERbuttonmomentarily.TheSampleratesettingwill
appearinthelowerleftcornerofthedisplay.
RS‐232/USBPCInterface
ForstreamingofdatatoaPCviatheRS232Outputjack,theoptional407001‐USBkit(USBcable
anddriverCD)alongwiththe407001software(availablefreeatwww.extech.com)arerequired.
ACPowerAdaptor
Thismeterisnormallypoweredbyeight(8)1.5V‘AA’batteries.Anoptional9Vpoweradaptoris
available.Whentheadaptorisused,themeterispermanentlypoweredandthepowerbutton
willbedisabled.

9 TM500-EU-EN v1.1 12/13
DataloggingandPCInterface
TypesofDataRecording
ManualDatalogging:Manuallylogupto99readingsontoanSDcardviapush‐buttonpress.
Thesampleratemustbesetto0toimplementthismode.
AutomaticDatalogging:AutomaticallylogdataontoanSDmemorycardwherethenumber
ofdatapointsisvirtuallylimitedonlybythecardsize.Readingsareloggedataratespecified
bytheuserfrom1to3600seconds.
RS‐232/USB:ThemeterincludesanRS‐232/USBPCinterfacejacklocatedonthelowerright
sideofthemeterunderthesnap‐offcompartmentcover.ForstreamingofdatatoaPCvia
theRS232Outputjack,theoptional407001‐USBkit(USBcableanddriverCD)alongwiththe
407001software(availablefreeathttp://www.extech.com/instruments/software.asp)are
required.
SDCardInformation
InsertanSDcard(from1Gsizeupto16G)intotheSDcardslotatthebottomofthemeter.
Thecardmustbeinsertedwiththefrontofthecard(labelside)facingtowardtherearofthe
meter.
IftheSDcardisbeingusedfor
thefirsttimeitisrecommendedthatthecardbeformatted
andthelogger’sclocksettoallowforaccuratedate/timestampingduringdatalogging
sessions.RefertotheSetupModesectionforSDcardformattingandtime/datesetting
instructions.
EuropeanandUSAnumericalformatsdiffer.ThedataontheSDcardcanbeformattedfor
eitherformat.ThemeterdefaultstoUSAmodewhereadecimalpointisusedtoseparate
unitsfromtenths,i.e.20.00.TheEuropeanformatusesacomma,i.e.20,00.Tochangethis
setting,refertotheSetupModesection.
ManualDatalogging
InthemanualmodetheuserpressestheLOGbuttontomanuallylogareadingontotheSDcard.
1. Setthesamplingrateto‘0’secondsasdescribedinthe SetupModesection.
2. PressRECbuttontoturnonmanualrecordmode.TheRECiconwillappearinthe
upper
leftcornerofthedisplay.Thelowerportionofthedisplaywillshowp‐n(n=memory
positionnumber1‐99).
3. PresstheENTERbuttonmomentarilytologareadingintomemory.TheLOGGERiconwill
flasheachtimeadatapointisstored(theSCANSD
iconwillappearwhenthemeter
accessesthecard).
4. Advancetothenextmemorylocationusingtheuparrow▲button.
5. Toexitthemanualdataloggingmode,pressandholdtheRECbuttonforatleast1.5
seconds.

10 TM500-EU-EN v1.1 12/13
AutomaticDatalogging
Inautomaticdataloggingmodethemetertakesandstoresareadingatauser‐specifiedsampling
rateontoanSDmemorycard.Themeterdefaultstoasamplingrateoftwoseconds.Tochange
thesamplingrate,refertotheSetupModesection(thesamplingratecannotbe‘0’for
automatic
datalogging):
1. PressRECbuttontoturnonrecordmode.TheRECiconwillappearintheupperleftcorner
ofthedisplay.
2. StartanautomaticDataloggingsessionbypressingtheLOGGERbutton.
3. ThemeterwillscanforanSDcardandverifythatitcanbeused
tostoredata.Ifacardis
notinsertedorifthecardisdefective,themeterwilldisplaySCANSDindefinitely.Inthis
case,switchthemeterOFFandtryagainwithavalidSDcard.
4. IftheSDcardisvalid,thedisplaywillshowtheDATALOGGERicon
andthenthe
DATALOGGERandtheRECiconswillflasheachtimethatareadingisstored.
5. TopausethedataloggerpresstheLOGGERbuttonmomentarily.TheDATALOGGERandREC
iconswillstopflashing.ToresumeloggingsimplypresstheLOGGERbuttonagain
momentarily.
6. Toterminatethedatalogging
sessionpresstheLOGGERbuttontostoptheloggingandthen
presstheRECbuttonforatleast1.5seconds.
7. WhenanSDcardisusedforthefirsttimeafolderiscreatedonthecardandnamed
TMD01.Upto99spreadsheetdocuments(eachwith30,000readings)
canbestoredinthis
folder.
8. WhendataloggingbeginsanewspreadsheetdocumentnamedTMD01001.xlsiscreatedon
theSDcardintheTMD01folder.Thedatarecordedwillbe placedintheTMD01001.xls
documentuntil30,000readingsarereached.
9. Ifthemeasurementsessionexceeds30,000readings,anew
documentwillbecreated
(TMD01002.xls)whereanother30,000readingscanbestored.Thismethodcontinuesfor
upto99documents,afterwhichanotherfolderiscreated(TMD02)whereanother99
spreadsheetdocumentscanbestored.Thisprocesscontinuesinthissamefashionwith
foldersTMD03throughTMD10(lastallowablefolder).
11 TM500-EU-EN v1.1 12/13
SDDataCardtoPCDataTransfer
1. Completeadataloggingsessionasdetailedinaboveintheprevioussections.Hint:Forthe
firsttest,simplyrecordasmallamountoftestdata.Thisistoensurethatthedatalogging
processiswellunderstoodbeforecommittingtocriticaldatalogging.
2. WiththemeterswitchedOFF,removetheSD
Card.
3. PlugtheSDCarddirectlyintoaPCSDcardreader.IfthePCdoesnothaveanSDcardslot,
useanSDcardadaptor(availableatmostoutletswherecomputeraccessoriesaresold).
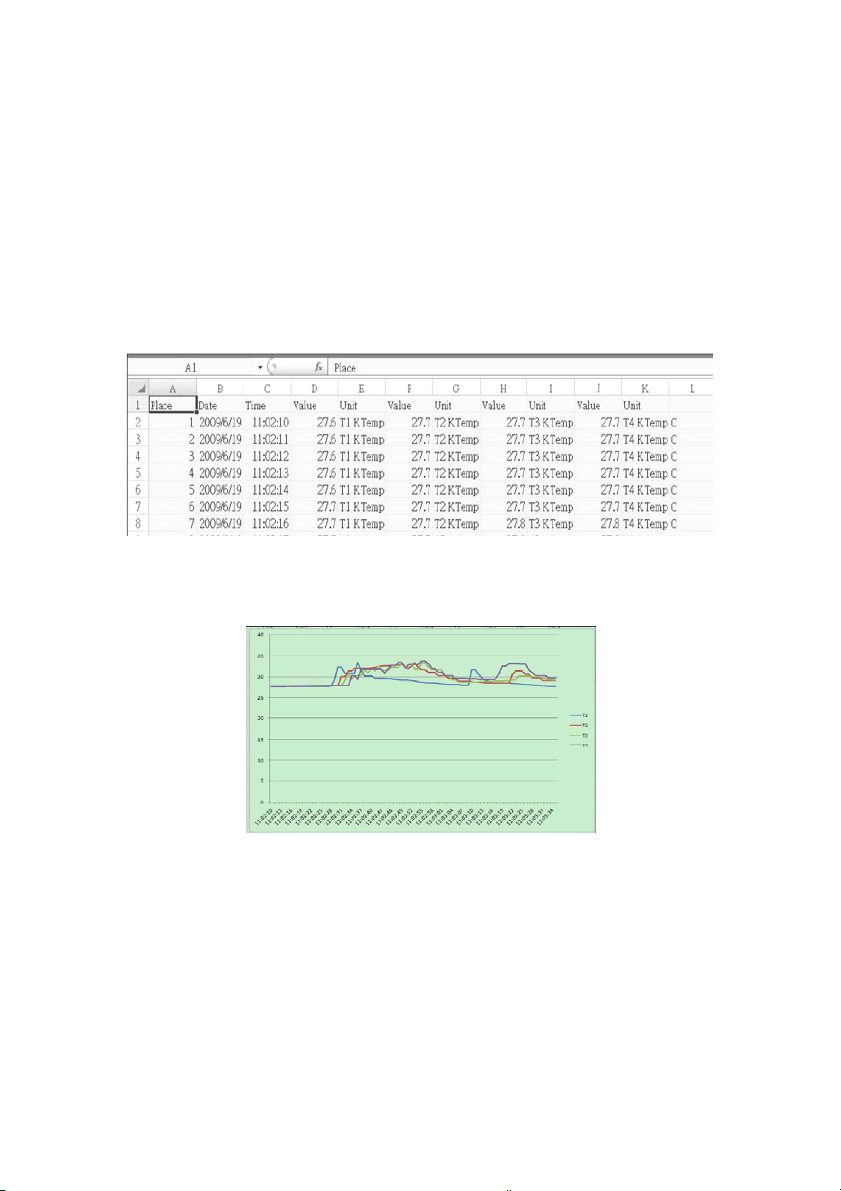
4. PowerthePCandrunaspreadsheetsoftwareprogram.Openthesaved
documentsinthe
spreadsheetsoftwareprogram(seeexamplespreadsheetdatascreensbelow).
Spreadsheetdataexample
Spreadsheetexample(Plottingthedata)

12 TM500-EU-EN v1.1 12/13
BatteryReplacementandDisposal
Whenthelowbatteryicon appearsontheLCD,thebatteriesmustbereplaced.Several
hoursofaccuratereadingsarestillpossibleinthiscondition;howeverbatteriesshouldbe
replacedassoonaspossible:
Removethetwo(2)Phillipsscrewsfromtherearofthemeter.
Removeandsafelyplacethebatterycompartmentandscrewswheretheywillnotbelost.
Replacetheeight(8)1.5V‘AA’batteriesobservingpolarity.
Replacethebatterycompartmentcoverwiththetwo(2)Phillipsscrews.
BatterySafetyReminders
Neverdisposeofbatteriesinafire.Batteriesmayexplodeorleak.
Nevermixbatterytypes.Alwaysinstallnewbatteriesofthesametype.
Asconsumers,usersarelegallyrequiredtotakeusedbatteriestoappropriate
collectionsites,theretailstorewhere thebatterieswerepurchased,orwherever
batteriesaresold.
Disposal:Donotdisposeofthisinstrumentinhouseholdwaste.Theuserisobligated
totakeend‐of‐lifedevicestoadesignatedcollectionpointforthedisposalof
electricalandelectronicequipment.

13 TM500-EU-EN v1.1 12/13
Specifications
GeneralSpecifications
Display BacklitLCD;LCDsize:
82×61mm(3.23×2.40")
Statusindicators Over‐ra nge (‐‐‐‐)andlowbat tery
MeasurementCh annels T1toT12
Sensortypes Thermocoupletypes:K,J,T,E,R,andS
MeasurementUn i ts °C/°F
OffsetAdjustment Toadjustthezerotemperaturedeviatio nvalue
LinearityCompensation Linearcompensati onforthefullrange
Datalogger SamplingRate AUTOLOGGING:1,2,5,10,30,60,120,
300,600,1800,
3600seconds.Note thataone(1) secondsamplingra te
cancause somedata lossonslowercomputer s
MemoryCa rd SDmemorycard;1Gto16GBsize
TemperatureCompen sati on Automaticcompensationforallthermo co uple types
Displayupdate rate Approx.1second.
DataOutput RS‐232/USBPC
computerinterface(9600,N,8,1)
OperatingTemperature 0to50°C(32to122°F)
OperatingHumidit y 85%R.H.maximum
AutoPowerOFFAfter10minutesofinactivity(canbe disab le d)
PowerSupply Eight(8)1. 5VDCba tte r ies (optional9VAC adaptor)
PowerConsumptio n Withbacklight&da ta log gerOFF:approx.7. 5mA
dc
WithbacklightOFFanddatalogger ON:approx.25mAdc
WithbacklightONanddata loggerON:approx.36mAdc
Weight 827g(1.84lbs.)meteronly
Dimensions Maininstrument:225x125x64mm(8.86x4.92x2.52”)

14 TM500-EU-EN v1.1 12/13
ThermocoupleInput
(typesK,J,T,E,R,andS)
Thesuppliedthermocoupleprobesareuseableintherangeof‐20to+250°C(‐4to+482°F)only.For
measuringoutsideofthisrange,pleaseobtainthermocouplesratedaccordingly.
Accuracyspecifiedformeteronly.Inputprobesaddadditionalmeasurementerror.GenerallyRTD
probesintroduceasmallererrorthan
thermocouples.
TheabovespecificationsaretestedunderanenvironmentalRFFieldStrengthlowerthan3V/ Mand
afrequenc ylowerthan30MHz
Copyright©2013FLIRSystems,Inc.
Allrightsreservedincludingtherightofreproductioninwholeorinpartinanyform
www.extech.com
SensorType Resolution Range Accuracy
TypeK
0.1
°
C
‐100.0to‐50.1
°
C
±(0.4%+1
°
C)
‐50.0to999.9
°
C
±
(0.4%+0.5°
C)
1°C
1000to1300
°
C
±(0.4%+1
°
C)
0.1
°
F
‐148.0to‐58.1
°
F
±(0.4%+1.8
°
F)
‐58.0to999.9
°
F
±(0.4%+1
°
F)
1°
F
1000to2372
°
F
±(0.4%+2
°
F)
TypeJ
0.1
°
C
‐100.0to‐50.1
°
C
±
(0.4%+1°
C
)
‐50.0to999.9
°
C
±(0.4%+0.5
°
C)
1°
C
1000to1150
°
C
±(0.4%+1
°
C)
0.1
°
F
‐148.0to‐58.1
°
F
±(0.4%+1.8
°
F)
‐58.0to999.9
°
F
±
(0.4%+1°
F
)
1
°
F
1000to2102
°
F
±(0.4%+2
°
F)
TypeT
0.1
°
C
‐100.0to‐50.1
°
C
±(0.4%+1
°
C)
‐50.0to400.0
°
C
±(0.4%+0.5
°
C)
0.1
°
F
‐148.0to‐58.1
°
F
±(0.4%+1.8
°
F)
‐58.0to752.0
°
F
±
(0.4%+1°
F
)
TypeE
0.1
°
C
‐100.0to‐50.1
°
C
±(0.4%+1
°
C)
‐50.0to900.0
°
C
±(0.4%+0.5
°
C)
0.1
°
F
‐148.0to‐58.1
°
F
±(0.4%+1.8
°
F)
‐58.0to999.9
°
F
±
(0.4%+1°
F
)
1
°
F
1000to1652
°
F
±(0.4%+2
°
F)
TypeR
1
°
C
0to600
°
C
±(0.5%+3
°
C)
601to1700
°
C
1°
F
32to1112
°
F
±(0.5%+5
°
F)
1113to3092°F
TypeS
1
°
C
0to600
°
C
±(0.5%+3
°
C)
601to1500°C
1°
F
32to1112
°
F
±(0.5%+5
°
F)
1113
to2732
°
F