WARNING:
Children have died or been seriously injured when gates are
not securely installed.
• Keep small parts away from children during assembly.
•
ALWAYS install and use gates as directed using all required
parts.
•
You MUST install wall cups to keep the gate in place. Without
wall cups, child can push out and escape.
•
STOP using when a child can climb over or dislodge the gate.
•
Use only with the locking/latching mechanism securely
engaged.
•
NEVER use to keep child away from pool.
Keep this instruction sheet for future reference, as it contains important information.
CAUTION:
•
ALWAYS
check regularly to ensure gate and locking
systems are secure. Tighten locking hardware as necessary.
DO NOT
over-tighten.
•
DO NOT
use gate if any parts are missing or broken. Contact
Dorel Juvenile Group for replacement parts and instructional
literature if needed.
•
DO NOT
use any replacement parts not provided by Dorel
Juvenile Group.
•
DO NOT
substitute parts or try to modify the product in any
way. Parts not provided and approved by Dorel Juvenile
Group may result in an unsafe product.
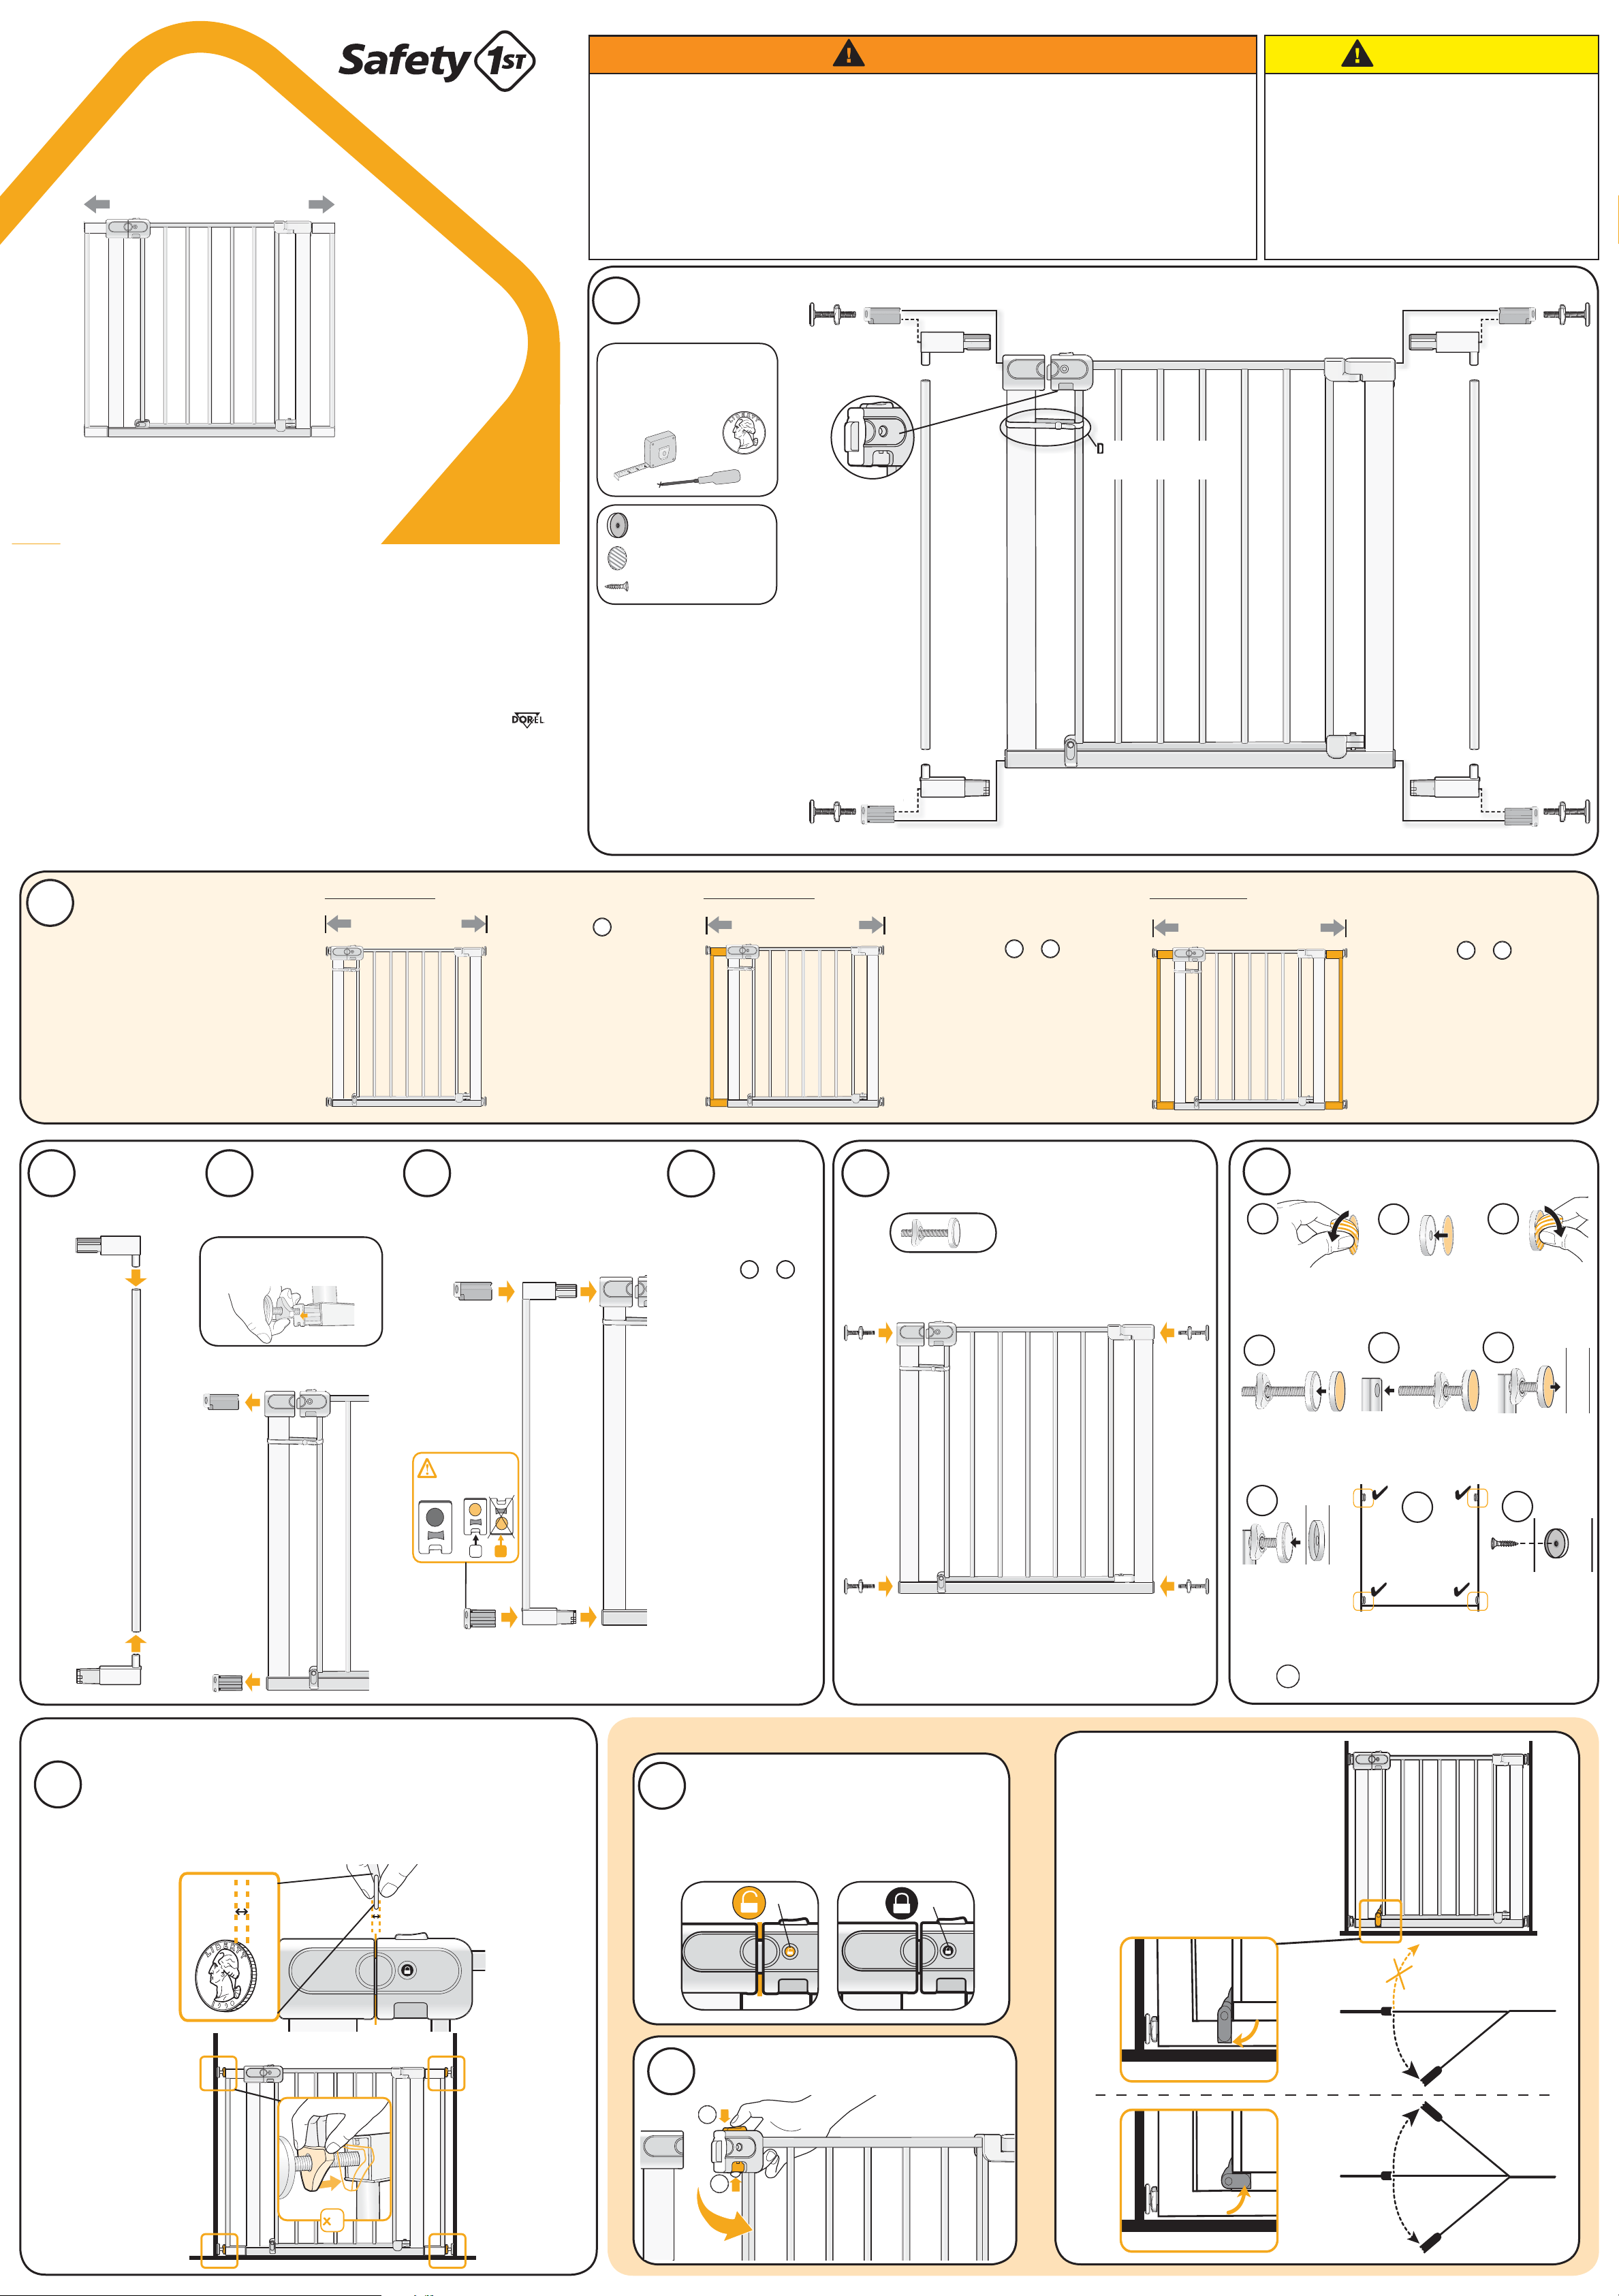
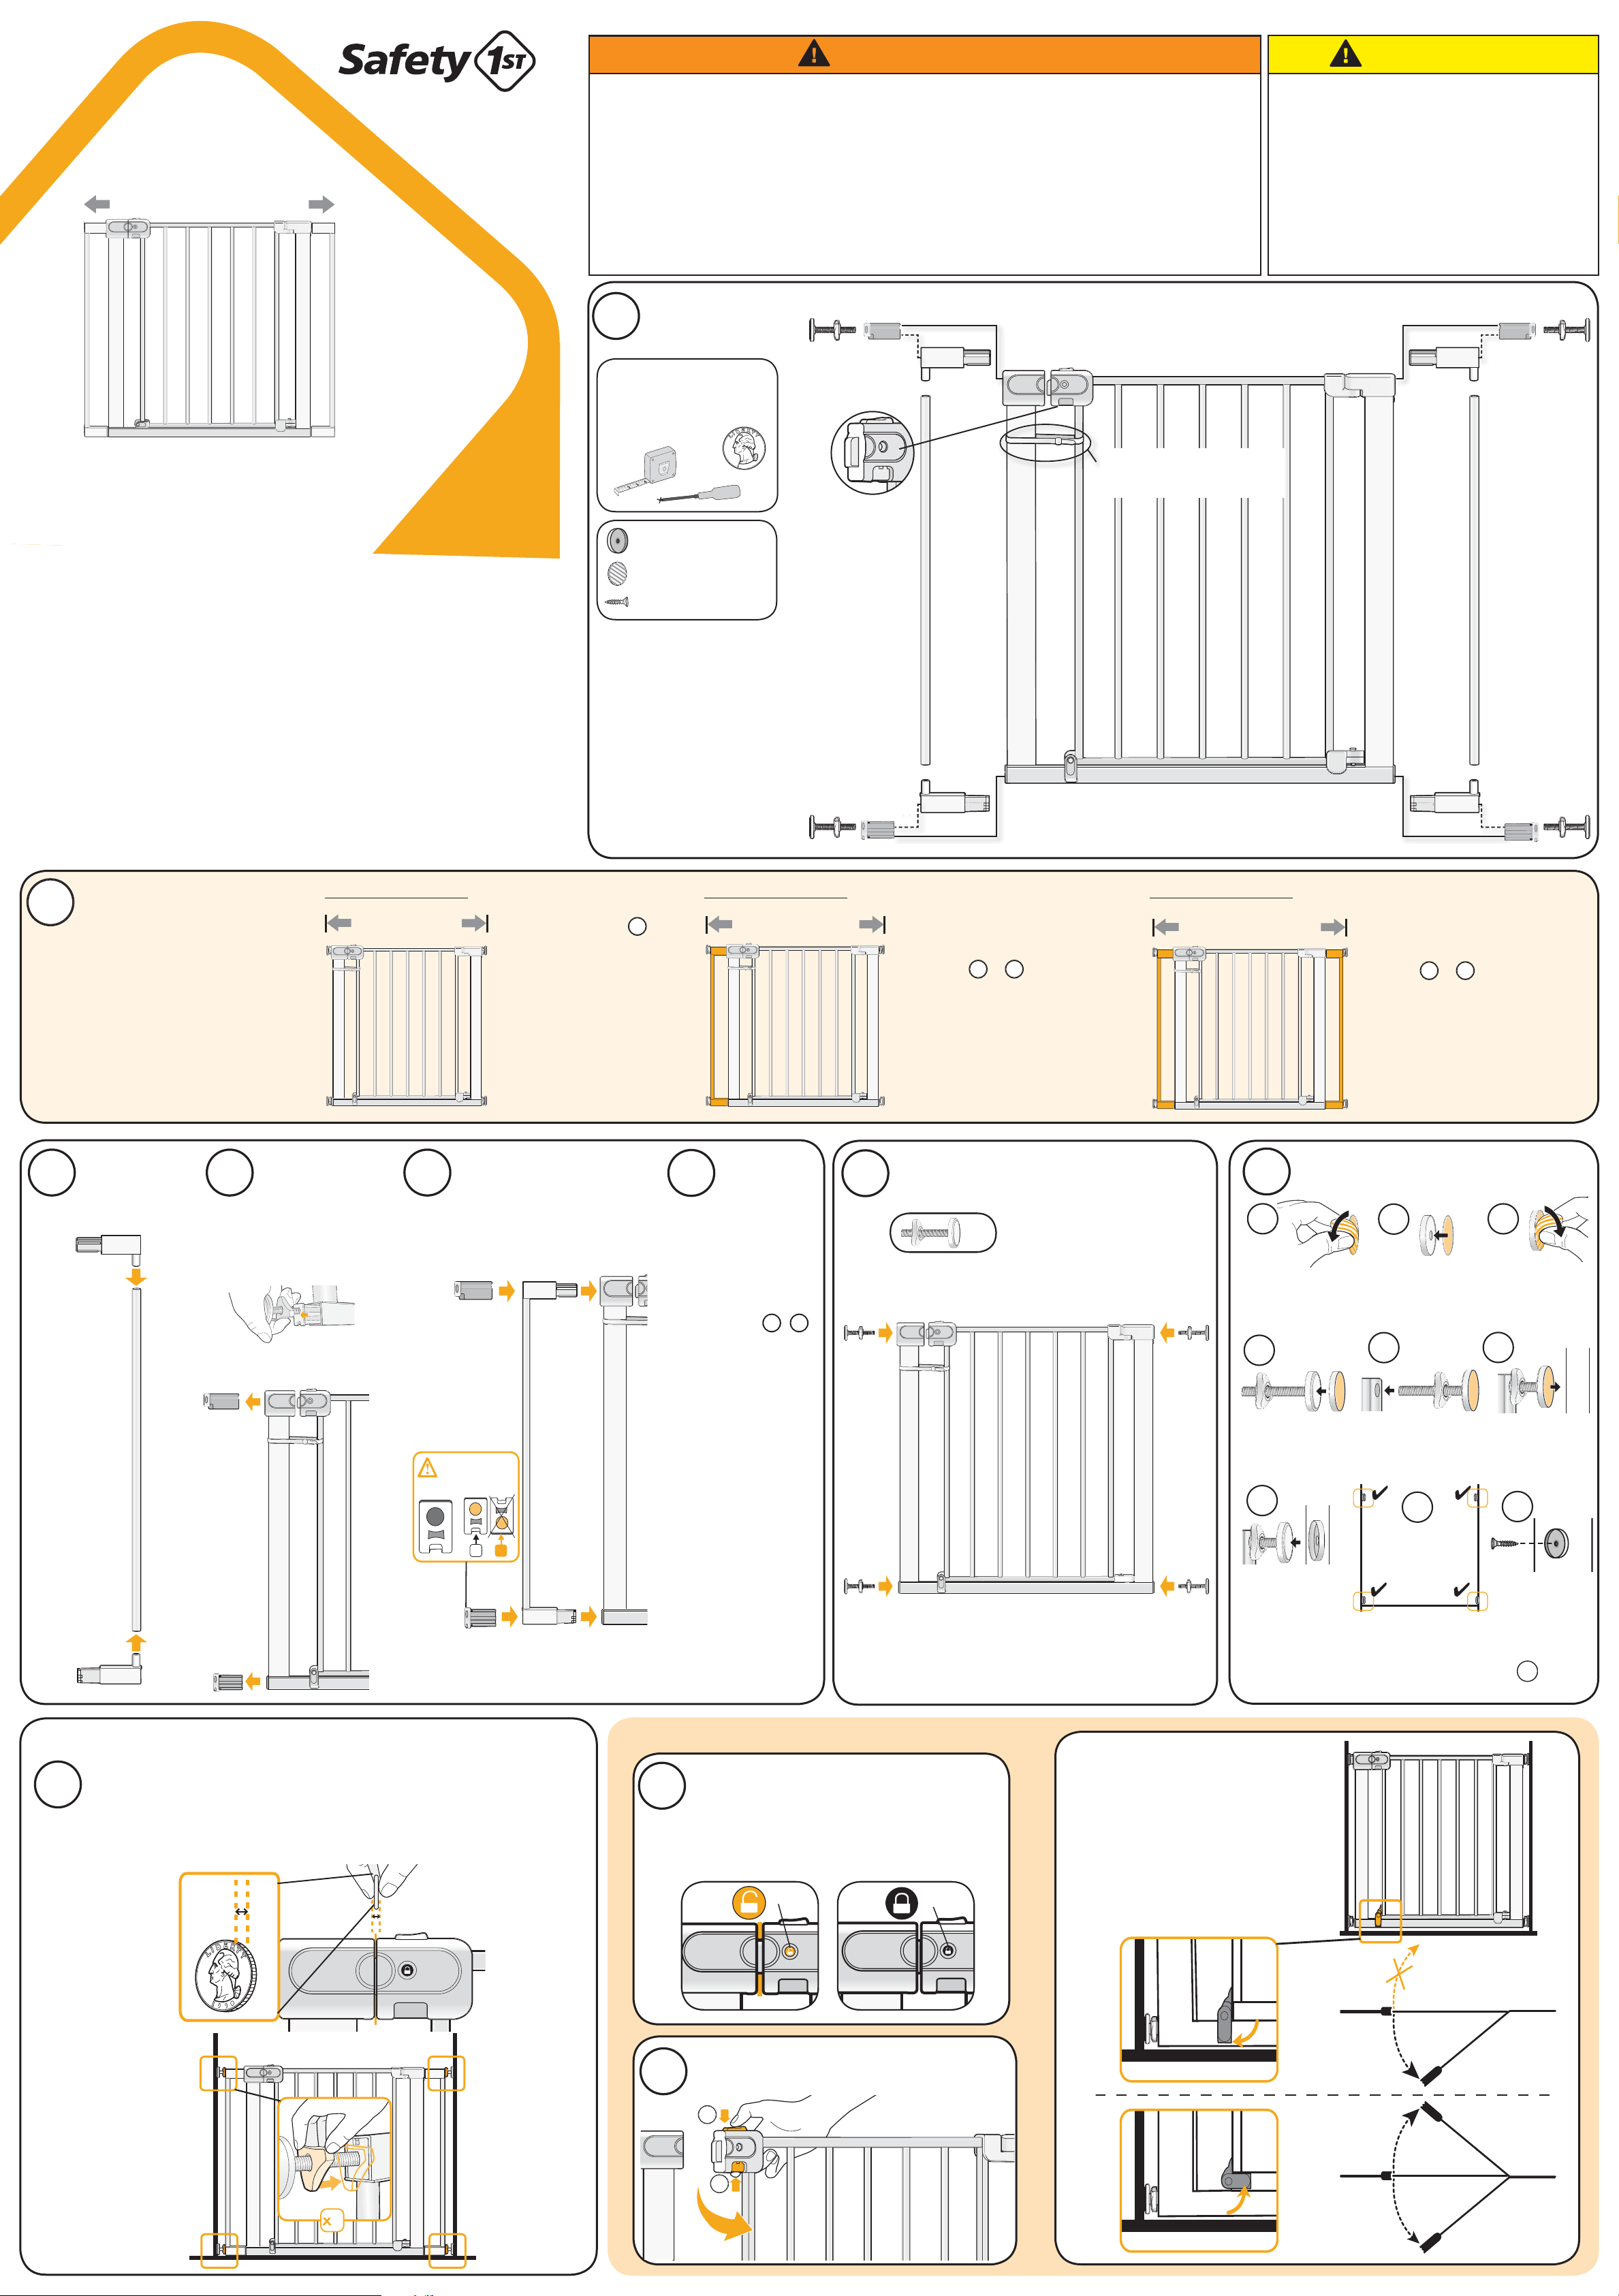
Lay out
all parts
1
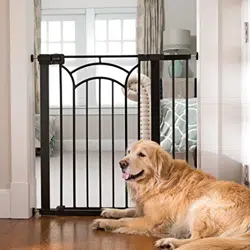
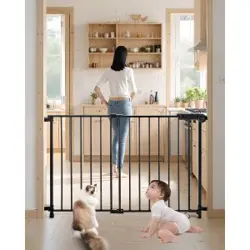
Easy Install
Auto-Close
Walk-Thru Gate /
Hands Free
Auto-Close Gate
min 29” - max 38”
Age: 6 to 24 months.
Adult assembly
required.
Repeat steps
2a
–
2c
with second extension on
the other side of the gate.
Insert extension into gate.
TIP: Use the bolt side of the
bumper to gently extract the
extension caps from the gate.
USA
USA
BOTTOM
TOP
Assemble
extension
Add extension
For openings
over 35” only
Transfer
extension
caps
OK
NO
USA
USA
TOP
BOTTOM
USA
Top
Bottom caps:
check!
Insert pressure bumpers into
4 corners
x4
Remove extension caps from
gate and insert into extension.
Use 2 extensions,
Go to steps
2a
–
2d
Use 1 extension,
Go to steps
2a
–
2c
Go to step
3
Up to 38”
If Opening is...
Measure opening
Up to 35”
If Opening is...
Up to 32”
If Opening is...
2
2b 2c
2d
2a
3
To Use
Using the SecureTech
TM
indicator
When gate door is open, SecureTech
TM
indicator
will turn red. Recheck tension if gate is not closing
automatically.
USA
USA
Red Green
6
1
2
Remove ‘STOP’ sign, raise
swing stops and open gate
7
Optional:
Using the swing stops
Gate will swing both ways unless
one of the swing stops is down.
Gate will not swing at all if both
swing stops are down.
Install
TIP: Think about which side you’ll want the handle on during daily use when you position
the gate.
Position gate flush to floor. Hand tighten top and bottom pressure bumpers until gap between
door and latch is 2mm — about the thickness of a quarter. Re-check tension regularly —
pressure mounted gates can loosen with regular use.
USA
USA
USA
USA
4
5
USA
2mm
Open Closed
©2021 Dorel Juvenile Group, Inc. Safety 1st™ and the Safety 1st logo and design are trademarks of Dorel
Juvenile Group, Inc. (800) 544-1108 www.safety1st.ca. Styles and colors may vary. Les styles et les couleurs
peuvent varier. Made in VIETNAM. Fabriqué en VIETNAM. Distributed by (Distribué par) Dorel Juvenile Group,
Inc., 2525 State St., Columbus, IN 47201-7494. Dorel Juvenile Canada, 2233 Argentia Road, Suite
110, Mississauga, ON L5N 2X7. Importado y Distribuido en Chile por: Comercial e Industrial Silfa S.A. - San
Ignacio 0201 / Parque Industrial Portezuelo Quilicura, Santiago Chile. Fono (562) 2339 9000. En Perú por:
Comexa S.A. - Los Libertadores 455 – San Isidro, Lima – Perú. Fono (511) 4469014. En Centro América, Caribe
y Ecuador por: Best Brands Group S.A. – Av. Balboa, Bay Mall Plaza, Planta Baja, local 9, Panamá. - Fono: (507)
300 2884. En Colombia por: Baby Universe S.A.S. - Vía 40 No. 77-29, Barranquilla, Colombia - Fono: (575)
353 1110 Importador: DJGM, S.A. DE C.V. Gabriel Mancera No. 1041 Col. Del Valle, Benito Juárez C.P. 03100
México, Ciudad de México R.F.C. DJG140305GN9 Tel. (55) 67199202 06/24/21 4358-6842D
Adhesive pads x4
Wall cups x4
USA
USA
BOTTOM
TOP
BOTTOM
TOP
DO NOT CUT UNTIL
GATE IS INSTALLED
D
T
OP
or
TOP
or
BOTTOM
B
or
BOTTOM
M
or
or
Care and Maintenance:
DO NOT immerse in water. To clean, wipe with a damp cloth and dry.
•
Discontinue use of the gate if it becomes damaged,
broken, or disassembled.
•
I
ntended for use with children from 6 months
through 24 months.
•
Install according to manufacturer’s instructions.
•
TO PREVENT FALLS, NEVER use at top of stairs.
•
ALWAYS install as close to the floor as possible.
•
This product will not necessarily prevent all
accidents. NEVER leave child unattended.
•
Gate is not meant to replace proper adult
supervision.
• Remove all contents from packaging and discard
box, and/or poly bags.
• Lay out all parts.
• Do not return this product to the place of
purchase. To address any issues or for helpful
information on assembly/installation or use,
please visit us at www.safety1st.ca to chat with
us there. You can also text us at (812) 652-
2525 or call Consumer Care at (800) 544-1108.
Have ready the model number and date code
(manufacture date) located on inside of gate
panel.
Tools needed (not included):
• Phillips head screwdriver
• Measuring tape
• Quarter (optional)
Screws x4
Install wall cups
NOTE: Position gate on the floor and center gate when
adhering each of the 4 wall cups. Follow procedure in
step to install gate into wall cups.
4a
4d
4b
4e
4c
4f
Place wall cup
on bumper.
Adhere to outside
of wall cup.
Remove paper
backing from one
side.
Insert bumper into
gate.
Remove paper
backing from
other side.
With gate on
the floor, touch
wall cup to wall.
WALL
4g
Remove gate.
Repeat for 3
other wall cups.
4h
5
Fasten each
wall cup with
screw.
4i
WALL
4
MISE EN GARDE:
Des enfants sont décédés ou ont été grièvement blessés à
cause de barrières ou d’enceintes installées incorrectement.
• Gardez les petites pièces loin des enfants pendant l’assemblage.
•
TOUJOURS installer et utiliser des barrières les instructions et en
utilisant toutes les pièces nécessaires
.
•
Vous DEVEZ installer les coupes murales pour maintenir
la barrière en place. Sans coupes murales, l’enfant peut
pousser et s’échapper.
•
CESSEZ d’utiliser la barrière dès que l’enfant est capable de
grimper par dessus
.
•
N’utiliser l’article que lorsque le mécanisme de fermeture/
verrouillage est solidement enclenché.
Conservez cette feuille d’instruction pour référence future, car elle contient des informations importantes.
Étaler toutes
les pièces
1
Barrière Battante
à fermeture
automatique facile à
installer / Main Libre
Barrière à fermeture
automatique
Âge: 6 à 24 mois
Doit être assemblé par
un adulte.
x4
3
Mode d’emploi
USA
USA
6
1
2
Enlever l’enseigne «ARRÊT», soulevez
les arrêts de pivot et ouvrez la barrière
7
USA
USA
USA
USA
4
5
USA
2mm
USA
USA
BOTTOM
TOP
BOTTOM
TOP
T
OP
o
TOP
o
BOTTOM
B
o
BOTTOM
M
o
o
Soin et Entretien:
NE PAS immerger dans l’eau. Essuyez avec un
chiffon humide et sechér.
•
NE JAMAIS utiliser pour garder les enfants loin de la piscine.
•
Cessez d’utiliser la barrière si elle est endommagée, cassée
ou démontée.
•
Destiné aux enfants de 6 à 24 mois.
•
I
nstallez conformément aux instructions du fabricant.
•
POUR ÉVITER TOUT RISQUE DE CHUTE, NE JAMAIS utiliser
dans le haut d’un escalier
.
•
TOUJOURS poser le plus près possible du plancher.
•
Cet article ne prévient pas nécessairement tous les accidents.
NE JAMAIS laisser l’enfant sans surveillance.
•
La barrière n’est pas destinée à remplacer la supervision
adéquate d’un adulte.
• Retirez tout le contenu de la boîte et jetez la boîte et/ou les
sacs en polyéthylène.
• Étalez toutes les pièces.
• Veuillez ne pas retourner ce produit au magasin. Pour
résoudre tout problème ou pour obtenir des informations
utiles sur l’assemblage/installation ou utilisation, visitez
notre site www.safety1st.ca pour discuter avec nous ou
pour visionner des vidéos. Vous pouvez également nous
envoyer un SMS au (812) 652-2525 ou appeler le service
à la clientèle au (800) 544-1108. Ayez en main le numéro
de modèle et le code dedate (date de fabrication) situé à
l’intérieur du panneau de la barrière.
Outils (non inclus):
• Tournevis à tête cruciforme
• Ruban à mesurer
• Pièce de 25¢
Installer les coupes murales
4a
4d
4b
4e
4c
4f
Placez la coupe
murale sur le
pare-chocs.
Collez à
l’extérieur de la
coupe mural.
Retirez le support
de papier d’un
côté.
Insérez le pare-
chocs dans la
barrière.
Retirez le support
de papier de
l’autre côt.
Avec la barrière
sur le sol,
touchez la coupe
murale au mur.
MUR
4g
Enlevez la
barrière.
Répétez pour
les 3 autres
coupes murales.
4h
Fixez chaque
coupe murale
avec une vis.
4i
MUR
4
Min. 73.6 cm - Max. 96.5 cm
(38”)(29”)
NE PAS ENLEVER L’ATTACHE
ZIP JUSQU’À CE QUE
L’INSTALLATION SOIT TERMINÉE.
Tampons adhésifs x4
Vis x4
Coupes murales x4
ATTENTION:
• TOUJOURS vérifier régulièrement si la barrière et le système de
verrouillage sont bien verrouillés. Serrez les vis de blocage si
nécessaire. NE PAS serrer excessivement.
• NE PAS utiliser la barrière s’il manque des pièces ou que
certaines pièces sont brisées. Communiquer avec Dorel Juvenile
Group pour obtenir des pièces de rechange et un mode d’emploi
si nécessaire.
• NE PAS utiliser aucune pièce de rechange qui n’est pas fournie par
Dorel Juvenile Group.
• NE PAS remplacer de pièces ou tenter de modifier le produit de
quelque manière que ce soit. Les pièces non fournies et approuvées
par Dorel Juvenile Group peuvent rendre le produit dangereux.
Répétez les étapes
2a
–
2c
avec une deuxième
extension sur l’autre côté
de la barrière.
Insérez l’extension dans la
barrière.
CONSEIL: Utilisez le côté du
boulon du butoir pour extraire
délicatement les capuchons
d’extension de la barrière.
USA
USA
BOTTOM
TOP
Assembler
l’extension
Ajouter l’extension
Pour
ouvertures
supérieures
à 88.9 cm
(35”)
seulement
Transférer les
capuchons
d’extension
OK
NO
USA
USA
TOP
BOTTOM
USA
Dessus
Capuchons
inférieurs:
Vérifiez!
Insérer les butoirs à pression
dans les 4 coins
Enlevez les capuchons d’extension
de la barrière et insérez-les dans
l’extension.
Utilisez 2 extensions,
Passez aux
étapes
2a
–
2d
Utilisez l’extension 1
Passez aux
étapes
2a
–
2c
Passez à l’étape
3
Si l’ouverture est...
Mesurer l’ouverture
Si l’ouverture est...
Jusqu’à 81.3 cm
Si l’ouverture est...
2
2b 2c
2d
2a
(32”)
Jusqu’à 88.9 cm
(35”)
Jusqu’à 96.5 cm
(38”)
Installer dans le cadre de porte
Conseil: Pensez de quel côté vous voulez que soit la poignée lors de l’utilisation
quotidienne lorsque vous installerez la barrière.
Positionnez la barrière à égalité avec le sol. Serrez à la main les butoirs à pression supérieur
et inférieur jusqu’à ce que l’écart entre la porte et le verrou soit à 2 mm – environ l’épaisseur
d’une pièce de 0,25 cent.
Optionnel:
Utilisation des
arrêts de pivot
La barrière pivotera des deux côtés
à moins que l’un des arrêts de pivot
soit abaissé. La barrière ne pivotera
pas du tout si les deux arrêts de
pivot sont abaissés.
Utilisation de l’indicateur
SecureTech™
Si elle est installée correctement, la barrière se fermera et se
verrouillera automatiquement. Vérifiez de nouveau la tension de la
barrière si celle-ci ne parvient pas à se verrouiller (indicateur rouge).
Rouge
Vert
Ouvert Fermé
NOTE: Positionnez la barrière sur le sol et centrez la
barrière au moment de faire adhérer chacune des 4
coupes murales. Suivez la procédure à l’étape pour
installer la barrière dans les coupes murales.
5