Loading ...
Loading ...
Loading ...
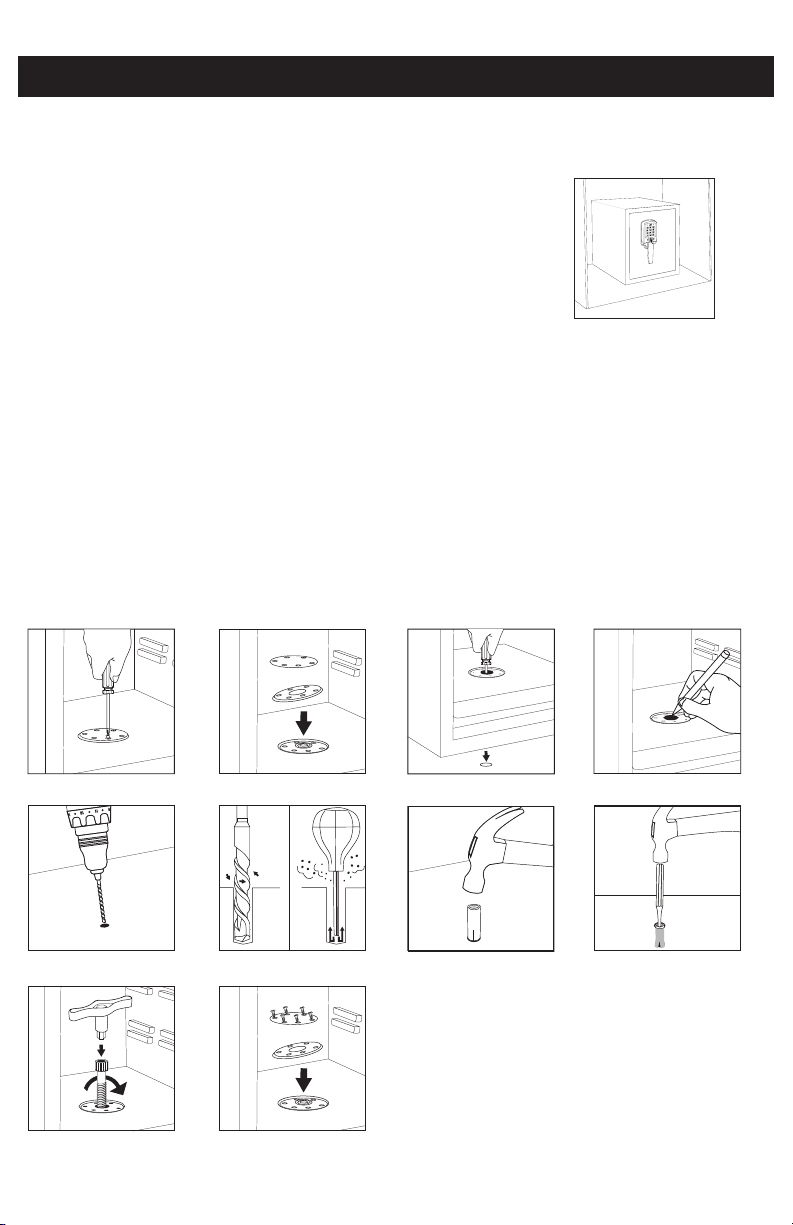
ANCHORING SAFE TO FLOOR
You may bolt your safe to a shelf or floor for added theft protection and resistance to tipping.
Your safe has a pre-drilled bolt-down hole in the floor panel and mounting hardware is
provided for securing to concrete surfaces. If bolting to wood or metal additional hardware will
be needed. Check with your local home center.
To secure your safe to a concrete floor:
1. Select a suitable and convenient location for your safe (Figure 1).
2. Empty the safe and remove the (6) screws securing the mounting hole
cover plate (Figure 2).
3. Remove the mounting hole cover plate and gasket along with the cap to
uncover the mounting hole (Figure 3).
4. Tilt the safe onto it’s back side and stick a screwdriver into the hole to
punch-out the bottom hole cover plug (Figure 4).
5. Turn safe back onto its feet and place your safe in the desired location for mounting, then
make a mark through the hole onto the floor surface creating a drilling guide (Figure 5).
6. Move the safe aside to clear the marked spot for drilling. Then drill a 5/8 in./16mm
diameter hole with a depth of 21/8 in./54mm and remove any excess dust
(Figure 6 and Figure 7).
7. Insert the supplied expanding Drop-in Anchor into the hole and tap into place using a
hammer until even with the floor surface (Figure 8).
8. Hammer a drift punch or phillips head screwdriver into the expanding Drop-in Anchor so
that it flares out and firmly locks into place to prevent it from turning when mounting the
safe (Figure 9).
9. Place the safe back into position lined up over the hole and secure in place using the
provided mounting bolt. Secure bolt tightly using the supplied hexagon wrench (Figure 10).
10. Replace the gasket and mounting plate cover by using a phillips screwdriver to replace the
6 screws to secure the mounting plate into place (Figure 11).
7
Figure 1
Important: Bolting/unbolting of the unit is at
the consumer’s expense and discretion. LH
Licensed Products, Inc. is not responsible for
any costs incurred if the unit has to be replaced.
If you have any questions about mounting the
safe, please check with your local home center/
hardware retailer or independent contractor.
Figure 2
Figure 6
Figure 11
Figure 3
Figure 7
Figure 5
Figure 9
Figure 10
Figure 4
Figure 8
Loading ...
Loading ...
Loading ...