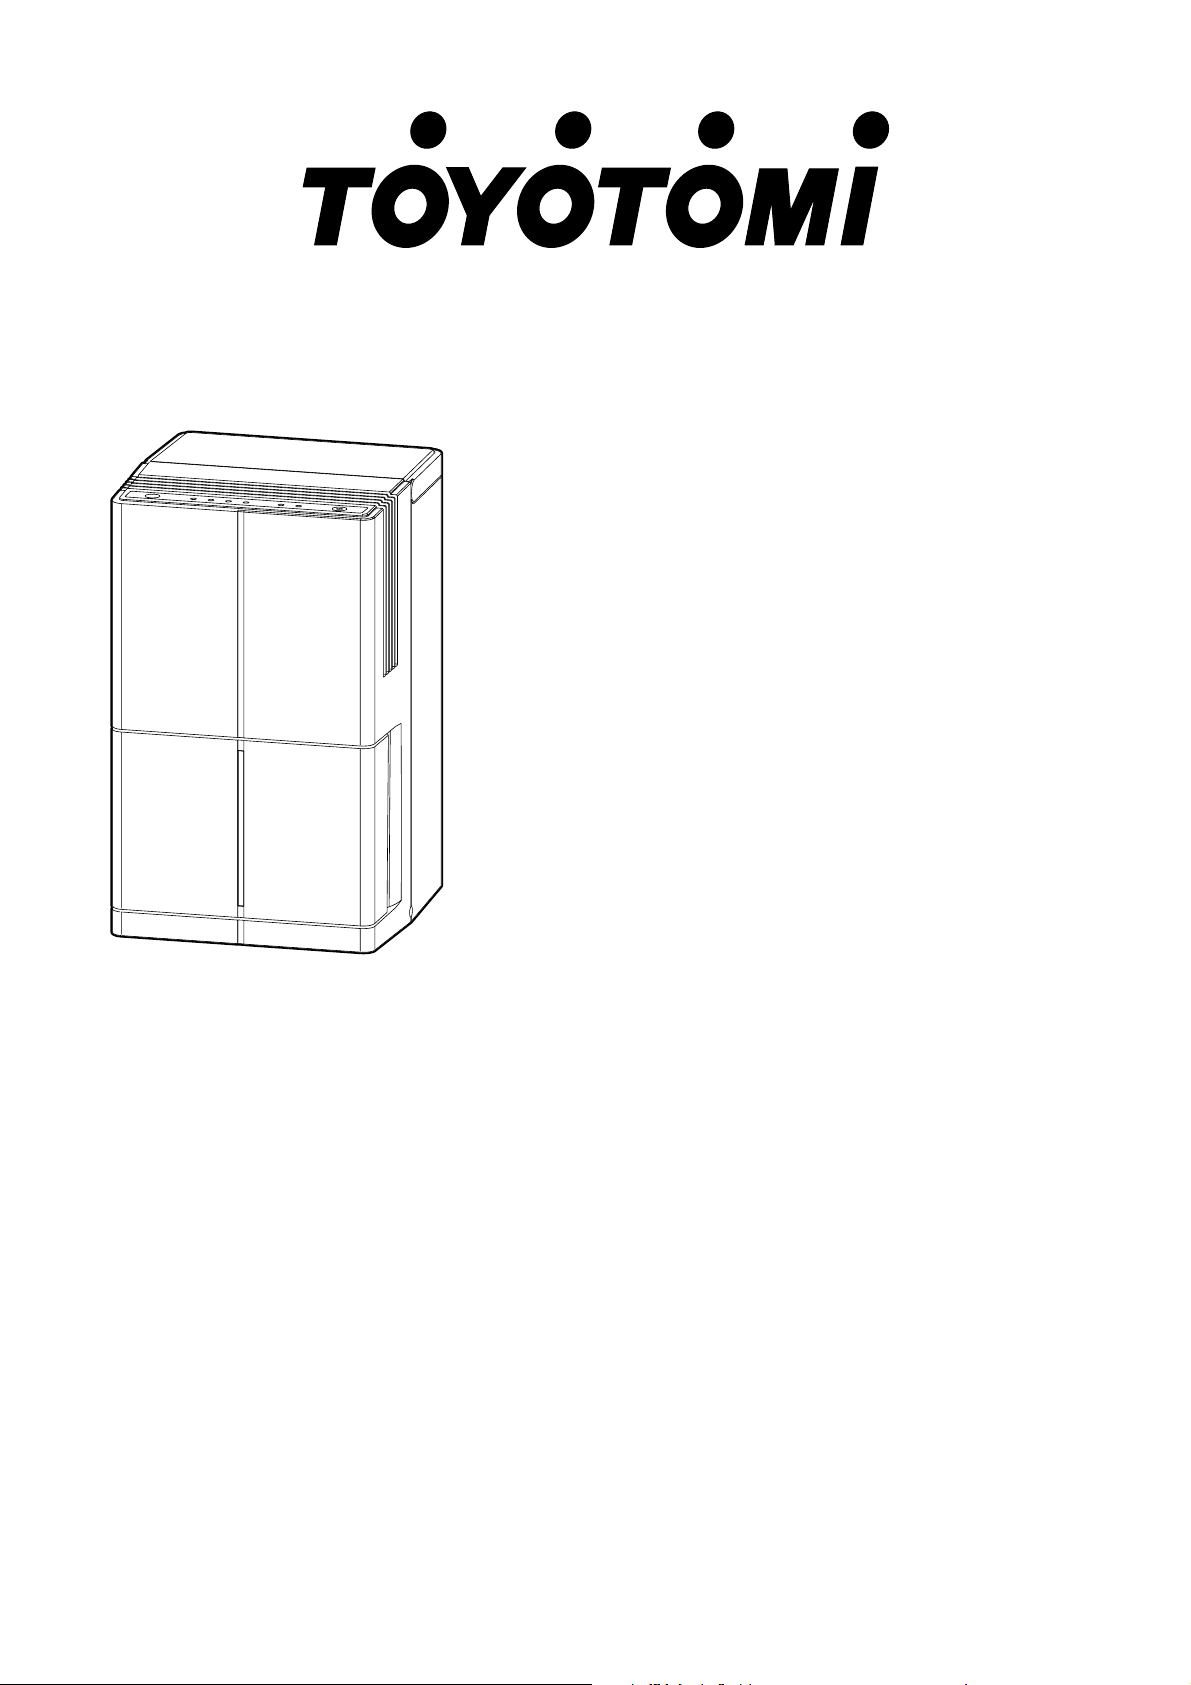
TD-C100
COMPRESSOR TYPE DEHUMIDIFIER
DÉSHUMIDIFICATEUR D’AIR
LUFTENTFEUCHTER
LUCHTONTVOCHTIGER
OPERATING MANUAL ENGLISH P. 1
MANUAL D’UTILISATION FRANÇAIS P. 5
BEDIENUNGSANLEITUNG DEUTSCH P. 9
GEBRUIKSAANWIJZING ENGELS NEDERLANDS P.13
TD-C100.qxd 14.10.9 13:01 ページ b
D1 D2 D3
A
B
C
D
C5 C6 C7 C8 C3 C2C4 C1
A1
A3
B5
B2
A2
A6
B1
B3
B4
A4
A5
F
G
E
TD-C100.qxd 14.10.9 13:01 ページ c
F
G
G1
G2
E
F1
F1
F3
F2
F1
E7 E8
E3
E6E5
E1 E2 E3
E4
E4
E3
E4
E9
E10 E11
TD-C100.qxd 14.10.9 13:01 ページ d

1
ENGLISH
SUMMARY
The idea behind the unit is a localized dehumidification. The unit
will greatly enhance your personal comfort whether at a work of-
fice, bathroom or even in your favorite closet.
It dries the air so that you can stay comfortable even when it’s hu-
mid or rainy outside. Also your furnishings, fabrics and clothes are
kept in good condition, and it is easy to dry your laundry and dry it
quickly.
This unit creates dry air zone anywhere you need it. It means that it
does not waste energy drying the surroundings.
It’s easy to operate. Once you set your desired level of relative hu-
midity from 60% to 40%, the built-in humidistat allows the room
humidity to be controlled automatically.
By connecting the commercially available hose to the unit, you can
use it as continuous drainage mode. This is especially convenient
for using in the outside such as garage.
OPERATIONAL FEATURES
1. DEHUMIDIFYING OPERATION:
This unit takes in the humidity and dry air is directed out from
the rear outlet by the compressor.
2. AUTOMATIC OPERATION:
Once the desired function has been set, it is memorized as
long as it remains connected to the wall outlet. In the event of
a power failure, the desired function must be re-entered when
power is restored.
3. HUMIDITY CONTROL:
The compressor will automatically shift to ON or OFF to main-
tain the desired humidity.
4. AUTOMATIC SHUT-OFF MECHANISM WHEN THE DRAIN
TANK IS FULL:
When the drain tank is full, the unit will be automatically shut
off. The “FULL” lamp will blink. It will resume operation after
the condensed water is removed from the tank.
5. AIR FILTER:
A pre-filter protects the unit from dust.
6. INTERNAL DRYING OPERATION:
After turning off the operation, fan spins for 30 minutes to dry
the inside of the unit. Moisture which is put inside of the unit
can be dried and it prevents the heat exchanger from causing
mold.
To stop the internal drying operation, press the Power button
more than 3 seconds during the internal drying operation.
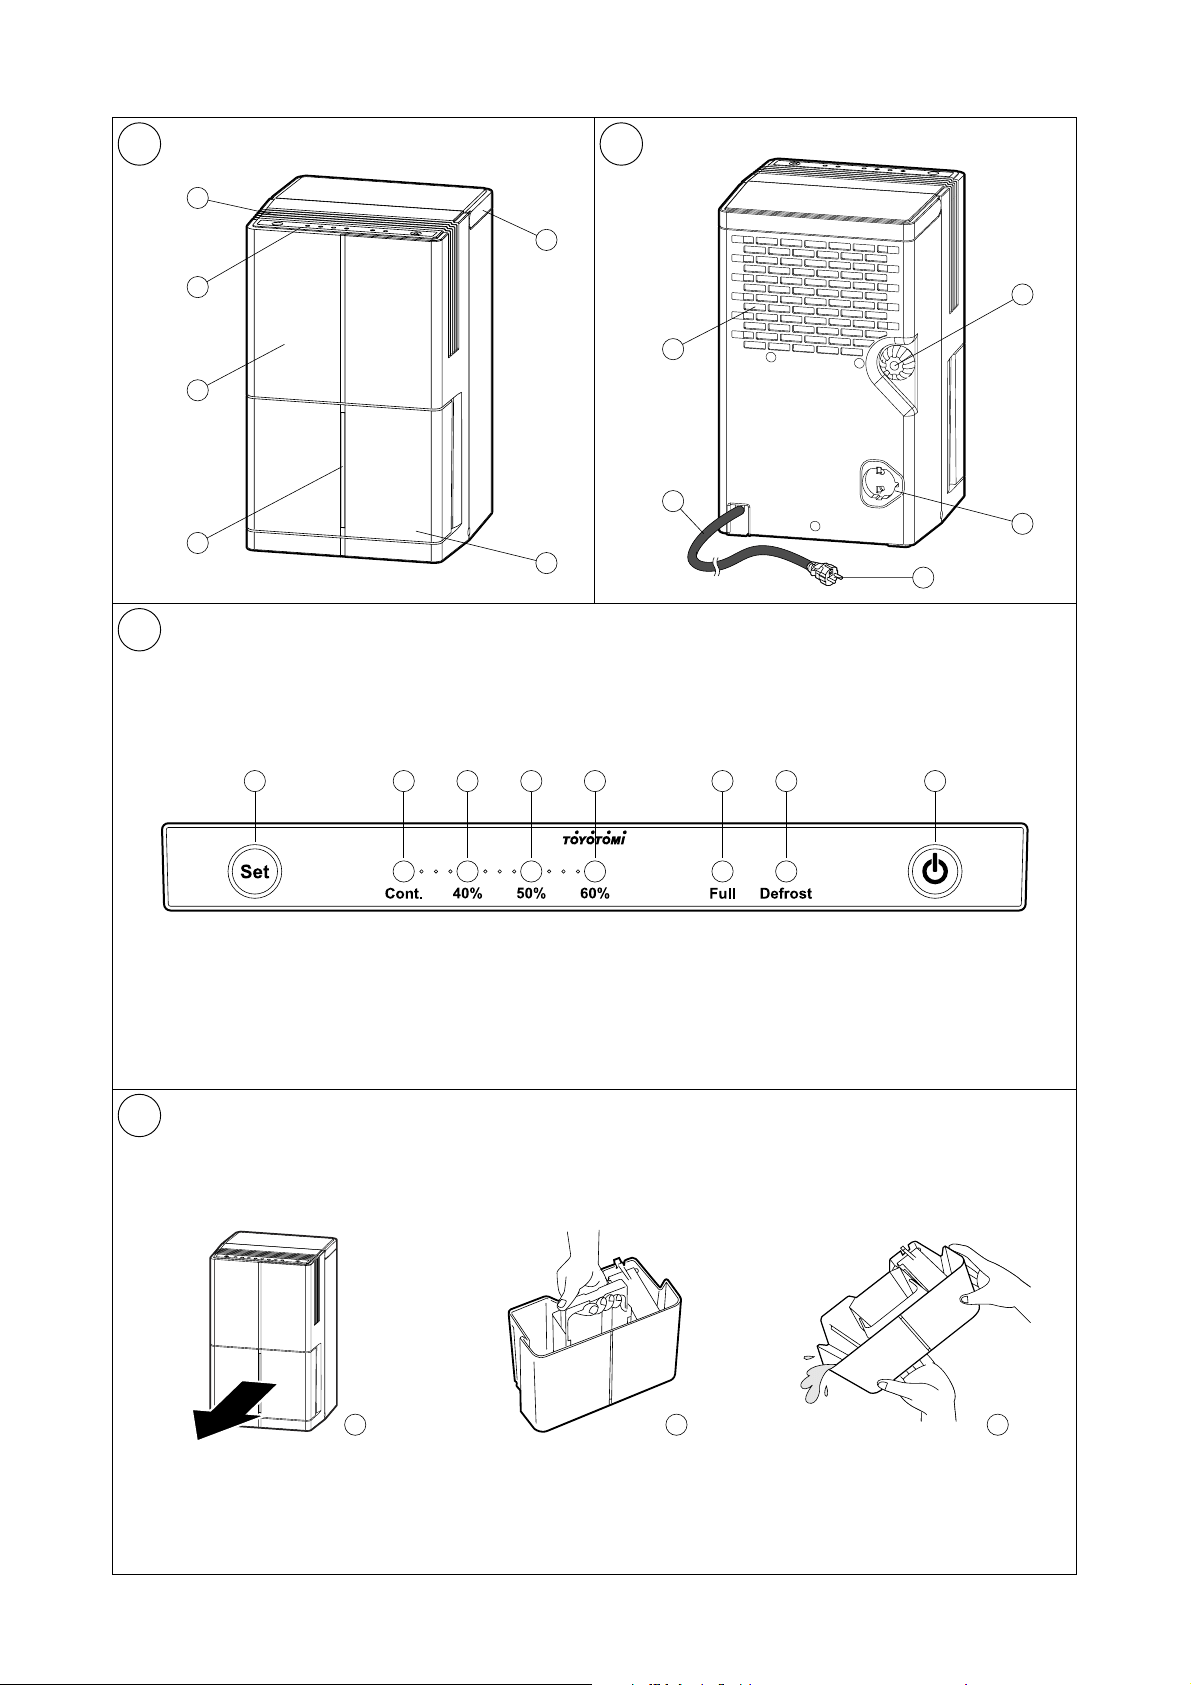
1. DESCRIPTION
Fig. A FRONT
A1 Air intake
A2 Front panel
A3 Operation panel
A4 Carrying handle
A5 Water tank
A6 Water gauge
Fig. B REAR
B1 Air outlet
B2 Power plug storage part
(To prevent the plug deformation)
B3 Power supply cord
B4 Power plug
B5 Drain water outlet for continuous drain operation
Fig. C OPERATION PANEL
C1 Power button
C2 Defrost lamp
C3 Full lamp
(When the tank filled up with water, the lamp will light)
C4 Humidity setting button
C5 Cont. lamp (Continue lamp)
C6 40% humidity setting lamp
C7 50% humidity setting lamp
C8 60% humidity setting lamp
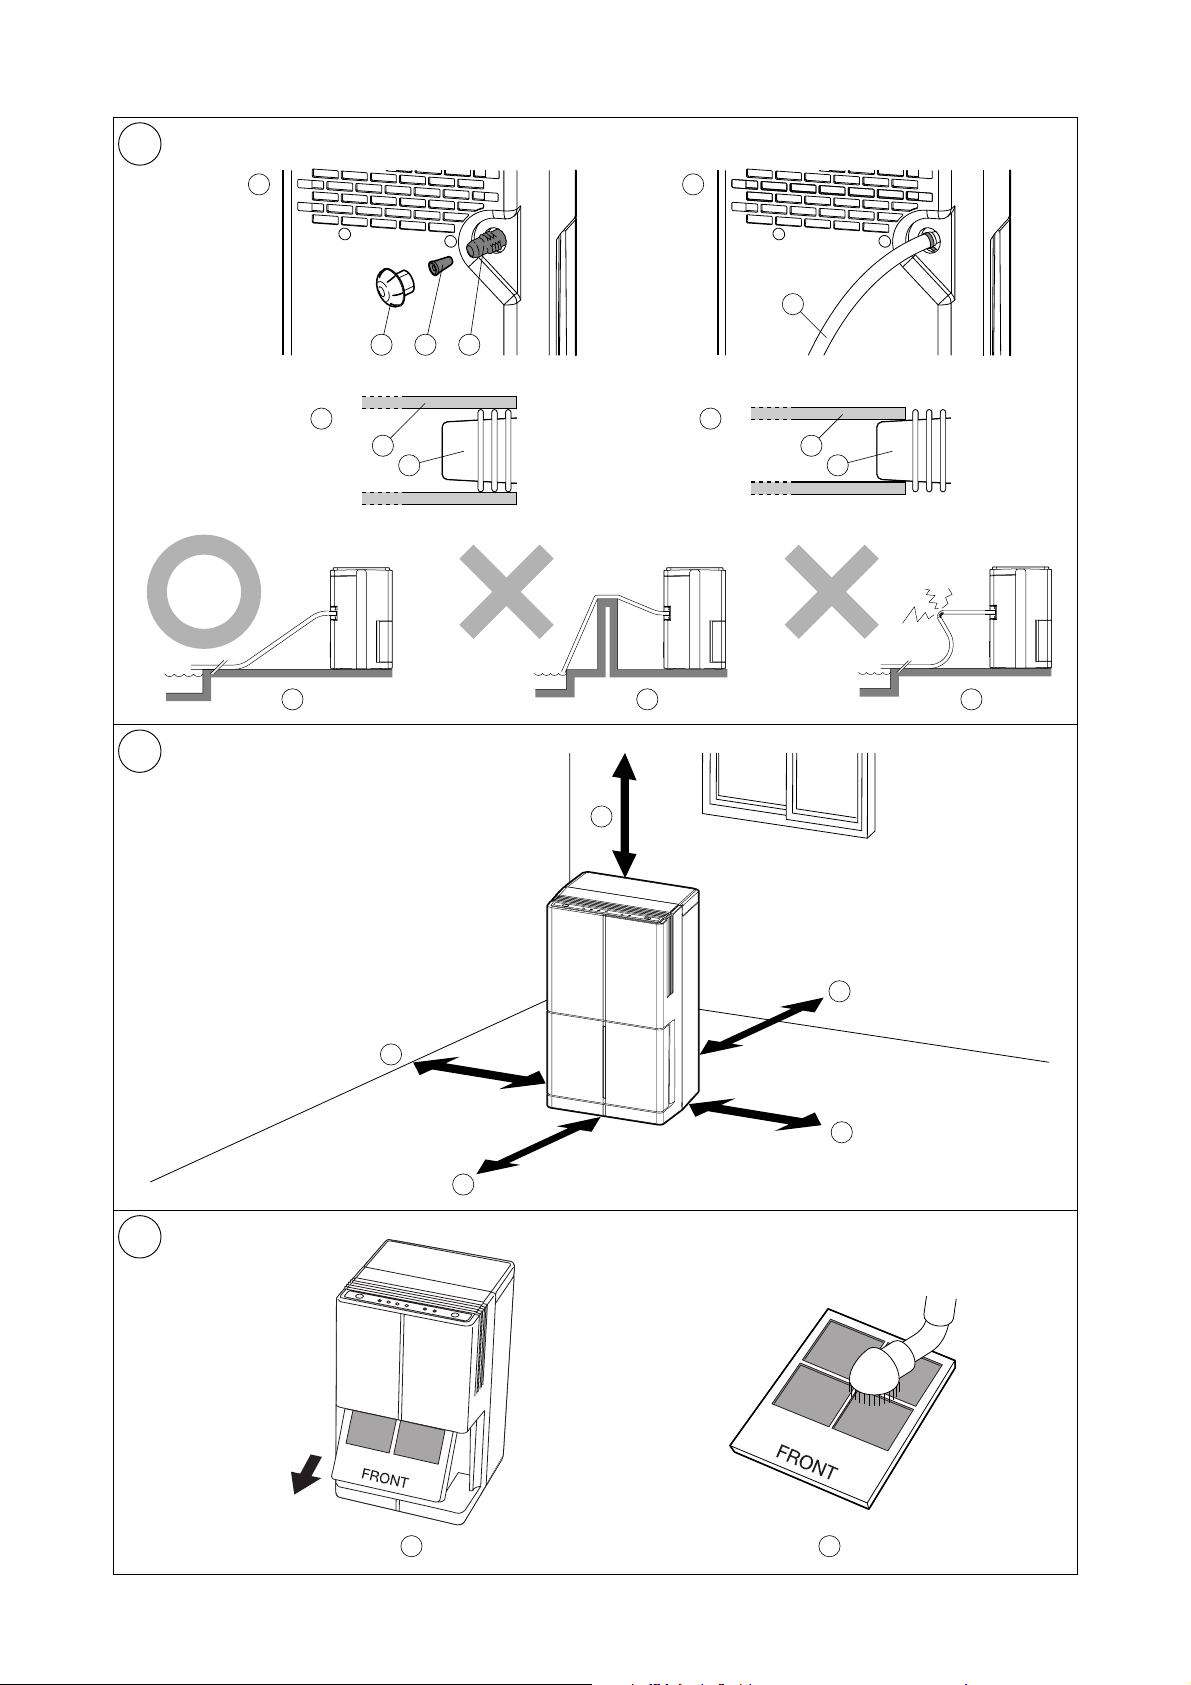
Fig. E CONTINUOUS DRAINAGE
E1 Outlet cap
E2 Rubber stopper
E3 Drain water outlet
E4 Drainage hose
2. SAFETY TIPS
IMPORTANT
• Read instructions carefully before operation.
• The unit should be operated when the room temperature is
between 5˚C to 32˚C. If the room temperature is below 5˚C, ice
may form on the coils. If the room temperature is above 32˚C,
the compressor will automatically shut off to protect itself.
• ALWAYS, wait 3 min. to restart after turning unit off.
WARNING
• NEVER expose infants, handicapped persons, or se-
nior persons directly to the airflow. Adjust the airflow
direction.
• Keep children away from unit. Children are particu-
larly liable to this danger. The inside fan is running at
high speed. Covering them may deteriorate dehumid-
ifier performance or cause it to become inoperative.
• NEVER insert objects of any kind into the air intake or
air outlet.
• DO NOT unplug or plug in if your hands are wet. An
electrical shock may occur.
• DO NOT operate in a wet location.
•ALWAYS plug into 220V-240V, 50Hz, single phase
electrical outlet.
• Be sure the power plug fits the receptacle securely.
• DO NOT run power cord under carpets, rugs, or floor
mats of any kind.
• DO NOT attempt to shorten or alter power cord in any
way.
• DO NOT apply any excessive force or pressure to the
power supply cord.
• Make sure that the plug is free of dust.
• DO NOT use an extension cord.
• DO NOT use multiple power points.
• DO NOT turn on and off by inserting or removing the
power plug, which may cause electric shock or fire.
• If there is a fear of lightning, stop the unit and dis-
connect the power supply cord.
• DO NOT touch the evaporator, condenser and pipes.
• DO NOT operate with filter removed.
• If the power cord on this unit is damaged, it must be
replaced by the manufacture, its service agent or
qualified persons in order to avoid a hazard.
• This appliance can be used by children aged from 8
years and above and persons with reduced physical,
sensory or mental capabilities or lack of experience
and knowledge if they have been given supervision
or instruction concerning use of the appliance in a
safe way and understand the hazards involved.
• Children shall not play with the appliance.
• Cleaning and user maintenance shall not be made by
children without supervision.
• The appliance shall not be installed in the laundry.
• The appliance shall be installed in accordance with
national wiring regulations.
TD-C100.qxd 14.10.9 13:01 ページ 1

CAUTION
• Keep unit more than 20 cm away on the rear side (F2), 10cm
away on the upper and both side (F1), and 15 cm away on the
front side (F3) from any objects or wall. (Fig. F)
• Remove drain water before moving unit.
• To minimize corrosion, DO NOT use in damp, salty air area.
• DO NOT operate in direct sunlight.
• DO NOT use for such particular purpose as preservation of
foodstuff, animals, plants, precision appliances, arts and med-
icine.
• DO NOT place an animal, plants or combustion equipment in
a place which is subjected to the direct air flow of the unit.
• DO NOT ride or place the objects on the unit.
• DO NOT turn the product on its side or upside down.
• DO NOT remove the rubber cap cover of water drainage outlet
except in continuous drainage mode to avoid water leakage.
• Waste electrical products should not be disposed
with household waste.
• Please recycle where facilities exist. Check with
your local authority or retailer for recycling advice.
3. OPERATION
OPERATING STEPS:
1. CONNECT POWER PLUG (B4) TO POWER SOCKET.
Make sure the water tank (A5) is placed in proper position, and
then connect to the power socket.
If the tank is not in proper position, the FULL lamp (C3) will
light light after plug on. If FULL lamp lights at the first time,
please pull out the tank once and push it back to the proper
position.
2. PRESS POWER BUTTON (C1) TO ON.
3. PRESS HUMIDITY SETTING BUTTON (C4)
Press the humidity setting button (C4) to select your desired
humidity mode.
By pressing the humidity setting button, indication lamp will
shift to; “CONTINUE” (C5)
➞ “60%” (C8) ➞ “50%” (C7) ➞
“40%” (C6) ➞ CONTINUE” (C5) and your desired humidity
mode can be selected.
4. STOP OPERATION
Press the “POWER” button (C1) and all lights will go out.
For the internal drying operation, the unit will stop operation
after the 30 minutes of fan operation.
During the internal drying operation, the humidity setting lamp
of 40%, 50% and 60% will continue lightning one by one.
To stop the internal drying operation, press the Power button
more than 3 seconds during the internal drying operation.
4. EMPTY THE WATER TANK (Fig.D)
1. Stop the operation.
NOTE: When the water tank is full, the Full lamp (C3) will blink
and unit stops automatically in a few minutes.
2. Remove the water tank. (Fig D1)
NOTE: Do not move the unit or remove the water tank, if the
machine is still operating, as water may leak, damage
the unit or cause an electric shock.
Do not remove or damage the float in the water tank, or the
unit cannot work correctly.
3. Carry the water tank with handle. (Fig.D2)
4. Pour water away. (Fig. D3)
5. Restore the water tank to the correct position.
NOTE: If the water tank is not well in the position, the Full
lamp (C3) will blink.
5. CONTINUOUS DRAINAGE WATER (Fig. E)
1. Prepare a hose that is inner diameter of 13mm or 15mm, and
take out the outlet cap (E1).
2. Remove the rubber stopper (E2) inside the outlet cap (E1).
Then you can see the hole. (Fig. E5)
3. Put the hose (E4) into the drain water outlet (E3). (Fig. E6)
NOTE:
• In case of using the hose of inner diameter of 15mm, insert the
hose to the drain water outlet all the end. (E7)
• In case of using the hose of inner diameter of 13mm, put the
hose into the tip of drain water outlet (E8)
• During the continuous drainage mode, the drain hose must be
horizontally or below the drainage hole (E9), and try not to
raise the hose above the drainage hole (E10) or fold the hose
(E11).
6. CLEANING
CLEANING AIR INTAKE FILTER (Fig. G)
1. Clean the air intake once every two weeks.
2. To remove the air intake filter, pull the water tank out of the
unit and draw out the air filter. (Fig. G1)
3. Remove the dust with a vacuum cleaner (Fig. G2), or wash the
dust away with water. If you wash it with water, dry it in the
shade after washing it.
WARNING
• DO NOT touch the evaporator. It may cause injury or damage.
CAUTION
• DO NOT use over 40˚C hot water. The plastic part may be de-
formed.
• Disconnect the power supply before cleaning and mainte-
nance.
CLEANING SURFACE
Clean the outside of the product with a soft damp cloth.
CAUTION
• NEVER use gasoline, solvents, chemical, products or polish as
they could damage the surface.
7. LONG-TERM STORAGE
At the end of each season, or when you do not plan to use this
product for an extended period of time, the following procedures
are recommended.
1. Empty the water tank.
After stopping operation, leave it for one day and empty the
water tank.
2. Take off the outlet cap (E1) and rubber stopper (E2) which is
for continuous drainage.
When you take the rubber stopper (E2) off, the drain water will
come out. Therefore receive the water with a bucket or a tank.
3. Clean the unit, tank and filter.
Wipe off any dirt or dust on the unit with a soft damp cloth or
a vacuum cleaner, and then wipe again using a soft dry cloth.
4. Store the unit.
The original shipping carton is the best place to store your
unit. If you do not have the original packing materials, cover
the unit with a large plastic bag and store in a cool dry place.
CAUTION:
• ALWAYS store the unit at less humidity and airy place with
standing vertically.
• DO NOT put heavy objects on top of the unit.
8. TRANSPORTATION
Preferably keep the unit in the vertical position during transporta-
tion. If it is necessary to place the unit in a horizontal position more
than 1/2 hour, ALLOW IT TO REMAIN UPRIGHT FOR 24 HOURS
BEFORE OPERATION. Failure to do so may result in damage to
the compressor. Before transporting / moving the unit make sure
the drain tank is empty.
ENGLISH
2
TD-C100.qxd 14.10.9 13:01 ページ 2
9. TROUBLESHOOTING
BEFORE CALLING FOR SERVICE
The following are not defects.
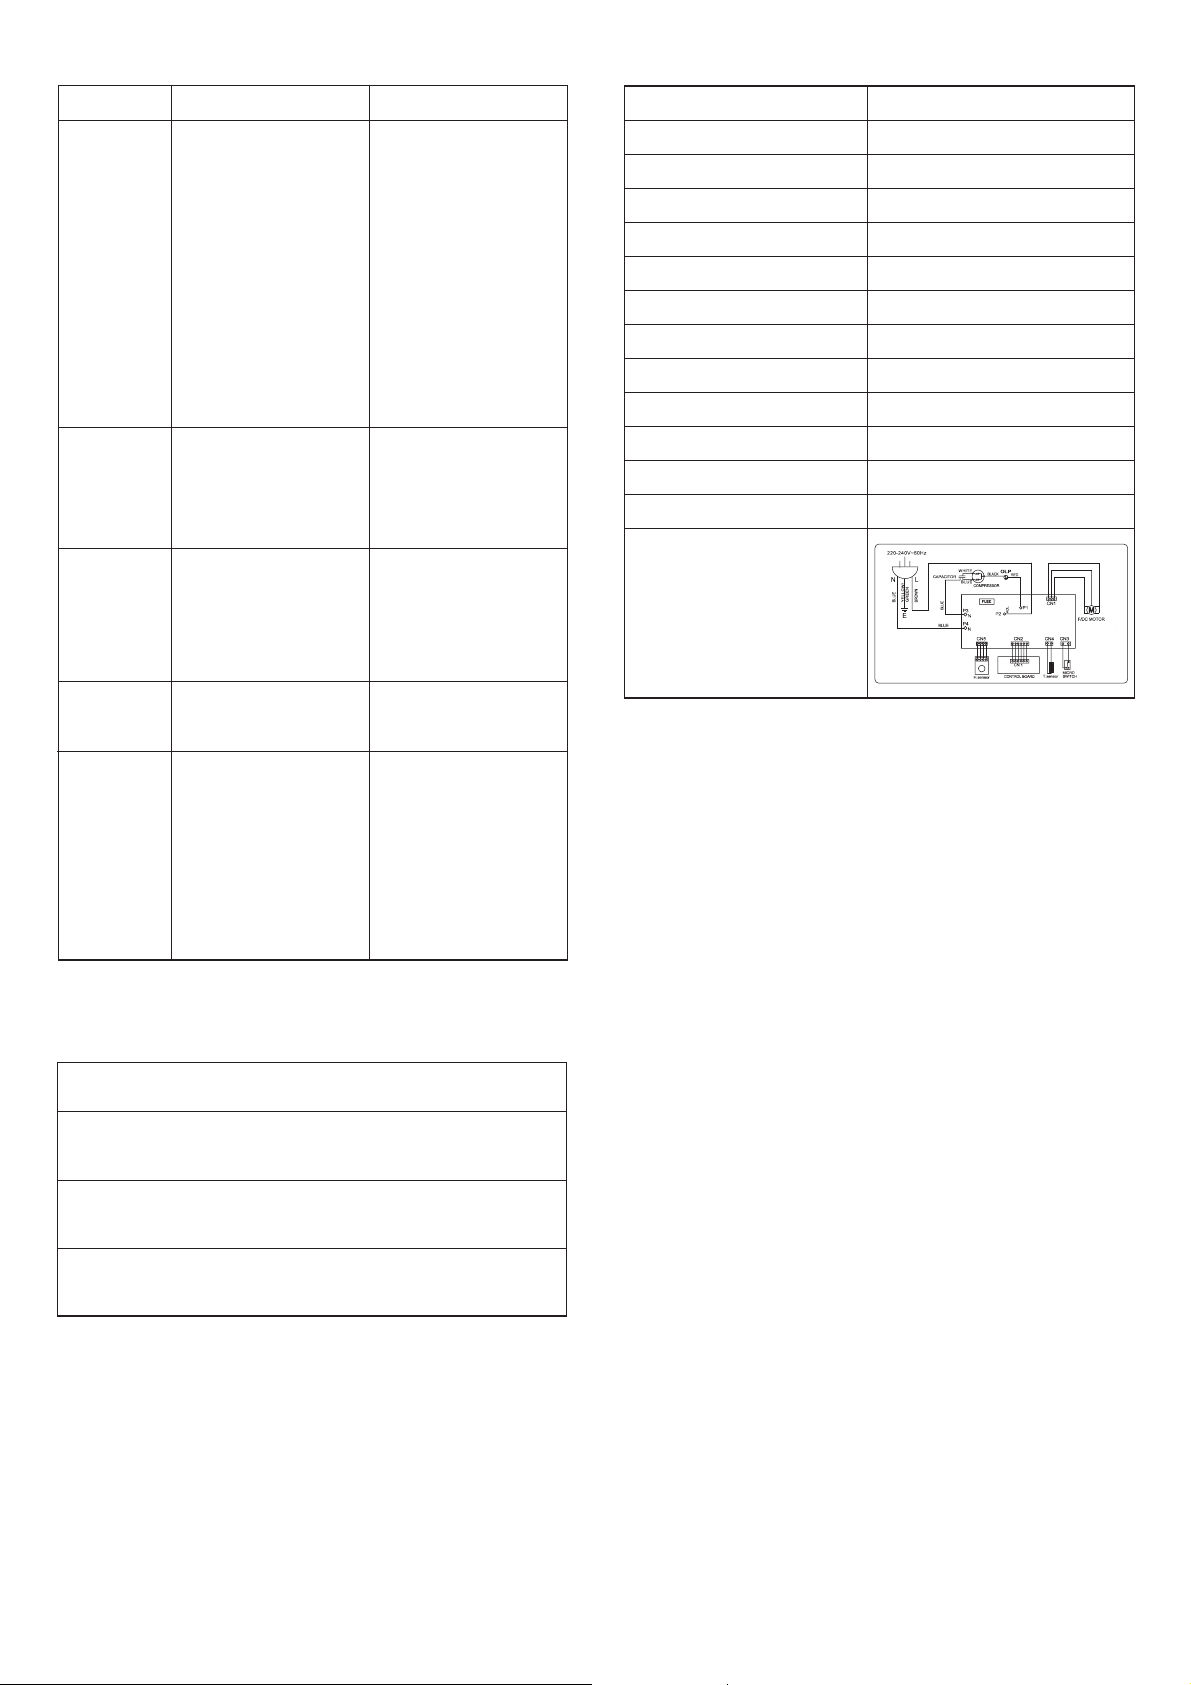
10. SPECIFICATIONS
NOTE: Dehumidifying capacity will vary according to temperature
and humidity of the room.
CONTAINS FLUORINATED GREENHOUSE GASES COVERED BY
THE KYOTO PROTOCOL.
HERMETICALLY SEALED SYSTEM
GWP information (according to (EC) No 842 / 2006
3
ENGLISH
SYMPTOM
Unit does
not work.
FULL lamp is
ON even the
water tank is
empty.
The product
does not de-
humidify.
Operation
sound is
loud.
The drain
water is
leaked.
CAUSE
- Power cut.
- The plug has been
plugged improperly.
- The FULL LAMP is
ON. Tank is full.
- The DEFROST LAMP
is ON.
- The tank is not insert-
ed properly.
- The float of tank is not
placed properly.
- The filter is dusty or air
outlet is clogged.
- Surrounding tempera-
ture and humidity are
low.
- The filter is dusty
- The unit operates on
the rough place.
- The unit leans.
- Move the unit with wa-
ter in the tank.
- The float is not in the
proper position.
- Take the water tank
out soon after stop-
ping the operation.
SOLUTION
- Wait for power to be
supplied again.
-Plug in again.
- Remove the drain wa-
ter from the drain
tank.
- When the room tem-
perature is under
12˚C, the heat ex-
changer is sometimes
frosted. And the unit
starts defrosting mode
automatically. During
this mode, DEFROST
LAMP is ON, and wait
for a while.
- Take the water tank
out once, and push it
back to the proper po-
sition.
- Place the float in the
proper position.
- Clean the filter and air
outlet.
- As the temperature
and humidity are low-
er, the amount of de-
humidification is also
lower.
- Clean the filter.
- Operate at the flat
place.
- Operate at the flat
place.
- Remove the water at
first, and then you can
move the product.
- Place the float proper-
ly.
- The product keeps
draining even the unit
stops operating. Wait
for approx. 5mins.
A hissing noise or hollow
sound:
A squeaking noise:
Odor:
The unit does not start nor
change operation mode
immediately:
e
This sound is generated from the
refrigerant flowing within pipes.
e
This noise is generated from the
unit when it is expands or con-
tracts with temperature changes.
e
Such odor as tobacco, cosmet-
ics, or foods may accumulate in
the unit.
e
To prevent overloading the com-
pressor motor, the unit will be
stopped for more than 3 minutes.
MODEL TD-C100
DEHUMIDIFYING CAPACITY 10 L/D (30˚C, 80%RH)
POWER SOURCE Single Phase 220-240V, 50Hz
POWER CONSUMPTION 205 W
OPERATING CURRENT 0.8A
AIR FLOW (MAX.) 45 m
3
/h
OPERATING TEMP. RANGE 5˚C ~ 32˚C
DIMENSIONS (WxHxD) 230 x 386 x 230 mm
WEIGHT 8.5kg
COMPRESSOR ROTARY
REFRIGERANT R-134A / 110g
FUSE 3.15A/250V (Type: 3N, 3K, 30T)
GWP 1300 (R134a)
WIRING DIAGRAM
250V 3.15A
TD-C100.qxd 14.10.9 13:01 ページ 3

4
ENGLISH
LIMITED WARRANTY
TOYOTOMI CO., LTD. (“TOYOTOMI”) warrants each product
and any parts thereof sold by it to be free from defects in mate-
rials or workmanship under normal use and service for TWENTY
FOUR (24) MONTHS from the date of delivery to the original
purchaser at retail subject to the following terms and condi-
tions:
WHAT IS COVERED: Product or any parts thereof which are
defective in materials or workmanship.
WHAT IS NOT COVERED:
This warranty does not extend to any defect due to the negli-
gence of others; failure to install, operate or maintain unit in ac-
cordance with instructions (operating and maintenance instruc-
tions are furnished with each new unit); unreasonable use, acci-
dents, alteration, use of unauthorized or non-standardized TOY-
OTOMI parts and accessories; electrical malfunction, i.e., as re-
sulting from large power surges, short circuit, etc.; incorrect in-
stallation; or repair by anyone other than a service facility speci-
fied by TOYOTOMI.
WHO IS COVERED: The original purchaser at retail.
WHAT WE WILL DO: TOYOTOMI will either repair or replace, at
its opinion, all defective parts free of charge that are covered by
this limited warranty on a carry-in basis, to your nearest autho-
rized dealer or distributor of TOYOTOMI.
WHAT YOU MUST DO FOR WARRANTY SERVICE: You must
return the defective Product or part to any authorized dealer or
distributor of TOYOTOMI with this LIMITED WARRANTY. If ser-
vice is not available locally, please contact our CUSTOMER RE-
LATIONS DEPARTMENT at:
TOYOTOMI EUROPE SALES B.V.
E-MAIL: [email protected]
INTERNET: www.toyotomi.eu
THE FOREGOING EXPRESS ALL OF TOYOTOMI’S OBLIGA-
TIONS AND LIABILITIES WITH RESPECT TO THE QUALITY OF
PRODUCT FURNISHED BY IT. ALL OTHER WARRANTIES, EX-
PRESSED OR IMPLIED, INCLUDING THE WARRANTIES OF
MERCHANTABILITY OR FIFTNESS FOR A PARTICULAR PUR-
POSE ARE DISCLAIED. TOYOTOMI SHALL NOT BE LIABLE
FOR THE LOSS OF USE OF THE PRODUCT, INCONVE-
NIENCE, LOSS OR ANY OTHER DAMAGES, DIRECT OR CON-
SEQUENTIAL ARISING OUT OF, THE USE OF, OR INABILITY
TO USE, THE PRODUCT OR DAMAGES RESULTING FROM
OR ATTRIBUTABLE TO DEFFECTS IN THE PRODUCT.
No other than TOYOTOMI has authority to extend or modify the
terms of this Limited Warranty in any manner whatsoever.
Some states do not allow the exclusion or limitation of inciden-
tal or consequential damages or limitations on how long an im-
plied warranty lasts, so these limitations or exclusions may not
apply to you. This Limited Warranty gives you specific legal
rights and you may also have other rights which vary from state
to state.
TD-C100.qxd 14.10.9 13:01 ページ 4

OP
MA
BE
GE
Printed in China
NEW 06/14
TOYOTOMI CO., LTD.
5-17, Momozono-cho, Mizuho-ku,
Nagoya, 467-0855 Japan
www.toyotomi.jp
TD-C100.qxd 14.10.9 13:01 ページ a