2200/ 1800-Watt CARB Por table Inver ter Generator
with USB Outlet Portable
and Compact Inverter Generator

www.SereneLifeHome.com2
Read this manual carefully before operation.
This manual includes important guidance for safety operation.
This Manual contains important safety information and instructions for
operating this generator set. PLEASE READ THIS MANUAL CAREFULLY.
Failure to do so could result in property damage and/or personal INJURY or
DEATH.
Keep this owner’s manual handy, so that you can refer to it any time.
This owner’s manual is considered a permanent part of the generator and should
remain with the generator if resold.
The information and specifications included in this publication were in
effect at the time of approval for printing.
All information in this publication is based on the latest product information
available at the time of printing. We reserve the right to change, alter and/or
improve the product and this document at any time without notice and without
incurring any obligation.
No part of this publication shall be reproduced without written permission.
Write down the generator set's serial number and purchase information.
Keep this manual and the receipt for future reference.
Model:
Serial number:
Date of purchase:

www.SereneLifeHome.com 3
CONTENTS
I. Operator safety
1. Safety rules
II. Features and controls
Ill. Operating
1. Operating checklist
2. Starting the generator set
3. Connect to electrical devices
4. Stopping the generator set
5. Parallel operation
IV. Maintenance
1. Maintenance schedule
2. Generator set maintenance
3. Engine maintenance
V. Troubleshooting
VI. Storage and transportation
VII. Specification
1. Wiring diagram
2. Features and Technical Specs
4
4
8
12
12
16
19
21
21
22
23
24
24
28
29
30
30
32

www.SereneLifeHome.com4
I. OPERATOR SAFETY
1. Safety Rules
Pay attention to this safety alert
symbol. Obey all safety messages
that followed by this symbol to avoid
possible property damage, INJURY
or DEATH.
Each safety message is preceded by
a safety alert symbol and one of
three words, DANGER, WARNING,
or CAUTION.
DANGER
Indicates a hazardous situation which,
if not strictly complied with, will result
in substantial property damage,
serious injury or DEATH.
WARNING
Indicates a hazardous situation which,
if not strictly complied with, may result
in property damage, serious injury or
DEATH.
CAUTION
Indicates a hazardous situation which,
if not strictly complied with, could result
in property damage or injury.
WARNING
READ THIS MANUAL COMPLETELY
BEFORE OPERATION.
DO NOT operate this generator set
until you have read ALL safety, operation,
and maintenance instructions listed in
this manual.
Failure to follow the instructions may
result in property damage, INJURY or
DEATH.
The warnings and precautions discussed
in this manual cannot cover all possible
conditions and situations that may
occur. It must be understood by the
operator that common sense and
caution are factors which cannot be
built into this product, but must be
possessed by the operator.
WARNING
This generator set is intended for
residential consumer use only.
Air cooled generator sets cannot be
run full time.
DO NOT modify any part of the
generator set and NO unsuitable usage
is allowed.
www.SereneLifeHome.com 5
DANGER
TOXIC FUMES
The exhaust of the engine contains
carbon monoxide, an odorless, color-
less, poison gas. Using engine indoors
CAN KILL YOU!
NEVER use inside any building or any
kind of enclosure, EVEN IF doors and
windows are open. Place the engine in
a well-ventilated area and carefully
consider wind and air currents when
positioning the engine.
WARNING
KICKBACK
Rapid retraction of the starter cord will
pull hand and arm towards the engine
faster than you can let go.
Unintentional startup can result in
entanglement, traumatic amputation
or laceration. Broken bones, fractures,
bruises or sprains.
WARNING
FIRE
Operation of this engine may create
sparks that can start fires around dry
vegetation. This engine may not be
equipped with a spark arresting muffler.
If the engine will be used around
flammable materials, or on land covered
with materials such as agricultural crops,
forest, brush, grass, or other similar
items, then an approved spark arrester
must be installed. In some area, a spark
arrester is required by law.
Please contact local fire agencies for
laws or regulations relating to fire
prevention requirements.
WARNING
Lithium battery is maintenance free, if
you have any question, please contact
a local authorized dealer.
WARNING
HOT SURFACE
Running engine generators produce
heat. Severe burns can occur on contact.
DO NOT touch engine while operating
or just after stopping. Avoid contact
with hot exhaust gases. Maintain at
least three feet of clearance on all sides
to ensure adequate cooling.
Combustible material can catch fire on
contact. Maintain at least five feet of
clearance from combustible materials.

www.SereneLifeHome.com6
DANGER
FIRE OR EXPLOSION
Gasoline is highly flammable and
extremely explosive. Fire or explosion
can cause severe burns or death.
Keep flammable items away while
handling gasoline. Fill fuel tank outdoors
and in a well-ventilated area with the
engine stopped. Always wipe off spilled
fuel and wait until the fuel has dried
before starting the engine.
DO NOT operate the engine with
known leaks in the fuel system.
Use proper fuel storage and handling
procedures.
DO NOT store fuel or other flammable
materials nearby. Empty the fuel tank
before storing or transporting this
engine. Keep fire extinguisher handy
and a be prepared if a fire starts.
WARNING
Before each use, check for loose or
damaged parts, signs of oil or fuel
leaks, and any other condition that may
affect proper operation. Repair or
replace all damaged or defective parts
immediately. Locate all operating
controls and safety labels. Make sure all
the safety instructions are in right and
working condition.
Operate only on level surfaces.
DO NOT expose generator set to
excessive moisture, dust, or dirt.
Keep all safety guards in place and in
proper working order at all times.
DO NOT allow any material to block the
cooling slots.
DO NOT allow children or untrained
persons to operate the generator set.
DO NOT run the generator set un-
attended. Turn off the generator set
before leaving the area.
DANGER
MOVING PARTS
Moving parts can cause severe injury.
Keep hands and feet away.
DO NOT operate engine with covers,
shrouds, or guards removed.
DO NOT wear loose-fitting clothing,
dangling drawstrings or items that
could become caught. Tie up long hair
and remove jewelry. The moving parts
may catch operator's hand, feet, hair or
clothes that will cause traumatic
amputation or broken bones, fracture.
NEVER place fingers, hands, or body
near the engine when it is running.

www.SereneLifeHome.com 7
DANGER
ELECTRIC SHOCK
This generator set produces powerful
voltage and the electricity CAN KILL
YOU. This is generator set must be
property connected to an appropriate
ground to help prevent electric shock.
Failure to properly ground generator
set can result in electrocution, especially
if the generator set is equipped with a
wheel kit. Consult an electrician for local
grounding requirements.
Installation should be performed by a
certified electrician.
Improper installation can result in
electric shock and death. To reduce the
risk of electric shock.
DO NOT use electrical cords that are
worn, frayed, bare or otherwise
damaged.
DO NOT touch bare wires or receptacles.
DO NOT operate generator set in wet
weather. Keep the generator set dry.
DO NOT handle generator set or
electrical cords while standing in water,
while barefoot, or while hands or feet
are wet. Keep children or pets away
from the generating set.
DO NOT hook up any generator set to
a building electrical system without
the proper use and installation of a
transfer switch installed by a qualified
electrician.
When using generator set for backup
power, notify utility company.
Use approved transfer generator set to
isolate generator set from electric
utility.
Failure to isolate generator set from
power utility can result in death or
injury to electric utility workers due to
backfeed of electrical energy.

1 2 3
5
6
7
8
9
4
www.SereneLifeHome.com8
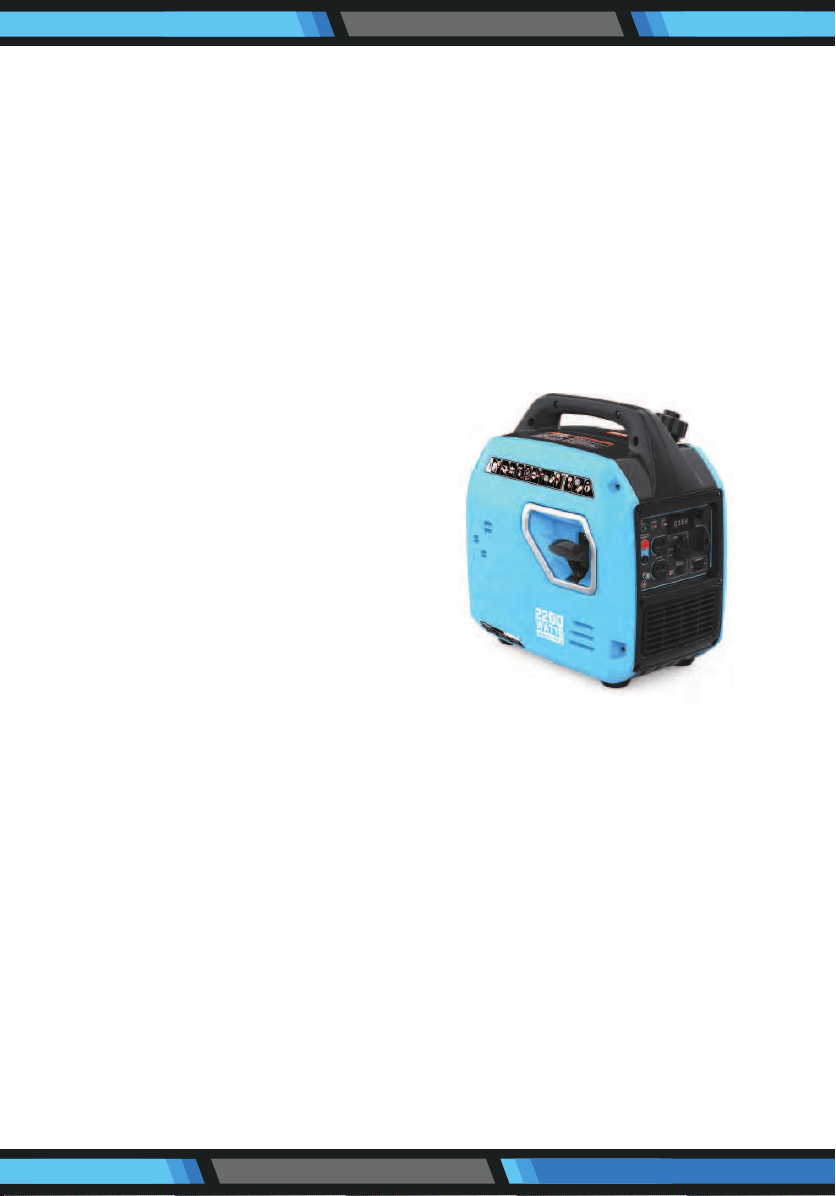
II. FEATURES AND CONTROLS
1. Carrying handle
2. Fuel tank cap
3. Ventilation knob
4. Spark plug maintenance cover
5. Recoil starter
Control Panel
6. Control Panel
7. Appearance cover
8. Muffler
9. Muffler blind window
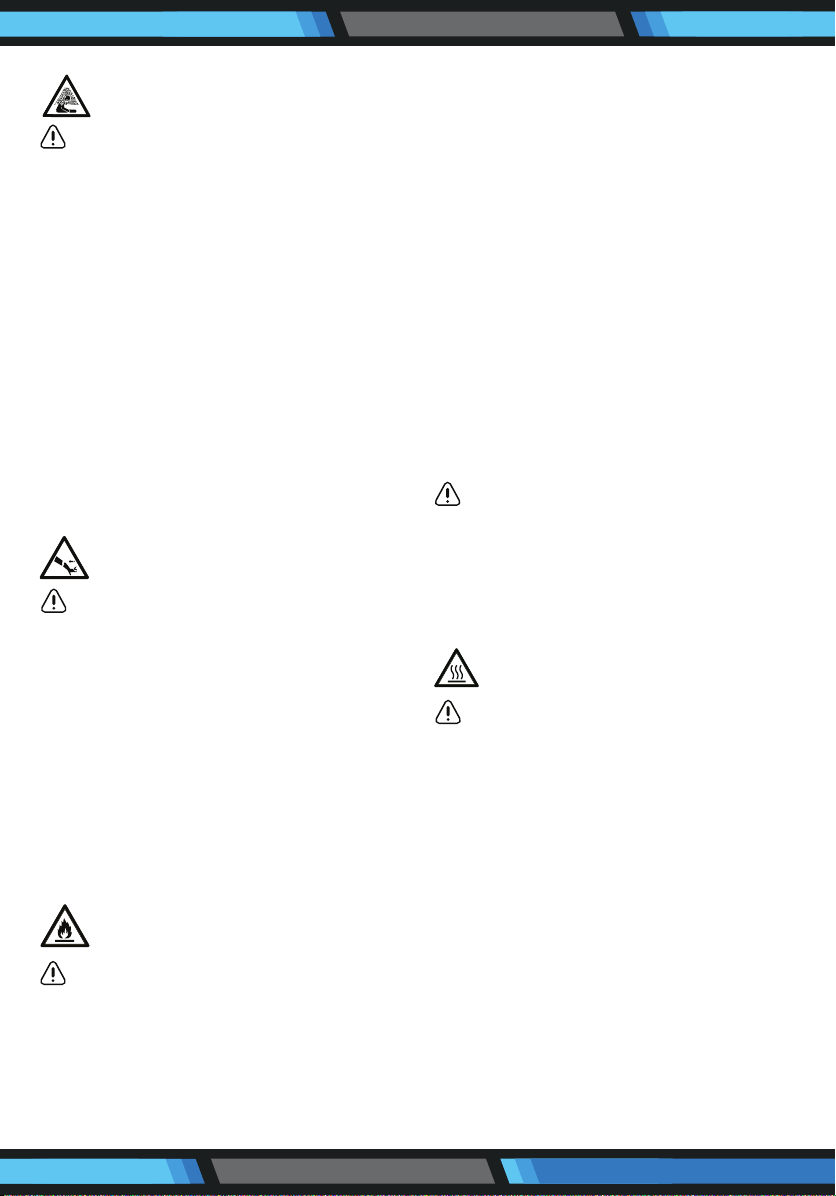
1. Running indicator
2. Overload indicator
3. Oil alarm lamp
4. Choke lever
5. Parallel Connection
6. AC 120V Nema 5-20R
Duplex Receptacles
7. USB Port
8. ON/RUN Switch
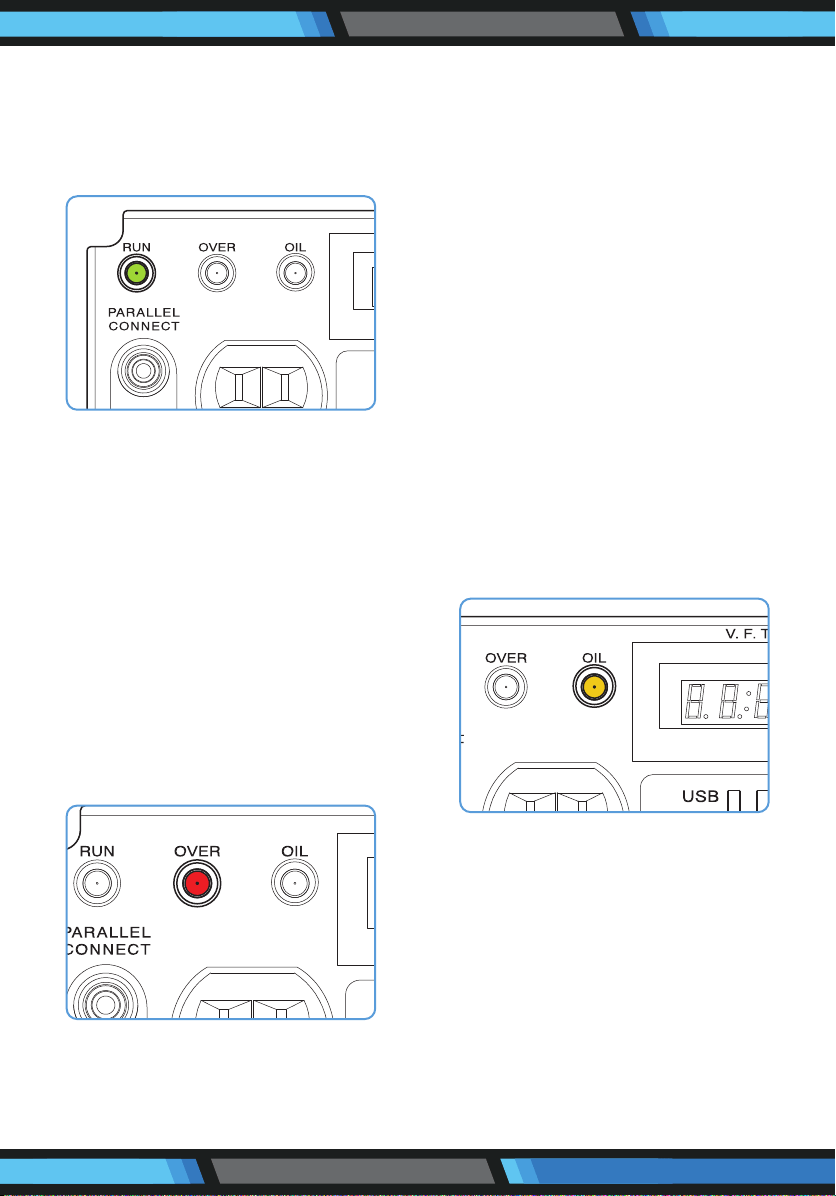
9. Grounding Nut
10. Circuit Breaker
11. Eco Mode Switch
12. VFT Meter
1 2 3
4
8
11
7
10
6
9
5
12
www.SereneLifeHome.com 9
Running indicator (green)
The running indicator lights up when
generator set starts and has normal
output.
Overload indicator (red)
When the overload indicator is on, it
indicates that the generator set is
overload and it may cause overheat of
frequency converter, or increase of AC
voltage. And then the AC protector
works. It will stop the output of
generating set to protect the electric
equipment and the generator set itself.
At this time, the running indicator
(green) is off and the overload indicator
(red) is on, but the engine is still in
running state.
When the generator set has no
output and the overload indicator is
on, please take the following steps:
1. Lower the total power of the
connected electric devices to the
rated output range of generator set.
2. Check the air intake for impurities
and check the control parts for
abnormal situation.
Handle immediately if necessary.
3. Press the reset button.
Oil alarm lamp (yellow)
When the oil level drops below the
lower limit, the oil protection system
will stop the engine automatically and
oil alarming lamp will blink by pulling
the recoil starter. The engine will not
run until the oil has been filled to the
proper level.
Note:
If engine flames out or fails to start,
turn the two-in-one switch to "RUN"
position and then pull the recoil starter.
If the oil alarming lamp lights up, it
shows lack of oil.
Please add appropriate oil and restart
the engine.

www.SereneLifeHome.com10
Choke lever
Note: When cold start, please close
(pull) the choke lever. When warm start,
please open (push) the choke lever.
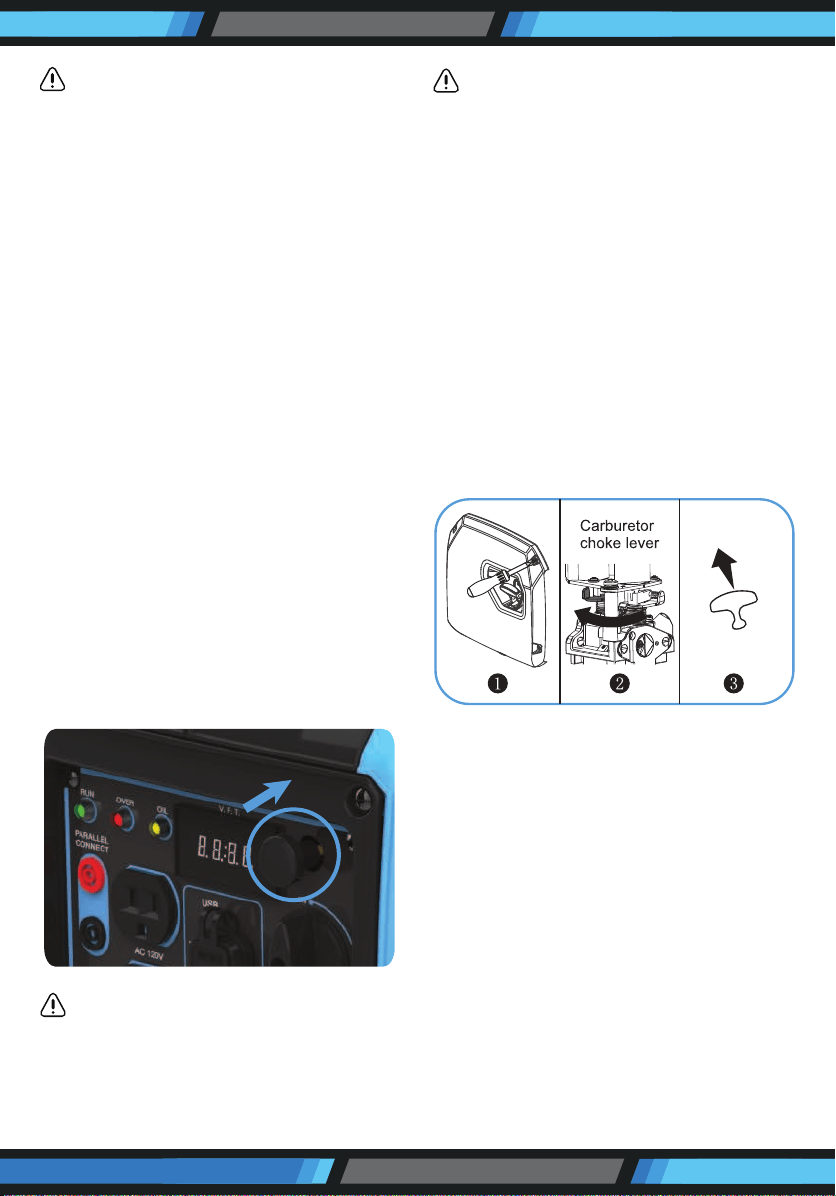
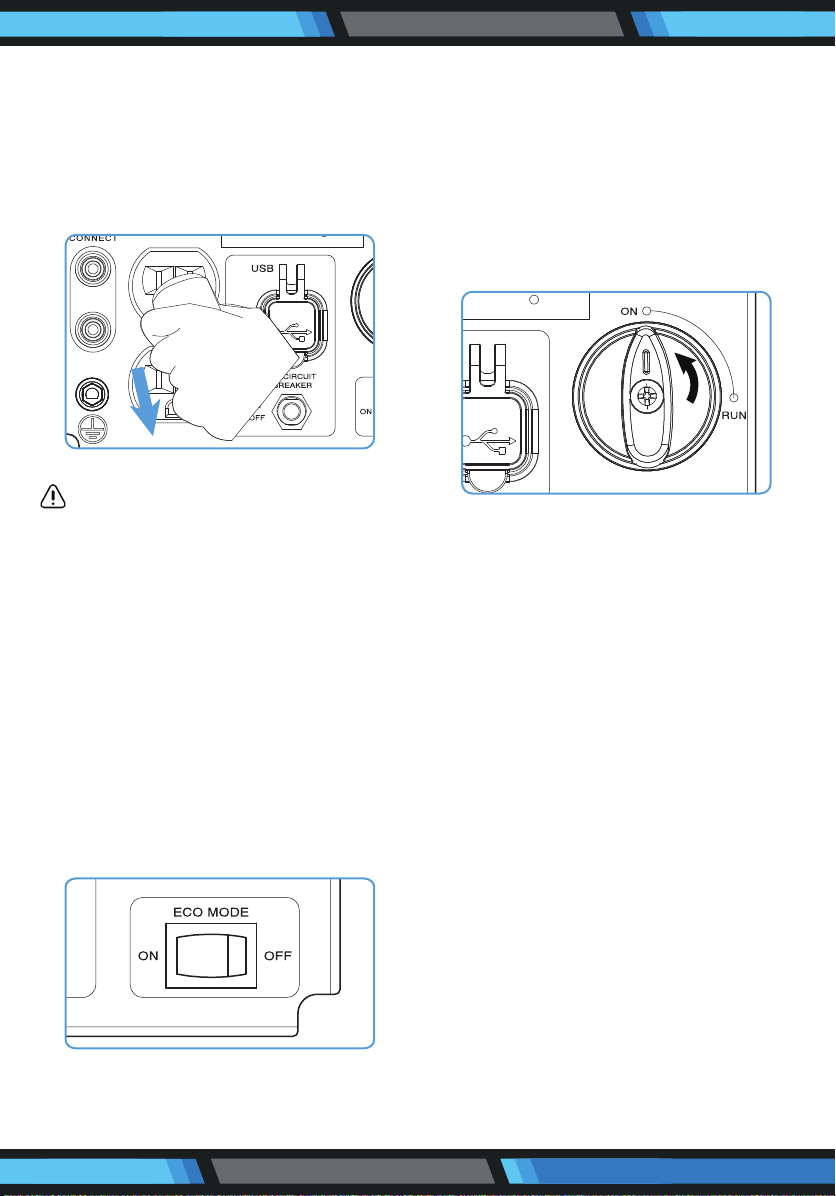
Energy-saving switch
When the energy-saving switch is in
"ON" position, the energy saving
equipment controls the engine rotate
speed according to the connected
loads. There will be good fuel
consumption and low noise. When the
energy-saving switch is in "OFF"
position, the engine will always run in
rated rotate speed no matter it is
connected to the loads or not.
Note: Please set the energy-saving
switch to "OFF" position when connect
to air compressor, sinking pump etc.,
because these equipments need large
starting current.
Grounding terminal
The grounding terminal is designed to
prevent electric shock by connecting it
to the grounding wire. The generator
set must be properly grounded before
operation.
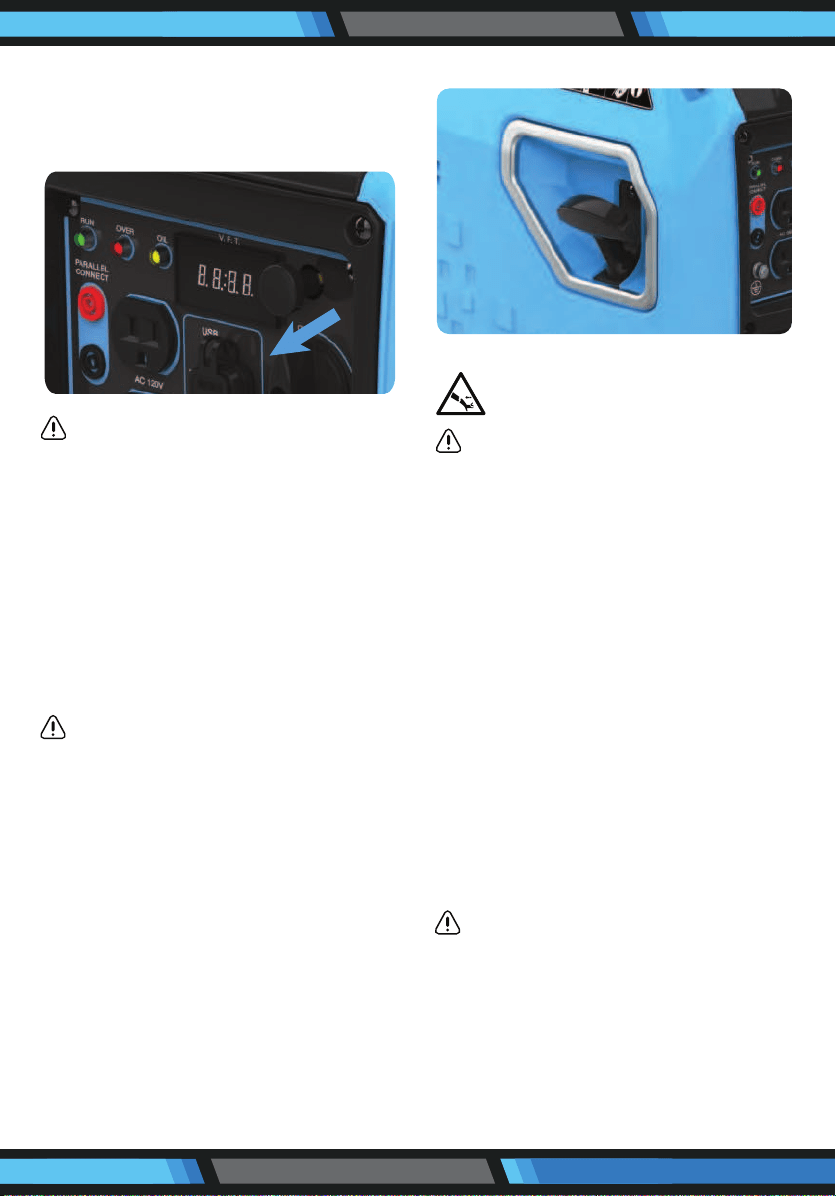
ON and RUN switch
(engine stop & fuel switch)
When the switch is in "ON" position, it
indicates that the engine is turned ON
and fuel switch are in off state.
www.SereneLifeHome.com 11
When the switch is in "RUN" position, it
indicates that the engine stop switch
and fuel switch are in on state.
Circuit breaker/Reset button
The reset button is used to restore
output if an overload occurs. To restore
output, reduce the loads and press the
reset button.
The circuit breaker protects the gene-
rator set against electrical overloads.
Parallel kit terminal
It is used for parallel operation with
another inverter (parallel kit sold
separately).
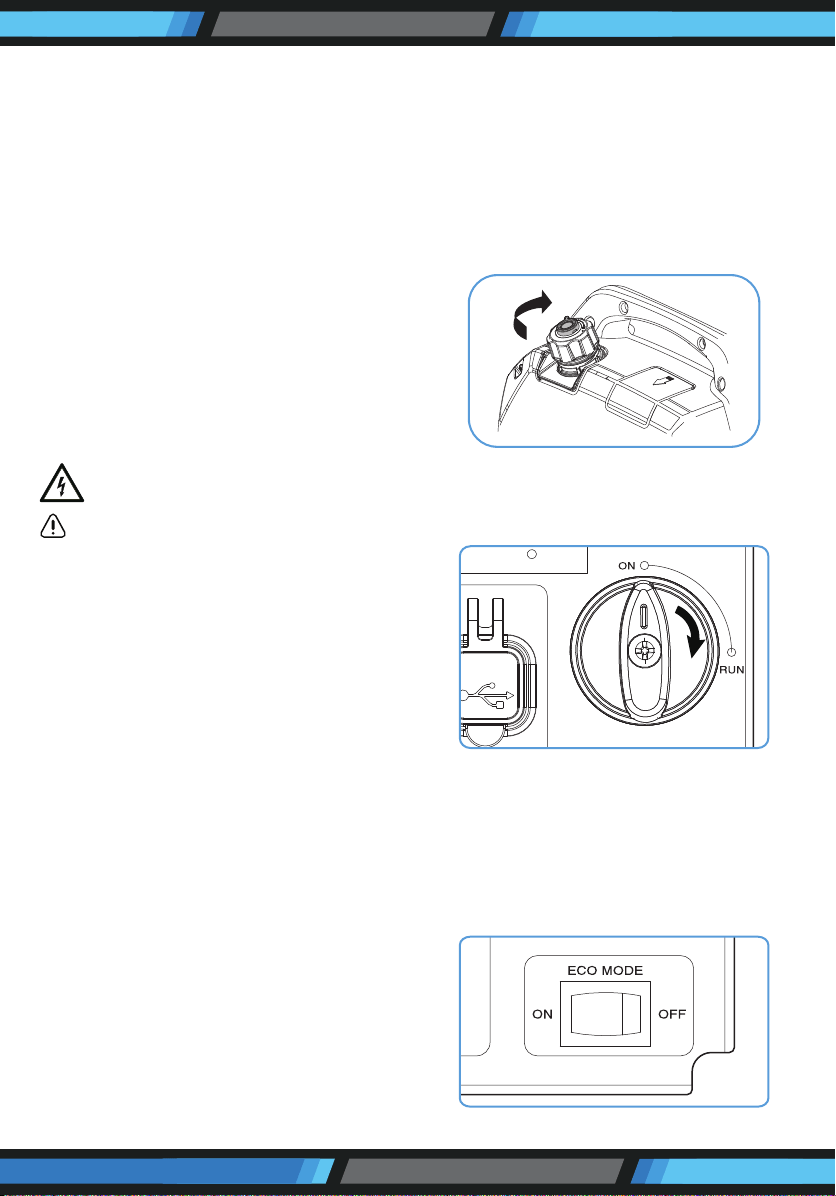
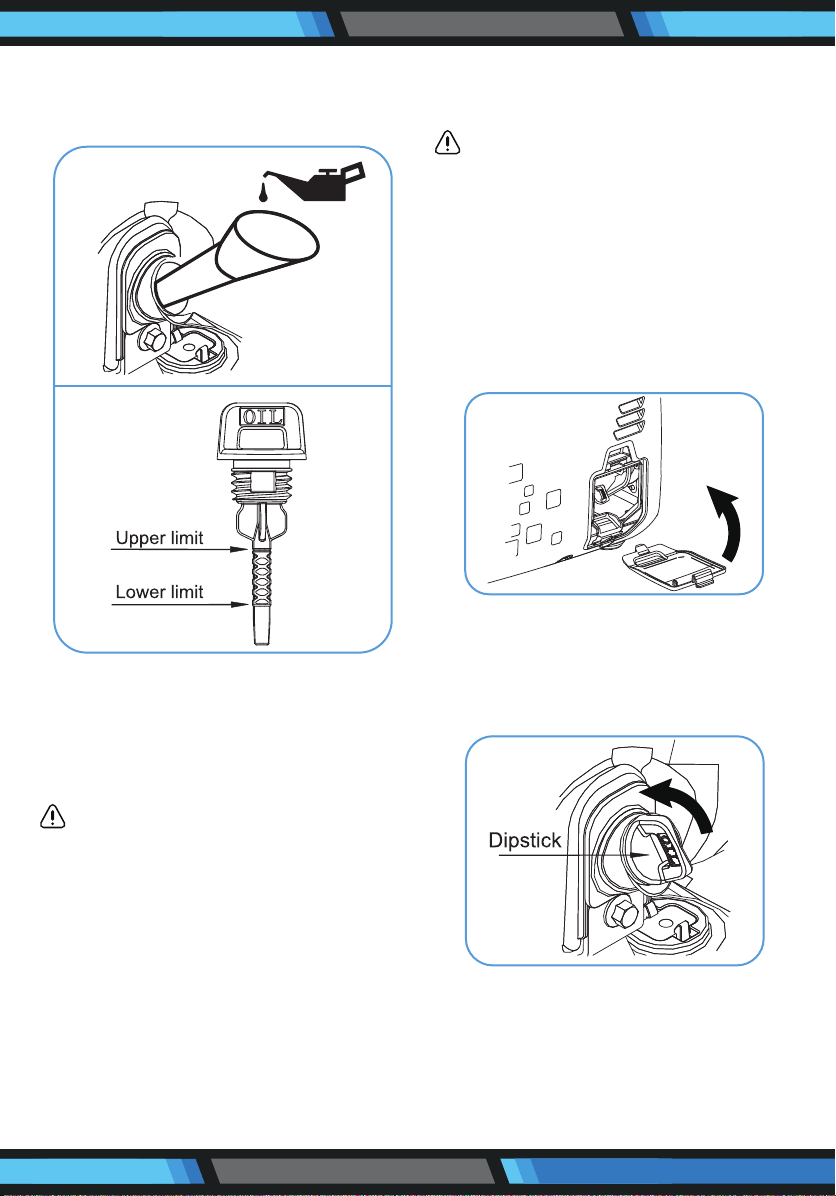
Fuel tank cap
Remove the fuel tank cap by rotating it
anticlockwise.
Ventilation knob
The fuel tank cap is equipped with the
ventilation knob to prevent leakage of
fuel. The ventilation knob must in "ON"
position when operating generator set.
Because this makes the fuel be injected
to the carburetor and drive the engine.
To avoid fuel leakage, turn it in "OFF"
position when carrying or not use the
generator set.

www.SereneLifeHome.com12
III. OPERATING
1. Operating checklist
Operating Location
Only use OUTSIDE and place the
generator set in a well-ventilated area.
Only operate the generator set on a
flat, level surface and in a clean, dry
operating environment.
Allow two feet clearance on all side of
the generator set while operating it
outdoors.
Operate in specified area, if any problem
on applicable occasion, please consult
the authorized local authority. In some
areas, generator set must be registered
with the local utility. Generator set used
to construction sites may be subject to
additional rules and regulations.
DANGER
TOXIC FUMES
The exhaust of the generator set
contains carbon monoxide.
Using engine indoors CAN KILL YOU!
NEVER use inside any building or any
kind of enclosure, EVEN IF doors and
windows are open. Place the generator
set in a well-ventilated and clean area.
Note the wind direction and air current
when placing the engine.
High altitude
This generator set may require a high
altitude carburetor kit to ensure correct
operation at high altitudes. Consult the
authorized local dealer for high altitude
kit information if you always operate
your engine at altitudes above 5,000
feet (1,500 meters).
CAUTION
Even with carburetor modification,
generator set horsepower will decrease
about 3.5% for each 1,000 feet (300
meters) increase in altitude.
The effect of altitude on horsepower
will be greater than this if no carburetor
modification is made.
CAUTION
Operation the engine at altitude below
5,000 feet (1,500 meters) with modified
carburetor may cause the generator
set to overheat and result in serious
engine damage. Please restore factory
specifications of the carburetor at the
dealer when using the engine in a low
altitude area.
2. Operating Condition
Check for loose or damaged parts,
signs of oil or fuel leaks, and any
other condition that may affect
proper operation. Repair or replace
all damaged or defective parts
immediately.
www.SereneLifeHome.com 13
WARNING
Failing to correct problem(s) before
operation could result in property
damage, serious injury or DEATH.
Remove any excessive dirt or debris,
especially around the muffler and
recoil starter. DO NOT move or tip the
generating set during operation. Use
generator set only for intended uses. If
you have questions about intended
use, ask your local dealer.
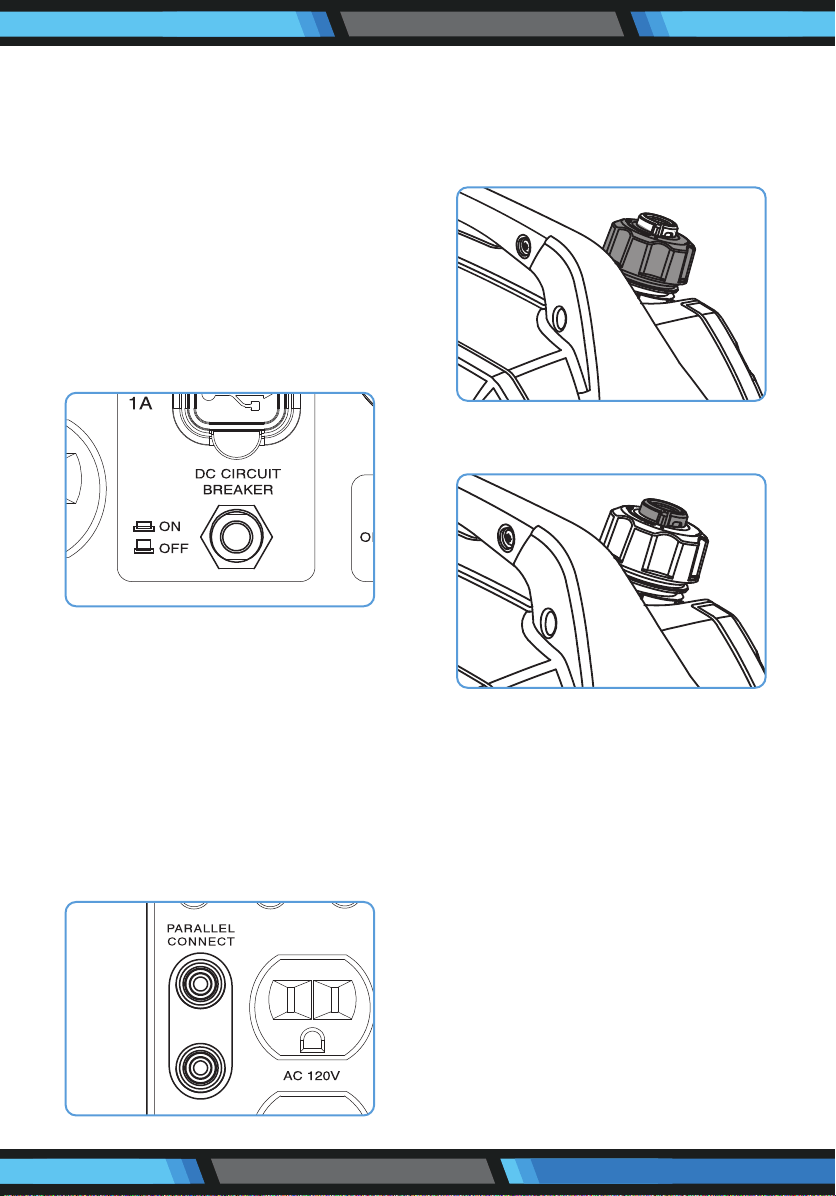
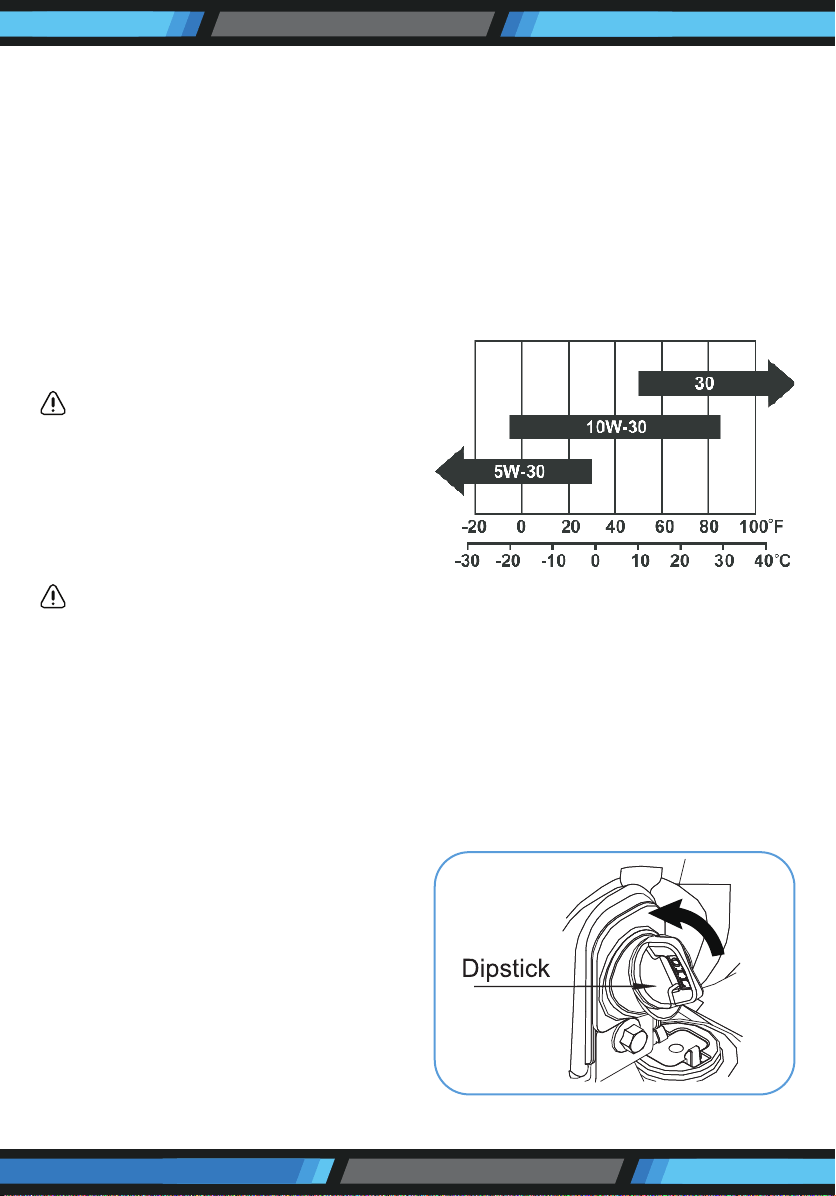
3. Engine oil check
Place the engine on a level surface
with engine stopped. Check the
engine oil level. Remove the oil
maintenance cover.
Remove the dipstick and wipe it clean.
Reinstall dipstick into hole; rest on oil
fill neck. DO NOT thread cap into hole.
Remove the dipstick again and check
oil level. Level should be between the
upper and lower limit.
Fill to the upper limit of the dipstick
with the recommended oil if the oil
level is too low.
Reinstall and fully tighten the dipstick.
Refer to add oil instruction in
MAINTENANCE section for more
information.
Oil capacity (rated):
See Parameters

WARNING
Oil is a major factor affecting perfor-
mance and service life. Use 4-stroke
automotive detergent oil recommended
in the MAINTENANCE section of this
manual.
CAUTION
Operate generator set only on leveled
surfaces. The engine is equipped with a
low oil sensor (applicable types) that
will automatic stop the engine when
the oil level falls below the safe limit.
To avoid the inconvenience of an
unexpected shutdown. Fill to the upper
limit and check the oil level regularly.
WARNING
This engine is not filled with oil before
send out to the factory. Any attempt to
crank or start the engine before it has
been properly filled with the recom-
mended type and amount of oil may
result in engine damage and void your
warranty.
4. Generator set fuel check
With the engine stopped, check the
fuel level. Refill the fuel tank if
necessary.
Use clean, fresh, regular unleaded
gasoline.
DO NOT mix oil with gasoline.
Always wipe up any spilled fuel.
CAUTION
Pressure can build up in the fuel tank.
Allow the generator set to cool for at
least two minutes before removing fuel
cap. Loosen the fuel cap slowly to
relieve any pressure in the tank
Be sure not to fill above the upper limit
mark. Always allow room for fuel
expansion.
Fuel capacity (rated):
See parameters.
DANGER
FIRE OR EXPLOSION
Gasoline is highly flammable and
extremely explosive.
Keep flammable items away while
handling gasoline.
Fill fuel lank outdoors and in a well-
ventilated area with the generator set
stopped. Always wipe off spilled fuel
and wait until the fuel has dried before
starting the generator set.
DO NOT operate the generator set
with known leaks in the fuel system.
Regularly check if there is any leak on
fuel system.
Use proper fuel storage and handling
procedures. DO NOT store fuel or other
flammable materials nearby.
Keep fire extinguisher handy and be
prepared if a fire starts.
www.SereneLifeHome.com14

www.SereneLifeHome.com 15
DANGER
Do not fill the fuel tank above the upper
limit. Over fill will result in engine die
or damage the carbon canister
(if equipped) and void your warranty.
NEVER use engine or carburetor cleaner
products in the fuel tank or permanent
damage may occur. It is important to
prevent gum deposits from forming in
essential fuel system parts. Such as the
carburetor, fuel filter, fuel hose or tank
during storage. Also, experience
indicates that alcohol-blended fuels
(called gasohol, ethanol or methanol)
can attract moisture, which leads to
separation and formation of acids
during storage. Acidic fuel can damage
the fuel system of the generator set
while in storage. Be sure to review the
instructions given in "Storage" section.
Gasoline/Alcohol blends: up to 10%
alcohol, 90% unleaded gasoline by
volume is approved as a fuel.
Other gasoline/alcohol blends are not
approved. Effects of old, stale or
contaminated fuel are not warrantable.
CAUTION
To minimize gum deposits in your fuel
system and to insure easy starting, do
not use gasoline left over from the
previous season.
CAUTION
Allow the generator set to cool for at
least two minutes before removing fuel
cap when adding fuel.
Loosen the fuel cap slowly to relieve
any pressure in the tank.
5. Internal battery grounding
(Applicable types)
Remove the appearance cover plate.
Use the nut of M6 to connect the
battery grounding wire with cylinder
head cover to make the ground
connection of internal battery.
6. Electrical devices
Disconnect all electrical devices from
the generator set and switch off the
AC circuit breaker before start the
engine. The generator set may be
hard to start with electrical devices
connected. The power of connected
electrical devices cannot limit the
generator set max power, specific
power see parameter sheet for
reference.
7. Generator set grounding
The generator set must be properly
connected to an appropriate ground.
It helps prevent electrical shock if a
ground fault condition exists in the
generator set or in connected
electrical devices, especially when
the unit is equipped with a wheel kit.
Proper grounding also helps dissipate
static electricity, which often builds
up in ungrounded devices.
DANGER
Electrical Shock
Failure to properly ground the
generator set can result in electric
shock.
A ground terminal on the frame of the
generator has been provided on the
generator end. For remote grounding,
connect a length of heavy gauge (4 mm²)
copper wire between the generator
ground terminal and a copper rod
driven into the ground.
Local electrical codes may also require
proper grounding of the unit.
We strongly recommend that you
consult with a qualified electrician for
grounding requirements in your area.
2. Starting the generator set
1. Perform operating checklist and
remove all loads.
2. Turn the ventilation knob to “ON”
position when engine is running to
make sure the fuel flowing.
3. Turn the ON/RUN switch to the
“RUN” position.
4. Turn the energy saving switch to the
“ON” position.
(Note: Please set the energy-saving
switch to “OFF” position when it
needs large starting current.)
www.SereneLifeHome.com16
www.SereneLifeHome.com 17
5. (Suitable for hand recoil starting)
Pull out the choke lever to close the
choke valve.
CAUTION
Choke position for starting may vary
depending upon temperature and other
factors. If re-starting a warm engine,
there’s no need to pull out the choke
lever.
6. Manual start
Hand recoil starting:
CAUTION
Check starter cord conditions before
operating. Have it replaced immediately
by local authorized dealer if cord is
frayed.
When starting engine, grasp the recoil
starter handle and pull slowly until
resistance is felt.
Then pull rapidly to avoid kickback.
When pulling the recoil starter, firmly
grasp the carrying handle to avoid
tumble of generator set.
WARNING
KICKBACK
Rapid retraction of the starter cord will
pull hand and arm towards the engine
faster than you can let go.
Unintentional startup can result in
entanglement, traumatic amputation
or laceration. Broken bones, fractures,
bruises or sprains.
If the starter cannot drive the engine to
rotate, turn off the starter immediately.
Do not attempt to start the engine
again before finding the causes of the
fault. Prohibit the unauthorized
change of other battery for re-start.
WARNING
The engine starts time cannot exceed
15 minutes. If the engine fails to start,
allow the starting motor to cool for one
minute before restart.
Failure to operate according to this rule
will damage the starting motor.
CAUTION
If the engine fails to start after attempt
for 3 times or flames out after starting,
inspect and ensure that the generator
set is placed in horizontal surface and
enough engine oil is injected.
If engine is equipped with an engine
oil alarm, it is possible to prevent
engine start when the engine oil in the
crankcase is lower than the minimum
level. During running-in, routinely
inspect the engine oil. See maintenance
section for recommended maintenance
period.
After the engine starts successfully,
and the temperature has been
increased, push the choke lever to open
the choke valve. If the engine runs
unstably (shaking exists), push the
choke lever to the HALF open position.
Then push it to the FULL open position
after engine runs stably.
CAUTION
If the engine is in warm state, open the
choke lever when restarting the
engine.
WARNING
When the starting battery of the
generator set is low in voltage and pull
starting the generator does not work,
please make sure the fuel tap is in the
on position. Please try and operate the
choke lever according to the below
diagram. This will add choke to the
engine to help the generator engine to
start when the battery is low in volts
and not being able to move the choke
automatically.
NOTE: Sometimes the generator can
take a few attempts to start in cold
weather. If machine does not start in
the first 10 seconds, wait for 30 seconds
before attempting again. If the motor
turns a little then stops when you press
the Start key, it may indicate a low
battery. Charge the battery before
operation or start by recoil start.
www.SereneLifeHome.com18
www.SereneLifeHome.com 19
7. After all the operations, the engine
can be normally loaded.
DANGER
It is prohibited to start or close the
generator set when the output terminal
of generator set is connected to an
electric device and the electric device
is in “ON” state.
3. Connect to electrical devices
Note:
1. Inspect power cord for damage
before using. There is a hazard of
electrical shock from crushing, cutting
or heat damage.
2. Make sure that the generator set has
been properly grounded. If the electric
devices require grounding, the
generator set must ground.
3. Allow the engine to stabilize and
warm up for a few minutes after
starting.
4. Make sure that the electric devices
are in “OFF” position.
5. Connect and start the electric devices.
6. Turn off all electric devices & disconnect
them from the generator set.
7. If the generator set supplies for
several loads or electric devices, start
the smallest one first and the largest
one last.
CAUTION
If connected devices overheat, turn
them off and disconnect them from
generator set.
DANGER
Electrical Shock
To reduce the risk of electrical shock.
DO NOT use electrical cords that are
worn, frayed, bare or otherwise
damaged.
DO NOT touch bare wires or receptacles.
DO NOT handle generator or electrical
cords while standing in water, or
barefoot, or while hands or feet are wet.
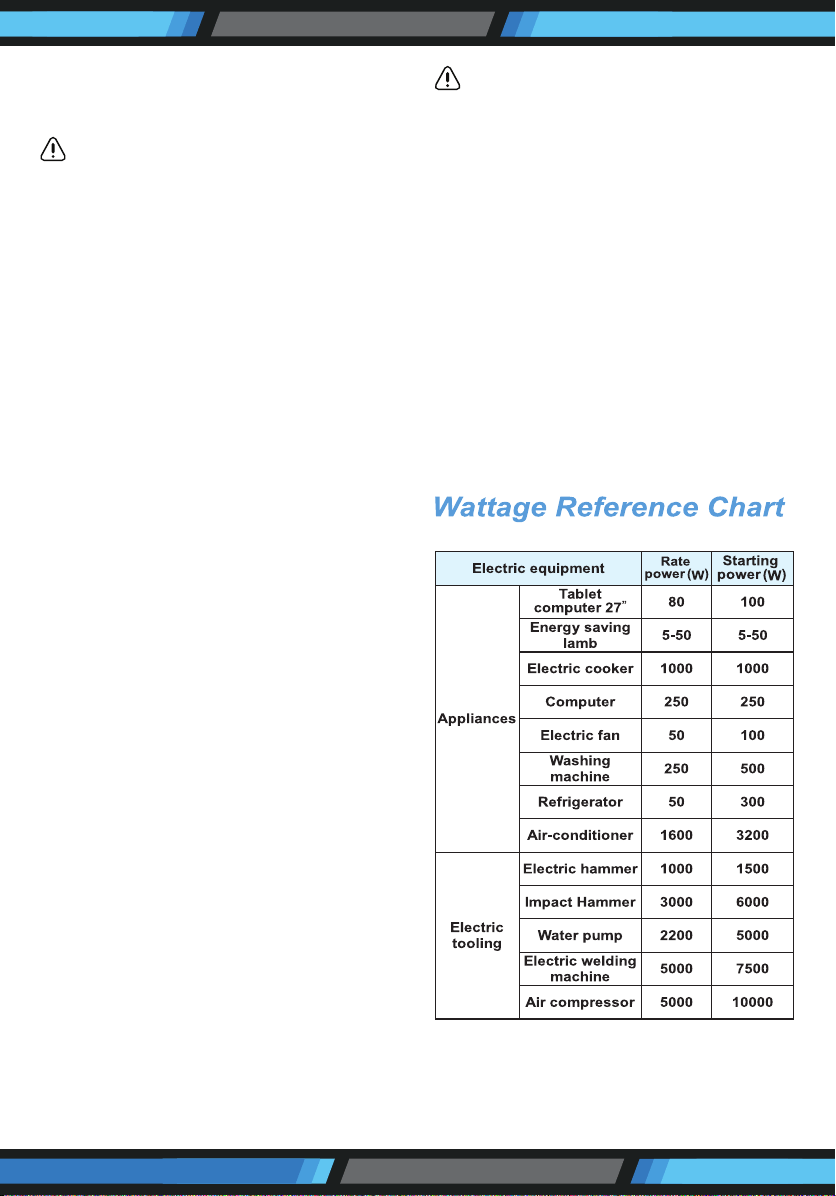
Loading capacity
WARNING
DO NOT overload the generator set.
Exceeding the generator set’s capacity
can damage the generator set and/or
electric devices connected to it.
You must make sure your generator set
can supply enough rated (running) and
(starting) watts for the electrical devices
at the same time.
Follow these simple steps to calculate
the running and starting watts necessary
for your purposes.
a. Count the electrical devices you will
power at the same time.
b. The amount of power you need to
run with the devices is the total
rated (running) watts of these items.
c. Starting power is the power needed
shortly when electric devices start.
Since not all devices start at the same
time, starting power can be estimated
by the maximum power of all devices
plus the total power counted in step
“ b”.
WARNING
It is necessary to equip with circuit
protector or switch to isolate the
generator set from the electric utility
when the generator set is mainly used
for backup. Failure to isolate the
generator set from the power utility
may result in injury or death to electric
utility workers and damage to the
generator set due to back feed of
electrical energy.
www.SereneLifeHome.com20
www.SereneLifeHome.com 21
4. Stopping the generator set
Remove the connectors of all electric
equipment from the generator set
panel.
WARNING
NEVER stop the engine with electrical
devices connected and running.
Note: If the generator will not be in
service for over 2 weeks, please turn
the knob to “OFF” position, or the
battery will be out of power and the
generator will not start.
Turn the energy saving switch to “ON”
position.
4. Allow the generator set run at no
load for a few minutes to stabilize
internal temperatures of the engine
and generator set.
5. Turn the ON/RUN switch to “ON”
position.
5. Parallel operation (If applicable)
Make sure that the generator set is
in a good running state before
connecting it to other generator sets.
The total power of electric devices
should not exceed rated power of
generator set. When electric motor
starts, the overload indicator (red)
will light up and normally it will stop
within 4 seconds. If it cannot stop,
please consult your local dealer.
During parallel operation, energy-
saving switch of generator set
should be in the same position.
www.SereneLifeHome.com22
1. Connect one generator set to other
generator set(s) in parallel. Use the
parallel kit to make the parallel
connection (the parallel kit needs to
be purchased separately).
2. Start the engine in proper order and
make sure that the running indicator
(green) is normal.
3. Connect the plug of electric devices
to the AC receptacle of parallel kit.
4. Run the electric devices.
CAUTION
When overload too much, overload
indicator (red) blinks continuously, and
the generator set may be damaged.
When overload a little, overload
indicator (red) lights up continuously,
it may shorten the service life of
generator set. When continuously
operating the generator set, power
cannot exceed the rated power of
generator set. The total power of electric
devices cannot exceed the rated power
of generator set.
The manufacturers of electric devices
or tools always list the rated power of
similar models or serial number.
IV. MAINTENANCE
It is the operator’s responsibility to
complete all scheduled maintenance in
a timely manner. Correct any issue
before operating the generator set.
Always follow the inspection and
maintenance recommendations and
schedules in this manual.
WARNING
Improper maintenance or failure to
correct a problem before operation can
cause a malfunction and result in
property damage, serious injury or
DEATH. Improper maintenance will
void your warranty.
DANGER
Accidental starts can cause severe injury
or death. Remove the spark plug cap
and ground generator set before
performing any service.
CAUTION
The filter element may contain PAHs.
PAHs are harmful for your health.
Please wear gloves for protection during
air filter maintenance.

www.SereneLifeHome.com 23
1. Maintenance Schedule
Stop the generator set before serving, disconnect all electric devices and
battery (if equipped), and cool down the generator set completely. Serve the
generator set in a clean, dry and flat area, so that no accident would happen
during the serving. Please make the wheel in brake state to stop accidental
movement of generator set. Follow the service intervals indicated in the chart
below. Service your generator set more frequently when operating in adverse
conditions. Contact your local authorized service dealer for your generator set
or engine maintenance needs.
NOTE:
Note 1: Applicable types (if available).
Note 2: Before each season and after then (whichever comes first).
Note 3: Service more frequently under severe, dusty, dirty conditions.
Note 4: To be performed by knowledgeable, experienced owners or the authorized
dealer.
www.SereneLifeHome.com24
2. Generator set maintenance
Use a damp cloth to clean exterior
surfaces of the generator set. Use a
sort brush to clean the dirt and oil.
Use an compressed air (25 PSI) to
clear dirt and debris from the
generator set. Inspect all air vents
and cooling slots to ensure that they
are clean and unobstructed.
WARNING
DO NOT use water to clean the
generator set. Water can enter the
generator set through the cooling slots
and damage the generator set windings.
WARNING
DO NOT modify the generator set in
any way.
DO NOT tamper with modified the
speed regulator. Generator set supplies
correct rated frequency and voltage
when running at factory set.
Tampering with modify the factory set
governor will void your warranty.
3. Engine Maintenance
Engine oil
Only use four-stroke engine oil of SJ, SL
or equivalent level which are in
accordance with or higher than API
standard.
Check the API label on oil bottle or
other container, and make sure the “SJ,
SL” or equivalent level letter is in the
label. SAE 10W-30 is recommended for
general, all-temperature use. Other
viscosities shown in the chart may be
used when the average temperature in
your area is within the indicated range.
Oil capacity (rated):
See parameters
Add oil
a. Place the engine on a level Surface.
b. Remove the dipstick and wipe it
clean.
www.SereneLifeHome.com 25
c. Add recommended oil to the upper
limit.
d. Fully tighten the dipstick.
e. Dispose of used oil at an approved
waste management facility.
WARNING
Oil level check
Reinstall dipstick into hole; rest on oil
fill neck. DO NOT thread cap into hole.
f. Properly dispose of any used oil at an
approved waste management
facility.
Change Oil
WARNING
Change oil when the engine is warm
from operation.
a. Place the machine on a level surface
which is 300mm higher than the
ground.
b. Remove the oil maintenance cover.
c. Place the waste oil box on the ground.
d. Remove the oil dipstick, and tilt the
machine to pour the oil.
e. Add recommended oil to the upper
limit.
www.SereneLifeHome.com26
f. Fully tighten the dipstick.
g. Properly dispose of any used oil at
an approved waste management
facility.
h. Reinstall the oil maintenance cover.
WARNING
The engine is not filled with oil at the
factory. Any operation before it has been
properly filled with the recommended
type and amount of oil may result in
engine damage and void your warranty.
Air filter
a. Remove the appearance cover.
b. Loosen the filter fix clamp and
remove the cover of the air filter.
c. Remove the foam filter element.
d. Wash in liquid detergent and warm
water.
e. Squeeze thoroughly dry in a clean
cloth.
f. Saturate in clean engine oil.
g. Squeeze in a clean absorbent cloth
to remove all excess oil.
h. Assemble the filter element onto the
filter unit.
i. Assemble the filter fix clamp.
j. Reinstall the appearance cover.
WARNING
DO NOT run the engine without the air
filter, or serious danger can result.
Spark plug
a. Clean any dirt from the spark
b. Remove the spark plug cap.
c. Using socket wrench to loose and
remove the spark plug.
d. Inspect the spark plug and spark
plug washer, if it was broken or worn,
replace with a new one. Clean the
spark plug with wire brush if reuse it.
e. Check spark plug gap. Carefully bend
side electrode to adjust the gap if
necessary.
www.SereneLifeHome.com 27
Spark plug gap:
0.6mm-0.8mm
f. Carefully thread the plug into the
engine by hand.
g. After the spark plug is seated, use
spark plug wrench to tighten the plug.
Spark Plug Tighten Torque:
15-20 N.m
h. Attach the spark cap to the plug and
connect the spark plug wire to the
plug.
WARNING
Only use recommended spark plug or
equivalent. DO NOT use spark plugs
that have improper heat range.
Spark Arrester (Applicable types)
a. Allow the generator set to cool
completely before servicing the
spark arrester.
b. Remove the muffler blind window
first.
c. Remove the spark arrester screen.
d. Carefully remove the carbon deposits
from the spark arrester screen with a
wire brush.
e. Replace the spark arrester if it is
damaged.
f. Reinstall the spark arrester in the
muffler and reinstall the muffler
blind window.

www.SereneLifeHome.com28
V. TROUBLESHOOTING

www.SereneLifeHome.com 29
VI. STORAGE AND
TRANSPORTATION
Storage
The generator set should be started at
least once every 2 weeks and allowed
to run for at least 20 minutes. Follow
the instructions below for longer term
storage if the generator set will be out
of service for 2 months or more.
DANGER
Fire or explosion
Gasoline is highly flammable and
extremely explosive. Empty the fuel
tank and shut off fuel valve before
storing or transporting this generator
set.
1. AIlow the generator set to cool
completely before storage.
2. Clean the generator set according to
instructions in Maintenance section.
3. Drain all fuel completely from the
fuel tank, fuel hose and carburetor to
prevent gum from forming.
4. Close the fuel switch to cut down
fuel supply.
5. Remove the appearance cover plate.
Unscrew the oil dipstick and slightly
tilt the whole set to pour out the oil.
6. Remove the spark plug and pour
about 15ml. of oil into the cylinder.
Pull the recoil starter slightly to
distribute the oil and lubricate the
cylinder. And then attach the spark
plug.
7. Store the unit in a clean, dry area out
of direct sunlight.
Transportation
To prevent fuel spillage when trans-
porting or during temporary storage,
the generator set should be secured
upright in its normal operating position,
with the engine switch OFF. The ON/RUN
switch should be turned OFF.
WARNING
When transporting:
Do not overfill the tank. Do not operate
the generator set while it is on vehicle.
Take the generator set off the vehicle
and use it in a well-ventilated place.
Avoid a place exposed to direct sunlight
when putting the generator set on a
vehicle. If the generator set is left in an
enclosed vehicle for many hours, high
temperature inside the vehicle could
cause fuel to vaporize resulting in a
possible explosion.
Do not drive on a rough road for an
extended period with the generator
set on board. If you must transport the
generating set on a rough road, drain
the fuel from the generator set before-
hand.

www.SereneLifeHome.com30
VII. SPECIFICATION
1. Wiring diagram
RECOIL START

www.SereneLifeHome.com 31
ELECTRIC START
NOTE:
Because of the difference of generator, the wiring diagram is only for reference.
www.SereneLifeHome.com32
VII. SPECIFICATION
Features:
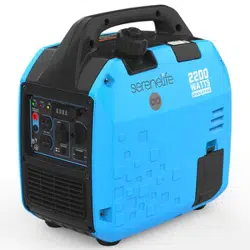
• 2,200 Peak Watts/1,800 Rated Watts (gas)
• Portable inverter generator boasts, 3HP, Single Cylinder, 4-Stroke, OHV,
air-cooled engine
• Inverter technology with parallel capability offered with portable inverter generator
• Offers super-quiet operation (~60dB)
• Portable inverter generator includes stable sine wave to use w/sensitive
electronic equipment
• Portable inverter generator features compact, impact resistant design with
carrying handle
• 1.18 gal. fuel tank included with portable inverter generator
• 8 hours of run time at load on a single tank of gasoline
• (2) 120V 15A AC Outlets, (1) 5V Integrated USB Outlet, parallel sockets
• Additional features include: recoil start system, low-oil indicator and shutdown
• Built-in Fuel Gauge
• Quiet Operation
• EPA, CARB-compliant portable inverter generator
• LCD Digital Display Shows (Voltage-Frequency-Running Time)
• Safe for Electronics such as TV, Tablets, Laptops and Other Sensitive Equipment
What's in the Box:
• Inverter Generator
• (1) 5V USB Port
• Eco-mode Switch
• Circuit Breaker
• Grounding Nut
• Indicator Lights
• Choke Lever
• Screw Driver
• Spark Plug Socket
• Funnel
• Grounding Wire
www.SereneLifeHome.com 33
Engine Technical Specs:
• Engine Model: 148F-2
• Engine Displacement (cc): 79cc
• Engine Type: 4 Stroke, OHV, Single Cylinder with Forced Air Cooling System
• Engine Speed: 4800 RPM
• Half-Load Run Time: 5-7 Hours
• Spark Plug Type: Torch E5T (NGK BP5H)
• Spark Plug Gap: 0.6 mm - 0.8 mm (0.02 in.-0.03 in.)
• Spark Plug Torque: 11.1-14.7 ft.-lbs. (15-20 Nm)
Technical Specs:
• Starting Power: 2200W
• Rated Power: 2100W
• Running Wattage: 1900W
• Noise Levels: 52-59 dB
• Fuel Tank Size: 1 Gallon
• Amperage: 16 Amp
• Decibel Rating: 53-59dB
• Life Span: 500h
• Frequency Response(Hz): 60Hz
• Rated Power (KW): 1.9
• Max Power (KW): 2.1
• Voltage(V): AC 120V NEMA 5-20R Duplex Receptacles, (1) 5V USB Port
• Max Fuel Tank Size (L): 4L
• Running Time At 50% Loading(H): 5.7
• Starting System: Recoil
• Alternator Material: Permanent Magnet
• THD(%): ≤3%
• Oil Capacity (L): 0.5
• Construction Material: Engineered ABS, Aluminum
• Grounding Wire Length:4.92 ft.
• USB Port 5V, 2.1A+1A
• Rated Amperage: AC:15.8A, 2.1A/1A (USB)
• Product Dimension (L x W x H): 17.3'' x 11.5'' x 17.7'' -inches