Loading ...
Loading ...
Loading ...
19
4. Press the two coloured release buttons inwards and at the
same time pull the brewing unit outwards (g. 33);
5. Soak the brewing unit in water for about 5 minutes, then
rinse under the tap;
Important!
RINSE WITH WATER ONLY
NO DETERGENTS NO DISHWASHER
6. Do not use detergents when cleaning the brewing unit, as
they could damage it.
7. Use the brush (D5) to remove any coee residues left in
the brewing unit housing, visible through the brewing unit
ap;
8. After cleaning, replace the brewing unit by sliding it onto
the internal support, then push the PUSH symbol fully in
until it clicks into place;
Please note:
If the brewing unit is dicult to insert, before insertion, adapt it
to the right size by pressing the two levers (g. 34).
34
9. Once inserted, make sure the two coloured buttons have
snapped out;
10. Close the brewing unit ap;
11. Put the water tank back.
15.9 Cleaning the milk carafes (E) and (F)
Each time you use the milk carafe, clean as described below:
1. Extract the lid of the milk carafe (E1) or (F1) (g. 18);
2. Extract the milk spout (E5) or (F5), milk spout extension
(E7) (“Hot” carafe only) and milk intake tube (E6) or (F6)
(g. 35);
35
36
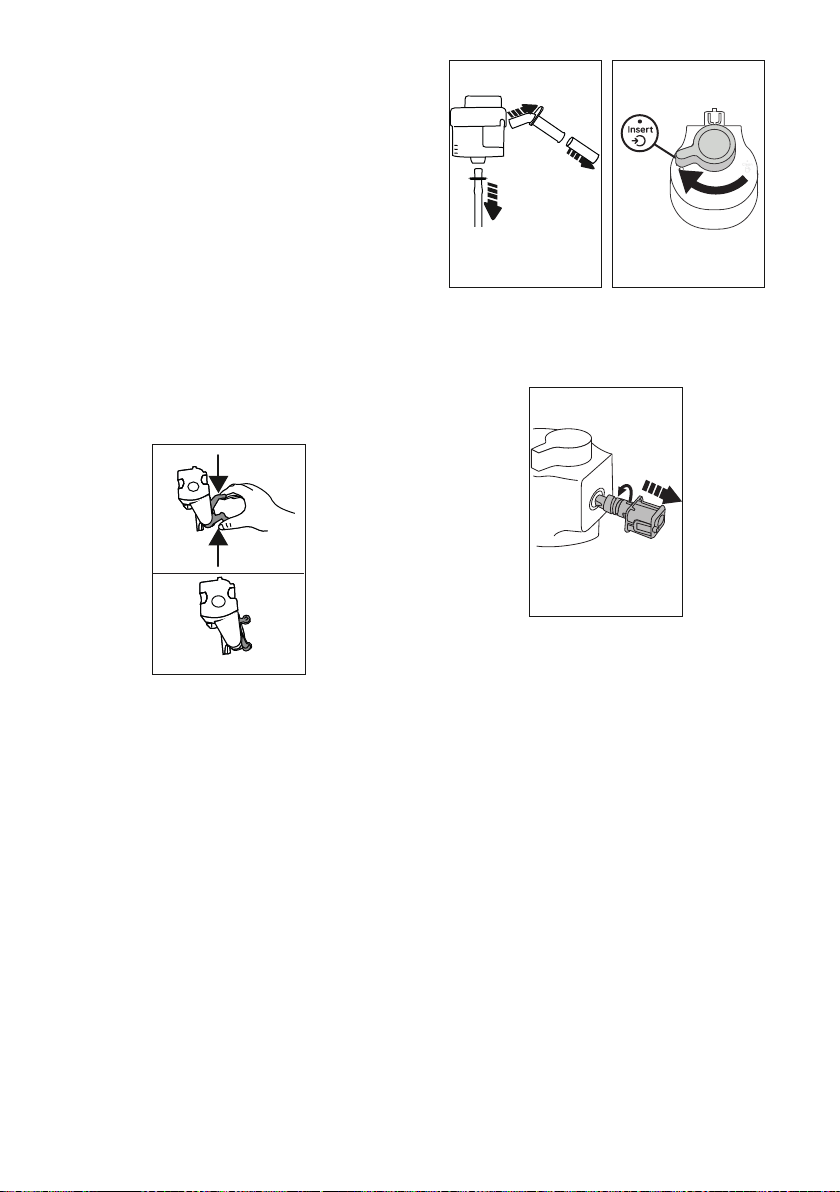
3. Turn the froth adjustment dial (E3) or (F3) clockwise to the
“Insert” position (g. 36) and pull to extract;
4. Turn anticlockwise and remove the milk carafe connector
(E4) or (F4) (g. 37).
37
5. Wash in a dishwasher (recommended) or by hand as indi-
cated below:
• In a dishwasher: Rinse all the above components and the
milk carafe with hot running drinking water (at least 40°C),
then place them in the top basket of the dishwasher and
run a programme at 50°C, e.g. standard ECO.
• By hand: Thoroughly rinse all the components and the
milk carafe with hot running drinking water (at least 40°C)
to remove all visible milk residues; make sure to run the
water through the holes in the lid (g. 38). Then immerse
all the components in hot drinking water (at least 40°C) and
washing up liquid for at least 30 minutes. Rinse all the above
components thoroughly under hot drinking water, rubbing
them one at a time with your hands.
6. Make sure there are no milk residues on the hollow and
groove under the dial (g. 39).
If necessary,
scrape the
groove with a toothpick;
Loading ...
Loading ...
Loading ...