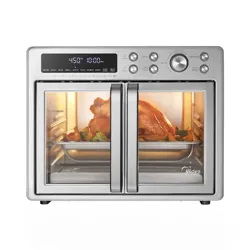
3
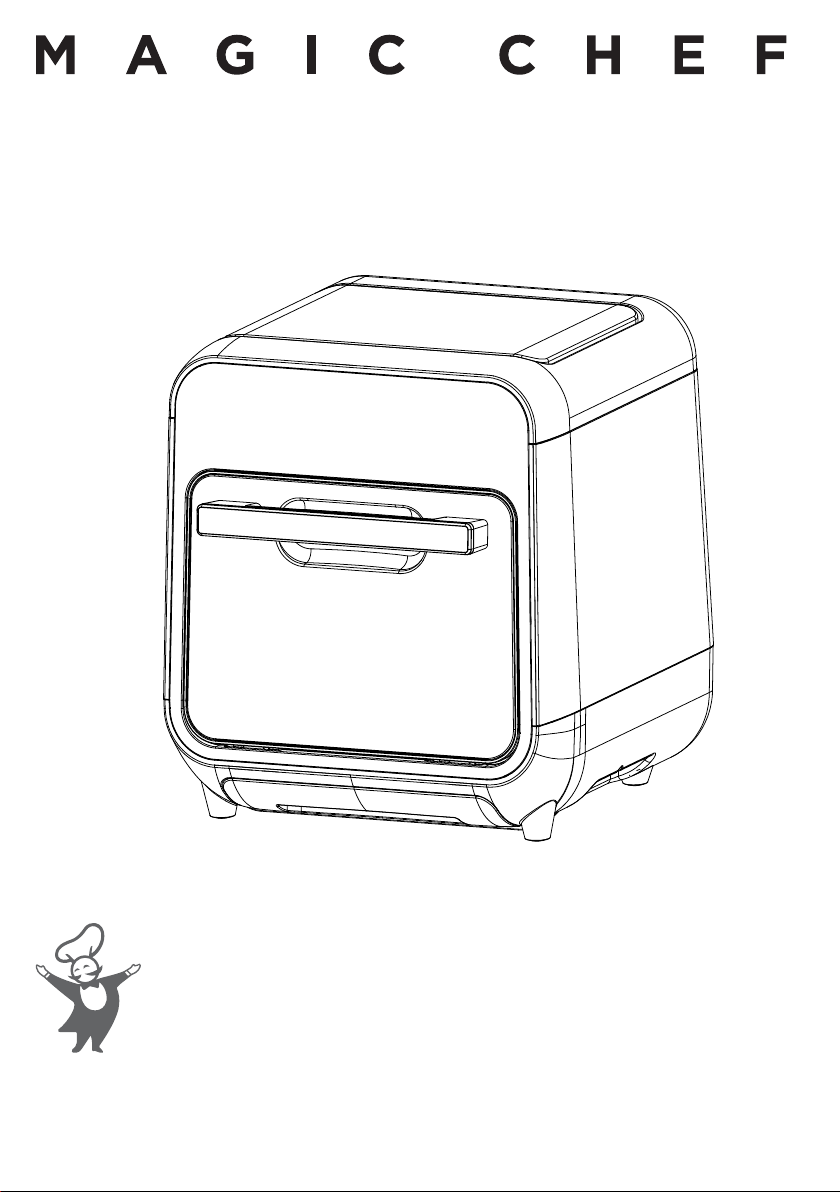
-in-1 Steam Air Fryer Oven
User Guide
Please read this manual carefully before using the air fryer and keep it for future reference.
www.magicchef.com MODEL # MCSAF15SM
®
2
PRODUCT REGISTRATION
3. Registering your product could act as your proof of purchase in the event of insurance loss.
Once again, thank you for purchasing a Magic Chef product.
®

3
CONTENTS
PRODUCT REGISTRATION ......................................................................
PRECAUTIONS .........................................................................................
IMPORTANT SAFETY INSTRUCTIONS ....................................................
SPECIFICATIONS ......................................................................................
PARTS AND FEATURES............................................................................
OPERATION INSTRUCTIONS .................................................................
CARE AND MAINTENANCE......................................................................
TROUBLESHOOTING...............................................................................
WARRANTY..............................................................................................
2
4
5
7
7
13
14
12
8

4
PRECAUTIONS
1. Read all instructions.
2. DO NOT touch hot surfaces. ALWAYS use handles or knobs and use oven mitts or potholders.
3. To protect against electric shock, do not immerse cord, plugs, or appliance in water or any other
liquid.
4. This appliance is not intended for use by any persons (including children) with reduced physical,
sensory or mental capabilities, or lack of experience and knowledge, unless they have been given
supervision and instruction concerning use of the appliance by a person responsible for their safety.
5. Children should be supervised to ensure that they do not play with the appliance.
6. ALWAYS unplug from outlet when not in use and before cleaning. Allow the unit to cool before putting
on or taking off parts, and before cleaning the appliance.
7. DO NOT operate any appliance with a damaged cord or plug or after the appliance malfunctions, or
has been damaged in any manner. If the cord or appliance is damaged in any way, contact customer
service or contact a qualified service technician to diagnose and/or repair.
8. The use of accessory attachments not recommended by the appliance manufacturer may cause
injuries.
9. DO NOT use outdoors.
10. DO NOT let the cord hang over the edge of the table or counter, and DO NOT allow the cord to come
into contact with hot surfaces.
11. DO NOT use the or place the air fryer on or near a stovetop or in a heated oven.
12. Extreme caution must be used when moving an appliance containing hot oil or any other hot liquid.
13. ALWAYS attach plug to appliance first, then plug the cord into a wall outlet. To disconnect, turn the
appliance off, then remove the plug from the wall outlet.
14. DO NOT use appliance for other than intended use.
15. Be sure the crisping tray is in place before adding food to be air fried.
16. Be sure the frying basket is locked securely into the front of the air fryer when in use.
WARNING: The air fryer will not operate unless the frying basket is fully closed.
CAUTION: After hot air frying, extreme caution must be used when handling the hot frying basket, the
crisping tray, and cooked foods.

5
IMPORTANT SAFETY INSTRUCTIONS
CAUTION: HOT SURFACES – This appliance generates heat and escaping steam during use. Proper
precautions must be taken to prevent the risk of burns, fires, or other injury to persons or damage to property.
CAUTION: This appliance gets hot during operation and retains heat for some time after being turned off.
ALWAYS use oven mitts when handling hot materials and allow the unit to cool completely before cleaning.
DO NOT place anything on top of the air fryer while it is in operation or hot from use.
WARNING - To reduce the risk of fire, electric shock, or injury to persons when using your appliance,
follow basic precautions, including the following:
1. Read all instructions before using the appliance.
2. The cord to this appliance must be plugged into a 120V AC electrical outlet only.
3. If the air fryer begins to malfunction during use, pull the frying basket out of the main body of the
appliance, then remove the plug from the wall outlet. DO NOT use or attempt to repair the
malfunctioning appliance.
4. DO NOT leave this appliance unattended during use.
5. DO NOT immerse the power cord in any liquid. If the power cord becomes damaged, contact customer
service.
6. ALWAYS keep the cord out of reach from children to avoid the risk of electric shock and choking.
7. ALWAYS place the air fryer on a flat, heat-resistant work area.
8. DO NOT obstruct the air outlet or air inlets on the back and sides of the air fryer with any objects or by
placing too close to a wall. ALWAYS avoid any escaping steam from the air outlet during use.
9. Keep appliance at least 4 inches away from walls or other objects during operation.
10. ALWAYS use the frying basket handle to open frying basket drawer.
11. WARNING: After air frying, be sure to place the frying basket on a flat, heat-resistant surface.
12. NEVER move the air fryer when it is hot or if it contains hot food. Allow unit to cool before moving.
13. DO NOT clean the air fryer with metal scouring pads. Pieces of the pads could break off and touch
electrical parts, creating a risk of electric shock.
14. WARNING: Overfilling the frying basket may damage the air fryer and could result in serious
personal injury.
ELECTRICAL SAFETY
The appliance must not be supplied through an external switching device, such as a timer, or
connected to a circuit that is regularly switched on and off by a utility.
DO NOT touch the plug with wet hands. To reduce the risk of electric shock, ALWAYS pull the plug to
unplug the product. DO NOT pull on the cord to unplug.
This appliance has a polarized plug (one blade is wider than the other). To reduce the risk of electric

6
shock, this plug will only fit into a polarized outlet one way. If the plug does not fit fully into the outlet,
reverse the plug. If it still does not fit, contact a qualified electrician.
DO NOT modify the plug in any way.
A short power-supply cord (or detachable power-supply cord) is to be provided to reduce the risk resulting
from becoming entangled in or tripping over a longer cord.
If an extension cord is required, it may be used as long as:
1. The marked electrical rating of the extension cord is at least as great as the electrical rating of the
appliance;
2. The longer cord should be arranged so that it does not drape over the counter top or table top
where it can be pulled on by children or tripped over unintentionally.
NOTE: If the electrical circuit is overloaded with other appliances or electric devices, the air fryer may not
operate properly. It is recommended that the unit be operated on a separate electrical circuit from other
appliances.
READ AND FOLLOW THIS
SAFETY INFORMATION CAREFULLY
SAVE THESE INSTRUCTIONS
7
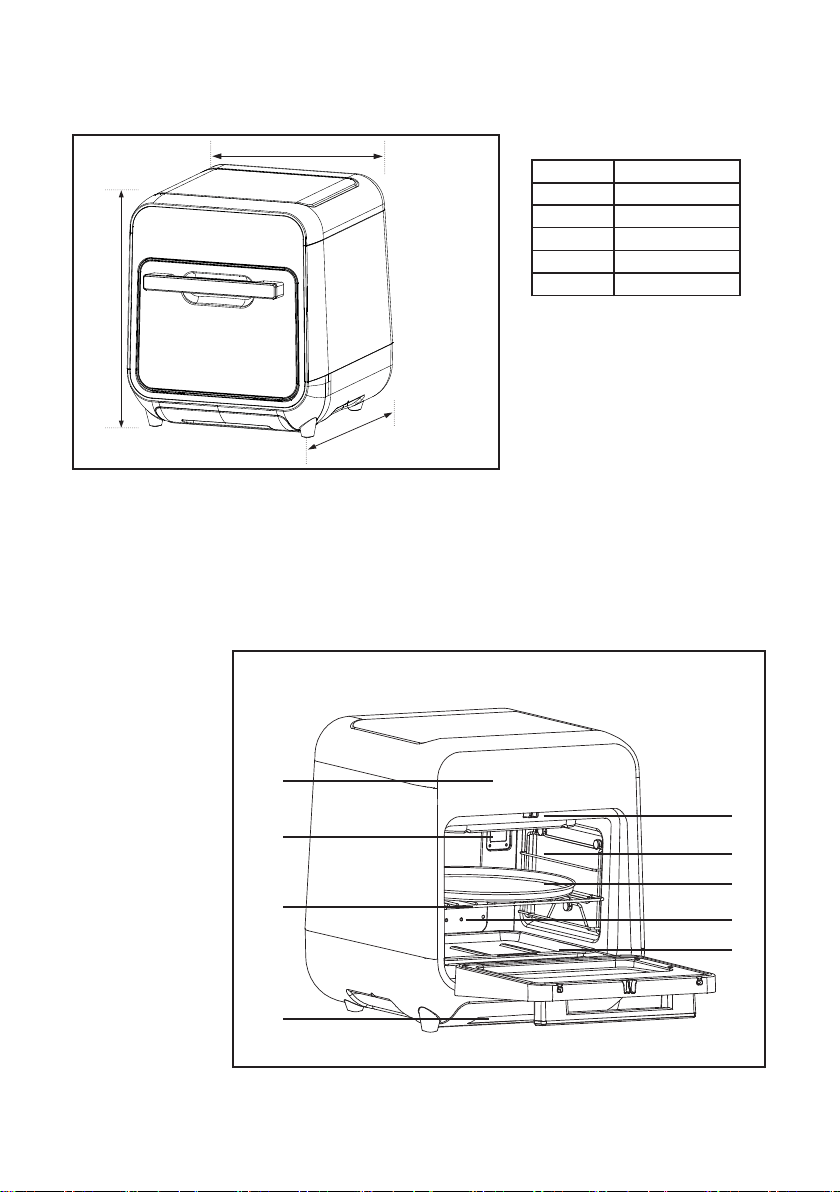
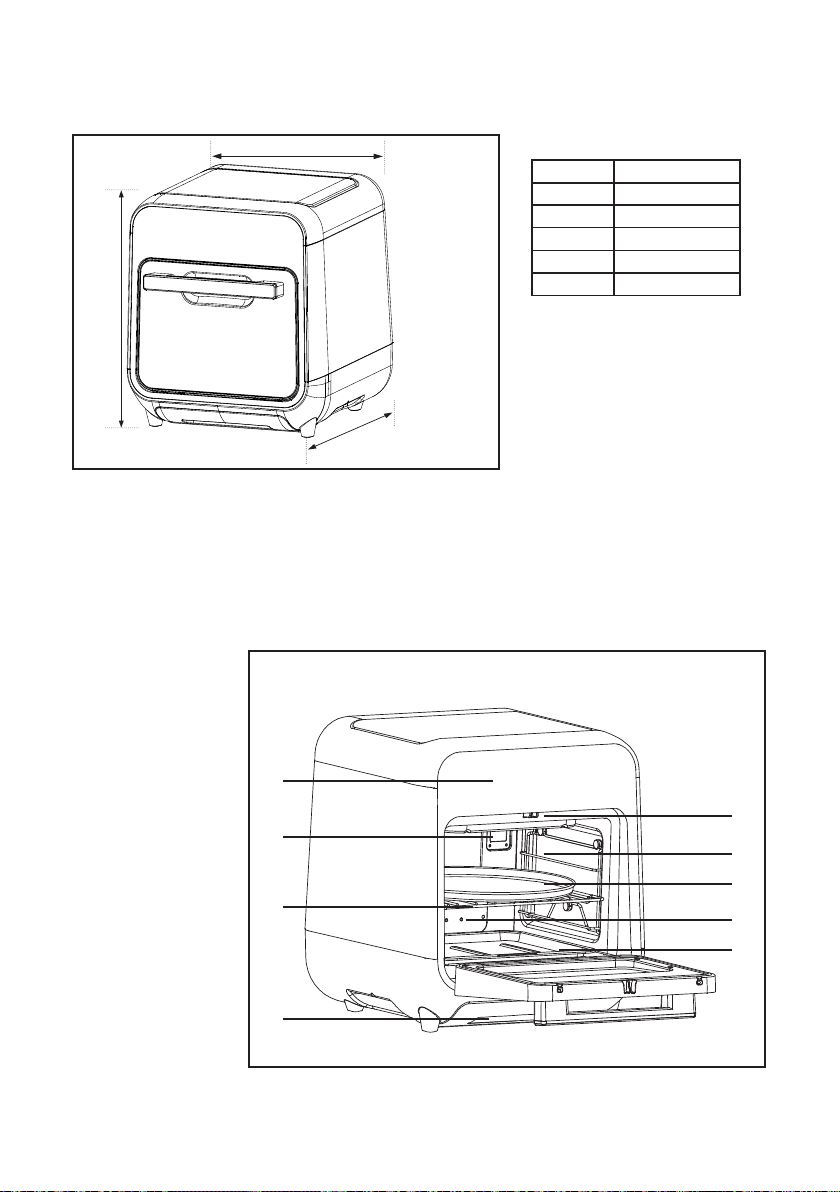
Figure 1
14.8”
15.7"
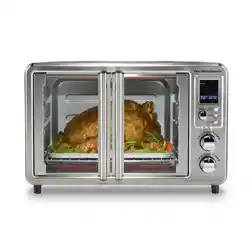
SPECIFICATIONS
Figure 2
PARTS AND FEATURES
Length 13.9" (352 mm)
Model MCSAF15SM
Width
14.8" (375 mm)
Net Weight 17.63 lbs (8 kg)
Height 15.7" (398 mm)
Capacity 15 L (15.9 qt)
a. Control Panel
b. Lamp
c. Rack
d. Water Tray
e. Door Switch
f. Adjustable
Rack Supports
g. Non-Stick Tray
h. Steam Vents
i. Oil Pan
13.9”
a
b
c
d
e
g
h
i
f
8
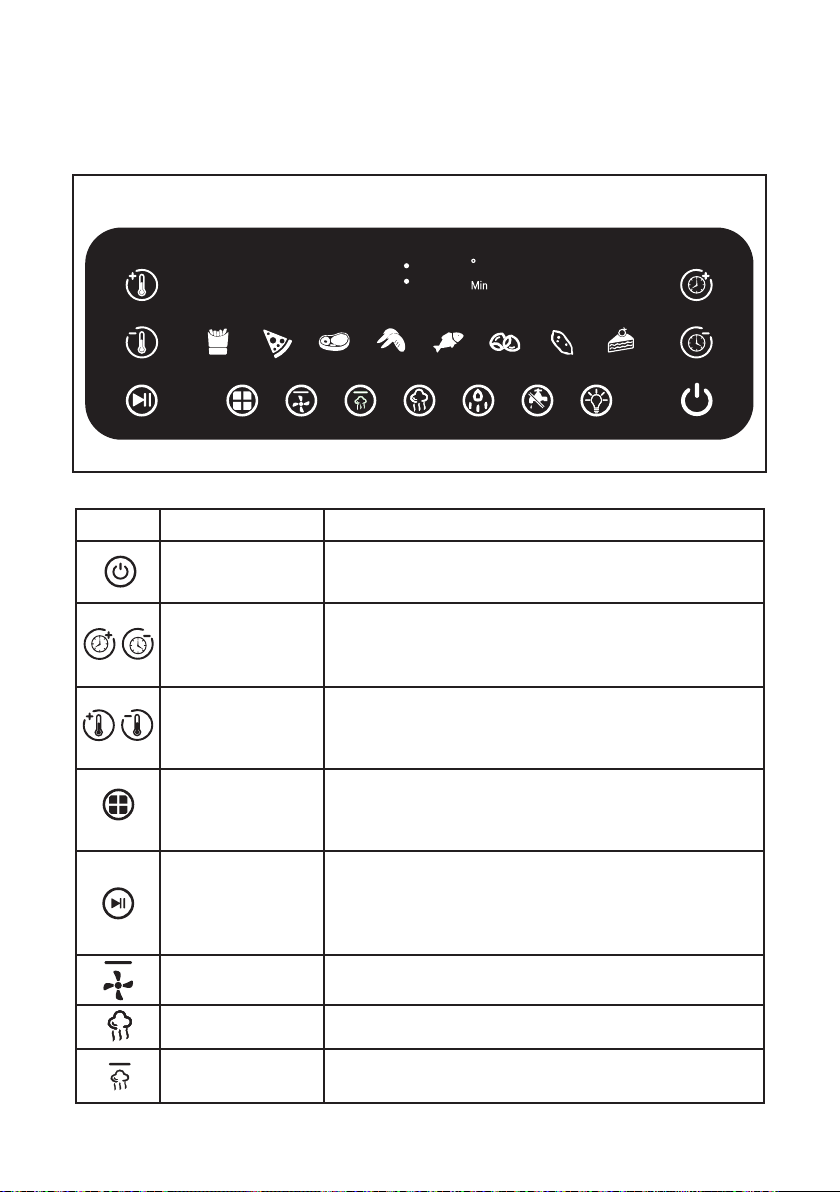
OPERATION INSTRUCTIONS
CONTROL PANEL
Figure 3
88 88
F
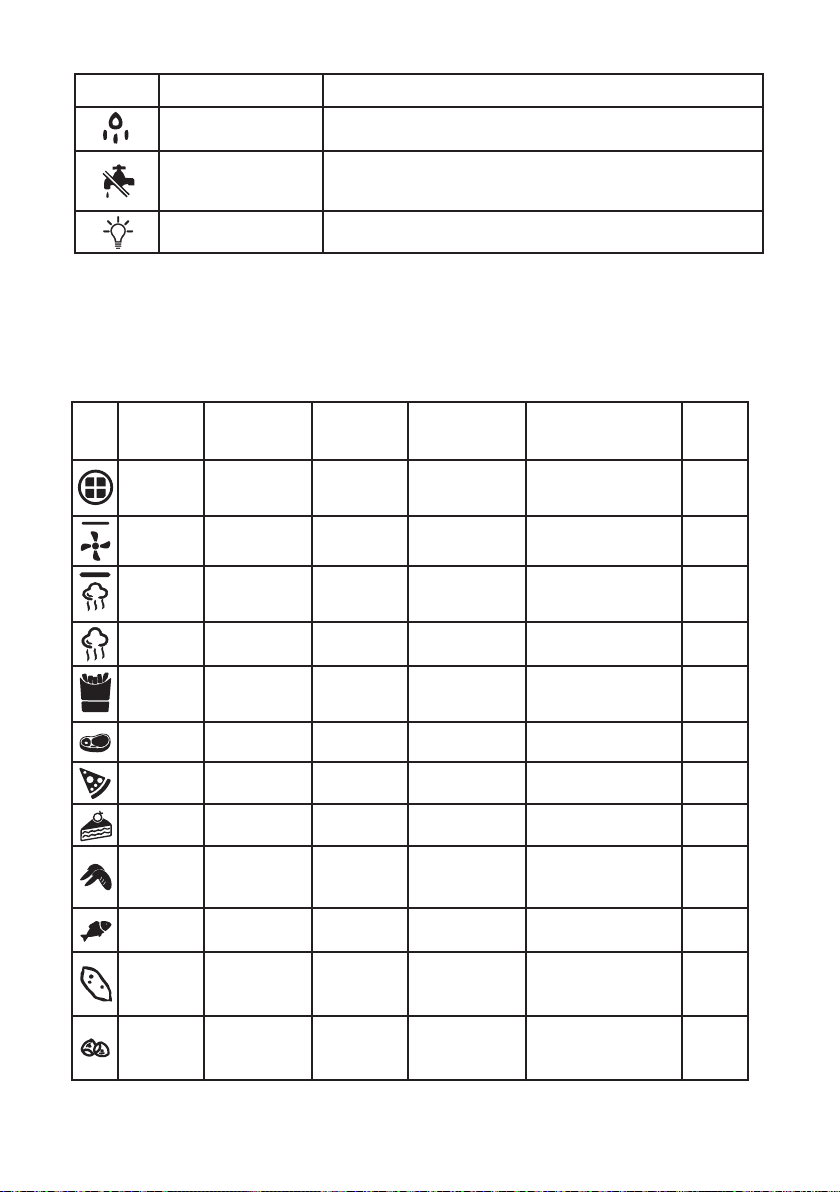
Symbol Function
Power On/Off
Description
Press to turn the unit On or Off. While the unit is in operation,
press and hold for about 3 seconds to turn off.
Time Adjustment
Use ‘+’ to increase or ‘-’ to decrease the cooking time. Press
briefly to change time in 1-minute intervals, and press and
hold to change time in 5-minute intervals.
Temperature
Adjustment
Use ‘+’ to increase or ‘-’ to decrease the cooking temperature.
Press briefly to change the temperature by 5° F, and press and
hold to change the temperature by 10° F.
'DIY' Button
Use to set your own cooking parameters. Press once and set
the cooking time, then press again to set the cooking
temperature.
Start / Pause Button
Press to Start or Pause a cooking program.
If the door is opened while the unit is in use, the cooking
program will automatically pause. Press Start/Pause to
continue cooking when the door is closed again.
Air Fry Button
Press to select 'Air Fry' cooking program.
Steam Cook Button
Bake and Steam
Cook Button
Press to cook alternating the bake and steam functions.
Press to cook using the steam function.

Low Water Warning
Indicator
Lights to indicate that the water tray needs to be filled.
Add Steam Button
Press to add a burst of steam to a cooking program.
Light
Press to turn internal light On/Off.
Symbol Function Description
9
Default
Time
Temp.
Range
Add
Steam
Icon
Cooking
Function
Air Fry
Bake
+ Steam
Steam
Manual
Cooking
1 - 60 min
Time
Range
Default
Temp.
N/A N/A
100° F - 450° F
No
15 min 400° F Yes
15 min 320° F
100° F - 450° F
N/A
60 min 200° F
N/A
N/A
18 min 400° F
100° F - 450° F
Yes
French
Fries
Barbeque
25 min 350° F
100° F - 450° F
Yes
Pizza
15 min 360° F
100° F - 450° F
Yes
Cake
30 min 320° F
100° F - 450° F
Yes
Chicken
Wings
20 min 380° F
100° F - 450° F
Yes
Fish
15 min 380° F
100° F - 450° F
Yes
Sweet
Potato
35 min 400° F
100° F - 450° F
Yes
Roasted
Nuts
18 min 360° F
100° F - 450° F
Yes
FUNCTION PARAMETERS
1 - 60 min
1 - 60 min
1 - 60 min
1 - 60 min
1 - 60 min
1 - 60 min
1 - 60 min
1 - 60 min
1 - 60 min
1 - 60 min
1 - 60 min
100° F - 450° F

1. Press the On/Off ( ) button to turn the unit on. The Control Panel and Display will illuminate.
2. Place the food to be cooked into the air fryer and choose the desired cooking function. Be
sure to use the non-stick tray for any food items that can drip liquids or melt. Items like bread
can be cooked directly on the rack.
NOTE: The cooking rack can be removed from the air fryer and moved to a higher or lower
position in the unit, however the tray can only be used with the rack in the middle position.
3. Adjust the cooking time ( ) and cooking temperature ( ) if desired based on the
parameters listed in the chart on page 9.
NOTE: Not all cooking programs allow changing the time or temperature.
4. Make sure the door is fully closed and press the Start/Pause ( ) button to begin cooking.
NOTE: If the door is opened during the cook cycle, the program will pause automatically. When
the door is securely closed again, press the Start/Pause ( ) button again to continue cooking.
COOKING FUNCTIONS
Air Frying: Press the ‘Air Fry’ button to cook items quickly using heat and a fan to heat them up in less
time while removing moisture and circulating the hot air. Cooking time ( ) and temperature
( )can be selected for air frying.
Steam Cooking: Press the ‘Steam’ button for cooking food items such as vegetables and fish using
steam. When using this function, only the cook time ( ) can be adjusted.
Bake and Steam Cooking: Press the ‘Bake and Steam Cooking’ button to cook food using both heat
from the heating element and steam. The appliance will alternate between heating with the element and
using steam to keep food from drying out while baking. Cook time ( ) and temperature ( )
can be adjusted using this function.
DIY (Manual) Cooking: Press the 'DIY' button for manual setting cook parameters. After pressing the
button, first select the desired Cook Time ( ), then press the 'DIY' button again and set the
Cook Temperature ( ). Once the time and temperature are set, press the 'Start/Pause' button to
begin cooking.
Add Steam: Press the ‘Steam’ button to add a burst of steam into a cooking program. The heating
element will shut off for a minute and the unit will steam the food inside. After a minute the steam will
stop the heating element and fan will turn back on. This function is not available in ‘DIY’ manual cook
programs.
10
USING THE AIR FRYER
Oven Light: Press the 'Oven Light' button to turn the light inside the air fryer On or Off.
11
NOTE: It is recommended to use distilled or filtered water in the
water tray to help prevent mineral build-up in the unit.
ADDITIONAL FEATURES
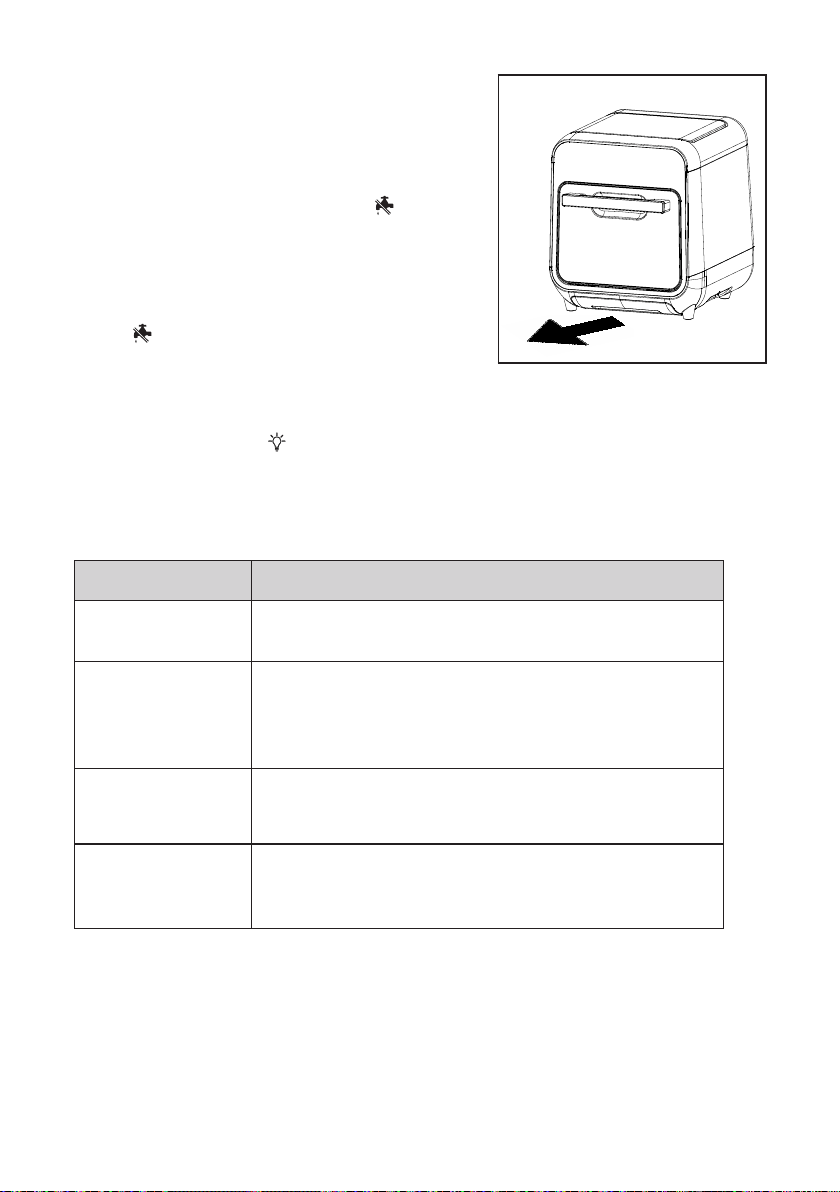
Water Tray and Low Water Warning: The Air Fryer has a
water tray located at the bottom of the unit for steaming as
well as collection of water from steaming. When the tray is
low on water, the 'Low Water Indicator' will light and an
alarm tone will sound if a cooking program that uses steam
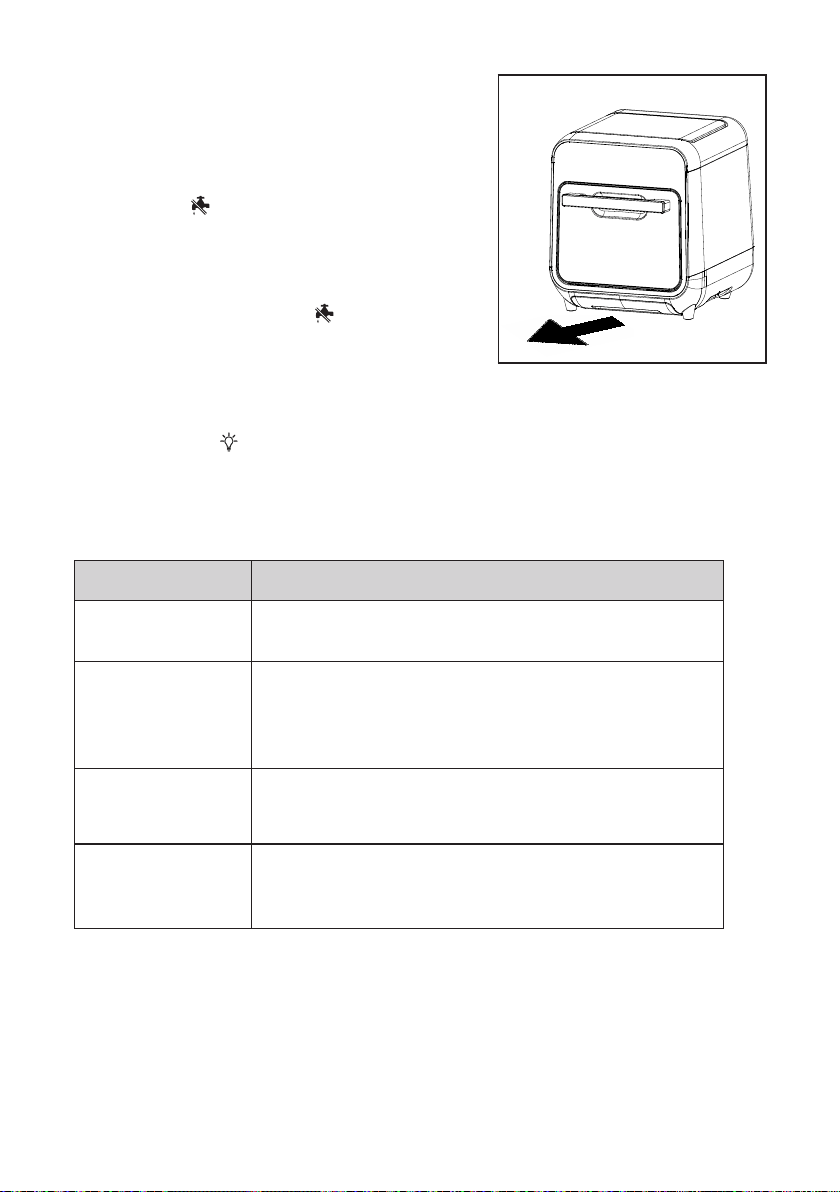
is started. To fill the tray, pull it straight out from the bottom
of the unit (see Fig. 4) by the handle, gently lift the stopper,
and fill. Once filled, slide the tray back into the slot at the
bottom of the air fryer and press the 'Low Water
Indicator' to stop the tone.
Figure 4
Water comes out of
the steam nozzles
When the water tank is full, a small amount of water may be
released from the steam nozzle. This is
normal.
Water escapes from the
outlet vents
After cooking, there is pressure in the cooking cavity. If the door
is closed immediately, a small amount of water or steam may be
pushed out from the vent, which is normal. It is recommended
to wait about 60 seconds after cooking before closing the door.
Steam condenses on
the door glass.
Steam from moisture in food items being cooked or from the
steam function may condense on the door. This is normal.
The fan keeps
running after
cooking.
The fan may continue to run after a cooking program to help
dissipate the heat in the unit. This is normal.
Issue Reason
During the course of using the air fryer, you may notice some of the following occurances.

12
CARE AND MAINTENANCE
IMPORTANT: Do not use industrial chemicals to clean your air fryer.
The air fryer should be cleaned after each use.
1. ALWAYS unplug the air fryer and allow it to completely cool down to room temperature before
cleaning.
2. Remove the oil pan, cooking rack and tray from the unit Wash in hot soapy water with a soft, non-
abrasive cloth or sponge. DO NOT use metal utensils or abrasive implements or cleaners as they
may damage non-stick surfaces.
3. The oil pan, rack and non-stick tray are top-rack dishwasher safe and may be washed in the
dishwasher.
4. Wipe the exterior and interior of the air fryer with a soft, non-abrasive damp cloth.
STEAM CLEANING FUNCTION
After the steam function has been used for 80 hours, the unit will require a cleaning cycle for the steam
system, and the display will show ‘CLER’.
1. Use a 20:1 solution of water and citric acid or vinegar. This can be achieved by putting about ½
ounce of the cleaner into the water tray, then filling it the rest of the way with water.
2. Press the ‘Start/Pause’ button to begin the cleaning cycle. ‘CL:01’ will show on the display.
NOTE: This step will run for about 48 minutes.
3. When the first step has finished running, the unit will stop and ‘CL02’ will show on the display.
Remove the water tank and rinse it thoroughly, refill it with clean (filtered or distilled) water, and
reinsert into the air fryer. If no buttons are pressed within 5 minutes of the cycle ending, the unit will
shut off into stand by mode.
4. Press the ‘Start/Pause’ button to start the final stage of the steam clean program. This step runs
for about 3 minutes. Once the second step has finished, the unit will go into stand by.

13
TROUBLESHOOTING
Before calling customer service, please check any problems you may encounter with the chart below for
possible solutions.
WARNING: If the problem persists even if you have applied the steps in this section, please contact
customer service or an Authorized Service Provider. Never try to repair a nonfunctional product.
The display is blank
POSSIBLE CAUSE
The air fryer has no
power.
Make sure unit is plugged in and there
is power to the outlet.
Display is not
working properly
The air fryer will not
turn on and run
Steam or water leaks
from the door during
cooking
The power cord is not
working properly.
Contact customer service at
888-775-0202 for assistance.
Contact customer service at
888-775-0202 for assistance.
Contact customer service at
888-775-0202 for assistance.
Display may be damaged.
The electronic components
of the circuit board are
damaged.
The door is not properly
shut.
The door is not properly
shut.
The sealing around the door
is damaged
Make sure the door is completely shut
and nothing is blocking it from latching.
Make sure the door is completely shut
and nothing is blocking it from latching.
Water tray is not properly
inserted.
Make sure the water tray is properly
inserted into the air fryer.
The electronic components
of the circuit board are
damaged
Contact customer service at
888-775-0202 for assistance.
SOLUTION
PROBLEM

LIMITED WARRANTY
MC Appliance Corporation warrants each new Air Fryer to be free from defects in material and workmanship, and agrees to
remedy any such defect or to furnish a new part(s), at the company’s option, for any part(s) of the unit that have failed during the
warranty period. Parts and labor expenses are covered on this unit for a period of one year from the date of purchase. A copy of
the dated sales receipt or invoice is required to receive warranty service by an authorized service agent.
In addition, MC Appliance Corporation warrants the compressor (parts only) to be free from defects in material and workmanship
for a period of ve years. The consumer is responsible for all labor and transportation expenses related to the diagnosis and
replacement of the compressor after the initial one-year warranty has expired. In the event the unit requires replacement or refund
under the terms of this warranty, the consumer is responsible for all transportation expenses to return the unit to our factory prior
to receiving a replacement unit or refund. A copy of the dated sales receipt/invoice is required to receive warranty service.
This warranty covers appliances in use within the continental United States, Alaska, Hawaii, and Puerto Rico. This warranty does
not cover the following:
• Damages due to shipping damage or improper installation or electrical connections.
• Damages due to misuse or abuse.
• Content losses due to failure of the unit.
• Inside components such as door panels, door shelves, racks, light bulbs, etc.
• Repairs performed by unauthorized service agents.
• Service calls that do not involve defects in material and workmanship such as instructions on proper use of the product and
door reversal or improper installation.
• Replacement or resetting of house fuses or circuit breakers.
• Failure of this product if used for other purposes than its intended purpose.
• Disposal costs for failed unit not returned to our factory.
• Any delivery/installation costs incurred as the result of a unit that fails to perform as specied.
• Expenses for travel and transportation for product service if your appliance is located in a remote area where service by an
authorized service technician is not available.
• The removal and reinstallation of your appliance if it is installed in an inaccessible location or is not installed in accordance
with published installation instructions.
• Refunds for non-repairable products are limited to the price paid for the unit per the sales receipt.
Limitations of Remedies and Exclusions:
Product repair in accordance with the terms herein, is your sole and exclusive remedy under this limited warranty. Any and all im-
plied warranties including merchantability and tness for a particular purpose are hereby limited to one year or the shortest period
allowed by law. MC Appliance Corporation is not liable for incidental or consequential damages and no representative or person is
authorized to assume for us any other liability in connection with the sale of this product. Under no circumstances is the consumer
permitted to return this unit to the factory without the prior written consent of MC Appliance Corporation.
Some states prohibit the exclusion or limitation of incidental or consequential damages, or limitations on implied warranties. This
warranty gives you specic legal rights, and you may also have other rights which vary from state to state.
Model Parts & Labor Type of Service
MCSAF15SM One Year Carry-In
For Service or Assistance please call 888-775-0202 or visit us on the web at www.mcappliance.com to request warranty service
or order parts.
®
14

CNA International, Inc. d/b/a MC appliance Corporation. all rights reserved.
Magic Chef® logo is a registered trademark of CNA International, Inc.
www.mcappliance.com Printed in China
15

3-in-1 VAPOR, FREIDORA DE AIRE,
HORNO
®
Manual de usuario
LEA ATENTAMENTE ESTE MANUAL ANTES DE USAR SU FREIDORA DE AIRE Y CONSÉRVELO PARA
FUTURAS REFERENCIAS. www.magicchef.com MODELO # MCSAF15SM

®
REGISTRO DEL PRODUCTO
Gracias por comprar un producto Magic Chef®. El primer paso para proteger su nuevo producto es
completar el registro del producto en nuestro sitio web: www.mcappliance.com/register. Beneficios de
registrar este producto:
1.
El registro del producto nos permitirá contactarlo en caso de una notificación de seguridad o
actualización del producto.
2.
El registro del producto nos permitirá procesar con más eficiencia el servicio de garantía cuando
este se necesite.
3.
El registro del producto puede servir como comprobante de compra en caso de pérdida del
seguro.
Una vez más, gracias por comprar un producto Magic Chef®
17

18
ÍNDICE
REGISTRO DEL PRODUCTO . . . . . . . . . . . . . . . . . . . . . . . . . . . . . . .
PRECAUCIONES . . . . . . . . . . . . . . . . . . . . . . . . . . . . . . . . . . . . . . . . .
INSTRUCCIONES IMPORTANTES DE SEGURIDAD. . . . . . . . . . . . .
ESPECIFICACIONES . . . . . . . . . . . . . . . . . . . . . . . . . . . . . . . . . . . . .
PIEZAS Y CARACTERÍSTICAS. . . . . . . . . . . . . . . . . . . . . . . . . . . . . .
INSTRUCCIONES DE OPERACIÓN. . . . . . . . . . . . . . . . . . . . . . . . . .
CUIDADO Y MANTENIMIENTO . . . . . . . . . . . . . . . . . . . . . . . . . . . . . .
SOLUCIÓN DE PROBLEMAS . . . . . . . . . . . . . . . . . . . . . . . . . . . . . .
GARANTÍA . . . . . . . . . . . . . . . . . . . . . . . . . . . . . . . . . . . . . . . . . . . . . .
17
19
20
22
22
27
28
23
29

19
PRECAUCIONES
1. Lea todas las instrucciones.
2. NO toque las superficies calientes. SIEMPRE utilice las asas o perillas, manipulándolas con
manoplas o agarra-ollas.
3. Para protegerse de una descarga eléctrica, no sumerja el cable, el enchufe ni el aparato en agua ni
otro líquido.
4. Este electrodoméstico no está diseñado para que lo usen personas (incluidos los niños) con
capacidades físicas, sensoriales o mentales reducidas, o falta de experiencia y conocimiento, a
menos de que estén bajo supervisión de una persona responsable de su seguridad o esta les haya
dado instrucciones sobre el uso.
5. Los niños deben ser supervisados para garantizar que no jueguen con el electrodoméstico.
6. SIEMPRE desenchufe del tomacorriente cuando no esté en uso y antes de limpiarlo. Deje que el
aparato se enfríe antes de poner o quitar piezas y antes de limpiarlo.
7. NO utilice ningún electrodoméstico si los cables o enchufes están dañados, si funciona mal o si sufrió
algún daño. Si el cable o el aparato están dañados de algún modo, comuníquese o con el servicio de
atención al cliente o con un técnico calificado para que realice el diagnóstico y/o la reparación.
8. El uso de accesorios no recomendados por el fabricante del aparato puede causar lesiones.
9. NO lo use al aire libre.
10. NO deje que el cable cuelgue del borde de la mesa o encimera, NI permita que el cable entre en
contacto con superficies calientes.
11. NO use ni coloque la freidora de aire encima o cerca de una hornilla de gas caliente o eléctrica, ni
dentro de un horno caliente.
12. Se debe tener mucho cuidado al mover el electrodoméstico cuando contenga aceite u otro líquido a
alta temperatura.
13. SIEMPRE conecte el cable de alimentación primero al electrodoméstico y luego al tomacorriente
sobre la pared. Para desconectar, apague el electrodoméstico y luego retire el enchufe del toma en la
pared.
14. NO use el electrodoméstico de una manera que no sea la prevista.
15. Asegúrese de que la bandeja para freír está colocada antes de añadir los alimentos que se van a freír
al aire.
16. Asegúrese de que la canasta de freír esté bien bloqueada en la parte delantera de la freidora de aire
cuando esté en uso.
ADVERTENCIA: La freidora de aire no funcionará a menos que la canasta esté completamente
cerrada.
PRECAUCIÓN: Después de freír con aire caliente, extreme las precauciones al manipular la canasta
de freír, la bandeja de fritura y los alimentos cocinados.

20
INSTRUCCIONES DE SEGURIDAD IMPORTANTES
PRECAUCIÓN: SUPERFICIES CALIENTES - Este aparato genera calor y vapor mientras está en uso.
Deben tomarse las precauciones adecuadas para evitar el riesgo de quemaduras, incendios u otros daños
personales o materiales.
PRECAUCIÓN: Este aparato se calienta durante el funcionamiento y conserva el calor durante algún
tiempo después de ser apagado. Utilice SIEMPRE guantes de cocina cuando manipule materiales calientes
y deje que el equipo se enfríe completamente antes de limpiarlo. NO coloque nada encima de la freidora de
aire mientras esté en funcionamiento o caliente después de ser usada.
ADVERTENCIA - Para reducir el riesgo de incendio, descarga eléctrica o lesiones personales al utilizar el
electrodoméstico, siga estas precauciones básicas, tales como:
1. Lea todas las instrucciones antes de utilizar el electrodoméstico.
2. El cable de este electrodoméstico solamente se debe enchufar a un tomacorriente de 120 V, c.a.
3. Si la freidora de aire comienza a funcionar mal mientras está en uso, extraiga la canasta de freír del
cuerpo principal y, a continuación, desenchúfela del tomacorriente. NO utilice ni intente reparar el
aparato averiado.
4. NO deje este aparato desatendido durante su uso.
5. NO sumerja el cable de alimentación en líquidos. Si el cable de alimentación se daña, comuníquese
con el servicio de atención al cliente.
6. Mantenga SIEMPRE el cable fuera del alcance de los niños para evitar el riesgo de descarga eléctrica
y asfixia.
7. Coloque SIEMPRE la freidora de aire sobre una superficie de trabajo plana y resistente al calor.
8. NO obstruya la salida de aire ni las entradas de aire de la parte posterior y los laterales de la freidora
de aire con ningún objeto ni colocándola demasiado cerca de una pared. Evite SIEMPRE que salga
vapor por la salida de aire durante el uso.
9. Mantenga el aparato a una distancia mínima de 4 pulgadas (10 cm) de las paredes u otros objetos
durante su funcionamiento.
10. Utilice SIEMPRE el asa de la canasta de freír para abrir el cajón de la canasta de freír.
11. ADVERTENCIA: Después de freír al aire, asegúrese de colocar la canasta de freír sobre una
superficie plana y resistente al calor.
12. NUNCA mueva la freidora de aire cuando esté caliente o si contiene alimentos calientes. Deje enfriar
el equipo antes de moverlo.
13. NO limpie la freidora de aire con esponjas metálicas. Partes de las esponjas se pueden desprender y
tocar las partes eléctricas, lo que implica un riesgo de descarga eléctrica.
14. ADVERTENCIA: El llenado excesivo de la canasta puede dañar la freidora de aire y podría
provocar lesiones personales graves.

21
1. La potencia eléctrica del cable de extensión es por lo menos igual a la potencia eléctrica del
electrodoméstico;
2. El cable más largo debe colocarse de tal manera que no cuelgue fuera de la superficie de la
mesa o encimera donde pueda ser halado por niños o que cause tropiezos.
NOTA: Si el circuito eléctrico está sobrecargado con otros aparatos o dispositivos, la freidora de aire
puede no funcionar correctamente. Se recomienda operar el equipo en un circuito eléctrico separado de
otros electrodomésticos.
LEA Y SIGA CUIDADOSAMENTE
ESTA INFORMACIÓN DE SEGURIDAD
GUARDE ESTAS INSTRUCCIONES
SEGURIDAD ELÉCTRICA
El aparato no debe alimentarse a través de un dispositivo de conmutación externo, como un temporizador,
ni conectarse a un circuito que sea encendido y apagado regularmente por una compañía eléctrica.
NO toque el enchufe con las manos mojadas. Para reducir el riesgo de descarga eléctrica, SIEMPRE tome
del enchufe para sacar la ficha eléctrica de la pared. NO hale del cable para desenchufar.
Este aparato tiene una clavija polarizada (un contacto es más ancho que el otro). Para reducir el riesgo de
descarga eléctrica, esta clavija solo encajará dentro de un tomacorriente polarizado de una sola forma. Si la
clavija no encaja completo dentro del tomacorriente, inviértala. Si aún no encaja, comuníquese con un
electricista calificado.
NO haga ninguna modificación al enchufe.
Se suministra un cable de electricidad corto (o extraíble) para reducir los riesgos de enredo o tropiezo con
un cable más largo. Si es necesario un cable de prolongación, puede usarse siempre que:
22
Figura 1
14.8”
15.7"
ESPECIFICACIONES
Figura 2
PIEZAS Y FUNCIONES
Largo 13.9" (352 mm)
Modelo MCSAF15SM
Ancho
14.8" (375 mm)
Peso neto 17.63 lbs (8 kg)
Alto 15.7" (398 mm)
Capacidad 15 L (15.9 qt)
a. Panel de control
b. Lámpara
c. Parrilla
d. Bandeja de agua
e. Conmutador de
puerta
f. Soportes de
parrilla ajustables
g. Bandeja
antiadherente
h. Ventilaciones de
vapor
i. Cubeta para aceite
13.9”
a
b
c
d
e
g
h
i
f

23
INSTRUCCIONES DE OPERACIÓN
PANEL DE CONTROL
Figura 3
88 88
F
Símbolo Función
Encendido/Apagado
Descripción
Presione este botón para encender o apagar el equipo. Mientras
el equipo está funcionando, presione y mantenga presionado
durante 3 segundos para apagarlo
Ajuste de tiempo
Use «+» o «-» para aumentar o disminuir el tiempo de cocción.
Pulse brevemente para cambiar el tiempo en intervalos de 1
minuto, y mantenga pulsado para cambiar el tiempo en
intervalos de 10 minutos.
Ajuste de temperatura
Use «+» o «-» para aumentar o disminuir la temperatura de
cocción. Pulse brevemente para cambiar la temperatura en 5
°F, y mantenga pulsado para cambiar la temperatura en 10 °F.
Botón «DIY»
(Personalizado)
Utilícelo para fijar sus propios parámetros de cocción. Pulse
una vez y fije el tiempo de cocción, después pulse de nuevo
para fijar la temperatura de cocción.
Botón «Inicio/Pausa»
Presione para iniciar o pausar un programa de cocción
Si se abre la puerta mientras el aparato está en funcionamiento,
el programa de cocción se detendrá automáticamente. Pulse
«Inicio/Pausa» para continuar la cocción cuando se vuelva a
cerrar la puerta.
.
Botón para freidora de
aire
Pulse para seleccionar el programa de cocción «Freidora de
aire».
Botón para cocción a
vapor
Botón para cocción a
vapor y hornear
Pulse para alternar las funciones de cocción al vapor y horneado
Pulse para usar la función de cocción al vapor
Indicador de aviso de
bajo nivel de agua
Se enciende para indicar que hay que llenar la bandeja de agua
Botón para añadir
vapor
Pulse para añadir un golpe de vapor a un programa de cocción
Luz
Pulse para encender o apagar la luz interna
Symbol Function Function
24
Tiempo
predeterminado
Rango de
temperaturas.
Añadir
vapor
Icono
Función
de cocción
Freidora
de aire
Horno
+ Vapor
Vapor
Cocción
manual
1 - 60 min
Rango de
tiempos
N/A N/A
100° F - 450° F
No
15 min 400° F Sí
10/20 min 320° F
100° F - 450° F
N/A
60 min 200° F
N/A
N/A
18 min 400° F
100° F - 450° F
Sí
Papas
Fritas
Barbacoa
25 min 350° F
100° F - 450° F
Sí
Pizza
15 min 360° F
100° F - 450° F
Sí
Torta
30 min 320° F
100° F - 450° F
Sí
Alitas de
pollo
20 min 380° F
100° F - 450° F
Sí
Pescado
15 min 380° F
100° F - 450° F
Sí
Batata
35 min 400° F
100° F - 450° F
Sí
Frutos
secos
tostados
18 min 360° F
100° F - 450° F
Sí
FUNCTION PARAMETERS
1 - 60 min
1 - 60 min
1 - 60 min
1 - 60 min
1 - 60 min
1 - 60 min
1 - 60 min
1 - 60 min
1 - 60 min
1 - 60 min
1 - 60 min
Hornear:100°F-450°F
Vapor: 210° F
Temperatura
predeterminada
FUNCIONES DE COCCIÓN
Freír al aire: Pulse el botón «Freidora de aire» para cocinar los alimentos rápidamente utilizando el
calor y un ventilador para calentarlos en menos tiempo mientras se elimina la humedad y circula el aire
caliente. El tiempo ( ) y la temperatura de cocción ( )se pueden seleccionar para freír con
aire.
Cocción al vapor: Pulse el botón «Vapor» para cocinar al vapor alimentos como verduras y pescado.
Cuando se utiliza esta función, solo es posible ajustar el tiempo de cocción ( ).
Hornear y cocción a vapor: Pulse el botón «Hornear y cocinar al vapor» para cocinar los alimentos
utilizando tanto el calor del elemento calentador como del vapor. El aparato alternará entre calentar con
el elemento calentador y utilizar vapor para evitar que los alimentos se sequen mientras se hornean. El
tiempo ( ) y la temperatura ( ) de cocción pueden ajustarse utilizando esta función.
Cocción manual (DIY): Pulse el botón «DIY» para fijar manualmente los parámetros de cocción.
Después de pulsar el botón, seleccione primero el tiempo de cocción deseado ( ), pulse de
nuevo el botón «DIY» y fije la temperatura de cocción ( ). Una vez fijados el tiempo y la
temperatura, pulse el botón «Inicio/Pausa» para empezar la cocción.
Añadir vapor: Pulse el botón «Vapor» para añadir un golpe de vapor a un programa de cocción. El
elemento calentador se apagará durante un minuto y el aparato cocinará al vapor los alimentos de su
interior. Al cabo de un minuto, el vapor se detendrá y el elemento calentador y el ventilador volverán a
encenderse. Esta función no está disponible en los programas de cocción manual «DIY»
25
USO DE LA FREIDORA DE AIRE
1. Presione el botón «Encendido/Apagado» ( ) para encender o apagar el equipo. El panel de
control y la pantalla se iluminarán.
2.
3.
Coloque los alimentos a cocinar en la freidora de aire y elija la función de cocción deseada.
Asegúrese de utilizar la bandeja antiadherente para cualquier alimento que pueda gotear
líquidos derretirse. Artículos como el pan pueden cocinarse directamente en la rejilla.
NOTA: La parrilla de cocción puede retirarse de la freidora de aire y colocarse más alta o más
baja, pero la bandeja sólo puede utilizarse con la rejilla en la posición central.
Ajuste el tiempo de cocción ( ) y la temperatura de cocción ( ) si lo desea en
función de los parámetros indicados en la tabla de la página 24.
NOTA: No todos los programas de cocción permiten cambiar el tiempo o la temperatura.
4. Asegúrese de que la puerta está completamente cerrada y pulse el botón «Inicio/Pausa» ( )
para iniciar la cocción.
NOTA: Si se abre la puerta durante el ciclo de cocción, el programa se detendrá
automáticamente. Cuando la puerta vuelva a estar bien cerrada, pulse de nuevo el botón
«Inicio/Pausa» ( ) para continuar la cocción.
Luz del horno: Pulse el botón «Luz del horno» para encender o apagar la luz del interior de la freidora
de aire
26
FUNCIONES ADICIONALES
Bandeja de agua y aviso de bajo nivel de agua: La freidora de
aire tiene una bandeja de agua debajo para cocinar al vapor,
así como para recoger el agua de la cocción al vapor. Cuando
la bandeja tenga poca agua, se encenderá el «Indicador de
bajo nivel de agua» y sonará un tono de alarma si se inicia un
programa de cocción que utilice vapor. Para llenar la bandeja,
tire de ella hacia fuera desde abajo (ver la Fig. 4) por el asa,
levante suavemente el tope y llénela. Una vez llena, vuelva a
deslizar la bandeja en la ranura abajo de la freidora de aire y
pulse el «Indicador de bajo nivel de agua» para detener el
tono.
NOTA: Se recomienda utilizar agua destilada o filtrada en esta
bandeja para evitar la acumulación de minerales en el equipo.
Figura 4
Sale agua por las
boquillas de vapor
Cuando el depósito de agua está lleno, puede salir una pequeña
cantidad de agua por la boquilla de vapor. Esto es normal.
Sale agua por las
rejillas de ventilación
Tras la cocción, hay presión en la cavidad de cocción. Si la puerta
se cierra inmediatamente, es posible que salga una pequeña
cantidad de agua o vapor por la rejilla de ventilación, lo cual es
normal. Se recomienda esperar unos 60 segundos después de la
cocción antes de cerrar la puerta
El vapor se condensa
en el vidrio de la puerta
El vapor procedente de la humedad de los alimentos que se están
cocinando o de la función de vapor puede condensarse en la
puerta. Esto es normal
El ventilador sigue
funcionando después
de la cocción
El ventilador puede seguir funcionando después de un programa de
cocción para ayudar a disipar el calor del equipo. Esto es normal.
Situación Motivo
Durante el uso de la freidora de aire, es posible que observe algunas de las siguientes situaciones

27
CUIDADO Y MANTENIMIENTO
IMPORTANTE: No utilice productos químicos industriales para limpiar la freidora de aire. La freidora
de aire debe limpiarse después de cada uso.
1. SIEMPRE apague y desenchufe la freidora de aire, y deje que se enfríe a temperatura ambiente
por completo antes de limpiarla.
2. Retire la bandeja de aceite, la parrilla de cocción y la bandeja del aparato. Lávelas en agua
caliente jabonosa con un paño o una esponja suave y no abrasiva. NO utilice utensilios metálicos
ni elementos o limpiadores abrasivos, ya que pueden dañar las superficies antiadherentes.
3. La bandeja de aceite, la parrilla y la bandeja antiadherente se pueden lavar en el lavavajillas.
4. Limpie el exterior y el interior de la freidora de aire con un paño húmedo suave y no abrasivo.
FUNCIÓN DE LIMPIEZA AL VAPOR
Después de que la función de vapor se haya utilizado durante 80 horas, el equipo requerirá un ciclo
de limpieza para el sistema de vapor, y la pantalla mostrará «CLER».
1. Utilice una solución 20:1 de agua y ácido cítrico o vinagre. Para ello, ponga aproximadamente ½
onza del limpiador en la bandeja de agua y, a continuación, llénela de agua hasta el fondo.
2. Pulse el botón «Inicio/Pausa» para comenzar el ciclo de limpieza. La pantalla mostrará
«CL:01».
NOTA: Este paso durará unos 48 minutos.
3. Cuando el primer paso haya terminado, el equipo se detendrá y aparecerá «CL02» en la pantalla.
Retire el depósito de agua y enjuáguelo a fondo, rellénelo con agua limpia (filtrada o destilada) y
vuelva a insertarlo en la freidora de aire. Si no se pulsa ningún botón en los 5 minutos siguientes a
la finalización del ciclo, el equipo se apagará y pasará al modo de espera.
4. Pulse el botón «Inicio/Pausa» para iniciar la etapa final del programa de limpiado al vapor. Este
paso dura unos 3 minutos. Una vez finalizado el segundo paso, el equipo entrará en modo de
espera.

28
SOLUCIÓN DE PROBLEMAS
Antes de llamar al servicio de atención al cliente, compruebe los problemas que le puedan surgir con el
cuadro siguiente para encontrar posibles soluciones.
ADVERTENCIA: ISi el problema persiste, aunque haya aplicado los pasos de esta sección,
comuníquese con el Servicio de Atención al Cliente o con un Proveedor de Servicios Autorizado.
Nunca intente reparar un producto que no funciona.
La pantalla está en blanco
CAUSA POSIBLE
La freidora de aire no tiene
electricidad
Asegúrese de que el equipo está
enchufado y de que hay energía
eléctrica en el tomacorriente
La pantalla no está
funcionando bien
La freidora de aire no se
enciende ni funciona
Fugas de vapor o agua
por la puerta durante la
cocción
El cable de alimentación no
está funcionando bien
Comuníquese con atención al cliente al
888-775-0202 para obtener asistencia
Comuníquese con atención al cliente al
888-775-0202 para obtener asistencia
Comuníquese con atención al cliente al
888-775-0202 para obtener asistencia
La pantalla puede haberse
dañado
Los componentes
electrónicos de la placa de
circuitos están dañados
La puerta no está bien
cerrada.
La puerta no está bien
cerrada.
El sello alrededor de la
puerta está dañado.
Asegúrese de que la puerta esté
completamente cerrada y que nada la
bloquee.
Asegúrese de que la puerta esté
completamente cerrada y que nada la
bloquee.
La bandeja de agua no está
correctamente colocada.
Asegúrese de que la bandeja de agua
esté correctamente insertada en la
freidora.
Los componentes
electrónicos de la placa de
circuito están dañados.
Comuníquese con atención al cliente al
888-775-0202 para obtener asistencia
SOLUCIÓN
PROBLEMA

GARANTÍA LIMITADA
MC Appliance Corporation garantiza que cada freidora de aire nueva carece de defectos en los materiales y en la mano de obra,
y acuerda remediar cualquier defecto o proporcionar la(s) pieza(s) nueva(s), por cualquier/cualesquiera pieza(s) del equipo que
haya(n) fallado durante el período de garantía, a discreción de la compañía. Los gastos de piezas y mano de obra están
cubiertos en este equipo por un período de un año a partir de la fecha de compra. Es necesario presentar una copia del recibo o
de la factura de venta fechado para recibir el servicio de garantía, el reemplazo o el reembolso. El consumidor asume todos los
gastos de traslado para devolver el equipo a nuestra fábrica antes de obtener un reemplazo o un reembolso, en caso de que
deba sustituirse el equipo o efectuarse un reembolso de conformidad con los términos de esta garantía. Es necesario presentar
una copia del recibo o de la factura de venta fechado, para recibir el servicio de garantía, reemplazo o reembolso
Esta garantía cubre los aparatos en uso dentro de los Estados Unidos contiguos. Esta garantía no cubre lo siguiente:
• Daños causados durante el envío o por instalación incorrecta.
• Daños por mal uso o abuso.
• Pérdidas de contenido por fallas del equipo.
• Componentes internos como paneles de puerta, estantes, parrillas, bombillos, etc.
• Reparaciones realizadas por agentes de servicio no autorizados.
• Las llamadas al servicio técnico que no impliquen defectos en el material y mano de obra, tales como instrucciones sobre
el uso correcto del producto o la instalación incorrecta.
• Reemplazo o reinicio de fusibles o interruptores de la vivienda.
• Fallo de este producto si se usa para otros fines que no sean los previstos.
• Los costos de desecho de cualquier equipo defectuoso no devuelto a nuestra fábrica.
• Cualquier costo de entrega/instalación incurrido como resultado de un equipo que no funciona como se especifica.
• Gastos de viaje y transporte para el servicio del producto si su electrodoméstico se encuentra en un lugar remota donde el
servicio de un técnico de servicio autorizado no está disponible.
• La extracción y reinstalación del electrodoméstico si está instalado en una ubicación inaccesible o no está instalado de
acuerdo con las instrucciones publicadas.
• Los reembolsos por productos no reparables se limitan al precio pagado por el equipo según el recibo de compra.
• Esta garantía es intransferible. Esta garantía aplica solo para el comprador original y no se extiende a los propietarios
posteriores.
LIMITACIONES A REMEDIOS Y EXCLUSIONES:
La reparación del producto de acuerdo con los términos aquí indicados es el único y exclusivo remedio bajo esta garantía
limitada. Todas y cada una de las garantías implícitas, incluidas la comerciabilidad y la idoneidad para un propósito particular, se
limitan a un año o al período más breve permitido por la ley. MC Appliance Corporation no es responsable por daños incidentales
o consecuentes y ningún representante o persona tiene autorización para asumir por nuestra parte ninguna otra responsabilidad
con relación a la venta de este producto. Bajo ninguna circunstancia se le permite al consumidor devolver este equipo a la
fábrica sin la autorización previa por escrito suministrada por MC Appliance Corporation.
Algunos estados prohíben la exclusión o limitación de los daños incidentales o consecuentes, o limitaciones en las garantías
implícitas. Esta garantía le otorga derechos legales específicos, y usted podría tener otros derechos que varían según el estado.
Model Parts & Labor Type of Service
MCSAF15SM One Year Carry-In
For Service or Assistance please call 888-775-0202 or visit us on the web at www.mcappliance.com to request warranty service
or order parts.
®
29

CNA International, Inc. realiza negocios bajo el nombre de MC Appliance Corporation.
Derechos reservados. Magic Chef® es una marca registrada de CNA International, Inc.
www.mcappliance.com
Impreso en China
30