
OVER THE RANGE CONVECTION
MICROWAVE OVEN
CMOH30SS model
FOUR MICRO-ONDES À CONVECTION
EN SURPLOMB DE CUISINIÉRE
Modèle CMOH30SS
�USER GUIDE
GUIDE D’UTILISATION
US CA

2 EN
PRECAUTIONS TO AVOID POSSIBLE
EXPOSURE TO EXCESSIVE
MICROWAVE ENERGY
Do not attempt to operate this microwave oven with the door open since
open-door operation can result in harmful exposure to microwave energy. It
is important not to defeat or tamper with the safety interlocks.
Do not place any object between the microwave oven front face and the
door or allow soil or cleaner residue to accumulate on sealing surfaces.
Do not operate the microwave oven if it is damaged. It is particularly
important that the microwave oven door close properly and that there is no
damage to the: (1) door (bent), (2) hinges and latches (broken or loosened),
(3) door seals and sealing surfaces.
The microwave oven should not be adjusted or repaired by anyone
except properly qualied service personnel.
A MESSAGE TO OUR CUSTOMERS
Thank you for selecting this Over the Range Convection Microwave Oven. Because of this appliance’s
unique features we have developed this Use and Care Guide. It contains valuable information on how to
properly operate and maintain your new appliance for years of safe and enjoyable cooking.
To help serve you better, please ll out and submit your Product Registration by visiting our websites:
www.sherpaykel.com and selecting “PRODUCT REGISTRATION“
In addition, keep this guide handy, as it will help answer questions that may arise as you use your new
appliance.
For your convenience, product questions can be answered by a Customer Care Representative at
1-888-936-7872, or email: usa.customercare@sherpaykel.com
NOTE: Please write the Model and Serial Numbers on this page for references (can be found on bottom
left corner of the cavity face).
MODEL NUMBER __________________________ SERIAL NUMBER ____________________________
NOTE: Inspect the product to verify that there is no shipping damage. If any damage is detected, call
the shipper and initiate a damage claim. Fisher & Paykel is not responsible for shipping damage.
DO NOT discard any packing material (box, pallet, straps) until the unit has been inspected.
PLEASE RETAIN THIS MANUAL FOR FUTURE REFERENCE.

EN 3
TABLE OF CONTENTS
A Message to Our Customers .................................... 2
Precautions to Avoid Possible Exposure
to Excessive Microwave Energy ................................ 2
Important Safety Instructions ................................... 4
Unpacking and Examining Your Oven ................... 6
Grounding Instructions ............................................... 6
Information You Need to Know ................................ 7
About Your Microwave Oven ............................... 7
About Microwave Cooking ................................... 7
About Utensils and Coverings ............................. 8
About Children and the Microwave ................ 10
About Food .............................................................. 10
About Safety ............................................................ 11
Part Names .................................................................... 12
Before Operating ........................................................ 14
To Set the Clock ..................................................... 14
Stop/Clear ................................................................ 14
Manual Microwave Operation ............................... 15
Turntable On/O .................................................. 15
Fan / Light ................................................................ 15
Time Cooking -Microwave .................................. 15
Keep Warm ............................................................... 16
To Set Power Level ................................................ 16
Microwave Features ................................................... 17
Defrost ....................................................................... 17
Defrost Chart ........................................................... 17
Manual Defrost ....................................................... 18
Sensor Cooking ...................................................... 18
Sensors ...................................................................... 19
Sensor Reheat ......................................................... 19
Popcorn ..................................................................... 19
Sensor Chart ............................................................ 20
Sensor Cook ............................................................. 21
Sensor Cook Chart ................................................. 21
Sensor Cook Recipes ............................................ 22
Manual Convection and
Automatic Mix Operation ........................................ 23
Convection Cooking ............................................. 23
To Cook with Convection .................................... 23
To Preheat and Cook with Convection .......... 23
Broil ............................................................................. 23
Slow Cook ................................................................. 24
Automatic Mix Cooking ..................................... 24
To Cook with Automatic Mix ............................. 24
To Preheat and Cook with Automatic Mix .... 24
Convection Automatic Mix Features ................... 25
Auto Broil ................................................................. 25
Auto Broil Chart ...................................................... 25
Auto Roast ................................................................ 26
Auto Roast Chart .................................................... 26
Auto Bake ................................................................. 27
Auto Bake Chart ..................................................... 27
Other Convenient Features..................................... 28
Multiple Sequence Cooking .............................. 28
More or Less Time Adjustment ......................... 28
Extra Minute ............................................................ 28
Help (Display Indicator) ....................................... 28
Help Menu ................................................................ 29
Start ............................................................................ 30
Kitchen Timer .......................................................... 30
Demonstration Mode........................................... 30
Cleaning and Care ...................................................... 31
Exterior ...................................................................... 31
Door ............................................................................ 31
Touch Control Panel ............................................. 31
Interior - After Microwave Cooking................. 31
Interior - After Convection,
Mix or Broil Cooking ............................................. 31
Waveguide Cover .................................................. 31
Odor Removal ......................................................... 31
Turntable/Turntable Support ........................... 31
Oven Racks ............................................................... 32
Grease Filters ........................................................... 32
Fan ............................................................................... 32
Light ........................................................................... 32
Oven Light................................................................ 33
Charcoal Filter ......................................................... 34
Service Call Check ...................................................... 35
Specications ............................................................... 36
Warranty ........................................................................ 37
INTERACTIVE COOKING SYSTEM
The Interactive Cooking System oers step-by-step instructions in the display for using the oven,
from setting the clock to programming each feature. It also includes Help Menu for instructions on
using Safety Lock, Audible Signal Elimination, Start and Help. There is a choice of English, Spanish
or French and a choice of U.S. Customary Unit-pound or Metric-kilograms. Touch HELP MENU and
follow the directions displayed or check page 29.

4 EN
IMPORTANT SAFETY INSTRUCTIONS
When using electrical appliances basic safety precautions should be followed, including the following:
WARNING - To reduce the risk of burns, electric shock, re, injury to persons or exposure to exces-
sive microwave energy:
1. Read all instructions before using the appliance.
2. Read and follow the specic “PRECAUTIONS TO AVOID POSSIBLE EXPOSURE TO EXCESSIVE
MICROWAVE ENERGY” on page 2.
3. This appliance must be grounded. Connect only to properly grounded outlet. See “GROUNDING
INSTRUCTIONS” on page 6 and INSTALLATION INSTRUCTIONS.
4. Install or locate this appliance only in accordance with the provided installation instructions.
5. Some products such as whole eggs and sealed containers—for example, closed glass jars—are able
to explode and should not be heated in this microwave oven.
6. Use this appliance only for its intended use as described in this manual. Do not use corrosive
chemicals or vapors in this appliance. This type of microwave oven is specically designed to heat,
cook or dry food. It is not designed for industrial or laboratory use.
7. As with any appliance, close supervision is necessary when used by children.
8. Do not operate this appliance if it has a damaged cord or plug, if it is not working properly or if it has
been damaged or dropped.
9. This appliance should be serviced only by qualied service personnel.
10. Do not cover or block any openings on the appliance.
11. Do not store or use this appliance outdoors. Do not use this product near water—for example, near
a kitchen sink, in a wet basement or near a swimming pool, or similar locations.
12. Do not immerse cord or plug in water.
13. Keep cord away from heated surfaces.
14. Do not let cord hang over edge of table or counter.
15. See door surface cleaning instructions on page 31.
16. To reduce the risk of re in the microwave oven cavity:
a. Do not overcook food. Carefully attend to appliance when paper, plastic or other combustible
materials are placed inside the microwave oven to facilitate cooking.
b. Remove wire twist-ties from paper or plastic bags before placing bag in microwave oven.
c. If materials inside the microwave oven ignite, keep microwave oven door closed, turn microwave
oven o and disconnect the power cord or shut o power at the fuse or circuit breaker panel.
d. Do not use the cavity for storage purposes. Do not leave paper products, cooking utensils or
food in the cavity when not in use.

EN 5
IMPORTANT SAFETY INSTRUCTIONS
17. Liquids, such as water, coee or tea are able to be overheated beyond the boiling point without
appearing to be boiling. Visible bubbling or boiling when the container is removed from the
microwave oven is not always present. THIS COULD RESULT IN VERY HOT LIQUIDS SUDDENLY
BOILING OVER WHEN A SPOON OR OTHER UTENSIL IS INSERTED INTO THE LIQUID.
To reduce the risk of injury to persons:
a. Do not overheat the liquid.
b. Stir the liquid both before and halfway through heating it.
c. Do not use straight-sided containers with narrow necks. Use a wide-mouthed container.
d. After heating, allow the container to stand in the microwave oven at least for 20 seconds before
removing the container.
e. Use extreme care when inserting a spoon or other utensil into the container.
18. Clean ventilation openings and grease lters frequently—grease should not be allowed to
accumulate on ventilation openings, hood (louver) or grease lters.
19. Use care when cleaning the louver and the grease lters. Corrosive cleaning agents, such as lye-
based oven cleaners, may damage the louver and the grease lters.
20. When aming food under the hood, turn the fan on.
21. This appliance is suitable for use above both gas and electric cooking equipment 36” wide or less.
SAVE THESE INSTRUCTIONS
6 EN
UNPACKING AND EXAMINING YOUR OVEN
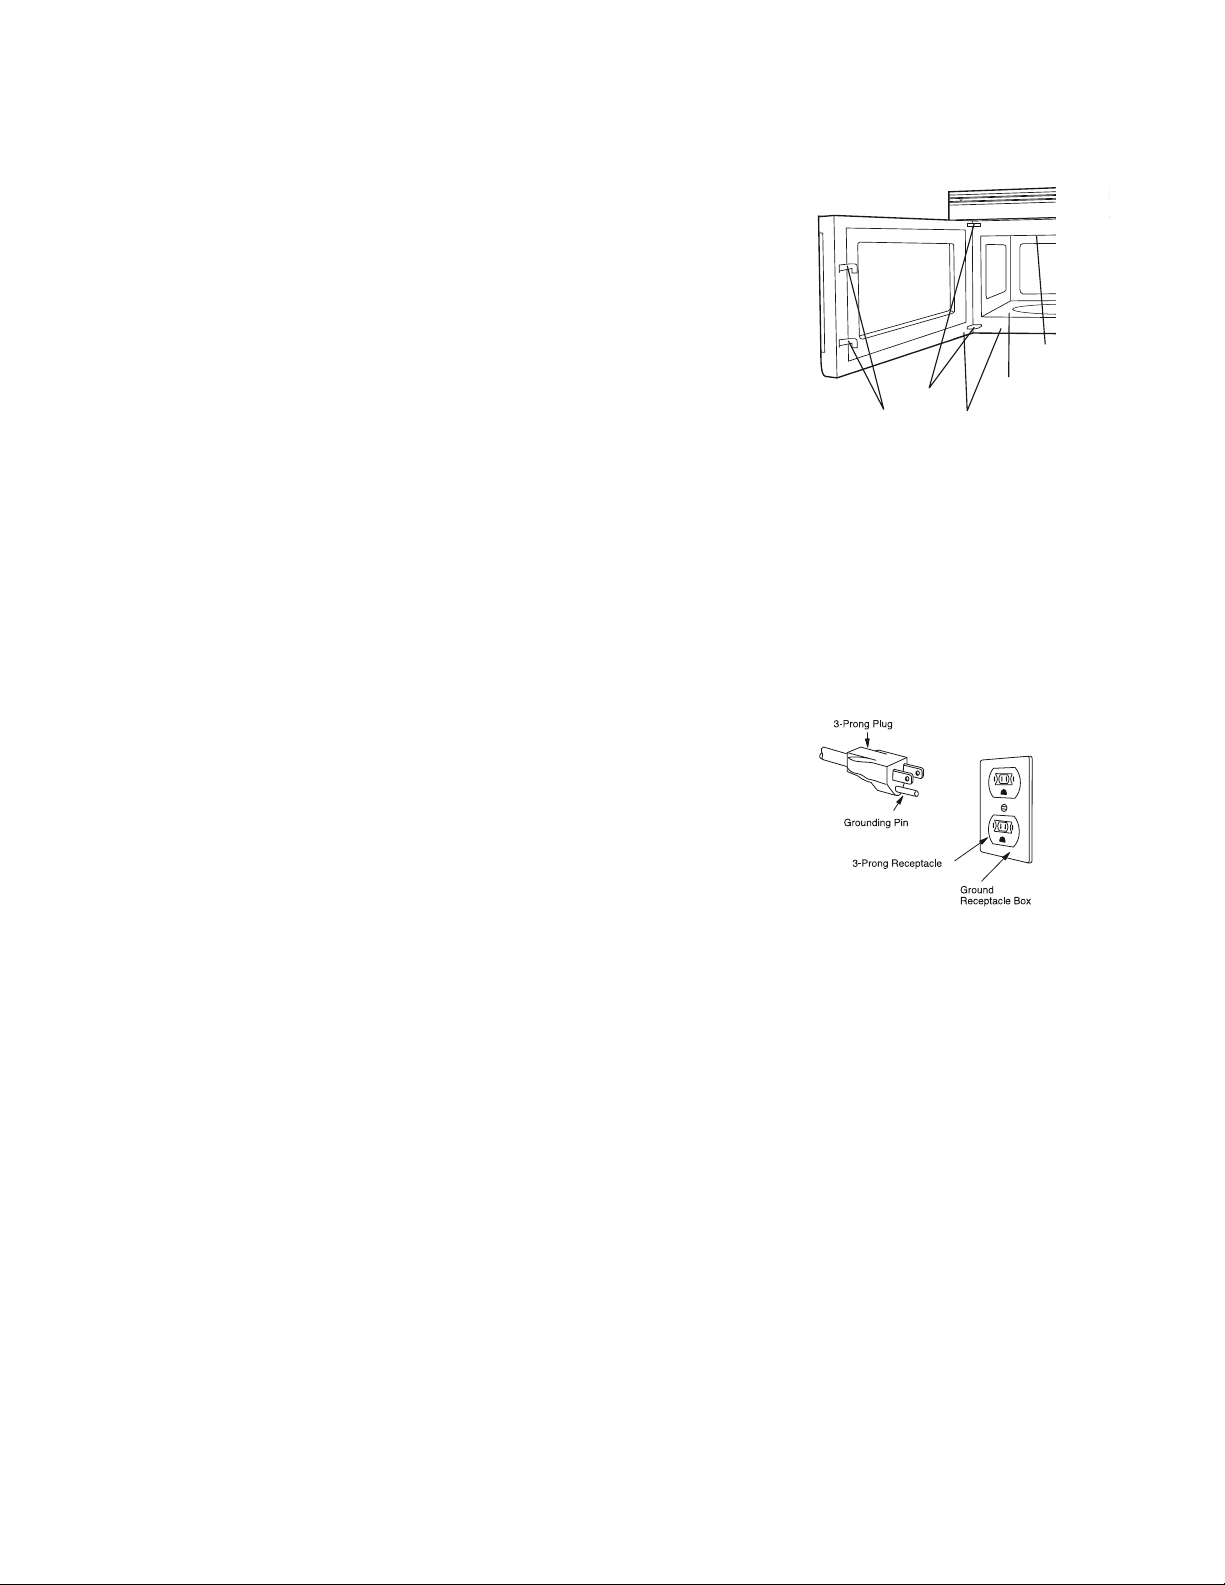
This appliance must be grounded. This microwave oven is equipped with
a cord having a grounding wire with a grounding plug. It must be plugged
into a wall receptacle that is properly installed and grounded in accordance
with the National Electrical Code and local codes and ordinances. In the
event of an electrical short circuit, grounding reduces risk of electric shock
by providing an escape wire for the electric current.
Warning – Improper use of the grounding plug can result in a risk of
electric shock. DO NOT USE AN EXTENSION CORD. If the power supply
cord is too short, have a qualied electrician or serviceperson install
an outlet near the appliance.
ELECTRICAL REQUIREMENTS
Check Installation Instructions for proper location for the power supply.
The electrical requirements are a 120 volt 60 Hz, AC only, 15 amp. or more protected electrical supply. It
is recommended that a separate circuit serving only the microwave oven be provided.
The microwave oven is equipped with a 3-prong grounding plug. It must be plugged into a wall recep-
tacle that is properly installed and grounded. DO NOT UNDER ANY CIRCUMSTANCES CUT OR REMOVE
THE GROUNDING PIN FROM THE PLUG.
Notes:
1. If you have any questions about the grounding or electrical instructions, consult a qualied electrician
or service person.
2. Neither Fisher & Paykel nor the dealer can accept any liability for damage to the microwave oven or
personal injury resulting from failure to observe the correct electrical connection procedures.
RADIO OR TV INTERFERENCE
Should there be any interference caused by the microwave oven to your radio or TV, check that the
microwave oven is on a dierent electrical circuit, relocate the radio or TV as far away from the micro-
wave oven as feasible or check position and signal of receiving antenna.
Carefully remove microwave oven from carton. SAVE THE CARTON AS
IT MAY MAKE INSTALLATION EASIER.
Remove:
1. All packing materials from inside the microwave oven cavity; how-
ever, DO NOT REMOVE THE WAVEGUIDE COVER, which is located on
the ceiling in the microwave oven cavity. Check to see that there
are Installation Instructions, Wall Template and Top Template. Read
enclosures and SAVE the Use and Care Guide.
2. The feature sticker from the outside of the door, if there is one.
Check the microwave oven for any damage, such as misaligned or
bent door, damaged door seals and sealing surfaces, broken or loose door hinges and latches and dents
inside the cavity or on the door. If there is any damage, do not operate the microwave oven and contact
your dealer or Fisher & Paykel AUTHORIZED SERVICER.
See Installation Instructions for more details.
GROUNDING INSTRUCTIONS
Oven
Waveguide
cover
cavity
Door seals and
sealing surfaces
Hinges
Latches

EN 7
INFORMATION YOU NEED TO KNOW
ABOUT YOUR MICROWAVE OVEN
This Use and Care Guide is valuable: read it carefully and always save it for reference.
NEVER use the microwave oven without the turntable and support nor turn the turntable over so that
a large dish could be placed in the microwave oven. The turntable will turn both clockwise and counter-
clockwise.
ALWAYS have food in the microwave oven when it is on to absorb the microwave energy.
When using the microwave oven at power levels below 100%, you may hear the magnetron cycling on
and o.
The fan will automatically start when heat rises from range surface units or burners and when convec-
tion, high mix, low mix or the broil settings are used.
Condensation is a normal part of microwave cooking. Room humidity and the moisture in food will
inuence the amount of moisture that condenses in the microwave oven. Generally, covered foods will
not cause as much condensation as uncovered ones. Ventilation openings must not be blocked.
The microwave oven is for food preparation only. It should not be used to dry clothes or newspapers.
Your microwave oven is rated 850 watts by using the IEC Test Procedure. In using recipes or package
directions, check food a minute or two before the minimum time and add time accordingly.
ABOUT MICROWAVE COOKING
• Arrange food carefully. Place thickest areas towards outside of dish.
• Watch cooking time. Cook for the shortest amount of time indicated and add more as needed. Food
severely overcooked can smoke or ignite.
• Cover foods while cooking. Check recipe or cookbook for suggestions: - paper towels, wax paper,
microwave plastic wrap (shouldn't touch food) or a lid. Covers prevent spattering and help foods to
cook evenly.
• Shield with small at pieces of aluminum foil any thin areas of meat or poultry to prevent overcook-
ing before dense, thick areas are cooked thoroughly.
• Stir foods from outside to center of dish once or twice during cooking, if possible.
• Turn foods over once during microwaving to speed cooking of foods such as chicken and hamburg-
ers. Large items like roasts must be turned over at least once.
• Rearrange foods such as meatballs halfway through cooking both from top to bottom and from the
center of the dish to the outside.
• Add standing time. Remove food from microwave oven and stir, if possible. Cover for standing time
which allows the food to nish cooking without overcooking.
• Check for doneness. Look for signs indicating that cooking temperatures have been reached.
Doneness signs include:
- Food steams throughout, not just at edge.
- Center bottom of dish is very hot to the touch.
- Poultry thigh joints move easily.
- Meat and poultry show no pinkness.
- Fish is opaque and akes easily with a fork.

8 EN
INFORMATION YOU NEED TO KNOW
ABOUT UTENSILS AND COVERINGS
It is not necessary to buy all new cookware. Many pieces already in your kitchen can be used success-
fully in your new microwave convection oven. The chart below will help you decide what utensils and
coverings should be used in each mode.
UTENSILS AND
COVERINGS
MICROWAVE ONLY CONVECTION,
BROIL, SLOW COOK
HIGH MIX/ROAST
LOW MIX/BAKE
Aluminum foil YES - Small at pieces
of aluminum foil placed
smoothly on food can be
used to shield areas from
cooking or defrosting too
quickly. Keep foil at least 1
inch from walls of oven.
YES - For shielding YES - For shielding
Aluminum
containers
YES - Can be used if 3/4 lled
with food. Keep 1 inch away
from walls and do not cover
with lid.
YES - Broil. No cover. YES - Can be used if
3/4 lled with food.
Keep 1 inch away from
walls and do not cover
with foil.
Browning dish YES - Do not exceed
recommended preheating
time. Follow manufacturer’s
directions.
NO NO
Glass ceramic
(Pyroceram
®
)
YES - Excellent YES - Excellent YES - Excellent
Glass,
heat-resistant
YES - Excellent. YES - Excellent YES - Excellent
Glass, non-heat-
resistant
NO NO NO
Lids, glass YES YES - Broil. No cover. YES
Lids, metal NO YES - Broil. No cover. NO
Metal cookware NO YES YES - Do not use metal
covering.
Metal, misc.: dishes
with metallic trim,
screws, bands,
handles. Metal
twist ties
NO NO NO
Oven cooking
bags
YES - Good for large meats or
foods that need tenderizing.
DO NOT use metal twist ties.
YES - Broil. No cover. YES - Do not use metal
twist ties.
Paper plates YES - For reheating. NO NO
Paper towels YES - To cover for reheating
and cooking. Do not use
recycled paper towels which
may contain metal llings.
NO NO
Paper, ovenable YES YES - For temperatures
up to 400˚F. Do not use
for broiling.
YES - For temperatures
up to 400˚F.

EN 9
INFORMATION YOU NEED TO KNOW
UTENSILS AND
COVERINGS
MICROWAVE ONLY CONVECTION,
BROIL, SLOW COOK
HIGH MIX/ROAST
LOW MIX/BAKE
Microwave-safe
plastic containers
YES - Use for reheating and
defrosting. Some microwave-
safe plastics are not suitable
for cooking foods with high
fat and sugar content. Follow
manufacturer’s directions.
NO NO
Plastic, Thermoset
®
YES YES - Are heat resis-
tant up to 425˚F. Do
not use for broiling.
yes
Plastic wrap YES - Use brands specially
marked for microwave use. DO
NOT allow plastic wrap to touch
food. Vent so steam can escape.
NO NO
Pottery, porcelain
stoneware
YES - Check manufacturer’s
recommendation for being
microwave safe.
YES YES - Must be
microwave safe
AND ovenable.
Styrofoam YES - For reheating NO NO
Wax paper YES - Good covering for cooking
and reheating.
NO NO
Wicker, wood, straw YES - May be used for short
periods of time. Do not use with
high fat or high sugar content
foods. Could char.
NO NO
DISH CHECK. If you wish to check if a dish is safe for microwaving, place the empty dish in the micro-
wave oven and microwave on HIGH for 30 seconds. If the dish becomes very hot, DO NOT use it for
microwaving.
ACCESSORIES There are many microwave accessories available for purchase. Evaluate carefully before
you purchase so that they meet your needs. A microwave-safe thermometer will assist you in determin-
ing correct doneness and assure you that foods have been cooked to safe temperatures. Fisher & Paykel
is not responsible for any damage to the oven when accessories are used.

10 EN
INFORMATION YOU NEED TO KNOW
ABOUT CHILDREN AND THE MICROWAVE
Children below the age of 7 should use the microwave oven with a supervising adult very near to them.
Between the ages of 7 and 12, the supervising adult should be in the same room.
The child must be able to reach the microwave oven comfortably; if not, he/she should stand on a
sturdy stool.
At no time should anyone be allowed to lean or swing on the microwave oven door.
Children should be taught all safety precautions: use potholders, remove coverings carefully, pay special
attention to packages of crisp food because they may be extra hot.
Don’t assume that because a child has mastered one cooking skill he/she can cook everything.
Children need to learn that the microwave oven is not a toy. See page 29 for Safety Lock feature.
ABOUT FOOD
FOOD DO DON'T
Eggs, sausages,
nuts, seeds,
fruits &
vegetables
• Puncture egg yolks before cooking
to prevent “explosion”.
• Pierce skins of potatoes, apples,
squash, hot dogs and sausages so
that steam escapes.
• Cook eggs in shells.
• Reheat whole eggs.
• Dry nuts or seeds in shells.
Popcorn • Use specially bagged popcorn for
the microwave oven.
• Listen while popping corn for the
popping to slow to 1 or 2 seconds
or use special POPCORN pad.
• Pop popcorn in regular brown bags or
glass bowls.
• Exceed maximum time on popcorn
package.
Baby food • Transfer baby food to small dish
and heat carefully, stirring often.
Check temperature before serving.
• Put nipples on bottles after heating
and shake thoroughly. “Wrist” test
before feeding.
• Heat disposable bottles.
• Heat bottles with nipples on.
• Heat baby food in original jars.
General • Cut baked goods with lling after
heating to release steam and avoid
burns.
• Stir liquids briskly before and after
heating to avoid “eruption”.
• Use deep bowl, when cooking
liquids or cereals, to prevent
boilovers.
• Heat or cook in closed glass jars or air
tight containers.
• Can in the microwave as harmful
bacteria may not be destroyed.
• Deep fat fry.
• Dry wood, gourds, herbs or wet
papers.

EN 11
INFORMATION YOU NEED TO KNOW
ABOUT SAFETY
• Check foods to see that they are cooked to the United States Department of Agriculture’s recom-
mended temperatures.
TEMP FOOD
160˚F For fresh pork, ground meat, boneless white poultry, sh, seafood, egg dishes and frozen
prepared food.
165˚F For leftover, ready-to-reheat refrigerated, and deli and carry-out “fresh” food.
170˚F White meat of poultry.
180˚F Dark meat of poultry.
To test for doneness, insert a meat thermometer in a thick or dense area away from fat or bone. NEVER
leave the thermometer in the food during cooking, unless it is approved for microwave use.
• ALWAYS use potholders to prevent burns when handling utensils that are in contact with hot food.
Enough heat from the food can transfer through utensils to cause skin burns.
• Avoid steam burns by directing steam away from the face and hands. Slowly lift the farthest edge
of a dish’s covering and carefully open popcorn and oven cooking bags away from the face.
• Stay near the oven while it’s in use and check cooking progress frequently so that there is no chance
of overcooking food.
• NEVER use the cavity for storing cookbooks or other items.
• Select, store and handle food carefully to preserve its high quality and minimize the spread of food-
borne bacteria.
• Keep waveguide cover clean. Food residue can cause arcing and/or res.
• Use care when removing items from the oven so that the utensil, your clothes or accessories do not
touch the safety door latches.
12 EN
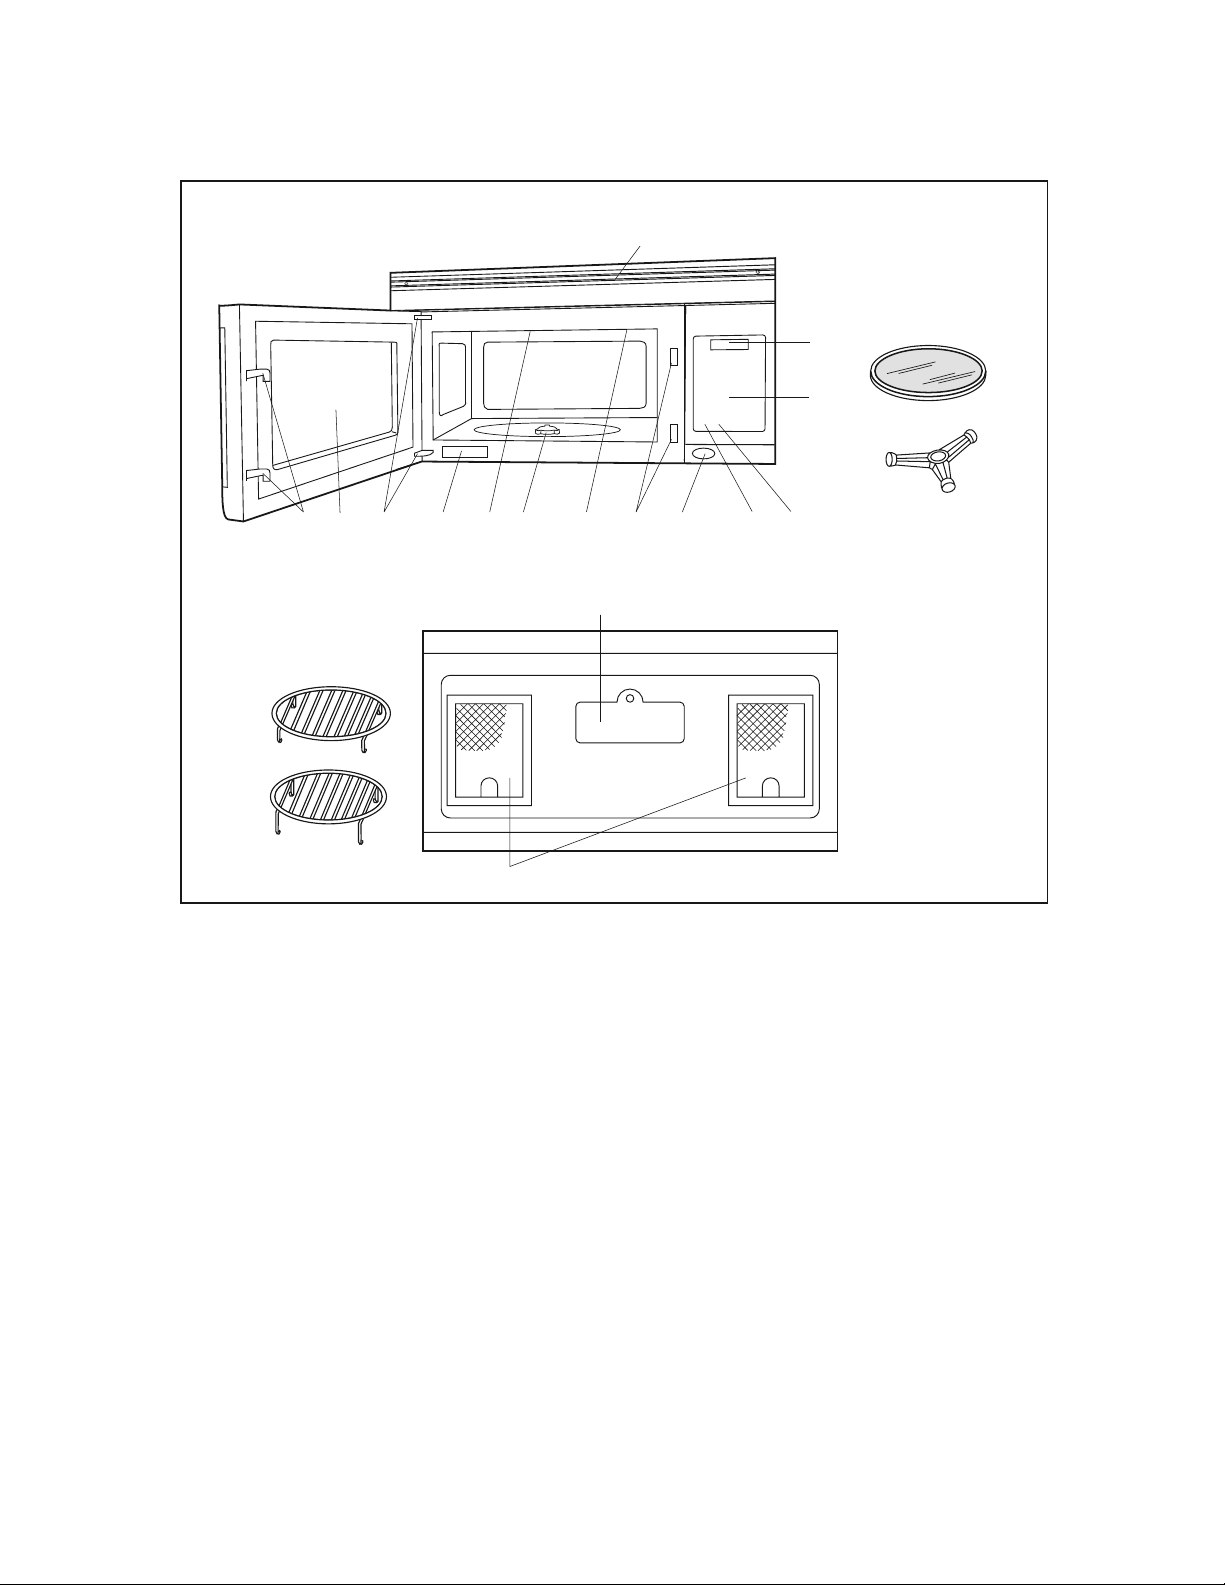
PART NAMES
1. Oven door with see-through window.
2. Door hinges.
3. Waveguide cover
DO NOT REMOVE.
4. Turntable motor shaft.
5. Oven light.
It will light when oven is operating or
door is open.
6. Safety door latches.
The oven will not operate unless the
door is securely closed.
7. One touch DOOR OPEN button.
Push to open door.
8. FAN HI / LO button.
Push for high/low/o.
9. LIGHT button.
Push for on/o.
10. Auto-Touch control panel.
11. Time display: Digital display, 99 minutes 99 seconds.
12. Ventilation openings.
13. Light cover.
14. Grease lters.
15. Removable ceramic turntable.
The turntable will rotate clockwise or
counterclockwise. Only remove for cleaning.
16. Removable turntable support.
Place the turntable support on the oor of the oven
cavity and the turntable on the turntable support.
17. Removable low rack for broiling and meat and
poultry roasting.
18. Removable high rack for two level baking.
19. Rating label
13
(Front of Microwave)
BOTTOM VIEW
14
17
18
15
16
FRONT VIEW
3
2 19
1
4
6
5
6
7
8
9
10
11
12
(Rear of Microwave)
EN 13
PART NAMES
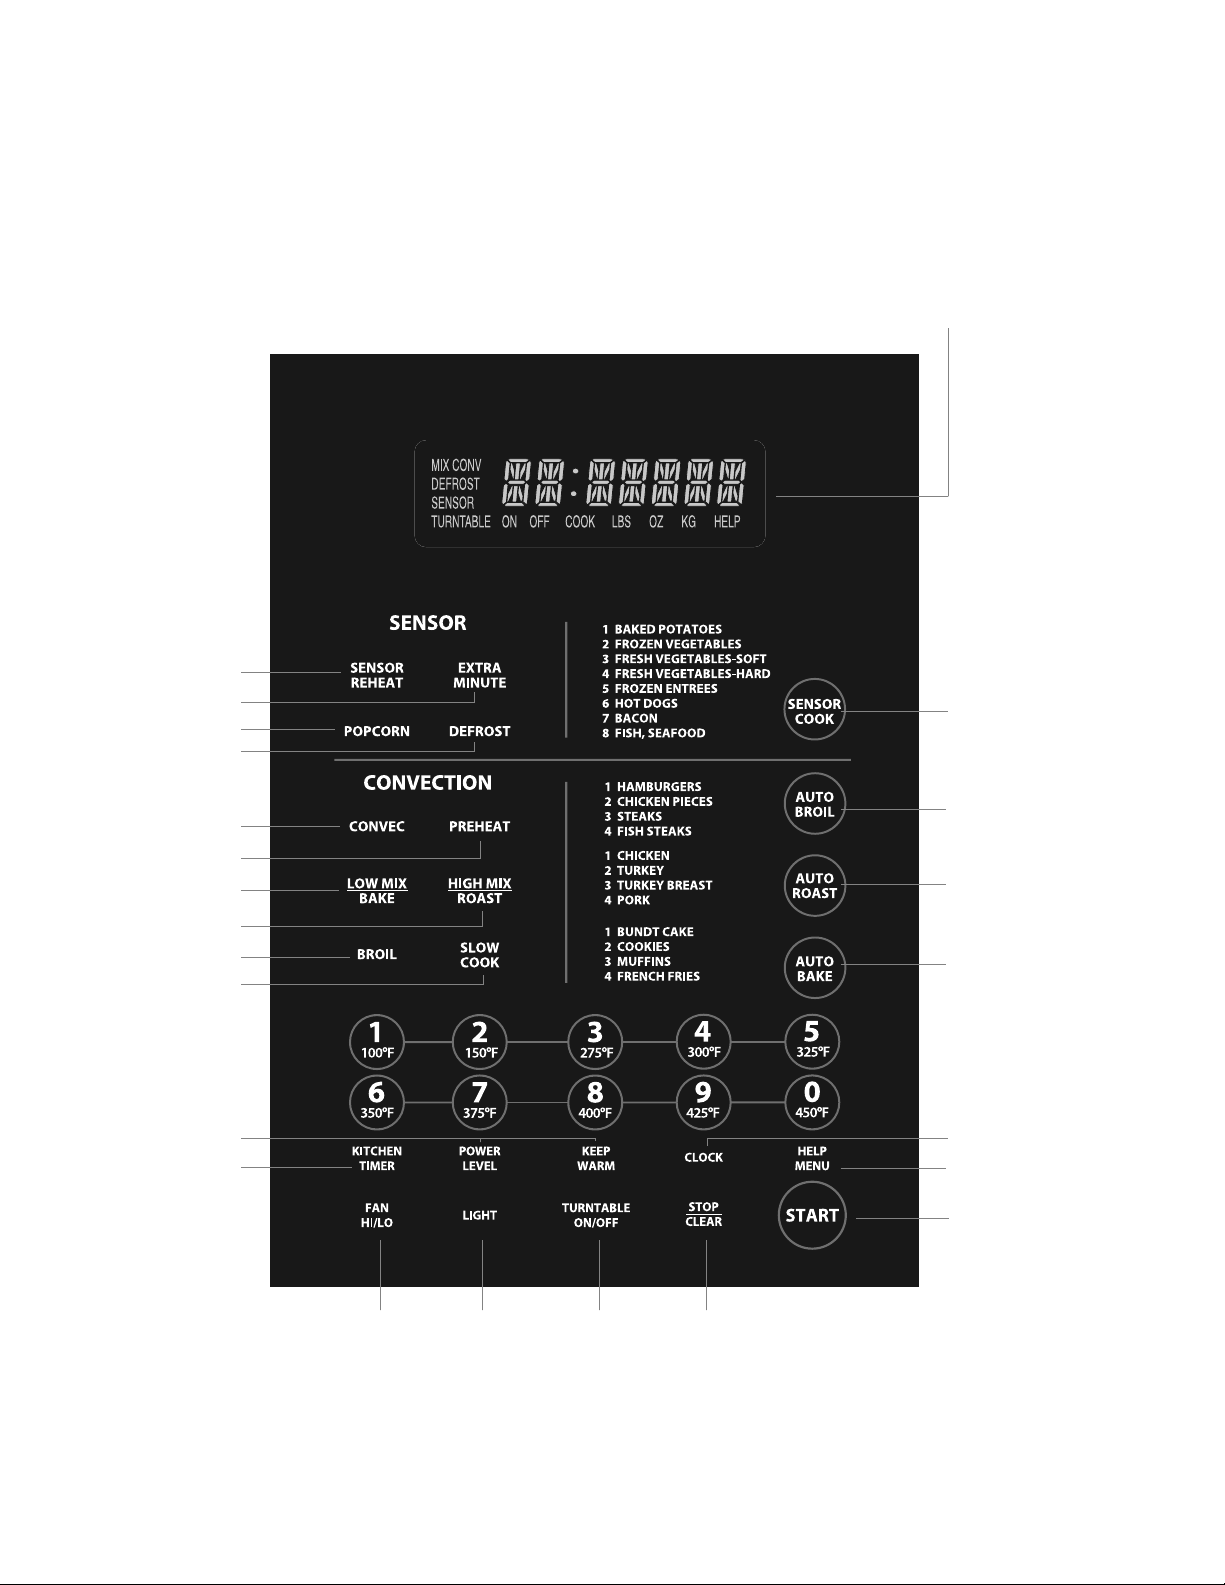
CONTROL PANEL
INTERACTIVE DISPLAY
Words will light in the display to indicate
features and cooking instructions.
Number next to the control panel illustration indicates page on which
there are feature descriptions and usage information.
15 15
15 14
19
28
19
17
23
23
24
24
23
24
18-21
25
26
27
14
29
30
16
30

14 EN
BEFORE OPERATING
• Before operating your new microwave oven make sure you read and understand this use and care
guide completely.
• Before the microwave oven can be used, follow these procedures:
1. Plug in the microwave oven. Close the door. The microwave oven display will show WELCOME
PRESS CLEAR AND PRESS CLOCK.
2. Touch the STOP/CLEAR pad. : will appear.
3. Touch CLOCK and follow directions to set.
TO SET THE CLOCK
1. Touch CLOCK pad.
2. Enter the correct time of day by touching the numbers in sequence.
3. Touch CLOCK pad again.
This is a 12 hour clock. If you attempt to enter an incorrect clock time, ERROR will appear in the display.
Touch the STOP/CLEAR pad and re-enter the time.
• If the electrical power supply to your microwave oven should be interrupted, the display will inter-
mittently show WELCOME PRESS CLEAR AND PRESS CLOCK after the power is reinstated. If this occurs
during cooking, the program will be erased. The time of day will also be erased. Simply touch STOP/
CLEAR pad and reset the clock for the correct time of day.
Note: Your oven can be programmed with the door open except for START, EXTRA MINUTE, SENSOR
REHEAT and POPCORN.
STOP/CLEAR
Touch the STOP/CLEAR pad to:
1. Erase if you make a mistake during programming.
2. Cancel KITCHEN TIMER.
3. Stop the microwave oven temporarily during cooking.
4. Return the time of day to the display.
5. Cancel a program during cooking, touch twice.

EN 15
MANUAL MICROWAVE OPERATION
TURNTABLE ON/OFF
For most cooking, the turntable should be on; however the turntable can be turned o so that it does
not rotate when extra large dishes, such as the popular 13”x9”x2” glass utility casserole, are used. The
casserole should be placed on the turntable so that it is level.
• Suppose you want to cook lasagna in a 13”x9”x2” casserole for 45 minutes on 40% power.
1. Touch TURNTABLE ON/OFF pad and note TURNTABLE OFF in the display.
2. Enter cooking time by touching the number pads 4500.
3. Touch POWER LEVEL pad and the number 4.
4. Touch START.
Notes:
The door can be opened for checking food and the turntable will stay in the o position. After checking,
close door and touch START.
The turntable will stay o for one minute after door is opened when time-of-day appears in the display. It
is possible to reprogram the oven during that minute without touching the TURNTABLE ON/OFF pad. The
display always indicates whether the turntable is o or on.
THE TURNTABLE SHOULD ALWAYS BE ON WHEN USING THE SPECIAL FEATURES. On/O function can be
used with manual cooking modes and Sensor Reheat. Turntable o condition will automatically change
to on condition when you select auto cooking except Sensor Reheat and Auto Bake.
When cooking large quantities of food which cannot be stirred, it is best to use a lower power level such
as 40 or 50%. You may speed cooking of large amounts by programming 5 to 10 minutes on 100% power
(HIGH) followed by the desired time on lower power. See page 28 for how to program multiple sequences.
You may wish to reverse a large casserole once during cooking; simply open door, reposition casserole,
close door and touch START.
FAN / LIGHT
Your oven is equipped with a light and a fan which can be used whether the door is open or closed.
To turn the light on, touch the LIGHT pad once. To turn the light o, touch the LIGHT pad again.
To turn the fan on, touch the FAN HI/LO pad once for high speed. To turn the fan to low speed, touch
pad twice and touch the pad three times to turn the fan o. When fan is manually turned on, "H" will be
shown on the display. When the fan is turned o, "H" will disappear from display.
TIME COOKING-MICROWAVE
Your oven can be programmed for 99 minutes 99 seconds (99.99). Always enter the seconds after the
minutes, even if they are both zeros.
• Suppose you want to cook for 5 minutes at 100%.
1. Enter cooking time by touching the number pads 500.
2. Touch START pad.

16 EN
MANUAL MICROWAVE OPERATION
KEEP WARM
KEEP WARM can only be programmed with manual cooking or as a separate program.
• Suppose you want to cook a baked potato for 4 minutes at 100% power and you want to keep it
warm after cooking for 30 minutes.
1. Touch the desired cook time 400 for 1 baked potato.
2. Touch KEEP WARM pad.
3. Touch START pad.
At the end of cook time, KEEP WARM is displayed warming food until end of 30 minutes.
To use KEEP WARM as a separate program, touch KEEP WARM pad within 1 minute after cooking,
closing the door or touching the STOP/CLEAR pad.
TO SET POWER LEVEL
There are eleven preset power levels.
Using lower power levels increases the cooking time which is recommended for foods such as cheese,
milk and long slow cooking of meats. Consult cookbook or recipes for specic recommendations.
TOUCH POWER LEVEL PAD ONCE
THEN TOUCH
APPROXIMATE PERCENTAGE
OF POWER
COMMON WORDS
FOR POWER LEVELS
POWER LEVEL 100% High
9 90%
8 80%
7 70% Medium High
6 60%
5 50% Medium
4 40%
3 30% Med Low/Defrost
2 20%
1 10% Low
0 0%
• Suppose you want to defrost for 5 minutes at 30% with the turntable on.
1. Enter defrosting time by touching the number pads 500.
2. Touch POWER LEVEL pad and number 3.
3. Touch START pad.

EN 17
MICROWAVE FEATURES
DEFROST
DEFROST automatically defrosts ground meat, steaks, chicken pieces.
• Suppose you want to defrost a 2.0 pound steak.
1. Touch DEFROST pad once. Then touch DEFROST pad two more times to select steak.
2. Enter weight by touching the number 20 pads.
3. Touch START pad.
The oven will stop and directions will be displayed. Follow the indicated message.
4. After the 1st stage, open the door. Turn steak over and shield any warm portions. Close the door.
Touch START pad.
5. After the 2nd stage, open the door. Shield any warm portions. Close the door. Touch START pad.
6. After defrost cycle ends, cover and let stand as indicated in chart below.
Notes:
1. The weight can be entered in increments of 0.1 lb. If you attempt to enter more or less than the
allowed amount as indicated in chart, an error message will appear in the display
2. Defrost can be programmed with More or Less Time Adjustment. See page 28.
3. To defrost other foods or foods above or below the weights allowed on Defrost Chart see Manual
Defrost on page 18.
DEFROST CHART
TOUCH
DEFROST PAD*
FOOD AMOUNT PROCEDURE
Once Ground Meat .5 - 3.0 lb. Remove any thawed pieces after each stage. Let
stand, covered, 5 to 10 minutes.
Twice Steaks
(chops, sh)
.5 - 4.0 lb. After each stage of defrost cycle, rearrange and if
there are warm or thawed portions, shield with small
at pieces of aluminum foil. Remove any meat or
sh that is nearly defrosted. Let stand, covered, 10 to
20 minutes.
3 times Chicken pieces .5 - 3.0 lb. After each stage of defrost cycle, if there are warm
or thawed portions, rearrange or remove. Let stand,
covered, 10–20 minutes.
* Number of touches AFTER initial touch to access DEFROST.
Notes:
Check foods when oven signals. After nal stage, small sections may still be icy. Let stand to continue
thawing. Do not cook until all ice crystals are thawed.
Shielding prevents cooking from occurring before the center of the food is defrosted. Use small smooth
strips of aluminum foil to cover edges and thinner sections of the food.

18 EN
MICROWAVE FEATURES
MANUAL DEFROST
If the food that you wish to defrost is not listed on the Defrost Chart or is above or below the limits in the
“Amount” column on the chart, you need to defrost manually.
You can defrost any frozen food, either raw or previously cooked, by using power level 3. Follow the
exact 3-step procedure found under To Set Power Level on page 16. Estimate defrosting time and press
number 3 for 30% when you select the power level.
For either raw or previously cooked frozen food, the rule of thumb is approximately 5 minutes per
pound. For example, defrost 5 minutes for 2-3 cups of casserole or 1 pound of frozen spaghetti sauce.
Always stop the oven periodically to remove or separate the portions that are defrosted. If food is not
defrosted at the end of the estimated defrosting time, program the oven in 1 minute increments on
power level 3 until totally defrosted.
When using plastic containers from the freezer, defrost only long enough to remove from the plastic in
order to place food in a microwave-safe dish.
SENSOR COOKING
The Sensor is a semi-conductor device that detects the vapor (moisture and humidity) emitted from the
food as it heats. The Sensor adjusts the cooking times and power level for various foods and quantities. It
takes the guesswork out of microwave cooking.
Using SENSOR Settings:
1. Room temperature should not exceed 95˚F.
2. Be sure the exterior of the cooking container and the interior of the oven are dry. Wipe o any mois-
ture with a dry cloth or paper towel.
3. Sensor cooking can only be entered within 1 minute after cooking, opening and closing the door or
touching the STOP/CLEAR pad.
4. During the rst part of sensor cooking, SENSOR REHEAT, POPCORN REGULAR SENSOR, BAKED POTATO,
FROZEN VEG, SOFT FRESH VEG, HARD FRESH VEG, FROZEN ENTREE, HOT DOGS, BACON or FISH will ap-
pear on display. Do not open oven door or touch STOP/CLEAR during this part of the cooking cycle.
The measurement of vapor will be interrupted. If this occurs, ERROR will appear and sensor cooking
will be interrupted. To continue cooking, touch the STOP/CLEAR pad and select cooking time and
power. When sensor detects the vapor emitted from the food, remainder of cooking time will appear.
Door may be opened when remaining cooking time appears on display. At this time, you may stir or
season food, as desired.
5. Check food for doneness after cooking with sensor settings. If additional time is needed, continue to
cook with variable power and time.
6. If the sensor does not detect vapor, ERROR will appear and the oven will shut o.
7. At the end of any cycle, open oven door or touch STOP/CLEAR pad. The time of day will reappear on
the display.
8. Any sensor setting can be programmed with More or Less Time Adjustment. See page 28.
Selecting Foods:
1. The sensor works with foods at normal storage temperature. For example, foods for reheating would
be at refrigerator temperature and potatoes for baking would be room temperature.
2. More or less food than the quantity listed in the charts should be cooked by time and variable power.

EN 19
MICROWAVE FEATURES
Covering Foods:
Some foods work best when covered. Use the cover recommended in the Sensor Cooking chart for
these foods.
1. Casserole lid.
2. Plastic wrap: Use plastic wrap recommended for microwave cooking. Cover dish loosely; allow
approximately 1/2 inch to remain uncovered to allow steam to escape. Plastic wrap should not
touch food.
3. Paper towel: Use paper towels to absorb excess fat and moisture when cooking bacon and potatoes.
Line the turntable when baking potatoes.
4. Wax paper: Cover dish completely; fold excess wrap under dish to secure. If dish is wider than paper,
overlap two pieces at least one inch to cover.
SENSORS
Your oven has Popcorn and Sensor Reheat. To use any of the Sensors, simply touch the chosen pad. The
microwave oven will start automatically. Any sensor setting can be programmed with More or Less Time
Adjustment. See page 28.
SENSOR REHEAT
Turntable on:
You can reheat many foods by touching just one pad. You don’t need to calculate reheating time or
power level. To reheat food with turntable on, simply touch the SENSOR REHEAT pad.
Touch SENSOR REHEAT pad. (Note: Sensor Reheat can be programmed with turntable on or o). SEN-
SOR REHEAT will be displayed repeatedly. When sensor detects the vapor emitted from the food, remain-
der of cooking time will appear. After cooking, LET STAND COVER will be displayed.
Turntable o:
You may reheat using a 11”x8”x2” or 13”x9”x2” casserole with the turntable o. First touch TURNTABLE
ON/OFF and note indicator. Then touch SENSOR REHEAT. The display will indicate turntable o and oven
will start automatically. After cooking, LET STAND COVER will be displayed.
POPCORN
• Suppose you want to pop a 3.5 oz. bag of popcorn.
Touch POPCORN pad once. SENSOR POPCORN REGULAR be displayed repeatedly. After cooking, END will
be displayed.
This sensor setting works well with most brands of microwave popcorn. You may wish to try several
and choose your favorite. Pop only one bag at a time. Unfold the bag and place in oven according to
directions.

20 EN
MICROWAVE FEATURES
SENSOR CHART
FOOD AMOUNT PROCEDURE
Leftovers such as
rice, potatoes,
vegetables
casserole
4-32 oz. Place in dish or casserole slightly larger than amount to be
reheated. Flatten, if possible. Cover with lid, plastic wrap
or wax paper. Use covers such as plastic wrap or lids with
larger quantities of more dense foods such as stews.
Soups 1-4 cups After reheating, stir well, if possible. Foods should be very
hot. If not, continue to heat with variable power and time.
After stirring, recover and allow to stand 2 to 3 minutes.
Canned entrees
and vegetables
4-16 oz. Use less Time Adjustment by touching POWER LEVEL pad
twice for small quantities of canned vegetables.
Dinner Plate
1 plate
3-6 oz. of meat plus
vegetables and/or
potato/rice
Use this pad to reheat precooked foods from the refrigera-
tor. Place meaty portions and bulky vegetables to outside of
plate. Cut large items like baked potatoes in smaller pieces.
Flatten foods such as mashed potatoes and other dense
foods. Cover with wax paper or plastic wrap. ONE PLATE
ONLY. After cooking, check that food is very hot through-
out and that the bottom center of the plate is very hot. If
not, continue heating using time and power level. Allow to
stand, covered, 2 to 3 minutes.
Popcorn Only 1 package
at a time
Use only popcorn packaged for microwave oven use. Try
several brands to decide which you like best. Do not try to
pop unpoped kernels. More or Less Time Adjustment can
be used to provide adjustment needed for older popcorn or
individual tastes.
3.0-3.5 oz. bag
(Regular size)
Touch POPCORN pad once. This setting works well with
most 3.0-3.5 oz. bags of microwave popcorn.
1.5-1.75 oz. bag
(Snack size)
Touch POPCORN pad twice for snack size bags.

EN 21
MICROWAVE FEATURES
SENSOR COOK
• Suppose you want to cook a baked potato:
1. Touch SENSOR COOK pad.
2. Select desired sensor setting. Example: Touch number pad 1 to cook baked potatoes.
3. Touch START pad. When sensor detects the vapor emitted from the food, the remainder of cooking
time will appear.
Open oven door or touch STOP/CLEAR pad. The time of day will appear in the display.
SENSOR COOK CHART
FOOD AMOUNT PROCEDURE
1. BAKED
POTATOES
1-6 medium Pierce. Place on paper-towel-lined turntable. After cook-
ing, remove from oven, wrap in aluminum foil and let
stand 5 to 10 minutes.
2. FROZEN
VEGETABLES
1-6 cups Cover with lid or plastic wrap. After cooking, stir and let
stand 3 minutes, covered.
3. FRESH VEGETABLESSOFT
Broccoli
Brussels sprouts
Cabbage
Cauliower (owerets)
Cauliower (whole)
Spinach
Zucchini
Baked apples
0.25-2.0 lb.
0.25-2.0 lb.
0.25-2.0 lb.
0.25-2.0 lb.
1 medium
0.25-1.0 lb.
0.25-2.0 lb.
2-4 medium
Wash and place in casserole. Add no water if vegetables
have just been washed. Cover with lid for tender veg-
etables. Use plastic wrap for tender-crisp vegetables.
Stir before standing, if possible. After cooking, let stand,
covered, 2 to 5 minutes.
4. FRESH VEGETABLESHARD
Carrots, sliced
Corn on the cob
Green beans
Winter squash: diced
halves
0.25-1.5 lb.
2-4 pcs
0.25-1.5 lb.
0.25-1.5 lb.
1-2
Place in casserole. Add 1-4 tbsp. water. Cover with lid for
tender vegetables. Use plastic wrap cover for tender-
crisp vegetables. Stir before standing, if possible. After
cooking, let stand, covered, 2 to 5 minutes.
5. FROZEN ENTREES 6-17 oz. Use for frozen convenience food. It will give satisfactory
results for most brands. You may wish to try several and
choose your favorite. Remove package from outer wrap-
ping and follow package directions for covering. After
cooking, Iet stand, covered, for 1 to 3 minutes.
6. HOT DOGS 1-4 servings Place hot dog in bun and wrap in paper towel or paper
napkin.
7. BACON 2-6 slices Place bacon on paper plate, lined with paper towel.
Bacon should not extend over the rim of plate. Cover
with paper towel.
8. FISH, SEAFOOD 0.25-2.0 lb. Arrange in ring around shallow glass dish (roll llet with
edges underneath). Cover with vented plastic wrap.
After cooking, let stand, covered, 3 minutes.

22 EN
MICROWAVE FEATURES
SENSOR COOK RECIPES
Cranberry Flu Makes 6 to 8 servings
2 cups fresh cranberries
1 cup water
¾ cup sugar
1 carton (3 oz.) orange-avored gelatin
½ pint whipping cream, whipped or
1 carton (8 oz.) non-dairy whipped topping
1. Combine cranberries, water and sugar in a 2-quart casserole dish. Cover with wax paper. Microwave
using SENSOR COOK for FRESH VEGETABLESSOFT. Drain cranberries and reserve liquid.
2. Add enough hot water to reserved liquid to make 2 cups. Stir gelatin into hot liquid until it dissolves.
Cover with wax paper. Microwave using SENSOR REHEAT Less.
3. Add berries and cool. Refrigerate until thickened. Fold whipped cream into cooled cranberry mixture.
Spoon into serving dishes and garnish with extra whipped cream. Refrigerate until ready to serve.
Glazed Apple Slices Makes 6 to 8 servings
¼ cup rmly-packed brown sugar
3 tablespoons butter or margarine
2 tablespoons apricot preserves
½ teaspoon ground nutmeg
¼ teaspoon salt
½ cup sugar
¾ cup orange juice
1 tablespoon cornstarch
4 baking apples (about 1½ lbs), peeled and sliced into 8 pieces each
3 tablespoons chopped green pistachios
1. Combine brown sugar, butter and apricot preserves in a small bowl. Microwave at HIGH (100%)
45 seconds to 1 minute, until butter melts and preserves soften. Stir in nutmeg, salt, sugar,
orange juice and cornstarch. Microwave at HIGH (100%), 4 to 6 minutes or until thickened, stirring
several times.
2. Arrange apple slices in a large microwave serving dish. Spread hot sauce over apples. Cover well
with vented wax paper. Microwave using FRESH VEGETABLESSOFT. Allow to cool 5 minutes before
serving.
3. Sprinkle with pistachios. Serve alone or over vanilla ice cream or sponge cake.
Savory Flounder Fillets Makes 4 servings
¾ cup corn ake crumbs
3 tablespoons chopped parsley
2 teaspoons grated lemon peel
½ teaspoon paprika
1 pkg. (1 lb.) ounder llets
1 egg, slightly beaten
Tarter or cocktail sauce, optional
1. On wax paper, combine crumbs, parsley, lemon peel and paprika. Dip llets in beaten egg, then coat
with crumb mixture.
2. Place sh in a covered, microwave-safe baking dish. Microwave using FISH, SEAFOOD.
3. Serve with tartar or cocktail sauce, if desired.

EN 23
MANUAL CONVECTION AND
AUTOMATIC MIX OPERATION
This section gives you specic cooking instructions and procedures. The oven should not be used with-
out the turntable in place, and it should never be restricted so that it cannot rotate. You may remove the
turntable when preheating the oven and when preparing food to be cooked directly on the turntable.
Caution: The oven cabinet, cavity, door, turntable, turntable support, racks and dishes will become
hot. To PREVENT BURNS, use thick oven gloves when removing the food or turntable from the oven.
CONVECTION COOKING
During convection heating, hot air is circulated throughout the oven cavity to brown and crisp foods
quickly and evenly. This oven can be programmed for ten dierent convection cooking temperatures for
up to 99 minutes, 99 seconds.
TO COOK WITH CONVECTION
• Suppose you want to cook at 350˚F for 20 minutes.
1. Touch CONVEC pad.
2. Select temperature by touching number pad
6
350˚F
.
3. Enter cooking time by touching number pads 2000.
4. Touch START pad.
TO PREHEAT AND COOK WITH CONVECTION
Your oven can be programmed to combine preheating and convection cooking operations. You can
preheat at the same temperature as the convection temperature or change it to a higher or lower
temperature.
• Suppose you want to preheat until 350˚F and then cook 25 minutes at 375˚F convection.
1. Touch PREHEAT pad.
2. Select temperature by touching number pad
6
350˚F
.
3. Touch CONVEC pad.
4. Select temperature by touching number pad
7
375˚F
.
5. Enter cooking time by touching number pads 2500.
6. Touch START pad.
When the oven reaches the programmed temperature, it will automatically hold at the preheat tem-
perature for 30 minutes and then the display will change to time of day. Whenever STOP/CLEAR pad is
touched during this 30 minute period, press CONVEC or press MIX will be displayed and cooking mode
and time can be entered.
Note: To preheat and cook with the same temperature, enter same temperature in steps 2 and 3.
BROIL
In the BROIL setting, preheating is automatic. Just enter the actual broiling time and wait for preheat to
be over before adding food. (Preset 450˚F). Oven temperature cannot be changed.
• Suppose you want to broil a ham steak for 15 minutes.
1. Touch BROIL pad.
2. Enter cooking time by touching number pads 1500.
3. Touch START pad.

24 EN
MANUAL CONVECTION AND
AUTOMATIC MIX OPERATION
SLOW COOK
Slow Cook is a preset at 300˚F. Slow Cook is programmed for 4 hours. Oven temperature can be changed
to temperature below 300˚F. Simply touch the SLOW COOK pad and touch the desired numbered pad
with temperature below 300˚F.
1. Touch SLOW COOK pad.
2. Touch START pad. The oven begins counting and continues to 4 hours.
AUTOMATIC MIX COOKING
This oven has two pre-programmed settings that make it easy to cook with both convection heat and
microwave automatically.
OVEN TEMPERATURE MICROWAVE POWER
HIGH MIX 325˚F 30%
LOW MIX 325˚F 10%
With the exception of those foods that cook best by convection heating alone, most foods are well
suited to mix cooking using either LOW MIX/BAKE or HIGH MIX/ROAST.
The marriage of these two cooking methods produces juicy meats, moist and tender cakes and ne
textured breads, all with just the right amount of browning and crispness.
The temperature can be changed; however, the microwave power cannot.
The oven temperature can be changed from 100˚F to 450˚F. To change the temperature, rst touch
HIGH MIX or LOW MIX, then touch the same pad again. When the display says SELECT TEMP, touch
desired temperature pad. Ex: HIGH MIX, HIGH MIX, pad 7. The mix temperature will change
automatically.
TO COOK WITH AUTOMATIC MIX
• Suppose you want to bake a cake at low mix for 20 minutes.
1. Touch LOW MIX/BAKE pad.
2. Enter cooking time by touching number pads 2000.
3. Touch START pad.
TO PREHEAT AND COOK WITH AUTOMATIC MIX
Your oven can be programmed to combine preheating and automatic mix cooking operations. You can
preheat at the same temperature as the preset combination temperature or change it to a dierent
temperature.
• Suppose you want to preheat to 350˚F and then cook 25 minutes on 300˚F LOW MIX/BAKE:
1. Touch PREHEAT pad.
2. Touch temperature pad
6
350˚F
.
3. Touch LOW MIX pad. Touch LOW MIX pad once more to change the cooking temperature.
4. Touch temperature pad
4
300˚F
.
5. Enter cooking time by touching number pads 2500.
6. Touch Start pad.
At the end of the baking time, 1 long tone will sound and
END
will be displayed.

EN 25
CONVECTION AUTOMATIC MIX FEATURES
This section of the Use and Care Guide oers instructions for preparing 12 popular foods using AUTO
BROIL, AUTO ROAST and AUTO BAKE.
After selecting the desired feature, follow the directions indicated in the display.
For helpful hints, simply touch HELP MENU anytime HELP is lighted in the display.
Caution: The oven cabinet, cavity, door, turntable, turntable support, racks and dishes will be-
come hot. To PREVENT BURNS, use thick oven gloves when removing the food or turntable from
the oven.
AUTO BROIL
AUTO BROIL automatically broils hamburgers, chicken pieces, steaks and sh steaks.
• Suppose you want to broil 2 hamburgers.
1. Touch AUTO BROIL pad.
2. Select desired setting. Example: for hamburgers, touch number pad 1.
3. Touch number pad to enter quantity. Example: 2. Follow information in display for cooking
information.
For well done or rare burgers, touch POWER LEVEL pad to select More for well done or Less for rare. See
More or Less Time Adjustment on page 28.
4. Touch START pad.
After broil preheat cycle ends, the oven will stop and directions will be displayed. Follow the indicated
message. Open the door and place hamburgers into oven. Close the door.
5. Touch START pad.
Notes:
1. AUTO BROIL can be programmed with More or Less Time Adjustment. See page 28.
2. If you attempt to enter more or less than the allowed amount as indicated in chart below, an error
message will appear in the display.
AUTO BROIL CHART
SETTING/FOOD AMOUNT PROCEDURE
1. HAMBURGERS 1-8 pieces
1/4 lb. each
Use this setting to broil hamburger patties. Place on low rack.
2. CHICKEN
PIECES
0.5-3.0 lb. Arrange pieces on low rack. After cooking, let stand, 3-5 minutes.
Dark meat should be 180˚F, and white meat should be 170˚F.
3. STEAKS 0.5-2.0 lb. Use this setting to broil steaks from 3/4” to 1” thick. Individual
boneless steaks broil evenly. Place steak on low rack. For well done,
touch POWER LEVEL once; for rare, touch POWER LEVEL twice.
4. FISH STEAKS 0.5-2.0 lb. Use this setting to broil sh steak which is 3/4” to 1” thick. Place on
low rack.

26 EN
CONVECTION AUTOMATIC MIX FEATURES
AUTO ROAST
AUTO ROAST automatically roasts chicken, turkey, turkey breast or pork.
• Suppose you want to roast a 2.5 pound chicken.
1. Touch AUTO ROAST pad.
2. Select desired setting. Example: For chicken, touch number pad 1.
3. Touch number pads 25 to enter weight.
4. Touch START pad.
After AUTO ROAST cycle ends, a long tone will sound. Follow the indicated message.
Notes:
1. AUTO ROAST can be programmed with More or Less Time Adjustment. See page 28.
2. If you attempt to enter more or less than the allowed weight as indicated in chart below, an error
message will appear in the display.
AUTO ROAST CHART
SETTING/FOOD AMOUNT RACK PROCEDURE
1. CHICKEN 2.5-7.0 lb. Low After the cycle ends, cover with foil and let stand for 5-10
minutes. Internal temperature of white meat should be
170˚F and of dark meat, 180˚F.
2. TURKEY
(unstued)
6.5-9.0 lb. Low Season, as desired. Place on low rack. After the cycle ends,
cover with foil and let stand 10 minutes. Internal tempera-
ture of white meat should be 170˚F and of dark meat, 180˚F.
3. TURKEY
BREAST
3.0-6.0 lb. Low Season, as desired. Place on low rack. After the cycle ends,
cover foil and let stand 10 minutes. Internal temperature of
white meat should be 170˚F.
4. PORK 2.0-3.5 lb. Low Boneless pork loin is recommended because it cooks evenly.
Place on low rack. After cooking, remove from oven, cover
with foil and allow to stand 5-10 minutes. Internal tempera-
ture should be 160˚F.

EN 27
CONVECTION AUTOMATIC MIX FEATURES
AUTO BAKE
AUTO BAKE automatically bakes cakes, brownies, muns and French fries.
• Suppose you want to bake a 13”x9”x2” cake.
1. Touch AUTO BAKE pad.
Note: Turntable function is automatically turned OFF.
2. Select desired setting. Example: For cake, touch number pad 1.
3. Touch START pad.
4. After Auto Bake preheat cycle ends, 4 tones will sound. Follow the indicated message. Open door.
Place the cake pan inside. Close door and touch START.
After AUTO BAKE cycle ends, 1 long tone will sound, and END will be displayed.
Note: AUTO BAKE can be programmed with More or Less Time Adjustment. See page 28.
AUTO BAKE CHART
SETTING/FOOD PAN SIZE/QTY RACK PROCEDURE
1. CAKE 13”x9”x2” Low Ideal for packaged cake mix or your own recipe for
13”x9”x2” pan. Prepare according to package or recipe
directions and place in a greased and oured 13”x9”x2”
baking pan. After the preheat is over, place pan in oven
centered on low rack. Cool before frosting and serving.
2. BROWNIES 13”x9”x2” Low Ideal for packaged brownie mix or your own recipe for
13”x9”x2” pan. Prepare according to package or recipe
directions and place in a greased and oured 13”x9”x2”
baking pan. After the preheat is over, place pan in oven
centered on low rack. Cool before cutting into serving
pieces.
3. MUFFINS 12 cup
Mun pan
Low Ideal for packaged mun mix or your own recipe for 12
medium size muns. Prepare according to package or
recipe directions and place in one 12-cup mun pan.
After the preheat is over, place pan in oven centered on
low rack.
4. FRENCH FRIES 3 - 24 oz.
Cookie sheet
to hold
Low Use frozen prepared French fries. No preheat is required
for the French fries baking procedure. Place French fries
on cookie sheet on low rack. For shoestring potatoes,
touch POWER LEVEL pad twice to enter less time before
touching START pad.

28 EN
OTHER CONVENIENT FEATURES
MULTIPLE SEQUENCE COOKING
The oven can be programmed for up to 4 automatic cooking sequences for the microwave mode
and 3 automatic cooking sequences for convection mode, switching from one setting to another
automatically.
Sometimes cooking directions tell you to start on one power level and then change to a dierent power
level. Your oven can do this automatically.
• Suppose you want to cook roast beef for 5 minutes at 90% and then continue to cook for 30 minutes at 50%.
1. Touch POWER LEVEL pad once.
2. Touch number pad 9 for 90% power.
3. Enter cooking time by touching number pads 500.
4. Touch POWER LEVEL pad again.
5. Touch number pad 5 for 50% power.
6. Enter cooking time by touching number pads 3000.
7. Touch START pad.
Notes:
1. If POWER LEVEL pad is touched twice, HIGH will be displayed.
2. If 100% is selected as the nal sequence, it is not necessary to touch the POWER LEVEL pad.
3. If you wish to know power level, simply touch the POWER LEVEL pad. As long as your nger is touching
the POWER LEVEL pad, the power level will be displayed.
MORE OR LESS TIME ADJUSTMENT
More: Should you discover that you like any of the DEFROST, AUTO ROAST, AUTO BAKE, AUTO BROIL,
SENSOR COOK or Sensor settings slightly more done, touch the POWER LEVEL pad once after touching
your choice of pads.
Less: Should you discover that you like any of the DEFROST, AUTO ROAST, AUTO BAKE, AUTO BROIL,
SENSOR COOK or Sensor settings slightly less done, touch the POWER LEVEL pad twice after touching
your choice of pads.
EXTRA MINUTE
EXTRA MINUTE allows you to cook for a minute at 100% by simply touching the EXTRA MINUTE pad. You
can also extend cooking time in multiples of 1 minute by repeatedly touching the EXTRA MINUTE pad
during manual cooking using microwave, convection, mix or broil.
• Suppose you want to heat a cup of soup for one minute.
Touch EXTRA MINUTE pad.
Notes:
1. Touch EXTRA MINUTE pad within 1 minute after cooking, closing the door, touching the STOP/CLEAR
pad or during cooking. EXTRA MINUTE cannot be used to start the oven if any program is on display.
2. EXTRA MINUTE cannot be used with SENSOR, SENSOR COOK, DEFROST, AUTO BROIL, AUTO ROAST or
AUTO BAKE.
HELP (DISPLAY INDICATOR)
Each setting of DEFROST, AUTO BROIL, AUTO ROAST, AUTO BAKE, SENSOR and SENSOR COOK has a
cooking hint. If you wish to check, touch HELP MENU whenever HELP is lighted in the Interactive Display.

EN 29
OTHER CONVENIENT FEATURES
HELP MENU
Help Guide provides 5 features which make using your oven easy because specic instructions are
provided in the Interactive Display.
1. Safety Lock
The Safety Lock prevents unwanted oven operation such as by small children. Note: Safety Lock is not
applicable to FAN and LIGHT buttons.
The oven can be set so that the control panel is deactivated or locked. To set, touch HELP MENU, the
number 1 and START pad. Should a pad be touched, LOCK will appear in the display.
To cancel, touch HELP MENU, the number 1 and STOP/CLEAR.
2. Audible Signal Elimination
If you wish to have the oven operate with no audible signal, touch HELP MENU, the number 2 and
STOP/CLEAR.
To cancel and restore the audible signal, touch HELP MENU, the number 2 and START.
3. Auto Start
If you wish to program your oven to begin cooking automatically at a designated time of day, follow this
procedure:
• Suppose you want to start cooking a stew for 20 minutes on 50% at 4:30. Before setting, check to
make sure the clock is set correctly.
1. Touch HELP MENU pad.
2. Touch number 3 to select the Auto Start.
3. To enter the start time at 4:30, touch numbers 43 and 0.
4. Touch CLOCK pad.
5. To enter cooking program, touch POWER LEVEL, number 5 and then touch numbers 200 and
0 for cooking time.
6. Touch START pad.
Notes:
1. Auto Start can be used for manual cooking, AUTO BROIL, AUTO ROAST, AUTO BAKE, if clock is set.
2. If the microwave oven door is opened after programming Auto Start, it is necessary to touch the
START pad for Auto Start time to appear in the readout so that the microwave oven will automatically
begin programmed cooking at the chosen Auto Start time.
3. Be sure to choose foods that can be left in the oven safely until the Auto Start time. Baked potatoes are
often a good choice.
4. Language Selection
The oven comes set for English language. To change, touch HELP MENU and the number 4. Continue
to touch the number 4 until your choice is selected. Then touch START pad.
Touch number 4 once for English.
Touch number 4 twice for Spanish.
Touch number 4 three times for French.

30 EN
OTHER CONVENIENT FEATURES
5. Weight/Temp Selection
The oven comes set for U.S. Customary Unit-pounds. To change, touch HELP MENU and the number 5.
Continue to touch the number 5 until your choice is selected. Then, touch START pad.
Touch number 5 once for LB. / ˚F.
Touch number 5 twice for KG. / ˚C.
START
START allows you to cook at 100% power by touching the START continuously. START is ideal for melt-
ing cheese, bringing milk to just below boiling etc. The maximum cooking time is 3 minutes.
• Suppose you want to melt cheese on a piece of toast.
1. Continuously touch the START pad. The cooking time will begin counting up.
2. When the cheese is melted to desired degree, remove nger from START pad. Microwave oven stops
immediately.
Notes:
1. Note time it takes for frequently used foods and program that time in the future.
2. To use START, touch pad within 1 minute after cooking, opening and closing the door or touching the
STOP/CLEAR pad.
3. START can only be used 3 times in a row. If more times are needed, open and close door or touch
STOP/CLEAR.
KITCHEN TIMER
• Suppose you want to time a 3 minute long distance phone call.
1. Touch KITCHEN TIMER pad.
2. Enter time by touching the number pads 300.
3. Touch START pad.
DEMONSTRATION MODE
To demonstrate, touch CLOCK, the number 0 and then touch START pad and hold for 3 seconds. DEMO
ON DURING DEMO NO OVEN POWER and DEMO will appear in the display. Cooking operations and
specic special features can now be demonstrated with no power in the microwave oven. For example,
touch EXTRA MINUTE pad and the display will show 1.00 and count down quickly to END.
To cancel, touch CLOCK, then the number 0 and STOP/CLEAR pads.

EN 31
CLEANING AND CARE
Disconnect the power cord before cleaning or leave the door open to deactivate the microwave oven
during cleaning.
EXTERIOR
The outside surface is precoated metal and plastic. Clean the outside with mild soap and water; rinse
and dry with a soft cloth. Do not use any type of household or abrasive cleaner.
DOOR
Wipe the window on both sides with a damp cloth to remove any spills or spatters. Metal parts will be
easier to maintain if wiped frequently with a damp cloth. Avoid the use of spray and other harsh clean-
ers as they may stain, streak or dull the door surface.
TOUCH CONTROL PANEL
Care should be taken in cleaning the touch control panel. If the control panel becomes soiled, open the
microwave oven door before cleaning. Wipe the panel with a cloth dampened slightly with water only.
Dry with a soft cloth. Do not scrub or use any sort of chemical cleaners. Close door and touch STOP/
CLEAR pad.
INTERIOR - AFTER MICROWAVE COOKING
The oven walls, ceiling and oor are stainless steel. Cleaning after microwave cooking is easy because no
heat is generated to the interior surfaces; therefore, there is no baking and setting of spills or spattering.
To clean the interior surfaces, wipe with a soft cloth and warm water. DO NOT USE ABRASIVE OR HARSH
CLEANERS OR SCOURING PADS. For heavier soil, use mild soap; rinse thoroughly with hot water.
INTERIOR - AFTER CONVECTION, MIX OR BROIL COOKING
Spatters may occur because of moisture and grease. Wash immediately after use with hot, soapy wa-
ter. Rinse and polish dry. Harder to remove spatters may occur if oven is not thoroughly cleaned or if
there is long time/high temperature cooking. If so, you may wish to purchase an oven cleaner pad with
liquid cleaner within it—not a soap lled steel pad—for use on stainless or porcelain surfaces. Follow
manufacturer’s directions carefully and be especially cautious not to get any of the liquid cleaner in the
perforations on the wall or ceiling or any door surfaces. Rinse thoroughly and polish dry.
WAVEGUIDE COVER
The waveguide cover is located on the ceiling in the oven cavity. It is made from mica so requires special
care. Keep the waveguide cover clean to assure good oven performance. Carefully wipe with a damp
cloth any food spatters from the surface of the cover immediately after they occur. Built-up splashes
may overheat and cause smoke or possibly catch re. DO NOT REMOVE THE WAVEGUIDE COVER.
ODOR REMOVAL
Occasionally, a cooking odor may remain in the oven. To remove, combine 1 cup water, grated peel and
juice of 1 lemon and several whole cloves in a 2-cup glass measuring cup. Boil for several minutes using
100% power. Allow to set in oven until cool. Wipe interior with a soft cloth.
TURNTABLE/TURNTABLE SUPPORT
The ceramic turntable and turntable support can be removed for easy
cleaning. Wash them in mild, sudsy water; for stubborn stains use a
mild cleanser and scouring sponge as described above. They are also
dishwasher-safe using top rack.
32 EN
CLEANING AND CARE
OVEN RACKS
The high and low baking racks can be removed for easy cleaning
and stored away from the microwave oven when racks are not
needed. After each use, wash them in mild, sudsy water. For any
stubborn stains, use a mild kitchen cleanser and scouring sponge
as described above. They are dishwasher-proof.
GREASE FILTERS
Filters should be cleaned at least once a month. Never operate the
fan or oven without the lters in place.
1. Pull the tab toward the front of the oven, down slightly and
remove the lter. Repeat for the other lter.
2. Soak the lters in a sink or dish pan lled with hot water and de-
tergent. DO NOT use ammonia or other alkali; they will react with
the lter material and darken it.
3. Agitate and scrub with a brush to remove embedded dirt.
4. Rinse thoroughly and shake dry.
5. Replace by tting the lter back into the opening.
FAN
The fan will automatically start when heat rises from range surface units or burners and when
CONVECTION, HIGH MIX, LOW MIX or the BROIL settings are used. This protects the microwave oven
from excessive temperature rise. The fan will stay on until the temperature decreases. It cannot be
turned o manually during this time.
For other uses, select either high or low speed.
Precautions For Proper Use:
1. DO NOT leave range unattended while using high temperatures. Automatic fan may start and pro-
vide excessive air to the surface units. This may cause spattering or boilover.
2. Avoid burning food.
3. Keep grease lters clean.
Tab Grease lter
EN 33
CLEANING AND CARE
Light cover
Screw
Light bulbs
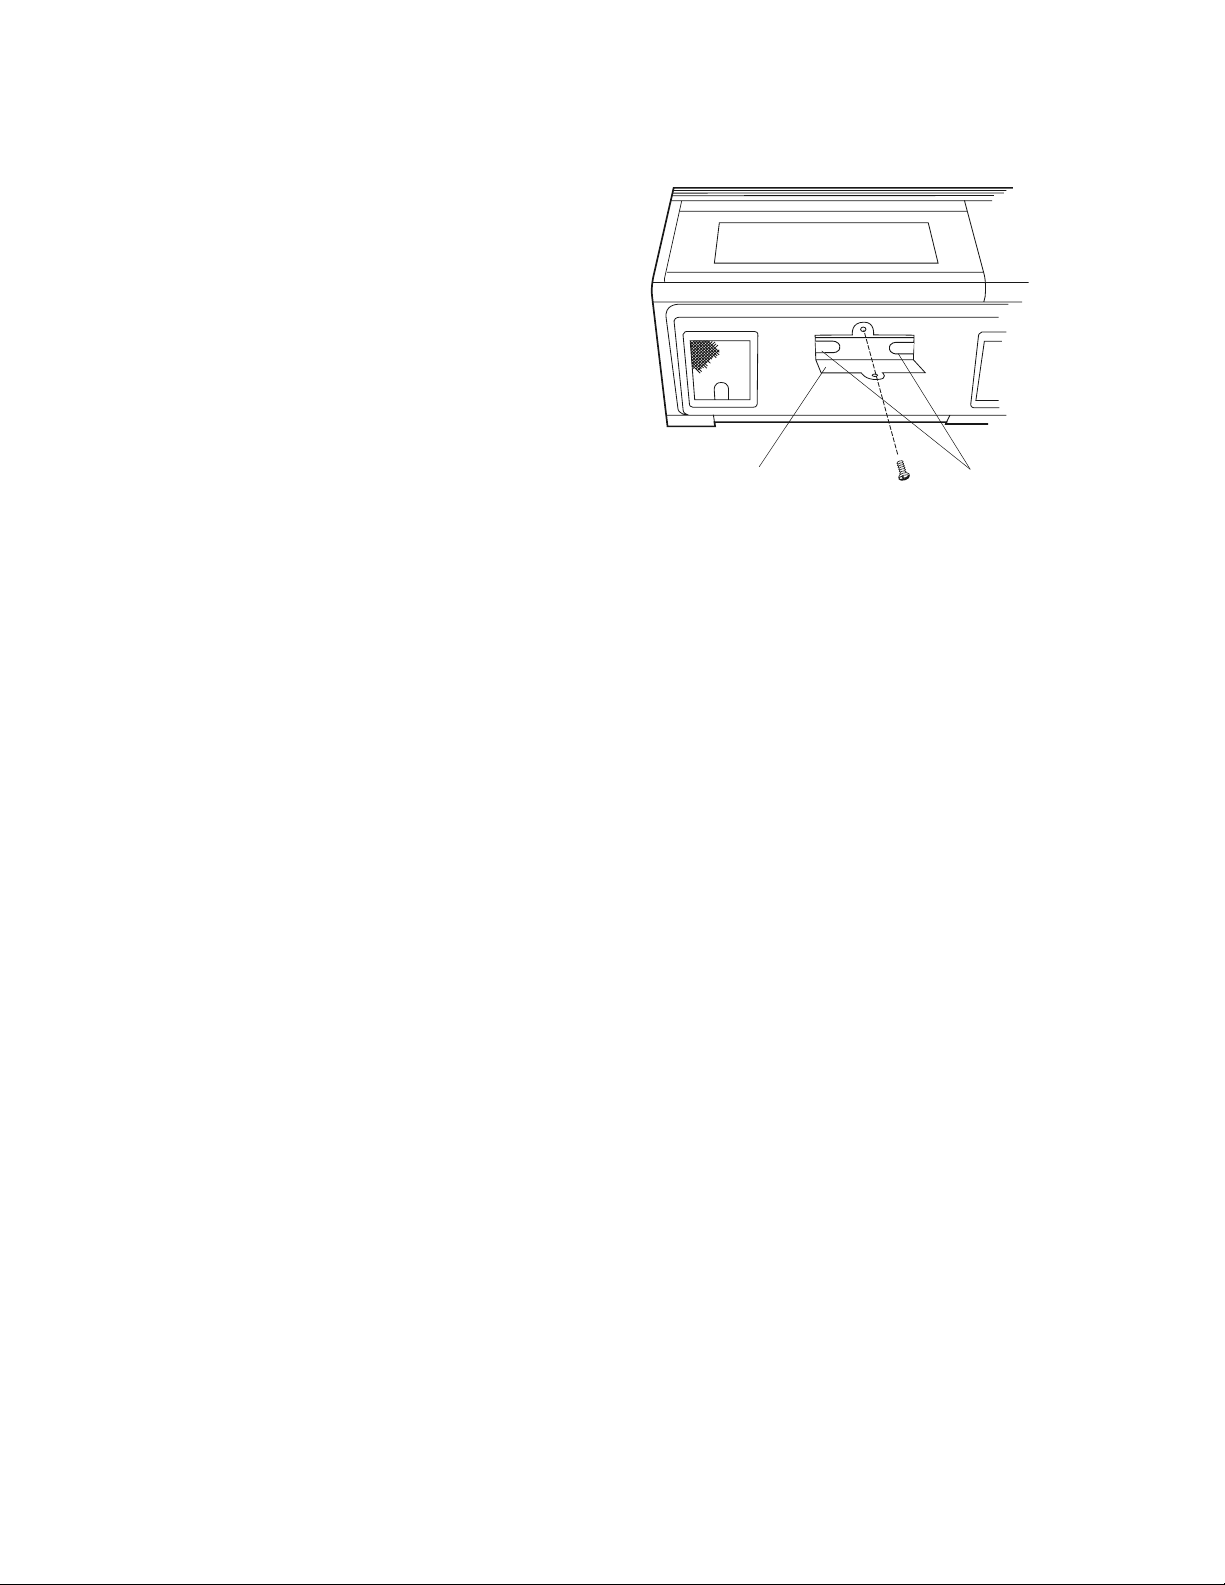
LIGHT
1. To replace light bulbs, rst disconnect power to
the oven at the circuit breaker panel or by unplug-
ging.
2. To release cover remove the screw on the light
cover. (See illustration.)
3. Replace bulbs only with 20 watt bulbs available
from a Fisher & Paykel Authorized Servicer or
parts distributor. Bulbs are also available at most
hardware stores or lighting centers. DO NOT USE A
BULB LARGER THAN 30 WATTS.
4. Close light cover and secure with screw removed
in step 2.
CAUTION: Light cover may become very hot. Do not touch glass when light is on. Do not use light
for long time use such as a night light.
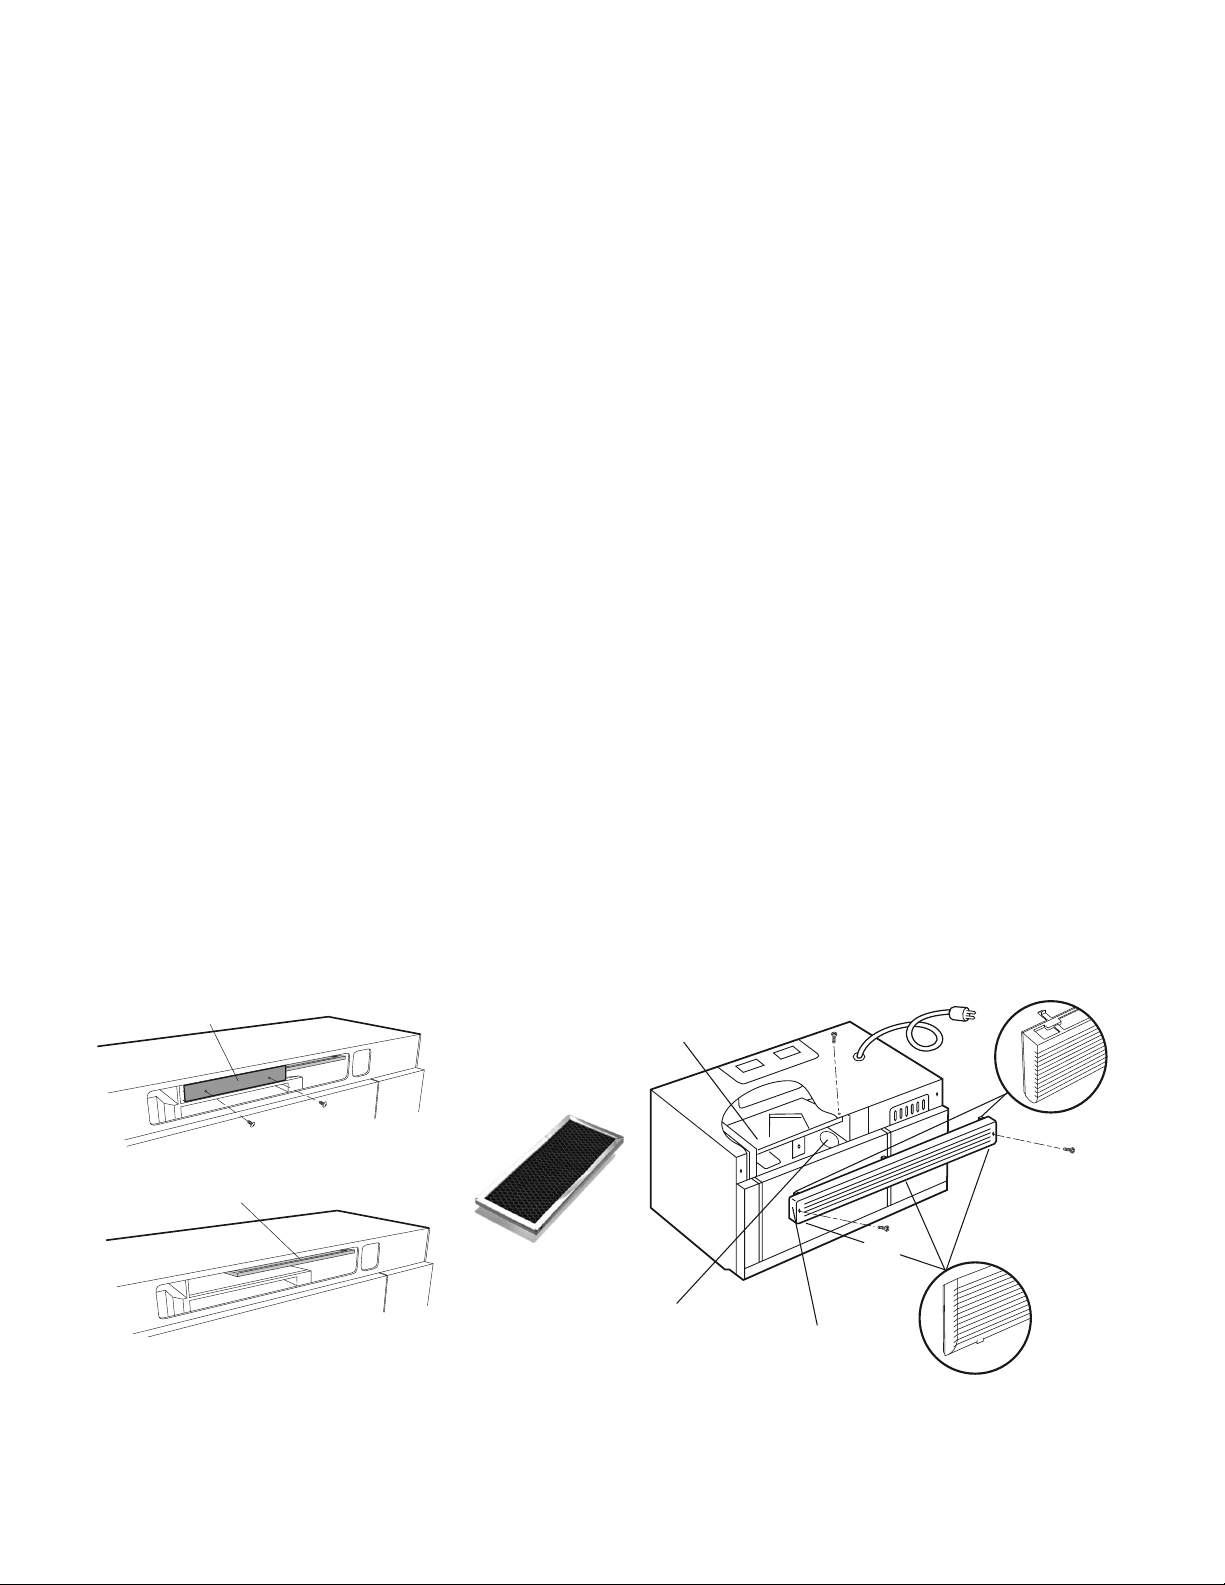
OVEN LIGHT
1. Disconnect power to the oven at the circuit breaker panel or by unplugging.
2. Remove 3 screws that secure louver.
3. Remove louver by inserting at edge screwdriver over each tab depressing the tab down and moving
louver away from unit.
4. Pull the louver away from the oven.
5. Slide the light cover forward and lift up.
6. Remove old light bulb and replace only with 20 watt bulb available from a Fisher & Paykel Authorized
Servicer or parts distributor. Bulbs are also available at most hardware stores or lighting centers.
DO NOT USE A BULB LARGER THAN 30 WATTS.
7. Replace the oven light cover, push louver back in place and replace the louver mounting screws.
34 EN
CLEANING AND CARE
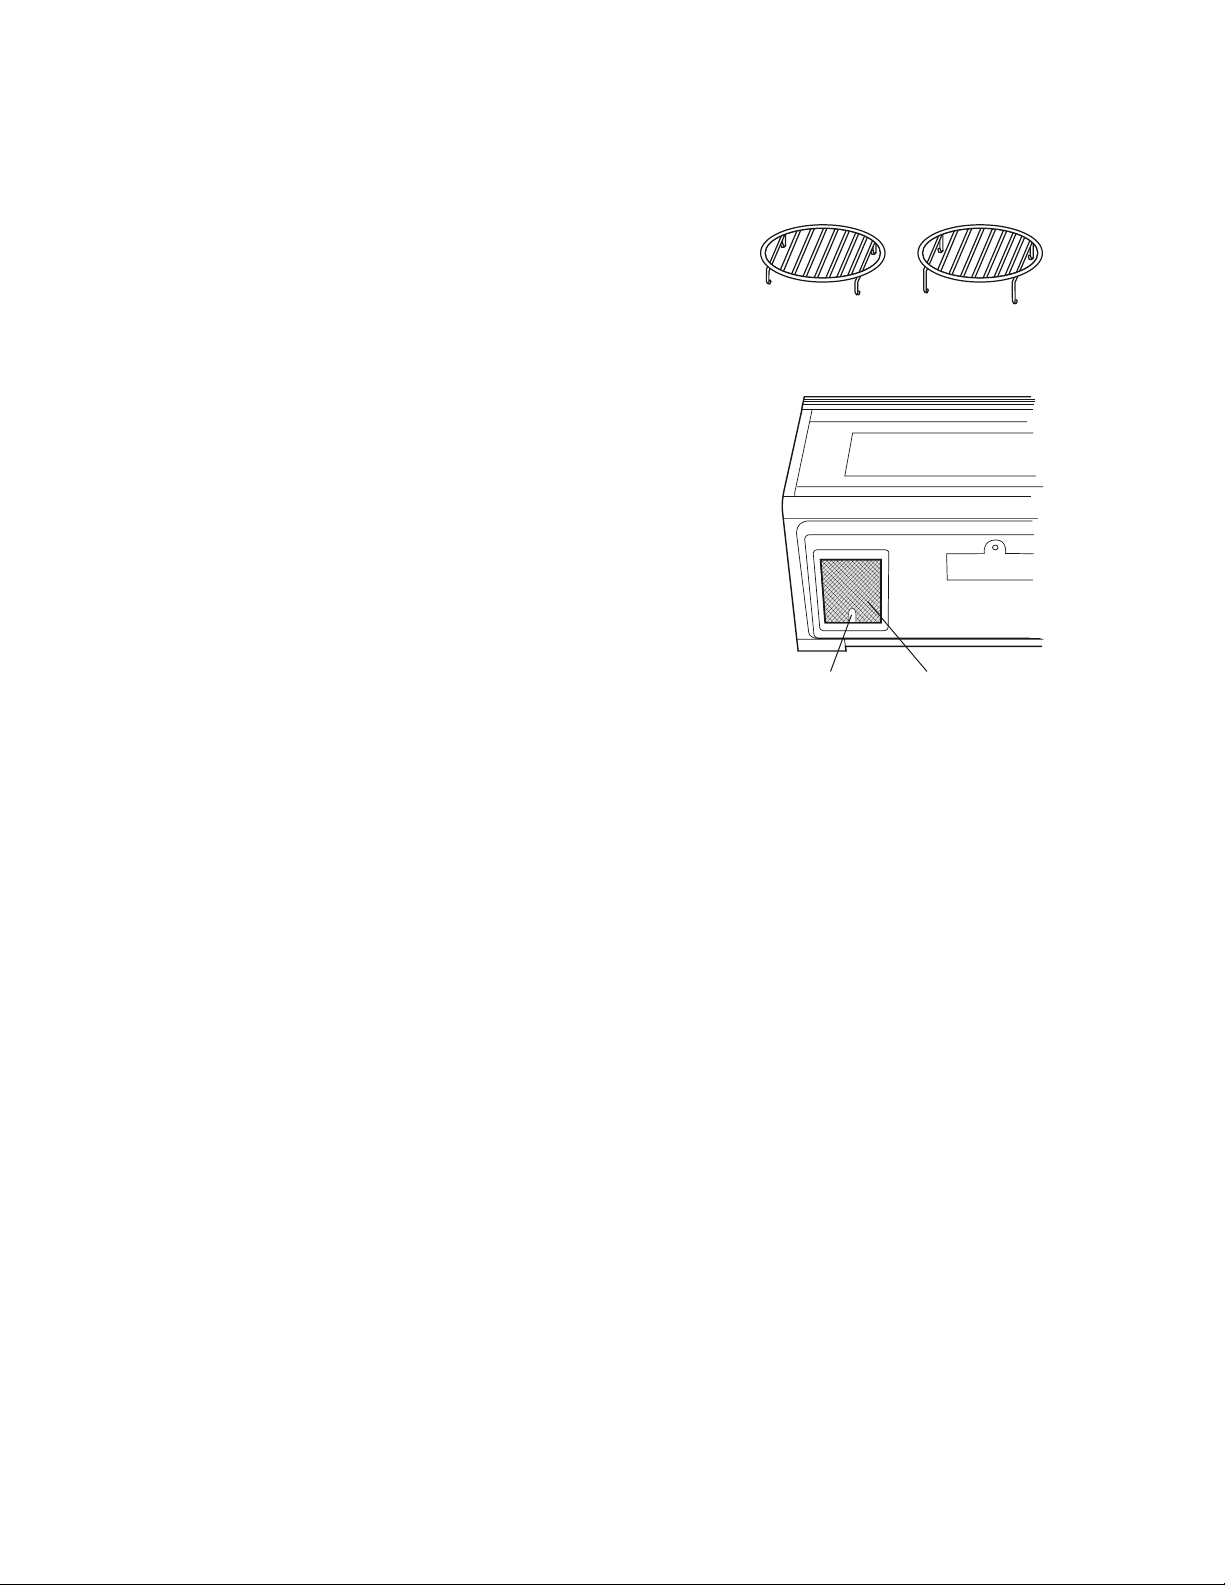
CHARCOAL FILTER
The Charcoal Filter is used for non-vented, re-circulated installations. The lter should be changed every
6 to 12 months depending on use.
To initially install the Charcoal Filter:
1. Disconnect power to the oven at the circuit
breaker panel or by unplugging.
2. Remove 3 screws that secure louver.
3. Remove louver by inserting at edge screw-
driver over each tab, depressing the tab down
and moving the louver away from unit.
4. Pull louver away from the oven.
5. Remove 2 screws that cover the sensor duct
cover.
6. Remove the sensor duct cover.
7. Insert the Charcoal Filter by sliding into position
on support tabs.
8. Reattach sensor duct cover and secure with
2 screws.
9. Push louver back into place and gently snap
tabs into place by hand. Replace the 3 screws to
secure louver.
To change/replace the Charcoal Filter:
1. Disconnect power to the oven at the circuit
breaker panel or by unplugging.
2. Remove 3 screws that secure louver.
3. Remove louver by inserting at edge screw-
driver over each tab, depressing the tab down
and moving the louver away from unit.
4. Pull louver away from the oven.
5. Remove 2 screws that cover the sensor duct
cover.
6. Remove the sensor duct cover.
7. Remove old Charcoal lter; discard.
8. Slide replacement Charcoal Filter into position
on support tabs.
9. Reattach sensor duct cover and secure with
2 screws.
10. Push louver back into place and gently snap
tabs into place by hand. Replace the 3 screws
to secure louver.
Note: Replacement Charcoal Filter can be purchased from Fisher and Paykel. Order part number 247890.
Louver
Oven light
Charcoal filter
Screw
Top tab
Bottom tab
Screw
Screw
Charcoal Filter
Sensor duct cover
Charcoal filter

EN 35
SERVICE CALL CHECK
Please check the following before calling for service:
1. Place one cup of water in a glass measuring cup in the oven and close the door securely.
Operate the oven for two minutes at HIGH 100%.
A. Does the light come on in the oven? YES _____ NO _____
B. Does the cooling fan work? (Put your hand over the top ventilation
openings.)
YES _____ NO _____
C. Does the turntable rotate when the TURNTABLE ON/OFF pad is
touched and TURNTABLE ON is in the display? (It is normal for the
turntable to turn in either direction when TURNTABLE ON is in the
display.)
YES _____ NO _____
D. Is the water in the oven warm? YES _____ NO _____
E. Does "H" appear on the display when fan is manually turned on? YES _____ NO _____
2. Remove the water from the oven and program: CONVEC,
0
450˚F
, 500 , START
A. Do CONV and COOK light? YES _____ NO _____
B. After the oven shuts o, is the inside of the oven hot? YES _____ NO _____
If “NO” is the answer to any of the above questions, please check electrical outlet, fuse and/or circuit
breaker If either or both are not functioning properly, CONTACT YOUR NEAREST Fisher & Paykel
AUTHORIZED SERVICER. A microwave oven should never be serviced by a “do-it-yourself” repair person.
Note: If time appearing in the display is counting down very rapidly, check Demonstration Mode on
page 30 and cancel.
For warranty service, please contact your local service provider or our Customer Care Representative at
(888) 936-7872. Before you call, please have the following information ready:
• Model Number (located on the bottom left corner of the cavity face)
• Serial Number (located on the bottom left corner of the cavity face)
• Date of installation
• A brief description of the problem
Your satisfaction is of the utmost importance to us. If a problem cannot be resolved to your satisfaction,
please write or email us at:
Write: Fisher & Paykel Appliances Inc.
695 Town Center Drive, Suite 180
Costa Mesa, CA 92626-1902
USA
Toll free: 1.888.9.FNP.USA (1.888.936.7872)
Fax: 949.790.8911
Email: usa.customercare@sherpaykel.com
Web: www.sherpaykel.com

36 EN
SPECIFICATIONS
AC Line Voltage: UL Rating - Single phase 120V, 60Hz, AC only
CSA Rating - Single phase 116V, 60Hz, AC only
AC Power Required: UL Rating - 1600 W 13.2 amps.
CSA Rating - 1500 W 13.0 amps.
Output Power Microwave: 850 W* (IEC Test Procedure)
Convection Heater: 1400 W
Frequency: 2450 MHz
Outside Dimensions: 29 ⁄” (W) x 16 ⁄” (H) x 15 ⁄” (D)
Cavity Dimensions: 17 ⁄” (W) x 8 ⁄” (H) x 13 ⁄” (D)
Oven Capacity: 1.1 cu. ft.
Cooking Uniformity: Turntable & Stirrer Fan
Weight: Approx. 71 lbs
* The International Electrotechnical Commission’s standardized method for measuring output wattage.
This test method is widely recognized.
In compliance with standards set by:
FCC – Federal Communications Commission Authorized.
DHHS – Complies with Department of Health and Human Services (DHHS) rule, CFR, Title 21, Chapter
I, Subchapter J.
– This symbol on the nameplate means the product is listed by Underwriters Laboratories, Inc.
for use in USA or Canada.

EN 37
WARRANTY
LIMITED WARRANTY
When you purchase a new Convection Microwave, you automatically receive a One Year Limited
Warranty covering parts and labor for the entire product, a Five Year Limited Warranty, with respect
to the magnetron tube in the Product, (parts only, labor and service are not provided free of charge
for this additional period) for servicing within the 48 mainland United States, Hawaii, Washington D.C.
and Canada. In Alaska the Limited Warranty is the same except that you must pay to ship the Product
to the service shop or the service technician’s travel to your home. Products for use in Canada must be
purchased through the Canadian distribution channel to ensure regulatory compliance.
FISHER & PAYKEL UNDERTAKES TO:
Repair without cost to the owner either for material or labor any part of the Product, the serial number
of which appears on the Product, which is found to be defective. In Alaska, you must pay to ship the
Product to the service shop or for the service technician’s travel to your home.
If we are unable to repair a defective part of the Product after a reasonable number of attempts, at our
option we may replace the part or the Product, or we may provide you a full refund of the purchase
price of the Product (not including installation or other charges).
This warranty extends to the original purchaser and any succeeding owner of the Product for products
purchased for ordinary single-family home use. All service under this Limited Warranty shall be provided
by Fisher & Paykel Appliances Inc. or its Authorized Service Agent during normal business hours.
HOW LONG DOES THIS LIMITED WARRANTY LAST?
Our liability under this Limited Warranty for the entire product expires One Year from the date of pur-
chase of the Product by the rst consumer. Our liability under this Limited Warranty for surface burn-
ers, griddle burners, grill burner and oven burners (parts only) expires Five Years from the date of the
purchase of the Product by the rst customer. Our liability under this Limited Warranty for the porcelain
oven liner and porcelain inner door panel (parts only) expires Two Years from the date of the purchase of
the Product by the rst customer.
Our liability under any implied warranties, including the implied warranty of merchantability (an unwrit-
ten warranty that the Product is t for ordinary use) also expires One Year (or such longer period as
required by applicable law) from the date of purchase of the Product by the rst consumer. Some states
do not allow limitations on how long an implied warranty lasts, so this limit on implied warranties may
not apply to you.
THIS WARRANTY DOES NOT COVER:
A. Service calls that are not related to any defect in the Product. The cost of a service call will be charged
if the problem is not found to be a defect of the Product. For example:
1. Correct faulty installation of the Product.
2. Instruct you how to use the Product.
3. Replace house fuses, reset circuit breakers, correct house wiring or plumbing, or replace light
bulbs.
4. Correct fault (s) caused by the user.
5. Change the set-up of the Product.
6. Unauthorized modications of the Product.
7. Noise or vibration that is considered normal, for example, drain/fan sounds, regeneration noises
or user warning beeps.
8. Correcting damage caused by pests, for example, rats, cockroaches etc.

38 EN
WARRANTY
B. Defects caused by factors other than:
1. Normal domestic use or
2. Use in accordance with the Product’s Use and Care Guide.
C. Defects to the Product caused by accident, neglect, misuse, re, ood or Act of God.
D. The cost of repairs carried out by non-authorized repairers or the cost of correcting such unauthorized
repairs.
E. Travel Fees and associated charges incurred when the product is installed in a location with limited or
restricted access. (i.e. airplane ights, ferry charges, isolated geographic areas).
F. Normal recommended maintenance as set forth in the Product’s Use and Care Guide.
If you have an installation problem contact your dealer or installer. You are responsible for providing
adequate electrical, exhausting and other connection facilities.
We are not responsible for consequential or incidental damages (the cost of repairing or replacing
other property damaged if the Product is defective or any of your expenses caused if the Product
is defective). Some states do not allow the exclusion or limitation of incidental or consequential
damages, so the above limitation or exclusion may not apply to you.
HOW TO GET SERVICE
Please read your Use and Care Guide. If you then have any questions about operating the Product, need
the name of your local Authorized Service Agent, or believe the Product is defective and wish service
under this Limited Warranty, please contact your dealer or call us at:
TOLL FREE (888) 936-7872 or contact us through our web site: www.sherpaykel.com
You may be required to provide reasonable proof of the date of purchase of the Product before the
Product will be serviced under this Limited Warranty.
COMMERCIAL USE
This warranty applies to appliances used in residential applications; it does not cover their use in
commercial situations.
NO OTHER WARRANTIES
This Limited Warranty is the complete and exclusive agreement between you and Fisher & Paykel
Appliances Inc. regarding any defect in the Product. None of our employees (or our Authorized Service
Agents) are authorized to make any addition or modication to this Limited Warranty.
Warrantor: Fisher & Paykel Appliances, Inc.
If you need further help concerning this Limited Warranty, please call us at the above number, or write to:
Fisher & Paykel Appliances Inc.
695 Town Center Drive, Suite 180
Costa Mesa, CA 92626-1902
USA
This Limited Warranty gives you specic legal rights, and you may also have other rights which vary from
state to state.
Fisher & Paykel Appliances Inc. is a leading manufacturer of premium quality cooking and specialty
appliances under the Fisher & Paykel brand.

243709G 11.21
FISHERPAYKEL.COM
© Fisher & Paykel Appliances 2021. All rights reserved.
The models shown in this guide may not be available in all markets
and are subject to change at any time.
The product specifications in this guide apply to the specific products and
models described at the date of issue. Under our policy of continuous product
improvement, these specifications may change at any time.
For current details about model and specification availability in your country,
please go to our website or contact your local Fisher&Paykel dealer.
© Fisher&Paykel Appliances 2021. Tous droits réservés.
Les modèles illustrés dans ce guide peuvent ne pas être disponibles
dans tous les pays et sont sujets à modifications sans préavis.
Les caractéristiques de produit présentées dans ce guide s’appliquent aux
modèles et produits spécifiques qui y sont décrits à la date de publication.
Dans le cadre de notre politique d’amélioration en permanence de nos produits,
ces caractéristiques peuvent être modifiées à tout moment.
Pour les plus récentes informations sur la disponibilité des modèles
et des caractéristiques dans votre pays, veuillez visiter notre site Web ou
contacter votre détaillant Fisher&Paykel local.
TINSEB516MRR4
