Contact SAMSUNG WORLDWIDE
if you have any questions or comments relating to Samsung products, please contact the SAMSUNG customer care center.
CANADA
iliiiii_i_i_!!_ii_i_ii!_i!_i_ii_!_i_i!_!_!_i_i_iii_ii_i_!_!i!_i_!i_!i_!i_!i_!i_!i_!i_!i_!i_!i_!ii!i_i
1-800-SAMSU NG(726-7864) www.samsung.com/ca
U.S.A 1-800-SAMSU NG(726-7864) www.samsung.com/us
© 2010 Sarnsung Electronics Co., Ltd. All rights reserved.
BN68-02624A-01
imaginethe possibilities
Thank you for purcnaslng this Samsun9 product.
To "ecelve more complete service, please register
your product at
www.samsung.com!register
Mode Serial No.
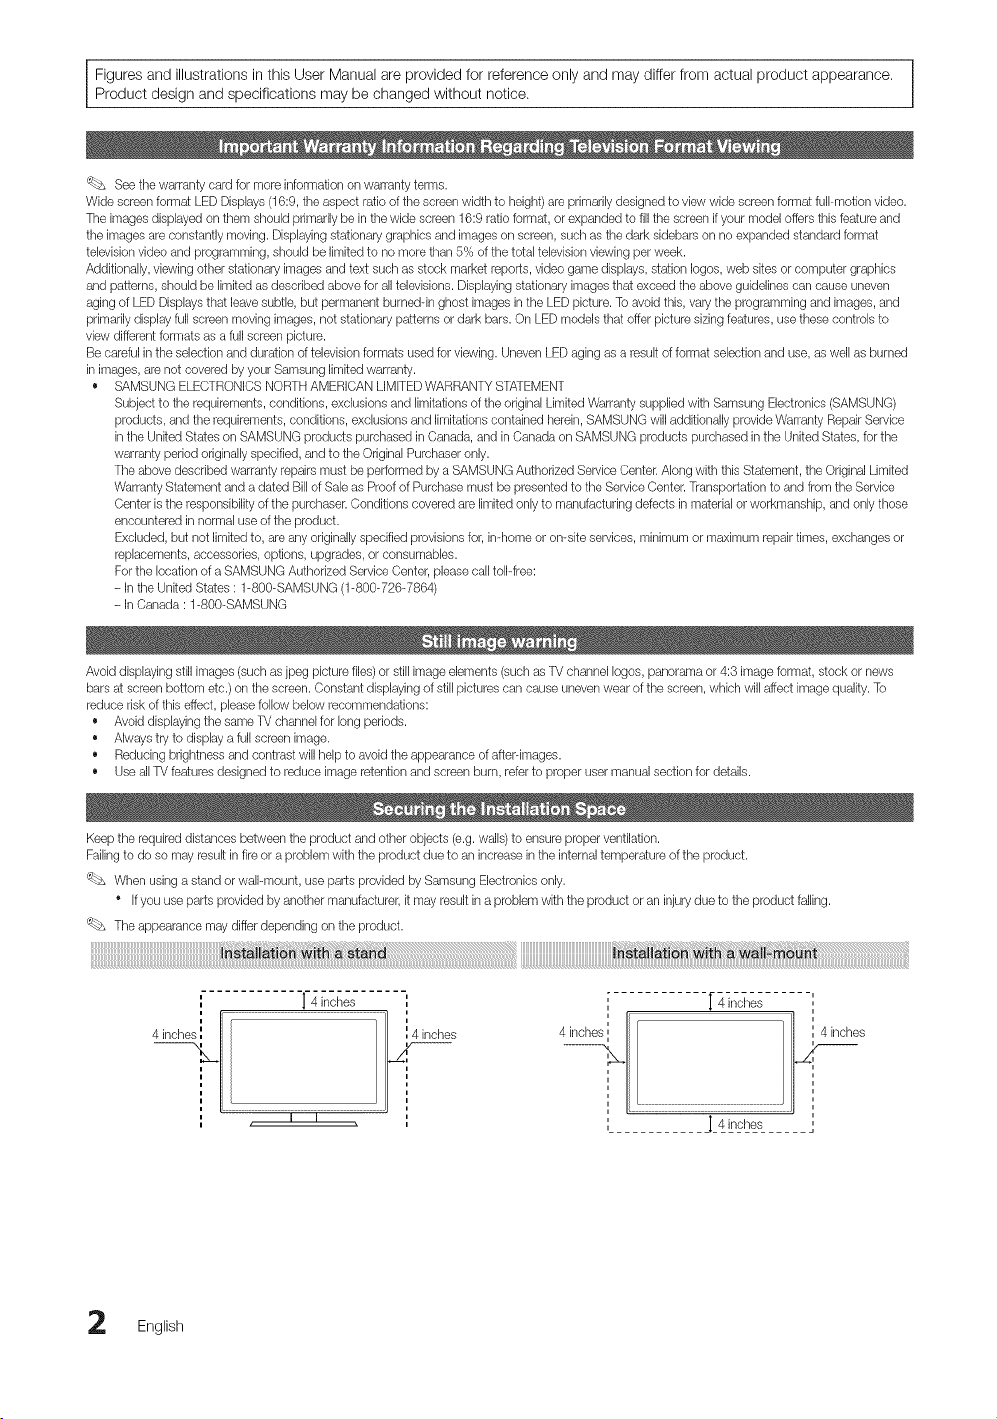
Figures and illustrations in this User Manual are provided for reference onlyand may differ from actual product appearance.
Product design and specifications may bechanged without notice.
'_bs Seethewarrantycard for more information on warranty terms.
Wide screen formatLEDDisplays (16:9,theaspect ratioofthescreen widthto height)are primarilydesignedtoview wide screen formatfull-motionvideo.
The imagesdisplayedon themshould primarily be inthewidescreen16:9 ratioformat, orexpandedtofillthescreenif your modeloffers thisfeature and
theimagesare constantly moving. Displaying stationary graphics and imageson screen,such asthedark sidebars on noexpandedstandard format
television videoand programming, should be limitedto no more than 5% of thetotal television viewing per week.
Additionally,viewing other stationary imagesand text such asstock marketreports,video game displays,station Iogos,web sitesorcomputer graphics
and patterns,should be limitedasdescribed abovefor all televisions. Displaying stationary imagesthat exceedtheabove guidelinescan causeuneven
aging of LED Displays that leavesubtle, but permanent burnedqn ghost imagesintheLED picture. To avoidthis, varytheprogramming and images, and
primarily display full screen movingimages, notstationary patterns ordark bars.On LEDmodelsthatoffer picture sizingfeatures, use these controls to
view different formats asafull screen picture.
Becareful in the selectionandduration oftelevision formats used for viewing. UnevenLEDaging asaresultofformat selectionanduse,aswellasburned
in images, are notcoveredbyyour Samsunglimitedwarranty.
• SAMSUNGELECTRONICSNORTHAMERICAN LIMFED WARRANTYSTATEMENT
Subject to therequirements, conditions, exclusions and limitations of theoriginalLimitedWarrantysupplied with SamsungElectronics(SAMSUNG)
products, and therequirements, conditions, exclusions and limitations contained herein,SAMSUNGwilladditionallyprovide WarrantyRepairService
in theUnitedStates on SAMSUNGproducts purchased in Canada, and in Canada on SAMSUNGproducts purchased intheUnitedStates, for the
warranty period originally specified,and to theOriginal Purchaseronly.
Theabovedescribed warranty repairsmust be performed byaSAMSUNGAuthorized Service Center.Along with this Statement, the Original Limited
WarrantyStatementand adated Bill of Saleas Proofof Purchasemust be presentedtothe Service Center.Transportation to and from the Service
Center isthe responsibility of the purchaser.Conditions coveredarelimitedonlyto manufacturing defectsin materialorworkmanship, and only those
encounteredin normaluse of theproduct.
Excluded,but notlimitedto, are any originally specifiedprovisionsfor, in-homeor on-site services, minimumormaximum repairtimes, exchanges or
replacements, accessories, options, upgrades, orconsumables.
For the location of aSAMSUNGAuthorizedServiceCenter,please call toll-free:
- In theUnitedStates : 1-800-SAMSUNG (1-800-726-7864)
- In Canada : 1-800-SAMSUNG
Avoid displaying still images(such asjpeg picture files)orstill imageelements(such asTVchannelIogos,panorama or4:3imageformat, stock ornews
bars at screen bottom etc.) on thescreen.Constantdisplaying of stillpicturescan cause unevenwear of thescreen,which willaffectimagequality.To
reduceriskof thiseffect,please followbelow recommendations:
• Avoid displaying thesame TV channel for longperiods.
• Always try to display afull scr_n image.
• Reducingbrightness and contrastwillhelpto avoidtheappearance of after-images.
• Use all TV features designed to reduceimageretentionand screen burn, referto properuser manual section for details.
Keep the requireddistances betweenthe productand other objects(e.g. walls)to ensureproperventilation.
Failingto do somayresult infireora problem with theproduct due to an increase intheinternal temperature of the product.
'_bs Whenusingastand orwall-mount, use partsprovidedbySamsung Electronicsonly.
Ifyou use partsprovided byanother manufacturer, it mayresult inaproblem with the productoran injurydue to theproduct falling.
Theappearance maydifferdepending on theproduct.
n
n
4inchest_l', {
"]'4 inches ' [ 4inches -',
I I
n
n
pohes
J_4__,s___e_,s_......
English

Contents
• List of Features ......................................................... 4
• Accessories .............................................................. 4
• Install the Stand
(UN19C4000, UN22C4000 / UN22C4010) ............... 5
• Install the Stand (UN26C4000) .................................. 5
• Viewing the Control Panel......................................... 6
• Viewing the Remote Control ...................................... 7
• Connecting to an Antenna ........................................ 8
• Plug & Play (Initial Setup) ........................................... 8
• Connecting to an AV Device...................................... 9
• Connecting to an Audio Device............................... 10
• Connecting to aPC ................................................ 11
• Changing the Input Source ..................................... 12
• How to Navigate Menus .......................................... 12
• Channel Menu ........................................................ 13
Seeing Channels 13
Using FavoriteChannels 13
Memorizingchannels 14
Editing Channels 14
Other Features 14
• Picture Menu .......................................................... 15
Changing the PresetPictureMode 15
Adjusting Picture Settings 15
EconomicalSolutions 16
Changing the Picture Options 16
Setting up the TV with Your PC 18
• Sound Menu ........................................................... 18
Changing the PresetSound Mode 18
Adjusting Sound Settings 18
SoundSettings 18
• Setup Menu ............................................................ 19
Setting the Time 19
Using the Sleep Timer 20
Setting the On/ OffTimer 20
LockingPrograms 20
Other Features 22
Picture In Picture (PIP) 23
Support Menu ......................................................... 23
• Media Play.............................................................. 25
Connecting aUSBDevice 25
ScreenDisplay 26
Playing MultipleFiles 29
MediaPlay -AdditionalFunctions 29
• Anynet+ ................................................................. 31
Setting Up Anynet+ 32
Switchingbetween Anynet+Devices 32
Recording 32
Listening through a Receiver 33
Troubleshootingfor Anynet+ 33
• Assembling the Cables ........................................... 34
• Installing the Wall Mount ......................................... 34
• Anti-theft Kensington Lock ...................................... 36
• Securing the TVto the Wall ..................................... 36
ToAvoid the TV from Falling 36
• Troubleshooting ...................................................... 37
License 39
• Specifications ......................................................... 40
• Dimensions ............................................................. 41
• Index ...................................................................... 42
Thisfunctioncall beusedby pressingthe
TOOLSbuttonon theremotecontrol.
Check the Symbol!
Note
Indicatesadditionalinformation.
®
Step by Step Guide
Check here for instructionson how to open
the relevantsubmenu within theOSD (on
screen display).
English 3

GettingStarted
• Excellent Digital Interface& Networking: With abuilt-in HDdigital tuner, nonsubscription HD broadcasts can be viewed
without a cable box / STB (Set-Top-Box) satellite receiver (Set-Top Box),
• Media Play: Allows you to playmusic files, pictures, and movies saved ona USB device (p.25),
• Self Diagnosis: You can check to make sure picture and sound operate normally (p. 23),
Please make sure thefollowing items are included with your LED TV. If any items are missing, contact your dealer.
The items' colors and shapes may vary depending on the models.
(M4X LS)
For best cable connection tothis product, be sure to use cables with amaximum thickness as below:
i • Maximum thickness 0.55 inches
(14mm)
Input Cables (Sold Separately)
,.n m
English
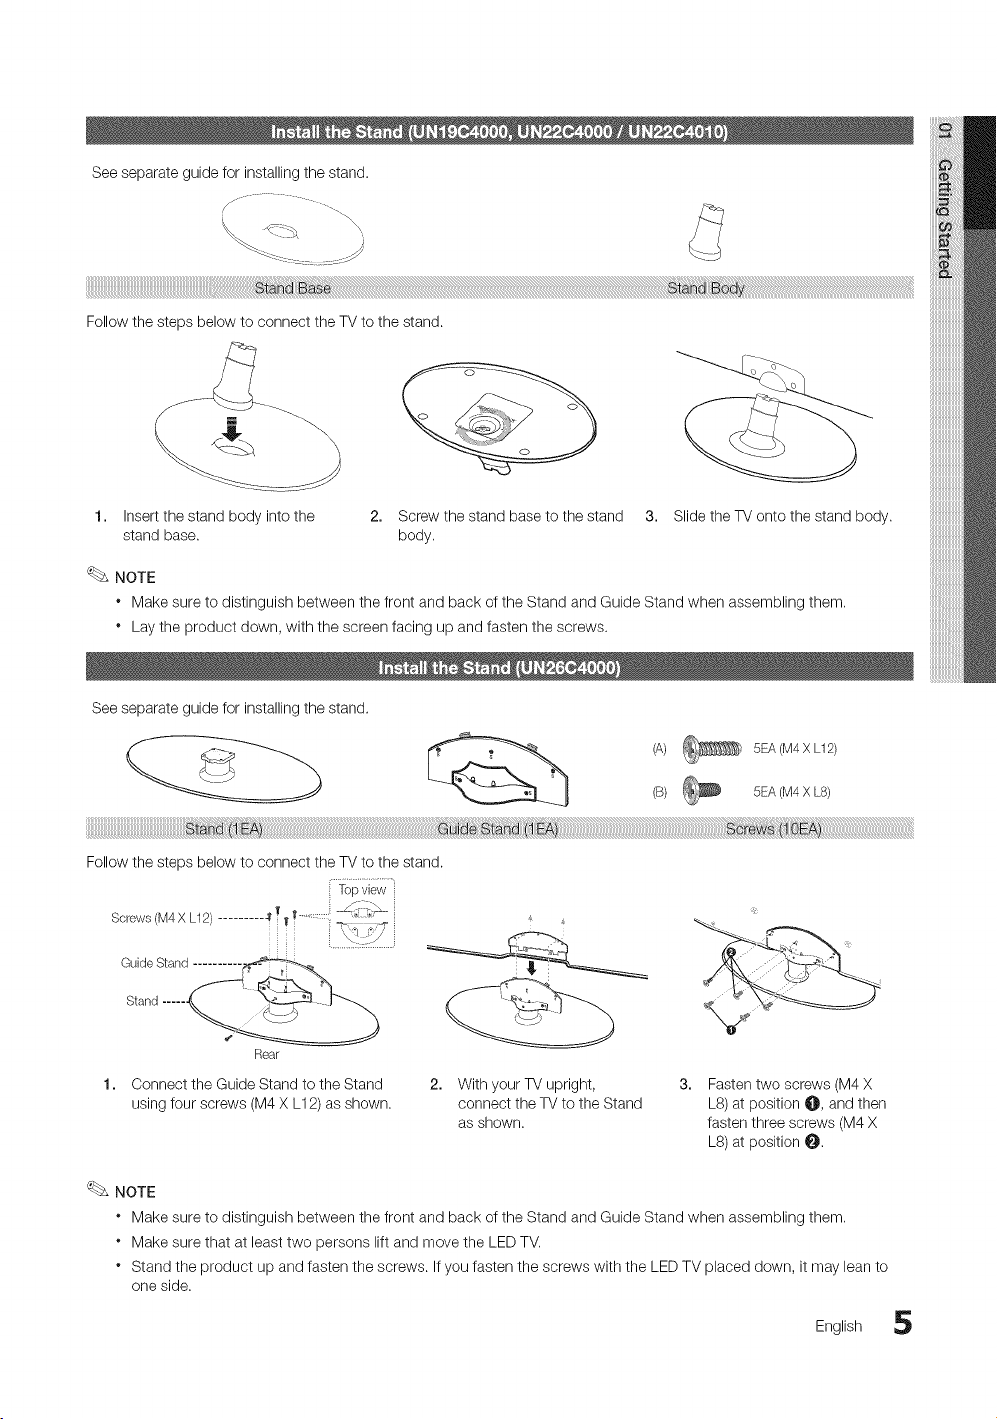
Seeseparateguideforinstallingthestand.
FellowthestepsbelowtoconnecttheTVtothestand.
1. Insert the stand body into the
stand base.
2. Screw the stand baseto the stand 3. Slide the TVonto the stand body.
body.
NOTE
* Make sure to distinguish between the front and back ofthe Stand and Guide Stand when assembling them.
* Lay the product down, with the screen facing up and fasten thescrews.
See separate guide for installing the stand.
[,,'_ _ (A) 5EA(M4X L12)
(B) 5EA(M4X L8)
Follow the steps below to connect the TVto the stand.
Screws(M4X L12)......... -_T Y
i .....
Stand ..... __,
Rear
Connect the Guide Stand to the Stand
using four screws (M4X L12) as shown.
2. With your TVupright,
connect the TVto the Stand
as shown.
Fasten two screws (M4X
L8)at position @, and then
fasten threescrews (M4X
LS) at position _.
NOTE
* Make sure to distinguish between the front and back ofthe Stand and Guide Stand when assembling them.
* Make sure that at least two persons lift and move the LED TV.
* Stand the product up and fasten the screws. If you fasten the screws with the LED TV placed down, it may lean to
one side.
English 5
GettingStarted
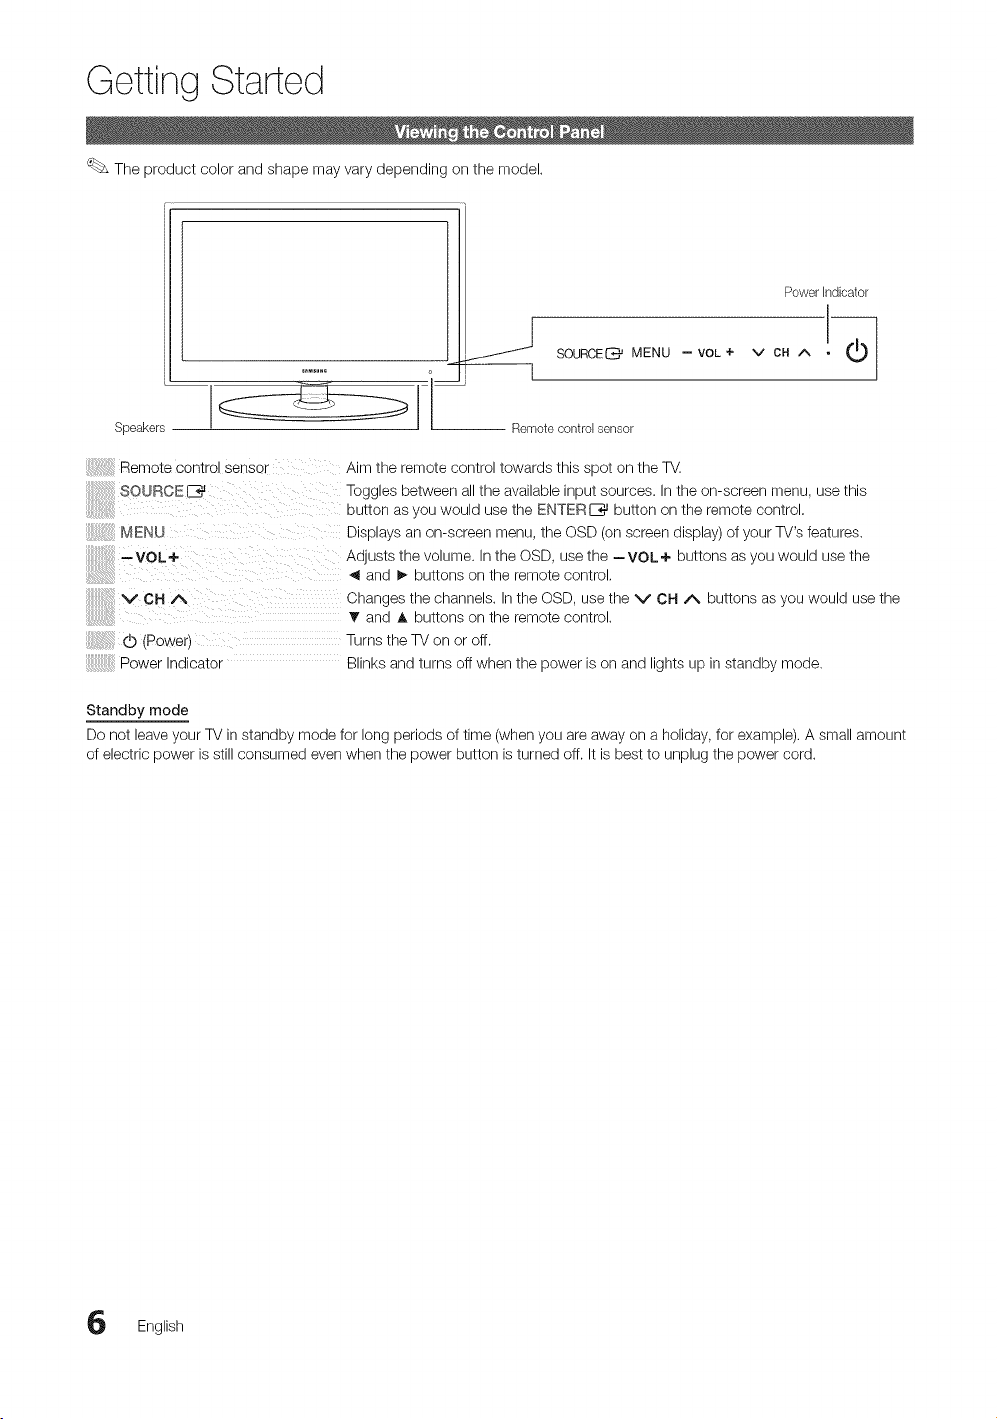
The product color and shape may vary depending onthe model.
Speakers
Powerhldicator
Remote control sensor
Remote control sense _
80URCEE_
MENU
--VOL+
VCHA
d) (Power)
Aim the remote control towards this spot on the TV.
Toggles between all the available input sources. Inthe on-screen menu, use this
button asyou would use the ENTERE_ button on the remote control.
Displays an on-screen menu, the OSD (onscreen display)of your TV's features.
Adjusts the volume. In the OSD, usethe --VOL÷ buttons as you would use the
and !_ buttons on the remote control,
Changes the channels. In the OSD, usethe V CH A buttons as you would use the
T and A buttons onthe remote control.
Turnsthe TV on or off.
Power Indicator Blinks and turns off when the power ison and lights up in standby mode.
Standby mode
Donot leave your TV instandby mode for long periods of time (whenyou areaway on a holiday, for example). A small amount
ofelectric power isstill consumed even when the power button isturned off. It isbest to unplug the power cord.
English
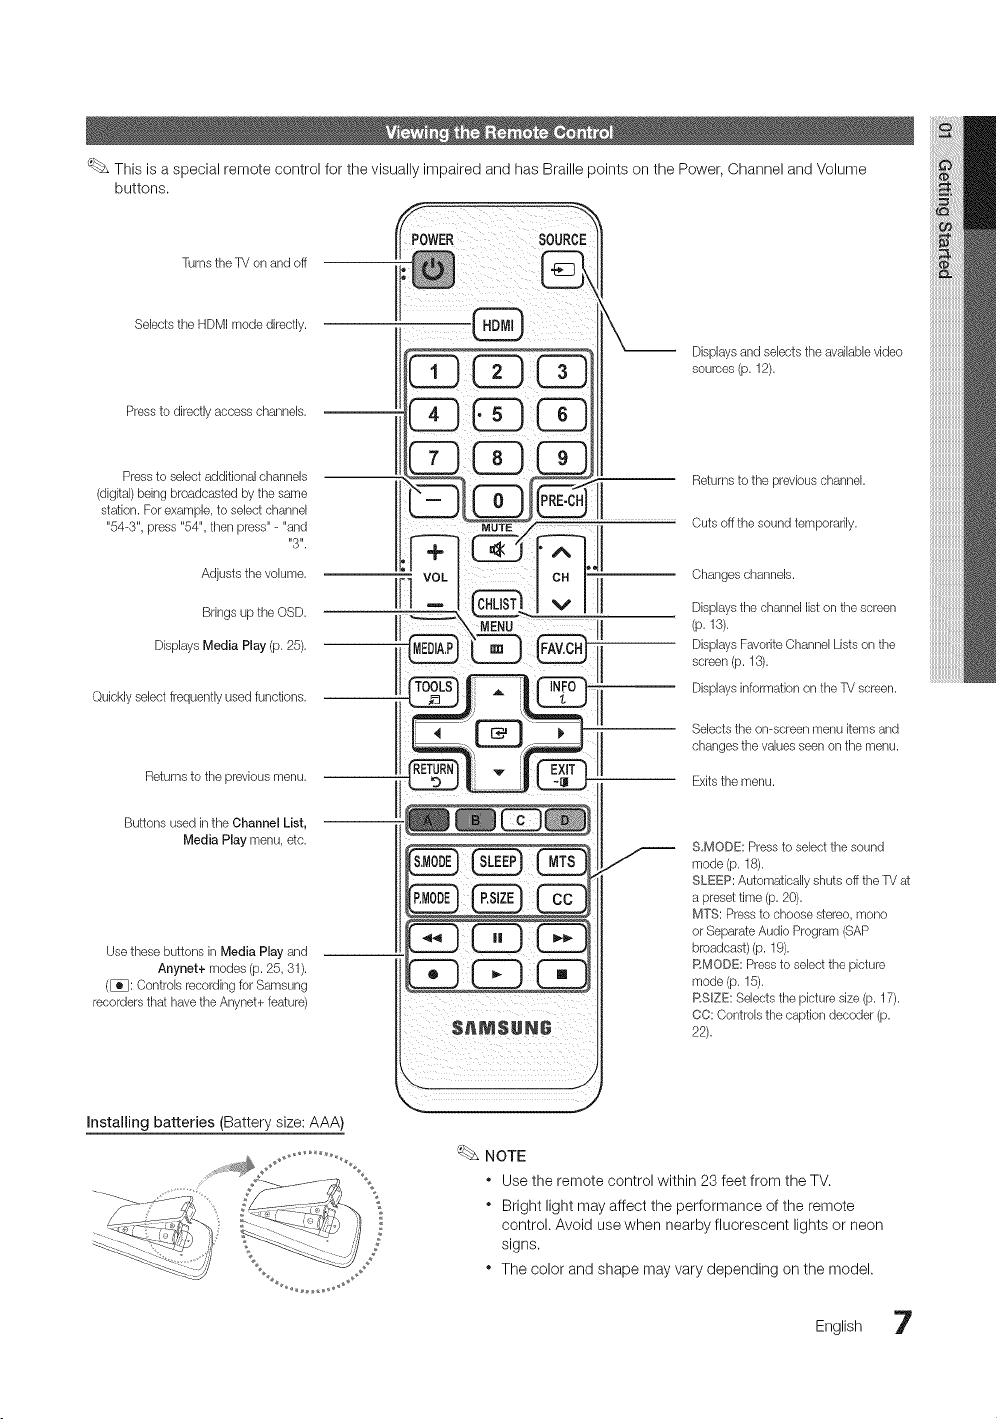
ThisisaspecialremotecontrolforthevisuallyimpairedandhasBraillepointsonthePower,ChannelandVolume
buttons.
TurnstheTV on and off
Selects the HDMImode directly.
Pressto directly access channels.
Pressto select additional channels
(digital)being broadcasted bythe same
station. For example,to select channel
"54-3", press "54", then press"- "and
"3".
Adjusts thevolume.
Brings up theOSD.
Displays Media Play (p. 25).
Quickly select frequentlyused functions.
Returns to theprevious menu.
Buttons used inthe Channel List,
Media Play menu, etc.
Use these buttons in Media Play and
Anynet+ modes (p. 25,31).
(_: Controlsrecordingfor Samsung
recordersthat have theAnynet+feature)
Displays and selects the availablevideo
sources (p. 12).
Returns to theprevious channel.
Cutsoff the soundtemporarily.
Changes channels.
Displays thechannel liston thescreen
(p. 13).
Displays Favorite ChannelListson the
screen (p. 13).
Displays information on theTVscreen.
Selects the on-screen menu itemsand
changes thevaluesseen on the menu.
Exits the menu.
S,MODE: Pressto select thesound
mode (p. 18).
SLEEP: Automatically shutsoff theTV at
apreset time (p. 20).
MTS: Pressto choosestereo,mono
orSeparateAudioProgram (SAP
broadcast)(p. 19).
RMODE: Pressto select the picture
mode (p. 15).
RSlZE: Selects the picture size (p. 17).
CC: Controlsthecaptiondecoder (p.
22).
Installing batteries (Battery size: AAA)
2
NOTE
* Use the remote control within 23 feet from the TV.
* Bright light may affect the performance of the remote
control. Avoid usewhen nearby fluorescent lights or neon
signs.
* The color and shape mayvary depending on the model.
English 7

GettingStarted
When the TVis initially powered on, basic settings proceed automatically.
_ Connecting the power cord and antenna.
Ifthe size of the cable mold part was an abnormal shape, thepart may not be connected to the input port properly,
VHF/UHFAntenna
' 1
Antenna Cable (Not Sipp_led}
or
When the TVis initially powered on, asequence of on-screen prompts will assistin configuring basic settings. Pressthe
POWERLb button. Plug & Play isavailable only when the input source isset to TV.
Toreturn tothe previous step, press the Red button.
Selecting a language Pressthe A or 1!'button, then press the ENTERIZ_ button.
Select the desired OSD (On Screen Display) language.
Selecting Store Demo Pressthe ,_ or !_ button, then press the ENTERI_ button.
, or Home Use • Select the Home Use mode. Store Demo Mode isfor retail
environments,
• Toreturn the unit's settings from Store Demo to Home Use
(standard):Press the volume button on the TV. When you
seethevolume OSD, press and hold MENU for 5sec.
Selecting an amenna
POWER
Pressthe A or V button, then press the ENTERI_ button. Select Air, Cable orAuto.
Setting the Clock
Mode
Viewing the HD
Connection Guide.
Pressthe A or _ button, then press the ENTERE_ button. Select thechannel source
to memorize. When setting the antenna source to Cable, a step appears allowing you to
assign numerical values (channel frequencies) tothe channels. For more information, refer to
Channel --_ Auto Program (p.14).
_£ Pressthe ENTER[_ button at any time to interrupt the memorization process.
Set the Clock Mode automatically or manually.
• Auto: Allows you to select DST(Daylight Saving Time) mode and timezone.
• Manual: Allows you to manually set the current date and time, (p. 19).
• The connection method for the best HD screen quality isdisplayed.
Enjoy yourTV.
Pressthe ENTERI_ button.
if You Want to Reset This Feature...
(_ MENUiTrl --_ Setup _ Plug & Play _ ENTERI_
English
Connections
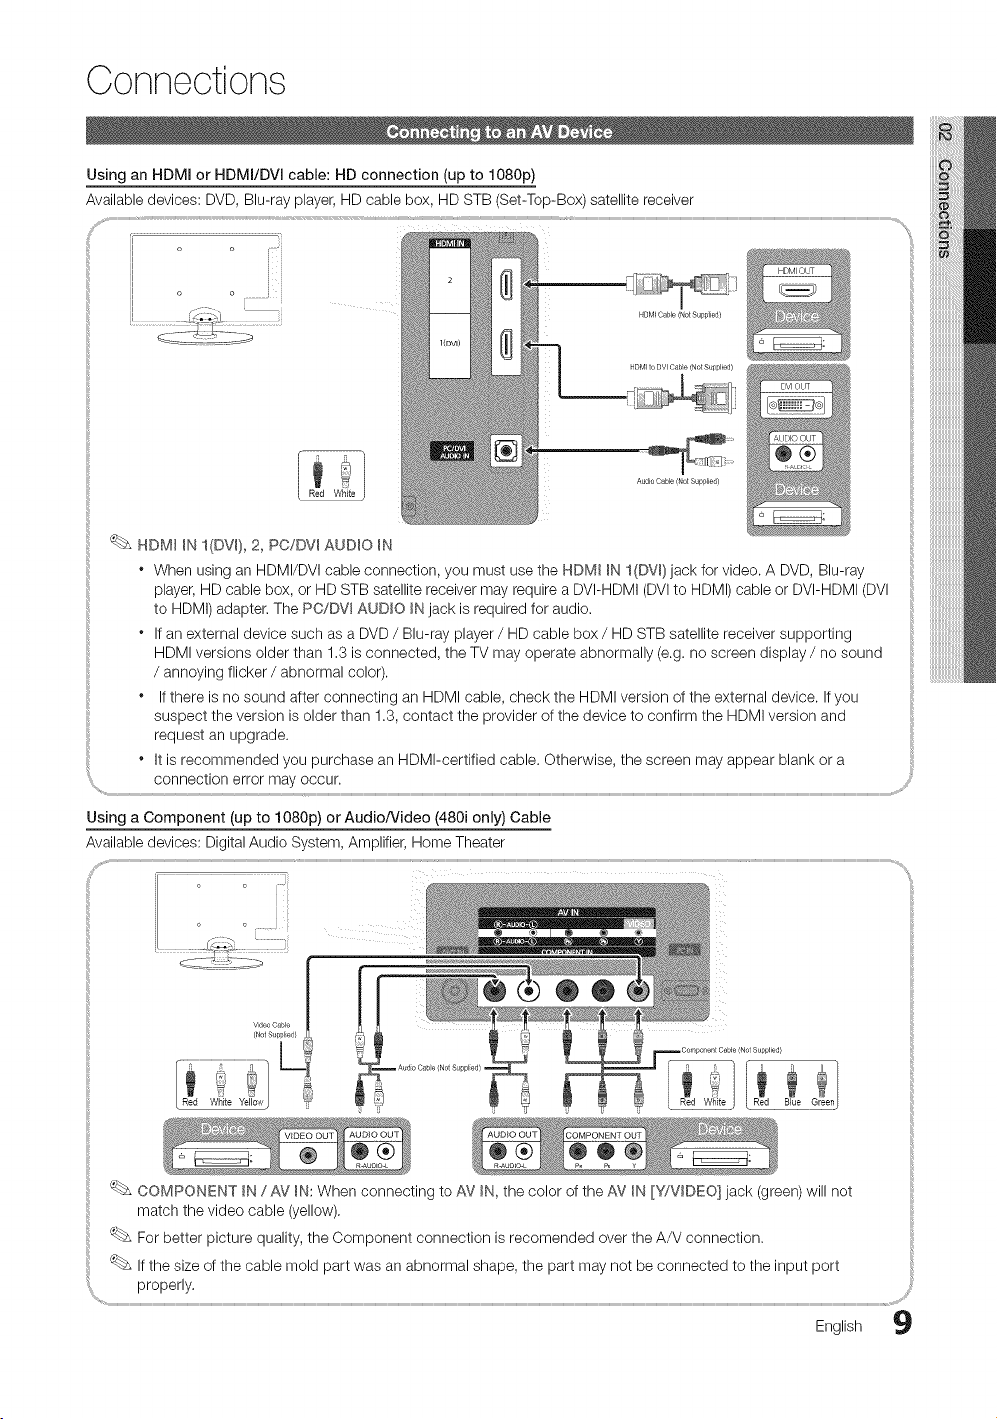
Using an HDMI or HDMI/DVI cable: HDconnection (up to 1080p)
Available devices: DVD, Blu-ray player,HD cable box, HD STB (Set-Top-Box) satellite receiver
HDM_ Cable/Not Supplied/
NDM__N I(DV_), 2, PC/DV_ AUDIO _N
* When using anHDMI/DVI cable connection, you must use the HDM_ _N l(DVm)jack for video. A DVD, Blu-ray
player,HD cable box, or HDSTB satellite receivermay require a DVI-HDMI (DVIto HDMI) cable orDVI-HDMI (DVI
to HDMI)adapter. The PC/DVmAUDIO _Njack isrequired for audio.
* Ifan external device such as a DVD / Blu-ray player / HDcable box / HDSTB satellite receiver supporting
HDMIversions older than 1.3 isconnected, the TV may operate abnormally (e.g.no screen display / no sound
/ annoying flicker / abnormal color).
* If there isnosound after connecting an HDMI cable, check the HDMI version of the external device. If you
suspect the version isolder than 1.3, contact the provider of the device to confirm the HDMI version and
request an upgrade.
" It isrecommended you purchase an HDMI-certified cable. Otherwise, the screen may appear blankor a
connection error may occur.
Using a Component (up to 1080p) or Audio/Video (480i only) Cable
Available devices: DigitalAudio System, Amplifier, Home Theater
COMPONENT _N/ AV _N:When connecting to AV _N,the color ofthe AV _N[Y/VDEO] jack (green) will not
match thevideo cable (yellow).
For better picture quality, the Component connection is recomended over the A/V connection.
i: _ Ifthe size of the cable mold part was an abnormal shape, the part may not be connected to the input port
properly.
English 9
Connections
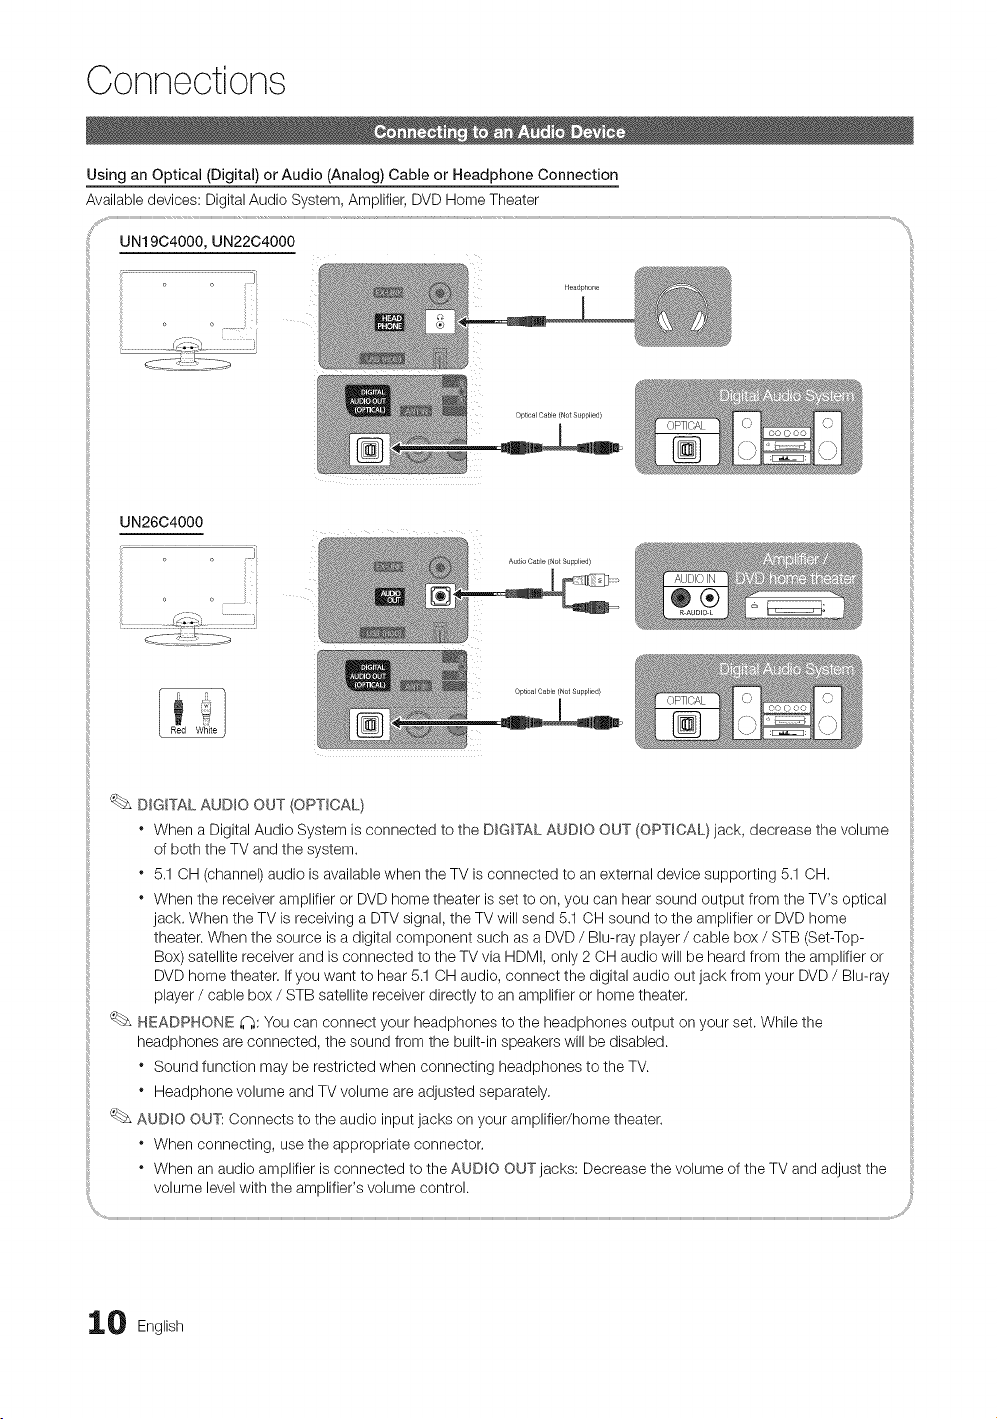
Using an Optical (Digital) orAudio (Analog) Cable or Headphone Connection
Available devices: DigitalAudio System, Amplifier, DVD Home Theater
UN19C4000, UN22C4000
Optical Cable (Not Supplied)
UN2604000
J
Optical Cable/Not Supplied/
DIGITAL AUDIO OUT (OPTICAL)
" When a Digital Audio System is connected to the DIGITAL AUDIO OUT (OPTICAL) jack, decrease the volume
ofboth the TV and the system.
" 5,1 OH (channel) audio is available when the TV is connected to an external device supporting 5.1 OH.
" When the receiver amplifier or DVD home theater isset to on, you can hear sound output from the TV's optical
jack. When the TV isreceiving aDTVsignal, theTV will send 5.1 OH sound to the amplifier or DVD home
theater. When the source isadigital component such as a DVD / Blu-ray player / cable box / STB (Set-Top-
Box) satellite receiver and isconnected to the TV viaHDMI, only 2OH audio will be heard from the amplifier or
DVD home theater. If you want to hear5.1 CH audio, connect the digital audio out jack from your DVD / Blu-ray
player / cable box / STB satellite receiver directly to an amplifier or home theater.
HEADPHONE _i_:You can connect your headphones to the headphones output on your set. While the
headphones areconnected, the sound from the built-in speakers will be disabled.
" Sound function may berestricted when connecting headphones to the TV.
" Headphone volume and TV volume are adjusted separately,
AUDmOOUT: Connects tothe audio input jacks on your amplifier/home theater.
" When connecting, use the appropriate connector.
" When an audio amplifier isconnected to the AUDIO OUT jacks: Decrease the volume of the TV and adjust the
volume levelwith the amplifier's volume control.
0 English

Using an EX-Link Cable Connection
Available Devices: External devices that support EX-Link
EX UNK: Connector for service only.
Display Modes (D-Sub and HDMI/DVI Input)
Optimal resolution is 1360 x 768 @ 60 Hz.
IBM
MAC
VESA CVT
VESA DMT
VESA GTF
640 x 350
720 x 400
640 x 480
832 x 624
720 x 576
1280 x 720
640 x 480
640 x 480
640 x 480
800 x 600
800 x 600
800 x 600
1024 x 768
1024 x 768
1024 x 768
1280 x 720
1360 x 768
1280 x 720
31.469
31.469
35.000
49.726
35.910
56.456
31.469
37.500
37.861
37.879
46.875
48.077
48.363
56.476
60.023
45.000
47.712
52.500
70.086
70.087
66.667
74.551
59.950
74.777
59.940
75.000
72.809
60.317
75.000
72.188
60.004
70.069
75.029
60.000
60.015
70.000
25.175
28.322
30.240
57.284
32.750
95.750
25.175
31.500
31.500
40.000
49.500
50.000
65.000
75.000
78.750
74.250
85.500
89.040
NOTE
* For HDMI/DVI cable connection, you must use the HDM__N I(DV_)jack.
* The interlace mode isnot supported.
* The set might operate abnormally if anon-standard video format isselected,
* Separate and Composite modes are supported. SOG(Sync On Green) isnot supported.
+/-
-/+
_/+
-/+
+/+
+/+
+/+
+/+
+/+
+/+
_/+
Englishii
Connections
Source List
Use toselect TV or an external input sources
such asa DVD / Blu-ray player/ cable box /
STB satellite receiver.
{_ MENUrlTI --_ Input _ Source List
ENTER I_
m
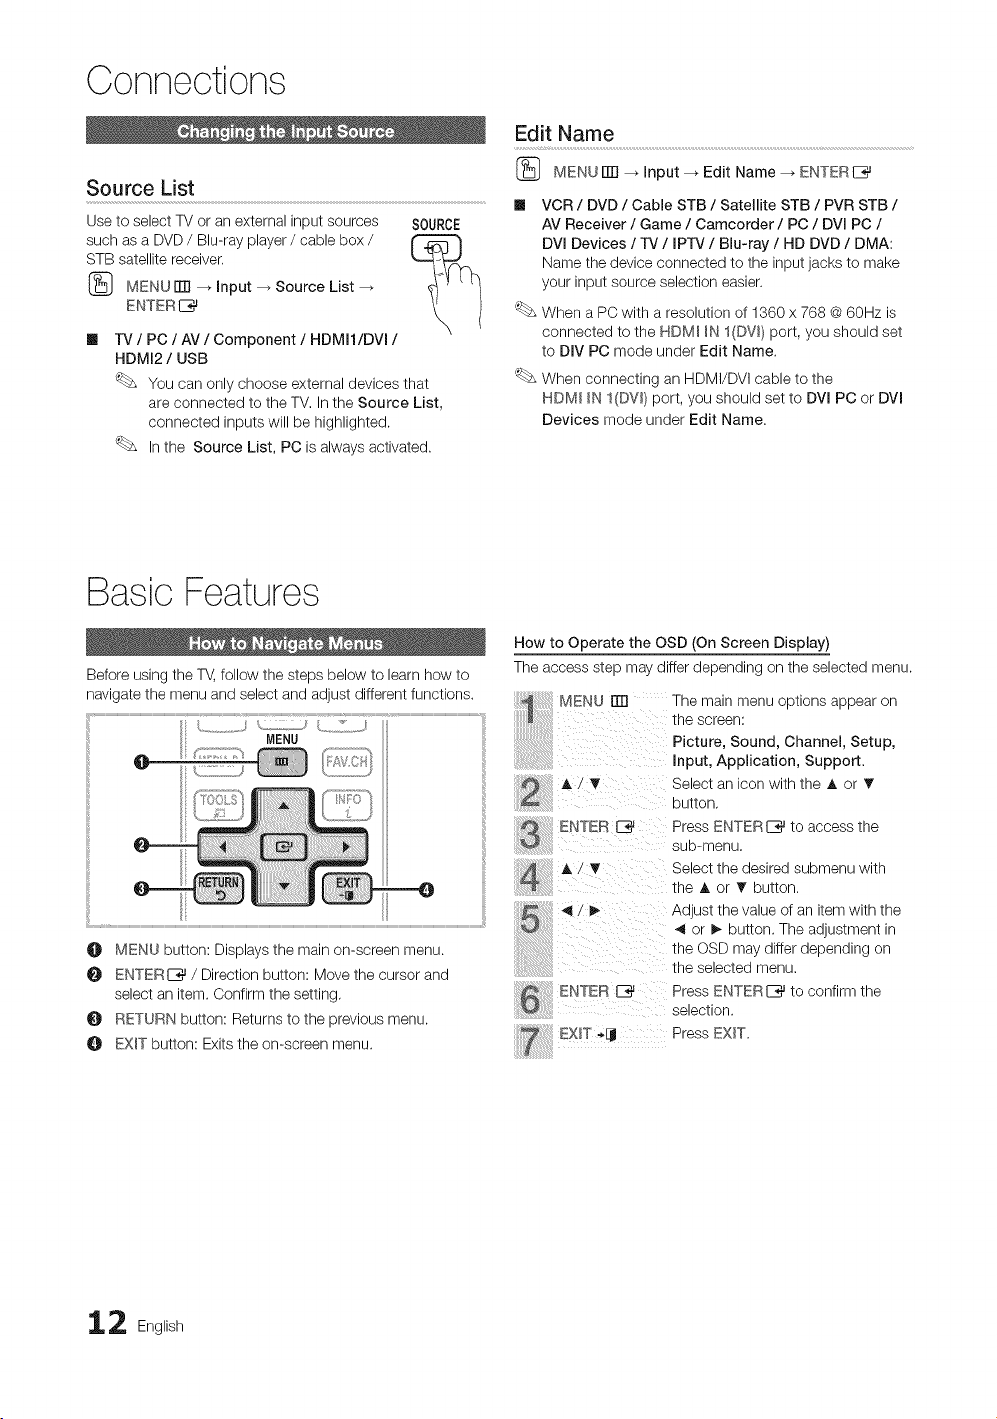
SOURCE
IV / PC / AV / Component / HDMI1/DVI /
HDMI2 / USB
You can only choose external devices that
are connected to the TM In the Source List,
connected inputs will be highlighted.
Inthe Source List, PC isalways activated.
Edit Name
{_ MENU ITTI_ Input --_ Edit Name --_ ENTERI_
VCR / DVD / Cable STB / Satellite STB / PVR STB /
AV Receiver / Game / Camcorder / PC / DVI PC /
DVl Devices / IV / IPrv / Blu-ray / HD DVD / DMA:
Name the device connected to the input jacks to make
your input source selection easier.
When aPC with a resolution of 1360 x 768 @ 60Hz is
connected to the HDM_ _N I(DV_) port, you should set
to DIV PC mode under Edit Name.
When connecting an HDMI/DVI cable to the
HDM_ _NI(DW) port, you should set to DVl PC or DVl
Devices mode under Edit Name.
BasicFeatures
Before using the T_,follow the steps below to learn how to
navigate the menu and select and adjust different functions.
MENU
O L ::;::E....L .,X.21_LL2
O MENU button: Displays the main on-screen menu.
O ENTERE_ / Direction button: Move the cursor and
select an item. Confirm the setting,
RETURN button: Returns to the previous menu.
EXIT button: Exitsthe on-screen menu.
How to Operate the OSD (On Screen Display)
Theaccess step may differ depending on the selected menu.
MENU rm The main menu options appear on
thescreen:
Picture,Sound,Channe,,Setup,
Input, Application, Support.
AiT Select an icon with the A or T
ENTER E_
A / T
ENTER E_
i
selection.
EXiT -4j Press EXIT.
button,
Press ENTERI_ to access the
sub-menu,
Select the desired submenu with
the A or _' button.
Adjust the value of an itemwith the
4 or I_ button. The adjustment in
the OSDmay differ depending on
the selected menu.
Press ENTERI_ to confirm the
2 English
Seeing Channels
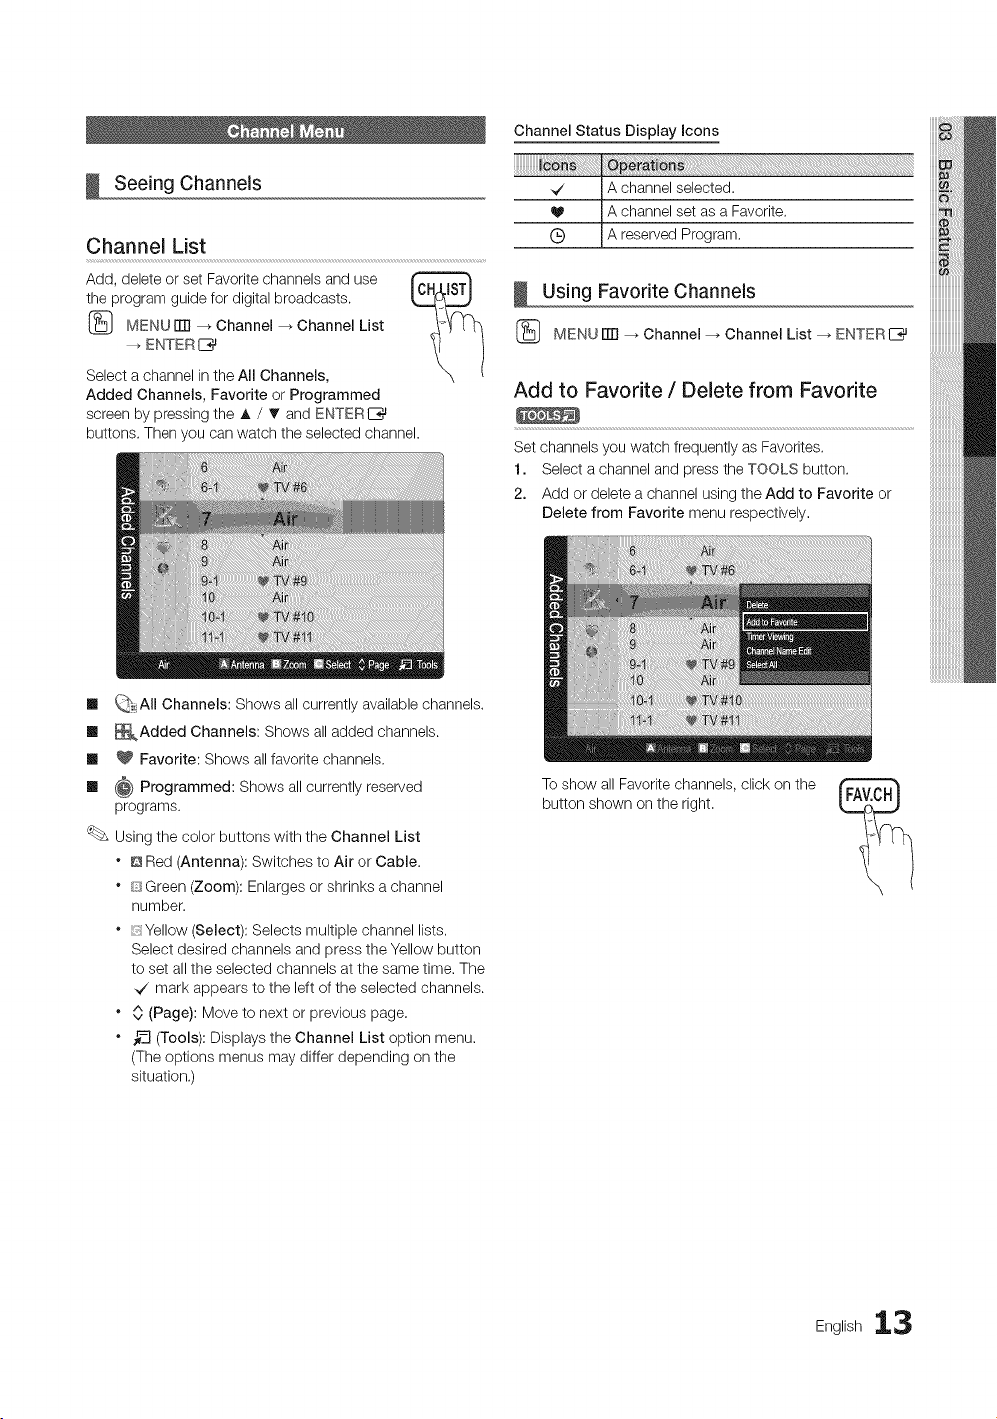
Channel List
Add, delete orset Favorite channels and use
the program guide for digital broadcasts.
(_ MENUiTFI --_ Channel _ Channel List
--_ ENTER I_
Select achannel inthe All Channels,
Added Channels, Favorite or Programmed
screen by pressing the A / T and ENTERE_
buttons. Thenyou can watch the selected channel.
Channel Status Display Icons
_/ A channel selected.
V A channel set as a Favorite.
(_) A reserved Program.
Using Favorite Channels
(_ MENU ITTI_ Channel --_Channel List _ ENTERI_
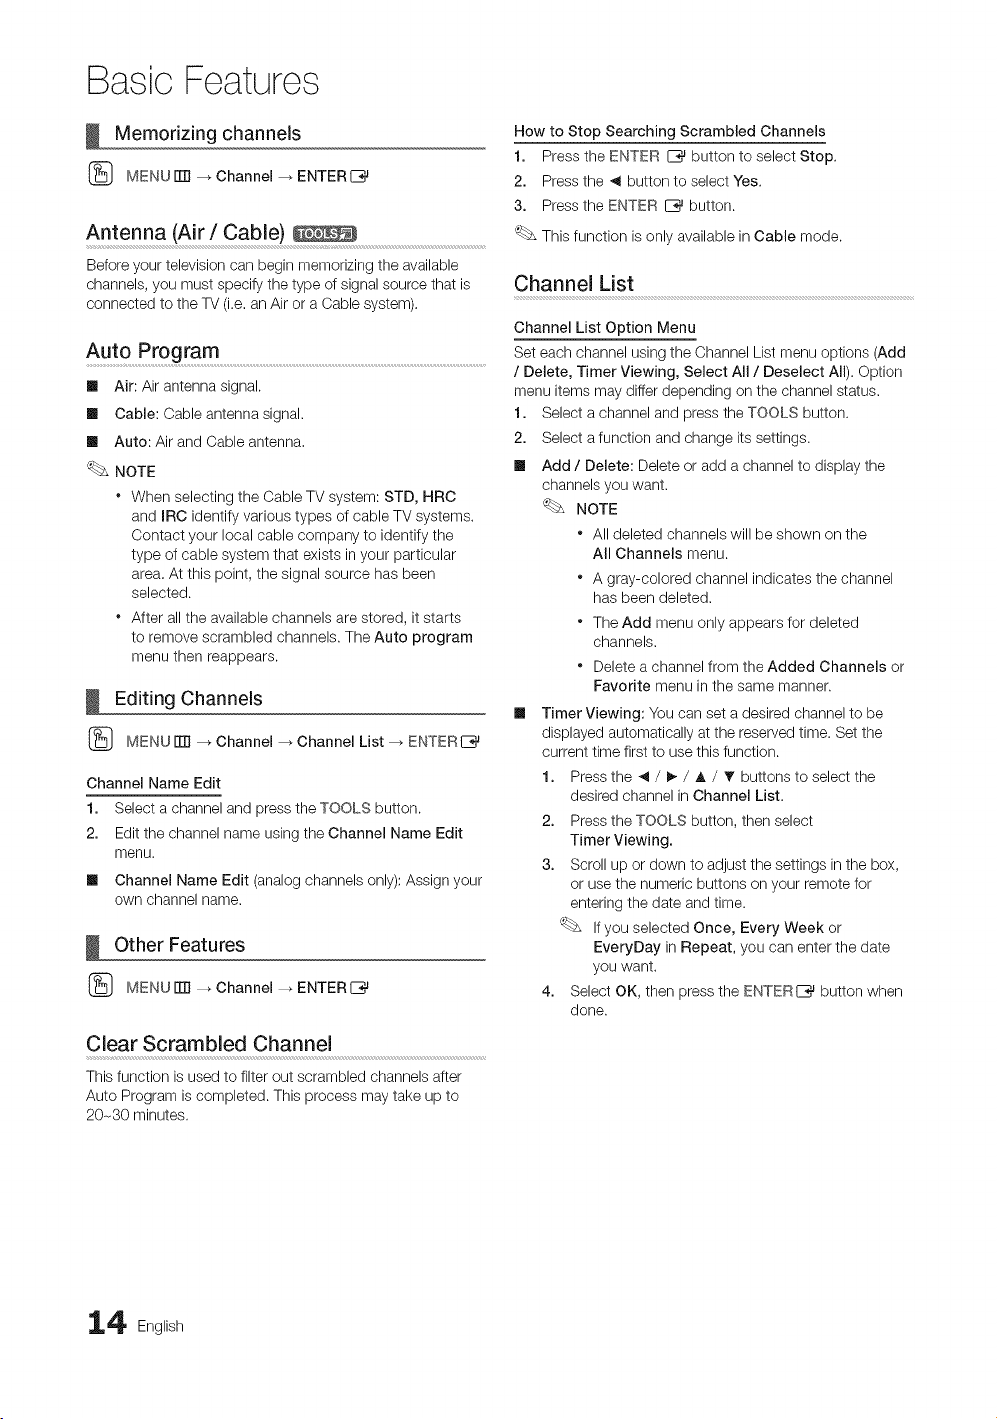
Add to Favorite / Delete from Favorite
Set channels you watch frequently as Favorites.
1. Select a channel and pressthe TOOLS button.
2. Add ordelete a channel usingthe Add to Favorite or
Delete from Favorite menu respectively.
Ill _,AII Channels: Shows allcurrently available channels.
Ill _Added Channels: Shows alladded channels.
Ill _ Favorite: Shows all favorite channels.
Ill @ Programmed: Shows allcurrently reserved
programs.
Using the color buttons with the Channel List
* @ Red (Antenna): Switches to Air or Cable.
* [!_Green (Zoom): Enlarges orshrinks a channel
number.
* ;_ Yellow (Select): Selects multiple channel lists.
Select desired channels and press the Yellow button
to set allthe selected channels atthe same time. The
.J mark appears tothe left of the selected channels.
* 0 (Page): Move to next or previous page.
* _-_(Tools): Displays the Channel List option menu.
(The options menus may differ depending on the
situation.)
Toshow all Favoritechannels, click on the
button shown onthe right.
Eng,lsh13
BasicFeatures
Memorizing channels
_} MENUITTI--_ Channel _ ENTERI_
Antenna (Air / Cable)
Before your television can begin memorizing the available
channels, you must specify the type of signal source that is
connected to the TV (i.e. an Air or aCable system).
Auto Program .........................................................................................................................................................................................
Ill Air: Air antenna signal.
Ill Cable: Cable antenna signal.
Ill Auto: Air and Cable antenna,
NOTE
* When selecting the Cable TV system: STD, HRC
and mRCidentify various types of cable TV systems.
Contact your local cable company to identify the
type of cable system that exists in your particular
area.At this point, the signal source has been
selected.
* After all the available channels arestored, it starts
to remove scrambled channels. The Auto program
menu then reappears.
Editing Channels
(_ MENUiTrl --_ Channel _ Channel List _ ENTERI_
Channel Name Edit
1. Select a channel and pressthe TOOLS button.
2. Edit the channel name usingthe Channel Name Edit
menu.
Ill Channel Name Edit (analogchannels only):Assignyour
own channel name.
Other Features
(_ MENUITTI--_ Channel _ ENTERI_
Clear Scrambled Channel
This function isused tofilter out scrambled channels after
Auto Program iscompleted. This process may take up to
20-80 minutes.
How to Stop Searching Scrambled Channels
1. Press the ENTER _ button to select Stop.
2. Pressthe _ button to select Yes.
3. Pressthe ENTER _ button.
This function isonly available in Cable mode.
Channel List
Channel List Option Menu
Set each channel using the Channel List menu options (Add
/ Delete, Timer Viewing, Select All / Deselect All). Option
menu items may differ depending on the channel status.
1. Select a channel and pressthe TOOLS button.
2. Select a function and change itssettings.
Ill Add / Delete: Delete or add a channel to display the
channels you want.
NOTE
* All deleted channels will beshown on the
All Channels menu.
* A gray-colored channel indicates the channel
has been deleted.
* The Add menu only appears for deleted
channels.
* Delete achannel from the Added Channels or
Favorite menu in the same manner.
Timer Viewing: You can set adesired channel to be
displayed automatically at the reservedtime. Set the
current time first to usethisfunction.
1. Pressthe _ / I_ / A / T buttons to select the
desired channel in Channel List.
2. Pressthe TOOLS button, then select
Timer Viewing.
3. Scroll up or down to adjust the settings in the box,
or usethe numeric buttons onyour remote for
entering the date and time.
If you selected Once, Every Week or
EveryDay in Repeat, you can enter the date
you want.
4. Select OK, then press the ENTERI_ button when
done.
4 English
m
m
NOTE
*Onlymemorizedchannelscanbereserved.
*Reservedprogramswillbedisplayedinthe
Programmedmenu.
* Whenadigitalchannelisselected,presstheI_
buttontoviewthedigitalprogram.
SelectAll:Selectallthechannelsinthechannellist.
DeselectAll:Deselectalltheselectedchannels.
YoucanonlyselectDeselectAllwhenoneor
morechannelsareselected.
Programmed
(in Channel List)
You can view, modify ordelete a show you have reserved
towatch. Programmed timer viewing isdisplayed here.
Highlight a program and press the TOOLS button to display
Options.
[] Change Info: Change ashow you have reserved to
watch. Begin with step 3 of "TimerViewing," above.
[] Cancel Schedules: Cancela show you have reserved
towatch.
This deletes the highlighted or selected
program(s).
[] Information: Displayashow you havereserved
towatch. (You can also change the reservation
Information.)
Alternatively, you can view Information by
highlighting a program and pressing the
ENTERE_ button.
[] Select All / Deselect All: Select or deselect allreserved
programs.
Fine Tune
(analog channels only)
If the reception isclear,you do not haveto fine tune the
channel, as this isdone automatically during the search and
store operation. If the signal isweak or distorted, fine tune
the channel manually. Scroll to the leftor right until the image
isclear.
Settings are applied to the channel your currently
watching.
Fine tuned channels that have been saved are marked
with an asterisk .....on the right-hand side of the
channel number in thechannel banner.
Toreset the fine-tuning, select Reset,
Changing the Preset Picture Mode
{_ MENU ITTI_ Picture -_ Mode -_ ENTERE_
Mode
Select your preferred picture type.
[] Dynamic: Suitable for a bright room.
[] Standard: Suitable for a normal
environment.
[] Movie: Suitablefor watching movies in a
dark room.
Adjusting Picture Settings
Backlight / Contrast / Brightness /
Sharpness/Color/T!nt (G/R)
{_ MENUITTI_ Picture _ ENTERI_
Your television has several setting options for picture quality
control.
NOTE
" When you make changes to Backlight, Contrast,
Brightness, Sharpness, Color or Tint (G/R) the
OSDwill be adjusted accordingly.
* InPC mode, you can only make changes to
Backlight, Contrast and Brightness.
* Settings can be adjusted and stored for each
external device connected to the TV.
* Lowering picture brightness reduces power
consumption.
English 15
BasicFeatures
Economical Solutions
Eco Solution
(_ MENUiTR _ Picture _ Eco Solution _ ENTER[_
Ill Energy Saving (Off / Low / Medium / High /
Picture Off / Auto): This adjusts the brightness of the
TVin order toreduce power consumption. If you select
Picture Off, the screen isturned off, but the sound
remains on. Press any button to turn on the screen
again.
Ill No Signal Power Off (Off / 15 min. / 30 min. / 60 min.):
Toavoidunnecessary energy consumption, set how long
you want the TV to remain on if it's not receiving a signal.
Disabled when the PC is in power saving mode.
Changing the Picture Options
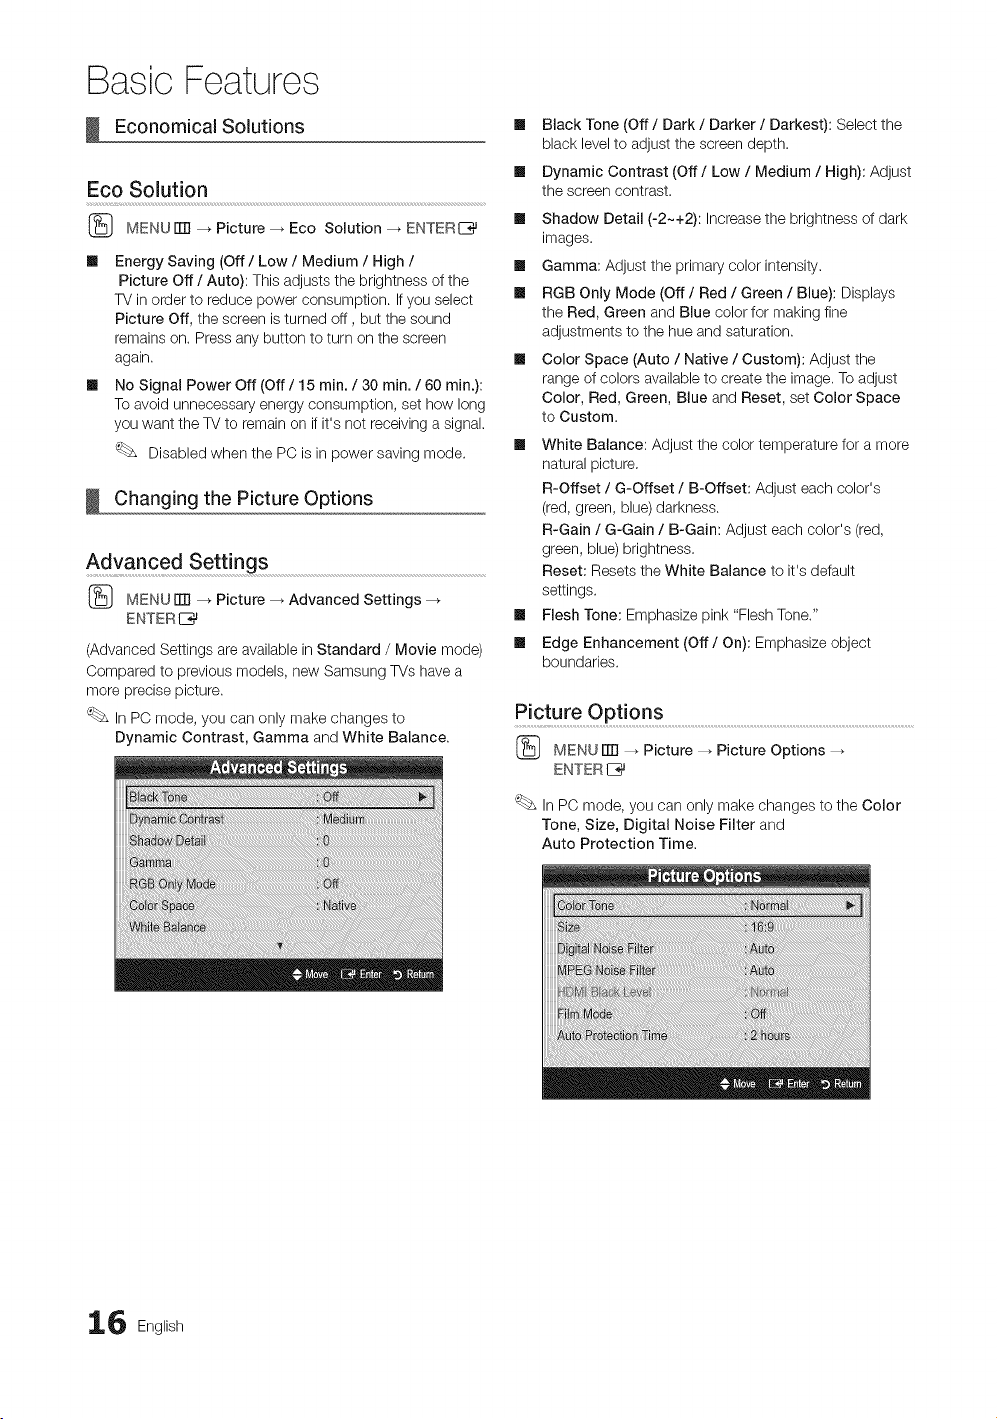
Advanced Settings
(_ MENU FITI--_ Picture _ Advanced Settings --_
ENTER
(Advanced Settings are available in Standard / Movie mode)
Compared to previous models, new Samsung TVs havea
more precise picture.
InPC mode, you can only make changes to
Dynamic Contrast, Gamma and White Balance.
m
m
m
m
m
Black Tone (Off / Dark / Darker / Darkest): Select the
black level to adjust the screen depth.
Dynamic Contrast (Off/Low / Medium / High): Adjust
the screen contrast.
Shadow Detail (-2-+2): Increasethe brightness of dark
images.
Gamma: Adjust the primary color intensity.
RGB Only Mode (Off / Red / Green / Blue): Displays
the Red, Green and Blue colorfor making fine
adjustments to the hue and saturation.
Color Space (Auto / Native / Custom): Adjust the
range of colors available to create the image.Toadjust
Color, Red, Green, Blue and Reset, set Color Space
to Custom.
Ill White Balance: Adjust the color temperature for a more
natural picture.
R-Offset / G-Offset / B-Offset: Adjust each color's
(red, green, blue) darkness.
R-Gain / G-Gain / B-Gain: Adjust each color's (red,
green, blue) brightness.
Reset: Resets the White Balance to it's default
settings.
Ill Flesh Tone: Emphasize pink "Flesh Tone."
Ill Edge Enhancement (Off / On): Emphasize object
boundaries.
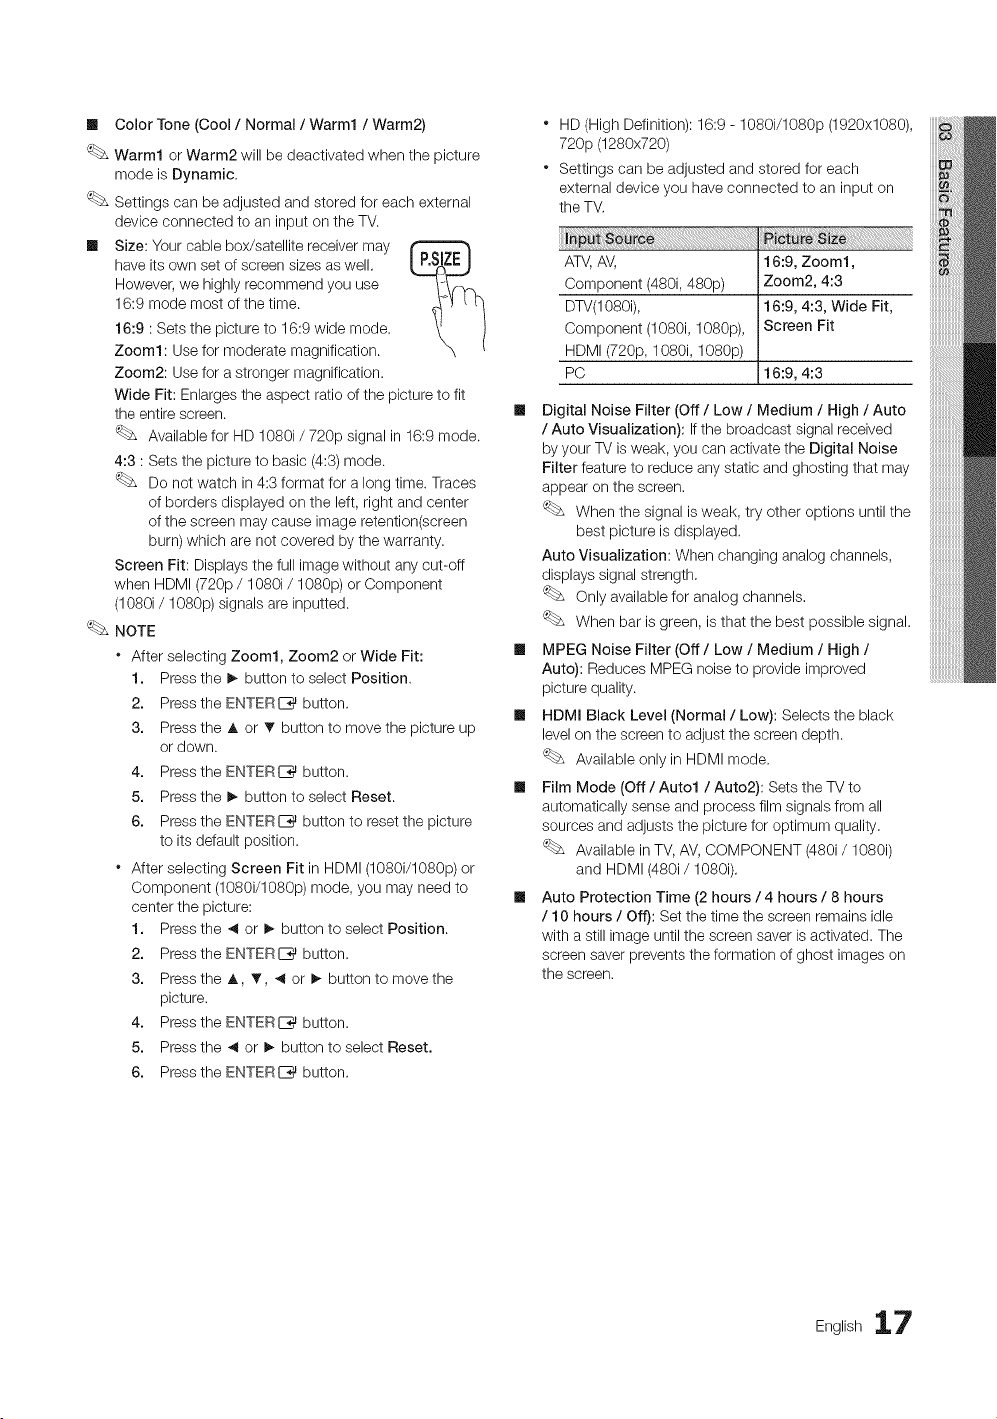
Picture OPt!ons ...........................................................................................................................................................................
(_ MENU rlTI_ Picture _ Picture Options
ENTERI_
InPC mode, you can only make changes to the Color
Tone, Size, Digital Noise Filter and
Auto Protection Time.
6 English
Ill ColorTone(Cool/ Normal /Warm1 / Warm2)
Warm1 or Warm2 will be deactivated when the picture
mode is Dynamic.
Settings can be adjusted and stored for each external
device connected to an input on the TV.
Ill Size: Your cable box/satellite receivermay
have itsown set of screen sizes as well.
However, we highly recommend you use
16:9 mode most of the time.
16:9 :Sets the picture to 16:9 wide mode.
Zoom1: Use for moderate magnification.
Zoom2: Use for a stronger magnification.
Wide Fit: Enlarges the aspect ratio of the picture to fit
the entire screen.
Available for HD1080i / 720p signal in 16:9 mode.
4:3 :Setsthe picture to basic (4:3)mode.
Do not watch in 4:3 format for a long time. Traces
of borders displayed on the left, right and center
ofthe screen may cause image retention(screen
burn) which are not covered by the warranty.
Screen Fit: Displays the full imagewithout any cut-off
when HDMI (720p/ 1080i/1080p) orComponent
(1080i / 1080p) signals areinputted.
NOTE
* After selecting Zoom1, Zoom2 or Wide Fit:
1. Pressthe I_ button to select Position.
2. Pressthe ENTERI_ button.
3. Pressthe A or • button to movethe picture up
ordown.
4. Pressthe ENTERE_ button.
5. Pressthe I_ button to select Reset.
6. Pressthe ENTERC_ button to reset the picture
to its default position.
* After selecting Screen Fit in HDMI (1080i/1080p) or
Component (1080i/1080p) mode, you may need to
center the picture:
1. Pressthe ,_or !_ button to select Position.
2. Pressthe ENTERI_ button.
3. Pressthe A, _', ,_ or !_ button to move the
picture.
4. Pressthe ENTERC_ button.
5. Pressthe ,_or _ button to select Reset.
6. Pressthe ENTERI_ button.
* HD(High Definition): 16:9 - 1080i/1080p (1920x1080),
720p (1280x720)
* Settings can be adjusted and stored for each
external device you have connected to an input on
the TV,
rc
AW,AV,
Component (480i, 480p)
DTV(1080i),
Component (1080i, 1080p),
HDMI(720p, 1080i, 1080p)
PC
16:9, Zoom1,
Zoom2, 4:3
16:9, 4:3, Wide Fit,
Screen Fit
16:9, 4:3
Ill Digital Noise Filter (Off / Low / Medium / High / Auto
/ Auto Visualization): If the broadcast signal received
by your TVisweak, you can activate the Digital Noise
Filter feature to reduce any static and ghosting that may
appear on the screen.
When the signal is weak, try other options until the
best picture isdisplayed.
Auto Visualization: When changing analog channels,
displays signal strength,
Only available for analog channels.
When bar isgreen, isthat the best possible signal.
Ill MPEG Noise Filter (Off / Low / Medium / High /
Auto): Reduces MPEG noise to provide improved
picture quality.
Ill HDMI Black Level (Normal / Low): Selects the black
level on the screen to adjust the screen depth.
Available only in HDMI mode.
Ill Film Mode (Off / Auto1 / Auto2): Sets the TV to
automatically sense and process film signals from all
sources and adjusts the picture for optimum quality.
Available in TV, AV,COMPONENT (480i/1080i)
and HDMI (480i/1080i).
Ill Auto Protection Time (2hours /4 hours / 8hours
/ 10 hours / Off): Set the time the screen remains idle
with a stillimage untilthe screen saver isactivated. The
screen saver prevents the formation of ghost images on
the screen.
English 17
BasicFeatures
Picture Reset (OK / Cance0 ..............................................................................................
Resets your current picture mode to itsdefault settings.
Setting up the TVwith Your PC
Set the input source to PC.
(_ MENUiTR --_ Picture _ ENTERC_
Auto Adjustment ........................................................................................................................
Adjust frequency values/positions and fine tune the settings
automatically.
Not available when connecting with an HDMI/DVI cable.
Screen
II Coarse / Fine: Removes or reduces picture noise. If the
noise isnot removed by Fine-tuning alone, then adjust
the frequency as best aspossible (Coarse) and Fine-
tune again. After the noise hasbeen reduced, readjust
the picture so that it isaligned to the center of screen.
II Position: Adjust the PC's screen positioning if it does
not fit the TV screen. Pressthe A or • button to adjust
the Vertical-Position. Pressthe _1or I_ button to adjust
the Horizontal-Position.
II image Reset: Resets the imageto default settings.
Using Your iV as a Computer (PC) Display
Setting Up Your PC Software (Based on Windows XP)
Depending on the version of Windows and thevideo card,
the actual screens on your PC will probably look different, but
the same basic set-up information will apply in most cases.
(Ifnot,contact your computer manufacturer or Samsung
Dealer.)
1. Click on "Control Panel" onthe Windows start menu.
2. Click on "Appearance and Themes" in the "Control
Panel" window and a display dialog-box will appear.
3. Click on "Display" and a display dialog box will appear.
4. Navigate to the "Settings" tab on the display dialog-box.
• Thecorrect size setting (resolution) [Optimum: 1360 x
768 pixels]
• Ifa vertical-frequency option exists on your display
settings dialog box, the correct value is '60' or '60 Hz'.
Otherwise, just click 'OK' and exitthe dialog box.
Changing the Preset Sound Mode
(_ MENU rrrl _ Sound _ Mode _ ENTERE_
Mode
II Standard: Selects the normal sound
mode.
II Music: Emphasizes music over voices.
II Movie: Provides the best sound for
movies.
II Clear Voice: Emphasizes voices over
other sounds.
III
Amplify: Increase the intensity of high-frequency sound
to allow a better listening experience for the hearing
impaired.
Adjusting Sound Settings
(_ MENU rrrl _ Sound _ Equalizer _ ENTERE_
Equalizer
Adjusts the sound mode (standard sound mode only).
Balance L/R: Adjusts the balance between the right and
left speaker,
II 100Hz / 300Hz / 1KHz / 3KHz / 10KHz (Bandwidth
Adjustment): Adjusts the level of specific bandwidth
frequencies.
II Reset: Resets the equalizer to its default settings.
Sound Settings
(_ MENU rrrl _ Sound -_ ENTERI_
Virtual Surround (Off / On)
(standard sound mode only)
Thisfunction provides a virtual 5.1 channel surround sound
experience through apair of speakers or headphones using
HRTF (Head RelatedTransferFunction) technology.
Dialog Clarity (Off ! On) .........................................................................................................................
(standard sound mode only)
Thisfunction allows youto increase the intensity of a voice
over background music or sound effects so that dialog can
be heard more clearly.
8 English
Preferred Language
(digital channels only)
DigitaI-TV broadcasts arecapable of
simultaneous transmission of many audio tracks
(for example, simultaneous translations ofthe
program into foreign languages).
You can only select a language among the
ones being broadcasted.
SPDIF Output
SPDIF (SonyPhilips Digital Interface)is usedto provide digital
sound, reducing interference going to speakers and various
digital devices such asanA/V Receiver/Home theater.
Ill Audio Format: During the reception of a digitalTV
broadcast, you can select the Digital Audio output
(SPDIF)format from the options PCM or Dolby Digital.
Multi-Track Sound (MTS)
(analog channels only)
Ill Mono: Choose for channels that are
broadcasting inmono or if you arehaving
difficulty receiving astereo signal.
Ill Stereo: Choose for channels that are
broadcasting instereo.
Audio Delay: Correct audio-video sync problems, when
watching TVor video, and when listening todigital audio
output using an external device such as an AVreceiver
(0me- 250me).
Sound Reset (OK/Cancel)
Reset allsound settings to the factory defaults.
Ill SAP: Choose to listento theSeparate Audio Program,
which is usually a foreign-language translation.
Depending on the particular program being broadcast,
you can listen to Mono, Stereo or SAR
Setting the Time
(_ MENUiTR -_Setup-_Time-_ ENTERE]}_
Auto Volume (Off/Normal/Night)
To equalizethe volume leveloneach channel, setto Normal.
Ill Night: This mode provides animproved sound
experience compared to Normal mode, making almost
no noise. It isuseful at night.
Speaker Select (External Speaker / TV
Speaker)
A sound echo may occur due to adifference in decoding
speed between the main speaker and the audio receiver. In
thiscase, set the TVto External Speaker.
When Speaker Select isset to External Speaker, the
volume and MUTE buttons will not operate and the
sound settings will be limited.
When Speaker Select isset to External Speaker
* TV Speaker: Off, External Speaker: On
When Speaker Select isset to TV Speaker
* TV Speaker: On, External Speaker: On
Ifthere isno video signal, both speakers will be mute.
Time ..................................................................................................................................................................................................................................................
Ill Clock: Setting the clock isfor using various timer
features of the TV.
(_ The current time will appear everytime you press
the _NFObutton.
Ifyou disconnect the power cord, you haveto set
the clock again.
Clock Mode (Auto / Manual)
- Auto: Set the current time automatically using the
time from a digital channel.
The antenna must be connected in order to set
the time automatically.
- Manual: Set the current time manually.
Depending on the broadcast station and signal,
the auto time set up may not be correct. In this
case, set the time manually.
English 19
BasicFeatures
Clock Set: Set Month, Day, Year, Hour, Minute and
am/pm manually.
Available onlywhen Clock Mode isset to
Manual.
You can set the Month, Day, Year, Hour and
Manual directly by pressing the number buttons
on the remote control.
DST (Daylight Saving Time} (Off/On): Switches the
Daylight Saving Time function on or off,
This function isonly available when the
Clock Mode isset to Auto.
Time Zone: Select your time zone.
This function isonly available when the
Clock Mode isset to Auto.
Using the Sleep Timer
(_ MENU iTR_ Setup _ Time _ Sleep Timer
ENTER [Z_
m
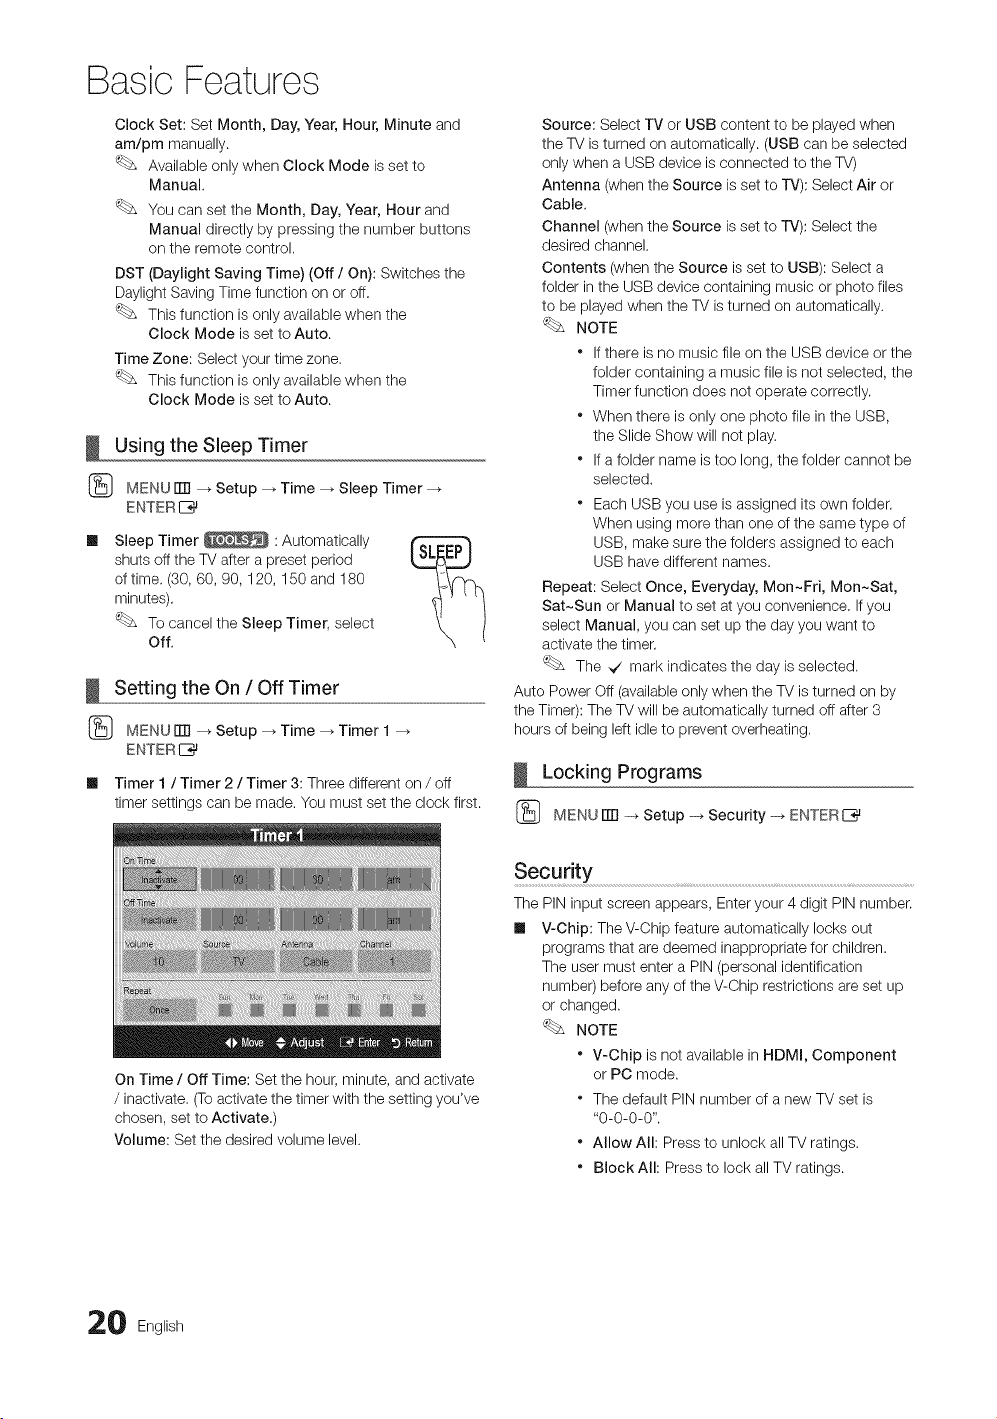
Sleep Timer _ :Automatically
shuts offthe TV after apreset period
oftime. (30,60, 90, 120, 150 and 180
minutes).
Tocancel the Sleep Timer, select
Off.
Setting the On / Off Timer
(_ MENUiTFI --_ Setup _ Time _ Timer 1
ENTER I_
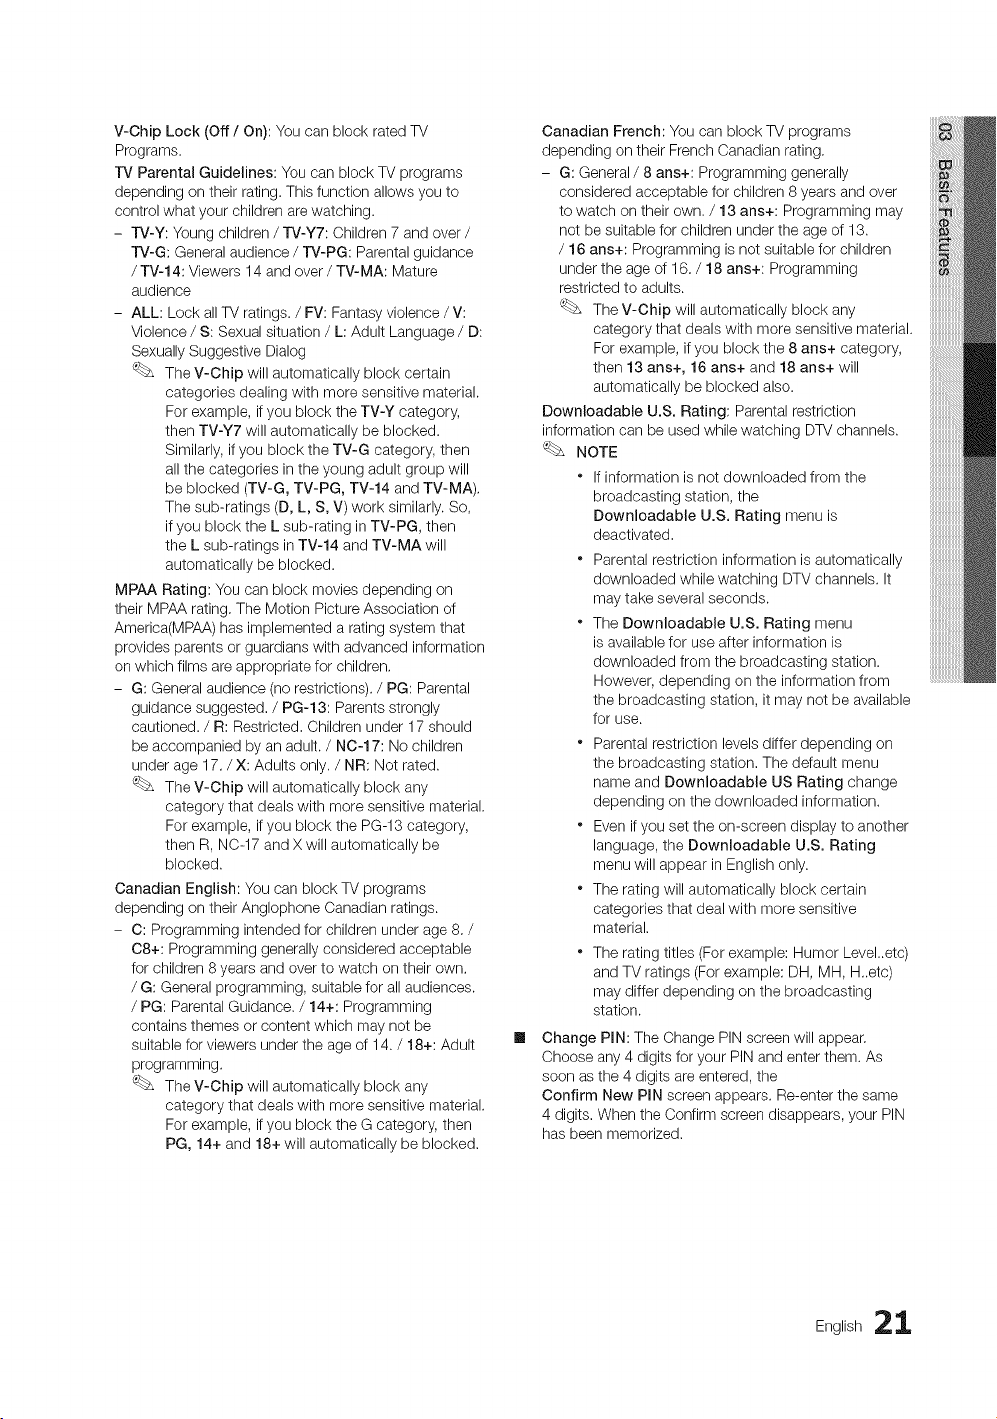
Ill Timer 1/ Timer 2/ Timer 3: Three different on / off
timer settings can be made. You must set the clock first.
Source: Select TV or USB content to beplayed when
the TVisturned on automatically. (USB can beselected
onlywhen a USB device isconnected to the TV)
Antenna (when the Source isset to rv): Select Air or
Cable.
Channel (when the Source isset torv): Select the
desired channel.
Contents (when the Source isset to USB): Select a
folder inthe USB device containing music or photo files
to be played when the TVisturned on automatically.
NOTE
* If there isnomusic fileon the USB device orthe
folder containing amusic file isnotselected, the
Timer function does not operate correctly.
* When there isonly one photo file in the USB,
the Slide Show will not play.
* If afolder name istoo long, the folder cannot be
selected.
* Each USB you use isassigned itsown folder.
When using more than one of the same type of
USB, make sure the folders assigned to each
USB have different names.
Repeat: Select Once, Everyday, Mon~Fri, Mon~Sat,
Sat~Sun or Manual to set at you convenience. If you
select Manual, you can set up the day you want to
activate the timer.
The _ mark indicates the day isselected.
Auto Power Off (availableonly when the TVisturned on by
the Timer): TheTV will beautomatically turned off after 3
hours of being left idle to prevent overheating.
Locking Programs
(_ MENU ITTI-+ Setup -_ Security -_ ENTERE_
On Time / Off Time: Set the hour, minute, and activate
/ inactivate. (Toactivate the timer with the setting you've
chosen, set to Activate.)
Volume: Set the desiredvolume level.
Security
ThePIN input screen appears, Enter your 4digit PIN number.
Ill V-Chip: The V-Chip feature automatically locks out
programs that aredeemed inappropriate for children.
The user must enter aPIN (personal identification
number) before any of the V-Chip restrictions areset up
or changed.
NOTE
* V-Chip isnot available in HDMI, Component
or PC mode.
* The default PIN number ofa new TV set is
"0-0-0-0".
* Allow All: Pressto unlock allTVratings.
* Block All: Pressto lock all TV ratings.
0 English
V-ChipLock(Off/On):YoucanblockratedTV
Programs.
TVParentalGuidelines:YoucanblockTVprograms
dependingontheirrating.Thisfunctionallowsyouto
controlwhatyourchildrenarewatching.
- TV-Y:Youngchildren/ TV-Y7: Children 7 and over /
TV-G: General audience / TV-PG: Parental guidance
/ TV-14: Viewers 14 and over / TV-MA: Mature
audience
- ALL: Lock all TVratings. / FV: Fantasyviolence / V:
Violence / S: Sexual situation / L: Adult Language / D:
Sexually Suggestive Dialog
The V-Chip will automatically block certain
categories dealing with moresensitive material.
For example, if you block the TV-¥ category,
then TV-Y7 will automatically be blocked.
Similarly, if you block the TV-G category, then
all the categories in the young adult group will
be blocked (TV-G, TV-PG, TV-14 and TV-MA).
The sub-ratings (D, L,S, V)work similarly. So,
if you block the L sub-rating in TV-PG, then
the L sub-ratings in TV-14 and TV-MA will
automatically be blocked.
MPAA Rating: You can block movies depending on
their MPAA rating. TheMotion Picture Association of
America(MPAA) has implemented arating system that
provides parents orguardians with advanced information
on which films areappropriate for children.
- G: Generalaudience (norestrictions). / PG: Parental
guidance suggested. / PG-13: Parentsstrongly
cautioned. / R:Restricted. Children under 17 should
be accompanied by an adult./ NO-17: No children
underage 17. / X: Adults only. / NR: Not rated.
The V-Chip will automatically block any
category that deals with more sensitive material.
For example, if you block the PG-13 category,
then R,NC-17 and X willautomatically be
blocked.
Canadian English: You can block TV programs
depending on their Anglophone Canadian ratings.
- C:Programming intended for children under age 8. /
08+: Programming generally considered acceptable
for children 8years and over to watch on their own.
/ G: General programming, suitablefor allaudiences.
/ PG: Parental Guidance. / 14+: Programming
contains themes or content which maynot be
suitablefor viewers under the age of 14. / 18+: Adult
programming.
The V-Chip will automatically block any
category that deals with more sensitive material.
For example, if you block the G category, then
PG, 14+ and 18+will automatically be blocked.
Canadian French: You can block TV programs
depending on their French Canadian rating.
- G: General/8 ans+: Programming generally
considered acceptable for children 8 years and over
to watch on their own. / 13 ans+: Programming may
not be suitable for children under the age of 13.
/ 16 ans+: Programming is not suitable for children
underthe age of 16. / 18 ans+: Programming
restricted to adults.
The V-Chip will automatically block any
category that deals with more sensitive material.
For example, if you block the 8 ans+ category,
then 13 arts+, 16 arts+ and 18 ans+ will
automatically be blocked also.
Downloadable U.S. Rating: Parentalrestriction
information can be used while watching DTV channels.
NOTE
* If information isnot downloaded from the
broadcasting station, the
Downloadable U.S. Rating menu is
deactivated.
* Parental restriction information is automatically
downloaded while watching DTV channels. It
maytake several seconds.
* The Downloadable U.S. Rating menu
isavailable for use after information is
downloaded from the broadcasting station.
However, depending on the information from
the broadcasting station, itmay not be available
for use.
* Parental restriction levels differ depending on
the broadcasting station. The default menu
name and Downloadable US Rating change
depending on the downloaded information.
* Evenif you set the on-screen display to another
language, the Downloadable U.S. Rating
menu will appear in English only.
* The rating will automatically block certain
categories that deal with more sensitive
material.
* The rating titles (Forexample: Humor Level..etc)
and TV ratings (For example: DH, MH, H_etc)
maydiffer depending on the broadcasting
station.
Change PIN: The Change PIN screen will appear.
Choose any4 digits foryour PIN and enterthem. As
soon as the 4digits areentered, the
Confirm New PIN screen appears. Re-enter the same
4digits. When the Confirm screen disappears, your PIN
has been memorized.
English 21
BasicFeatures
How to watch a restricted channel
If the TVistuned toa restricted channel, the V-Chip will
block it. The screenwill go blank and the following message
will appear:
This channel isblocked by V-Chip. Pleaseenter the PIN to
unblock.
If you forget the PIN, press the remote-control buttons
in thefollowing sequence, which resets the pin to "0-0-
0-0:" POWER (off) _ MUTE --_ 8 _ 2_ 4 _ POWER
(on)
Other Features
(_ MENUITTI--_ Setup _ ENTERC_
Menu Language
Set the menu language.
1. Select Menu Language and pressthe ENTER
button.
2. Choose desired language and press the ENTERI_
button.
Choose between English, Espanol and Francais.
Caption
(On-Screen Text Messages)
[] Caption (Off / On): You carl switch the
caption function on or off. If captions are
not available, theywill not be displayed on
the screen.
The Caption feature doesn't work in
Component, HDMI or PC modes.
Ill Caption Mode: You canselect the desired caption
mode.
The availability ofcaptions depends on the
program being broadcast.
Default / OO1~004 / Text1 ~Text4: (analog channels
only)TheAnalog Caption function operates in either
analog TVchannel mode or when a signal issupplied
from an external device to the T_.(Depending onthe
broadcasting signal, the Analog Caption function may or
may not work with digital channels.)
Default / Service1 ~Service6 / OO1~004 /
Text1 ~Text4: (digital channels only)The Digital Captions
function works with digital channels.
Service1~6 may not be available indigital caption
mode depending on the broadcast.
Ill Digital Caption Options: (digital channels only)
Size: Options include Default, Small, Standard and
Large.The default is Standard.
Font Style: Options include Default and Styles 0 to 7.
Thedefault isStyle 0.
Foreground Color: Options include Default, White,
Black, Red,Green, Blue, Yellow, Magenta and Cyan. You
can change the color of the letter. The default isWhite.
Background Color: Options include Default, White,
Black, Red,Green, Blue, Yellow, Magenta and Cyan.
You can change the background color of the caption.
Thedefault isBlack.
Foreground Opacity: This adjusts the opacity of text.
Options include Default, Transparent, Translucent, Solid
and Flashing.
Background Opacity: This adjusts the opacity of
the caption background. Options include Default,
Transparent, Translucent, Solid and Flashing.
Return to Default: This option sets each Size, Font
Style, Foreground Color, Background Color, Foreground
Opacity and Background Opacity to itsdefault.
NOTE
* Digital Caption Options areavailable only
when Default and Service1 ~Service6 can be
selected in Caption Mode.
* The availability of captions depends on the
program being broadcasted.
* The Default setting follows the standards set by
the broadcaster.
* The Foreground and Background cannot be set
to have the same color.
* You cannot set both the Foreground Opacity
and the Background Opacity to Transparent.
General
Ill Game Mode (Off / On): When connecting to agame
TM TM
console such asPlayStation or Xbox , you can enjoy
amore realistic gaming experience by selecting the
game mode.
NOTE
* Precautions and limitations for game mode
- Todisconnect the game console and connect
another external device, set Game Mode to Off in
the setup menu.
- Ifyou display the TVmenu in Game Mode, the
screen shakes slightly.
* Game Mode isnot available when the input source
isset toTV or PC.
* After connecting the game console, set Game Mode
to On to prevent poor picture quality.
* If Game Mode is On: Picture mode isset to
Standard and Sound mode isset to Movie.
* Selecting Reset after adjusting the equalizer returns
the equalizer to itsdefault settings.
2 English
BasicFeatures
[] Menu Transparency (Bright / Dark): Set the
Transparency of the menu.
[] Melody (Off / Low / Medium / High): Set so that a
melody plays when the TVisturned on or off.
Picture In Picture (PIP)
PIP
You can watch the TVtuner and one external video source
simultaneously. PIP (Picture-in-Picture) does not function in
the same mode.
(_ MENUiTrl --_ Setup _ PIP --_ENTERI_
NOTE
* For PIPsound, refer to the Sound Select
instructions.
* If you turn the TVoff while watching in PIPmode, the
PIPwindow will disappear.
* You may notice that the picture in the PIPwindow
becomes slightly unnatural when you use the main
screen toview a game or karaoke.
* While V-Chip isin operation, the PIP function cannot
be used.
* PIP Settings
Component, HDMI1/DVl, I
HDMI2, HDMI3, HDMI4, IV
PC
[] PIP (Off / On): Activate or deactivate the PIPfunction.
[] Air/Cable (Air/ Cable): Select either Air or Cable asthe
input source for the sub-screen.
[] Channel: Select the channel for the sub-screen.
[] Size ([_ / [_): Select asizefor the sub-picture.
[] Position (_ / _ / P_ / F_): Select aposition for the
sub-picture.
[] Sound Select (Main / Sub): You can choose the
desired sound (Main / Sub)in PIP mode.
(_ MENUiTrl _Support-_ ENTERE_
Self Diagnosis
[] Picture Test: Use to check for picture problems.
Yes: If the test pattern does not appear orthere is
noise in the test pattern, select Yes.There may be a
problem with the TV. Contact Samsung's CallCenter for
assistance (1-800-SAMSUNG).
No: If the test pattern isproperly displayed, select No.
There may be a problem with your external equipment.
Please check your connections. If the problem persists,
refer tothe external device's user manual.
[] Sound Test: Usethe built-in melody sound to check for
sound problems.
Ifyou hear no sound from the TV's speakers,
before performing the sound test, make sure
Speaker Select isset to TV Speaker inthe
Sound menu.
The melody will be heard during the test even if
Speaker Select isset to External Speaker or the
sound ismuted by pressing the M_UTEbutton.
Yes: If you can hearsound only from one speaker or not
atall during the sound test, select Yes.There may be a
problem with the TV. Contact Samsung's CallCenter for
assistance (1-800-SAMSUNG).
No: If you can hearsound from the speakers, select No.
There may be a problem with your external equipment.
Please check your connections. If the problem persists,
refer tothe external device's user manual.
[] Signal Information: (Digital channels only)An HD
channel's reception quality iseither perfect or the
channels are unavailable.Adjust your antenna to
increase signal strength.
[] Troubleshooting: If the TV seems to have a problem,
refer tothis description.
Ifnone ofthese troubleshooting tips apply, contact
the Samsung customer service center.
English 23
BasicFeatures
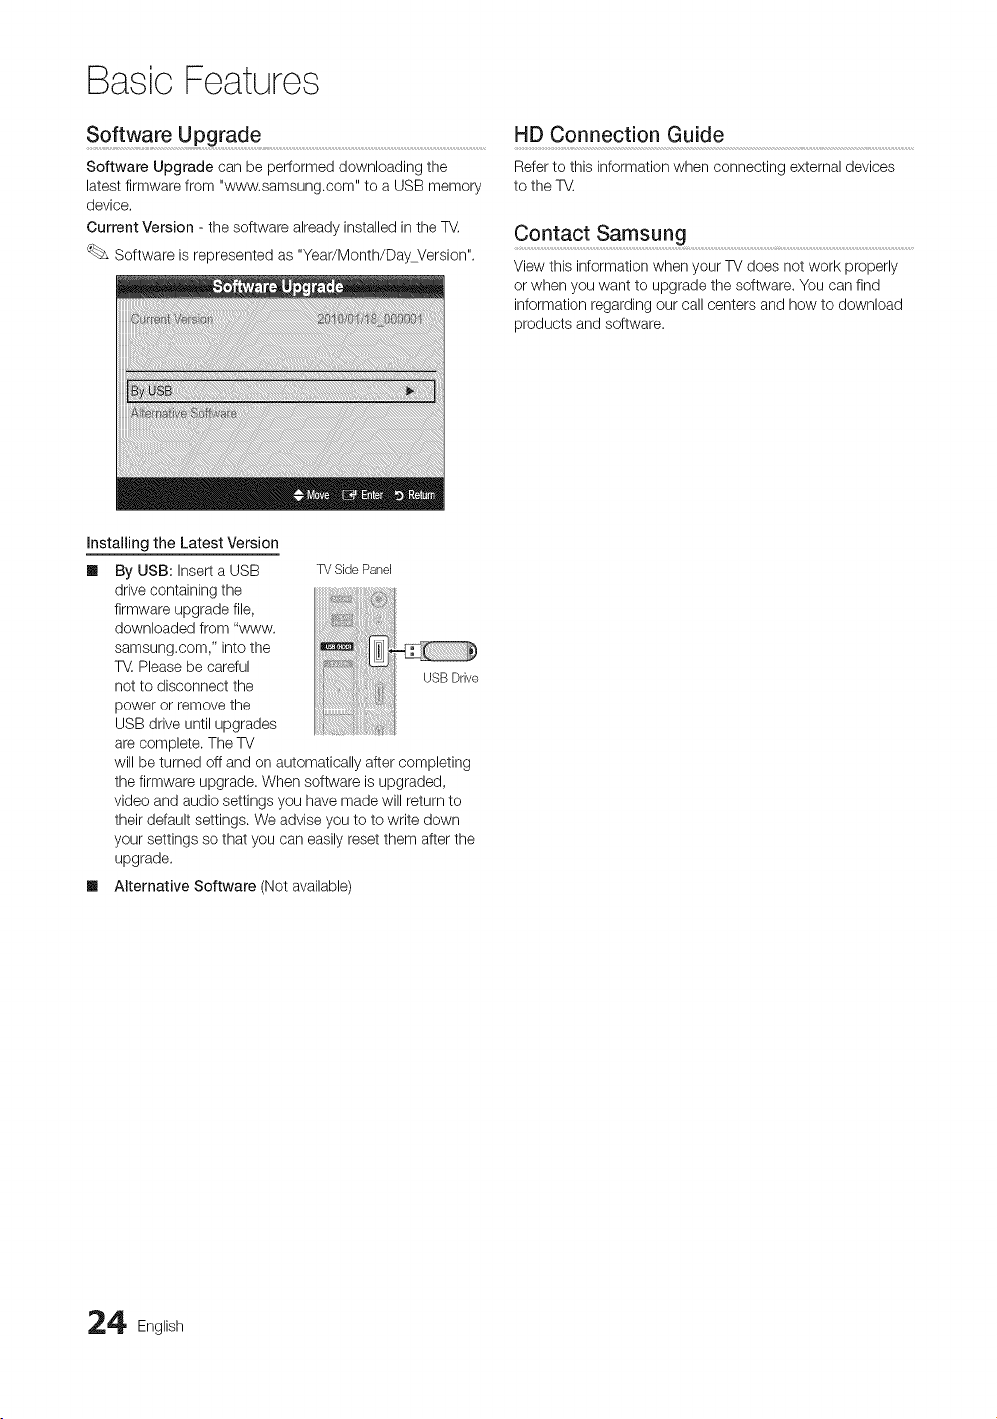
Software Upgrade ..........................................................................................................................................................
Software Upgrade can beperformed downloading the
latest firmware from "www.samsung.com" to aUSB memory
device.
Current Version - the software already installed in the TV,
Software isrepresented as "Year/Month/DayVersion".
HD Connection Guide
Referto this information when connecting external devices
tothe T_.
Contact Samsung ............................................................................................................................................................
Viewthis information when your TVdoes not work properly
orwhen you want to upgrade the software. You can find
information regarding our call centers and how to download
products and software.
Installing the Latest Version
Ill By,USB: Insert a USB
drive containing the
firmware upgrade file,
downloaded from "www.
samsung.com," into the
T_.Please becareful
not to disconnect the
power or remove the
USB drive until upgrades
arecomplete. The TV
will be turned offand on automatically aftercompleting
the firmware upgrade. When software isupgraded,
video and audio settings you havemade will return to
their default settings. We adviseyou to to write down
your settings so thatyou can easilyreset them after the
upgrade.
Ill Alternative Software (Not available)
TVSidePaneJ
!i!i!ii
_ii@il Ir_l_
USBDrive
4 English
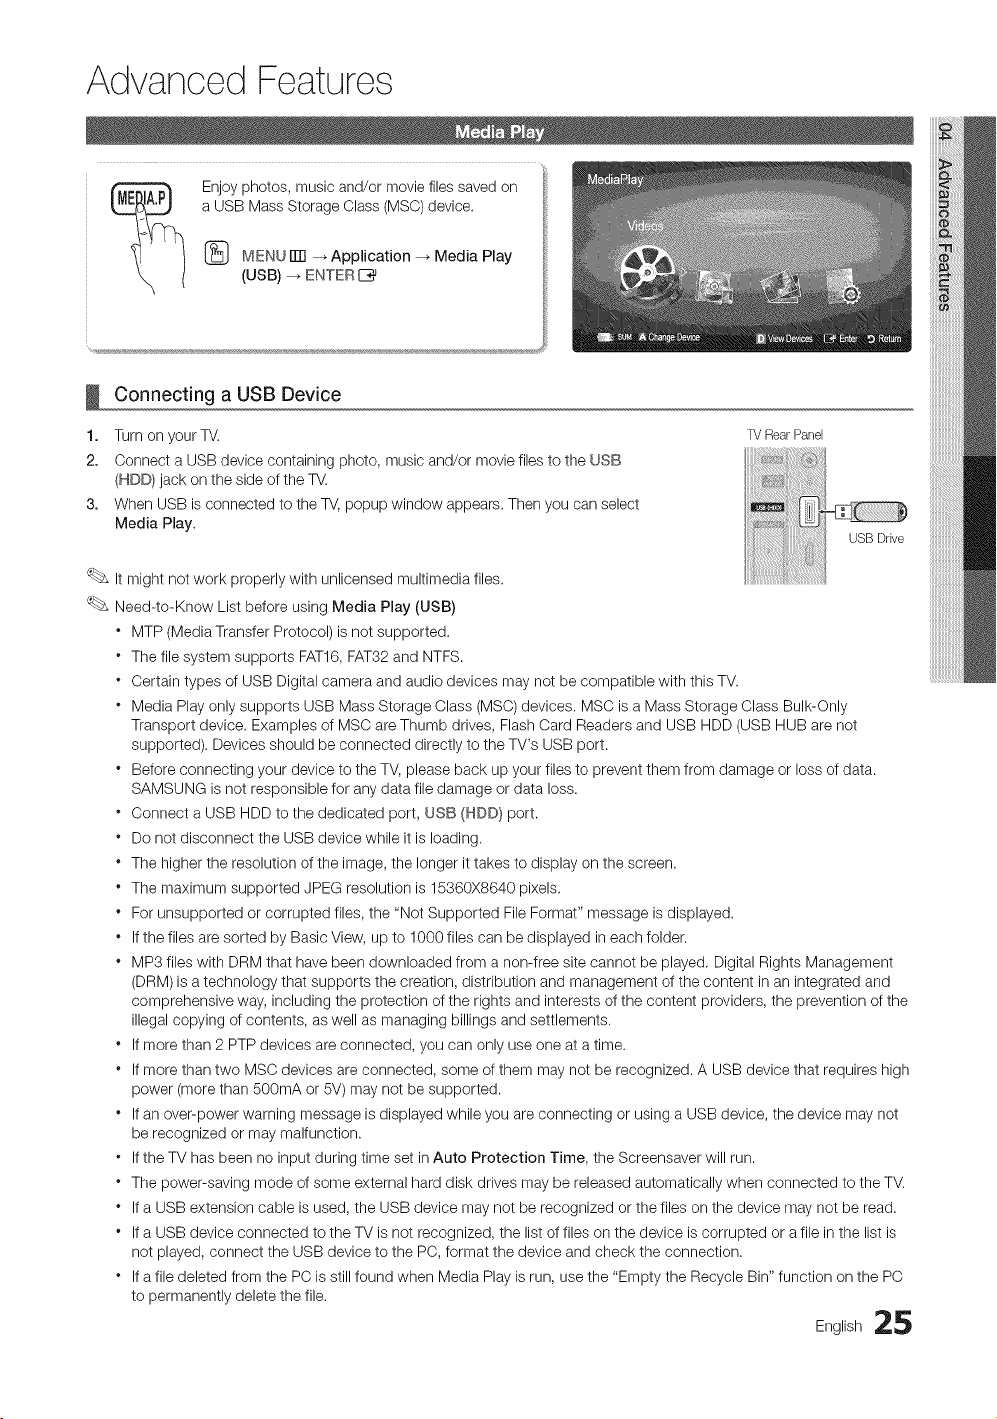
Advanced Features
Enjoy photos, music and/or movie files saved on
aUSB Mass Storage Class (MSC)device.
MENUiTrl _Application --_ Media Play
(USB) _ ENTERE_
!
1.
2.
3.
Connecting a USB Device
Turn on your TV.
Connect aUSB device containing photo, music and/or movie files tothe USB
(HDD}jack on the sideof the TV.
When USB isconnected to the TV,popup window appears. Then you can select
Media Play.
TV Rear PaneJ
USBDrive
Itmight not work properly with unlicensed multimedia files.
Need-to-Know List before using Media Play (USB)
* MTP(Media Transfer Protocol) is not supported.
* The filesystem supports FAT16, FAT32 and NTFS.
* Certain types of USB Digital camera and audio devices may not be compatible with this TV.
* Media Play only supports USB Mass Storage Class (MSC) devices. MSC isa Mass Storage Class Bulk-Only
Transport device. Examples of MSC are Thumb drives, Flash Card Readers and USB HDD (USB HUB arenot
supported). Devices should be connected directly tothe TV's USB port.
* Before connecting your device to the TV,please back up your files to prevent them from damage or loss ofdata.
SAMSUNG is not responsible for anydata filedamage or data loss.
* Connect a USB HDD to the dedicated port, USB (HDD) port.
* Donot disconnect the USB device while it isloading.
* The higher the resolution ofthe image, the longer it takes to display on the screen.
* The maximum supported JPEG resolution is15360X8640 pixels.
* For unsupported or corrupted files, the "Not Supported FileFormat" message is displayed.
* If the files aresorted by Basic View, up to 1000 files can be displayed in each folder.
* MP3 files with DRM that have been downloaded from a non-free site cannot be played. Digital Rights Management
(DRM) is a technology that supports the creation, distribution and management of the content in an integrated and
comprehensive way, including the protection ofthe rights and interests of the content providers, the prevention of the
illegalcopying of contents, as well as managing billings and settlements.
* Ifmorethan 2 PTP devices are connected, you can only use one at atime.
* Ifmorethan two MSC devices are connected, some of them may notbe recognized. A USB device that requires high
power (more than 500mA or 5V) may not be supported.
* If an over-power warning message is displayed while you areconnecting or using aUSB device, the device may not
be recognized or may malfunction.
* If the TVhas been no input during time set inAuto Protection Time, the Screensaver will run.
* The power-saving mode ofsome external hard disk drives maybe released automatically when connected to the TV.
* If a USB extension cable isused, the USB device may not be recognized or the files onthe device may not be read.
* If a USB device connected to the TV isnot recognized, the list offiles on the device iscorrupted or a file inthe list is
not played, connect the USB device to the PC, format the device and check the connection.
* If afile deleted from the PC isstillfound when Media Play isrun, use the "Empty the Recycle Bin" function on the PC
to permanently delete the file.
Eng,ish25
Advanced Features
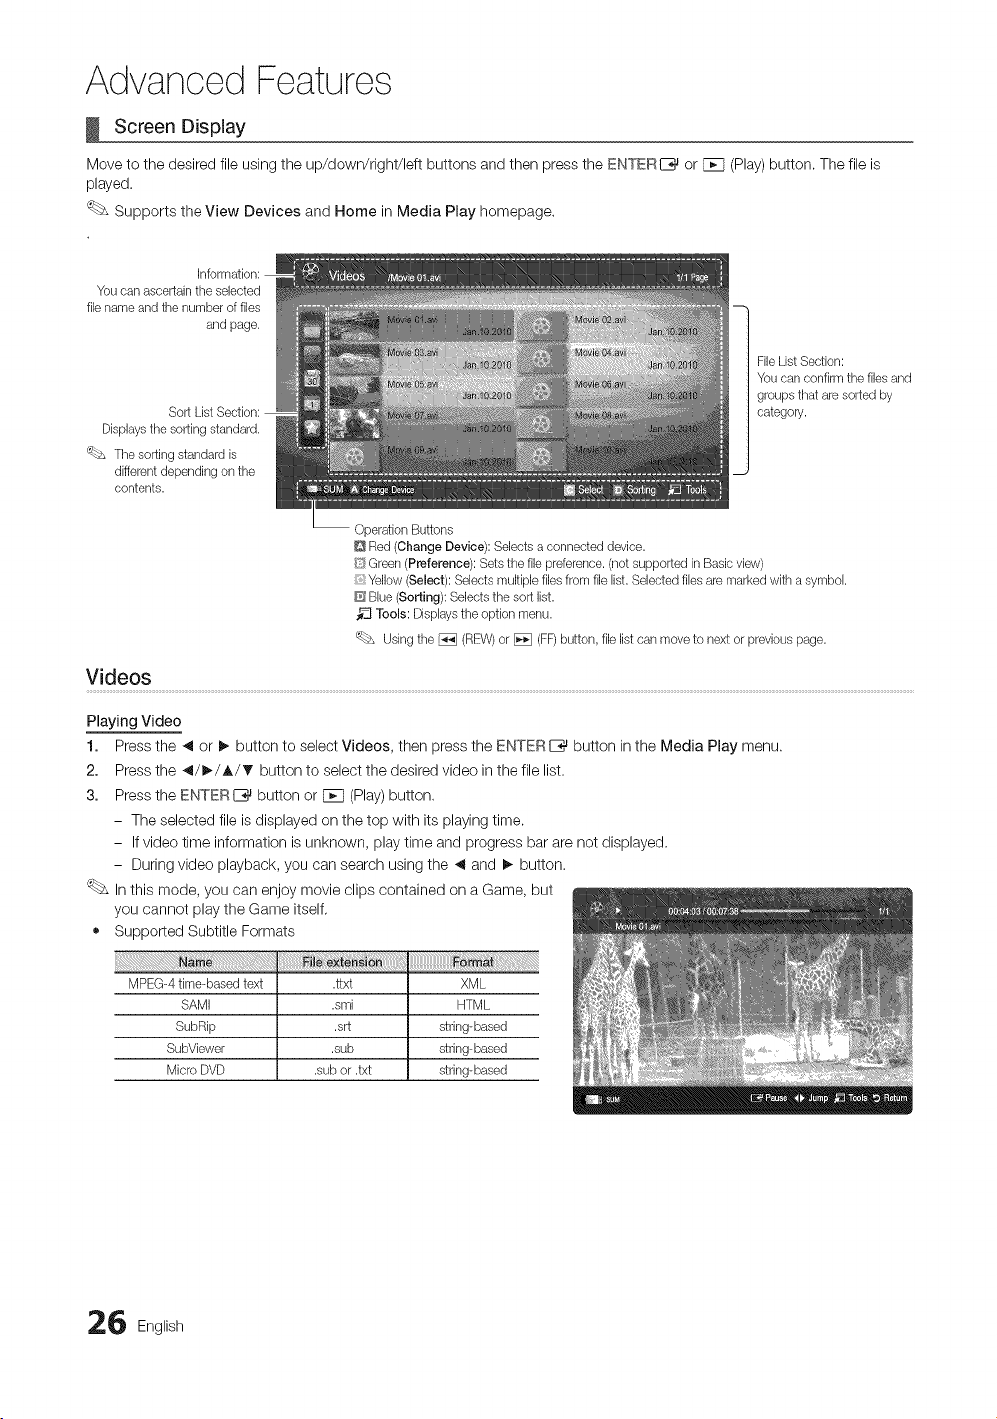
Screen Display
Move to the desired fileusing the up/down/righ'dleft buttons and then press the ENTER[__ or Fcq (Play)button. Thefileis
played.
Supports the View Devices and Home inMedia Play homepage.
You can ascertainthe selected
file name and tile numberof files
and page.
Displaysthe sorting standard.
'(_bs Tile sorting standardis
different depending on the
contents.
Operation Buttons
Q Red (Change Device): Selects aconnected device.
1
FileListSection:
You can confirm the filesand
groups that are sorted by
category.
_ Green (Preference): Sets the file preference.(notsupported inBasic vbw)
Yellow (Sebct): Selects multiple filesfrom file list. Selectedfilesare marked with asymbol.
Blue (Sorting): Selects thesort list.
Tools: Displaystheoption menu.
Usingthe _ (REW)or _ (FF)button, file listcan moveto nextorpreviouspage.
Videos
Playing Video
1. Press the _ or _, button to select Videos, then pressthe ENTERIZ_ button inthe Media Play menu.
2. Press the _/_/A/_' button to select the desired video inthefile list.
3. Press the ENTERI_ button or F_q(Play)button.
- The selected file isdisplayed on the top with itsplaying time.
- If video time information is unknown, play time and progress bararenot displayed.
- During video playback, you can search using the _ and !_ button.
Inthis mode, you can enjoy movie clips contained on a Game, but
you cannot play the Game itself.
• Supported Subtitle Formats
MPEG-4time-basedtext .ttxt XML
SAMI .smi HTML
SubRip .srt string-based
SubViewer .sub string-based
MicroDVD .subor.txt string-based
6 English
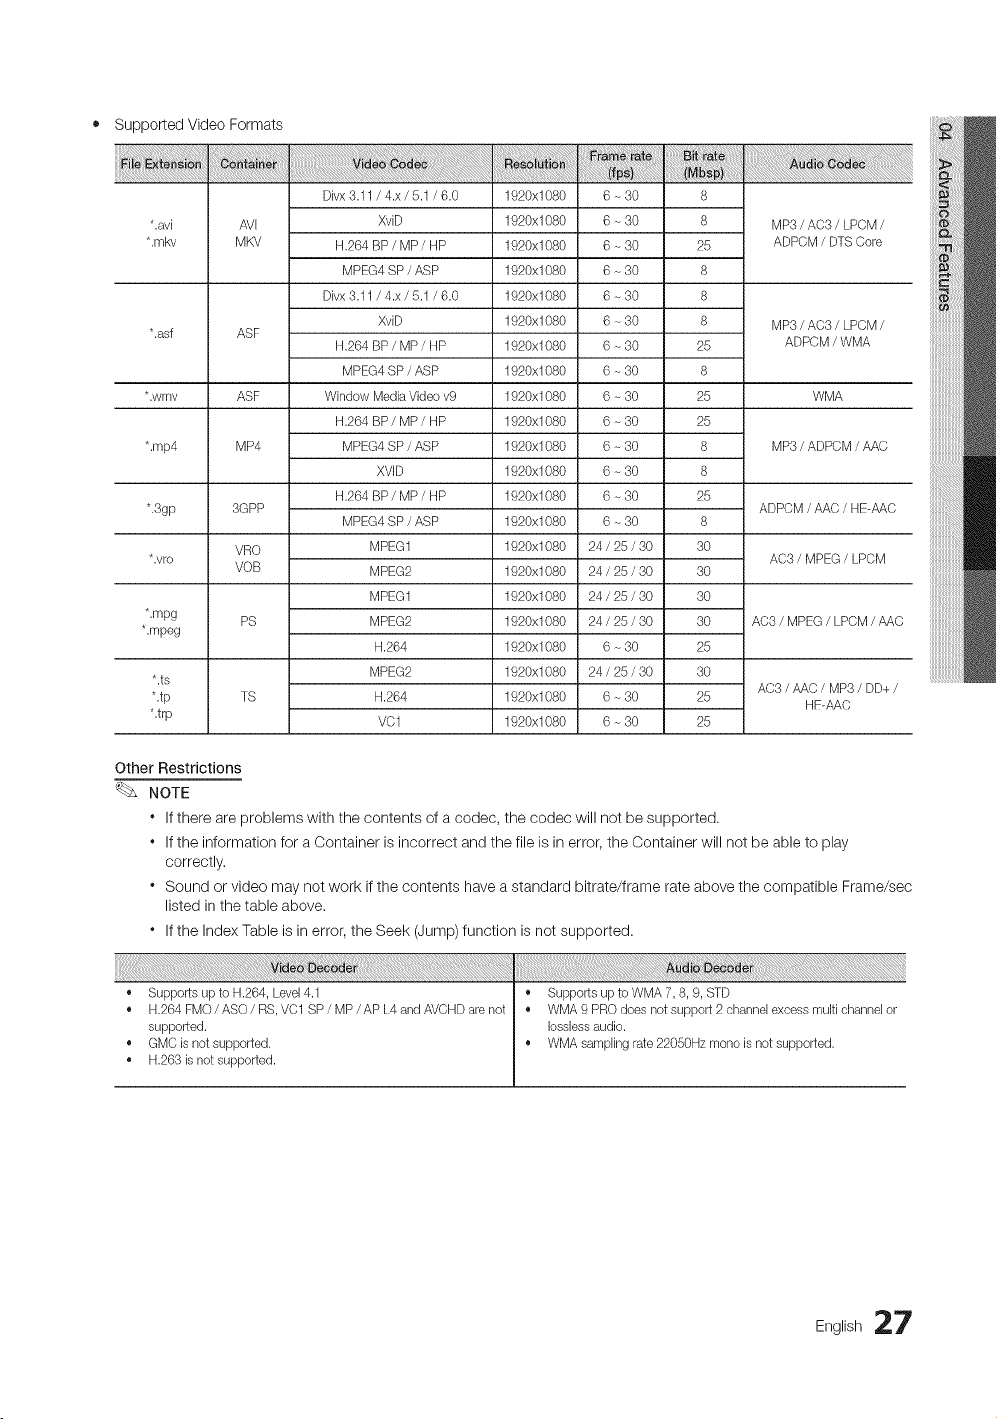
• SupportedVideoFormats
Divx 3.11 / 4.x / 5.1/ 6.0 1920x1080 6-30 8
*.avi AVI XviD 1920x1080 6 - 30 8 MP3/ AC3 / LPCM/
*.mkv MKV H.264BP / MP/ HP 1920x1080 6 - 30 25 ADPCM / DTS Core
MPEG4 SP / ASP 1920x1080 6 - 30 8
Divx 3.11 / 4.x / 5.1/ 6.0 1920x1080 6-30 8
XviD 1920x1080 6-30 8 MP3/AC3 / LPCM/
*.asf ASF
H.264 BP / MP / HP 1920xl 080 6 - 30 25 ADPCM / WMA
MPEG4 SP / ASP 1920x1080 6 - 30 8
*.wmv ASF Window MediaVideov9 1920x1080 6 - 30 25 WMA
H.264 BP / MP/ HP 1920xl 080 6 - 30 25
*.rap4 MP4 MPEG4 SP / ASP 1920x1080 6 - 30 8 MP3/ ADPCM / AAC
XVID 1920x1080 6 - 30 8
H.264 BP / MP/ HP 1920xl 080 6 - 30 25
*.3gp 3GPP ADPCM / AAC/ HE-AAC
MPEG4 SP / ASP 1920x1080 6 - 30 8
VRO MPEG1 1920x1080 24 / 25/ 30 30
*.vro AC3 / MPEG / LPCM
VOB MPEG2 1920x1080 24 / 25/ 30 30
MPEG1 1920x1080 24 / 25/ 30 30
*.mpg PS MPEG2 1920x1080 24 / 25/ 30 30 AC3 / MPEG/ LPCM/ AAC
*.mpeg
H.264 1920x1080 6 - 30 25
MPEG2 1920x1080 24 / 25/ 30 30
*.ts
AC3 / AAC/ MP3/ DD+ /
*.tp TS H.264 1920x1080 6 - 30 25
HF-AAC
*.trp VC1 1920x1080 6 ~30 25
Other Restrictions
NOTE
" If there areproblems with the contents of a codec, the codec will not besupported.
. If the information for aContainer isincorrect and the fileisin error, the Container will not be able to play
correctly.
" Sound or video may not work if the contents have astandard bitrate/frame rate above the compatible Frame/sec
listed in the table above.
" If the Index Table isin error, the Seek (Jump) function is not supported.
• Supports up to H.264, Level4.1
• H.264FMO/ASO/RS, VC1 SP/MP/APL4andAVCHDarenot
supported.
• GMCis notsupported.
• H.263 isnotsupported.
• Supports up to WMA 7, 8, 9, STD
• WMA 9 PRO does notsupport 2channel excess multichannelor
Iosslessaudio.
• WMA sampling rate22050Hz mono isnotsupported.
English 27
Advanced Features
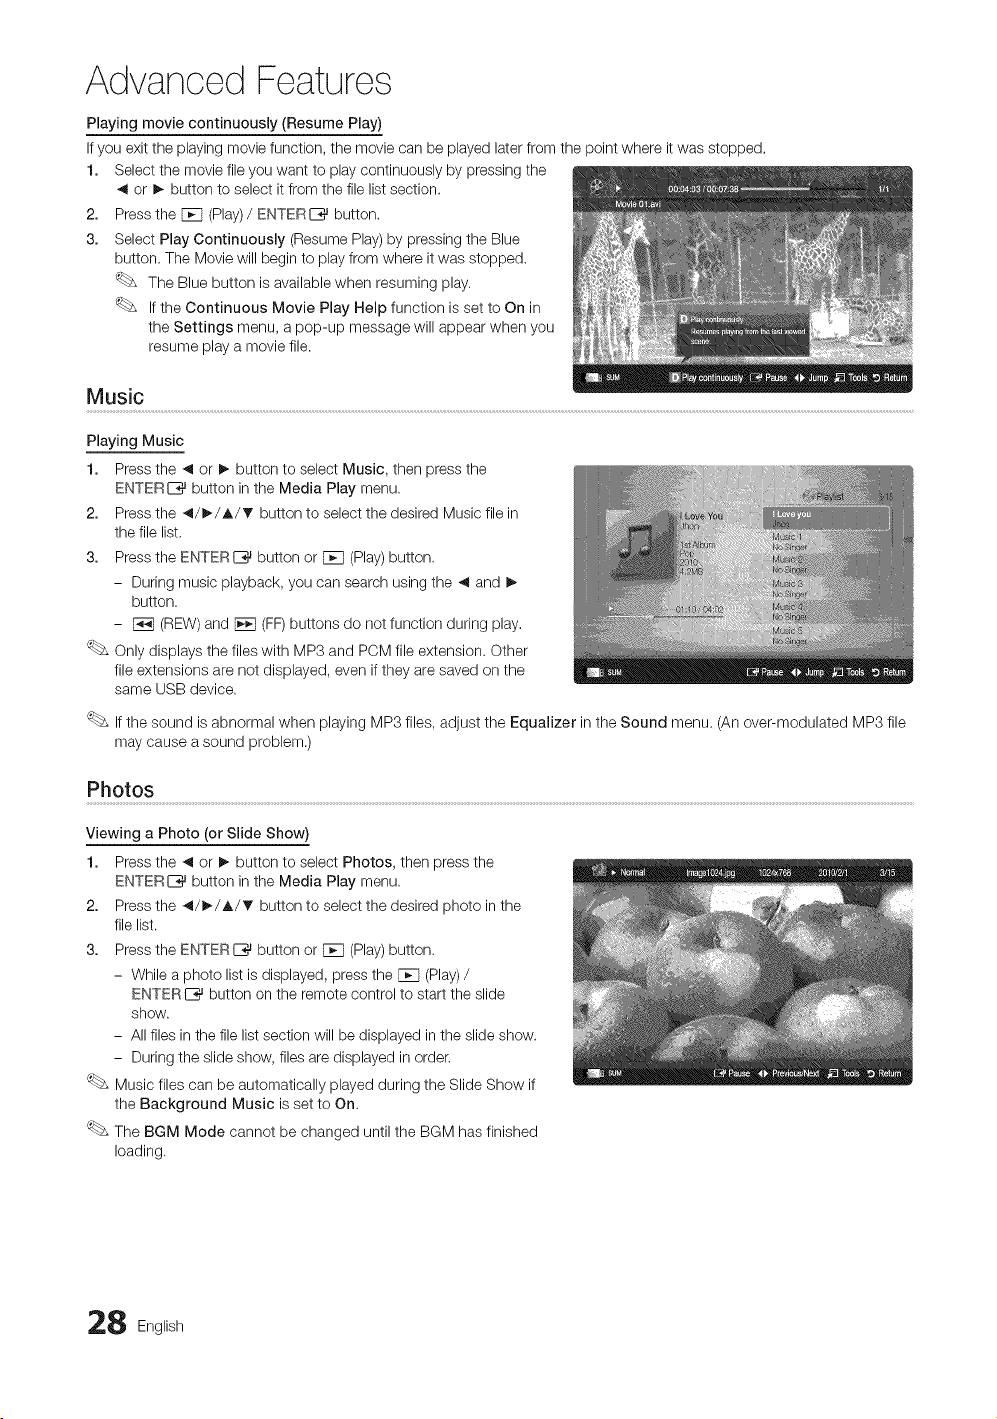
Playing movie continuously (Resume Play)
If you exit the playing movie function, the movie can be played later from the point where it was stopped.
1. Select the movie fileyou want to playcontinuously by pressing the
,_ or !_ button to select it from the filelist section.
2. Press the F_q(Play)/ ENTERE_ button.
3. Select Play Continuously (Resume Play) by pressing the Blue
button. The Movie will beginto playfrom where it was stopped.
The Blue button isavailable when resuming play.
Ifthe Continuous Movie Play Help function is set toOn in
the Settings menu, a pop-up message will appear when you
resume play a movie file.
Music
Playing Music
1. Press the _ or I_ button to select Music, then press the
ENTERE__ button in the Media Play menu.
2. Press the _/_/A/T button to select the desired Musicfile in
the filelist.
3. Press the ENTERI_ button or [_q (Play)button.
- During music playback, you can search using the ,_ and I_
button.
- F_3(REW) and F_q(FF)buttons do not function during play.
Only displays the files with MP3 and PCM file extension. Other
fileextensions are not displayed, even if they aresaved on the
same USB device.
Ifthe sound is abnormal when playing MP3 files, adjust the Equalizer in the Sound menu. (Anover-modulated MP3 file
may cause a sound problem.)
Photos
Viewing a Photo (or Slide Show)
1. Press the _ or I_ button to select Photos, then pressthe
ENTERC_J button in the Media Play menu.
2. Press the _/_/A/T button to select the desired photo inthe
filelist.
3. Press the ENTER_ button or F_q(Play)button.
- While aphoto list isdisplayed, press the F_q(Play)/
ENTERL%_button on the remote control to start the slide
show.
- All files in the file list section will be displayed intheslide show.
- During the slide show, files are displayed in order.
Music files can be automatically played during the Slide Show if
the Background Music isset to On.
The BGM Mode cannot be changed untilthe BGM has finished
loading.
8 English
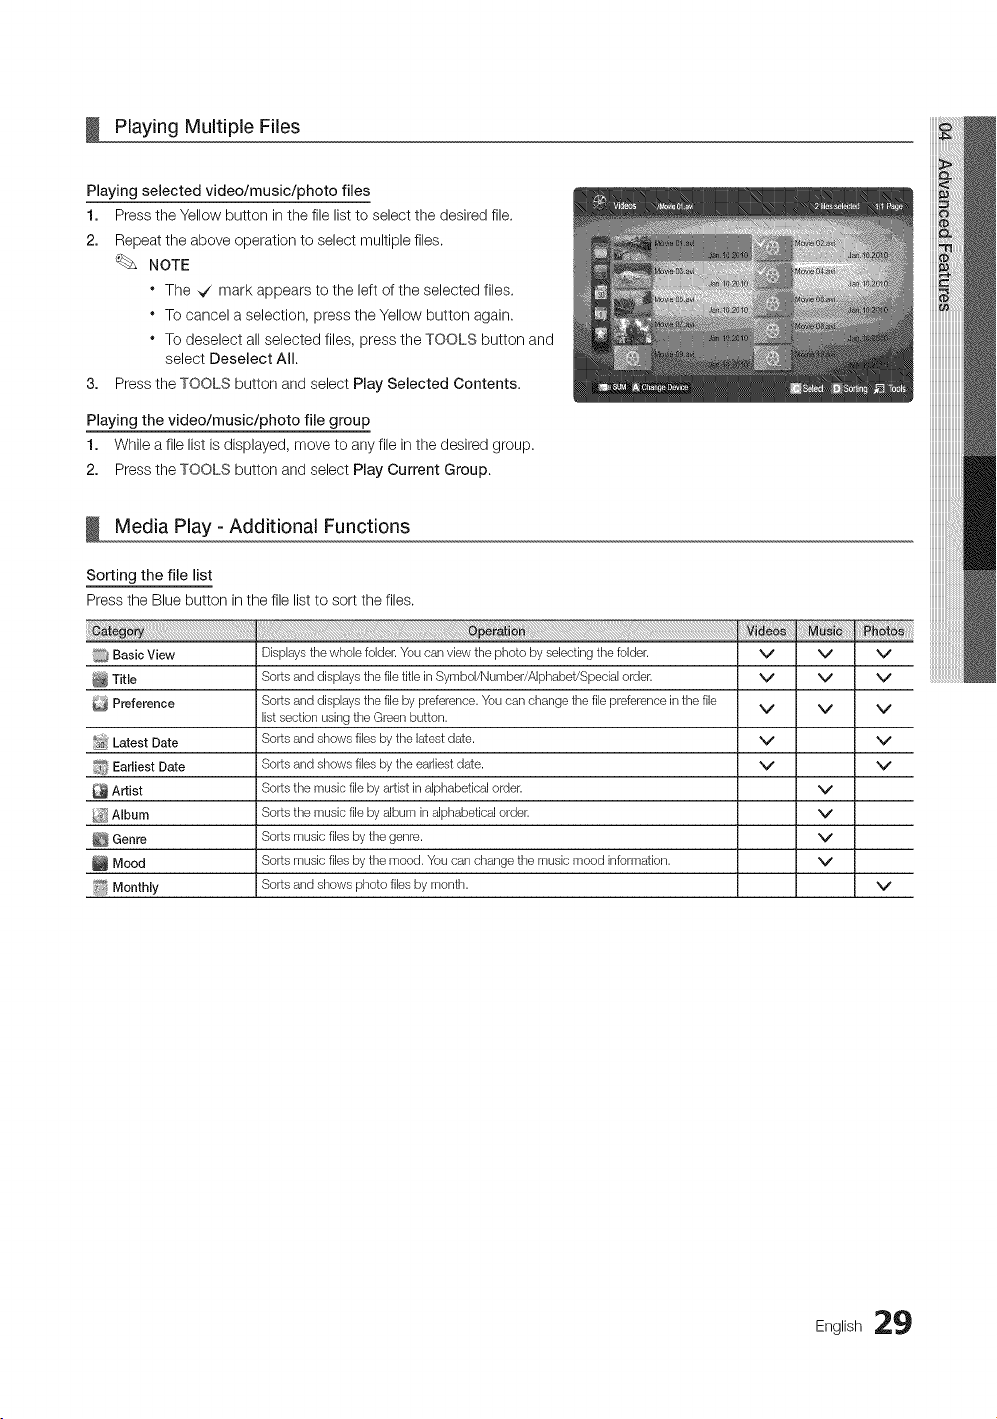
Playing Multiple Files
Playing selected video/music/photo files
1. Press the Yellow button in the file list to select the desired file,
2. Repeat the above operation to select multiple files,
NOTE
* The _ mark appears to the left of the selected files.
* To cancel a selection, press the Yellow button again.
* To deselect allselected files, press the TOOLS button and
select Deselect All.
3. Press the TOOLS button and select Play Selected Contents.
Playing the video/music/photo file group
1. While afile list isdisplayed, move to anyfilein thedesired group.
2. Press the TOOLS button and select Play Current Group.
Media Play - Additional Functions
Sorting the file list
Press the Blue button in the file list to sort the files.
,_ti :
_ Basic View
Title
Preference
_o;_Latest Date
_ Earliest Date
Artist
_ Album
Genre
Mood
i_ Monthly
Displays thewhole folder. You carl view thephoto byselecting thefolder.
Sorts and displays thefile titlein Symbol/Number/Alphabet!Special order.
Sorts and displays thefile bypreference.Youcan change thefilepreference in thefile
listsection usingtheGreen button.
Sorts and shows files bythelatestdate.
Sorts and shows files bytheearliestdate.
Sorts the music filebyartistinalphabeticalorder.
Sorts the music filebyalbum in alphabetical order.
Sorts music files bythegenre.
Sorts music files bythemood. Youcan change the musicmood information.
Sorts and shows photo files bymonth.
v v v
v v v
v v v
v v
v v
v
v
v
v
v
Eng,ish:29
Advanced Features
Videos/Music/Photos Play Option menu
During fileplayback, press the TOOLS button.
Title
Repeat Mode
Picture Size
(Model / Mode2 / Original)
Picture Setting
Sound Setting
Subtitle Setting
Stop Slide Show /
Start Slide Show
Slide Show Speed
Background Music
Zoom
Rotate
Information
_!l_i_i_:_!!i!!i!!i!!i!!i!i_!i!_!_i!_i!_i!_i!_i!_i!_i!_i!i!!_!!!!_!i!iiiii_i_iiiiiiiii_i_!_!__l_!_ii_i_!ii_i_!i_!ii_:_:_:_:_:_:_:_:_:_::_:_:_:_::_:_:_:_::_:_:_:_::_:_:_:_::_:_:_:_::_:_:_:_::_:_:_:_::_:_:_:_::_:_:_:_::_:_:_:_::_:_:_:_::_:_:_:_::_:_:_:_::_:_:_:_::::_:_:_::::_:_:_::::_:_:_::::_:_:_::::_:_:_::::_:_:_::::_:_:_::::_:_:_::::_:_:_::::_:_:_::::_:_:_::::_:_:_::::_:_:_:_::_:_:_:_::_:_:_:_::_:_:_:_::_:_:_:_::_:_:_;_:_i_i!i!_i_i_i_i!i!i!i_i_i_i_iiiiiii_i_!_!_!!
Youcan move directly to anotherTitle.
Youcan play movie and music filesrepeatedly.
Youcan adjust thepicture size to your preference.
Youcan adjust thepicture setting.(p. 15, 16,17,18)
Youcan adjust thesoundsetting. (p. 18,19)
Youcan play thevideowith Subtitles. Thisfunction only works ifthe subtitbs arethe
same file name asthe video.
Youcan start orstopaslideshow.
Youcan select theslideshow speed during theslideshow.
Youcan set various slideshow effects.
Youcan zoom intoimagesin full screen mode.
Youcan rotateimagesin full screen mode.
Youcan see detailed information about the played file.
v
v
v
v
v
v
v
v
v v
v
v
v
v
v
v
v
v
Settings ....................................................................................................................................................................................................................................................................................................................................................................................................................................................................................................
Using the Setup MenuSettings
Ill Continuous Movie Play Help (Resume Play) (On / Off): Select to display the helppop-up message for continuous movie
playback,
Ill Get DivX® VOD registration code: Shows the registration code authorized for the TV. If you connect to the DivX web site
and register,you can download the VOD registration file. If you play the VOD registration using Media Play, the registration
iscompleted.
For more information on DivX®VOD, visit "www.DivX,com."
Ill Get DivX® VOD deactivation code: When DivX® VOD is not registered, the registration deactivation code isdisplayed. If
you execute this function when DivX®VOD isregistered, the current DivX®VOD registration isdeactivated.
Ill Information: Select toview information about the connected device.
0 English
What isAnynet+?
Anynet+ isafunction that enables you to control all connected Samsung devices that support Anynet+ with your Samsung
TV's remote. The Anynet+ system can be used only with Samsung devices that have the Anynet+ feature, Tobesure your
Samsung device has thisfeature, check if there isanAnynet+ logo on it.
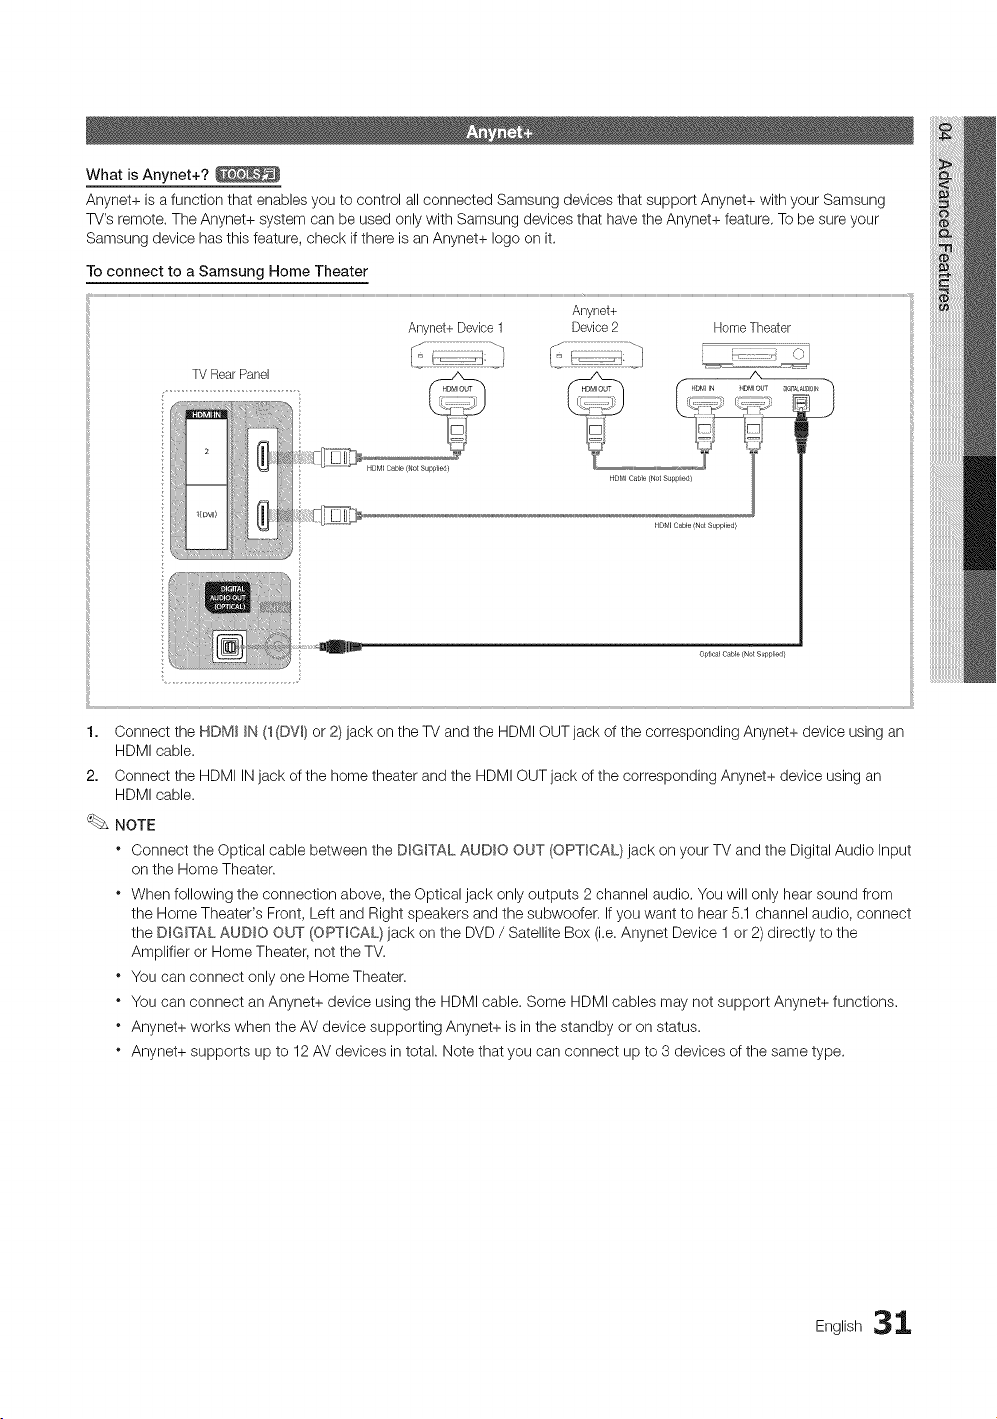
Toconnect to a Samsung Home Theater
Anynet+
Anynet+Device1 Device2 HomeTheater
TVRearPanel
Opt ca_CaMe {Not S_pplbd}
1. Connect the HDM__N(1(DW)or 2) jack onthe TVand the HDMI OUT jack ofthe corresponding Anynet+ device usingan
HDMI cable.
2. Connect the HDMIINjack of the home theater and the HDMIOUT jack of the corresponding Anynet+ device using an
HDMI cable.
NOTE
Connect the Optical cable between the DIGITAL AUDIO OUT (OPTICAL} jack on your TV and the Digital Audio Input
on the Home Theater.
When following the connection above, the Optical jack only outputs 2 channel audio. You will only hearsound from
the Home Theater's Front, Left and Right speakers and the subwoofer. If you want to hear 5.1 channel audio, connect
the DmG_TALAUDIO OUT (OPTICAL) jack on the DVD / Satellite Box (i.e. Anynet Device 1or 2)directly to the
Amplifier or Home Theater, not the TV.
* You can connect only one Home Theater.
* You can connect an Anynet+ device usingthe HDMI cable. Some HDMI cables may not support Anynet+ functions.
* Anynet+ works when the AVdevice supporting Anynet+ isinthe standby or onstatus.
* Anynet+ supports up to 12 AV devices in total. Note that you can connect upto 3devices of the same type.
English 31
Advanced Features
iiii_ii_i_i_i_i_i_!_!_!!_i_i!_i_i!_i!_i!_i!_i!i!!!_i!_i!_!_!_i:_!_ii_i_i!_!_!_i_i_i_ili'ii_i!_!_i¸iiiiiiiiiiiiiiiiiiiiiiiiii_ilililililili!iiiiiil
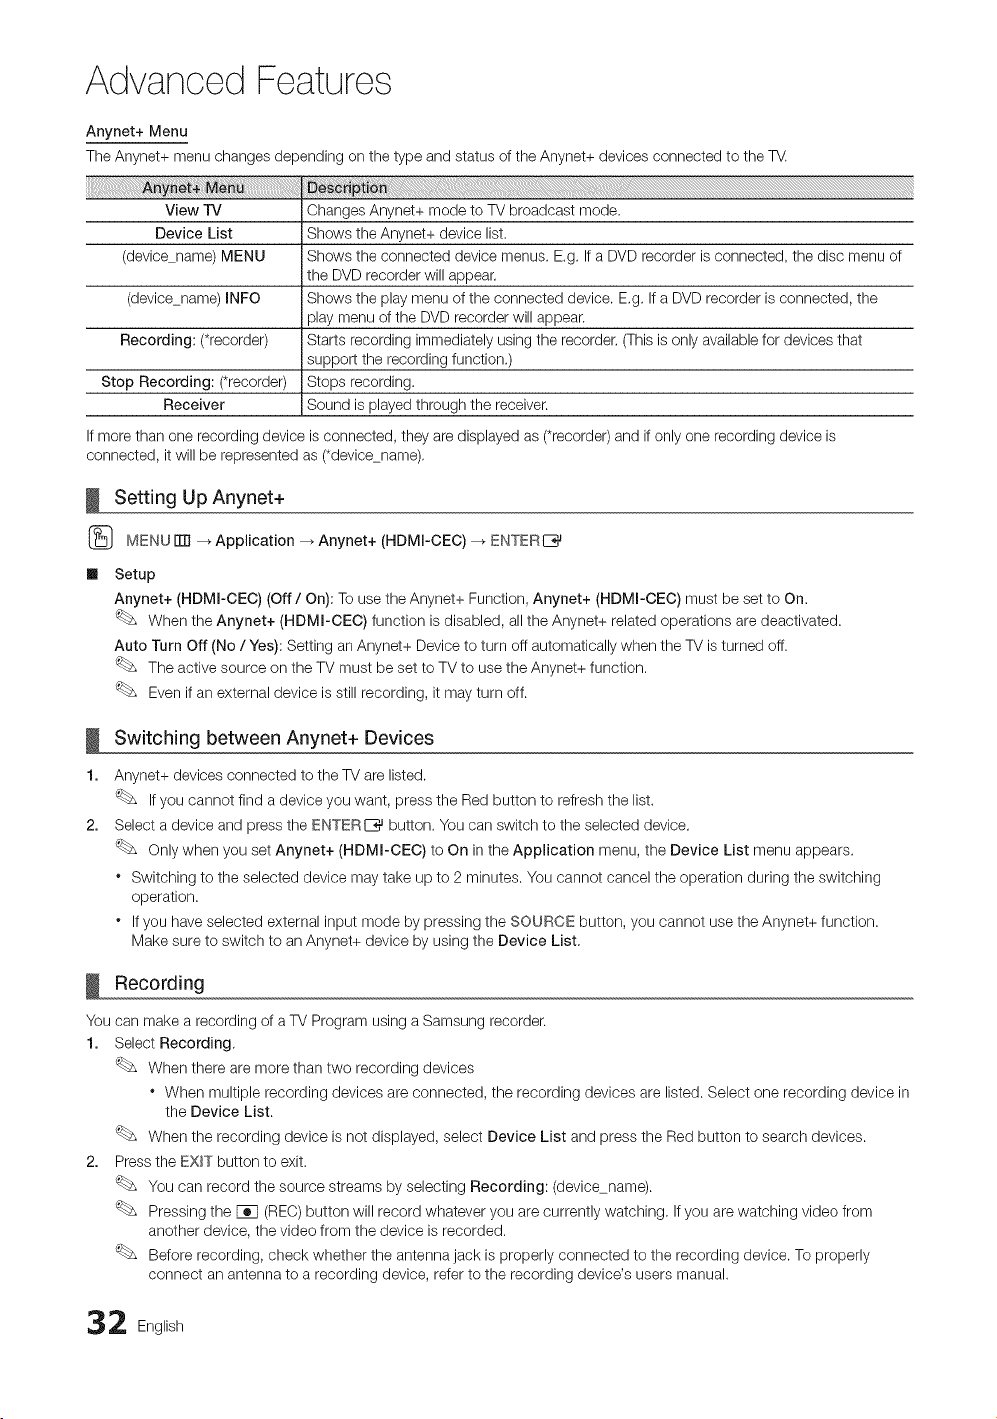
View IV
Device List
(device_name) MENU
Anynet+ Menu
The Anynet+ menu changes depending onthe type and status of the Anynet+ devices connected to the TV.
Changes Anynet+ mode to TV broadcast mode.
Shows theAnynet+ device list.
Shows theconnected device menus. E.g. If a DVD recorder isconnected, the disc menu of
the DVDrecorder will appear,
(device_name) INFO Shows theplay menu ofthe connected device. E,g. If a DVD recorder isconnected, the
playmenu of the DVD recorder will appear.
Recording: (*recorder) Starts recording immediately using the recorder, (This isonlyavailable for devices that
support the recording function.)
Stop Recording: (*recorder) Stops recording.
Receiver Sound isplayed through the receiver.
Ifmore than one recording device isconnected, they are displayed as (*recorder) and ifonly one recording device is
connected, it will be represented as (*device_name),
Setting Up Anynet+
(_ MENU ITTI--_Application _ Anynet+ (HDMm-CEC)--_ ENTER[_
Ill Setup
Anynet+ (HDMm-CEC) (Off / On): Touse the Anynet+ Function, Anynet+ (HDMm-CEC) must be set to On.
When the Anynet+ (HDMm-CEC) function isdisabled, allthe Anynet+ related operations aredeactivated.
Auto Turn Off (No /Yes): Setting anAnynet+ Device to turn offautomatically when the TV is turned off.
The active source onthe TVmust beset to TVto use the Anynet+ function.
Evenif anexternal device isstillrecording, it may turn off.
!
1.
2.
Switching between Anynet+ Devices
Anynet+ devices connected to the TV arelisted.
If you cannot find adevice you want, press the Redbutton to refresh the list.
Select adevice and press the ENTERE_ button, You can switch to the selected device,
Only when you set Anynet+ (HDMI-CEC) to On in theApplication menu, the Device List menu appears.
* Switching tothe selected device may take up to 2minutes. You cannot cancel the operation during the switching
operation.
* If you have selected external input mode by pressing the SOURCE button, you cannot usethe Anynet+ function.
Make sure to switch to an Anynet+ device by using the Device List,
Recording
You can makea recording of a TV Program using aSamsung recorder.
1. Select Recording.
When there aremore than two recording devices
When multiple recording devices are connected, the recording devices are listed. Select one recording device in
the Device List.
When the recording device isnot displayed, select Device List and press the Red button to search devices.
2. Press the EXIT button to exit.
You can record the source streams by selecting Recording: (devicename).
Pressing the [_q (REO) button will record whatever you arecurrently watching. If you are watching video from
another device, the video from the device isrecorded.
Before recording, check whether the antenna jack is properly connected to the recording device. To properly
connect an antenna to a recording device, refer to the recording device's users manual.
2 English

Listening through a Receiver
You can listen to sound through a receiver(i.e Home Theater) instead of the rv Speaker.
1. Select Receiver and setto On.
2. Press the EXIT button to exit.
If your receiver supports audio only, it may not appear in the device list.
The receiver will work when you have properly connected the optical injack ofthe receiver tothe DIGITAL AUDIO
OUT (OPTICAL} jack of the TV.
When the receiver (i.e Home Theater) isset to On, you can hear sound output from theTV's Optical jack, When
the TV isdisplaying a DTV(air)signal, the TVwill send out 5.1 channel sound to the receiver. When the source isa
digital component such asa DVD and is connected to the TVvia HDMI, only 2 channel sound will be heard from
the receiver.
NOTE
You can onlycontrol Anynet+ devices using the TV remote control, not the buttons on the TV.
The TVremote control may not work under certain conditions, If this occurs, reselect the Anynet+ device.
The Anynet+ functions do not operate with other manufacturers' products.
Troubleshooting for Anynet+
_ro_
Anynet+ does notwork.
Iwant to start Anynet+.
Iwant to exitAnynet+.
Themessage "Connectingto
Anynet+ device..."appears on the
screen.
• Check if the deviceisan Anynet+ device. TheAnynet+system supports Anynet+ devicesonly.
• Onlyone receiver(hometheater)can beconnected.
• Check if theAnynet+ devicepowercord isproperlyconnected.
• Check theAnynet+device'sVideo/Audio/HDMI cableconnections.
• Check whetherAnynet+ (HDMI-OEC) isset to On intheAnynet+setup menu.
• Check whethertheTV remote control isin TVmode.
• Check whetherthe remote control isAnynet+compatible.
• Anynet+doesn't work in certain situations. (Searchingchannels, operating Media Play (USB)or Plug & Play
(initialsetup),etc.)
• When connecting orremoving the HDMIcable, please make sure to search devicesagain orturnyour TV off
and on again.
• Check if theAnynet+ Function of Anynet+device isset on.
• Check if theAnynet+ deviceisproperlyconnected to theTV and check if the Anynet+ (HDMI-OEO) isset to
On in theAnynet+ Setupmenu.
• PresstheTOOLS button to display theAnynet+menu and selectamenuyouwant.
• Select View TV in theAnynet+menu.
• PresstheSOURCE bL_tonon the TV remote control and select a non- Anynet+ device.
• PressV CH A, PREoCN, and R&_LCk_to change theTVmode. (Note that thechannel button operatesonly
whenatuner-embedded Anynet+deviceisnotconnected.)
• You cannot use theremote control whenyou areconfiguringAnynet+orswitching to aview mode.
Use theremote control whentheAnynet+setting orswitching to view mode iscomplete.
TheAnynet+device does notplay. • You cannot use theplay function wtqen Plug & Play (initialsetup) isin progress.
Theconnected deviceisnot
displayed.
TheTV Program cannot be
recorded.
TheTV sound isnotoutput • Connectthe opticalcablebetween TVandthereceiver.
through thereceiver.
Check whetheror notthedevicesupports Anynet+ functions.
Check whetheror nottheHDMIcableisproperly connected.
Check whetherAnynet+ (HDMI-OEC) isset to On intheAnynet+setup menu.
Search Anynet+ devicesagain.
You can connect an Anynet+deviceusingthe HDMIcable only.Some HDMIcables maynotsupport Anynet+
functions.
Ifconnection isterminatedbecause there has been apowerinterruption orthe HDMIcablehas been
disconnected, please repeat the devicescan.
Check whethertheantenna jack on therecording deviceisproperlyconnected.
English 33
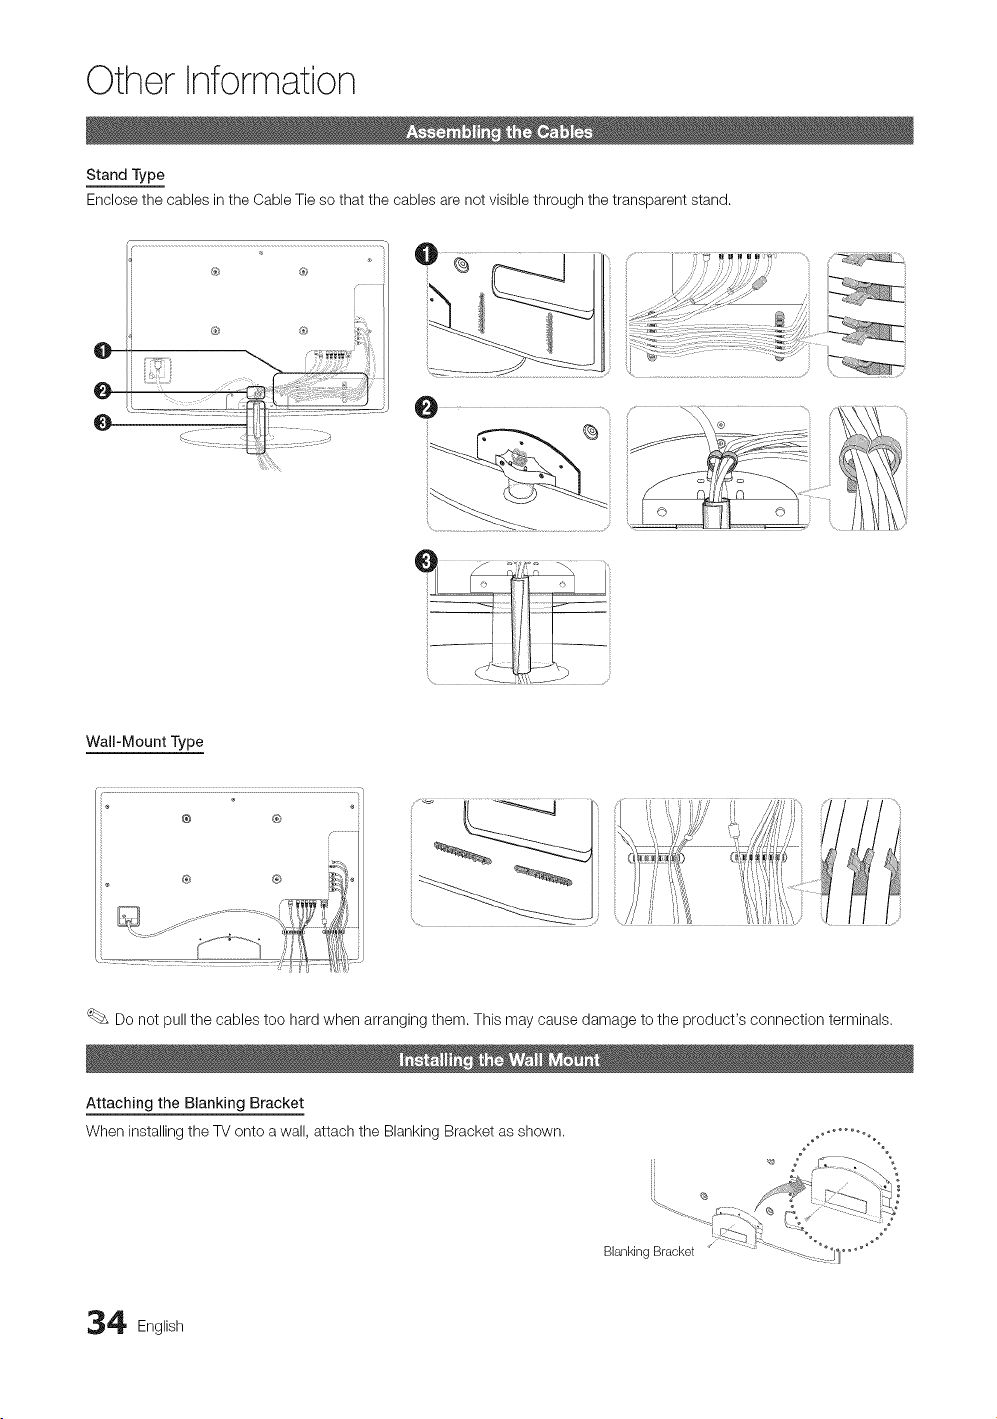
OtherInformation
Stand Type
Enclose the cables intheCable Tie so that the cables arenot visible through the transparent stand.
0
® ®,
Wall-Mount Type
.....:
__----°4 _.i' :_, t'7,
Do not pullthe cables too hardwhen arranging them. This may cause damage to the product's connection terminals.
Attaching the Blanking Bracket
When installing the TV onto awall, attach the Blanking Bracket as shown.
ii
BlankinaBracket oo
4 English
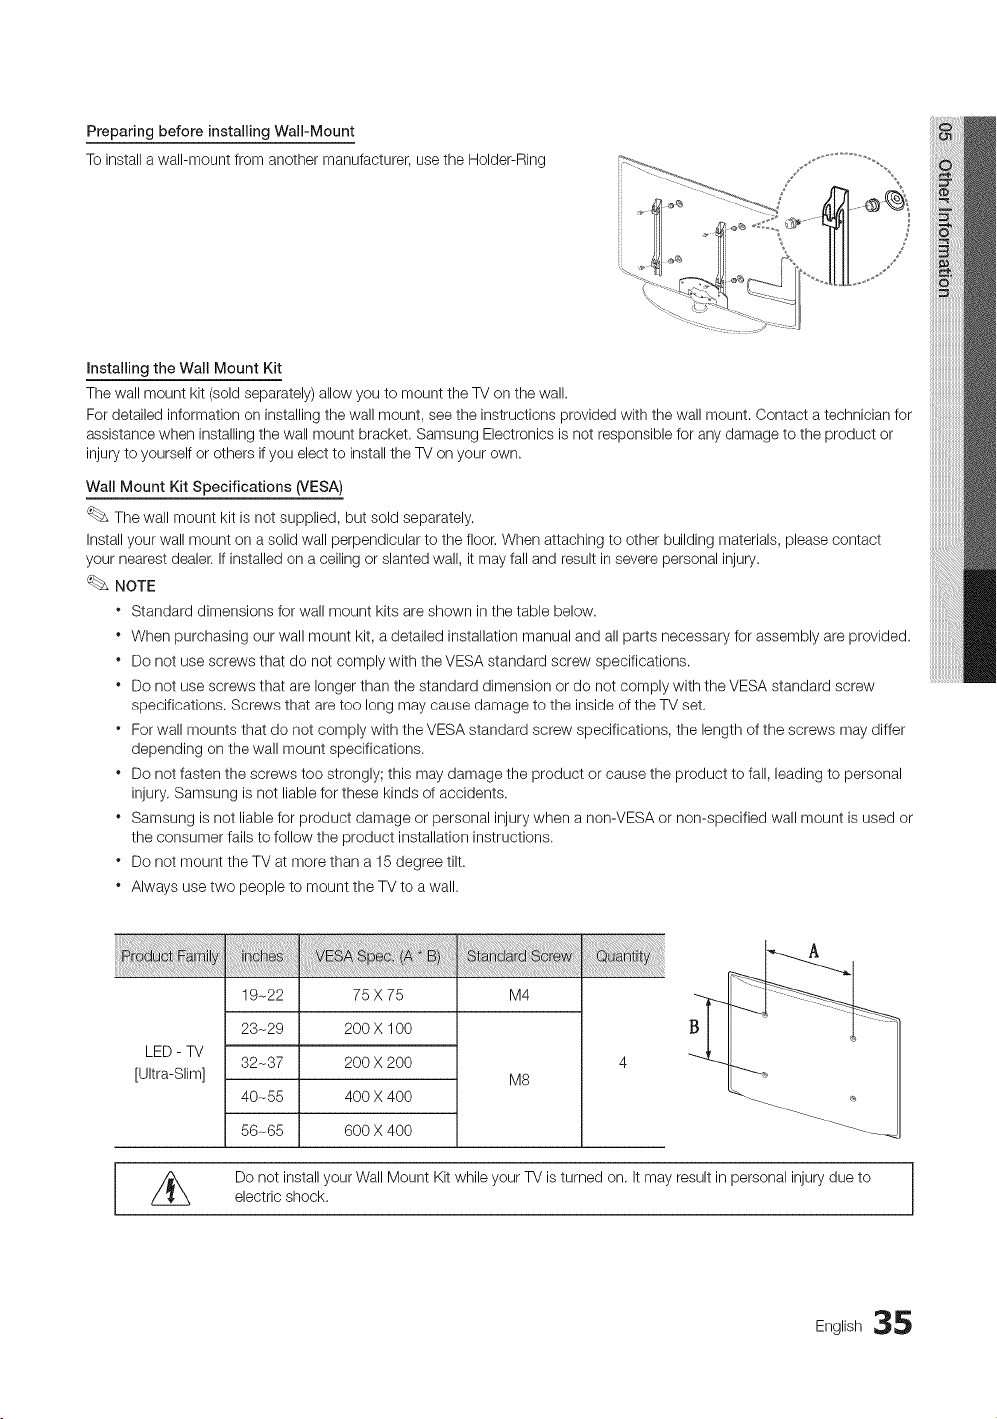
Preparing before installing Wall-Mount
To install a wall-mount from another manufacturer, use the Holder-Ring
Installing the Wall Mount Kit
The wall mount kit(sold separately) allow you to mount the TV on the wall.
For detailed information on installing the wall mount, see the instructions provided with the wall mount. Contact a technician for
assistance when installing the wall mount bracket. Samsung Electronics isnot responsible for any damage to the product or
injury toyourself or others if you electto installthe TV on your own.
Wall Mount Kit Specifications (VESA)
Thewall mount kit isnot supplied, but sold separately.
Installyourwall mount on asolidwall perpendicular to the floor, When attaching to other building materials, please contact
your nearest dealer. Ifinstalled on a ceiling or slanted wall, it may fall and resultin severe personal injury.
NOTE
* Standard dimensions for wall mount kits are shown in the table below.
* When purchasing our wall mount kit,a detailed installation manual andall parts necessary for assembly are provided.
* Donot use screws that do not comply with the VESA standard screw specifications.
* Donot use screws that are longer than the standard dimension or do not comply with the VESA standard screw
specifications. Screws that aretoo long may cause damage to the inside of the TVset.
* For wall mounts that do not comply with the VESA standard screw specifications, the length of the screws may differ
depending on the wall mount specifications.
* Donot fasten the screws too strongly; this may damage the product or cause the product tofall, leading to personal
injury, Samsung isnot liable for these kinds of accidents.
* Samsung isnot liablefor product damage or personal injury when anon-VESA or non-specified wall mount isused or
the consumer fails to follow the product installation instructions.
* Donot mount the TV at more than a 15 degree tilt.
* Always use two people to mount the TVto a wall.
LED - TV
[Ultra-Slim]
19-22 75 X 75 M4
23-29 200 X 100
32-37 200 X 200
40-55 400 X 400
56-65 600 X 400
M8
///_ Donot install your Wall Mount Kitwhile your TV isturned on, It may result in personal injury due toelectric shock.
English 35
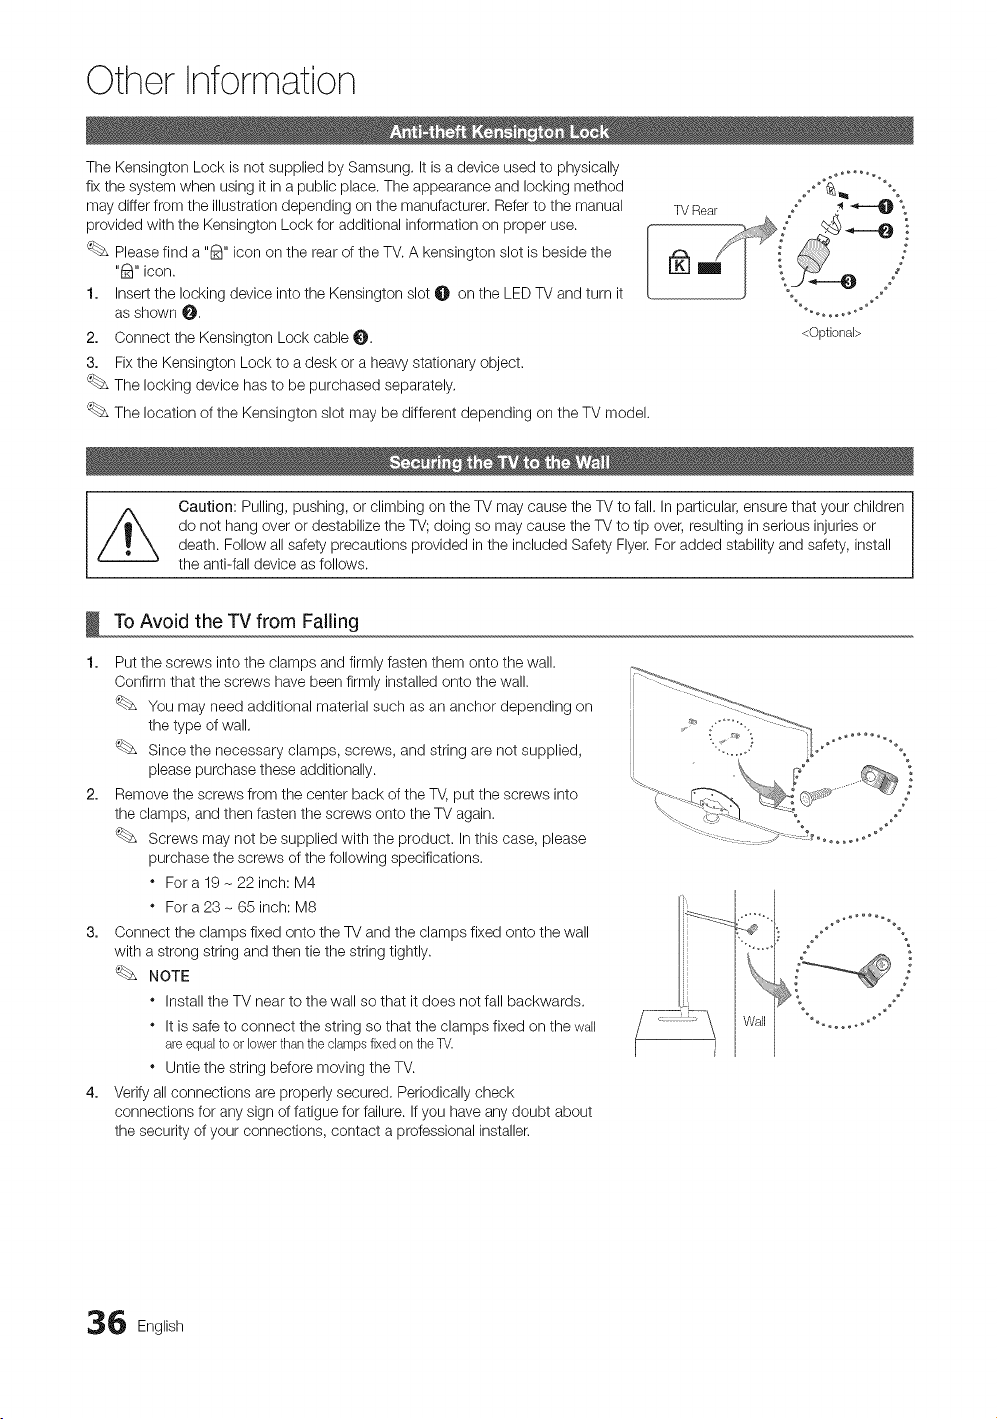
Other Information
The Kensington Lock is not supplied by Samsung. It isadevice used to physically
fix the system when using it in apublic place. Theappearance and locking method
may differ from the illustration depending on the manufacturer. Referto the manual
provided with the Kensington Lock for additional information on proper use. f
Please find a"8" icon on the rear ofthe TV.A kensington slot isbeside the
l
"8" icon.
1. Insert the locking device into the Kensington slot 0 onthe LED TV and turn it
as shown O,
2. Connect the Kensington Lockcable O.
3. Fixthe Kensington Lock toa desk or aheavy stationary object.
The locking device has to be purchased separately,
The location of the Kensington slot may be different depending on the TV model.
<Optional>
Caution: Pulling,pushing, or climbing on the TVmay cause the TV to fall.In particular, ensure that your children
do not hang over or destabilize the TV; doing so may cause the TV to tip over, resulting in serious injuries or
death. Follow allsafety precautions provided in the included Safety Flyer.For added stability and safety, install
the anti-fall device asfollows.
ToAvoid the TVfrom Failing
1.
Put the screws into the clamps and firmly fasten them onto the wall.
Confirm that the screws have been firmly installed onto the wall.
You may need additional material such as an anchor depending on
the type of wall.
Since the necessary clamps, screws, and string are not supplied,
please purchase these additionally.
2. Remove the screws from the center back of the TV,put the screws into
the clamps, and then fasten the screws onto the TVagain.
Screws may not be supplied with the product. In this case, please
purchase the screws of the following specifications.
* For a 19- 22 inch: M4
* For a 23- 65 inch: M8
3. Connect the clamps fixed onto the TVand the clamps fixed onto the wall
with astrong string and then tie the string tightly.
NOTE
* Install the TVnear to the wall so that it does not fall backwards.
* Itissafe to connect the string so that the clamps fixed on the wall
areequalto orlowerthanthe dampsfixedon theTV.
* Untie the string before moving the TV.
4. Verify all connections are properly secured, Periodically check
connections for anysign offatigue forfailure. If you haveany doubt about
the security of your connections, contact a professional installer.
I I
6 English
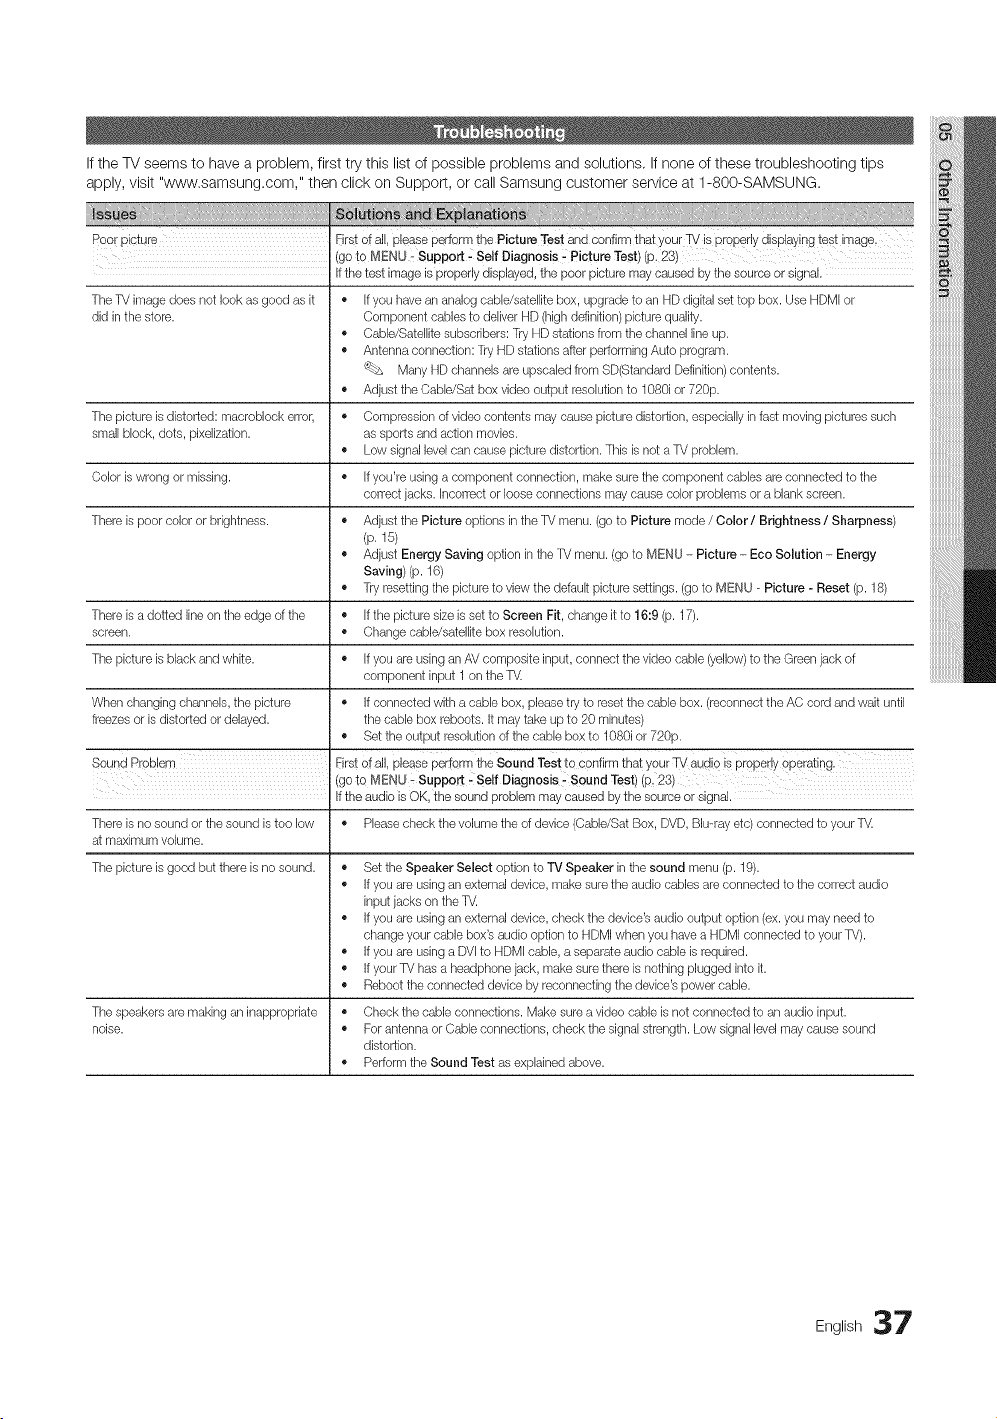
IftheTVseemstohaveaproblem,firsttrythislistofpossibleproblemsandsolutions.Ifnoneofthesetroubleshootingtips
apply,visit"www.samsung.com,"thenclickonSupport,orcallSamsungcustomerserviceat1-800-SAMSUNG.
Poo!picture Eirstof all, please performthe PictureTest and confirmthatyourTv' isproperly displaying test image.
(goto MENU _Support .-Self Diagnosis, PictureTest) (p. 23)
Ifthetest imageisproperly displayed, thepoor picture maycaused bythesource orsignal.
TheTV imagedoes not lookasgoodasit • Ifyou have an analog cable/satellitebox, upgrade to anHD digitalsettop box. UseHDMIor
did in thestore. Component cablesto deliver HD (highdefinition) picture quality.
• Cable/Satellite subscribers:Try HD stations from tlqe channel lineup.
• Antenna connection: TryHD stations after performingAuto program.
Many HD channels are upscaled from SD(Standard Definition) contents.
• Adjust tile Cable/Sat boxvideo output resolution to 1080ior720p.
Thepicture isdistorted: macroblock error, • Compressionof videocontents maycause picture distortion, espedally infast movingpictures such
small block, dots, pixelization, assportsand action movies.
• Low signal levelcan cause picture distortion. Ttqis isnot aTV problem.
Coloriswrong ormissing. • Ifyou're usingacomponent connection, make sure thecomponent cables areconnected to the
correctjacks. Incorrectorlooseconnections maycause color problems orablankscreen.
There ispoor color or brightness. • Adjust the Picture options intheTV menu. (gotoPicture mode / Color / Brightness / Sharpness)
(p. f 5)
• Adjust Energy Saving option intheTV menu. (gotoMENU - Picture - Eco Solution - Energy
Saving)(p. 16)
• Tryresettingtlqepicture to view the default picture settings. (gotoMENU - Picture - Reset (p. 18)
There isadotted lineon theedgeof the • Ifthe picturesizeissetto Screen Fit, changeitto 16:9 (p.17).
screen. • Change cable/satellite box resolution.
Ttqe picture isblackand white. • Ifyou are usingan AV composite input, connect thevideocable (yellow)to theGreen jack of
component input 1on theT_
When changingchannels, the picture • Ifconnected with acable box,pleasetry to resetthe cablebox.(reconnecttheACcord and wait until
freezesor isdistorted ordelayed, thecablebox reboots. Itmaytakeupto 20minutes)
• Set the output resolution of thecablebox to 1080i or720p.
SoundREoblem Eirstef all, please performthe Sound Testtoconfirm that yourW audio isproperlyoperating.
(goto MENU - Support, Self Diagnosis _Sound Test) (p. 23)
Iftheaudio isOK,the sound problem maycaused bythesource orsignal.
There isno soundortlqe soundistoo low • Pleasecheck thevolumetheof device(Cable/SatBox, DVD,Blu-ray etc) connected to your T_
at maximum volume.
Ttqe picture isgood butthere isnosound. • Set the Speaker Select optionto TV Speaker intlqe sound menu (p. 19).
• Ifyou are usingan externaldevice, make sure the audio cablesare connected to the correctaudio
input jacks on theT_
• Ifyou are usingan externaldevice, check thedevice'saudio output option (ex.you mayneedto
change your cablebox's audio option to HDMIwhen you have aHDMIconnected to your TV).
• Ifyou are usingaDVI to HDMIcable, aseparateaudio cable isrequired.
• Ifyour TV has aheadphone jack,make surethere isnothing pluggedinto it.
• Reboottheconnected devicebyreconnectingthe device'spowercable.
Ttqespeakers are makingan inappropriate • Check thecableconnections. Makesure avideocableisnotconnected to anaudio input.
noise. • For antenna orCable connections, check thesignalstrength. Low signallevelmaycause sound
distortion.
• PerformtlqeSound Test asexplained above.
og,,sh37
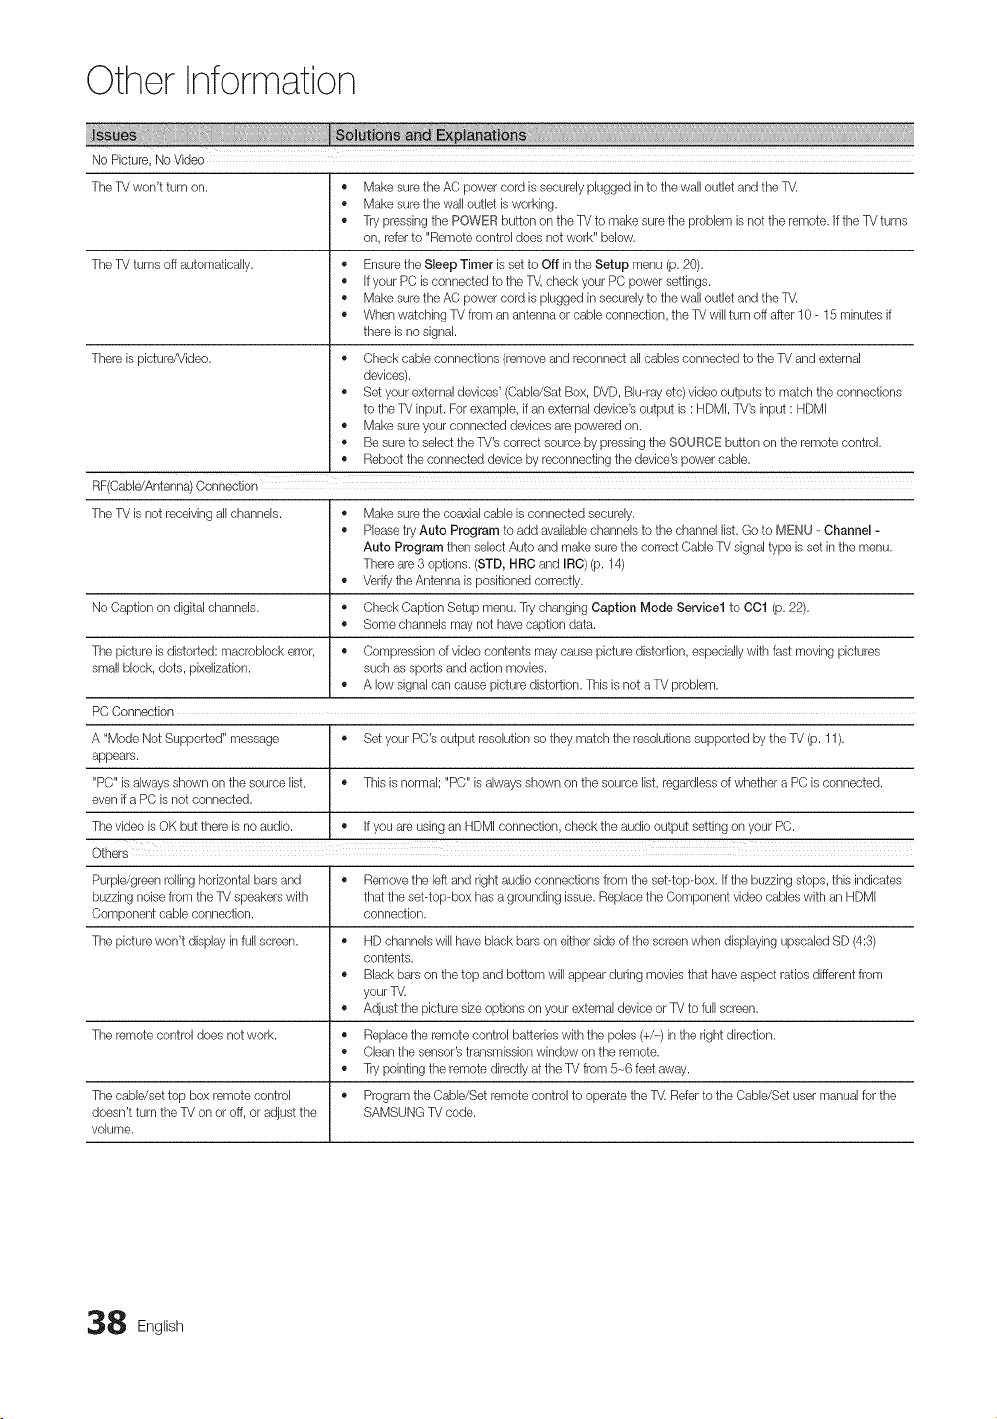
Other Information
No Picture, NoVideo
TheTV won't turnon. • Make sure theAC powercord issecurelypluggedin to thewalloutlet and theT_
• Make sure thewalloutlet b working.
• Trypressing the POWER button ontheTV to make suretheproblem isnottheremote, if theTVturns
on,referto "Remotecontrol does notwork" below.
TheTV turns off automatically. • Ensure theSleep Timer isset to Off intheSetup menu (p. 20).
• Ifyour PCisconnected to theT_, check yourPCpower settings.
• Make sure theAC powercord isplugged insecurelyto thewalloutlet and theT_
• When watching TVfromanantenna or cableconnection, theTVwillturn offafter10- 15minutesif
there isno signal.
There ispicture/Video. • Check cableconnections (remove and reconnect all cabbs connected to the TVand external
devices).
• Set your externaldevices' (Cabb/Sat Box, DVD,Blu-ray etc) videooutputs to matchtheconnections
to theTV input. For example,if an externaldevice'soutput is:HDMI,TV's input :HDMI
• Make sure your connected devicesarepoweredon.
• Besure to select theTV's correctsource bypressingthe SOURCE button ontheremote control.
• Reboottheconnected devicebyreconnectingthedevice's powercable.
RF(Cable/Antenna)Connection
TheTV isnot receiving all channels. • Makesure the coaxialcane isconnected securely.
• Pleasetry Auto Program to add avaiiabb channels to thechannel list. Go to MENU _Channel -
Auto Program then select Auto and make surethe correct CableTV signal typeisset in the menu.
There are 3options. (STD, HRC and IRO)(p. 14)
• VerifytheAntenna ispositionedcorrectly.
No Caption on digital channels. • Check CaptionSetup menu.Try changing Caption Mode Service1 to OO1(p.22).
• Some channels maynothave captiondata.
The picture isdistorted: macroblock error, • Compressionof videocontents maycause picture distortion, especiallywith fast movingpictures
small block, dots, pixeiization, such assports and action movies.
• A low signalcan cause picture distortion. ThisisnotaTV problem.
PCConnection
A "ModeNotSupported" message • Set your PC'soutput resolution sotheymatchthe resolutions supported bythe TV (p. 11).
appears.
"PC" isalwaysshown on thesource list, • Thisisnormal; "PC" isalwaysshown onthe sourcelist, regardless of whethera PCisconnected.
even if aPCisnot connected.
Thevideo isOK butthere isno audio. • Ifyou areusingan HDMIconnection, check theaudio output setting onyour PC.
Others
Purple/greenrolling horizontal bars and • Removethe left and right audioconnectionsfrom the set-top-box. Ifthe buzzingstops,thisindicates
buzzing noisefrom theTV speakerswith thattheset-top-box hasagrounding issue. ReplacetheComponent video cableswithan HDMI
Component cable connection, connection.
The picture won't displayin full screen. • HD channels will have black barson either side of thescreen when displaying upscabd SD(4:3)
contents.
• Black bars onthe top and bottom willappear duringmoviesthat have aspect ratiosdifferent from
your TV.
• Adjust thepicturesizeoptions on your externaldeviceorTVtofullscreen.
The remote control does notwork. • Replace the remote control batteries withthe poles(+/-) in theright direction.
• Clean thesensor'stransmissionwindow ontheremote.
• Trypointingtheremote directlyat theTVfrom5-_6 feet away.
Thecabb/set top boxremote control • Program the Cable/Setremote control to operatetheT_ RefertotheCabb/Set user manualforthe
doesn'tturn theTVon oroff, oradjust the SAMSUNGTVcode.
volume.
8 English
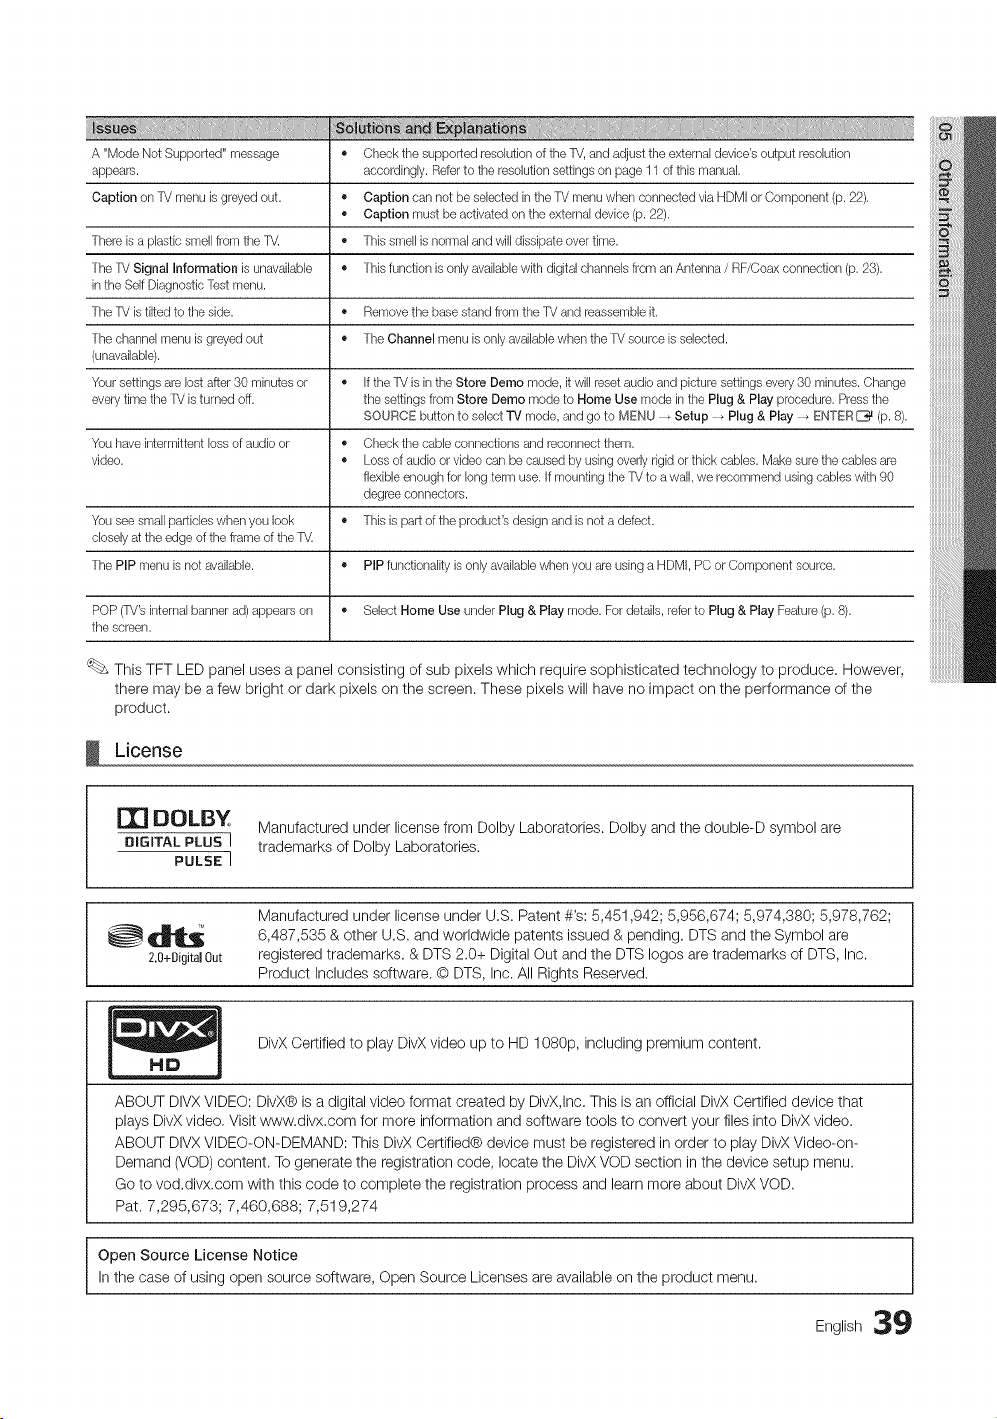
A "ModeNotSupported" message • Check thesupported resolution of theTV,and adjust theexternaldevice'soutput resolution
appears, accordingly. Referto theresolution settings on page 11 of thismanual.
Caption on TV menu isgreyedout. • Caption can notbeselected intheTV menu whenconnected via HDMIor Component(p. 22).
• Caption must be activated on theexternaldevice(p. 22).
There isaplastic smell from the T_ • Thissmell isnormaland willdissipate overtime.
TheTV Signal Information isunavailable • Thisfunction isonly availablewith digitalchannelsfrom anAntenna/ RF/Coaxconnection (p. 23).
in theSelfDiagnostic Test menu.
TheTV istilted to theside. • Removethe base stand from theTVandreassemble it.
Thechannel menu isgreyedout • The Channel menu isonly availablewhen theTVsourceisselected.
(unavailable).
Your settings are lostafter 30 minutes or • IftheTVisin the Store Oemo mode, it willresetaudioandpicture settings every30 minutes.Change
everytime theTV isturned off. the settings from Store Demo mode to Home Use mode inthePlug& Play procedure. Pressthe
SOURCE button to select "IV mode, and go to MENU -_ Setup -_ Plug & Play-_ ENTER_ (p. 8).
You have intermittent loss of audioor • Check thecableconnections and reconnect them.
video. • Loss of audio orvideo can be causedbyusingoverly rigidorthickcables. Make sure thecablesare
flexible enough for longterm use.Ifmounting theTV to awall, we recommend usingcableswith 90
degree connectors.
You see small particleswhenyou look • Thisispartof theproduct's design and isnotadefect.
closelyat theedge oftheframe of theT_
The PIP menu isnotavailable. • PIP functionality isonlyavailablewhenyou are using aHDMI, PCorComponent source.
POP (TV'sinternalbanner ad)appears on • Select Home Use underPlug & Play mode. For details, referto Plug & Play Feature(p.8).
the screen.
ThisTFT LED panel usesa panel consisting of sub pixels which require sophisticated technology to produce. However,
there may be a few bright or dark pixels on the screen. These pixels will have no impact on the performance of the
product.
License
m
DOLBY
Manufactured under license from Dolby Laboratories. Dolby and the double-D symbol are
DIGITAL PLUS J trademarks of Dolby Laboratories.
PULSE I
Manufactured under license under U.S. Patent #'s: 5,451,942; 5,956,674; 5,974,380; 5,978,762;
_'_q_ 6,487,535 & other U.S. and worldwide patents issued & pending. DTS and the
Symbol
are
2.O+[ligitalOut registered trademarks. & DTS 2.0+ Digital Out and the DTS Iogos are trademarks of DTS, Inc.
Product Includes software. O DTS, Inc. All Rights Reserved.
DivX Certified to play DivX video upto HD 1080p, including premium content.
ABOUT DIVXVIDEO: DivX® isadigital video format created by DivX,Inc.This isan official DivX Certified device that
plays DivX video, Visit www.divx,com for more information and software tools to convert your files into DivX video.
ABOUT DIVXVIDEO-ON-DEMAND: This DivX Certified® device must be registered in order to play DivX Video-on-
Demand (VOD) content. Togenerate the registration code, locate the DivX VODsection in the device setup menu.
Go to vod.divx.com with this code to complete the registration process and learn more about DivX VOD.
Pat. 7,295,673; 7,460,688; 7,519,274
Open Source License Notice
In the case ofusing open source software, Open Source Licenses areavailable onthe product menu.
English 39
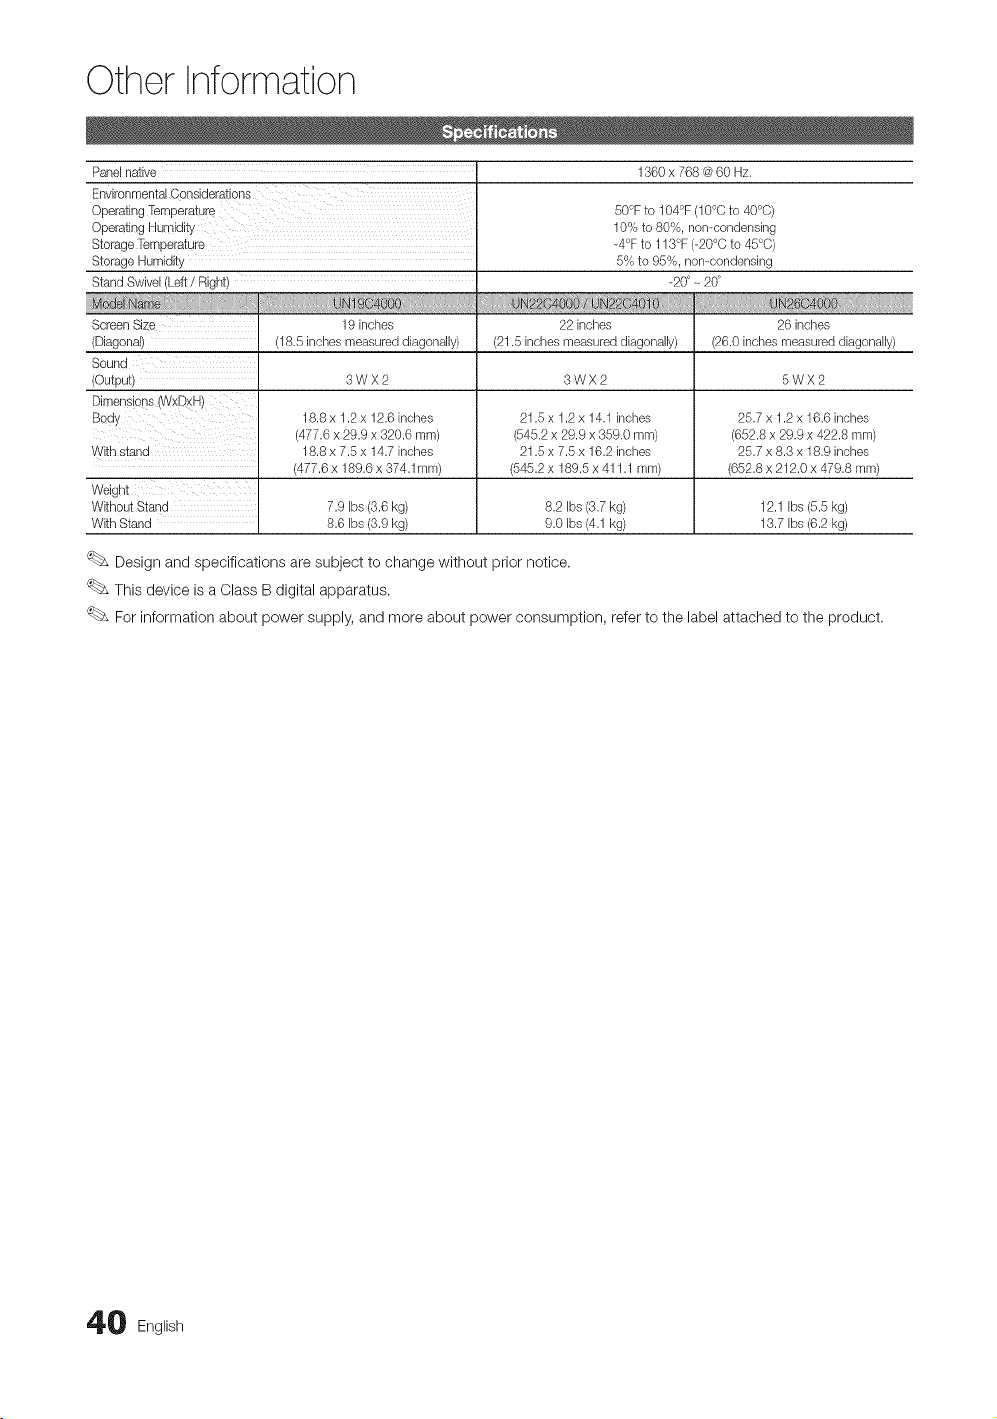
Other Information
Panelnative 1360x 768 @60 Hz.
OperatingHumidity
Storage Temperatgre
Storage Humidity
Stand Swivel(Left / Right)
uN
Screen Size
(Diagonal)
Sound
(Output)
Dimens!ons (WxDxH)
Body
19 inches
(18.5 inchesmeasured diagonally)
3WX2
18.8x 1.2x 12.6 inches
(477.6 x 29.9 x 320.6 ram)
18.8x 7.5x 14.7 inches
(477.6 x 189.6 x 374.1mm)
50°F to 104°F(10°Cto 40°C)
10% to 80%, non-condensing
d°F to 113°F(-20°Cto 45°C)
5% to 95%, non-condensing
_20°_20°
22 inches
(21.5 inches measured diagonally)
3WX2
21.5 x 1.2x 14.1 inches
(545.2 x 29.9 x 359.0 ram)
21.5x 7.5x 16.2 inches
(545.2 x 189.5 x 411.1 ram)
26 inches
(26.0 inchesmeasured diagonally)
5WX2
With stand
Without Stand 7.9 bs (3.6kg) 8.2 bs (3.7kg) 12.1 bs (5.5kg)
With Stand 8.6 Ibs (3.9kg) 9.0 Ibs (4.1kg) 13.7 Ibs (6.2kg)
25.7 x 1.2x 16.6 inches
(652.8 x 29.9 x 422.8 mm)
25.7 x 8.3x 18.9 inches
(652.8 x 212.0 x 479.8 ram)
Design and specifications aresubject to change without prior notice.
This device isa Class B digital apparatus.
For information about power supply, and more about power consumption, refer to the label attached tothe product.
0 English
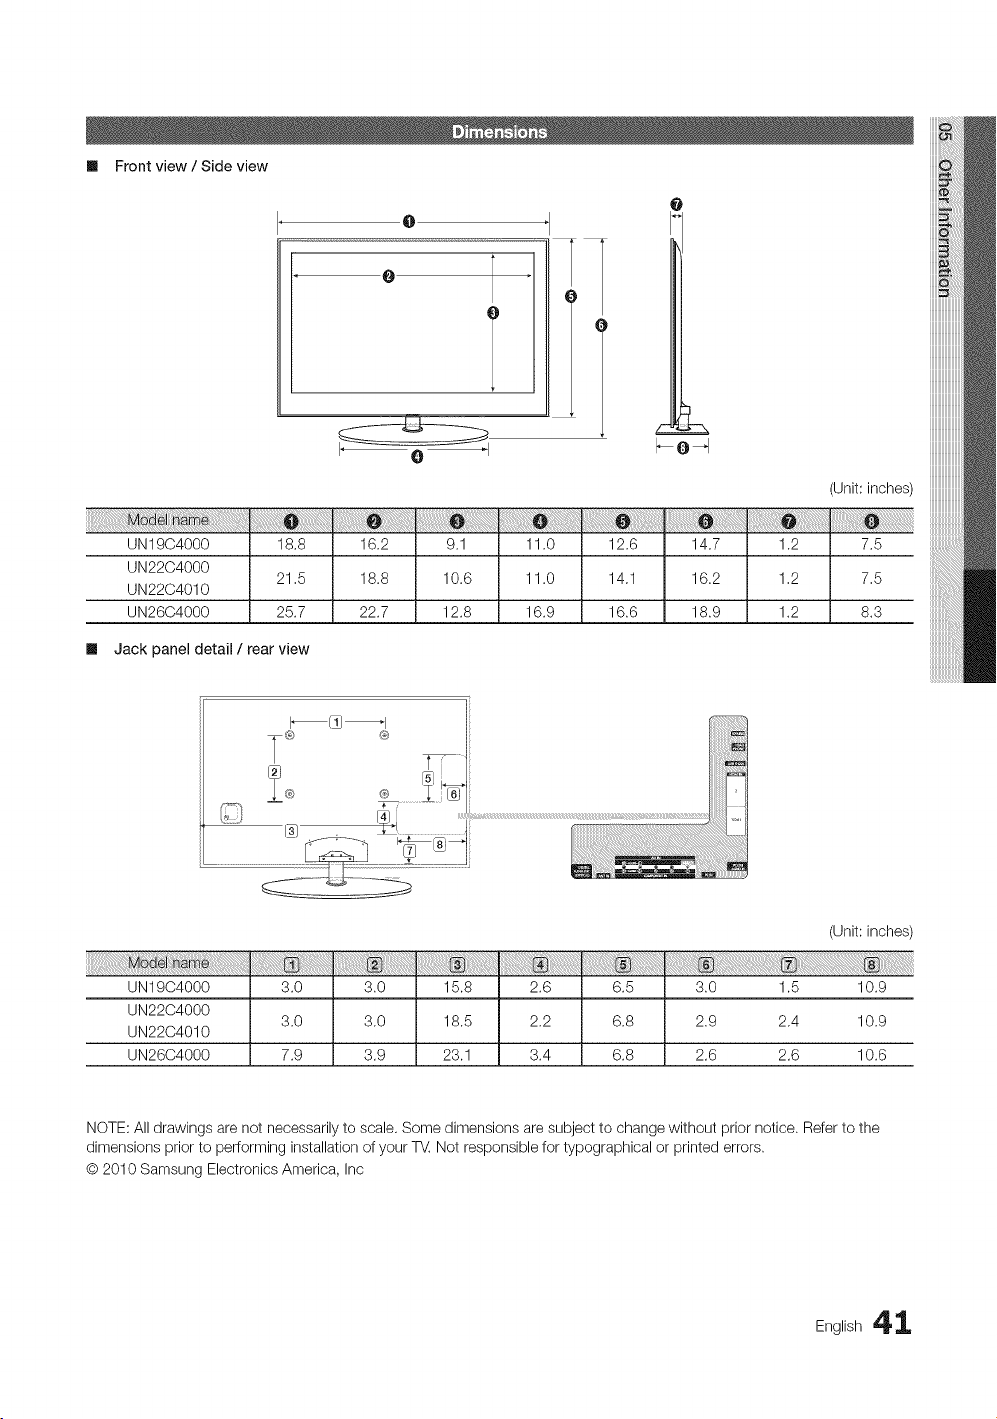
Ill Frontview/ Side view
O
O
T
0
(Unit: inches)
UN19C4000 18.8 16.2 9.1 11.0 12.6 14.7
UN2204000
21,5 18.8 10.6 11.0 14,1 16.2
UN2204010
UN2604000 25.7 22.7 12.8 16.9 16.6 18.9
1.2 7.5
1,2 7,5
1.2 8.3
Ill Jack panel detail / rear view
iiiiiiiiiiiiiiiiiiii
T°
UN19C4000 3.0 3.0 15.8 2.6 6.5
UN2204000
3.0 3,0 18.5 2.2 6.8
UN2204010
UN2604000 7.9 3.9 23.1 3.4 6.8
(Unit: inches)
3.0 1.5 10.9
2.9 2,4 10.9
2.6 2.6 10.6
NOTE: All drawings are not necessarily to scale. Some dimensions aresubject to change without prior notice. Refertothe
dimensions prior to performing installation ofyour T_ Not responsible for typographical or printed errors.
O 2010 Samsung Electronics America, Inc
English 4 1
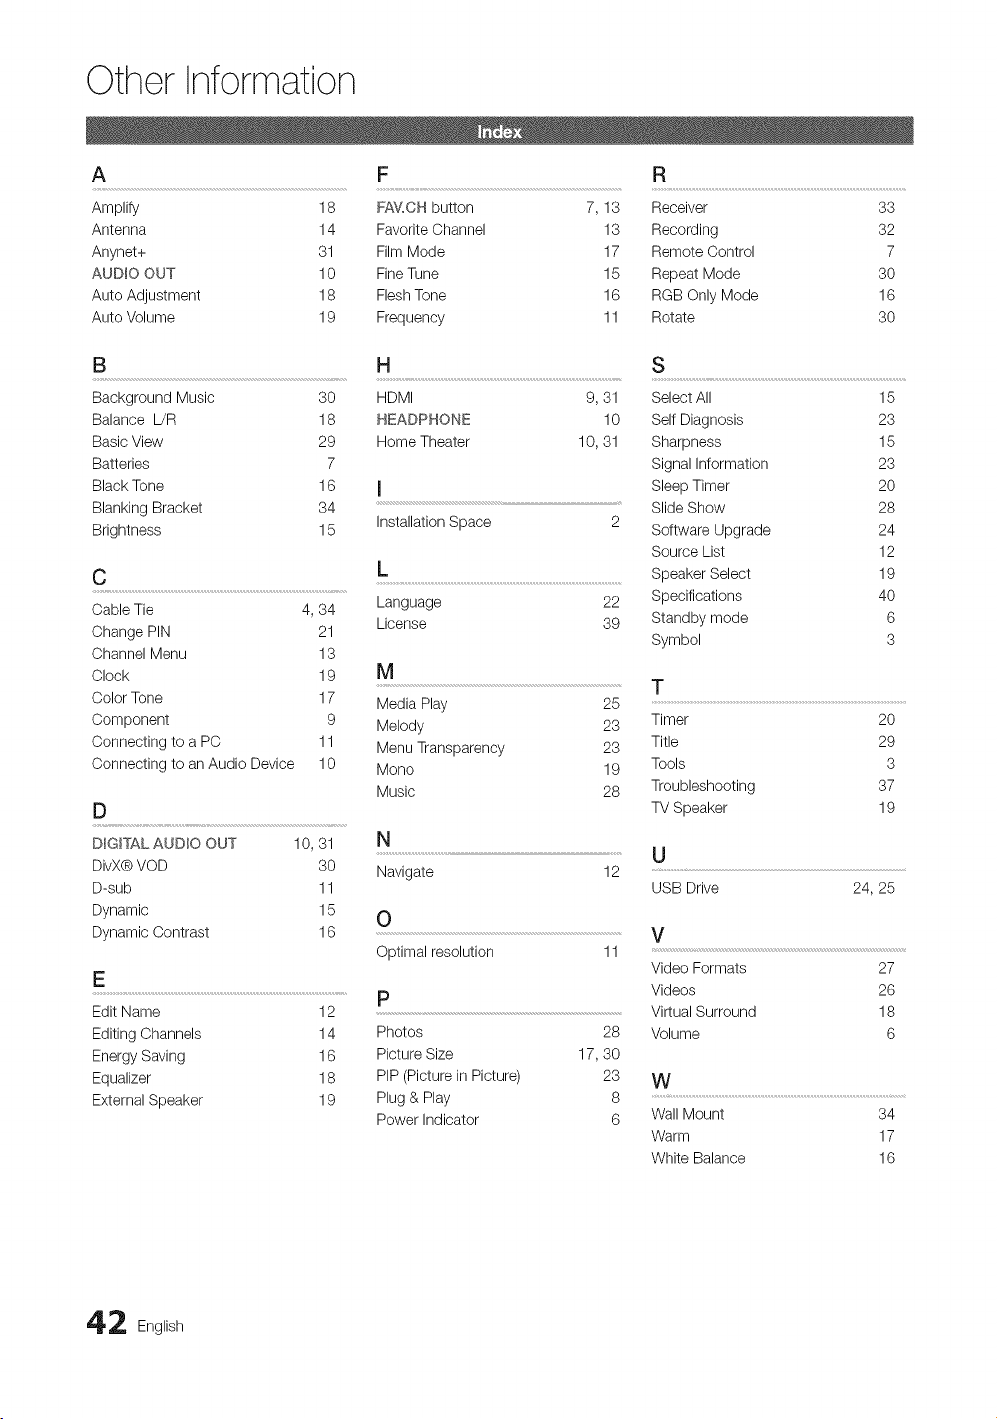
Other Information
A F R
Amplify 18 FA_L,CH button 7, 13 Receiver 33
Antenna 14 Favorite Channel 13 Recording 32
Anynet+ 31 Film Mode 17 Remote Control 7
AUDIO OUT 10 Fine Tune 15 Repeat Mode 30
Auto Adjustment 18 FleshTone 16 RGB Only Mode 16
Auto Volume 19 Frequency 11 Rotate 30
B H S
Background Music 30 HDMI
Balance L/R 18 HEADPHONE
Basic View 29 Home Theater
Batteries 7
Black Tone 16 I
Blanking Bracket 34
Installation Space
Brightness 15
9,31
10
10, 31
C
L
CableTie 4,34 Language 22
License 39
Change PIN 21
Channel Menu 13
Clock 19 M
Color Tone 17 Media Play 25
Component 9 Melody 23
Connecting to a PC 11 Menu Transparency 23
Connecting to an Audio Device 10 Mono 19
Music 28
D
DIGITAL AUDIO OUT 10, 31 N
U
DivX®VOD 30 Navigate 12
D-sub 11 USB Drive
Dynamic 15 O
Dynamic Contrast 16 V
Optimal resolution 11
E
.................................................................................................................................................................................p
EditName 12
Editing Channels 14 Photos 28
Energy Saving 16 Picture Size 17, 30
Equalizer 18 PIP (Picturein Picture) 23
External Speaker 19 Plug & Play 8
Power Indicator 6
Select All 15
SelfDiagnosis 23
Sharpness 15
Signal Information 23
SleepTimer 20
Slide Show 28
Software Upgrade 24
Source List 12
Speaker Select 19
Specifications 40
Standby mode 6
Symbol 3
T
Timer 20
Title 29
Tools 3
Troubleshooting 37
TV Speaker 19
24, 25
Video Formats 27
Videos 26
Virtual Surround 18
Volume 6
W
Wall Mount 34
Warm 17
White Balance 16
2 English