BEDIENUNG UND INSTALLATION
OPERATION AND INSTALLATION
UTILISATION ET INSTALLATION
GEBRUIK EN INSTALLATIE
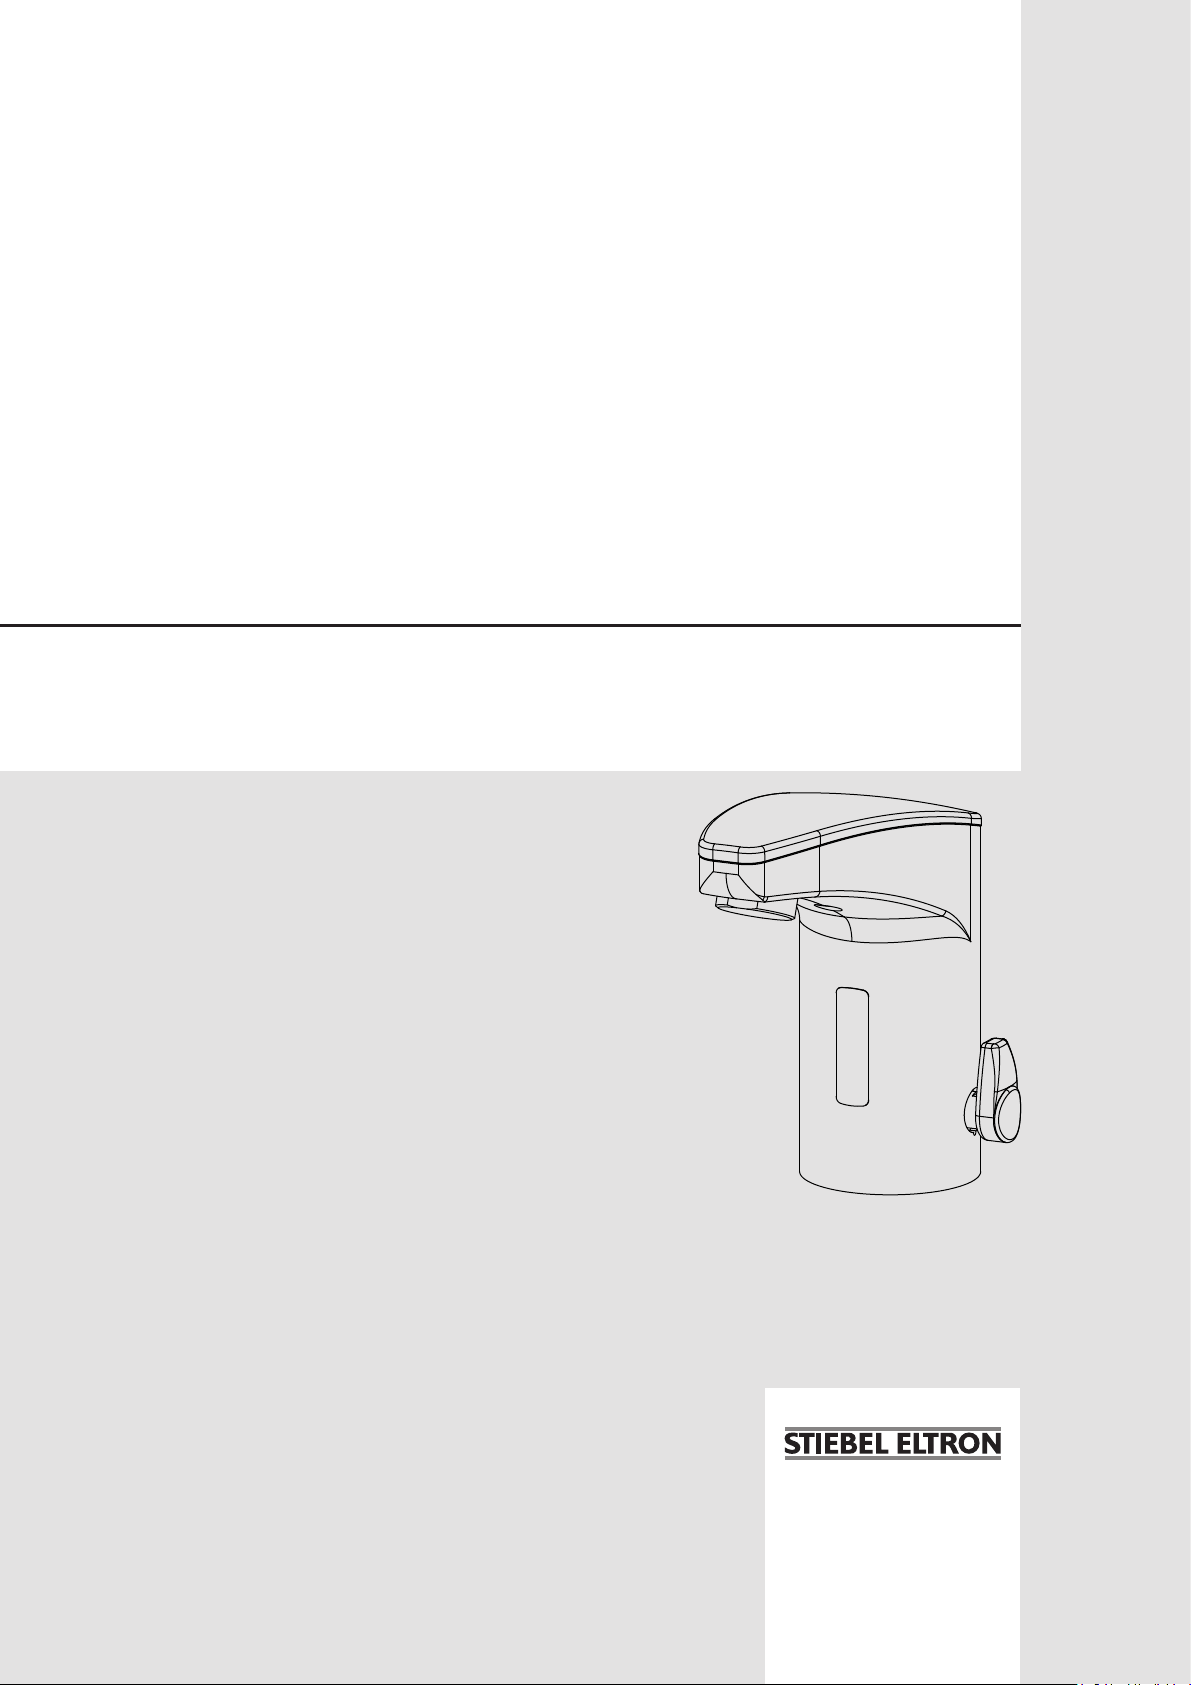
Sensor-Armatur für druckfeste (geschlossene) Warmwassergeräte | Sensor tap for
pressurised (sealed unvented) DHW appliances| Robinetterie à capteur pour appareils
de production ECS sous pression (en circuit fermé)| Sensorkraan voor drukvaste
(gesloten) warmwatertoestellen
» WSH 10
» WSH 20

www.stiebel-eltron.com WSH10 | WSH20 | 13
ENGLISH
CoNTeNTs | speCIAL INforMATIoN
speCIAL INforMATIoN
- The appliance may be used by children aged8
and older and persons with reduced physical,
sensory or mental capabilities or a lack of ex-
perience and know-how, provided that they
are supervised or they have been instructed
on how to use the appliance safely and have
understood the potential risks. Children must
never play with the appliance. Children must
never clean the appliance or perform user
maintenance unless they are supervised.
- The sensor tap can reach temperatures in
excess of 60°C. There is a risk of scalding at
outlet temperatures in excess of 43°C.
- Secure the sensor tap as described in chapter
„Installation/ Installation“.
- Observe the maximum permissible pressure
(see chapter „Installation/ Specification/
Data table“).
SPECIAL INFORMATION
OPERATION
1. General information ��������������������������������������� 14
1.1 Safety instructions ����������������������������������������������14
1.2 Other symbols in this documentation ���������������������� 14
1.3 Units of measurement ����������������������������������������� 14
2. Safety �������������������������������������������������������� 14
2.1 Intended use ����������������������������������������������������� 14
2.2 General safety instructions ����������������������������������� 14
3. Product description ���������������������������������������� 15
3.1 Function ���������������������������������������������������������� 15
4. Settings ����������������������������������������������������� 15
4.1 Setting the temperature ��������������������������������������� 15
4.2 Touch settings ���������������������������������������������������15
4.3 Standard settings ����������������������������������������������� 16
4.4 Extended settings ����������������������������������������������� 16
5. Troubleshooting �������������������������������������������� 18
5.1 Recalibrating the sensor �������������������������������������� 18
5.2 Replacing the battery in the WSH20 sensor tap ��������� 19
5.3 Supplement “Touch settings and programming” on
the internet ������������������������������������������������������ 19
6. Cleaning, care and maintenance ������������������������� 19
INSTALLATION
7. Safety �������������������������������������������������������� 20
7.1 General safety instructions ����������������������������������� 20
7.2 Instructions, standards and regulations �������������������20
8. Product description ���������������������������������������� 20
8.1 Standard delivery �����������������������������������������������20
9. Preparation ������������������������������������������������� 20
9.1 Installation location �������������������������������������������� 20
10. Installation �������������������������������������������������� 20
11. Commissioning ��������������������������������������������� 21
12. Settings ����������������������������������������������������� 21
12.1 Setting a fixed temperature ����������������������������������21
12.2 Setting the hot water stop ������������������������������������ 21
13. Troubleshooting �������������������������������������������� 22
14. Maintenance ������������������������������������������������ 22
15. Specification ������������������������������������������������ 22
15.1 Dimensions and connections ��������������������������������� 22
15.2 Data table �������������������������������������������������������� 22
GUARANTEE
ENVIRONMENT AND RECYCLING
operATIoN
General information
14 | WSH10 | WSH20 www.stiebel-eltron.com
operATIoN
1. General information
The chapters „Special information“ and „Operation“ are intended
for both users and qualified contractors.
The chapter „Installation“ is intended for qualified contractors.
Note
Read these instructions carefully before using the appli-
ance and retain them for future reference.
Pass on the instructions to a new user if required.
1.1 Safety instructions
1.1.1 Structure of safety instructions
KEYWORD Type of risk
Here, possible consequences are listed that may result
from failure to observe the safety instructions.
Steps to prevent the risk are listed.
1.1.2 Symbols, type of risk
Symbol Type of risk
Injury
Electrocution
Burns
(burns, scalding)
1.1.3 Keywords
KeYword Meaning
DANGER Failure to observe this information will result in serious
injury or death.
WARNING Failure to observe this information may result in serious
injury or death.
CAUTION Failure to observe this information may result in non-seri-
ous or minor injury.
1.2 Other symbols in this documentation
Note
General information is identified by the adjacent symbol.
Read these texts carefully.
Symbol Meaning
Material losses
(appliance damage, consequential losses and environmen-
tal pollution)
Appliance disposal
This symbol indicates that you have to do something. The ac-
tion you need to take is described step by step.
1.3 Units of measurement
Note
All measurements are given in mm unless stated oth-
erwise.
2. Safety
2.1 Intended use
The sensor tap is suitable for connection to pressurised (sealed
unvented) DHW appliances.
Any other use beyond that described shall be deemed inappro-
priate. Observation of these instructions and of the instructions
for any accessories used is also part of the correct use of this
appliance.
2.2 General safety instructions
CAUTION Burns
During operation, the sensor tap can reach temperatures
in excess of 60°C.
There is a risk of scalding at outlet temperatures in ex-
cess of 43°C.
WARNING Injury
The appliance may be used by children over 8 years of
age and persons with reduced physical, sensory or men-
tal capabilities or a lack of experience and expertise,
provided that they are supervised or they have been
instructed on how to use the appliance safely and have
understood the potential risks. Children must never play
with the appliance. Children must never clean the ap-
pliance or perform user maintenance unless they are
supervised.
operATIoN
Product description
www.stiebel-eltron.com WSH10 | WSH20 | 15
ENGLISH
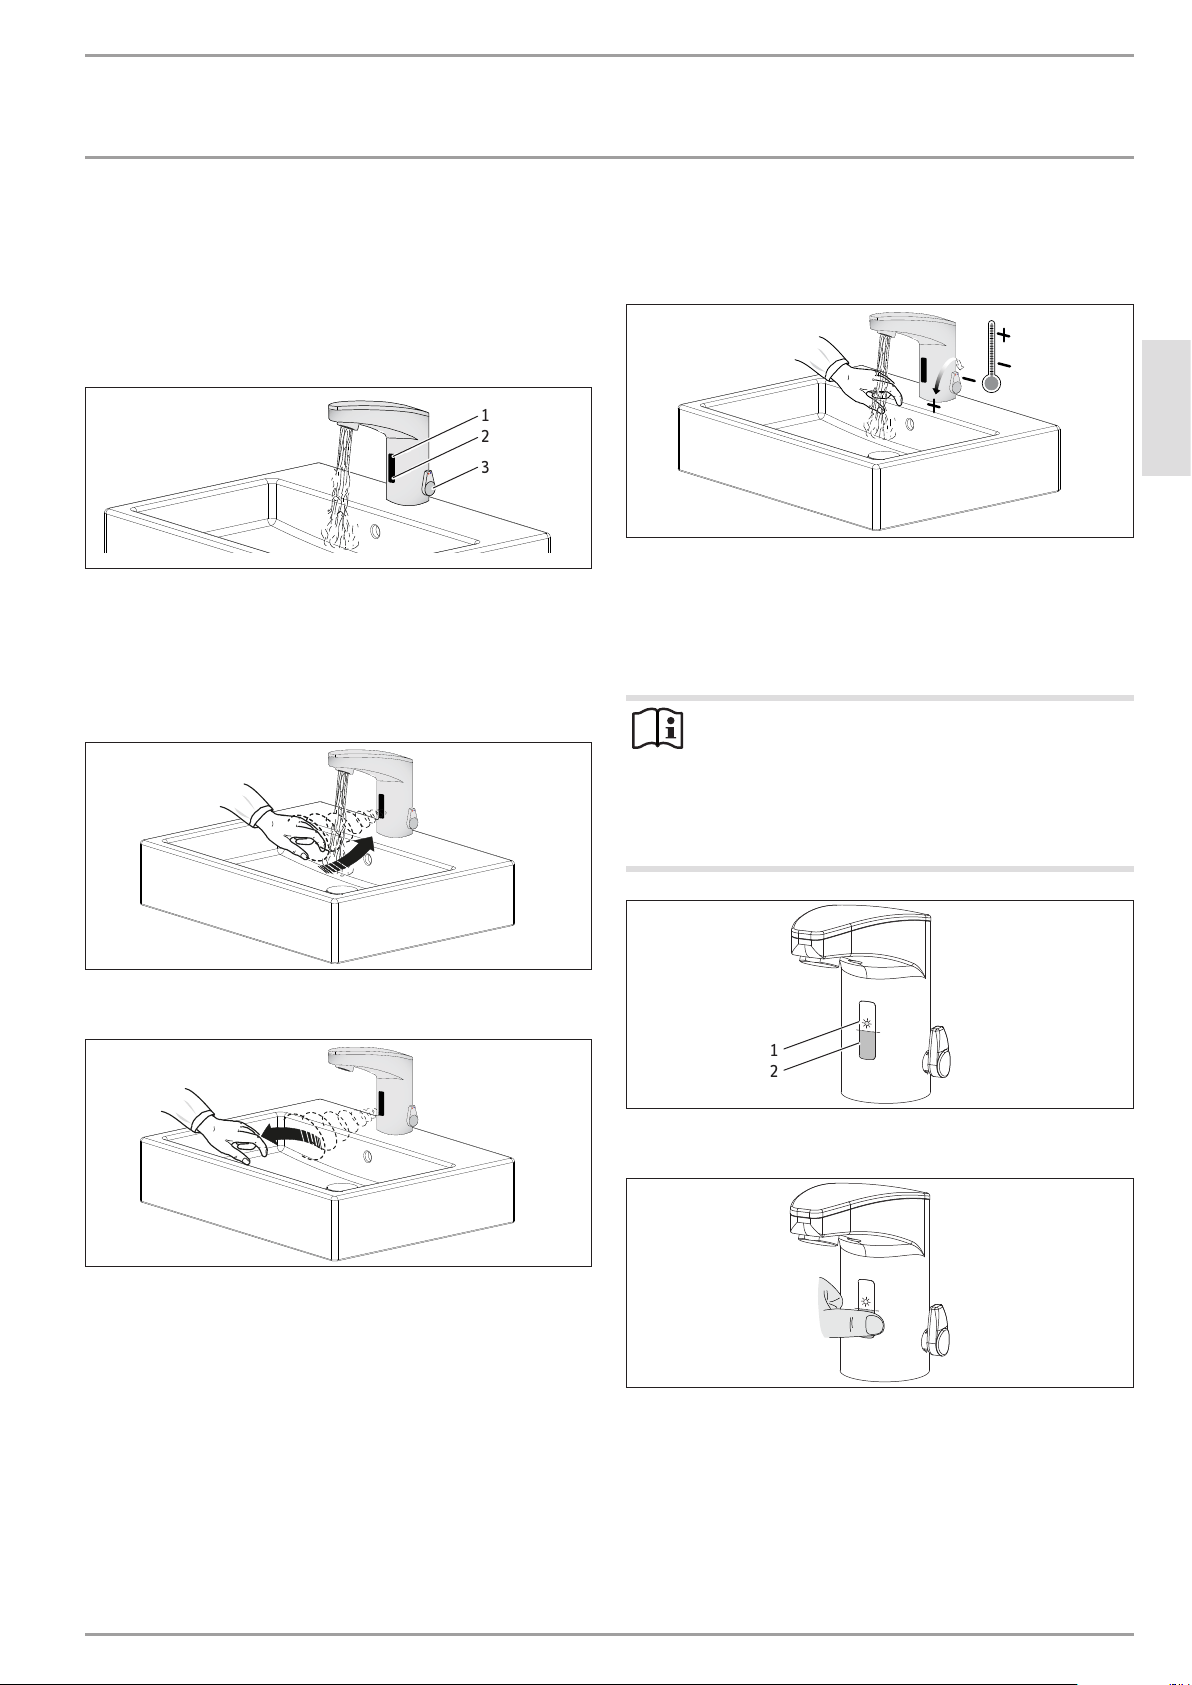
3. Product description
Operation of the sensor tap is contactless. The water is turned on
and off via a PCB with a proximity sensor. The PCB is supplied
with power as follows:
- WSH10 via a power supply unit
- WSH20 via a battery
D0000077118
1
2
3
1 Sensor and LED
2 Touch area
3 Lever for temperature setting
3.1 Function
Water ON
D0000077126
Water OFF
D0000077127
4. Settings
4.1 Setting the temperature
D0000077121
Your qualified contractor can set a fixed temperature or limit the
setting range to prevent scalding.
4.2 Touch settings
The following settings are made using your finger.
Note
- When making settings, do not place your hands or
other objects within range of the sensor.
- The LED on the sensor will flash/light up during and/
or after making the settings.
- The green LED confirms the settings have been com-
pleted.
D0000077668
1
2
1 Sensor and LED
2 Touch area
D0000077670
Move your finger to the touch area from the side or from
underneath.

operATIoN
Settings
16 | WSH10 | WSH20 www.stiebel-eltron.com
Symbols
Symbol Description
Touch the touch area
Move your finger away from the touch area
The LED on the sensor flashes
Water is running from the tap
The water flow has been interrupted
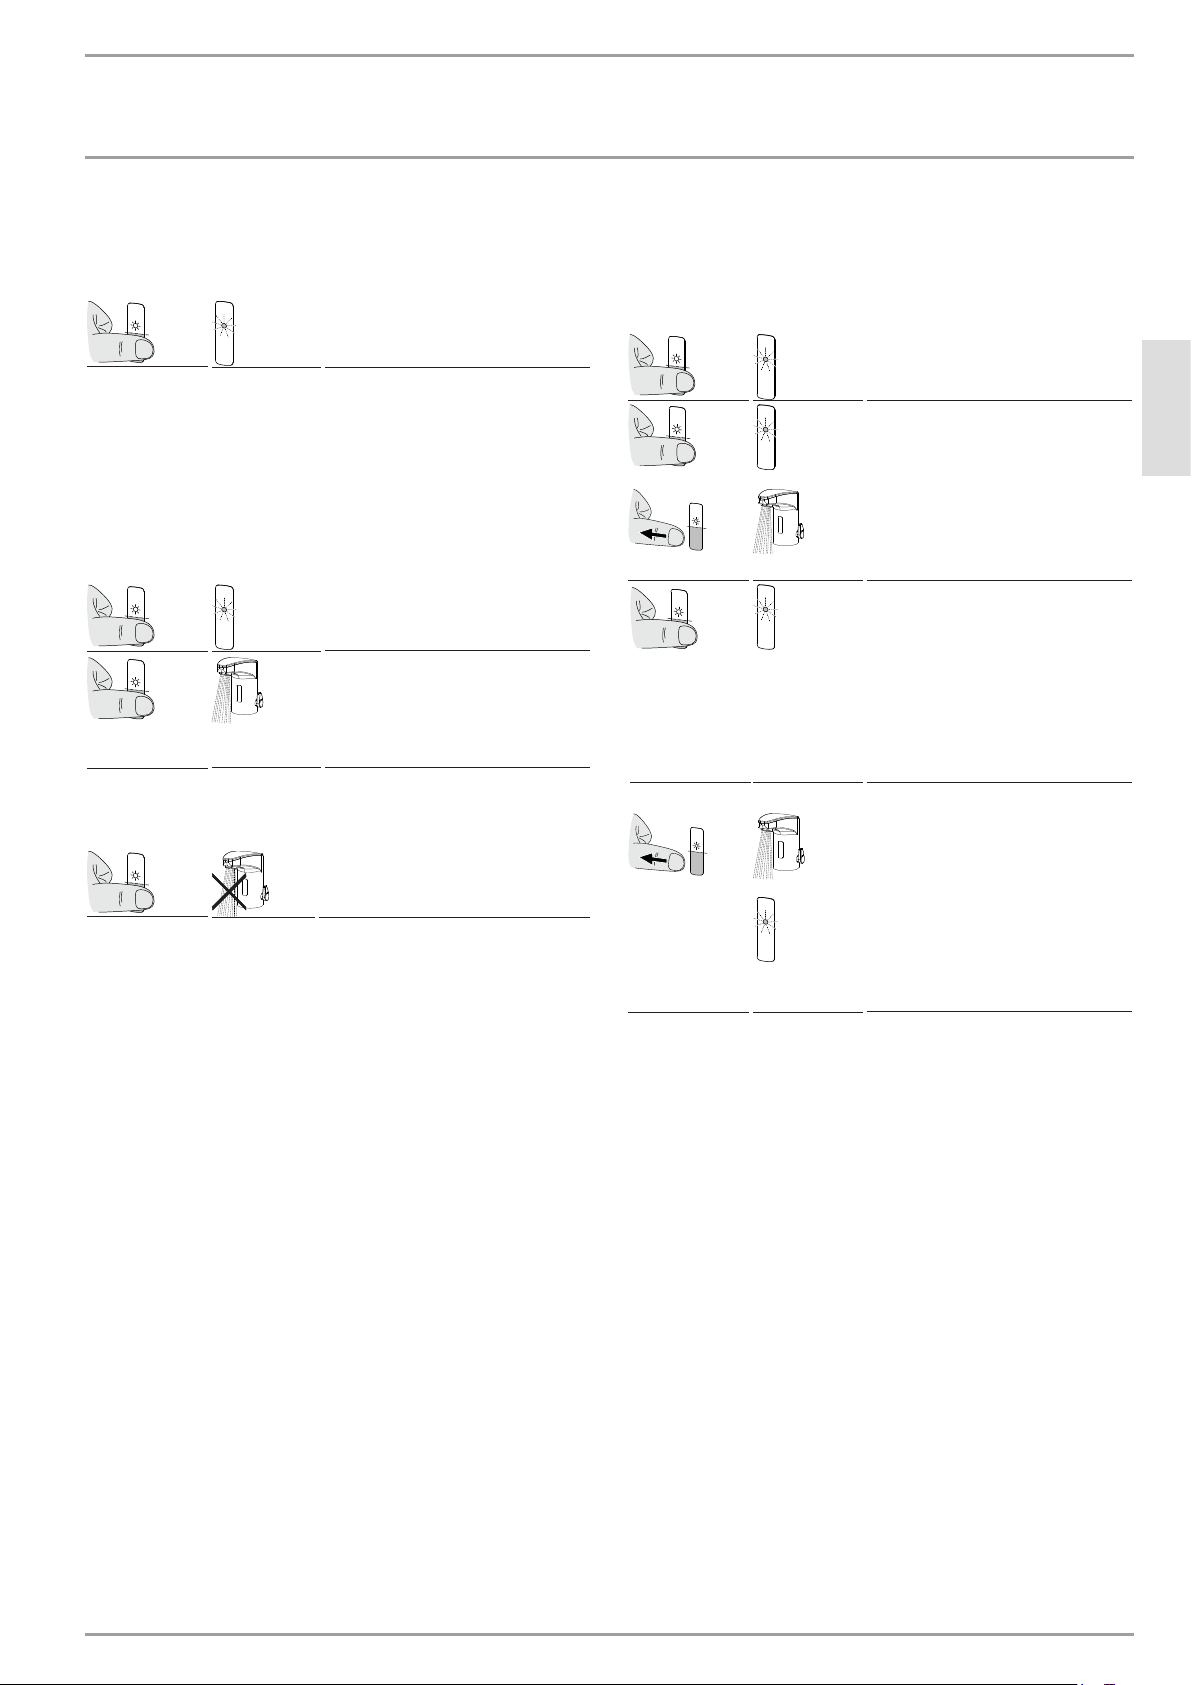
4.3 Standard settings
4.3.1 Setting the water run-on time
The water run-on time can be set between 0 and 10seconds.
Factory setting: approx. 1second
2s 1x
Touch the touch area for 2sec-
onds. The green LED lights up
once.
5s 1x/1x
Touch the touch area for 5sec-
onds. The green LED flashes
briefly. The red LED flashes
once.
0-10s
0-10s
Keep your finger on the touch
area for the period of time you
want the water to run on for.
Water runs while you make
the setting.
Setting: 1 - 10seconds = water
run-on time.
1x
If you move your finger away
from the touch area, the green
LED lights up once to confirm.
4.3.2 Adjusting the sensor range
The sensor range can be adjusted to suit the washbasin. This
prevents the sensor tap from running independently.
Factory setting: distance 6
2s
1x
Touch the touch area for 2sec-
onds. The green LED lights up
once.
2x
2x/1x
Touch the touch area briefly
twice (0.5seconds). The green
LED gives two short flashes
and one long flash. The red
LED pulses.
15s
1x
2x
3x
4x
5x
7x
8x
6 x
4x
...x
Factory setting
Hold your finger on the touch
area (ignore the red LED
which flashes four times after
5seconds). After approx.
15seconds, the red LED flash-
es one to eight times, indicat-
ing distances 1-8.
Move your finger away from
the touch area. The red LED
flashes according to the se-
lected distance.
Wait approx.10seconds until
the setting has been complet-
ed. The green LED lights up
once to confirm.
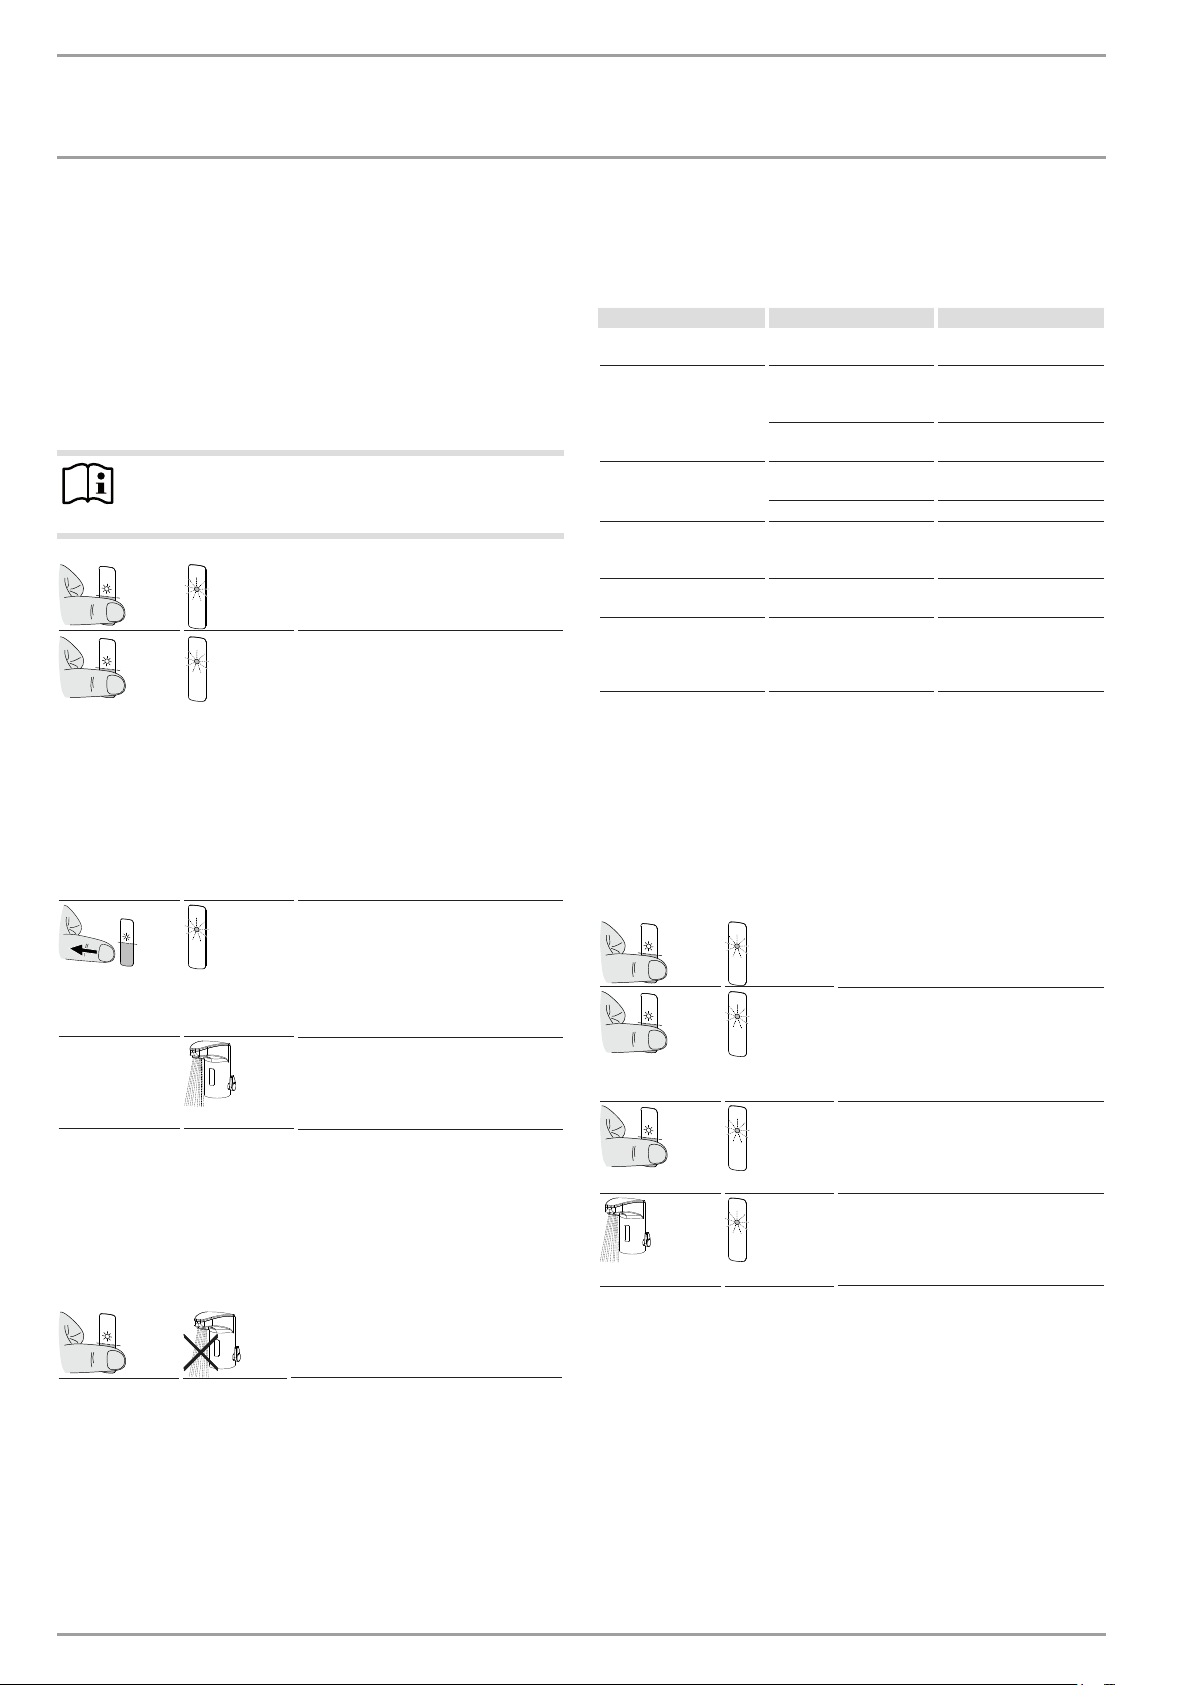
4.4 Extended settings
4.4.1 Setting the draw-off pause
You can interrupt the flow of water for approx. 2minutes to be able
to clean the sensor tap and washbasin, etc., without inadvertently
triggering the flow of water.
Activating the draw-off pause
2s 1x
Touch the touch area for 2sec-
onds. The green LED lights up
once.
2x 2x/1x
Touch the touch area briefly
twice (0.5seconds). The green
LED gives two short flashes.
The red LED pulses.
...
The flow of water is interrupt-
ed for 2minutes. The red LED
pulses.
operATIoN
Settings
www.stiebel-eltron.com WSH10 | WSH20 | 17
ENGLISH
Deactivating the draw-off pause
The pause is ended automatically after 2minutes or by touching
the touch area for 2seconds.
2s
1x
Touch the touch area for 2sec-
onds. The green LED lights up
once to confirm.
4.4.2 Continuous draw-off
You can set continuous draw-off for 0.5 to 20minutes to fill the
washbasin or containers, etc.
Activating continuous draw-off
Factory setting: approx. 2minutes
2s
1x
Touch the touch area for 2sec-
onds. The green LED lights up
once.
3s
Touch the touch area for
3seconds. The water will run
for approx. 2minutes (factory
setting or another preselected
time).
Deactivating continuous draw-off
1x
Touch the touch area briefly.
Setting continuous draw-off in minutes
Set continuous draw-off from 0.5 to 20minutes (in increments of
0.5minutes).
Factory setting: approx. 2minutes
2s
1x
Touch the touch area for 2sec-
onds. The green LED lights up
once.
3s
1x
Touch the touch area for 3sec-
onds. The green LED flashes
once (move your finger away
from the touch area before the
red LED flashes). The water
will run when you move your
finger away from the touch
area.
1-40x
Touch the touch area until the
red LED flashes. The number
of flashes corresponds to the
relevant increment:
1x red LED = 0.5min
2x red LED = 1min
3x red LED = 1.5min
...
40x red LED = 20min
...x/1x
Move your finger away from
the touch area when the num-
ber of flashes corresponds
to the required setting. The
setting is confirmed by the ap-
propriate number of flashes.
The water will run. The green
LED then lights up once to
confirm.
operATIoN
Troubleshooting
18 | WSH10 | WSH20 www.stiebel-eltron.com
4.4.3 Hygiene flush 12/24/48hours
You can set a hygiene flush to take place 12, 24 or 48hours after
last use.
The hygiene flush time corresponds to the setting for continuous
draw-off (see chapter „Extended settings/ Continuous draw-off/
Setting continuous draw-off in minutes“).
Factory setting: OFF
Setting/activating the hygiene flush start time
Note
Make sure that the drain is always clear to prevent
overflow due to the hygiene flush.
2s
1x
Touch the touch area for 2sec-
onds. The green LED lights up.
25s
1-4x
Touch the touch area for ap-
prox. 25seconds (ignore the
red LED after 5seconds and
green LED after 10seconds).
The red LED flashes one to
four times. The number of
flashes determines the hy-
giene flush start time:
1x red LED = OFF
2x red LED = ON after 12 h
3x red LED = ON after 24 h
4x red LED = ON after 48 h
1x
Move your finger away from
the touch area when the num-
ber of flashes corresponds
to the required setting. The
green LED flashes once to
confirm.
...s
The hygiene flush is carried
out automatically after the
last draw-off (according to the
programmed start time).
Setting the hygiene flush time
See chapter „Extended settings/ Continuous draw-off/ Setting
continuous draw-off in minutes“.
Deactivating the hygiene flush
1x
Touch the touch area briefly.
5. Troubleshooting
Observe chapter „Recalibrating the sensor“ to restore the factory
settings.
Problem Cause Remedy
Water does not run. The sensor does not rec-
ognise black objects.
Select an object with a
different colour.
The sensor is flashing.
The sensor is dirty.
Clean the sensor (see
chapter "Cleaning and
care").
Reflection in the wash-
basin.
Remove the object or
carry out recalibration.
Short spray of water at
the tap outlet.
The power supply is in-
sufficient.
Restore the power supply
or replace the battery.
The sensor is dirty. Clean the sensor.
The tap switches inde-
pendently.
Reflections in the wash-
basin trigger the flow of
water.
Recalibrate the sensor.
The water flow is too low. The aerator is blocked. Clean/replace the aer-
ator.
The tap switches off.
An object is within range
of the sensor for approx.
90seconds without
moving.
The tap automatically re-
calibrates the sensor.
If you cannot remedy the fault, notify your qualified contractor.
To facilitate and speed up your enquiry, please provide the serial
number from the type plate on the cold water supply (000000-
0000).
5.1 Recalibrating the sensor
Your settings will remain unchanged after recalibration. The sen-
sor is automatically recalibrated to the washbasin.
2s 1x
Touch the touch area for 2sec-
onds. The green LED lights up
once.
2x
2x/1x/...
Touch the touch area briefly
twice (0.5seconds). The green
LED gives two short flashes
and one long flash. The red
LED pulses.
5s
4x
Touch the touch area for ap-
prox. 5 seconds until the LED
has flashed red four times. Do
not reach into the sensor area.
1x
1x
The water will run briefly
and the green LED lights up
once. The tap is then ready for
operation.

operATIoN
Cleaning, care and maintenance
www.stiebel-eltron.com WSH10 | WSH20 | 19
ENGLISH
5.2 Replacing the battery in the WSH20 sensor tap
A B
C
10 sec.
D
2,5
2,5
D0000077120
Note
The sensor tap is powered by a lithium battery.
Remove spent batteries. Leaking batteries cause damage
which is excluded from any warranty. Non-rechargeable
batteries must not be recharged.
Never use rechargeable batteries.
If the sensor tap is not going to be used for an extended
period, remove the battery.
Battery disposal
Never dispose of batteries with domestic waste. Spent
batteries may contain noxious substances that can be det-
rimental to the environment and human health. Dispose
of batteries through your dealer or via a central recycling
point for special waste.
5.3 Supplement “Touch settings and
programming” on the internet
Note
You can also find separate instructions for
"Touch settings and programming" for the
sensor tap on the internet. To view this,
scan the QR code or paste this link into
your browser: www.stiebel-eltron.de/
sensorarmaturen
We recommend that you:
Print out the instructions and laminate them.
Position the instructions close to the sensor tap.
6. Cleaning, care and maintenance
Never use abrasive or corrosive cleaning agents or abrasive
sponges.
If the sensor tap is dirty or covered in limescale, clean it with
soapy water or diluted domestic vinegar, then rinse with
plenty of clean water. Dry the sensor tap with a cloth.
For descaling, remove the aerator from the fitting. To avoid
inadvertently triggering the flow of water, activate a draw-off
pause; see chapter „Extended settings/ Setting the draw-off
pause/ Activating the draw-off pause“.
INsTALLATIoN
Safety
20 | WSH10 | WSH20 www.stiebel-eltron.com
INsTALLATIoN
7. Safety
Only qualified contractors should carry out installation, commis-
sioning as well as maintenance and repair of the product.
7.1 General safety instructions
We guarantee trouble-free function and operational reliability only
if original accessories and spare parts intended for the product
are used.
DANGER Electrocution
Carry out all electrical connection and installation work
in accordance with relevant regulations.
!
Damage to the appliance and environmental pollution
Drain the system when there is a risk of frost.
Note
To meet the required sound levels, install a pressure re-
ducing valve in the main line if the supply pressure is
more than 0.6 MPa.
7.2 Instructions, standards and regulations
Note
Observe all applicable national and regional regulations
and instructions.
Note
Water line pressures must be the same for domestic hot
water and cold water.
8. Product description
The sensor tap is connected via two flexible pressure hoses with
dirt trap. A non-return valve has been fitted into the tap body.
8.1 Standard delivery
The following are delivered with the product:
- Power supply unit for WSH10
- Battery for WSH20, 1 x CR-P26 V (installed)
- 2 connection hoses
- 2 strainers
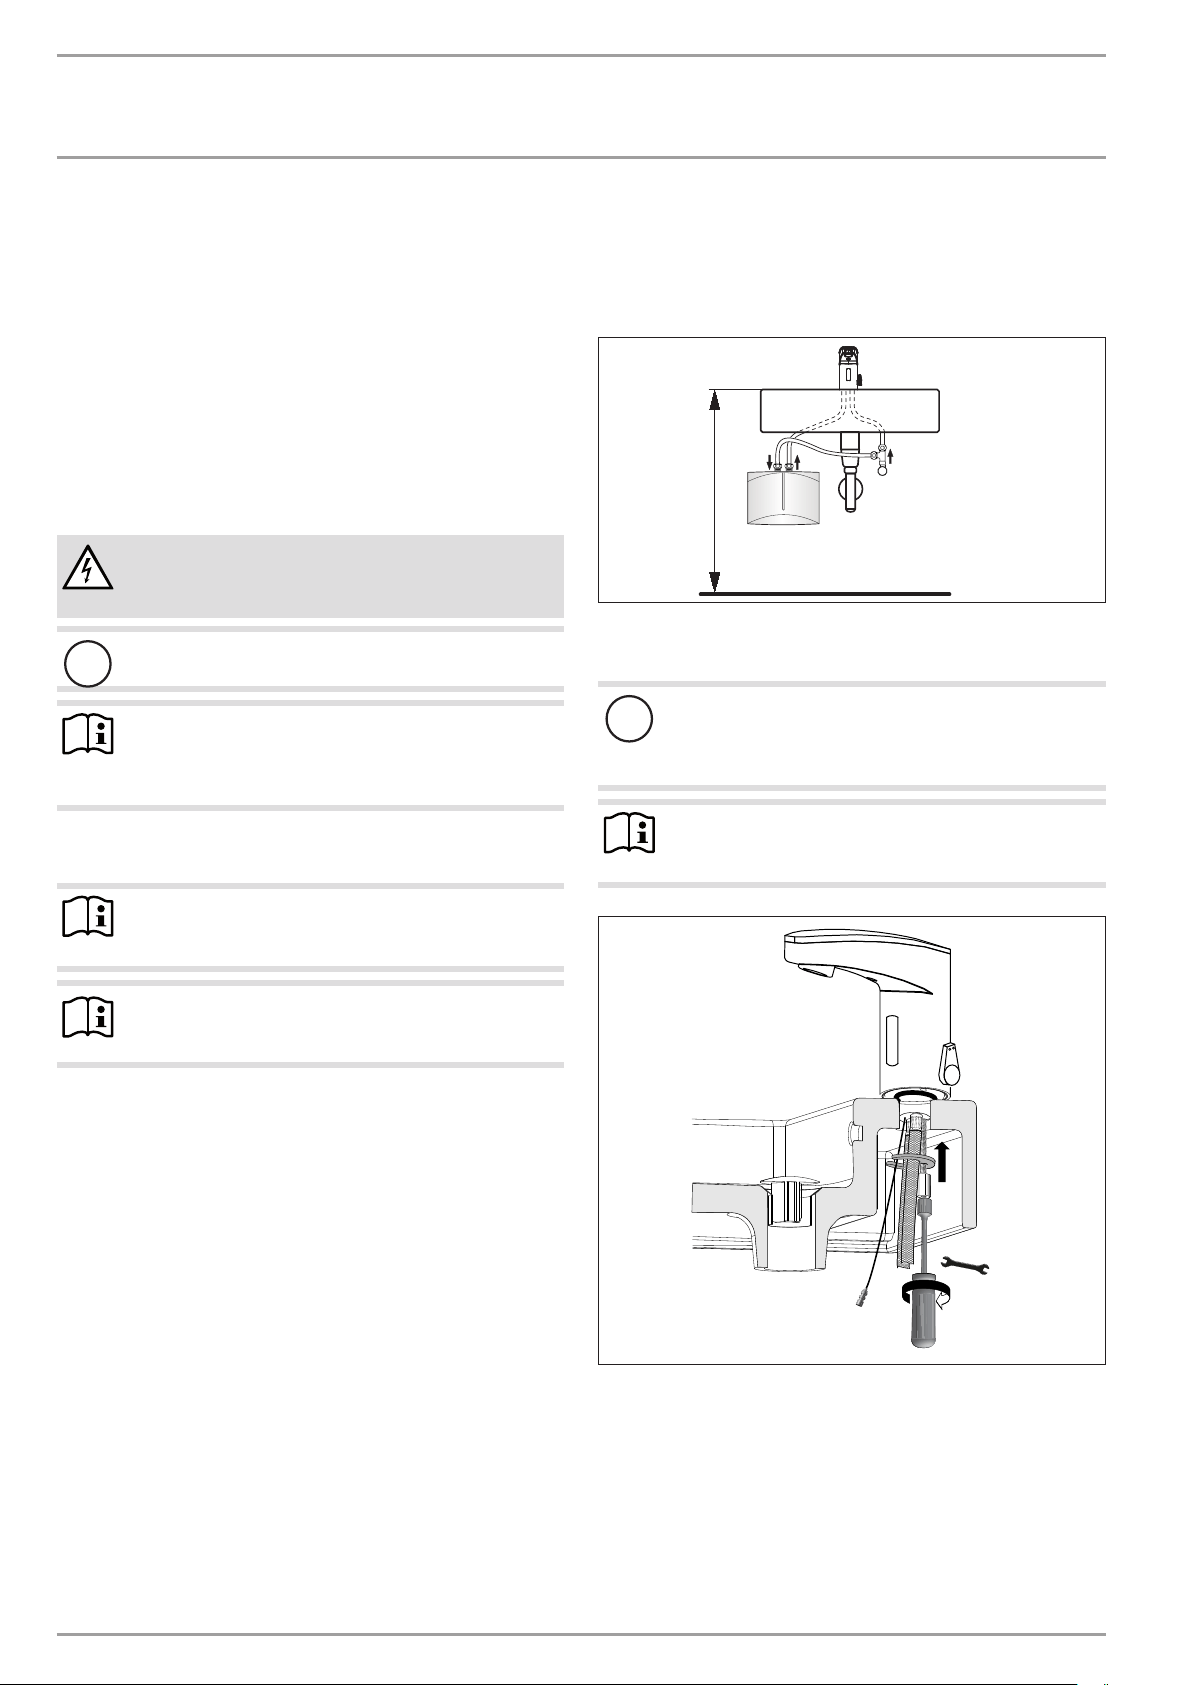
9. Preparation
9.1 Installation location
Installation example:
850 - 900
D0000077124
10. Installation
!
Damage to the appliance and environmental pollution
Refer to the operating and installation instructions for the
DHW appliance. Only use aerators that are permissible
for the DHW appliance.
Note
Make sure that the hoses are not kinked during installa-
tion and that the electrical connection is not damaged.
13
D0000077548
INsTALLATIoN
Commissioning
www.stiebel-eltron.com WSH10 | WSH20 | 21
ENGLISH
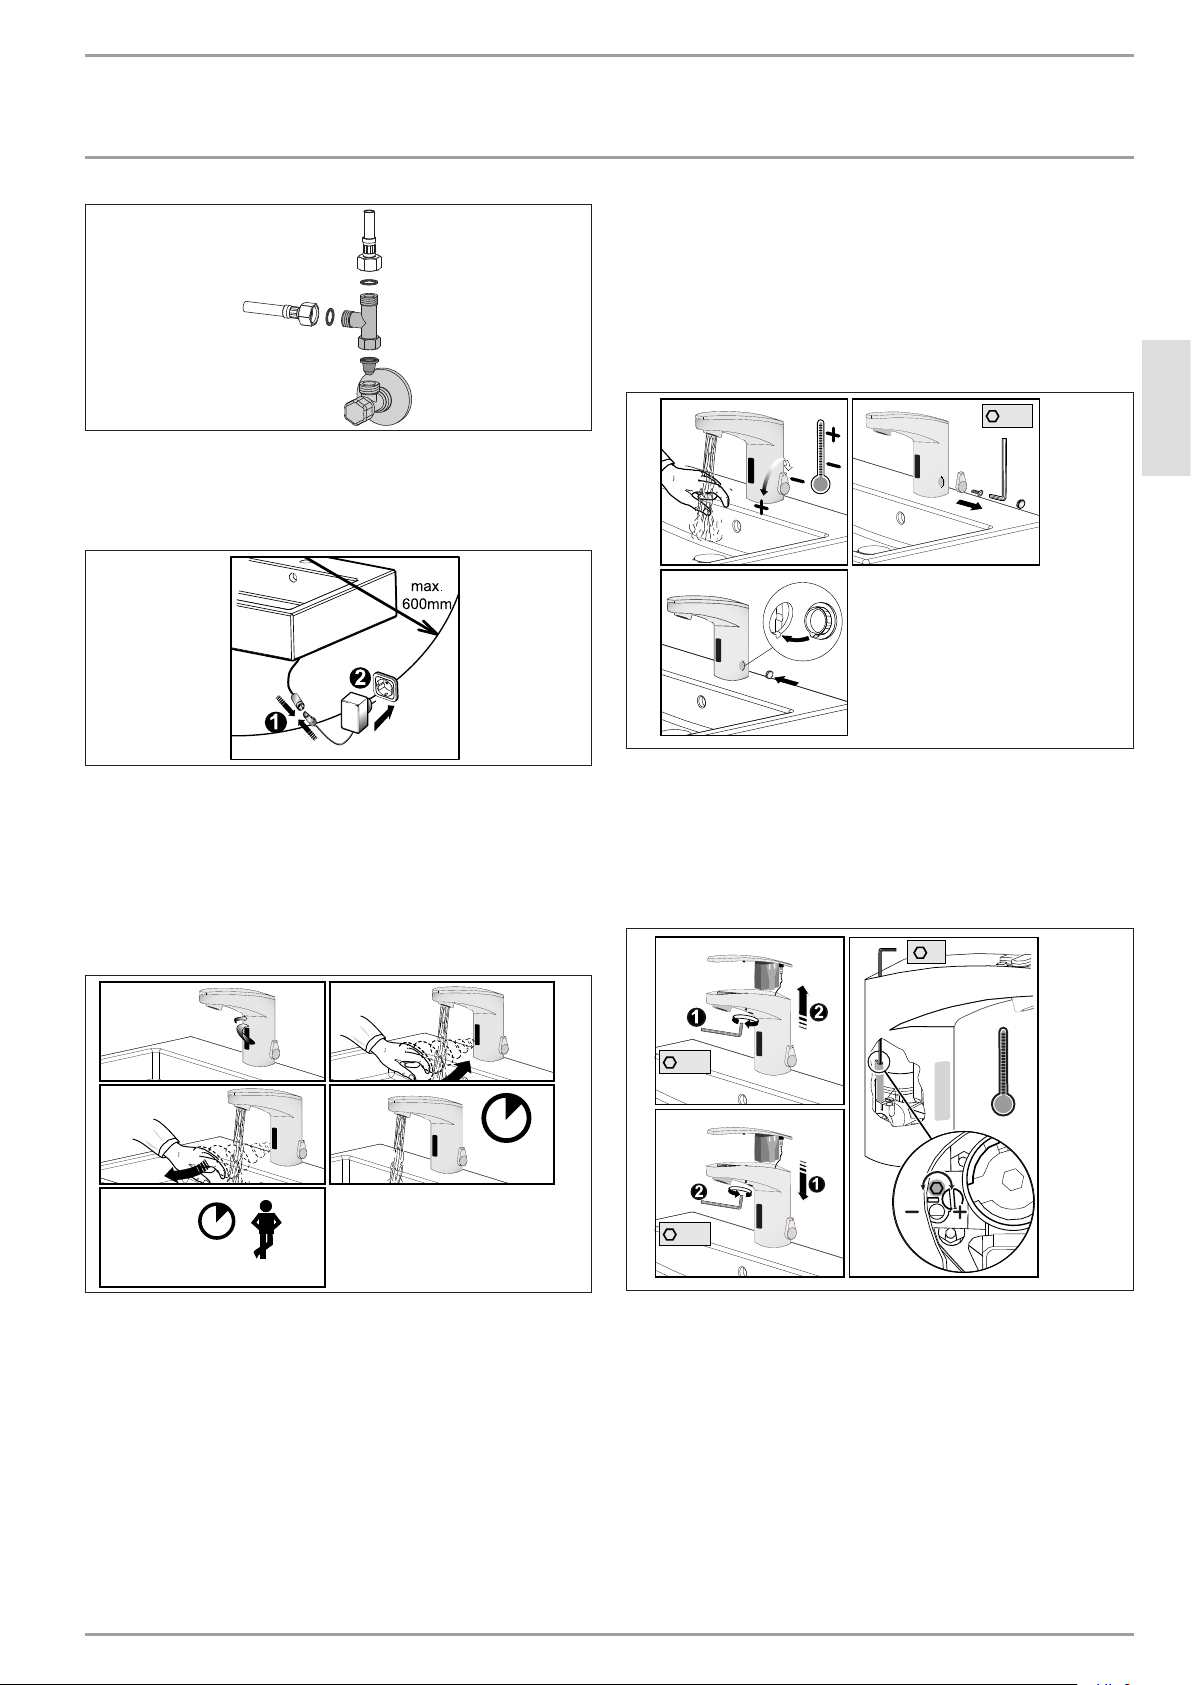
D0000077129
Install the strainer and gaskets (the tee is not included in the
standard delivery). Strainers are self-sealing.
Only WSH10:
D0000077133
Connect the sensor tap to the power supply unit. Connect up
the power supply unit.
11. Commissioning
Flush the pipeline.
Open the angle valve. Adjust the water to the required vol-
ume at the angle valve.
10 sec.
4 sec.
1x 2 Sec.
A B
C D
E
D0000077119
Commission the sensor tap:
A Remove the label.
B Wave your hand within range of the sensor.
C Move your hand out of range of the sensor.
D Water runs for approx. 4seconds.
E Wait another 10seconds. The sensor tap is now ready for
operation.
12. Settings
If required, you can set a fixed temperature and a hot water stop
at the sensor tap.
12.1 Setting a fixed temperature
You can set a fixed temperature at the sensor tap.
A B
C
2,5
D0000077123
Set the selected temperature as fixed by removing the lever
for adjusting the temperature and replacing it with a dummy
cap.
12.2 Setting the hot water stop
The hot water range can be locked by adjusting the Allen screw.
A B
C
2
2,5
2,5
D0000077122
Limit the setting range for hot water by turning the Allen
screw clockwise or anti-clockwise:
„+“ = reduce the hot water setting range
„-“ = increase the hot water setting range

www.stiebel-eltron.com WSH10 | WSH20 | 43
NEDERLANDS
NOTIZEN

Deutschland
STIEBEL ELTRON GmbH & Co. KG
Dr.-Stiebel-Straße 33 | 37603 Holzminden
Tel. 05531 702-0 | Fax 05531 702-480
info@stiebel-eltron.de
www.stiebel-eltron.de
Verkauf Tel. 05531 702-110 | Fax 05531 702-95108 | info-center@stiebel-eltron.de
Kundendienst Tel. 05531 702-111 | Fax 05531 702-95890 | kundendienst@stiebel-eltron.de
Ersatzteilverkauf Tel. 05531 702-120 | Fax 05531 702-95335 | ersatzteile@stiebel-eltron.de
Irrtum und technische Änderungen vorbehalten! | Subject to errors and technical changes! | Sous réserve
d‘erreurs et de modifications techniques! | Onder voorbehoud van vergissingen en technische wijzigingen!|
Salvo error o modificación técnica! | Excepto erro ou alteração técnica | Zastrzeżone zmiany techniczne i
ewentualne błędy | Omyly a technické změny jsou vyhrazeny! | A muszaki változtatások és tévedések jogát
fenntartjuk! | Отсутствие ошибок не гарантируется. Возможны технические изменения. | Chyby a
technické zmeny sú vyhradené! Stand 9375
Australia
STIEBEL ELTRON Australia Pty. Ltd.
6 Prohasky Street | Port Melbourne VIC 3207
Tel. 03 9645-1833 | Fax 03 9645-4366
info@stiebel.com.au
www.stiebel.com.au
Austria
STIEBEL ELTRON Ges.m.b.H.
Gewerbegebiet Neubau-Nord
Margaritenstraße 4 A | 4063 Hörsching
Tel. 07221 74600-0 | Fax 07221 74600-42
info@stiebel-eltron.at
www.stiebel-eltron.at
Belgium
STIEBEL ELTRON bvba/sprl
't Hofveld 6 - D1 | 1702 Groot-Bijgaarden
Tel. 02 42322-22 | Fax 02 42322-12
info@stiebel-eltron.be
www.stiebel-eltron.be
China
STIEBEL ELTRON (Tianjin) Electric Appliance
Co., Ltd.
Plant C3, XEDA International Industry City
Xiqing Economic Development Area
300085 Tianjin
Tel. 022 8396 2077 | Fax 022 8396 2075
info@stiebeleltron.cn
www.stiebeleltron.cn
Czech Republic
STIEBEL ELTRON spol. s r.o.
K Hájům 946 | 155 00 Praha 5 - Stodůlky
Tel. 251116-111 | Fax 235512-122
info@stiebel-eltron.cz
www.stiebel-eltron.cz
Finland
STIEBEL ELTRON OY
Kapinakuja 1 | 04600 Mäntsälä
Tel. 020 720-9988
info@stiebel-eltron.fi
www.stiebel-eltron.fi
France
STIEBEL ELTRON SAS
7-9, rue des Selliers
B.P 85107 | 57073 Metz-Cédex 3
Tel. 0387 7438-88 | Fax 0387 7468-26
info@stiebel-eltron.fr
www.stiebel-eltron.fr
Hungary
STIEBEL ELTRON Kft.
Gyár u. 2 | 2040 Budaörs
Tel. 01 250-6055 | Fax 01 368-8097
info@stiebel-eltron.hu
www.stiebel-eltron.hu
Japan
NIHON STIEBEL Co. Ltd.
Kowa Kawasaki Nishiguchi Building 8F
66-2 Horikawa-Cho
Saiwai-Ku | 212-0013 Kawasaki
Tel. 044 540-3200 | Fax 044 540-3210
info@nihonstiebel.co.jp
www.nihonstiebel.co.jp
Netherlands
STIEBEL ELTRON Nederland B.V.
Daviottenweg 36 | 5222 BH 's-Hertogenbosch
Tel. 073 623-0000 | Fax 073 623-1141
info@stiebel-eltron.nl
www.stiebel-eltron.nl
Poland
STIEBEL ELTRON Polska Sp. z O.O.
ul. Działkowa 2 | 02-234 Warszawa
Tel. 022 60920-30 | Fax 022 60920-29
biuro@stiebel-eltron.pl
www.stiebel-eltron.pl
Russia
STIEBEL ELTRON LLC RUSSIA
Urzhumskaya street 4,
building 2 | 129343 Moscow
Tel. 0495 7753889 | Fax 0495 7753887
info@stiebel-eltron.ru
www.stiebel-eltron.ru
Slovakia
TATRAMAT - ohrievače vody s.r.o.
Hlavná 1 | 058 01 Poprad
Tel. 052 7127-125 | Fax 052 7127-148
info@stiebel-eltron.sk
www.stiebel-eltron.sk
Switzerland
STIEBEL ELTRON AG
Industrie West
Gass 8 | 5242 Lupfig
Tel. 056 4640-500 | Fax 056 4640-501
info@stiebel-eltron.ch
www.stiebel-eltron.ch
Thailand
STIEBEL ELTRON Asia Ltd.
469 Moo 2 Tambol Klong-Jik
Amphur Bangpa-In | 13160 Ayutthaya
Tel. 035 220088 | Fax 035 221188
info@stiebeleltronasia.com
www.stiebeleltronasia.com
United Kingdom and Ireland
STIEBEL ELTRON UK Ltd.
Unit 12 Stadium Court
Stadium Road | CH62 3RP Bromborough
Tel. 0151 346-2300 | Fax 0151 334-2913
info@stiebel-eltron.co.uk
www.stiebel-eltron.co.uk
United States of America
STIEBEL ELTRON, Inc.
17 West Street | 01088 West Hatfield MA
Tel. 0413 247-3380 | Fax 0413 247-3369
info@stiebel-eltron-usa.com
www.stiebel-eltron-usa.com
A 329936-41014-9429
4<AMHCMO=cjjdgd>