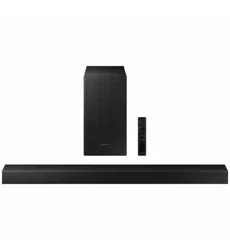

HW-Q600B
FULL MANUAL
Imagine the possibilities
Thank you for purchasing this Samsung product.
To receive more complete service, please register
your product at www.samsung.com/register
ENG - 2
SAFETY INFORMATION
SAFETY WARNINGS
TO REDUCE THE RISK OF ELECTRIC SHOCK, DO
NOT REMOVE THE COVER (OR BACK).
NO USER-SERVICEABLE PARTS ARE INSIDE.
REFER SERVICING TO QUALIFIED SERVICE
PERSONNEL.
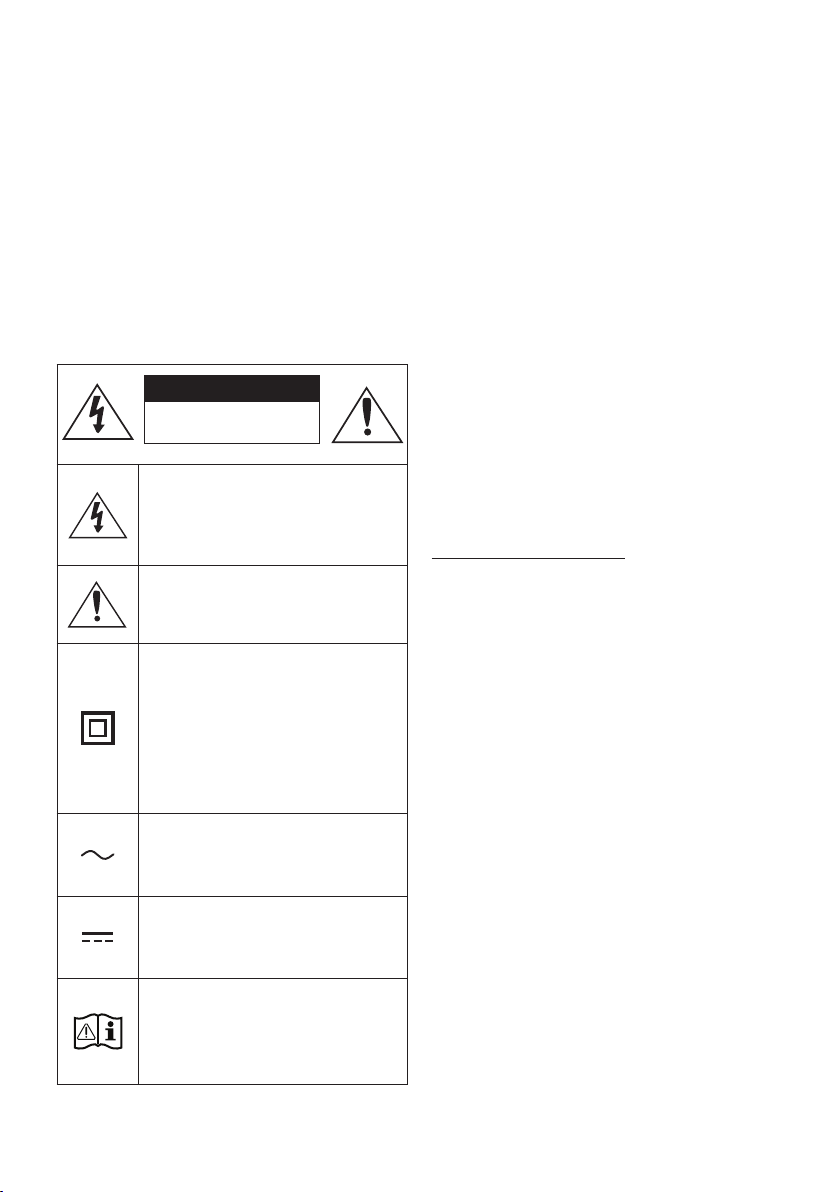
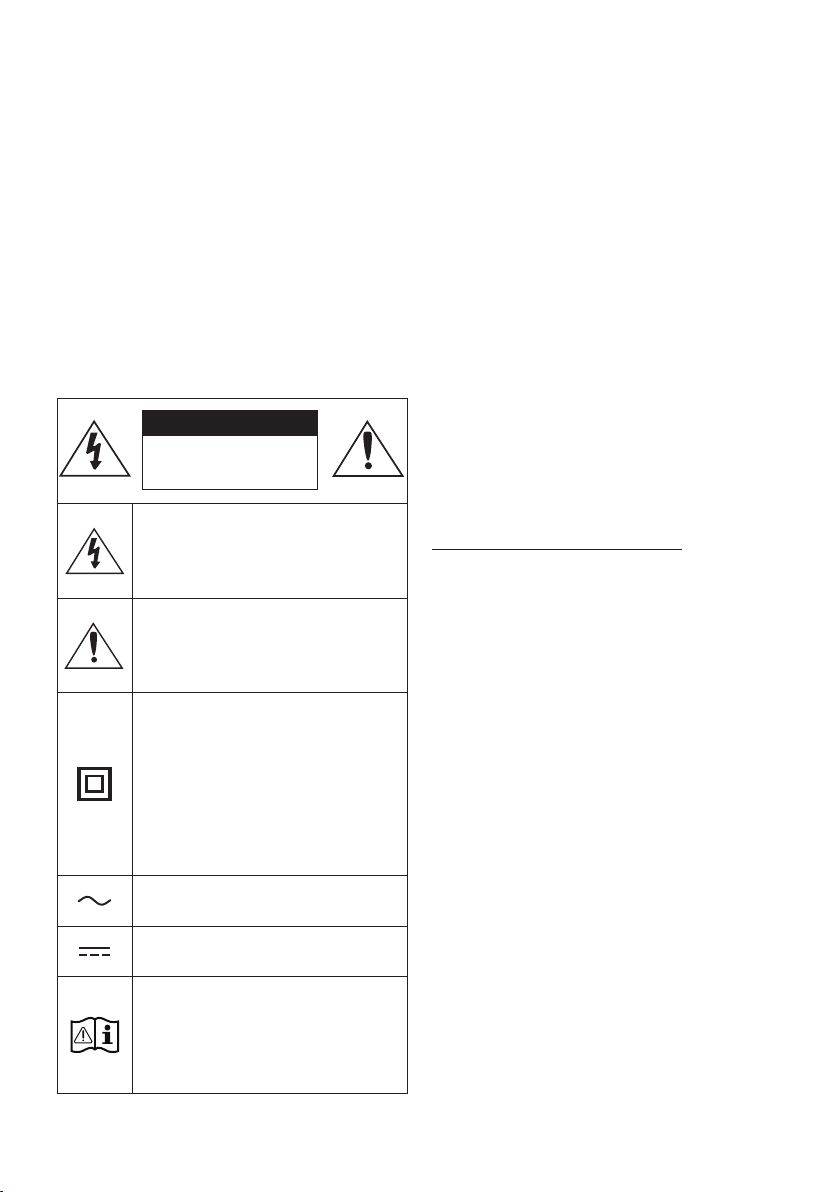
Refer to the table below for an explanation of
symbols which may be on your Samsung product.
CAUTION
RISK OF ELECTRIC SHOCK.
DO NOT OPEN.
This symbol indicates that high voltage
is present inside. It is dangerous to
make any kind of contact with any
internal part of this product.
This symbol indicates that this product
has included important literature
concerning operation and maintenance.
Class II product : This symbol indicates
that it does not require a safety
connection to electrical earth (ground).
If this symbol is not present on a
product with a power cord, the product
MUST have a reliable connection to
protective earth (ground).
AC voltage : This symbol indicates that
the rated voltage marked with the
symbol is AC voltage.
DC voltage : This symbol indicates that
the rated voltage marked with the
symbol is DC voltage.
Caution, Consult instructions for use :
This symbol instructs the user to
consult the user manual for further
safety related information.
WARNING
not expose this appliance to rain or moisture.
To prevent injury, this apparatus must be
accordance with the installation instructions.
CAUTION
Do not expose this apparatus to dripping or
liquids, such as vases, on the apparatus.
To turn this apparatus off completely, you
must pull the power plug out of the wall
socket. Consequently, the power plug must
be easily and readily accessible at all times.
CAUTION (for Canada)
This device contains licence-exempt
transmitter(s)/receiver(s) that comply with
Innovation, Science and Economic Development
Canada’s licence-exempt RSS(s). Operation is
subject to the following two conditions:
(1) This device may not cause interference.
(2) This device must accept any interference,
including interference that may cause undesired
operation of the device.
This device and its antenna(s) must not be co-
located or operation in conjunction with any other
antenna or transmitter.
This device may automatically discontinue
transmission if there is no information to
transmit, or an operational failure. Note that this
is not intended to prohibit the transmission of
control or signaling information or the use of
repetitive codes where required by the
technology.
This Class B digital apparatus complies with
Canadian ICES-003.

ENG - 3
Radiation Exposure Statement
This equipment complies with IC RSS-102
radiation exposure limits set forth for an
uncontrolled environment. This equipment should
be installed and operated with minimum distance
20 cm between the radiator & your body.
Important Safety Instructions
Read these operating instructions carefully
before using the unit. Follow all the safety
instructions listed below. Keep these operating
instructions handy for future reference.
1. Read these instructions.
2. Keep these Instructions.
3. Heed all warnings.
4. Follow all instructions.
5. Do not use this apparatus near water.
6. Clean only with dry cloth.
7. Do not block any ventilation openings.
Install in accordance with the manufacturer’s
instructions.
8. Do not install near any heat sources such as
radiators, heat registers, stoves, or other
heat.
9. Do not defeat the safety purpose of the
polarized or grounding-type plug.
A polarized plug has two blades with one
wider than the other. A grounding type plug
has two blades and a third grounding prong.
The wide blade or the third prong are
provided for your safety. If the provided plug
electrician for replacement of the obsolete
outlet.
10. Protect the power cord from being walked
on or pinched particularly at plugs,
convenience receptacles, and the point
where they exit from the apparatus.
11.
by the manufacturer.
12. Use only with the cart, stand,
tripod, bracket, or table
or sold with the apparatus.
When a cart is used, use caution when
moving the cart/apparatus combination to
avoid injury from tip-over.
13. Unplug this apparatus during lightning
storms or when unused for long periods of
time.
14.
personnel. Servicing is required when the
apparatus has been damaged in any way,
such as power-supply cord or plug is
damaged, liquid has been spilled or objects
have fallen into the apparatus, the apparatus
has been exposed to rain or moisture, does
not operate normally, or has been dropped.

ENG - 4
PRECAUTIONS
1. Ensure that the AC power supply in your
house complies with the power
sticker located on the bottom of your
product. Install your product horizontally, on
a suitable base (furniture), with enough
space around it for ventilation (3~4 inches).
Make sure the ventilation slots are not
or other equipment which may become hot.
This unit is designed for continuous use.
To fully turn off the unit, disconnect the AC
plug from the wall outlet. Unplug the unit if
you intend to leave it unused for a long
period of time.
2. During thunderstorms, disconnect the AC
plug from the wall outlet. Voltage peaks due
to lightning could damage the unit.
3. Do not expose the unit to direct sunlight or
other heat sources. This could lead to
overheating and cause the unit to
malfunction.
4. Protect the product from moisture (i.e.
equipment creating strong magnetic or
the AC wall socket if the unit malfunctions.
Your product is not intended for industrial
use. It is for personal use only. Condensation
may occur if your product has been stored in
cold temperatures. If transporting the unit
during the winter, wait approximately
2 hours until the unit has reached room
temperature before using.
5. The battery used with this product contains
chemicals that are harmful to the
environment. Do not dispose of the battery
in the general household trash. Do not
expose the battery to excess heat, direct
disassemble, or overheat the battery.
CAUTION : Danger of explosion if the battery
is replaced incorrectly. Replace only with the
same or equivalent type.

ENG - 5
CONTENTS
01 Checking the Components 7
02 Product Overview 8
Front Panel / Top Panel of the Soundbar
------------------------- 8
Bottom Panel of the Soundbar
------------------------- 9
03 Using the Remote Control 10
Inserting Batteries before using the Remote Control (AAA batteries X 2)
------------------------- 10
How to Use the Remote Control
-------------------------
10
Using the Hidden Buttons (Buttons with more than one function)
-------------------------
14
-------------------------
14
Adjusting the Soundbar volume with a TV remote control
------------------------- 15
04 Connecting the Soundbar 16
Connecting Electrical Power
-------------------------
16
Connecting the Samsung Wireless Rear Kit to your Soundbar
-------------------------
19
05 Using a wired connection to the TV 20
Method 1. Connecting with HDMI
-------------------------
20
Method 2. Connecting using an Optical Cable
-------------------------
22
06 Using a wireless connection to the TV 24
Connecting via Bluetooth
-------------------------
24
07 Connecting an External Device 26
Method 1. Connecting using an HDMI Cable
(Capable of Dolby Atmos® decoding and playback)
-------------------------
26
Method 2. Connecting using an Optical Cable
-------------------------
27

ENG - 6
08 Connecting a USB drive 28
09 Connecting a Mobile Device 29
Connecting via Bluetooth
-------------------------
29
Using Tap Sound
-------------------------
33
10 Installing the Wall Mount 34
Installation Precautions
-------------------------
34
Wallmount Components
-------------------------
34
11 Installing the Soundbar in front of TV 36
12 Software Update 37
USB Update
-------------------------
37
Reset
-------------------------
38
13 Troubleshooting 39
14 License 41
15 Open Source License Notice 42
16 Important Notes About Service 42
-------------------------
43
ENG - 7
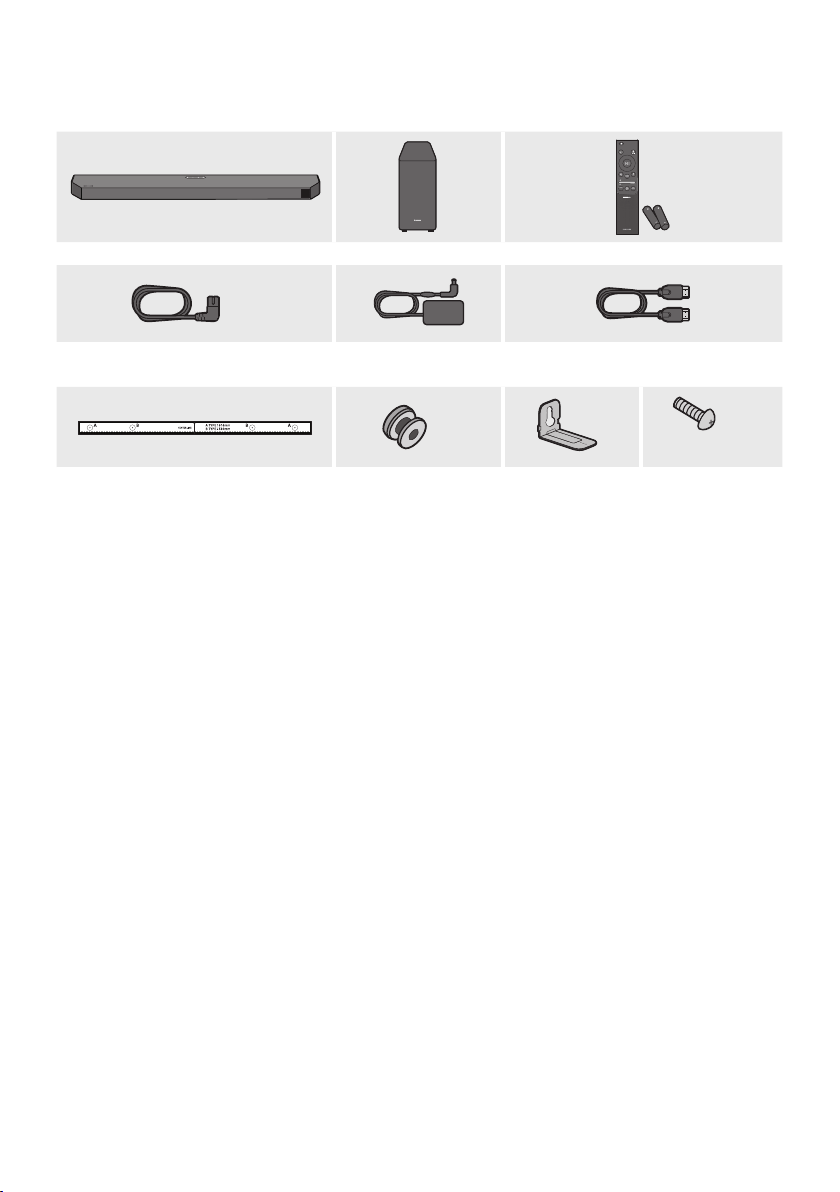
01 CHECKING THE COMPONENTS
SOUND
MODE
WOOFER
TONE
CONTROL
CH LEVEL
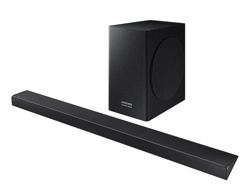
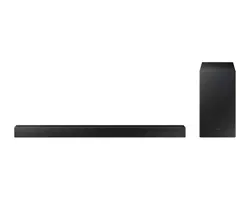
Soundbar Main Unit Subwoofer Remote Control / Batteries
x 2
Power Cord
(Subwoofer, Soundbar)
AC/DC Adapter
(Soundbar)
HDMI Cable
x 2
x 2
(M4 x L10)
x 2
Wall Mount Guide Holder-Screw
Bracket-Wall Mount
Screw
For more information about the power supply and power consumption, refer to the label attached
to the product. (Label: Bottom of the Soundbar Main Unit)
To purchase additional components or optional cables, contact a Samsung Service Center or
Samsung Customer Care.
For more information about the wallmount see page 34.
The appearance of the components may differ slightly from the illustrations above.
ENG - 8
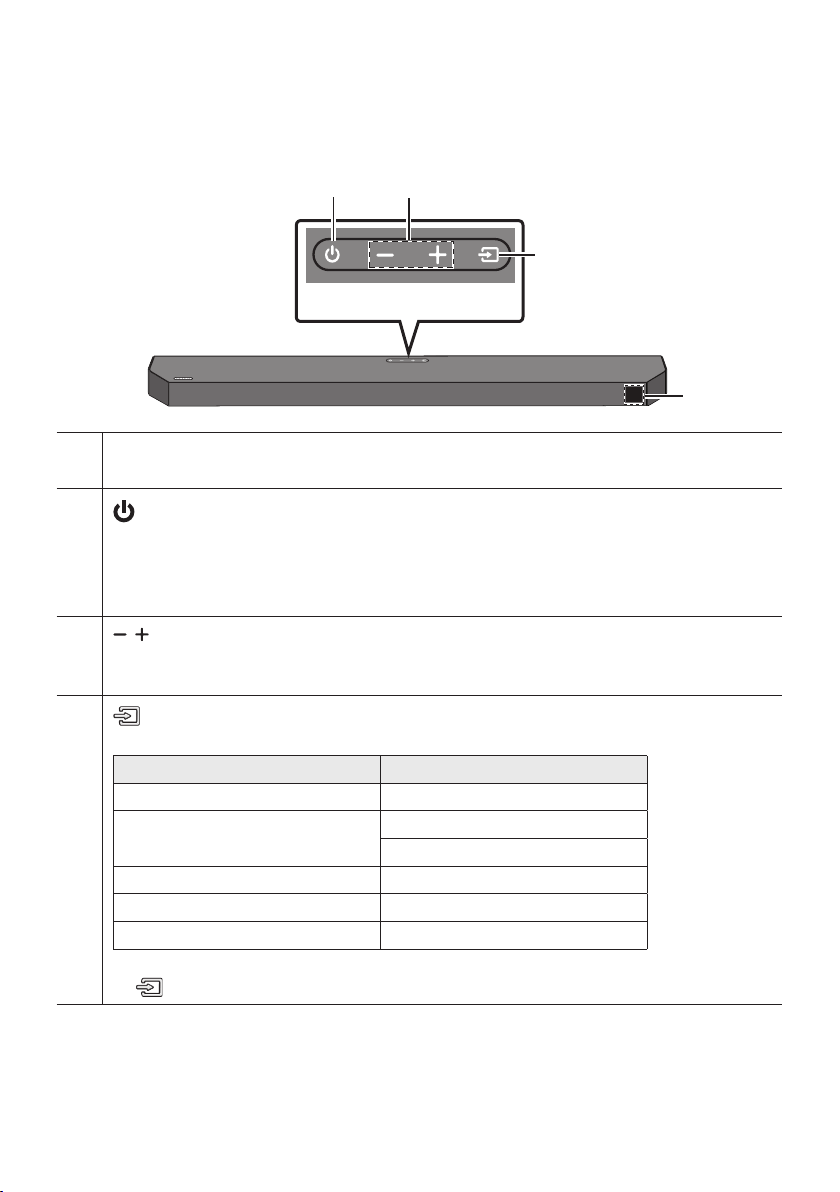
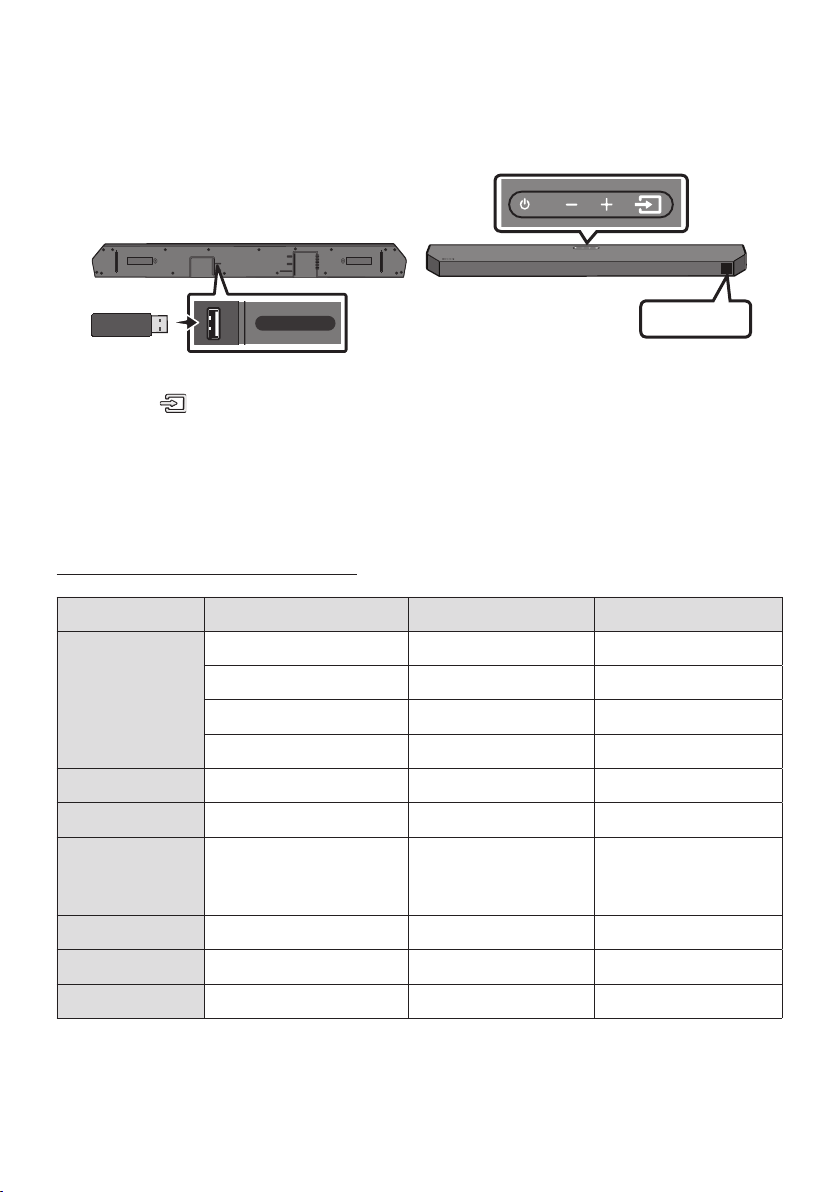
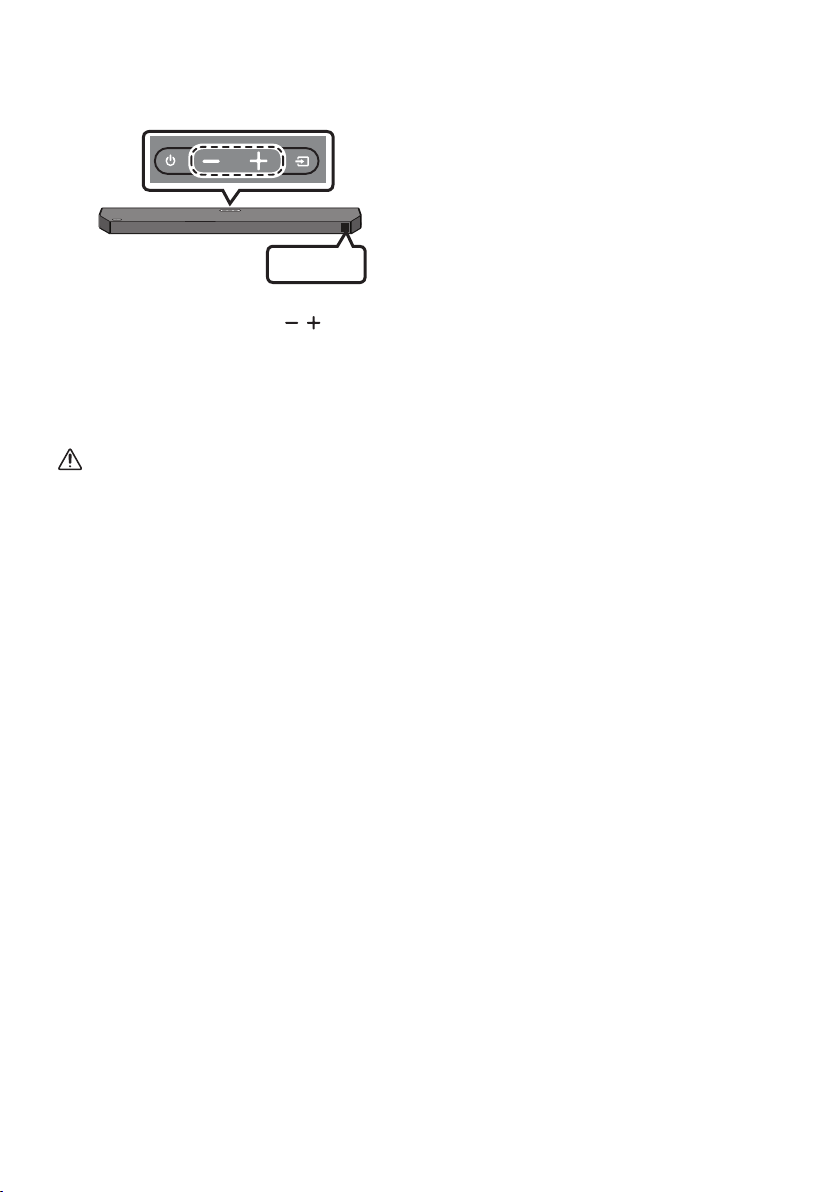
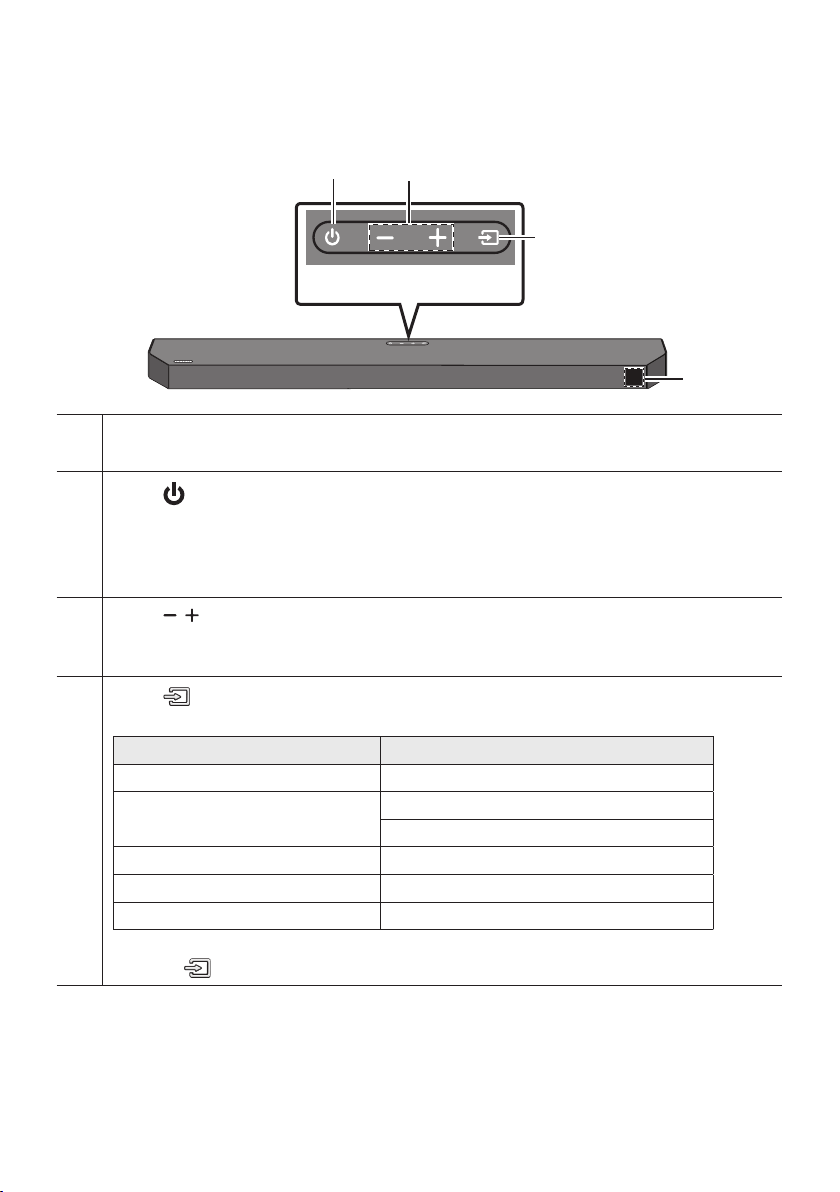
02 PRODUCT OVERVIEW
Front Panel / Top Panel of the Soundbar
Top Panel
Display
Displays the product’s status and current mode.
(Power) Button
Turns the power on and off.
Auto Power Down Function
The unit turns off automatically in the following situations:
– In D.IN / HDMI / BT / USB Mode : If there is no audio signal for 18 minutes.
(Volume) Button
Adjusts the volume.
When adjusted, the volume level appears on the Soundbar’s front display.
(Source) Button
Selects the source input mode.
Input mode Display
Optical D.IN
eARC/ARC (HDMI OUT)
* D.IN TV eARC (Auto conversion)
D.IN TV ARC (Auto conversion)
HDMI HDMI
BLUETOOTH mode BT
USB mode USB
To turn on “BT PAIRING” mode, change the source to “BT” mode, and then press and hold the
(Source) button for more than 5 seconds.
“*” mode is supported when the eARC function in the TV setting is On.
When you plug in the AC cord, the power button will begin working in 4 to 6 seconds.
ENG - 9
When you turn on this unit, there will be a 4 to 5 second delay before it produces sound.
If you hear sounds from both the TV and Soundbar, go to the Settings menu for the TV audio and
change the TV speaker to External Speaker.
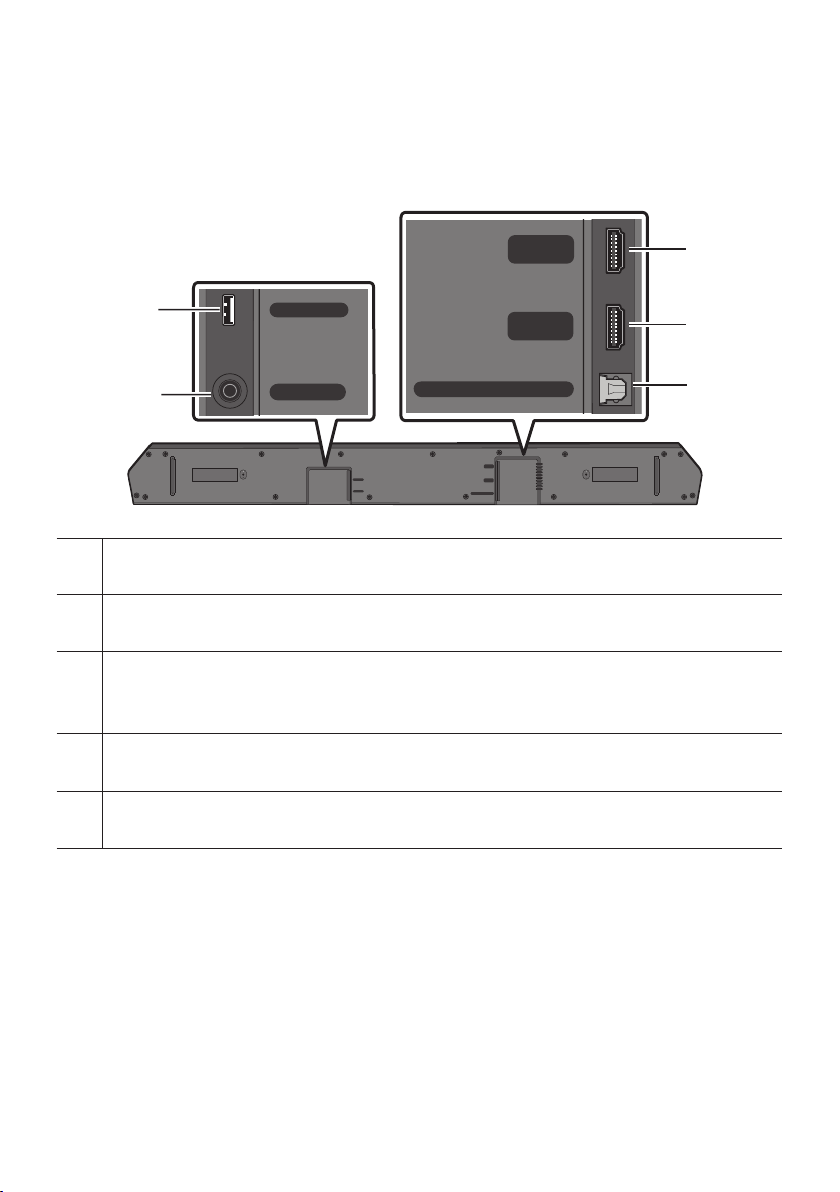
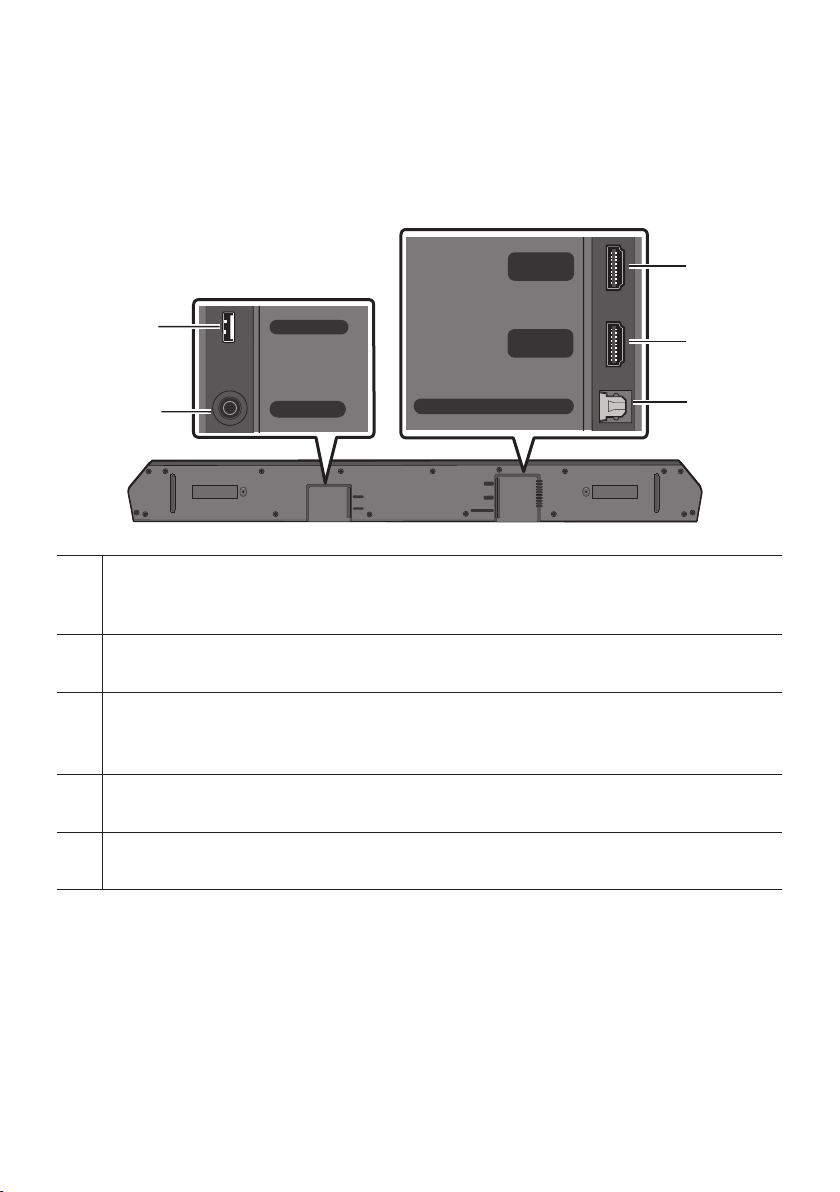
Bottom Panel of the Soundbar
HDMI
HDMI TO TV
(eARC/ARC)
DIGITAL AUDIO IN (OPTICAL)
USB (5V 0.5A)
DC 24V
HDMI
HDMI TO TV
(eARC/ARC)
DIGITAL AUDIO IN (OPTICAL)
USB (5V 0.5A)
DC 24V
USB (5V 0.5A)
DC 24V (Power Supply In)
Connect the AC/DC power adapter.
HDMI
Inputs digital video and audio signals simultaneously using an HDMI cable.
Connect to the HDMI output of an external device.
HDMI TO TV (eARC/ARC)
Connect to the HDMI IN (ARC) port on a TV.
DIGITAL AUDIO IN (OPTICAL)
Connect to the digital (optical) output of an external device.
When disconnecting the power cable of the AC/DC power adapter from a wall outlet, pull the plug.
Do not pull the cable.
Do not connect this unit or other components to an AC outlet until all connections between
components are complete.
ENG - 10
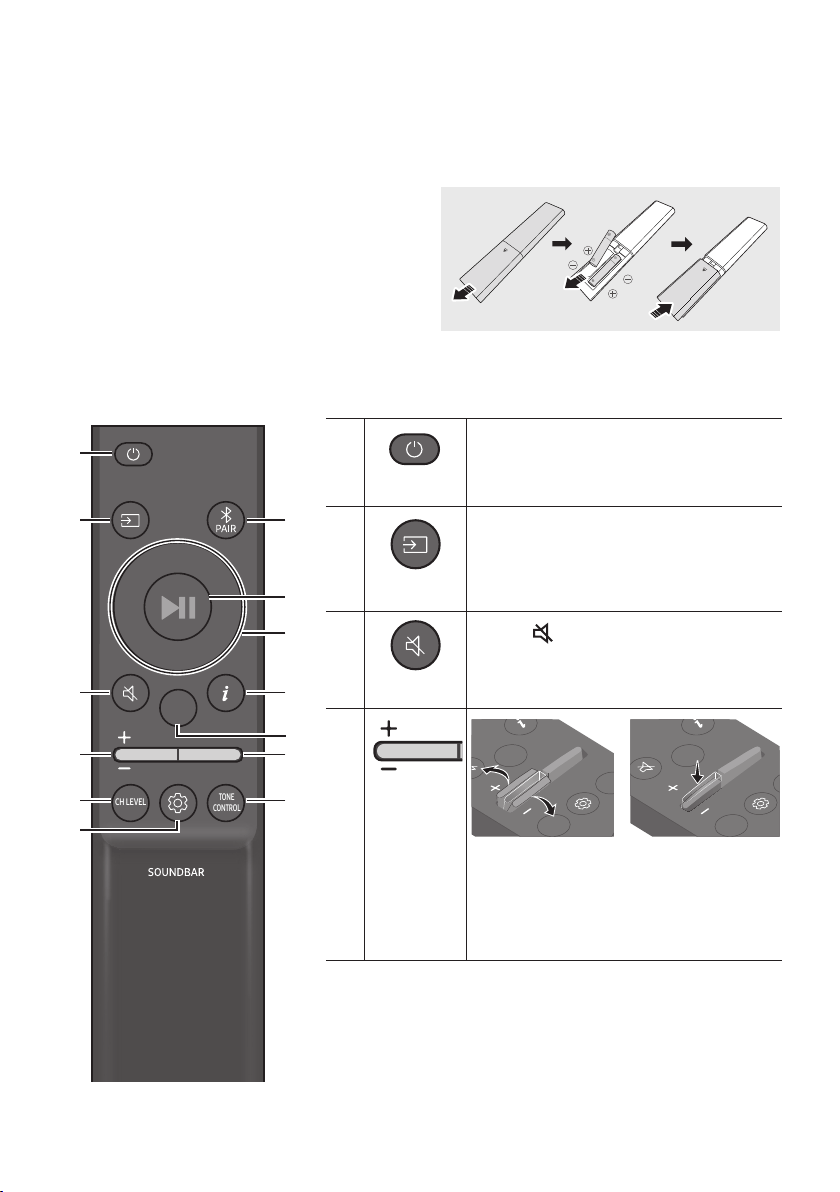
03 USING THE REMOTE CONTROL
Inserting Batteries before using the Remote Control (AAA batteries X 2)
Slide the back cover in the direction of the arrow
until it is completely removed.
Insert 2 AAA batteries (1.5V) oriented so that their
polarity is correct. Slide the back cover back into
position.
How to Use the Remote Control
SOUND
MODE
WOOFER
TONE
CONTROL
CH LEVEL
Power
Turns the Soundbar on and off.
Source
Press to select a source connected to the
Soundbar.
Mute
Press the
(Mute) button to mute the sound.
Press it again to unmute the sound.
Volume
CH LEVEL
TONE
CONTR
WOOFER
SOUND
MODE
CH LEVEL
TO
C
WOOFER
SOUND
MODE
Push the button up or down to adjust the
volume.
Mute
Press the Volume button in to mute the
sound. Press it in again to unmute the sound.
ENG - 11
CH LEVEL
CH LEVEL
By pressing the button, you can adjust the volume of the each speaker.
Press the button to select CENTER LEVEL or TOP LEVEL and then adjust the volume
between -6~+6 by using the Up/Down buttons.
If the Rear Speakers (sold separately) are connected, the setting REAR LEVEL is
supported. To adjust the volume of the REAR LEVEL between -6 to +6 by using the Up/
Down buttons.
VEL
Sound Control
By pressing the button, you can set the audio function. The desired settings can be
adjusted using the Up/Down buttons.
VOICE ENHANCE ON/OFF NIGHT MODE ON/OFF AUDIO SYNC VIRTUAL ON/OFF
– VOICE ENHANCE ON/OFF
This mode is makes it easier to hear spoken dialog in movies and TV.
– NIGHT MODE ON/OFF
This mode is optimized for nighttime viewing with the settings adjusted to bring the
volume down but keep the dialog clear.
– AUDIO SYNC
If the video on the TV and audio from the Soundbar are not synchronized, press the
(Sound Control) button to select AUDIO SYNC and then set the audio delay
Up/Down buttons. (Not available in “USB”
or “BT” mode.)
– VIRTUAL ON/OFF
Dolby Virtual function can be turned ON/OFF.
The VOICE ENHANCE, NIGHT MODE, and VIRTUAL audio function can be turned ON/
OFF by using the Up/Down buttons. (VIRTUAL function is not available in “USB” or “BT”
mode.)
Press and hold the (Sound Control) button for about 5 seconds to adjust the sound
for each frequency band. 150Hz, 300Hz, 600Hz, 1.2kHz, 2.5kHz, 5kHz, and 10kHz are
selectable using the Left/Right buttons and each can be adjusted to a setting between
-6 to +6 using the Up/Down buttons.
(Make sure the Sound mode is set to “STANDARD”.)
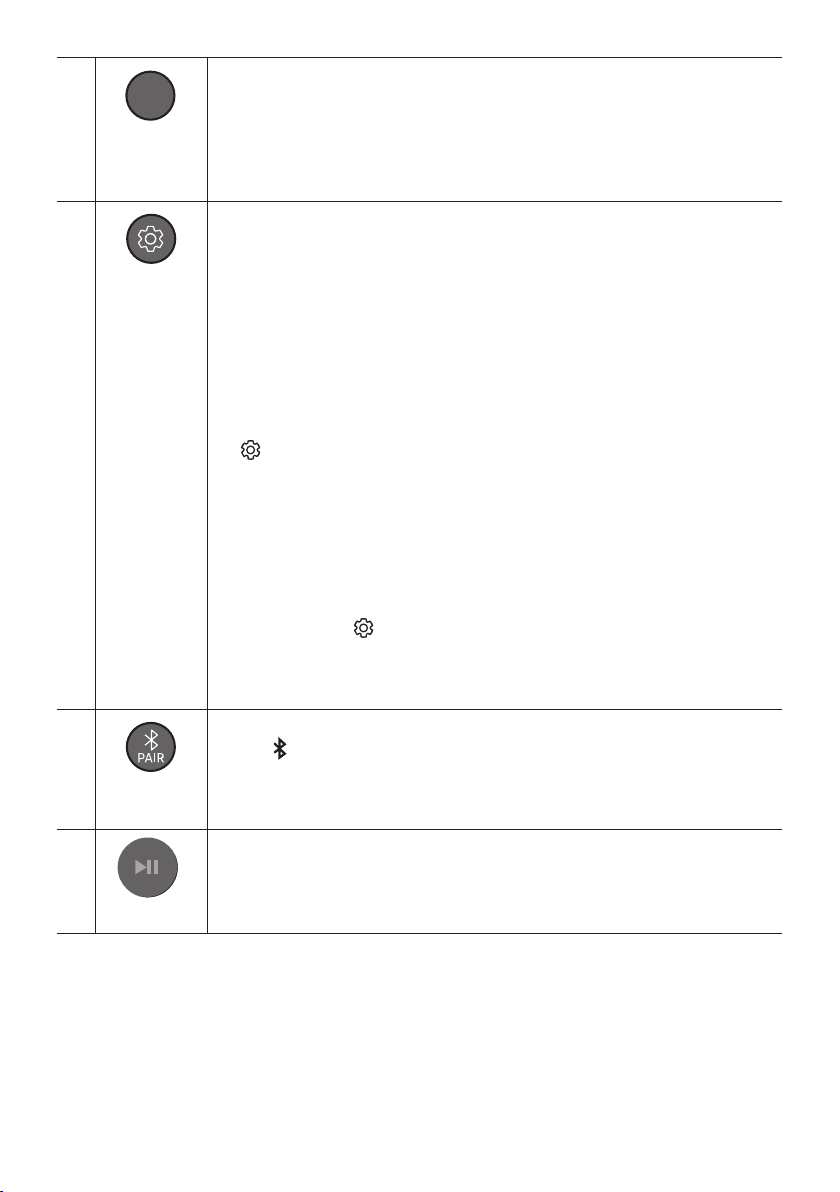
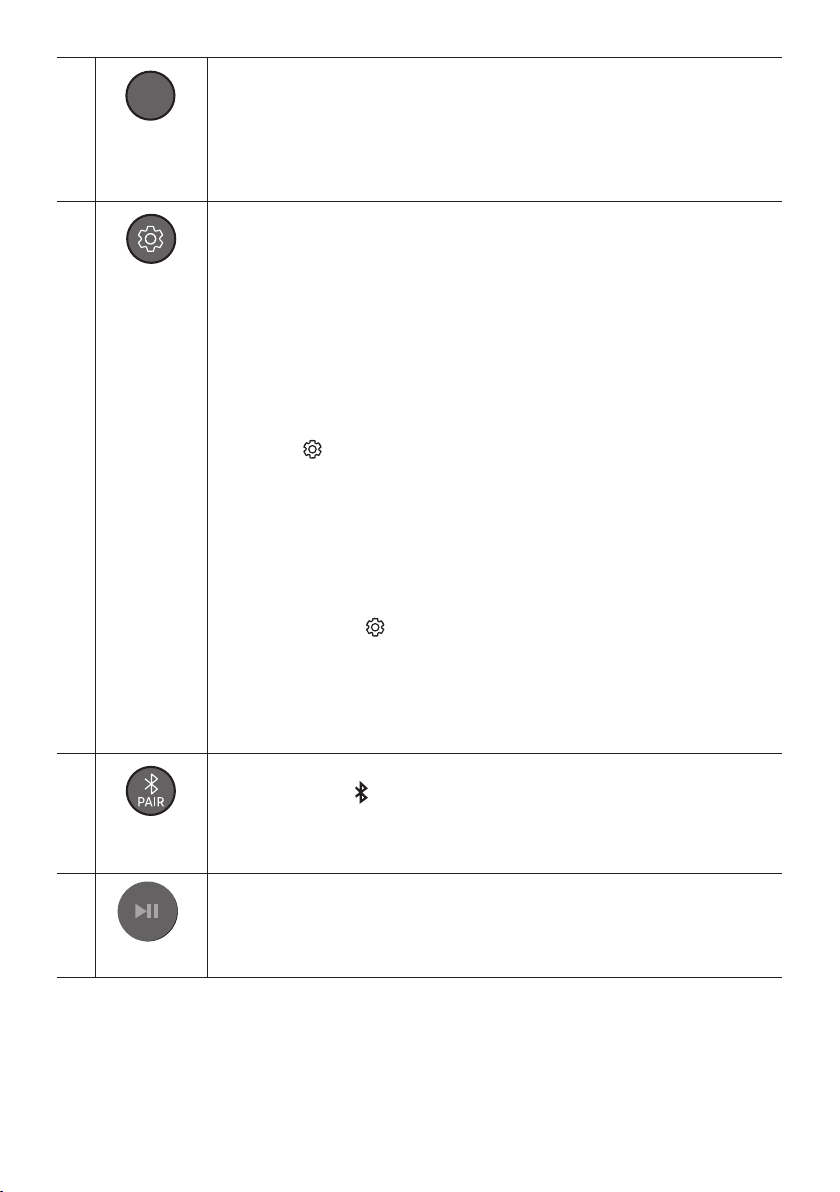
Bluetooth
PAIR
Switch the Soundbar to Bluetooth pairing mode.
Press the
PAIR button and wait for the “BT PAIRING” screen to connect to a new
Bluetooth device.
Play / Pause
You can also play or pause music by pressing the button.
ENG - 12
Up/Down/
Left/Right
Press the indicated areas to select Up/Down/Left/Right.
Press Up/Down/Left/Right on the button to select or set functions.
Repeat
To use the Repeat function in “USB” mode, press the Up button.
Music Skip
Press the RightLeft button to select the
ID SET
Press and hold the Up button for 5 seconds to complete ID SET (when connecting to a
wireless subwoofer or wireless rear speakers).
OUND
Info
When pressed, the information for each mode appears. (See page 8.)
SOUND
MODE
SOUND MODE
By pressing the button, you can select the desired sound mode.
SURROUND SOUND GAME PRO ADAPTIVE SOUND STANDARD
– SURROUND SOUND
– GAME PRO
Provides stereoscopic sound to immerse you in the action while gaming.
– ADAPTIVE SOUND
based on the characteristics of the content.
– STANDARD
Outputs the original sound.
DRC (Dynamic Range Control)
Lets you apply dynamic range control to Dolby Digital tracks. Press and hold the
SOUND MODE
turn DRC (Dynamic Range Control) on or off. With the DRC turned on, loud sound is
reduced. (The sound may be distorted.)
Bluetooth Power
This feature automatically turns the Soundbar on when it receives a connection
request from a previously connected TV or Bluetooth device. The setting is On by
default.
– Press and hold the SOUND MODE button for more than 5 seconds to turn off the
Bluetooth Power function.

ENG - 13
WOOFER
WOOFER
(BASS) LEVEL
CH LEVEL
TONE
CONTR
WOOFER
SOUND
MODE
CH LEVEL
TONE
CONTR
WOOFER
SOUND
MODE
Push the button up or down to adjust the level of the woofer (bass) to -12 or between -6 to
+6. To set the woofer (bass) volume level to 0 (Default), press the button.
TONE
CONTROL
TONE
CONTROL
By pressing the button, you can adjust the volume of the treble or bass sound.
Press the button to select TREBLE or BASS and then adjust the volume between -6~+6
by using the Up/Down buttons.
ENG - 14
Using the Hidden Buttons (Buttons with more than one function)
Hidden Button
Reference page
Remote Control Button Function
WOOFER (Up) TV remote control On/Off (Standby) page 15
Left TV Auto connect On/Off (BT Ready) page 25
Up ID SET page 12
(Sound Control)
7 Band EQ page 11
SOUND MODE
DRC ON/OFF (Standby) page 12
Bluetooth Power page 12
Effect Input
Output
With Subwoofer Only
With Subwoofer &
Wireless Rear Speaker
Kit
SOUND MODE
SOUND
MODE
SURROUND
SOUND
2.0 ch
3.1.2 ch 5.1.2 ch
5.1 ch 3.1.2 ch 5.1.2 ch
Dolby Atmos®, DTS:X 3.1.2 ch 5.1.2 ch
GAME PRO
2.0 ch
3.1.2 ch 5.1.2 ch
5.1 ch 3.1.2 ch 5.1.2 ch
Dolby Atmos®, DTS:X 3.1.2 ch 5.1.2 ch
ADAPTIVE
SOUND
2.0 ch
3.1.2 ch 5.1.2 ch
5.1 ch 3.1.2 ch 5.1.2 ch
Dolby Atmos®, DTS:X 3.1.2 ch 5.1.2 ch
STANDARD
2.0 ch
2.1 ch 2.1 ch
5.1 ch 3.1 ch 5.1 ch
Dolby Atmos®, DTS:X 3.1.2 ch 5.1.2 ch
The Samsung Wireless Rear Speaker Kit can be purchased separately. To purchase a Kit, contact the
vendor you purchased the Soundbar from.
When the input source is Dolby Atmos®, DTS:X, the Subwoofer-only setup provides 3.1.2 channel
audio, while the Subwoofer & Wireless Rear Speaker Kit setup provides 5.1.2 channel audio.
The Rear Speakers will not produce sounds for 2 channel output while STANDARD mode is in use.
To enable sound for the Rear Speakers, change the effect mode to SURROUND SOUND.
ENG - 15
Adjusting the Soundbar volume with a TV remote control
Adjust the Soundbar volume using the TV’s remote control.
This function can be used with IR remote controls only. Bluetooth remote controls (remote
controls that require pairing) are not supported.
Set the TV speaker to External Speaker to use this function.
Manufacturers supporting this function:
Samsung, VIZIO, LG, Sony, Sharp, PHILIPS, PANASONIC, TOSHIBA, Hisense, RCA
1. Turn Off the Soundbar.
2. Push up and hold the WOOFER button for 5 seconds.
Each time you push the WOOFER button up and hold it for 5 seconds, the mode switches in the
following order: “OFF-TV REMOTE” (Default mode), “SAMSUNG-TV REMOTE”, “ALL-TV REMOTE”.
Remote Control Button Display Status
SOUND
MODE
WOOFER
L
TONE
CON
5 Sec
OFF-TV REMOTE
(Default mode)
Disable the TV remote control.
SOUND
MODE
WOOFER
L
TONE
CON
5 Sec
SAMSUNG-TV REMOTE
Enable a Samsung TV’s IR remote
control.
SOUND
MODE
WOOFER
L
TONE
CON
5 Sec
ALL-TV REMOTE
Enable a third-party TV’s IR remote
control.
ENG - 16
04 CONNECTING THE SOUNDBAR
Connecting Electrical Power
Use the power components to connect the Subwoofer and Soundbar to an electrical outlet in the following
order:
For more information about the required electrical power and power consumption, refer to the
label attached to the product. (Label: Bottom of the Soundbar Main Unit)
1. Connect the power cord to the Subwoofer.
2. Connect the power cord to the AC/DC adapter. Connect the AC/DC adapter (with the power cord)
to the Soundbar.
3. Connect power to the Soundbar and Subwoofer.
turning on the Soundbar.
POWER
Rear of Subwoofer
Power Cord
Connecting
Electrical Power
USB (5V 0.5A)
DC 24V
DC 24V
Bottom of the
Soundbar Main Unit
AC/DC Adapter
Power Cord
Connecting
Electrical Power
that it is hanging with the AC cord input facing upwards, water or other foreign substances could
enter the Adapter and cause the Adapter to malfunction.
If you unplug and reconnect the power cord when the product is turned on, the Soundbar turns on
automatically.
ENG - 17
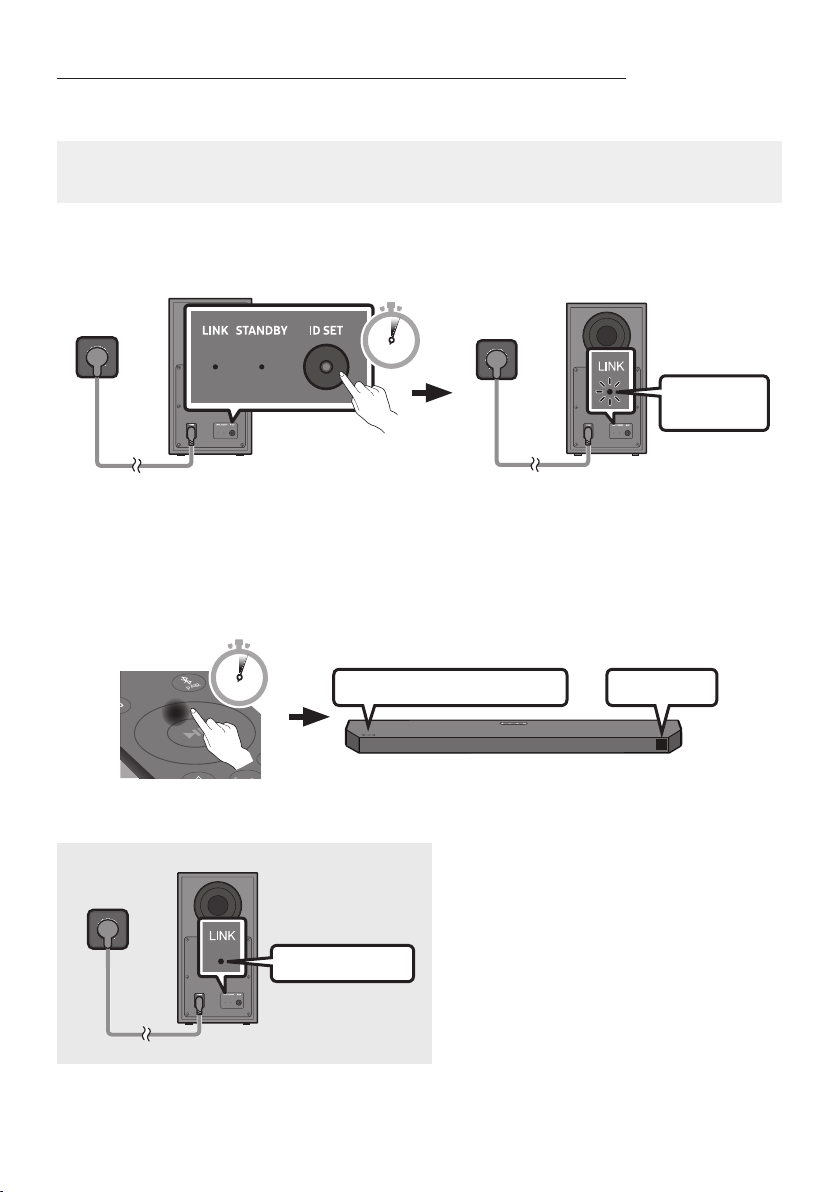
Manually connecting the Subwoofer if automatic connection fails
Before performing the manual connection procedure below:
Check whether the power cables for the Soundbar and subwoofer are connected properly.
Make sure that the Soundbar is turned on.
1. Press and hold ID SET on the rear of the subwoofer for at least 5 seconds.
The red indicator on the rear of the subwoofer turns off and the blue indicator blinks.
Blinking blue
fast
5 Sec
Rear of Subwoofer Rear of Subwoofer
2. Press and hold the Up button on the remote control for at least 5 seconds.
The ID SET message appears on the display of the Soundbar for a moment, and then it
disappears.
The Soundbar will automatically power on when ID SET is complete.
SOUND
MODE
PAIR
5 Sec
ID SET
SAMSUNG logo is on the top
3. Check if the LINK LED is solid blue (connection complete).
Blue is On
The LINK LED indicator stops blinking and
glows a solid blue when a connection is
established between the Soundbar and the
Wireless Subwoofer.
ENG - 18
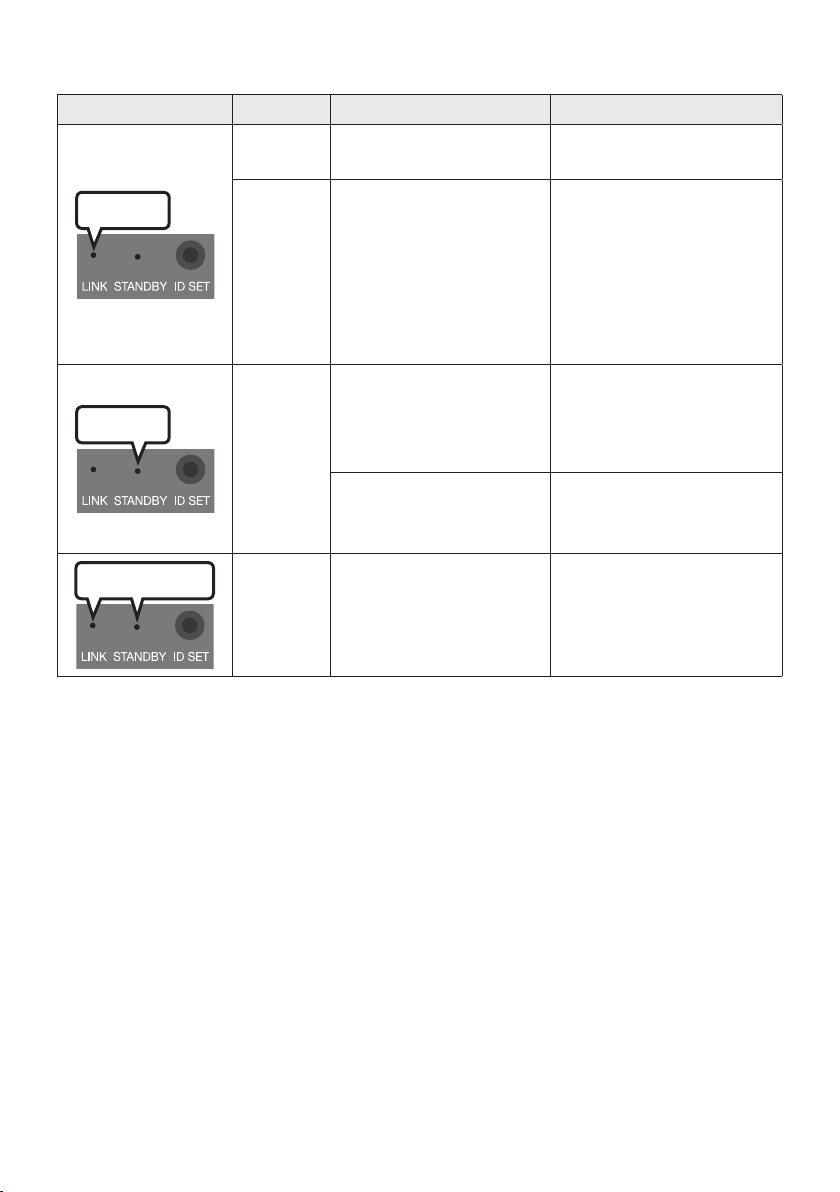
LED Indicator Lights on the Rear of Subwoofer
LED Status Description Resolution
Blue
On
Successfully connected
(normal operation)
-
Blinking Recovering the connection
Check if the power cable
attached to the main
Soundbar unit is connected
properly or wait about 5
minutes. If blinking persists,
try manually connecting the
subwoofer. See page 17.
Red
On
Standby (with the Soundbar
main unit turned off)
Check if the power cable
attached to the main
Soundbar unit is connected
properly.
Connection failed
Connect again. See the
instructions for manual
connection on page 17.
Red and blue
Blinking Malfunction
See the contact information
for the Samsung Service
Center in this manual.
NOTES
Do not connect the power cord of this product or your TV to a wall outlet until all connections
between components are complete.
Before moving or installing this product, be sure to turn off the power and disconnect the power cord.
If the main unit is powered off, the wireless subwoofer will go into stand-by mode and the
STANDBY LED on the rear of the sub-woofer will turn red after blinking blue several times.
If you use a device that uses the same frequency as the Soundbar near the Soundbar, interference
may cause some sound interruption.
The maximum transmission distance of the main unit’s wireless signal is about 32.8 ft (10 m), but
may vary depending on your operating environment. If a steel-concrete or metallic wall is between
the main unit and the wireless subwoofer, the system may not operate at all because the wireless
signal cannot penetrate metal.

ENG - 19
CAUTION
Wireless receiving antennas are built into the wireless subwoofer. Keep the unit away from water
and moisture.
For optimal listening performance, make sure that the area around the wireless subwoofer and the
Wireless Receiver Module (sold separately) is clear of any obstructions.
Connecting the Samsung Wireless Rear Kit to your Soundbar
Expand to true wireless surround sound by connecting the Samsung Wireless Rear Speaker Kit
(SWA-9100S, SWA-9200S sold separately) to your Soundbar.
For detailed information on connections, see the Samsung Wireless Rear Speaker Kit manual.
ENG - 20
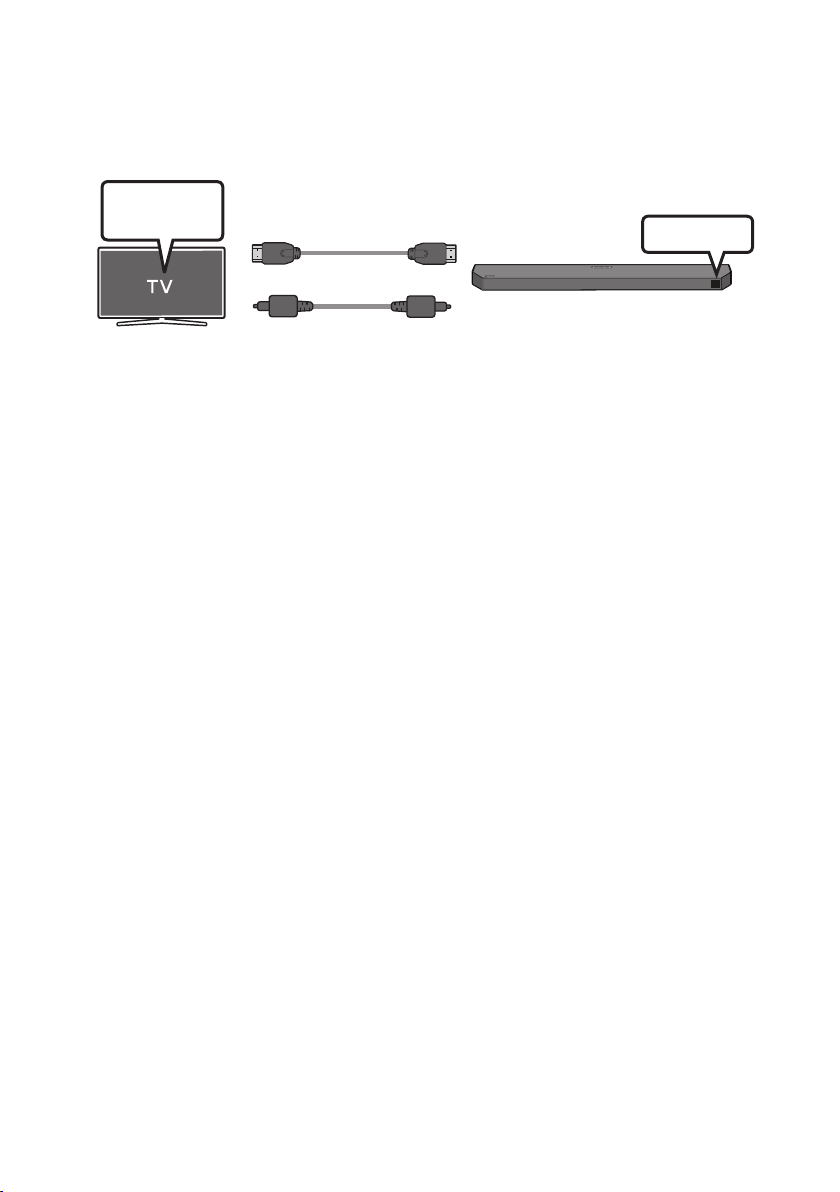
05 USING A WIRED CONNECTION TO THE TV
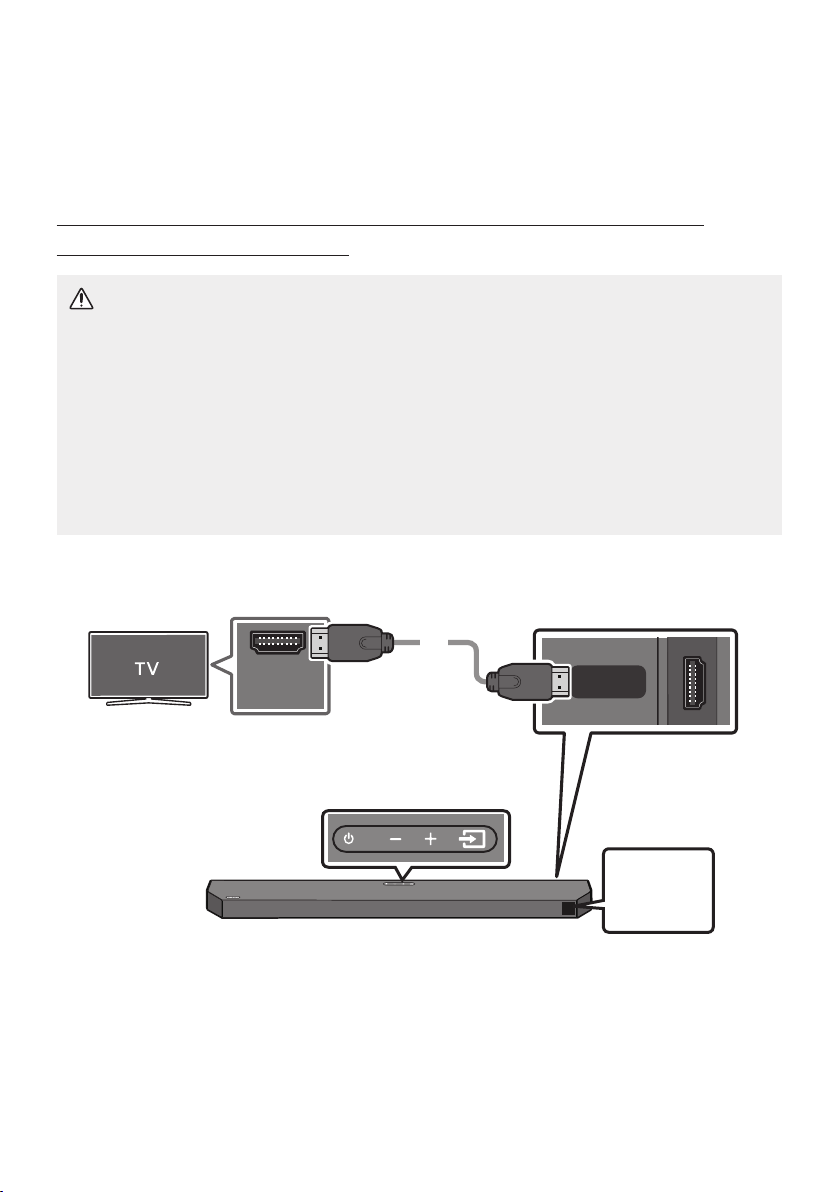
Method 1. Connecting with HDMI
Connecting the TV that supports HDMI ARC/eARC (Audio Return Channel/
Enhanced Audio Return Channel)
CAUTION
To connect the HDMI cable between the TV and Soundbar, be sure to connect the terminals
marked ARC or eARC. Otherwise, the TV sound may not be output.
The recommended cable is High Speed HDMI Cable with Ethernet.
When connecting a TV that supports the eARC function, “TV eARC” appears on the display and
the sound is heard.
Dolby Atmos® is supported in the ARC/eARC function.
TV port can be marked eARC depending on the TV.
Connect to the HDMI IN (ARC) or
(eARC) port of your TV.
HDMI IN
(ARC)
HDMI TO TV
(eARC/ARC)
HDMI Cable
Bottom of the Soundbar
Connect to the HDMI TO TV (eARC/
ARC) port of the Soundbar main unit.
Top of the Soundbar
TV ARC
or
TV eARC
1.
2. “TV ARC” or “TV eARC” appears in the display window of the Soundbar main unit and the Soundbar
plays TV sound.
“TV eARC” is displayed when the eARC function in the TV setting is On.

ENG - 21
To connect with eARC, the eARC function in the TV menu should be set to On. Refer to the TV
user manual for details on setting. (e.g. Samsung TV : Home (
All Settings ( )
If TV sound is inaudible, press the (Source) button on the remote control or on the top of
the Soundbar to switch to “D.IN” mode. The screen displays “D.IN” and “TV ARC” or “TV eARC” in
sequence, and TV sound is played.
If “TV ARC” or “TV eARC” does not appear in the display window of the Soundbar main unit,
Use the volume buttons on the TV’s remote control to change the volume on the Soundbar.
NOTES
When you connect the TV that supports the HDMI ARC/eARC (Audio Return Channel/Enhanced
Audio Return Channel) to the Soundbar with an HDMI cable, you can transmit the digital video and
audio data without connecting a separate optical cable.
We recommend you use a coreless HDMI cable if possible. If you use a cored HDMI cable, use one
whose diameter is less than 0.55 inches (14 mm).
This function is not available if the HDMI cable does not support ARC or eARC.
ARC and eARC differ in bandwidth. eARC that is enhanced version of the audio return channel has
be transmitted. So, with the eARC channel, you can enjoy the sound through formats such as Dolby
Atmos® and DTS:X.
When the audio in a broadcast is encoded in Dolby Digital and the “Digital Output Audio Format” on
your TV is set to PCM, we recommend that you change the setting to Dolby Digital. When the
setting on the TV is changed, you will experience better sound quality. (The TV menu may use
different words for Dolby Digital and PCM depending on the TV manufacturer.)
ENG - 22
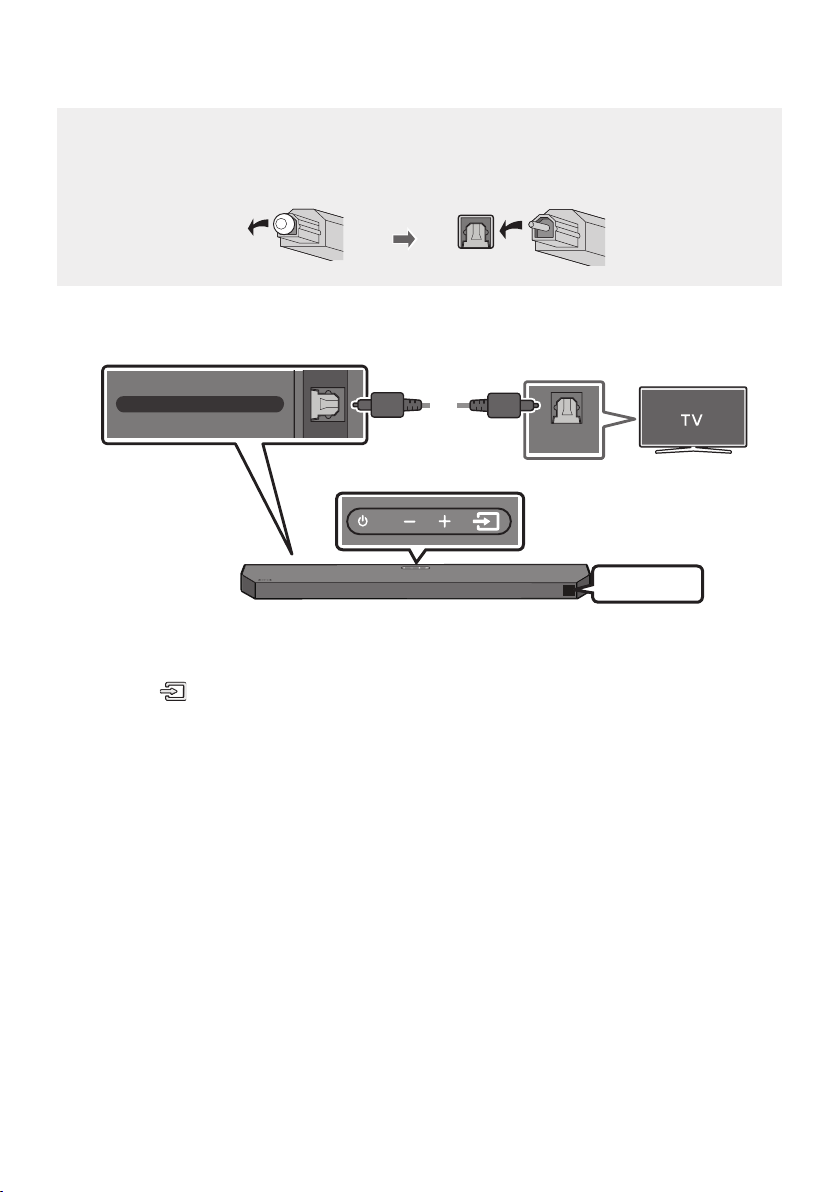
Method 2. Connecting using an Optical Cable
Pre-connection Checklist
When you use an optical cable and the terminals have covers, be sure to remove the covers.
OPTICAL OUT
DIGITAL AUDIO IN (OPTICAL)
Bottom of the Soundbar
Optical Cable
(not supplied)
D.IN
Top of the Soundbar
1. Connect the DIGITAL AUDIO IN (OPTICAL) port on the Soundbar to the OPTICAL OUT port of the
TV with a digital Optical Cable (not supplied).
2. Press the (Source) button on the top panel or remote control, and then select the “D.IN” mode.
3. The TV sound is output from the Soundbar.
ENG - 23
Using the Q-Symphony Function
For Q-Symphony, the Soundbar syncs with a Samsung TV to output sound through two devices for
optimum surround effect. When the Soundbar is connected, the menu, “TV+Soundbar” appears under
the Sound Output menu of the TV. Select the corresponding menu.
TV Menu
OR
Optical Cable (not supplied)
HDMI Cable
D.IN
TV menu example: TV + [AV] Soundbar series name (HDMI)
NOTES
It can operate according to the Codec supported by TV.
This function is supported only when the HDMI Cable or Optical Cable (not supplied) is connected.
The message displayed may differ with the TV model.
This function is available in some Samsung TVs and some Soundbar models.
ENG - 24
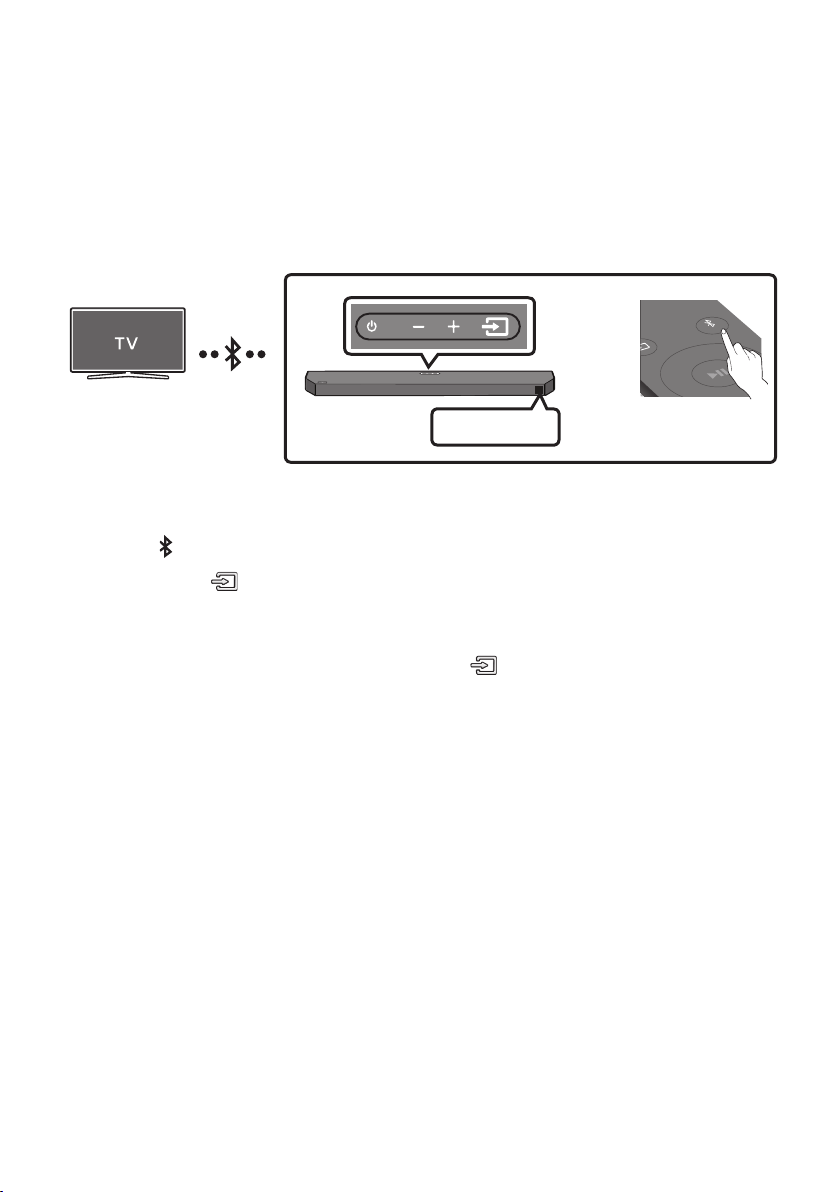
06 USING A WIRELESS CONNECTION TO THE TV
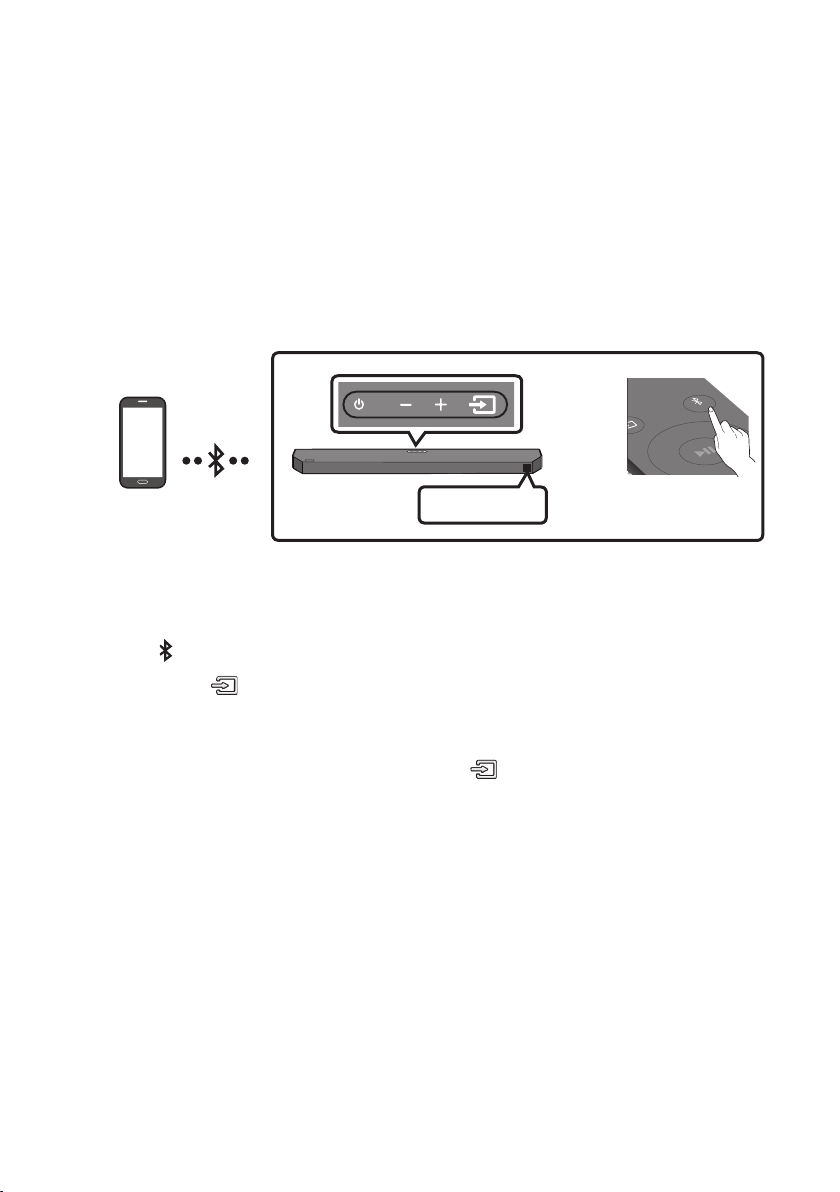
Connecting via Bluetooth
When a TV is connected using Bluetooth, you can hear stereo sound without the hassle of cabling.
Only one TV can be connected at a time.
PAIR
OR
BT PAIRING
The initial connection
1. Press the
PAIR button on the remote control to enter the “BT PAIRING” mode.
(OR)
a. Press the
(Source) button on the top panel and then select “BT”.
“BT” changes to “BT PAIRING” in a few seconds automatically or changes to “BT READY” if
there is a connect record.
b. When “BT READY” appears, press and hold the
(Source) button on the top panel of the
Soundbar for more than 5 seconds to display “BT PAIRING”.
2. Select Bluetooth mode on the TV. (For more information, see the TV’s manual.)
3. Select “[AV] Samsung Soundbar Q6B-Series” from the list on TV’s screen.
An available Soundbar is indicated with “Need Pairing” or “Paired” on the TV’s Bluetooth device
list. To connect the TV to the Soundbar, select the message, and then establish a connection.
When the TV is connected, [TV NameBT” appears on the Soundbar’s front display.
4. You can now hear TV sound from the Soundbar.
BT READY” mode to
reconnect.
If the device fails to connect
If a previously connected Soundbar listing (e.g. “[AV] Samsung Soundbar Q6B-Series”) appears in
the list, delete it.
Then repeat steps 1 through 3.

ENG - 25
Disconnecting the Soundbar from the TV
Press the (Source) button on the top panel or on the remote control and switch to any mode but “BT”.
Disconnecting takes time because the TV must receive a response from the Soundbar.
(The time required may differ, depending on the TV model.)
To cancel the automatic Bluetooth connection between the Soundbar and TV, press the
Left button
on the remote control for 5 seconds with the Soundbar in “BT READY
What is the difference between BT READY and BT PAIRING?
BT READY : In this mode, you can reconnect TV or mobile device that was connected before.
BT PAIRING : In this mode, you can connect a new device to the Soundbar. (Press the PAIR button
on the remote control or press and hold the (Source) button on the top of the Soundbar for
more than 5 seconds while the Soundbar is in “BT” mode.)
Notes on Bluetooth connection
Locate a new device within 3.28 ft (1 m) to connect via Bluetooth communication.
If asked for a PIN code when connecting a Bluetooth device, enter <0000>.
In Bluetooth connection mode, the Bluetooth connection will be lost if the distance between the
Soundbar and the Bluetooth device exceeds 32.8 ft (10 meters).
The Soundbar automatically turns off after 18 minutes in the Ready state.
The Soundbar may not perform Bluetooth search or connection correctly under the following
circumstances:
–
– If several Bluetooth devices are simultaneously paired with the Soundbar.
– If the Bluetooth device is turned off, not in place, or malfunctions.
Electronic devices may cause radio interference. Devices that generate electromagnetic waves
must be kept away from the Soundbar main unit - e.g., microwaves, wireless LAN devices, etc.
ENG - 26
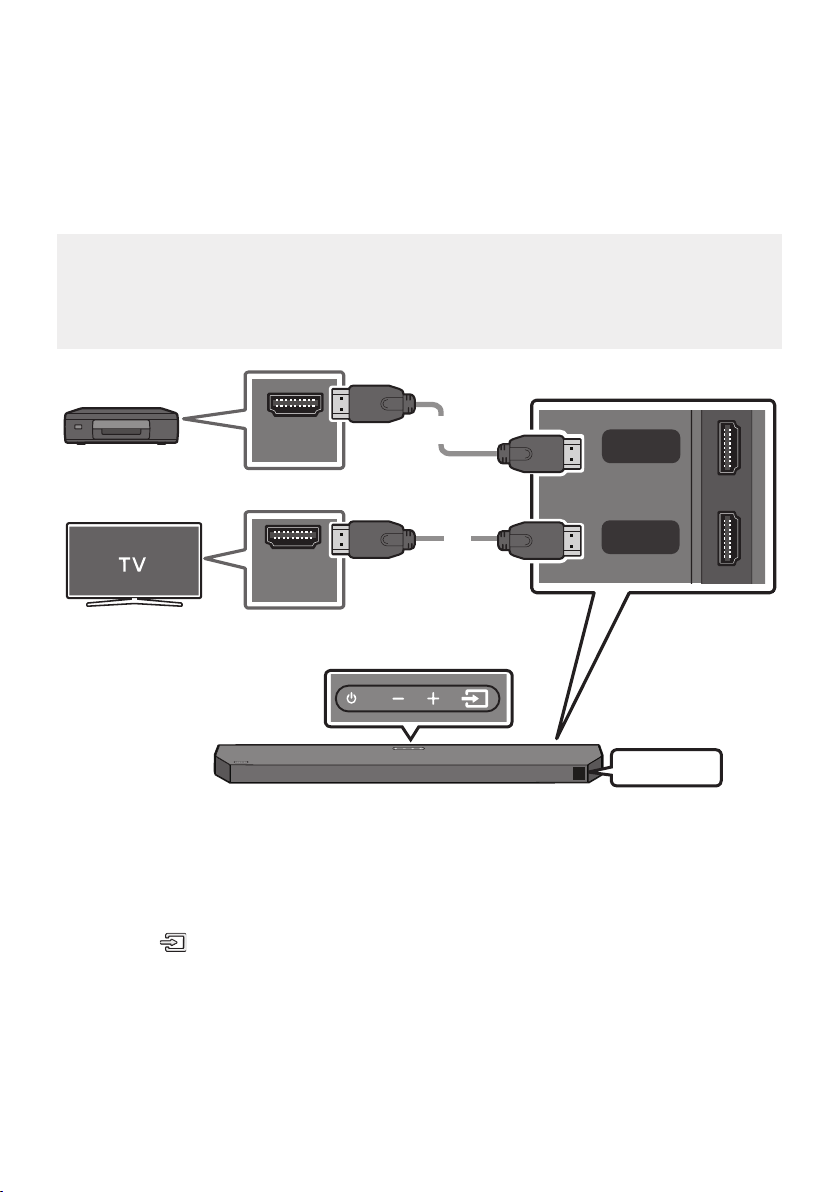
07 CONNECTING AN EXTERNAL DEVICE
Method 1. Connecting using an HDMI Cable (Capable of Dolby
Atmos® decoding and playback)
Pre-connection Checklist
If the Audio Output options include Secondary Audio, make sure Secondary Audio is set to Off.
Make sure that the content supports Dolby Atmos®.
TV port can be marked eARC depending on the TV.
HDMI OUT
HDMI IN
(ARC)
HDMI
HDMI TO TV
(eARC/ARC)
HDMI Cable
HDMI Cable
Bottom of the Soundbar
External Device
HDMI
Top of the Soundbar
1. Connect an HDMI cable from the HDMI port on the bottom of the Soundbar to the HDMI OUT port
on your digital device.
2. Connect an HDMI cable from the HDMI TO TV (eARC/ARC) port on the bottom of the Soundbar to
the HDMI IN (ARC) port on your TV.
3. Press the (Source) button on the top panel or on the remote control, and then select “HDMI”.
4. “HDMI” mode is displayed on the Soundbar display panel and sound plays.
ENG - 27
NOTES
When you use Dolby Atmos®: If the input source is Dolby Atmos®, 3.1.2 channels are output.
When Dolby Atmos® is activated, “DOLBY ATMOS” appears in the front display.
Open the audio output options on the settings menu of your BD player or other device and make
sure that “No Encoding” is selected for Bitstream. For example, on a Samsung BD Player, go to
HDMI Pass-Through is that the Soundbar plays the audio from the source through its own speakers
and sends the unaltered video signal to a TV via the second HDMI cable.
Frame rate (fps) Color depth
< 60
8 bit
10 bit - -
12 bit - -
120
8 bit - - - -
10 bit - - - -
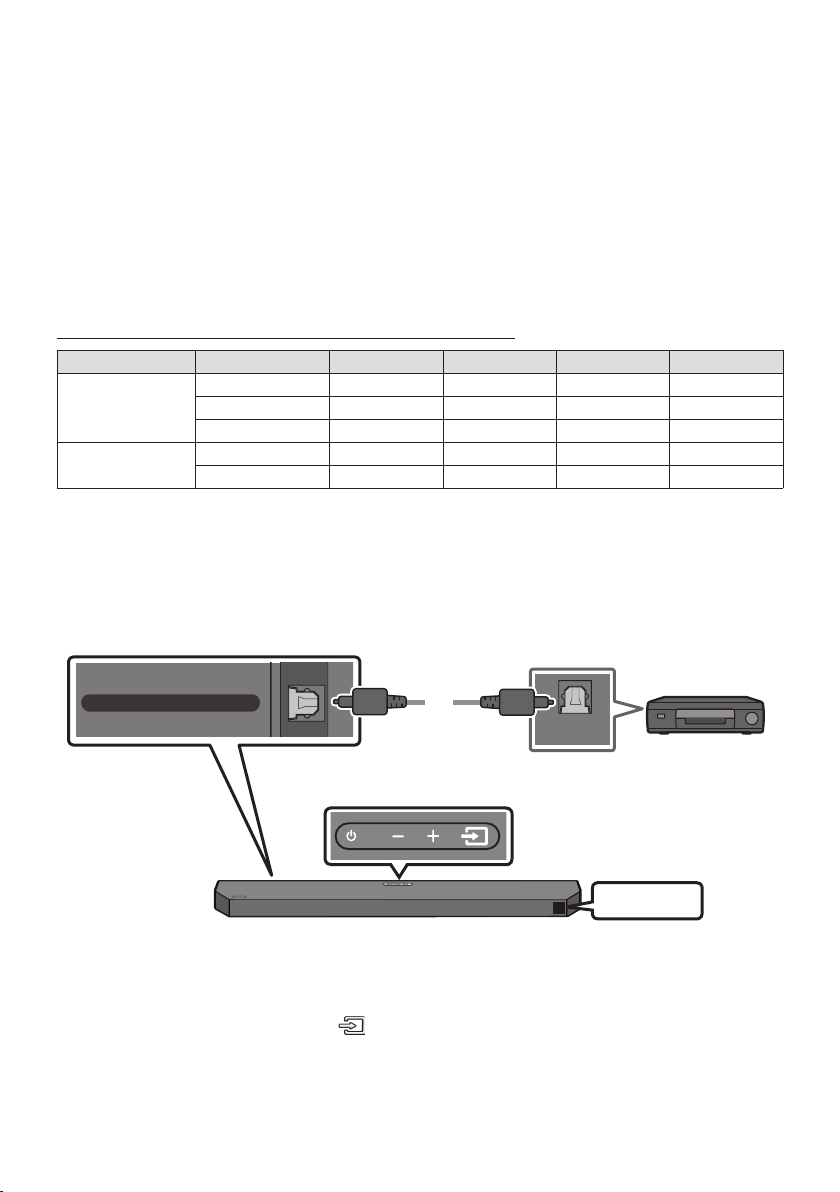
Method 2. Connecting using an Optical Cable
OPTICAL OUT
DIGITAL AUDIO IN (OPTICAL)
Optical Cable
(not supplied)
Bottom of the Soundbar
BD / DVD player /
Set-top box /
Game console
D.IN
Top of the Soundbar
1. Connect the DIGITAL AUDIO IN (OPTICAL) port on the Soundbar and the OPTICAL OUT port on the
2. Select “D.IN” mode by pressing the
(Source) button on the top panel or on the remote control.
3. The external device sound is output from the Soundbar.
ENG - 28
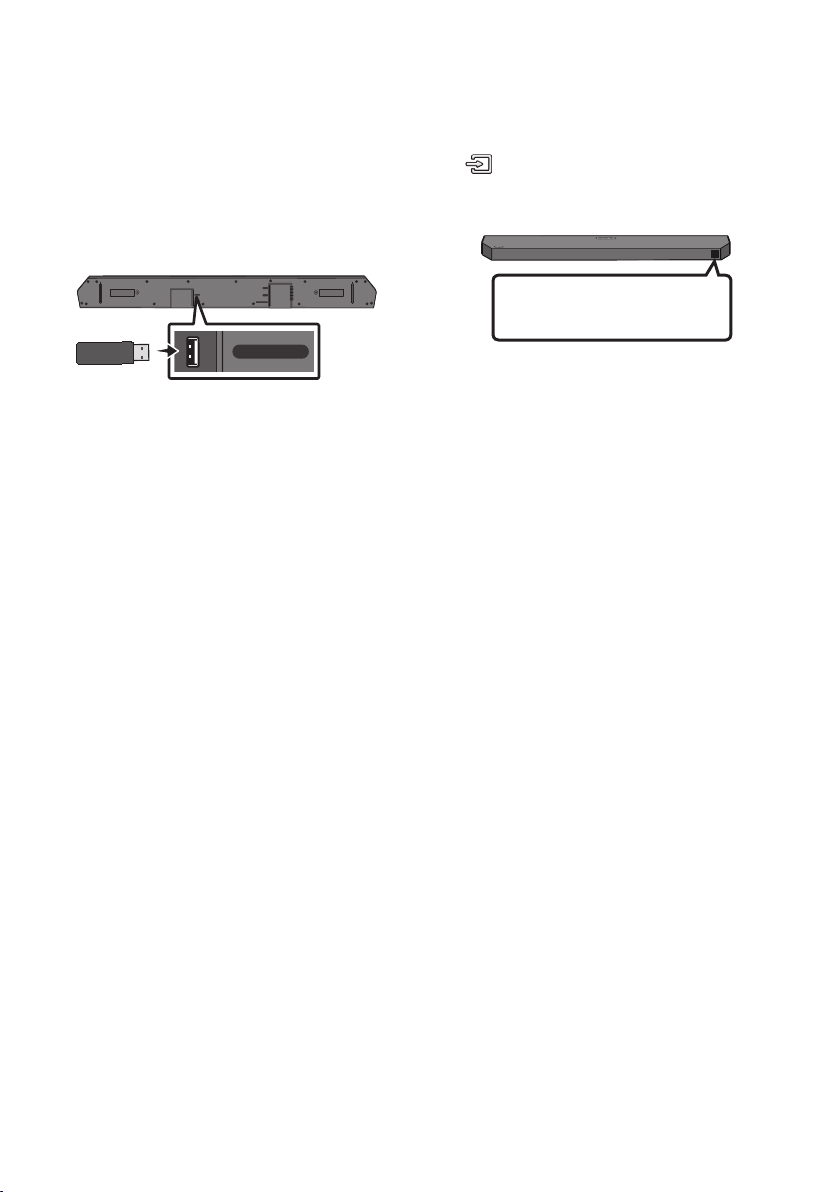
08 CONNECTING A USB DRIVE
USB port
HDMI
HDMI TO TV
(eARC/ARC)
DIGITAL AUDIO IN (OPTICAL)
USB (5V 0.5A)
DC 24V
USB (5V 0.5A)
USB
1. Connect the USB drive to the USB port on the bottom of the product.
2. Press the
(Source) button on the top panel or on the remote control, and then select “USB”.
3. “USB” appears in the display screen.
4.
The Soundbar automatically turns off (Auto Power Down) if there is no audio signal from USB
drive or no USB drive connection for more than 18 minutes.
File Format Type Compatibility list
Extension Codec Sampling Rate Bitrate
*.m p3 MPEG1 Layer2 32kHz ~ 48kHz 32kbps ~ 320kbps
MPEG1 Layer3 32kHz ~ 48kHz 32kbps ~ 320kbps
MPEG2 Layer3 16kHz ~ 24kHz 8kbps ~ 160kbps
MPEG2.5 Layer3 8kHz ~ 12kHz 8kbps ~ 160kbps
*.wma WMA7/8/9 (Audio Only) 32kHz ~ 48kHz 32kbps ~ 320kbps
*.ogg Vorbis 32kHz ~ 48kHz 45kbps ~ 500kbps
*.aac
*.m 4a
*.m p4
A AC- LC
(MPEG2/MPEG4 Audio Only)
32kHz ~ 48kHz 32kbps ~ 320kbps
*.wav LPCM 32kHz ~ 192kHz 1,024kbps ~ 9,216kbps
FLAC 32kHz ~ 192kHz 162kbps ~ 8,100kbps
*.ai ff AIFF 32kHz ~ 192kHz 1,024kbps ~ 9,216kbps
ENG - 29
09 CONNECTING A MOBILE DEVICE
Connecting via Bluetooth
When a mobile device is connected using Bluetooth, you can hear stereo sound without the hassle of
cabling.
When you connect a paired Bluetooth device with the Soundbar off, the Soundbar automatically
turns on.
The connection is limited to one TV or two Bluetooth devices at the same time.
PAIR
OR
BT PAIRING
Bluetooth device
The initial connection
When connecting to a new Bluetooth device, make sure the device is within 3.28 ft (1 m) distance.
1. Press the
PAIR button on the remote control to enter the “BT PAIRING” mode.
(OR)
a. Press the
(Source) button on the top panel and then select “BT”.
“BT” changes to “BT PAIRING” in a few seconds automatically or changes to “BT READY” if
there is a connect record.
b. When “BT READY” appears, press and hold the
(Source) button on the top panel of the
Soundbar for more than 5 seconds to display “BT PAIRING”.
2. On your device, select “[AV] Samsung Soundbar Q6B-Series” from the list that appears.
When the Soundbar is connected to the Mobile device, [Mobile Device NameBT” appears in
the front display.
3.
BT
READY” mode to reconnect.

ENG - 30
If the device fails to connect
If you have an existing Soundbar (e.g., “[AV] Samsung Soundbar Q6B-Series”) on the list of
speakers on the Mobile device, delete it.
Then repeat steps 1 and 2.
What is the difference between BT READY and BT PAIRING?
BT READY : In this mode, you can reconnect TV or mobile device that was connected before.
BT PAIRING : In this mode, you can connect a new device to the Soundbar. (Press the
PAIR button
on the remote control or press and hold the (Source) button on the top of the Soundbar for
more than 5 seconds while the Soundbar is in “BT” mode.)
Notes on Bluetooth connection
Locate a new device within 3.28 ft (1 m) to connect via Bluetooth communication.
If asked for a PIN code when connecting a Bluetooth device, enter <0000>.
In Bluetooth connection mode, the Bluetooth connection will be lost if the distance between the
Soundbar and the Bluetooth device exceeds 32.8 ft (10 m).
The Soundbar automatically turns off after 18 minutes in the Ready state.
The Soundbar may not perform Bluetooth search or connection correctly under the following
circumstances:
–
– If several Bluetooth devices are simultaneously paired with the Soundbar.
– If the Bluetooth device is turned off, not in place, or malfunctions.
Electronic devices may cause radio interference. Devices that generate electromagnetic waves
must be kept away from the Soundbar main unit - e.g., microwaves, wireless LAN devices, etc.
The Soundbar supports SBC data (44.1kHz, 48kHz).
Connect only to a Bluetooth device that supports the A2DP (AV) function.
You cannot connect the Soundbar to a Bluetooth device that supports only the HF (Hands Free)
function.
Once you have paired the Soundbar to a Bluetooth device, selecting “[AV] Samsung Soundbar Q6B-
Series” from the device’s scanned devices list will automatically change the Soundbar to “BT” mode.
– Available only if the Soundbar is listed among the Bluetooth device’s paired devices.
(The Bluetooth device and the Soundbar must have been previously paired at least once.)
The Soundbar will appear in the Bluetooth device’s searched devices list only when the Soundbar is
displaying “BT READY”.
When connecting the Soundbar to a Bluetooth device, place them as close to each other as possible.
The farther the Soundbar and Bluetooth device are from each other, the lower the sound quality
will become. The Bluetooth connection may break when the devices are out of the effective range.
The Bluetooth connection may not function as intended in areas with poor reception.

ENG - 31
A Bluetooth device may experience noise or malfunction under in the following conditions:
– When the body is in contact with the signal transceiver on the Bluetooth device or Soundbar
– In corners or when there is an obstacle in proximity, such as a wall or partition, where electrical
changes may occur.
– When exposed to radio interferences by other products operating on the same frequency
ranges, such as medical equipment, microwave ovens, and wireless LAN devices.
– Obstacles such as doors and walls may still impact the sound quality even when the devices
are within the effective range.
Note that your Soundbar cannot be paired with other Bluetooth devices while using the Bluetooth
option.
This wireless device may cause electrical interference during operation.
Bluetooth Power On (SOUND MODE)
If a previously paired Bluetooth device tries to pair with the Soundbar when the Bluetooth Power On
function is on and the Soundbar is turned off, the Soundbar turns on automatically.
1. Press and hold the SOUND MODE button for more than 5 seconds on the remote while the
Soundbar is turned on.
2. “ON-BLUETOOTH POWER” appears on the Soundbar’s display.
Disconnecting the Bluetooth device from a Soundbar
You can disconnect a Bluetooth device from the Soundbar. For instructions, see the Bluetooth device’s
user manual.
The Soundbar will be disconnected.
When the Soundbar is disconnected from the Bluetooth device, the Soundbar will display
“BT DISCONNECTED” on the front display.
Disconnecting the Soundbar from the Bluetooth device
Press the
(Source) button on the top panel or on the remote control, and then change to any mode
except “BT”.
Disconnecting takes time because the Bluetooth device must receive a response from the
Soundbar. (Disconnection time may differ, depending on the Bluetooth device)
When the Soundbar is disconnected from the Bluetooth device, the Soundbar will display
“BT DISCONNECTED” on the front display.
ENG - 32
Bluetooth Multi connection
The Soundbar can be connected to 2 Bluetooth devices at the same time.
Bluetooth device A Bluetooth device B
BT
1. Connect the Soundbar to up to two Bluetooth devices. (See page 29)
2. Play music from one of the connected Bluetooth devices while two devices are connected.
3. If music is played from the Bluetooth device “B” while playing from the device “A”, the music is
started playing on the device “B” and automatically being stopped/paused playback on the device
“A”.
4. In versions prior to AVRCP V1.4, the switching time of the device playing music may be delayed.
NOTES
Some devices do not support Bluetooth multi connection.
“BT PAIRING” mode stops when no device is paired within 3 minutes.
Switching devices may take about 7 seconds on some apps.
If you attempt to connect a 3rd Bluetooth device, the A or B devices will be disconnected.
(A device that is not currently playing will be disconnected.)
Only one Samsung TV, or 2 Bluetooth devices can be connected at the same time.
The Soundbar will be disconnected from Bluetooth devices when it receives a connection request
from a Samsung TV.
ENG - 33
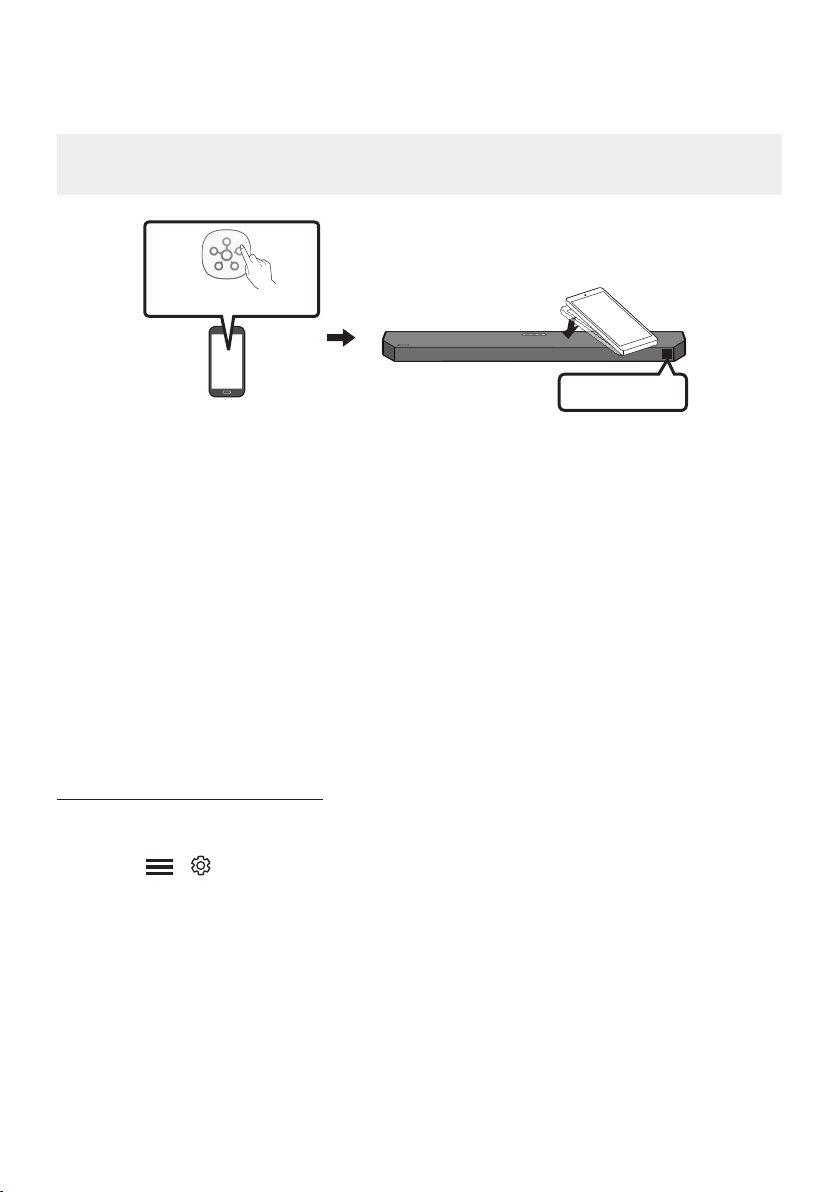
Using Tap Sound
Tap the Soundbar with your mobile device to play audio from the mobile device through the Soundbar.
This function may not be supported, depending on the mobile device.
This function is only compatible with Samsung mobile devices with Android 8.1 or later.
Mobile device
SmartThings App
Top of the Soundbar
TAP
BT
1. Turn on the Tap Sound function on your mobile device.
For details on how to turn on the function, refer to “Enable the Tap Sound function” below.
2. Tap the Soundbar with the mobile device. Select “Start now” in the displayed message window.
A connection is established between the mobile device and Soundbar via Bluetooth.
3. Play audio from the mobile device through the Soundbar.
This function connects a mobile device to the Soundbar via Bluetooth by detecting vibration
that occurs when the device touches the Soundbar.
Make sure the mobile device does not tap a sharp corner of the Soundbar. The Soundbar or
mobile device may become scratched or damaged.
It is recommended that the mobile device be covered with a case. Lightly tap the wide area in
the upper portion of the Soundbar, without using excessive force.
To use this function, update the SmartThings app to the latest version.
The function may not be supported, depending on the app version.
Enable the Tap Sound function
Use the SmartThings app to turn on the Tap View, Tap Sound function.
1. On the mobile device, run the SmartThings app.
2. Select ( ) in the SmartThings app screen displayed on the mobile device.
3. Set “Tap View, Tap Sound” to On to allow the function to work when a mobile device moves close to
the Soundbar.
NOTES
When the mobile device is in power-saving mode, the Tap Sound function does not work.
The Tap Sound function may not work if there are devices near the Soundbar that cause radio
interference such as electric devices. Make sure devices that may cause radio interference are
ENG - 34
10 INSTALLING THE
WALL MOUNT
Installation Precautions
Install on a vertical wall only.
Do not install in a place with high
temperature or humidity.
Verify whether the wall is strong enough to
support the product’s weight. If not, reinforce
the wall or choose another installation point.
anchors appropriate for the kind of wall you
have (plaster board, iron board, wood, etc.). If
studs.
Purchase wall mounting screws according to
the type and thickness of the wall you want to
mount the Soundbar on.
– Diameter: M5
– Length: 1 3/8 inches (35 mm) or longer
recommended.
Connect cables from the unit to external
devices before you install the Soundbar on
the wall.
Make sure the unit is turned off and
unplugged from the power source before you
install it. Otherwise, it may cause an electric
shock.
Wallmount Components
Wall Mount Guide
x 2
(M4 x L10)
x 2
Holder-Screw Screw
x 2
Bracket-Wall Mount
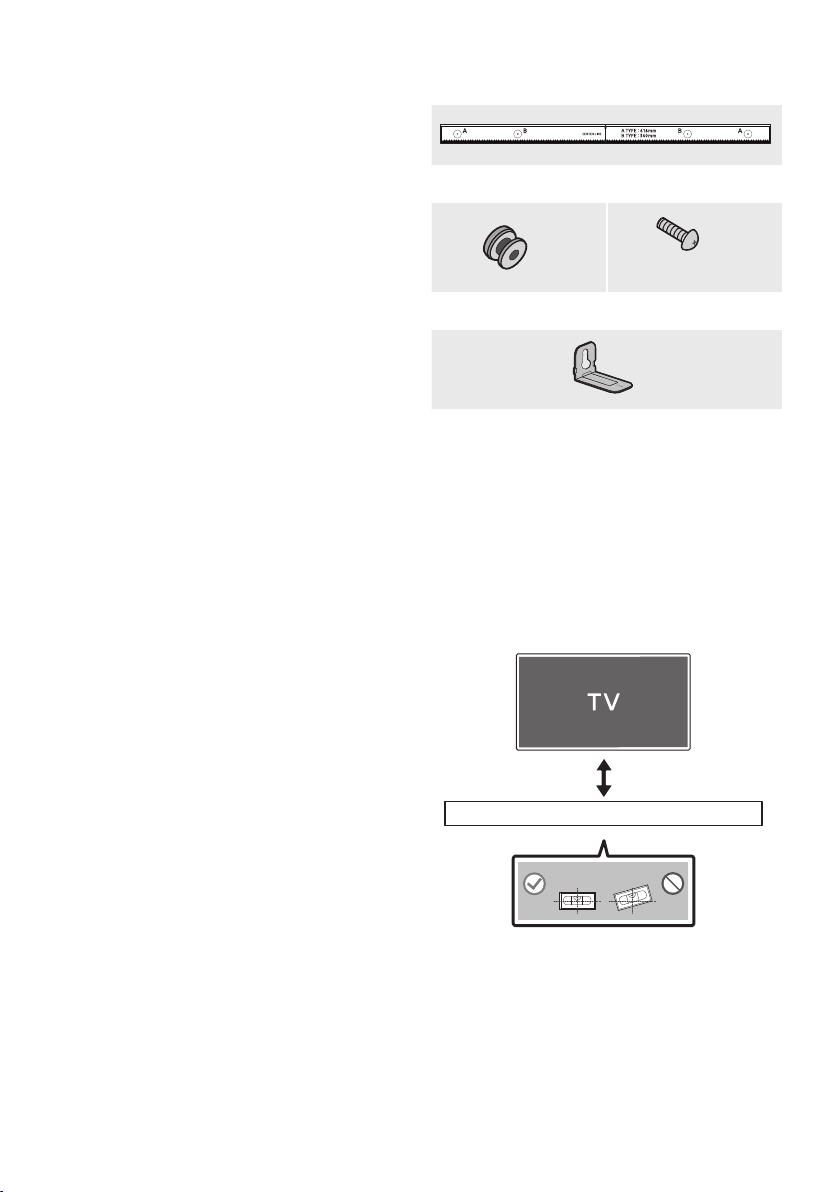
1. Place the Wall Mount Guide against the wall
surface.
The Wall Mount Guide must be level.
If your TV is mounted on the wall, install
the Soundbar at least 2 inches (5 cm)
below the TV.
2 inches (5 cm) or more
ENG - 35
2. Align the Wall Mount Guide’s Center Line
with the center of your TV (if you are
mounting the Soundbar below your TV), and
Wall Mount Guide to the wall
using tape.
If you are not mounting below a TV, place
the Center Line in the center of the
installation area.
Center Line
3. Push a pen tip or sharpened pencil tip
through the center of the A-TYPE images on
each end of the Guide to mark the holes for
the supporting screws, and then remove the
Wall Mount Guide.
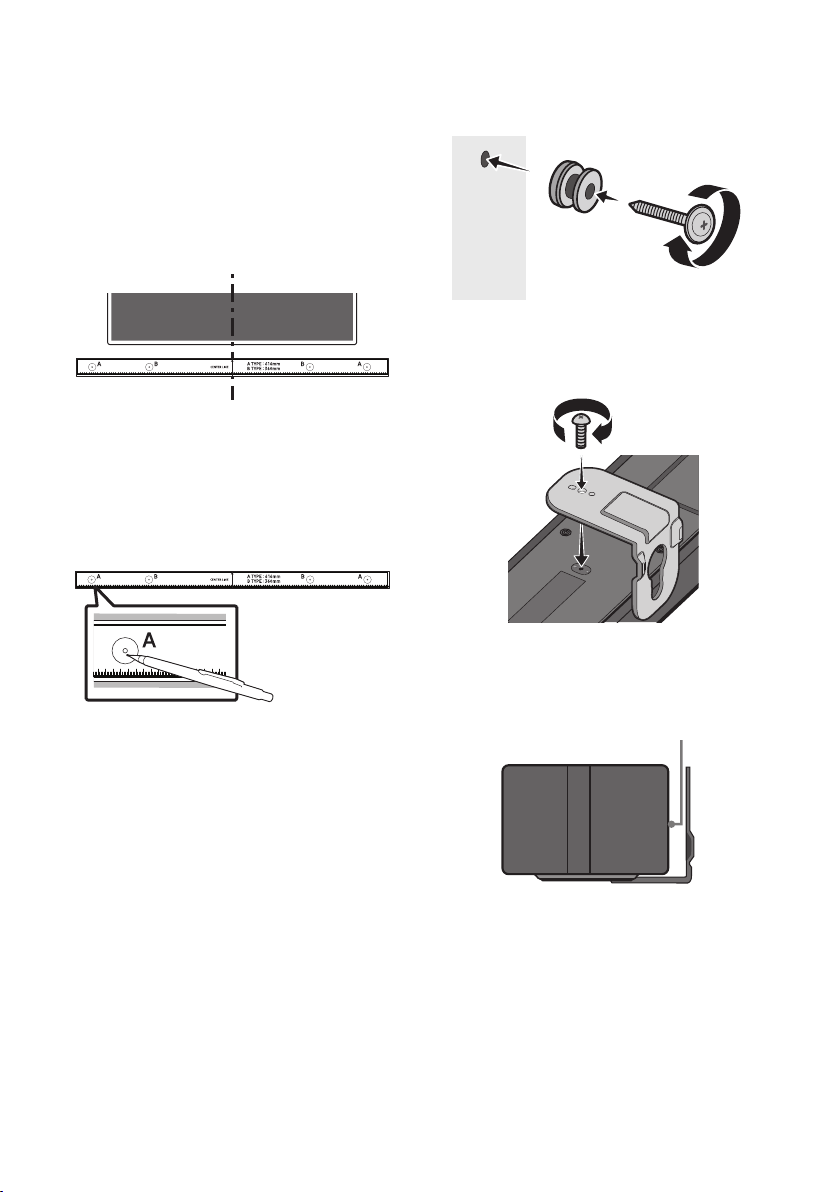
4. Using an appropriately sized drill bit, drill a
hole in the wall at each marking.
If the markings do not correspond to the
positions of studs, make sure you insert
appropriate anchors into the holes before
you insert the support screws. If you use
anchors, make sure the holes you drill are
large enough for the anchors you use.
5. Push a screw (not supplied) through each
Holder-Screw, and then screw each screw
(Not supplied)
Wall
6. Install the 2 Bracket-Wall Mounts in the
correct orientation on the bottom of the
Soundbar using 2 Screws.
When assembling, make sure the hanger
part of the Bracket-Wall Mounts are
located behind the rear of the Soundbar.
Rear of Soundbar
Right end of Soundbar
ENG - 36
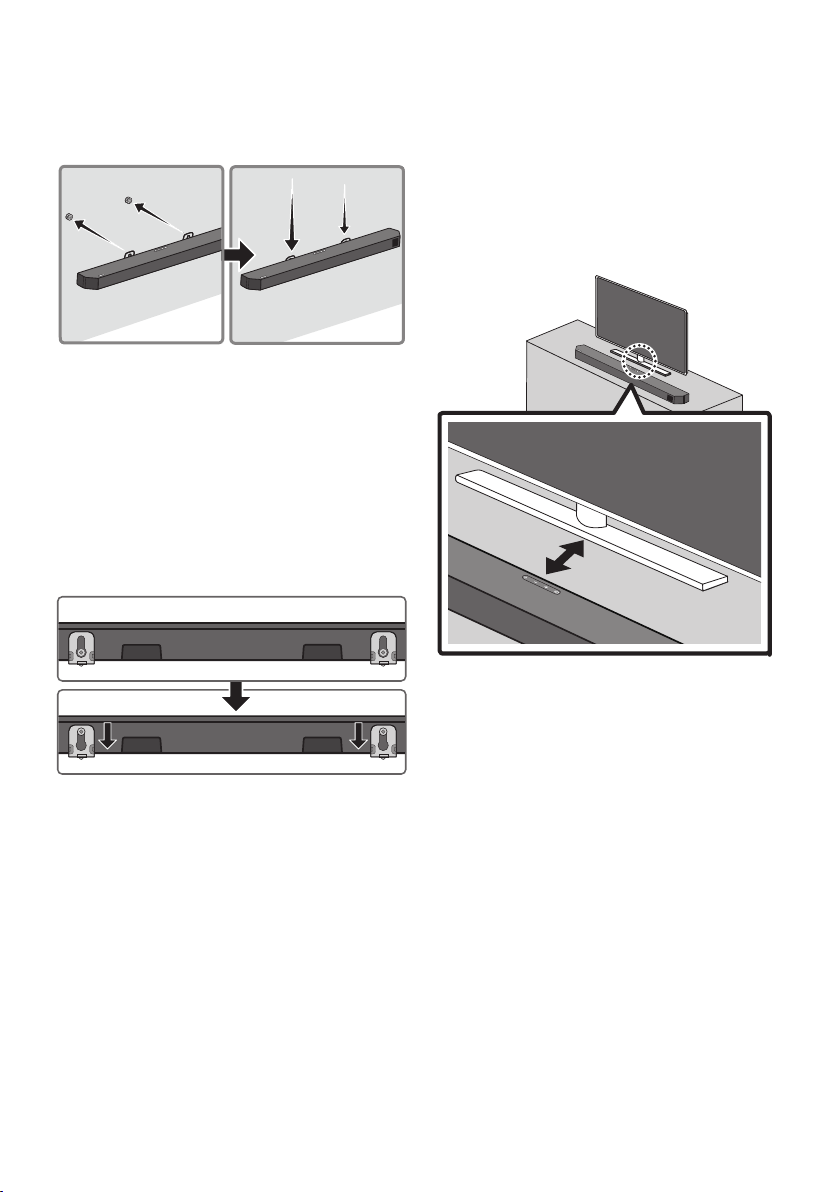
7. Install the Soundbar with the attached
Bracket-Wall Mounts by hanging the
Bracket-Wall Mounts on the Holder-Screws
on the wall.
Wall
8. Slide the Soundbar down as shown below so
that the Bracket-Wall Mounts rest securely
on the Holder-Screws.
Insert the Holder-Screws into the wide
(bottom) part of the Bracket-Wall
Mounts, and then slide the Bracket-Wall
Mounts down so that the Bracket-Wall
Mounts rest securely on the
Holder-Screws.
11 INSTALLING THE
SOUNDBAR IN
FRONT OF TV
Place the Soundbar on a TV stand.
1.2 inches (3cm) or more
As illustrated in the image, align the center of the
Soundbar with the center of the TV, carefully
place the Soundbar onto the TV stand.
For optimal sound quality, position the Soundbar
at least 1.2 inches (3 cm) away from the TV front.
NOTES
and solid surface.
acoustic problems.
ENG - 37
12 SOFTWARE
UPDATE
Samsung may offer updates for the Soundbar’s
USB port
HDMI
HDMI TO TV
(eARC/ARC)
DIGITAL AUDIO IN (OPTICAL)
USB (5V 0.5A)
DC 24V
USB (5V 0.5A)
If an update is offered, you can update the
your Soundbar.
USB Update
After the update completes, all your customized
user settings are maintained.
1. Connect a USB drive to the USB port on your
computer.
Important: Make sure there are no music
2. Go to (samsung.com)
Select the product
type or enter the model number of your
Soundbar and download the latest upgrade
For more information about update, refer
to Upgrade Guide.
3.
drive.
4. Turn off the Soundbar and connect the USB
USB port on the Soundbar.
5. Turn on the Soundbar and press the
(Source) button to select USB source.
“UPDATE” will be displayed, this may take up
to 3 minutes.
UPDATE
B --%
DONE
BYE
displayed UPDATE -> B --% -> DONE -> BYE
in sequence, B, D or H can be displayed
NOTES
Soundbar is rebooted automatically when the
update is completed.
This product has a DUAL BOOT function. If the
During update, do not turn it off or remove
the USB.
If update does not proceed, reconnect the
Soundbar power cord.
When the latest version is installed, no
update is performed.
Depending on the USB type, update may not
be supported.
If the connection to the subwoofer is not
re-established automatically after the
update, refer to page 17.
If the software update fails, check if the USB
drive is defective.
Mac OS users should use MS-DOS (FAT) as the
USB format.
ENG - 38
Reset
INIT OK
Top of the Soundbar
With the Soundbar on, press the (Volume)
buttons on the body at the same time for at least
5 seconds. “INIT OK” appears on the display and
then the Soundbar is reset.
CAUTION
All the settings of the Soundbar are reset.
Be sure to perform this only when a reset is
required.
ENG - 39
13 TROUBLESHOOTING
Before seeking assistance, check the following.
Soundbar does not turn on.
; Check whether the power cord of the
Soundbar is correctly inserted into the
outlet.
Soundbar works erratically.
; After removing the power cord, insert it
again.
; Unplug the power cord and plug it back
into the external device and try again.
; If there is no signal, the Soundbar
automatically turns off after a certain
period of time. Turn on the power.
(See page 8.)
If the remote control does not work.
; Point the remote directly at the Soundbar.
; Replace the batteries with new ones.
Soundbar does not output any sound.
; The volume of the Soundbar is too low or
muted. Adjust the volume.
; When any external device (STB, Bluetooth
device, mobile device, etc.) is connected,
adjust the volume of the external device.
; For sound output of the TV, select
Soundbar. (Samsung TV: Home (
)
Soundbar)
; The cable connection to the Soundbar may
not be loose. Remove the cable and
connect again.
; Remove the power cord completely,
reconnect, and turn the power on.
; Reset the product and try again.
(See page 38.)
Subwoofer does not output any sound.
; Check whether the LED indicator on the rear of
the Subwoofer is on in blue. Reconnect the
Soundbar and Subwoofer if the indicator is
blinking in blue or turned red. (See page 17.)
; You may experience an issue if there is an
obstacle between the Soundbar and Subwoofer.
Move devices to an area away from obstacles.
; Other devices sending radio frequency signals
in proximity may interrupt the connection.
Keep your speaker away from such devices.
; Remove and reconnect the power plug.
The Subwoofer volume is too low.
; The original volume of the content you are
playing may be low. Try adjusting the
Subwoofer level. (See page 13.)
; Bring the Subwoofer speaker closer to you.
If the TV is not connected via HDMI TO TV
(eARC/ARC).
; Check whether the HDMI cable is correctly
connected to the ARC terminal.
20.)
; Connection may not be possible due to the
connected external device (set-top box, game
machine, etc.). Directly connect the Soundbar.
; HDMI-CEC may not be activated on the TV.
Turn on the CEC on the TV menu. (
Samsung
TV: Home (
All Settings (
ON)
; To connect with eARC, the eARC function in
the TV menu should be set to On.
(Samsung TV:
Home (
Settings ( )
(Auto))
ENG - 40
There is no sound in when connecting to the
TV in HDMI TO TV (eARC/ARC) mode.
; Your device is unable to play the input
signal. Change the TV’s audio output to
PCM or Dolby Digital.
(For a Samsung TV: Home (
Settings (
Format)
Soundbar does not connect via Bluetooth.
; When connecting a new device, switch to
“BT PAIRING” for connection. (Press the
PAIR button on the remote control or
press the (Source) button on the body
for at least 5 seconds.)
; If the Soundbar is connected to another
switch the device.
; Reconnect it after removing the Bluetooth
speaker list on the device to connect.
(Samsung TV: Home (
Settings (
; The automatic TV connection may be
disabled. While the Soundbar is in “BT
READY”, press and hold the Left button on
the Soundbar remote control for 5 seconds
to select ON-TV CONNECT. If you see
OFF-TV CONNECT, press and hold Left
button again for 5 seconds to switch the
selection.
; Remove and reconnect the power plug,
then try again.
; Reset the product and try again.
(See page 38.)
Sound drops out when connected via
Bluetooth.
; Some devices can cause radio interference
if they are located too close to the
Soundbar. e. g. microwaves, wireless
routers, etc.
; If your device that is connected via
Bluetooth moves too far away from the
Soundbar, it may cause the sound to drop
out. Move the device closer to the
Soundbar.
; If a part of your body is in contact with the
Bluetooth transceiver or the product is
installed on metal furniture, sound may
drop out. Check the installation
environment and conditions for use.
Bluetooth multi connection does not work.
; When the TV is connected to the soundbar,
Bluetooth multi connection may not
operate. Disconnect the Soundbar from the
TV and try again.
; Check whether the Bluetooth Multi
connection setting is turned on.
(Refer to the “Soundbar does not connect
via Bluetooth.” section.)
; Disconnect the device currently playing,
pair with the device that you want to
connect, and reconnect the previous
device.
; If the sound is inaudible even after
connecting properly, refer to the “Sound
drops out when connected via Bluetooth.”
section.
Soundbar does not turn on automatically with
the TV.
; When you turn off the Soundbar while
watching TV, power synchronization with
the TV is disabled. First turn off the TV.

ENG - 41
14 LICENSE
Dolby, Dolby Atmos, and the double-D symbol
are registered trademarks of Dolby
Laboratories Licensing Corporation.
Manufactured under license from Dolby
Copyright © 2012-2021 Dolby Laboratories. All
rights reserved.
For DTS patents, see http://patents.dts.com.
Manufactured under license from DTS, Inc. (for
companies headquartered in the U.S./Japan/
Taiwan) or under license from DTS Licensing
Limited (for all other companies). DTS, DTS:X,
and the DTS:X logo are registered trademarks
or trademarks of DTS, Inc. in the United States
and other countries. © 2021 DTS, Inc. ALL
RIGHTS RESERVED.
Multimedia Interface, and the HDMI Logo are
trademarks or registered trademarks of HDMI
Licensing Administrator, Inc. in the United
States and other countries.
The Bluetooth® word mark and logos are
registered trademarks owned by Bluetooth SIG,
Inc. and any use of such marks by Samsung
Electronics Co., Ltd. is under license. Other
trademarks and trade names are those of their
respective owners.
[ENERGY STAR]
– Your Samsung product is ENERGY STAR
Change to certain features, settings and
functionality in this product can change the
power consumption, possibly beyond the
limits required for ENERGY STAR
– Environmental Protection Agency and
Department of Energy. ENERGY STAR is a
joint program of the Government agencies,
products and practices.
Refer to www.energystar.gov for more
information of the ENERGY STAR Program.
(Applicable to Thin Client models only)
As an ENERGY STAR® Partner, SAMSUNG has
determined that this product meets the
ENERGY STAR® guidelines for energy
– The ENERGY STAR Program has been to
reduced greenhouse gas emissions and
save energy through voluntary labeling.
– Power management setting of this product
have been enabled by default, and have
various timing setting from 1 minutes to 5
hours.
– The product can wake with a button press
on the chassis from sleep mode.
models)
– As an ENERGY STAR Partner, Samsung has
determined that this product or product
models meets the ENERGY STAR guideline

ENG - 42
15 OPEN SOURCE
LICENSE NOTICE
To send inquiries and requests for questions
regarding open sources, contact Samsung Open
Source (http://opensource.samsung.com)
16 IMPORTANT
NOTES ABOUT
SERVICE
Figures and illustrations in this User Manual are
provided for reference only and may differ from
actual product appearance.

ENG - 43
17 SPECIFICATIONS AND GUIDE
Model Name HW-Q600B
USB 5V/0.5A
Weight 8.4 lbs (3.8 kg)
Dimensions (W x H x D)
40.6 x 2.2 x 4.1 inches
(1030.0 x 57.0 x 105.0 mm)
Operating Temperature Range +41°F to +95°F (+5°C to +35°C)
Operating Humidity Range 10 % ~ 75 %
AMPLIFIER
Rated Output power
200W (30W x 6 + 10W x 2)
Supported play formats
Dolby 5.1ch / Dolby Digital Plus / Dolby TRUE HD
/ Dolby ATMOS / DTS:X MA / DTS:X / DTS-HD
MA / DTS-HD HRA / DTS Express / DTS 96/24 /
DTS-ES / DTS Digital Surround / LPCM 8ch
Subwoofer Name PS-WB67B
Weight 12.1 lbs (5.5 kg)
Dimensions (W x H x D)
7.2 x 13.5 x 11.6 inches
(184.0 x 343.0 x 295.0 mm)
AMPLIFIER
Rated Output power
160W
NOTES
Weight and dimensions are approximate.
LIMITED WARRANTY TO ORIGINAL PURCHASER
Samsung Electronics Canada Inc.(SECA), warrants that this product is free from
defective material and workmanship.
warranty period and the failure is due to improper workmanship or defective
materials, SECA will repair or replace the product at its option.
All warranty repairs must be performed by a SECA Authorized Service Center. (The name and
address of the location nearest you can be obtained by calling toll free: 1- 800- SAMSUNG)
LABOR
One year (Carry- in)
PARTS
One year
On carry-in models, transportation to and from the service center is the customer’s
responsibility.
The original dated sales receipt must be retained by the customer and is the only
acceptable proof of purchase. It must be presented to the authorized service center at
the time service is requested.
EXCLUSIONS (WHAT IS NOT COVERED)
God; misuse, incorrect line voltage, improper installation, improper or unauthorized
lamps, glass are not covered under this warranty. Customer adjustments which are
explained in the instruction manual are not covered under the terms of this warranty.
This warranty will automatically be voided for any unit found with a missing or altered
serial number. This warranty is valid only on products purchased and used in Canada.
Samsung Electronics Canada Inc
2050 Derry Rd West
Mississauga, On. L5N 0B9
Tel: 1-800-SAMSUNG (726-7864)
Fax: (905) 542- 1199
Website: www.samsung.com/ca

© 2022 Samsung Electronics Co., Ltd. All rights reserved.
Contact SAMSUNG WORLD WIDE
If you have any questions or comments relating to Samsung products, please contact the SAMSUNG customer
care Center.
HEADQUARTERS
Samsung Electronics Canada Inc. 2050 Derry Road West, Mississauga, Ontario L5N 0B9 Canada
TEL: 1-800-SAMSUNG (1-800-726-7864)
www.samsung.com/ca/support
Country Samsung Service Center
Web Site
`
North America
CANADA 1-800-SAMSUNG (726-7864)
www.samsung.com/ca/support (English)
www.samsung.com/ca_fr/support (French)
U.S.A 1-800-SAMSUNG (726-7864) www.samsung.com/us/support

HW-Q600B
MANUEL COMPLET
Imaginez les possibilités
Merci d’avoir choisi un appareil Samsung.
Pour recevoir une assistance plus complète,
veuillez enregistrer votre produit sur
www.samsung.com/register
FRA - 2
INFORMATIONS RELATIVES À LA SÉCURITÉ
AVERTISSEMENTS
POUR ÉVITER LES RISQUES DE CHOC
ÉLECTRIQUE, NE DÉMONTEZ PAS LE CAPOT.
L’APPAREIL NE CONTIENT PAS DE PIÈCES
RÉPARABLES PAR L’UTILISATEUR. S’ADRESSER À
UN SERVICE APRÈS-VENTE QUALIFIÉ.
Reportez-vous au tableau ci-dessous pour
votre produit Samsung.
MISE EN GARDE
RISQUE DE CHOC
ÉLECTRIQUE NE PAS
OUVRIR
Ce symbole indique la présence d'une
haute tension à l'intérieur. Tout contact
avec une pièce interne de l'appareil
présente un danger.
Ce symbole vous informe qu'une
documentation importante relative au
fonctionnement et à l'entretien est
fournie avec le produit.
indique qu'il ne nécessite pas une
connextion de sécurité à la terre
(masse). Si ce symbole n'est pas présent
sur un produit équipé d'un cordon
d'alimentation, le produit DOIT être
tension nominale est la tension CA.
tension nominale est la tension CC.
Attention, consultez les instructions aux
l'utilisateur qu'il doit consulter le guide
d'utilisation pour avoir de l'information
au sujet de la sécurité.
AVERTISSEMENT
choc électrique, n’exposez pas cet appareil à
la pluie ou à l’humidité.
Pour éviter des blessures, cet appareil doit
conformément aux directives d’installation.
MISE EN GARDE
Veillez à éviter toute projection sur l’appareil.
Ne placez jamais de récipients contenant un
de déconnexion. Elle doit donc rester
disponible en permanence.
ATTENTION (Pour le Canada)
L’émetteur/récepteur exempt de licence contenu
dans le présent appareil est conforme aux CNR
d’Innovation, Sciences et Développement
économique Canada applicables aux appareils
radio exempts de licence. L’exploitation est
1) L’appareil ne doit pas produire de brouillage;
2) L’appareil doit accepter tout brouillage
radioélectrique subi, même si le brouillage est
susceptible d’en compromettre le fonctionnement.
Cet appareil et son ou ses antennes ne doivent
pas etre installés a proximité ou etre utilisés
conjointement avec une autre antenne ou un
autre émetteur.
Le dispositif pourrait automatiquement cesser
d’émettre en cas d’absence d’informations à
transmettre, ou une défaillance opérationnelle.
Notez que ce n’est pas l’intention d’interdire la
transmission des informations de contrôle ou de
signalisation ou l’utilisation de codes répétitifs
lorsque requis par la technologie.
Cet appareil numerique de la classe B est
conforme a la norme NMB-003 du Canada.

FRA - 3
Declaration d’exposition aux radiations:
Cet equipement est conforme aux limites
d’exposition aux rayonnements IC RSS-102
etablies pour un environnement non controle.
Cet equipement doit etre installe et utilise avec
un minimum de 20 cm de distance entre la source
de rayonnement et votre corps.
Consignes de sécurité importantes
Lisez attentivement ces consignes avant d’utiliser
l’appareil. Veillez à respecter toutes les consignes
répertoriées ci-après. Conservez ces instructions à
portée de main pour vous y référer ultérieurement.
1. Lisez attentivement ces consignes.
2. Conservez-les précieusement.
3. Tenez compte de tous les avertissements
mentionnés.
4. Respectez toutes les instructions sans
exception.
5. N’utilisez pas cet appareil à proximité de
l’eau.
6. Nettoyez-le à l’aide d’un tissu sec.
7. Ne bloquez pas les ouvertures de ventilation.
Installez l’appareil conformément aux
instructions du fabricant.
8. N’installez pas le lecteur à proximité d’une
source de chaleur de type radiateur, registre
de chaleur, cuisinière ou tout autre appareil
(y compris les récepteurs AV) générateur de
chaleur.
9. Ne désactivez pas le dispositif de sécurité de
deux lames dont l’une est plus large que
deux lames et une troisième broche de mise
à la terre. La lame la plus large et la
troisième broche sont destinées à assurer
pas dans la prise utilisée, faites appel à un
électricien pour faire remplacer celle-ci.
10. Placez le cordon d’alimentation de sorte qu’il
ne puisse être ni piétiné ni pincé,
prise de courant et du point de sortie de
l’appareil.
11.
12. Utilisez exclusivement le
meuble à roulettes, le socle, le
trépied, le support ou la table
recommandés par le fabricant
ou vendus avec l’appareil.
Si l’appareil est posé sur un meuble à
roulettes, déplacez l’ensemble avec
précaution pour éviter de faire tomber le
lecteur et de vous blesser.
13. Débranchez l’appareil en cas d’orage ou
lorsqu’il est inutilisé pendant une période
prolongée.
14.
être réparé lorsqu’il a été endommagé de
détérioration
projection de liquide sur l’appareil, chute
d’objets à l’intérieur de l’appareil, exposition
à la pluie ou à l’humidité, dysfonctionnement,
chute.

FRA - 4
PRÉCAUTIONS
1. Assurez-vous que le bloc d’alimentation CA
chez vous est conforme aux exigences de
produit. Installez votre produit
horizontalement, sur un socle approprié
pour la ventilation sur le pourtour 3~4 po.
de ventilation. Ne posez pas l’ensemble sur
susceptible de chauffer. Cet ensemble est
conçu pour une utilisation en continu.
Pour éteindre totalement l’appareil,
Débranchez l’appareil si vous prévoyez une
longue période d’inactivité.
2.
l’appareil de la prise murale. Les surtensions
occasionnées par l’orage pourraient
endommager votre appareil.
3. N’exposez pas l’ensemble aux rayons directs
du soleil ou à toute autre source de chaleur.
causer un dysfonctionnement de l’unité.
4.
Protégez le produit de l’humidité (comme les
vases) et d’une chaleur excessive (comme une
cheminée) ou de tout équipement capable de
créer des champs magnétiques ou électriques.
Débranchez le câble d’alimentation en cas de
dysfonctionnement. Votre produit n’est pas
prévu pour un usage industriel. Ce produit ne
Une condensation peut se former si le produit
ou un disque a été stocké à basse
température. Si vous devez transporter
l’ensemble pendant l’hiver, attendez environ
2 heures que l’appareil ait atteint la
température de la pièce avant de l’utiliser.
5. Les piles utilisées dans ce produit peuvent
contenir des produits chimiques dangereux
pour l’environnement. Ne jetez pas les piles
dans votre poubelle habituelle. Ne vous
débarrassez pas des piles en les faisant
brûler. Les piles ne doivent pas être court-
circuitées, démontées ou subir de surchauffe.
MISE EN GARDE : Le remplacement
incorrect des piles peut entraîner un danger
d’explosion. Remplacez-les uniquement par
des produits similaires ou équivalents.

FRA - 5
SOMMAIRE
02 Présentation du Produit 8
Panneau avant/Panneau supérieur du Soundbar
------------------------- 8
Partie inférieure du panneau du Soundbar
------------------------- 9
03 Utlisation de la Télécommande 10
Insertion des piles avant d’utiliser la télécommande (2 piles AAA)
------------------------- 10
Procédure d’utilisation de la télécommande
-------------------------
10
Utilisation des boutons masqués (boutons ayant plusieurs fonctions)
-------------------------
14
Caractéristiques de sortie pour les différents modes d’effets sonores
-------------------------
14
Réglage du volume du Soundbar avec une télécommande du téléviseur
------------------------- 15
04 Branchement du Soundbar 16
Branchement de l’alimentation
-------------------------
16
-------------------------
19
-------------------------
20
Méthode 2. Branchement à l’aide d’un câble optique
-------------------------
22
Connexion par Bluetooth
-------------------------
24
07 Branchement d’un Périphérique Externe 26
Méthode 1. Branchement à l’aide d’un câble HDMI
-------------------------
26
Méthode 2. Branchement à l’aide d’un câble optique
-------------------------
27

FRA - 6
08 Branchement d’un lecteur USB 28
09 Branchement d’un Appareil Mobile 29
Connexion par Bluetooth
-------------------------
29
Utilisation de la fonction Tap Sound
-------------------------
33
10 Installation du Support Mural 34
Précautions d’installation
-------------------------
34
Composantes murales
-------------------------
34
12 Mise à jour Logicielle 37
Mise à jour USB
-------------------------
37
Réinitialisation
-------------------------
38
13 Dépannage 39
14 Licence 41
17 Caractéristiques et Guide 43
-------------------------
43

FRA - 7
01 VÉRIFICATION DES COMPOSANTS
SOUND
MODE
WOOFER
TONE
CONTROL
CH LEVEL
Unité principale du Soundbar Caisson de basses Télécommande/Piles
x 2
Cordon d’alimentation
(Caisson de basses, Soundbar)
Adaptateur CA/CC
(Soundbar)
Câble HDMI
x 2
x 2
x 2
(M4 x L10)
Guide de montage mural Vis de support
Support mural
Vis
Pour obtenir de l’information sur la source d’alimentation et la consommation électrique, veuillez vous
Soundbar)
Pour acheter des composants supplémentaires ou des câbles en option, veuillez contacter un
centre de service Samsung ou le service clientèle Samsung.
Pour plus d’informations sur le support mural, consultez la page 34.
FRA - 8
02
PRÉSENTATION DU PRODUIT
Panneau supérieur
Bouton
(Alimentation)
Permet d'allumer et d'éteindre l'appareil.
Fonction Auto Power Down
– Mode D.IN / HDMI / BT / USB
Bouton
Permet de régler le volume.
Bouton
(Source)
Permet de sélectionner le mode d'entrée source.
Mode d’entrée
Optique D.IN
eARC/ARC (HDMI OUT)
* D.IN TV eARC (Conversion automatique)
D.IN TV ARC (Conversion automatique)
HDMI HDMI
Mode BLUETOOTH BT
Mode USB USB
Pour activer le mode «BT PAIRINGBT», puis appuyez sur le
bouton
(Source) et maintenez-le appuyé pendant plus de 5 secondes.
Le mode “*” est pris en charge quand la fonction eARC est activée dans les réglages du téléviseur.
Lorsque vous branchez le cordon c.a., la touche de mise en fonction s’activera dans un délai de 4 à
6 secondes.
FRA - 9
Lorsque vous mettez cet appareil sous tension, un délai de 4 à 5 secondes précède l’émission du son.
Si le son provient à la fois du téléviseur et du Soundbar, accédez au menu Paramètres
correspondant au son du téléviseur et réglez le haut-parleur du téléviseur à Haut-p. externe.
Partie inférieure du panneau du Soundbar
HDMI
HDMI TO TV
(eARC/ARC)
DIGITAL AUDIO IN (OPTICAL)
USB (5V 0.5A)
DC 24V
HDMI
HDMI TO TV
(eARC/ARC)
DIGITAL AUDIO IN (OPTICAL)
USB (5V 0.5A)
DC 24V
USB (5V 0.5A)
Soundbar.
DC 24V (Entrée d'alimentation)
Se branche à l'adaptateur d'alimentation CA/CC.
HDMI
Permet d'entrer simultanément des signaux vidéo et audio numériques à l'aide d'un câble HDMI.
Se branche à la sortie HDMI d'un périphérique externe.
HDMI TO TV (eARC/ARC)
Se branche au raccord HDMI IN (ARC) d'un téléviseur.
DIGITAL AUDIO IN (OPTICAL)
Se branche à la sortie numérique (optique) d'un périphérique externe.
Lorsque vous débranchez d’une prise murale le câble d’alimentation de l’adaptateur CC/CA, tirez sur
Ne raccordez pas cette unité ou d’autres composants à une prise secteur CA tant que tous les
composants ne sont pas connectés.

FRA - 10
03 UTLISATION DE LA TÉLÉCOMMANDE
Faites glisser le panneau arrière dans le sens de la
Insérez 2 piles AAA (1,5V) dans le bon sens (polarité
correcte). Refaites glisser le panneau arrière dans
sa position initiale.
Procédure d’utilisation de la télécommande
SOUND
MODE
WOOFER
TONE
CONTROL
CH LEVEL
Alimentation
Permet d'allumer et d'éteindre le Soundbar.
Source
Appuyez sur ce bouton pour sélectionner une
source connectée au Soundbar.
Mise en
sourdine
Appuyez sur la touche
(Mise en sourdine)
pour désactiver le son. Appuyez de nouveau sur
la touche pour activer le son.
Volume
CH LEVEL
TONE
CONTR
WOOFER
SOUND
MODE
CH LEVEL
TO
C
WOOFER
SOUND
MODE
Faites basculer ce bouton vers le haut ou vers le
bas pour régler le volume.
Mise en sourdine
Appuyez sur le bouton Volume pour couper
le son. Appuyez à nouveau sur le bouton pour
rétablir le son.
FRA - 11
CH LEVEL
CH LEVEL
En appuyant sur le bouton, vous pouvez ajuster le volume de chaque haut-parleur.
Appuyez sur le bouton CENTER LEVEL ou TOP LEVEL, puis réglez le volume entre -6 et
+6 à l’aide des boutons Haut/Bas.
Si les haut-parleurs arrière (vendus séparément) sont connectés, le réglage REAR
LEVEL est disponible. Pour régler le volume REAR LEVEL entre -6 et +6 en utilisant les
boutons Haut/Bas.
VEL
Contrôle du son
paramètres à l’aide des boutons Haut/Bas.
VOICE ENHANCE ON/OFF NIGHT MODE ON/OFF AUDIO SYNC VIRTUAL ON/OFF
– VOICE ENHANCE ON/OFF
– NIGHT MODE ON/OFF
Ce mode est optimisé pour un visionnement nocturne lorsque les paramètres sont
réglés de façon à baisser le volume tout en préservant la clarté des dialogues.
– AUDIO SYNC
Si la vidéo du téléviseur et l’audio du Soundbar ne sont pas synchronisés, appuyez sur
le bouton
(Contrôle du son) pour sélectionner AUDIO SYNC, puis réglez le retard
de l’audio entre 0 et 300 millisecondes à l’aide des boutons Haut/Bas. (Non disponible
en mode «USB» ou «BT».)
– VIRTUAL ON/OFF
La fonction Dolby Virtual peut être activée et désactivée ON/OFF.
Les fonctions audio VOICE ENHANCE, NIGHT MODE et VIRTUAL peuvent être activées
et désactivées ON/OFF à l’aide des boutons Haut/Bas. (La fonction VIRTUAL n’est pas
disponible en mode «USB» ou «BT».)
Maintenez le bouton (Contrôle du son) enfoncé environ 5 secondes pour régler le
son pour chaque bande de fréquence. Vous pouvez utiliser les boutons Gauche/Droite
de -6 à +6 à l’aide des touches Haut/Bas
«STANDARD».)
Bluetooth
PAIR
Mettez le Soundbar en mode association Bluetooth.
Appuyez sur le bouton
PAIR et attendez que l’écran «BT PAIRING» se connecte à un
nouvel appareil Bluetooth.
Lecture/Pause
Vous pouvez également lire ou mettre en pause la musique en appuyant sur ce bouton.
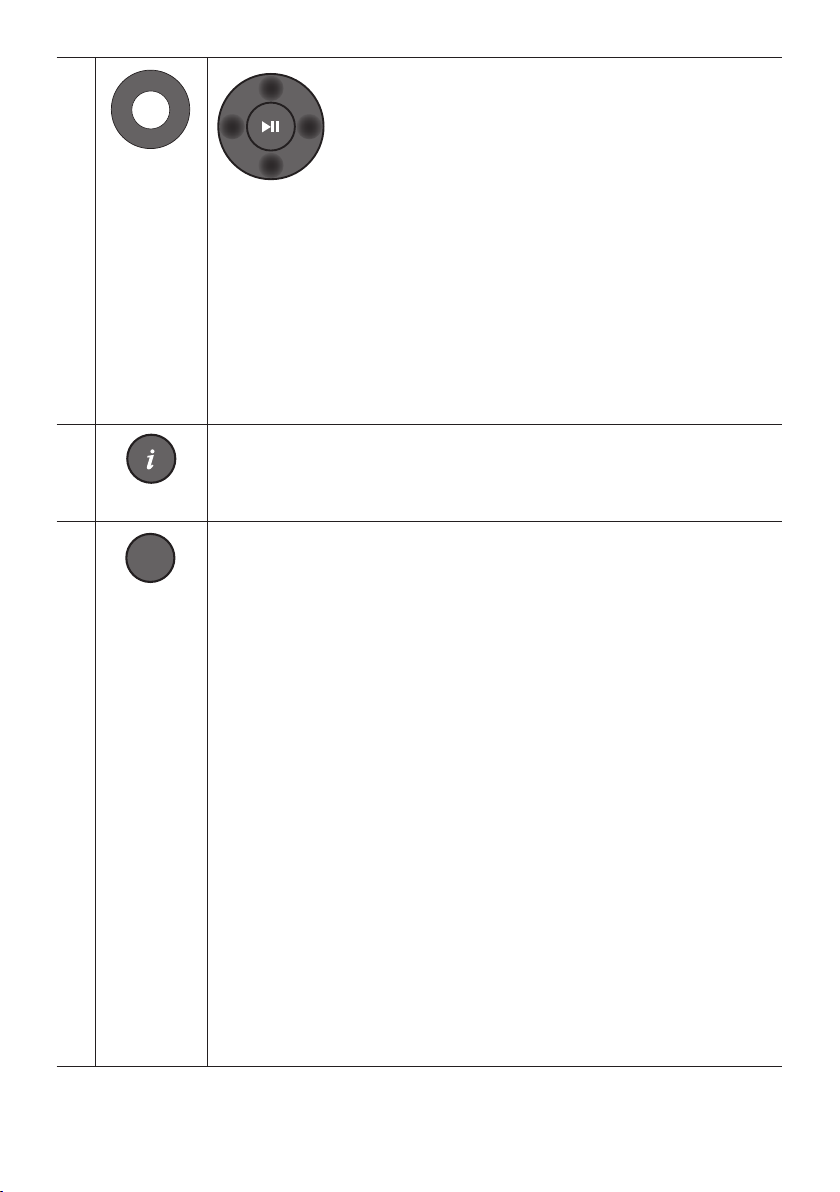
FRA - 12
Haut/Bas/
Gauche/
Droite
Appuyez sur les zones indiquées pour sélectionner le bouton
du Haut/Bas/Gauche/Droite.
fonctions.
Répéter
Pour utiliser la fonction Répéter en mode «USB», appuyez sur le bouton du Haut.
Passer un morceau
Appuyez sur le bouton de Droite pour sélectionner le prochain morceau. Appuyez sur
le bouton de Gauche pour sélectionner le morceau précédent.
ID SET
Maintenez le bouton Haut enfoncé pendant 5 secondes pour terminer ID SET (lors de la
OUND
Info
Lorsque vous appuyez sur ce bouton, les informations relatives à chaque mode
apparaissent. (Voir page 8.)
SOUND
MODE
SOUND MODE
En appuyant sur le bouton, vous pouvez sélectionner le mode de son souhaité.
SURROUND SOUND GAME PRO ADAPTIVE SOUND STANDARD
– SURROUND SOUND
Fournit un champ sonore plus étendu que la norme.
– GAME PRO
jouez.
– ADAPTIVE SOUND
Analyse le contenu en temps réel et fournit automatiquement le champ sonore
optimal en fonction des caractéristiques du contenu.
– STANDARD
Émet le son d’origine.
DRC (Dynamic Range Control)
Vous permet d’appliquer la commande de portée dynamique aux pistes Dolby Digital.
Maintenez enfoncé le bouton SOUND MODE
le Soundbar est hors tension pour activer ou désactiver la fonction DRC (commande de
portée dynamique). Quand la fonction DRC est activée, les sont forts sont limités. (Il
peut se produire une distorsion du son.)
Bluetooth Power
Cette fonction est activée automatiquement sur le Soundbar lors de la réception d’une
demande de connexion depuis un appareil Bluetooth ou un téléviseur connecté
précédemment. Le paramètre est activé par défaut.
– Appuyez sur la touche SOUND MODE et maintenez-la enfoncée pendant plus de 5
secondes pour désactiver la fonction Bluetooth Power.
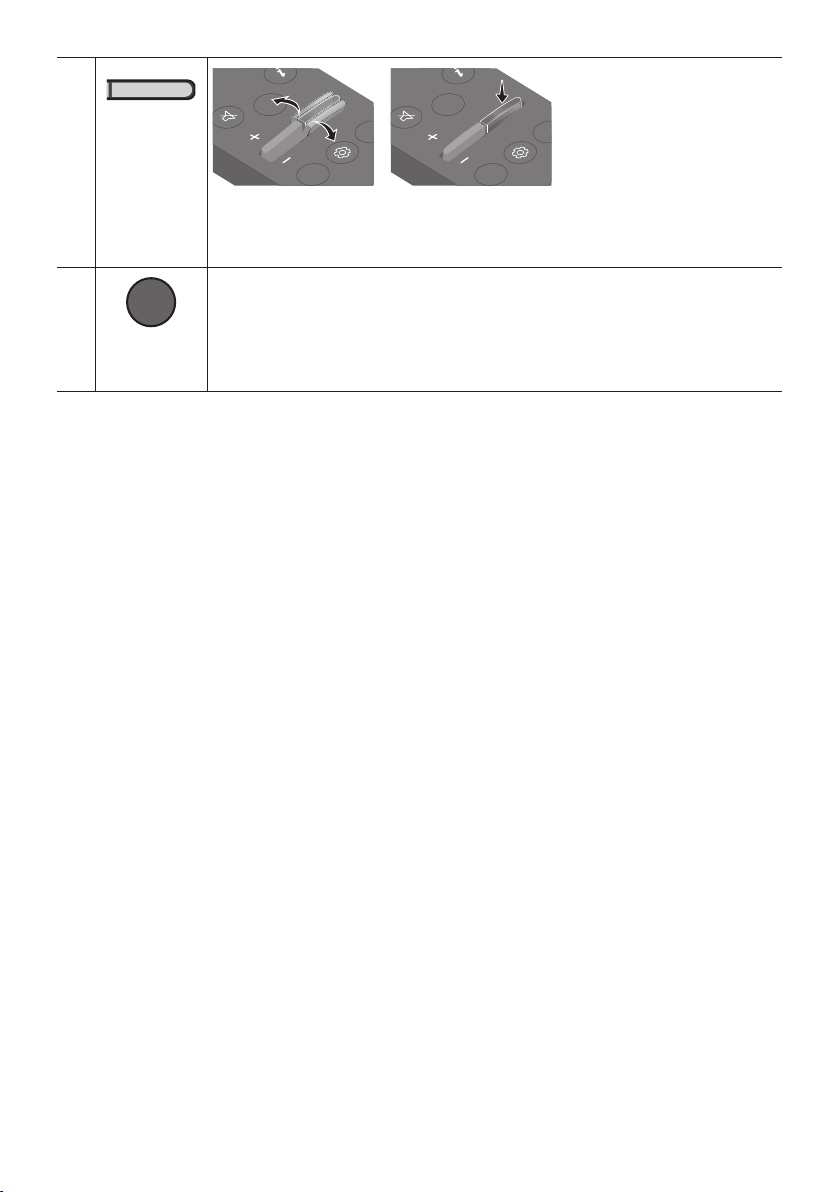
FRA - 13
WOOFER
NIVEAU du
WOOFER
(BASSES)
CH LEVEL
TONE
CONTR
WOOFER
SOUND
MODE
CH LEVEL
TONE
CONTR
WOOFER
SOUND
MODE
Faites basculer ce bouton vers le haut ou vers le bas pour régler le niveau du haut-parleur
(basses) sur -12 ou entre -6 et +6. Pour régler le niveau de volume du haut-parleur (basses)
sur 0 (par défaut), appuyez sur ce bouton.
TONE
CONTROL
TONE
CONTROL
En appuyant sur le bouton, vous pouvez ajuster le volume des aigus ou des basses.
Appuyez sur le bouton TREBLE ou BASS, puis réglez le volume entre -6 et +6 à l’aide
des boutons Haut/Bas.
FRA - 14
Utilisation des boutons masqués (boutons ayant plusieurs fonctions)
Bouton masqué
Page de référence
Bouton de la télécommande Fonction
WOOFER (Haut)
Activer/Désactiver la fonction Télécommande de votre
téléviseur (mode veille)
page 15
Gauche
Activation/Désactivation de la connexion automatique
du téléviseur (BT Prêt)
page 25
Haut ID SET page 12
(Contrôle du son)
EQ 7 bandes page 11
SOUND MODE
DRC ON/OFF (mode veille) page 12
Bluetooth Power page 12
Caractéristiques de sortie pour les différents modes d’effets sonores
Effet Entrée
Sortie
basses uniquement
l’ensemble de haut-parleurs
SOUND MODE
SOUND
MODE
SURROUND
SOUND
2.0 canaux
3.1.2 canaux 5.1.2 canaux
5.1 canaux 3.1.2 canaux 5.1.2 canaux
3.1.2 canaux 5.1.2 canaux
GAME PRO
2.0 canaux
3.1.2 canaux 5.1.2 canaux
5.1 canaux 3.1.2 canaux 5.1.2 canaux
3.1.2 canaux 5.1.2 canaux
ADAPTIVE
SOUND
2.0 canaux
3.1.2 canaux 5.1.2 canaux
5.1 canaux 3.1.2 canaux 5.1.2 canaux
3.1.2 canaux 5.1.2 canaux
STANDARD
2.0 canaux
2.1 canaux 2.1 canaux
5.1 canaux 3.1 canaux 5.1 canaux
3.1.2 canaux 5.1.2 canaux
contactez le fournisseur auprès duquel vous avez acheté le Soundbar.
STANDARD
est utilisé. Pour activer le son des haut-parleurs arrière, réglez le mode d’effet à SURROUND SOUND.
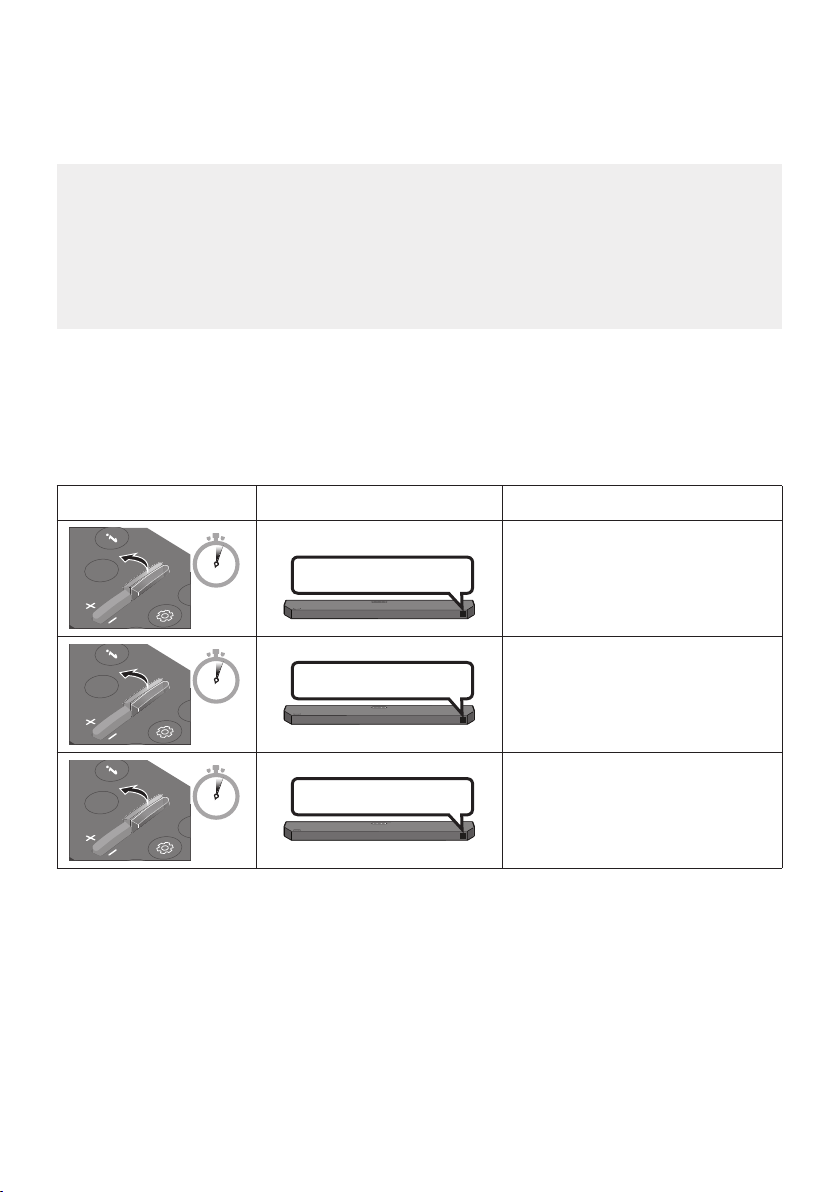
FRA - 15
Contrôlez le volume du Soundbar à l’aide de la télécommande du téléviseur.
Cette fonction ne peut être utilisée qu’avec des télécommandes infrarouges.
Les télécommandes Bluetooth (télécommandes qui nécessitent un appairage) ne sont pas prises
en charge.
Réglez le haut-parleur du téléviseur sur Haut-p. externe pour utiliser cette fonction.
Samsung, VIZIO, LG, Sony, Sharp, PHILIPS, PANASONIC, TOSHIBA, Hisense, RCA
1. Éteignez le Soundbar.
2. Appuyez sur le bouton WOOFER et maintenez-le enfoncé pendant 5 secondes.
À chaque fois que vous faites basculer le bouton WOOFER vers le haut et le maintenez enfoncé
OFF-TV REMOTE» (Mode par défaut),
«SAMSUNG-TV REMOTE», «ALL-TV REMOTE».
Bouton de la télécommande Écran État
SOUND
MODE
WOOFER
L
TONE
CON
5 Sec
OFF-TV REMOTE
(Mode par défaut)
Télécommande du téléviseur
désactivée.
SOUND
MODE
WOOFER
L
TONE
CON
5 Sec
SAMSUNG-TV REMOTE
Télécommande infrarouge du
téléviseur Samsung activée.
SOUND
MODE
WOOFER
L
TONE
CON
5 Sec
ALL-TV REMOTE
Télécommande infrarouge du
téléviseur tiers activée.
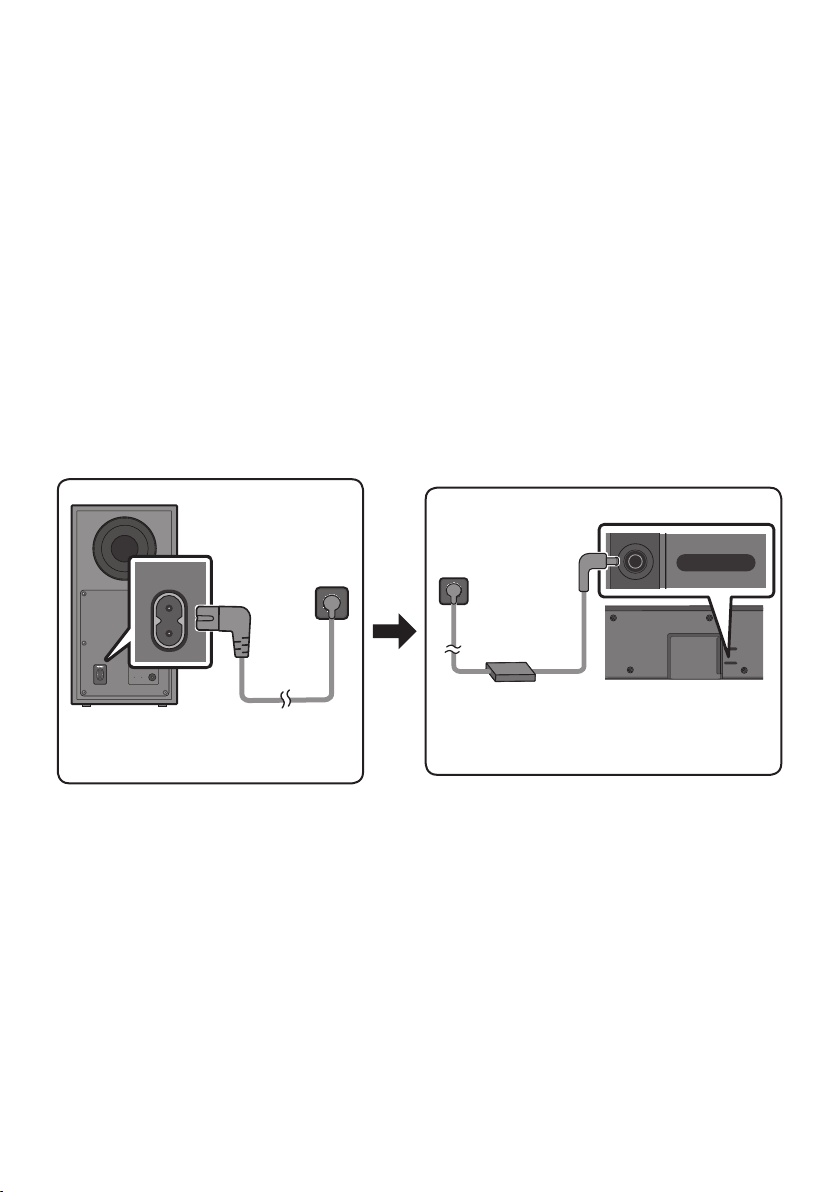
FRA - 16
04 BRANCHEMENT DU SOUNDBAR
Branchement de l’alimentation
Pour obtenir de l’information sur la source d’alimentation et la consommation électrique, veuillez vous
Soundbar)
1. Raccordez le cordon d’alimentation au caisson de basses.
2. Branchez le cordon d’alimentation à l’adaptateur CA/CC. Connectez l’adaptateur CA/CC (avec le
cordon d’alimentation) au Soundbar.
3. Connectez l’alimentation au Soundbar et au caisson des basses.
Raccordez en premier le cordon d’alimentation au caisson de basses. Le caisson de basses sera
automatiquement connecté lors de la mise sous tension du Soundbar.
POWER
Arrière du caisson
des basses
Cordon
d’alimentation
Branchement de
l’alimentation
USB (5V 0.5A)
DC 24V
DC 24V
Partie inférieure de
l’unité principale du
Soundbar
Adaptateur CA/CC
Cordon
d’alimentation
Branchement de
l’alimentation
Veillez à bien poser à plat l’adaptateur CA/CC sur une table ou au sol. Si l’adaptateur CA/CC est
suspendu, avec l’entrée du câble d’alimentation CA vers le haut, de l’eau ou d’autres substances
étrangères peuvent pénétrer dans l’adaptateur et provoquer son dysfonctionnement.
Si vous débranchez et rebranchez le cordon d’alimentation lorsque le produit est sous tension, le
Soundbar s’allume automatiquement.
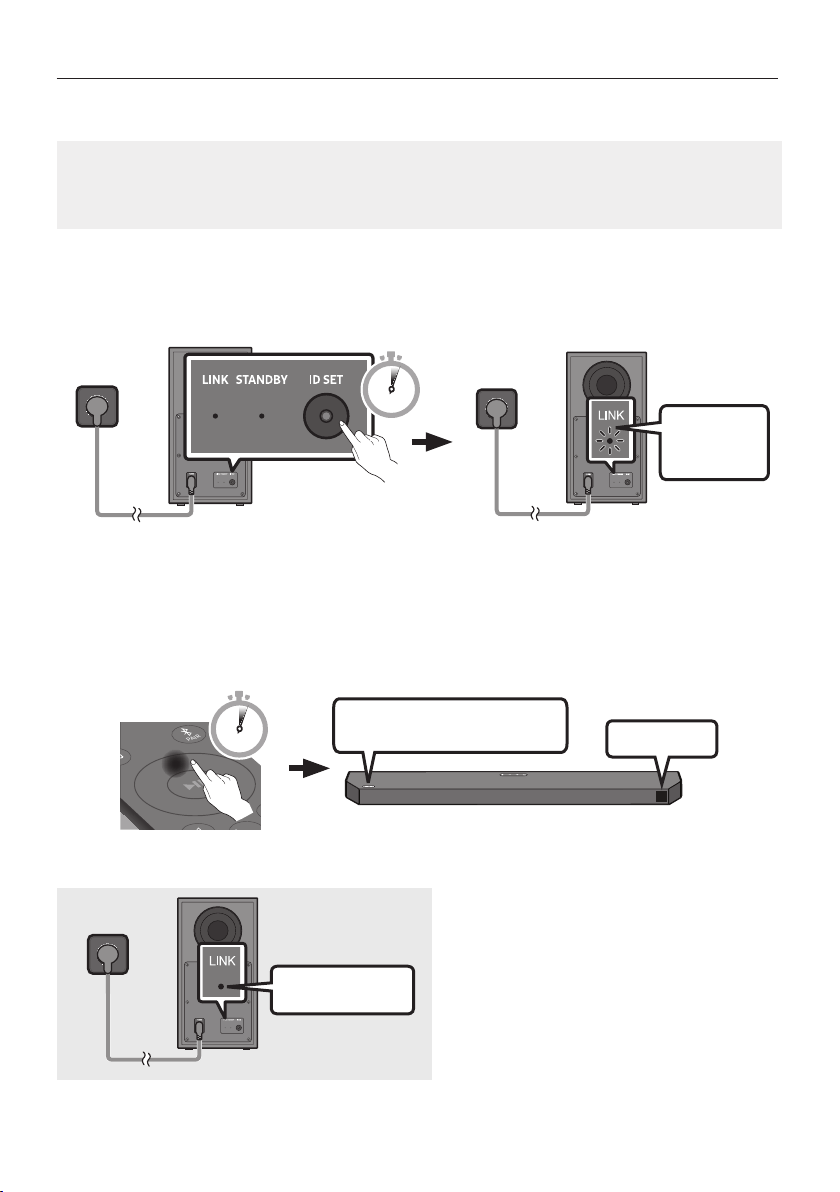
FRA - 17
Connexion manuelle du caisson des basses en cas d’échec de la connexion automatique
des basses.
Assurez-vous que le Soundbar est allumé.
1. Appuyez sur le bouton ID SET situé à l’arrière du caisson des basses et maintenez-le appuyé
pendant au moins 5 secondes.
Le voyant rouge situé à l’arrière du caisson des basses s’éteint et le voyant bleu clignote.
Voyant bleu
clignotant
rapidement
5 Sec
Arrière du caisson des basses Arrière du caisson des basses
2. Appuyez sur la touche Haut de la télécommande et maintenez-le enfoncé pendant au moins
Le message ID SET apparaît sur l’écran du Soundbar pendant un moment, puis disparaît.
Le Soundbar est mis sous tension automatiquement lorsque ID SET est terminé.
SOUND
MODE
PAIR
5 Sec
ID SET
Le logo
SAMSUNG
est situé sur le
dessus.
3.
allumé
entre le Soundbar et le caisson de basses
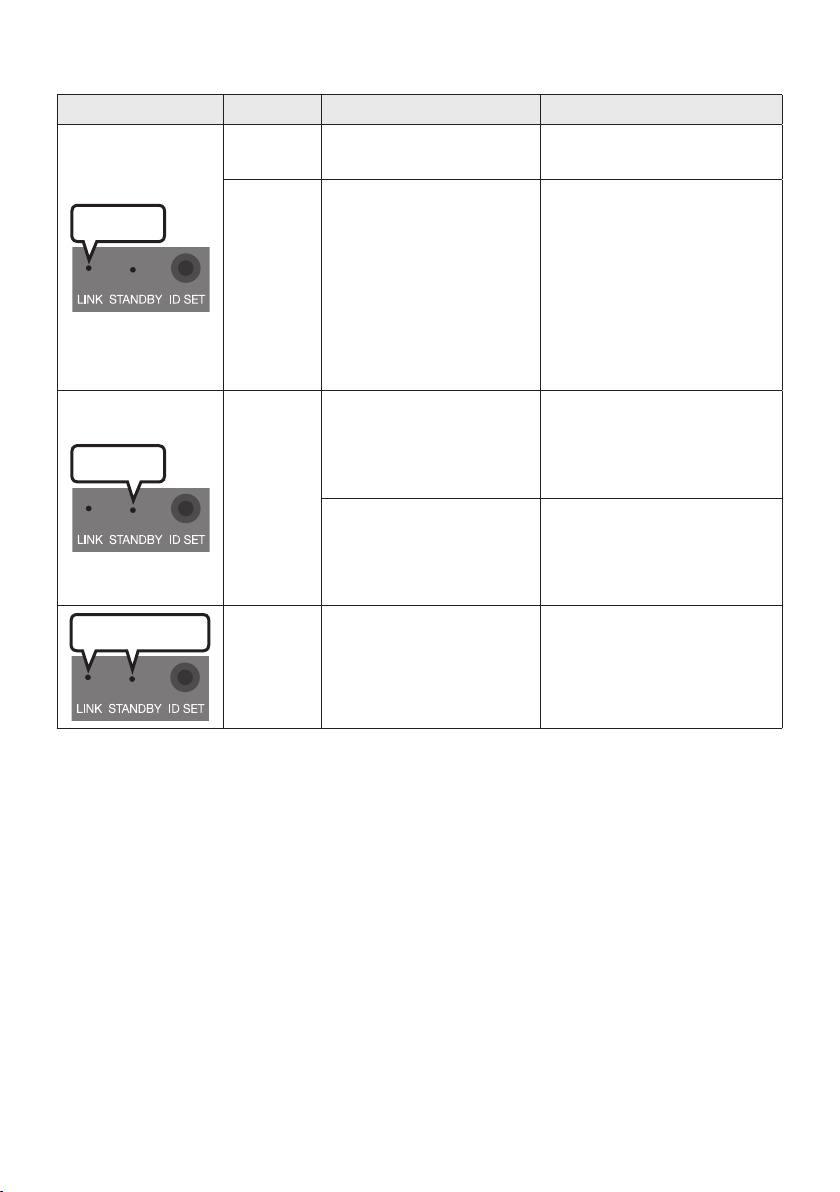
FRA - 18
Voyants DEL à l’arrière du caisson des basses
DEL Statut Description Résolution
Bleu
Activé
Connexion établie
(fonctionnement normal)
-
Clignotant
Récupération de la
connexion
d’alimentation branché à l’unité
principale du Soundbar est bien
connecté ou patientez 5
minutes. Si le clignotement
persiste, essayez de connecter
manuellement le caisson de
basses. Voir page 17.
Rouge
Activé
Veille (unité principale du
Soundbar éteinte)
d’alimentation est bien branché
sur l’unité principale du
Soundbar.
Échec de la connexion
Rebranchez le produit.
Reportez-vous aux instructions
relatives au branchement
manuel à la page 17.
Rouge et bleu
Clignotant Dysfonctionnement
Recherchez les coordonnées du
Centre de service Samsung
dans le manuel.
REMARQUES
Ne branchez pas le cordon d’alimentation de ce produit ou de votre téléviseur à une prise murale
tant que tous les composants ne sont pas connectés.
Avant de déplacer ou d’installer ce produit, veillez à couper l’alimentation et à débrancher le cordon
d’alimentation.
DEL de STANDBY à l’arrière devient rouge après avoir clignoté en bleu plusieurs fois.
Si vous utilisez un dispositif qui utilise la même fréquence que le Soundbar près du Soundbar, des
interférences peuvent provoquer des interruptions du son.

FRA - 19
MISE EN GARDE
unités à l’écart de l’eau et de l’humidité.
Pour des performances d’écoute optimales, assurez-vous que la zone entourant le caisson des
Soundbar
Samsung (SWA-9100S ou SWA-9200S, vendu séparément) à votre Soundbar.
Pour plus d’informations sur les connexions, veuillez consulter le manuel d’utilisation du haut-parleur
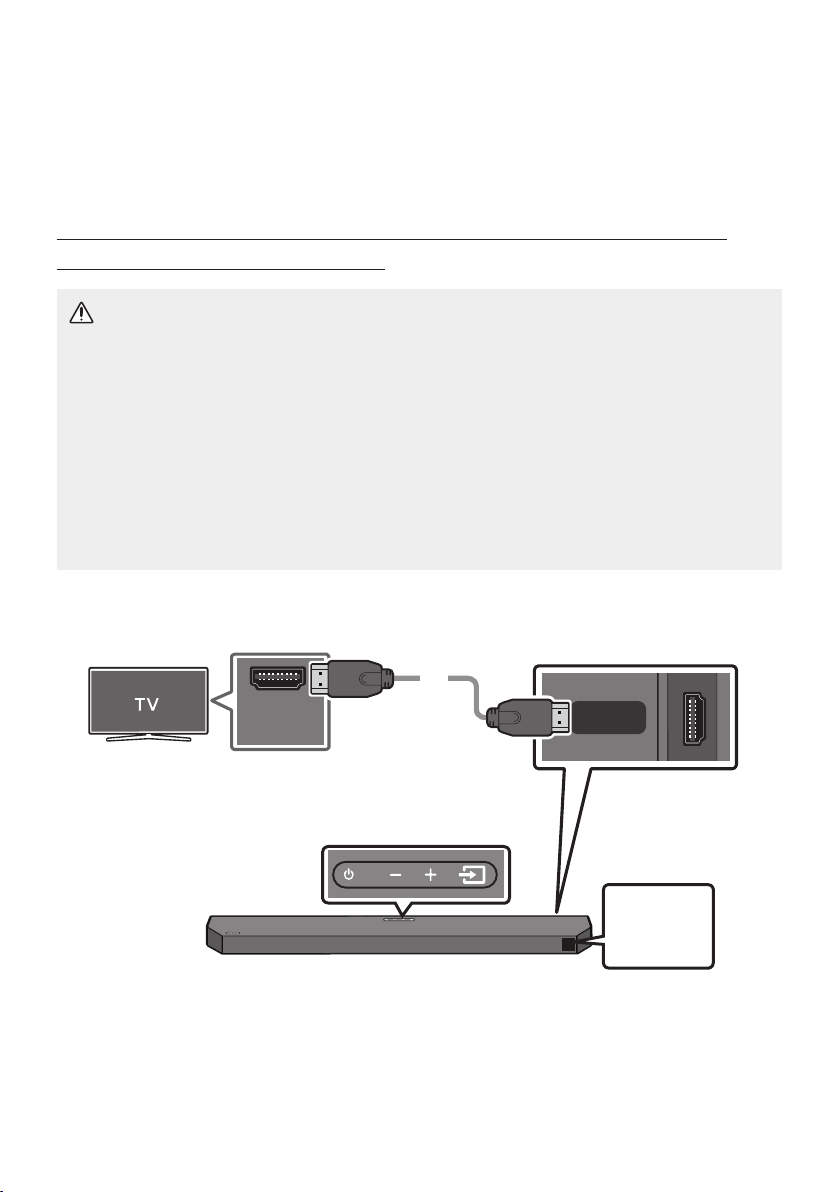
FRA - 20
05 UTILISATION D’UNE CONNEXION FILAIRE
AU TÉLÉVISEUR
audio/canal de retour audio amélioré)
MISE EN GARDE
Lorsque le câble HDMI et le câble optique sont tous les deux connectés, le signal HDMI est reçu
en premier.
Pour connecter le câble HDMI entre le téléviseur et le Soundbar, assurez-vous de connecter les
bornes marquées ARC ou eARC. Sinon, le son du téléviseur risque de ne pas être émis.
Le câble recommandé est le High-Speed HDMI Cable with Ethernet.
Lors de la connexion d’un téléviseur prenant en charge la fonction eARC, «TV eARC» apparaît à
l’écran et le son est audible.
Le port TV peut être marqué eARC selon le téléviseur.
HDMI IN
(ARC)
HDMI TO TV
(eARC/ARC)
Câble HDMI
Partie inférieure du panneau
du Soundbar
sur l'unité principale du Soundbar.
Dessus du Soundbar
TV ARC
ou
TV eARC
1. Allumez le Soundbar et le téléviseur, puis branchez le câble HDMI comme indiqué sur l’image.
2. «TV ARC» ou «TV eARC
du téléviseur est diffusé.
«TV eARC

FRA - 21
Pour la connexion à eARC, la fonction eARC dans le menu du téléviseur devrait être activée.
Reportez-vous au manuel de l’utilisateur du téléviseur pour de plus amples renseignements sur
les paramètres (
Si le son du téléviseur est inaudible, appuyez sur le bouton (Source) de la télécommande ou
sur le dessus du Soundbar pour basculer en mode «D.IND.IN» et
«TV ARC» ou «TV eARC», et le son du téléviseur est diffusé.
Si l’option «TV ARC» ou «TV eARC
HDMI est connecté au bon port.
Utilisez les boutons de volume de la télécommande du téléviseur pour régler le volume du
Soundbar.
REMARQUES
Lorsque vous connectez le téléviseur prenant en charge HDMI ARC/eARC (canal de retour audio/
canal de retour audio amélioré) au Soundbar avec un câble HDMI, vous pouvez transmettre les
données vidéo et audio numériques sans connecter de câble optique distinct.
Nous vous recommandons d’utiliser un câble HDMI sans noyau si possible. Si vous utilisez un câble
HDMI avec noyau, utilisez-en un dont le diamètre est inférieur à 0,55 po (14 mm).
Cette fonction n’est pas disponible si le câble HDMI ne prend pas en charge l’ARC ou eARC.
ARC et eARC ont des bandes passantes différentes. eARC, qui est une version améliorée du canal
de retour audio, possède une bande passante beaucoup plus élevée qu’ARC. Une bande passante
plus élevée augmente la quantité de données qui peuvent être transmises. Avec le canal eARC,
Lorsque le son d’une diffusion est encodé en Dolby Digital et que le paramètre «Format audio de
différents termes pour Dolby Digital et PCM, selon le fabricant du téléviseur.)
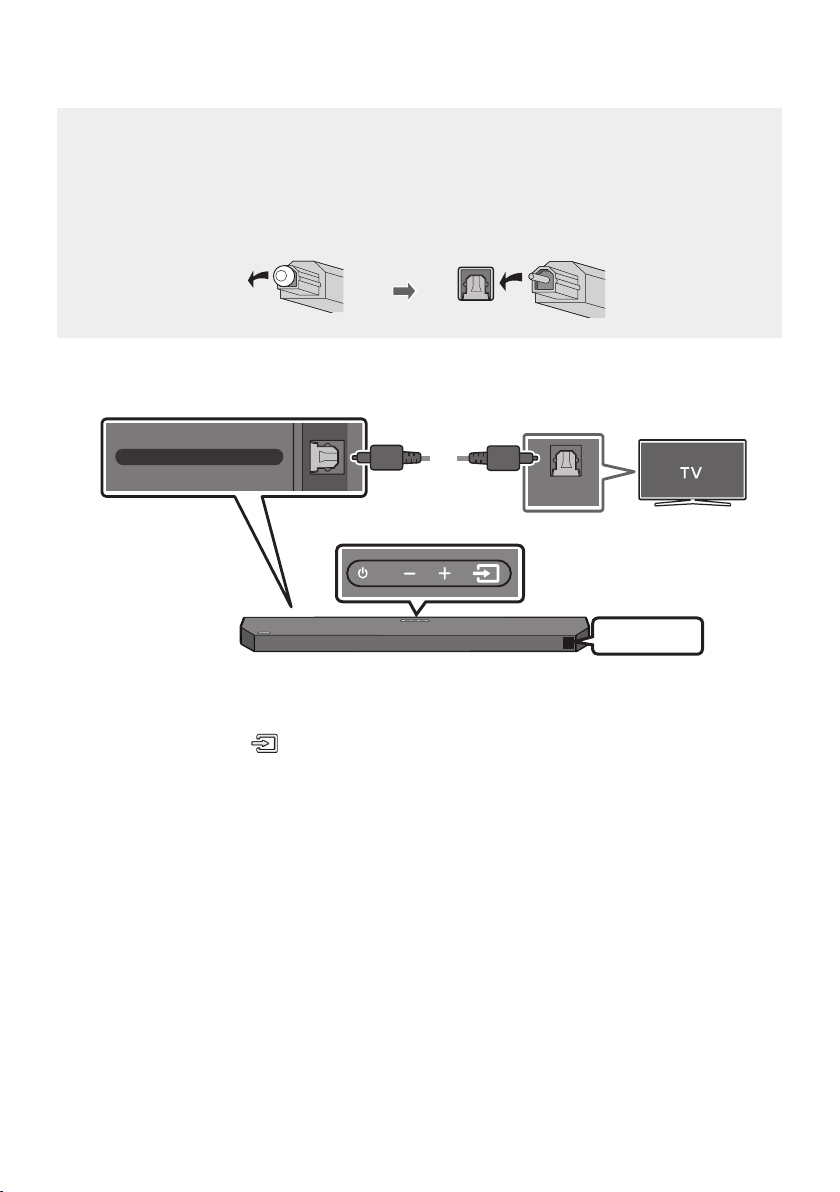
FRA - 22
Méthode 2. Branchement à l’aide d’un câble optique
Liste de contrôle de pré-connexion
Lorsque le câble HDMI et le câble optique sont tous les deux connectés, le signal HDMI est reçu
en premier.
Lorsque vous utilisez un câble optique et que les bornes ont leurs caches, assurez-vous de
retirer les caches.
OPTICAL OUT
DIGITAL AUDIO IN (OPTICAL)
Partie inférieure du panneau du
Soundbar
Câble optique
(non fourni)
D.IN
Dessus du Soundbar
1. Branchez le connecteur DIGITAL AUDIO IN (OPTICAL) du Soundbar sur le connecteur OPTICAL
OUT du téléviseur avec un câble optique (non fourni) numérique.
2. Appuyez sur le bouton (Source) du panneau supérieur ou de la télécommande, puis
sélectionnez le mode «D.IN».
3. Le son du téléviseur est émis par le Soundbar.
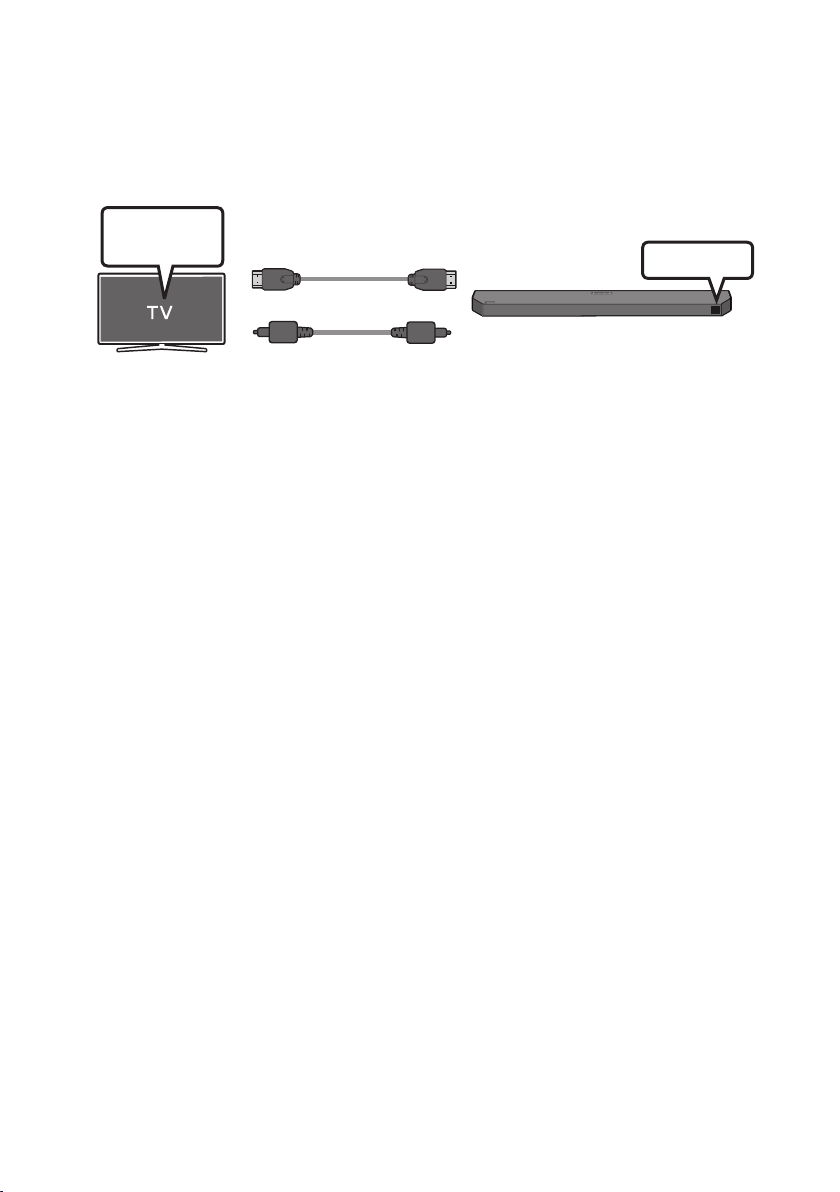
FRA - 23
Utilisation de la fonction Q-Symphony
restituer le son via deux appareils pour un effet ambiophonique optimal. Lorsque le Soundbar est
connecté, le menu «TV+Soundbar» apparaît au-dessous du menu Sortie audio du téléviseur.
Sélectionnez le menu correspondant.
Menu du
OU
Câble optique (non fourni)
Câble HDMI
D.IN
+ [AV] Soundbar numéro de série (HDMI)
REMARQUES
Le fonctionnement dépend du codec pris en charge par le téléviseur.
Cette fonction est prise en charge uniquement lorsque le câble HDMI ou le câble optique (non
fourni) est connecté
Cette fonction est disponible sur certains téléviseurs Samsung et sur certains modèles de
Soundbar.

FRA - 24
06 UTILISATION D’UNE CONNEXION SANS FIL
AVEC LE TÉLÉVISEUR
Connexion par Bluetooth
encombrer avec des câbles.
Un seul téléviseur peut être connecté à la fois.
PAIR
OU
BT PAIRING
Connexion initiale
1. Appuyez sur le bouton
PAIR de la télécommande pour accéder au mode «BT PAIRING».
(OU)
a. Appuyez sur le bouton
(Source) du panneau supérieur, puis sélectionnez «BT».
«BT» passe automatiquement à «BT PAIRING» en quelques secondes ou à «BT READY»
s’il y a un enregistrement de connexion.
b. Lorsque «BT READY» apparaît, appuyez sur le bouton
(Source) du panneau supérieur
BT
PAIRING».
2. Sélectionnez le mode Bluetooth sur le téléviseur. (Pour plus d’informations, reportez-vous au
manuel du téléviseur.)
3. Sélectionnez «[AV] Samsung Soundbar Q6B-Series
téléviseur. Lorsqu’un Soundbar est disponible, il a le statut «Need Pairing» ou «Paired» dans la
liste des périphériques Bluetooth du téléviseur. Pour se connecter au Soundbar, sélectionnez le
message et établissez une connexion.
Lorsque le téléviseur est connecté, [BT
l’avant du Soundbar.
4. Le son du téléviseur est désormais diffusé sur le Soundbar.
Une fois que vous avez connecté le Soundbar à votre téléviseur la première fois, utilisez le mode
«BT READY» pour la reconnexion.
En cas d’échec de la connexion du périphérique
Si l’entrée correspondant au Soundbar précédemment connecté (par ex., «[AV] Samsung Soundbar
Q6B-Series
Répétez ensuite les étapes 1 à 3.

FRA - 25
Appuyez sur le bouton (Source) du panneau supérieur ou de la télécommande, puis sélectionnez
n’importe quel mode sauf «BT».
La déconnexion prend du temps car le téléviseur doit recevoir une réponse du Soundbar.
(Le temps requis peut différer en fonction du modèle du téléviseur.)
Pour annuler la connexion Bluetooth automatique entre le Soundbar et le téléviseur, appuyez sur la
touche Gauche de la télécommande pendant 5 secondes en mode «BT READY». (La fonction passe
de Activé à Désactivé)
Quelle est la différence entre BT READY et BT PAIRING ?
BT READY
auparavant.
BT PAIRING
la touche
PAIR de la télécommande ou appuyez sur le bouton
(Source)
situé sur le dessus du
Soundbar et maintenez-le enfoncé pendant plus de 5 secondes pendant que le Soundbar est en
mode «BT».)
Remarques sur la connexion Bluetooth
Placez un nouvel appareil à moins de 3,28 pi (1 m) pour vous connecter par Bluetooth.
Si vous êtes invité à saisir un code PIN lors de la connexion à un périphérique Bluetooth, entrez
<0000>.
En mode de connexion Bluetooth, la connexion Bluetooth est perdue si la distance entre le
Soundbar et le périphérique Bluetooth est supérieure à 32,8 pi (10 m).
Le Soundbar se désactive automatiquement après avoir passé 18 minutes à l’état Prêt.
Il se peut que le Soundbar n’effectue pas correctement la recherche ou la connexion Bluetooth
– En présence d’un champ électrique puissant dans l’environnement du Soundbar.
– Si plusieurs appareils Bluetooth sont associés simultanément au Soundbar.
– En cas de désactivation, de mauvais positionnement ou de dysfonctionnement du périphérique
Bluetooth.
Les appareils électroniques peuvent créer des interférences radio. Les appareils produisant des
ondes électromagnétiques doivent être gardés à distance de l’unité principale du Soundbar, par
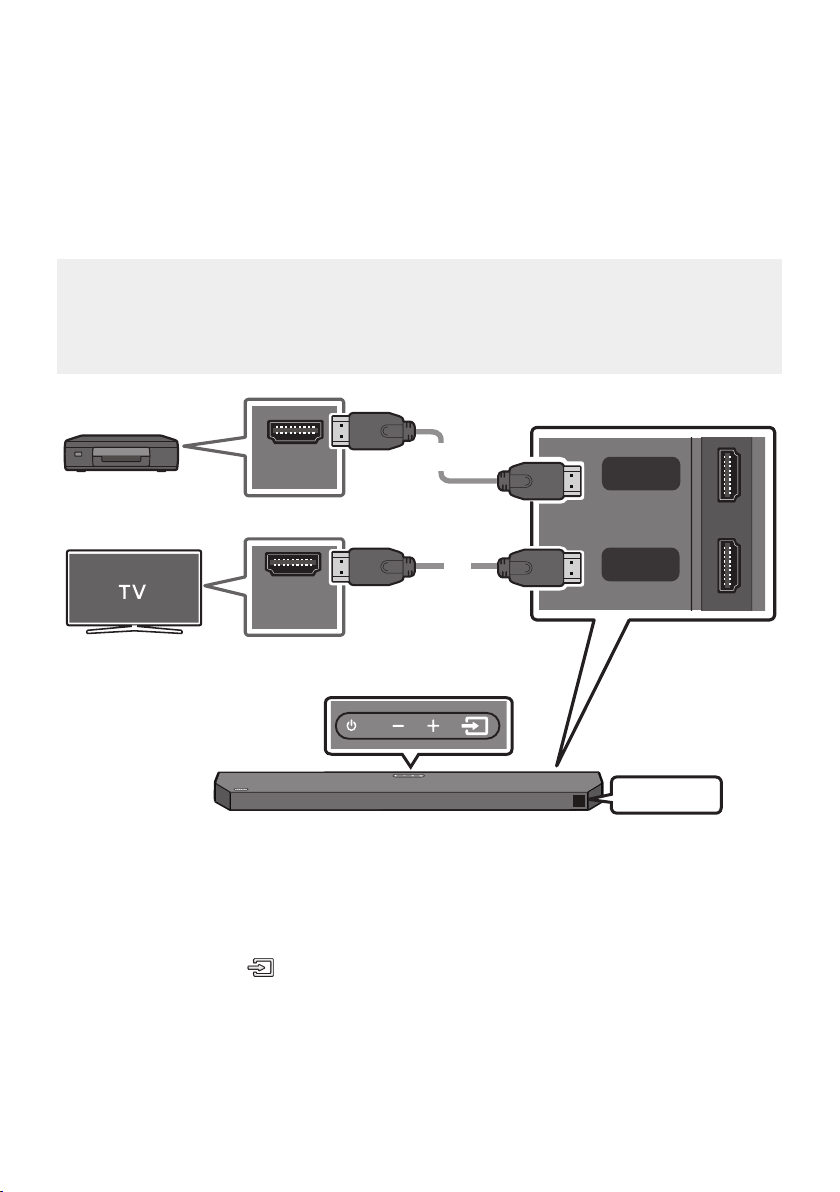
FRA - 26
07 BRANCHEMENT D’UN PÉRIPHÉRIQUE
EXTERNE
Méthode 1. Branchement à l’aide d’un câble HDMI (décodage et
Liste de contrôle de pré-connexion
Le port TV peut être marqué eARC selon le téléviseur.
HDMI OUT
HDMI IN
(ARC)
HDMI
HDMI TO TV
(eARC/ARC)
Câble HDMI
Câble HDMI
Partie inférieure du panneau du
Soundbar
Périphérique
externe
HDMI
Dessus du Soundbar
1. Branchez un câble HDMI entre le port HDMI au bas du Soundbar et le port HDMI OUT de votre
appareil numérique.
2. Branchez un câble HDMI entre le port HDMI TO TV (eARC/ARC) au bas du Soundbar et le port
HDMI IN (ARC) de votre téléviseur.
3. Appuyez sur le bouton (Source) du panneau supérieur ou de la télécommande, puis sélectionnez
«HDMI».
4. Le mode «HDMI

FRA - 27
REMARQUES
le canaux 3.1.2.
DOLBY ATMOS» apparaît sur l’écran avant.
Ouvrez les options de sortie audio dans le menu des paramètres de votre lecteur Blu-ray ou d’un autre
Fréquence d'images
(images/sec)
Profondeur de
couleur
< 60
8 bits
10 bits - -
12 bits - -
120
8 bits - - - -
10 bits - - - -
conditions d’utilisation.
Méthode 2. Branchement à l’aide d’un câble optique
OPTICAL OUT
DIGITAL AUDIO IN (OPTICAL)
Câble optique
(non fourni)
Partie inférieure du panneau du Soundbar
Lecteur BD/DVD /
Décodeur /
Console de jeu
D.IN
Dessus du Soundbar
1. Connectez le port DIGITAL AUDIO IN (OPTICAL) au Soundbar principal et le port OPTICAL OUT à
2. Sélectionnez le mode «D.IN» en appuyant sur le bouton (Source) du panneau supérieur ou de
la télécommande.
3. Le son de l’appareil externe est émis par le Soundbar.
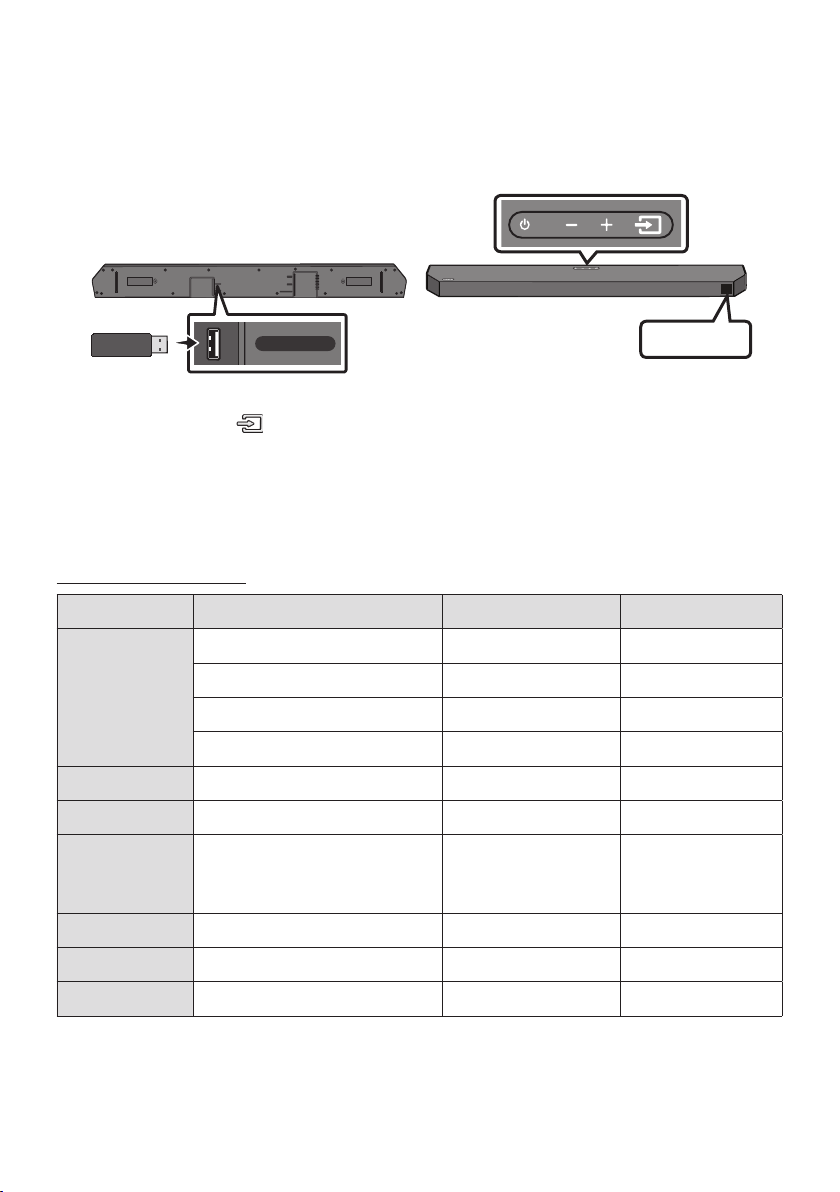
FRA - 28
08 BRANCHEMENT D’UN LECTEUR USB
Soundbar.
Port USB
HDMI
HDMI TO TV
(eARC/ARC)
DIGITAL AUDIO IN (OPTICAL)
USB (5V 0.5A)
DC 24V
USB (5V 0.5A)
USB
1. Connectez le lecteur USB au port USB situé en bas du produit.
2. Appuyez sur le bouton (Source) du panneau supérieur ou de la télécommande, puis sélectionnez «USB».
3. «USB
4.
Le Soundbar s’éteint automatiquement (Auto Poser Down) en l’absence de signal audio du
Liste de compatibilité
Rallonge Codec Taux d’échantillonnage Débit binaire
*.m p3 MPEG1 Layer2 32 kHz à 48 kHz 32 à 320 kbps
MPEG1 Layer3 32 kHz à 48 kHz 32 à 320 kbps
MPEG2 Layer3 16 kHz à 24 kHz 8 à 160 kbps
MPEG2.5 Layer3 8 kHz à 12 kHz 8 à 160 kbps
*.wma WMA7/8/9 (audio uniquement) 32 kHz à 48 kHz 32 à 320 kbps
*.ogg Vorbis 32 kHz à 48 kHz 45 à 500 kbps
*.aac
*.m 4a
*.mp 4
A AC- LC
(MPEG2/MPEG4 audio uniquement)
32 kHz à 48 kHz 32 à 320 kbps
LPCM 32 kHz à 192 kHz 1,024 à 9,216 kbps
FLAC 32 kHz à 192 kHz 162 à 8,100 kbps
*.ai ff AIFF 32 kHz à 192 kHz 1,024 à 9,216 kbps

FRA - 29
09 BRANCHEMENT D’UN APPAREIL MOBILE
Connexion par Bluetooth
encombrer avec des câbles.
Lorsque vous connectez un appareil Bluetooth associé alors que le Soundbar est éteint, le Soundbar
s’allume automatiquement.
La connexion est limitée à un téléviseur ou à deux appareils Bluetooth simultanément.
PAIR
OU
BT PAIRING
Périphérique Bluetooth
Connexion initiale
Lors de la connexion à un nouvel appareil Bluetooth, assurez-vous que l’appareil est à moins de 3,28
pi (1 m) de distance.
1. Appuyez sur le bouton
PAIR de la télécommande pour accéder au mode «BT PAIRING».
(OU)
a. Appuyez sur le bouton
(Source) du panneau supérieur, puis sélectionnez «BT».
«BT» passe automatiquement à «BT PAIRING» en quelques secondes ou à «BT READY»
s’il y a un enregistrement de connexion.
b. Lorsque «BT READY» apparaît, appuyez sur le bouton
(Source) du panneau supérieur
BT
PAIRING».
2. Sur votre appareil, sélectionnez «
[AV] Samsung Soundbar Q6B-Series
» dans la liste qui apparaît.
Lorsque le Soundbar est connecté à l’appareil mobile, [Nom de l’appareil mobileBT»
apparaît sur l’écran avant.
3. Lisez des morceaux depuis le périphérique, connecté par Bluetooth, via le Soundbar.
Une fois que vous avez connecté le Soundbar à votre appareil mobile la première fois, utilisez le
mode «BT READY» pour la reconnexion.

FRA - 30
En cas d’échec de la connexion du périphérique
Si vous avez un Soundbar existant (par exemple, «[AV] Samsung Soundbar Q6B-Series») dans la
liste des haut-parleurs de l’appareil mobile, supprimez-le.
Répétez ensuite les étapes 1 et 2.
Quelle est la différence entre BT READY et BT PAIRING ?
BT READY
auparavant.
BT PAIRING
touche PAIR de la télécommande ou appuyez sur le bouton (Source) situé sur le dessus du Soundbar
et maintenez-le enfoncé pendant plus de 5 secondes pendant que le Soundbar est en mode «BT».)
Remarques sur la connexion Bluetooth
Locate a new device within 3,28 pi (1 m) to connect via Bluetooth communication.
Si vous êtes invité à saisir un code PIN lors de la connexion à un périphérique Bluetooth, entrez <0000>.
En mode de connexion Bluetooth, la connexion Bluetooth est perdue si la distance entre le
Soundbar et le périphérique Bluetooth est supérieure à 32,8 pi (10 m).
Le Soundbar se désactive automatiquement après avoir passé 18 minutes à l’état Prêt.
Il se peut que le Soundbar n’effectue pas correctement la recherche ou la connexion Bluetooth
– En présence d’un champ électrique puissant dans l’environnement du Soundbar.
– En cas d’appariement simultané de plusieurs périphériques Bluetooth avec le Soundbar.
– En cas de désactivation, de mauvais positionnement ou de dysfonctionnement du périphérique
Bluetooth.
Les appareils électroniques peuvent créer des interférences radio. Les appareils produisant des
ondes électromagnétiques doivent être gardés à distance de l’unité principale du Soundbar, par
Le Soundbar prend en charge les données SBC (44,1kHz, 48kHz).
La connexion est possible uniquement sur un périphérique Bluetooth compatible avec la fonction A2DP (AV).
Vous ne pouvez pas brancher le Soundbar à un dispositif Bluetooth qui prend seulement en charge
la fonction HF (Hands Free).
Une fois l’appariement du Soundbar avec un périphérique Bluetooth réalisé, la sélection de
«[AV] Samsung Soundbar Q6B-Series» dans la liste des périphériques numérisés de l’appareil fera
automatiquement passer le Soundbar en mode «BT».
– Accessible seulement si le Soundbar est énuméré dans la liste des dispositifs Bluetooth appariés.
(Le dispositif Bluetooth et le Soundbar doivent avoir été appariés précédemment au moins une fois.)
Soundbar apparaîtra dans la liste des appareils recherchés du dispositif Bluetooth seulement si le
BT READY».
Lorsque vous connectez le Soundbar à un appareil Bluetooth, placez-les aussi près que possible l’un
de l’autre.
Plus le Soundbar et l’appareil Bluetooth sont éloignés l’un de l’autre, plus la qualité sonore diminue.
La connexion Bluetooth peut se rompre lorsque les appareils sont hors de portée effective.
La connexion Bluetooth peut ne pas fonctionner comme prévu dans les zones où la réception est
mauvaise.

FRA - 31
– Lorsque le corps est en contact avec l’émetteur-récepteur de signal sur l’appareil Bluetooth ou
le Soundbar.
– Dans les coins ou lorsqu’il y a un obstacle à proximité, tel qu’un mur ou une cloison, où des
changements électriques peuvent se produire.
– Lorsqu’il est exposé à des interférences radio par d’autres produits fonctionnant sur les mêmes
gammes de fréquences, comme des équipements médicaux, des fours à micro-ondes et des
– Les obstacles tels que les portes et les murs peuvent avoir un impact sur la qualité sonore,
même lorsque les appareils sont dans le champ de portée effective.
Notez que votre Soundbar ne peut pas être appairé avec d’autres appareils Bluetooth lorsque vous
utilisez l’option Bluetooth.
Si un périphérique Bluetooth précédemment apparié tente de s’apparier avec le Soundbar lorsque la
fonction Bluetooth Power est activée et que le Soundbar est éteint, celui-ci se met automatiquement
en marche.
1. Appuyez sur la touche SOUND MODE de la télécommande et maintenez-la enfoncée pendant plus
de 5 secondes pendant que le Soundbar est allumé.
2. «ON-BLUETOOTH POWER» apparaît sur l’écran du Soundbar.
Déconnexion d’un périphérique Bluetooth d’un Soundbar
Vous pouvez déconnecter le périphérique Bluetooth à partir du système Soundbar. Pour des directives,
consultez le manuel d’utilisation du périphérique Bluetooth.
Le système Soundbar sera déconnecté.
message «BT DISCONNECTED» sur le panneau avant.
Déconnexion du Soundbar du périphérique Bluetooth
Appuyez sur le bouton
(Source) du panneau supérieur ou de la télécommande, puis choisissez
n’importe quel mode à l’exception de «BT».
La déconnexion prend du temps car le périphérique Bluetooth doit recevoir une réponse du
Soundbar. (Le temps de déconnexion requis peut différer en fonction du périphérique Bluetooth.)
Lorsque le Soundbar est déconnecté du périphérique Bluetooth, le message
«BT DISCONNECTED

FRA - 32
Connexion Bluetooth multiple
Le Soundbar peut être connecté à 2 appareils Bluetooth simultanément.
Appareil Bluetooth A Appareil Bluetooth B
BT
1. Connectez le Soundbar à deux appareils Bluetooth au maximum (voir page 29).
2. Écoutez de la musique à partir de l’un des appareils Bluetooth connectés pendant que deux
appareils sont connectés.
3. Si de la musique est lue à partir de l’appareil Bluetooth «B» alors que la lecture est en cours à
partir de l’appareil «A», la musique est lue sur l’appareil «B» et est automatiquement arrêtée/mise
en pause sur l’appareil «A».
4. Dans les versions antérieures à AVRCP V1.4, il est possible de retarder le temps de commutation de
l’appareil qui lit de la musique.
REMARQUES
certains appareils.
Certains appareils ne prennent pas en charge la multiconnexion Bluetooth.
Le mode «BT PAIRING
Si vous essayez de connecter un troisième appareil Bluetooth, les appareils A ou B se déconnectent.
(Un appareil qui n’est pas en cours de lecture est déconnecté.)
Un seul téléviseur Samsung ou deux appareils Bluetooth peuvent être connectés en même temps.
Le Soundbar se déconnecte des appareils Bluetooth lorsqu’il reçoit une demande de connexion d’un
téléviseur Samsung.
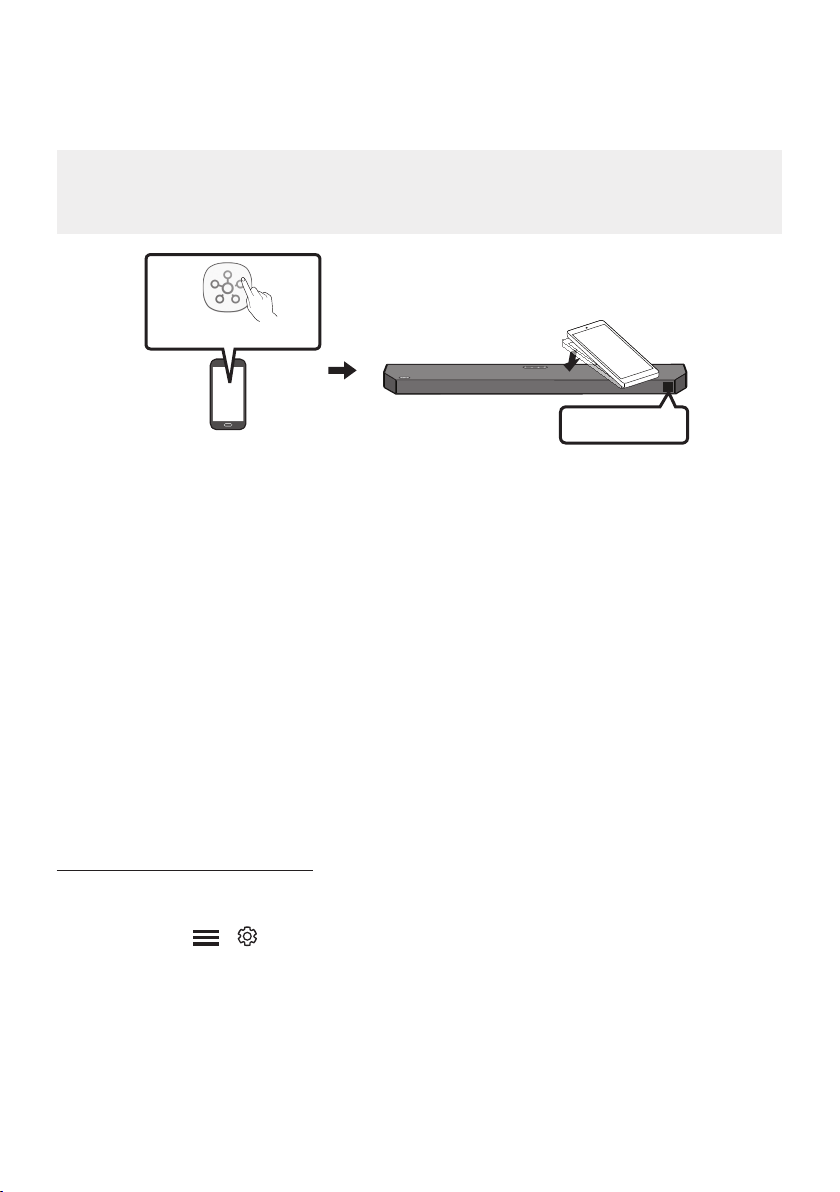
FRA - 33
Utilisation de la fonction Tap Sound
Appuyez sur le Soundbar avec votre appareil mobile pour écouter le son de l’appareil mobile au moyen
du Soundbar.
Cette fonction peut ne pas être prise en charge en fonction de l’appareil mobile.
Cette fonction n’est compatible qu’avec les appareils mobiles Samsung fonctionnant sous
Android 8.1 ou une version ultérieure.
Appareil mobile
Application SmartThings
Dessus du Soundbar
TAP
BT
1. Activez la fonction Tap Sound sur votre appareil mobile.
Pour plus d’informations sur la façon d’activer cette fonction, reportez-vous à la section
«» ci-dessous.
2. Appuyez sur le Soundbar avec l’appareil mobile. Sélectionnez «Démarrer» dans la boîte de
La connexion est établie entre l’appareil mobile et le Soundbar via Bluetooth.
3. Lisez le son de l’appareil mobile au moyen du Soundbar.
Cette fonction connecte un appareil mobile au Soundbar via Bluetooth en détectant les
vibrations produites lorsque l’appareil touche le Soundbar.
Veillez à ne pas appuyer l’appareil mobile sur un coin pointu du Soundbar. Cela pourrait rayer ou
endommager le Soundbar ou l’appareil mobile.
Il est recommandé de placer l’appareil mobile dans un étui. Appuyez légèrement sur la zone
large de la partie supérieure du Soundbar, sans exercer de force excessive.
Pour utiliser cette fonction, mettez à jour l’application SmartThings vers la dernière version.
Cette fonction peut ne pas être prise en charge en fonction de la version de l’application.
Utilisez l’application SmartThings pour activer la fonction Tap View, Tap Sound.
1. Sur l’appareil mobile, lancez l’application SmartThings.
2. Sélectionnez (
) sur l’écran de l’application SmartThings qui apparaît sur l’appareil mobile.
3. Tap View, Tap Sound» sur Activé pour permettre à la fonction de se lancer lorsqu’un
appareil mobile se rapproche du Soundbar.
REMARQUES
Lorsque l’appareil mobile est en mode d’économie d’énergie, la fonction Tap Sound ne fonctionne pas.
La fonction Tap Sound peut ne pas fonctionner si des appareils à proximité du Soundbar, par exemple
des appareils électriques, provoquent des interférences radio. Assurez-vous que les appareils
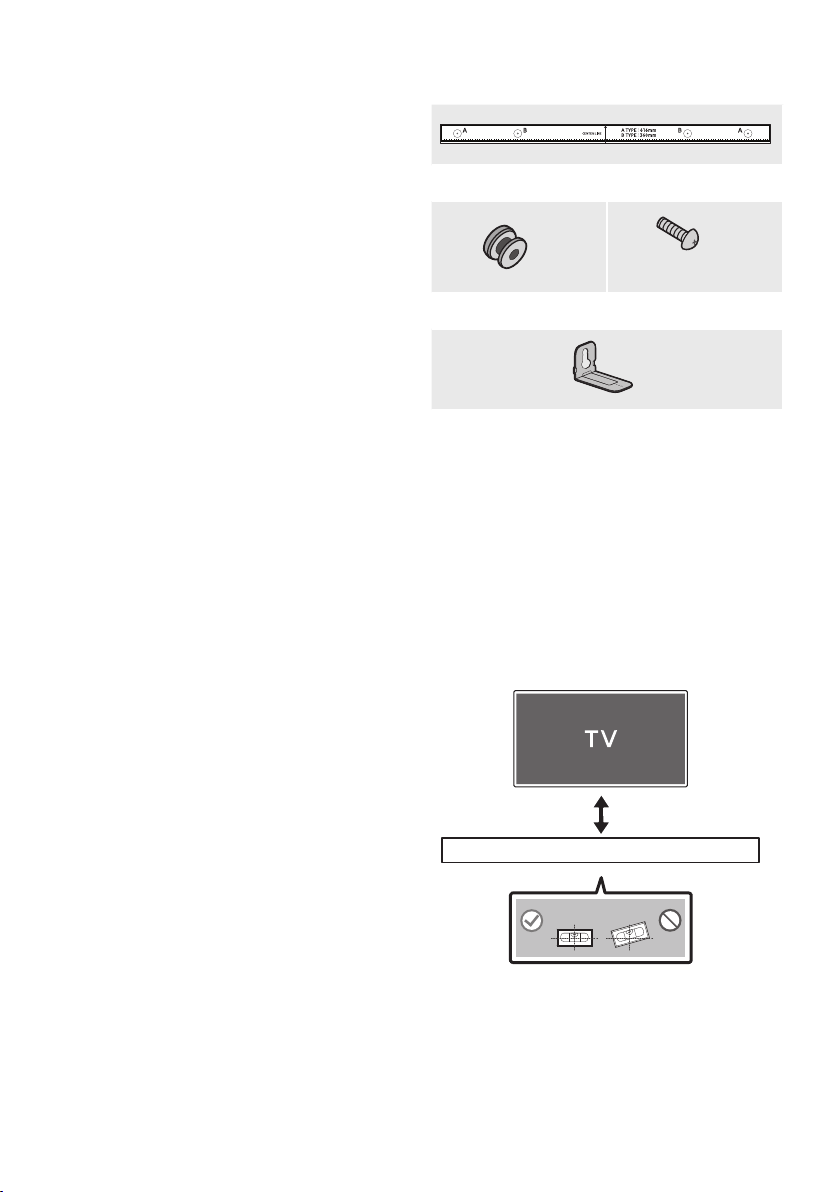
FRA - 34
10 INSTALLATION
DU SUPPORT
MURAL
Précautions d’installation
Effectuez l’installation sur un mur vertical
uniquement.
N’installez pas le produit dans un endroit où
la température ou l’humidité sont élevées.
pour supporter le poids du produit. Sinon,
renforcez le mur ou choisissez un autre
endroit pour l’installation.
Achetez et utilisez les chevilles ou les vis de
support sur les montants des murs.
Achetez des vis de montage mural en
fonction du type et de l’épaisseur du mur sur
lequel vous souhaitez installer le Soundbar.
–
–
long.
Raccordez les câbles de l’unité à des
Soundbar au mur.
Assurez-vous que l’unité est éteinte et
débranchée de la source d’alimentation avant
de l’installer. Sinon, cela pourrait provoquer
un choc électrique.
Composantes murales
Guide de montage mural
x 2
(M4 x L10)
x 2
Vis de support Vis
x 2
Support mural
1. Placez le Guide de montage mural contre la
surface du mur.
Le Guide de montage mural doit être à
niveau.
installez le Soundbar au moins 2 pouces
(5 cm) en dessous du téléviseur.
2 pouces (5 cm) ou plus
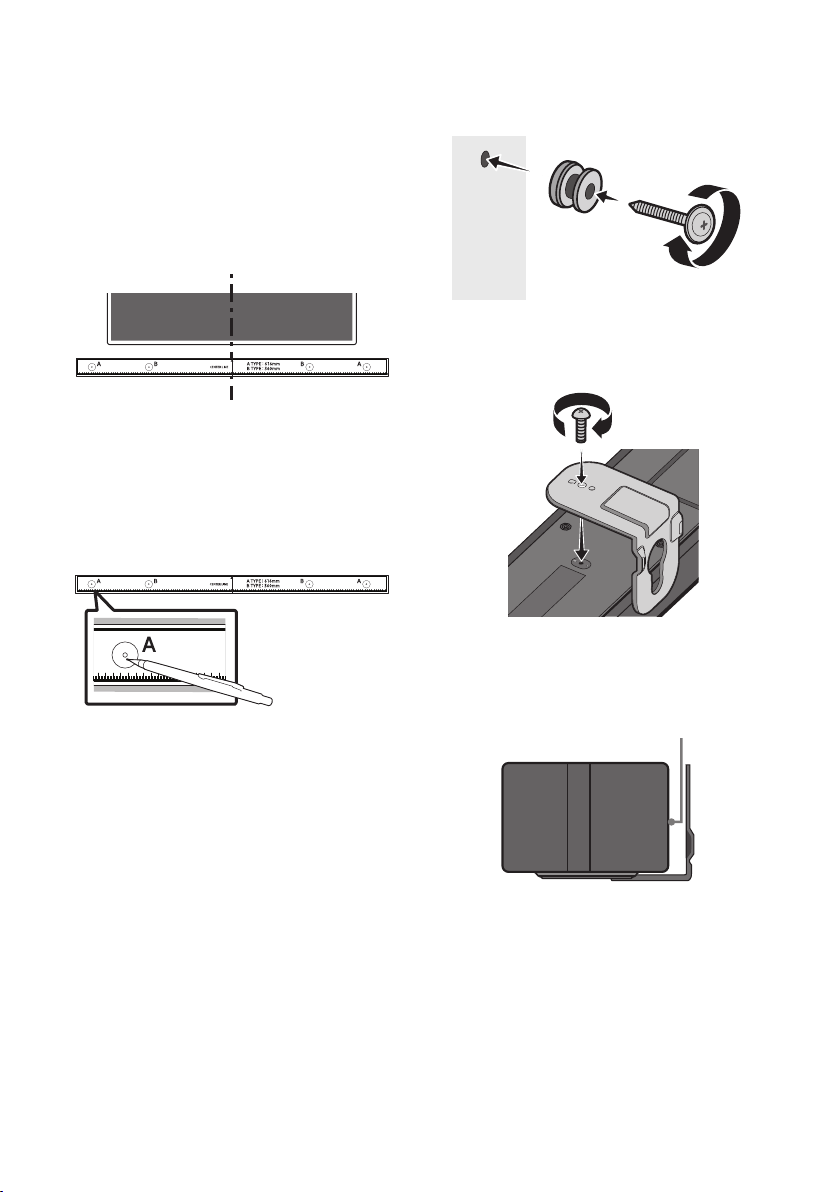
FRA - 35
2. Alignez la Ligne Centrale du Guide de
montage mural sur le centre de votre
téléviseur (si vous montez le Soundbar sous
Guide de montage
mural au mur avec du ruban adhésif.
Si vous ne l’installez pas sous un
téléviseur, placez la Ligne Centrale au
centre de la zone d’installation.
Ligne Centrale
3. Poussez une pointe de stylo ou une pointe de
crayon bien taillé au centre des images
A-TYPE à chaque extrémité du guide pour
marquer les trous des vis de support, puis
retirez le Guide de montage mural.
4. À l’aide d’un foret de taille appropriée, percez
un trou dans le mur à chaque marque.
Si les marques ne correspondent pas à la
position des montants de la cloison, veillez
à insérer les ancrages appropriés dans les
trous avant d’insérer les vis de support. Si
vous utilisez des ancrages, assurez-vous
que les trous que vous percez sont assez
grands pour les accommoder.
5. Poussez une vis (non fournie) dans chaque
Vis de support, puis vissez fermement
chaque vis dans un trou de vis de support.
(Non fournie)
Mur
6. Installez les 2
selon l’orientation correcte en bas de la
Soundbar, à l’aide de 2 Vis.
Lors du montage, assurez-vous que
l’étrier des
est situé à l’arrière du Soundbar.
Arrière du Soundbar
Extrémité droite du Soundbar
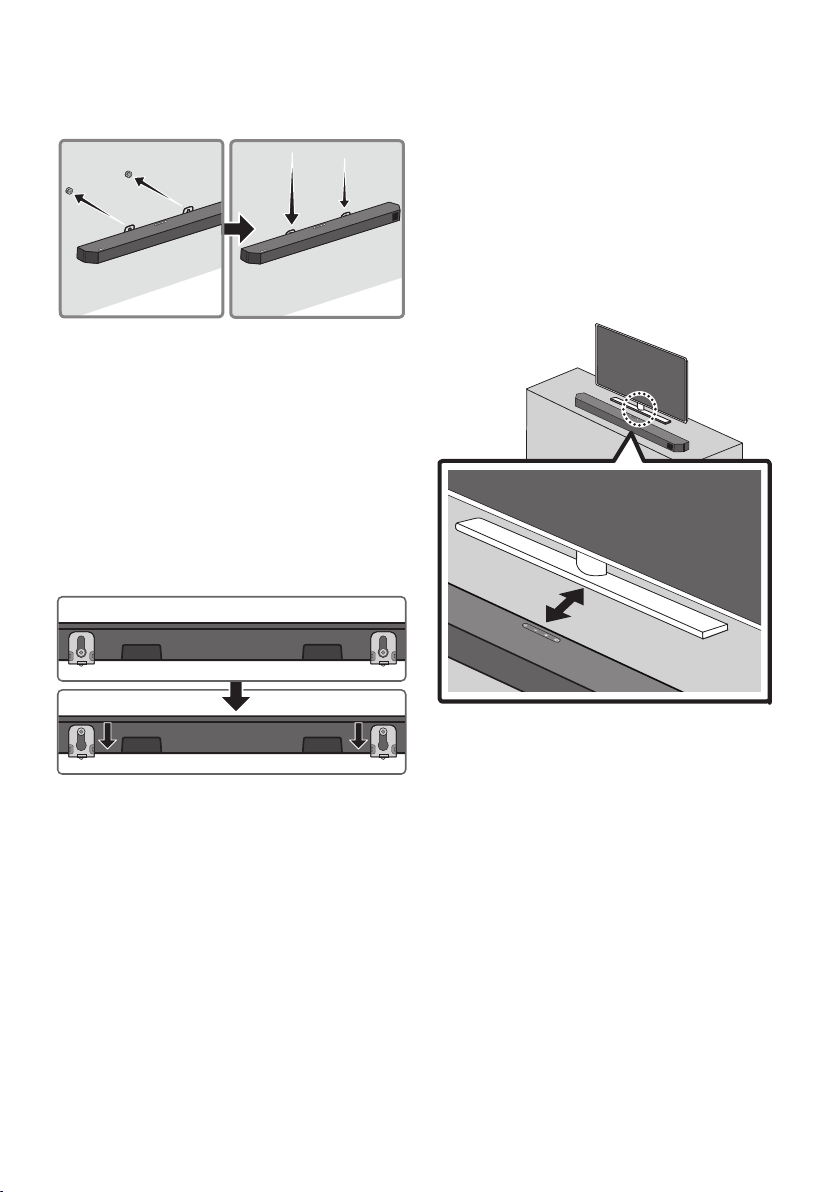
FRA - 36
7. Installez le Soundbar à l’aide des Support de
en accrochant ces derniers
sur les Vis de support
Mur
8. Faites glisser la Soundbar vers le bas, comme
Équerres de
support mural reposent fermement sur les
Vis de support.
Insérez les Vis de support dans la partie
large (inférieure) des
murale, puis faites glisser les Support de
reposent
fermement sur les Vis de support.
11 INSTALLATION
DU SOUNDBAR
DEVANT LE
TÉLÉVISEUR
Placez le Soundbar sur un support de téléviseur.
1,2 pouce (3 cm) ou plus
Comme illustré sur l’image, alignez le centre du
Soundbar avec le centre du téléviseur, puis placez
soigneusement le Soundbar sur le support du
téléviseur.
Pour une qualité sonore optimale, placez le
Soundbar à une distance minimale de 1,2 pouce
REMARQUES
Assurez-vous que le Soundbar est placé sur
une surface plane et solide.
téléviseur peut entraîner des problèmes
d’ordre acoustique.
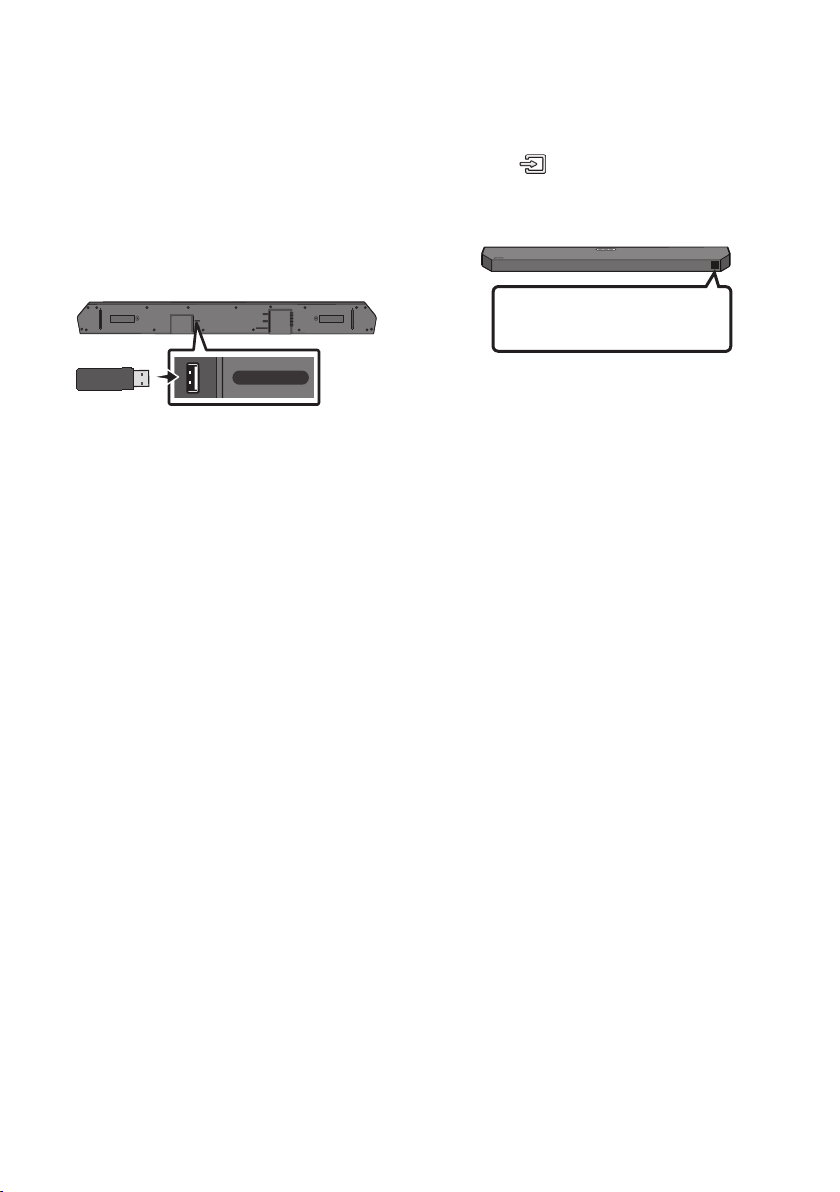
FRA - 37
12 MISE À JOUR
LOGICIELLE
Il se peut que Samsung propose ultérieurement
des mises à jour pour le micrologiciel du système
du Soundbar.
Port USB
HDMI
HDMI TO TV
(eARC/ARC)
DIGITAL AUDIO IN (OPTICAL)
USB (5V 0.5A)
DC 24V
USB (5V 0.5A)
Si une mise à jour est offerte, vous pouvez mettre
à jour le micrologiciel en connectant un lecteur
USB qui contient le micrologiciel de mise à jour au
port USB de votre Soundbar.
Mise à jour USB
Une fois la mise à jour terminée, tous vos
paramètres personnalisés sont conservés.
1. Connectez un lecteur USB au port USB de
votre ordinateur.
Assurez-vous qu’il n’y a pas de
a, cela risque de faire échouer la mise à jour
du micrologiciel.
2. Accédez au site (samsung.com)
Sélectionnez le type de produit ou saisissez le
numéro de modèle de votre Soundbar et
Pour plus d’informations sur la mise à jour,
reportez-vous au Guide de mise à niveau.
3.
4. Éteignez le Soundbar et connectez le lecteur
USB contenant la mise à jour du microgiciel
au port USB du Soundbar.
5. Allumez le Soundbar, puis appuyez sur le
bouton
(
Source
) pour sélectionner la
UPDATE
prendre trois minutes.
UPDATE
B --%
DONE
BYE
Le processus de mise à jour du
micrologiciel afche UPDATE → B --% →
DONE → BYE successivement; B, D ou H
peut s’afcher selon le micrologiciel faisant
l’objet de la mise à jour.
REMARQUES
Le Soundbar redémarre automatiquement
quand la mise à jour est terminée.
Ce produit possède une fonction DUAL BOOT.
Si la mise à jour du micrologiciel échoue, vous
pouvez de nouveau le mettre à jour.
Pendant la mise à jour, n’éteignez pas le
produit et ne retirez pas le câble USB.
Si la mise à jour ne s’exécute pas, rebranchez
le cordon d’alimentation du Soundbar.
Si la dernière version est installée, aucune
mise à jour n’est effectuée.
Selon le type d’USB, la mise à jour peut ne pas
être prise en charge.
Si la connexion au caisson des basses n’est
pas rétablie automatiquement après la mise à
17.
que le lecteur USB n’est pas défectueux.
MS-DOS (FAT) en tant que format USB.

FRA - 38
Réinitialisation
INIT OK
Dessus du Soundbar
Lorsque le Soundbar est allumé, appuyez sur les
boutons (Volume) de l’unité pendant au
«INIT OK»
apparaît sur l’écran et le Soundbar se réinitialise.
MISE EN GARDE
Tous les paramètres du Soundbar sont
réinitialisés.
Veillez à effectuer cette opération
uniquement lorsqu’une réinitialisation est
requise.
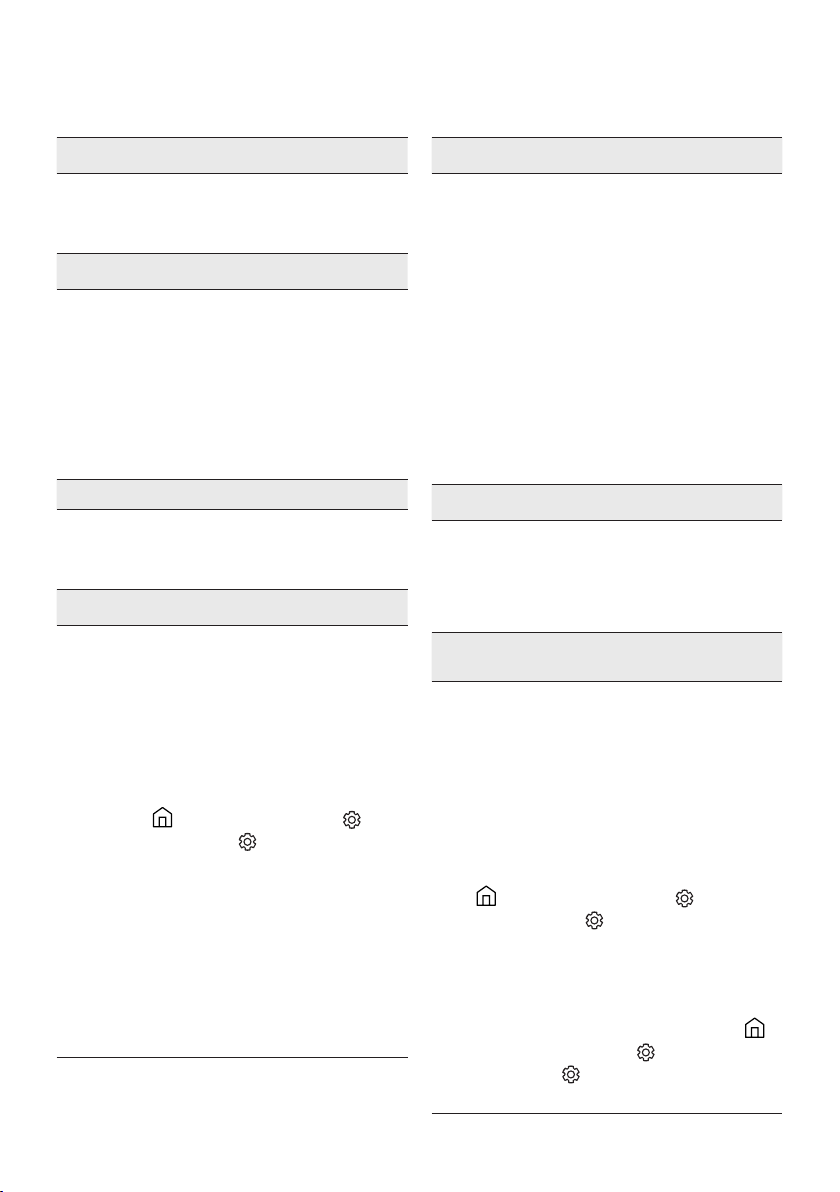
FRA - 39
Le Soundbar ne s’allume pas.
;
Soundbar est correctement inséré dans la
prise.
Le Soundbar fonctionne par intermittence.
; Après avoir retiré le cordon d’alimentation,
réinsérez-le.
; Débranchez le cordon d’alimentation et
rebranchez-le dans l’appareil externe, puis
réessayez.
; S’il n’y a pas de signal, le Soundbar s’éteint
automatiquement après un certain temps.
Allumez le produit. (Voir la page 8.)
Si la télécommande ne fonctionne pas.
; Pointez la télécommande directement sur
le Soundbar.
; Remplacez les piles.
Le Soundbar n’émet aucun son.
; Le volume du Soundbar est trop faible ou
coupé. Réglez le volume.
; Lorsqu’un appareil externe (STB, appareil
Bluetooth, appareil mobile, etc.) est
connecté, réglez le volume de l’appareil
externe.
; Pour la sortie audio du téléviseur,
Accueil (
Tous les paramètres (
; La connexion du câble au Soundbar ne doit
pas être lâche. Débranchez le câble et
rebranchez-le.
; Retirez complètement le cordon
d’alimentation, rebranchez-le et mettez
l’appareil sous tension.
; Initialisez le produit et réessayez.
(Voir page 38.)
Le caisson de basses n’émet aucun son.
;
caisson des basses s’allume en bleu.
Rebranchez le Soundbar et le caisson des
basses si le voyant clignote en bleu ou
devient rouge. (Voir page 17.)
; Vous pouvez rencontrer un problème s’il y a
un obstacle entre le Soundbar et le caisson
des basses. Déplacez les appareils dans
une zone éloignée des obstacles.
; D’autres appareils envoyant des signaux
radioélectriques à proximité peuvent
interrompre la connexion. Éloignez votre
haut-parleur de tels appareils.
;
; Le volume d’origine du contenu que vous lisez
peut être faible. Essayez de régler le niveau
du caisson des basses. (Voir page 13.)
; Rapprochez-vous du haut-parleur du
caisson des basses.
(eARC/ARC).
;
20.)
; La connexion peut ne pas être possible en
raison de l’appareil externe connecté
(décodeur, machine de jeux, etc.).
Connectez directement le Soundbar.
; HDMI-CEC peut ne pas être activé sur le
téléviseur. Activez le CEC dans le menu du
téléviseur. (
(
les paramètres ( )
Anynet+ (HDMI-CEC) ACTIVÉ)
; Pour la connexion à eARC, la fonction eARC
dans le menu du téléviseur devrait être
(
)
paramètres ( )
13 DÉPANNAGE
FRA - 40
Aucun son n’est émis lors de la connexion au
; Votre appareil ne peut pas lire le signal
d’entrée. Changez la sortie audio du téléviseur
et réglez-la sur PCM ou sur Dolby Digital.
Accueil (
paramètres ( )
Le Soundbar ne se connecte pas par Bluetooth.
; Lors de la connexion d’un nouvel appareil,
passez à «BT PAIRING» pour la connexion.
(Appuyez sur le bouton PAIR de la
télécommande ou sur le bouton (Source)
; Si le Soundbar est connecté à un autre
appareil, débranchez d’abord cet appareil
pour commuter l’appareil.
; Reconnectez l’appareil après avoir supprimé
la liste des haut-parleurs Bluetooth sur
l’appareil à connecter. (
Accueil (
Tous les paramètres ( )
)
; La connexion automatique au téléviseur peut
être désactivée. Pendant que le Soundbar est
en mode «BT READY», appuyez sur la touche
Gauche de la télécommande du Soundbar et
pour sélectionner ON-TV CONNECT. Si
OFF-TV CONNECT
nouveau sur la touche Gauche et maintenez-
la enfoncée pendant 5 secondes pour
changer de sélection.
;
puis réessayez.
; Initialisez le produit et réessayez.
(Voir page 38.)
Le son se coupe lors d’une connexion par
Bluetooth.
; Certains appareils peuvent créer des
interférences radio s’ils sont trop proches
du Soundbar (p. ex. fours à micro-ondes,
; Si votre appareil connecté par Bluetooth
est trop éloigné du Soundbar, il est possible
que le son soit coupé. Rapprochez l’appareil
du Soundbar.
; Si une partie de votre corps est en contact
avec l’émetteur-récepteur Bluetooth ou
que le produit est installé sur un meuble en
métal, une coupure du son peut se
d’installation et les conditions d’utilisation.
La multiconnexion Bluetooth ne fonctionne
pas.
; Lorsque le téléviseur est connecté au
Soundbar, la multiconnexion Bluetooth
pourrait ne pas fonctionner. Déconnectez le
Soundbar du téléviseur et réessayez.
;
Bluetooth est activé. (Reportez-vous à la
section «Le Soundbar ne se connecte pas par
Bluetooth.»)
; Déconnectez l’appareil en cours de lecture,
appariez-le avec l’appareil que vous souhaitez
connecter, puis reconnectez l’appareil
précédent.
; Si le son est inaudible même après avoir établi
correctement la connexion, reportez-vous à la
section «Le son se coupe lors d’une connexion
par Bluetooth.».
Le Soundbar ne s’allume pas
; Lorsque vous éteignez le Soundbar tout en
regardant la télévision, la synchronisation
de l'alimentation avec le téléviseur est
désactivée. Éteignez d'abord le téléviseur.

FRA - 41
14 LICENCE
Dolby, Dolby Atmos, and the double-D symbol
are registered trademarks of Dolby
Laboratories Licensing Corporation.
Manufactured under license from Dolby
Copyright © 2012-2021 Dolby Laboratories. All
rights reserved.
Manufactured under license from DTS, Inc. (for
companies headquartered in the U.S./Japan/
Taiwan) or under license from DTS Licensing
or trademarks of DTS, Inc. in the United States
and other countries. © 2021 DTS, Inc. ALL
RIGHTS RESERVED.
Multimedia Interface, de même que le logo
HDMI sont des marques commerciales ou des
marques déposées de HDMI Licensing
Administrator, Inc. aux États-Unis et dans
d’autres pays.
registered trademarks owned by Bluetooth SIG,
Inc. and any use of such marks by Samsung
Electronics Co., Ltd. is under license. Other
trademarks and trade names are those of their
respective owners.
[ENERGY STAR]
– Your Samsung product is ENERGY STAR
Change to certain features, settings and
functionality in this product can change the
power consumption, possibly beyond the
limits required for ENERGY STAR
– Environmental Protection Agency and
Department of Energy. ENERGY STAR is a
joint program of the Government agencies,
products and practices.
Refer to www.energystar.gov for more
information of the ENERGY STAR Program.
(Applicable to Thin Client models only)
determined that this product meets the
– The ENERGY STAR Program has been to
reduced greenhouse gas emissions and
save energy through voluntary labeling.
– Power management setting of this product
have been enabled by default, and have
various timing setting from 1 minutes to 5
hours.
– The product can wake with a button press
on the chassis from sleep mode.
models)
– As an ENERGY STAR Partner, Samsung has
determined that this product or product
models meets the ENERGY STAR guideline

FRA - 42
15 AVIS DE
LICENCES LIBRES
Pour envoyer des questions concernant les
sources ouvertes, communiquez avec Samsung
16 REMARQUE
IMPORTANTE
CONCERNANT LE
SERVICE
Les chiffres et les illustrations contenus dans ce
Guide d’utilisation sont fournis à titre de référence
uniquement et pourraient ne pas représenter
exactement le produit.

FRA - 43
17 CARACTÉRISTIQUES ET GUIDE
Nom de modèle HW-Q600B
USB 5V/0,5A
Poids 8,4 lbs (3,8 kg)
Dimensions (L x H x P)
40,6 x 2,2 x 4,1 po
(1030,0 x 57,0 x 105,0 mm)
Plage de températures en fonctionnement +41°F à +95°F (+5°C à +35°C)
Plage d’humidité en fonctionnement 10 % à 75 %
AMPLIFICATEUR
Puissance de sortie nominale
200W (30W x 6 + 10W x 2)
Formats de lecture pris en charge
Dolby 5.1ch / Dolby Digital Plus / Dolby TRUE HD /
DTS-HD HRA / DTS Express / DTS 96/24 / DTS-ES /
DTS Digital Surround / LPCM 8ch
Nom du caisson de basses PS-WB67B
Poids 12,1 lbs (5,5 kg)
Dimensions (L x H x P)
7,2 x 13,5 x 11,6 po
(184,0 x 343,0 x 295,0 mm)
AMPLIFICATEUR
Puissance de sortie nominale
160W
REMARQUES
Le poids et les dimensions sont approximatifs.

GARANTIE LIMITÉE À L’ACHETEUR INITIAL
Samsung Electronics Canada Inc. (SECA) garantit ce produit contre tout défaut de fabrication.
SECA garantit aussi que si cet appareil ne fonctionne pas convenablement durant la
période de garantie SECA se réservera le droit de réparer ou de remplacer l’appareil
défectueux.
Toutes les réparations sous garantie doivent être effectuées par un Centre de service
autorisé SECA. Le nom et l’adresse du Centre de service le plus près de chez vous peut
être obtenu en composant sans frais le 1- 800- SAMSUNG ou en visitant notre site web
au www.samsung.ca
MAIN-D’OEUVRE
UN (1) AN (AU COMPTOIR)
PIÈCES
UN (1) AN
Pour tous les modèles portatifs, le transport de l’appareil sera la responsabilité du client.
Le reçu de vente original doit être conservé par le client car cela constitue la seule preuve
d’achat acceptée. Le client doit le présenter au Centre de service agréé au moment où il
fait la demande d’une réparation sous garantie.
EXCLUSIONS (CE QUI N’EST PAS COUVERT)
Cette garantie ne couvre pas les dommages causés par un accident, un incendie, une
inondation, un cas de force majeure, un mauvais usage ou une tension incorrecte.
La garantie ne couvre pas une mauvaise installation, une mauvaise réparation, une
réparation non autorisée et tout usage commercial ou dommages survenus durant le
cette garantie. Les ajustements par le client qui sont expliqués dans le guide de l’utilisateur
ne sont pas couverts en vertu de cette garantie. Cette garantie sera automatiquement
garantie est valable seulement sur les appareils achetés et utilisés au Canada.
Samsung Electronics Canada Inc
2050 Derry Rd West
Mississauga, On. L5N 0B9
Tel: 1-800-SAMSUNG (726-7864)
Fax: (905) 542- 1199
Website: http://www.samsung.com/ca_fr

© 2022 Samsung Electronics Co., Ltd. Tous droits réservés.
Comment contacter Samsung dans le monde
Si vous avez des suggestions ou des questions concernant les produits Samsung, veuillez contacter le Service
Consommateurs Samsung.
SIÈGE SOCIAL
Samsung Electronics Canada Inc. 2050 Derry Road West, Mississauga, Ontario L5N 0B9 Canada
TEL: 1-800-SAMSUNG (1-800-726-7864)
www.samsung.com/ca_fr/support
Pays Centre de service Samsung
Site Web
`
Amérique du Nord
CANADA 1-800-SAMSUNG (726-7864)
www.samsung.com/ca/support (English)
www.samsung.com/ca_fr/support (French)
U.S.A 1-800-SAMSUNG (726-7864) www.samsung.com/us/support