
Loading ...
Loading ...
Loading ...
Using DEWALT RAFTER SQUARE (continued)
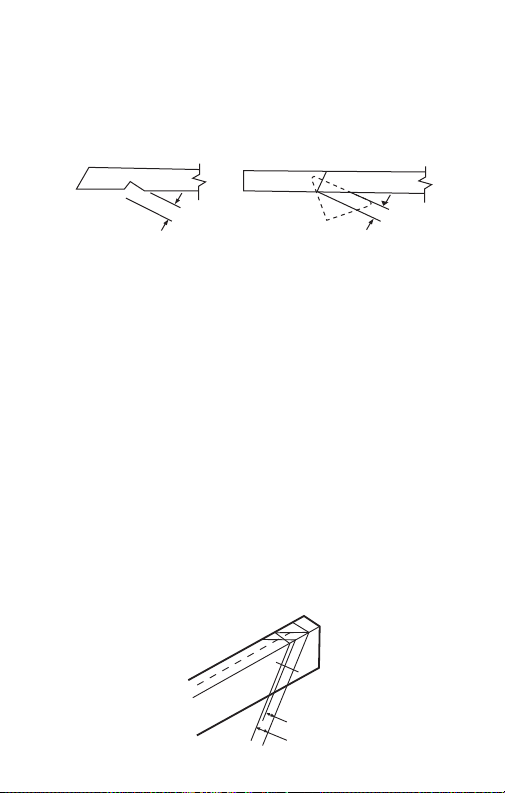
9) Measure the depth (D) at the heel cut from a common rafter,
and mark the seat cut Iine by setting the pivot at the square on the edge
of the rafter. Rotate the square about the pivot until the edge of the
rafter lines up at the '9' on the HIP/VAL scale.
10) Now we move back to the top plumb cut line. The deduction
for the ridge board thickness must be subtracted from the rafter length
previously obtained from Table 1. Since the hip and valley rafters sit at
an angle at 45 degrees to the ridge in the plan view, the thickness of
the ridge board must be measured on a 45 degree diagonal line.
Draw a 45 degree line across the top of the ridge board. Measure the
length of the line and divide by 2. (In this case, the line should be 2
1
/8
inches long-divided by 2 = 1
1
/16 inch.)
11) Along the perpendicular line laid out in Step 3, page 33, and
from the original top plumb cut line, measure and mark 1
1
/16 inch. and
at this mark make another top plumb cut line.
12) From the top at this top plumb cut line, draw another side cut
line parallel to the side cut line made in Step 6). These last top plumb
and side cut lines define the angle at which the end of the rafter is to
be cut to fit flush against the ridge board.
Note that if a portable electric circular saw is used to cut this end of the
rafter, that by tilting the blade at an angle of 45 degrees to the sole
plate of the saw, and cutting along the top plumb cut line, the result will
be the correct side cut angle. It is best to lay out the side cut angle on
top of the rafter in any case, in order to be sure the tilt at the blade
angle is In the right direction to result in the desired side cut.
D
D
COMMON RAFTER
VALLEY OR HIP RAFTER
1
1
/16”
1
3
/4”
Loading ...
Loading ...
Loading ...