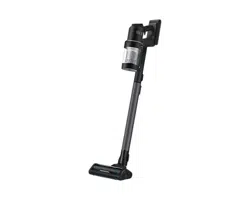
Vacuum cleaner
User manual
VS28C97****/VS25C97****
• Before operating this unit, please read the instructions carefully.
• For indoor use only

English2
Contents
Contents
Safety information 3
Important safety symbols 3
General 4
Vacuum cleaner 5
Maintenance 7
Clean Station 8
Battery 10
Preparation
12
Accessories 12
Parts overview 13
Operation 14
Installing the Clean Station 14
Using the Clean Station 14
Charging the battery 18
Inserting the battery 18
Ejecting the battery 18
Charging the additional battery 19
How to use the batteries optimally 19
Using the buttons and display 20
Using the Accessory Cradle 22
Using the accessories 23
Maintenance
25
Cleaning the Clean Station 25
Cleaning the vacuum cleaner 26
Appendix
33
SmartThings app 33
Notes and cautions 37
Troubleshooting 43
Product specification 48

English 3
Safety information
• Before operating the appliance, please read this manual thoroughly
and retain it for your reference.
• Because the following operating instructions cover various models,
the characteristics of your vacuum cleaner may differ slightly from
those described in this manual.
Important safety symbols
WARNING
Indicates that a danger of death or serious injury exists.
CAUTION
Indicates that a risk of personal injury or material damage exists.
NOTE
Indicates that the following text contains additional important
information.
Safety information

Safety information
English4
Safety information
General
For information on Samsung’s environmental commitments and
product specific regulatory obligations e.g. REACH (WEEE, Batteries)
visit: samsung.com/uk/aboutsamsung/samsungelectronics/
corporatecitizenship/data_corner.html
Failure to meet these requirements could cause damage to the internal
parts of the vacuum and void your warranty.
• Read all instructions carefully. Before plug the station in, make
sure that the voltage of your electricity supply is the same as that
indicated on the rating plate at the bottom of the station.
• This appliance can be used by children aged from 8 years and above
and persons with reduced physical, sensory or mental capabilities or
lack of experience and knowledge if they have been given supervision
or instruction concerning use of the appliance in a safe way and
understand the hazards involved. Children should not play with the
appliance. Children should not clean or perform maintenance on the
vacuum without adult supervision.
• Do not allow the vacuum cleaner to run unattended at any time.
• This product is intended for household use only. (Do not use this
product for other than its intended purposes.)
• Do not allow children to ride on or play with the product.
– An injury or product damage may occur.

English 5
Safety information
Vacuum cleaner
• When assembling the vacuum, be careful not to catch your fingers or
hands in the movement fold of the handle.
• Do not use the vacuum cleaner on a wet rug or floor.
• Do not use the product at the following places;
– In a place where a burning candle or a desk lamp is placed on the
floor.
– In a place where heaters are turned on or unextinguished embers
exist in an unattended fireplace or an ashtray etc.
– In a place where there are combustible materials such as oil paint,
paint thinner, mothproofing substances, gasoline, alcohol, thinner,
ashtrays with unextinguished cigarettes, etc.
– In a closed place filled with explosive or toxic vapor.
• Do not pick up the following things. Abnormal operation or product
damage may occur.
– A match or unextinguished ashes or cigarettes
– Hard or sharp objects
– Toxic materials (chlorine bleach, ammonia, drain cleaner etc.)
– Liquid such as water or beverage or pet's waste
– Chalk powder
• If there is a gas leak or combustible spray such as a dust remover
is used, do not touch the power outlet and open the window for
ventilation.
– An explosion or fire may occur.
• If the product makes a strange sound or emits a smell or smoke, turn
off the product immediately, and then contact a Samsung service
center.
– Electric shock or fire may occur.

Safety information
English6
Safety information
• When using the vacuum cleaner, be careful not to hurt yourself on the
moving or spinning parts.
– Keep your body parts (Hair, hands, etc.) from the spin brush or the
spin disk.
• When cleaning the wall or ceiling, you should use both hands.
– If you clean with one hand, you can damage your wrist or drop the
vacuum and cause an injury or damage the vacuum.
• Do not use the vacuum cleaner on objects that can be easily scratched
(monitors, stainless steel appliances, etc.).
• Sometimes the wheel of a brush can scratch the floor. Before using
the vacuum cleaner, check the wheels of the brush.
– If there is foreign matter on the wheel of the brush which cannot
be removed easily, contact a Samsung service center.
• When the spin brush inside a brush is working, do not touch the
brush.
– Otherwise, your hand can be caught and it may cause an injury.
• Do not use the vacuum cleaner in direct sunlight or high heat.
• If excessive force is applied to an accessory with motor or foreign
matter is caught in the spin brush (or spin disk), the accessory may
stop working to protect the motor or the product. Turn the vacuum
cleaner off, remove the foreign matter, and then turn it back on.
• Static electricity may occur depending on the humidity, temperature,
or floor material, etc. in your home. If it happens repeatedly, contact a
Samsung service center.
• Do not use the brush or tools in one spot for a long time because the
floor may get damaged depending on its material.
English 7
Safety information
• Do not use Pet Tool + in a small area for a long time and do not let Pet
Tool + keep spinning in one place.
– Damage may occur if used on sensitive materials
• Do not use Combination Tool on hard materials such as leather or
wood while bristles are not extended.
Maintenance
• While using or after using the vacuum cleaner, you should lay the
vacuum cleaner down or place it on the Clean Station to store.
– The product may fall and an injury and severe product damage
occur. In addition, you may not be compensated for the damage.
• Do not store the vacuum cleaner inside a car.
• Before removing foreign matter inside the product, turn off the
product first.
– If the product is on while you are removing the foreign matter, you
can hurt yourself or damage the product.
• When cleaning the exterior of the product, turn off the product first
and then wipe it with a dry towel. Do not spray water directly onto the
product or wipe it with volatile materials such as benzene, thinner, or
alcohol.
– If water gets into the product and an error occurs, turn off the
product and contact a Samsung service center.
• When cleaning the washable parts, do not use alkaline detergent,
acid, industrial detergent, air freshener, acetic acid, etc.
– Product damage such as plastic breakage, deformation,
discoloration, printing deterioration, etc. may occur.

Safety information
English8
Safety information
Washable Parts
Dustbin, Washable Micro Filter, Fine Dust Filter, Spinning
Cyclone Filter, dry cloth
Non-washable parts Premotor Filter and Fine Dust Filter of the Clean Station
Acceptable
detergent
Neutral Dish washing detergent
Prohibited
detergent
Alkaline Lox, mold cleaner, etc.
Acid Paraffin oil, an emulsifier, etc.
Industrial
cleaners
NV-I, PB-I, Opti, alcohol, acetone, benzene, thinner, etc.
Air freshener Jet spray air fresheners (coffee flavor, herb, etc.)
Oils Animal oils, vegetable oils
Etc. Edible acetic acid, vinegar, glacial acetic acid, etc.
• Storing the product in sunlight for long hours may cause parts of
the product to deform or discolor. Therefore, store the product in the
shade.
• After cleaning the dustbin, Spinning Cyclone Filter, or Washable Micro
Filter with water, dry them in the shade.
– When heat is applied, part deformation may occur.
Clean Station
• Do not pull or carry by the cord, use the cord as a handle, close a door
on the cord, or pull the cord around sharp edges or corners. Keep the
cord away from heated surfaces.
• Do not unplug by pulling on the cord. To unplug, grasp the plug, not
the cord.
• Do not pull the power cord and do not touch the power plug with wet
hands.
– Electric shock or fire may occur.
• Do not use extension cords or outlets with inadequately rated current.

English 9
Safety information
• If there is dust, water, etc. on a pin or contact point of the power plug
pin, wipe them carefully.
– Abnormal operation or electric shock may occur.
• Do not use a damaged power plug, power cord, or loose power outlet.
– Electric shock or fire may occur.
• Unplug the Clean Station from the outlet before servicing.
• Do not expose the Clean Station to high temperatures or allow
moisture or humidity of any kind to come into contact with the Clean
Station.
• Do not plug the Clean Station into a power source with the incorrect
voltage. Do not plug the Clean Station into a multi-plug outlet or
power strip.
– Electric shock or fire may occur.
• If the power cord is damaged, have a Samsung authorized service
center replace the power cord with a new power cord.
– Electric shock or fire may occur.
• Make sure that the charging terminals of the vacuum cleaner and the
Clean Station do not come into contact with a conductor such as a
bracelet, watch, metal rod, nail, etc.
– Product malfunction or electric shock may occur.
• As the Clean Station is designed for the use of Samsung Jet cordless
vacuum cleaner only, do not use the Clean Station for other electronic
appliances and other purposes.
– Severe damage to the Clean Station or fire may occur.
• Do not allow children to cling to or push the Clean Station.
– Personal injury, product and floor damage may occur.
• Do not charge the product near a window, heater, toilet, bathroom,
etc.

Safety information
English10
Safety information
• Do not attempt to open the Clean Station. Repairs should be only
carried out by a qualified Samsung service center.
• Injury or product malfunction from incorrect installation of the Clean
Station may not be compensated.
• Do not bend the power cord with excessive force or put heavy objects
on the power cord.
– Electric shock or fire may occur.
• Before unplugging or plugging in the Clean Station, turn off the
vacuum cleaner and make sure that the pins of the power plug do not
come into contact with your hands.
– Fire or electric shock may occur.
Battery
• Do not mutilate or incinerate batteries as they will explode at high
temperatures.
• Do not drop or strike the battery or subject it to a sudden shock.
• Do not disassemble the battery and make sure that you do not create
a short circuit across the plus (+) and minus (-) terminals.
• As the battery is manufactured only for this product, do not use the
battery for other electronic appliances or other purposes.
• When you purchase a new battery, make sure to check the model
name (VCA-SBTC97, VCA-SBTC97S) and the genuine
logo.
– Contact your nearest Samsung Electronics retailer or Samsung
service center to purchase any consumable accessories.

English 11
Safety information
• Leaks from battery cells can occur under extreme usage or
temperature conditions. If the liquid gets on your skin, wash the
affected area quickly with water. If the liquid gets into your eyes, flush
them immediately with clean water for a minimum of 10 minutes.
Seek medical attention.
• When attaching the battery to the vacuum cleaner, insert it until you
hear a click. This assures that the battery is firmly attached.
– Otherwise, the battery may fall and could cause product damage
or injury.
• If you are not going to use the vacuum cleaner for a long period of
time or you are going to be away from home for a long period of
time, unplug the Clean Station, and then detach the battery from the
vacuum cleaner. When the battery is not being charged and not being
used, it will slowly discharge.
• To protect the motor and the battery, the product may not operate
when the temperature is lower than 5 °C or higher than 45 °C.
• Dispose of the dead battery in compliance with the local regulations.
English12
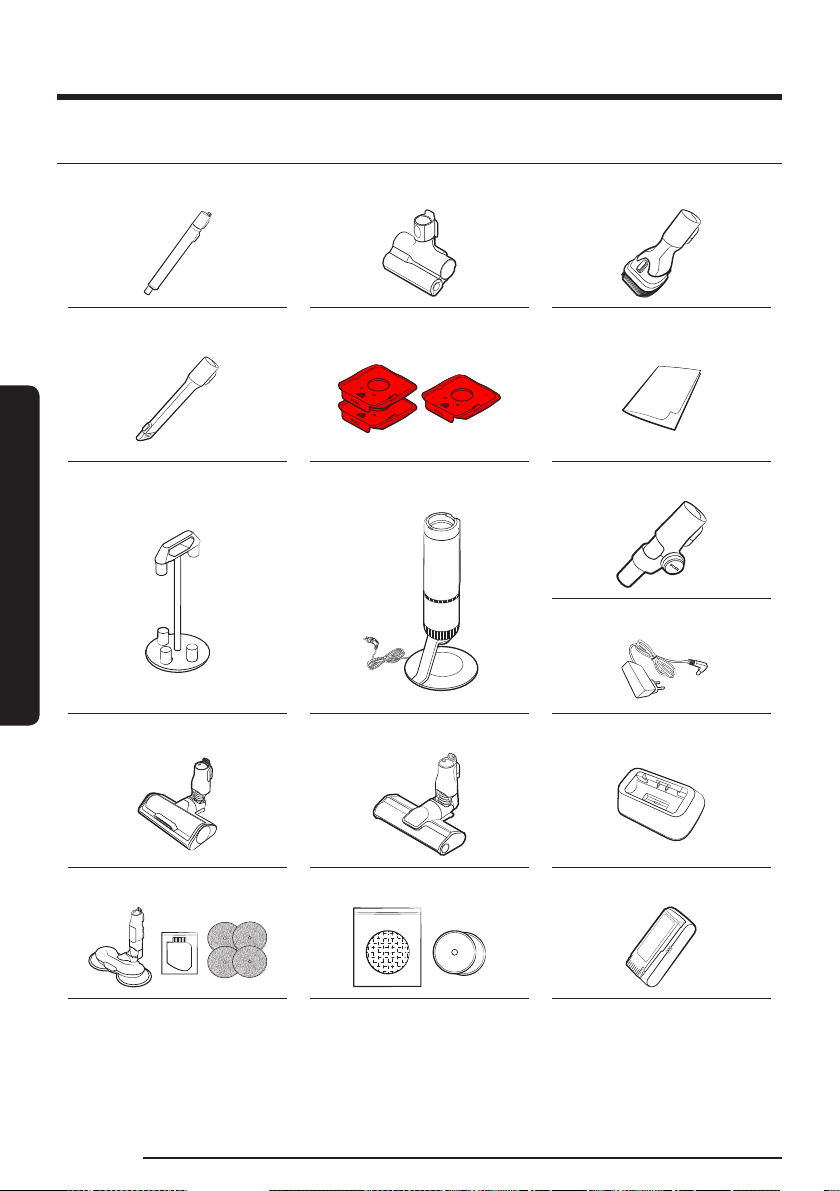
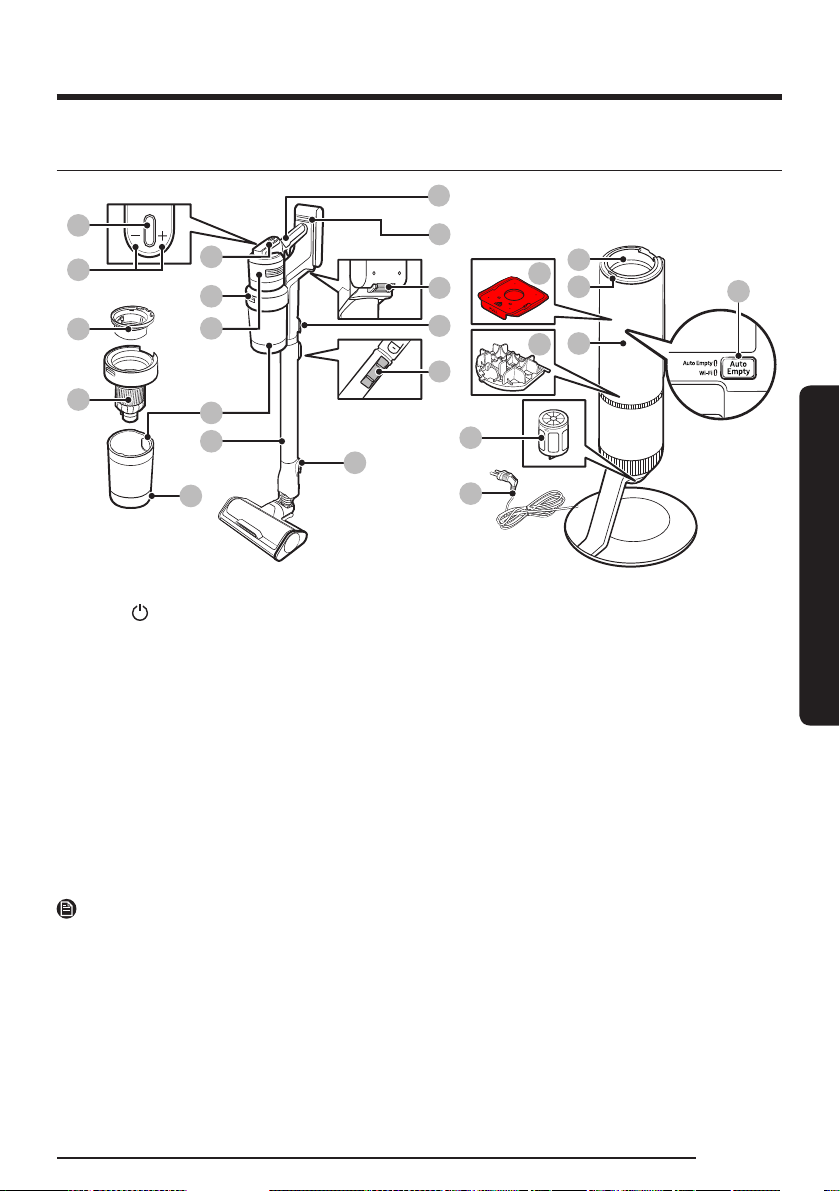
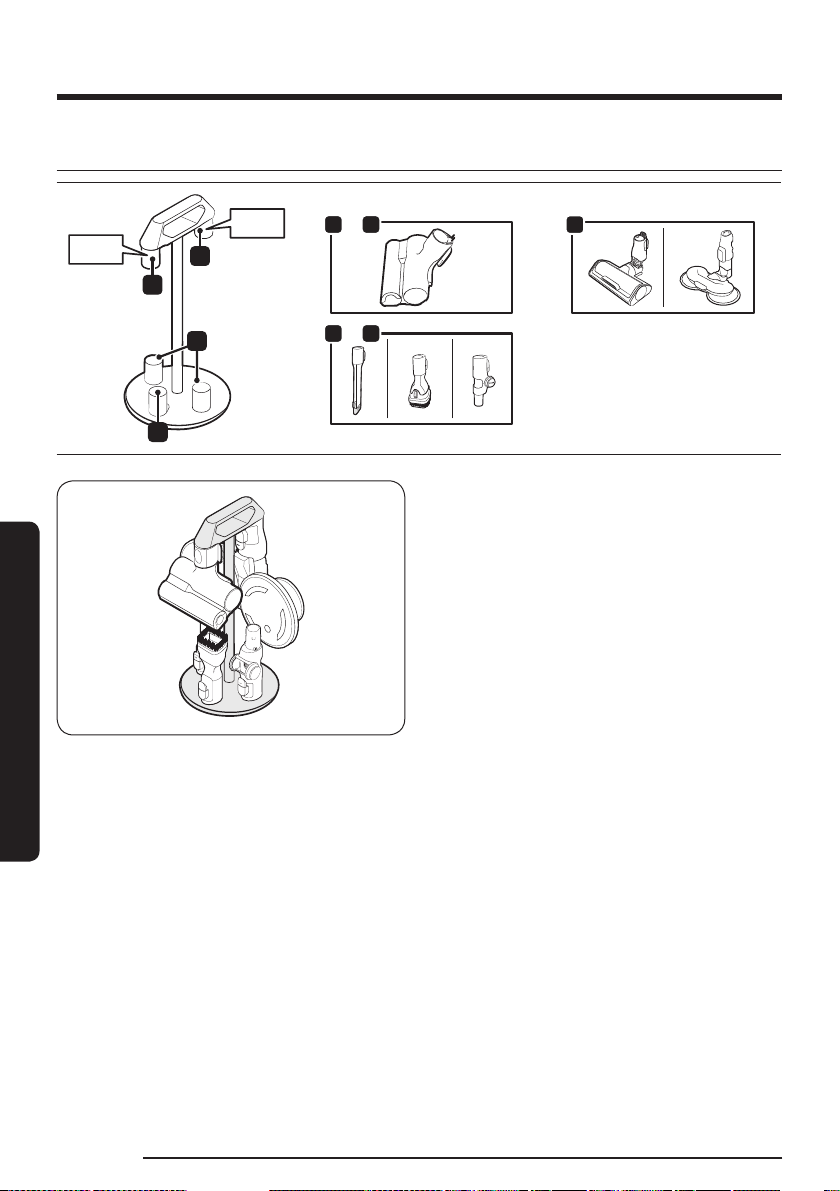
Preparation
Accessories
The accessories with the ' * ' mark may differ depending on the models.
Telescopic pipe Pet Tool + Combination Tool
Extension Crevice Tool Dust bags (1 installed, 2 extra) User manual
* Flexible Tool
* Accessory Cradle Clean Station * Battery charger
* Active Dual Brush * Slim LED Brush+ * Battery cradle
* Spray Spinning Sweeper /
Water tank / Reusable wet pads
* Disposable wet pads /
Attachable pad
* Battery
* Optional
• The Spray Spinning Sweeper includes reusable wet pads and disposable wet pads.
• The number of dust bags may differ depending on the model.
Preparation
English 13
Preparation
Parts overview
01
03
04
12
15
16
14
24
17
20
21
13
06
09
07
08
10
02
18
22
19
23
11
05
01 Power ( ) button
02 Suction power control buttons
03 Washable Micro Filter
04 Spinning Cyclone Filter
05 Display
06 Dustbin release button
07 Fine Dust Filter
08 Dustbin
09 Adjustable pipe
10 Handle
11 Battery level indicator
12 Battery release button
13 Pipe release button
14 Pipe length adjustment button
15 Brush release button
16 Dustbin Lid Release button
17 Dustbin joint
18 Clean Station START/STOP button
19 Dust bag
20 Clean Station front cover
21 Auto Empty button/Wi-Fi button
22 Clean Station Premotor Filter
23 Clean Station Fine Dust Filter
24 Power cord
NOTE
The wave pattern on the exterior of the product is a natural appearance due to the use of pearl plastic
materials and its pearl distribution. In addition, the shining pearl used in the material gives an excellent
gloss coating, no extra coating necessary.
English14
Operation
For detailed information, please refer to the QR code.
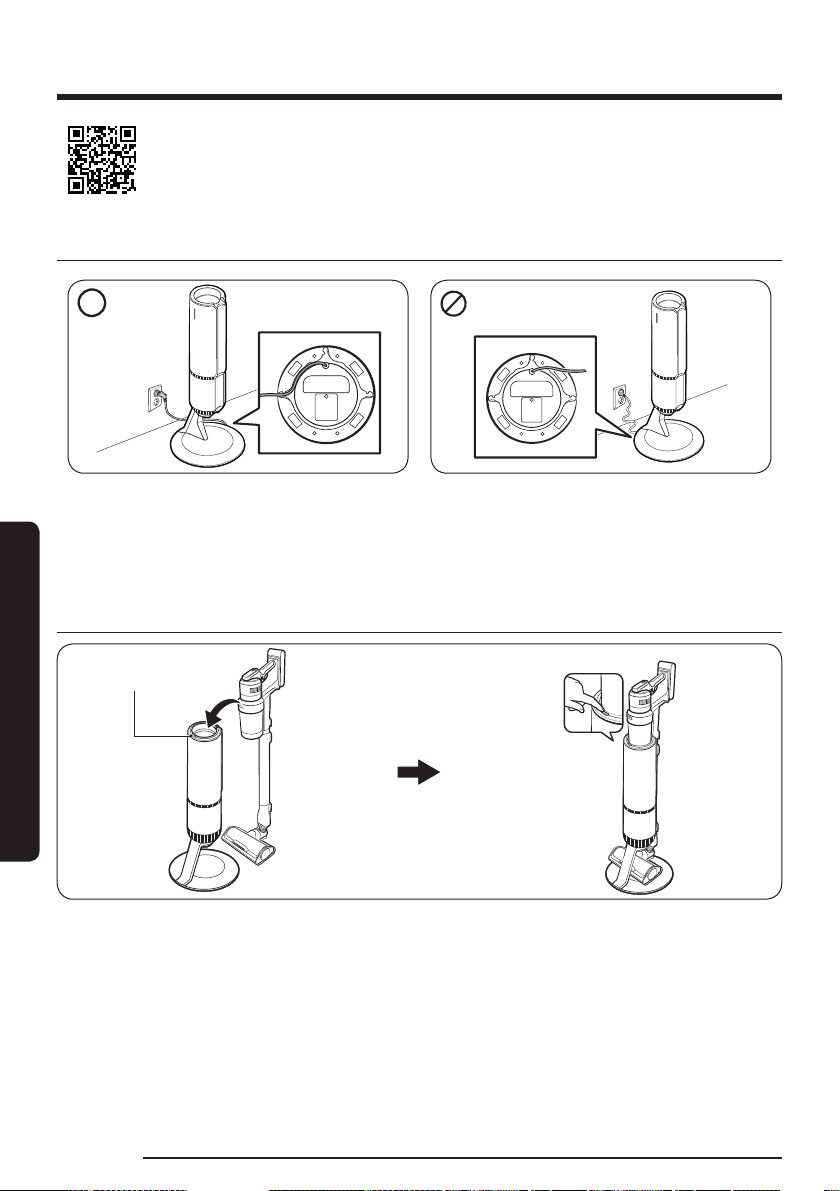
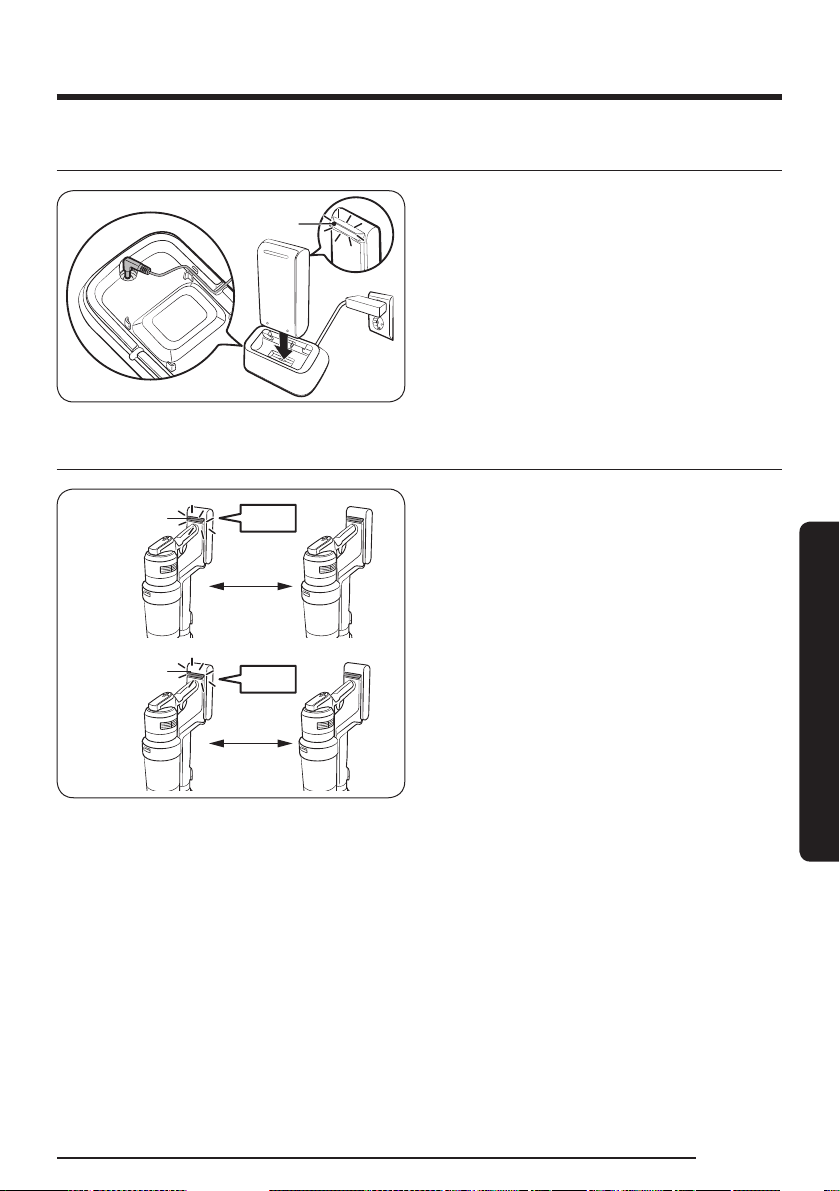
Installing the Clean Station
• Run the power cord of the Clean Station along the round groove at the bottom.
- Make sure the power cord is correctly placed so that the Clean Station stands without tilting.
• Before plugging in the Clean Station, arrange the power cord neatly.
• When plugging in the Clean Station, the
START/STOP button turns blue for 5 seconds and goes off.
Using the Clean Station
START/STOP button
• The vacuum cleaner’s dustbin will be emptied automatically when you put the vacuum cleaner on the
Clean Station.
- The Auto Empty function is enabled as a default setting.
• You can press the
START/STOP button to start or stop the emptying process at a desired time.
• If the vacuum cleaner is placed back on the Clean Station within a minute from it was taken off from the
Clean Station, the Auto Empty function will not operate even it the function is enabled.
Operation
English 15
Operation
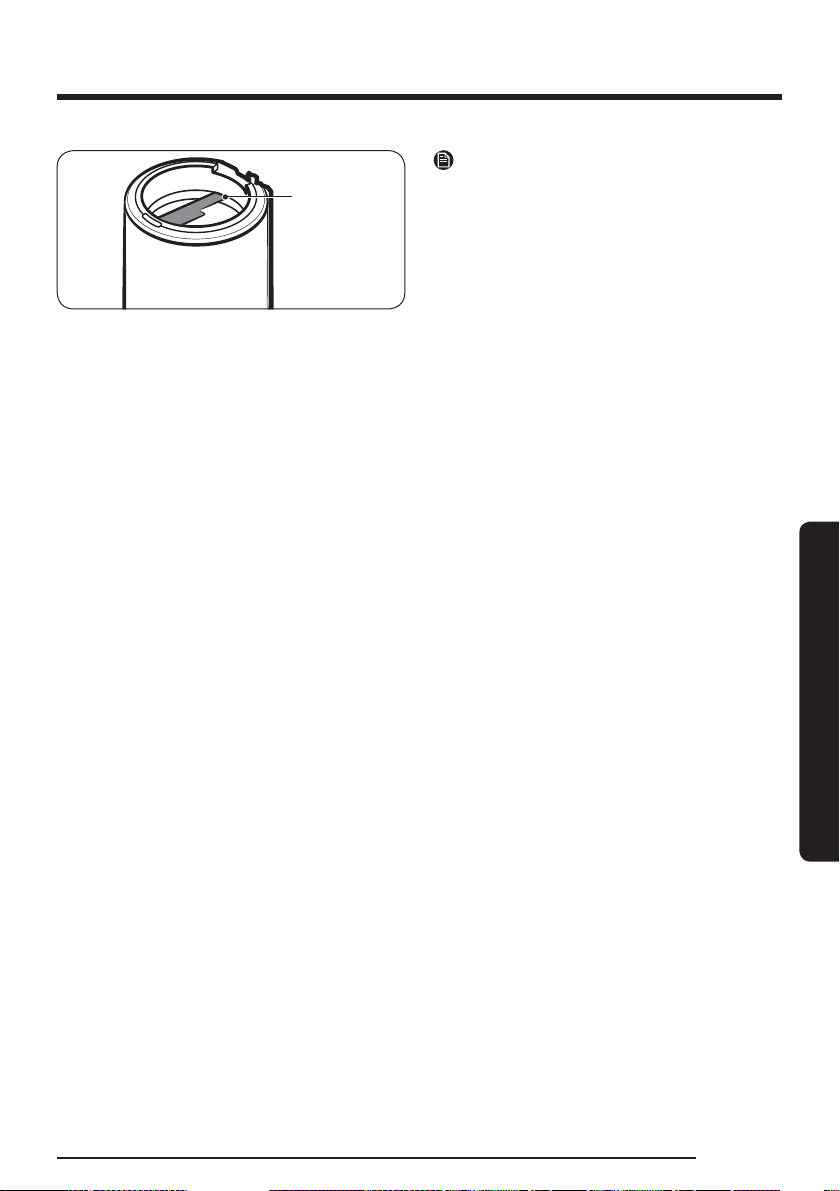
Auto dustbin
lid closer
NOTE
• If clumps of dust, hair, threads, etc. wound
around the Spinning Cyclone Filter in the
dustbin, the Spinning Cyclone Filter may not
spin and therefore dustbin may not be emptied
completely. In this case, repeatedly press the
START/STOP button on the Clean Station until
the dustbin is completely empty.
- Clean the dustbin if you find any foreign
matters after emptying it. (Refer to the
'Dustbin/Washable Micro Filter' section.)
• If the auto dustbin lid closer is stained with
coffee, drinks, or other sticky or viscous
substances, wipe it with a wet tissue.
• Properly place the vacuum cleaner on the Clean
Station.
- If not, the vacuum cleaner may not be
charged and the Auto Empty function may
not work.
- If the dustbin cannot be opened, the
START/
STOP button turns red.
Operation
English16
Operation
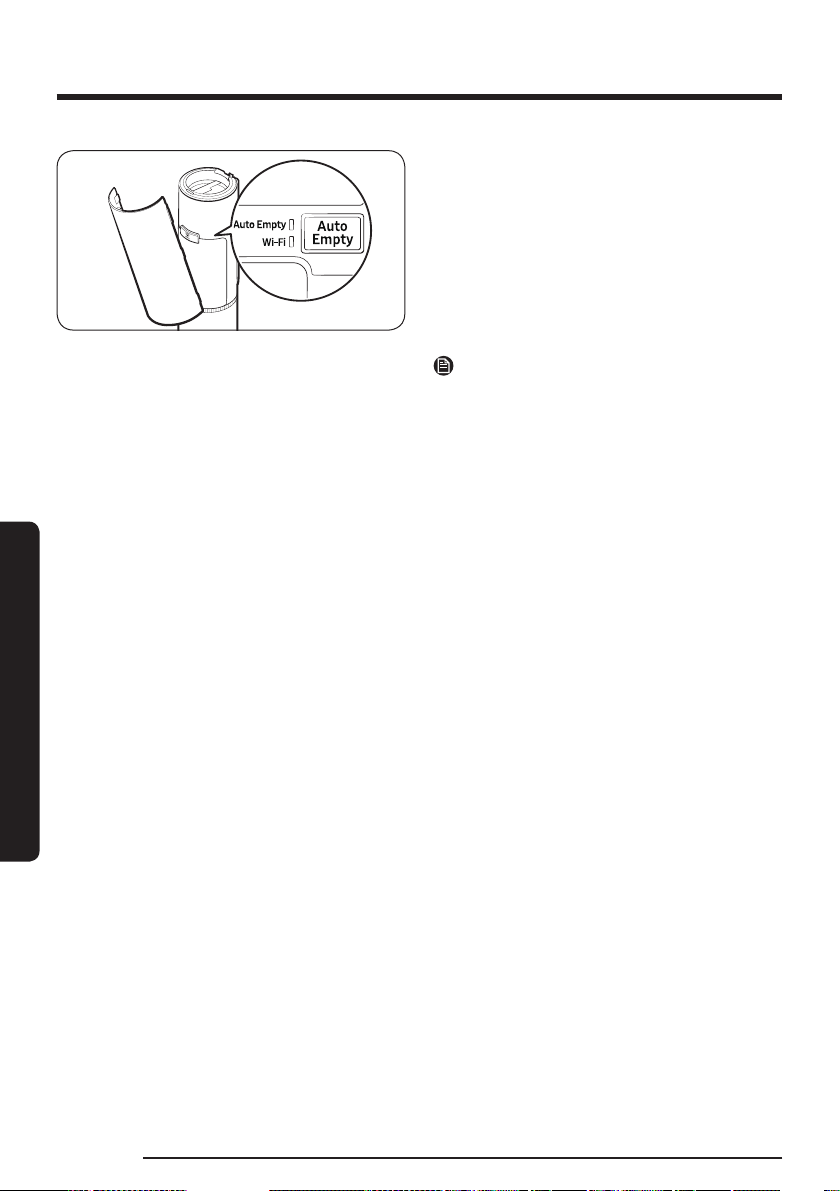
• If the Auto Empty function is enabled, the Auto
Empty LED indicator turns white.
- Press the
Auto Empty button to enable and
disable the function.
• For optimal performance, we recommend
enabling the Auto Empty function.
- The Auto Empty function can affect the
performance of the Spinning Cyclone Filter
and the self-diagnosis.
NOTE
• After emptying the dustbin, the self-diagnosis
process starts for optimal performance. Wait for
the self-diagnosis process to complete before
using the vacuum cleaner again.
• After the self-diagnosis, diagnostic results and
a user guide is provided for the optimized use of
the vacuum cleaner.
• You can start the self-diagnosis process on the
SmartThings app, or by simultaneously pressing
the + and – buttons.
• The initial default suction power mode is ‘AI’.
The self-diagnosis function turns off if you
change the default suction power to a different
mode in the SmartThings app. However, if
you have used the vacuum cleaner in the ‘AI’
suction power mode for more than 5 minutes,
the self-diagnosis function starts when you put
the vacuum cleaner on the clean station even if
the default suction power mode is not ‘AI’ in the
SmartThings app.

English 17
Operation
Setting and canceling the network connection
• Refer to the ‘SmartThings app’ section for network connection settings. To cancel the network
connection after entering the AP mode, press and hold the
Auto Empty button for 5 seconds.
Resetting the network connection
• If the network connection continues to fail, press and hold the
Auto Empty button for 5 seconds to
enter AP mode. Then, press and hold the Auto Empty button for at least 10 seconds to reset the network
connection settings.
- The AP mode will be canceled.
Allowing or blocking the network connection
• To allow or block Wi-Fi, press and hold the
Auto Empty button for at least 15 seconds until the Auto
Empty LED and Wi-Fi LED blink simultaneously.
Factory reset
• We recommend performing a factory reset to protect your privacy data if you are going sell this product
as a used good. Press and hold the
Auto Empty button for 5 seconds to enter AP mode. Then, press and
hold the Auto Empty button for at least 15 seconds.
- The AP mode will be canceled and the network setting will reset.
Operation
English18
Operation
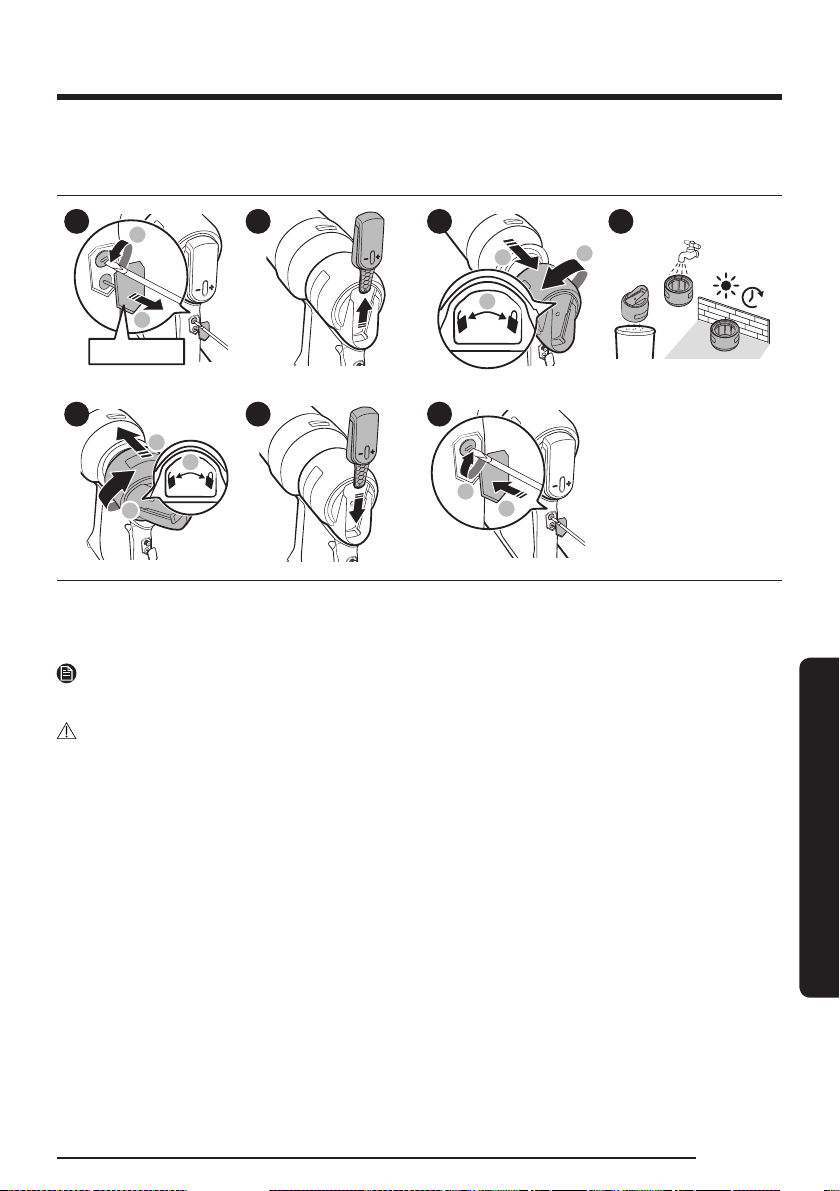
Charging the battery
• When the battery level indicator turns red or the ‘
Low battery’ message appears on the display, charge
the battery.
• You cannot use the vacuum cleaner while charging.
• Make sure the back of the battery is correctly placed onto the vacuum charging part.
• Check that the battery level indicator is displayed while charging.
• When charging starts, the battery level indicator turns on (red, orange, or yellow depending on charging
progress), it rises gradually, and changes to green when the charging is complete.
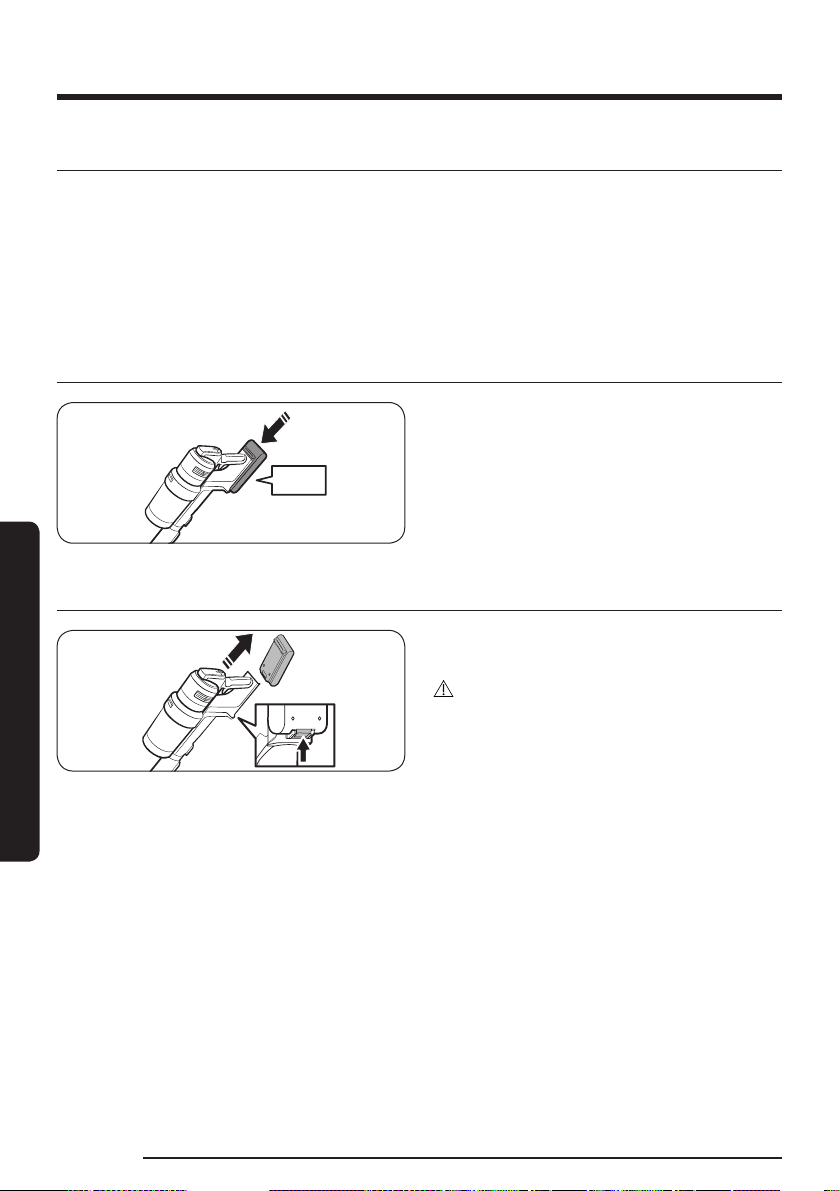
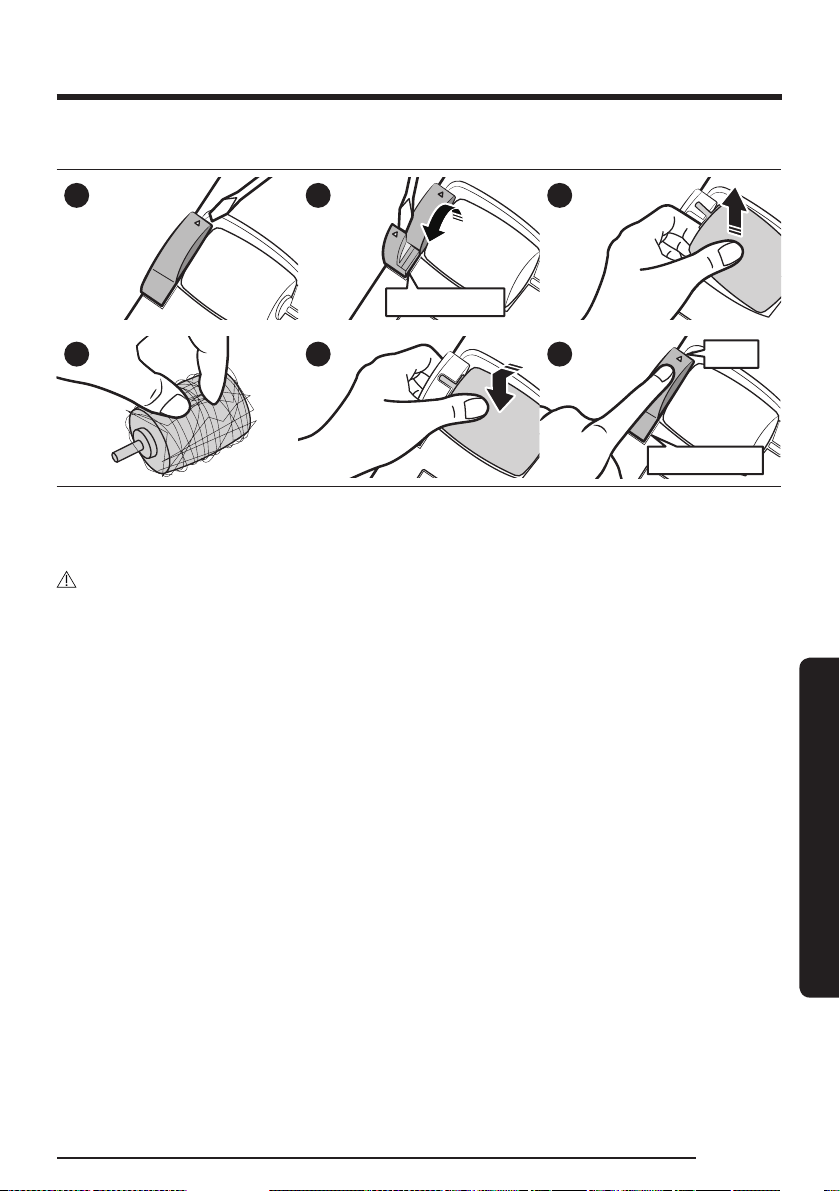
Inserting the battery
‘Click’
Push the battery to the end until you hear it click.
Ejecting the battery
Press the battery release button at the rear of the
handle to eject the battery.
CAUTION
• Before ejecting the battery, the vacuum cleaner
must be turned off.
- The vacuum cleaner may malfunction if you
eject the battery forcibly from the operating
vacuum cleaner.
• Be careful not to drop the battery. You may
injure yourself or damage the battery.
English 19
Operation
Charging the additional battery
Battery level
indicator
Charge the additional battery on the battery cradle.
• Firmly push the battery onto the battery cradle.
• Battery level indicator turns on and changes
color to red, orange, and yellow as the battery
charges. The battery level indicator will turn
green when the battery is fully charged.
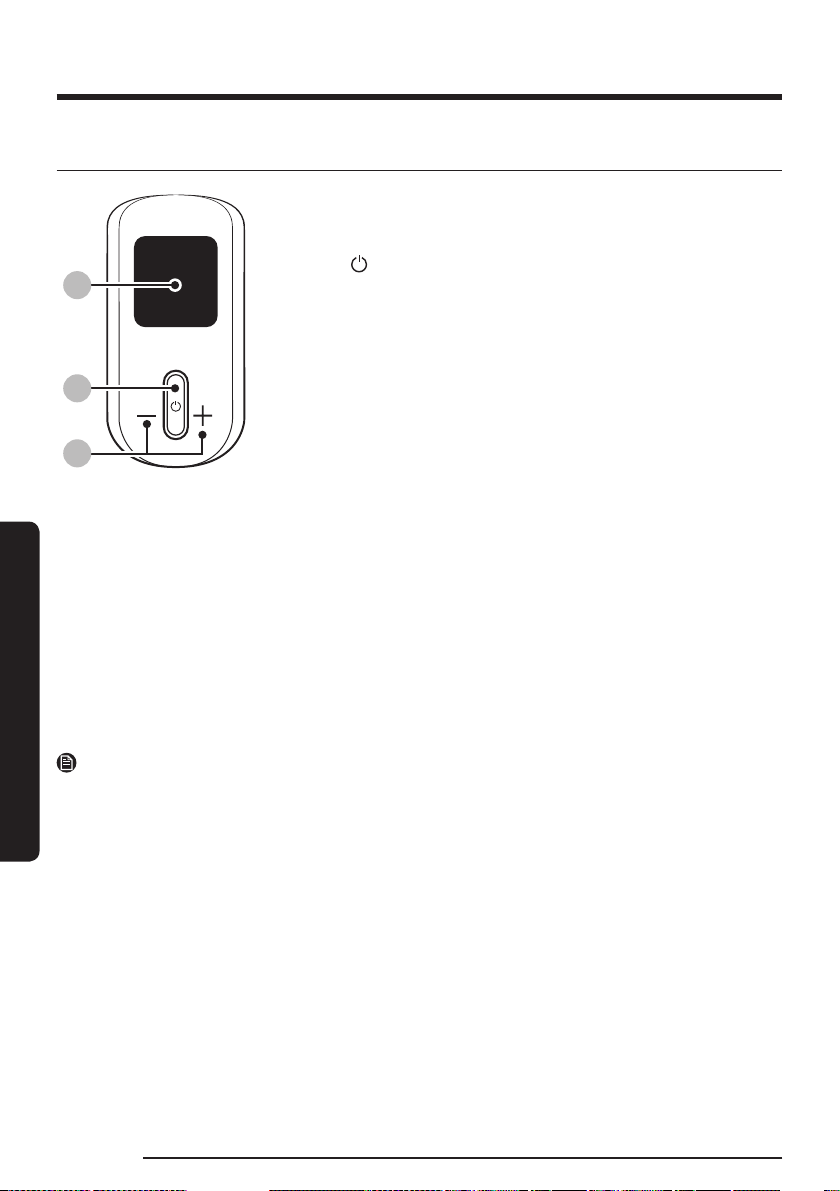
How to use the batteries optimally
Battery level
indicator
Battery level
indicator
30 times
5 times
Blink
Blink
• To use the batteries longer, use the vacuum
cleaner with the lower suction power setting.
• We recommend alternating the use of battery
with an additional battery.
• If the additional battery is fully charged and will
not be used for an extended period of time, we
recommend removing the additional battery
from the battery charger and storing it at room
temperature.
• The vacuum cleaner has a battery protection
mode, which can suddenly stop the operating
vacuum cleaner when it detects a danger to
battery use.
- If the battery level indicator blinks red for 30
times, you must wait for 30 seconds before
you can use the vacuum cleaner again.
- If the battery level indicator blinks red for 5
times, the battery is no longer usable. Please
replace the battery with a new one.
Operation
English20
Operation
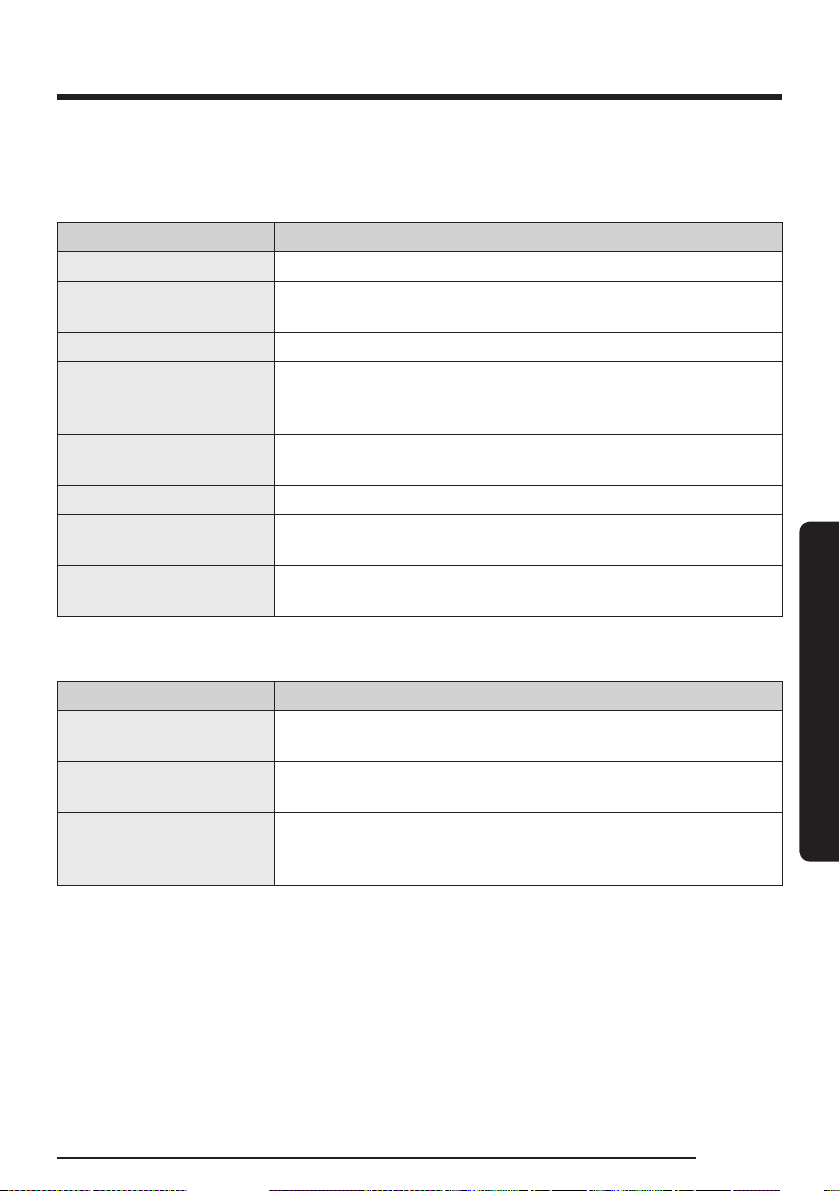
Using the buttons and display
8:
89
8;
01 Display
- Displays the current mode (‘
MIN, AI, MID, MAX, JET, or WET’) or the
alert message.
02 Power ( )
- Press this button to turn on or off the vacuum cleaner.
- When you turn on the power, the vacuum cleaner starts in the ‘
MID’
mode.
- If you assemble the Spray Spinning Sweeper, the vacuum cleaner
starts in the ‘WET’ mode.
- If you assemble the Active Dual Brush or Slim LED Brush+, the
vacuum cleaner starts in the ‘AI’ mode.
03 Suction power control (+ / -)
- You can change the suction power mode (‘
MIN, AI, MID, MAX, or
JET’).
- In the 'AI' mode, the vacuum cleaner automatically adjusts
the suction power and brush rotation speed according to the
surrounding environment for optimized performance. The vacuum
cleaner proceeds the optimization process for 1 ~ 2 seconds when it
detects changes in the floor.
- In the ‘WET’ mode, press the + button to spray water once or press
and hold the + button to spray water for up to 2 seconds.
- While the vacuum cleaner is on the Clean Station, press and hold the
+ button for 5 seconds to enable or disable the Energy Saving mode.
Press and hold the Auto Empty button on the Clean Station for 15
seconds to turn off the Wi-Fi and save extra energy.
NOTE
• The ‘AI’ mode is only available if the Active Dual Brush or Slim LED Brush+ is assembled.
• The ‘AI’ mode may not work well on some floor environments (floors with thin rugs and some yoga mats
with grooves, etc.).
• The automatic brush rotation speed adjustment in the ‘AI’ mode is only available when the Active Dual
Brush is attached.
• Only the + button works when the vacuum cleaner is in the ‘WET’ mode.
• You cannot enter the language settings when the vacuum cleaner is in the ‘WET’ mode.
• The Energy Saving mode is automatically disabled if you use the vacuum cleaner.
• The brush may cling to the floor or does not turn properly depending on the floor material (a carpet, a
mat, bedding, etc.). If such a problem occurs, change the suction power mode to ‘MIN or MID’.
Selecting the language
1. Press and hold the + button for 3 seconds to enter or exit the language setting.
2. Press the + or – button to select a language.
English 21
Operation
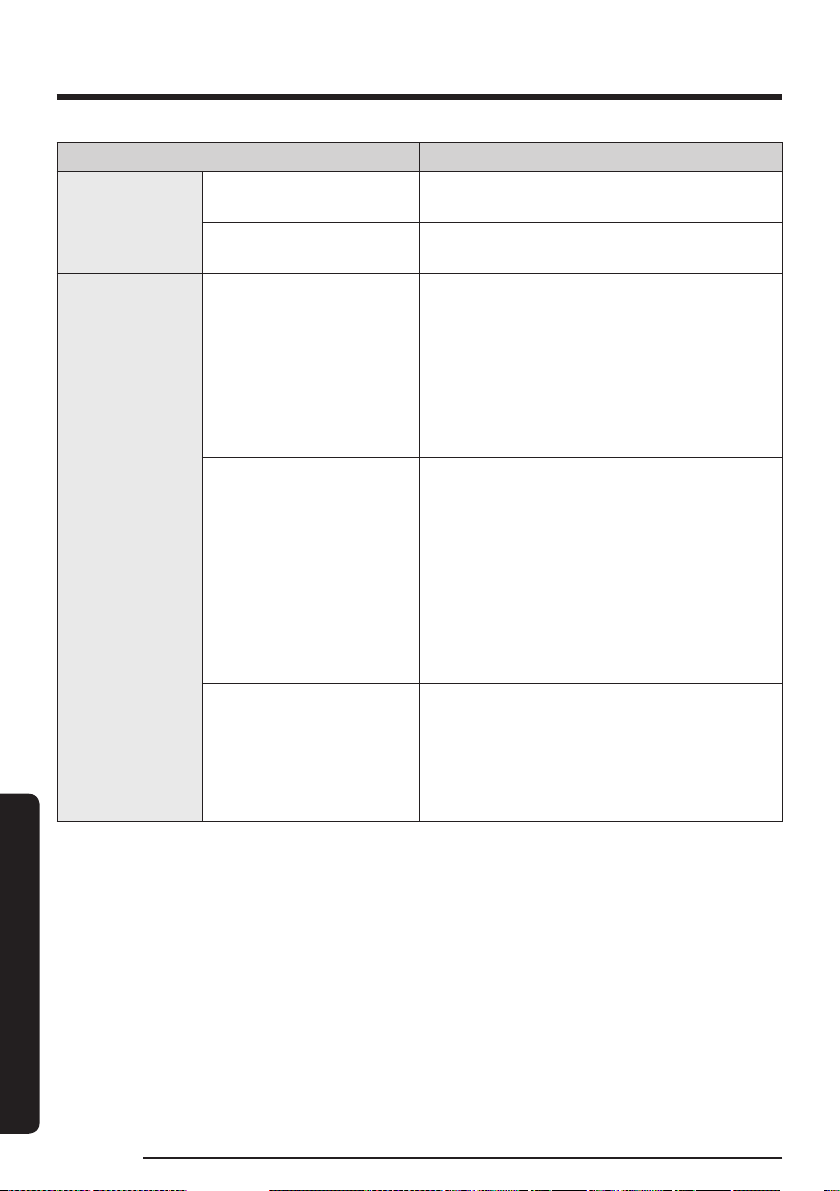
Alert messages and what to do
The vacuum cleaner displays alert messages for user to inspect certain parts or clean certain parts such as
a filter. Also, its self-diagnosis feature provides a guide that helps you maintain its best performance.
Message What to do
Object stuck in brush/tool Check if the foreign matters are stuck in the brush or tool.
Check if clogged
Check if the brush, pipe, Washable Micro Filter or Fine Dust Filter is
clogged with foreign matter.
Filter not inserted Check if the Washable Micro Filter is properly assembled.
Clean Micro filter
Alerts and recommends the user to regularly check and wash the
Washable Micro Filter. (Refer to the 'Cleaning the vacuum cleaner'
section.)
Use compatiable battery
Check the model name of the battery and make sure it is compatible.
(VCA-SBTC97, VCA-SBTC97S)
Close the dustbin Check the dustbin and close it if it is open.
Dust bag of Clean Station is
full. Replace it
Replace the dust bag in the Clean Station with a new dust bag.
Connect floor brush to run
diagnosis
Attach the Slim LED Brush+ or Active Dual Brush.
Self-diagnosis messages and what to do
Message What to do
Check micro filter or dustbin
Check if the dustbin is open. If the Washable Micro Filter and the dustbin
is contaminated, empty the dustbin and wash them with water.
Check if brush or pipe is
clogged
Check if the brush or pipe is clogged and clean them according to the
instructions on the ‘Cleaning the vacuum cleaner’ section.
Check debris inside the spin
brush
Check if foreign matters are tangled to the spin brush and clean it
according to the instructions on the ‘Cleaning the vacuum cleaner’
section.
Operation
English22
Operation
Using the Accessory Cradle
9
<
:
;
‘Click’
‘Click’
9<or
;<or
:
[Accessory Cradle]
• To detach the accessories, press the release
button on the back of each accessory.
• Dust that remains in the accessory may fall
when you detach it from the vacuum cleaner.
When you finish using the vacuum cleaner,
shorten the Telescopic Pipe and operate the
vacuum cleaner in the 'MAX' mode for more
than 10 seconds.
• Make sure to remove any wet pads from the
Spray Spinning Sweeper before attaching it to
the Accessory Cradle.
• When attaching accessories to 1 and 2, push
them until they make a clicking sound.
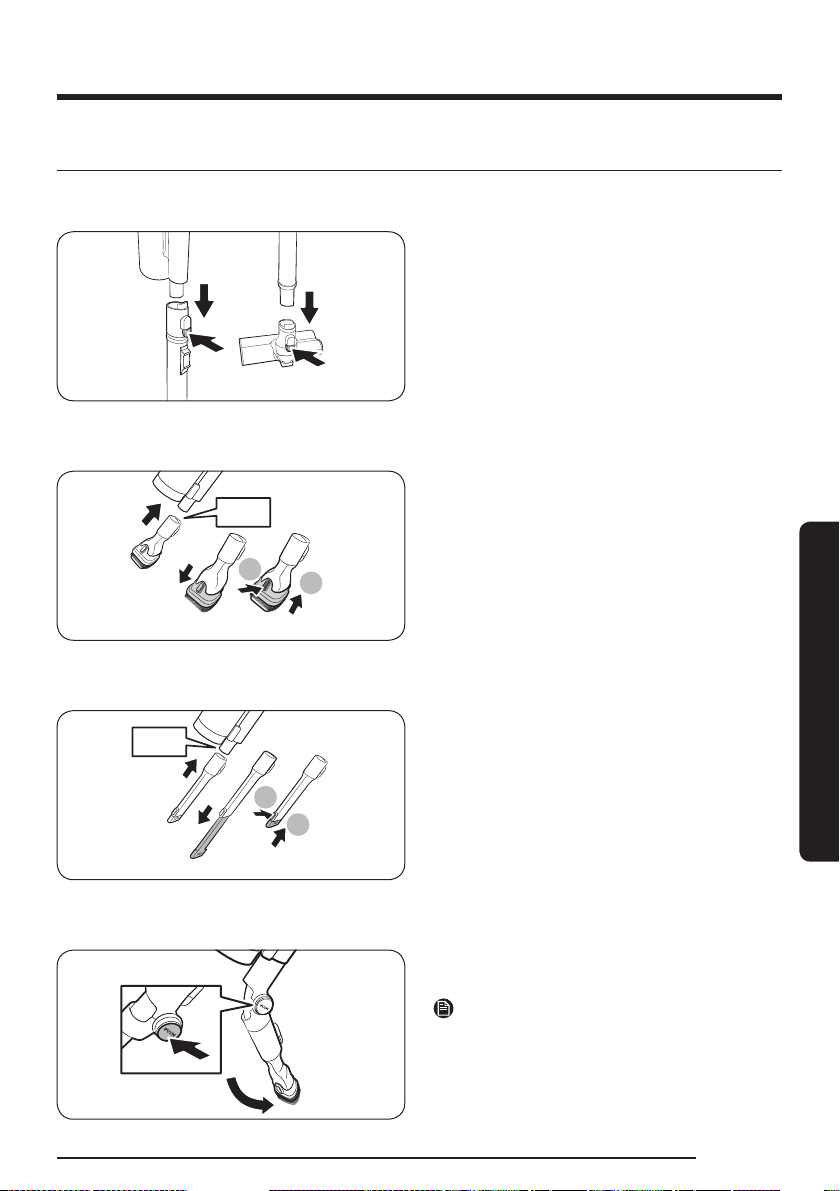
English 23
Operation
Using the accessories
Detaching the accessories
• To detach the accessories, press the release
button on the back of each accessory.
• Before detaching the accessories, operate
the vacuum cleaner in the 'MAX' mode for 10
seconds to prevent any foreign matter remains
inside the accessory.
Combination Tool
1
2
‘Click’
Use to remove dust from curtains, furniture, sofas,
etc.
Extension Crevice Tool
1
2
‘Click’
Use to remove dust in grooves of window frames,
narrow gaps, corners, etc.
Flexible Tool
Use to clean hard to reach places such as upper or
rear parts of furniture or ceilings.
NOTE
You can connect the Combination Tool or the
Extension Crevice Tool to use with the Flexible Tool.
Operation
English24
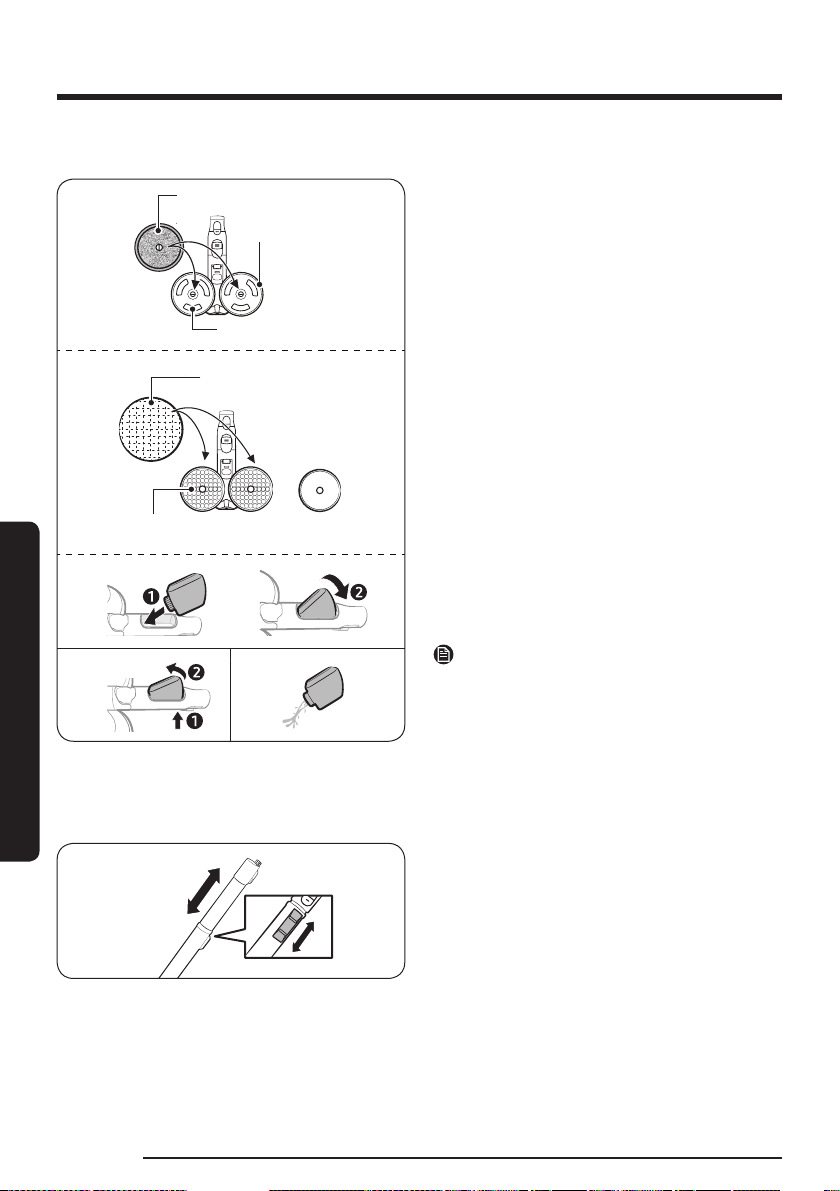
Operation
Spray Spinning Sweeper
Reusable wet pad
Disposable wet pad
Attachable pad
Attaching
Detaching
After use
<Front> <Back>
Spin disk
Velcro
Use to clean a wooden or linoleum floor with a wet
pad.
• The Spray Spinning Sweeper does not have a
dust suction function.
Using the reusable wet pad
• When attaching the wet pad, make sure the pad
is in the center of the spin disk.
Using the disposable wet pad
• Attach the disposable wet pad to the front side
(Velcro side) of the attachable pad on the spin
disk.
- If you use the disposable wet pad without
the attachable pad, cleaning performance
can be degraded.
• After using the disposable wet pad, discard the
pad.
Detaching or attaching the water tank
• Press the lower part of the water tank to detach.
• When attaching the water tank, insert the front
end first.
NOTE
• Do not use groundwater or polluted water.
• When using the Spray Spinning Sweeper for the
first time, the air in the internal pump and the
tube may cause a delay in spraying water. Press
the + button repeatedly.
Adjusting the pipe length
Press the pipe length adjustment button to
lengthen or shorten the Telescopic Pipe.
English 25
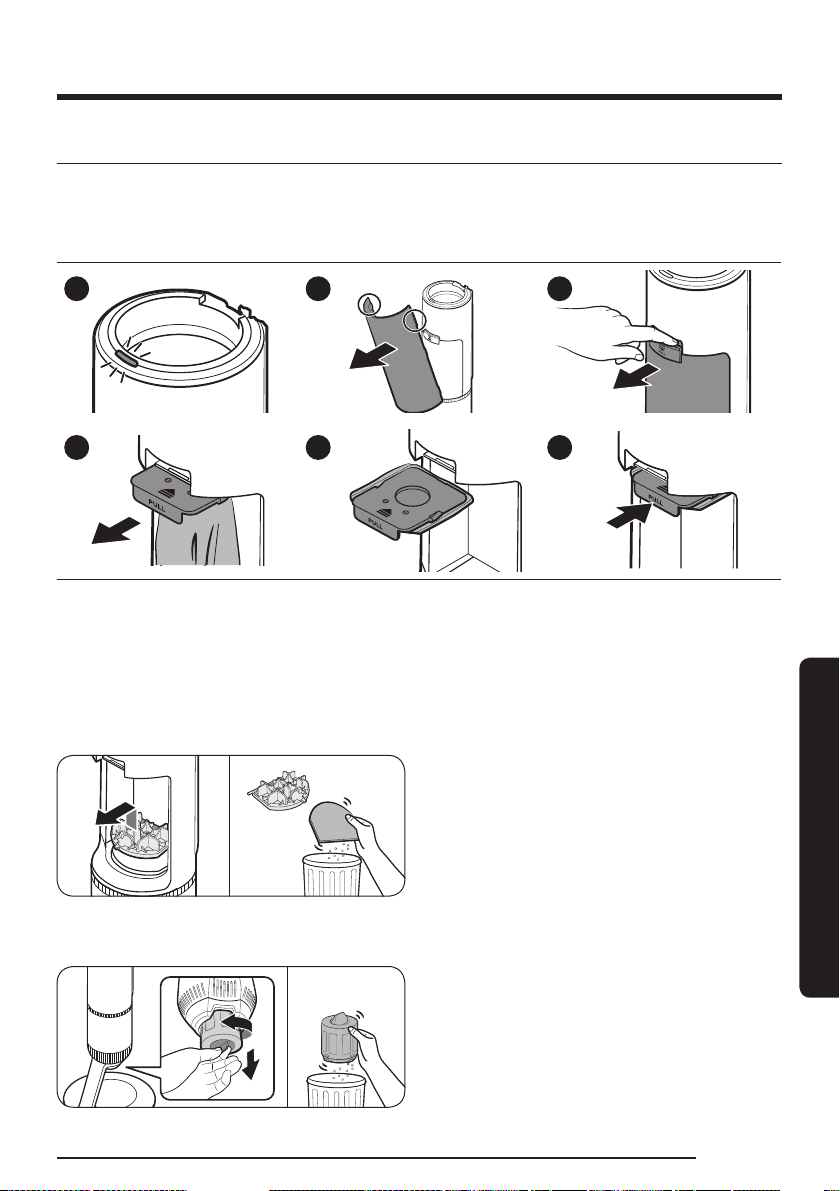
Maintenance
Cleaning the Clean Station
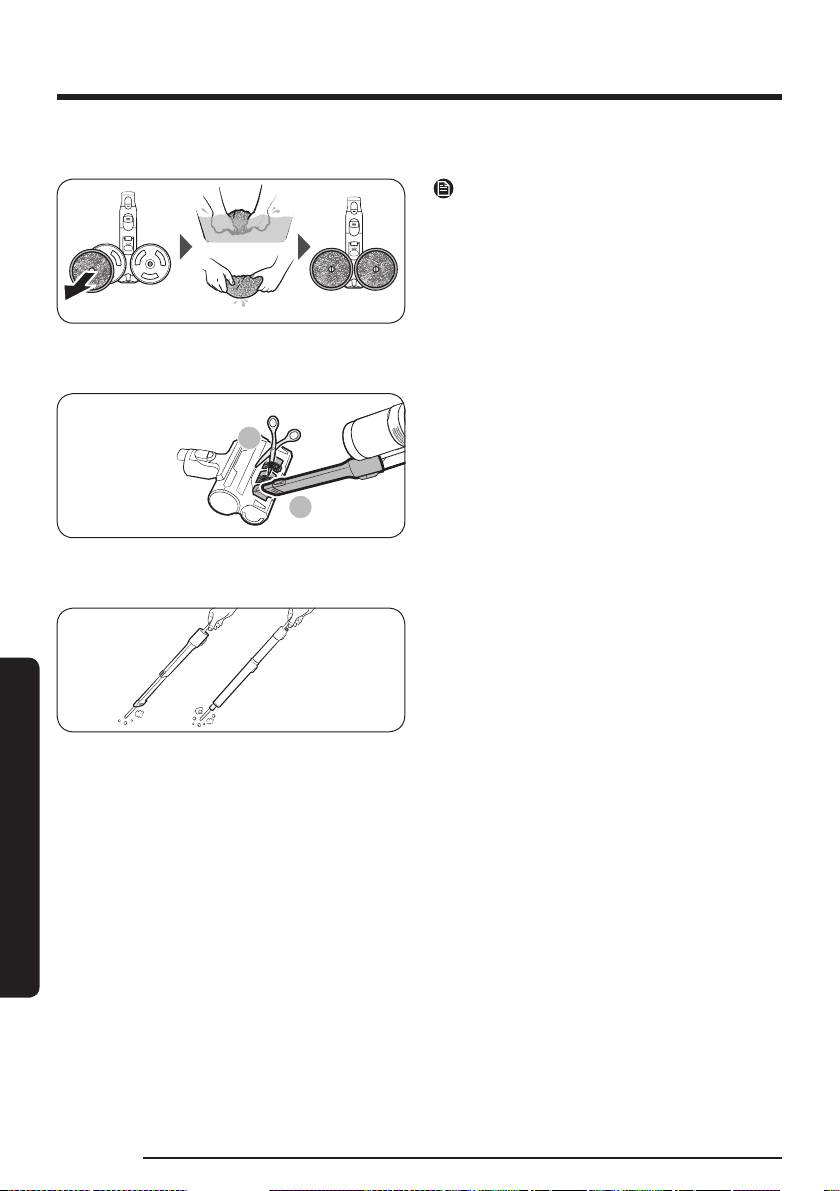
Replacing the dust bag
If the
START/STOP button on the Clean Station turns red, check if the dust bag is full. If the dust bag is not
full, check if the vacuum cleaner’s dustbin, pipe, or brush is clogged.
1 2 3
4 5 6
• You must dispose of the used dust bag in the trash. (Not re-usable)
• During periods of high temperature and humidity, it is recommended to replace the dust bag every one
to two months.
- Household bugs and larvae can be suctioned into the dust bag and possibly multiply in time. When it
happens, wipe with a wet tissue and replace the dust bag with a new one.
Cleaning the Premotor Filter
Use the handle to lift the filter off and shake over a
bin to remove dust.
Cleaning the Fine Dust Filter
Shake the Fine Dust Filter over a bin to remove
dust.
Maintenance

Maintenance
English26
Maintenance
Cleaning the vacuum cleaner
For detailed information, please refer to the QR code.
Dustbin/Washable Micro Filter
1 2
3
4 5 6
24H
7
‘Click’
8 9
9
:
‘Click’
CAUTION
• Do not unscrew the screw (A) and never get it to loosen.
• After cleaning the dustbin and Washable Micro Filter with water, dry them completely in the shade for
more than 24 hours before use.
- When heat is applied, part deformation may occur.
- If the filter is not dried completely before being used, it can cause an odor.
• If the dustbin or the filter is clogged, the vacuum cleaner may stop its operation due to the overheating
prevention device of the motor.
- Clean the dustbin or the filters and then operate the vacuum cleaner again.
• When cleaning the dustbin and Washable Micro Filter, be careful not to press the dustbin lid release
button.
English 27
Maintenance
Fine Dust Filter
Make sure to turn off the product before cleaning the filter.
9
:
Rubber cover
1 2
:
;
9
3
24H
4
;
:
9
5 6
:
9
7
• Disassemble the Fine Dust Filter and remove the dust. Then, reassemble the Fine Dust Filter.
• Turn the Fine Dust Filter toward the unlock icon to disassemble it and toward the lock icon to
reassemble it.
NOTE
• Tools required for assembling and disassembling: Flat-head screwdriver.
CAUTION
• For best performance, regularly remove the dust in the Fine Dust Filter and clean it with water once a
month.
- After cleaning the filter with water, dry it completely for more than 24 hours in the shade before use.
Using the filter without sufficiently drying it may cause odors.
- If the smell does not go away after several cleanings, replace the filter.
- Applying heat can cause deformation.
• Be careful not to injure your hands or other body parts when using the tool.
• For your safety, wear gloves before disassembling.
• You may damage the product if you use tools that are wider or thicker than the gaps allowed for
disassembly.
• Be careful not to tighten the screws with excessive force, as this can damage the product.
• Be careful not to damage the rubber cover.
• Keep the detached control panel out of the reach of children.
• Do not allow water to come into contact with the detached control panel.
• Do not clean the detached control panel with a wet tissue or water.
• Be careful not to drop the detached control panel or subject it to an impact which may damaging it.
Maintenance
English28
Maintenance
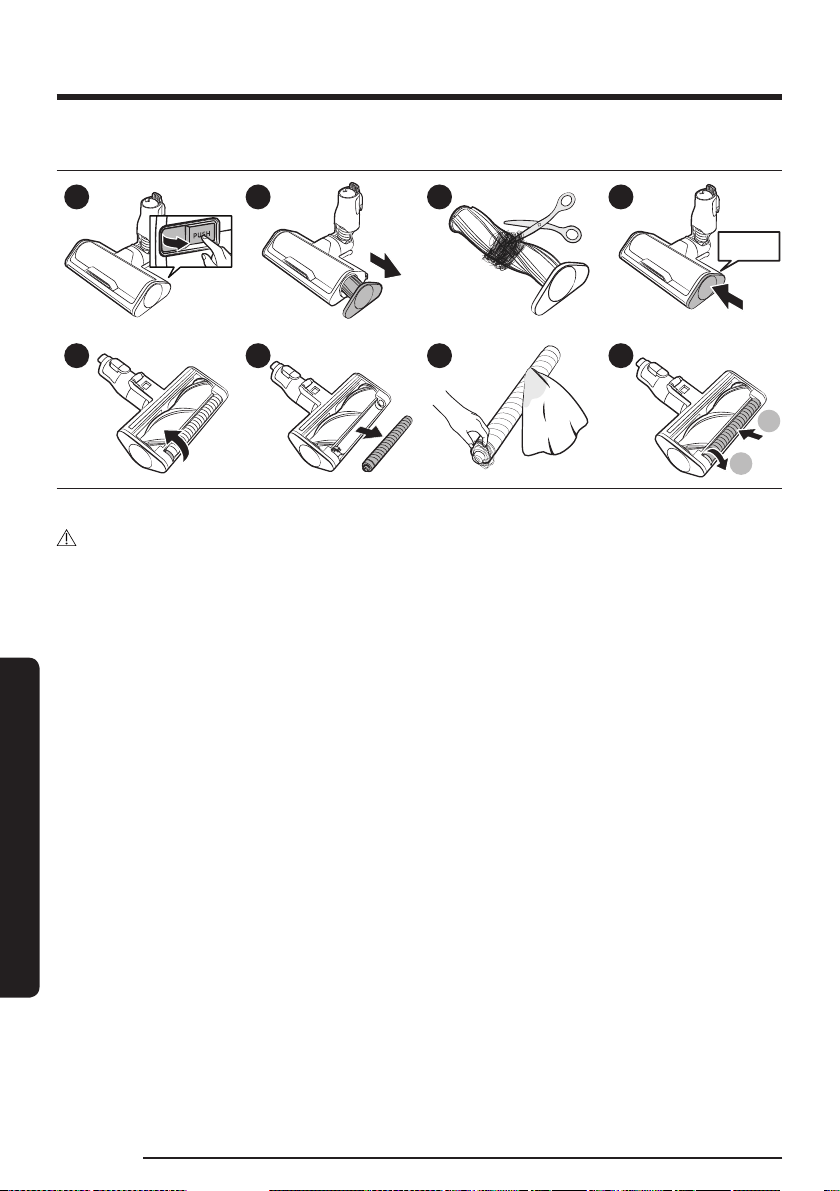
Active Dual Brush
1 2 3
‘Click’
4
5 6 7 8
1
2
If the foreign matter is not removed, use scissors to remove it.
CAUTION
• If a cloth or other foreign matter gets tangled with the spin brush, the spin brush will stop working to
protect the brush motor. After cleaning the brush, turn the power off and then on again.
• If the brush does not work after cleaning, turn the power off and then on again.
• When cleaning the brush, be careful not to catch your fingers in the folding parts of the brush.
English 29
Maintenance
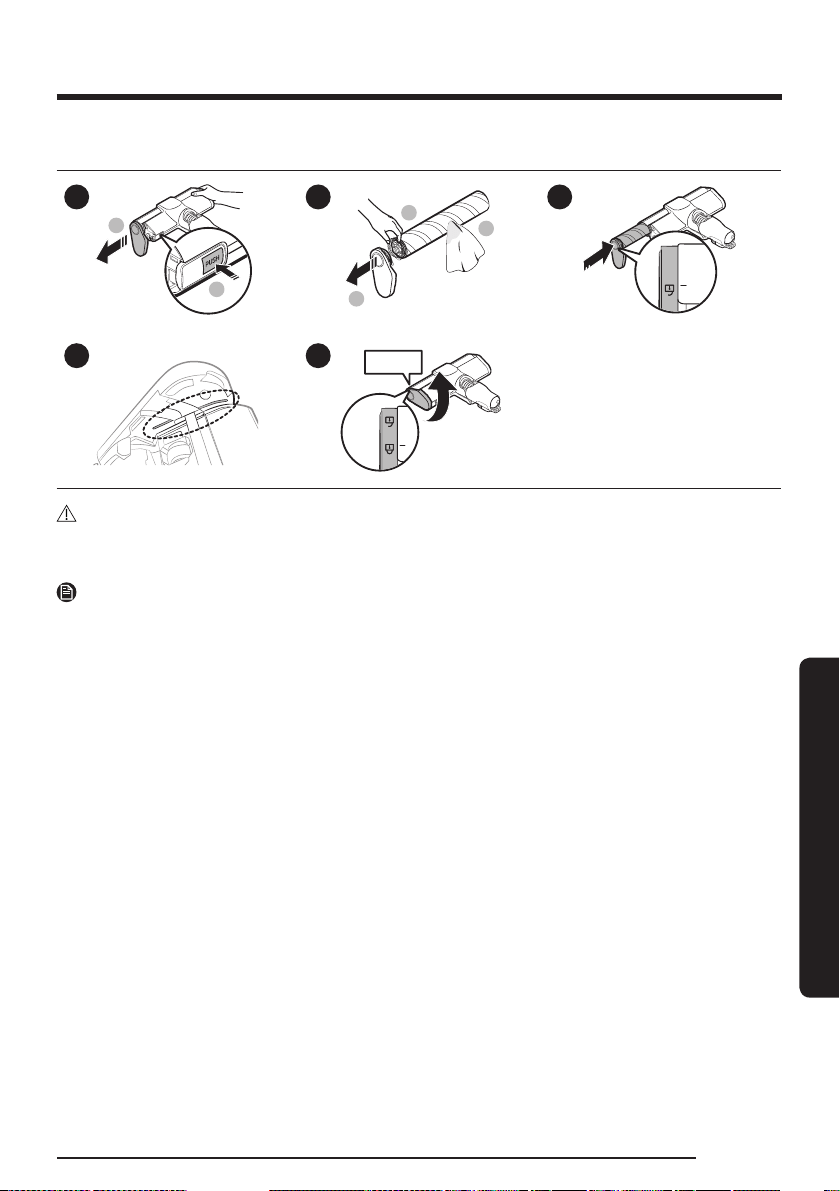
Slim LED Brush+
9
:
1
9
:
;
2
3
4
‘Click’
5
CAUTION
• Do not clean the brush with water.
• When foreign matter remains on the brush, remove it with a wet tissue or a dry cloth.
NOTE
• If the spin brush does not work after cleaning the Slim LED Brush+, the overheating prevention device
of the motor may have been enabled. Wait 30 minutes or more to cool the motor before operating it
again.
• When removing residual debris with a wet tissue, rub the spin brush gently to avoid compressing it.
- To prevent the bristles on the spin brush from being compressed and causing unwanted vibration,
dry the spin brush vertically on the floor.
• Properly insert the spin brush to its slot.
Maintenance
English30
Maintenance
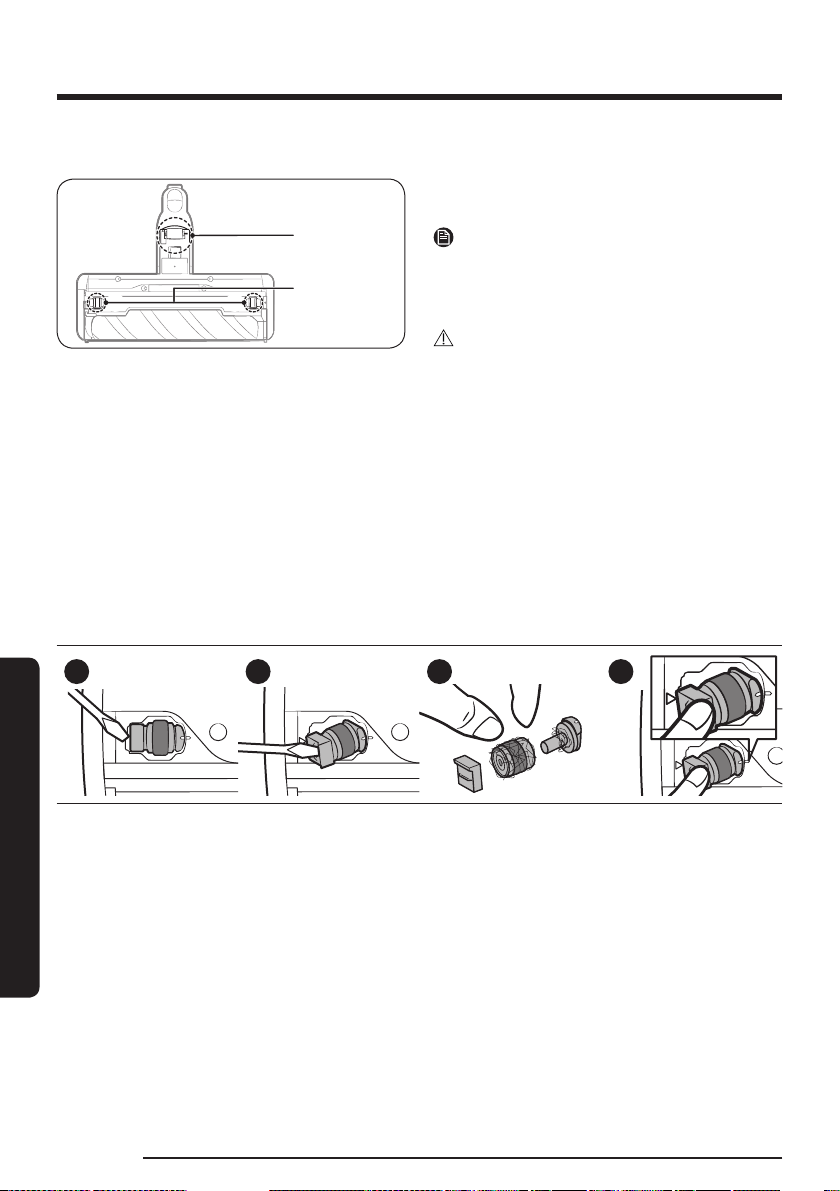
Slim LED Brush+ roller wheels
Front roller
wheel
Rear roller
wheel
Use a small screwdriver to disassemble the front
and rear roller wheels.
NOTE
Tools required for disassembly. Flat head
screwdriver (3 mm or less in width), Phillips
screwdriver, prying tool.
CAUTION
• For your safety, wear gloves before
disassembling.
• You may damage the product if you use tools
that are wider or thicker than the gaps allowed
for disassembly.
• Keep the detached front and rear roller wheels
out of children's reach. Beware of detached
front and rear roller wheels as they can be a
choking hazard.
• Be careful not to injure your hands or other
body parts when using the tool.
Front roller wheel
1 2 3 4
• Disassemble the front roller wheels and remove the tangled foreign matter. Then, reassemble the
wheels.
• Align the line marked on the wheel to the line on the body of the brush, and then insert it back into its
place.
English 31
Maintenance
Rear roller wheel
1
Release lever
2 3
4
5
‘Click’
Release lever
6
• Lift the release lever to detach the rear roller wheel.
• Detach the rear roller wheel and remove the tangled foreign matter. Then, reassemble the wheel.
• Insert the rear roller wheel into its place, and then press the release lever until you hear a click.
CAUTION
Be careful not to damage the release lever with a screwdriver. There is a chance of damaging the release
lever if you apply excessive force to lift the release lever or twist the screwdriver while it is inserted into the
gap.
Maintenance
English32
Maintenance
Spray Spinning Sweeper
NOTE
If the spin disk does not work after cleaning
the Spray Spinning Sweeper, the overheating
prevention device of the motor may have been
enabled. Wait 30 minutes or more to cool the
motor and operate again.
Pet Tool +
1
2
Cut the tangled hair or fur with scissors, and then
use a vacuum cleaner to suck up the pieces.
Extension Crevice Tool / Telescopic Pipe
Insert a long thin stick and rotate several times to
clean the Extension Crevice Tool or the Telescopic
Pipe.
English 33
Appendix
SmartThings app
The SmartThings app is only compatible with
models that have a Wi-Fi function. If you do
not have a Wi-Fi router, you cannot use the
SmartThings app.
STEP 1 Setting up the wireless router
• Please refer to your wireless router’s user
manual for how to set it.
• This vacuum cleaner supports only 2.4 GHz
Wi-Fi.
• This vacuum cleaner supports IEEE 802.11b/g/n
and Soft-AP.
- IEEE 802.11n is recommended.
• This vacuum cleaner supports only DHCP
(Dynamic Host Configuration Protocol). Please
make sure that the DHCP server option is
activated on your wireless router.
• The vacuum cleaner supports the WEP-OPEN,
WPA-PSK/TKIP, and WPA2-PSK/AES for the
authentication and encryption protocols.
- WPA2-PSK/AES is recommended.
- Confirm that your router has a unique SSID
and password.
• The quality of your wireless network
connection may be influenced by the
surrounding wireless environment.
• If your Internet service provider has
permanently registered the MAC address (a
unique identification number) of your PC or
modem, your vacuum cleaner may not be able
to connect to the Internet. Ask your Internet
service provider about the procedure to
connect an apparatus other than a PC to the
Internet.
• If your Internet service provider requires your
ID or password to connect to the Internet, your
vacuum cleaner may not be able to connect.
If this is the case, you must enter your ID or
password when connecting to the Internet.
• The vacuum cleaner may not be able to
connect to the Internet because of the firewall
setting of your network. Contact your Internet
service provider to resolve these issues.
• Some wireless routers may transmit an
abnormal Domain Name Server (DNS) address
even if the Internet is not connected. If this
occurs, contact the manufacturer of your
wireless router and your Internet service
provider.
• If you still cannot connect to the Internet even
after trying the procedure provided by your
Internet service provider, please contact an
authorized Samsung service center.
• If your router is not a Wi-Fi certified product,
the vacuum cleaner may not be able to connect
to the Internet.
STEP 2 Downloading the SmartThings app
• Download and install the SmartThings App
from the markets (Google Play Store, Apple
App Store, or Samsung Galaxy Store). To find
the app, use the keyword “SmartThings”.
NOTE
• The SmartThings app is incompatible with
some tablets and mobile devices.
- [Android] 8.0 or later (at least 3 GB of RAM)
is recommended.
• Some iPads and some mobile devices may not
be supported.
- [iOS] 14.0 or later is supported.
• Visit Play Store or App Store to see if your
mobile device is compatible with the
SmartThings app.
• The supporting software version of the
SmartThings app is subject to change
according to the OS supporting policy the
manufacturer provides. In addition, as for the
SmartThings app or the functions that the app
supports, the new application update policy on
the existing OS version can be suspended due
to usability or security reasons.
• The SmartThings app is subject to change
without notice to improve usability or
performance. As the mobile phone OS version
is updated every year, the SmartThings is also
updated continually according to the latest OS.
Appendix

Appendix
English34
Appendix
• If you have inquiries regarding the items
mentioned above, please contact us at
STEP 3 Setting up a Samsung account
• You must sign in to a Samsung account before
using the SmartThings app.
• To set up a Samsung account, you can follow
the directions provided by the SmartThings
app.
• If you have a Samsung smartphone, you can
add your Samsung account in the Settings
app. Then, it will automatically sign in to
your Samsung account and you can use the
SmartThings app.
STEP 4 Registering a device to the
SmartThings app
1. Connect your smartphone to your wireless
router.
- If the smartphone is not connected, turn on
the Wi-Fi in the Settings app and select a
wireless router you want to connect to.
- Set your smartphone to use Wi-Fi only and
connect a device.
2. Open the SmartThings app on your
smartphone.
3. If a pop-up saying that a new device has been
found appears, tap ADD NOW.
- If the pop-up does not appear, add a device
by selecting the ‘Stick vacuums’ under the
‘Home appliances’ category and select your
stick vacuum cleaner.
- If you scan the QR code attached at the
bottom of the Clean Station, you can
easily connect your vacuum cleaner to the
SmartThings app.
4. The connection to your device will be
progressed automatically.
5. Once the device is connected to the app, follow
the on-screen instructions to proceed with
authentication.
6. The connection to your wireless router will be
progressed automatically.
7. When the product registration is complete, the
Stick vacuum device card is added.
NOTE
• When the vacuum cleaner cannot be registered
to the SmartThings app
- Refer to the SmartThings app guide or pop-
up messages.
- Confirm that the UPnP option of your
wireless router is active, and then try the
registration procedure again.
- Confirm that your wireless router is
operating in a wireless mode. If not, change
it to the wireless mode and try again.
- If you have two or more vacuum cleaners,
unplug the other vacuum cleaner’s Clean
Station, as you must register one device at
a time.
- If more than one wireless router on your
network has the same SSID, rename them
to distinguish them from each other.
• If the vacuum cleaner and the smartphone are
not connected to the same wireless router,
response can be delayed depending on the
network environment.
- If you change your wireless router, the
connection between the vacuum cleaner
and the SmartThings app will be lost.
- If you change your wireless router, register
your vacuum cleaner again with the
SmartThings app.
English 35
Appendix
Software Update
• When the Clean Station is connected to Wi-Fi, it communicates with the server to check for software
updates. If a new version of the software is available, it will be automatically downloaded and updated.
• Software update is in progress if the
START/STOP button’s LED is solid white and pressing the button
does not start emptying the dustbin. Please wait until rebooting is complete. The LED will turn off when
the software update is complete.
Open Source Announcement
The software included in this product contains open source software.
The following URL http://opensource.samsung.com/opensource/SMART_TP1_0/seq/0 leads to open source
license information as related to this product.
Functions of the SmartThings app
Check what's going on with your product anytime, anywhere with the app or control it remotely.
Functions Explanation
General
Empty dustbin You can empty the vacuum cleaner's dustbin.
Default suction power
You can select the default suction power when
you start using the vacuum cleaner. (MIN, AI, MID,
MAX, JET)
Call and message alert
• You can set the vacuum cleaner to notify you
when you receive incoming calls or messages.
If you enable this function, the vacuum cleaner
stops operation to notify you of incoming calls
and messages.
※ This menu may not be available on some
devices.
- Supported devices: Samsung smartphones
with Android 11 (R OS), One UI 3.1 or later.
- Unsupported devices: Some Samsung
smartphones (A1x, A2x, M1x, M2x) and third-
party smartphones.
Appendix
English36
Appendix
Functions Explanation
Other services
HomeCare Manager
You can check and manage the usage history, filter
status etc., and run self-diagnosis.
SmartThings Energy
You can check the energy consumption of your
vacuum cleaner.
Settings
Dustbin emptying duration
(Default: Normal)
You can set the time that takes for emptying the
vacuum cleaner’s dustbin.
• Short (8-10 seconds), Normal (12-14 seconds),
Long (20-22 seconds)
※ If there is a lot of dirt (hair / lint), increase the
emptying duration.
• ‘Dustbin emptying duration’ can only be set
from the SmartThings app.
Lighting
(Default: On)
• You can set the vacuum cleaner display and
battery lighting settings while the vacuum
cleaner is mounted on the Clean Station.
- On: The vacuum cleaner display light turns
off when the battery is fully charged, and
the battery light does not turn off.
- Off: The vacuum cleaner display and the
battery lights turn off 3 seconds after the
vacuum cleaner has mounted on the Clean
Station.
Wi-Fi
• If you have changed your Wi-Fi router, update
your vacuum cleaner’s Wi-Fi information.
※ Once you change your Wi-Fi router, your
vacuum cleaner becomes offline. Then, you
can connect again by updating the Wi-Fi
information.

English 37
Appendix
Notes and cautions
Installation
CAUTION
• Do not install the product near water, in an area with excessive
moisture, or near window, etc.
• Do not place the Clean Station in a place where people pass by
frequently, in entrance way or narrow passage.
– People may trip over it and be injured, or product damage may
occur.
• If the Clean Station is installed incorrectly, it may fall over, which
could cause an injury and severe product damage.
• Install the Clean Station in a place where there are no objects that
could break and cause damage.
– This may affect the performance of the self-diagnosis.
• If you have a problem with installing the Clean Station, contact a
Samsung service center.

Appendix
English38
Appendix
Battery usage
NOTE
• If the product does not work after you charge the battery, replace
the battery. If it still does not work with the new battery, contact a
Samsung service center.
• Spare batteries and the Accessory Cradle chargers need to be
purchased separately.
CAUTION
• Do not disassemble the battery or the Clean Station.
• Do not apply heat to the battery and do not put the battery in a fire.
• Removing the battery during operation may cause product
malfunction.
• If you have removed the battery while the vacuum cleaner motor is
operating, the vacuum cleaner may not work for 30 seconds even
after you re-attach the battery for safety reasons.
• Battery usage time may shorten with increased battery use. When
the battery no longer charges or runs down quickly, replace the
exhausted battery with a new one.
• Use only the Clean Station and batteries provided by the
manufacturer.
• Before inserting the battery, confirm that the battery is being
inserted in the correct direction.
English 39
Appendix
Operation
NOTE
• Please charge the battery before using a newly purchased battery for
the first time or if you have not used the battery for a long time.
• When the battery level is low, recharge it. If the level of the battery
remains low for a long period of time, it can cause the performance of
the battery to degrade.
• Before using the Spray Spinning Sweeper, detach the wet pad and put
some water on it, then reattach it to the spin disk.
• Clean the reusable wet pad of the Spray Spinning Sweeper in a
normal washing machine by using a neutral detergent.
– However, If the wet pad is exposed to heat, softener, etc, it may be
modified or discolored and product performance can be degraded.
Do not boil the wet pad.
• Use a genuine wet pad of Samsung Electronics for the Spray Spinning
Sweeper.
• If the Spray Spinning Sweeper is used without a wet pad, any product
malfunction will not be covered by warranty and a service fee will be
charged.
• When you purchase an additional reusable wet pad for the Spray
Spinning Sweeper, contact a Samsung service center.
• When you purchase an additional disposable wet pad, check the
model name (VCA-SPA92).
• When you purchase an additional dust bag, make sure to check the
model name (VCA-ADB952).
– Contact your nearest Samsung Electronics retailer or Samsung
service center to purchase any consumable accessories.

Appendix
English40
Appendix
• When the dust bag in the Clean Station is filled with dust, the Clean
Station may stop due to the overheating prevention device of the
motor. Replace the dust bag and then use the Clean Station.
• If there is a larva in the suctioned dust, it can multiply in the dust bag.
Clean the Clean Station with a wet tissue and replace the dust bag.
• Do not push the Clean Station so it falls over.
– Personal injury, product and floor damage may occur.
CAUTION
• Do not leave the product leaning against a wall or a table.
– The product may fall and an injury and severe product damage
may occur.
• Do not allow children to touch the product while cleaning.
– When the vacuum cleaner overheats, children may get burnt.
• Use both hands to carry the Clean Station.
• When you pull the power cord out of the groove at the bottom of the
Clean Station, do not pull it hard. Turn the cord gently on its side so
that it can come out smoothly.
– The power cord may get damaged and could cause an electric
shock or fire.
• Before unplugging or plugging in the Clean Station, turn off the
vacuum cleaner and make sure that the pins of the power plug do not
come into contact with your hands.
– Fire or electric shock may occur.
• Disconnect the battery charger from the battery cradle when moving
them from one place to another.
– It will minimize the charging terminal and power cord from
getting damaged which could cause a risk of electric shock.

English 41
Appendix
• Do not step heavily on the upper part of the Spray Spinning Sweeper
while using it.
– Product damage or floor damage may occur.
• When cleaning, be careful that the side of the brush does not bump
into a molding part, a wall, furniture, etc. and cause staining.
– For a slight stain, remove it with a wet tissue or a cleaner.
• Do not use water to clean the product when in use.
• You should use the product in dry places and do not use the product
in wet places or on water.
• Do not put hot water, detergent, etc. into the water tank of the Spray
Spinning Sweeper.
– Product malfunction or performance degradation may occur.
• When not using the Spray Spinning Sweeper, empty all the water in
the water tank.
• Do not use without a filter in place.
Appendix
English42
Appendix
Maintenance
NOTE
• If the inner part of the Spray Spinning Sweeper is clogged with large
foreign matter, spinning speed decreases or the spin disk stops.
CAUTION
• Do not push the vacuum cleaner while it is stored in the Clean Station.
– Personal injury, product and floor damage may occur.
• Do not clean the brush of the vacuum cleaner with water. Cleaning it
with water can cause deformation of parts or malfunction.
• If you notice a continuous reduction in suction or the vacuum cleaner
overheats abnormally, clean the products and replace filters.
• When the Clean Station smells bad, replace the dust bag or clean the
filters.
English 43
Appendix
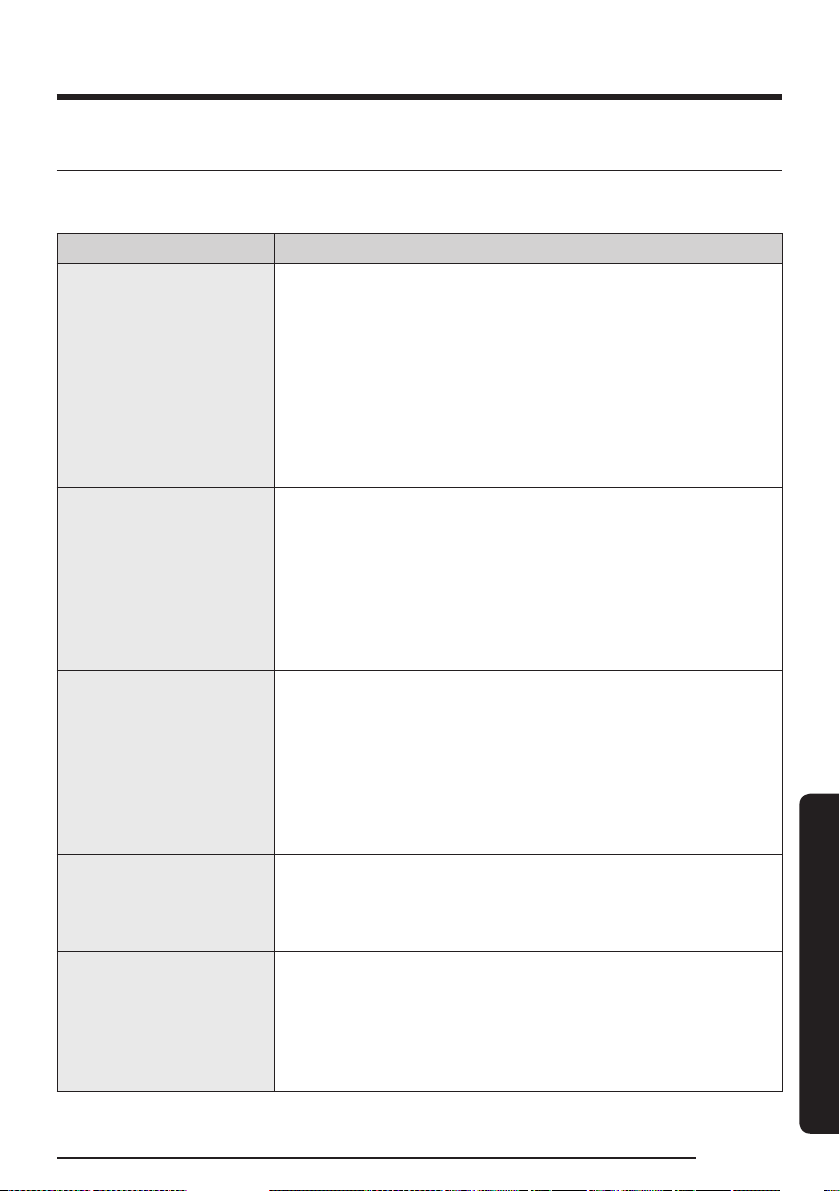
Troubleshooting
Before calling for service, review the problems and solutions below. Note that you will be charged for any
service calls in which no defects were found.
Problem Solutions
The vacuum cleaner does not
work.
• Check the battery level and charge the battery.
• Check whether the product is turned off, and then press the Power
button to turn it on.
• Make sure the battery is properly inserted into the vacuum cleaner.
• Check whether the Telescopic Pipe, the dustbin, or the brush is
blocked.
• Check that the Washable Micro Filter is inserted correctly.
• If the vacuum cleaner has not been used for a long time, charge the
battery.
• If the battery dies, replace the battery.
The spin brush (or spin
disk) of an accessory is not
moving.
• When the 'Check Brush' message appears on the display, turn off the
vacuum cleaner and check whether the brush is clogged with foreign
matter. If so, remove the foreign matter and restart the vacuum
cleaner.
• When the vacuum cleaner is turned on, turn it off and on again.
- For the Slim LED Brush+ and Spray Spinning Sweeper, if the
overheating prevention device of the accessory's motor is
enabled, it may take about 30 minutes to cool the motor.
An odor emits from the air
outlet or the filter of the
product.
• Empty the dustbin and clean the filters frequently.
- As your vacuum cleaner is a new product, it may have a slight
odor for the first 3 months after purchase.
- If you use the vacuum cleaner for a long period of time,
accumulated dirt in the dustbin or dust on the filter may generate
an odor.
• Replacement filters are available at your local Samsung service
agent.
Static electricity occurs when
cleaning a thick and soft mat.
• Materials of a mat (childcare center mat, noise prevention mat for
between floors, etc.) may cause static electricity.
- Move the brush on a normal floor for a while and clean again,
then the static electricity should disappear.
The Spray Spinning Sweeper
does not spray water.
• When using the Spray Spinning Sweeper for the first time, the air in
the internal pump and the tube may cause to delay in spraying water.
- Detach the water tank, press the + button, and check that the
pump operates with a sound.
- Fill the water tank, attach it to the Spray Spinning Sweeper, and
then press the
+ button repeatedly.
Appendix
English44
Appendix
Problem Solutions
The vacuum cleaner cannot
be charged.
• Make sure the vacuum cleaner is properly placed on the Clean
Station.
• Make sure the Clean Station is properly plugged in.
• Confirm that the voltage provided to the Clean Station matches the
requirements of the Clean Station.
• Check that the vacuum cleaner is turned on, and then check that the
LED of the battery level indicator is turned on.
• Check if foreign matter (dust) is on the charging terminal. Remove
any foreign matter with a cotton swab or soft cloth.
• Check if you have turned the Lighting option off in the SmartThings
app.
The AI mode is not working.
• Make sure the assembled brush is either the Active Dual Brush or
Slim LED Brush+.
• Make sure the suction power is set on the AI mode.
• If the AI mode is not working, empty the dustbin and then follow the
guide provided after the self-diagnosis.
The vacuum cleaner is on the
Clean Station but emptying
dustbin and self-diagnosis is
not working.
• Make sure the Clean Station is properly plugged in.
• Make sure the vacuum cleaner is properly placed on the Clean
Station.
• Check if you enabled the Auto Empty function.
• Check the Bluetooth connection.
- Press and hold the Clean Station’s
START/STOP button for 5
seconds.
- The Clean Station’s START/STOP button blinks red for 5 seconds
when the Bluetooth is not connected and blinks in blue for 5
seconds when the Bluetooth is connected.
• Connecting the Bluetooth
- Press and hold the Clean Station’s
START/STOP button for 5
seconds until its light blinks. Press the Auto Empty button while
the START/STOP button blinks.
- Simultaneously press the + and - buttons. Then, simultaneously
press and hold the + and - buttons again for 3 seconds. Hold
the buttons until you see the message that says, ‘Connecting to
Bluetooth’.
- Wait until the Bluetooth connection succeeds.
- If the connection fails, try again from the beginning.
• Make sure the battery is properly inserted into the vacuum cleaner.
• If the vacuum cleaner is placed back on the Clean Station within a
minute from it was taken off from the Clean Station, the Auto Empty
function will not operate even it the function is enabled.
• If you set the default suction power setting in the SmartThings app
to a mode other than AI, the Clean Station will not perform self-
diagnosis after emptying the dustbin.
English 45
Appendix
Problem Solutions
The vacuum cleaner stops
operation during cleaning.
• As this product has the overheating prevention device of the
motor, the product will stop operation temporarily for the following
conditions. After correcting the cause of the problem, turn the
product on again. (This case may differ depending on the ambient
temperature.)
- When the vacuum cleaner operates with a full dustbin.
- When the vacuum cleaner operates with a brush, pipe, or tool
clogged.
- When the Extension Crevice Tool is used for long hours.
The suction power suddenly
decreases and the vacuum
cleaner makes a vibrating
sound.
• Check whether the brush, dustbin, or Telescopic Pipe is clogged with
foreign matter and remove it.
• Check whether the dustbin is fully filled with dust. If it is, empty the
bin.
• Check whether the filter is dirty. If it is, clean the filter.
The cleaning is finished but
small dust particles come out
of the accessories.
• After cleaning, operate the vacuum cleaner for 10 seconds or more to
suck the small dust particles.
The SmartThings app cannot
be installed.
• The SmartThings app operates on Android OS 8.0 or later, iOS 14.0 or
later.
• The supporting OS version for the SmartThings app may change
later.
• Normal installation or use of the app is not guaranteed on rooted
devices.
I have installed the
SmartThings app but fails
to connect with the Clean
Station.
• Refer to the ‘SmartThings app’ section in the user manual to connect
the Clean Station to a wireless router.
• Check the Bluetooth connection.
- Press and hold the Clean Station’s
START/STOP button for 5
seconds.
- The Clean Station’s START/STOP button blinks red for 5 seconds
when the Bluetooth is not connected and blinks in blue for 5
seconds when the Bluetooth is connected.
I cannot log into the
Samsung account.
• Check your ID and password on the screen of the Samsung account.
The wireless router I want
to connect is not detected
during the product
registration.
• Cancel the product registration, open the SmartThings app again,
and try the product registration again.
During product registration, I
entered the wrong password
for the wireless router that I
try to connect to.
• Cancel the product registration, open the SmartThings app again,
and try the product registration again.
• Press and hold the wireless router you want to connect on the
network list, and delete the network to initialize the password.
Appendix
English46
Appendix
Problem Solutions
While registering for the
product, I get a message that
registration has failed.
• Try the product registration procedure again by referring to the pop-
up messages.
• Try the product registration procedure again by referring to the
‘SmartThings app’ section in the user manual.
• Refer to the instructions in the ‘SmartThings app’ section of the user
manual to resolve the product registration problem.
• When the product registration keeps failing, restart the SmartThings
app and try the product registration.
• All users should use the Samsung account issued by the country
which launches the product.
The Clean Station is not
connected to Wi-Fi.
• Check the settings of the wireless router.
Clean Station is successfully
connected to the
smartphone, but I cannot
operate the product from the
smartphone.
• Turn off the SmartThings app and then run it again.
• Disconnect the smartphone from the wireless router and then
connect it again.
• Turn off the Clean Station and turn it back on. Wait for a few minutes,
and then open the SmartThings app again. I cannot turn on the
vacuum cleaner on the SmartThings app.
I cannot turn on the vacuum
cleaner on the SmartThings
app.
• Check if the vacuum cleaner is offline on the SmartThings app.
• Connect the wireless router with the Clean Station again by referring
to the ‘SmartThings app ’ section in the user manual.
The Clean Station appears to
be offline in the SmartThings
app after successfully
registering the device.
• Check the Internet connection of your wireless router. Firewall
settings in your network may interrupt the SmartThings app to work
normally.
• Connection may be lost if the Clean Station is too far away from the
wireless router.
• Close the SmartThings app and then restart it.
• If you cannot resolve the lost connection, try registering your product
again.
• If the SSID/password of your wireless router has changed, try the
product registration again.
• Check if the Clean Station is in Sleep mode. To cancel the Sleep
mode, press the Auto Empty button. When controlling with a
smartphone, a response is delayed.
• If the vacuum cleaner and the smartphone are not connected to the
same wireless router, a response can be delayed depending on the
network environment.

English 47
Appendix
Problem Solutions
When controlling with a
smartphone, a response is
delayed.
• If your smartphone is not connected to the same network as the
Clean Station, response can be delayed depending on the network
environment.
• This Vacuum cleaner is approved for the following.
- The Low Voltage Directive 2014/35/EU
- The EMC Directive 2014/30/EU
• Hereby, Samsung Electronics, declares that the radio equipment type appliance is in compliance with
Directive 2014/53/EU. The full text of the EU declaration of conformity is available at the following
internet address: The official Declaration of conformity may be found at http://www.samsung.com, go
to Support > Search Product Support and enter the model name.
Appendix
English48
Appendix
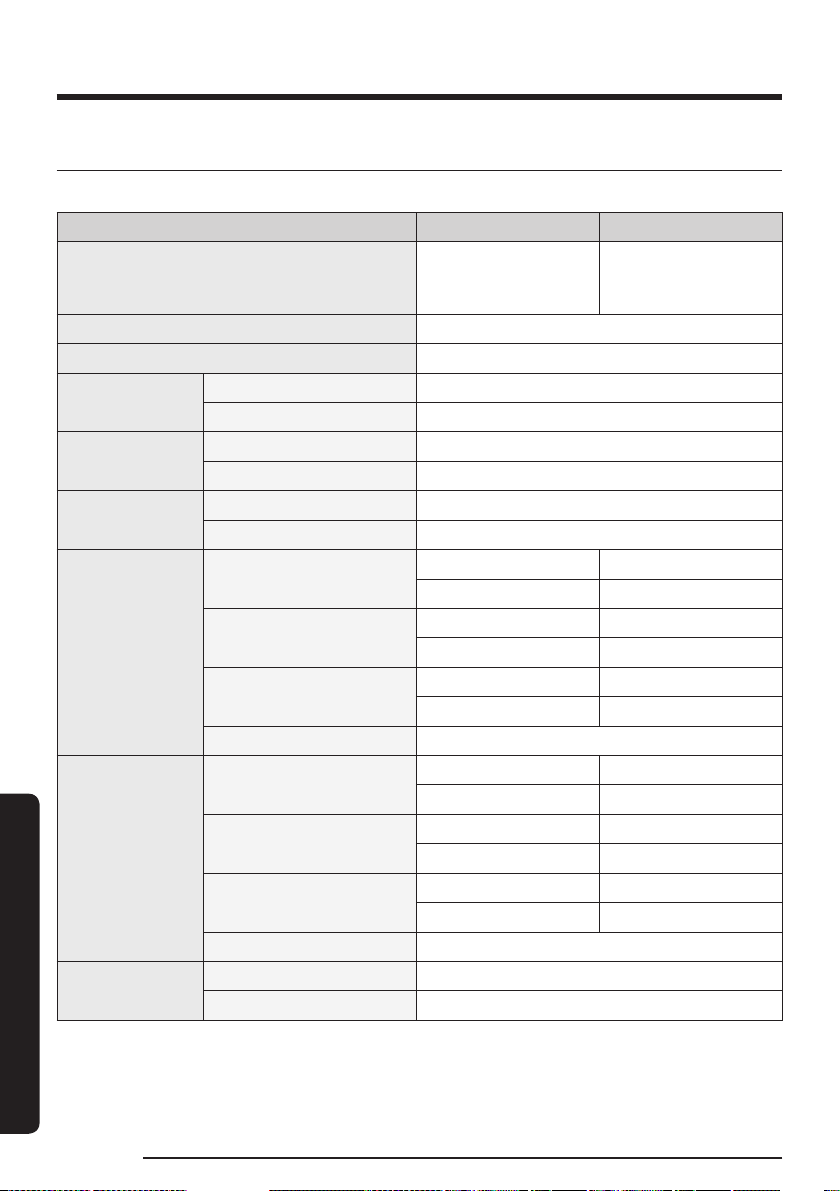
Product specification
Charging and cleaning time may differ depending on the type of brush and the conditions of use.
Model VS28C97**** Series VS25C97**** Series
Power consumption
730 W
(with VCA-SBTC97
battery)
660 W
(with VCA-SBTC97S
battery)
Battery specification (VCA-SBTC97) Li-ion 25.2 V, 3970 mAh, 7 cell
Battery specification (VCA-SBTC97S) Li-ion 25.2 V, 2200 mAh, 7 cell
Weight (Vacuum
cleaner)
With battery VCA-SBTC97 3.17 kg (With Active Dual Brush)
With battery VCA-SBTC97S 2.98 kg (With Active Dual Brush)
Dimensions
(Vacuum cleaner)
With battery VCA-SBTC97 Width 250 mm x Depth 243 mm x Height 1036 mm
With battery VCA-SBTC97S Width 250 mm x Depth 243 mm x Height 1011 mm
Charging time
With battery VCA-SBTC97 5.0 hours
With battery VCA-SBTC97S 3.5 hours
Cleaning time
(With battery
VCA-SBTC97)
(Default mode: AI)
Combination Tool /
Extension Crevice Tool
MIN: Approx. 100 min. MID: Aprrox. 49 min.
MAX: Approx. 16 min. JET: Approx. 4 min.
Active Dual Brush
MIN: Approx. 58 min. MID: Aprrox. 40 min.
MAX: Approx. 20 min. JET: Approx. 14 min.
Slim LED Brush+
MIN: Approx. 77 min. MID: Aprrox. 43 min.
MAX: Approx. 24 min. JET: Approx. 18 min.
Spray Spinning Sweeper Approx. 160 min.
Cleaning time
(With battery
VCA-SBTC97S)
(Default mode: AI)
Combination Tool /
Extension Crevice Tool
MIN: Approx. 60 min. MID: Aprrox. 30 min.
MAX: Approx. 10 min. JET: Approx. 2.5 min.
Active Dual Brush
MIN: Approx. 34 min. MID: Aprrox. 21 min.
MAX: Approx. 12 min. JET: Approx. 8 min.
Slim LED Brush+
MIN: Approx. 45 min. MID: Aprrox. 25 min.
MAX: Approx. 14 min. JET: Approx. 10 min.
Spray Spinning Sweeper Approx. 100 min.
Wi-Fi
Frequency range 2412 - 2472 MHz
Transmitter power (Max) 20 dBm
English 49
Appendix
Model VS28C97**** Series VS25C97**** Series
Bluetooth (BLE)
Frequency range 2402 - 2480 GHz
Transmitter power (Max) 20 dBm
• Hereby, Samsung declares that this radio equipment is in compliance with Directive 2014/53/EU and
with the relevant statutory requirements in the UK. The full text of the EU declaration of conformity and
the UK declaration of conformity is available at the following internet address: http://www.samsung.
com, go to Support >Search Product Support and enter the model name.
NOTE
Cleaning time stated in the above table is based on a test using one battery. Cleaning time doubles when
you use two batteries consecutively.

Memo

Memo
DJ68-00900H-04
