Loading ...
Loading ...
Loading ...
-10-
Assembly
▶ Planer Blades
The planer blades are
sharp and fragile and
must be handled carefully to avoid
injury to the user or damage to the
blades.
• There are three types of blades that
can be used with the Bosch PL2632
planer; standard mini tungsten
carbide blades, Bosch Woodrazor
micrograin mini tungsten carbide
blades (standard equipment with the
Bosch PL2632 planer), and large HSS
blades.
• While the Bosch PA1202 mini
tungsten carbide blades are sharper
and more durable than standard mini
tungsten carbide blades, the
assembly and adjustment of both of
Woodrazor and standard tungsten
carbide blades are the same.
Henceforth, all references in this
manual to “mini TC blades” refer to
both Woodrazor blades and standard
mini tungsten carbide blades.
• To use large HSS blades with the
PL2632 it is necessary to purchase
optional accessories.
Wear protective
gloves when
changing planer blades. Edges are
sharp and may cause injury.
▼ REMOVING MINI TUNGSTEN
CARBIDE BLADES
Mini TC planer blades have two cutting
edges, and may be reversed when one
of the cutting edges becomes dull or
chipped. (Fig. 6) Before any work on the
machine itself, pull the power plug.
Always change both blades at the same
time. Otherwise, imbalance can cause
vibration and reduce the useful service
life of the tool. Use only blades
designated for use with this model,
because other blades can cause
vibration, decrease performance and
may not clamp securely in blade holder.
Do not attempt to sharpen or use re-
sharpened any TC blades.
To remove the blades:
1. Rotate the blade drum until the
clamping jaw is parallel to the planer
shoe.
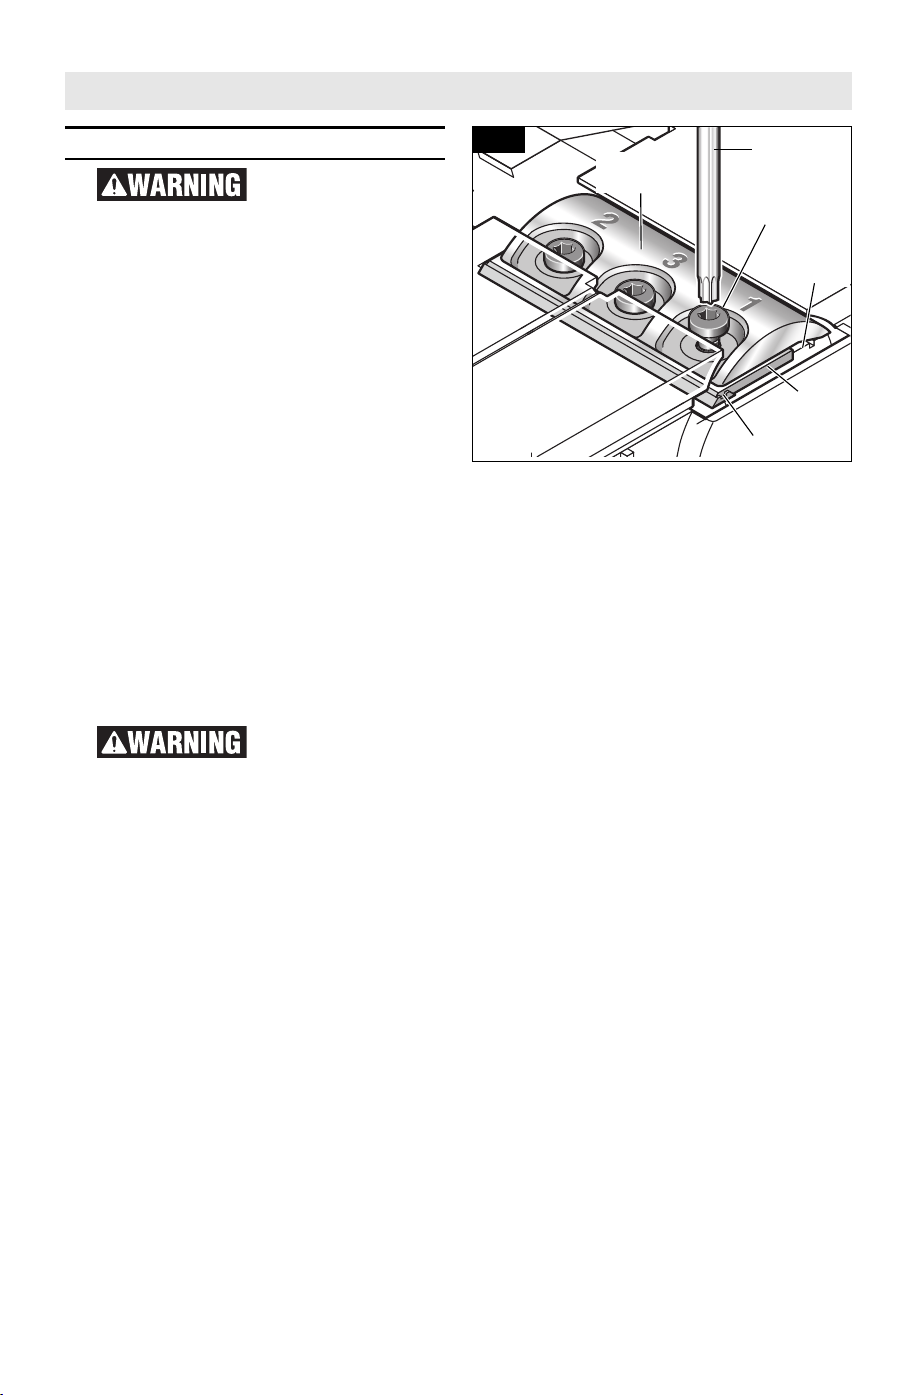
2. Loosen the three clamp screws by
about one revolution each. (It is not
necessary to remove the clamping
jaw.) (Fig. 4)
3. Slightly rotate the blade drum and
use a piece of wood to push the
blade sideways and out from under
the clamping jaw. Make sure to keep
your fingers away from the sharp
edges of the blade. If the blade is
gummed and difficult to remove, you
may clean the blade and clamp with
mineral spirits, lacquer thinner or
alcohol. (Fig. 5)
4. Rotate the blade drum 180° and
repeat the procedure to remove the
second blade. Before inserting a new
or sharpened blade, clean all surfaces
(blades, retainer and drum) with
mineral spirits; lacquer thinner or
alcohol, as this will ensure an
accurate blade setting and proper
tool performance.
▼ INSTALLING AND ADJUSTING MINI
CARBIDE BLADES
If the blades and/or holder are gummed
and difficult to remove, remove the
clamping jaws and screws and clean all
surfaces with mineral spirits; lacquer
thinner or alcohol, as this will ensure an
accurate blade setting and proper tool
performance. (See REMOVAL OF MINI
TC BLADE HOLDERS AND RETAINERS)
To install, carefully slide the blades onto
ridges on the blade holders.
To ensure proper operation and an even
cut, the blades must be positioned so
that they are:
• Centered relative to the front and
rear shoes.
• Aligned with each other.
Fig. 4
CLAMPINg
SCREw
FRONT
SHOE
BLADE
HOLDER
RIDgE
CLAMPINg
JAw
BLADE
DRUM
BLADE
wRENCH
2610052960.qxp_PL2632 7/17/19 8:53 AM Page 10
Loading ...
Loading ...
Loading ...