Loading ...
Loading ...
Loading ...

9
1830007702_DG8624U1_110x154_41/19 Page
9
1 • Safety lock (according to model)
• Your steam station is equipped with a
safety lock that holds the iron on to the
base unit in order to facilitate transport
and storage:
• Pull up – fig. 1.
• Push down – fig. 2.
The safety lock allows you to carry your
steam station by the iron handle:
- place the iron on the iron rest of the steam
station and lock it into place (you will hear
an audible “click” sound) – fig. 1.
- Hold the iron by its handle in order to
transport your steam station - fig. 3.
2 • Water recommendations
What water should I use?
• This appliance has been designed to be
used with untreated tap water. If your
water is very hard, (hardness above 30°F,
or 17°dH or 21°e) use a mixture of 50%
tap water and 50% distilled water. In some
seaside regions, salt content might be
high. In that case, use only water bottle,
with low mineral lever
• They are different type of softened
water, and most of them can be used
in your steam gen. However, some of
them, especially the one with chimical
components, like salt, might occur white
or brown runs. If you face this type
of issue., we recommand you to use
non-treated tap water or bottled water.
•
You should not use water from domestic
appliances, with additives (starch,
perfume, etc.), rain water, boiled, filtered,
bottled water. Do not use pure distilled
nor pure demineralised water. Such
water might affect steam attributes and
at high temperature generate steam
chamber sediment, liable to stain your
linen and provoque early appliance
aging.
3 • Preparing your steam
station
• Place the steam station on a flat, stable,
horizontal and heat-resistant surface.
•
Lift the removable water tank (located at
the front of the steam station) pressing on
the lock screw located on the tank handle
– fig. 4.
• Fill the tank with untreated tap water,
taking care not to exceed the maximum
level - fig. 5.
• Slide the tank back into its housing until it
“clicks” into place.
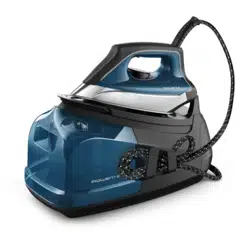
DESCRIPTION
1. Iron handle
2. Steam trigger
3. Iron temperature control dial
4. Base unit
5. Precision tip
6. Safety lock (to hold the iron onto the
base unit)*
7. Removable 1.1L / 37fl oz water tank
8. Tank filling shutter
9. “Calc away system” scale collector
or “boiler rinse” cap cover *
10. Iron rest
11. Iron temperature control light
12. Steam cord
13. Steam cord storage clip
14. “Calc Away System” scale collector*
15. a: ON / OFF Button
b: ECO button
c: MAX button
d: Water tank OK button
e: Calc away OK button
* according to model
PREPARATION
EN
Loading ...
Loading ...
Loading ...