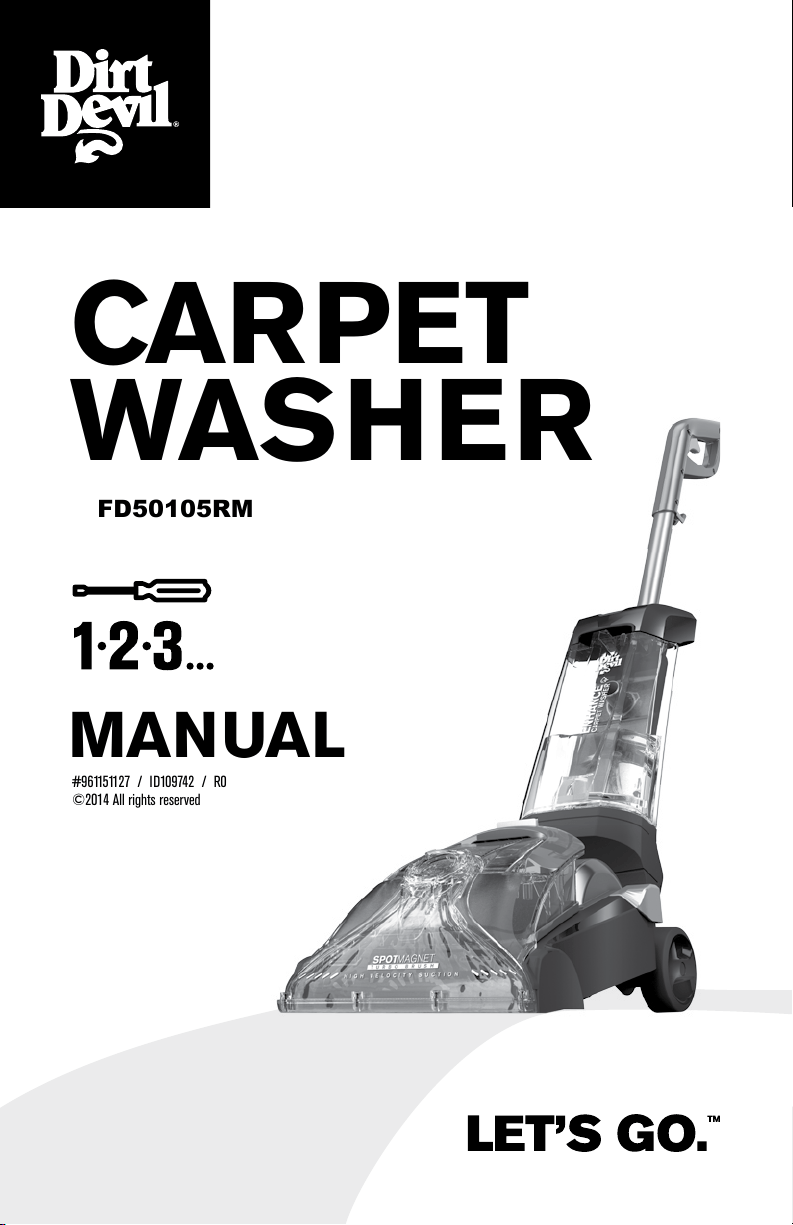
FD50105RM
CARPET
WASHER
MANUAL
#961151127 / ID109742 / R0
©2014 All rights reserved
REMANUFACTURED
TABLE OF
CONTENTS
HI. WELCOME.
PRODUCT
REGISTRATION
Quick Start Assembly 6
Preparing the Carpet 10
How to
Remove and Replace Clean
Water Solution Tank 12
Empty the Dirty Water Tank 14
Place Dirty Water
Tank in Base of Cleaner 15
Remove the Brushroll 16
Replace the Belt 17
Trouble Shooting 18
Limited Warranty 19
For quick reference, please record your product information below.
Model #:
Mfg. Code:
(Mfg. code located on the back or bottom of product)
Warranty Registration
Be sure to register your product online at www.DirtDevil.com or
call 1-800-321-1134 to register by phone.
Hint: Attach your sales receipt to this Owner’s manual. Verication of date of purchase may
be required for warranty service of your Dirt Devil
®
product.
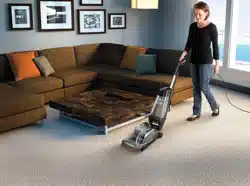
Congrats on purchasing your new Dirt Devil
®
Carpet
Washer. Inside, you’ll find everything you want to
know from the quick start guide to how to.
So what are you waiting for? LET’S GO.
™
This product uses the following parts:
BELT STYLE 30
PRE-MOTOR FILTER
F92
Find GENUINE Replacement Parts at www.dirtdevil.com
TABLE OF
CONTENTS
HI. WELCOME.
PRODUCT
REGISTRATION
Quick Start Assembly 6
Preparing the Carpet 10
How to
Remove and Replace Clean
Water Solution Tank 12
Empty the Dirty Water Tank
14
Place Dirty Water
Tank in Base of Cleaner
15
Remove the Brushroll 16
Replace the Belt 17
Trouble Shooting 18
Limited Warranty 19
For quick reference, please record your product information below.
Model #:
Mfg. Code:
(Mfg. code located on the back or bottom of product)
Warranty Registration
Be sure to register your product online at www.DirtDevil.com or
call 1-800-321-1134 to register by phone.
Hint: Attach your sales receipt to this Owner’s manual. Verication of date of purchase may
be required for warranty service of your Dirt Devil
®
product.
Congrats on purchasing your new Dirt Devil
®
Carpet
Washer. Inside, you’ll find everything you want to
know from the quick start guide to how to.
So what are you waiting for? LET’S GO.
™
This product uses the following parts:
BELT STYLE 30
PRE-MOTOR FILTER F92
Find GENUINE Replacement Parts at www.dirtdevil.com
6
MONTH

IMPORTANT: READ CAREFULLY BEFORE ASSEMBLY AND USE.
THIS PRODUCT IS INTENDED FOR HOUSEHOLD USE ONLY. IF
USED COMMERCIALLY WARRANTY IS VOID.
IMPORTANT SAFETY INSTRUCTIONS
When using an electrical appliance, basic precautions should always be
followed, including the following:
READ ALL INSTRUCTIONS BEFORE USING THIS APPLIANCE.
WARNING: TO REDUCE THE RISK OF FIRE,
ELECTRIC SHOCK OR INJURY:
• Fully assemble before operating.
• Operate cleaner only at voltage specied on data plate on bottom of cleaner.
• Do not leave appliance when plugged in. Unplug from outlet when not in use and before
cleaning or servicing.
• Use indoors only.
• Do not immerse. Use only on carpet moistened by cleaning process.
• Use only DIRT DEVIL® cleaning products intended for use with this machine.
(See the “Cleaning Products” section of this manual.)
• Do not use a ammable or combustible liquid to clean a oor.
• Do not allow to be used as a toy. Not intended for use by children age 12 and under.
Close supervision is necessary when used near children. To avoid injury or damage, keep
children away from product, and do not allow children to place ngers or other objects into
any openings.
• Use only as described in this manual. Use only manufacturer’s recommended attachments
and products.
• Do not use with damaged cord or plug. If appliance is not working as it should, has been
dropped, damaged, left outdoors, or dropped into water, take it to a service center prior to
continuing use.
• Do not pull or carry by cord, use cord as a handle, close a door on cord, or pull cord
around sharp edges or corners. Do not place product on cord. Do not run appliance over
cord. Keep cord away from heated surfaces.
• Do not unplug by pulling on cord. To unplug, grasp the plug, not the cord.
• Do not handle plug or appliance with wet hands.
• Do not put any object into openings. Do not use with any opening blocked; keep free of
dust, lint, hair, and anything that may reduce air ow.
• Keep hair, loose clothing, ngers, and all parts of body away from openings and moving parts.
• Turn off all controls before unplugging.
• Use extra care when cleaning on stairs. To avoid personal injury or damage, and to prevent
the cleaner from falling, always place cleaner at bottom of stairs or on oor. Do not place
cleaner on stairs or furniture, as it may result in injury or damage.
• Do not use to pick up ammable or combustible materials, such as gasoline, or ne wood
sandings, or use in areas where they may be present.
• Connect to a properly grounded outlet only. See Grounding Instructions.
• Do not pick up anything that is burning or smoking, such as cigarettes, matches, or hot ashes.
• Do not use without tanks or lters in place.
• Do not clean over oor electrical outlets.
• WARNING: This product contains chemicals known to the State of California to cause
cancer, birth defects or reproductive harm.
WASH HANDS AFTER USING.
CAUTION: TO REDUCE THE RISK OF DAMAGE:
• Avoid picking up hard, sharp objects with this product, as they may cause damage.
• Store in a dry place. Do not expose machine to freezing temperatures.
• Do not use sharp objects to clean out hose as they can cause damage.
• To assist in reducing drying time, be certain the area is well ventilated when using
detergents and other cleaners with this machine.
• To help prevent matting and resoiling, avoid contact with carpets until they are dry. Keep
children and pets away from carpets until they are completely dry.
• Do not store extractor with solution in tanks.
• With brushes on, do not allow cleaner to sit in one location with brushes on for extended
periods of time, as damage to oor can result.
• DO NOT USE THIS EXTRACTOR ON HARD FLOORS. USING THIS
MACHINE ON HARD FLOORS MAY SCRATCH OR DAMAGE YOUR FLOOR.
SAVE THESE INSTRUCTIONS
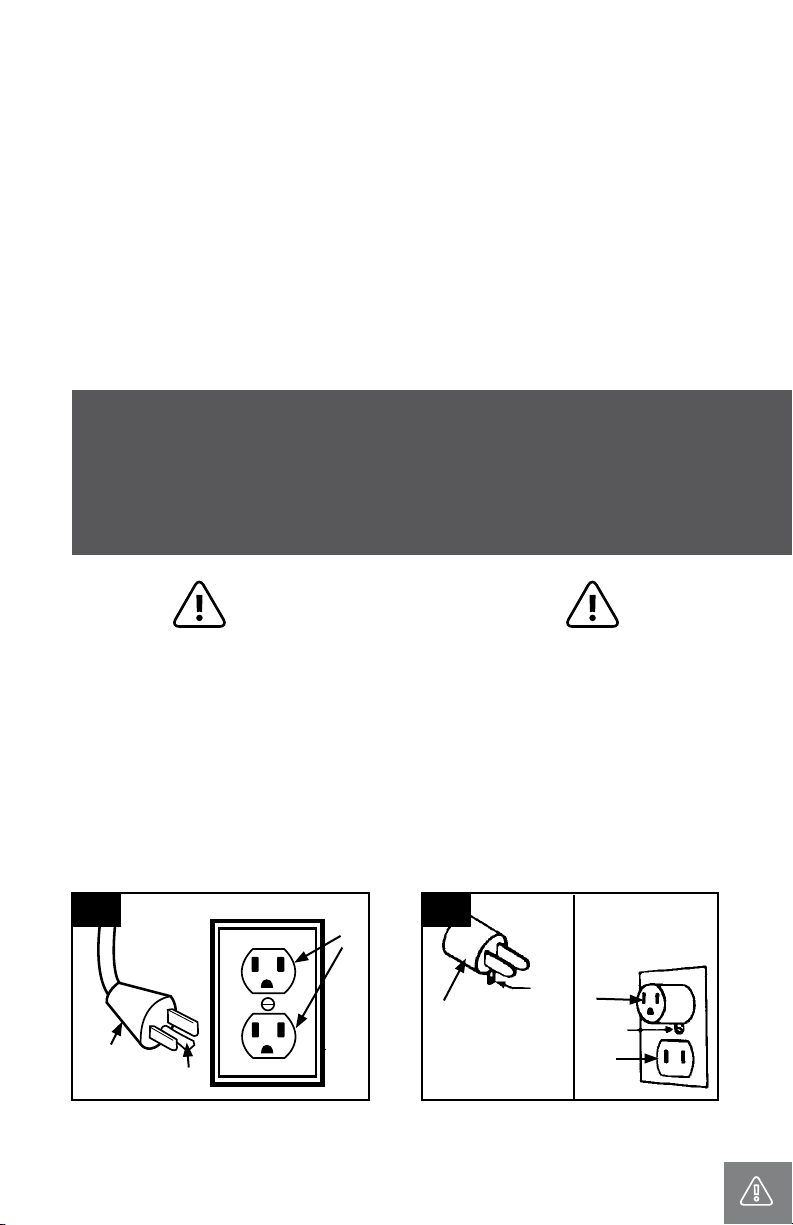
WARNING
WARNING
Improper connection of the equipment-grounding conductor can result in the risk of electric
shock. Check with a qualified electrician or service person if you are in doubt as to whether the
outlet is properly grounded. Do not modify the plug provided with the appliance - if it will not fit
the outlet, have a proper outlet installed by a qualified electrician. This appliance is for use on a
nominal 120-volt circuit and has a grounding plug that looks like the plug (A) illustrated in Fig. 1.
A temporary adapter (D) may be used to connect this plug to a 2-pole receptacle (E) if a properly
grounded outlet is not available (Fig. 2). The temporary adapter should be used only until a
properly grounded outlet (B) can be installed by a qualified electrician (Fig. 1). The green colored
rigid ear, lug, or the like (F) extending from the adapter must be connected to a permanent ground
(G) such as a properly grounded outlet box cover (Fig. 2). Whenever the adapter is used, it
must be held in place by a metal screw. NOTE: In Canada, the use of a temporary adapter is not
permitted by the Canadian Electrical Code.
GROUNDING INSTRUCTIONS
This appliance must be grounded. If it should malfunction or breakdown, grounding provides a
path of least resistance for electric current to reduce the risk of electric shock. This appliance
is equipped with a cord having an equipment-grounding conductor (C) and grounding plug (A).
The plug must be inserted into an appropriate outlet (B) that is properly installed and grounded
in accordance with all local codes and ordinances.
D
F
E
G
D
GROUNDING
OUTLET BOX
B
A
C
2
1
IMPORTANT: READ CAREFULLY BEFORE ASSEMBLY AND USE.
THIS PRODUCT IS INTENDED FOR HOUSEHOLD USE ONLY. IF
USED COMMERCIALLY WARRANTY IS VOID.
IMPORTANT SAFETY INSTRUCTIONS
When using an electrical appliance, basic precautions should always be
followed, including the following:
READ ALL INSTRUCTIONS BEFORE USING THIS APPLIANCE.
WARNING: TO REDUCE THE RISK OF FIRE,
ELECTRIC SHOCK OR INJURY:
• Fully assemble before operating.
• Operate cleaner only at voltage specied on data plate on bottom of cleaner.
• Do not leave appliance when plugged in. Unplug from outlet when not in use and before
cleaning or servicing.
• Use indoors only.
• Do not immerse. Use only on carpet moistened by cleaning process.
• Use only DIRT DEVIL® cleaning products intended for use with this machine.
(See the “Cleaning Products” section of this manual.)
• Do not use a ammable or combustible liquid to clean a oor.
• Do not allow to be used as a toy. Not intended for use by children age 12 and under.
Close supervision is necessary when used near children. To avoid injury or damage, keep
children away from product, and do not allow children to place ngers or other objects into
any openings.
• Use only as described in this manual. Use only manufacturer’s recommended attachments
and products.
• Do not use with damaged cord or plug. If appliance is not working as it should, has been
dropped, damaged, left outdoors, or dropped into water, take it to a service center prior to
continuing use.
• Do not pull or carry by cord, use cord as a handle, close a door on cord, or pull cord
around sharp edges or corners. Do not place product on cord. Do not run appliance over
cord. Keep cord away from heated surfaces.
• Do not unplug by pulling on cord. To unplug, grasp the plug, not the cord.
• Do not handle plug or appliance with wet hands.
• Do not put any object into openings. Do not use with any opening blocked; keep free of
dust, lint, hair, and anything that may reduce air ow.
• Keep hair, loose clothing, ngers, and all parts of body away from openings and moving parts.
• Turn off all controls before unplugging.
• Use extra care when cleaning on stairs. To avoid personal injury or damage, and to prevent
the cleaner from falling, always place cleaner at bottom of stairs or on oor. Do not place
cleaner on stairs or furniture, as it may result in injury or damage.
• Do not use to pick up ammable or combustible materials, such as gasoline, or ne wood
sandings, or use in areas where they may be present.
• Connect to a properly grounded outlet only. See Grounding Instructions.
• Do not pick up anything that is burning or smoking, such as cigarettes, matches, or hot ashes.
• Do not use without tanks or lters in place.
• Do not clean over oor electrical outlets.
• WARNING: This product contains chemicals known to the State of California to cause
cancer, birth defects or reproductive harm.
WASH HANDS AFTER USING.
CAUTION: TO REDUCE THE RISK OF DAMAGE:
• Avoid picking up hard, sharp objects with this product, as they may cause damage.
• Store in a dry place. Do not expose machine to freezing temperatures.
• Do not use sharp objects to clean out hose as they can cause damage.
• To assist in reducing drying time, be certain the area is well ventilated when using
detergents and other cleaners with this machine.
• To help prevent matting and resoiling, avoid contact with carpets until they are dry. Keep
children and pets away from carpets until they are completely dry.
• Do not store extractor with solution in tanks.
• With brushes on, do not allow cleaner to sit in one location with brushes on for extended
periods of time, as damage to oor can result.
• DO NOT USE THIS EXTRACTOR ON HARD FLOORS. USING THIS
MACHINE ON HARD FLOORS MAY SCRATCH OR DAMAGE YOUR FLOOR.
SAVE THESE INSTRUCTIONS
WARNING
WARNING
Improper connection of the equipment-grounding conductor can result in the risk of electric
shock. Check with a qualified electrician or service person if you are in doubt as to whether the
outlet is properly grounded. Do not modify the plug provided with the appliance - if it will not fit
the outlet, have a proper outlet installed by a qualified electrician. This appliance is for use on a
nominal 120-volt circuit and has a grounding plug that looks like the plug (A) illustrated in Fig. 1.
A temporary adapter (D) may be used to connect this plug to a 2-pole receptacle (E) if a properly
grounded outlet is not available (Fig. 2). The temporary adapter should be used only until a
properly grounded outlet (B) can be installed by a qualified electrician (Fig. 1). The green colored
rigid ear, lug, or the like (F) extending from the adapter must be connected to a permanent ground
(G) such as a properly grounded outlet box cover (Fig. 2). Whenever the adapter is used, it
must be held in place by a metal screw. NOTE: In Canada, the use of a temporary adapter is not
permitted by the Canadian Electrical Code.
GROUNDING INSTRUCTIONS
This appliance must be grounded. If it should malfunction or breakdown, grounding provides a
path of least resistance for electric current to reduce the risk of electric shock. This appliance
is equipped with a cord having an equipment-grounding conductor (C) and grounding plug (A).
The plug must be inserted into an appropriate outlet (B) that is properly installed and grounded
in accordance with all local codes and ordinances.
D
F
E
G
D
GROUNDING
OUTLET BOX
B
A
C
2
1
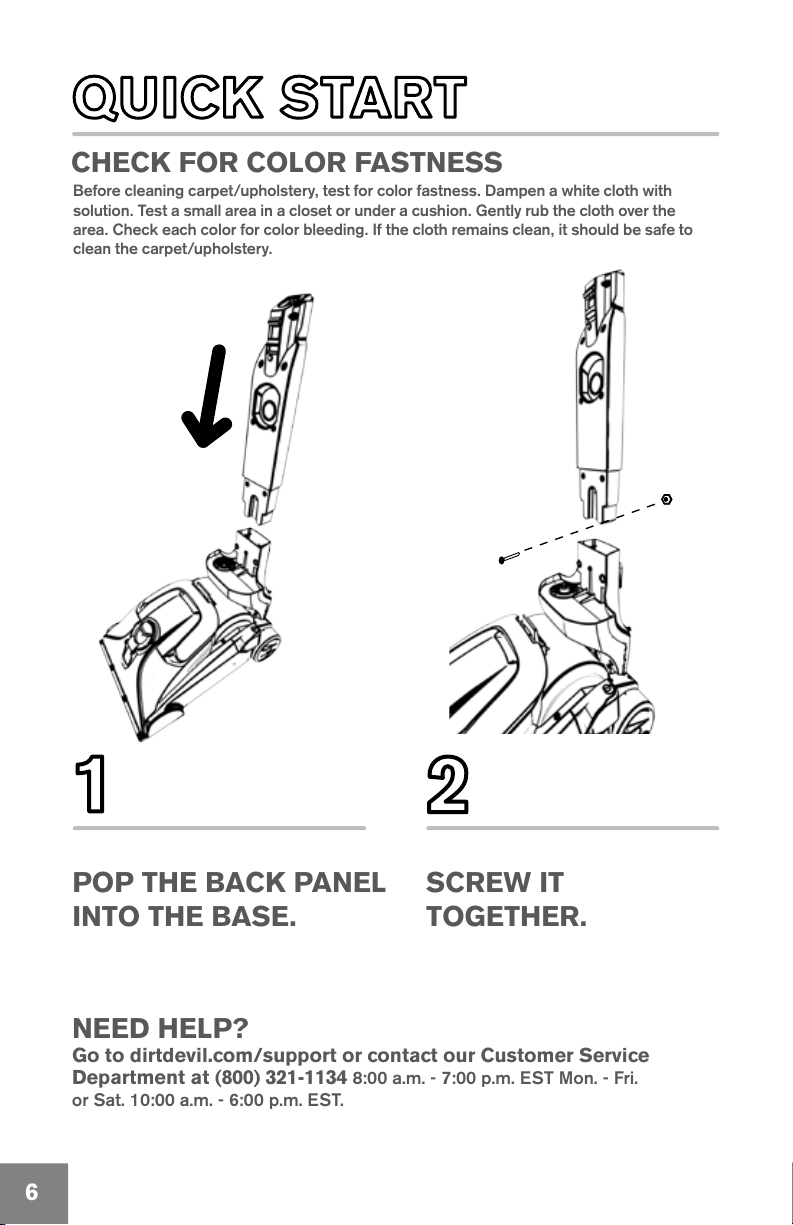
POP THE BACK PANEL
INTO THE BASE.
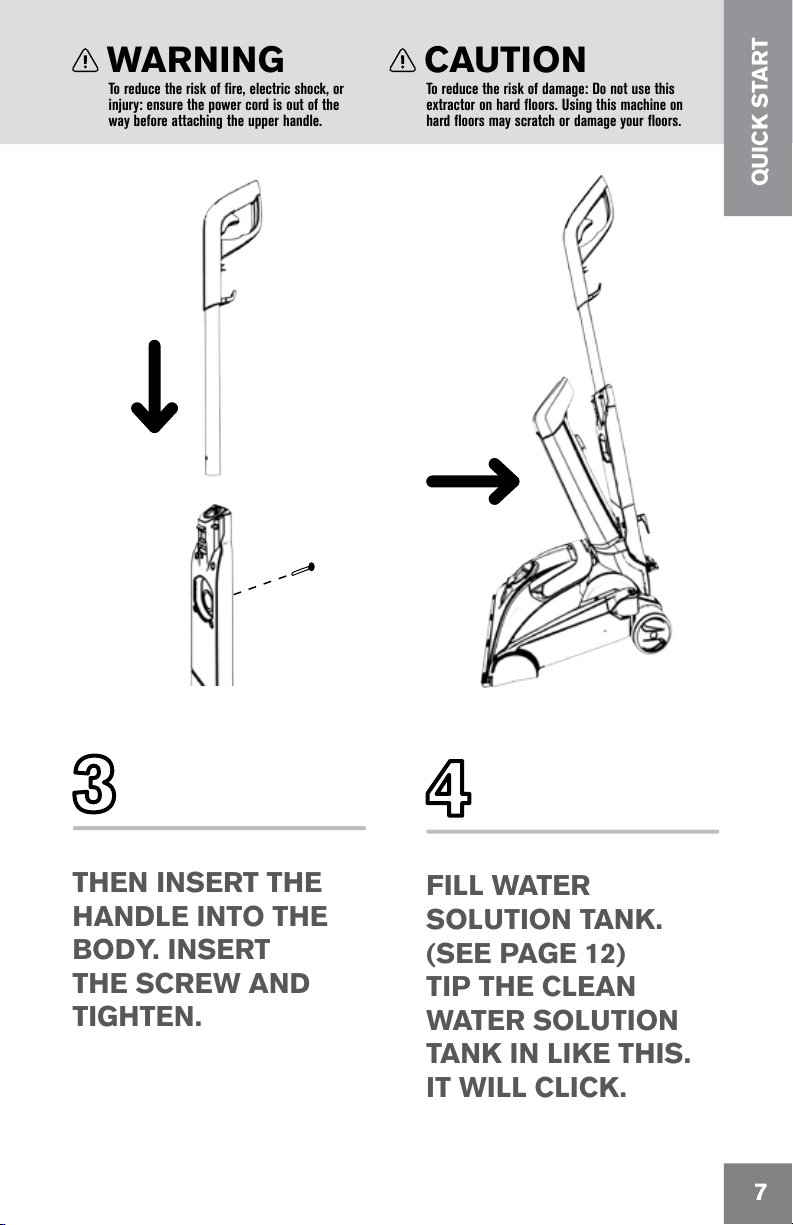
THEN INSERT THE
HANDLE INTO THE
BODY. INSERT
THE SCREW AND
TIGHTEN.
SCREW IT
TOGETHER.
NEED HELP?
Go to dirtdevil.com/support or contact our Customer Service
Department at (800) 321-1134 8:00 a.m. - 7:00 p.m. EST Mon. - Fri.
or Sat. 10:00 a.m. - 6:00 p.m. EST.
WARNING CAUTION
To reduce the risk of fire, electric shock, or
injury: ensure the power cord is out of the
way before attaching the upper handle.
To reduce the risk of damage: Do not use this
extractor on hard floors. Using this machine on
hard floors may scratch or damage your floors.
FILL WATER
SOLUTION TANK.
(SEE PAGE 12)
TIP THE CLEAN
WATER SOLUTION
TANK IN LIKE THIS.
IT WILL CLICK.
CHECK FOR COLOR FASTNESS
Before cleaning carpet/upholstery, test for color fastness. Dampen a white cloth with
solution. Test a small area in a closet or under a cushion. Gently rub the cloth over the
area. Check each color for color bleeding. If the cloth remains clean, it should be safe to
clean the carpet/upholstery.
76
QUICK START
POP THE BACK PANEL
INTO THE BASE.
THEN INSERT THE
HANDLE INTO THE
BODY. INSERT
THE SCREW AND
TIGHTEN.
SCREW IT
TOGETHER.
NEED HELP?
Go to dirtdevil.com/support or contact our Customer Service
Department at (800) 321-1134 8:00 a.m. - 7:00 p.m. EST Mon. - Fri.
or Sat. 10:00 a.m. - 6:00 p.m. EST.
WARNING CAUTION
To reduce the risk of fire, electric shock, or
injury: ensure the power cord is out of the
way before attaching the upper handle.
To reduce the risk of damage: Do not use this
extractor on hard floors. Using this machine on
hard floors may scratch or damage your floors.
FILL WATER
SOLUTION TANK.
(SEE PAGE 12)
TIP THE CLEAN
WATER SOLUTION
TANK IN LIKE THIS.
IT WILL CLICK.
CHECK FOR COLOR FASTNESS
Before cleaning carpet/upholstery, test for color fastness. Dampen a white cloth with
solution. Test a small area in a closet or under a cushion. Gently rub the cloth over the
area. Check each color for color bleeding. If the cloth remains clean, it should be safe to
clean the carpet/upholstery.
76
QUICK START
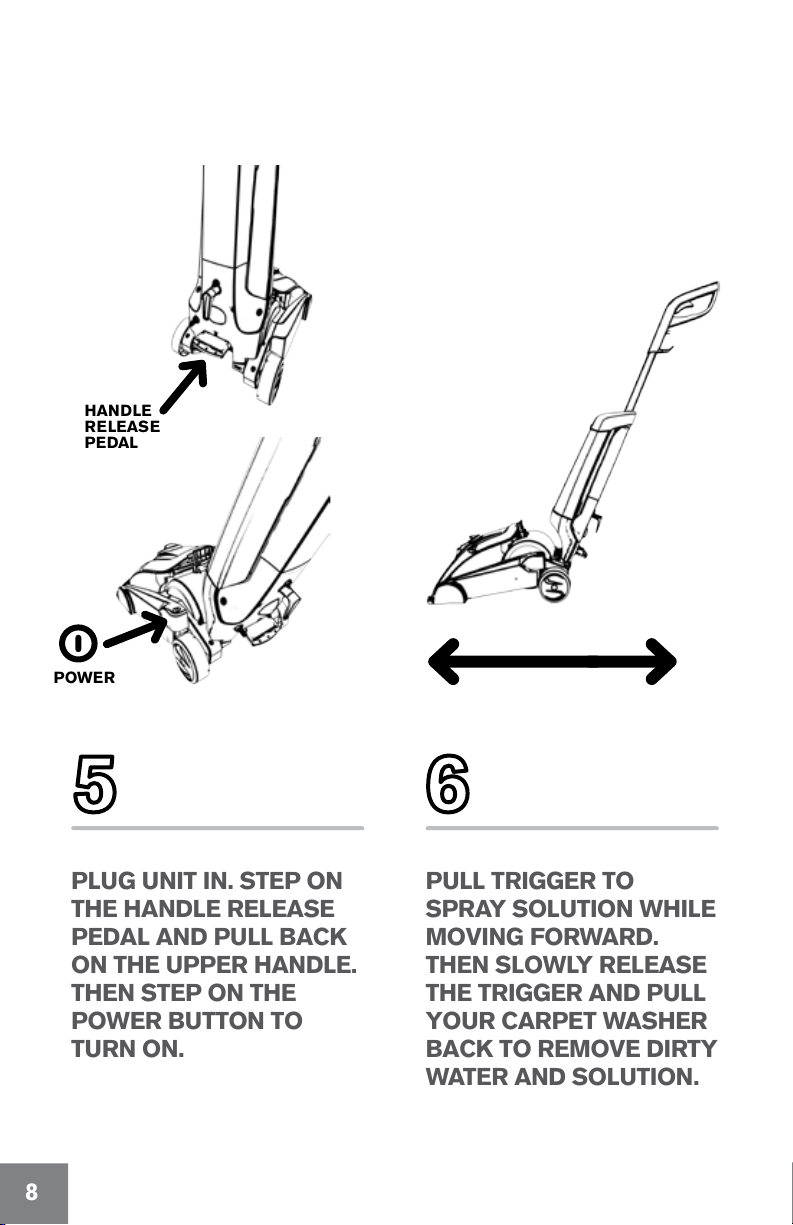
PLUG UNIT IN. STEP ON
THE HANDLE RELEASE
PEDAL AND PULL BACK
ON THE UPPER HANDLE.
THEN STEP ON THE
POWER BUTTON TO
TURN ON.
EMPTY CLEAN WATER
SOLUTION TANK AND
REFILL WITH CLEAN
WATER. REPEAT STEP
6 WITH JUST CLEAN
WATER FOR RINSING.
EMPTY DIRTY WATER
TANK WHEN FULL.
PULL TRIGGER TO
SPRAY SOLUTION WHILE
MOVING FORWARD.
THEN SLOWLY RELEASE
THE TRIGGER AND PULL
YOUR CARPET WASHER
BACK TO REMOVE DIRTY
WATER AND SOLUTION.
YOUR
CARPET
IS FRESH
AND CLEAN!
HANDLE
RELEASE
PEDAL
POWER
NEED HELP?
Go to dirtdevil.com/support or
contact our Customer Service
Department at (800) 321-1134
8:00 a.m. - 7:00 p.m. EST Mon. - Fri.
or Sat. 10:00 a.m. - 6:00 p.m. EST.
Pick up the conversation on...
Twitter@DirtDevil
Facebook.com/DirtDevil
CAUTION
Never leave unit unattended with power on. Turn OFF when emptying and filling tank. Do NOT oversaturate the carpet.
If the sound of the motor changes to a high pitch, this indicates the dirty water tank is full and must be emptied.
98
QUICK START

HELPFUL HINTS FOR CLEANING CARPET
AFTER CLEANING
1. Vacuum carpet thoroughly
with a Dirt Devil
®
cleaner.
• Do not oversaturate your
carpet with cleaning
solution.
• Stay off of the carpet
until it is dry.
2. Place plastic or foil under
and around the legs of
furniture until the carpet
has completely dried.
• Additional applications
may be needed for
heavily soiled areas.
• Be sure to rinse carpet
thoroughly with water.
• Wipe cleaning solution
from wood to prevent
damage.
• After carpet is dry,
vacuum with a
Dirt Devil
®
cleaner.
• Plan your route so you
don’t walk over previously
cleaned areas.
• Allow carpet to dry completely. Try not to walk on the
carpet until it is dry.
• If you need to walk on the carpet, place white towels
on the areas you want to walk.
• If the carpet is not dry and the furniture must be placed
back in the room, use plastic or foil under the furniture
to prevent staining the carpet.
• Thoroughly clean the dirty water tank with hot tap water.
See page 14.
CAUTIONWARNING
Do not use the carpet cleaner as a
dry vacuum.
Do not store the carpet cleaner in garage
or area where unit could freeze.
NOTE: Do not transport the carpet cleaner with either the Clean Water
Solution Tank or Dirty Water Tank full.
1110
PREPARING THE CARPET

HELPFUL HINTS FOR CLEANING CARPET
AFTER CLEANING
1. Vacuum carpet thoroughly
with a Dirt Devil
®
cleaner.
• Do not oversaturate your
carpet with cleaning
solution.
• Stay off of the carpet
until it is dry.
2. Place plastic or foil under
and around the legs of
furniture until the carpet
has completely dried.
• Additional applications
may be needed for
heavily soiled areas.
• Be sure to rinse carpet
thoroughly with water.
• Wipe cleaning solution
from wood to prevent
damage.
• After carpet is dry,
vacuum with a
Dirt Devil
®
cleaner.
• Plan your route so you
don’t walk over previously
cleaned areas.
• Allow carpet to dry completely. Try not to walk on the
carpet until it is dry.
• If you need to walk on the carpet, place white towels
on the areas you want to walk.
• If the carpet is not dry and the furniture must be placed
back in the room, use plastic or foil under the furniture
to prevent staining the carpet.
• Thoroughly clean the dirty water tank with hot tap water.
See page 14.
CAUTION WARNING
Do not use the carpet cleaner as a
dry vacuum.
Do not store the carpet cleaner in garage
or area where unit could freeze.
NOTE: Do not transport the carpet cleaner with either the Clean Water
Solution Tank or Dirty Water Tank full.
1110
PREPARING THE CARPET
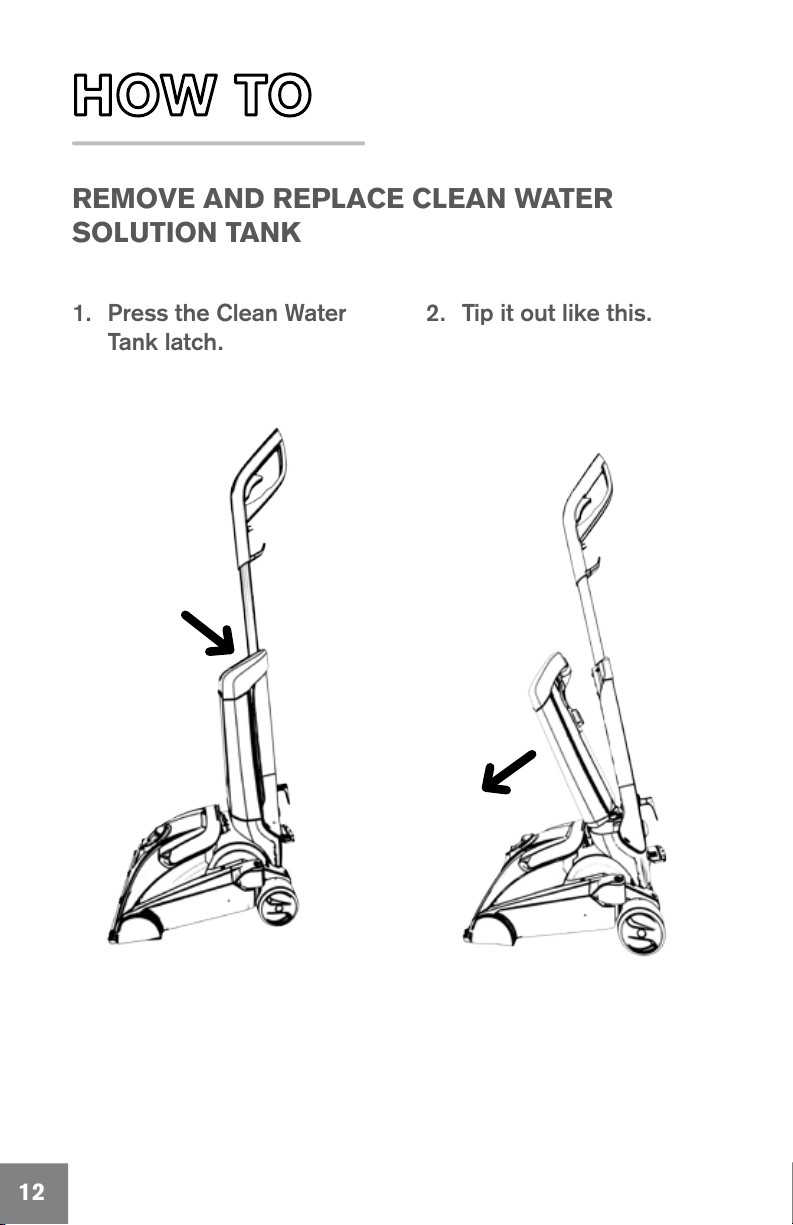
1. Press the Clean Water
Tank latch.
2. Tip it out like this.
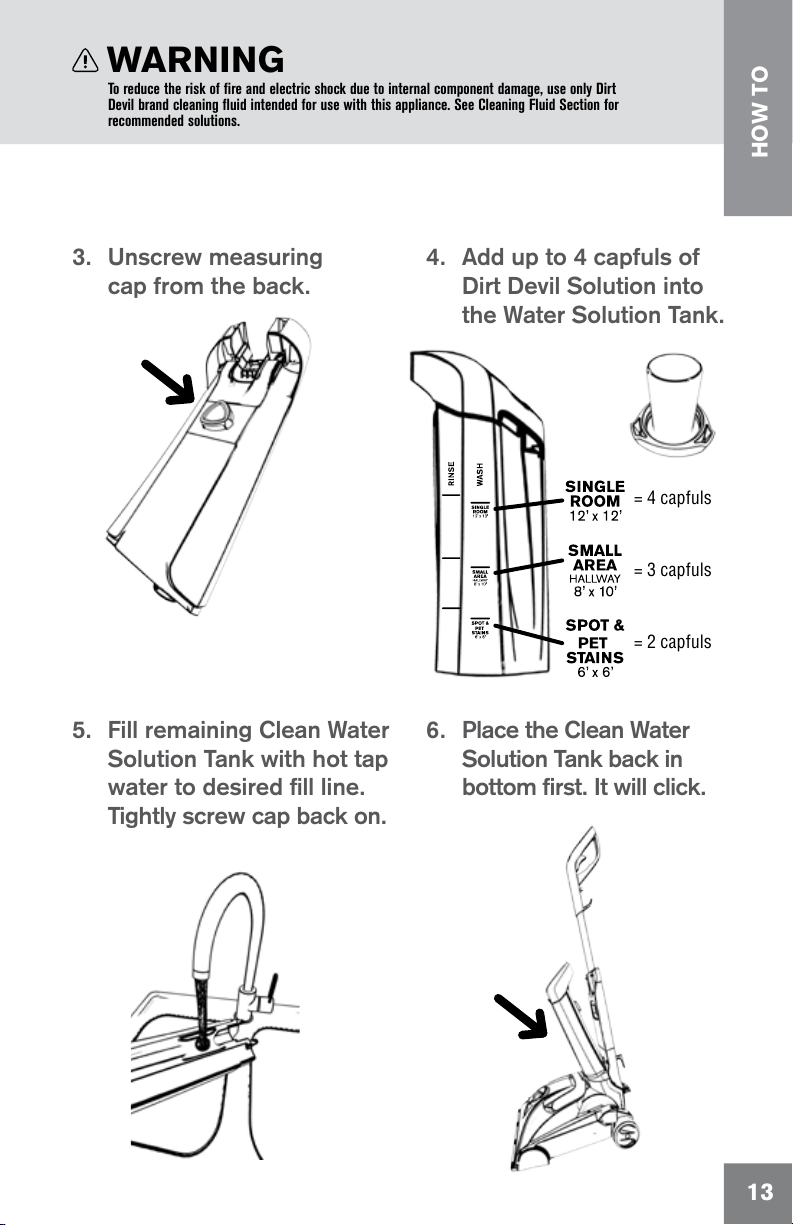
3. Unscrew measuring
cap from the back.
4. Add up to 4 capfuls of
Dirt Devil Solution into
the Water Solution Tank.
5. Fill remaining Clean Water
Solution Tank with hot tap
water to desired fill line.
Tightly screw cap back on.
6. Place the Clean Water
Solution Tank back in
bottom first. It will click.
REMOVE AND REPLACE CLEAN WATER
SOLUTION TANK
WARNING
To reduce the risk of fire and electric shock due to internal component damage, use only Dirt
Devil brand cleaning fluid intended for use with this appliance. See Cleaning Fluid Section for
recommended solutions.
= 2 capfuls
= 3 capfuls
= 4 capfuls
HOW TO
1312
1. Press the Clean Water
Tank latch.
2. Tip it out like this.
3. Unscrew measuring
cap from the back.
4. Add up to 4 capfuls of
Dirt Devil Solution into
the Water Solution Tank.
5. Fill remaining Clean Water
Solution Tank with hot tap
water to desired fill line.
Tightly screw cap back on.
6. Place the Clean Water
Solution Tank back in
bottom first. It will click.
REMOVE AND REPLACE CLEAN WATER
SOLUTION TANK
WARNING
To reduce the risk of fire and electric shock due to internal component damage, use only Dirt
Devil brand cleaning fluid intended for use with this appliance. See Cleaning Fluid Section for
recommended solutions.
= 2 capfuls
= 3 capfuls
= 4 capfuls
HOW TO
1312
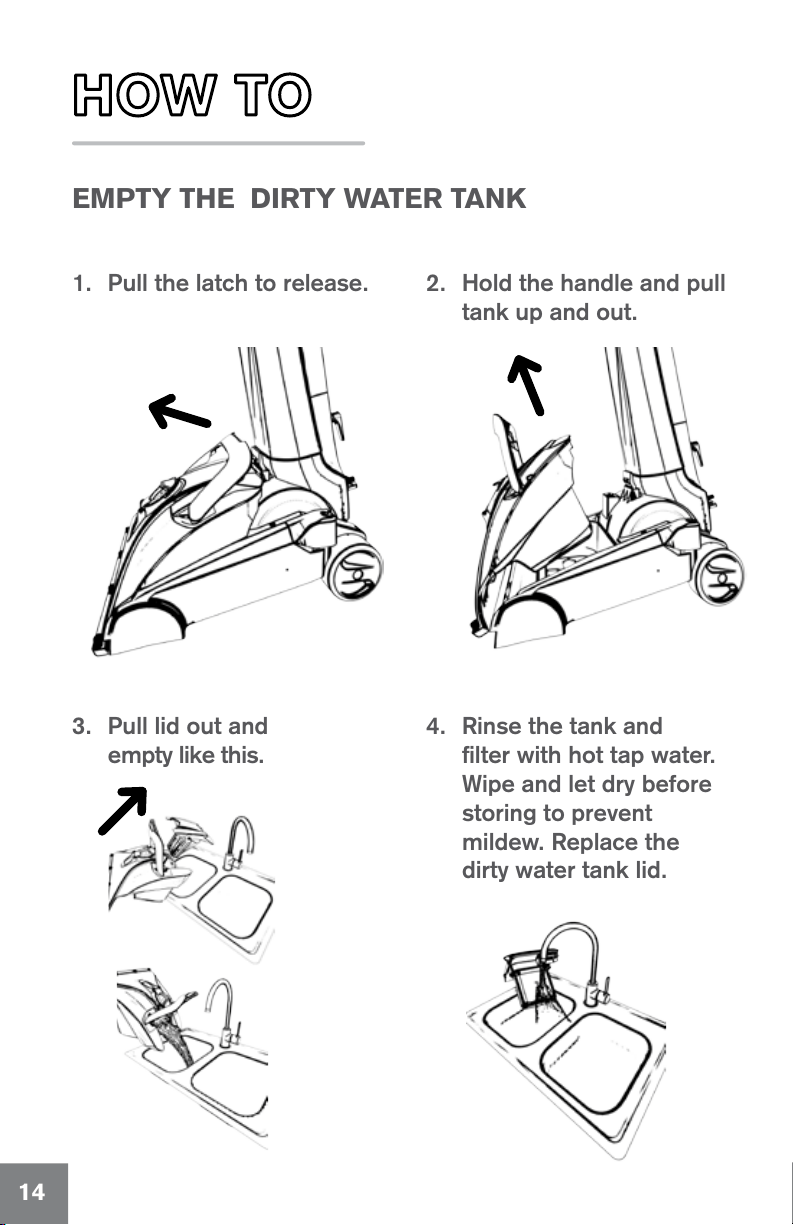
EMPTY THE DIRTY WATER TANK
1. Pull the latch to release.
2. Hold the handle and pull
tank up and out.
3. Pull lid out and
empty like this.
4. Rinse the tank and
filter with hot tap water.
Wipe and let dry before
storing to prevent
mildew. Replace the
dirty water tank lid.
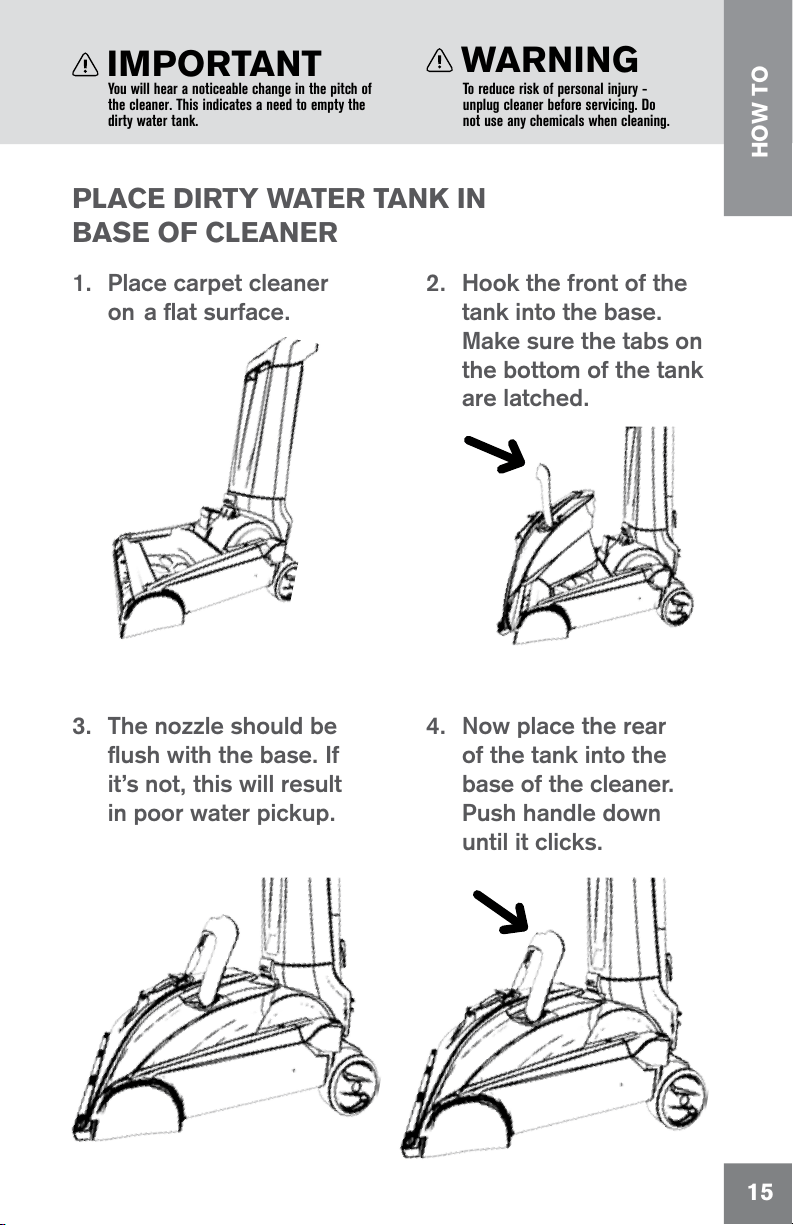
PLACE DIRTY WATER TANK IN
BASE OF CLEANER
1. Place carpet cleaner
on a flat surface.
2. Hook the front of the
tank into the base.
Make sure the tabs on
the bottom of the tank
are latched.
3. The nozzle should be
flush with the base. If
it’s not, this will result
in poor water pickup.
4. Now place the rear
of the tank into the
base of the cleaner.
Push handle down
until it clicks.
IMPORTANT
You will hear a noticeable change in the pitch of
the cleaner. This indicates a need to empty the
dirty water tank.
WARNING
To reduce risk of personal injury -
unplug cleaner before servicing. Do
not use any chemicals when cleaning.
HOW TO
1514
EMPTY THE DIRTY WATER TANK
1. Pull the latch to release.
2. Hold the handle and pull
tank up and out.
3. Pull lid out and
empty like this.
4. Rinse the tank and
filter with hot tap water.
Wipe and let dry before
storing to prevent
mildew. Replace the
dirty water tank lid.
PLACE DIRTY WATER TANK IN
BASE OF CLEANER
1. Place carpet cleaner
on a flat surface.
2. Hook the front of the
tank into the base.
Make sure the tabs on
the bottom of the tank
are latched.
3. The nozzle should be
flush with the base. If
it’s not, this will result
in poor water pickup.
4. Now place the rear
of the tank into the
base of the cleaner.
Push handle down
until it clicks.
IMPORTANT
You will hear a noticeable change in the pitch of
the cleaner. This indicates a need to empty the
dirty water tank.
WARNING
To reduce risk of personal injury -
unplug cleaner before servicing. Do
not use any chemicals when cleaning.
HOW TO
1514
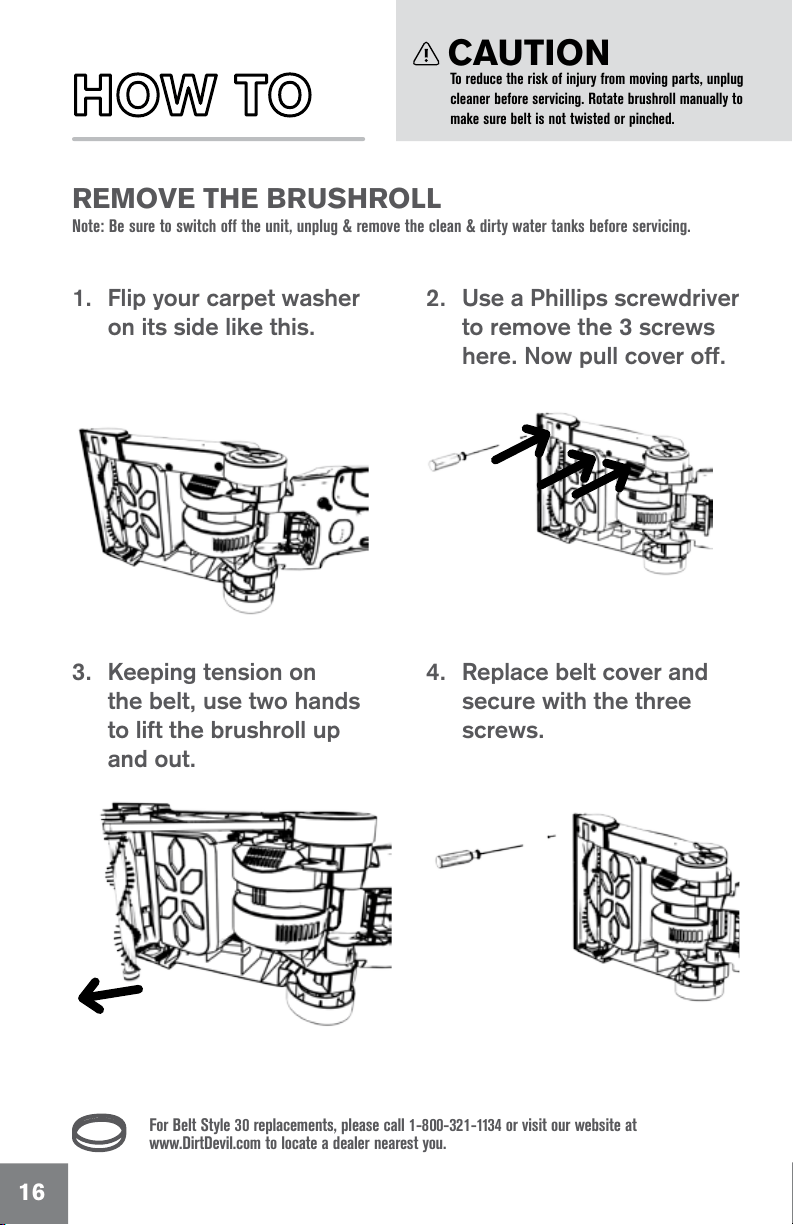
REMOVE THE BRUSHROLL
Note: Be sure to switch off the unit, unplug & remove the clean & dirty water tanks before servicing.
REPLACE THE BELT
1. Flip your carpet washer
on its side like this.
2. Use a Phillips screwdriver
to remove the 3 screws
here. Now pull cover off.
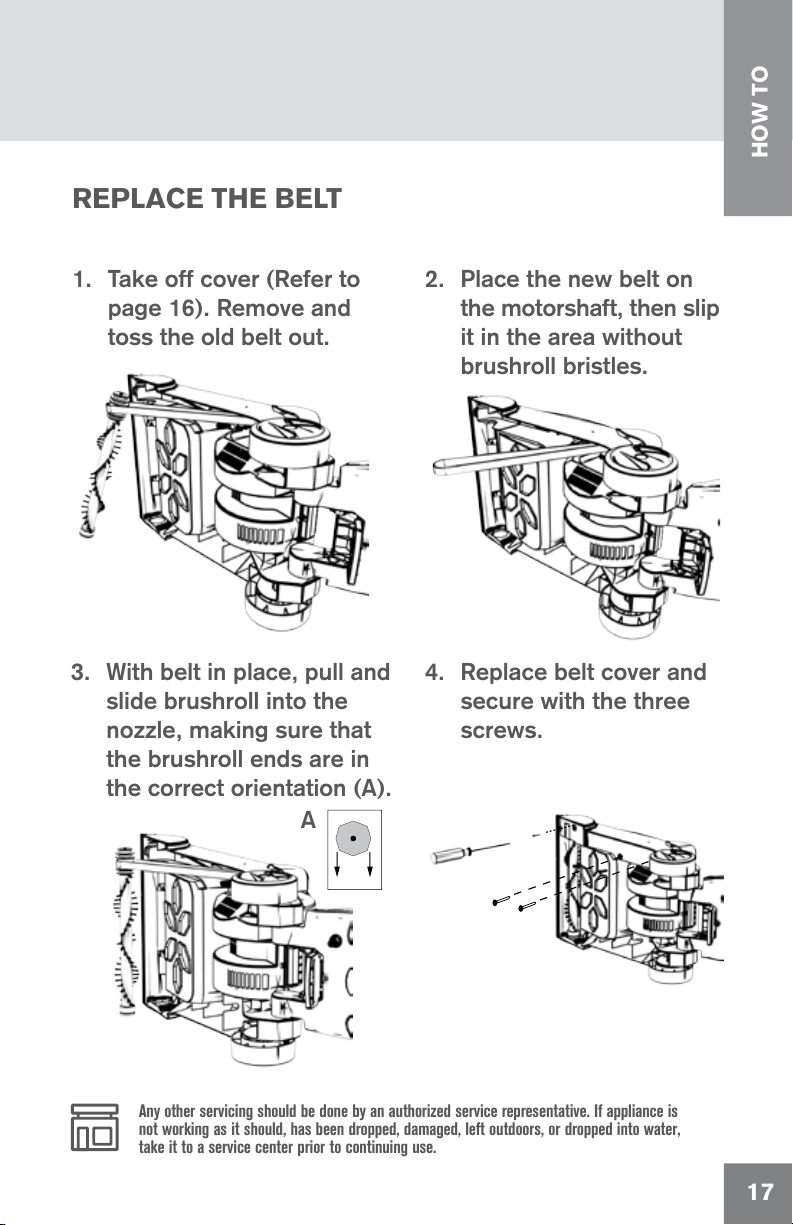
1. Take off cover (Refer to
page 16). Remove and
toss the old belt out.
2. Place the new belt on
the motorshaft, then slip
it in the area without
brushroll bristles.
3. Keeping tension on
the belt, use two hands
to lift the brushroll up
and out.
4. Replace belt cover and
secure with the three
screws.
4. Replace belt cover and
secure with the three
screws.
A
CAUTION
To reduce the risk of injury from moving parts, unplug
cleaner before servicing. Rotate brushroll manually to
make sure belt is not twisted or pinched.
For Belt Style 30 replacements, please call 1-800-321-1134 or visit our website at
www.DirtDevil.com to locate a dealer nearest you.
Any other servicing should be done by an authorized service representative. If appliance is
not working as it should, has been dropped, damaged, left outdoors, or dropped into water,
take it to a service center prior to continuing use.
3. With belt in place, pull and
slide brushroll into the
nozzle, making sure that
the brushroll ends are in
the correct orientation (A).
HOW TO
1716
REMOVE THE BRUSHROLL
Note: Be sure to switch off the unit, unplug & remove the clean & dirty water tanks before servicing.
REPLACE THE BELT
1. Flip your carpet washer
on its side like this.
2. Use a Phillips screwdriver
to remove the 3 screws
here. Now pull cover off.
1. Take off cover (Refer to
page 16). Remove and
toss the old belt out.
2. Place the new belt on
the motorshaft, then slip
it in the area without
brushroll bristles.
3. Keeping tension on
the belt, use two hands
to lift the brushroll up
and out.
4. Replace belt cover and
secure with the three
screws.
4. Replace belt cover and
secure with the three
screws.
A
CAUTION
To reduce the risk of injury from moving parts, unplug
cleaner before servicing. Rotate brushroll manually to
make sure belt is not twisted or pinched.
For Belt Style 30 replacements, please call 1-800-321-1134 or visit our website at
www.DirtDevil.com to locate a dealer nearest you.
Any other servicing should be done by an authorized service representative. If appliance is
not working as it should, has been dropped, damaged, left outdoors, or dropped into water,
take it to a service center prior to continuing use.
3. With belt in place, pull and
slide brushroll into the
nozzle, making sure that
the brushroll ends are in
the correct orientation (A).
HOW TO
1716
WARNING TO REDUCE THE RISK OF PERSONAL
INJURY - UNPLUG BEFORE CLEANING OR SERVICING.
If a minor problem occurs, it usually can be solved quite easily when the cause is found
by using the checklist below. Any other servicing should be done by an authorized service
representative. If appliance is not working as it should, has been dropped, damaged, left
outdoors, or dropped into water, take it to a service center prior to continuing use.
LIMITED
WARRANTY
WHAT THIS WARRANTY COVERS
When used and maintained in normal household use and in accordance with the Owner’s Manual, your
Dirt Devil
®
product is warranted against original defects in material and workmanship. During the
Warranty Period, We will provide labor and parts, at no cost to you, to correct any such defect in
products purchased in the United States, U.S. Military Exchanges and Canada.
HOW TO MAKE A WARRANTY CLAIM
If this product is not as warranted, take or send the product to a Dirt Devil
®
Authorized Warranty
Service Dealer along with proof of purchase. For an automated referral to authorized service outlets in
the U.S.A., phone: 1-800-321-1134 OR visit Dirt Devil
®
online at www.DirtDevil.com. For additional
assistance or information concerning this Warranty or the availability of warranty service outlets, phone
the Dirt Devil
®
Consumer Response Center, Phone 1-800-321-1134, Mon-Fri 8am-7pm EST.
WHAT THIS WARRANTY DOES NOT COVER
This Warranty does not cover: use of the product in a commercial operation (such as maid, janitorial
and equipment rental services), brushroll, belt, bags, filters, improper maintenance of the product,
damage due to misuse, acts of God, nature, vandalism or other acts beyond the control of Royal
Appliance Mfg. Co. (“Royal”, “we”), owner’s acts or omissions, use outside the country in which the
product was initially purchased and resales of the product by the original owner. This warranty does
not cover pick up, delivery, transportation or house calls.
This warranty does not apply to products purchased outside the United States, including its
territories and possessions, outside a U.S. Military Exchange and outside of Canada. This warranty
does not cover products purchased from a party that is not an authorized retailer, dealer, or
distributor of Royal products.
OTHER IMPORTANT TERMS
This Warranty is not transferable and may not be assigned. This Warranty shall be governed and
construed under the laws of the state of Ohio. The Warranty Period will not be extended by any
replacement or repair performed under this Warranty.
THIS WARRANTY IS THE EXCLUSIVE WARRANTY AND REMEDY PROVIDED BY ROYAL. ALL OTHER
WARRANTIES, EXPRESSED OR IMPLIED, INCLUDING WARRANTIES OF MERCHANTABILITY OR
FITNESS FOR PARTICULAR PURPOSE, ARE DISCLAIMED. IN NO EVENT WILL ROYAL BE LIABLE
FOR ANY SPECIAL, INDIRECT, INCIDENTAL OR CONSEQUENTIAL DAMAGES OF ANY KIND OR
NATURE TO OWNER OR ANY PARTY CLAIMING THROUGH OWNER, WHETHER BASED IN
CONTRACT, NEGLIGENCE, TORT OR STRICT PRODUCTS LIABILITY OR ARISING FROM ANY CAUSE
WHATSOEVER. Some states do not allow the exclusion of consequential damages, so the above
exclusion may not apply to you. This warranty gives you specific rights; you may also have others that
vary from state to state.
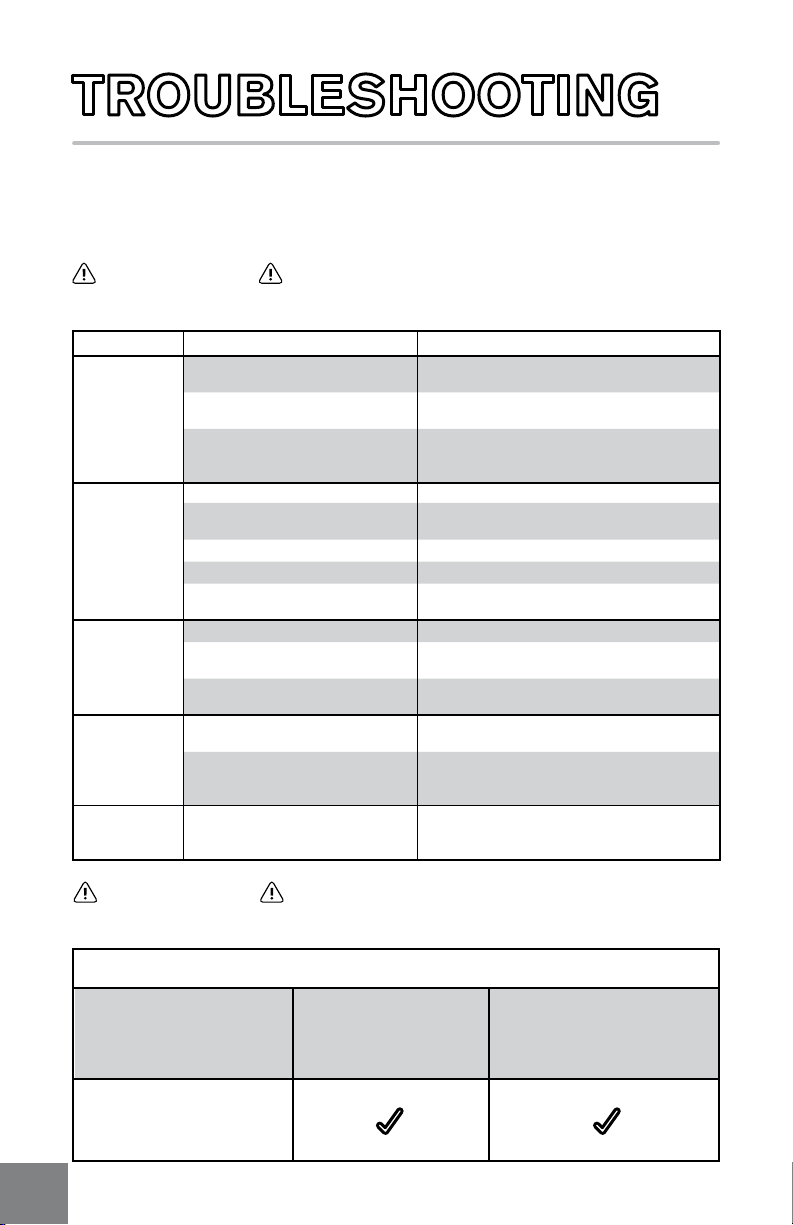
PROBLEM POSSIBLE CAUSE POSSIBLE SOLUTION
Cleaner won’t
run
1. Power cord not firmly plugged
into outlet.
1. Plug unit in firmly.
2. Blown fuse or tripped breaker.
2. Check fuse or breaker in home. Replace
fuse/reset breaker in home.
3. Needs service.
3. Take to service center. To find nearest
location, visit our website at www.DirtDevil.com
or call 1-800-321-1134.
Cleaner won’t
pick-up or low
suction
1. Dirty Water Tank Lid not installed. 1. Insert Dirty Water Tank Lid - Pg. 14.
2. Dirty Water Tank is not installed
correctly.
2. Review Placing Dirty Water Tank in base of
cleaner - Pg. 15.
3. Dirty Water Tank is full. 3. Empty Dirty Water Tank - Pg. 14.
4. Dirty water passage clogged. 4. Clean Dirty Water Tank - Pg. 14.
5. Foam filter is dirty. 5. Clean filter. Review Emptying & Cleaning the
Dirty Water Tank - Pg. 14.
Water
escaping from
Cleaner
1. Dirty Water Tank is full. 1. Emptying Dirty Water Tank - Pg. 14.
2. Dirty Water tank is not installed
correctly.
2. Review Placing Dirty Water Tank in base of
cleaner - Pg. 15.
3. Clean Water Solution Tank not
installed properly.
3. Review Clean Water Solution Tank
Installation - Pg. 12.
Cleaner won’t
dispense
1. Clean Water Solution Tank not
installed properly.
1. Review Clean Water Solution Tank
Installation - Pg. 12.
2. Needs service. 2. Take to service center. To find nearest
location, visit our website at www.DirtDevil.com
or call 1-800-321-1134.
Motor noise
becomes
high-pitched
1. The float in the Dirty Water Tank
has been activated.
1. Review Emptying & Cleaning the Dirty Water
Tank - Pg. 14.
Dirt Devil
®
Cleaning Product Guide
Product Name
Dirt Devil
®
Quick & Light
Revive™
Enhance™
Deep Clean
Advanced
32 oz. & 64 oz.
Deep Clean
Pet
32 oz. & 64 oz.
WARNING TO REDUCE THE RISK OF FIRE AND ELECTRICAL SHOCK DUE
TO INTERNAL COMPONENT DAMAGE, USE ONLY DIRT DEVIL
®
BRAND DETERGENT PRODUCTS
INTENDED FOR USE WITH THE APPLIANCE.
19
18

WARNING TO REDUCE THE RISK OF PERSONAL
INJURY - UNPLUG BEFORE CLEANING OR SERVICING.
If a minor problem occurs, it usually can be solved quite easily when the cause is found
by using the checklist below. Any other servicing should be done by an authorized service
representative. If appliance is not working as it should, has been dropped, damaged, left
outdoors, or dropped into water, take it to a service center prior to continuing use.
LIMITED
WARRANTY
WHAT THIS WARRANTY COVERS
When used and maintained in normal household use and in accordance with the Owner’s Manual, your
Dirt Devil
®
product is warranted against original defects in material and workmanship. During the
Warranty Period, We will provide labor and parts, at no cost to you, to correct any such defect in
products purchased in the United States, U.S. Military Exchanges and Canada.
HOW TO MAKE A WARRANTY CLAIM
If this product is not as warranted, take or send the product to a Dirt Devil
®
Authorized Warranty
Service Dealer along with proof of purchase. For an automated referral to authorized service outlets in
the U.S.A., phone: 1-800-321-1134 OR visit Dirt Devil
®
online at www.DirtDevil.com. For additional
assistance or information concerning this Warranty or the availability of warranty service outlets, phone
the Dirt Devil
®
Consumer Response Center, Phone 1-800-321-1134, Mon-Fri 8am-7pm EST.
WHAT THIS WARRANTY DOES NOT COVER
This Warranty does not cover: use of the product in a commercial operation (such as maid, janitorial
and equipment rental services), brushroll, belt, bags, filters, improper maintenance of the product,
damage due to misuse, acts of God, nature, vandalism or other acts beyond the control of Royal
Appliance Mfg. Co. (“Royal”, “we”), owner’s acts or omissions, use outside the country in which the
product was initially purchased and resales of the product by the original owner. This warranty does
not cover pick up, delivery, transportation or house calls.
This warranty does not apply to products purchased outside the United States, including its
territories and possessions, outside a U.S. Military Exchange and outside of Canada. This warranty
does not cover products purchased from a party that is not an authorized retailer, dealer, or
distributor of Royal products.
OTHER IMPORTANT TERMS
This Warranty is not transferable and may not be assigned. This Warranty shall be governed and
construed under the laws of the state of Ohio. The Warranty Period will not be extended by any
replacement or repair performed under this Warranty.
THIS WARRANTY IS THE EXCLUSIVE WARRANTY AND REMEDY PROVIDED BY ROYAL. ALL OTHER
WARRANTIES, EXPRESSED OR IMPLIED, INCLUDING WARRANTIES OF MERCHANTABILITY OR
FITNESS FOR PARTICULAR PURPOSE, ARE DISCLAIMED. IN NO EVENT WILL ROYAL BE LIABLE
FOR ANY SPECIAL, INDIRECT, INCIDENTAL OR CONSEQUENTIAL DAMAGES OF ANY KIND OR
NATURE TO OWNER OR ANY PARTY CLAIMING THROUGH OWNER, WHETHER BASED IN
CONTRACT, NEGLIGENCE, TORT OR STRICT PRODUCTS LIABILITY OR ARISING FROM ANY CAUSE
WHATSOEVER. Some states do not allow the exclusion of consequential damages, so the above
exclusion may not apply to you. This warranty gives you specific rights; you may also have others that
vary from state to state.
PROBLEM POSSIBLE CAUSE POSSIBLE SOLUTION
Cleaner won’t
run
1. Power cord not firmly plugged
into outlet.
1. Plug unit in firmly.
2. Blown fuse or tripped breaker.
2. Check fuse or breaker in home. Replace
fuse/reset breaker in home.
3. Needs service.
3. Take to service center. To find nearest
location, visit our website at www.DirtDevil.com
or call 1-800-321-1134.
Cleaner won’t
pick-up or low
suction
1. Dirty Water Tank Lid not installed. 1. Insert Dirty Water Tank Lid - Pg. 14.
2. Dirty Water Tank is not installed
correctly.
2. Review Placing Dirty Water Tank in base of
cleaner - Pg. 15.
3. Dirty Water Tank is full. 3. Empty Dirty Water Tank - Pg. 14.
4. Dirty water passage clogged. 4. Clean Dirty Water Tank - Pg. 14.
5. Foam filter is dirty. 5. Clean filter. Review Emptying & Cleaning the
Dirty Water Tank - Pg. 14.
Water
escaping from
Cleaner
1. Dirty Water Tank is full. 1. Emptying Dirty Water Tank - Pg. 14.
2. Dirty Water tank is not installed
correctly.
2. Review Placing Dirty Water Tank in base of
cleaner - Pg. 15.
3. Clean Water Solution Tank not
installed properly.
3. Review Clean Water Solution Tank
Installation - Pg. 12.
Cleaner won’t
dispense
1. Clean Water Solution Tank not
installed properly.
1. Review Clean Water Solution Tank
Installation - Pg. 12.
2. Needs service. 2. Take to service center. To find nearest
location, visit our website at www.DirtDevil.com
or call 1-800-321-1134.
Motor noise
becomes
high-pitched
1. The float in the Dirty Water Tank
has been activated.
1. Review Emptying & Cleaning the Dirty Water
Tank - Pg. 14.
Dirt Devil
®
Cleaning Product Guide
Product Name
Dirt Devil
®
Quick & Light
Revive™
Enhance™
Deep Clean
Advanced
32 oz. & 64 oz.
Deep Clean
Pet
32 oz. & 64 oz.
WARNING TO REDUCE THE RISK OF FIRE AND ELECTRICAL SHOCK DUE
TO INTERNAL COMPONENT DAMAGE, USE ONLY DIRT DEVIL
®
BRAND DETERGENT PRODUCTS
INTENDED FOR USE WITH THE APPLIANCE.
19
18
6
MONTH
Appeler le service à la
clientèle au 800 321 1134,
de 8 h à 19 h (HE), du lundi au
vendredi, ou 10 h à 18 h (HE), le samedi
www.dirtdevil.com
Obtenez des pièces
d’origine à
www.dirtdevil.com
Le produit utilise les pièces suivantes :
TYPE DE COURROIE
30
FILTRE SITUÉ AVANT LE MOTEUR F92
NOS ASPIRATEURS
PARLENT DE
VOLUMES
Participez à la conversation...
Twitter@DirtDevil
Facebookcom/DirtDevil
LAVADORA DE
ALFOMBRAS
MANUAL
#961151127 / ID109742 / R0
©2014 Todos los derechos reservados
FD50105RM
RE
FABRICADO

HOLA. BIENVENIDO.
REGISTRO DEL
PRODUCTO
Para una referencia rápida, registre la información de su electrodoméstico a continuación.
Modelo #:
Fabricación: Código:
(Código de fabricación ubicado en la parte posterior o inferior del producto)
Registro de garantía
No olvide registrar su electrodoméstico en línea en www.DirtDevil.com o
llamar al 1-800-321-1134 para hacerlo por teléfono.
Sugerencia: Adjunte el recibo de compra a este manual del propietario. Es posible que se necesite
vericar la fecha de compra para hacer válido el servicio de garantía de su producto Dirt Devil
®
.
Felicidades por la compra de su nueva lavadora de
alfombras Dirt Devil
®
. En el interior encontrará todo
lo que necesita saber, desde la guía de inicio rápido
hasta cómo utilizarla.
Entonces, ¿qué espera? LET’S GO.
™
Este producto utiliza las siguientes piezas:
CORREA ESTILO 30
FILTRO PREVIO AL MOTOR
F92
Si necesita piezas de repuesto originales, visite en
www.dirtdevil.com
ÍNDICE
Guía de inicio rápido 46
Preparación de la alfombra 50
Cómo utilizar
Cómo retirar y colocar nuevamente
el tanque de agua limpia 52
Vacíe el tanque de agua sucia 54
Coloque el tanque de agua sucia
en la base de la limpiadora 55
Cómo retirar el cepillo giratorio 56
Cómo remplazar la correa 57
TGuía de solución de problemas 58
Garantía limitada 59
HOLA. BIENVENIDO.
REGISTRO DEL
PRODUCTO
Para una referencia rápida, registre la información de su electrodoméstico a continuación.
Modelo #:
Fabricación: Código:
(Código de fabricación ubicado en la parte posterior o inferior del producto)
Registro de garantía
No olvide registrar su electrodoméstico en línea en www.DirtDevil.com o
llamar al 1-800-321-1134 para hacerlo por teléfono.
Sugerencia: Adjunte el recibo de compra a este manual del propietario. Es posible que se necesite
vericar la fecha de compra para hacer válido el servicio de garantía de su producto Dirt Devil
®
.
Felicidades por la compra de su nueva lavadora de
alfombras Dirt Devil
®
. En el interior encontrará todo
lo que necesita saber, desde la guía de inicio rápido
hasta cómo utilizarla.
Entonces, ¿qué espera? LET’S GO.
™
Este producto utiliza las siguientes piezas:
CORREA ESTILO 30
FILTRO PREVIO AL MOTOR F92
Si necesita piezas de repuesto originales, visite en
www.dirtdevil.com
ÍNDICE
Guía de inicio rápido
25
Preparación de la alfombra
29
Cómo utilizar
Cómo retirar y colocar nuevamente
el tanque de agua limpia
31
Vacíe el tanque de agua sucia
33
Coloque el tanque de agua sucia
en la base de la limpiadora
34
Cómo retirar el cepillo giratorio
35
Cómo remplazar la correa
36
TGuía de solución de problemas
37
Garantía limitada
38
6
MESES

IMPORTANTE: LEA ATENTAMENTE ANTES DE ENSAMBLAR Y USAR.
ESTE PRODUCTO ESTÁ DISEÑADO SÓLO PARA USO DOMÉSTICO.
EL USO COMERCIAL DE ESTE PRODUCTO ANULA LA GARANTÍA.
INSTRUCCIONES DE SEGURIDAD IMPORTANTES
Cuando use un aparato eléctrico, siempre siga las precauciones básicas, que
incluyen las siguientes:
LEA TODAS LAS INSTRUCCIONES ANTES DE USAR ESTE APARATO
ADVERTENCIA: PARA REDUCIR EL RIESGO DE
INCENDIO,DESCARGA ELÉCTRICA O LESIÓN:
• Ensamble completamente el producto antes de hacerlo funcionar.
• Use la aspiradora y el cargador solamente con el voltaje especicado en la placa de datos
ubicada en la parte inferior de la misma.
• No deje el aparato sin supervisión cuando esté enchufado. Desenchúfelo de la toma de
corriente cuando no lo esté usando y antes de limpiarlo o darle mantenimiento.
• Para uso de interiores únicamente.
• No sumergir. Use únicamente en alfombras humedecidas por el proceso de limpieza.
• Únicamente use los productos de limpieza marca DIRT DEVIL® destinados a este aparato.
(Vea la sección “Productos de limpieza” incluida en este manual.)
• No use líquidos para la limpieza que sean inamables o combustibles.
• No permita que el producto se use como un juguete. No está diseñado para que lo usen
niños de 12 años o menos. Se debe prestar especial atención cuando se use cerca de
niños. Para evitar daños y lesiones, mantenga a los niños alejados del producto, y no
permita que introduzcan sus dedos u otros objetos en ninguna abertura.
•
Use el producto únicamente como se describe en este manual. Use únicamente los productos y
accesorios recomendados por el fabricante
.
• No lo use si el cable o enchufe están dañados. Si el producto no funciona adecuadamente,
se dejó caer, se dañó, se dejó a la intemperie o se dejó caer dentro del agua, llévelo a un
centro de servicio antes de volver a usarlo.
• No tire del cordón ni lo jale para mover el aparato, tampoco lo use como manija; no
cierre la puerta si el cordón se atraviesa ni tire de éste alrededor de esquinas o bordes
losos. No coloque el producto sobre el cordón. No lo haga funcionar encima del cordón.
Mantenga el cordón lejos de supercies calientes.
• No lo desenchufe tirando del cordón. Para desenchufarlo, sujete el enchufe, no el cordón.
Nunca manipule el enchufe ni la aspiradora con las manos húmedas.
• No coloque ningún objeto en las aberturas. No use este producto si alguna abertura se
encuentra obstruida; manténgalo libre de suciedad, pelusa, cabello y cualquier objeto que
pueda reducir el ujo de aire.
• Mantenga el cabello, la ropa holgada, los dedos y todas las partes del cuerpo fuera
de las aberturas y otras piezas en movimiento. Apague todos los controles antes de
desenchufarlo.
• T
enga especial cuidado al limpiar escaleras. Para evitar lesiones físicas o daños y evitar que
se caiga el aparato, siempre colóquelo al pie de la escalera o en el suelo. No lo coloque sobre
escaleras ni muebles, ya que puede ocasionar lesiones o daños.
• No use este aparato para aspirar materiales inamables o combustibles, como gasolina, o restos
de madera lijada, ni lo use en áreas donde dichos materiales pudieran estar presentes.
•
Conéctelo únicamente a una toma de corriente conectada a tierra de manera adecuada. Consulte las
instrucciones de conexión a tierra.
• No aspire ningún objeto que se esté quemando o que libere humo, como cigarrillos,
fósforos o cenizas calientes.
• No use esta lavadora si los tanques o los ltros no están colocados en su lugar.
• No lave supercies con tomacorrientes eléctricos de piso.
• ADVERTENCIA: Este producto contiene sustancias químicas reconocidas por el estado de
California como causantes de cáncer, defectos congénitos o daños reproductivos.
LÁVESE LAS MANOS DESPUÉS DE USAR EL PRODUCTO.
WASH HANDS AFTER USING.
PRECAUCIÓN: PARA REDUCIR EL RIESGO DE DAÑOS:
• Evite aspirar objetos duros y losos con este producto, ya que pueden causar daños.
• Almacene en un lugar seco. No exponga el aparato a temperaturas de congelamiento.
• No use objetos losos para limpiar la manguera, ya que pueden causar daños.
• Cuando use detergentes y otros limpiadores con esta aspiradora, asegúrese de
que el área esté bien ventilada para que se seque más rápido.
• No pise la alfombra hasta que se haya secado para prevenir que se opaque o se
manche. Mantenga a niños y mascotas alejados de la alfombra hasta que ésta se
seque completamente.
• No guarde el extractor si los tanques contienen solución limpiadora.
• No deje que el aparato permanezca inmóvil en el mismo lugar durante mucho
tiempo cuando los cepillos estén encendidos, ya que podría dañar el suelo.
• NO UTILICE ESTA LAVADORA EXTRACTORA EN SUELOS DUROS. SI LO UTILIZA
EN SUELOS DUROS, ESTE APARATO PUEDE RAYAR O DAÑAR SU SUPERFICIE.
CONSERVE ESTAS INSTRUCCIONES
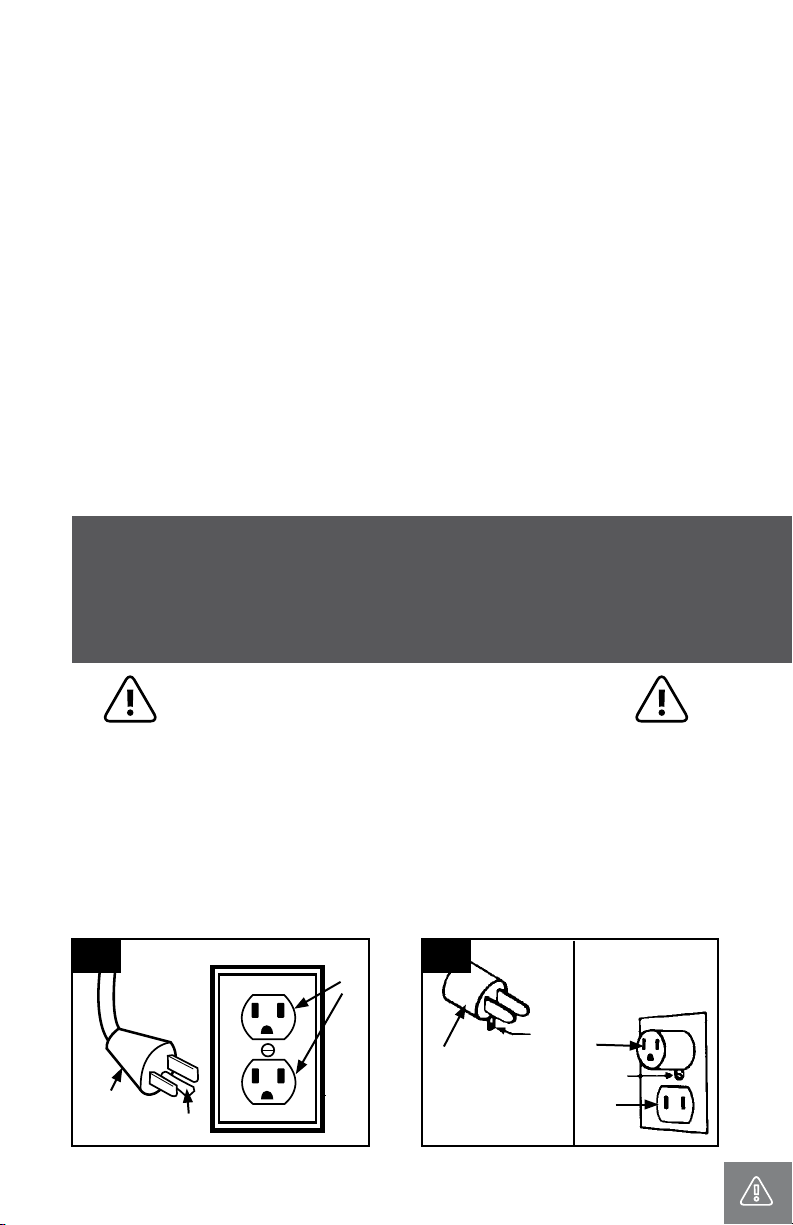
ADVERTENCIA
ADVERTENCIA
La conexión inadecuada del conductor de conexión a tierra del equipo puede ocasionar un riesgo de choque
eléctrico. Consulte a un electricista calificado o al personal de mantenimiento si no está seguro de que la toma
de corriente está conectada a tierra correctamente. No modifique el enchufe suministrado con el aparato; si
no es compatible con la toma de corriente, solicite la ayuda de un electricista calificado para que instale una
toma de corriente apropiada. Esta aspiradora debe usarse en un circuito nominal de 120 voltios, y tiene un
enchufe con conexión a tierra que se parece al enchufe (A) ilustrado en la figura 1. Si no cuenta con una toma
de corriente con una conexión a tierra apropiada, se puede usar un adaptador temporal (D) para conectar este
enchufe en un receptáculo de dos clavijas (E) (Fig.2) Se usará el adaptador temporal hasta que un electricista
calificado instale apropiadamente una toma de corriente con conexión a tierra (B) (Fig. 1). La oreja, patilla o
dispositivo rígido similar de color verde (F) que sale del adaptador debe conectarse a una conexión a tierra
permanente (G), como la tapa de la caja de una toma de corriente con una conexión a tierra adecuada (Fig. 2).
Cuando use el adaptador, apriételo con un tornillo. NOTA: El Código de Electricidad de Canadá no permite el
uso de un adaptador temporal en dicho país.
INSTRUCCIONES DE CONEXIÓN A TIERRA.
Este aparato debe conectarse a tierra. En caso de desperfecto o falla, la conexión a tierra reduce el riesgo de
choque eléctrico ofreciendo un circuito de menor resistencia para la corriente eléctrica. Este aparato tiene un
cordón con un conductor de conexión a tierra del equipo (C) y un enchufe de conexión a tierra (A). El enchufe
debe introducirse en una toma de corriente adecuada (B) correctamente instalada y conectada a tierra, de
acuerdo con todos los códigos y las normas locales
D
F
E
G
D
GROUNDING
OUTLET BOX
B
A
C
2
1
IMPORTANTE: LEA ATENTAMENTE ANTES DE ENSAMBLAR Y USAR.
ESTE PRODUCTO ESTÁ DISEÑADO SÓLO PARA USO DOMÉSTICO.
EL USO COMERCIAL DE ESTE PRODUCTO ANULA LA GARANTÍA.
INSTRUCCIONES DE SEGURIDAD IMPORTANTES
Cuando use un aparato eléctrico, siempre siga las precauciones básicas, que
incluyen las siguientes:
LEA TODAS LAS INSTRUCCIONES ANTES DE USAR ESTE APARATO
ADVERTENCIA: PARA REDUCIR EL RIESGO DE
INCENDIO,DESCARGA ELÉCTRICA O LESIÓN:
• Ensamble completamente el producto antes de hacerlo funcionar.
• Use la aspiradora y el cargador solamente con el voltaje especicado en la placa de datos
ubicada en la parte inferior de la misma.
• No deje el aparato sin supervisión cuando esté enchufado. Desenchúfelo de la toma de
corriente cuando no lo esté usando y antes de limpiarlo o darle mantenimiento.
• Para uso de interiores únicamente.
• No sumergir. Use únicamente en alfombras humedecidas por el proceso de limpieza.
• Únicamente use los productos de limpieza marca DIRT DEVIL® destinados a este aparato.
(Vea la sección “Productos de limpieza” incluida en este manual.)
• No use líquidos para la limpieza que sean inamables o combustibles.
• No permita que el producto se use como un juguete. No está diseñado para que lo usen
niños de 12 años o menos. Se debe prestar especial atención cuando se use cerca de
niños. Para evitar daños y lesiones, mantenga a los niños alejados del producto, y no
permita que introduzcan sus dedos u otros objetos en ninguna abertura.
•
Use el producto únicamente como se describe en este manual. Use únicamente los productos y
accesorios recomendados por el fabricante
.
• No lo use si el cable o enchufe están dañados. Si el producto no funciona adecuadamente,
se dejó caer, se dañó, se dejó a la intemperie o se dejó caer dentro del agua, llévelo a un
centro de servicio antes de volver a usarlo.
• No tire del cordón ni lo jale para mover el aparato, tampoco lo use como manija; no
cierre la puerta si el cordón se atraviesa ni tire de éste alrededor de esquinas o bordes
losos. No coloque el producto sobre el cordón. No lo haga funcionar encima del cordón.
Mantenga el cordón lejos de supercies calientes.
• No lo desenchufe tirando del cordón. Para desenchufarlo, sujete el enchufe, no el cordón.
Nunca manipule el enchufe ni la aspiradora con las manos húmedas.
• No coloque ningún objeto en las aberturas. No use este producto si alguna abertura se
encuentra obstruida; manténgalo libre de suciedad, pelusa, cabello y cualquier objeto que
pueda reducir el ujo de aire.
• Mantenga el cabello, la ropa holgada, los dedos y todas las partes del cuerpo fuera
de las aberturas y otras piezas en movimiento. Apague todos los controles antes de
desenchufarlo.
• T
enga especial cuidado al limpiar escaleras. Para evitar lesiones físicas o daños y evitar que
se caiga el aparato, siempre colóquelo al pie de la escalera o en el suelo. No lo coloque sobre
escaleras ni muebles, ya que puede ocasionar lesiones o daños.
• No use este aparato para aspirar materiales inamables o combustibles, como gasolina, o restos
de madera lijada, ni lo use en áreas donde dichos materiales pudieran estar presentes.
•
Conéctelo únicamente a una toma de corriente conectada a tierra de manera adecuada. Consulte las
instrucciones de conexión a tierra.
• No aspire ningún objeto que se esté quemando o que libere humo, como cigarrillos,
fósforos o cenizas calientes.
• No use esta lavadora si los tanques o los ltros no están colocados en su lugar.
• No lave supercies con tomacorrientes eléctricos de piso.
• ADVERTENCIA: Este producto contiene sustancias químicas reconocidas por el estado de
California como causantes de cáncer, defectos congénitos o daños reproductivos.
LÁVESE LAS MANOS DESPUÉS DE USAR EL PRODUCTO.
WASH HANDS AFTER USING.
PRECAUCIÓN: PARA REDUCIR EL RIESGO DE DAÑOS:
• Evite aspirar objetos duros y losos con este producto, ya que pueden causar daños.
• Almacene en un lugar seco. No exponga el aparato a temperaturas de congelamiento.
• No use objetos losos para limpiar la manguera, ya que pueden causar daños.
• Cuando use detergentes y otros limpiadores con esta aspiradora, asegúrese de
que el área esté bien ventilada para que se seque más rápido.
• No pise la alfombra hasta que se haya secado para prevenir que se opaque o se
manche. Mantenga a niños y mascotas alejados de la alfombra hasta que ésta se
seque completamente.
• No guarde el extractor si los tanques contienen solución limpiadora.
• No deje que el aparato permanezca inmóvil en el mismo lugar durante mucho
tiempo cuando los cepillos estén encendidos, ya que podría dañar el suelo.
• NO UTILICE ESTA LAVADORA EXTRACTORA EN SUELOS DUROS. SI LO UTILIZA
EN SUELOS DUROS, ESTE APARATO PUEDE RAYAR O DAÑAR SU SUPERFICIE.
CONSERVE ESTAS INSTRUCCIONES
ADVERTENCIA
ADVERTENCIA
La conexión inadecuada del conductor de conexión a tierra del equipo puede ocasionar un riesgo de choque
eléctrico. Consulte a un electricista calificado o al personal de mantenimiento si no está seguro de que la toma
de corriente está conectada a tierra correctamente. No modifique el enchufe suministrado con el aparato; si
no es compatible con la toma de corriente, solicite la ayuda de un electricista calificado para que instale una
toma de corriente apropiada. Esta aspiradora debe usarse en un circuito nominal de 120 voltios, y tiene un
enchufe con conexión a tierra que se parece al enchufe (A) ilustrado en la figura 1. Si no cuenta con una toma
de corriente con una conexión a tierra apropiada, se puede usar un adaptador temporal (D) para conectar este
enchufe en un receptáculo de dos clavijas (E) (Fig.2) Se usará el adaptador temporal hasta que un electricista
calificado instale apropiadamente una toma de corriente con conexión a tierra (B) (Fig. 1). La oreja, patilla o
dispositivo rígido similar de color verde (F) que sale del adaptador debe conectarse a una conexión a tierra
permanente (G), como la tapa de la caja de una toma de corriente con una conexión a tierra adecuada (Fig. 2).
Cuando use el adaptador, apriételo con un tornillo. NOTA: El Código de Electricidad de Canadá no permite el
uso de un adaptador temporal en dicho país.
INSTRUCCIONES DE CONEXIÓN A TIERRA.
Este aparato debe conectarse a tierra. En caso de desperfecto o falla, la conexión a tierra reduce el riesgo de
choque eléctrico ofreciendo un circuito de menor resistencia para la corriente eléctrica. Este aparato tiene un
cordón con un conductor de conexión a tierra del equipo (C) y un enchufe de conexión a tierra (A). El enchufe
debe introducirse en una toma de corriente adecuada (B) correctamente instalada y conectada a tierra, de
acuerdo con todos los códigos y las normas locales
D
F
E
G
D
GROUNDING
OUTLET BOX
B
A
C
2
1
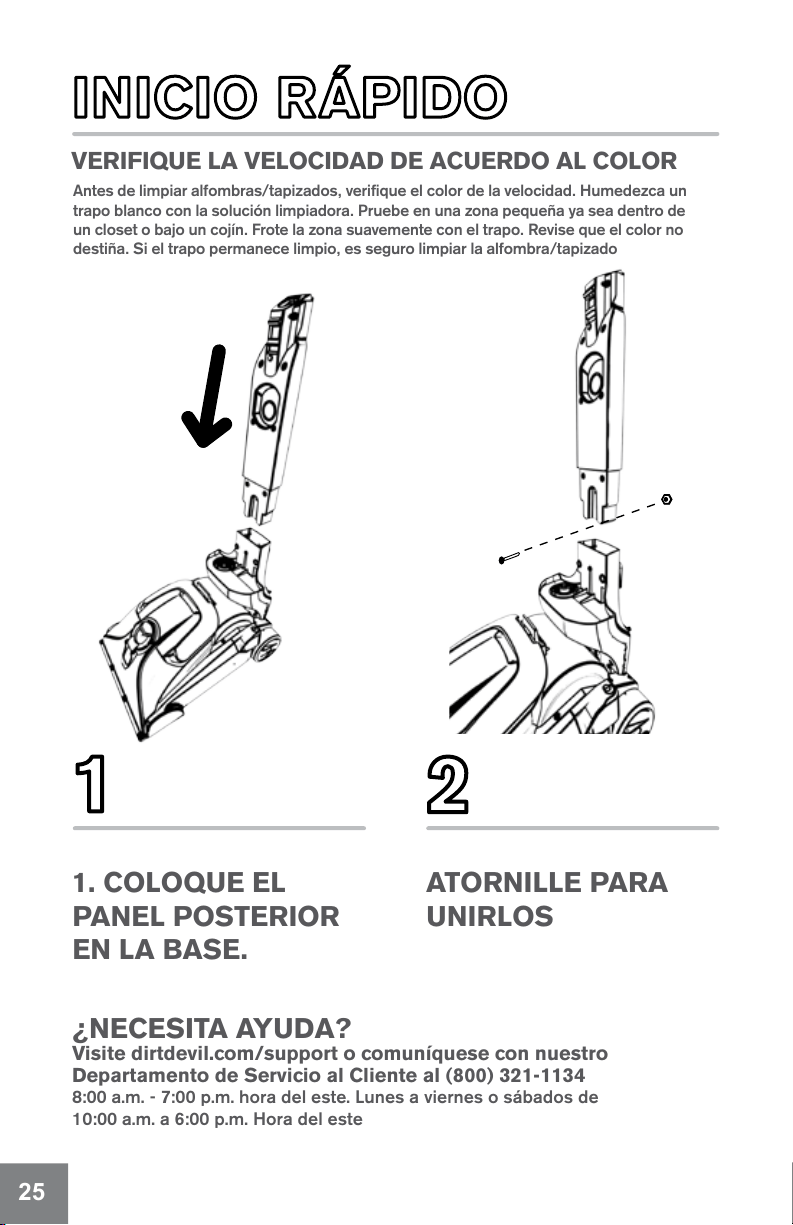
1. COLOQUE EL
PANEL POSTERIOR
EN LA BASE.
INSERTE EL MANGO
EN EL CUERPO DEL
APARATO. INSERTE
EL TORNILLO Y
APRIÉTELO.
ATORNILLE PARA
UNIRLOS
¿NECESITA AYUDA?
Visite dirtdevil.com/support o comuníquese con nuestro
Departamento de Servicio al Cliente al (800) 321-1134
8:00 a.m. - 7:00 p.m. hora del este. Lunes a viernes o sábados de
10:00 a.m. a 6:00 p.m. Hora del este
ADVERTENCIA PRECAUCIÓN
Para reducir el riesgo de incendio, descarga eléctrica o
lesión: asegúrese de que el cable de la electricidad no
esté en el camino antes de colocar el mango superior.
Para reducir el riesgo de daños: No utilice esta aspiradora
extractora en suelos duros. Utilizada en suelos duros, esta
aspiradora puede rayar o dañar sus pisos.
LLENE EL TANQUE
DE SOLUCIÓN.
(VEA LA PÁGINA 12)
VUELQUE EL TANQUE
DE SOLUCIÓN
LIMPIADORA COMO
SE MUESTRA. ÉSTE
HARÁ CLIC.
VERIFIQUE LA VELOCIDAD DE ACUERDO AL COLOR
Antes de limpiar alfombras/tapizados, verifique el color de la velocidad. Humedezca un
trapo blanco con la solución limpiadora. Pruebe en una zona pequeña ya sea dentro de
un closet o bajo un cojín. Frote la zona suavemente con el trapo. Revise que el color no
destiña. Si el trapo permanece limpio, es seguro limpiar la alfombra/tapizado
47
25
INICIO RÁPIDO

1. COLOQUE EL
PANEL POSTERIOR
EN LA BASE.
INSERTE EL MANGO
EN EL CUERPO DEL
APARATO. INSERTE
EL TORNILLO Y
APRIÉTELO.
ATORNILLE PARA
UNIRLOS
¿NECESITA AYUDA?
Visite dirtdevil.com/support o comuníquese con nuestro
Departamento de Servicio al Cliente al (800) 321-1134
8:00 a.m. - 7:00 p.m. hora del este. Lunes a viernes o sábados de
10:00 a.m. a 6:00 p.m. Hora del este
ADVERTENCIA PRECAUCIÓN
Para reducir el riesgo de incendio, descarga eléctrica o
lesión: asegúrese de que el cable de la electricidad no
esté en el camino antes de colocar el mango superior.
Para reducir el riesgo de daños: No utilice esta aspiradora
extractora en suelos duros. Utilizada en suelos duros, esta
aspiradora puede rayar o dañar sus pisos.
LLENE EL TANQUE
DE SOLUCIÓN.
(VEA LA PÁGINA 12)
VUELQUE EL TANQUE
DE SOLUCIÓN
LIMPIADORA COMO
SE MUESTRA. ÉSTE
HARÁ CLIC.
VERIFIQUE LA VELOCIDAD DE ACUERDO AL COLOR
Antes de limpiar alfombras/tapizados, verifique el color de la velocidad. Humedezca un
trapo blanco con la solución limpiadora. Pruebe en una zona pequeña ya sea dentro de
un closet o bajo un cojín. Frote la zona suavemente con el trapo. Revise que el color no
destiña. Si el trapo permanece limpio, es seguro limpiar la alfombra/tapizado
26
46
INICIO RÁPIDO
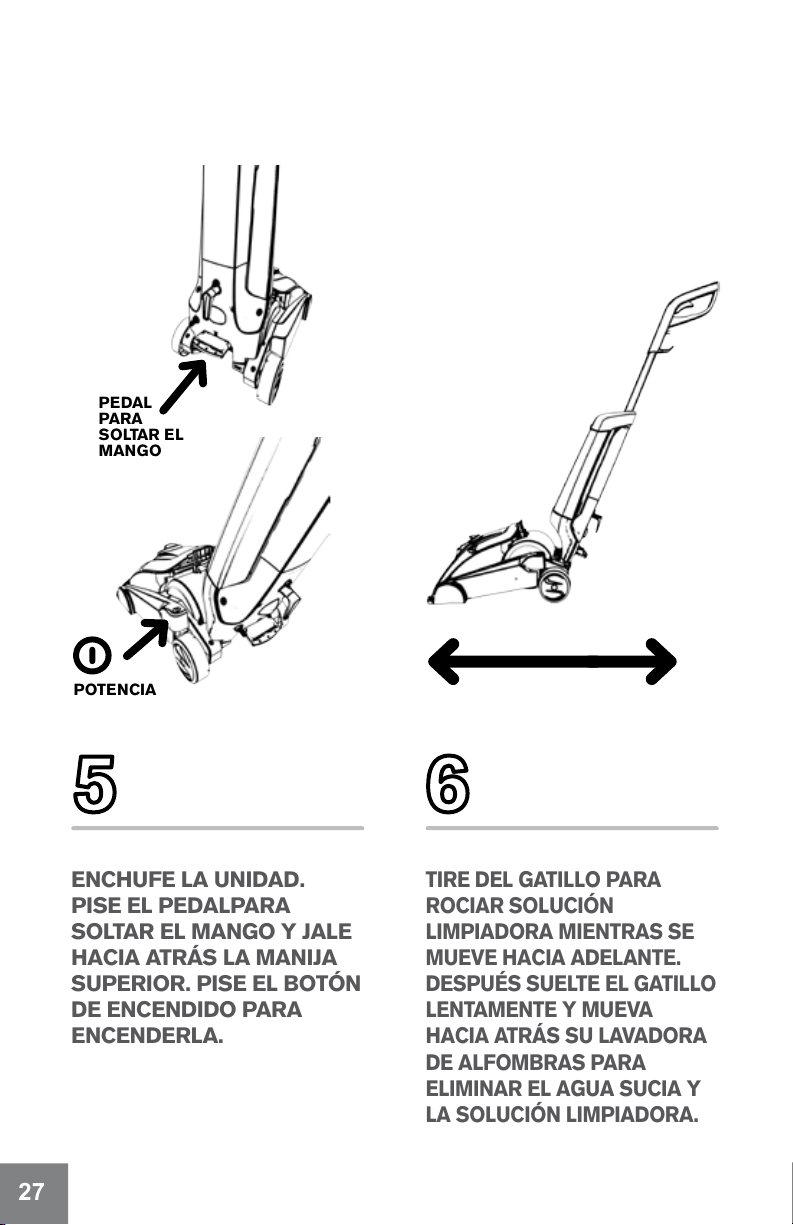
ENCHUFE LA UNIDAD.
PISE EL PEDALPARA
SOLTAR EL MANGO Y JALE
HACIA ATRÁS LA MANIJA
SUPERIOR. PISE EL BOTÓN
DE ENCENDIDO PARA
ENCENDERLA.
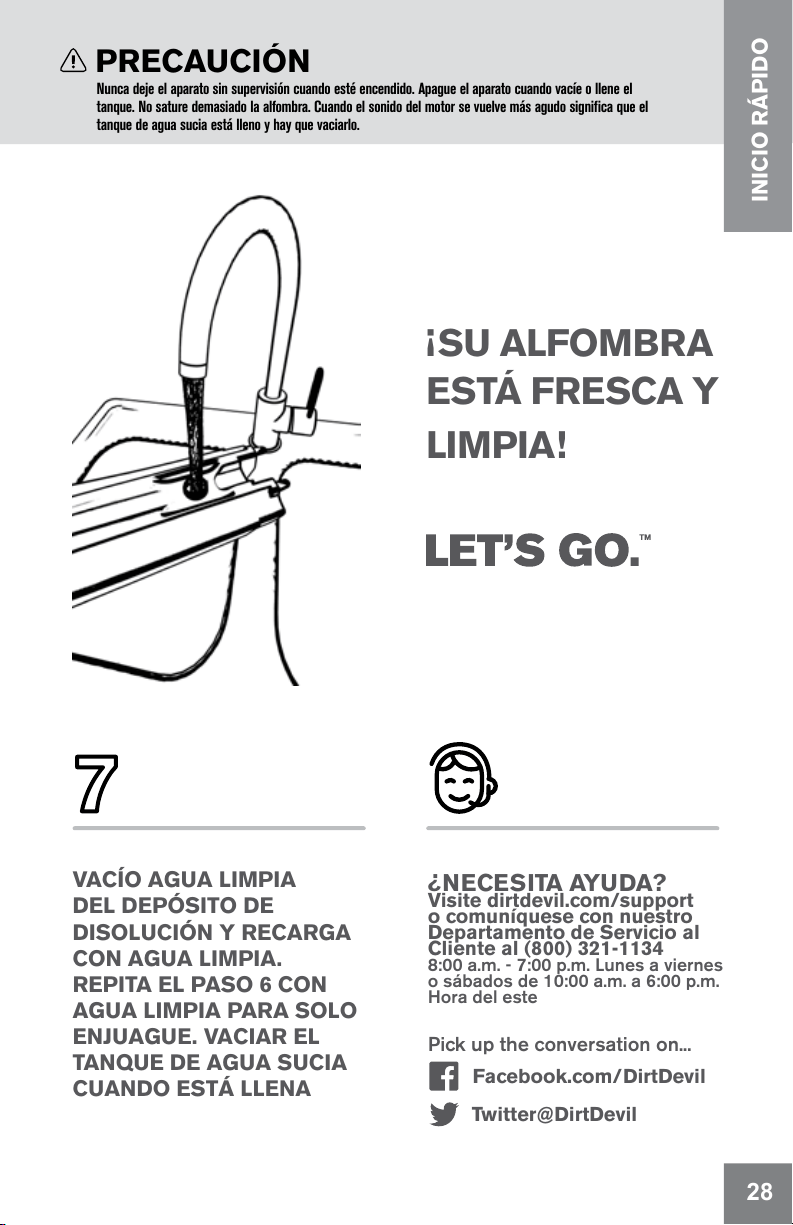
VACÍO AGUA LIMPIA
DEL DEPÓSITO DE
DISOLUCIÓN Y RECARGA
CON AGUA LIMPIA.
REPITA EL PASO 6 CON
AGUA LIMPIA PARA SOLO
ENJUAGUE. VACIAR EL
TANQUE DE AGUA SUCIA
CUANDO ESTÁ LLENA
TIRE DEL GATILLO PARA
ROCIAR SOLUCIÓN
LIMPIADORA MIENTRAS SE
MUEVE HACIA ADELANTE.
DESPUÉS SUELTE EL GATILLO
LENTAMENTE Y MUEVA
HACIA ATRÁS SU LAVADORA
DE ALFOMBRAS PARA
ELIMINAR EL AGUA SUCIA Y
LA SOLUCIÓN LIMPIADORA.
¡SU ALFOMBRA
ESTÁ FRESCA Y
LIMPIA!
PEDAL
PARA
SOLTAR EL
MANGO
POTENCIA
¿NECESITA AYUDA?
Visite dirtdevil.com/support
o comuníquese con nuestro
Departamento de Servicio al
Cliente al (800) 321-1134
8:00 a.m. - 7:00 p.m. Lunes a viernes
o sábados de 10:00 a.m. a 6:00 p.m.
Hora del este
Pick up the conversation on...
Twitter@DirtDevil
Facebook.com/DirtDevil
PRECAUCIÓN
Nunca deje el aparato sin supervisión cuando esté encendido. Apague el aparato cuando vacíe o llene el
tanque. No sature demasiado la alfombra. Cuando el sonido del motor se vuelve más agudo significa que el
tanque de agua sucia está lleno y hay que vaciarlo.
49
27
INICIO RÁPIDO
ENCHUFE LA UNIDAD.
PISE EL PEDALPARA
SOLTAR EL MANGO Y JALE
HACIA ATRÁS LA MANIJA
SUPERIOR. PISE EL BOTÓN
DE ENCENDIDO PARA
ENCENDERLA.
VACÍO AGUA LIMPIA
DEL DEPÓSITO DE
DISOLUCIÓN Y RECARGA
CON AGUA LIMPIA.
REPITA EL PASO 6 CON
AGUA LIMPIA PARA SOLO
ENJUAGUE. VACIAR EL
TANQUE DE AGUA SUCIA
CUANDO ESTÁ LLENA
TIRE DEL GATILLO PARA
ROCIAR SOLUCIÓN
LIMPIADORA MIENTRAS SE
MUEVE HACIA ADELANTE.
DESPUÉS SUELTE EL GATILLO
LENTAMENTE Y MUEVA
HACIA ATRÁS SU LAVADORA
DE ALFOMBRAS PARA
ELIMINAR EL AGUA SUCIA Y
LA SOLUCIÓN LIMPIADORA.
¡SU ALFOMBRA
ESTÁ FRESCA Y
LIMPIA!
PEDAL
PARA
SOLTAR EL
MANGO
POTENCIA
¿NECESITA AYUDA?
Visite dirtdevil.com/support
o comuníquese con nuestro
Departamento de Servicio al
Cliente al (800) 321-1134
8:00 a.m. - 7:00 p.m. Lunes a viernes
o sábados de 10:00 a.m. a 6:00 p.m.
Hora del este
Pick up the conversation on...
Twitter@DirtDevil
Facebook.com/DirtDevil
PRECAUCIÓN
Nunca deje el aparato sin supervisión cuando esté encendido. Apague el aparato cuando vacíe o llene el
tanque. No sature demasiado la alfombra. Cuando el sonido del motor se vuelve más agudo significa que el
tanque de agua sucia está lleno y hay que vaciarlo.
28
48
INICIO RÁPIDO

CONSEJOS PRÁCTICOS PARA LIMPIAR SU
ALFOMBRA
DESPUÉS DE LIMPIAR
1. Aspire bien la
alfombra con su
limpiadora Dirt Devil
®
.
• No sature su alfombra
con solución de limpieza.
• Manténgase fuera de la
alfombr hasta que esté
seca.
2. Coloque plástico
o aluminio bajo y
alrededor de las patas
de los muebles hasta
que la alfombra se haya
secado por completo.
• Es posible que necesite
accesorios adicionales
para áreas muy sucias.
• Asegúrese de
enjuagar bien la
alfombra con agua.
• Limpie la solución de
limpieza de la madera
para evitar daños.
• Una vez que se haya
secado, aspire con su
limpiadora Dirt Devil
®
.
• Planee su ruta para que
no camine sobre áreas
previamente lavadas.
• Permita que se seque la alfombra completamente.
Intente no caminar sobre la alfombra hasta que
esté seca.
• Si necesita caminar sobre la alfombra, coloque
toallas blancas en las áreas donde va a caminar.
• Si la alfombra no está seca aún y ya debe colocar
los muebles en su lugar, coloque plástico o
aluminio debajo de los muebles para evitar que se
manche la alfombra.
• Limpie bien el tanque de agua sucia con agua
caliente de la llave. Consulte la página 14.
PRECAUCIÓN ADVERTENCIA
No utilice este limpiador de alfombras
como aspiradora.
No guarde la limpiadora de alfombras
en la cochera o en algún área donde
pueda congelarse.
NOTA: No transporte la limpiadora de alfombras si el tanque de solución
limpiadora o el tanque de agua sucia están llenos.
CÓMO PREPARAR LA ALFOMBRA
51
29

CONSEJOS PRÁCTICOS PARA LIMPIAR SU
ALFOMBRA
DESPUÉS DE LIMPIAR
1. Aspire bien la
alfombra con su
limpiadora Dirt Devil
®
.
• No sature su alfombra
con solución de limpieza.
• Manténgase fuera de la
alfombr hasta que esté
seca.
2. Coloque plástico
o aluminio bajo y
alrededor de las patas
de los muebles hasta
que la alfombra se haya
secado por completo.
• Es posible que necesite
accesorios adicionales
para áreas muy sucias.
• Asegúrese de
enjuagar bien la
alfombra con agua.
• Limpie la solución de
limpieza de la madera
para evitar daños.
• Una vez que se haya
secado, aspire con su
limpiadora Dirt Devil
®
.
• Planee su ruta para que
no camine sobre áreas
previamente lavadas.
• Permita que se seque la alfombra completamente.
Intente no caminar sobre la alfombra hasta que
esté seca.
• Si necesita caminar sobre la alfombra, coloque
toallas blancas en las áreas donde va a caminar.
• Si la alfombra no está seca aún y ya debe colocar
los muebles en su lugar, coloque plástico o
aluminio debajo de los muebles para evitar que se
manche la alfombra.
• Limpie bien el tanque de agua sucia con agua
caliente de la llave. Consulte la página 14.
PRECAUCIÓN ADVERTENCIA
No utilice este limpiador de alfombras
como aspiradora.
No guarde la limpiadora de alfombras
en la cochera o en algún área donde
pueda congelarse.
NOTA: No transporte la limpiadora de alfombras si el tanque de solución
limpiadora o el tanque de agua sucia están llenos.
CÓMO PREPARAR LA ALFOMBRA
30
50
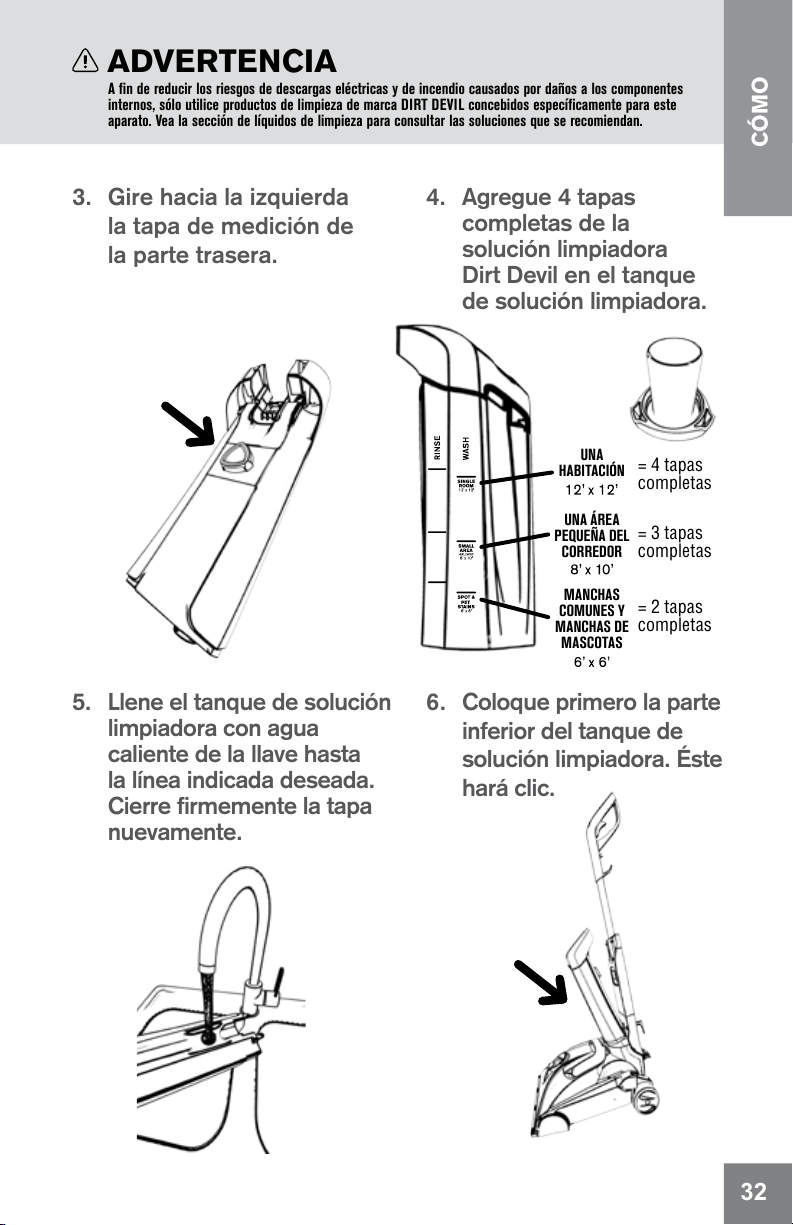
= 4 tapas
completas
= 3 tapas
completas
= 2 tapas
completas
UNA
HABITACIÓN
UNA ÁREA
PEQUEÑA DEL
CORREDOR
MANCHAS
COMUNES Y
MANCHAS DE
MASCOTAS
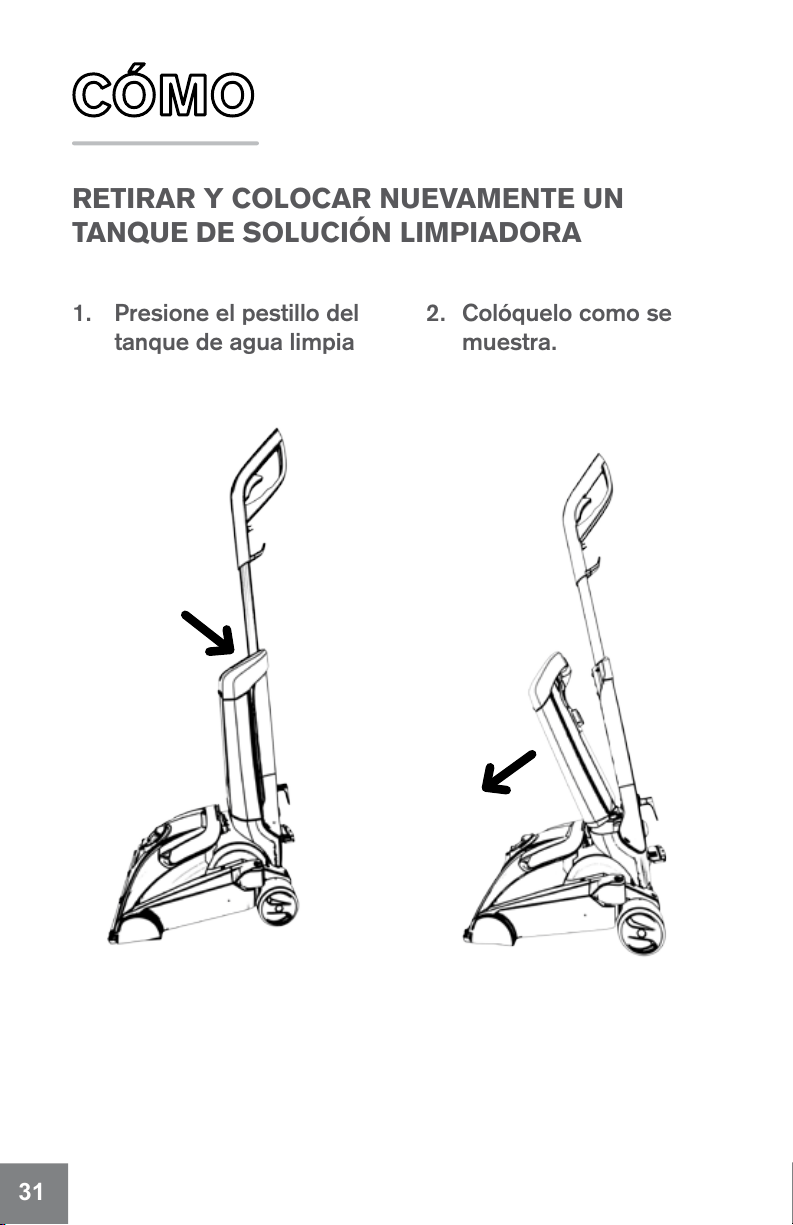
1. Presione el pestillo del
tanque de agua limpia
2. Colóquelo como se
muestra.
3. Gire hacia la izquierda
la tapa de medición de
la parte trasera.
4. Agregue 4 tapas
completas de la
solución limpiadora
Dirt Devil en el tanque
de solución limpiadora.
5. Llene el tanque de solución
limpiadora con agua
caliente de la llave hasta
la línea indicada deseada.
Cierre firmemente la tapa
nuevamente.
6. Coloque primero la parte
inferior del tanque de
solución limpiadora. Éste
hará clic.
RETIRAR Y COLOCAR NUEVAMENTE UN
TANQUE DE SOLUCIÓN LIMPIADORA
ADVERTENCIA
A fin de reducir los riesgos de descargas eléctricas y de incendio causados por daños a los componentes
internos, sólo utilice productos de limpieza de marca DIRT DEVIL concebidos específicamente para este
aparato. Vea la sección de líquidos de limpieza para consultar las soluciones que se recomiendan.
CÓMO
53
31
= 4 tapas
completas
= 3 tapas
completas
= 2 tapas
completas
UNA
HABITACIÓN
UNA ÁREA
PEQUEÑA DEL
CORREDOR
MANCHAS
COMUNES Y
MANCHAS DE
MASCOTAS
1. Presione el pestillo del
tanque de agua limpia
2. Colóquelo como se
muestra.
3. Gire hacia la izquierda
la tapa de medición de
la parte trasera.
4. Agregue 4 tapas
completas de la
solución limpiadora
Dirt Devil en el tanque
de solución limpiadora.
5. Llene el tanque de solución
limpiadora con agua
caliente de la llave hasta
la línea indicada deseada.
Cierre firmemente la tapa
nuevamente.
6. Coloque primero la parte
inferior del tanque de
solución limpiadora. Éste
hará clic.
RETIRAR Y COLOCAR NUEVAMENTE UN
TANQUE DE SOLUCIÓN LIMPIADORA
ADVERTENCIA
A fin de reducir los riesgos de descargas eléctricas y de incendio causados por daños a los componentes
internos, sólo utilice productos de limpieza de marca DIRT DEVIL concebidos específicamente para este
aparato. Vea la sección de líquidos de limpieza para consultar las soluciones que se recomiendan.
CÓMO
32
52

VACÍE EL TANQUE DE AGUA SUCIA.
1. Tire el pestillo para
liberarlo.
2. Tome el mango y
levante el tanque y tire
hacia afuera.
3. Quite la tapa y vacíe como
se muestra.
4. Enjuague el tanque y el
filtro con agua caliente de
la llave. Limpie y permita
que se seque antes de
guardarlos para evitar que
se enmohezca. Coloque
nuevamente la tapa del
tanque de agua sucia.
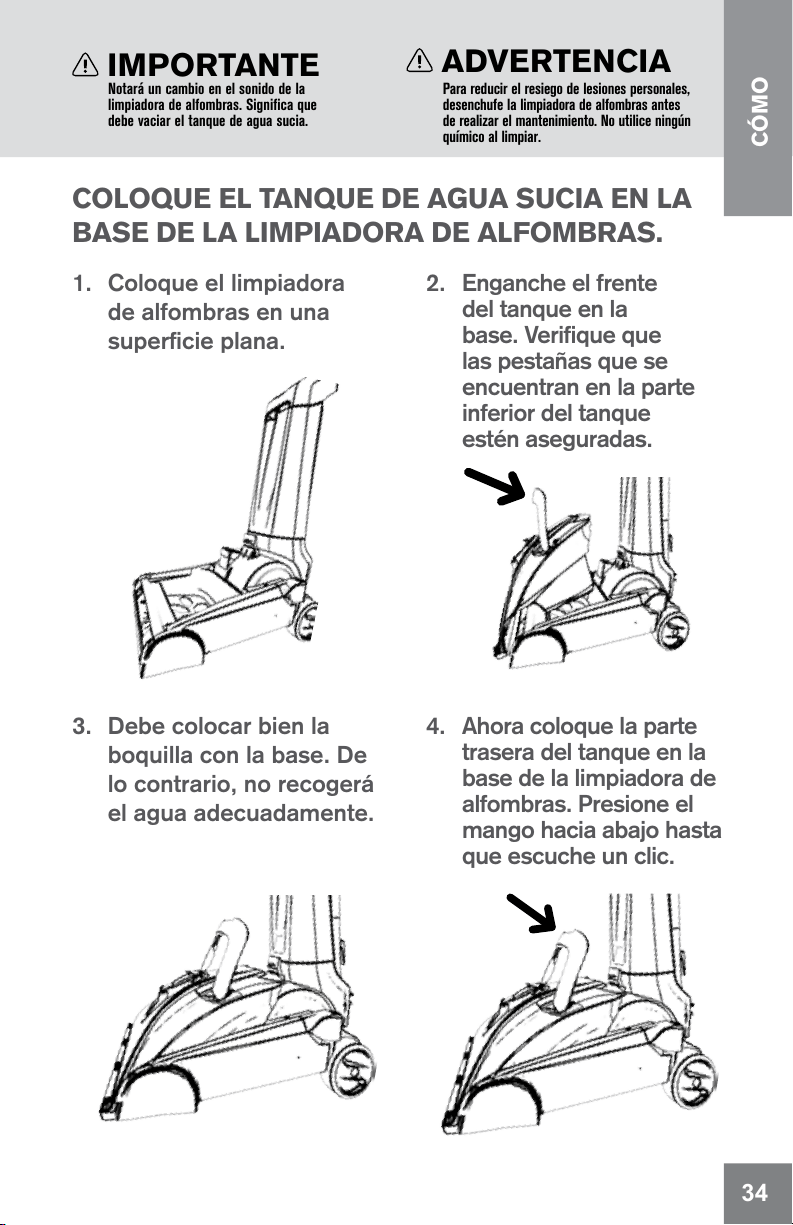
COLOQUE EL TANQUE DE AGUA SUCIA EN LA
BASE DE LA LIMPIADORA DE ALFOMBRAS.
1. Coloque el limpiadora
de alfombras en una
superficie plana.
2. Enganche el frente
del tanque en la
base. Verifique que
las pestañas que se
encuentran en la parte
inferior del tanque
estén aseguradas.
3. Debe colocar bien la
boquilla con la base. De
lo contrario, no recogerá
el agua adecuadamente.
4. Ahora coloque la parte
trasera del tanque en la
base de la limpiadora de
alfombras. Presione el
mango hacia abajo hasta
que escuche un clic.
IMPORTANTE
Notará un cambio en el sonido de la
limpiadora de alfombras. Significa que
debe vaciar el tanque de agua sucia.
ADVERTENCIA
Para reducir el resiego de lesiones personales,
desenchufe la limpiadora de alfombras antes
de realizar el mantenimiento. No utilice ningún
químico al limpiar.
CÓMO
55
33
VACÍE EL TANQUE DE AGUA SUCIA.
1. Tire el pestillo para
liberarlo.
2. Tome el mango y
levante el tanque y tire
hacia afuera.
3. Quite la tapa y vacíe como
se muestra.
4. Enjuague el tanque y el
filtro con agua caliente de
la llave. Limpie y permita
que se seque antes de
guardarlos para evitar que
se enmohezca. Coloque
nuevamente la tapa del
tanque de agua sucia.
COLOQUE EL TANQUE DE AGUA SUCIA EN LA
BASE DE LA LIMPIADORA DE ALFOMBRAS.
1. Coloque el limpiadora
de alfombras en una
superficie plana.
2. Enganche el frente
del tanque en la
base. Verifique que
las pestañas que se
encuentran en la parte
inferior del tanque
estén aseguradas.
3. Debe colocar bien la
boquilla con la base. De
lo contrario, no recogerá
el agua adecuadamente.
4. Ahora coloque la parte
trasera del tanque en la
base de la limpiadora de
alfombras. Presione el
mango hacia abajo hasta
que escuche un clic.
IMPORTANTE
Notará un cambio en el sonido de la
limpiadora de alfombras. Significa que
debe vaciar el tanque de agua sucia.
ADVERTENCIA
Para reducir el resiego de lesiones personales,
desenchufe la limpiadora de alfombras antes
de realizar el mantenimiento. No utilice ningún
químico al limpiar.
CÓMO
34
54
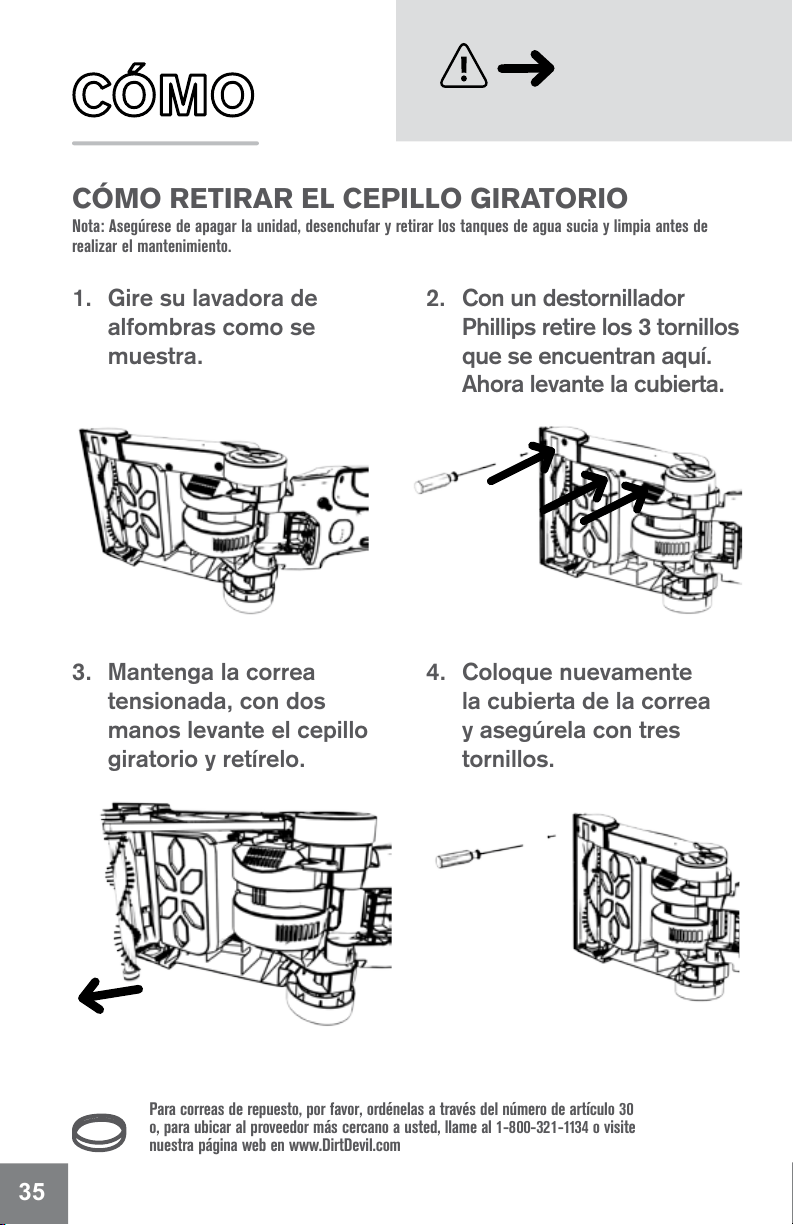
CÓMO RETIRAR EL CEPILLO GIRATORIO
Nota: Asegúrese de apagar la unidad, desenchufar y retirar los tanques de agua sucia y limpia antes de
realizar el mantenimiento.
CÓMO REMPLAZAR LA CORREA
1. Gire su lavadora de
alfombras como se
muestra.
2. Con un destornillador
Phillips retire los 3 tornillos
que se encuentran aquí.
Ahora levante la cubierta.
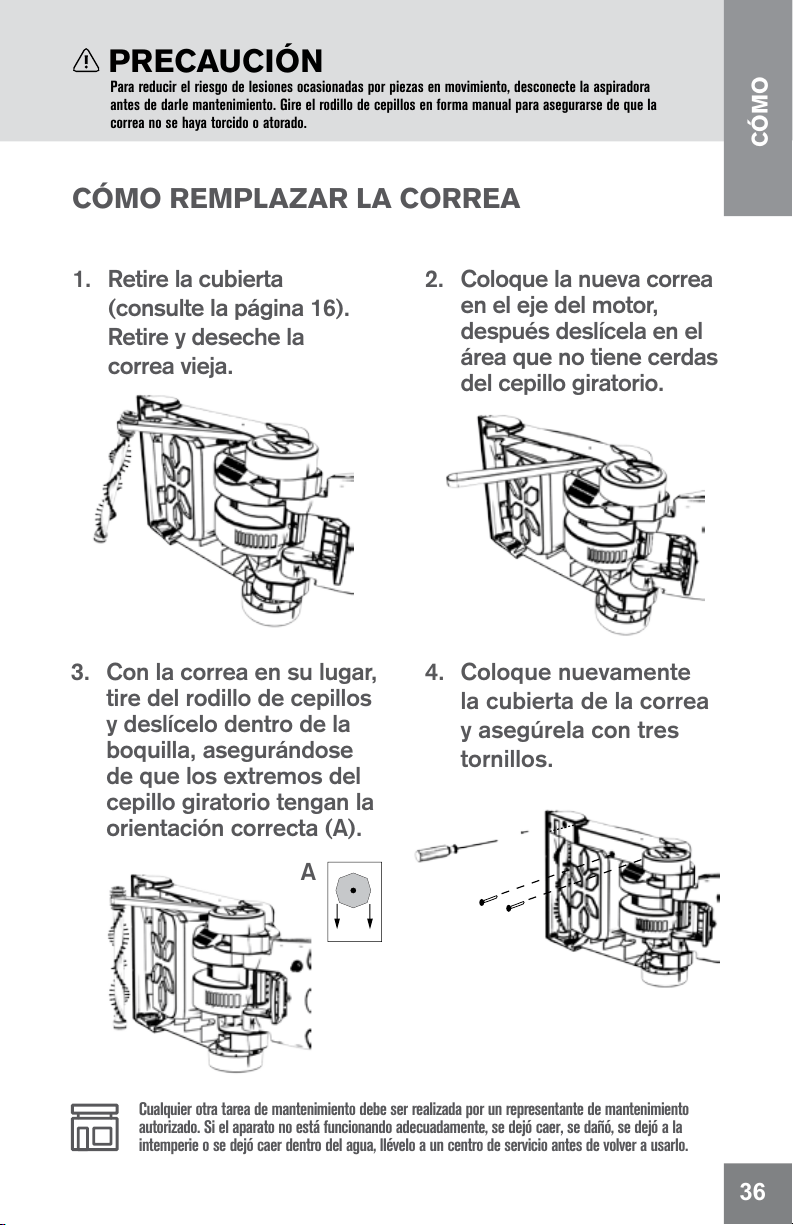
1. Retire la cubierta
(consulte la página 16).
Retire y deseche la
correa vieja.
2. Coloque la nueva correa
en el eje del motor,
después deslícela en el
área que no tiene cerdas
del cepillo giratorio.
3. Mantenga la correa
tensionada, con dos
manos levante el cepillo
giratorio y retírelo.
4. Coloque nuevamente
la cubierta de la correa
y asegúrela con tres
tornillos.
4. Coloque nuevamente
la cubierta de la correa
y asegúrela con tres
tornillos.
A
PRECAUCIÓN
Para reducir el riesgo de lesiones ocasionadas por piezas en movimiento, desconecte la aspiradora
antes de darle mantenimiento. Gire el rodillo de cepillos en forma manual para asegurarse de que la
correa no se haya torcido o atorado.
Para correas de repuesto, por favor, ordénelas a través del número de artículo 30
o, para ubicar al proveedor más cercano a usted, llame al 1-800-321-1134 o visite
nuestra página web en www.DirtDevil.com
Cualquier otra tarea de mantenimiento debe ser realizada por un representante de mantenimiento
autorizado. Si el aparato no está funcionando adecuadamente, se dejó caer, se dañó, se dejó a la
intemperie o se dejó caer dentro del agua, llévelo a un centro de servicio antes de volver a usarlo.
3. Con la correa en su lugar,
tire del rodillo de cepillos
y deslícelo dentro de la
boquilla, asegurándose
de que los extremos del
cepillo giratorio tengan la
orientación correcta (A).
CÓMO
57
35
CÓMO RETIRAR EL CEPILLO GIRATORIO
Nota: Asegúrese de apagar la unidad, desenchufar y retirar los tanques de agua sucia y limpia antes de
realizar el mantenimiento.
CÓMO REMPLAZAR LA CORREA
1. Gire su lavadora de
alfombras como se
muestra.
2. Con un destornillador
Phillips retire los 3 tornillos
que se encuentran aquí.
Ahora levante la cubierta.
1. Retire la cubierta
(consulte la página 16).
Retire y deseche la
correa vieja.
2. Coloque la nueva correa
en el eje del motor,
después deslícela en el
área que no tiene cerdas
del cepillo giratorio.
3. Mantenga la correa
tensionada, con dos
manos levante el cepillo
giratorio y retírelo.
4. Coloque nuevamente
la cubierta de la correa
y asegúrela con tres
tornillos.
4. Coloque nuevamente
la cubierta de la correa
y asegúrela con tres
tornillos.
A
PRECAUCIÓN
Para reducir el riesgo de lesiones ocasionadas por piezas en movimiento, desconecte la aspiradora
antes de darle mantenimiento. Gire el rodillo de cepillos en forma manual para asegurarse de que la
correa no se haya torcido o atorado.
Para correas de repuesto, por favor, ordénelas a través del número de artículo 30
o, para ubicar al proveedor más cercano a usted, llame al 1-800-321-1134 o visite
nuestra página web en www.DirtDevil.com
Cualquier otra tarea de mantenimiento debe ser realizada por un representante de mantenimiento
autorizado. Si el aparato no está funcionando adecuadamente, se dejó caer, se dañó, se dejó a la
intemperie o se dejó caer dentro del agua, llévelo a un centro de servicio antes de volver a usarlo.
3. Con la correa en su lugar,
tire del rodillo de cepillos
y deslícelo dentro de la
boquilla, asegurándose
de que los extremos del
cepillo giratorio tengan la
orientación correcta (A).
CÓMO
36
56
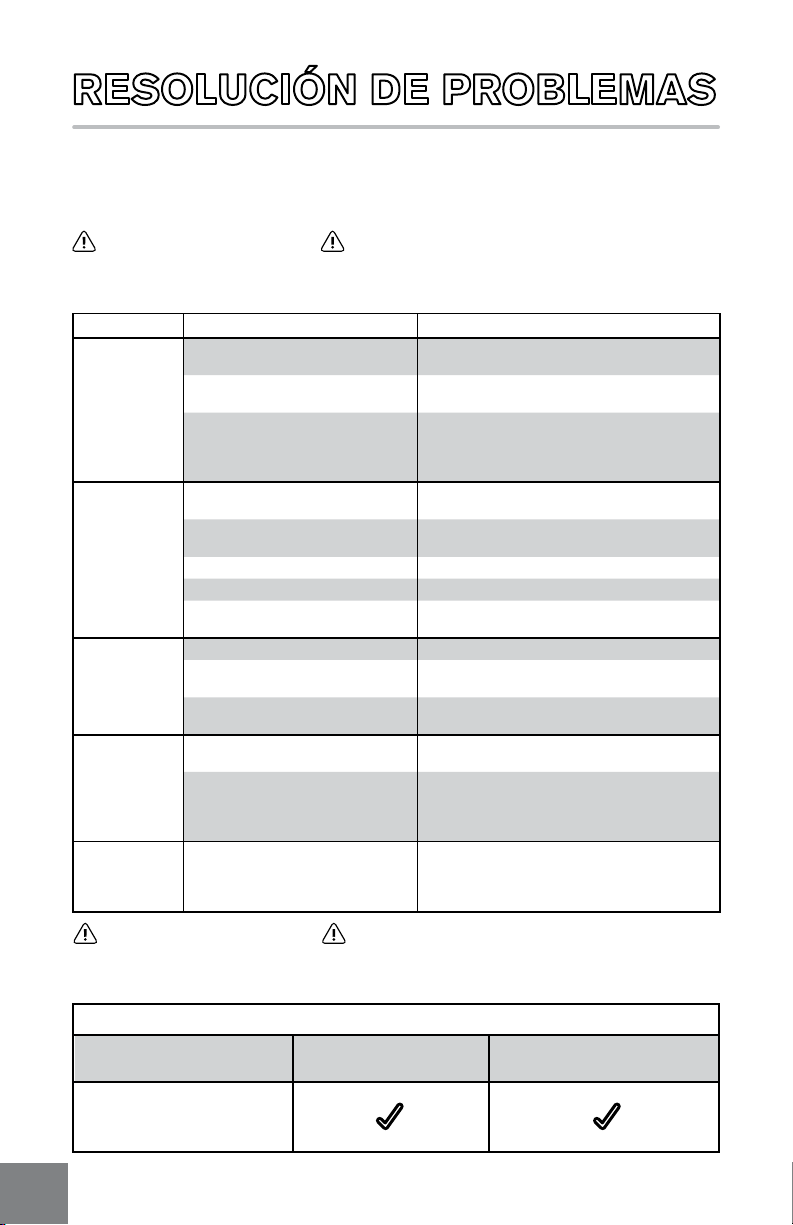
ADVERTENCIA PARA REDUCIR EL RIESGO DE LE-
SIONES FÍSICAS, DESENCHUFE EL APARATO ANTES DE LIMPIAR-
LO O DE DARLE MANTENIMIENTO.
Si el problema es menor, normalmente se puede resolver fácilmente al encontrar la causa en el
listado siguiente. Cualquier otra tarea de mantenimiento debe ser realizada por un representante de
mantenimiento autorizado. Si el producto no funciona adecuadamente, se dejó caer, se dañó, se dejó
a la intemperie o se dejó caer dentro del agua, llévelo a un centro de servicio antes de volver a usarlo.
GARANTÍA LIMITADA DE 1 AÑO
LO QUE ESTÁ CUBIERTO POR ESTA GARANTÍA
Siempre que el uso y el mantenimiento de su producto Dirt Devil
®
se realicen en condiciones de uso
doméstico normales y según el Manual del usuario, el producto estará garantizado contra defectos
originales en el material y la fabricación. Durante el período de garantía, le proporcionaremos
gratuitamente mano de obra y piezas para corregir cualquier defecto de este tipo en productos
comprados en los Estados Unidos, tiendas situadas en una base militar de los EE. UU., y Canadá.
CÓMO HACER UN RECLAMO SEGÚN LA GARANTÍA
Si este producto no se ajusta a las condiciones garantizadas, llévelo o envíelo a un Concesionario autorizado
de servicio de garantía de Dirt Devil
®
junto con el comprobante de compra. Llame al 1-800-321-1134 para
que le indiquen de manera automática la ubicación de los centros autorizados de servicio en los EE. UU. O
BIEN, visite Dirt Devil
®
en línea en www.DirtDevil.com. Para obtener asistencia adicional o información
relacionada con esta garantía o a la disponibilidad de centros de servicio para reparaciones bajo la garantía,
llame al centro de respuesta a consumidores de Dirt Devil
®
al 1-800-321-1134, de lunes a viernes de 8:00
a.m. a 7:00 p.m., hora del Este.
LO QUE ESTA GARANTÍA NO CUBRE
Esta garantía no cubre el uso del producto en una operación comercial (tal como servicios de empleadas
domésticas, mantenimiento de edificios y alquiler de equipos), rodillos de cepillos, correas, bolsas, filtros,
mantenimiento incorrecto del producto, daños debidos a uso indebido, causas de fuerza mayor, naturaleza,
vandalismo u otras situaciones fuera del control de Royal Appliance Mfg. Co. (“Royal”, “nosotros”), acciones u
omisiones del propietario, uso fuera del país en el que se compró el producto inicialmente y reventas del producto
por parte del propietario original. Esta garantía no cubre recogidas, entregas, transporte ni visitas a domicilio.
Esta garantía no se aplica a los productos comprados fuera de los Estados Unidos, incluidos sus territorios
y posesiones, fuera de una tienda situada en una base militar de los EE. UU. ni fuera de Canadá. Esta
garantía no cubre los productos comprados a una parte que no sea un minorista, concesionario o distribuidor
autorizados de los productos de Royal.
OTROS TÉRMINOS IMPORTANTES
Esta garantía no es transferible y no puede ser asignada a ningún tercero. Esta garantía será regida e
interpretada de acuerdo con las leyes del estado de Ohio. El período de garantía no podrá ser extendido
por cualquier tipo de reemplazo o reparación realizados bajo esta garantía.
ESTA GARANTÍA ES LA ÚNICA GARANTÍA Y EL ÚNICO RECURSO PROVISTO POR ROYAL. TODAS LAS
DEMÁS GARANTÍAS, EXPRESAS O IMPLÍCITAS, INCLUIDAS LAS GARANTÍAS DE COMERCIABILIDAD
O APTITUD PARA UN FIN PARTICULAR, QUEDAN EXCLUIDAS. ROYAL NO SERÁ RESPONSABLE EN
NINGÚN CASO POR NINGÚN DAÑO ESPECIAL, INDIRECTO, INCIDENTAL O MEDIATO DE NINGÚN
TIPO O NATURALEZA CON RESPECTO AL PROPIETARIO O A CUALQUIER PARTE QUE REALICE UN
RECLAMO A TRAVÉS DEL PROPIETARIO, YA SEA QUE SE BASE EN RESPONSABILIDAD
CONTRACTUAL, NEGLIGENCIA, RESPONSABILIDAD EXTRACONTRACTUAL O RESPONSABILIDAD
CIVIL OBJETIVA POR LOS PRODUCTOS, O EMERGENTE DE CUALQUIER OTRA CAUSA Algunos
estados no permiten la exclusión de los daños mediatos, por lo que es posible que la exclusión anterior
no se aplique a su caso en particular. Esta garantía le otorga derechos legales específicos, y es posible
que también tenga otros derechos que varían de un estado a otro.
PROBLEMA POSIBLE CAUSA SOLUCIONES POSIBLES
La aspiradora
no funciona
1. El cordón de alimentación no está bien
enchufado en la toma de corriente.
1. Enchufe bien la unidad.
2. Se quemó el fusible o se disparó el
disyuntor.
2. Verifique el fusible o el disyuntor de la casa. Cambie
los fusibles o reinicie los disyuntores de la casa.
3. Necesita mantenimiento. 3. Lleve la limpiadora a un centro de servicio. Para
encontrar el centro de servicio más cercano, visite
nuestro sitio web en www.DirtDevil.com o llame al
1-800-321-1134.
Si la limpiado-
ra no aspira o
presenta baja
succión
1. La tapa del tanque de agua sucia no
está en su lugar.
1. Coloque la tapa del tanque de agua sucia - pág. 14.
2. El tanque de agua sucia no está
correctamente instalado.
2. Revise cómo colocar el tanque de agua sucia en la
base de la limpiadora - pág. 15.
3. El tanque de agua sucia está lleno. 3. Vacíe el tanque de agua sucia - pág. 14.
4. El conducto del agua sucia está obstruido. 4. Limpie el tanque de agua sucia - pág. 14.
5. El filtro de espuma está sucio. 5. Limpie el filtro. Revise cómo vaciar y limpiar el
tanque de agua sucia - pág. 14.
Sale agua de
la limpiadora
1. El tanque de agua sucia está lleno. 1. Vacíe el tanque de agua sucia - pág. 14
2. El tanque de agua sucia no está cor-
rectamente instalado.
2. Revise cómo colocar el tanque de agua sucia en
la base de la limpiadora - pág. 15.
3. El tanque de agua limpia/solución no
está correctamente instalado.
3. Revise cómo instalar el tanque de agua limpia/
solución - pág. 12.
El limpiador no
abastece
1. El tanque de agua limpia/solución no
está correctamente instalado.
1. Revise cómo instalar el tanque de agua limpia/
solución - pág. 12.
2. Necesita mantenimiento. 2. Lleve la limpiadora a un centro de servicio. Para
encontrar el centro de servicio más cercano, visite
nuestro sitio web en www.DirtDevil.com o llame al
1-800-321-1134.
Cuando el
sonido del
motor se vuelva
más agudo
1. El flotador del tanque de agua sucia
se activó.
1. Revise cómo vaciar y limpiar el tanque de agua
sucia - pág. 14.
ADVERTENCIA A FIN DE REDUCIR LOS RIESGOS DE DESCARGAS
ELÉCTRICAS Y DE INCENDIO CAUSADOS POR DAÑOS A LOS COMPONENTES INTERNOS, SÓLO
UTILICE PRODUCTOS DE LIMPIEZA DE MARCA DIRT DEVIL
®
CONCEBIDOS ESPECÍFICAMENTE
PARA ESTE APARATO.
Guía de productos de limpieza Dirt Devil
®
Nombre del producto
Dirt Devil
®
Quick & Light
Revive™
Enhance™
Avanzada y profunda limpieza
32 onzas y 64 onzas
Limpieza profunda producidas por mascotas
32 onzas y 64 onzas
59
37

ADVERTENCIA PARA REDUCIR EL RIESGO DE LE-
SIONES FÍSICAS, DESENCHUFE EL APARATO ANTES DE LIMPIAR-
LO O DE DARLE MANTENIMIENTO.
Si el problema es menor, normalmente se puede resolver fácilmente al encontrar la causa en el
listado siguiente. Cualquier otra tarea de mantenimiento debe ser realizada por un representante de
mantenimiento autorizado. Si el producto no funciona adecuadamente, se dejó caer, se dañó, se dejó
a la intemperie o se dejó caer dentro del agua, llévelo a un centro de servicio antes de volver a usarlo.
GARANTÍA LIMITADA DE 6 MESES
LO QUE ESTÁ CUBIERTO POR ESTA GARANTÍA
Siempre que el uso y el mantenimiento de su producto Dirt Devil
®
se realicen en condiciones de uso
doméstico normales y según el Manual del usuario, el producto estará garantizado contra defectos
originales en el material y la fabricación. Durante el período de garantía, le proporcionaremos
gratuitamente mano de obra y piezas para corregir cualquier defecto de este tipo en productos
comprados en los Estados Unidos, tiendas situadas en una base militar de los EE. UU., y Canadá.
CÓMO HACER UN RECLAMO SEGÚN LA GARANTÍA
Si este producto no se ajusta a las condiciones garantizadas, llévelo o envíelo a un Concesionario autorizado
de servicio de garantía de Dirt Devil
®
junto con el comprobante de compra. Llame al 1-800-321-1134 para
que le indiquen de manera automática la ubicación de los centros autorizados de servicio en los EE. UU. O
BIEN, visite Dirt Devil
®
en línea en www.DirtDevil.com. Para obtener asistencia adicional o información
relacionada con esta garantía o a la disponibilidad de centros de servicio para reparaciones bajo la garantía,
llame al centro de respuesta a consumidores de Dirt Devil
®
al 1-800-321-1134, de lunes a viernes de 8:00
a.m. a 7:00 p.m., hora del Este.
LO QUE ESTA GARANTÍA NO CUBRE
Esta garantía no cubre el uso del producto en una operación comercial (tal como servicios de empleadas
domésticas, mantenimiento de edificios y alquiler de equipos), rodillos de cepillos, correas, bolsas, filtros,
mantenimiento incorrecto del producto, daños debidos a uso indebido, causas de fuerza mayor, naturaleza,
vandalismo u otras situaciones fuera del control de Royal Appliance Mfg. Co. (“Royal”, “nosotros”), acciones u
omisiones del propietario, uso fuera del país en el que se compró el producto inicialmente y reventas del producto
por parte del propietario original. Esta garantía no cubre recogidas, entregas, transporte ni visitas a domicilio.
Esta garantía no se aplica a los productos comprados fuera de los Estados Unidos, incluidos sus territorios
y posesiones, fuera de una tienda situada en una base militar de los EE. UU. ni fuera de Canadá. Esta
garantía no cubre los productos comprados a una parte que no sea un minorista, concesionario o distribuidor
autorizados de los productos de Royal.
OTROS TÉRMINOS IMPORTANTES
Esta garantía no es transferible y no puede ser asignada a ningún tercero. Esta garantía será regida e
interpretada de acuerdo con las leyes del estado de Ohio. El período de garantía no podrá ser extendido
por cualquier tipo de reemplazo o reparación realizados bajo esta garantía.
ESTA GARANTÍA ES LA ÚNICA GARANTÍA Y EL ÚNICO RECURSO PROVISTO POR ROYAL. TODAS LAS
DEMÁS GARANTÍAS, EXPRESAS O IMPLÍCITAS, INCLUIDAS LAS GARANTÍAS DE COMERCIABILIDAD
O APTITUD PARA UN FIN PARTICULAR, QUEDAN EXCLUIDAS. ROYAL NO SERÁ RESPONSABLE EN
NINGÚN CASO POR NINGÚN DAÑO ESPECIAL, INDIRECTO, INCIDENTAL O MEDIATO DE NINGÚN
TIPO O NATURALEZA CON RESPECTO AL PROPIETARIO O A CUALQUIER PARTE QUE REALICE UN
RECLAMO A TRAVÉS DEL PROPIETARIO, YA SEA QUE SE BASE EN RESPONSABILIDAD
CONTRACTUAL, NEGLIGENCIA, RESPONSABILIDAD EXTRACONTRACTUAL O RESPONSABILIDAD
CIVIL OBJETIVA POR LOS PRODUCTOS, O EMERGENTE DE CUALQUIER OTRA CAUSA Algunos
estados no permiten la exclusión de los daños mediatos, por lo que es posible que la exclusión anterior
no se aplique a su caso en particular. Esta garantía le otorga derechos legales específicos, y es posible
que también tenga otros derechos que varían de un estado a otro.
PROBLEMA POSIBLE CAUSA SOLUCIONES POSIBLES
La aspiradora
no funciona
1. El cordón de alimentación no está bien
enchufado en la toma de corriente.
1. Enchufe bien la unidad.
2. Se quemó el fusible o se disparó el
disyuntor.
2. Verifique el fusible o el disyuntor de la casa. Cambie
los fusibles o reinicie los disyuntores de la casa.
3. Necesita mantenimiento. 3. Lleve la limpiadora a un centro de servicio. Para
encontrar el centro de servicio más cercano, visite
nuestro sitio web en www.DirtDevil.com o llame al
1-800-321-1134.
Si la limpiado-
ra no aspira o
presenta baja
succión
1. La tapa del tanque de agua sucia no
está en su lugar.
1. Coloque la tapa del tanque de agua sucia - pág. 14.
2. El tanque de agua sucia no está
correctamente instalado.
2. Revise cómo colocar el tanque de agua sucia en la
base de la limpiadora - pág. 15.
3. El tanque de agua sucia está lleno. 3. Vacíe el tanque de agua sucia - pág. 14.
4. El conducto del agua sucia está obstruido. 4. Limpie el tanque de agua sucia - pág. 14.
5. El filtro de espuma está sucio. 5. Limpie el filtro. Revise cómo vaciar y limpiar el
tanque de agua sucia - pág. 14.
Sale agua de
la limpiadora
1. El tanque de agua sucia está lleno. 1. Vacíe el tanque de agua sucia - pág. 14
2. El tanque de agua sucia no está cor-
rectamente instalado.
2. Revise cómo colocar el tanque de agua sucia en
la base de la limpiadora - pág. 15.
3. El tanque de agua limpia/solución no
está correctamente instalado.
3. Revise cómo instalar el tanque de agua limpia/
solución - pág. 12.
El limpiador no
abastece
1. El tanque de agua limpia/solución no
está correctamente instalado.
1. Revise cómo instalar el tanque de agua limpia/
solución - pág. 12.
2. Necesita mantenimiento. 2. Lleve la limpiadora a un centro de servicio. Para
encontrar el centro de servicio más cercano, visite
nuestro sitio web en www.DirtDevil.com o llame al
1-800-321-1134.
Cuando el
sonido del
motor se vuelva
más agudo
1. El flotador del tanque de agua sucia
se activó.
1. Revise cómo vaciar y limpiar el tanque de agua
sucia - pág. 14.
ADVERTENCIA A FIN DE REDUCIR LOS RIESGOS DE DESCARGAS
ELÉCTRICAS Y DE INCENDIO CAUSADOS POR DAÑOS A LOS COMPONENTES INTERNOS, SÓLO
UTILICE PRODUCTOS DE LIMPIEZA DE MARCA DIRT DEVIL
®
CONCEBIDOS ESPECÍFICAMENTE
PARA ESTE APARATO.
Guía de productos de limpieza Dirt Devil
®
Nombre del producto
Dirt Devil
®
Quick & Light
Revive™
Enhance™
Avanzada y profunda limpieza
32 onzas y 64 onzas
Limpieza profunda producidas por mascotas
32 onzas y 64 onzas
38
58
6
MESES
Llame a nuestro Departamento
de Servicio al Cliente al (800)
321-1134
8:00 a.m. - 7:00 p.m. Hora del este, Lunes
a viernes o sábados 10:00 a.m. a 6:00 p.m.
Hora del este
www.dirtdevil.com
Si necesita piezas de
repuesto originales, visite
en www.dirtdevil.com
Este producto utiliza las siguientes piezas:
CORREA ESTILO
30
FILTRO PREVIO AL MOTOR F92
NUESTRAS ASPIRADORAS
HABLAN POR SÍ SOLAS.
Retome la conversación en…
Twitter@DirtDevil
Facebookcom/DirtDevil