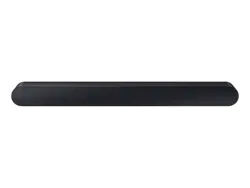
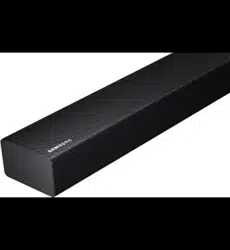
HW-S60B / HW-S61B
FULL MANUAL
Imagine the possibilities
Thank you for purchasing this Samsung product.
To receive more complete service, please register
your product at www.samsung.com/register
ENG - 2
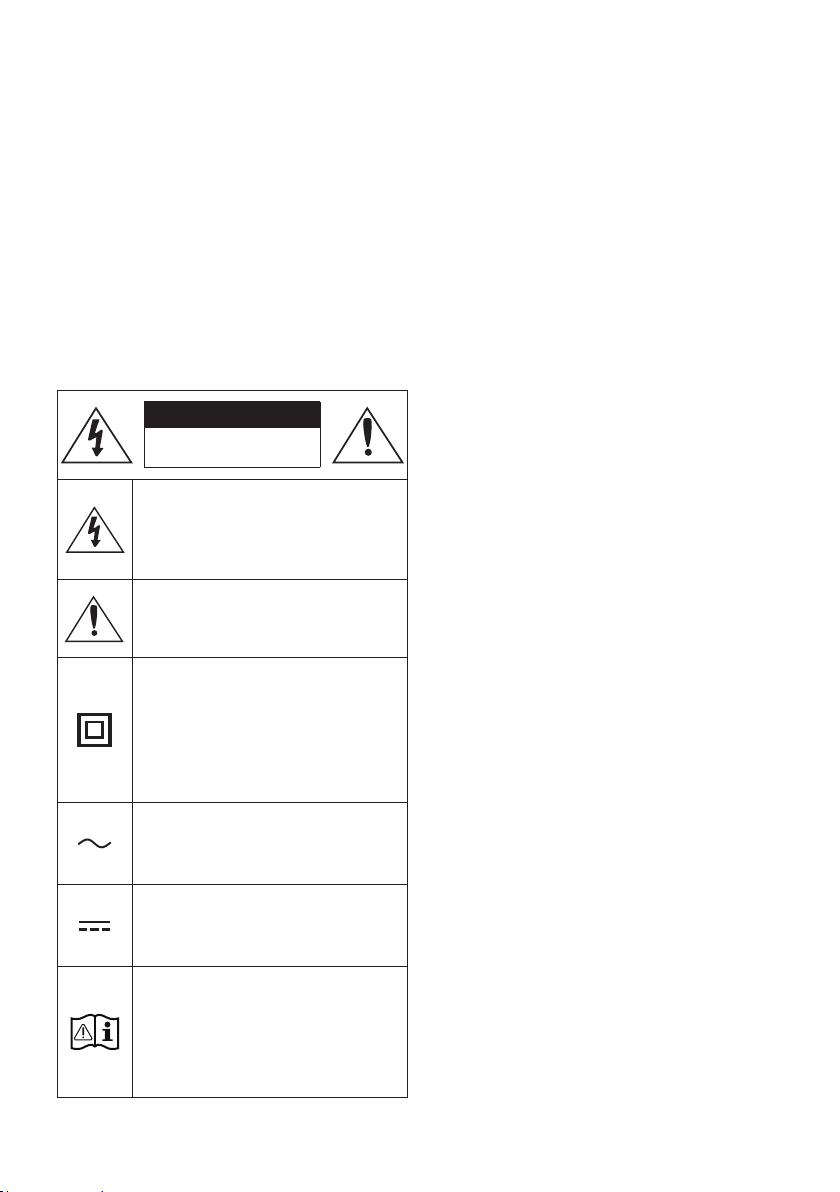
SAFETY INFORMATION
SAFETY WARNINGS
TO REDUCE THE RISK OF ELECTRIC SHOCK, DO
NOT REMOVE THE COVER (OR BACK).
NO USER-SERVICEABLE PARTS ARE INSIDE.
REFER SERVICING TO QUALIFIED SERVICE
PERSONNEL.
Refer to the table below for an explanation of
symbols which may be on your Samsung product.
CAUTION
RISK OF ELECTRIC SHOCK.
DO NOT OPEN.
This symbol indicates that high voltage
is present inside. It is dangerous to
make any kind of contact with any
internal part of this product.
This symbol indicates that this product
has included important literature
concerning operation and maintenance.
Class II product : This symbol indicates
that it does not require a safety
connection to electrical earth (ground).
If this symbol is not present on a
product with a power cord, the product
MUST have a reliable connection to
protective earth (ground).
AC voltage : This symbol indicates that
the rated voltage marked with the
symbol is AC voltage.
DC voltage : This symbol indicates that
the rated voltage marked with the
symbol is DC voltage.
Caution, Consult instructions for use :
This symbol instructs the user to
consult the user manual for further
safety related information.
WARNING
not expose this appliance to rain or moisture.
CAUTION
TO PREVENT ELECTRIC SHOCK, MATCH WIDE
BLADE OF PLUG TO WIDE SLOT, FULLY INSERT.
This apparatus shall always be connected to a
AC outlet with a protective grounding
connection.
To disconnect the apparatus from the mains,
the plug must be pulled out from the mains
socket, therefore the mains plug shall be
readily operable.
Do not expose this apparatus to dripping or
liquids, such as vases on the apparatus.
To turn this apparatus off completely, you
must pull the power plug out of the wall
socket. Consequently, the power plug must
be easily and readily accessible at all times.

ENG - 3
PRECAUTIONS
1. Ensure that the AC power supply in your
house complies with the power
sticker located on the bottom of your
product. Install your product horizontally, on
a suitable base (furniture), with enough
space around it for ventilation (7~10 cm).
Make sure the ventilation slots are not
or other equipment which may become hot.
This unit is designed for continuous use. To
fully turn off the unit, disconnect the AC plug
from the wall outlet. Unplug the unit if you
intend to leave it unused for a long period of
time.
2. During thunderstorms, disconnect the AC
plug from the wall outlet. Voltage peaks due
to lightning could damage the unit.
3. Do not expose the unit to direct sunlight or
other heat sources. This could lead to
overheating and cause the unit to
malfunction.
4. Protect the product from moisture (i.e.
equipment creating strong magnetic or
the AC wall socket if the unit malfunctions.
Your product is not intended for industrial
use. It is for personal use only. Condensation
may occur if your product has been stored in
cold temperatures. If transporting the unit
during the winter, wait approximately
2 hours until the unit has reached room
temperature before using.
5. The battery used with this product contains
chemicals that are harmful to the
environment. Do not dispose of the battery
in the general household trash. Do not
expose the battery to excess heat, direct
disassemble, or overheat the battery.
CAUTION : Danger of explosion if the battery
is replaced incorrectly. Replace only with the
same or equivalent type.

ENG - 4
CONTENTS
01 Checking the Components 6
02 Product Overview 7
Front Panel / Top Panel of the Soundbar
------------------------- 7
Bottom Panel of the Soundbar
------------------------- 9
03 Using the Remote Control 10
Inserting Batteries before using the Remote Control (AAA batteries X 2)
------------------------- 10
How to Use the Remote Control
-------------------------
10
-------------------------
14
Using the Hidden Buttons (Buttons with more than one function)
-------------------------
14
-------------------------
15
Adjusting the Soundbar volume with a TV remote control
------------------------- 16
04 Connecting the Soundbar 17
Connecting Electrical Power
-------------------------
17
Connecting the Samsung Wireless Rear Kit and Subwoofer to your
Soundbar
-------------------------
17
05 Connecting to a TV 18
Connecting the TV that supports HDMI ARC (Audio Return Channel)
-------------------------
18
Connecting using an Optical Cable
-------------------------
20
Connecting via Bluetooth
-------------------------
21
Connecting via Wi-Fi
-------------------------
23
Connecting to a TV that supports Dolby Atmos®
-------------------------
24
Using the Q-Symphony Function
-------------------------
26
Using the SpaceFit Sound
-------------------------
27

ENG - 5
06 Connecting an External Device 28
Connecting using an Optical Cable
-------------------------
28
07 Connecting a Mobile Device 29
Method 1. Connecting via Bluetooth
-------------------------
29
Method 2. Connecting via Wi-Fi (Wireless Network)
-------------------------
32
Using the Tap Sound
-------------------------
33
08 Connecting via Apple AirPlay 2 34
09 Installing the Wall Mount 35
Installation Precautions
-------------------------
35
Wallmount Components
-------------------------
35
10 Installing the Soundbar in front of TV 37
11 Software Update 38
Auto Update
-------------------------
38
USB Update
-------------------------
38
Reset
-------------------------
39
12 Troubleshooting 40
13 Licence 42
14 Open Source Licence Notice 43
15 Important Notes About Service 43
16 Specications and Guide 44
-------------------------
44

ENG - 6
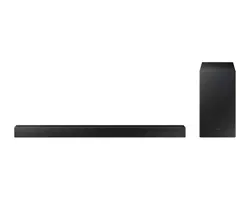
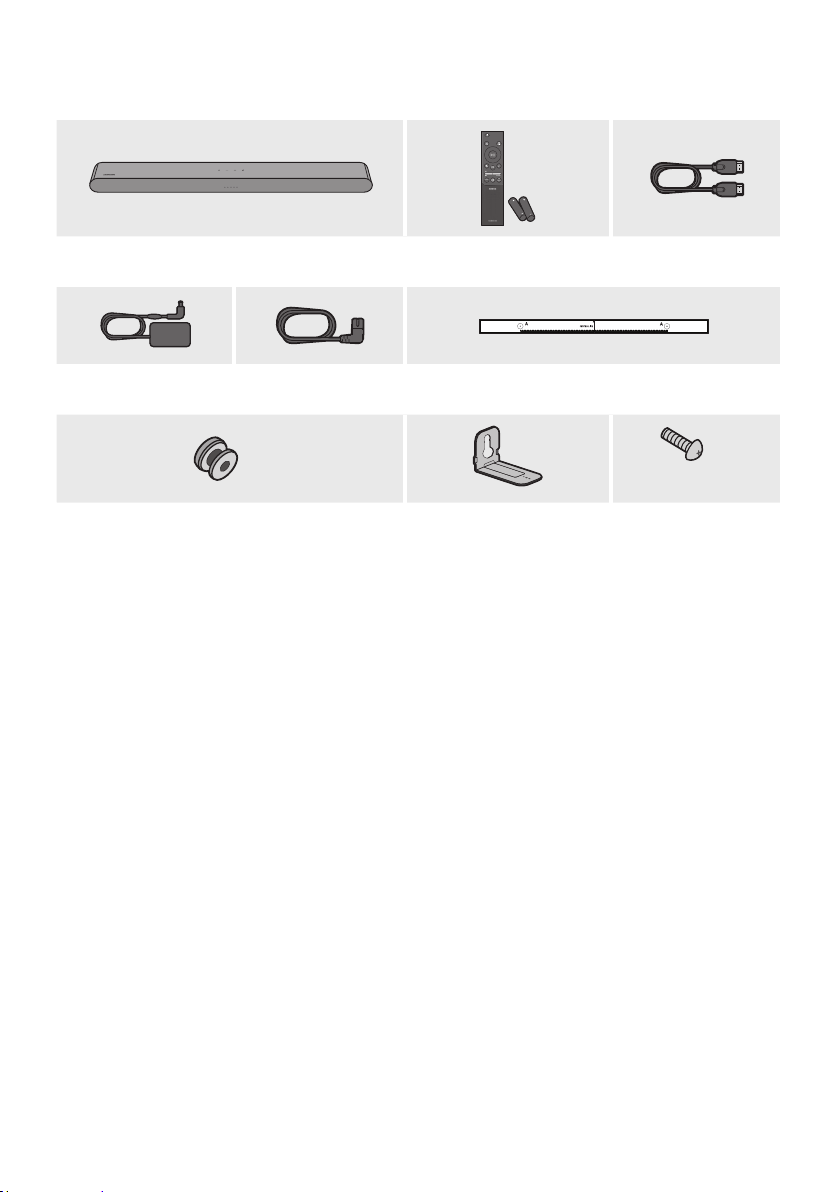
01 CHECKING THE COMPONENTS
SOUND
MODE
WOOFER
TONE
CONTROL
CH LEVEL
Soundbar Main Unit Soundbar Remote Control
/
Batteries
HDMI Cable
A TYPE : 450mm
AC/DC Adapter
(Soundbar)
Power Cord
(Soundbar)
Wall Mount Guide
x 2
x 2
(M4 x L10)
x 2
Holder-Screw Bracket-Wall Mount Screw
For more information about the power supply and power consumption, refer to the label attached
to the product. (Label: Bottom of the Soundbar Main Unit)
To purchase additional components or optional cables, contact a Samsung Service Centre or
Samsung Customer Care.
For more information about the wallmount see page 35.
The appearance of the accessories may differ slightly from the illustrations above.
ENG - 7
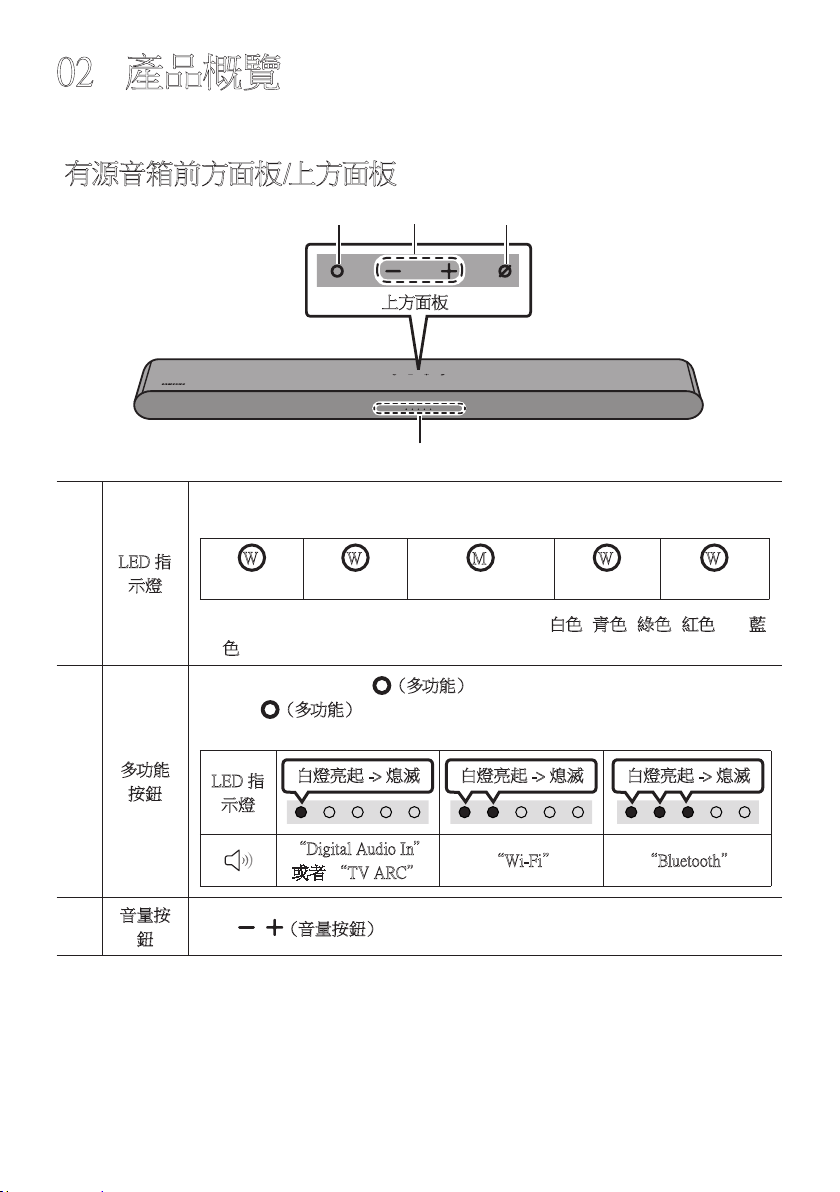
02 PRODUCT OVERVIEW
Front Panel / Top Panel of the Soundbar
Top Panel
LED
indicator
mode or status. The colour of the LED indicator and the number of lights indicate the active
mode as described below.
W
White LED
W
White LED
M
Multicolour LED
W
White LED
W
White LED
The Multicolour LED changes to White, Cyan, Green, Red, and Blue depending on the
mode or status.
Multi
Function
Button
In standby mode, press the
(Multi Function) button to turn on the Soundbar.
Press the (Multi Function) button to change the mode. Each time you change the
mode, the LED lights in white and then turns off.
LED
Indicator
White On -> Off White On -> Off White On -> Off
“Digital Audio In” or
“TV ARC”
“Wi-Fi” “Bluetooth”
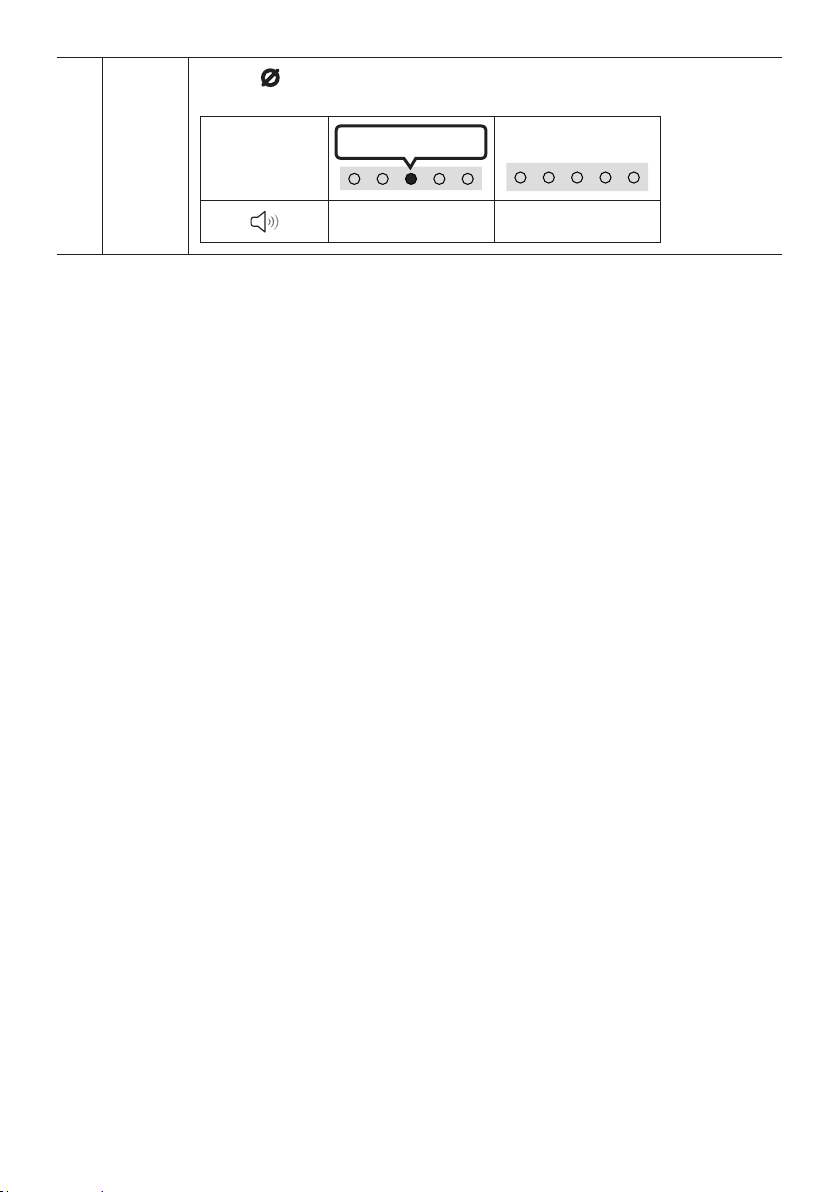
Volume
Button
Press the
(Volume) button to adjust the volume.
ENG - 8
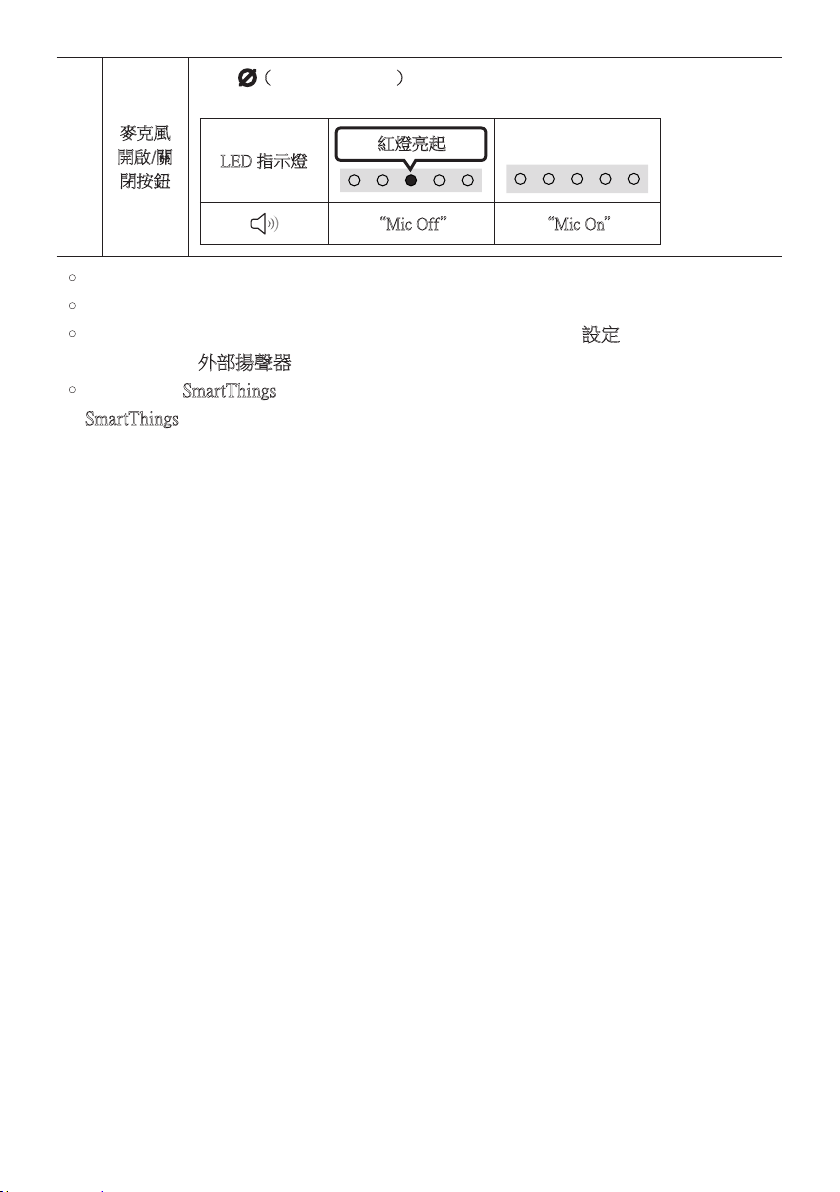
Mic
On/Off
Button
Press the (Mic On/Off) button to turn the microphone on or off.
When the microphone is off, the LED Indicator will light red.
LED Indicator
Red On
“Mic Off” “Mic On”
When you plug in the AC cord, the power button will begin working in 4 to 6 seconds.
When you turn on this unit, there will be a 4 to 5 second delay before it produces sound.
If you hear sounds from both the TV and Soundbar, go to the Settings menu for the TV audio and
change the TV speaker to External Speaker.
You can turn on and off audio feedback by using SmartThings app. To learn about using the
SmartThings app, refer to “Method 2. Connecting via Wi-Fi (Wireless Network)”.
ENG - 9
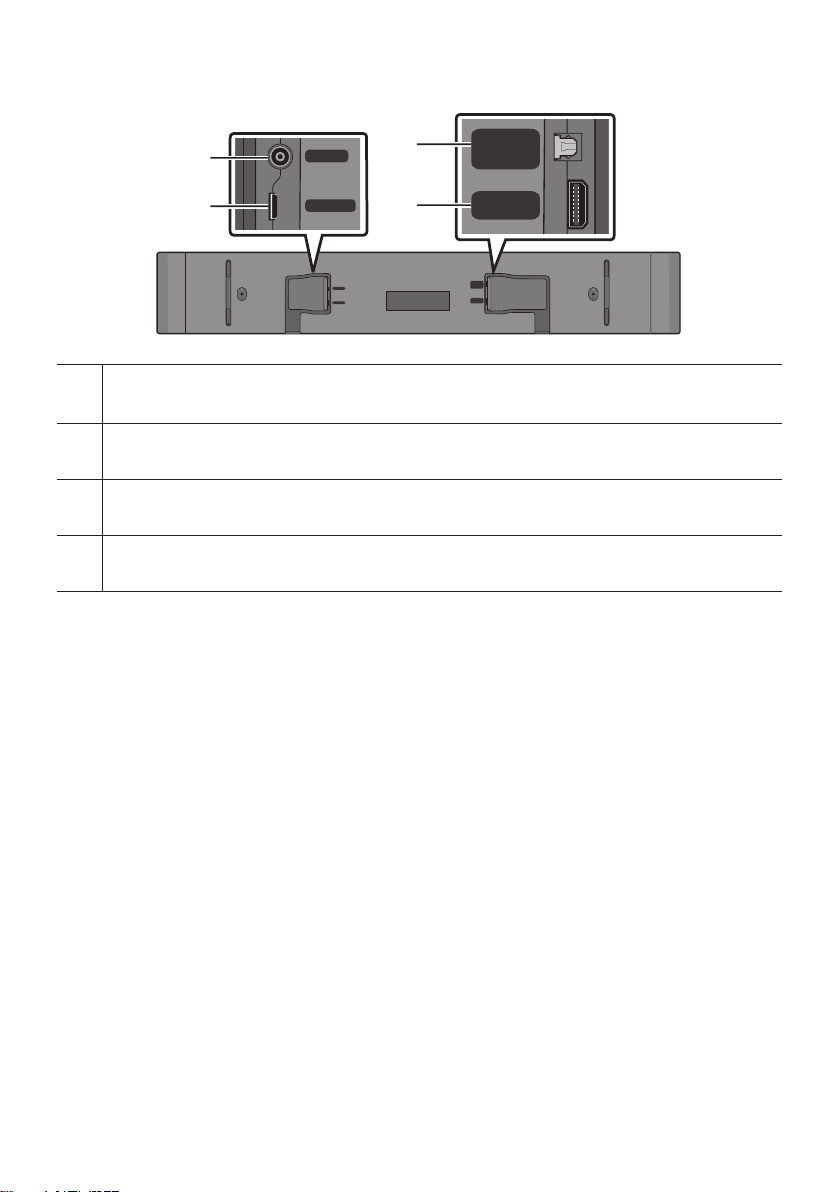
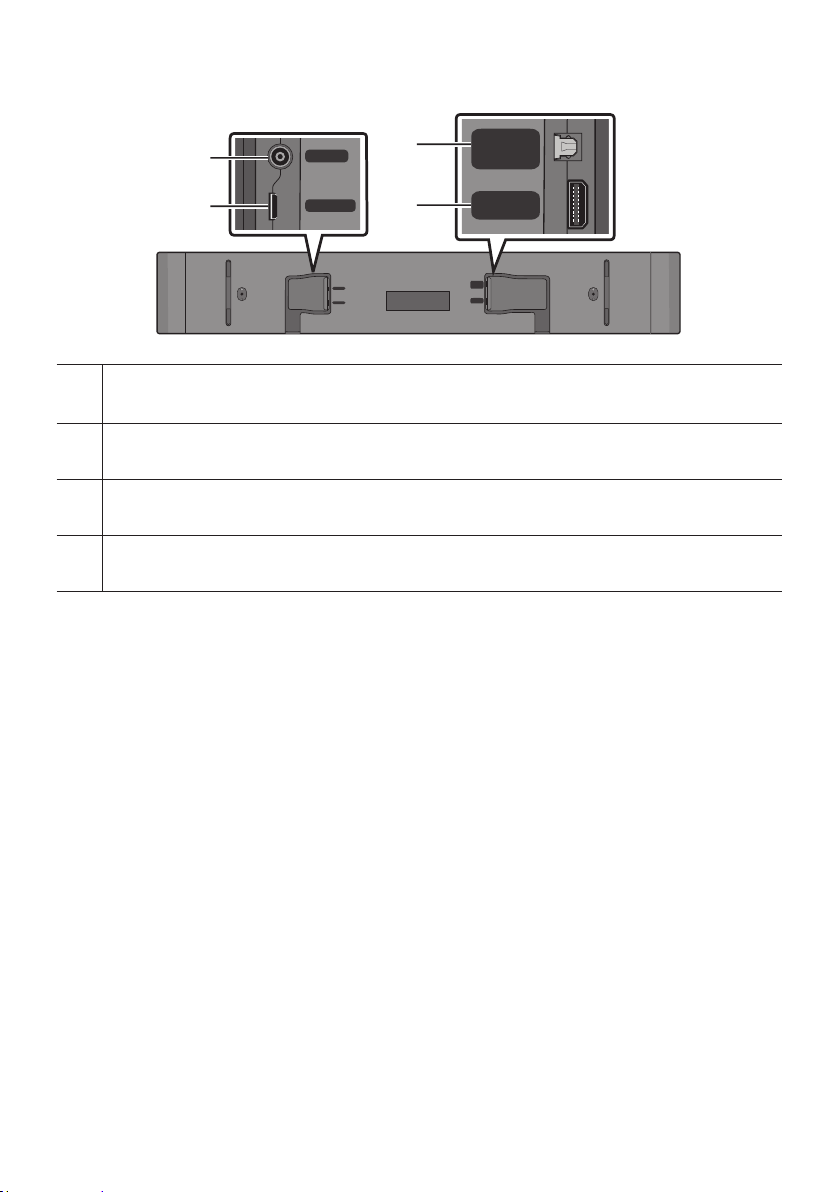
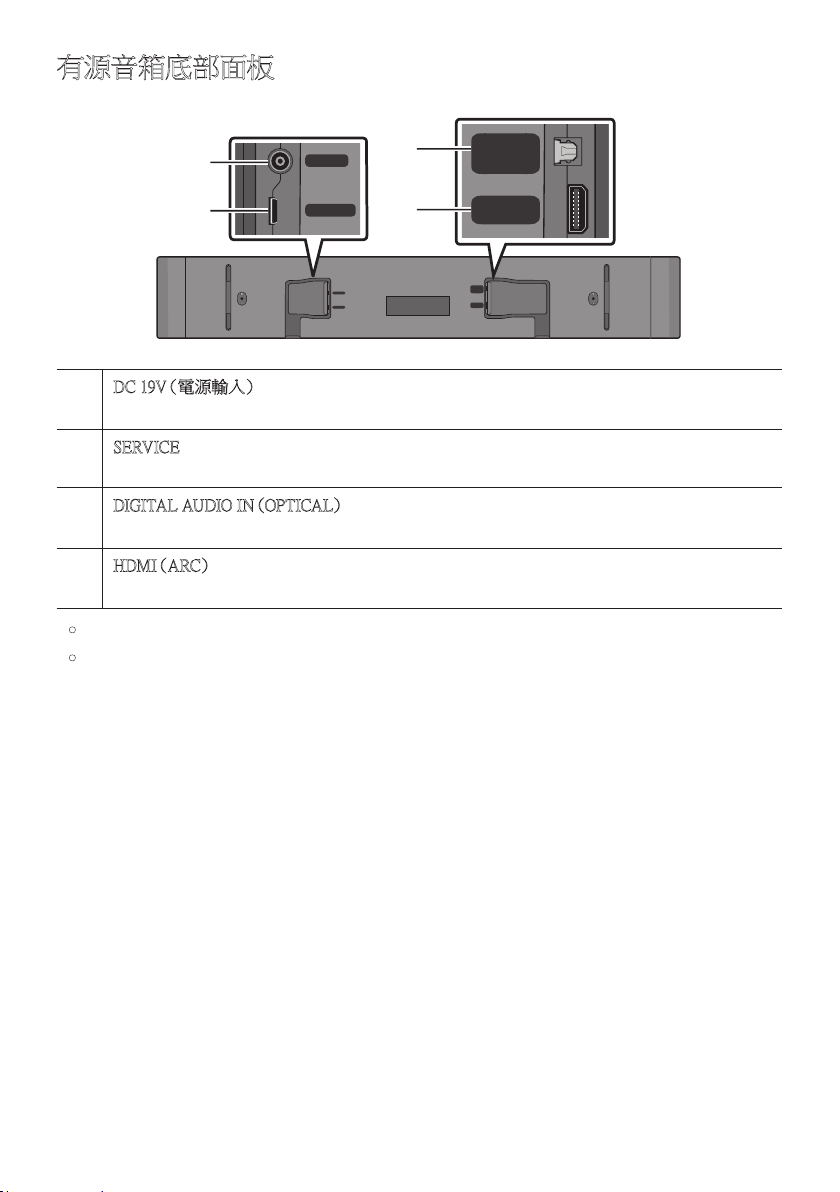
Bottom Panel of the Soundbar
SERVICE
DC 19V
DIGITAL
AUDIO IN
(OPTICAL)
HDMI
(ARC)
DIGITAL
AUDIO IN
(OPTICAL)
HDMI
(ARC)
SERVICE
DC 19V
DC 19V (Power Supply In)
Connect the AC/DC power adapter. (See page 17)
SERVICE
DIGITAL AUDIO IN (OPTICAL)
Connect to the digital (optical) output of an external device. (See page 28)
HDMI (ARC)
Connect to the HDMI (ARC) port on a TV. (See page 18)
When disconnecting the power cable of the AC/DC power adapter from a wall outlet, pull the plug.
Do not pull the cable.
Do not connect this unit or other components to an AC outlet until all connections between
components are complete.
ENG - 10
03 USING THE REMOTE CONTROL
Inserting Batteries before using the Remote Control (AAA batteries X 2)
Slide the back cover in the direction of the arrow
until it is completely removed.
Insert 2 AAA batteries (1.5V) oriented so that their
polarity is correct. Slide the back cover back into
position.
How to Use the Remote Control
SOUND
MODE
WOOFER
TONE
CONTROL
CH LEVEL
Power
Turns the Soundbar on and off.
LED
Indicator
Cyan Blinks X1
On
Off
Red Blinks X3
Auto Power Down Function
The unit turns off automatically in the following
situations:
– In “Digital Audio In” or “TV ARC” / “Wi-Fi” /
“Bluetooth” mode if there is no audio signal for 18
minutes.
(Source)
Press to select a source connected to the Soundbar.
Audio Feedback On/Off
You can turn the Audio Feedback on or off. Press and hold
the (Source) button on the remote control for
5 seconds while the Soundbar is off (Standby mode).
LED
Indicator
Cyan Blinks X1
On
Off
Red Blinks X1

ENG - 11
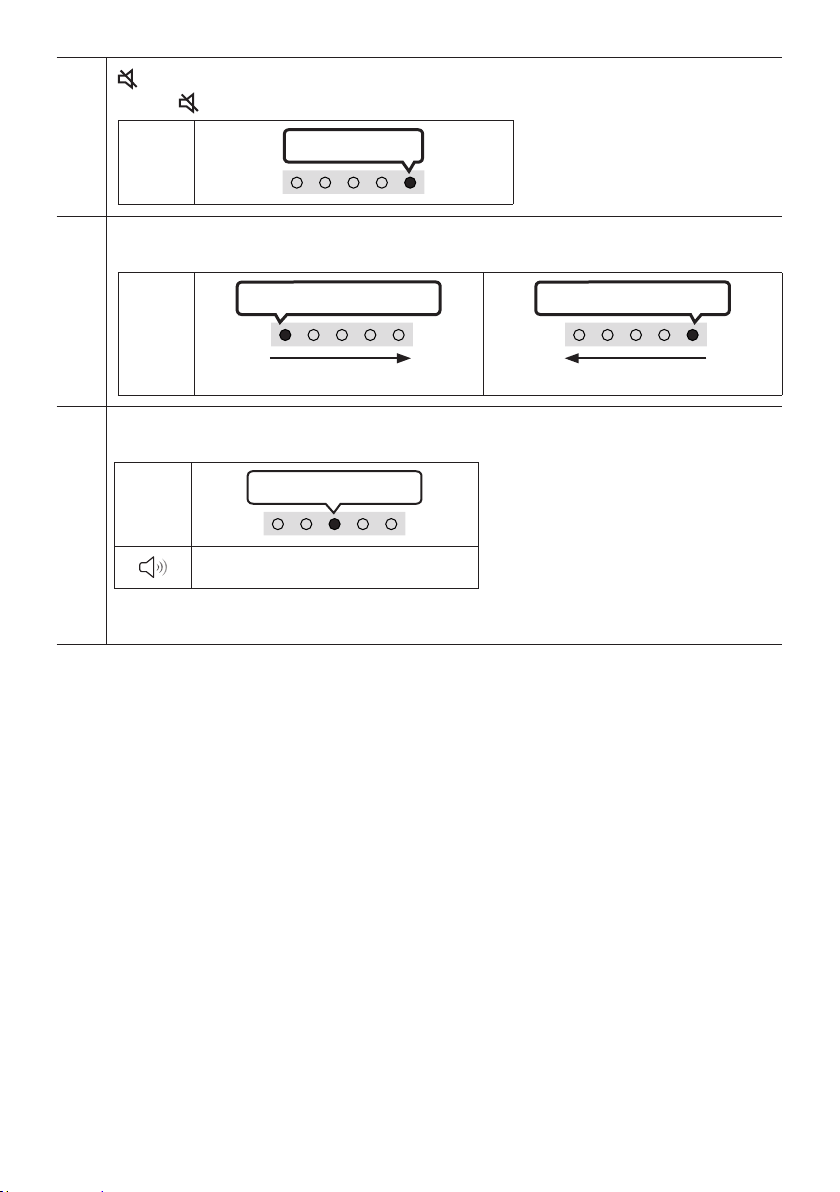
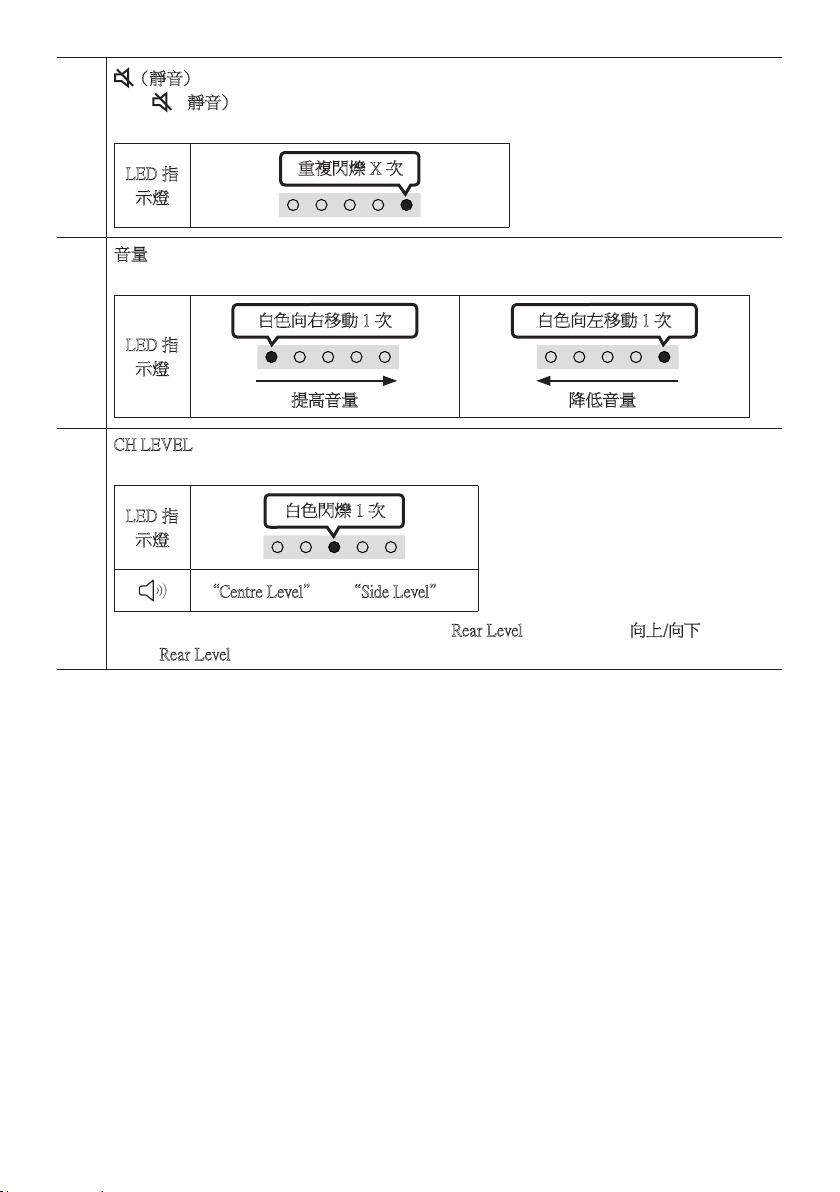
(Mute)
Press the (Mute) button to mute the sound.
Press it again to unmute the sound.
LED
Indicator
Blinks X Repeatly
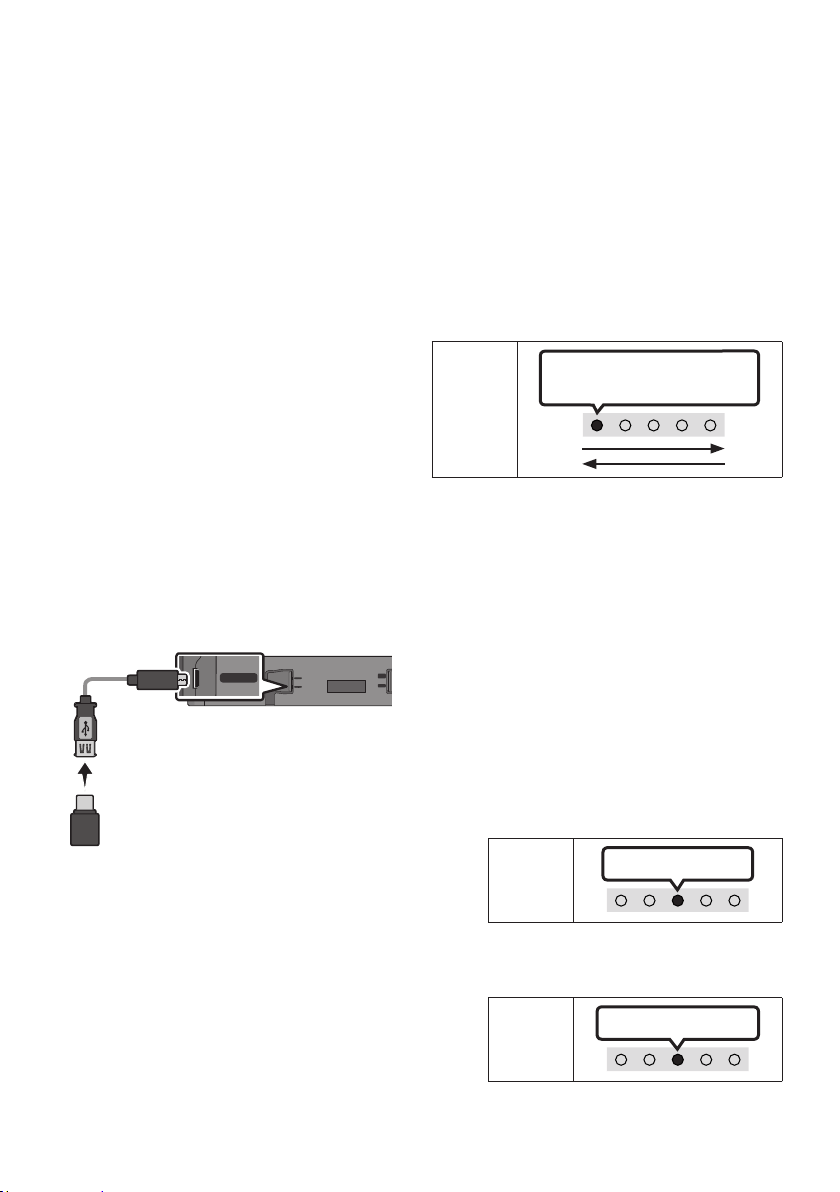
Volume
Push the button up or down to adjust the volume.
LED
Indicator
White moves to right X1
Volume Up
White moves to left X1
Volume Down
CH LEVEL
By pressing the button, you can adjust the volume of the each speaker.
LED
Indicator
White Blinks X1
“Centre Level” “Side Level”
– If the Rear Speakers (sold separately) are connected, the setting “Rear Level” is supported. To adjust
the volume of the “Rear Level” between -6 to +6 by using the Up/Down buttons.
ENG - 12
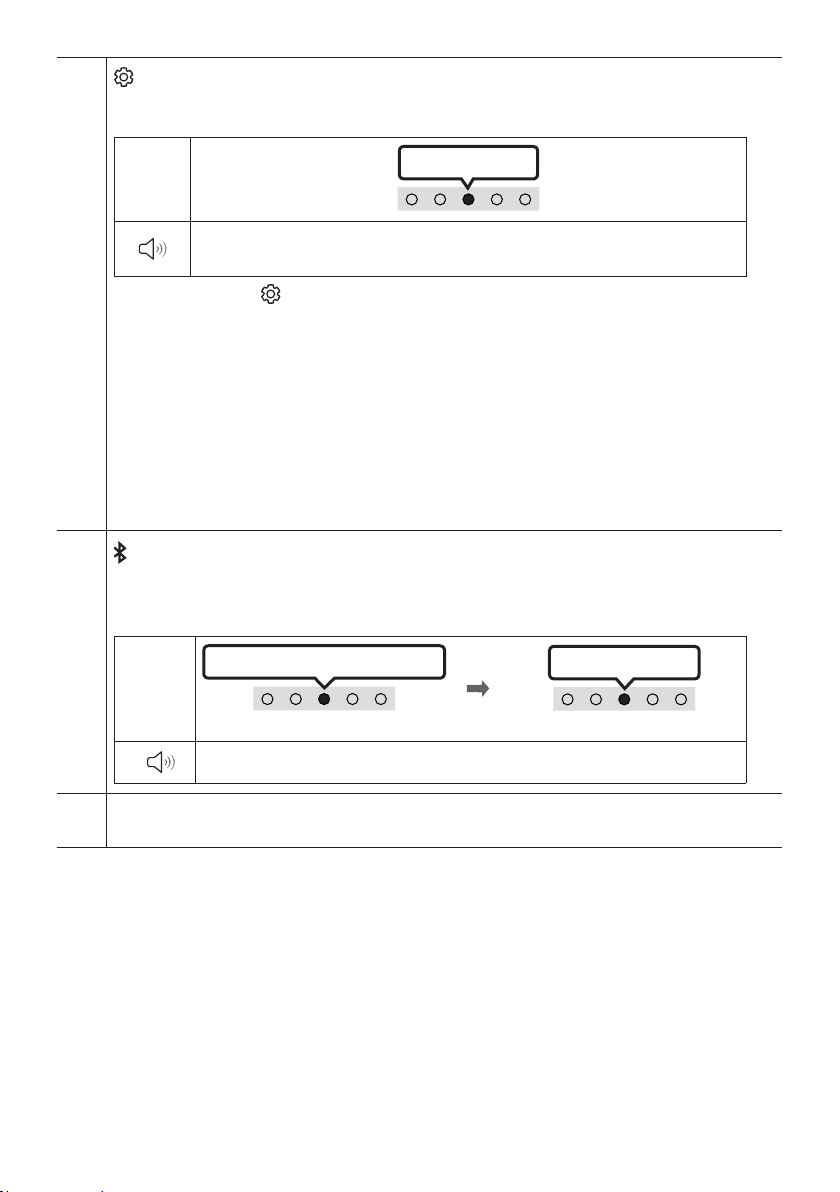
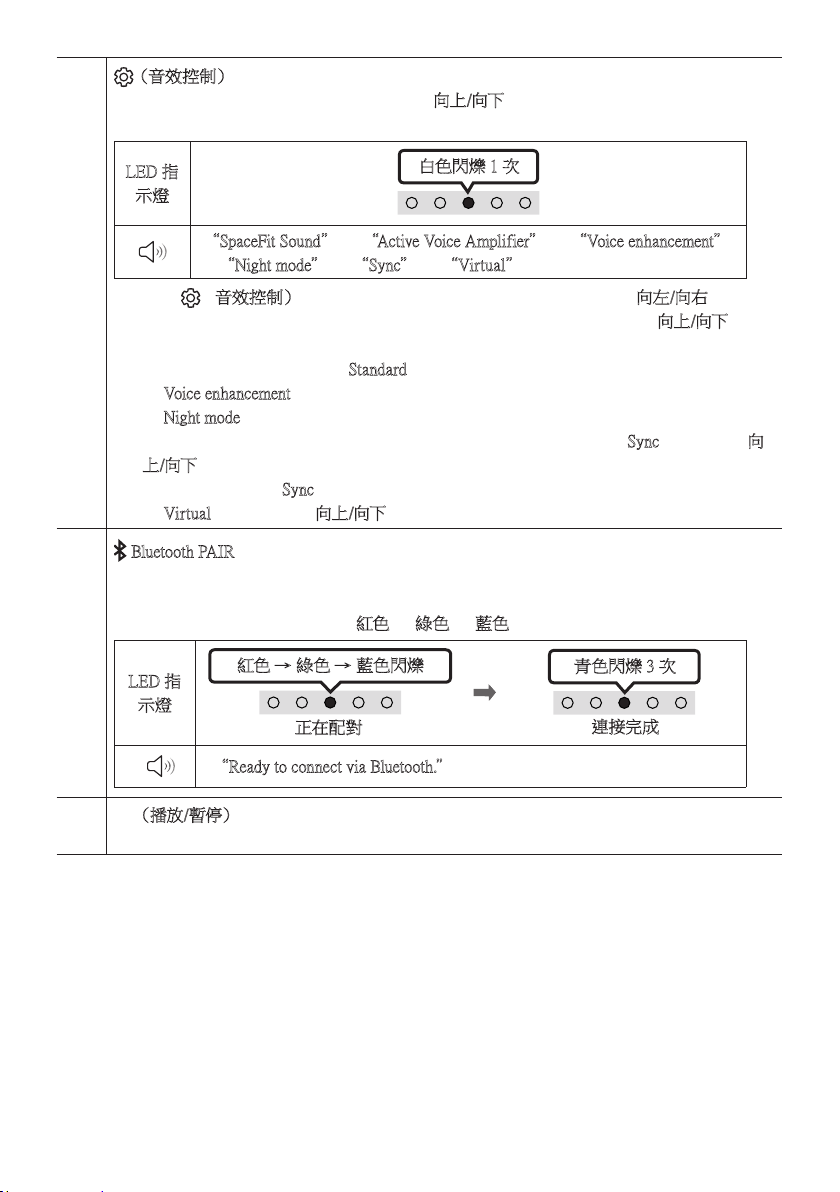
(Sound Control)
By pressing the button, you can set the audio function. The desired item can be adjusted using the Up/
Down buttons. Each time the mode changes, the Multicolour LED blinks in white.
LED
Indicator
White Blinks X1
“SpaceFit Sound” “ Active Voice Amplier” “Voice enhancement” “Night
mode” “Sync” “Virtual”
– Press and hold the (Sound Control) button for about 5 seconds to adjust the sound for each
frequency band. 150Hz, 300Hz, 600Hz, 1.2kHz, 2.5kHz, 5kHz, and 10kHz are selectable using the Left/
Right buttons and each can be adjusted to a setting between -6 to +6 using the Up/Down buttons.
(Make sure the Sound mode is set to "Standard".)
– “Voice enhancement” makes it easier to hear spoken dialog in movies and TV.
– “Night mode” is optimized for night time viewing with the settings adjusted to bring the volume
down but keep the dialog clear.
– If the video on the TV and audio from the Soundbar are not synchronized, select “Sync” in Sound
Control, and then set the audio delay between 0~300 milliseconds by using the Up/Down buttons.
– “Sync” is only supported for some functions.
– The “Virtual” function can be turned On/Off by using the Up/Down buttons.
Bluetooth PAIR
Switch the Soundbar to Bluetooth pairing mode.
When you press the button, the LED display changes as shown below.
Until pairing is complete, the Multicolour LED changes as RedGreenBlue in turn.
LED
Indicator
Red Green Blue Blinks
Pairing
Connection is complete
Cyan Blinks X3
“Ready to connect via Bluetooth.”
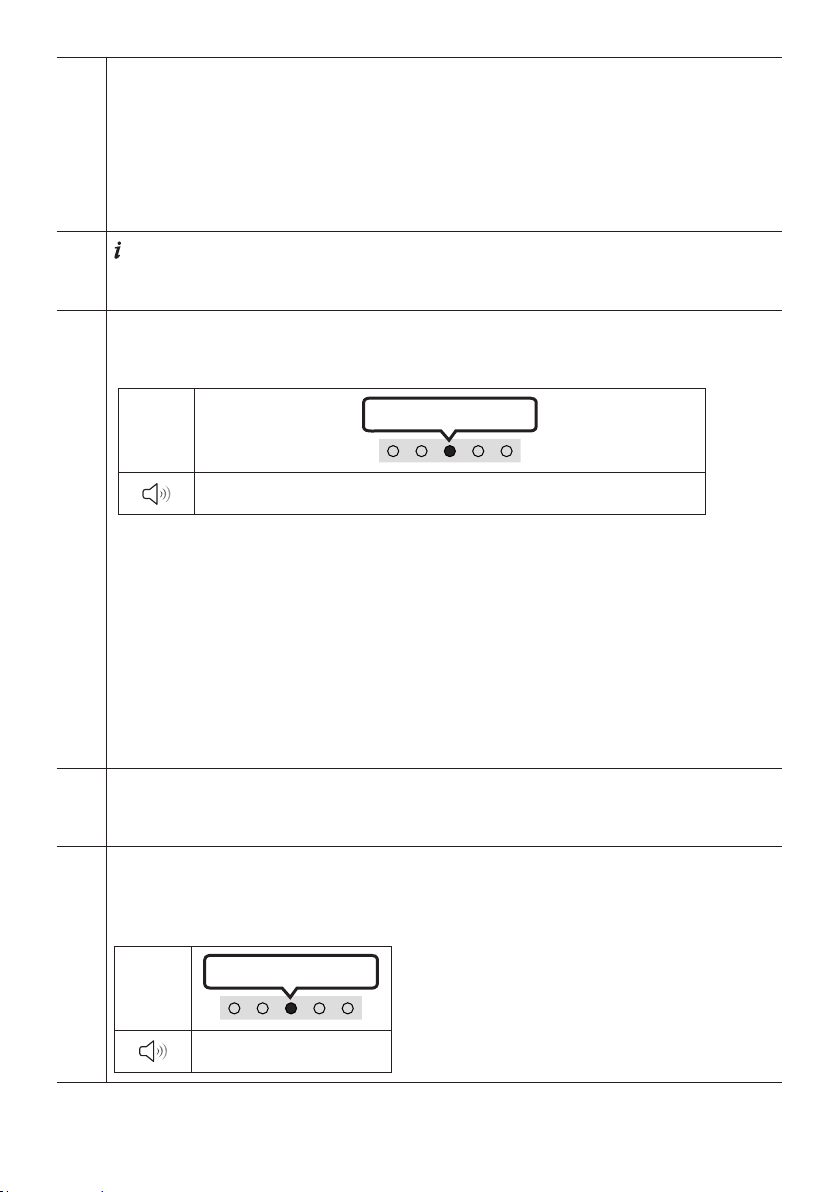
p (Play / Pause)
You can also play or pause music by pressing the button.
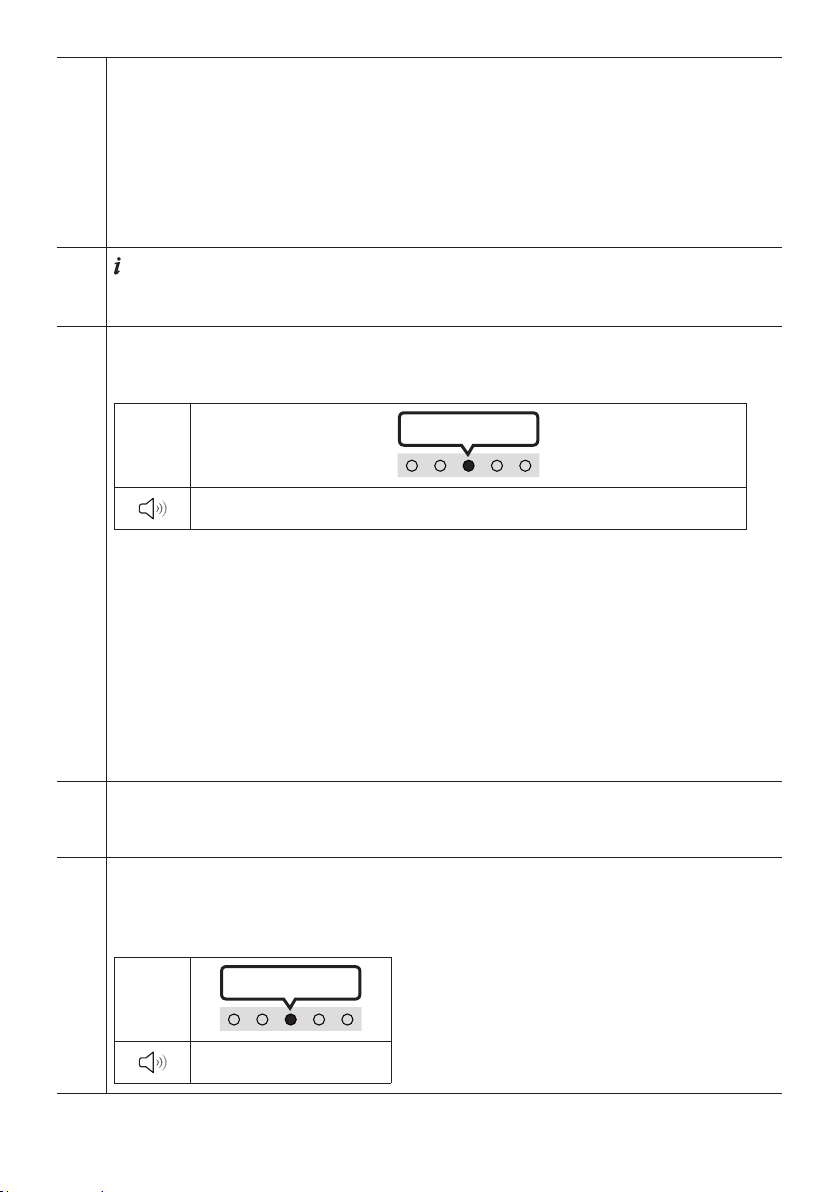
ENG - 13
Up/Down/Left/Right
Press Up/Down/Left/Right on the button to select or set functions.
Music Skip
Press the RightLeft button to select the previous music
ID SET
Press and hold the Up button for 5 seconds to complete ID SET (when connecting to a wireless
subwoofer or wireless rear speakers).
(Info)
Press the button to display information about the current function. (See page 7.)
When connected to Dolby Atmos®, the LED indicator blinks cyan 3 times.
SOUND MODE
By pressing the button, you can select the desired audio mode. Each time the mode changes, the
Multicolour LED blinks in white.
LED
Indicator
White Blinks X1
“Adaptive Sound” “DTS Virtual:X” “Music” “Game” “Standard”
Adaptive Sound
characteristics of the content.
DTS Virtual:X
Immersive 3D sound from any content.
Music
Game
Provides stereoscopic sound to immerse you in the action while gaming.
Standard
Outputs the original sound.
WOOFER (BASS) LEVEL
Push the button up or down to adjust the level of the woofer (bass) to -12 or between -6 to +6. To set the
woofer (bass) volume level to 0 (Default), press the button.
TONE CONTROL
By pressing the button, you can adjust the volume of the treble or bass sound. The desired item can be
adjusted using the Up/Down buttons. (This feature is available in all sound modes except “Standard”
mode.)
LED
Indicator
White Blinks X1
“Treble” “Bass”
ENG - 14
Active Voice Amplier (AVA)
Analyzes external noise in real time while soundbar is playing, so that voice audio can always be
heard clearly.
No data is saved during the analysis.
Using the Hidden Buttons (Buttons with more than one function)
Hidden Button
Reference page
Remote Control Button Function
WOOFER (Up) TV remote control On/Off (Standby) page 16
Up ID SET page 13
(Sound Control)
7 Band EQ page 12
(Source)
Audio Feedback On/Off (Standby) page 10
ENG - 15
Output specications for the different sound effect modes
Effect Input
Output
With Subwoofer Only
With Subwoofer & Wireless
Rear Speaker Kit
Adaptive Sound
2.0 ch 5.1 ch 7.1 ch
5.1 ch 5.1 ch 7.1 ch
Dolby Atmos® 5.1 ch 7.1 ch
DTS Virtual:X
2.0 ch 5.1 ch 7.1 ch
5.1 ch 5.1 ch 7.1 ch
Dolby Atmos® 5.1 ch 7.1 ch
Music
2.0 ch 5.1 ch 7.1 ch
5.1 ch 5.1 ch 7.1 ch
Dolby Atmos® 5.1 ch 7.1 ch
Game
2.0 ch 5.1 ch 7.1 ch
5.1 ch 5.1 ch 7.1 ch
Dolby Atmos® 5.1 ch 7.1 ch
Standard
2.0 ch 2.1 ch 2.1 ch
5.1 ch 5.1 ch 5.1ch
Dolby Atmos® 5.1 ch 7.1 ch
The Samsung Wireless Rear Speaker Kit, and Subwoofer can be purchased separately.
To purchase a Kit or the Subwoofer, contact the vendor you purchased the Soundbar from.
When the input source is Dolby Atmos® the Subwoofer-only setup provides 5.1 channel audio,
while the Subwoofer & Wireless Rear Speaker Kit setup provides 7.1 channel audio.

ENG - 16
Adjusting the Soundbar volume with a TV remote control
Adjust the Soundbar volume using the TV’s remote control.
This function can be used with IR remote controls only. Bluetooth remote controls (remote
controls that require pairing) are not supported.
Set the TV speaker to External Speaker to use this function.
Manufacturers supporting this function:
Samsung, VIZIO, LG, Sony, Sharp, PHILIPS, PANASONIC, TOSHIBA, Hisense, RCA
1. Turn Off the Soundbar.
2. Push up and hold the WOOFER button for 5 seconds.
Each time you push the WOOFER button up and hold it for 5 seconds, the mode switches in the
following order: “Off-TV Remote” (Default mode), “Samsung-TV Remote”, “All-TV Remote”.
The LED indicator status changes each time the mode is changed, as shown below.
Remote Control Button LED Indicator Status
SOUND
MODE
WOOFER
L
TONE
CON
5 Sec
"Off-TV Remote"
(Default mode)
Red Blinks X1
Disable the TV remote control.
SOUND
MODE
WOOFER
L
TONE
CON
5 Sec
"Samsung-TV Remote"
Cyan Blinks X1
Enable a Samsung TV’s IR remote
control.
SOUND
MODE
WOOFER
L
TONE
CON
5 Sec
"All-TV Remote"
Blue Blinks X1
Enable a third-party TV’s IR remote
control.
ENG - 17
04 CONNECTING THE SOUNDBAR
Connecting Electrical Power
Use the power components to connect the Soundbar to an electrical outlet in the following order:
For more information about the required electrical power and power consumption, refer to the
label attached to the product. (Label: Bottom of the Soundbar Main Unit)
1. First connect the power cable to the AC/DC adapter.
Connect the AC/DC adapter (with the power cable) to the Soundbar.
2. Connect the power cord to a wall socket.
Bottom of the Soundbar Main Unit
SERVICE
DC 19V
DC 19V
Power Cord
AC/DC Adapter
SERVICE
DC 19V
NOTES
If you unplug and reconnect the power cord when the product is turned on, the Soundbar turns on
automatically.
that it is hanging with the AC cord input facing upwards, water or other foreign substances could
enter the Adapter and cause the Adapter to malfunction.
Connecting the Samsung Wireless Rear Kit and Subwoofer to your
Soundbar
Expand to true wireless surround sound by connecting the Samsung Wireless Rear Speaker Kit
(SWA-9100S or SWA-9200S, sold separately) and Wireless Subwoofer (SWA-W510, sold separately) to
your Soundbar.
For detailed information on connections, see the Samsung Wireless Rear Speaker Kit and Wireless
Subwoofer manual.
ENG - 18
05 CONNECTING TO A TV
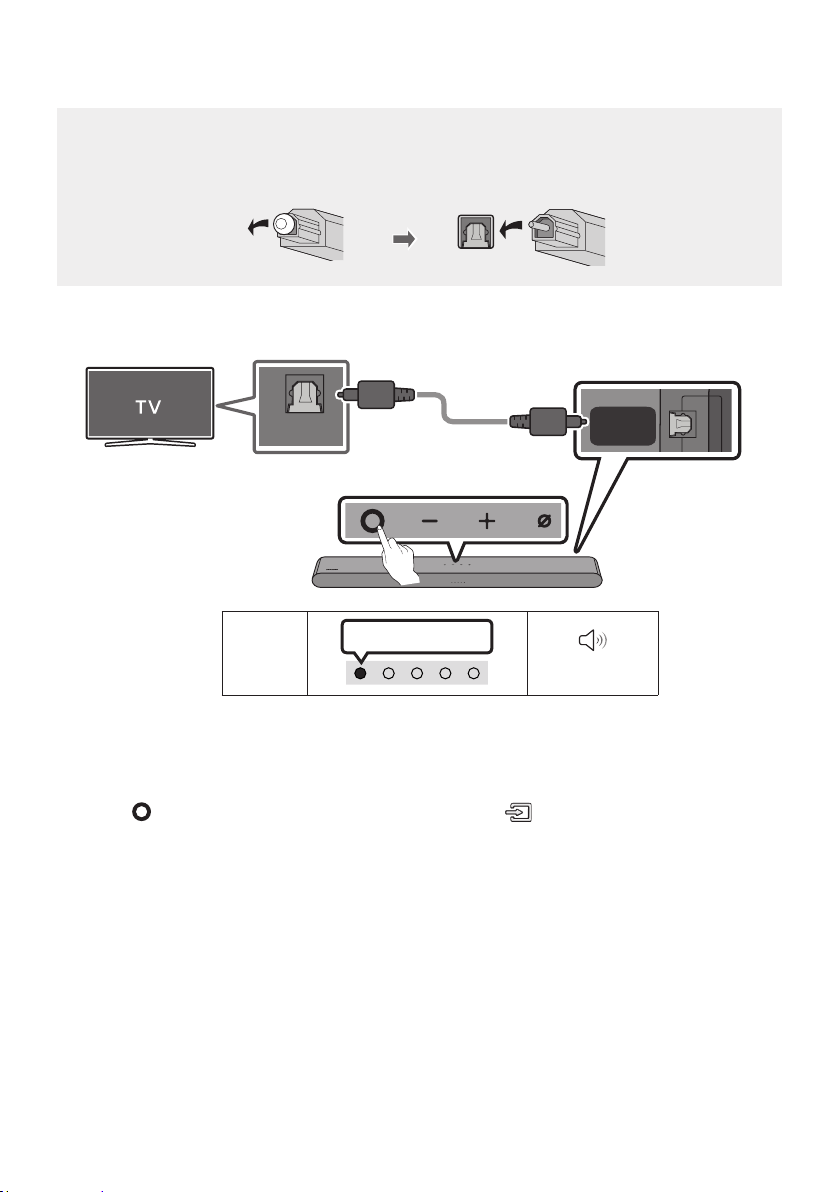
Connecting the TV that supports HDMI ARC (Audio Return Channel)
CAUTION
To connect the HDMI cable between the TV and Soundbar, be sure to connect the terminals
marked ARC. Otherwise, the TV sound may not be output.
The recommended cable is High Speed HDMI Cable with Ethernet.
HDMI IN
(ARC)
(OPTICAL)
HDMI
(ARC)
Connect to the HDMI IN (ARC) or
(eARC) port of your TV.
HDMI Cable
Bottom of the
Soundbar
Connect to the HDMI (ARC) port of
the Soundbar main unit.
Top of the Soundbar
LED
Indicator
White On -> Off
“Digital Audio In”
1.
2. Turn on the Soundbar and TV.
3. TV sound is output from the Soundbar.
When the TV sound is not output, press the (Multi Function) button at the top of the
Soundbar or the (Source) button on the remote control to select the “Digital Audio In”
mode.
When the sound is not output, check the HDMI Cable connection again.
Use the volume buttons on the TV’s remote control to change the volume on the Soundbar.

ENG - 19
NOTES
When you connect the TV that supports the HDMI ARC (Audio Return Channel) to the Soundbar
with an HDMI cable, you can transmit the digital video and audio data without connecting a
separate optical cable.
We recommend you use a coreless HDMI cable if possible. If you use a cored HDMI cable, use one
whose diameter is less than 14 mm.
This function is not available if the HDMI cable does not support ARC.
When the audio in a broadcast is encoded in Dolby Digital and the “Digital Output Audio Format” on
your TV is set to PCM, we recommend that you change the setting to Dolby Digital. When the
setting on the TV is changed, you will experience better sound quality. (The TV menu may use
different words for Dolby Digital and PCM depending on the TV manufacturer.)
ENG - 20
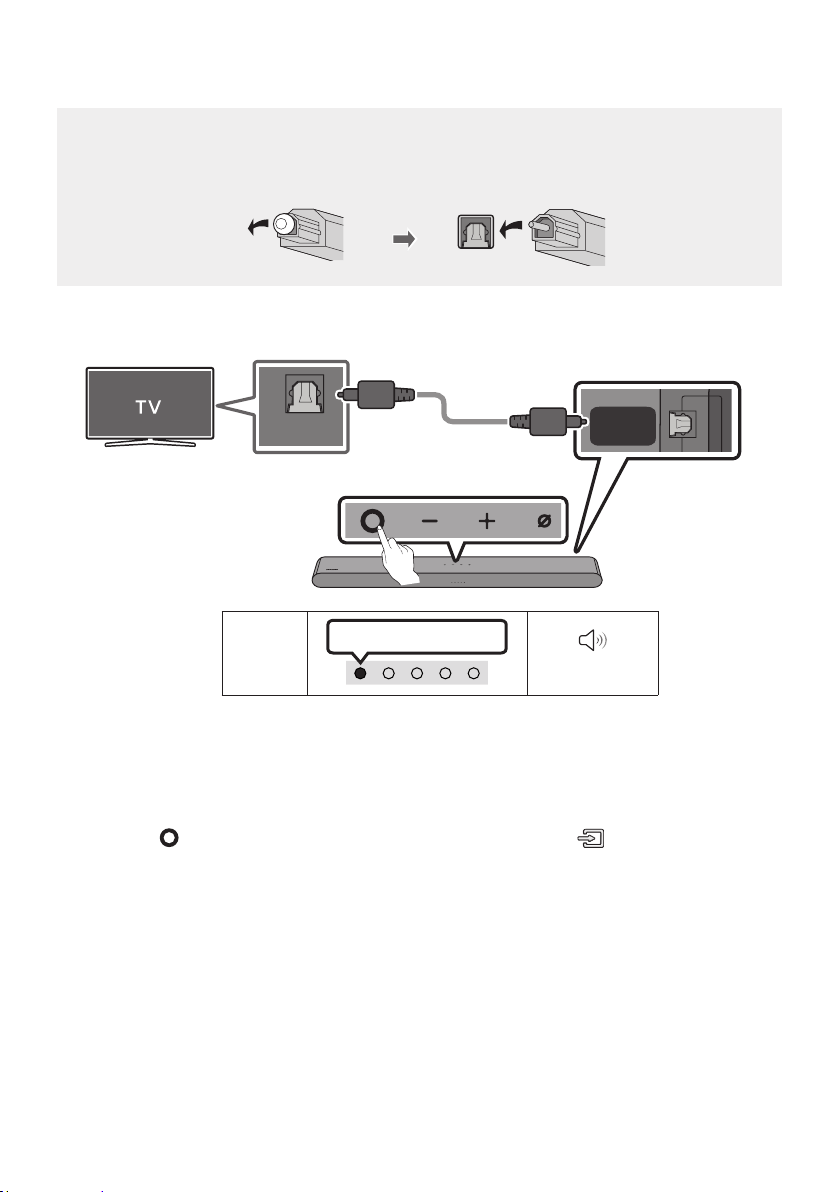
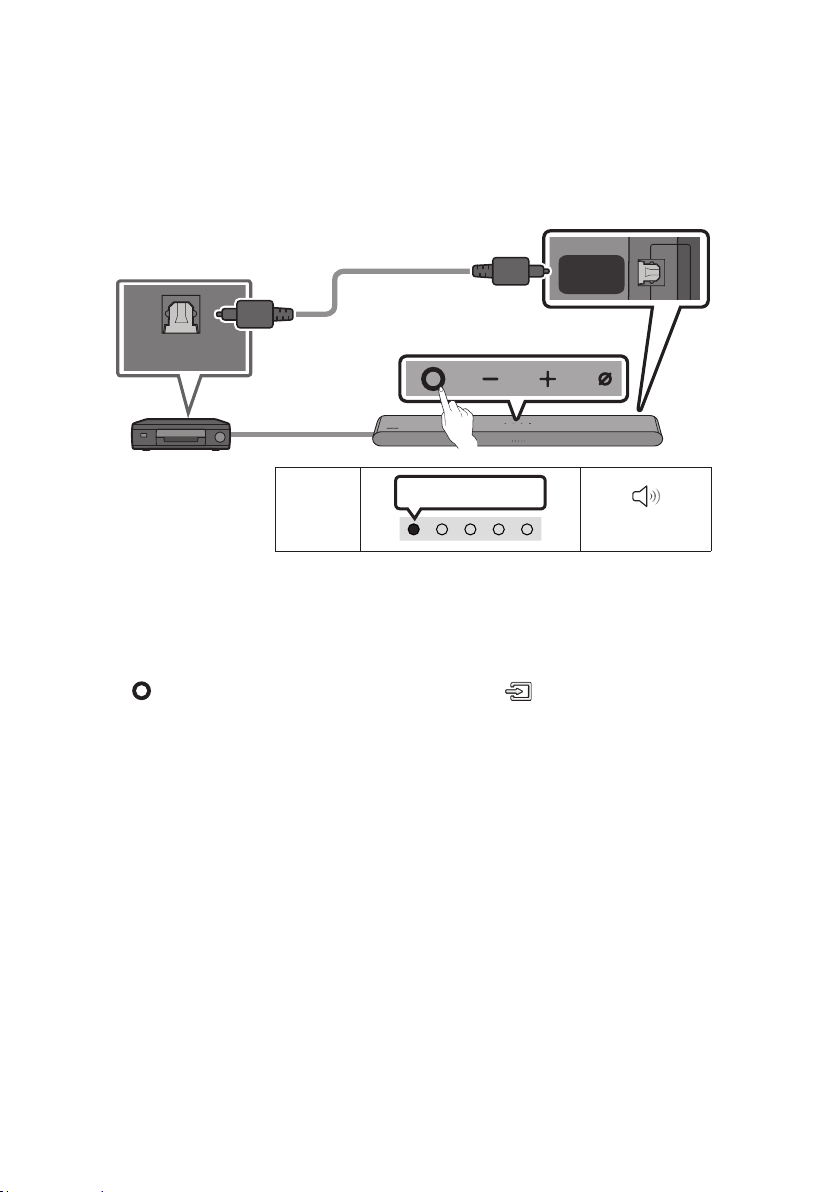
Connecting using an Optical Cable
Pre-connection Checklist
When you use an optical cable and the terminals have covers, be sure to remove the covers.
LED
Indicator
White On -> Off
“Digital Audio In”
DIGITAL
AUDIO IN
(OPTICAL)
OPTICAL OUT
Bottom of the
Soundbar
Optical Cable (not supplied)
Top of the Soundbar
1. With the TV and Soundbar turned off, connect the DIGITAL AUDIO IN (OPTICAL) port on the
Soundbar and the OPTICAL output port on the TV with the optical cable (not supplied), as shown in
2. Turn on the Soundbar and TV.
3. Press the (Multi Function) button at the top of the Soundbar or the (Source) button on the
remote control and then select the “Digital Audio In” mode. Then the announcement, “Digital
Audio In” is output.
4. The TV sound is output from the Soundbar.

ENG - 21
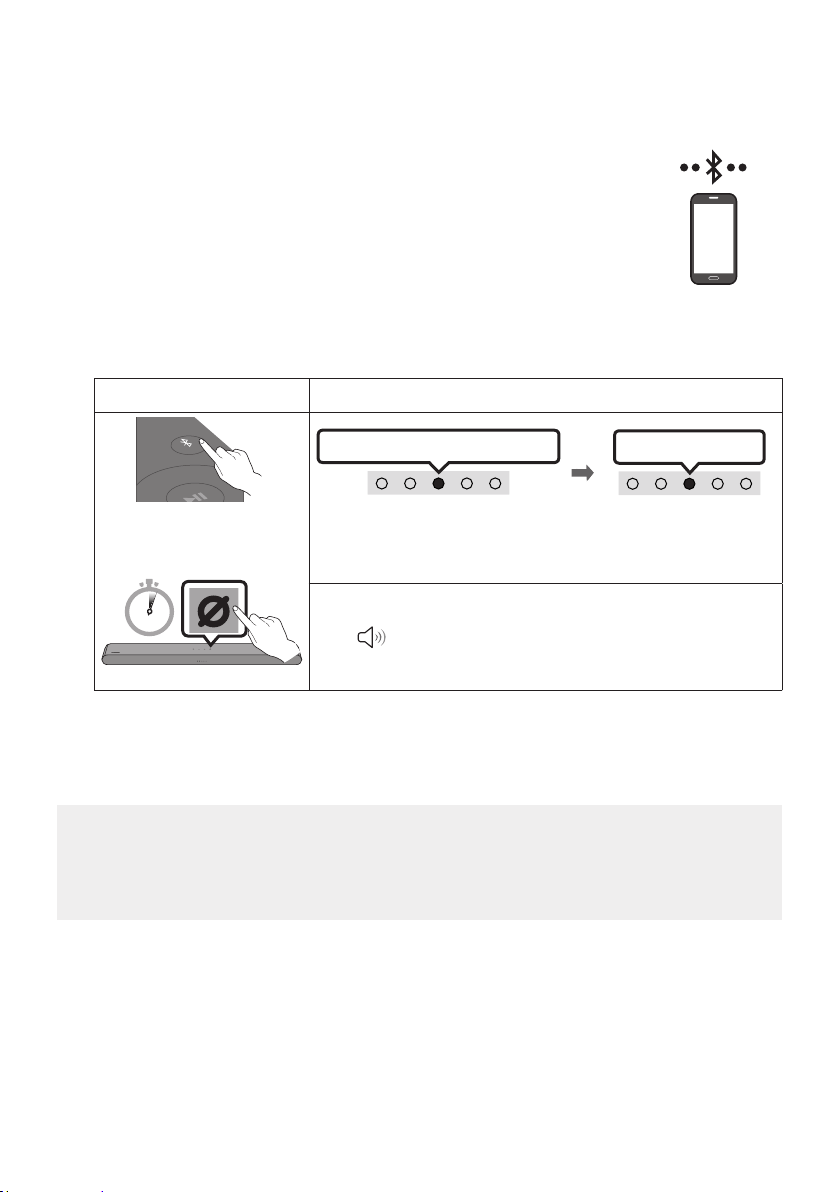
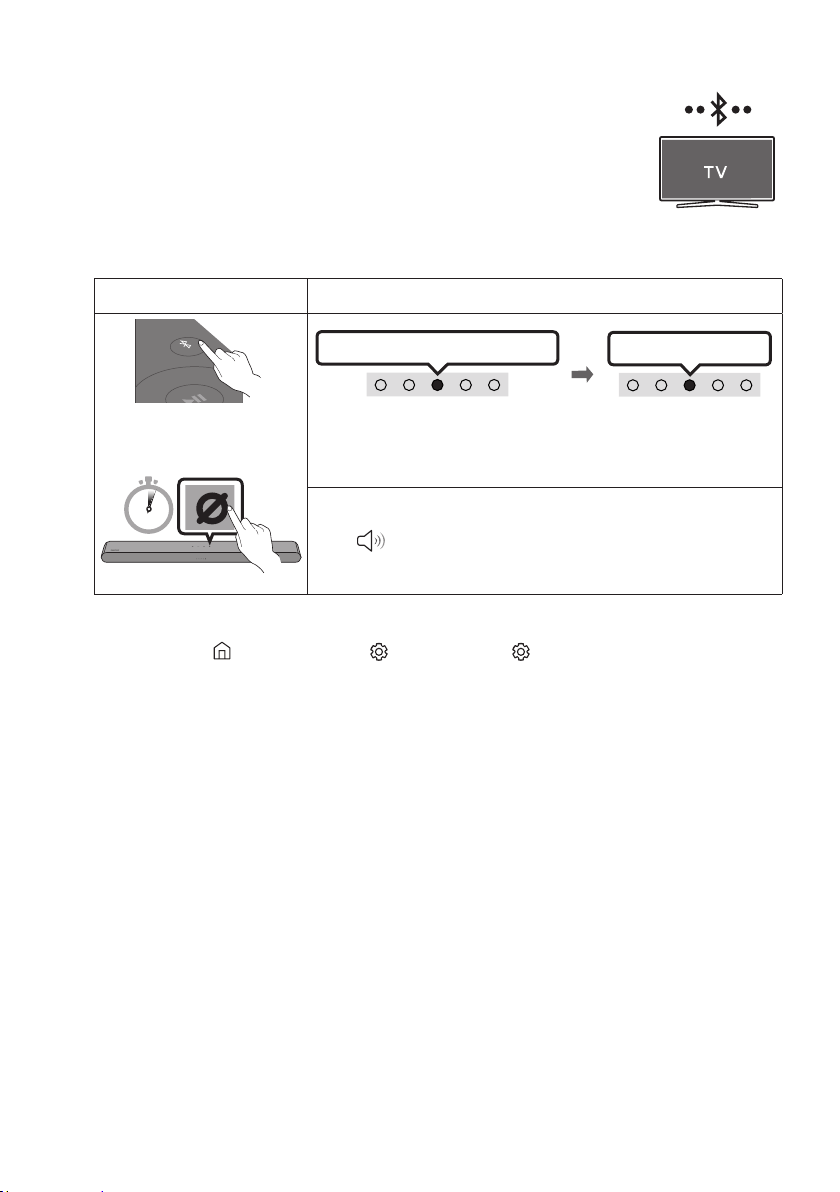
Connecting via Bluetooth
When a Samsung TV is connected using Bluetooth, you can hear stereo
sound without the hassle of cabling.
Only one Samsung TV can be connected at a time.
Samsung TV that supports Bluetooth can be connected. Check the
The initial connection
1.
Bluetooth Pairing button LED Indicator
PAIR
OR
Red Green Blue Blinks
Pairing
Connection is complete
Cyan Blinks X3
When in “Bluetooth” mode
5 Sec
Until pairing is complete, the Multicolour LED changes as Red
GreenBlue in turn.
“Ready to connect via Bluetooth.”
2. Select Bluetooth mode on the Samsung TV.
(e.g. Home (
) Sound Sound Output
Bluetooth Speaker List [AV] Samsung Soundbar S60B / [AV] Samsung Soundbar S61B
(Bluetooth))
3. Select “[AV] Samsung Soundbar S60B / [AV] Samsung Soundbar S61B” from the list on TV’s
screen.
An available Soundbar is indicated with “Need Pairing” or “Paired” on the TV’s Bluetooth device
list. To connect the Samsung TV to the Soundbar, select the message, and then establish a
connection.
4. You can now hear Samsung TV sound from the Soundbar.
If there is a connection log between the Soundbar and Samsung TV, the Soundbar is
automatically connected by changing its mode to “Bluetooth”
ENG - 22
If the device fails to connect
If you have an existing Soundbar (e.g., [AV] Samsung Soundbar S60B / [AV] Samsung Soundbar
S61B) on the list of speakers on the Samsung TV, delete it.
Then repeat steps 1 through 3.
Disconnecting the Soundbar from the Samsung TV
Press the
(Multi Function) button at the top of the Soundbar or the (Source) button on the
remote control to select the mode other than “Bluetooth”.
Disconnecting takes time because the Samsung TV must receive a response from the Soundbar.
(The time required may differ, depending on the Samsung TV model.)
Notes on Bluetooth connection
Locate a new device within 1 m to connect via Bluetooth communication.
If asked for a PIN code when connecting a Bluetooth device, enter <0000>.
The Soundbar automatically turns off after 18 minutes in the Ready state.
The Soundbar may not perform Bluetooth search or connection correctly under the following
circumstances:
–
– If several Bluetooth devices are simultaneously paired with the Soundbar.
– If the Bluetooth device is turned off, not in place, or malfunctions.
Electronic devices may cause radio interference. Devices that generate electromagnetic waves
must be kept away from the Soundbar main unit - e.g., microwaves, wireless LAN devices, etc.

ENG - 23
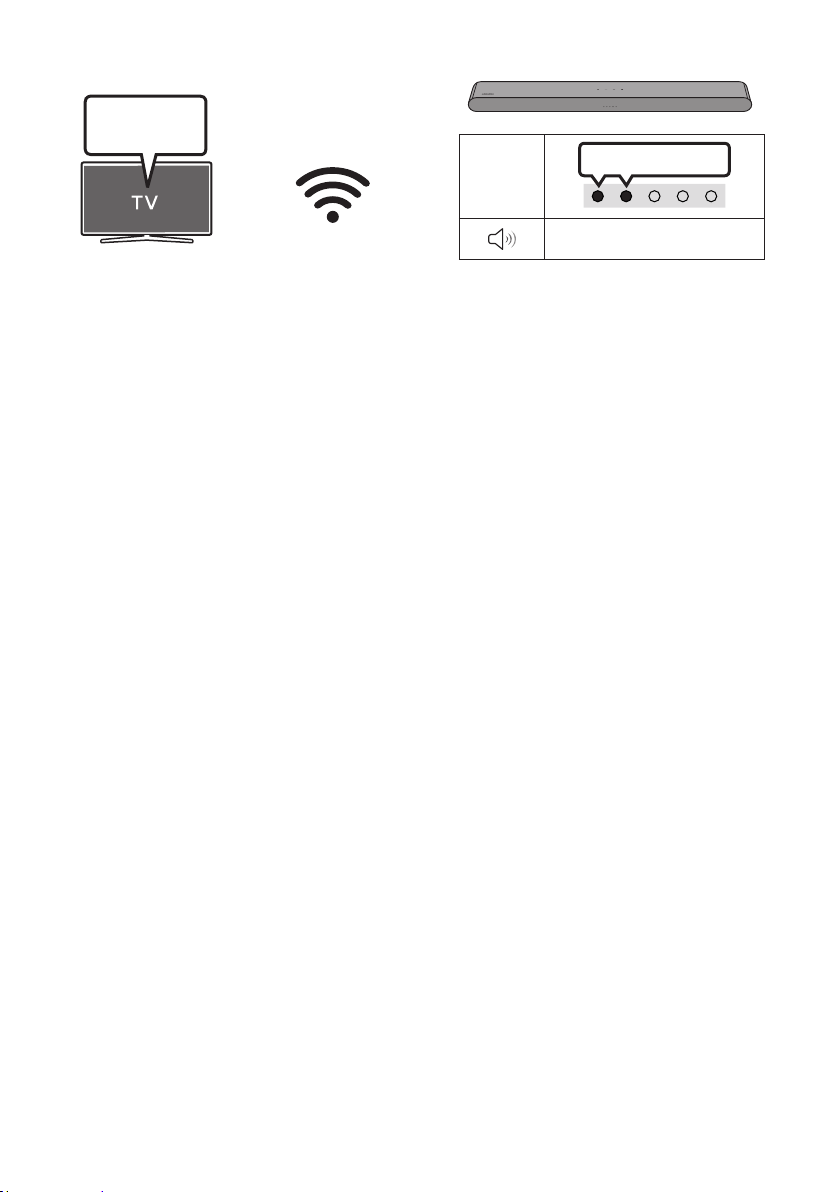
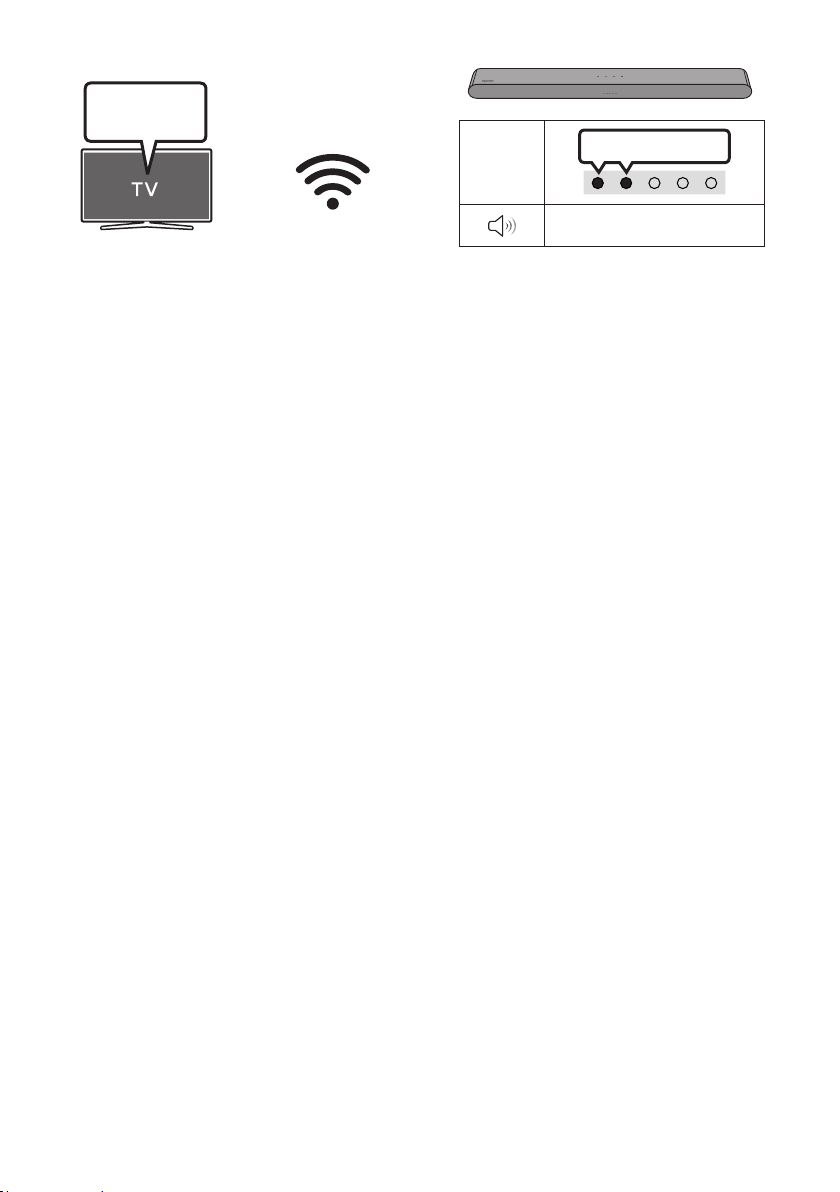
Connecting via Wi-Fi
Pre-connection Checklist
Wi-Fi connection is available only on Samsung TV.
Check whether the wireless router (Wi-Fi) is turned on and the TV is connected to the router.
The TV and Soundbar must be connected to the same wireless network (Wi-Fi).
If your wireless router (Wi-Fi) uses a DFS channel, you will not be able to establish a Wi-Fi
connection between the TV and Soundbar. Contact your Internet service provider for details.
Because the menus may differ depending on the year of manufacture, refer to your TV manual.
See page 32, for details on how to establish a Wi-Fi connection.
1. For more information about Wi-Fi connection to the Soundbar, see page 32, “Method 2.
Connecting via Wi-Fi (Wireless Network)”.
2. Change the input source of the TV by using the Audio menu to Soundbar.
Samsung TVs released in 2017 or later
Home ( ) Sound Sound Output
[AV] Samsung Soundbar S60B / [AV] Samsung Soundbar S61B (Wi-Fi)
ENG - 24
Connecting to a TV that supports Dolby Atmos®
Pre-connection Checklist
Dolby Atmos® is supported in "TV ARC" or "Wi-Fi" mode.
Make sure that the content supports Dolby Atmos®.
HDMI IN
(ARC)
(OPTICAL)
HDMI
(ARC)
Connect to the HDMI IN (ARC)
or (eARC) port of your TV.
HDMI Cable
Bottom of the
Soundbar
Connect to the HDMI (ARC) port of
the Soundbar main unit.
Top of the Soundbar
LED
Indicator
White On -> Off
“TV ARC”
1.
2. Turn on the Soundbar and TV.
3. TV sound is output from the Soundbar.
ENG - 25
LED
Indicator
White On -> Off
“Wi-Fi”
TV menu
Wi-Fi
1. Connect the Soundbar and TV to the same wireless network (Wi-Fi).
2. For sound output of the TV, select Soundbar.
3. TV sound is output from the Soundbar.
NOTES
Conguring Dolby Atmos® on a BD player or other device connected to the TV.
Open the audio output options on the settings menu of your BD player or other device and make
sure that “No Encoding” is selected for Bitstream. For example, on a Samsung BD Player, go to
This function is available in some Samsung TVs and some Soundbar models.

ENG - 26
Using the Q-Symphony Function
For Q-Symphony, the Soundbar syncs with a Samsung TV to output sound through two devices for
optimum surround effect. When the Soundbar is connected, the menu, “TV+Soundbar” appears under
the Sound Output menu of the TV. Select the corresponding menu.
LED
Indicator
White On -> Off
“Digital Audio In”
TV menu
OR
Optical Cable (not supplied)
HDMI Cable
TV menu example: TV + [AV] Soundbar series name (HDMI)
LED
Indicator
White On -> Off
“Wi-Fi”
TV menu
Wi-Fi
TV menu example: TV + [AV] Soundbar series name (Wi-Fi)
NOTES
It can operate according to the Codec supported by TV.
This function is supported only when the HDMI Cable or Optical Cable (not supplied) or Wi-Fi is
connected.
The message displayed may differ with the TV model.
Ensure that your TV and Soundbar are connected to the same wireless router/frequency.
This function is available in some Samsung TVs and some Soundbar models.

ENG - 27
Using the SpaceFit Sound
Provides optimized sound quality by analyzing the listening spaces.
Method 1. Connecting via Soundbar
To enable this function, turn on the SpaceFit Sound mode with the remote control of the Soundbar.
(
(Sound Control) "SpaceFit Sound Off"▲ ( Up )"SpaceFit Sound On")
This is available in all Sound modes.
Method 2. Connecting via TV
To enable this function, turn on the Adaptive Sound+ mode on your Samsung TV menu.
(Home (
) General Intelligent Mode Settings
Adaptive Sound+)
The sound mode on your Soundbar will automatically change to Adaptive Sound+ if you enable the
Adaptive Sound+ mode on your TV.
NOTE
This function works when the Soundbar connects to some of the Samsung TVs.

ENG - 28
06 CONNECTING AN EXTERNAL DEVICE
Connecting using an Optical Cable
LED
Indicator
White On -> Off
“Digital Audio In”
OPTICAL OUT
DIGITAL
AUDIO IN
(OPTICAL)
Bottom of the Soundbar
Optical Cable
(not supplied)
Top of the Soundbar
BD / DVD player / Set-top
box / Game console
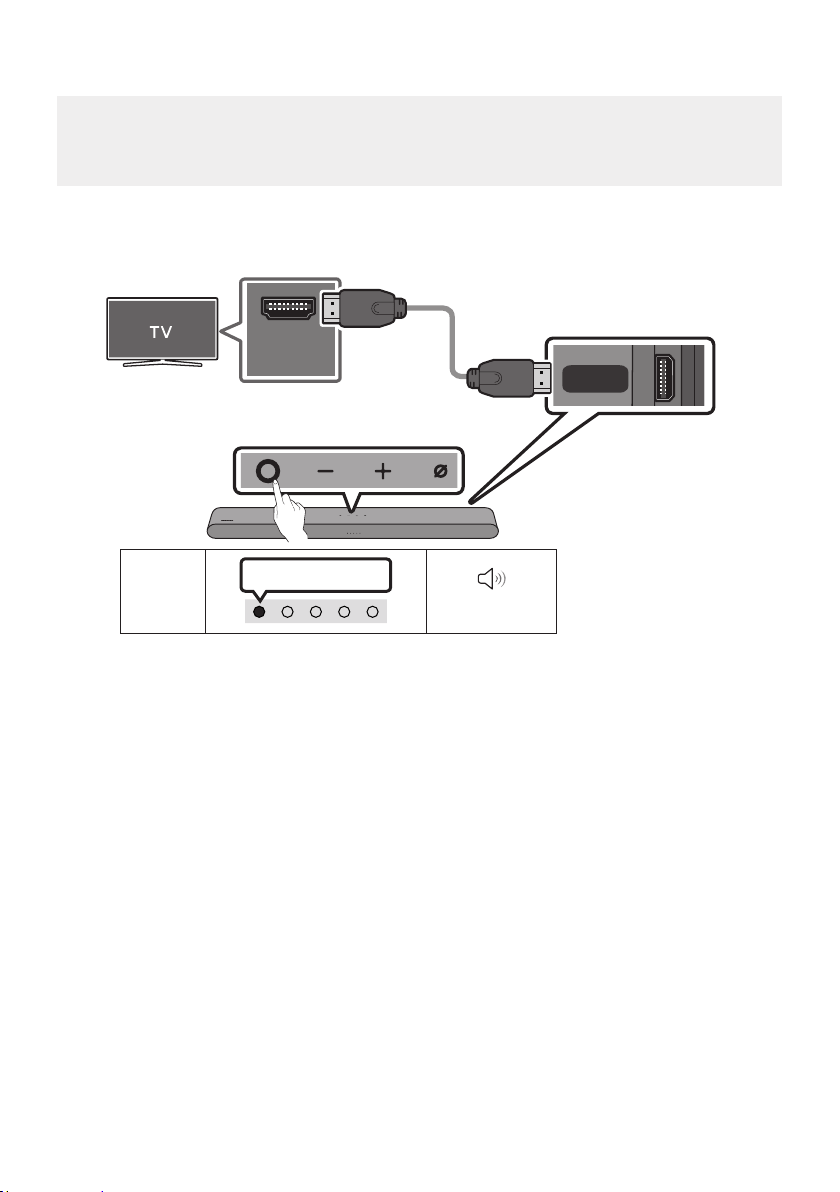
1. With the external device and Soundbar turned off, connect the DIGITAL AUDIO IN (OPTICAL) port
on the Soundbar and the OPTICAL output port on the external device with the optical cable (not
2. Turn on the Soundbar and external device.
3. Press the (Multi Function) button at the top of the Soundbar or the (Source) button on the
remote control and then select the “Digital Audio In” mode. Then the announcement, “Digital
Audio In” is output.
4. The external device sound is output from the Soundbar.
ENG - 29
07 CONNECTING A MOBILE DEVICE
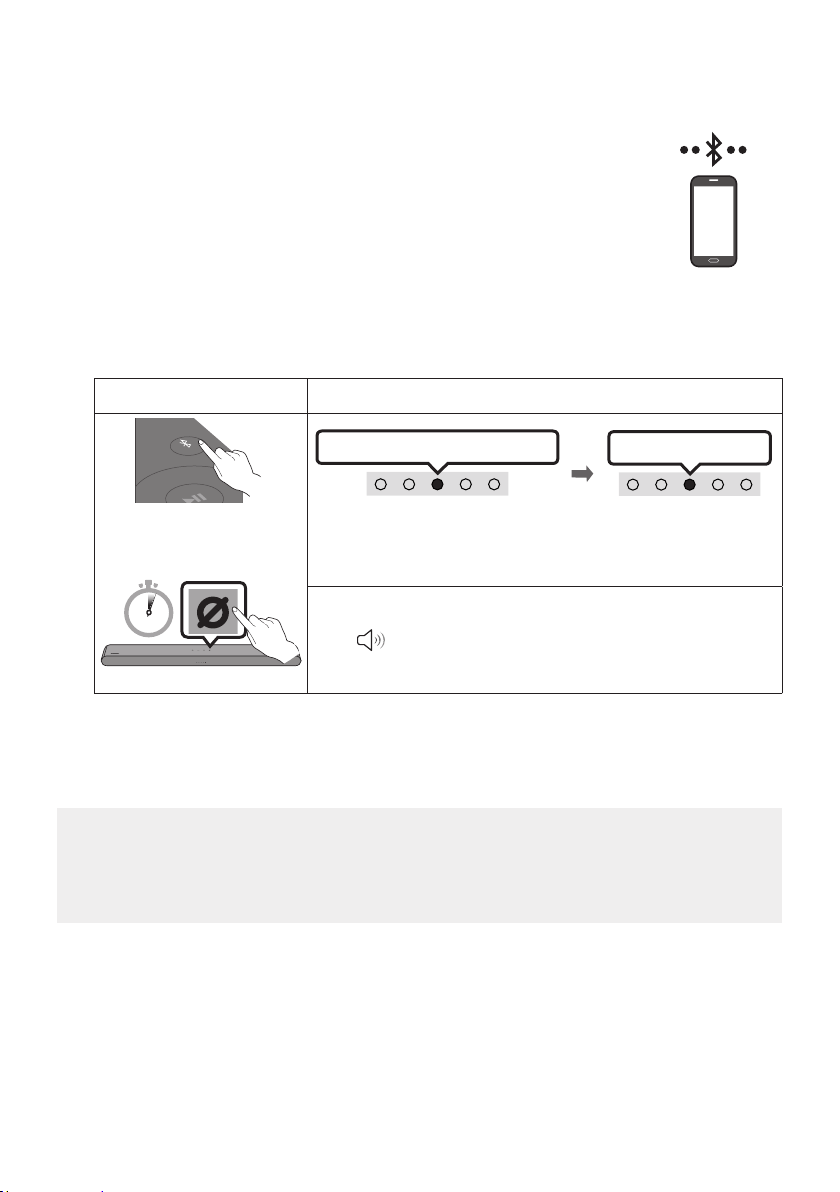
Method 1. Connecting via Bluetooth
When a mobile device is connected using Bluetooth, you can hear stereo sound
without the hassle of cabling.
When you connect a paired Bluetooth device with the Soundbar off, the
Soundbar automatically turns on.
The initial connection
When connecting to a new Bluetooth device, make sure the device is within 1 m distance.
1.
Bluetooth Pairing button LED Indicator
PAIR
OR
Red Green Blue Blinks
Pairing
Connection is complete
Cyan Blinks X3
When in “Bluetooth” mode
5 Sec
Until pairing is complete, the Multicolour LED changes as Red
GreenBlue in turn.
“Ready to connect via Bluetooth.”
2. On your device, select “[AV] Samsung Soundbar S60B / [AV] Samsung Soundbar S61B” from the
list that appears.
3.
If the device fails to connect
If you have an existing Soundbar (e.g., [AV] Samsung Soundbar S60B / [AV] Samsung Soundbar
S61B) on the list of speakers on the Mobile device, delete it.
Then repeat steps 1 and 2.
mobile device

ENG - 30
Notes on Bluetooth connection
Locate a new device within 1 m to connect via Bluetooth communication.
If asked for a PIN code when connecting a Bluetooth device, enter <0000>.
The Soundbar automatically turns off after 18 minutes in the Ready state.
The Soundbar may not perform Bluetooth search or connection correctly under the following
circumstances:
–
– If several Bluetooth devices are simultaneously paired with the Soundbar.
– If the Bluetooth device is turned off, not in place, or malfunctions.
Electronic devices may cause radio interference. Devices that generate electromagnetic waves
must be kept away from the Soundbar main unit - e.g., microwaves, wireless LAN devices, etc.
The Soundbar supports SBC data (44.1kHz, 48kHz).
Connect only to a Bluetooth device that supports the A2DP (AV) function.
You cannot connect the Soundbar to a Bluetooth device that supports only the HF (Hands Free)
function.
When connecting the Soundbar to a Bluetooth device, place them as close to each other as possible.
The farther the Soundbar and Bluetooth device are from each other, the lower the sound quality
will become.
The Bluetooth connection may break when the devices are out of the effective range.
The Bluetooth connection may not function as intended in areas with poor reception.
A Bluetooth device may experience noise or malfunction under in the following conditions:
– When the body is in contact with the signal transceiver on the Bluetooth device or Soundbar
– In corners or when there is an obstacle in proximity, such as a wall or partition, where electrical
changes may occur.
– When exposed to radio interferences by other products operating on the same frequency
ranges, such as medical equipment, microwave ovens, and wireless LAN devices.
– Obstacles such as doors and walls may still impact the sound quality even when the devices
are within the effective range.
Note that your Soundbar cannot be paired with other Bluetooth devices while using the Bluetooth
option.
This wireless device may cause electrical interference during operation.

ENG - 31
Disconnecting the Bluetooth device from a Soundbar
You can disconnect a Bluetooth device from the Soundbar. For instructions, see the Bluetooth device’s
user manual.
The Soundbar will be disconnected.
If the Soundbar is disconnected from the Bluetooth device, the multicolour LED indicator on the
Soundbar blinks "Red” three times.
Disconnecting the Soundbar from the Bluetooth device
Press the
(Multi Function) button at the top of the Soundbar or the (Source) button on the
remote control to select the mode other than “Bluetooth”.
Disconnecting takes time because the Bluetooth device must receive a response from the
Soundbar. (Disconnection time may differ, depending on the Bluetooth device)
ENG - 32
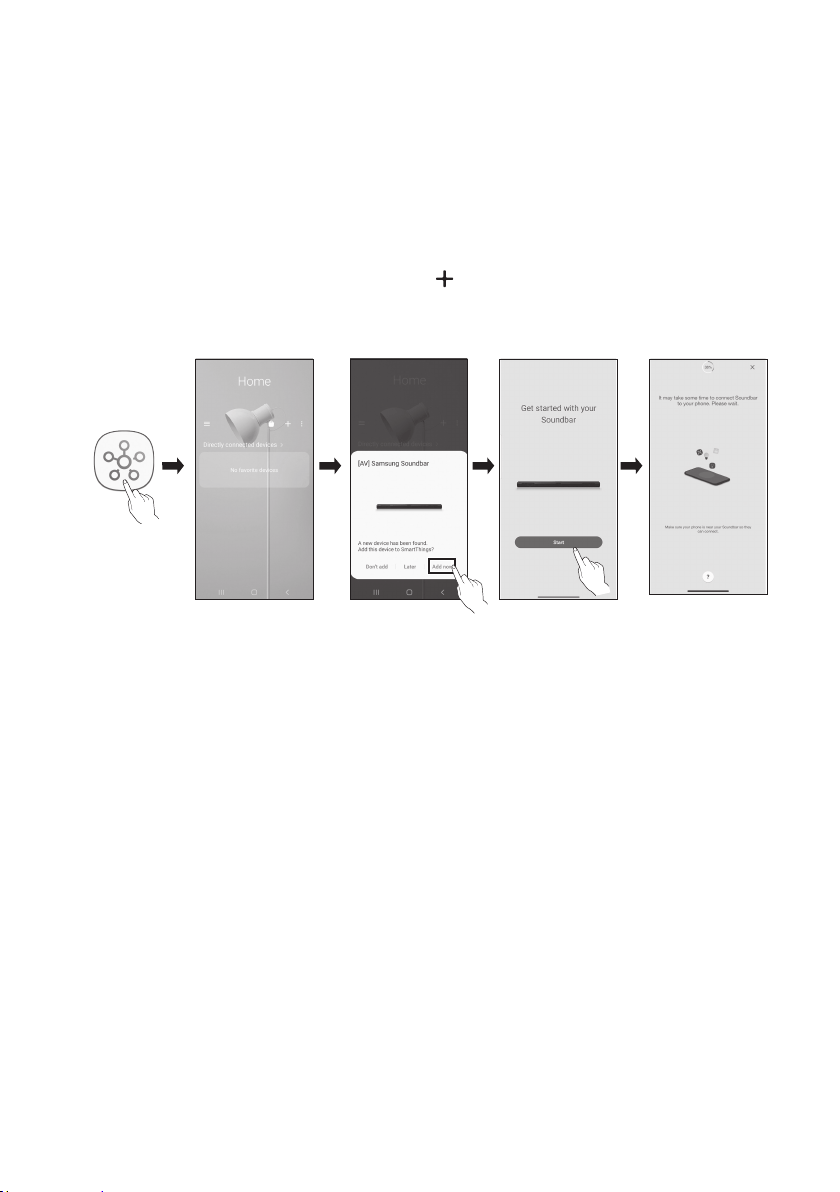
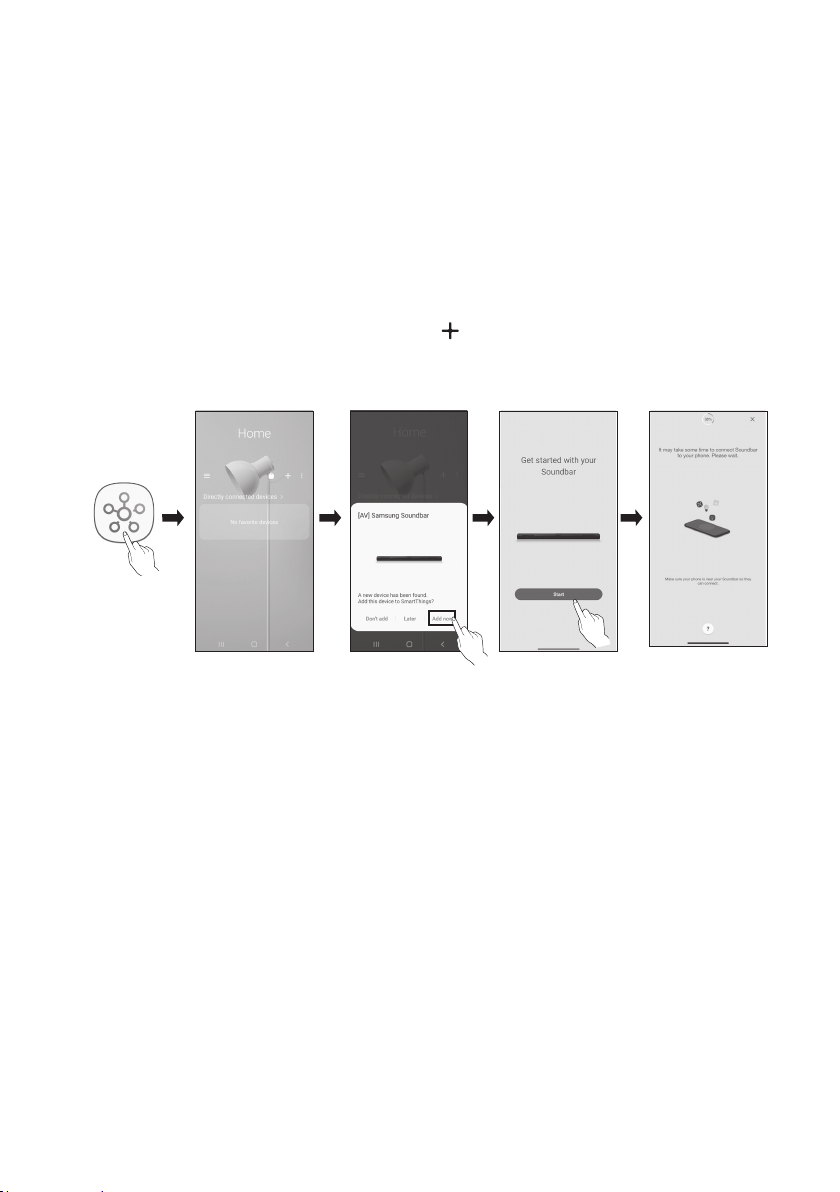
Method 2. Connecting via Wi-Fi (Wireless Network)
To connect a Soundbar to a mobile device via a wireless network (Wi-Fi), the SmartThings app is
required.
The initial connection
1. Install and launch the SmartThings app from your mobile device (smartphone or tablet).
2. On the app, follow the screen instructions to add the Soundbar.
The automatic pop-up (the second screenshot below) may not show on some devices.
If the pop-up window does not appear, press “ ” on the Home screen. The Soundbar is added
to the app.
The illustration below may differ according to the app version.
Launch App Add deviceAuto pop-up
SmartThings
App
ENG - 33
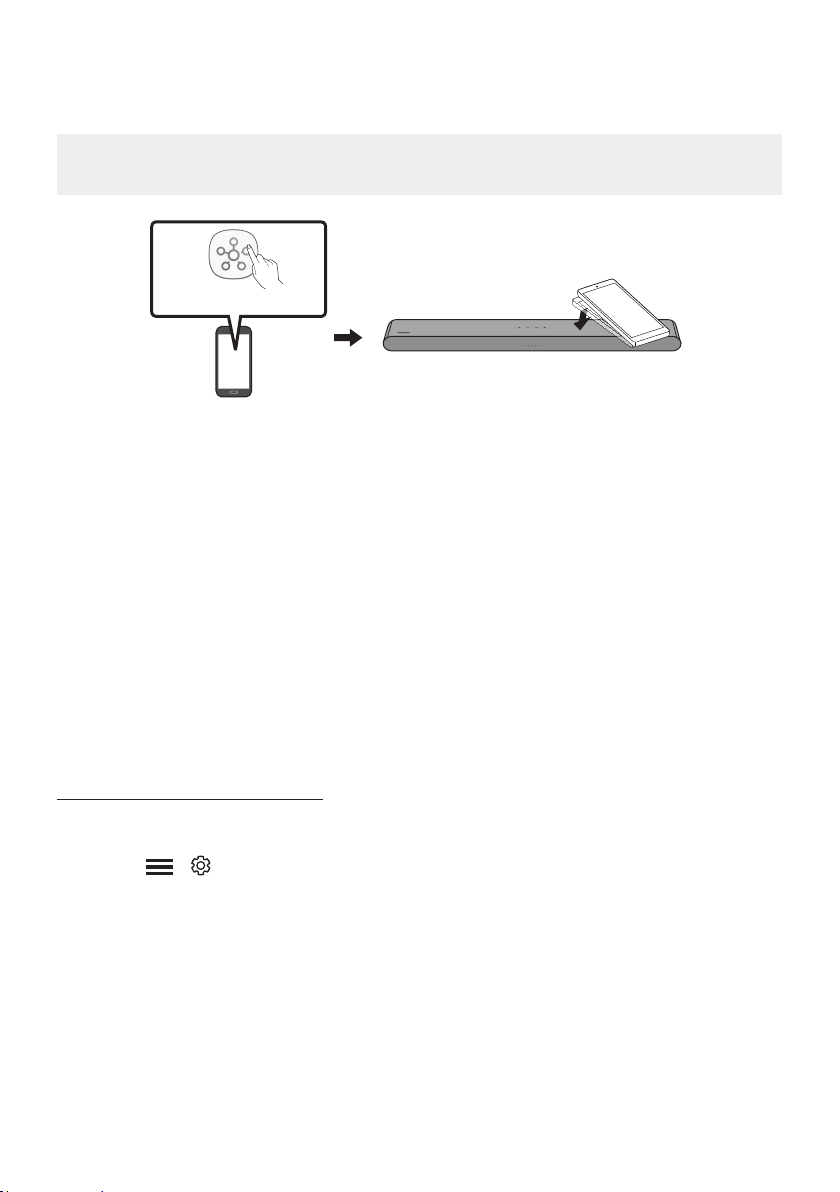
Using the Tap Sound
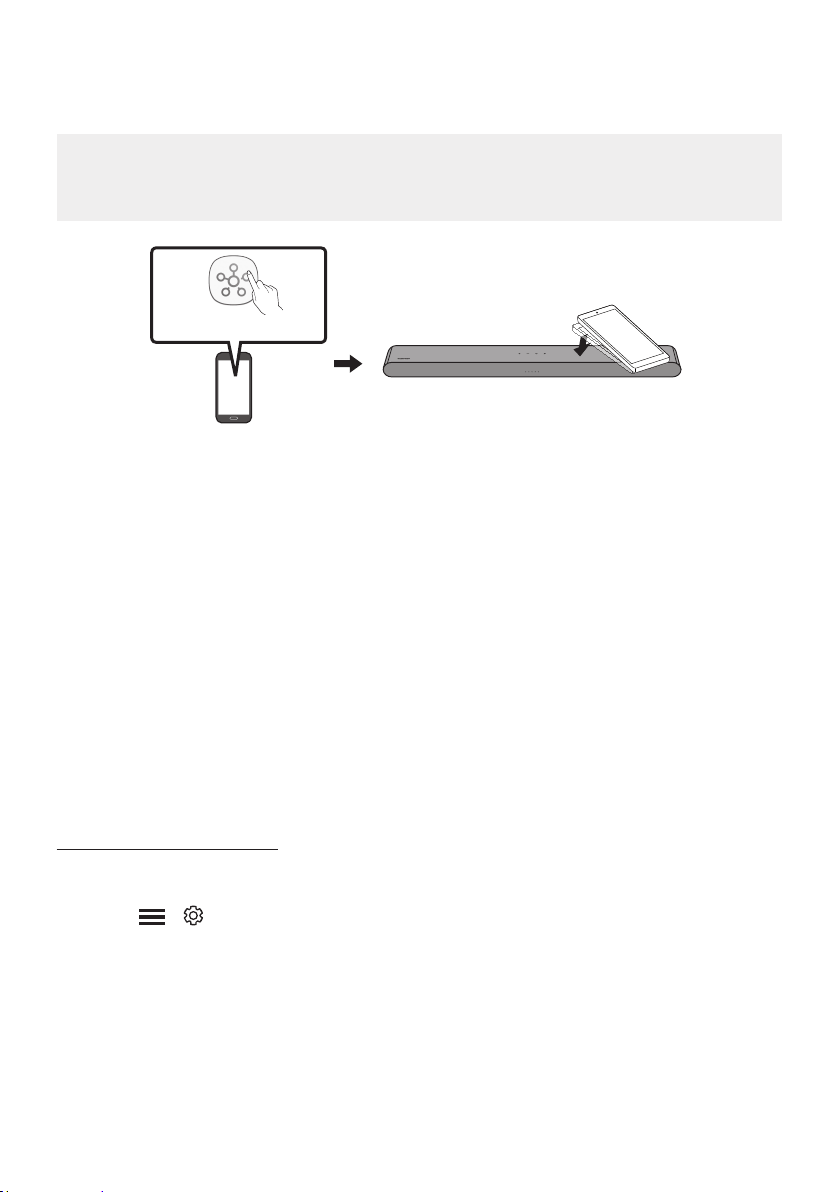
Tap the Soundbar with your mobile device to play audio from the mobile device through the Soundbar.
This function may not be supported, depending on the mobile device.
This function is only compatible with Samsung mobile devices with Android 8.1 or later.
Mobile device
SmartThings App
Top of the Soundbar
1. Turn on the Tap Sound function on your mobile device.
For details on how to turn on the function, refer to “Enable the Tap Sound function” below.
2. Tap the Soundbar with the mobile device. Select “Start now” in the displayed message window.
A connection is established between the mobile device and Soundbar via Bluetooth.
3. Play audio from the mobile device through the Soundbar.
This function connects a mobile device to the Soundbar via Bluetooth by detecting vibration
that occurs when the device touches the Soundbar.
Make sure the mobile device does not tap a sharp corner of the Soundbar. The Soundbar or
mobile device may become scratched or damaged.
It is recommended that the mobile device be covered with a case. Lightly tap the wide area in
the upper portion of the Soundbar, without using excessive force.
To use this function, update the SmartThings app to the latest version.
The function may not be supported, depending on the app version.
Enable the Tap Sound function
Use the SmartThings app to turn on the Tap View, Tap Sound function.
1. On the mobile device, run the SmartThings app.
2. Select (
) in the SmartThings app screen displayed on the mobile device.
3. Set “Tap View, Tap Sound” to On to allow the function to work when a mobile device moves close to
the Soundbar.
NOTES
When the mobile device is in power-saving mode, the Tap Sound function does not work.
The Tap Sound function may not work if there are devices near the Soundbar that cause radio
interference such as electric devices. Make sure devices that may cause radio interference are

ENG - 34
08 CONNECTING VIA APPLE AIRPLAY 2
This feature may not be available in some countries.
This Samsung Soundbar supports AirPlay 2 and requires iOS 11.4 or later.
With AirPlay 2, you can stream music, podcasts, and other audio from your Apple devices to the
Samsung Soundbar.
Make sure the Soundbar is powered on and connected to the same Wi-Fi network as your Apple
device.
Select
from an AirPlay-supported app or Control Centre on your iPhone, iPad, or Mac.
Select the Soundbar from the list of available devices to play the current audio to.
ENG - 35
09 INSTALLING THE
WALL MOUNT
Installation Precautions
Install on a vertical wall only.
Do not install in a place with high
temperature or humidity.
Verify whether the wall is strong enough to
support the product’s weight. If not, reinforce
the wall or choose another installation point.
anchors appropriate for the kind of wall you
have (plaster board, iron board, wood, etc.). If
studs.
Purchase wall mounting screws according to
the type and thickness of the wall you want to
mount the Soundbar on.
– Diameter: M5
– Length: 35 mm or longer recommended.
Connect cables from the unit to external
devices before you install the Soundbar on
the wall.
Make sure the unit is turned off and
unplugged from the power source before you
install it. Otherwise, it may cause an electric
shock.
Wallmount Components
A TYPE : 450mm
Wall Mount Guide
x 2
(M4 x L10)
x 2
Holder-Screw Screw
x 2
Bracket-Wall Mount
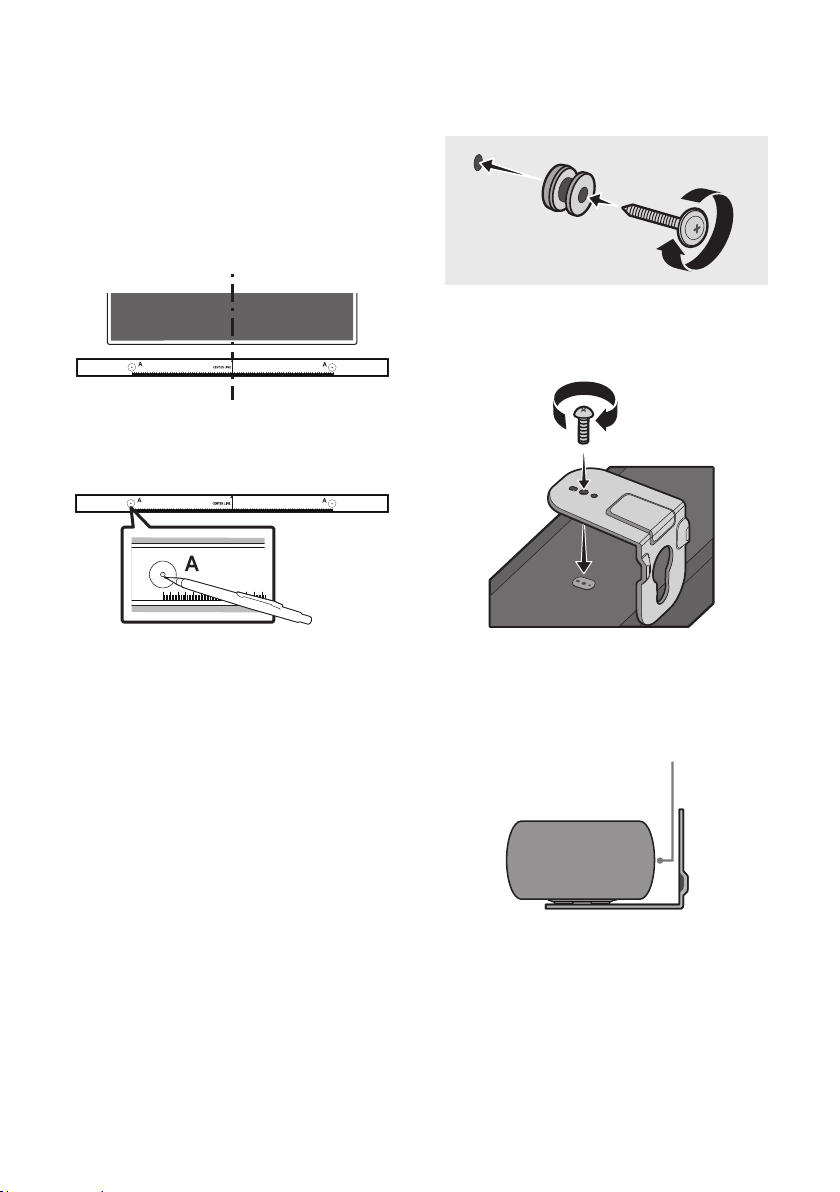
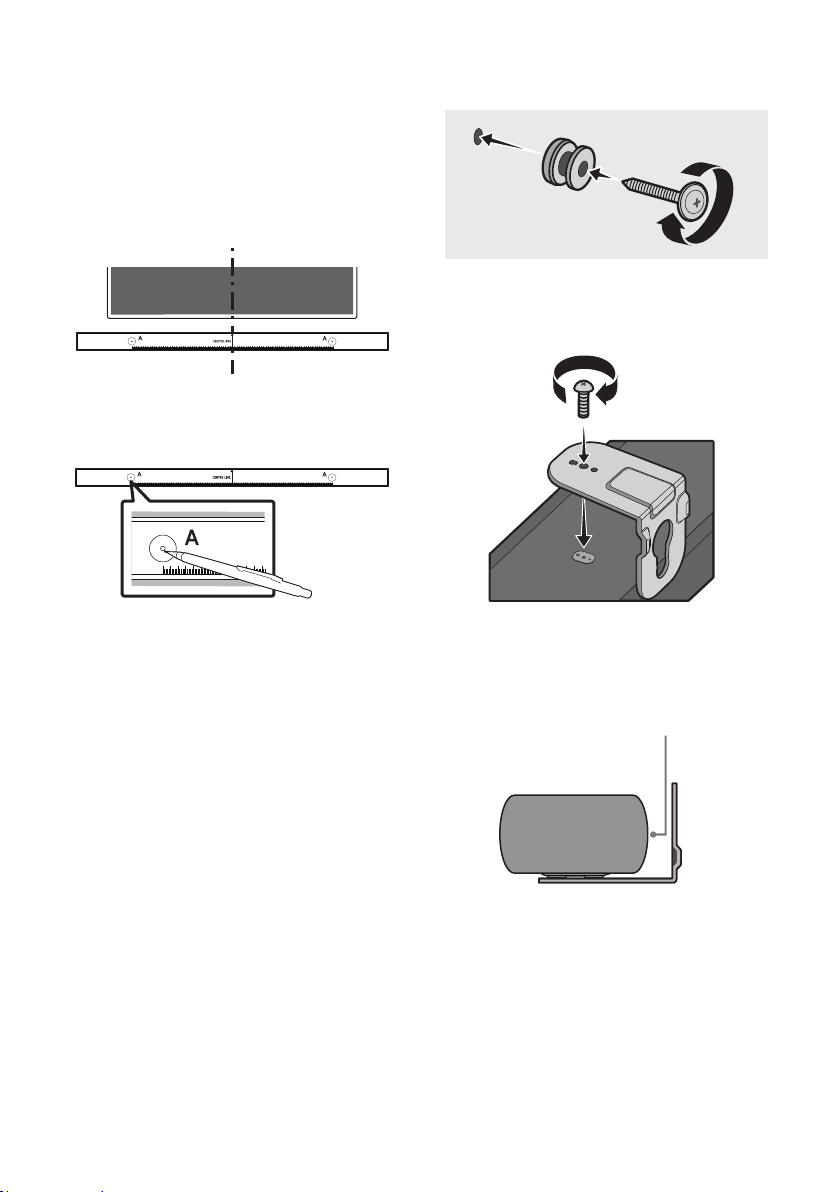
1. Place the Wall Mount Guide against the wall
surface.
The Wall Mount Guide must be level.
If your TV is mounted on the wall, install
the Soundbar at least 5 cm below the TV.
5 cm or more
ENG - 36
2. Align the Wall Mount Guide’s Centre Line
with the centre of your TV (if you are
mounting the Soundbar below your TV), and
Wall Mount Guide to the wall
using tape.
If you are not mounting below a TV, place
the Centre Line in the centre of the
installation area.
Centre Line
A TYPE : 450mm
3. Use a pen to mark the positions of the holes
and remove the Wall Mount Guide.
A TYPE : 450mm
4. Using an appropriately sized drill bit, drill a
hole in the wall at each marking.
If the markings do not correspond to the
positions of studs, make sure you insert
appropriate anchors into the holes before
you insert the support screws. If you use
anchors, make sure the holes you drill are
large enough for the anchors you use.
5. Push a screw (not supplied) through each
Holder-Screw, and then screw each screw
(Not supplied)
6. Install the 2 Bracket-Wall Mounts in the
correct orientation on the bottom of the
Soundbar using 2 Screws.
When assembling, make sure the hanger
part of the Bracket-Wall Mounts are
located behind the rear of the Soundbar.
Rear of Soundbar
Right end of Soundbar
The actual product may look different
from the above image, depending on
the model.
ENG - 37
7. Install the Soundbar with the attached
Bracket-Wall Mounts by hanging the
Bracket-Wall Mounts on the Holder-Screws
on the wall.
8. Slide the Soundbar down as shown below so
that the Bracket-Wall Mounts rest securely
on the Holder-Screws.
Insert the Holder-Screws into the wide
(bottom) part of the Bracket-Wall
Mounts, and then slide the Bracket-Wall
Mounts down so that the Bracket-Wall
Mounts rest securely on the
Holder-Screws.
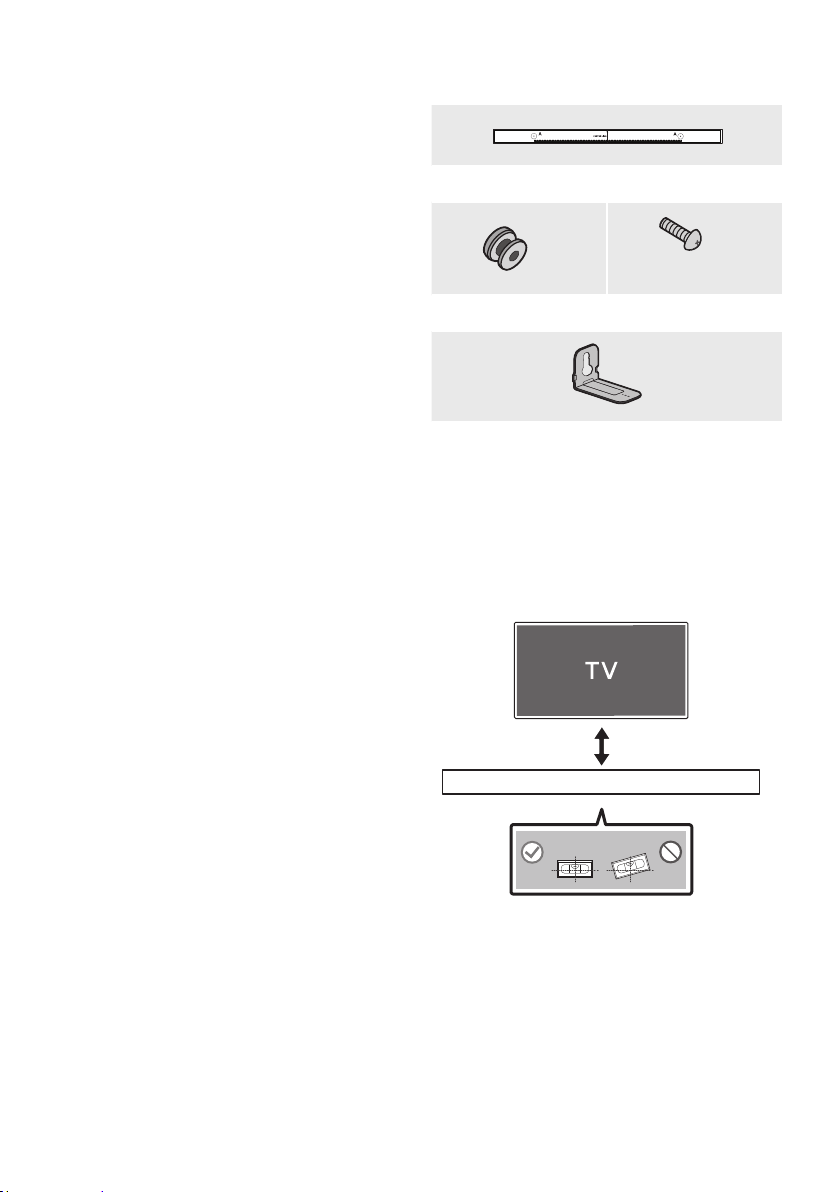
10 INSTALLING THE
SOUNDBAR IN
FRONT OF TV
3cm or more
Microphones
Align the centre of the Soundbar to the centre of
the TV as illustrated in the image.
At this time, place the Soundbar at least 3cm
away from the TV so that there is no interference
with voice recognition.
NOTES
and solid surface.
recognition and acoustic problems.
ENG - 38
11 SOFTWARE
UPDATE
Auto Update
When the Soundbar is connected to the Internet,
software updates automatically occur even when
the Soundbar is turned off.
To use the Auto Update function, the
Soundbar must be connected to the Internet.
The Wi-Fi connection to the Soundbar will be
terminated if the Soundbar’s power cord is
disconnected or the power is cut off. If the
power is cut off, when the power comes back
on or you reconnect the power cord, turn on
the Soundbar, and then reconnect it to the
Internet.
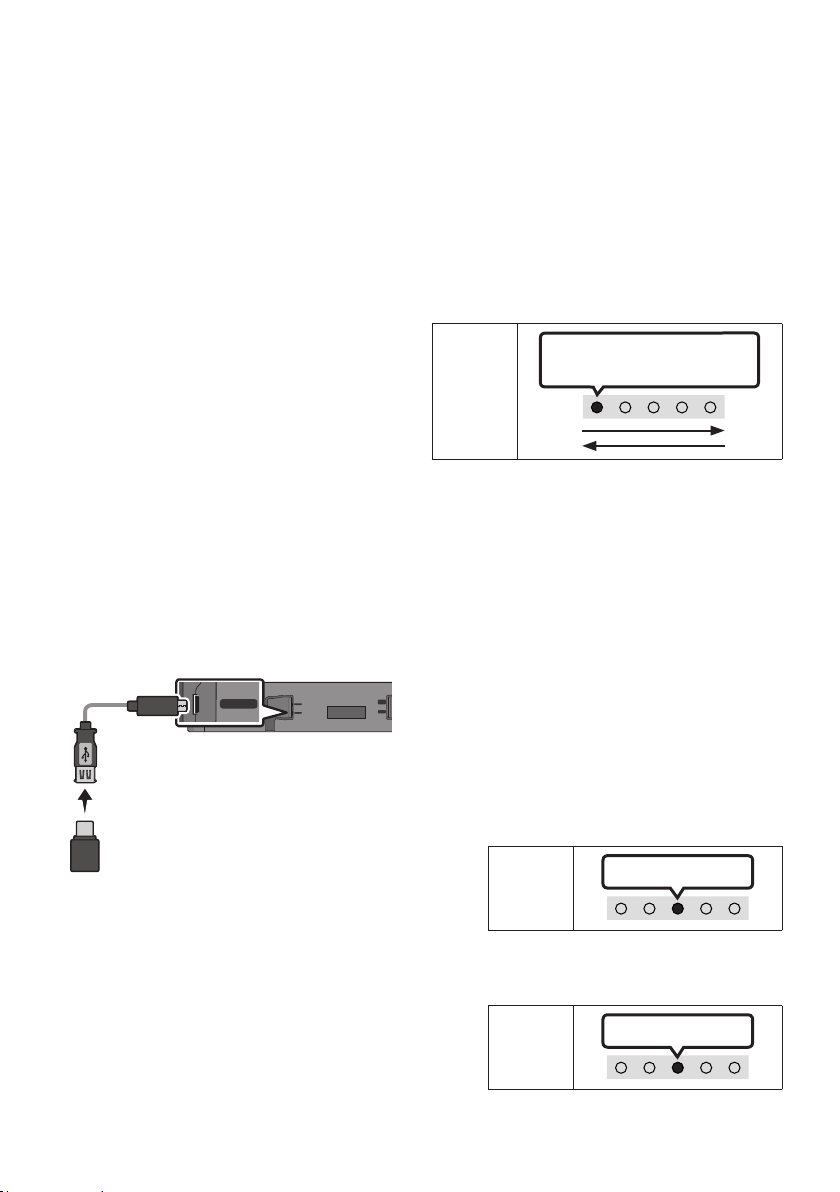
USB Update
SERVICE
DC 19V
DIGITAL
AUDIO IN
(OPTICAL)
HDMI
(ARC)
SERVICE
Micro USB to
USB adapter Cable
(not supplied)
Bottom of the Soundbar
Samsung may offer updates for the Soundbar’s
system rmware in the future.
When an update is available, you can update the
Soundbar by connecting the USB drive that
SERVICE
port of the Soundbar.
1.
model name from the customer support
menu option.
For more information about update, refer
to Upgrade Guide.
2.
3.
name.
4. Store the created folder in a USB and then
connect it to the Soundbar.
5. Turn on the Soundbar. Then the product is
updated within 3 minutes.
LED
Indicator
White moves from left to right
and right to left
During update, do not turn it off or
remove the USB.
If the yellow LED is on after the software
update is completed, this means that an
additional update is in progress. When
remove the USB.
If update does not proceed, reconnect the
Soundbar power cord.
When the latest version is installed, no
update is performed.
Depending on the USB type, update may
not be supported.
LED
Indicator
Red Blinks X3
or lower
LED
Indicator
Cyan Blinks X3
ENG - 39
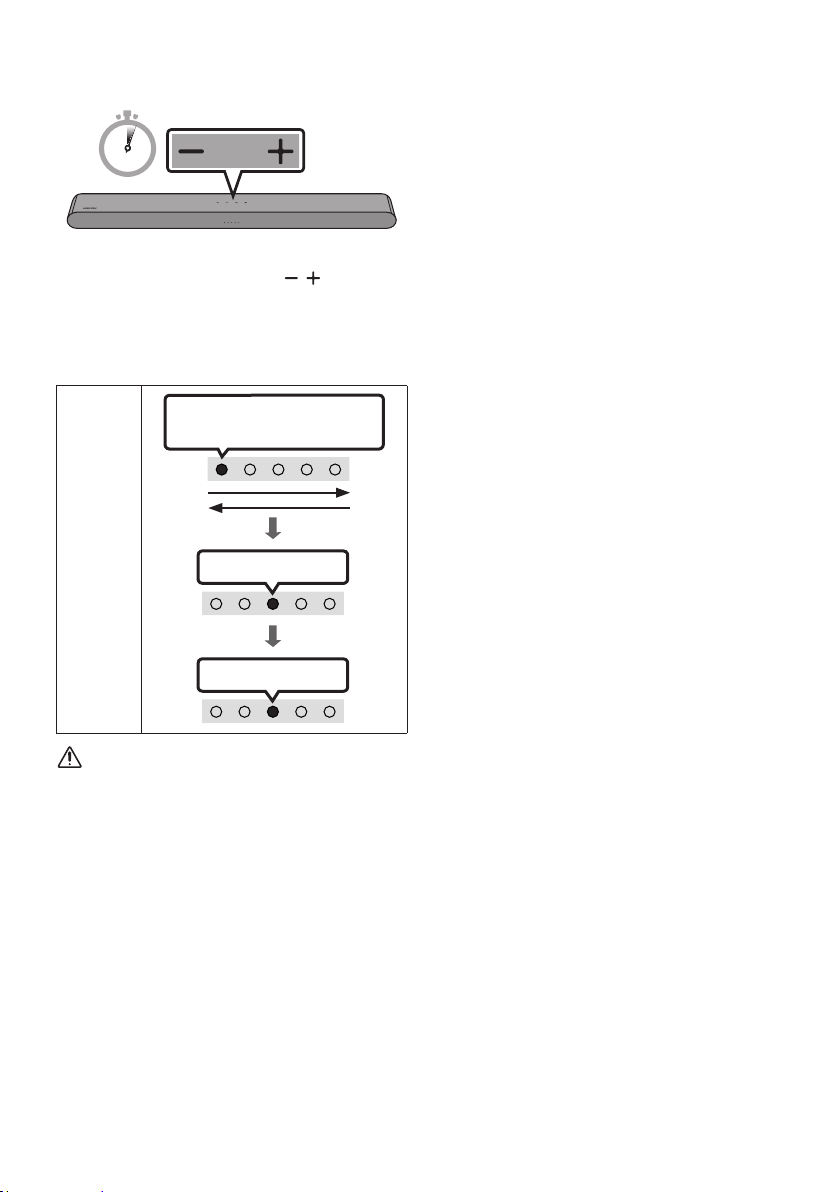
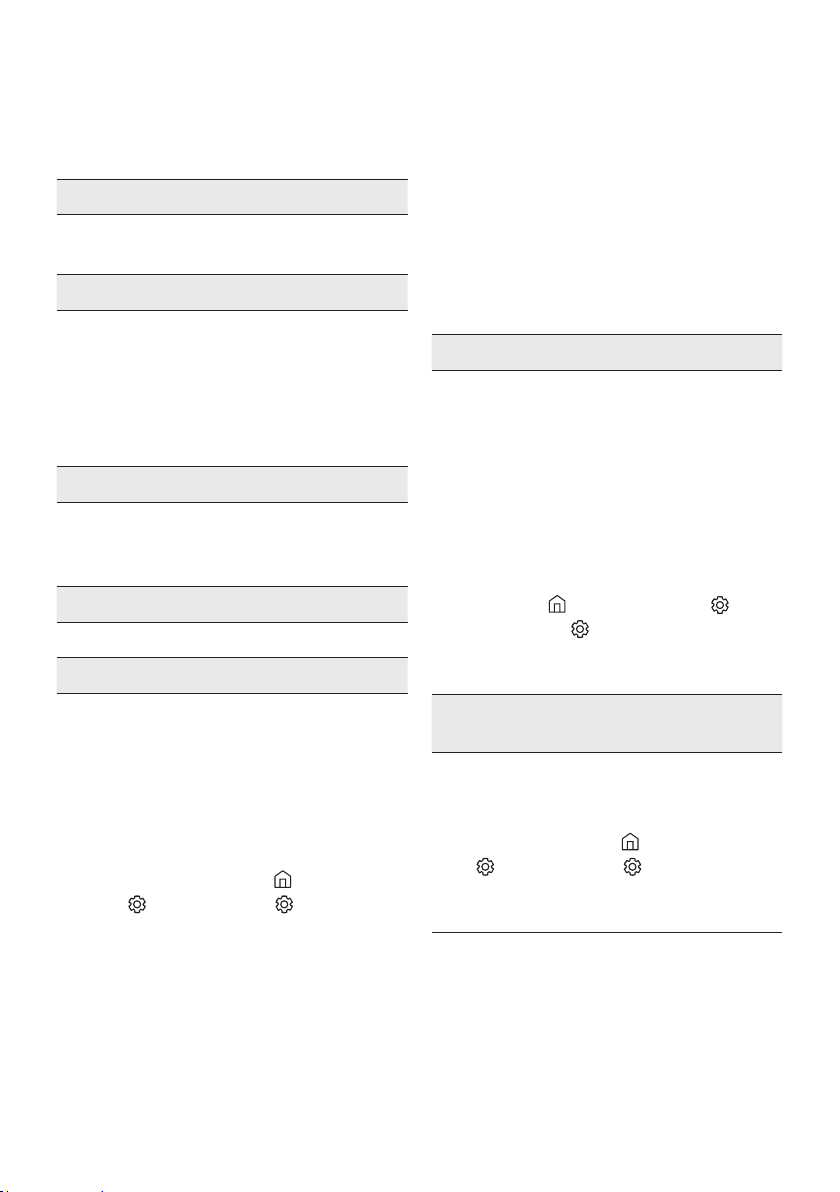
Reset
5 Sec
With the Soundbar on, press the (Volume)
buttons on the body at the same time for at least
5 seconds. The LED display changes as shown
below and then the Soundbar is reset.
LED
Indicator
Cyan Blinks X3
Red Blinks Off
White moves from left to right
and right to left
CAUTION
All the settings of the Soundbar are reset.
Be sure to perform this only when a reset is
required.
ENG - 40
12 TROUBLESHOOTING
Refer to the instructions below if this product does not function properly.
Soundbar does not turn on.
; Check whether the power cord of the
Soundbar is correctly inserted into the
outlet.
Soundbar works erratically.
; After removing the power cord, insert it
again.
; Power cycle the external device and try
again.
; If there is no signal, the Soundbar
automatically turns off after a certain
period of time. Turn on the power. (See
page 10.)
Remote control does not work.
; Point the remote directly at the Soundbar.
; Replace the batteries with new ones.
The red LED indicator light on the soundbar
stays on.
; The microphone is turned off. Turn on the
microphone. (See page 8.)
The Soundbar does not output any sound.
; The volume of the Soundbar is too low or
muted. Adjust the volume.
; When any external device (STB, Bluetooth
device, mobile device, etc.) is connected,
adjust the volume of the external device.
; For sound output of the TV, select
Soundbar. (Samsung TV: Home (
)
Soundbar)
; The cable connection to the Soundbar may
not be loose. Remove the cable and
connect again.
; Remove the power cord completely,
reconnect, and turn the power on.
; Reset the product and try again.
(See page 39.)
If the TV is not connected via HDMI (ARC).
; Check whether the HDMI cable is correctly
connected to the ARC terminal.
18)
; Connection may not be possible due to the
connected external device (set-top box,
game console, etc.). Directly connect the
Soundbar.
; HDMI-CEC may not be activated on the TV.
Turn on the CEC on the TV menu. (Samsung
TV: Home (
All Settings (
ON)
There is no sound in when connecting to the
TV in HDMI (ARC) mode.
; Your device is unable to play the input
signal. Change the TV’s audio output to
PCM or Dolby Digital.
(For a Samsung TV: Home (
Settings (
Format)
ENG - 41
The Soundbar will not connect via Bluetooth.
; When connecting a new device, switch to
Bluetooth Pairing for connection. (Press the
PAIR button on the remote control or
press the (Mic On/Off) button on the
body for at least 5 seconds.)
; If the Soundbar is connected to another
switch the device.
; Reconnect it after removing the Bluetooth
speaker list on the device to connect.
(Samsung TV: Home (
Settings (
; Remove and reconnect the power plug,
then try again.
; Reset the product and try again.
(See page 39.)
The sound drops out when connected via
Bluetooth.
; Some devices can cause radio interference
if they are located too close to the
Soundbar. e. g. microwaves, wireless
routers, etc.
; If your device that is connected via
Bluetooth moves too far away from the
Soundbar, it may cause the sound to drop
out. Move the device closer to the Soundbar.
; If a part of your body is in contact with the
Bluetooth transceiver or the product is
installed on metal furniture, the sound may
drop out. Check the installation
environment and conditions for use.
Unable to connect to Wi-Fi.
; Check whether your wireless router is on.
; Turn off the router, turn it back on, and then
try again.
; The Soundbar will not connect if the
wireless signal is too weak. Try moving the
router closer to the Soundbar, or
eliminating any obstacles that are between
the Soundbar and the router, if possible.
; If your wireless router is new, you will need
settings.
The Soundbar does not turn on automatically
with the TV.
; When you turn off the Soundbar while
watching TV, power synchronization with
the TV is disabled. First turn off the TV.
The AVA function is not available in the
following cases.
; The AVA function will not be available using
Q-Symphony function.
; The AVA function will not be available
when the microphone is turned off.
After connecting the TV to the Soundbar, I
switched the Soundbar mode. Then no sound
is output from the TV.
; If you connect your Soundbar to a mobile
device while the Soundbar is connected to
the TV, the Soundbar outputs sound from
the mobile device while keeping the TV
connection. So the TV sound will not be
delivered anywhere.
; Disconnect the mobile device, and the TV
sound will be output from the Soundbar
again.
ENG - 42
13 LICENCE
Dolby, Dolby Atmos, and the double-D symbol
are registered trademarks of Dolby
Laboratories Licensing Corporation.
Manufactured under license from Dolby
Copyright © 2012-2021 Dolby Laboratories.
All rights reserved.
For DTS patents, see http://patents.dts.com.
Manufactured under license from DTS, Inc. (for
companies headquartered in the U.S./Japan/
Taiwan) or under license from DTS Licensing
Limited (for all other companies). DTS, Digital
Surround, Virtual:X, and the DTS logo are
registered trademarks or trademarks of DTS,
Inc. in the United States and other countries.
© 2021 DTS, Inc. ALL RIGHTS RESERVED.
Multimedia Interface, and the HDMI Logo are
trademarks or registered trademarks of HDMI
Licensing Administrator, Inc. in the United
States and other countries.
Use your phone, tablet or computer as a
remote control for Spotify. Go to spotify.
com/connect to learn how
The Spotify Software is subject to third
party licenses found here :
https://www.spotify.com/connect/third-
party-licenses.
Apple, Airplay, iPhone, iPad, and Mac are
trademarks of Apple Inc., registered in the
U.S. and other countries.
Use of the Works with Apple badge means
that an accessory has been designed to
performance standards.

ENG - 43
[ENERGY STAR]
ENERGY STAR qualied model only
– Your Samsung product is ENERGY STAR
Change to certain features, settings and
functionality in this product can change the
power consumption, possibly beyond the
limits required for ENERGY STAR
– Environmental Protection Agency and
Department of Energy. ENERGY STAR is a
joint program of the Government agencies,
products and practices.
Refer to www.energystar.gov for more
information of the ENERGY STAR Program.
ENERGY STAR qualied model only
(Applicable to Thin Client models only)
As an ENERGY STAR® Partner, SAMSUNG has
determined that this product meets the
ENERGY STAR® guidelines for energy
– The ENERGY STAR Program has been to
reduced greenhouse gas emissions and
save energy through voluntary labeling.
– Power management setting of this product
have been enabled by default, and have
various timing setting from 1 minutes to 5
hours.
– The product can wake with a button press
on the chassis from sleep mode.
ENERGY STAR qualied model only (The other
models)
– As an ENERGY STAR Partner, Samsung has
determined that this product or product
models meets the ENERGY STAR guideline
14 OPEN SOURCE
LICENCE NOTICE
To send inquiries and requests for questions
regarding open sources, contact Samsung Open
Source (http://opensource.samsung.com)
15 IMPORTANT
NOTES ABOUT
SERVICE
Figures and illustrations in this User Manual are
provided for reference only and may differ from
actual product appearance.
ENG - 44
16 SPECIFICATIONS AND GUIDE
Specications
Model Name HW-S60B / HW-S61B
Weight 2.7 kg
Dimensions (W x H x D) 670.0 x 62.0 x 105.0 mm
Operating Temperature Range +5°C to +35°C
Operating Humidity Range 10 % ~ 75 %
AMPLIFIER
Rated Output power (30W x 2) + (30W x 2) + (30W x 2) + 20W
Supported play formats
Dolby 5.1ch / Dolby Digital Plus /
Dolby ATMOS (Dolby Digital Plus) /
DTS 5.1ch / LPCM 2ch
NOTES
Weight and dimensions are approximate.
For India Only
“This product is RoHS compliant”
For Taiwan Only
HW-S60B / HW-S61B : DC 19V, 31W
Precaution : The Soundbar will restart automatically if you turn on/turn off Wi-Fi.
Wi-Fi
Port deactivation method
Press the CH LEVEL button on the remote control of the Soundbar
for 30 seconds to turn Wi-Fi On / Off.
Bluetooth
Port deactivation method
Press the TONE CONTROL button on the remote control of the
Soundbar for 30 seconds to turn Bluetooth On / Off.
VIE - 2
THÔNG TIN AN TOÀN
CNH BO AN TON
CHÚ Ý
NGUY CƠ BỊ ĐIỆN GIẬT
KHÔNG MỞ
CNH BO
CHÚ Y

VIE - 3
PHÒNG NGA
1.
2.
3.
4.
5.
CHÚ Ý :

VIE - 4
NI DUNG
01 Kiểm tra thành phần 6
02 Tổng quan về sản phẩm 7
-------------------------
------------------------- 9
03 Sử dụng Điều khiển từ xa 10
-------------------------
-------------------------
-------------------------
-------------------------
-------------------------
-------------------------
04 Kết nối Soundbar 17
-------------------------
-------------------------
05 Kết nối với TV 18
-------------------------
-------------------------
-------------------------
-------------------------
23
-------------------------
24
-------------------------
-------------------------

06 Kết nối thiết bị bên ngoài 28
-------------------------
07 Kết nối thiết bị di động 29
-------------------------
29
-------------------------
32
-------------------------
33
08 Kết nối thông qua Apple AirPlay 2 34
09 Lắp giá treo tường 35
-------------------------
-------------------------
10 Lắp Đặt Soundbar Trước TV 37
11 Cập nhật phần mềm 38
-------------------------
-------------------------
-------------------------
39
12 Xử l s cô 40
13 Giy Php 42
14 Thông báo Giy php Ngun m 43
15 Lưu Quan Trọng về Dịch vụ 43
16 Thông số kỹ thuật và Hướng dẫn 44
-------------------------
44
01 KIỂM TRA THNH PHẦN
SOUND
MODE
WOOFER
TONE
CONTROL
CH LEVEL
Thiết bị chính Soundbar Pin/điều khiển từ xa
Soundbar
Cáp HDMI
A TYPE : 450mm
Bộ chuyển đổi AC/DC
(Soundbar)
Dây ngun
(Soundbar)
Thanh dẫn giá treo tường
Vít đỡ Giá gắn tường-Giá treo
tường
Vít
02 TỔNG QUAN VỀ SN PHẨM
Pa-nen mặt trước / Pa-nen mặt trên cùng của Soundbar
Bảng mặt trên
Đèn báo
LED
W
W
M
W
W
Màu trắngMàu xanh lơMàu xanh láMàu đỏ Màu
lam
Nút Đa
chức
năng
(Đa chức năng)
(Đa chức năng)
Sáng màu trắng -> Tắt Sáng màu trắng -> Tắt Sáng màu trắng -> Tắt
“Digital Audio In
“TV ARC”
“Wi-Fi” “Bluetooth”
Nút Âm
lượng
(Âm lượng)
Nút Bật/
tắt micrô
(Bật/tắt micrô)
Sáng màu đỏ
“Mic Off” “Mic On”
Cài đặt
Loa ngoài
SmartThings
“Phương pháp 2. Kết nối qua Wi-Fi (Mạng không
dây)”
VIE - 9
Mặt dưới của Soundbar
SERVICE
DC 19V
DIGITAL
AUDIO IN
(OPTICAL)
HDMI
(ARC)
DIGITAL
AUDIO IN
(OPTICAL)
HDMI
(ARC)
SERVICE
DC 19V
DC 19V (Đầu vào ngun điện)
SERVICE
DIGITAL AUDIO IN (OPTICAL)
HDMI (ARC)
03 SỬ DỤNG ĐIỀU KHIỂN T XA
Lắp Pin trước khi dùng Điều khiển từ xa (pin AAA X 2)
Cách sử dụng điều khiển từ xa
SOUND
MODE
WOOFER
TONE
CONTROL
CH LEVEL
Bật/tắt
Nhp nháy màu xanh lơ 1 lần
Bật Tắt
Nhp nháy màu đỏ 3 lần
Chức năng Auto Power Down
– Digital Audio In“TV ARCWi-Fi
“Bluetooth
(Ngun tín hiệu)
Bật/tắt phản hi âm thanh
(Ngun tín hiệu)
Nhp nháy màu xanh lơ 1 lần
Bật Tắt
Nhp nháy màu đỏ 1 lần
(Tắt tiếng)
(Tắt tiếng)
Nhp nháy X lần lặp lại
Âm lượng
Màu trắng chuyển sang phải 1 lần
Màu trắng chuyển sang trái 1 lần
CH LEVEL
Nhp nháy màu trắng 1 lần
“Centre Level” “Side Level”
– Rear Level
Rear LevelLên/Xuống

(Điều khiển âm thanh)
Lên/Xuống
Nhp nháy màu trắng 1 lần
“SpaceFit Sound” “Active Voice Amplier” “Voice enhancement” “Night
mode” “Sync” “Virtual”
– (Điều khiển âm thanh)
Trái/PhảiLên/Xuống
Standard
– “Voice enhancement
– “Night mode
– Sync
Lên/Xuống
– “Sync
– VirtualLên/Xuống
Bluetooth PAIR
Màu đỏ Màu xanh láMàu
lam
Màu đỏ Màu xanh lá Màu lam nhp nháy
Ghép nối
Kết nối hoàn tất
Nhp nháy màu xanh lơ 3 lần
“Ready to connect via Bluetooth.”
p (Phát/tạm dừng)
Lên/Xuống/Trái/Phải
LênXuốngTráiPhải
Bỏ qua nhạc
PhảiTrái
ID SET
LênID SET
(Thông tin)
SOUND MODE
Nhp nháy màu trắng 1 lần
“Adaptive Sound” “DTS Virtual:X” “Music” “Game” “Standard”
Adaptive Sound
DTS Virtual:X
Music
Game
Standard
MỨC WOOFER (ÂM TRẦM)
TONE CONTROL
Lên/Xuống
“Standard
Nhp nháy màu trắng 1 lần
“Treble” “Bass”
Active Voice Amplier (AVA)
Sử dụng các Nút Ẩn (Các nút có nhiều chức năng)
Nút Ẩn
Trang tham khảo
Nút trên Điều khiển Từ xa Chức năng
Thông số kỹ thuật đầu ra cho các chế độ hiệu ứng âm thanh khác nhau
Hiệu ứng Đầu vào
Đầu ra
Chỉ với Loa siêu trầm
Với Loa siêu trầm & Bộ loa
sau không dây
Điều chỉnh âm lượng Soundbar bằng điều khiển từ xa TV
Loa ngoài
1.
2. WOOFER
WOOFEROff-TV
RemoteSamsung-TV RemoteAll-TV Remote
Nút trên Điều khiển Từ xa Đèn báo LED Trạng thái
SOUND
MODE
WOOFER
L
TONE
CON
5 Sec
Nhp nháy màu đỏ 1 lần
SOUND
MODE
WOOFER
L
TONE
CON
5 Sec
Nhp nháy màu xanh lơ 1 lần
SOUND
MODE
WOOFER
L
TONE
CON
5 Sec
Nhp nháy màu lam 1 lần

VIE - 17
04 KẾT NỐI SOUNDBAR
Kết nối ngun điện
1.
2.
Mặt đáy của thiết bị chính Soundbar
SERVICE
DC 19V
DC 19V
Dây ngun
Bộ chuyển đổi AC/DC
SERVICE
DC 19V
GHI CHÚ
Kết nối Bộ loa sau không dây và Loa siêu trầm Samsung với
Soundbar
Mở rộng sang âm thanh vòm hoàn toàn không dây bằng cách kết nối Bộ loa sau không dây Samsung
(, bán riêng) và Loa siêu trầm không dây (SWA-W510, bán riêng) với
Soundbar của bạn.
Để biết thông tin chi tiết về các kết nối, xem sách hướng dẫn Bộ loa sau không dây và Loa siêu trầm
không dây của Samsung.
05 KẾT NỐI VỚI TV
Kết nối TV có hỗ trợ HDMI ARC (Kênh chuyển âm thanh)
CHÚ Y
High Speed HDMI Cable with Ethernet
HDMI IN
(ARC)
(OPTICAL)
HDMI
(ARC)
Kết nối với cổng HDMI IN (ARC)
hoặc (eARC) của TV.
Cáp HDMI
Mặt đáy của
Soundbar
Kết nối với cổng HDMI (ARC) của
thiết bị chính Soundbar.
Mặt trên của Soundbar
Sáng màu trắng -> Tắt
“Digital Audio In”
1.
2.
3.
(Đa chức năng)
(Ngun tín hiệu)Digital Audio In

GHI CHÚ
Kết nối bằng Cáp quang
Danh sách kiểm tra trước khi kết nối
Sáng màu trắng -> Tắt
“Digital Audio In”
DIGITAL
AUDIO IN
(OPTICAL)
OPTICAL OUT
Mặt đáy của
Soundbar
Cáp quang
(không đi kèm)
Mặt trên của Soundbar
1. DIGITAL AUDIO IN (OPTICAL)
2.
3. (Đa chức năng) (Ngun tín hiệu)
Digital Audio InDigital Audio In
4.
Kết nối qua Bluetooth
Kết nối ban đầu
1.
Nút Ghp nối Bluetooth Đèn báo LED
PAIR
HOẶC
Màu đỏ Màu xanh lá Màu lam nhp nháy
Ghép nối
Kết nối hoàn tất
Nhp nháy màu xanh lơ 3 lần
Bluetooth”
5 Sec
Màu đỏ Màu xanh láMàu lam
“Ready to connect via Bluetooth.”
2.
3. [AV] Samsung Soundbar S60B / [AV] Samsung Soundbar S61B
Cần ghp nốiĐã ghp nối
4.
Bluetooth”
VIE - 22
Nếu thiết bị không kết nối được
[AV] Samsung Soundbar S60B / [AV] Samsung Soundbar
S61B
Ngắt kết nối Soundbar khỏi TV Samsung
(Đa chức năng) (Ngun tín hiệu)
Bluetooth
Lưu khi kết nối Bluetooth
–
–
–

VIE - 23
Kết nối qua Wi-Fi
Danh sách kiểm tra trước khi kết nối
bộ định tuyến không dây (Wi-Fi)TV có được kết nối với bộ định
tuyến không
32
1. 32Phương pháp 2. Kết nối
qua Wi-Fi (Mạng không dây)
2.
TV Samsung được phát hành năm 2017 hoặc muộn hơn
VIE - 24
Kết nối với một TV hỗ trợ Dolby Atmos®
Danh sách kiểm tra trước khi kết nối
TV ARCWi-Fi
HDMI IN
(ARC)
(OPTICAL)
HDMI
(ARC)
Kết nối với cổng HDMI IN (ARC)
hoặc (eARC) của TV.
Cáp HDMI
Mặt đáy của
Soundbar
Kết nối với cổng HDMI (ARC) của
thiết bị chính Soundbar.
Mặt trên của Soundbar
Sáng màu trắng -> Tắt
“TV ARC”
1.
2.
3.
Sáng màu trắng -> Tắt
“Wi-Fi”
Menu TV
Wi-Fi
1.
2.
3.
GHI CHÚ
Cách cu hình Dolby Atmos® trên trình phát BD hoặc thiết bị khác kết nối với TV.
Chức năng này có sẵn trên một số TV Samsung và một số mẫu Soundbar.

Sử dụng chức năng Q-Symphony
TV+Soundbarra âm
thanh
Sáng màu trắng -> Tắt
“Digital Audio In”
Menu TV
HOẶC
Cáp quang (không đi kèm)
Cáp HDMI
TV + tên sê-ri [AV] Soundbar (HDMI)
Sáng màu trắng -> Tắt
“Wi-Fi”
Menu TV
Wi-Fi
TV + tên sê-ri [AV] Soundbar (Wi-Fi)
GHI CHÚ

Sử dụng SpaceFit Sound
Phương pháp 1. Kết nối qua Soundbar
(Điều khiển Âm thanh) "SpaceFit Sound Off"▲ ( Lên )"SpaceFit Sound On"
Phương pháp 2. Kết nối qua TV
Âm thanh thích nghi+
Âm thanh thích nghi+
Âm thanh thích nghi+
LƯU Ý
06 KẾT NỐI THIẾT BỊ BÊN NGOI
Kết nối bằng Cáp quang
Sáng màu trắng -> Tắt
“Digital Audio In”
OPTICAL OUT
DIGITAL
AUDIO IN
(OPTICAL)
Mặt đáy của Soundbar
Cáp quang
(không đi kèm)
Mặt trên của Soundbar
BD / Đầu DVD /
Hộp thu phát kỹ thuật số /
Máy chơi game
1. DIGITAL AUDIO IN (OPTICAL)
2.
3. (Đa chức năng) (Ngun tín hiệu)
Digital Audio InDigital Audio In
4.
VIE - 29
07 KẾT NỐI THIẾT BỊ DI ĐNG
Phương pháp 1. Kết nối qua Bluetooth
Kết nối ban đầu
1.
Nút Ghp nối Bluetooth Đèn báo LED
PAIR
HOẶC
Màu đỏ Màu xanh lá Màu lam nhp nháy
Ghép nối
Kết nối hoàn tất
Nhp nháy màu xanh lơ 3 lần
Bluetooth”
5 Sec
Màu đỏ Màu xanh láMàu lam
“Ready to connect via Bluetooth.”
2. [AV] Samsung Soundbar S60B / [AV] Samsung Soundbar S61B
3.
Nếu thiết bị không kết nối được
[AV] Samsung Soundbar S60B / [AV] Samsung Soundbar
S61B
Thiết bị di động

Lưu khi kết nối Bluetooth
–
–
–
–
–
–
–

Ngắt kết nối giữa thiết bị Bluetooth và Soundbar
"Màu đỏ
Ngắt kết nối giữa Soundbar và thiết bị Bluetooth
(Đa chức năng) (Ngun tín hiệu)
Bluetooth
VIE - 32
Phương pháp 2. Kết nối qua Wi-Fi (Mạng không dây)
SmartThings
Kết nối ban đầu
1. SmartThings
2.
Home
Ứng dụng
SmartThings
VIE - 33
Sử dụng Tap Sound
Thiết bị di động
Ứng dụng SmartThings
Mặt trên cùng của Soundbar
1. Tap Sound
Bật Chức năng Tap Sound
2. Bắt đầu ngay
3.
SmartThings
Bật Chức năng Tap Sound
SmartThingsTap View, Tap Sound
1. SmartThings
2.
SmartThings
3. Tap View, Tap Sound
GHI CHÚ
Tap Sound
Tap Sound

VIE - 34
08 KẾT NỐI THÔNG QUA APPLE AIRPLAY 2
09 LẮP GI TREO
TƯỜNG
Những điểm cần cân nhắc khi
lắp đặt
–
–
Chi tiết treo tường
A TYPE : 450mm
Thanh dẫn giá treo tường
Vít đỡ Vít
Giá gắn tường-Giá treo tường
1. Thanh dẫn giá treo tường
Thanh dẫn giá treo tường
5 cm tr lên
2. Trục trung tâm của Thanh dẫn giá
treo tường
Thanh dẫn giá treo tường
Trục
trung tâm
Trục trung tâm
A TYPE : 450mm
3.
Thanh dẫn giá treo tường
A TYPE : 450mm
4.
5. Vít đỡ
(Không đi kèm)
6. Giá đỡ gắn trên tường
Đinh vít
Giá đỡ gắn trên tường
Mặt sau của Soundbar
Đầu bên phải của Soundbar
7. Giá đỡ gắn trên tường
Giá đỡ gắn trên tườngVít
đỡ
8.
Giá đỡ gắn trên tường
Vít đỡ
Vít đỡ Giá
đỡ gắn trên tườngGiá đỡ
gắn trên tườngGiá đỡ gắn trên
tườngVít đỡ
10 LẮP ĐẶT
SOUNDBAR
TRƯỚC TV
3 cm tr lên
Micrô
GHI CHÚ
11 CẬP NHẬT PHẦN
MỀM
T động cập nhật
Cập nhật USB
SERVICE
DC 19V
DIGITAL
AUDIO IN
(OPTICAL)
HDMI
(ARC)
SERVICE
Cáp chuyển đổi
Micro USB thành
USB (không đi kèm)
Mặt đáy của Soundbar
Samsung có thể cung cp bản cập nhật cho vi
chương trình hệ thống của Soundbar trong
tương lai.
SERVICE
1.
2.
3.
4.
5.
Màu trắng di chuyển từ trái sang
phải và từ phải sang trái
Nhp nháy màu đỏ 3 lần
Nhp nháy màu xanh lơ 3 lần
VIE - 39
Đặt lại
5 Sec
(Âm lượng)
Nhp nháy màu xanh lơ 3 lần
Nhp nháy màu đỏTắt
Màu trắng di chuyển từ trái sang
phải và từ phải sang trái
CHÚ Y
12 XỬ LÝ S CÔ
Soundbar không bật.
;
Soundbar hoạt động chập chờn.
;
;
;
Điều khiển từ xa không hoạt động.
;
;
Đèn báo LED màu đỏ trên Soundbar vẫn bật.
;
Soundbar không phát ra bt kỳ âm thanh nào.
;
;
;
;
;
;
39
Nếu không kết nối TV qua HDMI (ARC).
;
;
;
Không có âm thanh khi kết nối với TV chế độ
HDMI (ARC).
;

Soundbar sẽ không kết nối qua Bluetooth.
;
PAIR
(Bật/tắt Micrô)
;
;
;
;
39
Rớt âm thanh khi được kết nối qua Bluetooth.
;
;
;
Không thể kết nối với Wi-Fi.
;
;
;
;
Soundbar không t động bật với TV.
;
Chức năng AVA không khả dụng trong các
trường hợp sau.
;
;
Sau khi kết nối TV với Soundbar, tôi đã tắt chế
độ Soundbar. TV không phát âm thanh.
;
;

VIE - 42
13 GIY PHP

VIE - 43
[ENERGY STAR]
ENERGY STAR qualied model only
–
–
ENERGY STAR qualied model only
(Applicable to Thin Client models only)
–
–
–
ENERGY STAR qualied model only (The other
models)
–
14 THÔNG BO GIY
PHP NGUN MỞ
15 LƯU Ý QUAN
TRỌNG VỀ DỊCH
VỤ
VIE - 44
16 THÔNG SỐ KỸ THUẬT V HƯỚNG DẪN
Thông số kỹ thuật
GHI CHÚ
Thận trọng: Soundbar sẽ t động khi động lại nếu bạn bật/tắt Wi-Fi.
CH LEVEL
TONE CONTROL

TRUNG TÂM BO HNH SAMSUNG
A. ĐIỀU KIỆN BO HNH:
1. Sản phẩm còn trong thời hạn Bảo hành da vào tin nhắn
từ tổng đài 6060
2. Nếu không có tin nhắn từ tổng đài 6060, sẽ áp dụng thời hạn
Bảo hành cho sản phẩm như sau:
-
-
-
-
-
-
-
3. Sản phẩm phải còn đầy đủ nhãn máy để kiểm tra hoặc các
chứng từ liên quan.
4. Sản phẩm không nằm trong trường hợp bị từ chối bảo
hành.
5. Các sản phẩm do SAMSUNG sản xut và phân phối chính
thức tại thị trường Việt Nam sẽ được bảo hành tại các
Trung Tâm Bảo Hành trên toàn quốc do SAMSUNG VINA
ủy quyền.
B. ĐIỀU KIỆN T CHỐI BO HNH:
Trung Tâm Bảo Hành sẽ từ chối bảo hành hoặc sẽ sửa
chữa có tính phí trong những trường hợp máy hỏng
không phải lỗi của nhà sản xut như sau:
1.
2.
-
-
-
3.
4.
5.
6.
7.
QUÝ KHCH VUI LÒNG LIÊN HỆ VỚI CHÚNG TÔI THEO SỐ
ĐIỆN THOẠI (Miễn phí cuộc gọi).
1800 588 889
Cảm ơn Qu khách đã la chọn và sử dụng sản phẩm của
Công ty TNHH Điện Tử SAMSUNG VINA.
1.
-
-
-
QUÝ KHCH HÃY LIÊN HỆ CHÚNG TÔI THEO SỐ ĐIỆN
THOẠI (Miễn phí cuộc gọi)
1800 588 889
2.
- [
14 số Sê Ri máy]
-
3.
-
-
-
THÔNG TIN BO HNH
TPE - 2
安全資訊
安全警告
為減少觸電的危險,請勿取下機蓋(或後蓋)。
本裝置內部沒有使用者可自行維修的零件。請
讓合格的維修人員進行維修。
請參閱以下表格,查看可能出現在 Samsung
產品上的符號說明。
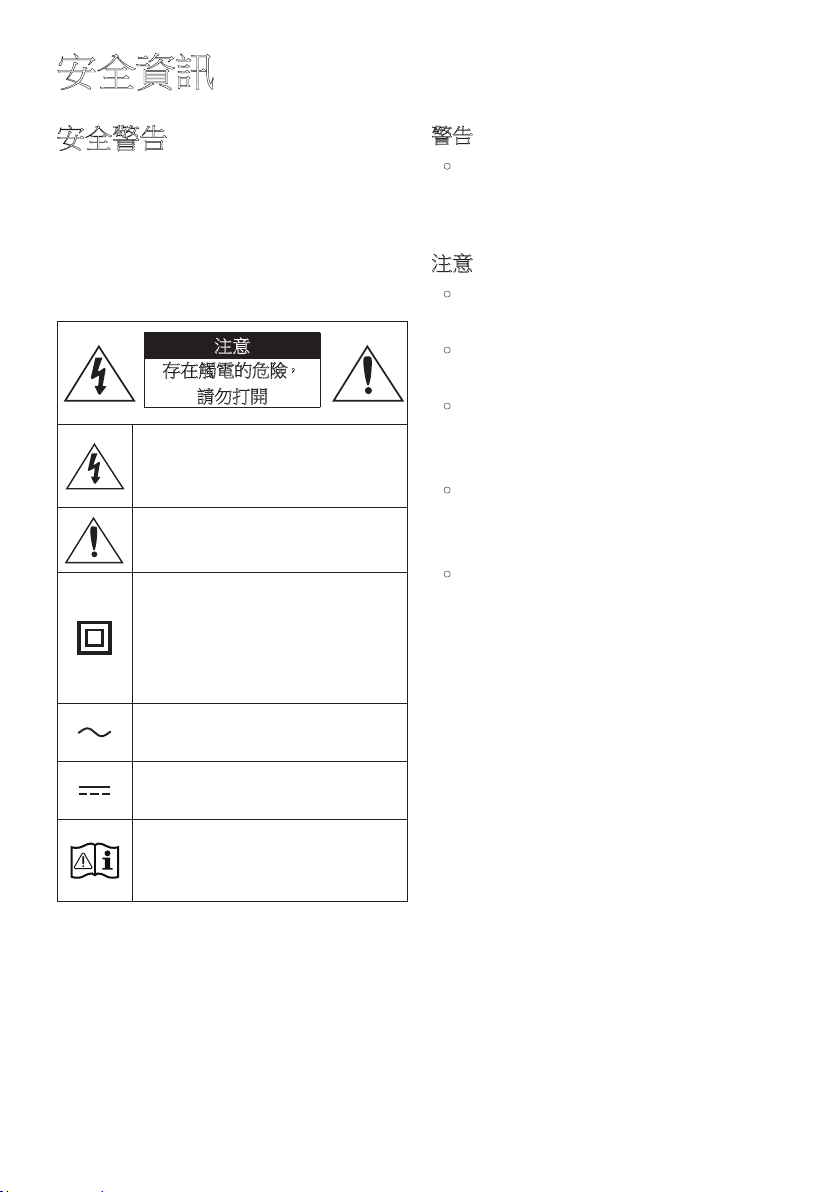
注意
存 在 觸 電 的 危 險,
請勿打開
此 符 號 表 示 內 部 有 高 壓 電。
以任何方式碰觸本產品的任何內部
零 件 均 有 危 險。
此符號表示本產品隨附關於操作與
維 護 的 重 要 說 明 文 件。
II 類產品:此符號表示不需要連接
接 地。
若此符號沒有出現在含電源線的產
品上,則該產品必須牢固連接至保
護 性 接 地 ( 地 線 )。
AC 電壓:此符號表示額定電壓的
標記為 AC 電壓。
DC 電壓:此符號表示額定電壓的
標記為 DC 電壓。
注 意, 使 用 時 須 參 照 說 明 指 示:此
符號指示用戶查閱使用者手冊以取
得 進 一 步 的 安 全 相 關 資 訊。
警告
• 為降低發生火災或觸電的風險,請勿使
本裝置淋雨或將其放置在潮濕的環境
中。
注意
• 為 避 免 觸 電,請 將 插 頭 的 寬 插 腳 對 準 寬
插 槽 並 將 它 完 全 插 入。
• 本裝置一律要連接至帶有保護接地連接
的 交 流 電 源 插 座。
• 要斷開本裝置的電源,必須從電源插座
上拔下插頭,因此電源插頭應該易於操
作。
• 請勿使本裝置滴到水或濺到水。請勿在
本裝置上放置裝有液體的物件,如花
瓶。
• 若要完全關閉本裝置,必須從牆上插座
拔下電源插頭。因此,電源插頭必須隨
時 都 可 輕 鬆 快 速 拔 插。

TPE - 3
注意事項
1. 請確保家中的交流電符合本產品底部的
識別貼紙上所列的電源要求。產品水平
安 裝 在 平 台( 傢 俱 )上,並 在 周 圍 留 出 足
夠的空間用於通風 7~10 公分。請確保
通風槽沒有被遮擋。不要將裝置放置在
放大器或可能會變熱的裝置上。本裝置
設 計為 可 以 連 續 使 用。
若要完全關閉裝置,請從牆上插座拔下
交流電源插頭。如果您打算長時間不使
用裝置,請拔下裝置的電源插頭。
2. 在雷暴期間,請從牆上插座拔下交流電
源轉接器。閃電造成的電壓尖峰可能會
損 壞 裝 置。
3. 不要將裝置放置在陽光直射到的位置
或靠近熱源的位置。這可能導致產品過
熱,從 而 使 得 裝 置 發 生 故 障。
4. 避免產品受潮(例如遠離 花瓶)、遠離
高熱位置(例如壁爐)或會形成強磁場
或電場的裝置。如果裝置發生故障,請
從交流電源插座中拔下電源插頭。本產
品並非設計為供工業使用。僅限個人使
用。如 果 您 的 產 品 貯 藏 在 寒 冷 的 溫 度
中,則 可 能 會 發 生 冷 凝。如 果 在 冬 天 運
輸裝置,請靜候約 2 小時,直到裝置達
到 室 溫 後 再 使 用。
5. 與產品配合使用的電池含有對環境有
害 的 化 學 物 品。 請 勿 將 電 池 放 入一 般
家 庭 垃 圾 筒 中。請 勿 將 電 池 置 於 火
中。不要使電池短路、分解或過熱。
注意 : 若沒有正確更換電池,將會有爆
炸的危險。 請使用相同類型的電池來
更 換。
TPE - 4
目錄
01 檢查元件 6
02 產品概覽 7
有源音箱前方面板/上方面板
--------------------------------- 7
有源音箱底部面板
---------------------------------
9
03 使用遙控器 10
在使用遙控器前插入電池(AAA 電池 X 2)
--------------------------------- 10
如何使用遙控器
---------------------------------
10
Active Voice Amplifier(AVA)
---------------------------------
14
使用隱藏按鈕(多功能按鈕)
---------------------------------
14
不同音效模式的輸出規格
---------------------------------
15
使用電視遙控器調整有源音箱音量
--------------------------------- 16
04 連接有源音箱 17
連接電力
---------------------------------
17
將 Samsung 無線後置揚聲器套件和有源重低音音箱連接至有
源音箱
---------------------------------
17
05 連接至電視 18
連接支援 HDMI ARC(音訊傳回頻道)
---------------------------------
18
使用光纖纜線連接
---------------------------------
20
透過 Bluetooth 連線
---------------------------------
21
透過 Wi-Fi 連接
---------------------------------
23
連接至支援 Dolby Atmos® 的電視
---------------------------------
24
使用 SpaceFit Sound
---------------------------------
27
TPE - 5
06 連線外部裝置 28
使用光纖纜線連接
---------------------------------
28
07 連線行動裝置 29
方法 1。透過藍牙連線
---------------------------------
29
方法 2。透過 Wi-Fi(無線網路)連線
---------------------------------
32
使用感應連結
---------------------------------
33
08 透過 Apple AirPlay 2 連接 34
09 安裝掛牆托架 35
安裝注意事項
---------------------------------
35
牆面安裝元件
---------------------------------
35
10 將有源音箱安裝於電視前方 37
11 軟體更新 38
自動更新
---------------------------------
38
USB 更新
---------------------------------
38
重設
---------------------------------
39
12 疑難排解 40
13 授權 42
14 開放式原始碼授權聲明 43
15 關於維修的重要說明 43
16 規格和指南 44
規格
---------------------------------
44
TPE - 6
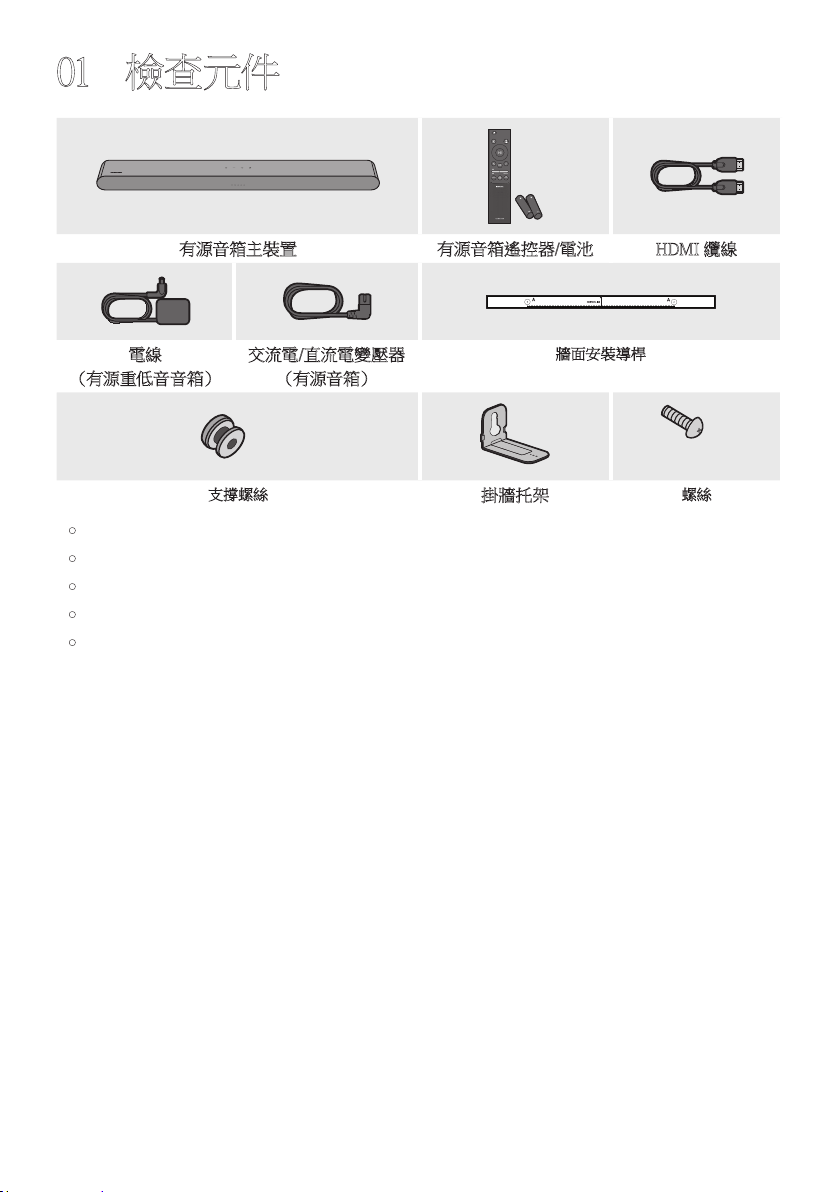
01 檢查元件
SOUND
MODE
WOOFER
TONE
CONTROL
CH LEVEL
有源音箱主裝置 有源音箱遙控器/電池 HDMI 纜線
A TYPE : 450mm
電線
(有源重低音 音箱)
交流電/直流電變壓器
(有源音 箱)
牆面安裝導桿
x 2
x 2
(M4 x L10)
x 2
支撐螺絲
掛牆托架
螺絲
• 電源和消耗功率,請參考本產品上的標籤。(標籤 : 有源音箱主裝置底部)
• 若要購買其他元件或選用纜線,請洽詢 Samsung 服務中心或是 Samsung 客戶服務。
• 如需更多關於掛牆托架的資訊,請參閱第 35 頁。
• 設計、規格和應用程式畫面可隨時變更,不必事先通知。
• 配件的外觀可能與上面的圖例略有差異。
TPE - 7
02 產品概覽
有源音箱前方面板/上方面板
上方面板
LED 指
示燈
LED 指示燈根據有源音箱的目前模式或狀態閃爍、發光或改變顏色。 LED 指
示燈的顏色和燈光數量依下列所述指示 active mode。
W
白色 LED
W
白色 LED
M
多彩 LED
W
白色 LED
W
白色 LED
• 多彩 LED 指示燈根據目前模式或狀態改變成
白色、青色、綠色、紅色以及藍
色。
多功能
按鈕
• 處 於 待 機 模 式, 按 下 (多功能)按鈕,以開啟有源音箱。
• 按下 (多功 能)按鈕,以變更模式。 每當變更模式時,LED 會發出白色
光,然 後 熄 滅。
LED 指
示燈
白燈亮起 -> 熄滅 白燈亮起 -> 熄滅 白燈亮起 -> 熄滅
“Digital Audio In”
或者 “TV ARC”
“Wi-Fi” “Bluetooth”
音量按
鈕
按下
(音 量 按 鈕)按 鈕,以 調 整 音 量。
TPE - 8
麥克風
開啟/關
閉按鈕
按下
(麥克風開啟/關閉)按鈕,以開啟或關閉麥克風。
麥克風關閉時,LED 指示燈會發出紅色光。
LED 指示燈
紅燈亮起
“Mic Off” “Mic On”
• 您插入交流電源線後,電源鍵會 4 到 6 秒鐘內生效。
• 當您開啟本裝置時,可能會延遲 4 到 5 秒後,裝置才會發出聲音。
• 若您同時聽見來自電視和有源音箱的聲音,請前往電視音訊的設定功 能 表,並 將 電 視
揚聲器變更為外部揚聲器。
• 您可以使用 SmartThings 應用程式來開啟或關閉音訊反饋。 如需了解如何使用
SmartThings 應用程式,請參閱 「方法 2。透過 Wi-Fi(無線網路)連線」。
TPE - 9
有源音箱底部面板
SERVICE
DC 19V
DIGITAL
AUDIO IN
(OPTICAL)
HDMI
(ARC)
DIGITAL
AUDIO IN
(OPTICAL)
HDMI
(ARC)
SERVICE
DC 19V
DC 19V(電源輸入)
連接交流電/直流電變壓器。(請參閱第 17 頁 )。
SERVICE
連接 USB 儲存裝置以升級產品軟體。
DIGITAL AUDIO IN(OPTICAL)
連接至外部裝置的數位(光纖)輸出。(請參閱第 28 頁 )。
H D M I( A R C )
連接至電視上的 HDMI(ARC)插孔。(請參閱第 18 頁 )。
• 從牆面插座拔除交流電/直流電轉接器電纜時,請拉動插頭。請勿拉動纜線。
• 在完成元件之間的所有連接之前,請勿將此裝置或其他元件連接至交流電插座。
TPE - 10
03 使用遙控器
在使用遙控器前插入電池(AAA 電池 X 2)
以 箭 頭 方 向 滑 動 後 蓋,直 到 完 全 卸 下 為 止。
按照正確的電極方向插入 2 個 AAA 電池
( 1 . 5 V )。 將 後 蓋 滑 回 原 位 。
如何使用遙控器
SOUND
MODE
WOOFER
TONE
CONTROL
CH LEVEL
電源
開 啟 及 關 閉 有 源 音 箱。
LED 指
示燈
青色閃爍 1 次
開啟 關閉
紅色閃爍 3 次
•
Auto Power Down 功能
裝 置 會 在 下 列 情 況 自 動 關 閉:
– 若 18 分鐘都沒有音訊訊號,則會進入
“Digital Audio In” 或 “TV ARC” / “Wi-Fi”
/ “Bluetooth” 模 式。
(訊號源)
按下可選擇連接至有源音箱的訊號源。
• 音訊回饋開啟/關閉
您可以開啟或關閉音訊回饋。 有源音箱關閉時
( 待 機 模 式 ), 按 住 遙 控 器 上 的 (訊號源)按鈕
5 秒鐘。
LED 指
示燈
青色閃爍 1 次
開啟 關閉
紅色閃爍 1 次
TPE - 11
(靜音)
按下 (靜 音)按鈕以靜音聲音。
再次按下以取消靜音聲音。
LED 指
示燈
重複閃爍 X 次
音量
向上或向下推動按鈕可調整音量。
LED 指
示燈
白色向右移動 1 次
提高音量
白色向左移動 1 次
降低音量
CH LEVEL
按下按鈕即可調整每個揚聲器的音量。
LED 指
示燈
白色閃爍 1 次
“Centre Level” “Side Level”
– 若 連 接 後 置 揚 聲 器( 另 售)時,則 會 支 援 “
Rear Level” 設定。 使用向上/向下按鈕將
“Rear Level” 的音量調整為介於 -6 到 +6 之間。
TPE - 12
(音 效 控 制)
您可以按下按鈕設定音訊功能。 您可以使用向上/向下按鈕調整所需設定。
每當模式變更時,多彩 LED 會閃爍白色光。
LED 指
示燈
白色閃爍 1 次
“SpaceFit Sound” “Active Voice Amplifier” “Voice enhancement”
“Night mode” “Sync” “Virtual”
– 按住 (音效控制)按鈕大約 5 秒,以調整每個頻帶的聲音。可使用向左/向右按鈕選
擇 150Hz、300Hz、600Hz、1.2kHz、2.5kHz、5kHz 和 10kHz,每項都能使用向上/向下按鈕
調整為介於 -6 到 +6 之間的設定。
(請確認聲音模式設定為 “Standard” 。)
– “Voice enhancement” 可讓您更容易聽見電影及電視內的口語對話。
– “Night mode” 為夜間觀看的最佳選擇,可調整設定將音量調低但仍保持對話清晰。
– 若電視上的視訊與有源音箱的音訊不同步,請在聲音控制中選擇 “Sync” 然後使用向
上/向下按鈕設定 0 到 300 毫秒之間的音訊延遲。
– 僅某些功能支援 “Sync” 。
– “Virtual” 功能可使用向上/向下按鈕切換成開啟/關閉。
Bluetooth PAIR
將有源音箱切換至 Bluetooth 配對模式。
按下按鈕時,LED 顯示器會如下圖變化。
• 在配對完成前,多彩 LED 會依紅色 → 綠色 → 藍色的 順 序 變 更 發 光。
LED 指
示燈
紅色 → 綠色 → 藍色閃爍
正在配對
連接完成
青色閃爍 3 次
“Ready to connect via Bluetooth.”
p
(播放/暫停)
您也可以按下按鈕以播放或暫停音樂。
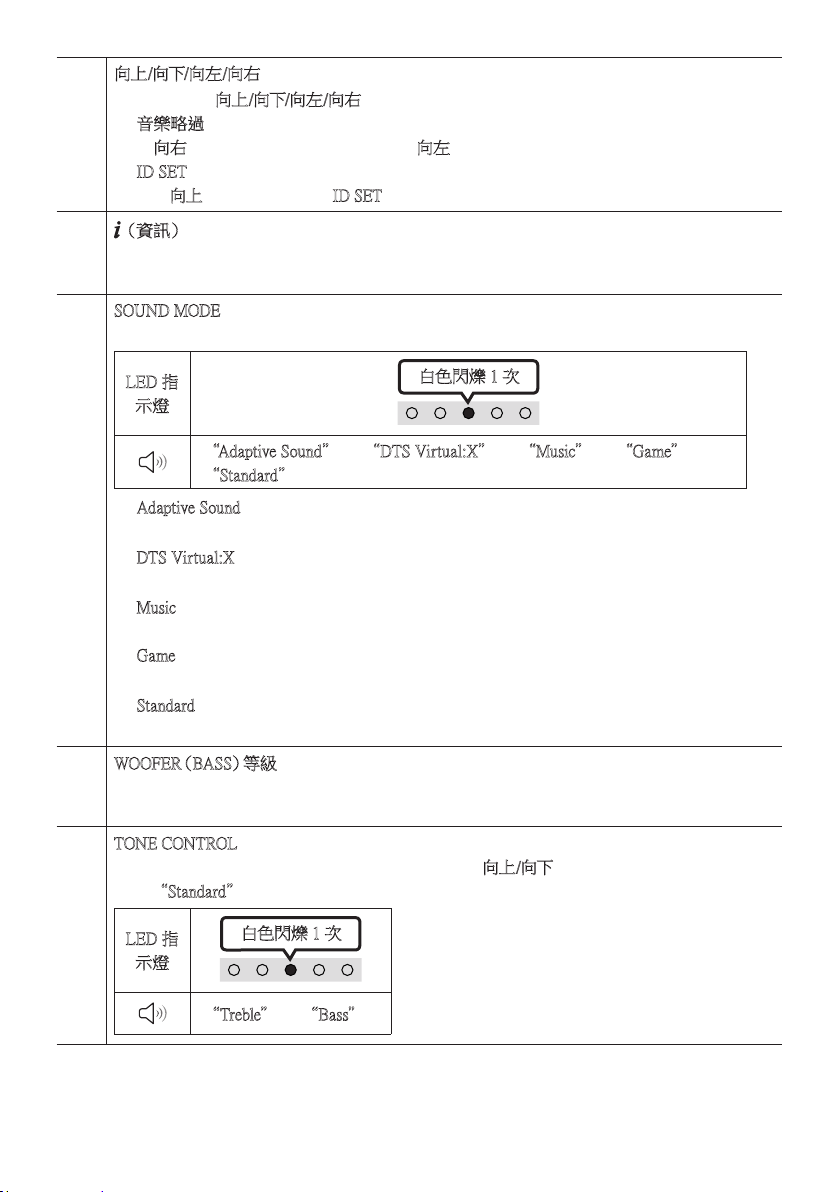
TPE - 13
向上/向下/向左/向右
按下按鈕上的向上/向下/向左/向右選擇或設定功能。
• 音樂略過
按向右按鈕可選擇下一個音樂檔案。按向左按鈕可選擇上一個音樂檔案。
• ID SET
按住向上按鈕 5 秒,以完成 ID SET(連接至無線有源重低音音箱或無線後置揚聲器時)。
(資訊)
按 下 後 , 隨 即 出 現 各 種 模 式 的 資 訊 。( 請 參 閱 第 7 頁 。)
連接至 Dolby Atmos® 時,LED 指示燈會閃爍 3 次青色光。
SOUND MODE
您可以按下按鈕選擇想要的音訊模式。 每當模式變更時,多彩 LED 會閃爍白色光。
LED 指
示燈
白色閃爍 1 次
“Adaptive Sound” “DTS Virtual:X” “Music” “Game”
“Standard”
• Adaptive Sound
即時分析內容並根據內容特徵自動提供最佳音場。
• DTS Virtual:X
無論何種內容,都能帶來身臨其境的 3D 音效。
• Music
為音樂內容提供更自然且充滿房間的聲音。
• Game
提供立體聲以讓您在遊戲時沉浸在動作中。
• Standard
輸 出 原 始 聲 音。
W O O F E R( B A S S ) 等 級
向上或向下推動按鈕以將有源重低音音箱(低音)的音量調整為 -12 或介於 -6 到 +6 之間。
若要將有源重低音音箱(低音)音量設定為 0(預設),請按下按鈕。
TONE CONTROL
您可以按下按鈕調整高音或低音的音量。 可以使用向上/向下按 鈕 調 整 所 需 項 目 。( 此 功 能
除了 “Standard” 模式以外,在所有聲音模式中皆適用。)
LED 指
示燈
白色閃爍 1 次
“Treble” “Bass”
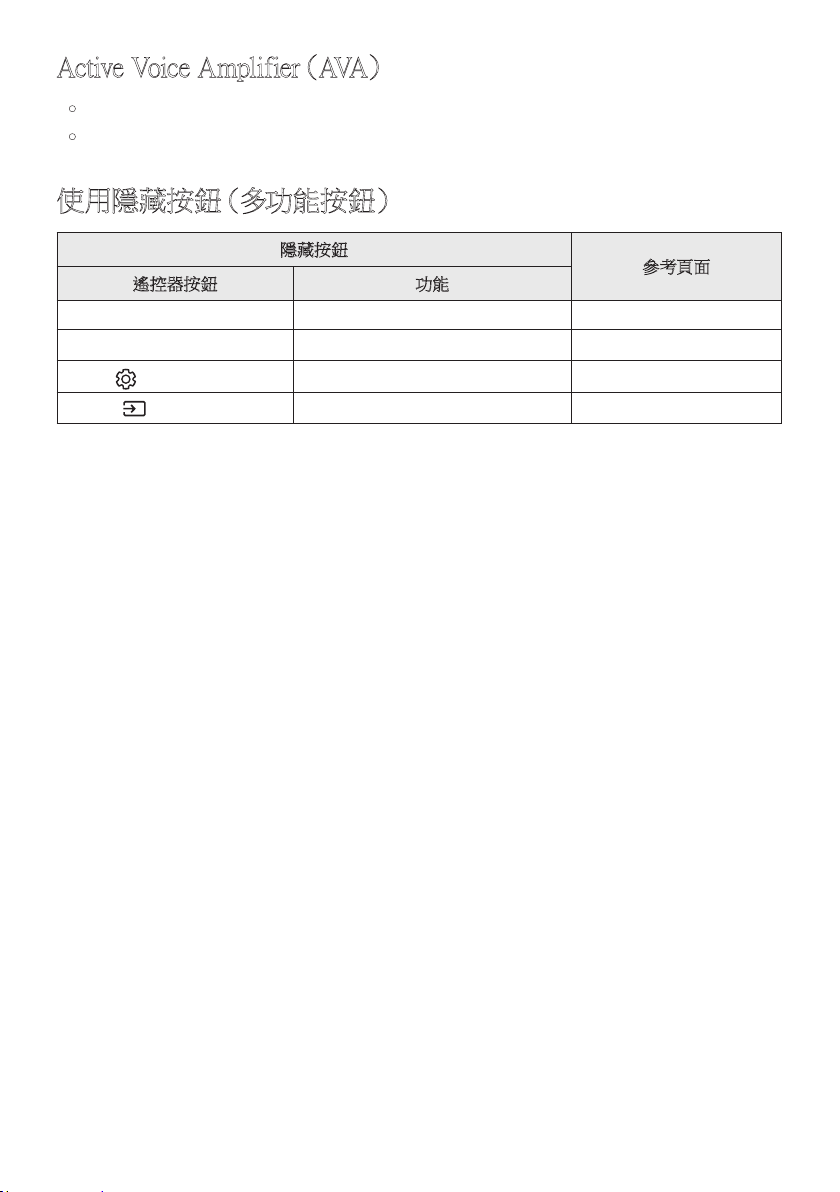
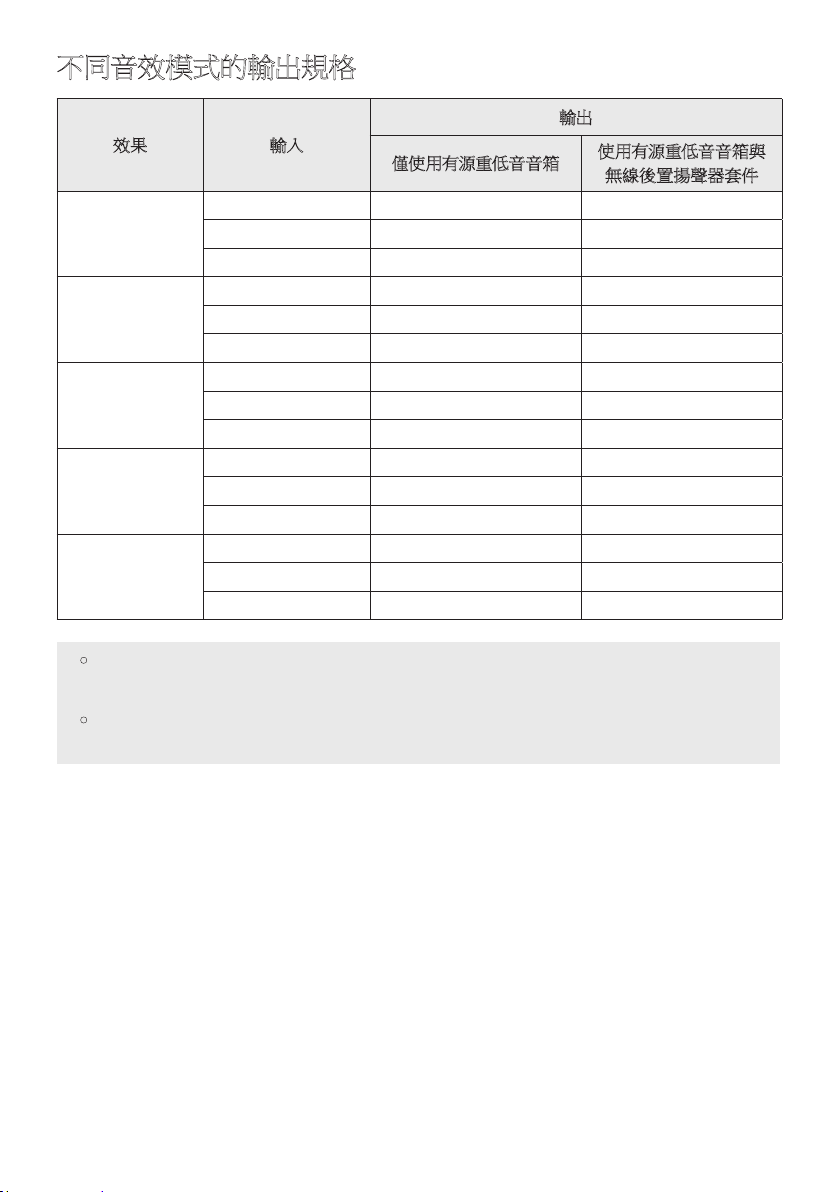
TPE - 15
不同音效模式的輸出規格
效果 輸入
輸出
僅使用有源重低音音箱
使用有源重低音音箱與
無線後置揚聲器套件
Adaptive Sound
2.0 頻道 5.1 頻道 7.1 頻道
5.1 頻道 5.1 頻道 7.1 頻道
Dolby Atmos® 5.1 頻道 7.1 頻道
DTS Virtual:X
2.0 頻道 5.1 頻道 7.1 頻道
5.1 頻道 5.1 頻道 7.1 頻道
Dolby Atmos® 5.1 頻道 7.1 頻道
Music
2.0 頻道 5.1 頻道 7.1 頻道
5.1 頻道 5.1 頻道 7.1 頻道
Dolby Atmos® 5.1 頻道 7.1 頻道
Game
2.0 頻道 5.1 頻道 7.1 頻道
5.1 頻道 5.1 頻道 7.1 頻道
Dolby Atmos® 5.1 頻道 7.1 頻道
Standard
2.0 頻道 2.1 頻道 2.1 頻道
5.1 頻道 5.1 頻道 5.1頻道
Dolby Atmos® 5.1 頻道 7.1 頻道
• 可另外購買 Samsung 無線後置揚聲器套件和有源重低音音箱。
若要購買套件或有源重低音音箱,請聯絡您購買有源音箱時的廠商。
• 若輸入訊號源是 Dolby Atmos®,則僅限有源重低音音箱的設定可提供 5.1 頻道音
訊,而有源重低音音箱與無線後置揚聲器套件設定可提供 7.1 頻道音訊。
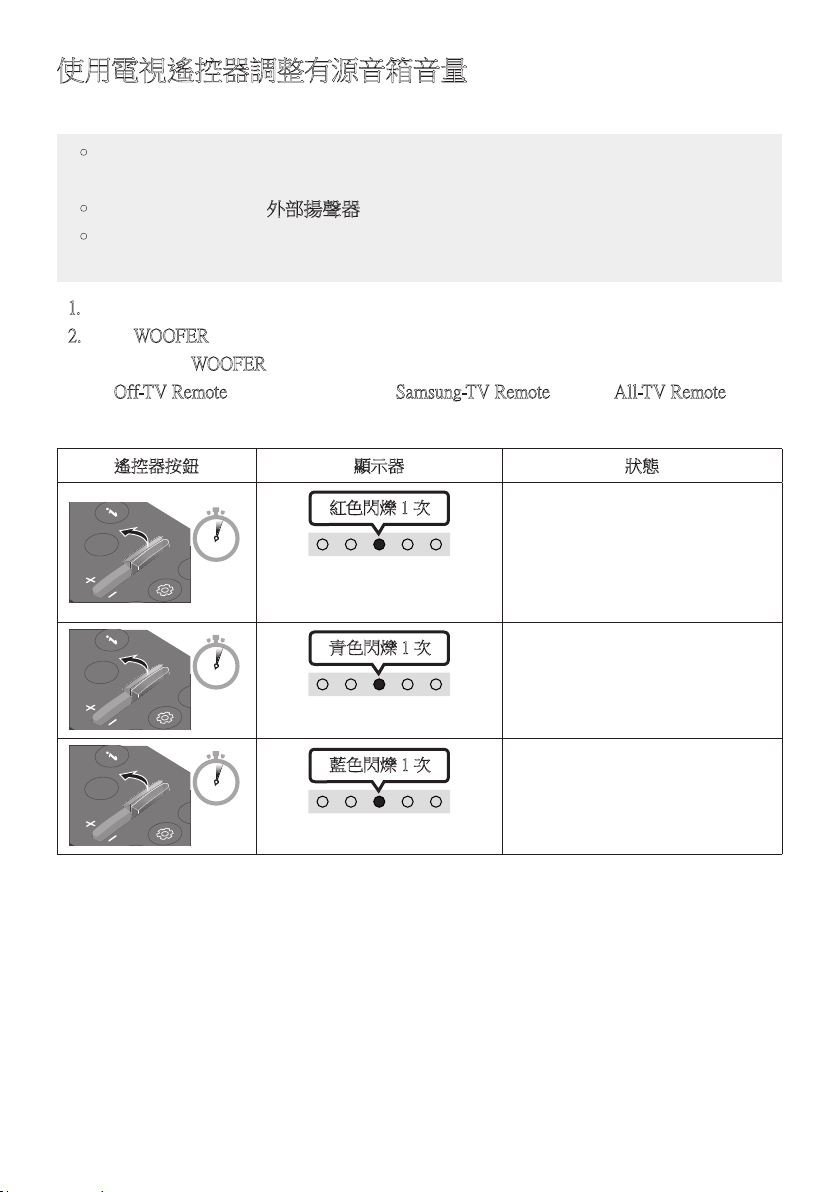
TPE - 16
使用電視遙控器調整有源音箱音量
使用電視遙控器調整有源音箱音量。
• 只有在使用紅外線遙控器時才能使用此功能。 不支援藍牙遙控器(需要配對的遙控
器 )。
• 將電視揚聲器設定為外部揚聲器以 使 用 此 功 能。
• 支 援 此 功 能 的 製 造 商:
Samsung、VIZIO、LG、Sony、Sharp、PHILIPS、PANASONIC、TOSHIBA、Hisense、RCA
1. 關 閉 有 源 音 箱。
2. 按住 WOOFER 按鈕 5 秒。
每次您按住 WOOFER 按鈕 5 秒時,就會按照下列順序切換模式:
“Off-TV Remote” (預設模式)、 “Samsung-TV Remote” 、 “All-TV Remote” 。
每當模式變更時,LED 指示燈狀態都會變更,如下所示。
遙控器按鈕 顯示器 狀態
SOUND
MODE
WOOFER
L
TONE
CON
5 Sec
"Off-TV Remote"
(預設模式)
紅色閃爍 1 次
停用電視遙控器。
SOUND
MODE
WOOFER
L
TONE
CON
5 Sec
"Samsung-TV Remote"
青色閃爍 1 次
啟用 Samsung TV 的紅外線遙控器。
SOUND
MODE
WOOFER
L
TONE
CON
5 Sec
"All-TV Remote"
藍色閃爍 1 次
啟用第三方電視的紅外線遙控器。
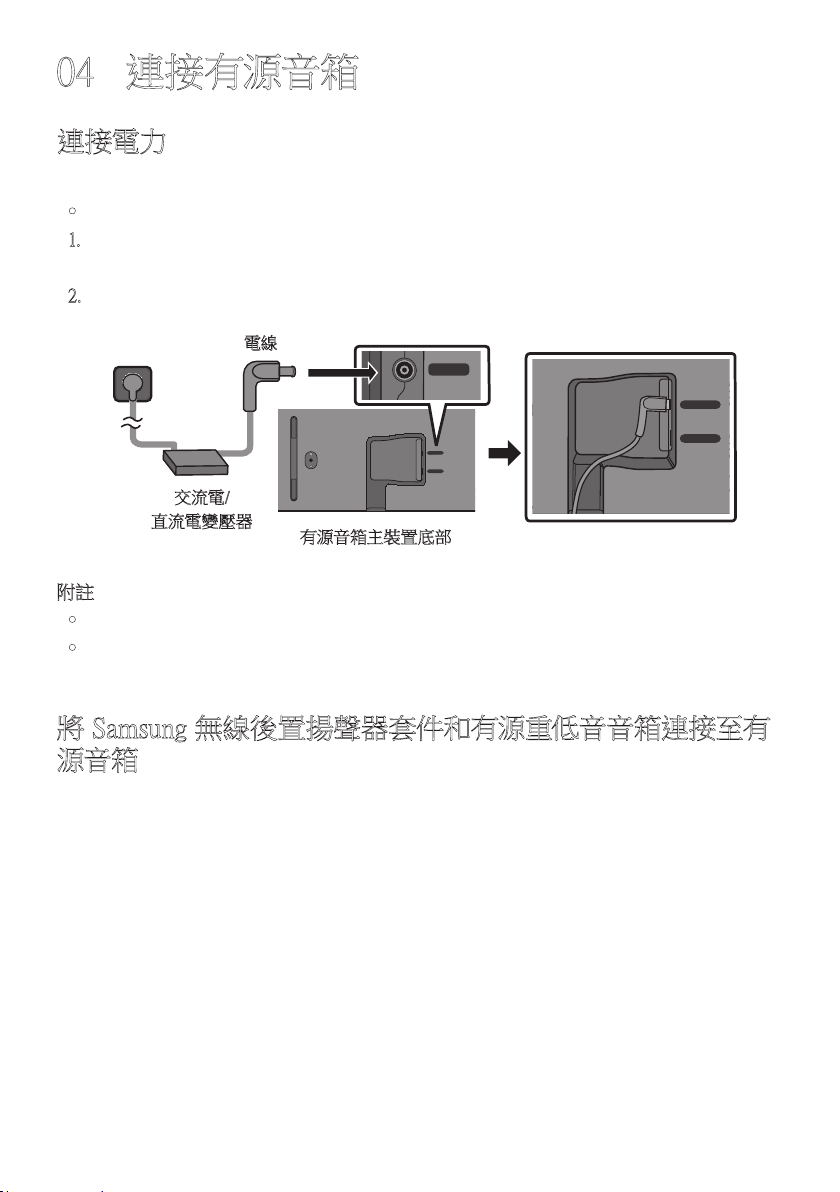
TPE - 17
04 連接有源音箱
連接電力
依照下列順序,使用電源元件將有源音箱連接至電源插座:
• 電源和消耗功率,請參考本產品上的標籤。(標籤 : 有源音箱主裝置底部)
1. 請 先 將 電 源 線 連 接 至 交 流 / 直 流 電 變 壓 器。
將交流/直流電變壓器(具備電源線) 連接至有源音箱。
2. 將電源線連接至電源插座。
有源音箱主裝置底部
SERVICE
DC 19V
DC 19V
電線
交流電/
直流電變壓器
SERVICE
DC 19V
附註
• 若您在本產品開啟時拔除並重新連接電源線,有源音箱會自動開啟。
• 請務必將交流電/直流電變壓器平放在桌面或地面上。如果您將交流電/直流電變壓器的
交流電電線輸入端朝上懸掛,水或其他異物可能會進入變壓器,並造成變壓器故障。
將 Samsung 無線後置揚聲器套件和有源重低音音箱連接至有
源音箱
透過將 Samsung 無線後置揚聲器套件(SWA-9100S 或 SWA-9200S,另售) 和無線有源重低
音音箱(SWA-W510,另售) 連接至有源音箱,可擴大至逼真的無線環場音效。
如需連接的詳細資訊,請參閱 Samsung 無線後置揚聲器套件和無線有源重低音音箱手冊。
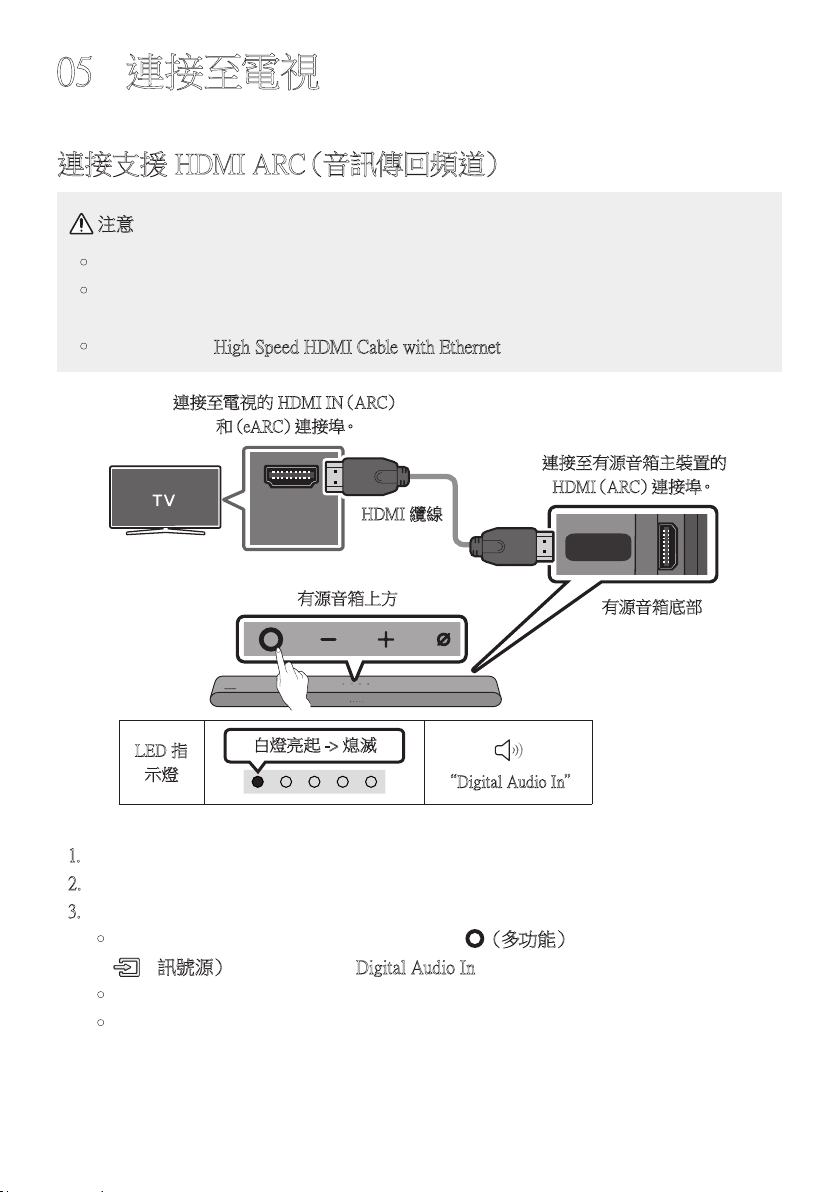
TPE - 18
05 連接至電視
連接支援 HDMI ARC(音訊傳回頻道)
注意
• 若同時連接了 HDMI 纜線和光纖纜線,則會先收到 HDMI 訊號。
• 若要在電視和有源音箱之間連接 HDMI 纜線,務必連接標記 ARC 的終端。否則,電
視聲音可能無法輸出。
• 建議的纜線為 High Speed HDMI Cable with Ethernet。
HDMI IN
(ARC)
(OPTICAL)
HDMI
(ARC)
連接至電視的 HDMI IN(ARC)
和(e A R C) 連 接 埠。
HDMI 纜線
有源音箱底部
連接至有源音箱主裝置的
H D M I( A R C )連 接 埠。
有源音箱上方
LED 指
示燈
白燈亮起 -> 熄滅
“Digital Audio In”
1. 在關閉有源音箱和電視的情況下,連接 HDMI 纜線,如圖所示。
2. 開 啟 有 源 音 箱 和 電 視。
3. 電 視 聲 音 會 從 有 源 音 箱 輸 出。
• 若電視聲音不是輸出,請按有源音箱頂端的 (多功能)按鈕或是遙控器上的
(訊號源)按鈕,以選取 “Digital Audio In” 模式。
• 若聲音不是輸出,請再次檢查 HDMI 纜線連接情況。
• 使用電視遙控器上的音量按鈕變更有源音箱的音量。

TPE - 19
附註
• 使用 HDMI 纜線將支援 HDMI ARC(音訊傳回頻道)的電視連接至有源音箱時,您可以
傳輸數位視訊和音訊資料,而不必另外連接光纖纜線。
• 如果可能,建議您使用空心 HDMI 纜線。若您使用實心 HDMI 纜線,請使用直徑小於
14 公釐的纜線。
• 若 HDMI 纜線不支援 ARC,則此功能無法使用。
• 若廣播中的音訊以杜比數位編碼,而電視上的「數位輸出音訊格式」設定為 PCM,則建
議您將設定變更為杜比數位。變更電視上的設定後,將能體驗更好的聲音品質。(不同
的電視製造商可能會在電視功能表使用不同的字詞來表示 Dolby Digital 和 PCM)
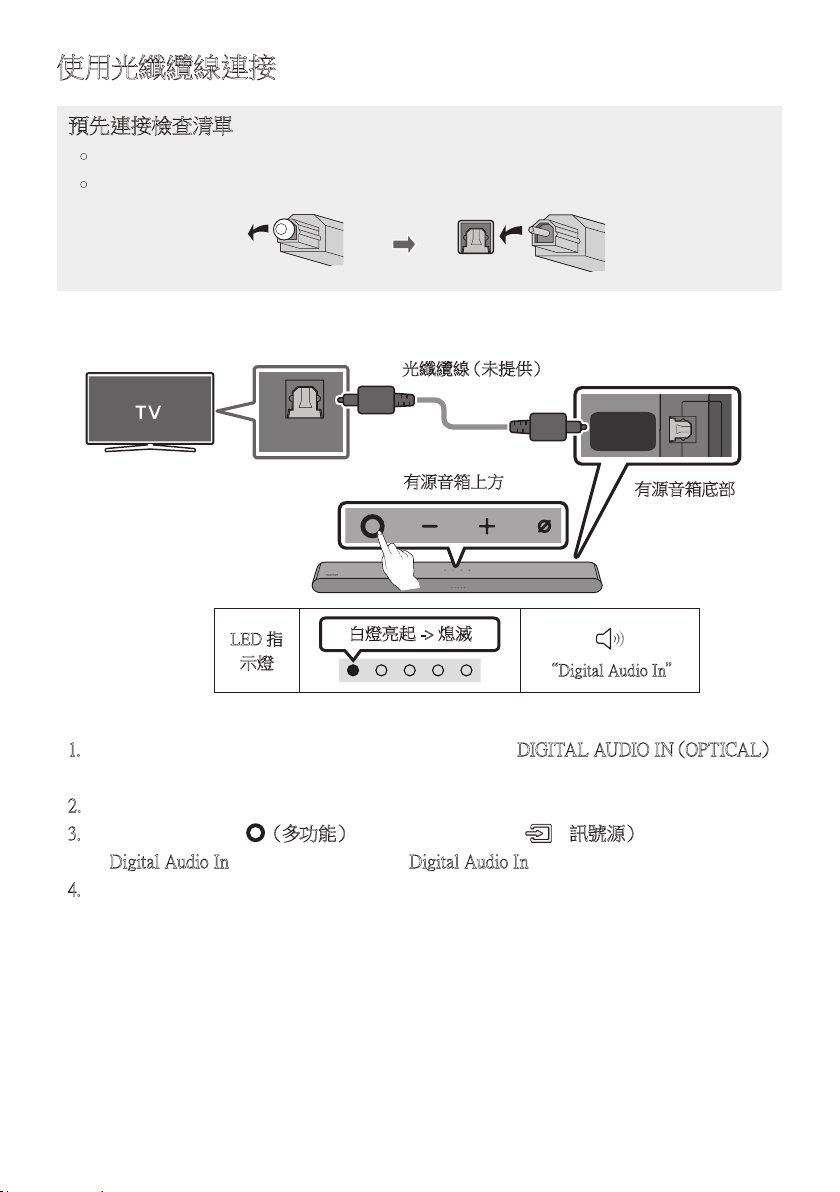
TPE - 20
使用光纖纜線連接
預先連接檢查清單
• 若同時連接了 HDMI 纜線和光纖纜線,則會先收到 HDMI 訊號。
• 若使用光纖纜線且終端有蓋子,務必取下蓋子。
LED 指
示燈
白燈亮起 -> 熄滅
“Digital Audio In”
DIGITAL
AUDIO IN
(OPTICAL)
OPTICAL OUT
有源音箱底部
光 纖 纜 線( 未 提 供)
有源音箱上方
1. 在關閉電視和有源音箱的情況下,連接有源音箱上的 DIGITAL AUDIO IN(OPTICAL)
連接埠並使用光纖纜線(未提供) 連接電視上的 OPTICAL 輸出連接埠,如圖所示。
2. 開 啟 有 源 音 箱 和 電 視。
3. 按有源音箱頂端的 (多功能)按鈕或是遙控器上的 (訊號源)按 鈕,然 後 選 取
“Digital Audio In” 模式。 就會聽到 “Digital Audio In” 輸出的公告。
4. 電 視 聲 音 會 從 有 源 音 箱 輸 出。
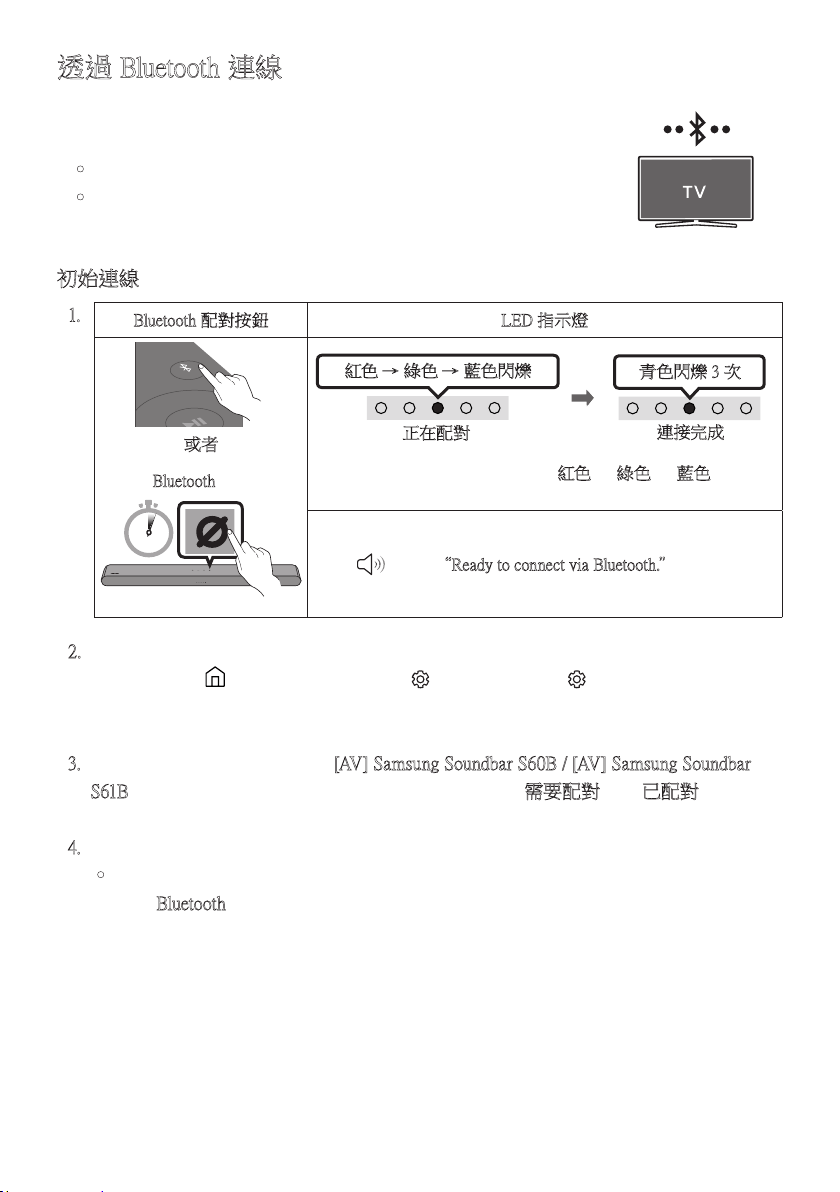
TPE - 21
透過 Bluetooth 連線
使用 Bluetooth 連線 Samsung TV 時,您可以聽見立體聲,不必煩惱
纜 線 問 題。
• 一次只能連線一個 Samsung TV。
• 可以連線支援 Bluetooth 的 Samsung TV。 檢查電視規格。
初始連線
1.
Bluetooth 配對按鈕 LED 指示燈
PAIR
或者
紅色 → 綠色 → 藍色閃爍
正在配對
連接完成
青色閃爍 3 次
在 “
Bluetooth” 模式時
5 Sec
• 在配對完成前,多彩 LED 會依紅色 → 綠色 → 藍色的順序
變 更 發 光。
“Ready to connect via Bluetooth.”
2. 選擇 Samsung TV 上的 Bluetooth 模式。
(例 如 首 頁( )→ 功能表 → 設定( )→ 所有設定( ) 音效 音效輸出
藍牙揚聲器清單 [AV] Samsung Soundbar S60B / [AV] Samsung Soundbar
S61B(Bluetooth))
3. 從電視畫面上的清單中選擇 「[AV] Samsung Soundbar S60B / [AV] Samsung Soundbar
S61B」。 可用的有源音箱會在電視藍牙裝置清單中以「需要配對」或「已配對」顯 示 。
若要連線至有源音箱,請選擇訊息並建立連線。
4. 您現在可以聽見來自有源音箱的 Samsung TV 聲音。
• 如果有源音箱與 Samsung TV 之間有連接記錄,則有源音箱會透過將自身模式變更
為 “Bluetooth” 以自動連接。
TPE - 22
若裝置無法連線
• 若 Samsung TV 的揚聲器清單中已存在有源音箱(例如 [AV] Samsung Soundbar S60B /
[AV] Samsung Soundbar S61B), 請 予 以 刪 除 。
• 然後重複步驟 1 到 3。
從 Samsung TV 中斷有源音箱連線
按下有源音箱頂端的
(多功能)按 鈕,或 是 遙 控 器 上 的 (訊號源),以 選 取
“Bluetooth” 以 外 的 模 式。
• 中斷連線需要時間,因為 Samsung TV 必須接收來自有源音箱的回應。(不同 Samsung
TV 型號的所需時間可能會不同)。
Bluetooth 連線備註
• 透過 Bluetooth 通訊在 1 公尺 內尋找新的裝置以進行連線。
• 連線藍牙裝置時,若要求 PIN 碼,請輸入 <0000>。
• 有源音箱會在就緒狀態持續 18 分鐘後自動關閉。
• 在 下 列 狀 況 下,有 源 音 箱 無 法 正 確 執 行 藍 牙 搜 尋 或 連 線:
– 若 有 源 音 箱 附 近 有 強 烈 電 場。
– 若有數個 Bluetooth 裝置同時與有源音箱配對。
– 若藍牙裝置關閉、位置不正確或故障。
• 電子裝置可能會造成無線電波干擾。產生電磁波的裝置必須遠離有源音箱主裝置 - 例
如微波爐、無線 LAN 裝置等。
TPE - 23
透過 Wi-Fi 連接
連接之前的檢查清單
• Wi-Fi 連接僅適用於 Samsung TV。
• 檢查無線路由器(Wi-Fi) 是否為開啟,且電視已與路由器連接。
• 電視與有源音箱必須連接至相同的無線網路(Wi-Fi)。
• 若您的無線路由器(Wi-Fi) 使用 DFS 頻道,您將無法建立電視與有源音箱之間的
Wi-Fi 連接。 請聯絡您的網際網路服務提供者以獲得詳細資訊。
• 由於功能表可能會因製造年份而有所不同,因此請參閱您的電視機操作手冊。
• 若要透過 Wi-Fi 將電視連接至有源音箱,請先將有源音箱連接至無線路由器。 請參
閱第 32, 頁,了解如何建立 Wi-Fi 連接的詳細資訊。
1. 如需有源音箱 Wi-Fi 連接的詳細資訊,請參閱第 32, 頁的「方法 2。透過 Wi-Fi(無線
網路) 連接」。
2. 使用音訊功能表將電視的輸入訊號源變更為有源音箱。
• 2017 年或之後上市的 Samsung TV
首 頁( )→ 功能表 → 設定( )→ 所有設定( ) 音效 音效輸出
[AV] Samsung Soundbar S60B / [AV] Samsung Soundbar S61B(Wi-Fi)
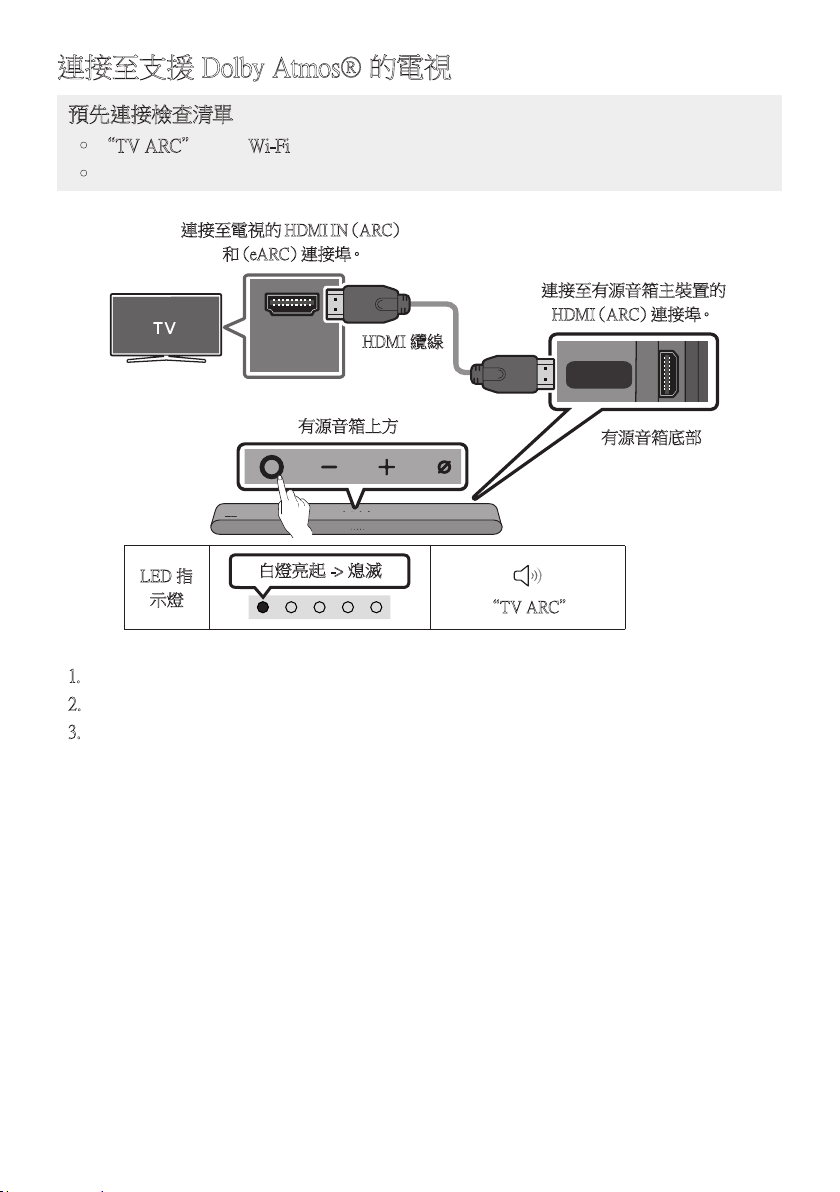
TPE - 24
連接至支援 Dolby Atmos® 的電視
預先連接檢查清單
• “TV ARC” 或 “Wi-Fi” 模式中支援 Dolby Atmos®。
• 確認內容支援 Dolby Atmos®。
HDMI IN
(ARC)
(OPTICAL)
HDMI
(ARC)
連接至電視的 HDM I I N(ARC)
和(e A R C) 連 接 埠。
HDMI 纜線
有源音箱底部
連接至有源音箱主裝置的
H D M I( A R C )連 接 埠。
有源音箱上方
LED 指
示燈
白燈亮起 -> 熄滅
“TV ARC”
1. 在關閉有源音箱和電視的情況下,連接 HDMI 纜線,如圖所示。
2. 開 啟 有 源 音 箱 和 電 視。
3. 電 視 聲 音 會 從 有 源 音 箱 輸 出。
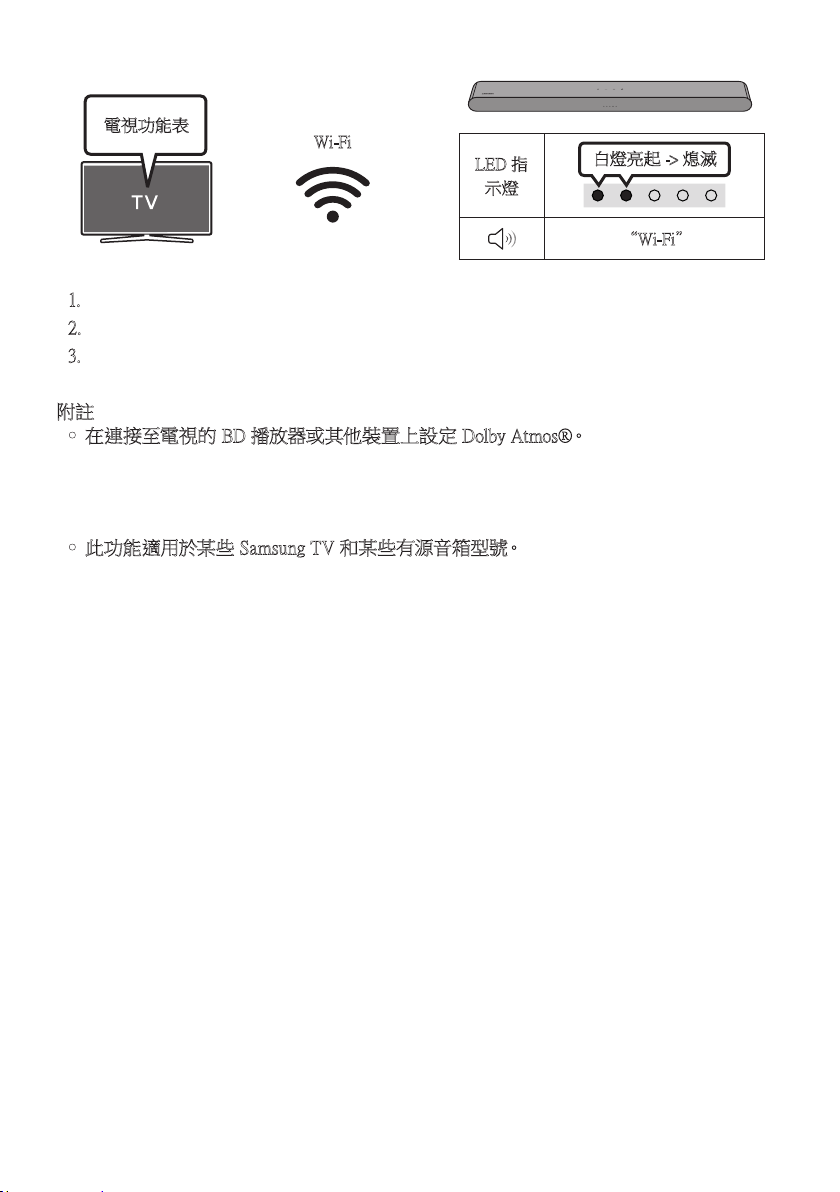
TPE - 25
LED 指
示燈
白燈亮起 -> 熄滅
“Wi-Fi”
電視功能表
Wi-Fi
1. 將有源音箱與電視連接至相同的無線網路(Wi-Fi)。
2. 如需電視的聲音輸出,請選擇有源音箱。
3. 電 視 聲 音 會 從 有 源 音 箱 輸 出。
附註
• 在連接至電視的 BD 播放器或其他裝置上設定 Dolby Atmos®。
開啟 BD 播放器或其他裝置的設定功能表上的音訊輸出選項,並確認針對位元流選擇「
無編碼」。例如,在 Samsung BD 播放器上,前往首頁功能表 → 聲音 → 數位輸出,然後
選擇位元流(未處理)。
• 此功能適用於某些 Samsung TV 和某些有源音箱型號。
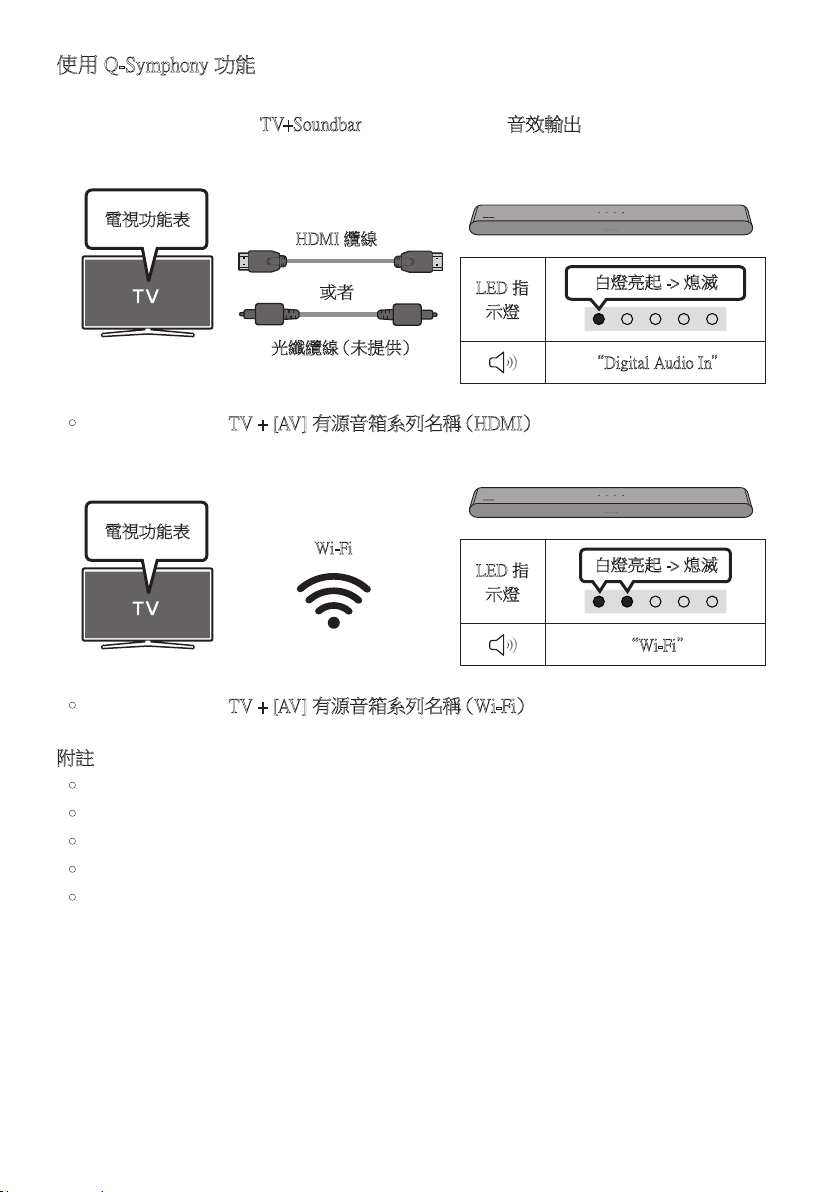
TPE - 26
使用 Q-Symphony 功能
對於 Q-Symphony,有源音箱會與 Samsung TV 同步,以透過兩個裝置輸出聲音,提供最佳
音 效 。 連 接 有 源 音 箱 時 ,「
TV+Soundbar」會 出 現 在 電 視 的 音效輸出 功能表下方。選擇相應
的 功 能 表。
LED 指
示燈
白燈亮起 -> 熄滅
“Digital Audio In”
電視功能表
或者
光 纖 纜 線( 未 提 供)
HDMI 纜線
• 電 視 功 能 表 範 例: TV + [AV] 有源音箱系列名稱(HDMI)
LED 指
示燈
白燈亮起 -> 熄滅
“Wi-Fi”
電視功能表
Wi-Fi
• 電 視 功 能 表 範 例: TV + [AV] 有源音箱系列名稱(Wi-Fi)
附註
• 這可以根據電視支援的轉碼器來操作。
• 只有在連接 HDMI 纜線或光纖纜線(未提供) 或 Wi-Fi 時,才支援此功能。
• 顯 示 的 訊 息可 能 因 電 視 型 號 而 異。
• 請確認您的電視和有源音箱已連線至相同的無線路由器/頻率。
• 此功能適用於某些 Samsung TV 和某些有源音箱型號。
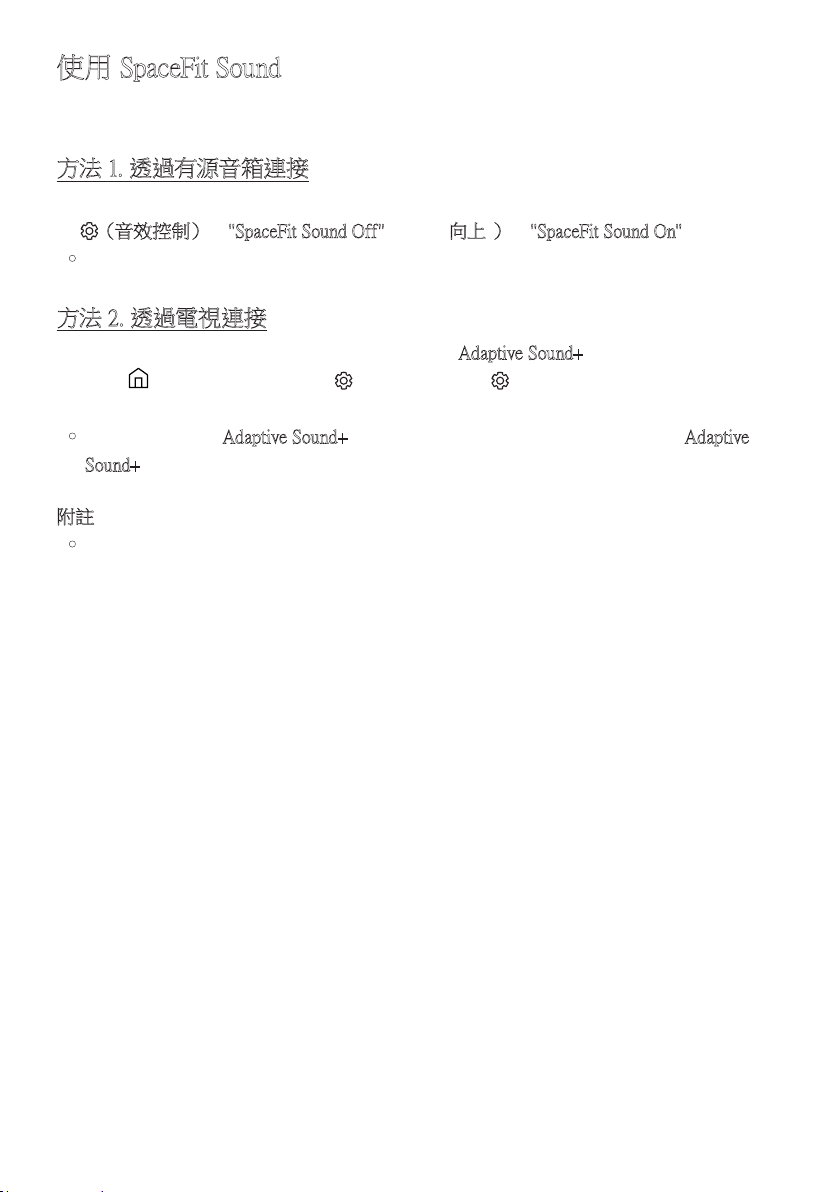
TPE - 27
使用 SpaceFit Sound
藉 由 分 析 聆 聽 空 間, 提 供 最 佳 的 聲 音 品 質。
方法 1. 透過有源音箱連接
若要啟用此功能,請使用有源音箱的遙控器開啟 SpaceFit Sound 模式。
(
(音 效 控 制)→ "SpaceFit Sound Off" → ▲( 向上 )→ "SpaceFit Sound On")
• 在 所 有 聲 音 模 式 中 皆 適 用。
方法 2. 透過電視連接
若要啟用此功能,請開啟 Samsung TV 功能表中的
Adaptive Sound+ 模 式。
(首 頁( )→ 功能表 → 設定( )→ 所有設定( ) 一般 智慧模式設定
Adaptive Sound+)
• 若在電視上啟用 Adaptive Sound+ 模式,有源音箱的聲音模式會自動變更為 Adaptive
Sound+。
附註
• 此功能會在有源音箱連接至某些 Samsung TV 時運作。
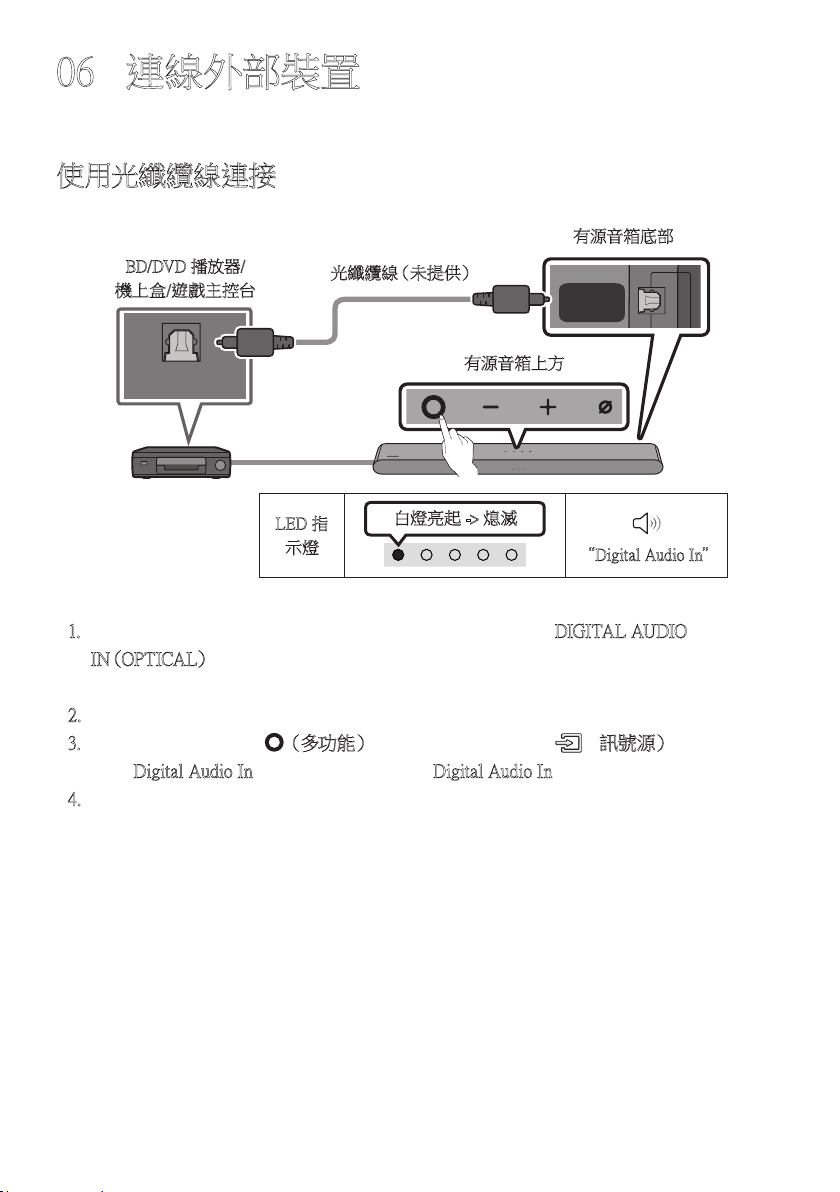
TPE - 28
06 連線外部裝置
使用光纖纜線連接
LED 指
示燈
白燈亮起 -> 熄滅
“Digital Audio In”
OPTICAL OUT
DIGITAL
AUDIO IN
(OPTICAL)
有源音箱底部
光 纖 纜 線( 未 提 供)
有源音箱上方
BD/DVD 播放器/
機上盒/遊戲主控台
1. 在關閉外部裝置和有源音箱的情況下,連接有源音箱上的 DIGITAL AUDIO
I N(O P T I C A L ) 連接埠並使用光纖纜線(未提供) 連接外部裝置上的 OPTICAL 輸出
連 接 埠,如 圖 所 示 。
2. 開 啟 有 源 音 箱 和 外 部 裝 置。
3. 按下有源音箱頂端的 (多功 能)按 鈕 ,或 是 遙 控 器 上 的 (訊號源)按 鈕,然 後 選
取 “Digital Audio In” 模式。 就會聽到 “Digital Audio In” 輸出的公告。
4. 外部裝置的聲音會從有源音箱輸出。
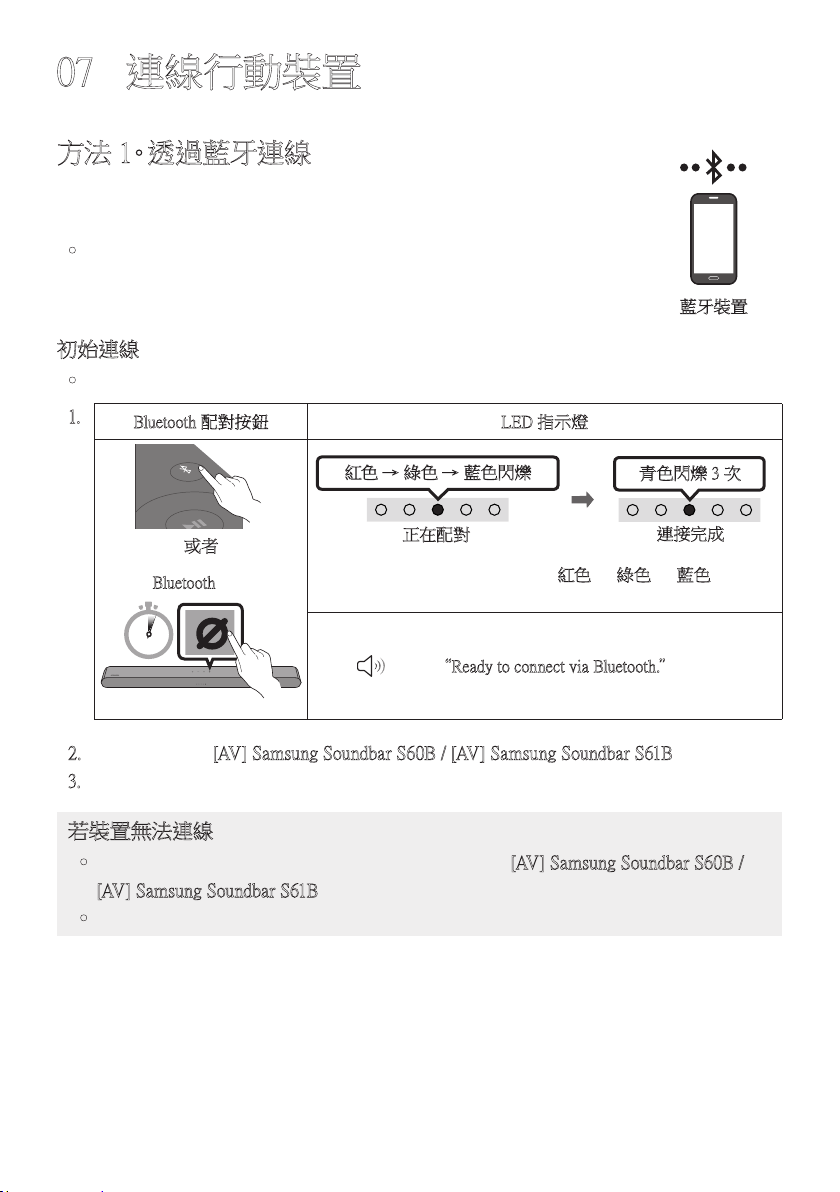
TPE - 29
07 連線行動裝置
方法 1。透過藍牙連線
若行動裝置使用藍牙連線,您可以聆聽立體聲音效,且省去連接纜線的
麻 煩。
• 在有源音箱關閉的情況下連線已配對的 Bluetooth 裝置時,有源音箱
會 自 動 開 啟。
初始連線
• 當連線至新的 Bluetooth 裝置時,請確認該裝置位於 1 公尺的距離內。
1.
Bluetooth 配對按鈕 LED 指示燈
PAIR
或者
紅色 → 綠色 → 藍色閃爍
正在配對
連接完成
青色閃爍 3 次
在 “
Bluetooth” 模式時
5 Sec
• 在配對完成前,多彩 LED 會依紅色 → 綠色 → 藍色的順序
變 更 發 光。
“Ready to connect via Bluetooth.”
2. 從 清 單 中 選 擇「[AV] Samsung Soundbar S60B / [AV] Samsung Soundbar S61B」。
3. 透過有源音箱從藍牙連線裝置播放音樂檔案。
若裝置無法連線
• 若行動裝置的揚聲器清單中已存在有源音箱(例如「[AV] Samsung Soundbar S60B /
[AV] Samsung Soundbar S61B」 ), 請 予 以 刪 除 。
• 然後重複步驟 1 到 2。
藍牙裝置
TPE - 30
Bluetooth 連線備註
• 透過 Bluetooth 通訊在 1 公尺內尋找新的裝置以進行連線。
• 連線藍牙裝置時,若要求 PIN 碼,請輸入 <0000>。
• 在藍牙連線模式中,若有源音箱和藍牙裝置之間的距離超過 10 公尺,會遺失藍牙連
線。
• 有源音箱會在就緒狀態持續 18 分鐘後自動關閉。
• 在 下 列 狀 況 下,有 源 音 箱 無 法 正 確 執 行 藍 牙 搜 尋 或 連 線:
– 若 有 源 音 箱 附 近 有 強 烈 電 場。
– 若有數個藍牙裝置同時與有源音箱配對。
– 若藍牙裝置關閉、位置不正確或故障。
• 電子裝置可能會造成無線電波干擾。產生電磁波的裝置必須遠離有源音箱主裝置 - 例
如微波爐、無線 LAN 裝置等。
• 有源音箱僅支援中等品質 SBC 資料(44.1kHz, 48kHz)
• 只能連接至支援 A2DP(AV)功能的藍牙裝置。
• 不能將有源音箱連接至僅支援 HF(Hands Free)功能的藍牙裝置。
• 將有源音箱連接至 Bluetooth 裝置時,請盡可能讓這些裝置靠近彼此。
• 有源音箱和 Bluetooth 裝置之間的距離越遠,聲音品質就會變得越低。 Bluetooth 連線可
能 會 在 裝 置 超 出 有 效 範 圍 時 中 斷。
• Bluetooth 連線在接收不良的區域可能無法如預期運作。
• 在下列情況下,Bluetooth 裝置可能會有雜訊或故障:
– 機身接觸到 Bluetooth 裝置或有源音箱上的訊號收發器時。
– 位於角落或附近有牆壁或隔板等障礙物時,在此情況下可能會發生電氣變化。
– 受到以相同頻率範圍操作之其他產品的無線電干擾,例如醫療設備、微波爐和無線
LAN 裝置。
– 即使裝置位於有效範圍內,門和牆等障礙物仍可能會影響聲音品質。
• 請注意,使用 Bluetooth 選項時,有源音箱無法與 Bluetooth 裝置配對。
• 這 個 無 線 裝 置 可 能 會 在 操 作 期 間 造 成 電 氣 干 擾。
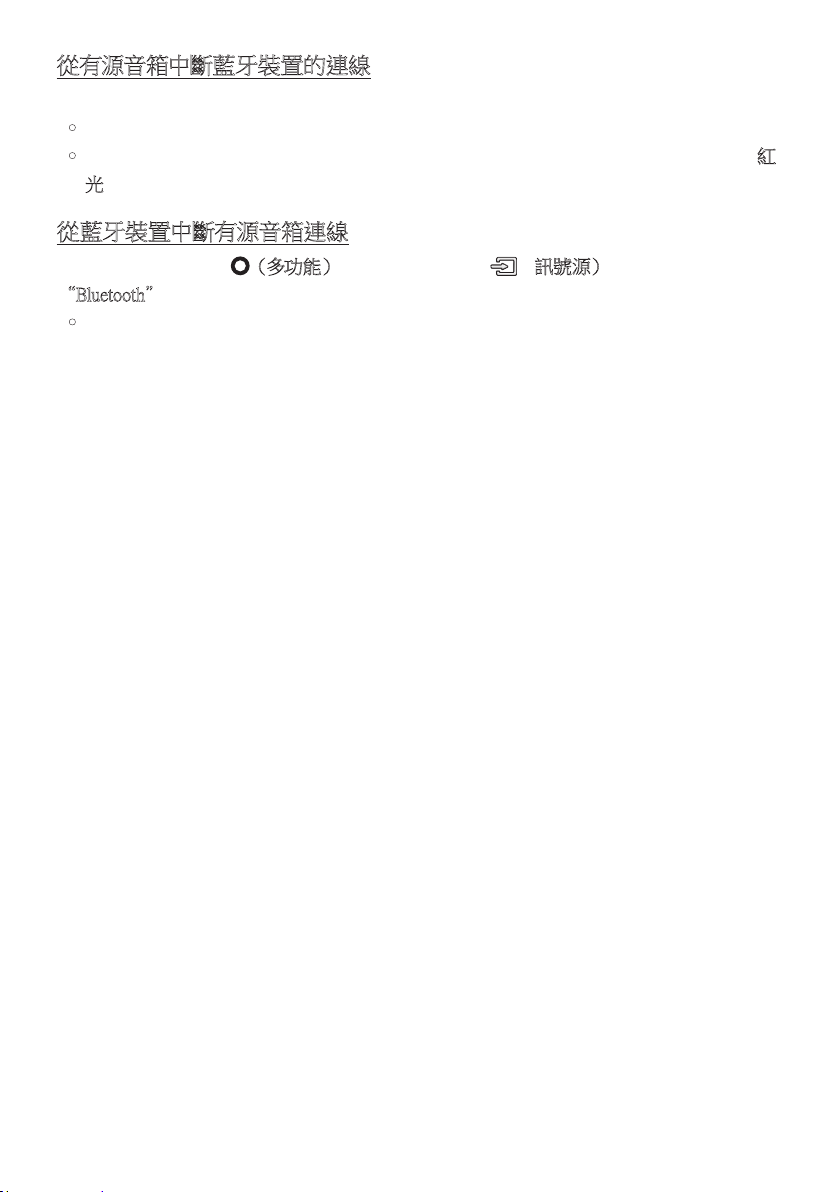
TPE - 31
從有源音箱中斷藍牙裝置的連線
您可以從有源音箱斷開藍牙裝置的連線。如需說明,請參閱藍牙裝置的使用者手冊。
• 有 源 音 箱 將 斷 開 連 線。
• 若有源音箱與 Bluetooth 裝置中斷連接,有源音箱上的多彩 LED 指示燈會閃爍三次「紅
光」。
從藍牙裝置中斷有源音箱連線
按下有源音箱頂端的
(多功能)按鈕或遙控器上的 (訊號源)按 鈕,以 選 擇
“Bluetooth” 以 外 的 模 式。
• 中斷連線需要時間,因為藍牙裝置必須收到來自有源音箱的回應。(不同的藍牙裝置需
要不同的中斷連線時間)
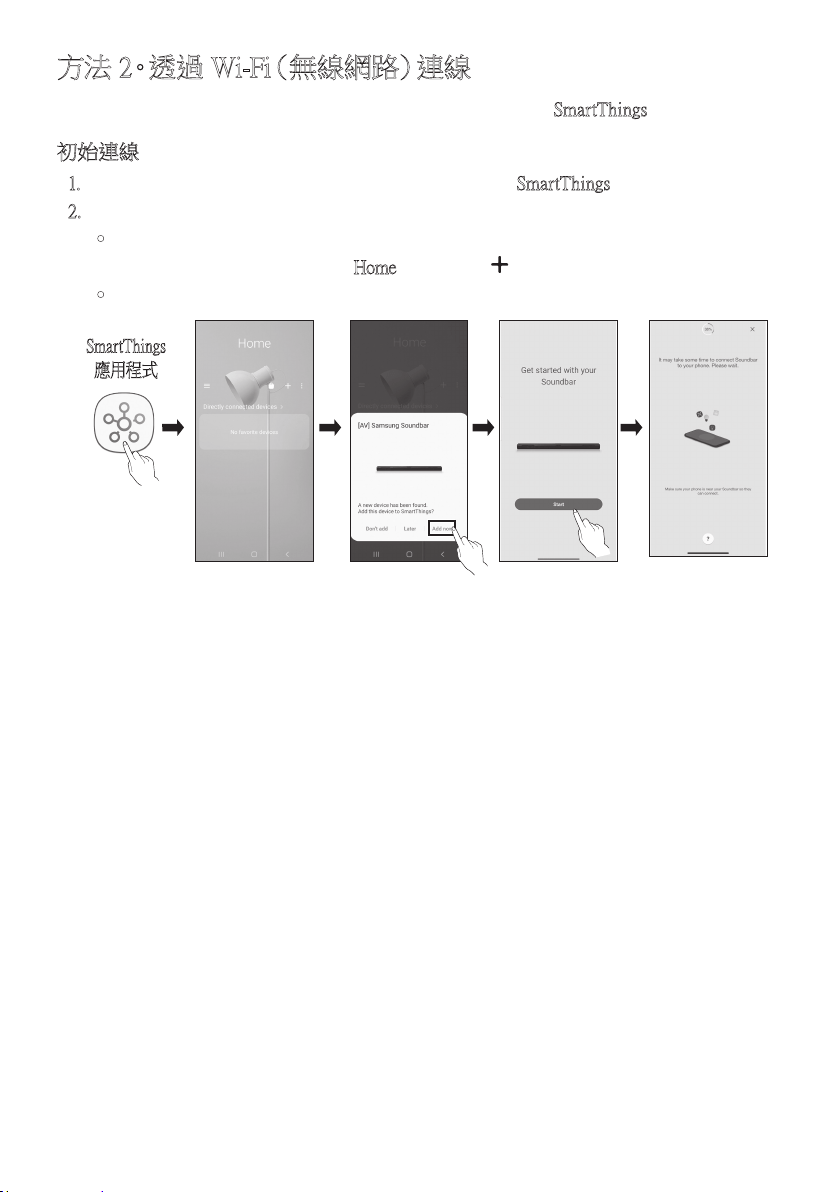
TPE - 32
方法 2。透過 Wi-Fi(無線網路)連線
若要透過無線網路(Wi-Fi)將有源音箱連線至行動裝置,需要
SmartThings 應 用 程 式。
初始連線
1. 安裝並啟動行動裝置(智慧型手機或平板電腦)上的 SmartThings 應 用 程 式。
2. 在應用程式上,按照螢幕上的指示新增有源音箱。
• 自動快顯視窗(以下第二張螢幕擷取畫面)在某些裝置上可能無法顯示。
若沒有顯示快顯視窗,請按下 Home 螢 幕 上 的「 」。有源音箱已新增至應用程式。
• 以下 圖 片 可 能 會 根 據 應 用 程 式 版 本 而 異。
啟動應t用程式 新增裝置自動快顯視窗
SmartThings
應用程式
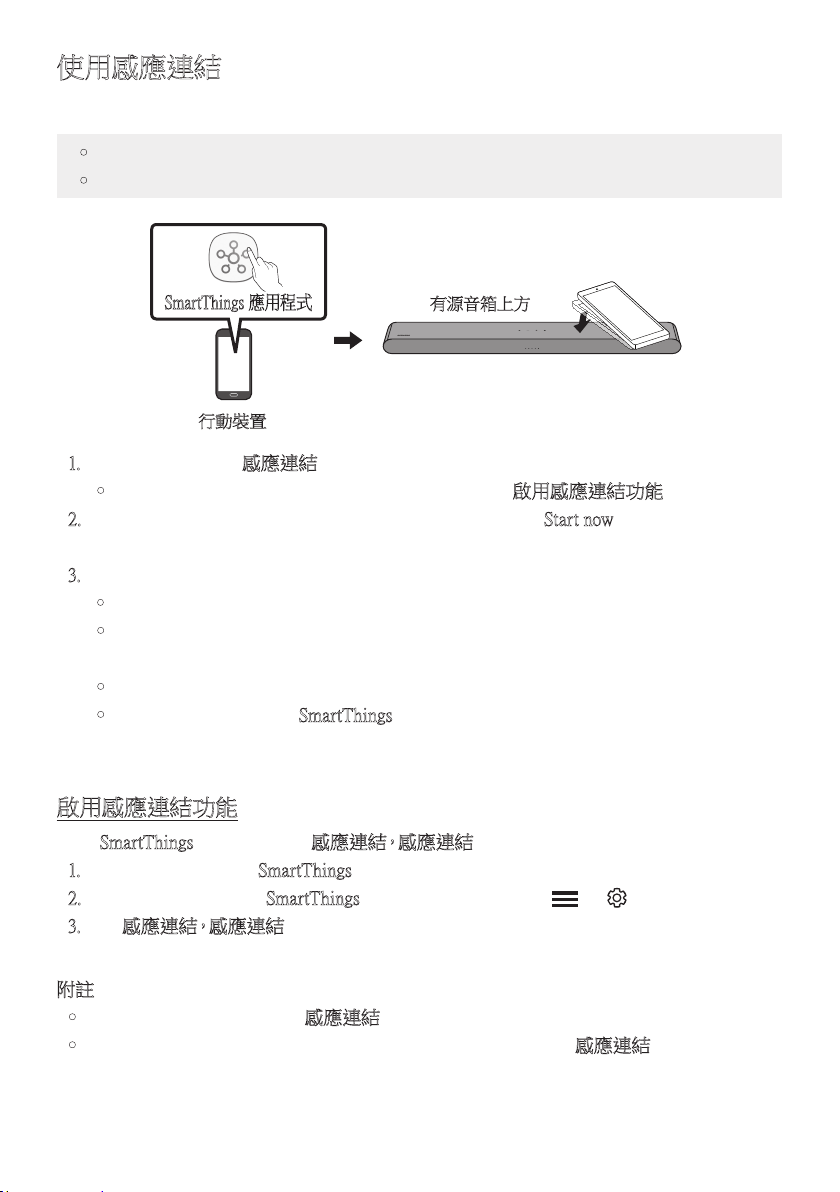
TPE - 33
使用感應連結
使用行動裝置輕觸有源音箱,以透過有源音箱播放行動裝置上的音訊。
• 此 功 能 可 能 不 受 支 援,視 行 動 裝 置 而 定。
• 此功能僅與具有 Android 8.1 或更高版本的 Samsung 行動裝置相容。
行動裝置
SmartThings 應用程式
有源音箱上方
1. 在行動裝置上開啟感應連結功 能。
• 如需如何開啟該功能的詳細資訊,請參閱下面的「啟用感應連結功能」。
2. 使用行動裝置輕觸有源音箱。在顯示的訊息視窗中選擇「Start now」。
會透過藍牙在行動裝置和有源音箱之間建立連線。
3. 透過有源音箱播放行動裝置上的音訊。
• 此功能偵測裝置觸碰有源音箱時產生的振動,以透過藍牙將行動裝置連線至有源音箱。
• 確保行動裝置沒有輕觸有源音箱的尖銳邊緣。有源音箱或行動裝置可能會被刮傷
或 損 壞。
• 建議為行動裝置套上外殼。輕觸有源音箱上方部分的寬廣區域,不要過度施力。
• 若要使用此功能,請將 SmartThings 應用程式更新為最新版本。
該 功 能 可 能 不 受 支 援,視 應 用 程 式 版 本 而 定。
啟用感應連結功能
使用
SmartThings 應用程式開啟感應連結,感應連結功 能。
1. 在行動裝置上,執行 SmartThings 應 用 程 式。
2. 在行動裝置上顯示的 SmartThings 應用程式畫面中選擇( → )。
3. 將「感應連結,感應連結」設定為開啟,以便在行動裝置移近有源音箱時允許該功能運
作。
附註
• 行動裝置處於省電模式時,感應連結功能無法運作。
• 若 有 電 子 設 備 等 裝 置 位 於 有 源 音 箱 附 近,造 成 無 線 電 干 擾,則 感應連結功能可能無法運
作。確認可能會造成無線電干擾的裝置與有源音箱之間有充足的距離。
TPE - 34
08 透過 APPLE AIRPLAY 2 連接
• 某些國家/地區可能無法使用此功能。
• 此 Samsung 有源音箱支援 AirPlay 2,並需要 iOS 11.4 或更新版本。
只要有了 AirPlay 2,您就可以透過 Apple 裝置將音樂、Podcast 以及其他音訊串流至
Samsung 有源音箱。
• 確認有源音箱是否已經開啟電源並連線至與您 Apple 裝置相同的 Wi-Fi 網路。
• 在支援 AirPlay 的應用程式或 iPhone、iPad、Mac 上選取 。
• 在可用裝置清單中選取有源音箱,以透過有源音箱播放目前的音訊。
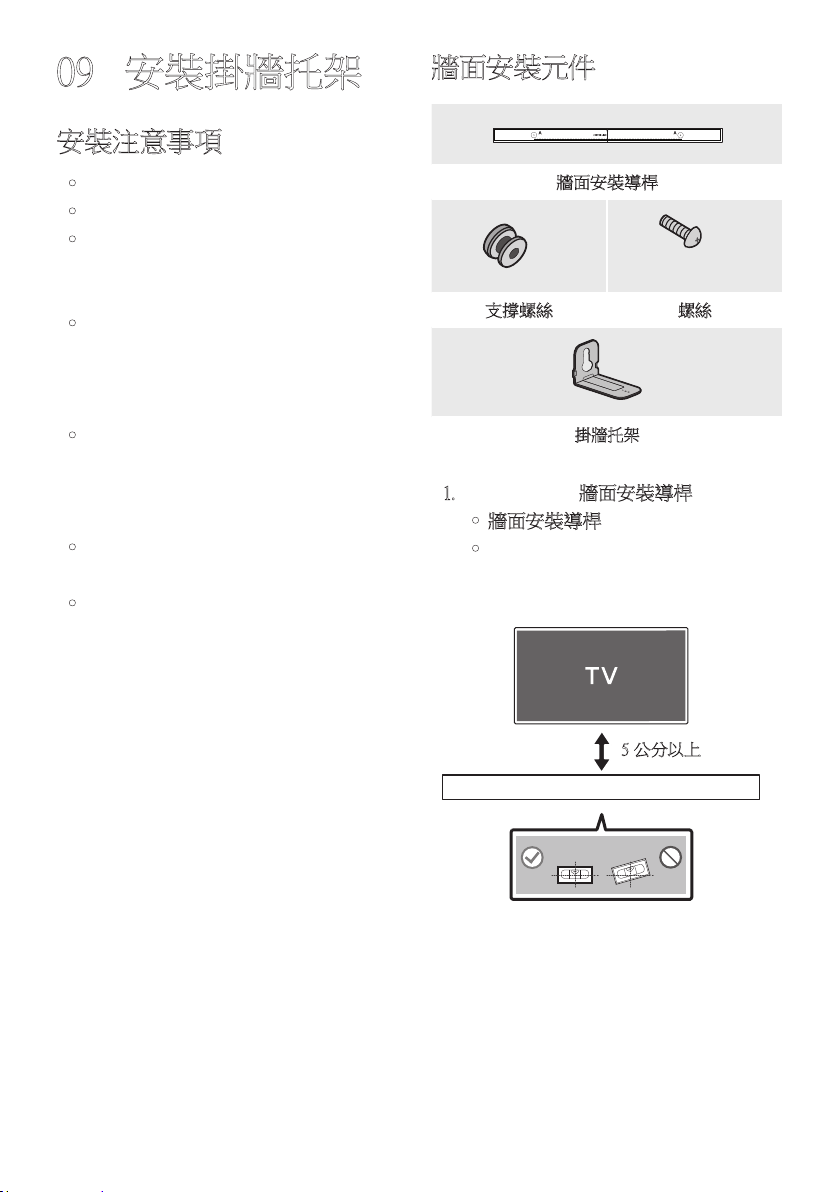
TPE - 35
09 安裝掛牆托架
安裝注意事項
• 僅安裝於垂直牆面。
• 請勿安裝於高溫或高濕度的地方。
• 檢查牆壁是否夠堅固,能夠支撐產品重
量。若無法支撐,請強化牆壁或選擇其
他 安 裝 點。
• 購買並使用適合用於該牆壁種類(灰漿
板、鐵 板、木 材 等)的 銼 屑 螺 絲 或 固 定
器 。若 可 能,請 支 撐 螺 絲 固 定 在 牆 壁 螺
栓 中。
• 根據您要安裝有源音箱的牆壁類型和厚
度,購 買 牆 面 安 裝 螺 絲 。
– 直 徑 :M 5
– 長度:建議使用 35 毫米以上。
• 請先將纜線從裝置連接至外部裝置,再
將 有 源 音 箱 安 裝 到 牆 上。
• 在安裝前,請確認裝置已關閉並拔下電
源插頭。否則,可能會造成觸電。
牆面安裝元件
A TYPE : 450mm
牆面安裝導桿
x 2
(M4 x L10)
x 2
支撐螺絲 螺絲
x 2
掛牆托架
1. 對著牆面放置牆面安裝導桿。
• 牆面安裝導桿必 須 水 平。
• 若電視安裝於牆面,請將有源音箱安
裝在距離電視下方至少 5 公分處。
5 公分以上
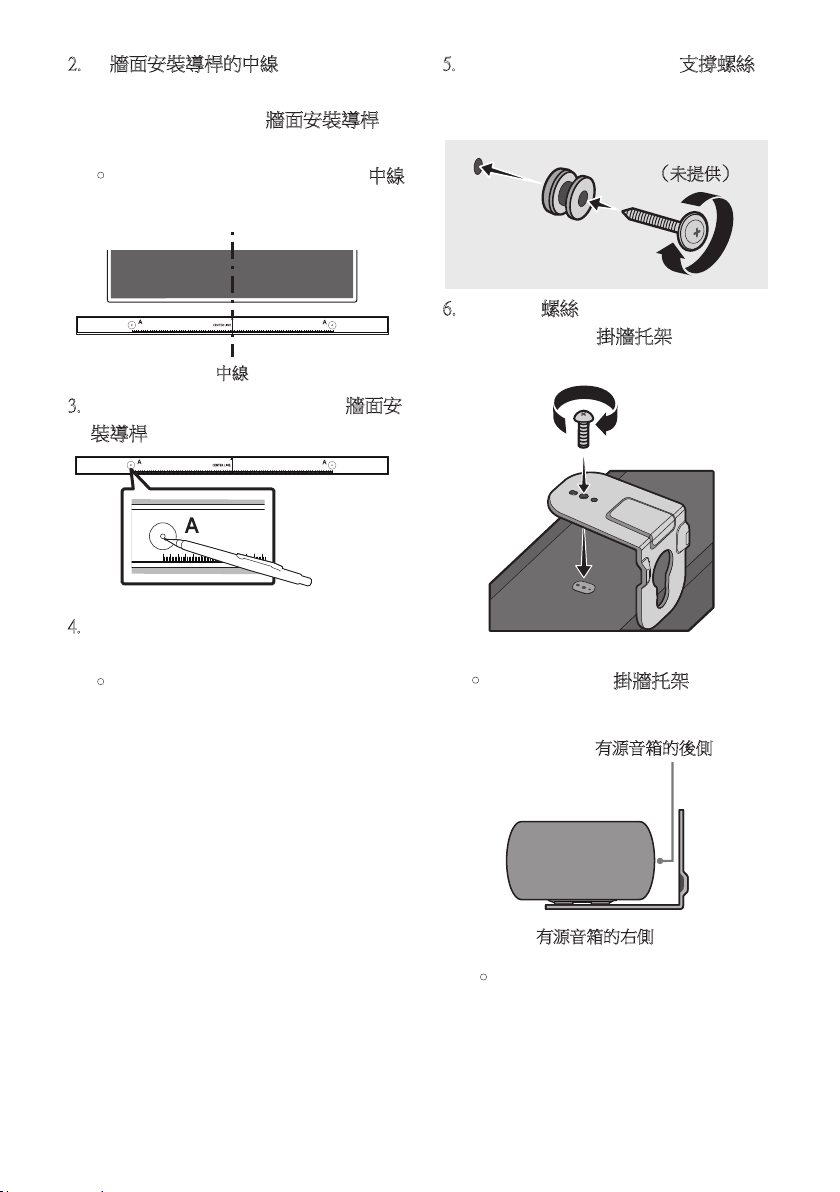
TPE - 36
2. 將牆面安裝導桿的中線與電視的中央
對齊(如果您將有源音箱安裝在電視下
方 ), 然 後 使 用 膠 帶 將 牆面安裝導桿固
定 在 牆 上。
• 如 果 您 未 在 電 視 下 方 安 裝,請 將 中線
放在安裝區域的中央。
中線
A TYPE : 450mm
3. 用筆標記孔洞的位置,然後移除牆面安
裝導桿。
A TYPE : 450mm
4. 使用適當大小的鑽頭,在牆上的每個標
記 鑽 孔。
• 如 果 標 記 與 掛 釘 的 位 置 不 一 致, 請 務
必將適當的膨脹管先插入孔中,再插
入支撐螺絲。如果您使用膨脹管,請
確定您鑽的孔足以容納要使用的膨脹
管。
5. 將螺釘(未提供)推入每個支撐螺絲,
然後將每個螺釘緊緊地鎖入支撐螺孔
中。
(未提供)
6. 使用 2 個螺絲,以 正 確 的 方 向 在 有 源 音
箱底部安裝 2 個掛牆托架。
• 組 裝 時,請 確 認 掛牆托架的吊掛部位
位於有源音箱後側的後方。
有源音箱的後側
有源音箱的右側
• 視機型而定,實際產品外觀可能和
以 上 影 像 有 所 不 同。
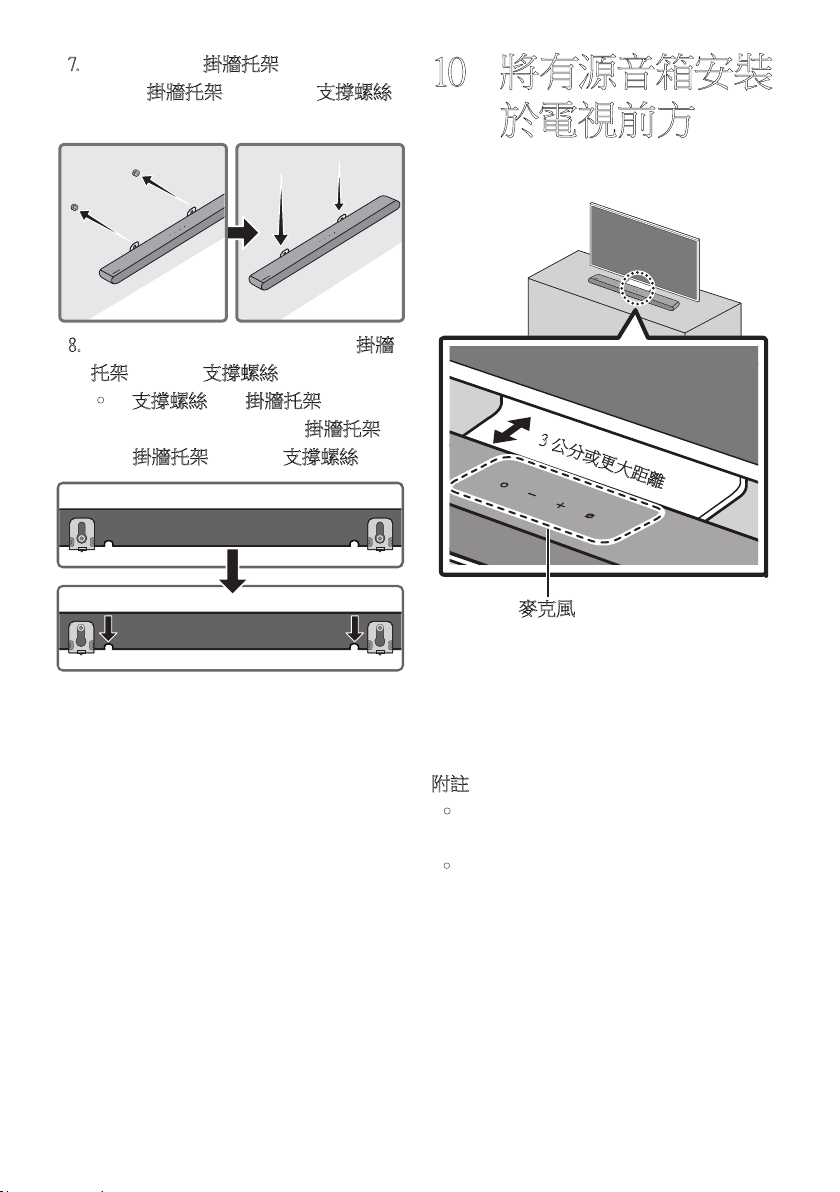
TPE - 37
7. 使用已固定的掛牆托架安 裝 有 源 音 箱,
只要將掛牆托架掛在牆上的支撐螺絲
即 可。
8. 如下所示,向下滑動有源音箱,讓掛牆
托架牢固置於支撐螺絲。
• 將支撐螺絲插入掛牆托架寬的部分
( 底 部 ), 然 後 向 下 滑 動 掛牆托架,
讓掛牆托架牢固置於支撐螺絲。
10 將有源音箱安裝
於電視前方
3 公分或更大距離
麥克風
如圖中所示,將有源音箱的中央對齊電視的
中 央。
此時,將有源音箱置於電視旁至少 3 公分以
外的位置,以免語音辨識受到干擾。
附註
• 務必將有源音箱置於平坦且堅固的表
面。
• 如果與電視之間的間距不足,可能會造成語
音辨識和聲響問題。
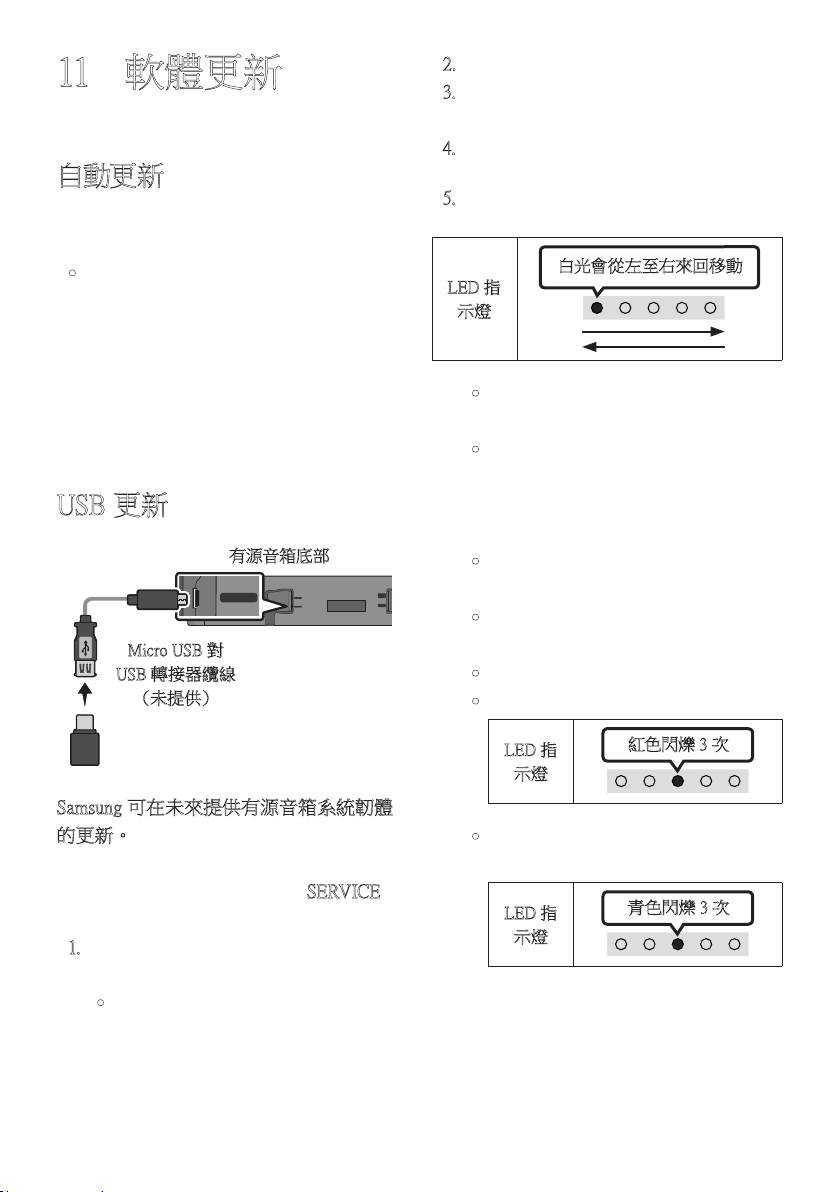
TPE - 38
11 軟體更新
自動更新
當有源音箱連線至網際網路時,即使有源音
箱關閉,也會自動進行軟體更新。
• 若要使用自動更新功能,有源音箱必須
連 線 至 網 際 網 路。
若拔除有源音箱的電源線或切斷電源,
將會終止對於有源音箱的 Wi-Fi 連線。
若切斷電源,則當恢復電源或重新連接
電 源 線 時,請 開 啟 有 源 音 箱,然 後 重 新 連
線 至 網 際 網 路。
USB 更新
SERVICE
DC 19V
DIGITAL
AUDIO IN
(OPTICAL)
HDMI
(ARC)
SERVICE
Micro USB 對
USB 轉接器纜線
(未提供)
有源音箱底部
Samsung 可在未來提供有源音箱系統韌體
的更新。
有更新可用時,您可以將包含更新韌體的
USB 磁碟機連接至有源音箱的 SERVICE 連
接 埠。
1. 請至(www.samsung.com)→ 從客戶支
援功能表選項搜尋型號名稱。
• 如需更多更新相關資訊,請參閱升級
指 南。
2. 下載升級檔案(USB 類型)。
3. 解壓縮檔案以建立具有該檔案名稱的
資 料 夾。
4. 在 USB 中儲存已建立的資料夾,然後
連 接 至 有 源 音 箱。
5. 開啟有源音箱。 然後產品會在 3 分鐘
內 更 新 完 畢。
LED 指
示燈
白光會從左至右來回移動
• 更新期間請勿關閉有源音箱或移除
U S B。
• 若軟體更新完成後亮起黃色 LED
燈,代表其他更新正在進行中。 發
生此情況時,請勿關閉電源或移除
U S B。
• 若更新並未繼續進行,請重新連接有
源 音 箱 的 電 源 線。
• 安 裝 最 新 版 本 後 ,不 會 執 行 任 何 更
新。
• 根據 USB 類型,可能不支援更新。
• 如果沒有可用的更新檔案
LED 指
示燈
紅色閃爍 3 次
• 如果更新檔案是提供給相同版本或
更低版本
LED 指
示燈
青色閃爍 3 次
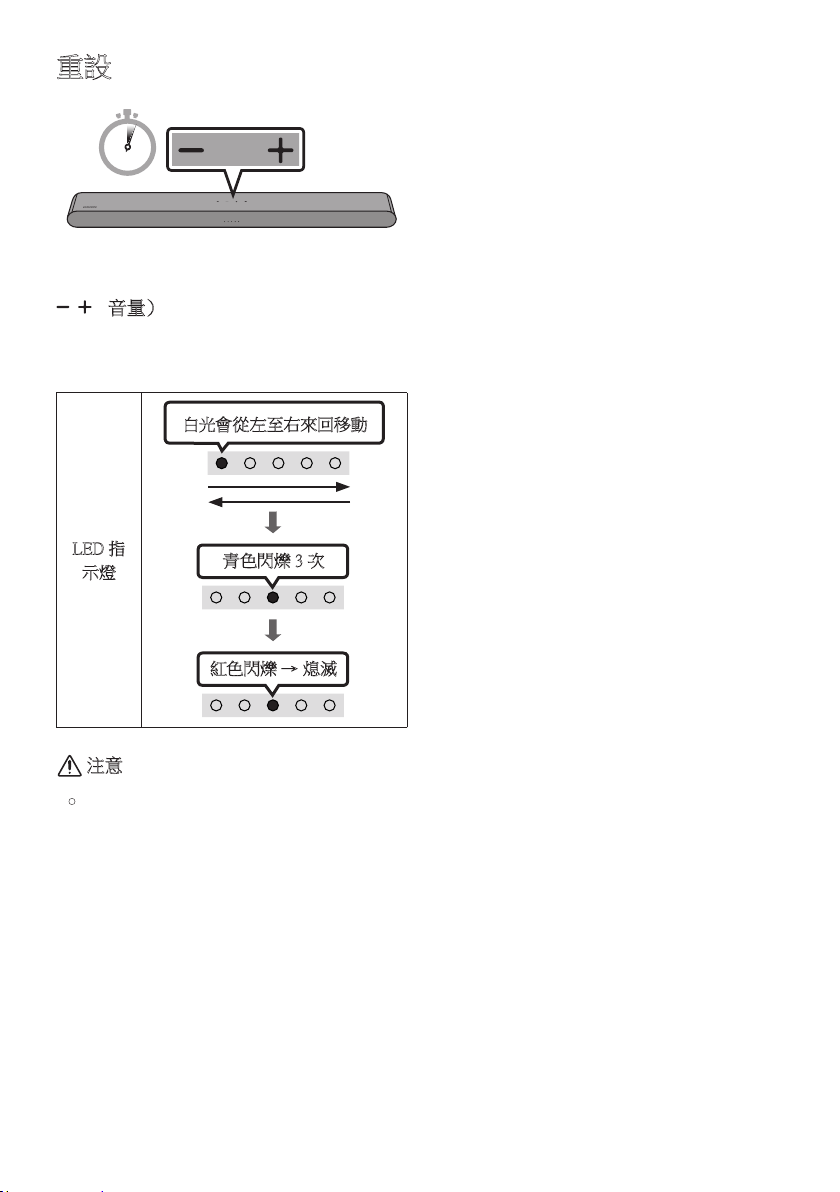
TPE - 39
重設
5 Sec
在有源音箱開啟時,同時按下機身上的
(音量)按鈕至少 5 秒。
LED 顯示器會如下圖變化,而有源音箱會隨
即 重 設。
LED 指
示燈
青色閃爍 3 次
紅色閃爍 → 熄滅
白光會從左至右來回移動
注意
• 會重設有源音箱的所有設定。
務 必 僅 在 需 要 進 行 重 設 時 才 執 行。
TPE - 40
12 疑難排解
如果本產品運作不順,請參閱以下指示。
有 源 音 箱 未 開 啟。
; 檢查有源音箱的電源線是否正確插入
插 座 中。
有 源 音 箱 不 正 常 運 作。
; 在 拔 下 電 源 線 後,重 新 插 入。
; 重 啟 外 部 裝 置,然 後 重 試。
; 若沒有訊號,有源音箱會在一段特定
時間後自動關閉。開啟電源。
(請參閱第 10 頁 )。
遙 控 器 無 法 運 作。
; 操將遙控器直接對準有源音箱。
; 更換新的電池。
有源音箱上的紅色 LED 指示燈一直亮
著。
; 麥克風已關閉。 開啟麥克風。
(請參閱第 8 頁 )。
有源音箱沒有輸出任何聲音。
; 有 源 音 箱 音 量 太 低 或 靜 音。調 整 音
量。
; 連接任何外部裝置(STB 藍牙裝置、
行動裝置等)時,請調整外部裝置的
音 量。
; 如需電視的聲音輸出,請選擇有源音箱。
(Samsung TV:首頁( )→ 功能表 →
設 定( )→ 所有設定( )→ 音效
→ 音效輸出 → 選擇有源音箱)
; 連接至有源音箱的纜線不可鬆脫。拔
除纜線並重新連接。
; 完全拔除電源線,重新連接,然後開啟
電 源。
; 初 始 化 產 品 並 重 試。
(請參閱第 39 頁 )。
若電視沒有透過 HDMI(ARC)連 接。
; 檢查 HDMI 纜線是否正確連接至
ARC 終端。(請參閱第 18 頁 )。
; 可能因為連接的外部裝置(機上盒、遊
戲機等)而無法進行連接。直接連接有
源 音 箱。
; 可能沒有在電視上啟動 HDMI-CEC。在
電視功能表上開啟 CEC。(Samsung TV:
首 頁( )→ 功能表 → 設定( )→
所 有 設 定( )→ 連線 → 外部裝置管
理員 → Anynet+(HDMI-CEC)開啟)
以 HDMI(ARC)模式連接至電視時沒有
聲 音。
; 裝置無法播放輸入訊號源。將電視的
音訊輸出變更為 PCM 或 Dolby
Digital。(對於 Samsung TV:
首 頁( )→ 功能表 → 設定
( )→ 所有設定( )→ 音效 →
進階設定 → 數位輸出音訊格式)
TPE - 41
有源音箱無法透過 Bluetooth 連接。
; 連接至新的裝置時,切換至 Bluetooth
配對以進行連接。(按下遙控器上的
PAIR 按鈕或按下機身上的
(麥克風開啟/關閉)按鈕至少 5
秒 )。
; 若 有 源 音 箱 已 連 接 至 另 一 個 裝 置 ,請
先中斷連接該裝置,再切換裝置。
; 在要連線的裝置上移除藍牙揚聲器清單後
重新連線。(Samsung TV:首頁( )→ 功
能表 → 設定( )→ 所有設定( )→
音效 → 音效輸出 → 藍牙揚聲器清單)
; 拔 除 並 重 新 連 接 電 源 插 頭,然 後 重
試。
; 初 始 化 產 品 並 重 試。
(請參閱第 39 頁 )。
透過 Bluetooth 連線時,聲音中斷。
; 有些產品在太靠近有源音箱時會造成
無線電干擾。例如:微波爐、無線路由
器 等。
; 若透過 Bluetooth 連線的裝置離有源音
箱 過 遠,可 能 會 造 成 聲 音 中 斷。請 將 裝
置移到更靠近有源音箱的位置。
; 若您身體的一部分接觸到 Bluetooth 收
發器或本產品安裝於金屬家具上,則
聲 音 可 能 會 中 斷。
請 檢 查 安 裝 環 境 和 使 用 情 況。
無法連接至 Wi-Fi。
; 檢 查 無 線 路 由 器 是 否 開 啟。
; 關 閉 路 由 器, 再 重 新 開 啟, 然 後 重 試 。
; 若無線訊號太弱,有源音箱將無法連
接。如有可能,請嘗試將路由器移到更
靠近有源音箱的位置,或清空有源音
箱與路由器之間的任何障礙物。
; 若無線路由器是新的,您需要重新設
定 揚 聲 器 的 網 路 設 定。
有 源 音 箱 並 未 與 電 視 自 動 開 啟。
; 若您在觀看電視時關閉有源音箱,會
停 用 與 電 視 之 間 的 電 源 同 步。請 先 關
閉 電 視。
在下列情況下無法使用 AVA 功能。
; 使用 Q-Symphony 功能時,無法使用
AVA 功能。
; 關閉麥克風時,無法使用 AVA 功能。
我將電視連接到有源音箱後,切換至有源
音箱模式。 就聽不到電視輸出的聲音了。
; 若在有源音箱連接電視時,將有源音
箱連接至行動裝置,則有源音箱會輸
出行動裝置的聲音,並保持與電視連
接。 因此電視的聲音不會傳到任何地
方。
; 與行動裝置中斷連接,然後電視的聲
音會再次由有源音箱輸出。
TPE - 42
13 授權
Dolby, Dolby Atmos, and the double-D
symbol are registered trademarks of Dolby
Laboratories Licensing Corporation.
Manufactured under license from Dolby
Laboratories. Confidential unpublished works.
Copyright © 2012-2021 Dolby Laboratories.
All rights reserved.
For DTS patents, see http://patents.dts.com.
Manufactured under license from DTS, Inc.
(for companies headquartered in the U.S./
Japan/Taiwan)or under license from DTS
Licensing Limited(for all other companies).
DTS, Digital Surround, Virtual:X, and the
DTS logo are registered trademarks or
trademarks of DTS, Inc. in the United States
and other countries.
© 2021 DTS, Inc. ALL RIGHTS
RESERVED.
HDMI、HDMI高清晰度多媒体接口及
HDMI 商標為HDMI Licensing
Administrator, Inc. 在美國及其他國家的商
標 或 註 冊 商 標。
• 將你的手機、平板或電腦用作 Spotify
遙控器。前往 spotify.com/connect 了解
如何使用
• Spotify 軟體必須遵守此處提供的第三
方授權規定: https://www.spotify.com/
connect/third-party-licenses。
• Apple, Airplay, iPhone, iPad, and Mac are
trademarks of Apple Inc., registered in the
U.S. and other countries.
• Use of the Works with Apple badge
means that an accessory has been
designed to work specifically with the
technology identified in the badge and has
been certified by the developer to meet
Apple performance standards.
TPE - 43
[ENERGY STAR]
ENERGY STAR qualied model only
– Your Samsung product is ENERGY
STAR qualified in its factory default
setting. Change to certain features,
settings and functionality in this product
can change the power consumption,
possibly beyond the limits required for
ENERGY STAR qualification.
– Environmental Protection Agency and
Department of Energy. ENERGY STAR
is a joint program of the Government
agencies, designed to promote energy
efficient products and practices.
Refer to www.energystar.gov for more
information of the ENERGY STAR Program.
ENERGY STAR qualied model only
(Applicable to Thin Client models only)
As an ENERGY STAR® Partner,
SAMSUNG has determined that this product
meets the ENERGY STAR® guidelines for
energy efficiency.
– The ENERGY STAR Program has been
to reduced greenhouse gas emissions and
save energy through voluntary labeling.
– Power management setting of this product
have been enabled by default, and have
various timing setting from 1 minutes to
5 hours.
– The product can wake with a button press
on the chassis from sleep mode.
ENERGY STAR qualied model only
(The other models)
– As an ENERGY STAR Partner, Samsung
has determined that this product or
product models meets the ENERGY
STAR guideline for energy efficiency.
14 開放式原始碼授
權聲明
若要針對開放原始碼相關問題傳送詢問和
要求,請聯絡 Samsung Open Source
(http://opensource.samsung.com)
15 關於維修的重要
說明
本使用說明書中的圖片和圖解僅供參考,可
能與實際的產品外觀有所不同。
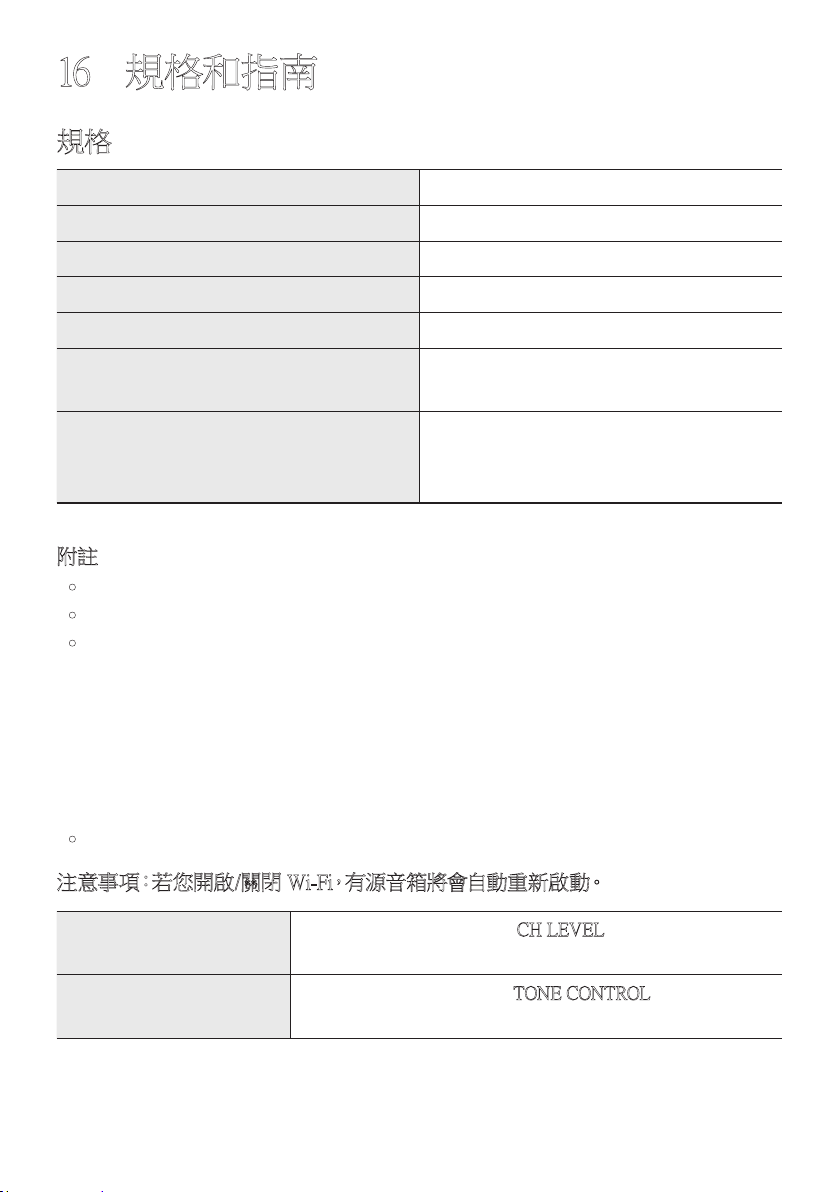
TPE - 44
16 規格和指南
規格
型號名稱 HW-S60B / HW-S61B
重量 2.7 千克
尺寸(寬 x 高 x 厚) 670.0 x 62.0 x 105.0 毫米
工作溫度範圍 +5°C 到 +35°C
工作濕度範圍 10 % 到 75 %
放大器
額定輸出功率 (30W x 2)+(30W x 2)+(30W x 2)+ 20W
支援的播放格式
Dolby 5.1ch / Dolby Digital Plus /
Dolby ATMOS(Dolby Digital Plus)/
DTS 5.1ch / LPCM 2ch
附註
• Samsung Electronics Co., Ltd 保留隨時變更規格的權利,恕不另行通知。
• 重 量 和 尺 寸 為 估 計 值。
• 取得審驗證明之低功率射頻器材,非經核准,公司、商號或使用者均不得擅自變更頻
率、加 大 功 率 或 變 更 原 設 計 之 特 性 及 功 能。
低功率射頻器材之使用不得影響飛航安全及干擾合法通信;經發現有干擾現象時,應
立即停用,並改善至無干擾時方得繼續使用。
前述合法通信,指依電信管理法規定作業之無線電通信。低功率射頻器材須忍受合法通
信或工業、科學及醫療用電波輻射性電機設備之干擾。
應避免影響附近雷達系統之操作。
• HW-S60B / HW-S61B : DC 19V、31W
注意事項:若您開啟/關閉 Wi-Fi,有源音箱將會自動重新啟動。
Wi-Fi 連接埠停用方式
按住有源音箱遙控器上的
CH LEVEL 按鈕 30 秒,以開啟/
關閉 Wi-Fi。
藍牙連接埠停用方式
按住有源音箱遙控器上的
TONE CONTROL 按鈕 30 秒,以
開啟/關閉 Bluetooth。
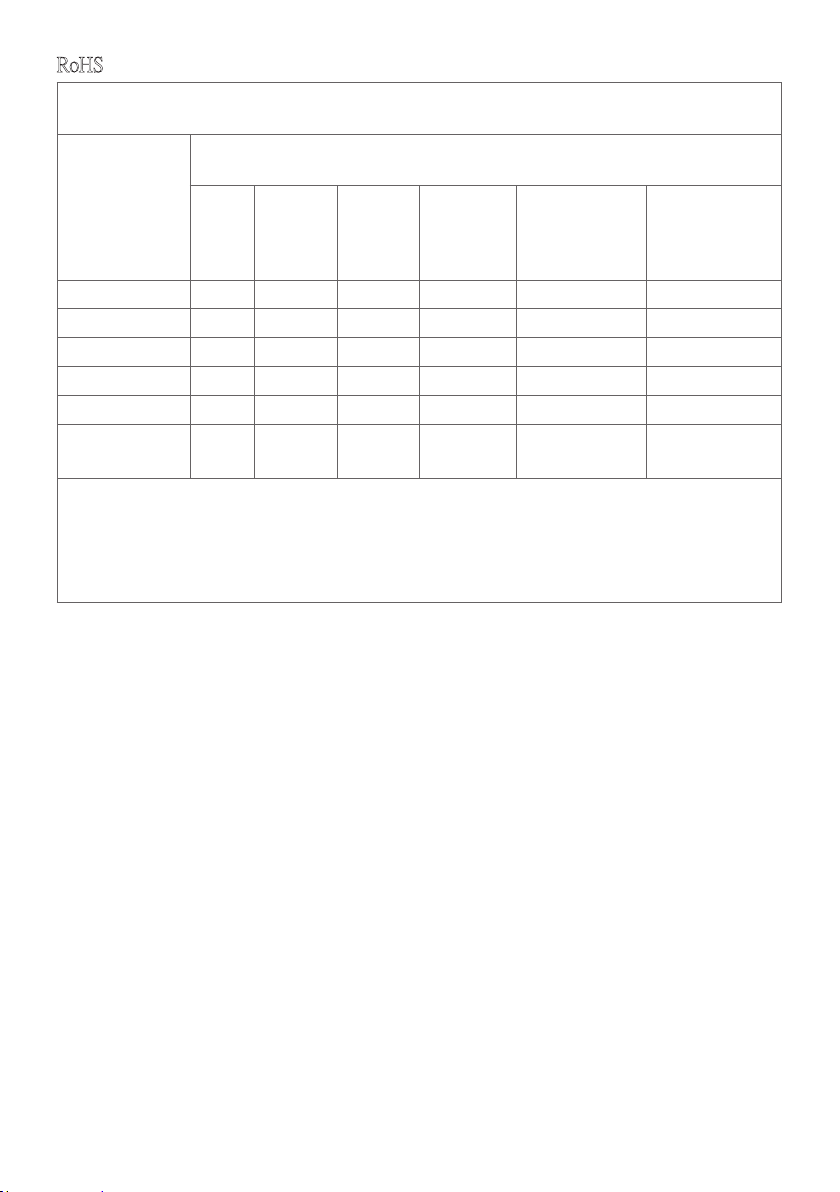
RoHS
設 備 名 稱:有 源 音 箱 型號(型式):HW-S60B / HW-S61B
Equipment name Typ e designat ion(Type)
單元
Unit
限用物質及其化學符號
Restricted substances and its chemical symbols
鉛
Lead
(P b)
汞
Mercury
(Hg)
鎘
Cadmium
(C d)
六價鉻
Hexavalent
chromium
(C r
+6
)
多溴聯苯
Polybrominated
biphenyls
(P B B)
多溴二苯醚
Polybrominated
diphenyl
ethers(PBDE)
電路板 - ○ ○ ○ ○ ○
外殼 ○ ○ ○ ○ ○ ○
金屬零件 - ○ ○ ○ ○ ○
揚聲器 ○ ○ ○ ○ ○ ○
電源供應器 - ○ ○ ○ ○ ○
配件(例:線材,
遙 控器)
- ○ ○ ○ ○ ○
備考1.〝○〞係指該項限用物質之百分比含量未超出百分比含量基準值。
Note 1: “○” indicates that the percentage content of the restricted substance does not exceed the percentage of
reference value of presence.
備考2.〝-〞係指該項限用物質為排除項目。
Note 2:The “-” indicates that the restricted substance corresponds to the exemption.
© 2022 Samsung Electronics Co., Ltd. All rights reserved.
Contact SAMSUNG WORLD WIDE
If you have any questions or comments relating to Samsung products, please contact the SAMSUNG customer
care Centre.
Country / Area Samsung Service Centre
Web Site
`
Asia Pacifi c
CHINA 400-810-5858 www.samsung.com/cn/support
TAIWAN
0800-329-999
0809-00-5237 ( B2B / Dealer)
www.samsung.com/tw/support
HONG KONG
3698 4698 (All Product)
3698 4688 (B2B)
3698 4633 (eStore)
2121 9088 (Samsung pay)
www.samsung.com/hk/support (Chinese)
www.samsung.com/hk_en/support (English)
MACAU 0800 333
SINGAPORE 1800 7267864 | 1800-SAMSUNG www.samsung.com/sg/support
AUSTRALIA 1300 362 603 www.samsung.com/au/support
NEW ZEALAND 0800 726 786 www.samsung.com/nz/support
VIETNAM 1800 588 889 www.samsung.com/vn/support
THAILAND 1800-29-3232 (Toll free for all product) www.samsung.com/th/support
MYANMAR +95-1-2399-888 www.samsung.com/mm/support
CAMBODIA 1800-20-3232 (Toll free)
www.samsung.com/th/support
LAOS +856-214-17333
MALAYSIA
1800-88-9999
+603-7713 7420 (Overseas contact)
www.samsung.com/my/support
INDONESIA
021-5699-7777
0800-112-8888 (All Product, Toll Free)
0800-112-7777 (All Product, Toll Free)
www.samsung.com/id/support
PHILIPPINES
Dedicated Hotline for Mobile Phones:
#GALAXY (just dial #425299)
All Products :
1-800-10-7267864 [ PLDT - Toll Free ]
1-800-8-7267864 [ Globe - Toll Free ]
84222111 [ Landline ]
www.samsung.com/ph/support
INDIA
1800 40 SAMSUNG (1800 40 7267864) (Toll-Free)
1800 5 SAMSUNG (1800 5 7267864) (Toll-Free)
www.samsung.com/in/support
NEPAL
16600172667 (Toll Free for NTC Only)
9801572667 (Toll Free for Ncell users)
www.samsung.com/in/support
BANGLADESH
08000-300-300 (Toll free)
09612-300-300
www.samsung.com/bd/support
SRI LANKA 011 SAMSUNG (011 7267864) www.samsung.com/in/support