Loading ...
Loading ...
Loading ...
20 21
3. INSTALL THE ACCORDION PANELS
NOTE: The Top Rail and sliding panels on each
side are there to provide the proper pitch to
the rear of (5/16") this unit. This is necessary for
proper condensed water utilization and drainage.
If you are not using the side panels for any reason,
this pitch to the rear should also be maintained.
1. Place the unit on a solid surface. Hold the
Accordion Panel in one hand and gently pull
the center back to free the open end.
2. Slide the free end “I” section of the panel
directly into the grooves on the side of the
AC unit, as shown in the image below. Next,
slide the panel down. Be sure to leave enough
space to slip the top and bottom of the frame
into the rails on the cabinet.
3. Once the panel has been installed to the side
of the cabinet, slightly adjust it to make sure
it sits securely inside the frame channel. Slide
the top and bottom ends of the frame into the
top and bottom rails of the cabinet.
4. Slide the panel all the way in and repeat these
steps to assemble the other side.
Model 6000~8000BTU/h 10000~14500BTU/h
H
About 3/4" to 1" About 1" to 1–3/8"
1. Once the AC unit is installed, extend both
Accordion Panels to the window frame.
4. INSTALL THE AC UNIT IN THE WINDOW
Keep a firm grip on the Air Conditioner, then carefully
place the unit into the window opening so the
bottom of the Air Conditioner frame is against the
window sill. Carefully close the window behind the
Top Rail of the unit.
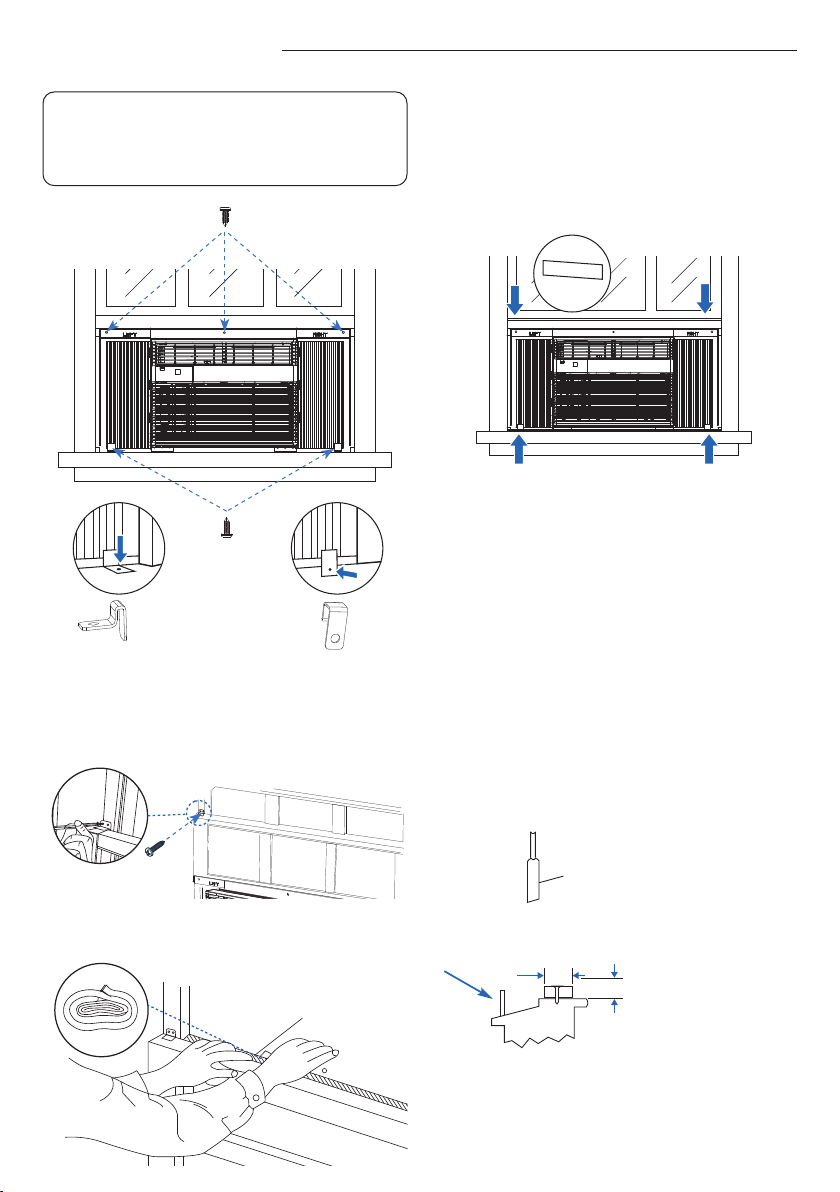
5. INSTALL THE SUPPORT BRACKET
1. Based on your window type, install the support
bracket.
• For Wooden Windows:
Drive the 1/2" (12.7 mm) locking screws through
the Frame Lock and into the windowsill.
Drive the 1/2" (12.7 mm) locking screws through
the frame holes into the window sash.
• For Vinyl-Clad Windows:
Drive the 1/2" (12.7 mm) locking screws through
the Frame Lock and into the window sash.
NOTE: Before driving the screws, drill 5 pilot
holes (through the holes in the Frame Lock
and frame extensions) into the window sash
as shown.
1/2" Screw
1/2" Screw
For Wooden
Window
For Vinyl-Clad
Window
2. To secure the lower sash in place, attach the
Sash Lock at right angle using the 3/4" (19 mm)
or 1/2" (12.7 mm) screws as shown.
3. Cut the Window Sash Seal and insert it in the
gap between the upper and lower sashes.
6. INSTALL THE WEATHER STRIPPING
ONLY APPLICABLE TO MODELS WITH
THE ENERGY STAR RATING
In order to minimize air leaks between the Air
Conditioner and the window opening, trim the
Weather Stripping to a proper length, peel the
protective backing off, and plug any gaps if needed.
IF AC IS BLOCKED BY A STORM WINDOW
Add the wood as shown below, or remove the
storm window before the Air Conditioner is
installed. If the Storm Window Frame must be
kept, make sure the drain holes or slots are not
caulked or painted shut, and the accumulated rain
water or condensation can be drained out.
Removing the AC From the Window
Turn the AC off and disconnect the power cord.
Remove the Window Sash Seal from the windows,
and unscrew the safety Sash Lock.
Remove the screws installed through the frame
and Frame Lock.
Slide the side panels into the frame.
Keeping a firm grip on the Air Conditioner, raise
and remove the sash carefully.
Sash
The storm window
frame or other
obstruction
Follow the required
board thickness for
proper pitch to rear
(along the entire sill).
Fasten with the nails
or screws. (See > Fig. D
on Page 20)
Installation Instructions Installation Instructions
H
Window Frame
Window Sill
Inside
Outside
CAUTION: We recommend 2 people for safer
and easier installation.
NOTE: To prevent the windowsill from
splitting, drill 1/8" (3 mm) pilot holes
before driving.
NOTE: Check that the Air Conditioner is tilted
about 3° to 4° downward to the outside for
drainage. After installation, the condensate
will not drain from the overflow drain hole.
RIGHT
“I” section
Loading ...
Loading ...
Loading ...