
Metra. The World’s Best Kits.
®
MetraOnline.com © COPYRIGHT 2019 METRA ELECTRONICS CORPORATION REV. 10/2/19 INST95-9011
INSTALLATION INSTRUCTIONS
9 5-9011
Attention! Let the vehicle sit with the key
out of the ignition for a few minutes before
removing the factory radio. When testing the
aftermarket equipment, ensure that all factory
equipment is connected before cycling the
key to ignition.
KIT FEATURES
• ISO DDIN radio provision
• 95-9011B - Scratch resistant matte black
• 95-9011HG - Painted high gloss black
KIT COMPONENTS
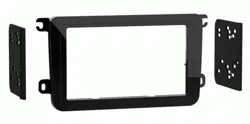
• A) Radio housing • B) ISO DDIN radio brackets • C) DDIN trim plate
TOOLS REQUIRED
• Panel removal tool • Phillips screwdriver
• Socket wrench
Applications
WIRING & ANTENNA CONNECTIONS
(sold separately)
Wiring Harness: Visit metraonline.com for wiring
harness options
Antenna Adapter: Visit metraonline.com for
antenna adapter options
A B C
Volkswagen Multi-kit 2005-Up
Visit MetraOnline.com for more detailed information about the product and up-to-date vehicle
specific applications
Beetle .................2012-2019
CC .....................2009-2017
EOS .....................2007-2016
GTI .....................2006-2014
Golf, Golf R .........2010-2014
Jetta .................. 2005-2018
Jetta GLI ............2006-2018
Jetta SportWagen ...............
2010-2014
Passat ..................2006-up
R32 ....................2007-2008
Rabbit ...............2007-2009
Tiguan ...............2009-2017
1.800.221.0932
|
MetraOnline.com
2
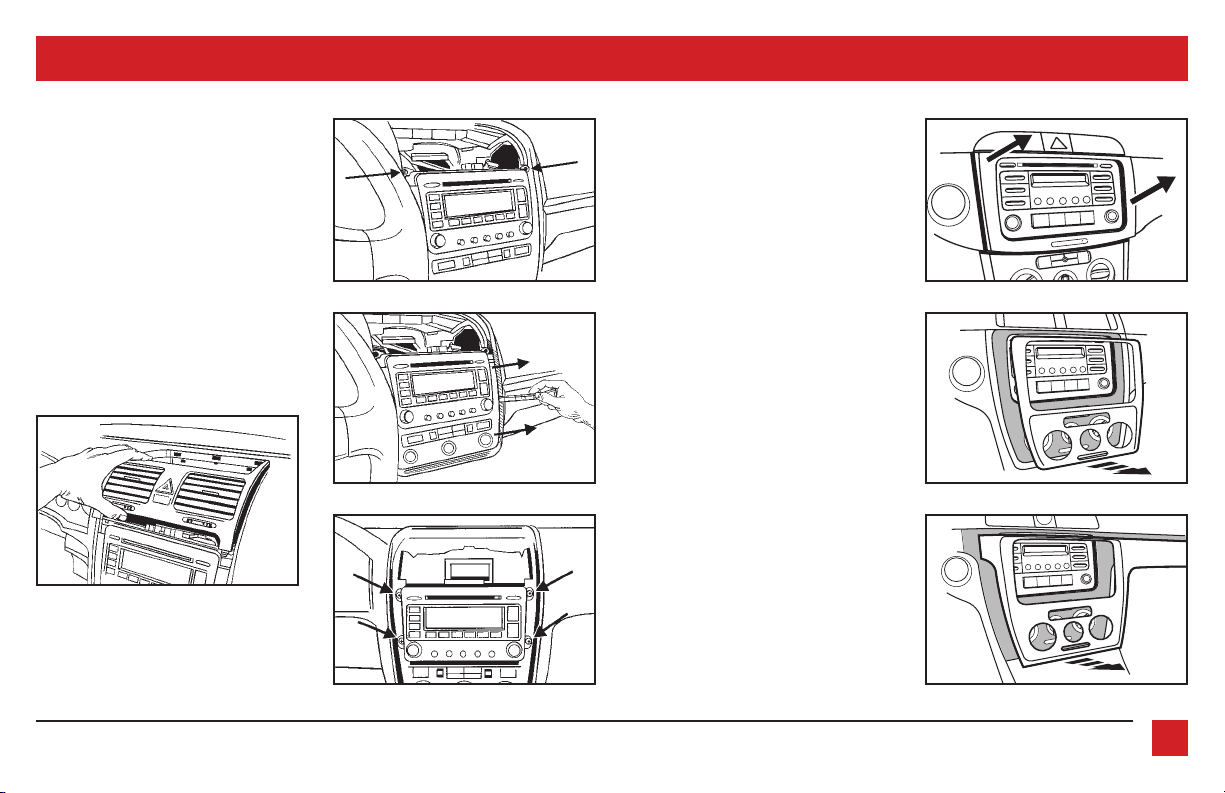
New Jetta 2005-2010,
Jetta GLI 2006-2018, GTI 2006-2009
Rabbit 2007-2009, R32 2007-2008
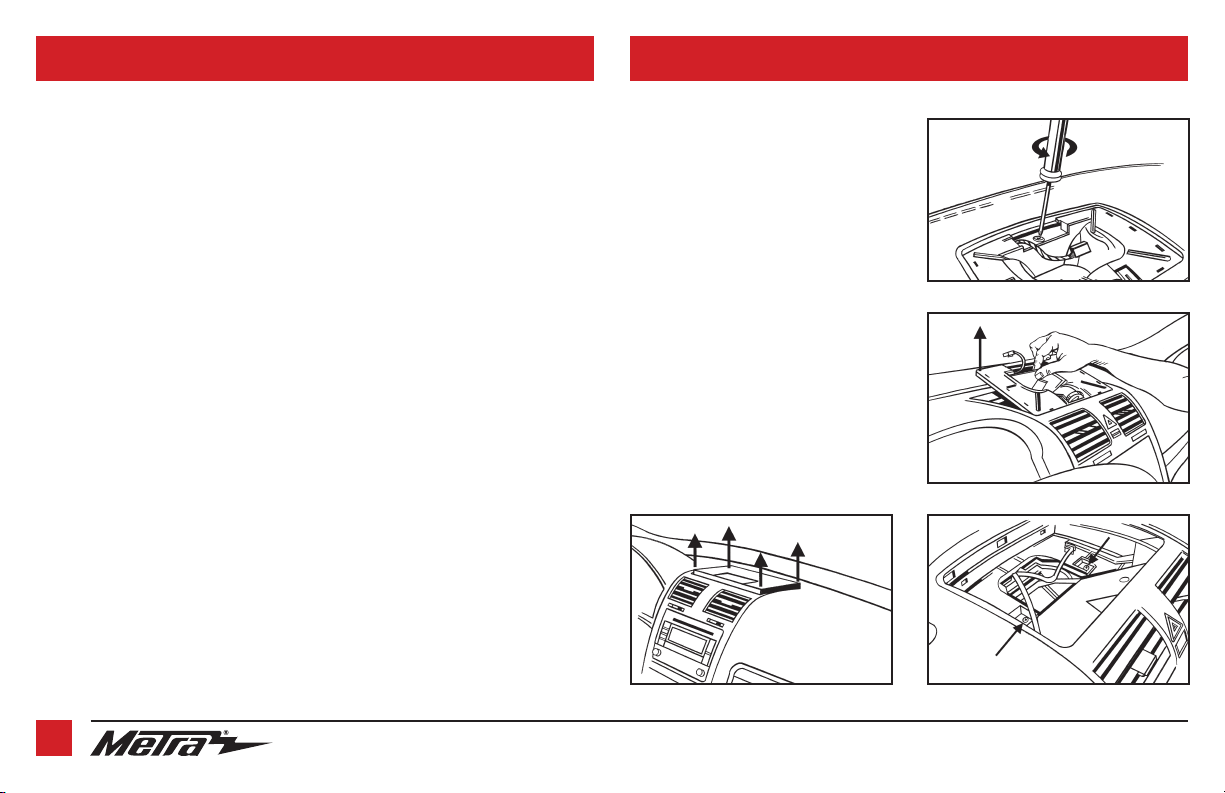
1. Unclip and remove the grille from the
top-center of dash. (Figure A)
2. Remove one T-20 Torx screw from black
insert from under grille removed in step
one. (Figure B)
3. Remove insert. (Figure C)
4. Remove two T-20 Torx screws from
under black insert removed in step two.
(Figure D)
Continued on next page
DASH DISASSEMBLYTABLE OF CONTENTS
Dash Disassembly
– . Jetta GLI 2006-2018 ............................................................................................................................. 2-3
– . GTI 2006-2009 .....................................................................................................................................2-3
– . New Jetta 2005-2010 ...........................................................................................................................2-3
– . Rabbit 2007-2009 ................................................................................................................................2-3
– . R32 2007-2008 ..................................................................................................................................... 2-3
– . Jetta 2011-2018 .........................................................................................................................................3
– . CC 2009-2017 ............................................................................................................................................3
– . Passat 2006-2010 ....................................................................................................................................3
– . Passat 2012-up .........................................................................................................................................3
– . Jetta SportWagen 2010-2014 .................................................................................................................3
– . Jetta GLI 2012-up .....................................................................................................................................3
– . Golf, Golf R 2010-2014 ..............................................................................................................................3
– . GTI 2010-up ..............................................................................................................................................3
– . Tiguan 2009-2017 ................................................................................................................................... 4
– . EOS 2007-2016 ......................................................................................................................................... 4
– . Beetle 2012-2019 ..................................................................................................................................... 5
Kit Assembly.................. ............................................................................................................................. 6
(Figure B)
(Figure C)
(Figure D)(Figure A)

REV. 10/2/2019 INST95-9011
3
5. Unclip and remove the grille from the
top-center of dash. (Figure E)
6. Remove one T-20 Torx screw from black
insert from under grille removed in step
one. (Figure F)
7. Remove insert. (Figure G)
8. Remove two T-20 Torx screws from
under black insert removed in step two.
(Figure H)
Continue to Kit Assembly
CC 2009-2017, Passat 2006-2010,
Jetta SportWagen 2010-2014,
Jetta 2011-2018, Golf, Golf R 2010-2014,
GTI 2010-up
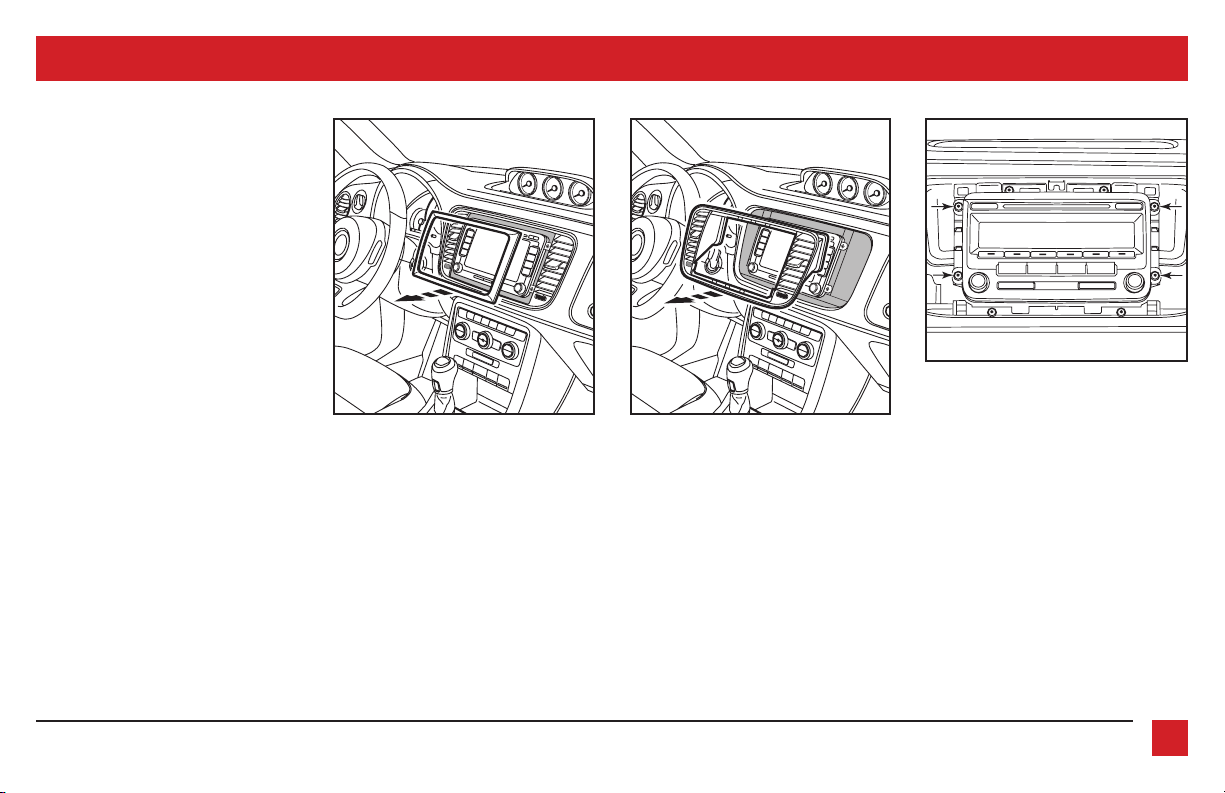
1. Unclip and remove trim panel
surrounding radio. (Figure A)
2. Remove (4) T-20 Torx screws to
remove radio.
Continue to Kit Assembly
Jetta GLI 2012-up
1. Unclip and remove trim panel
surrounding radio. (Figure B)
2. Remove (4) T-20 Torx screws to
remove radio.
Continue to Kit Assembly
Passat 2012-up
1. Unclip and remove trim panel
surrounding radio. (Figure C)
2. Remove (4) T-20 Torx screws to
remove radio.
Continue to Kit Assembly
(Figure F) (Figure F)
(Figure G) (Figure G)
(Figure H) (Figure H)
(Figure E)
PASSENGER AIR BAG OFF
ON
VOL
SCAN
TUNE
BASS
TREB
BAL
FAD
FM
AM
CD
AC
FM2
103.7MHZ
72
64
80
1
2
3
4
DASH DISASSEMBLY (CONT.)

1.800.221.0932
|
MetraOnline.com
4
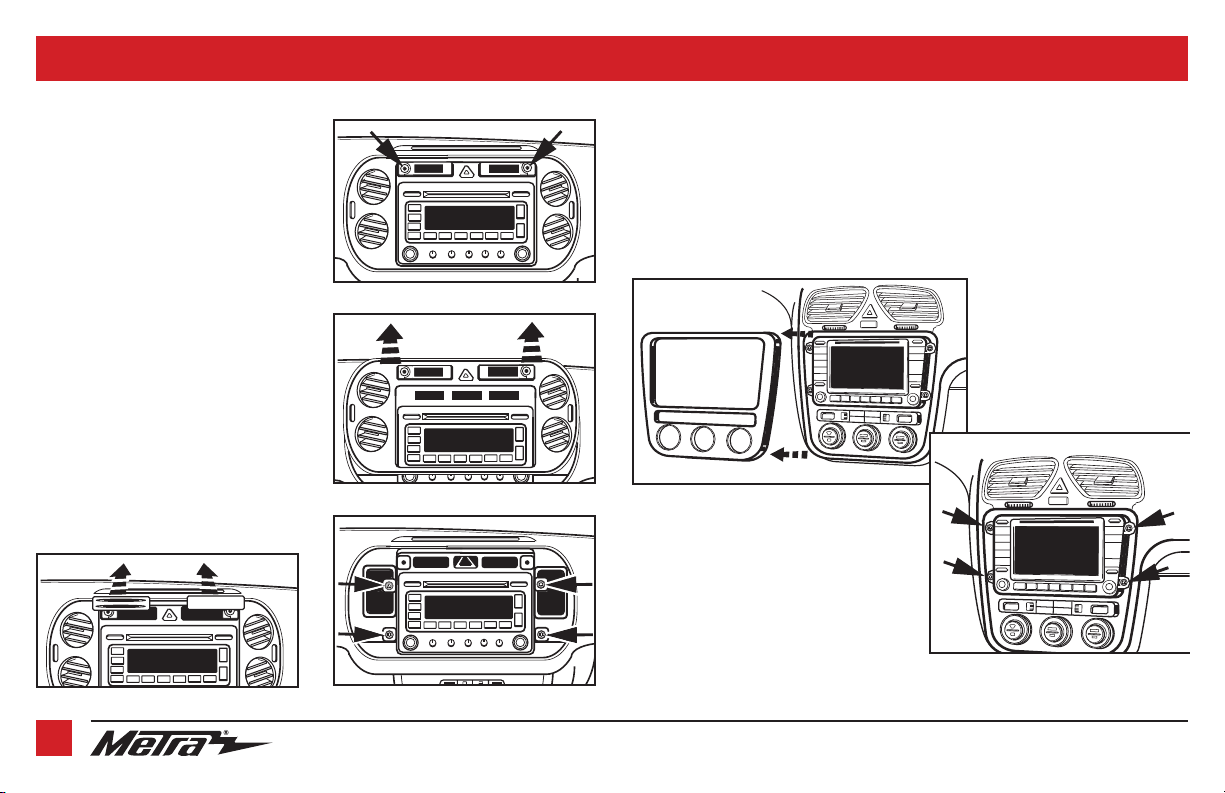
Tiguan 2009-2017
1. Unclip and remove passenger air bag
light panel to the right of the hazard
light button. (Figure A)
2. Unclip and remove the panel with the
two slots in it to the left of the hazard
light button. (Figure A)
3. Remove (2) T-20 Torx screws exposed
behind the two panels removed in the
two previous steps. (Figure B)
4. Unclip and remove the trim panel
surrounding the radio. (Figure C)
5. Remove (4) T-20 Torx screws securing
the radio. Unplug and remove the radio.
(Figure D)
Continue to Kit Assembly
DASH DISASSEMBLY
(Figure B)
(Figure C)
(Figure D)(Figure A)
AF
PASSENGER
AIR BAG
AF
PASSENGER
AIR BAG
AF
AF
PASSENGER
AIR BAG
PASSENGER
AIR BAG
PASSENGER
AIR BAG
(Figure B)
(Figure A)
EOS 2007-2016
1. Unclip and remove the radio trim panel.
(Figure A)
2. Remove the (4) screws securing the
radio. Unplug and remove the radio.
(Figure B)
Continue to Kit Assembly
REV. 10/2/2019 INST95-9011
5
DASH DISASSEMBLY
Beetle 2012-2019
1. Unclip and remove the small trim
around radio. (Figure A)
2. Unclip and remove larger trim around
radio including the a/c vents. (Figure B)
3. Remove (4) Torx screws securing radio to
remove the radio. (Figure C)
Continue to Kit Assembly
(Figure A)
(Figure B)
(Figure C)
1.800.221.0932
|
MetraOnline.com
6
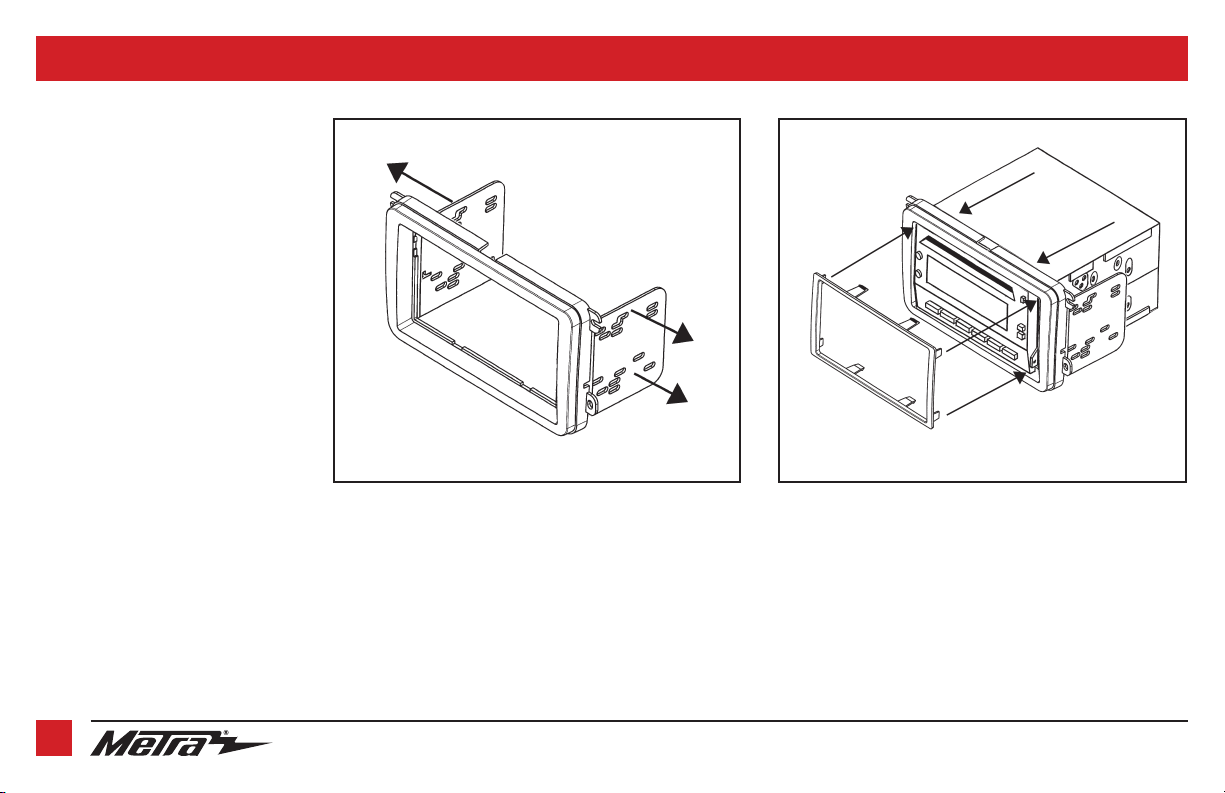
1. Snap the ISO DDIN brackets to the inside
edge of the radio housing. (Figure A)
2. Slide the DDIN radio into the DDIN
bracket/radio housing assembly and
secure the radio to the kit using the
screws supplied with the radio.
(Figure B)
3. Snap the DDIN trim plate onto the
housing/radio assembly. (Figure B)
4. Locate the factory wiring harness in
the dash. Metra recommends using
the proper mating adapter from Metra
or AXXESS. Test the radio for proper
operation.
5. Reassemble dash in reverse order
of disassembly.
KIT ASSEMBLY
(Figure A) (Figure B)

REV. 10/2/2019 INST95-9011
7
KNOWLEDGE IS POWER
Enhance your installation and fabrication skills by
enrolling in the most recognized and respected
mobile electronics school in our industry.
Log onto www.installerinstitute.com or call
800-354-6782 for more information and take steps
toward a better tomorrow.
®
Metra recommends MECP
certified technicians
Metra. The World’s Best Kits.
®
MetraOnline.com © COPYRIGHT 2019 METRA ELECTRONICS CORPORATION REV. 10/2/19 INST95-9011
INSTALLATION INSTRUCTIONS
9 5-9011
If you are having difficulties with the installation
of this product, contact our Tech Support line
either by phone at 386-257-1186 ext. 8300, or
email at techsupport@metra-autosound.com.
Before doing so, look over the instruction booklet
a second time and ensure that the installation
was performed exactly as the instruction booklet
is stated. Have the vehicle apart and ready to
perform troubleshooting steps before contacting
Metra/Axxess Tech Support.

¡PRECAUCIÓN! Todos los accesorios, interruptores,
paneles de controles de clima y especialmente las
luces del indicador de las bolsas de aire deben estar
conectados antes ciclar la ignición. Además, no
quite el radio de fábrica con la llave en la posición o
de encendido ni con el vehículo funcionando.
The World’s best kits.
®
MetraOnline.com © COPYRIGHT 2019 METRA ELECTRONICS CORPORATION REV. 10/2/19 INST95-9011
INSTRUCCIONES DE INSTALACIÓN
9 5-9011
COMPONENTES DEL KIT
• A) Carcasa del radio • B) Soportes ISO DDIN • C) Placa de moldura DDIN
HERRAMIENTAS REQUERIDAS
• Herramienta para quitar paneles
• Destornillador Phillips • Llave del tubo
Volkswagen Multi-kit 2005 y mas
Visite MetraOnline.com para obtener información más detallada sobre el producto y aplicaciones
actualizadas específicas para vehículos.
CARACTERÍSTICAS DEL KIT
• Provisión de radio doble ISO DIN
• 95-9011B - Negro mate resistente a los arañazos
• 95-9011HG - Pintado negro brillante
A B C
APLICACIONES
CABLEADO Y CONEXIONES DE ANTENA
(se venden por separado)
Arnés de cableado: visite metraonline.com para
ver las opciones de cableado
Adaptador de antena: visite metraonline.com
para conocer las opciones de adaptador de antena
Beetle .................2012-2019
CC .....................2009-2017
EOS .....................2007-2016
GTI .....................2006-2014
Golf, Golf R .........2010-2014
Jetta .................. 2005-2018
Jetta GLI ............2006-2018
Jetta SportWagen ...............
2010-2014
Passat .............2006 y mas
R32 ....................2007-2008
Rabbit ...............2007-2009
Tiguan ...............2009-2017

1.800.221.0932
|
MetraOnline.com
DESMONTAJE DEL TABLEROINDICE
2
New Jetta 2005-2010,
Jetta GLI 2006-2018, GTI 2006-2009
Rabbit 2007-2009, R32 2007-2008
1. Desenganche y quite la rejilla del centro
superior del tablero. (Figura A)
2. Quite el tornillo Torx T-20 del inserto
negro debajo de la rejilla que quitó en el
paso uno. (Figura B)
3. Quite el inserto. (Figura C)
4. Quite los dos tornillos Torx T-20 de abajo
del inserto negro que quitó en el paso
dos. (Figura D)
Continua en la siguiente pagina
Desmontaje del tablero
– . Jetta GLI 2006-2018 ............................................................................................................................. 2-3
– . GTI 2006-2009 .....................................................................................................................................2-3
– . New Jetta 2005-2010 ...........................................................................................................................2-3
– . Rabbit 2007-2009 ................................................................................................................................2-3
– . R32 2007-2008 ..................................................................................................................................... 2-3
– . Jetta 2011-2018 .........................................................................................................................................3
– . CC 2009-2017 ............................................................................................................................................3
– . Passat 2006-2010 ....................................................................................................................................3
– . Passat 2012-up .........................................................................................................................................3
– . Jetta SportWagen 2010-2014 .................................................................................................................3
– . Jetta GLI 2012-up .....................................................................................................................................3
– . Golf, Golf R 2010-2014 ..............................................................................................................................3
– . GTI 2010 y mas .........................................................................................................................................3
– . Tiguan 2009-2017 ................................................................................................................................... 4
– . EOS 2007-2016 ......................................................................................................................................... 4
– . Beetle 2012-2019 ..................................................................................................................................... 5
Ensamble del kit ........... ............................................................................................................................. 6
(Figura B)
(Figura C)
(Figura D)(Figura A)
REV. 10/2/2019 INST99-9011
DESMONTAJE DEL TABLERO (CONT.)
3
5. Desenganche y quite la rejilla del centro
superior del tablero. (Figura E)
6. Quite el tornillo Torx T-20 del inserto
negro debajo de la rejilla que quitó en el
paso uno. (Figura F)
7. Quite el inserto. (Figura G)
8. Quite los dos tornillos Torx T-20 de abajo
del inserto negro que quitó en el paso
dos. (Figura H)
Continúe con el ensamble del kit
CC 2009-2017, Passat 2006-2010,
Jetta SportWagen 2010-2014,
Jetta 2011-2018, Golf, Golf R 2010-2014,
GTI 2010
y mas
1. Desenganche y quite el panel de la
moldura que rodea el radio. (Figura A)
2. Quite los (4) tornillos Torx T-20 para
quitar el radio.
Continúe con el ensamble del kit
Jetta GLI 2012y mas
1. Desenganche y quite el panel de la
moldura que rodea el radio. (Figura A)
2. Quite los (4) tornillos Torx T-20 para
quitar el radio.
Continúe con el ensamble del kit
Passat 2012 y mas
1. Desenganche y quite el panel de la
moldura que rodea el radio. (Figura A)
2. Quite los (4) tornillos Torx T-20 para
quitar el radio.
Continúe con el ensamble del kit
(Figura F) (Figura F)
(Figura G) (Figura G)
(Figura H) (Figura H)
(Figura E)
PASSENGER AIR BAG OFF
ON
VOL
SCAN
TUNE
BASS
TREB
BAL
FAD
FM
AM
CD
AC
FM2
103.7MHZ
72
64
80
1
2
3
4
1.800.221.0932
|
MetraOnline.com
4
DESMONTAJE DEL TABLERO
Tiguan 2009-2017
1. Desenganche y quite el panel del
foco de la bolsa de aire del pasajero
a la derecha del botón de las luces
intermitentes. (Figura A)
2. Desenganche y quite el panel que tiene
dos ranuras a la izquierda del botón de
las luces intermitentes. (Figura A)
3. Quite los (2) tornillos Torx T-20
expuestos detrás de los dos paneles
que quitó en los dos pasos anteriores.
(Figura B)
4. Desenganche y quite el panel de
moldura que rodea el radio. (Figura C)
5. Quite los (4) tornillos Torx T-20 que
sujetan el radio. Desconecte y quite el
radio. (Figura D)
Continúe con el ensamble del kit
(Figura B)
(Figura C)
(Figura D)
(Figura A)
AF
PASSENGER
AIR BAG
AF
PASSENGER
AIR BAG
AF
AF
PASSENGER
AIR BAG
PASSENGER
AIR BAG
PASSENGER
AIR BAG
(Figura B)
(Figura A)
EOS 2007-2016
1. Desenganche y quite el panel de la
moldura del radio. (Figura A)
2. Quite los (4) tornillos que sujetan el
radio. Desconecte y quite el radio.
(Figura B)
Continúe con el ensamble del kit

REV. 10/2/2019 INST99-9011
5
DESMONTAJE DEL TABLERO
Beetle 2012-2019
1. Desenganche y quite la pequeña
moldura que rodea el radio. (Figura A)
2. Desenganche y quite la moldura más
grande que rodea el radio, incluyendo
las rejillas del aire acondicionado.
(Figura B)
3. Quite los (4) tornillos Torx que sujetan el
radio para quitarlo. (Figura C)
Continúe con el ensamble del kit
(Figura A)
(Figura B)
(Figura C)

1.800.221.0932
|
MetraOnline.com
6
ENSAMBLE DEL KIT
(Figura A) (Figura B)
1. Coloque a presión los soportes ISO DDIN
en el borde interior de la carcasa del
radio. (Figura A)
2. Deslice el radio DDIN en el soporte/
ensamble de carcasa del radio DDIN
y sujete el radio al kit utilizando los
tornillos suministrados con el radio.
(Figura B)
3. Coloque a presión la placa de la moldura
DDIN en la carcasa/conjunto del radio.
(Figura B)
4. Ubique el arnés de cableado de fábrica
en el tablero. Metra recomienda el
uso de un adaptador adecuado de
acoplamiento de Metra o de AXXESS.
Probar la radio para su correcto
funcionamiento.
5. Vuelva a armar el tablero al revés de
como lo desarmó.
REV. 10/2/2019 INST99-9011
7
KNOWLEDGE IS POWER
Enhance your installation and fabrication skills by
enrolling in the most recognized and respected
mobile electronics school in our industry.
Log onto www.installerinstitute.com or call
800-354-6782 for more information and take steps
toward a better tomorrow.
®
EL CONOCIMIENTO ES PODER
Mejore sus habilidades de instalación y
fabricación inscribiéndose en la escuela de
dispositivos electrónicos móviles más reconocida
y respetada de nuestra industria. Regístrese en
www.installerinstitute.com o llame al
800-354-6782 para obtener más información y
avance hacia un futuro mejor.
Metra recomienda MECP
Técnicos certificados
The World’s best kits.
®
MetraOnline.com © COPYRIGHT 2019 METRA ELECTRONICS CORPORATION REV. 10/2/19 INST95-9011
INSTRUCCIONES DE INSTALACIÓN
9 5-9011
Si tiene dificultades con la instalación de este
producto, comuníquese con nuestra línea de soporte
técnico, ya sea por teléfono al 386-257-1187, o envíe
un correo electrónico a techsupport@metra-
autosound.com. Antes de hacerlo, revise el folleto
de instrucciones por segunda vez y asegúrese de
que la instalación se realizó exactamente como
se indica en el manual de instrucciones. Tenga el
vehículo separado y listo para realizar los pasos de
solución de problemas antes de ponerse en contacto
con el soporte técnico de Metra / Axxess.