
Owner's Manual
Pneumatic
3/8" REVERSIBLE DRILL
Model No.
875.199500
WARNING:
Before operating tool, read this
manual and follow all
Safety Recommendations and
Operating Instructions.
, Safety
Warranty
Features & Operation
Maintenance
Espa#ol
Distributed by Sears,
www,,Sears,,com
Roebuck and Co., Hoffman Estates, IL 60'179
Read Operating Instructions
Please become familiar with all the instructions and
warnings before operating any pneumatic tool.
Always Wear Approved Eye Protection
Impact resistant eye proteclien should meet or exceed
the standards set forth in ANSI Z87t, Occupational and
Educational Eye and Face Protection Look for marking
Z87..t on your eye protection te ensure that it is an
approved style..
ttearing Protection is Recommended
Hearing protection should be used when the noise level
exposure equals or exceeds an 8 hour time-weighted
average sound level of 85dBA Process noise, reflective
surfaces, other tools being operated nearby, all add to the
noise level in a given work area. If you are unable to
determine your noise level exposure, we recommend the
use of hearing protection..
Avoid Prolonged Exposure to Vibration
Pneumatic tools can vibrate during use.. Prolonged
exposure to vibration er very repetitive hand and arm
movements can cause injury.. Discontinue the use of any
tool if you experience tingling, numbness, discomfort or
pain in your hands or arms. You should consult your
physician before resuming use of tool.
90 PSI Maximum
This tool is designed to operate at an air pressure of 90
pounds per square inch gauge pressure (90 PSI)
maximum, at the tool. Use of higher air pressure can, and
may cause injury. Also, the use of higher air pressure
places the internal components under loads and
stresses they were not designed for, causing premature
tool failure.
NOTE: THE AIR SUPPLY SHOULD BE CLEAN, DRYAND
PREFERABLY LUBRICATED. FOR BEST RESULTS
DRAIN THE MOISTURE FROM YOUR COMPRESSOR
DALLY
Use Proper Accessories
Always disconnect tool from air supply before changing
accessories. Never hold work in hands, lap or against
other paris of the body Secure all work with clamps or a
vice so that both hands are free to operate tool. Keep
proper footing and balance at all times.. Verify tool
direction before starting. Do not change direction of tool
while tool is running. Do not force tool, allow drill to work
at designed pace.
I, WARNINGI
Some dustcreated by power sanding, sawing, grinding,ddlltng
and other construction activities containschem}caIs knownto
causecancer, birth defects or other reproductive harm Some
examples ofthese chemicalsare:
Lead fromlead based paint
crystalline silica from bricksand cement
and other masonry products, and
arsenicand chromium fromchemically-
treatedlumber.
Your risk from those exposures varies, depending on how often
you do thistype of work. To reduce your exposure to these
chemicals: work inawell ventilated area, and work with
approved safety equipment, such as dust masks that are
specilieally designed to filler out microscopic particles
(2)
FULL ONE YEAR WARRANTY ON
CRAFTSMAN AIR-DRIVETOOLS
If this Craftsman tool fails to give complete satisfaction
within one year from the date of purchase, RETURN IT
TO THE NEAREST SEARS STORE IN THE UNITED
STATES, and Sears will repair or replace it free of charge
If this Craftsman tool is used for commercial or rental
purposes, this warranty applies for only 90 days from the
date of purchase. This warranty gives you specific legal
rights, and you may also have other rights which vary
from state to state.
Distributed by Sears, Roebuck and Con, DepL 817WA,
Hoffman Estates, IL 60179,
The Craftsman Model 875,. 199500 3!8" Reversible Drill
is designed for applications which include drilling,
honing, wire brushing and fastening!unfastening of
screws.. This tool features a side mounted reverse
lever for quick and easy direction changes.
Features
• Planetary gears for smooth power transfer andlow
vibration.
Side mounled reverse lever for quick direction change..
• Jacobs_chuck for tong life
Specifications
Spindle Thread ...................................................................................................3/8"x 24
Free speed (No Load) ........................................................................2200 RPM
Weight .................................................................................................................................2.1 lbs
Overall length .................................................................................................................6-1/2."
Average air consumption ..................................................................5 5 SCFM
Recommended hose size .....................................................................318"[.D,
Air inlet..........................................................................................................................I14" NPT
Maximum Air Pressure............................................................................................g0 PSI
Pre-Operation
Beforethetootisconnectedtotheairsupply,cfeartheair
hose of accumulated dust and moisture by running air
freely through the air hose for 5-10 seconds. Before
removing a tool for service or changing sockets, make
sure the air line is shut-off at the compressor This wilt
prevent the tool from operating if the throttle is accidently
engaged..
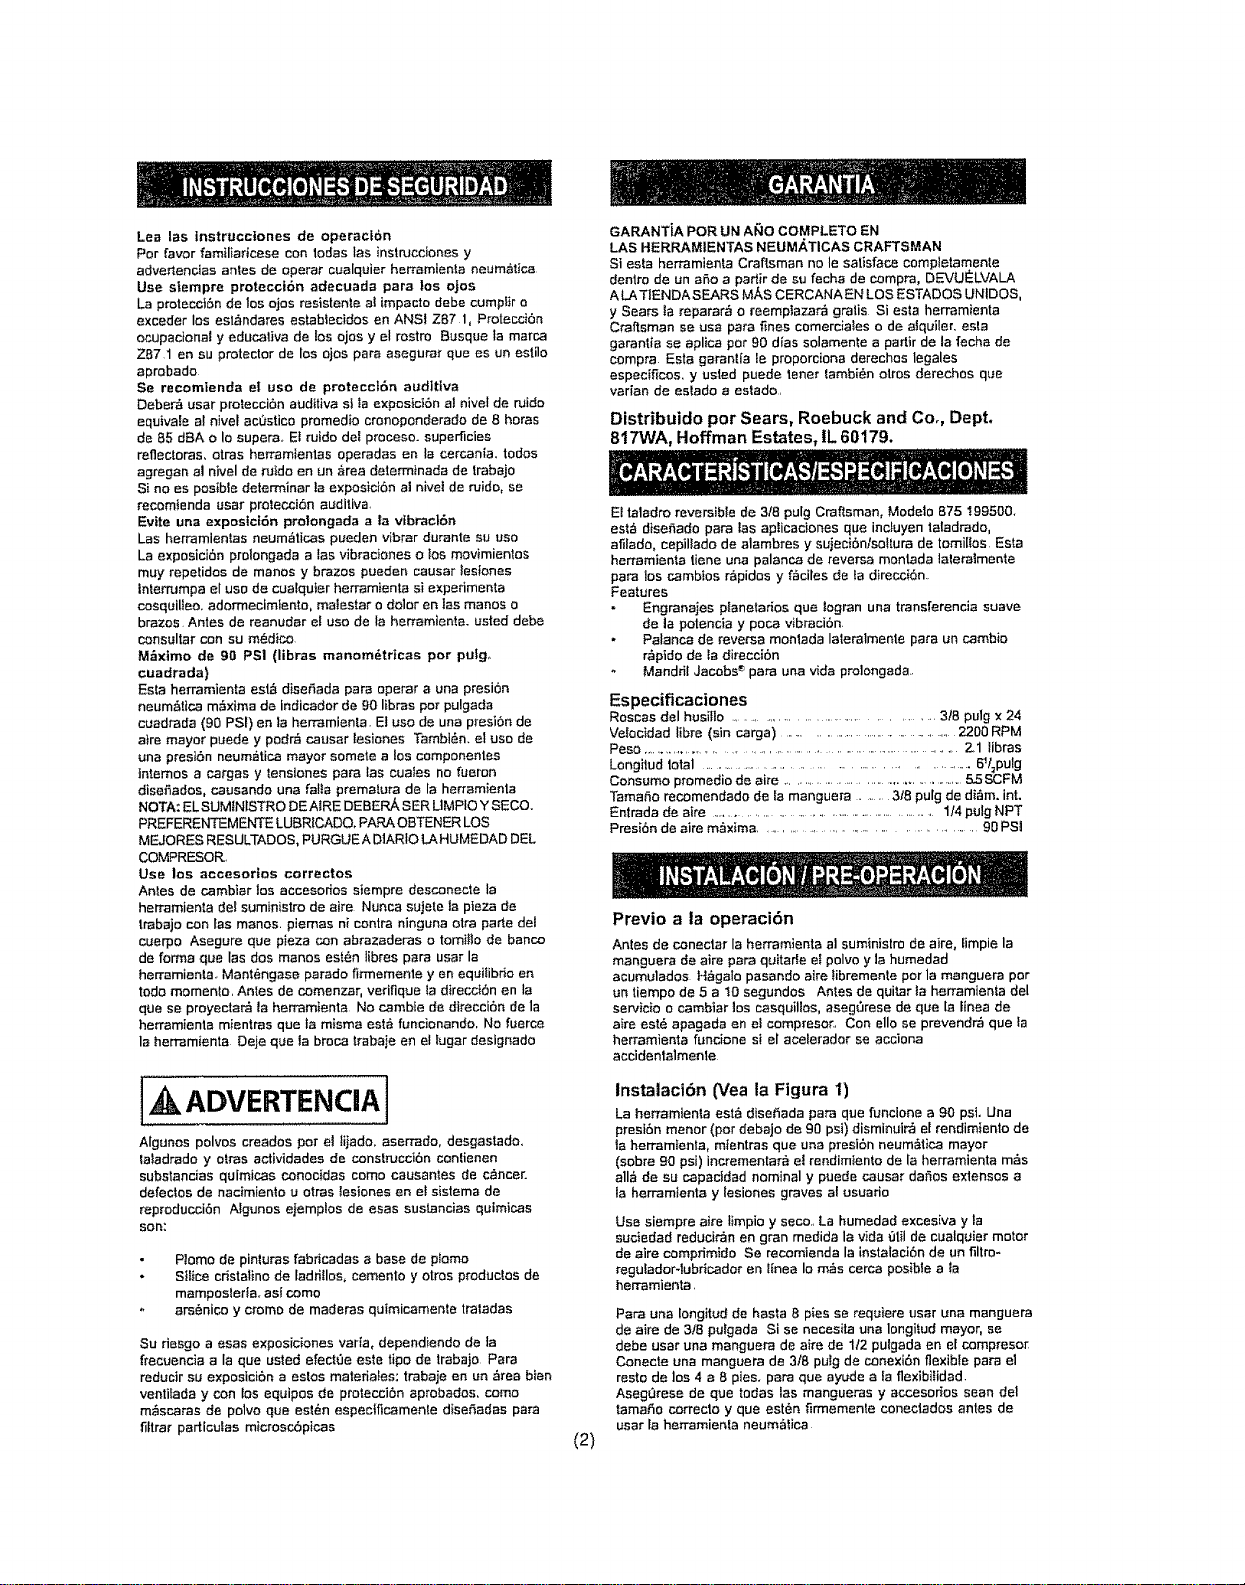
Installation (See figure 1)
This tool is designed to operate at 90 psL Lower pres-
sure (below 90 psi) will reduce performance of the tool
while higher air pressure (over 90 psi) raises the perfor-
mance of the tool beyond its rated capacity and could
cause serious damage to tool and user
Always use clean dry air Excessive moisture and dirt will
greatly reduce the life of any air motor. We recommend
the installation ef an in-line filter-regulator-lubricator as
close to the tool as possible
A 3/8" air hose is required up to a length of 8 ft. If more
length is required a 112" air hose should be used at the
compressor. Attach a 3/8" whip hose for the remaining
4 - 8 ft..for flexibility.. Be sure all hoses and fitlings are the
correct size and tightly secured before using air tool
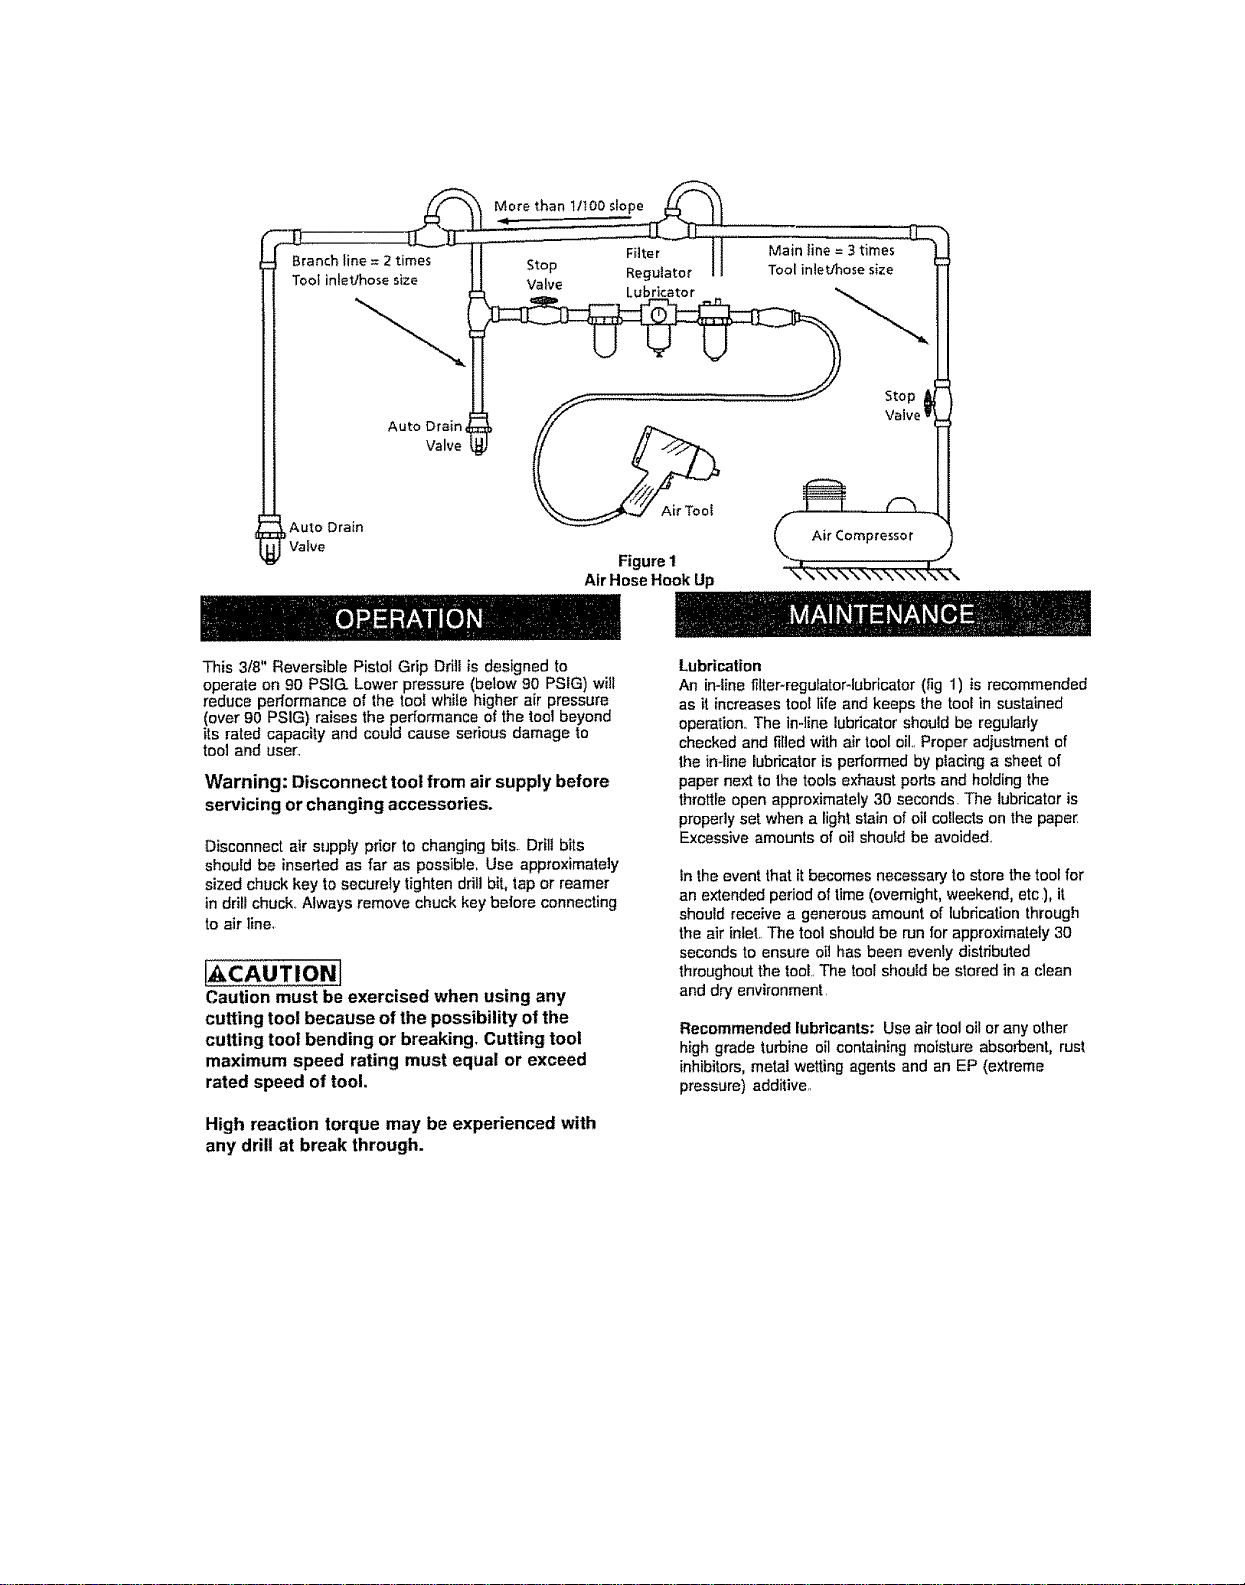
_AutoDrain
_ Valve
More than 1/100 slope
Filter
Stop Regulator
Valve Lubricator
Figure 1
Air Hose Hook Up
Main line = 3 times
Tool inlet/nose size
Stop
Vave
Air Compressor
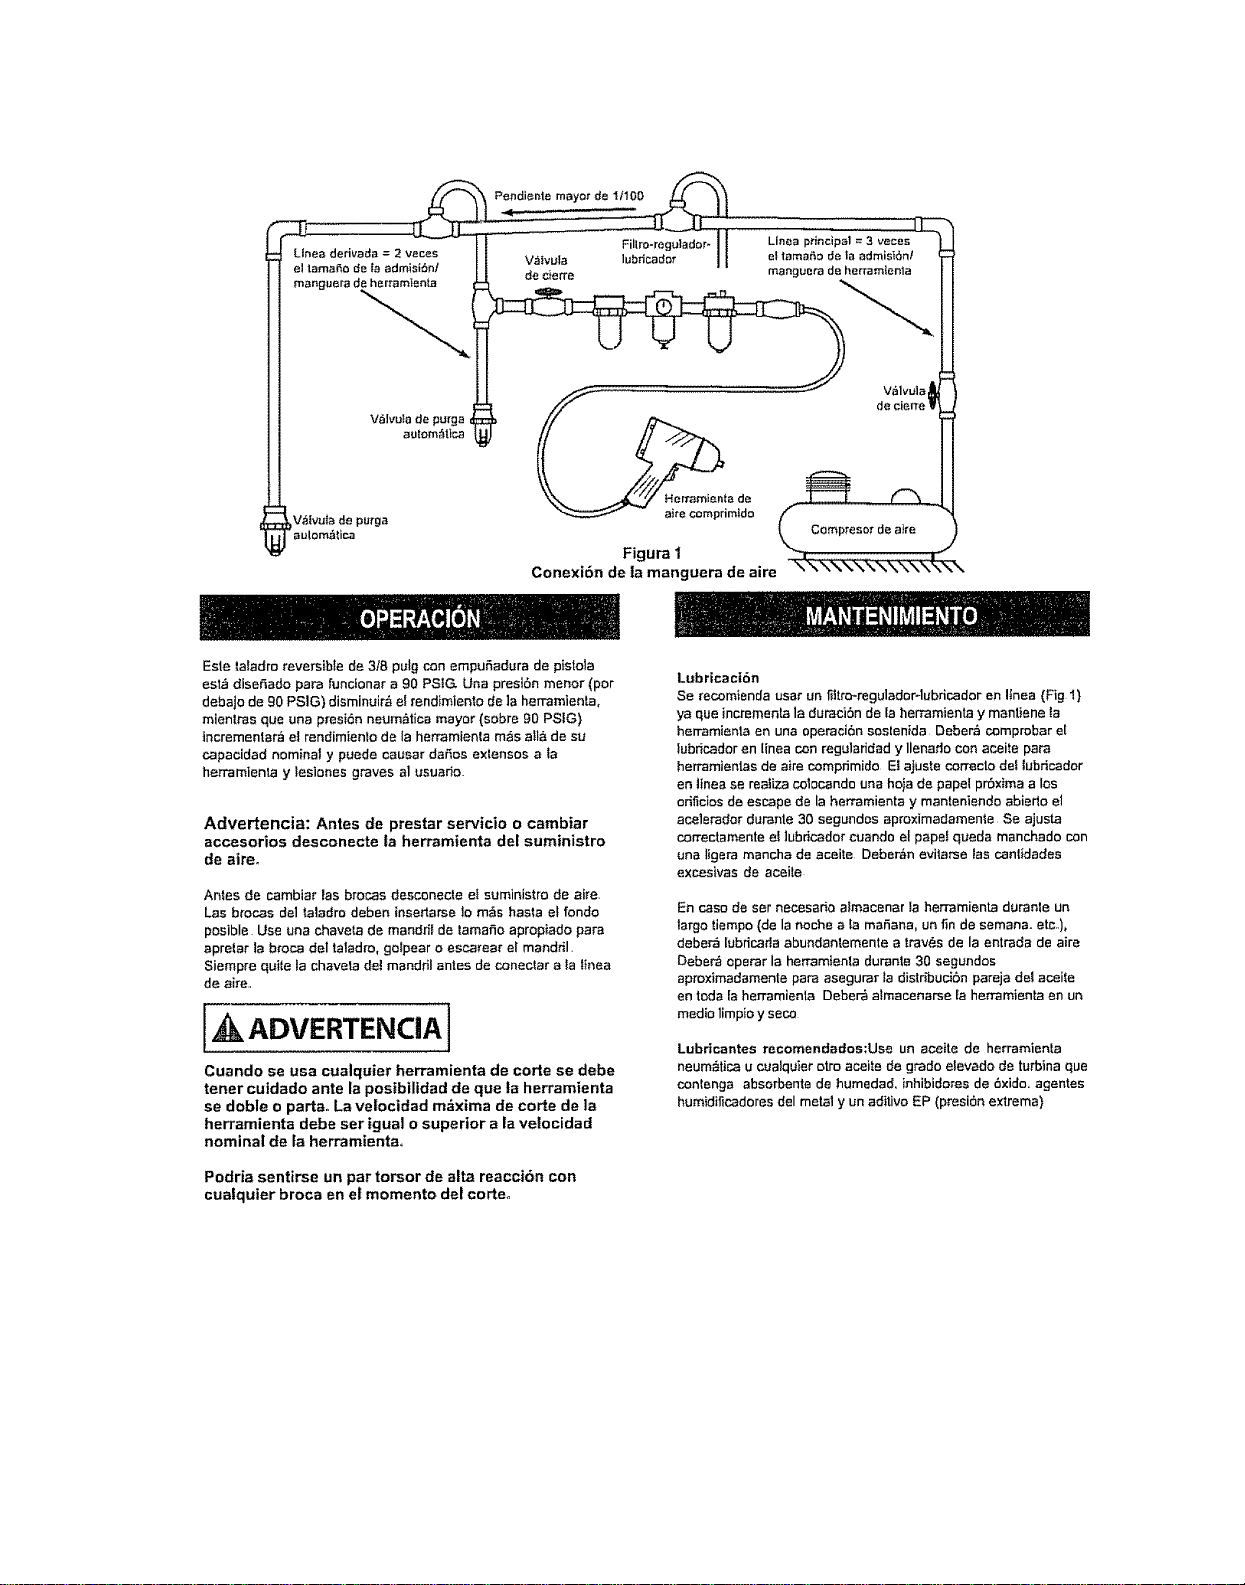
This 3t8" Reversible Pistol Grip Drill is designed to
operate on 90 PSlG. Lower pressure (below 90 PSlG) will
reduce performance of the tool while higher air pressure
(over 90 PSlG) raises the performance of the tool beyond
its rated capacity and could cause serious damage to
tool and user,
Warning: Disconnect tool from air supply before
servicing or changing accessories.
Disconnect air supply prior to changing bits. Drill bits
should be inserted as far as possible. Use approximately
sized chuck key to securely tighten ddll bit, lap or reamer
in drill chuck.. Always remove chuck key before connecting
to air iine,
Caution must be exercised when using any
cutting tool because of the possibility of the
cutting tool bending or breaking. Cutting tool
maximum speed rating must equal or exceed
rated speed of tool,
High reaction torque may be experienced with
any drill at break through.
Lubrication
An in-line filter-regulator-lubricator (fig 1) is recommended
as it increases tool life and keeps the tool in sustained
operation,, The in-line lubricator should be regularly
checked and filled with air tool oil,, Proper adiuslment of
1hein-line lubricator is performed by placing a sheet of
paper next to the tools exhaust ports and holding the
throttle open approximately 30 seconds. The lubricator is
properly set when a light stain of oil collects on the paper
Excessive amounts of oil should be avoided,,
In the event that it becomes necessary to store the tool for
an extended period of time (ovemight, weekend, etc), it
should receive a generous amount of lubrication through
the air inlet.. The tool should be run for approximately 30
seconds to ensure oit has been evenly distributed
throughout the tool.. The tool shou?d be stored in a clean
and dry environment.
Recommended lubricants: Use air tool oil or any other
high grade turbine oil containing moisture absorbent, rust
inhibitors, metal wetting agents and an EP (extreme
pressure) additive..
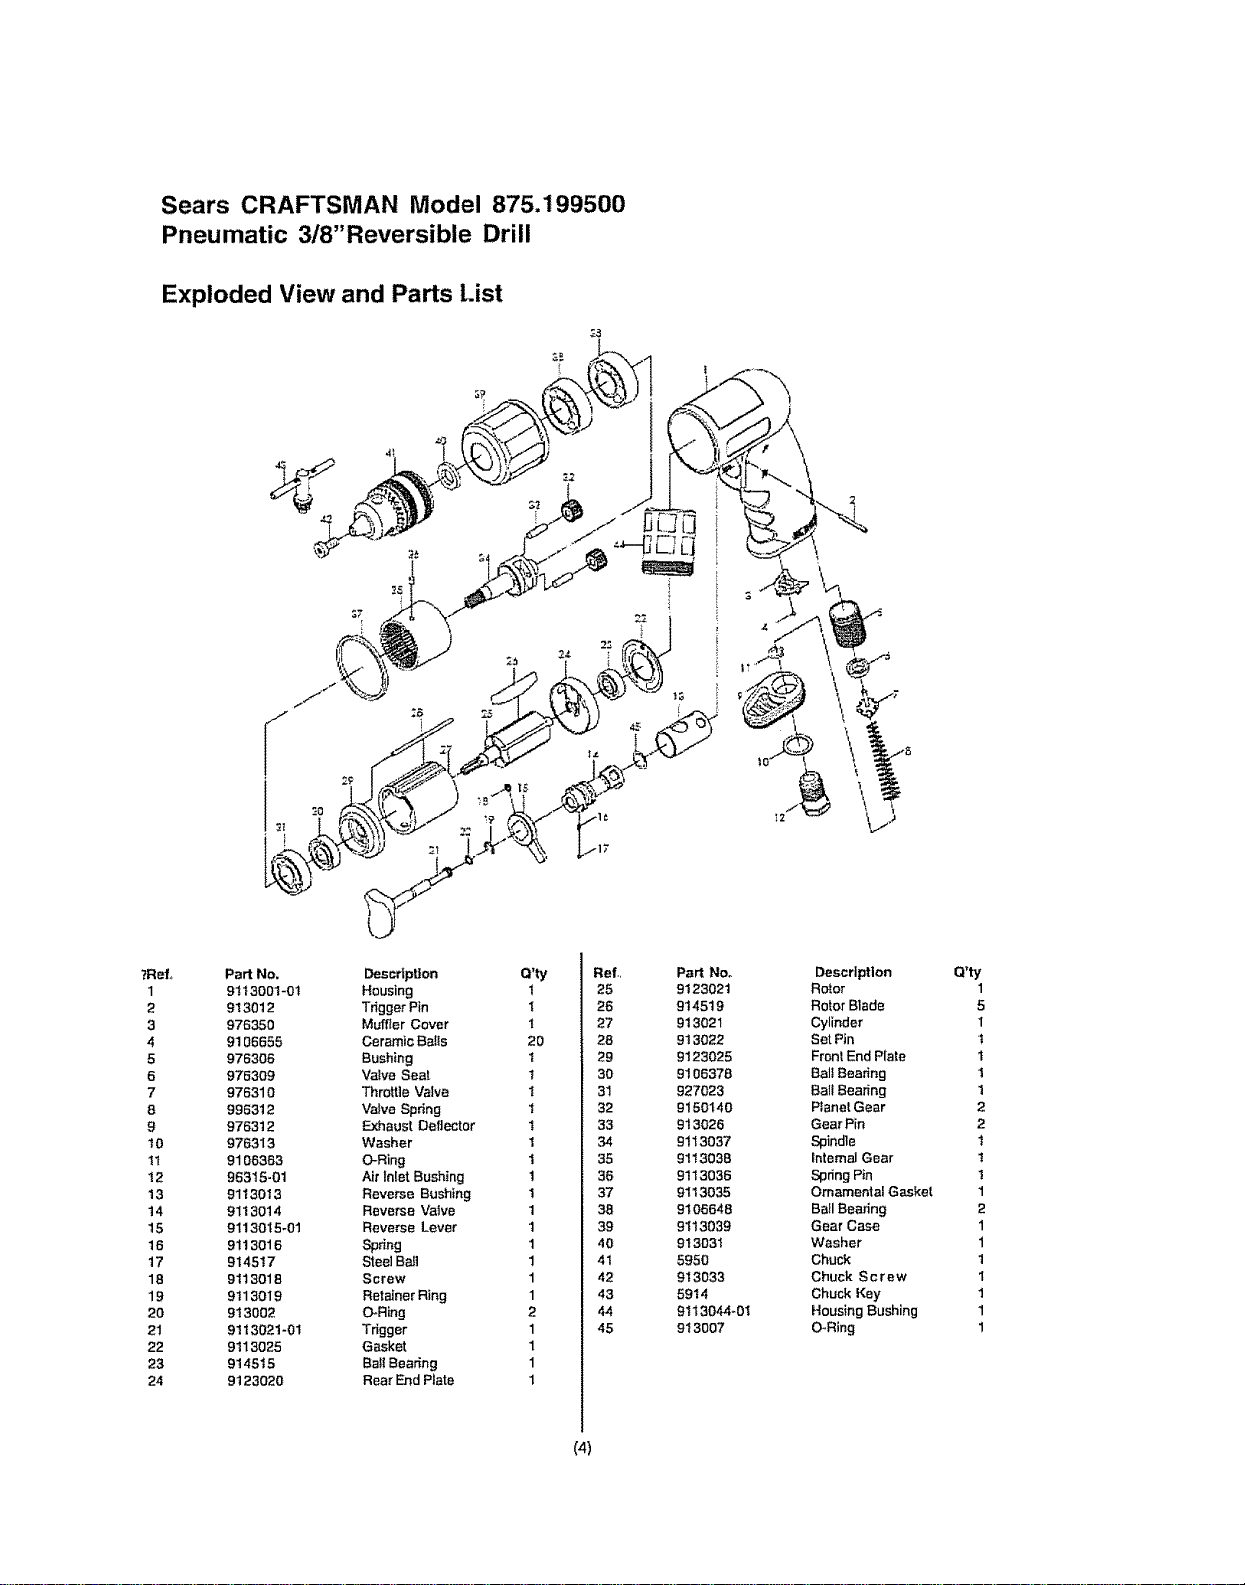
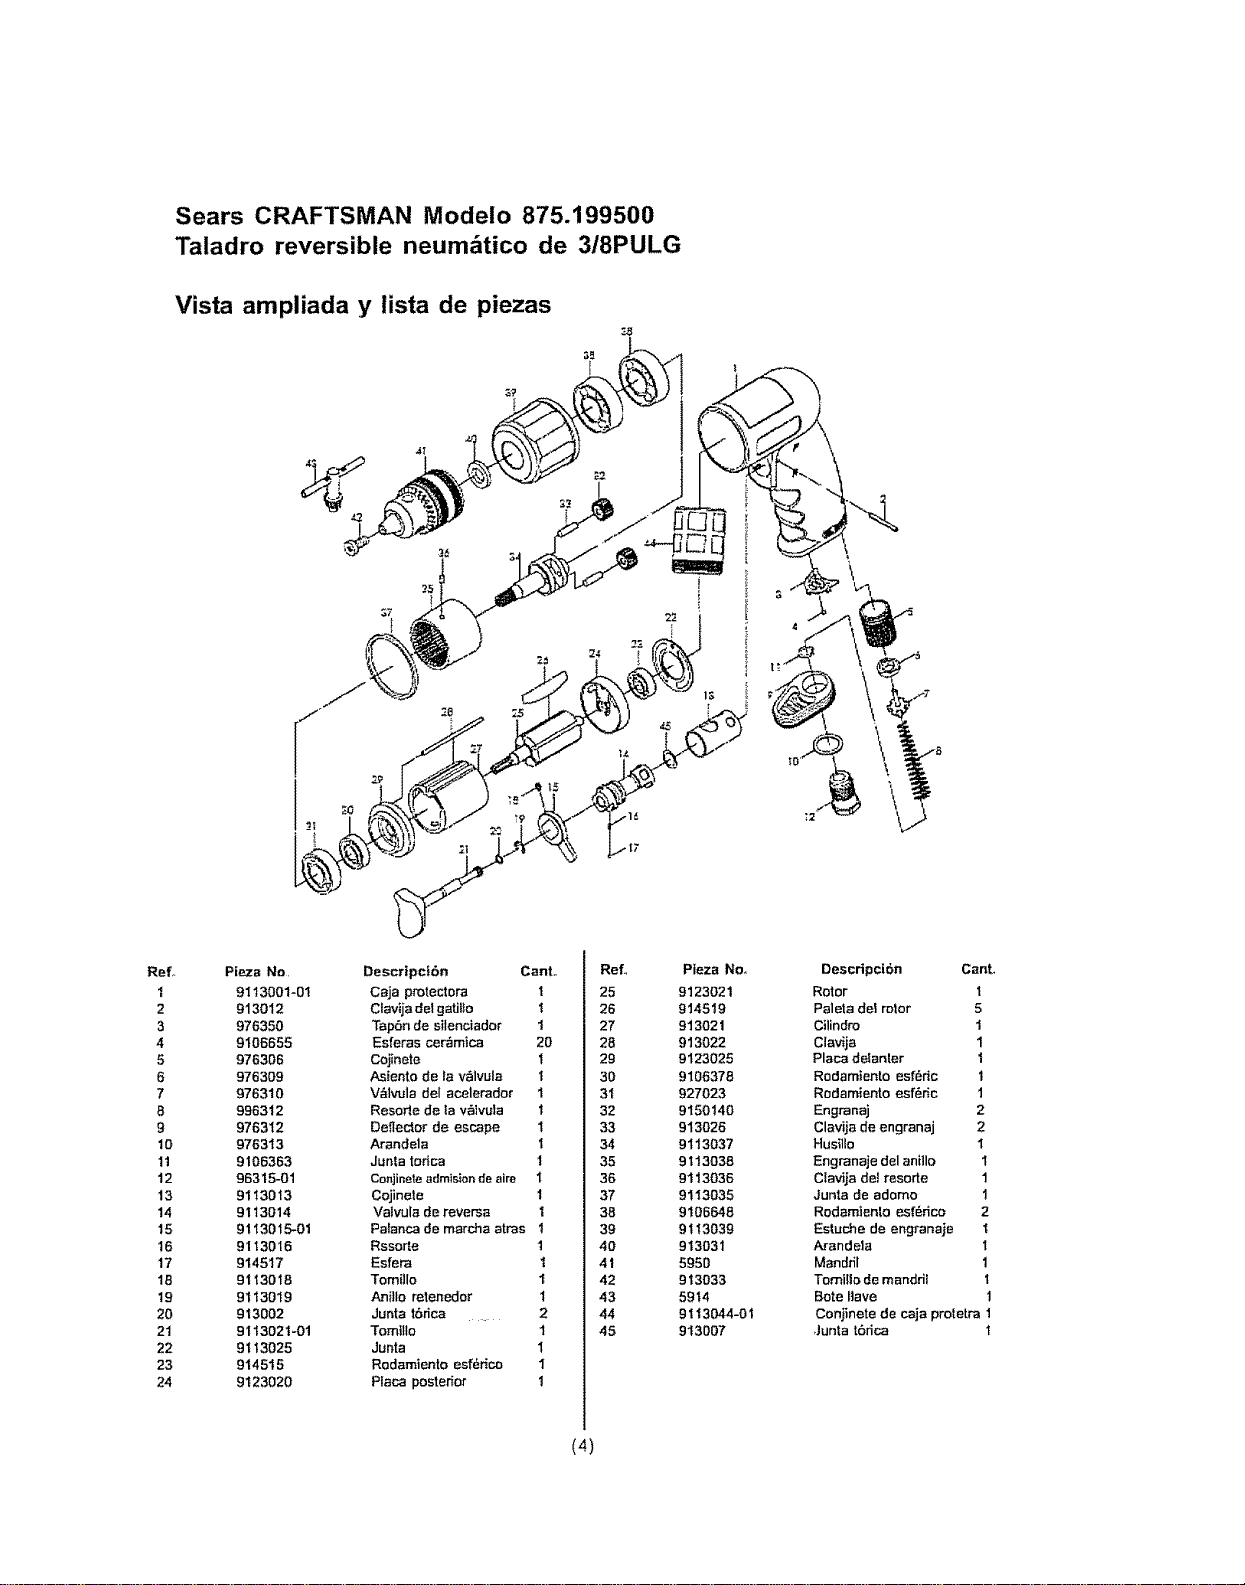
Sears CRAFTSMAN Model 875.199500
Pneumatic 3/8"Reversible Drill
Exploded View and Parts List
7Ref,,
1
2
3
4
5
6
7
8
9
t0
tt
t2
13
14
15
15
17
18
19
2O
21
22
23
24
Part No,
91t3001-0t
913012
976350
9106655
976306
976309
976310
9963t2
976312
976313
9106363
96315-01
9113013
91130t4
91130t5-01
9tl 3016
914517
9113018
9113019
9t 3002
9113021-01
9113025
9145t 5
9t 23020
DescdptJon Q'ty
Housing 1
Tdgger Pin I
Muffler Cover t
Ceramic Balls 20
Bushing t
Valve Seat t
Throttle Valve t
Valve Spdng t
Exhaust Deflector t
Washer 1
O-Ring 1
Air Inlet Bushing 1
Reverse Bushing 1
Reverse Valve 1
Reverse Lever 1
Spdng 1
Steel Bail 1
Screw 1
Retainer Ring 1
O-Ring 2
Tdgger 1
Gasket 1
Ball Beadng 1
Rear End Plate 1
Ref,,
25
26
27
28
29
30
31
32
33
34
35
36
37
38
39
40
41
42
43
44
45
Part Noo
9123021
914519
913021
913022
9123025
9106378
927023
9150140
913026
9113037
9113038
9113036
9113035
9t 06648
9113039
9t 303I
5950
9t 3033
59!4
9113044_01
913007
\
Description Q'ty
Rotor 1
Rotor Blade 5
Cylinder 1
Set Pin !
Front End Plate 1
Ball Bearing t
Ball Beadng 1
Planet Gear 2
Gear Pin 2
Spindle t
Internal Gear t
Spdng Pin !
Ornamental Gasket 1
Bafl Beadng 2
Gear Case 1
Washer 1
Chuck 1
Chuck Screw 1
Chuck Key 1
Houslng Bushing 1
O_Ring 1
(4)
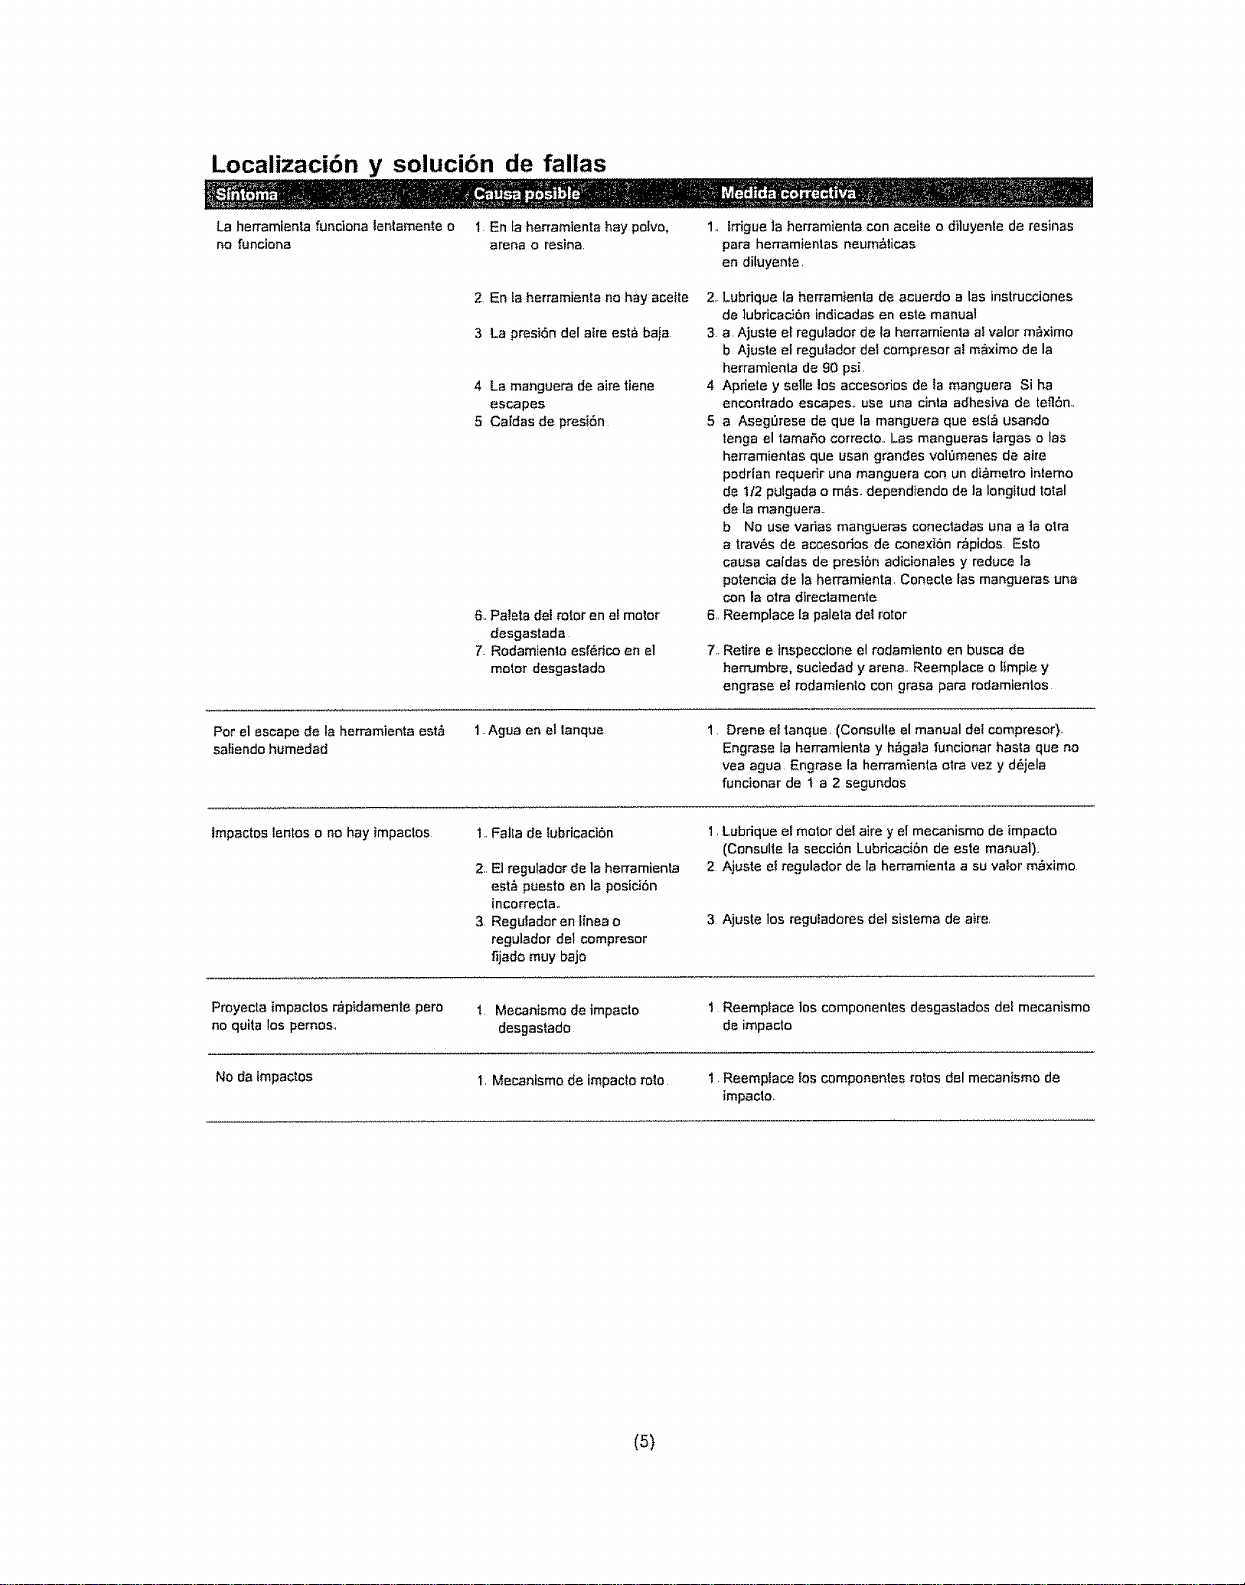
Troubleshooting
' =, ....................................................... .....
Tool runs slowly or will not operate 1, Grit or gum in toot
1_Flush the tool with air tool oil or gum
solvent,
2. NO oil in toot
3. Low air pressure
4. Air hose leaks
5, Pressure drops
6 Worn rotor blade in motor
7. Worn ball bearing in motor
2 Lubricate the tool according to the lubrication
instructions in this manual
3,a, Adjust the regulator on the tool to the maxi-
mum setting
b. Adjust the compressor regulator to tool
maximum of 90 psi.
4.Tighten and seal hose fittings if leaks are found
use teflon tape,
5.a, Be sure the hose is the proper size Long
hoses or tools using large volumes of air may
require a hose with an LD..of 112- or larger
depending on the total length of the hose
b Do not use a multiple number of hoses
connected together with quick connect fittings
This causes additional pressure drops and
reduces lhe tool power,, Directly connecl the
hoses together
6. Replace rotor blade
7, Remove and inspect bearing for rust, dirt and
grit, Replace or clean and grease bearing with
bearing grease
Moisture blowing out of tool exahust 1,,Water in tank
t..Drain tank., (See air compressor manual) Oil tool
and run until no water is evident Oil tool again and
run 1-2 seconds
Impacts slowly or will not impact
t _,Lack of lubrication
2, Tool regulator set in wrong
position
3, In-line regulator or
compressor regulator
set too low
1,,Lubricate the air motor and the impact mechanism
(See Lubrication section of this manua0
2.Adjust the regulator on the tool to the maximum
setting
3,,Adjust regulators in the air system
Impacts rapidly but 1. Worn impact mechanism t., Replace worn impact mechanism components
wilt not remove bolls
Does not impact t. Broken impact mechanism 1.,Replace broken impact mechanism components
{5)

Manual del Propietario
TALADRO NEUMATICO
REVERSIBLE DE 3/8 PULG
Modelo No.
875.199500
ADVERTENCIA:
Antes de usar esta herramienta,
lea este manual y siga todas las
recomendaciones de seguridad
e instrucciones de operaci6n.
Seguridad
Garant{a
_, Caracteristicas y operaci6n
Mantenimiento
EspaSol
Distribuido por Sears, Roebuck and Co., Hoffman Estates, IL 60179
wwwoSears,,com
Lealaslnstruccfonesdeoperacf6n
Per favor familiaricese con todas las instrucciones y
advetlencias antes de operar cuelquier herramienta neumatica
Use siempre protecci6n adecuada pars los ojos
La protecct_n de los ojos resistente a! impacto debe cumplir o
exceder los est,_ndares estabtecidos en ANSI Z87 1, Protecci6n
ocupactonal y educativa de los ojos y el rostra Busque ta marCo
Z871 en su protector de los ojes pars asegurar que es un estilo
aprobado
Se recomtenda el use de protecc|6n audittva
Debe_ usar protecci_n audttiva st Ia expostclSn al nivel de ruide
equivMe at nivel ac0stico promedio cronopenderado de 8 heros
de 85 dBA o Io super& Ef ruide del proceso, superficies
reflector'as, arras herramientas operadas en la cercania, redes
agregan M nivel de _J}do en un &tea determinada de trabejo
Si no es posibie determinar !a exposici6n al nivel de ruido, se
recomtenda usar prolecci6n auditiva.
Evite una exposlcf6n pro|ongada a la vlbracl6n
Las herramientas neum_ticas pueden vibrar durante su use
La exposici6n prolongada a los vibraciones o los movimientos
muy repetidos de manes y brazes pueden causar tesiones
intenumpa el use de cualquier herramienta si experimenta
cosquilleo, adormecimiento, malestar o dolor en los manes o
brazes. Antes de reanudar el use de la herramienta, usted debe
consultar con su m,_dico
M_xtmo de 90 PSI (libras manom_trieas per pulg,
cuadrada)
Esta herramienta est_ disefiada para operar a una preston
neum_tica m_xima de indicador de 90 libras per pulgada
euadrada {90 PSi) en la herramienta. El use de una presi6n de
sire mayor puede y pedr_ causar tesiones Tambl_n. el use de
una presibn neum_tica mayor somete a los componentes
internes a cargos y tenslones pars las cuales no fueron
disefiados, causando una falia prematura de la herramienta
NOTA: ELSUMINISTRO DEAtRE DEBEPJ_ SER UMPIO Y SECO.
PREFERENTEMENTE LUBRICADO, PARA OBTENER LOS
MEJORES RESULTADOS, PURGUEA DtARIO LAHUMEDAD DEL
COMPRESOR.
Use los accesortos correctos
Antes de cambiar los accesodes siempre desconecte la
herramienta del suministro de aire Nunca sujete la pfeza de
trabaja con tas manes, piemas ni contra ninguna otra parle del
cuerpo Asegura que pieza con abrazaderas o tomi_!e de banco
de forms que Ias dos manes est_n libres pars usar la
herramienta. Mant_ngase parade firmemente y en equilibria en
todo memento. Antes de comenzar, verifique ta direccibn en la
que se proyectar_ la herramtenta No cambte de direcci6n de la
herramienta mientras qua fa misma est& funcionando. No fuerce
la herramienta Deje que la braca trabaje en el Iugar designado
ADVERTENCIA 1
Algunos pelves creados per el tijado, aserrado, desgastado,
laladrado y arras actividades de constnJcciOn contienen
substancias quimicas conocidas coma causantes de c_ncer.
defectos de nacimiento u otras lesiones en el sistema de
reproducci6n AIgunos ejemplos de esas sustancias qutmicas
SOn:
P!omo de pinturas fabdcadas a base de p$omo
Silica cdstatino de laddllos, cemento y arras productos de
mamposteria, ast come
ars_nico y creme de maderas quimicamente tratadas
Su desgo a esas exposiciones varIa, dependiendo da la
frecuencia a Ia qua usted efect0e este tipo de trabajo Pars
reducir su expesicibn a estos matefiates: trabaje an un _rea bien
ventifada y con los equipos de protecci6n aprabados, come
m_scaras de pelvo qua est_n espec{ficamente disefiadas pars
fittrar partlcufas microsc6pieas
(2)
GARANTiA PeR UN AISle COMPLETe EN
LAS HERRAMIENTAS NEUM/_TICAS CRAFTSMAN
St esta herramienta CraP,sman no le satisface completamente
dentro de un abe a padir de su fecha de compra, DEVUt_LVALA
A LATIENDASEARS M/kS CERCANA EN LOS ESTADOS UNIDOS,
y Sears ta reparar_ o reempiazar_ gratis Si esta herramienta
Craftsman se usa para '_nes cemerciales o de aiquiler, asia
garantia sa aplica per 90 dias solamente a partir de la fecha de
compra Esta garantia Ie proporciona derechos legales
especificos, y Usted puede tenor tambi_-n arras darechos qua
varian de estado a estado,
Distribuido per Sears, Roebuck and Co,, Dept,
817WA, Hoffman Estates, tL 60179.
Et taladro reversible de 3/8 pulg Craftsman, Modet0 875 ! 99500.
est_ disefiado pars las apficaciones qua incluyen taladrado,
afilado, cepillado de alambres y sujeci6n/soltura de tomillos Esta
herramienta tiene una palanca de reveres montada laleralmente
pars los cambtos rapides y f_cites de la direcci6n.
Features
Engranajes planetados qua logran una transferencia suave
de la potencia y poca vibracibn.
Palanca de reversa monlada lateralmente pars uncambio
r_pido de la direcci6n
Mandril Jacobs _ pars una vida prolongada..
Roscas del husitlo ................................................. 3!8 pulg x 24
Ve!ocidad libra (sin carga) .................................................. 2200 RPM
Peso ............................................................................... Z1 libras
Longitud total ........................................................... 6V=pulg
Consume promedio de sire .................................................. 5.5SCFM
TamaSo recomendado de la manguera ....... 3/8 pulg de di_m. int.
Entrada de sire ......................................................... 1/4 pulg NPT
Presi6n de sire m_xima .............................................. 90 PSi
Previo a la operaci6n
Antes de conectar la herramtenta al suministro de sire, limpie la
manguera de aire pars quitade el polvo y la humedad
acumulados Hagalo pasando sire tibremante per la manguera per
un tiempo de 5 a 10 segundos Antes de quitar ta herramienta del
servicio o cambtar los casquillos, aseg0rese de qua la ftnea de
sire eat6 apagada en el compreser,, Con ella se prevendr_ que la
herramienta funcione si el acelerador se acciona
accidentalmente
Instalaci6n (Vea la Figura 1)
La herramienta est& dise_iada pars qua funcione a 90 psi. Una
preei6n manor (per debajo de 90 psi) disminuir_ el rendimtento de
la herramtenta, mtentras que una presi6n neum&tica mayor
(sabre 90 psi) incrementara el rendimiento de la herramienta m&s
all_ de su capacldad nominal y puede causar dafios extensos a
la herramlenta y lesiones graves at asuado
Use siempre sire limpio y seco.. La humedad excesiva y la
suciedad reduci_n en gran medida la vida 0til de cualq_Jier motor
de sire compfimido Se recomienda la instalaci6n de un filtro-
regulador-lubdcador en tines Io m_s cema posible a ta
herramienta.
Pars una Iongitud de hasta 8 pies se requiere usar una manguera
de aire de 3!8 pulgada Si se necesila una longitud mayor, se
debe usar una manguera de aire de 1/2 pulgada en el compreso_:
Conecte una manguera de 3/8 putg de conexi6n flexibfe pars el
resto de los 4 a 8 pies. pars que ayude a la flexibilidad.
AsegOrese de que todas los mangueras y accesodos seandel
tamat'_o correcto y que est6n firmemente conecJados antes de
usar fa herramienta neumalica
Pendiente mayc, rde "I/!0D
Fillro-regulador*
V_tvula lubricad_r
de c_erre
Linea principal = 3 races
el tamaho de la admistbnl
mangueta de herramienla
Herramianta de
aite compdmldo
Figure 1
Conexi6n de |a manguera de aire
Comps'earn" de eke
Este taladra reversible de 3/8 pulg con empuSadura de pistola
est_ dise6ado par° functonar a 90 PSIG. Una presi6n menor (per
debajo de 90 PSIG) disminuir_ e{ rendtmlento de ]a herr°relent°,
mientras qua una presidn neum_tica mayor {sabre 90 PSIG)
]ncrementar_ et rendimiento de la herramienta m&s aH_ de su
capacidad nominal y puede causer da6es extensos ala
herr°relent° y tesiones graves al usuario.
Advertencia: Antes de prestar servicio o cambiar
accesorios desconecte |a herramienta del suministro
de aim.
Antes de cambiar las braces {tesconecte ef euministro de aide.
Las braces del taladro deben insentarse 1o m&s hast° el fondo
posible Use una chaveta de manddt de tam°fie apropiado par°
aprelar la brace del tatadro, go,pear o esca_'ear el manddl,
Siempm quite la chaveta del mandril antes de conec_ar a _a Itnea
de aim,
[ ADVERTENCIA I
Cuando se usa cualquier herramienta de cortese debe
tener cuidado ante la posibilidad de que la herramienta
sedoble oparta,, La velocidad m&xima de corte de la
herramienta debe ser |gual o superior a la velocidad
nominal de la herramienta,,
Podria sentirse un par torsor de alta reacci6n con
cualquier broca en et momento del corteo
Lubricaci6n
Se recamienda user un littro-reguladorqubficador en line° (Fig 1)
ya que increment° la duraci5n de Ia herramienta y mantiene la
herramienta en una operaciSn sostenida Deber_ comprobar el
Iubricador en [inea can regular|dad y Ilenado con ace|l° papa
herramientas de air° compfimido Ei ajuste correcto del tubricader
en ttnea se reaiiZa cotacande una hoia de papal pr6xima a los
orificios de escape de la herramienta y manteniendo abiedo el
acelerader duranle 30 segundos apraximadamente Se °just°
cart°clement° e{ ]ubdcador cuando el papef queda manchado con
una ligera mancha de ace|re Deber_n evitarse las canlidades
excesivas de ace|t°
En case de set necesario almacenar la herramienta duranle un
largo tiempo (de la noche a _amaSana, un fin de semen°, etc.),
deber_ lubricada abundantemente a tray,s de la entrada de aire
Deber_ operar la herramienta durante 30 segundos
aproximadamente par° asegurar la distribucibn pareja del aceite
en ted° la herramienta Debe_ aim°caners° la herramienta enun
media limpio y seca
Lubrtcantes recomendados:Use un aceite de herramienta
neum_tJca u cualqu]er otro ace|t° de grade el°veda de turbina que
conlenga absorbente de hum°dad, inhibidores de 6xido. agentes
humfdificadores del metal y un aditivo EP (presi6n extreme)
Sears CRAFTSMAN Modelo 875.199500
Taladro reversible neumbtico de 3/8PULG
Vista ampliada y lista de piezas
Refo
t
2
3
4
5
6
7
8
9
10
11
12
13
14
15
16
17
18
19
2O
2t
22
23
24
Plaza No,
9113001-0I
913012
976350
9106655
976306
976309
976310
996312
976312
976313
9106363
96315-01
9113013
9113014
91t3015--01
9113016
914517
9113018
9113019
913002
9113021-01
9113025
914515
9123020
Descripct6n Cant.,
Caja protectora 1
Clavlja del gatiI_o 1
Tap6n de silenciador 1
Esferas cat, mica 20
Cojinete I
Aslento de fa v_lvula I
V&lvula del acalerador 1
Resode de la v_Ivula t
Deflector de escape t
Arandela 1
Junta totica I
Conjirzeteadmision deaim I
Cojinete 1
Valvula de reversa I
Patanca de marcha atras 1
Rssorte 1
Esfera t
Tomillo I
Anillo retenedor 1
Junta t6dca 2
Tomtllo 1
Junta 1
Rodamiento esf_rica 1
Placa posterior 1
\
Re[, Pieza Noo Descripci6n Cant_
25 9123021 Rotor 1
26 914519 Paleta del rotor 5
27 913021 Cilindro 1
28 913022 Clavija 1
29 9123025 Placa delanler 1
30 9106378 Rodamiento esf_ric t
31 927023 Rodamiento esf_r_c 1
32 9150140 Engranaj 2
33 913026 Clavija de engranaj 2
34 9I13037 Hus{llo 1
35 9113038 Engranaje del an{llo 1
36 9113036 Ctavija del resorte 1
37 9113035 Junta de adomo 1
38 9106648 Rodamiento esf_rico 2
39 9113039 Estuche de engranaje t
40 913031 Arandela I
41 595D Mandril 1
42 913033 TomiIlo de mandril t
43 59t4 Bate fiave 1
44 9113044-01 Conjinete de caja protetra 1
45 913007 ,Junta tbrica 1
(4)
Localizaci6n y solucibn de fallas
La herramienta funclona lentamente o
no funciona
1 En la herramienta hay polvo,
arena o resina
2 En ta herramienta no hay acette 2.
3 La presi6n del aim est_ baja 3
4 la manguera de aire tiene 4
escapes
5 Ca{dos de presi6n 5
6.. Paleta deI rotor en et motor 6,,
desgastada
7. Rodamtento esf(_rico en el 7..
motor desgasiado
trrigue ]a herramienla con aceite o diluyente de resinas
pare herramientas neum_,ticas
en diluyente.
Lubdque la herramienta de acuerdo a los instrucciones
de ]ubricaci6n indicadas an este manual
a. Ajuste el regulador de la her_amienta al valor m_ximo
b Ajuste el regulador de! compresor a! m&ximo de la
herramienta de 90 psi
Apdete y setle los accesorios de la manguera Si ha
encontrado escapes, use una cinta adhesive de teII6n..
a Aseg0rese de qua la manguera qua est_ usando
tango el tamaSo correcto. Los mangueras largas o las
herramientas qua usan grandes vol_menes de aire
podrian requerir una manguera con un di_metro interne
de t/2 pulgada o m_s. dependiendo de ]a Iongitud total
de [a manguera..
b No use varies mangueras cenectadas una ala olra
a tray,s de accesorios de conexl6n r_pidos Esto
cause cafdas de presibn ad{cionates y reduce la
potencia de la herramienta. Conecte fas mangueras una
con la otra directamente
Reemplace [a paleta de1rotor
Retire e tnspeccione el rodamlento en busca de
herrumbre, suciedad y arena.. Reemplace o Ltmpie y
engrase el rodamiento con grasa pare rodamientos
Per el escape de la herramienta est,_
satiendo humedacl
1. Ague en el lanque Drene el tanque. (Consulle el manual del compresor).
Engrese fa herramienta y h_gata funcionar hasta qua no
yea agua Engrase la herramienta otra vez y d_jela
funcionar de 1 a 2 segundos
tmpactos lentos o no hay impactos
1..Falta de lubricaciSn
2,, El regulador de la herramienta
est_ puesto en la posici6n
incorrect&,
3 Regulador en f{nea o
regulador del compresor
fijado muy bajo
1.Lubrique et motor del aire y el mecanismo de impacto
(Consulte la secci6n Lubricaci6n de este manual).
2 Ajuste ef regulador de la herramienta a su valor m_ximo
3 Ajuste los reguladores del sistema de aire.
Proyecta impactos r_pidamente pero I Mecanismo de impacto 1 Reemp_ace los componentes desgastados del mecanismo
no quite los pemos., desgastado de impacto
No da impactos 1. Mecenismo de impacto role 1. ReempIace fos cempor_entes rotes del mecan{smo de
impaclo.
(5)

For the repair or replacement
parts you need delivered directly to your home
Call 7 am - 7 pro, 7 days a week
1-800-366-PART
(1-800-366-7278)
Para ordenar piezas con entrega
a domicilio - 1-800-659-7084
For the location of a
Sears Parts and Repair Center
in your area
Call 24 hours a day, 7 days a week
1-800-488-1222
munmmmmnm
mnmmm)m
For more information on
purchasing a Sears
Maintenance Agreement or to inquire
about an existing Agreement
Call 9 am - 5 pro, Monday-Saturday
1-800-827-6655
The model number of your air tool is located
on the serial plate attached to the tool,
When requesting service or ordering parts,
always give the following information:
• Product Type
, Model Number
• Pneumatic Tool
• Part Description
Distributed by Sears, Roebuck and Co., Hoffman Estates, IL 60179 USA