

Contents
Connection
Establishing a Wired Internet Connection..................................................3
Establishing a Wireless Internet Connection............................................. 3
Connecting Bluetooth Devices...................................................................4
Using HDMI&CEC......................................................................................4
Connecting a Digital Audio System to Use eARC/ARC.............................5
Connecting an AV device, a PC or a Game Console with an HDMI
cable...................................................................................................... 6
Connecting USB Devices...........................................................................7
Game
Game Mode Settings................................................................................. 8
Game Assistant..........................................................................................9
Smart Functions
Getting Familiar with the Home Screen...................................................10
Using Voice Control................................................................................. 11
Media........................................................................................................12
Apps......................................................................................................... 16
Picture and Sound
Adjusting the Picture Quality....................................................................18
Adjusting the Sound Quality.................................................................... 21
Multi-screen
Screen Sharing........................................................................................ 24
Content Sharing....................................................................................... 24
Accessibility and System
Accessibility.............................................................................................. 26
Configuring Device Preferences Settings................................................ 26
Configuring Advanced System Settings...................................................28
Troubleshooting
1

Picture Issues...........................................................................................31
Sound Issues........................................................................................... 31
Network Issues.........................................................................................32
External Device Connection Issues......................................................... 32
Apps......................................................................................................... 33
Media Files...............................................................................................33
Voice Control Issues................................................................................34
Other Issues.............................................................................................34
Using the E-Manual
Launching the E-Manual.......................................................................... 36
Using the Buttons in the E-Manual..........................................................36
2
Connection
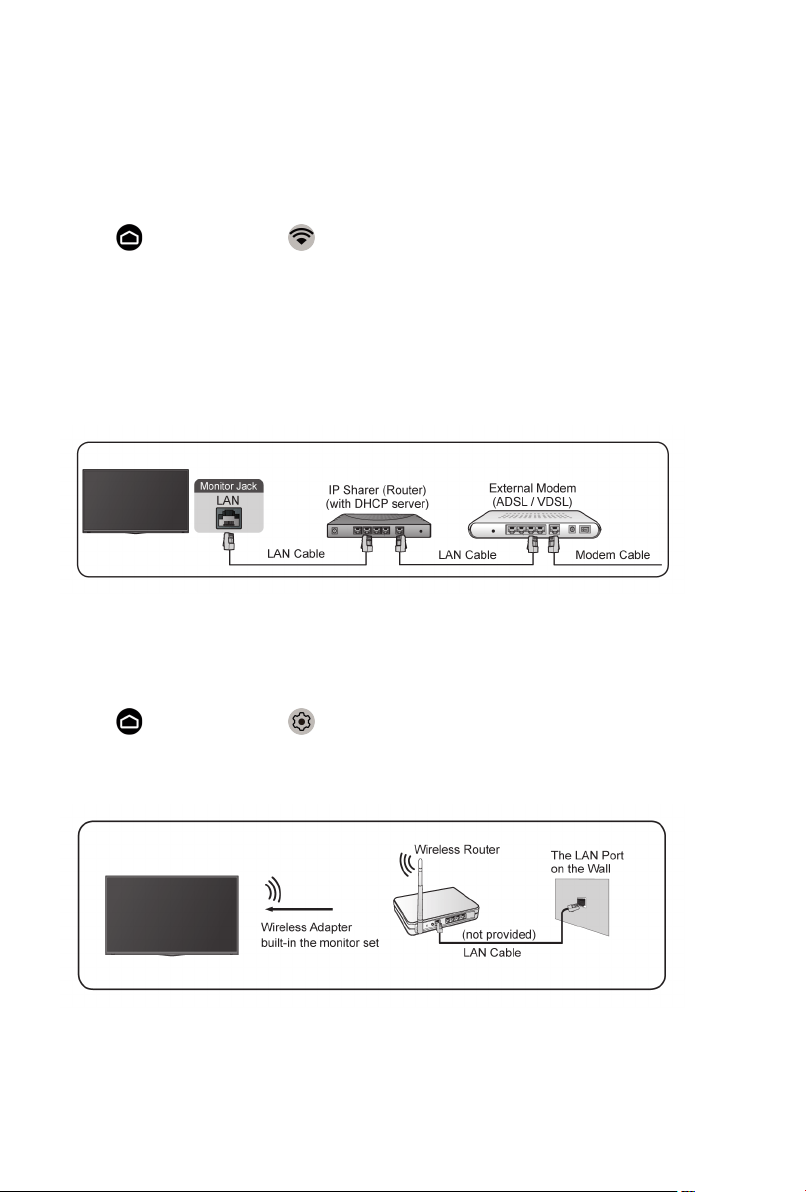
Establishing a Wired Internet Connection
Connecting to a wired (Ethernet) network
Press button to select icon to enter Network & Internet.
To get access to the Internet in a wired way, it is recommended to use
a modem or router that supports Dynamic Host Configuration Protocol
(DHCP). Modems and routers that support DHCP automatically provide the
IP address, subnet mask, gateway, and DNS, so you don't have to enter
them manually. Most home networks already have DHCP.
See the illustration below.
Establishing a Wireless Internet Connection
Connecting to a wireless network
Press button to select icon, and select Network & Internet > Wi-Fi
To connect to an available wireless network, make sure that you have the
wireless router’s SSID and password before attempting to connect.
To get access to the Internet in a wireless way:
1. Turn on your Wi-Fi.
2. The list of networks will display automatically.
3. Select a wireless network from the list, input the password.
3
4. If the network connection does not appear in the list, select See all to
display all the list, or select Add new network to input a Wi-Fi name,
select the type of security mode, and enter password.
Connecting Bluetooth Devices
Connecting a Bluetooth device
To pair a Bluetooth device, such as Bluetooth headphones, speakers,
keyboards, mouse or even moblie devices:
1. Before pairing your Bluetooth devices, make sure they're in pairing mode
and put devices within range of the monitor. To put your Bluetooth devices
in pairing mode, refer to the user manual of devices.
2.
Press button to select icon, and select Remotes & Accessories
> Add accessory to put the monitor in pairing mode. A list of available
Bluetooth devices will be displayed.
3. Select the desired device from the list, then follow the onscreen
instructions. If you are prompted to enter a passcode, refer to the user
manual of the device. After pairing is completed, the device is connected
and is stored to the monitor.
Note:
• You need to unpair a paired device first if the maximum number of paired
devices was reached.
Listening to the monitor through Bluetooth devices
1. Pair the Bluetooth audio devices using the monitor’s Bluetooth function.
Refer to the user manual of your audio device such as Bluetooth speaker,
sound bar and headphones for detailed connection steps and usage.
2.
Press button to select icon, select Sound > Audio Output, and
then select the Bluetooth option to listen to the audio through bluetooth
devices.
Note:
• Compatibility issues may occur depending on the Bluetooth device.
• The monitor and Bluetooth device may disconnect depending on the
distance between them.
Using HDMI&CEC
Use the monitor's remote to control external devices that are connected
to the monitor by an HDMI cable. The external devices need to support
HDMI&CEC function.
4

Connecting an external device through HDMI&CEC function
Press button to select icon, and select Inputs > HDMI control.
1. Set HDMI control to On.
2. Connect an HDMI&CEC compliant device to the monitor.
3. Turn on the connected external device. The device is automatically
connected to the monitor. After connection is finished, you can access the
menu of the connected device on your monitor screen using your monitor
remote and control the device.
Enabling device auto power off
Press button to select icon, and select Inputs > Device auto power
off.
Set to On to turn off CEC compatible external devices when the monitor is
turned off.
Enabling Display auto power on
Press button to select icon, and select Inputs > Display Auto Power
On.
Set to On to turn on the monitor when CEC compatible external devices is
turned on.
Note:
• HDMI cables must be used to connect HDMI&CEC compatible devices to
your monitor.
• The HDMI&CEC feature of the connected device must be turned on.
• If you connect an HDMI device that is not HDMI&CEC compatible, all the
HDMI&CEC control features do not work.
• Depending on the connected HDMI device, the HDMI&CEC control
feature may not work.
• The HDMI&CEC feature are supported One Touch Play, Routing Control,
System Standby, Device OSD Name Transfer, Remote Control Pass
Through, Give Device Power Status, System Audio Control.
Connecting a Digital Audio System to Use eARC/
ARC
If you’d like to use the Enhanced Audio Return Channel (eARC) / the Audio
Return Channel (ARC) feature to have sound sent from the monitor back
down an HDMI cable to a digital sound system, you can connect to the
HDMI 3 (eARC) Port of your monitor.
5

By using this feature, you will also be able to control the sound system with
your monitor remote instead of using multiple remotes for each device.
After the connection:
1. Power on the sound system.
2.
Press button to select icon, and select Sound > Audio Output >
eARC/ARC. If the device supports eARC function, first select Sound >
eARC to set it to On.
Note:
• It works only when the monitor is connected to the audio receiver that
supports the eARC/ARC function.
• If the device has an Input Selector feature then make sure to change it to
monitor.
• When this port is used as the eARC/ARC function, it can be used as
signal input when a DVD is connected to amplifier and the amplifier is
connected to the monitor at the same time. (Some amplifiers may not
support series connection.)
Connecting an AV device, a PC or a Game Console
with an HDMI cable
You can connect an AV device, a PC or a Game Console with an HDMI
cable.
After the connection:
1. Power on the device.
2. Press button on your remote, select the corresponding HDMI as the
input source.
Note:
6
• Only HDMI 3 / 4 Port supports HDMI 2.1, If you'd like to use UHD @120Hz
Timing, first select Menu > HDMI Format > Enhanced format
• Refer to the "Multilingual Installation Guide" for more connection
information.
• Some devices such as DVD player require HDMI signal to be set to
output in the device's settings. Please consult your device user manual for
instructions.
• If there is no sound from your monitor, change the device's audio settings.
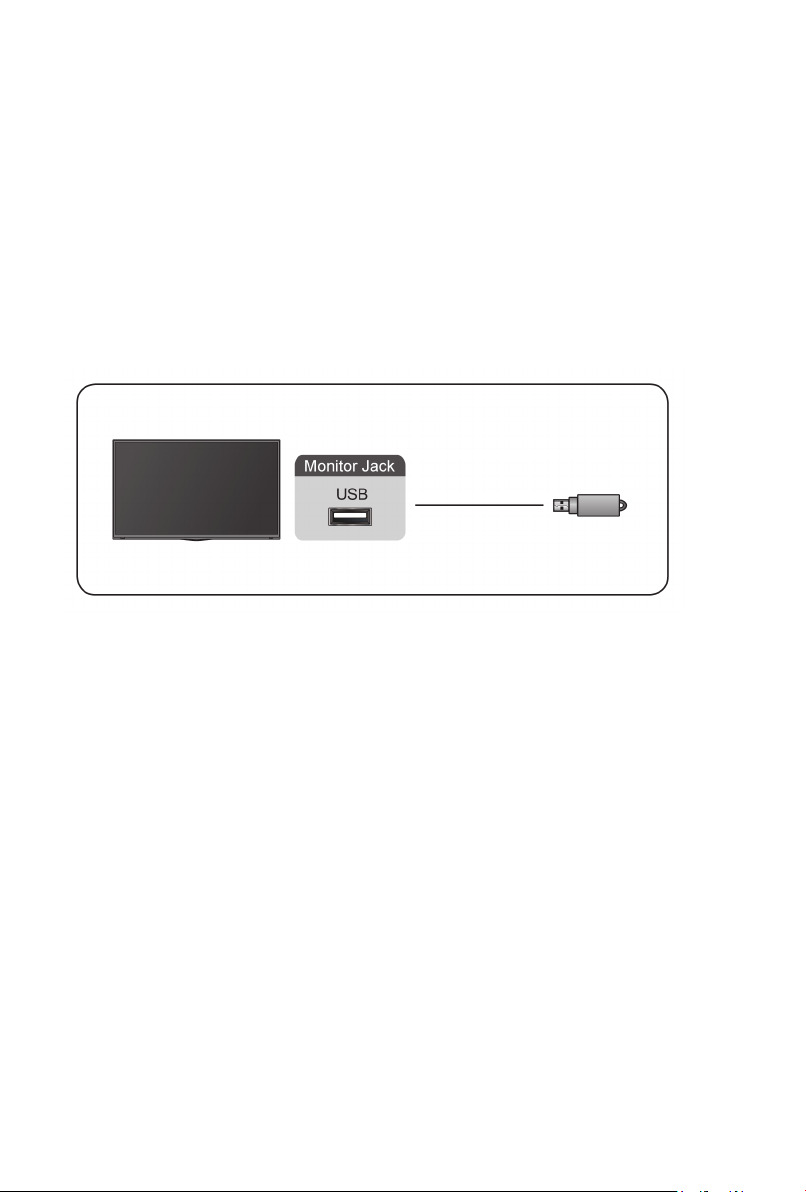
Connecting USB Devices
Connect the USB devices such as hard drives, USB sticks and digital
cameras for browsing photos, listening to music.
• Support the USB disk 4G, 8G, 16G, 32G, 64G, 128G and other common
market size, and 8T hard drive is currently supported.
• Support format: NTFS, FAT32.
• Certain digital cameras may not be compatible with the monitor.
7
Game
Game Mode Settings
Enabling game mode
Press button to select icon, and select Picture > Picture Mode.
You can select the Game mode to optimize the monitor's settings for you to
enjoy a comfortable gaming experience with PC or game console connected
to the monitor.
In the Game Mode:
• Reducing input lag to make sure every press or click matches what's
happening on the screen;
• Improving responsiveness to produce very little motion blur;
• Processing YUV 4:4:4 format signals precisely to present accurate image
colors.
Note:
• This function may not be applicable in some input sources.
Enabling Low Input Lag Mode
Press button to select icon, and select Picture > Advanced Settings
> Low Input Lag Mode.
You can enjoy a smooth viewing experience with external devices connected
to the monitor when Low Input Lag Mode is turned on.
Note:
• When Game mode is selected, Low Input Lag will not be switched off
automatically.
Enabling FreeSync
Press button to select icon, and select Picture > Advanced Settings
> FreeSync.
You can enjoy a smooth viewing experience with external devices connected
to the monitor when FreeSync is turned on.
Note:
• Some functions above may not be applicable in some models/countries/
regions.
8

Game Assistant
Gaming Info
Under HDMI input, press button on your remote to select Gaming, and
select Gaming Info.
Configure the FPS (First Person Shooting) game related settings.
• Gaming Timer
Select countdown timer mode, including off, Count Up, Count Down. To
disable this function, set the setting to off.
• Refresh Rate
Enable or disable the real-time refresh rate setting.
• Info Location
Specify the location of the information to be shown on the screen.
Crosshair
Press button on your remote to select Gaming, and select Crosshair.
Select the desired crosshair type to suit your gaming environment. It makes
aiming much easier.
Display Alignment
Press button on your remote to select Gaming, and enable or disable
Display Alignment.
When the function is enabled, it displays the alignment lines on the four
sides of the screen, providing handy tool for you to line up multiple monitors
perfectly.
9

Smart Functions
Getting Familiar with the Home Screen
The simple design of the Home screen menu makes it easy to navigate. And
you can easily add or delete applications in the Home screen according to
your needs.
To access the Home screen, press button on your remote and use the D-
pad to make your selection.
To exit the Home screen, press button on your remote or use the D-pad
to move the cursor to Inputs icon on the top of the screen, press button
to enter, and select your desired input source.
Indicators and icons on the top of the Home screen
• Google Assistant
You can search movies, songs, and more by speaking.
• Google Search
You can search movies, songs, and more by typing.
• Notifications
Notifications can come from the system, an external device, an
application, the media player, etc.
• Inputs
Select the input source depending on the device you have connected to
your monitor.
• Network & Internet
You can set up the Network & Internet.
• Settings
Settings lets you configure the monitor, set app options, add accounts,
and change other preferences.
• Time
You can always view the current time on the Home screen.
Names of sections that appear on the Home screen
The Home screen displays the following sections:
• Apps
This is the a location where you have the access to all apps on your
monitor. You can enjoy a wide range of services including video
streaming.
10
• Play Next
You can select types of content for Play Next.
You can also manually add a program to play next by long-pressing on a
program in the Home screen.
• Recommended content
Here will display the premium content on the screen, and you can quickly
enter these contents that you want.
Managing apps on the apps row
On the apps row, select an app you want to open, remove or move, and long
press button to manage.
If your favorite app is not on your Home screen, select your favorite app and
long press button, and then select Add to favorites.
Using Voice Control
Voice Control may not be applicable in some models/countries/regions.
Google Assistant
Setup Google Assistant, and enjoy Google Assistant service. You can ask for
information, search for your favorite movies, control your monitor and more,
just by asking Google Assistant.
Before setting up Google Assistant, connect your monitor to the network.
Sign in Google Assistant on monitor
1.
Go to > Settings > Device Preferences > Google Assistant. Turn
on Google Assistant.
2.
Go to > Settings > Accounts & Sign In.
3. Sign in to get new apps, recommendations, movies, and more from
Google. You can use your phone or computer, or use your remote to sign
in. Also you can select Google Assistnat in the Guide when you turn on
the monitor for the first time.
How to start Google Assistant
You can choose one way to start Google Assistant.
•
Press button to select Settings > Device Preferences > Google
Assistant.
•
Press button to select / icon on the top of Home screen to
Google Assistant.
•
Press button on your remote.
11

Note:
• The Google Assistant function may not be applicable in some models/
countries/regions.
• The setup steps above may vary depending on actual products.
Hands-free Voice Control
Google Assistant can answer your questions or help you change monitor
configuration.
Before using this function, connect the monitor to the Internet and sign in
your Google account, by pressing button, selecting icon and selecting
Accounts & Sign In.
How to set up Hands-free Voice Control
1.
Switch the control button on the bottom of the monitor to to turn on
Google Assistant.
2. Start a conversation by saying "Hey Google", and the dialog bar appears
at the bottom of the monitor screen. At the same time, indicator lights
illuminate.
3. Continue speaking, such as "What's the weather" or "volume up".
Screenless mode
> Settings > Advanced System > Screenless Mode
Talk to Google Assistant even when the screen is off.
In Screenless Mode, Google Assistant is always available to help even when
the screen is not on. Just say "Hey Google".
This feature will affect standby power consumption. To turn it off, press
button to select icon, and select Advanced System > Screenless Mode.
Note:
• Google Assistant and some features are available on limited country/
region/language.
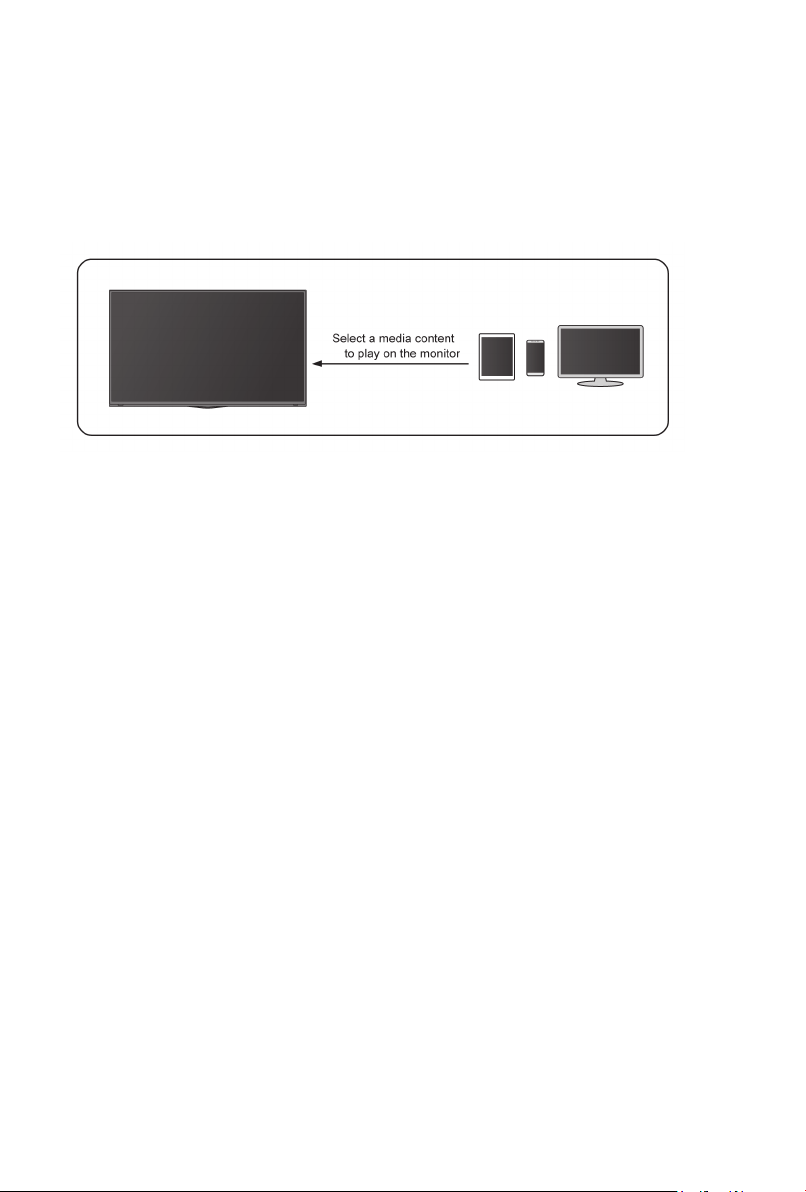
Media
Media is a central location for you to view or listen to different types of
content, such as photos, music and movies. You can view media content
through the following methods:
• A USB thumb drive or hard drive.
12
• Compatible mobile phone, tablet or other personal devices: you can
stream movies, music and photos that are stored on compatible personal
device and play or view the content on your monitor.
Browsing content
You have two ways to enter Media:
• Insert a USB device, a prompt message appears, choose whether to go to
the media.
•
When your USB device is connected to the monitor that doesn't show
Media page, press button to select Apps > Media.
To browse content based on the type that you wish to access:
1. Navigate to the appropriate menu tab on the screen and select All Media,
Videos, Photos, Music.
2. Click on the name of the folder that contains your content.
3. Make your selection to play or view the content.
If you want to close out of the Media centre, then press button on your
remote.
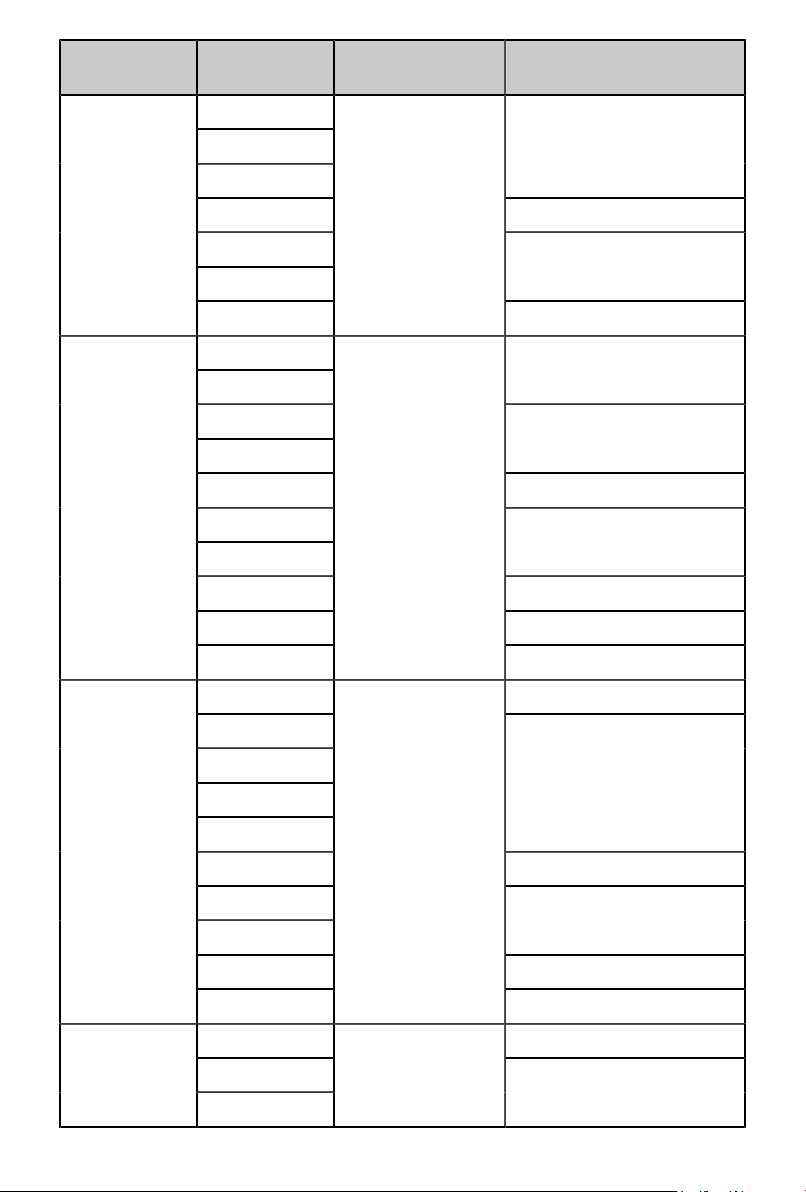
Media format list
Due to differences in programming tools and other factors, some of the file
formats that are listed may not be supported.
Video Format
Container Video Codec File Extension
Name
Resolution and Frame Rate
MPG MPEG1/2 .mpg .mpeg
MPEG1/2
MPEG4
1920 x 1080 @ 60fps
MPEG program
stream
H.264
.DAT, .VOB, .MPG,
.MPEG
3840 x 2160 @ 120fps
HEVC/H.265 3840 x 2160 @ 120fps
MPEG4 1920 x 1080 @ 60fps
H.264 3840 x 2160 @ 120fps
VC1 1920 x 1080 @ 60fps
MPEG transport
stream
MPEG1/2
.ts, .trp, .tp
1920 x 1080 @ 60fps
VP8 1920 x 1080 @ 60fps
AV1
MP4
HEVC/H.265
.mp4, .mov
3840 x 2160 @ 120fps
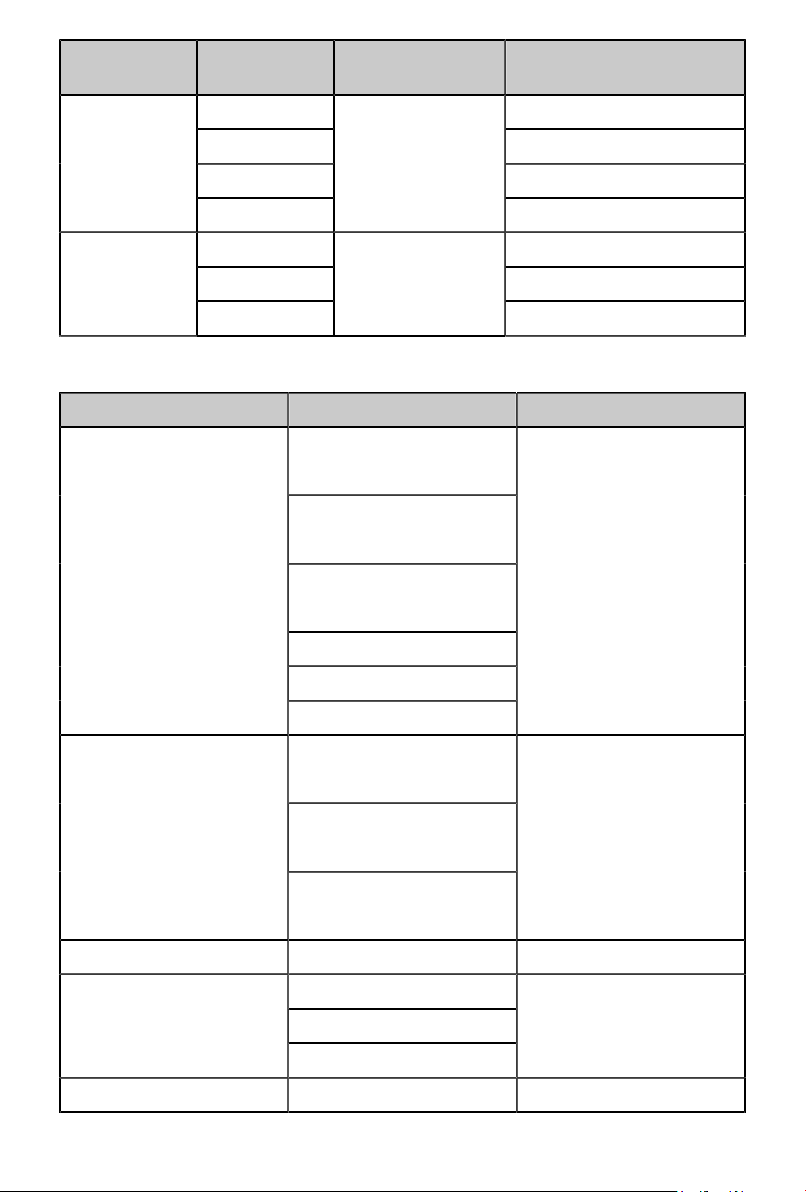
13
Container Video Codec File Extension
Name
Resolution and Frame Rate
MPEG1/2
MPEG4
H.263
1920 x 1080 @ 60fps
H.264 3840 x 2160 @ 120fps
WMV3
VC1
1920 x 1080 @ 60fps
Motion JPEG 1920 x 1080 @ 30fps
VP9
HEVC/H.265
3840 x 2160 @ 120fps
MPEG1/2
MPEG4
1920 x 1080 @ 60fps
H.264 3840 x 2160 @ 120fps
WMV3
VC1
1920 x 1080 @ 60fps
Motion JPEG 1920 x 1080 @ 30fps
VP8 1920 x 1080 @ 60fps
MKV
AV1
.mkv
3840 x 2160 @ 120fps
HEVC/H.265 3840 x 2160 @ 120fps
MPEG1/2
MPEG4
Sorenson H.263
H.263
1920 x 1080 @ 60fps
H.264 3840 x 2160 @ 120fps
WMV3
VC1
1920 x 1080 @ 60fps
Motion JPEG 1920 x 1080 @ 30fps
AVI
VP8
.avi
1920 x 1080 @ 60fps
HEVC/H.265 3840 x 2160 @ 120fps
MPEG4
FLV
Sorenson H.263
.flv
1920 x 1080 @ 60fps
14
Container Video Codec File Extension
Name
Resolution and Frame Rate
H.263
H.264 3840 x 2160 @ 120fps
Motion JPEG 1920 x 1080 @ 30fps
VP8 1920 x 1080 @ 60fps
VP9 3840 x 2160 @ 120fps
VP8 1920 x 1080 @ 60fps
WEBM
AV1
.webm
3840 x 2160 @ 120fps
Audio Format
Container Audio Codec File Extension Name
MPEG1/2
Layer1
MPEG1/2
Layer2
MPEG1/2/2.5
Layer3
AAC-LC, HEAAC
DTS, DTS HD
WAV
LPCM
.wav
MPEG1/2
Layer1
MPEG1/2
Layer2
MP3
MPEG1/2/2.5
Layer3
.mp3
AAC AAC-LC, HEAAC .aac
WMA7, WMA8, WMA9
WMA Pro
WMA
WMA9 Pro
.wma, .wmv
FLAC FLAC .flac
15
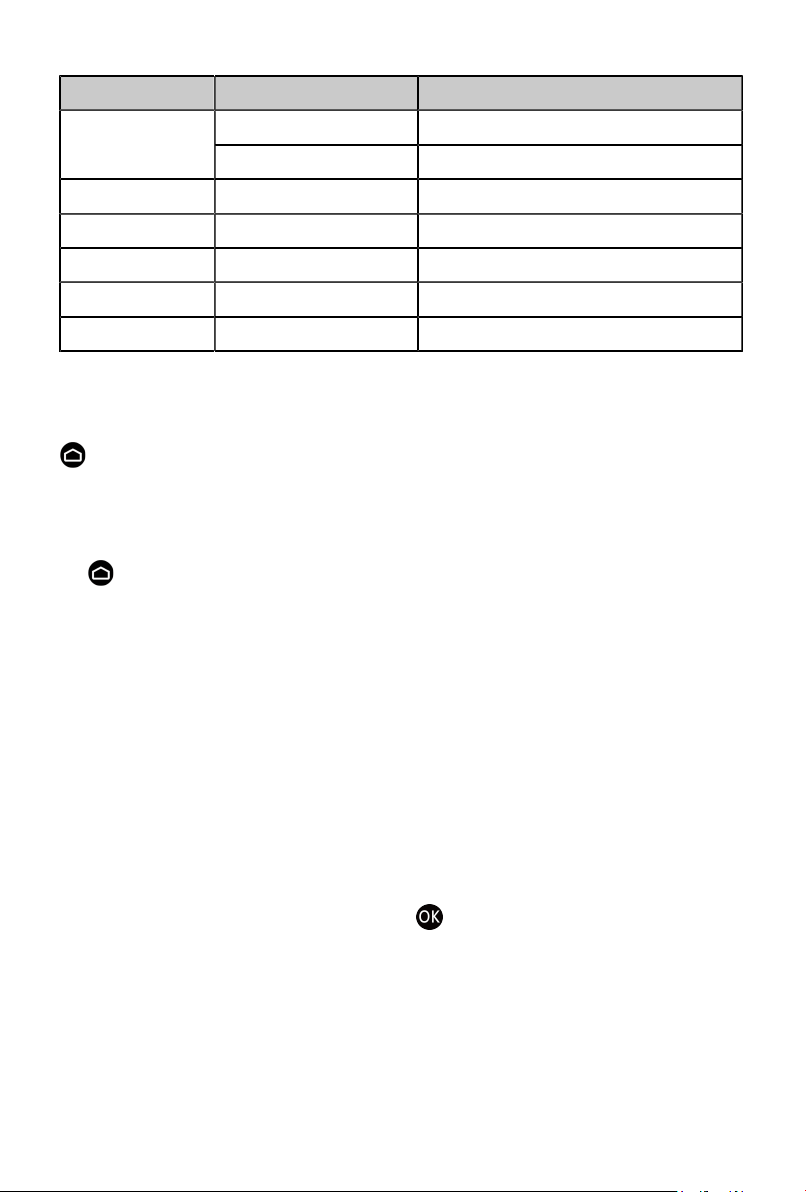
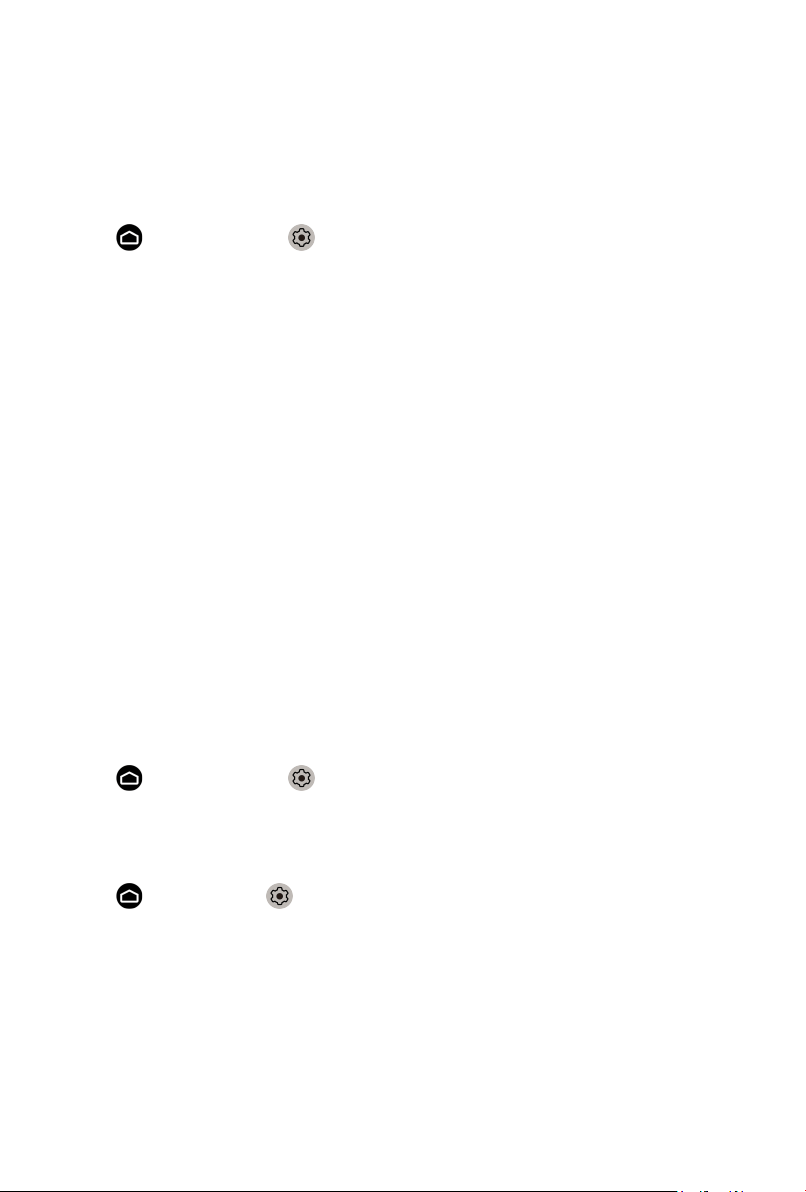
Photo Format
Image Photo Resolution
.jpg .jpeg 15360 x 8640JPEG
Progressive 1024 x 768
PNG 9600 x 6400
BMP 9600 x 6400
GIF 6400 x 4800
WebP 3840 x 2160
HEIF 4000 x 3000
Apps
> Apps
Installing an app
To install an app:
1.
> Apps > Get more apps.
2. Use the D-pad on your remote to select the app that you want to install.
3. Select the Install. The selected app is installed on the monitor.
Note:
• To use this function, your monitor must be connected to the Internet.
• Adding apps is free, but it might cost you money when using some apps.
Removing an app
You can only delete apps that you’ve installed to the monitor. Factory-
installed apps can not be deleted.
To delete an app:
1.
From the Apps screen, use the D-pad on your remote to select the app
that you want to remove. Long press button.
2. Select Uninstall.
3. A dialog message displays that asks "do you want to uninstall this app".
Confirm and the app will be removed from the Apps screen.
Note:
• If an app is deleted, the information related to that app is also removed.
16

Moving app icons around
To move an app:
1.
From the Apps screen, use the navigation buttons on your remote to
select the app that you want to move. Long press button.
2. Select Move.
3.
Use the navigation buttons on your remote to move the location of the
app. Press button to confirm.
17
Picture and Sound
Adjusting the Picture Quality
Using the backlight function
Press button to select icon, and select Picture > Backlight.
You can change the overall brightness of the screen.
• Dynamic Backlight Control (or Local Dimming if support)
Enable the monitor to automatically adjust the backlight by sections
according to the changes in the image and increase the contrast.
• Backlight Level
• Adjust the bright you want images to appear, lower settings create darker
images.
• Automatic Light Sensor
Enable the monitor to automatically adjust the picture settings according
to the amount of ambient light in you room.
• Light Sensor Shift
Adjust the lower point of the dynamic backlight adjustment scope. This is
a money-saving feature because it reduces power consumption.
Note:
• Some functions above may not be applicable in some models/countries/
regions.
Choosing a picture mode
Press button to select icon, and select Picture > Picture Mode.
You can select the picture mode that provides the best viewing experience.
Adjusting the picture quality for each picture mode
Press button select icon, and select Picture > Contrast, Black
Equalizer, Color, Tint or Sharpness.
Choose a picture mode and then adjust the settings.
• Contrast
Adjust the Contrast level to increase or decrease how bright images
appear.
• Black Equalizer
Adjust the black equalizer to generate lighter or darker images.
18
• Color
Adjust the color intensity of the picture for a more vibrant image.
• Tint
Adjust the colors from a green to magenta tint to view the natural skin
tones of people on the screen.
• Sharpness
Adjust how sharp or soft edges of images appear.
Changing the display mode
Press button to select icon, and select Picture > Display Mode
You can adjust the Aspect Ratio to stretch or zoom in on your picture. You
can choose from the following settings: Auto, Normal, Zoom, Wide, Direct,
1:1, Panoramic, Cinema, 21:9or 32:9.
Applying the current picture settings to other input sources
Press button to select icon, and select Picture > Apply Picture
Settings.
Adjust current picture mode to apply to all sources (Including both external
devices and OTT sources) or just current source.
Enabling smart scene function
Press button to select icon, and select Picture > Smart Scene.
Set to On to enable your monitor to recognize the scene in the content
watching and enhance the picture quality on all input sources.
Note:
• Some specific application has explicit constraints that the content
recognition is not allowed.
Configuring advanced picture settings
Press button to select icon, and select Picture > Advanced Settings.
You can configure picture mode settings that provides the best viewing
experience.
• Overscan
Change the video size settings to slightly crop the edges of the displayed
image.
• Color Temperature
Adjust how warm (red) or cool (blue) the white areas of an image appears.
19

• Motion Enhancement
Reduce seeing afterimages that are left on the screen when viewing fast-
moving objects.
If you select Custom, you can configure Blur Reduction and Judder
Reduction manually.
• Aim Stabilizer
Improve how clear the picture appears when viewing.
• Noise Reduction
Improve how clear the picture appears by reducing noise.
• Digital Noise Reduction
Improve picture clarity by reducing video noise.
• HDMI Range
Adjust the HDMI signal range to be more suitable for the content. (HDMI
mode only)
• Active Contrast
Automatically darken dark areas and lighten light areas of images to see
more details.
• Color Space
Change the range of colors the monitor displays.
Note:
• Some functions above may not be applicable in some models/countries/
regions.
Configuring calibration settings
Press button to select icon, and select Picture > Calibration
settings.
Adjust the color space and Gamma to best suit the content you’re viewing.
• Color Tuner
Adjust the Color, Hue, Saturation and Brightness of color settings.
• White Balance
Adjust the intensity of red, green and blue lights to view the true colors of
all images in the picture.
• Gamma
Adjust the Gamma to alter how the monitor will respond to the grayscale
content. In a dark room choose a Higher number like 2.2. In a brighter
area select a Lower number like 2.0. In general, 2.4 is normally
recommended.
20
• Gamma Calibration
Adjust selected Gamma curve.
• RGB Only
View images based on default settings or choose the color red, blue or
green.
• Low Blue Light
Enable or disable low blue light. This function is designed to reduce the
level of blue light to protect your eyes.
To reduce the eye strain and protect eyes when you watch monitor for a
period of time, you are suggested to:
• Take regular and frequent breaks to avoid watching monitor for a long
period of time. Long time of watching may cause you eye fatigue. It is not
recommended to watch monitor for more than one hour.
• Look away from the monitor screen and look at distance objects during
the breaks for at least 10 minutes for eye care.
• Relax yourself during a break by doing eye exercises or outdoor activities.
• The best recommended viewing distance is 3 times the vertical height of
the monitor screen.
Proper breaks and exercises are proved excellent help to relieve eye
strain and fatigue.
Note:
• Some functions above may not be applicable in some models/countries/
regions.
• Low blue light certification may vary by model.
Resetting the picture settings
Press button to select icon, and select Picture > Reset.
Reset current picture settings back to the factory setting.
Adjusting the Sound Quality
Enabling system sounds
Press button to select icon, and select Sound > System Sounds.
Set to On to open the default system sound.
Choosing a sound mode
Press button to select icon, and select Sound > Sound Mode.
You can select a preset sound mode suitable for the content type or the
listening environment.
21
Selecting speakers
Press button to select icon, and select Sound > Audio Output.
Select the speakers that you want to have audio output.
Configuring WiSA Speaker
Press button to select icon, and select Sound > WiSA Speaker
Settings.
Wireless audio transmission can be available with Dongle provided by WiSA
Ready and sound system certified by WiSA Ready.
Enabling eARC
Press button to select icon, and select Sound > eARC.
Connect an audio device that supports eARC via HDMI-eARC, and set eARC
to On to enjoy premium sound quality.
Enabling speaker
Press button to select icon, and select Sound > Speaker.
Turn on or off the monitor speaker.
If ARC or Bluetooth is selected in Audio Output, configuration here is
unavailable.
Enabling Dolby Atmos
Press button to select icon, and select Sound > Dolby Atmos.
Set Dolby Atmos to On to enhance the richness of sound, and you can enjoy
an immersive listening experience.
Enabling Wall Mount Mode
Press button to select icon, and select Sound > Wall Mount Mode.
Automatically optimize the sound based on the position of the monitor.
Configuring advanced sound settings
Press button to select icon, and select Sound > Advanced Settings.
Tune the audio settings and quality of the monitor.
• Balance
Adjust the left and right speaker strength to optimize audio for a specific
location.
• Volume Level
Balance the sound volume of each source.
22

• Auto Volume Control
Activate to prevent the volume from changing when you switch monitor
channels.
• Digital Audio Out
Select the digital audio output format that best suits the audio device type.
Note:
• When using optical connection, PCM and Dolby Audio-Dolby Digital are
suggested.
• If your external audio device does not support Dolby or DTS, PCM is
suggested.
• Digital Audio Delay
Adjust the digital audio output delay time to sync sound from an external
speaker with the images on the monitor.
Note:
• Digital Audio Out and Digital Audio Delay functions are only applicable
when Audio Output is set to ARC or when external audio players are
connected via DIGITAL AUDIO OUT jack.
• Lip Sync
Synchronize the displayed image with the audio output.
• Equalizer
Boost the volume at different frequencies.
• Preferred Audio Language
Set the default audio output language for the type of digital broadcast
content that you’re viewing.
• Headphone Mode
Change the way audio is sent through the type of device that’s connected
to your monitor Audio Out port.
Note:
• This function may not be applicable in some models/countries/regions.
• Headphone Volume
Independently adjust the volume of audio out devices.
Note:
• This function may not be applicable in some models/countries/regions.
Resetting the sound settings
Press button to select icon, and select Sound > Reset.
Reset current audio settings to factory mode.
23
Multi-screen
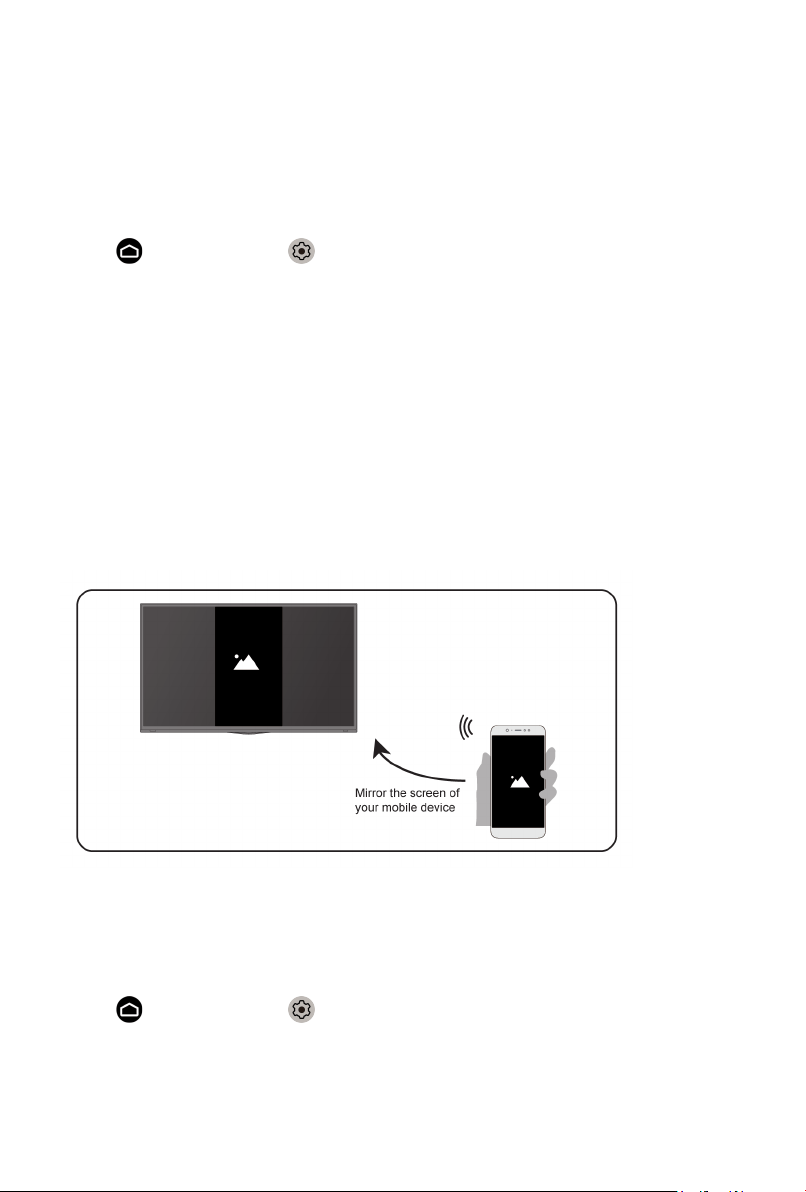
Screen Sharing
Mirror content from your mobile device to the monitor. View videos, photos
and more from your device on your monitor screen.
Press button to select icon, and select Advanced System > Mobile
Device Connection Tips > Screen Sharing.
1. Turn on the casting function of your Android/Windows10 device. The
setting icon may vary depending on the device. The feature may be called
"Wireless display", "Smart view", "Wireless projection", etc.
2. Find the monitor name in the searching list of your device and select
it. Your mobile device's screen will be mirrored once you select your
monitor. If you are using WI-FI, the connecting may fail and the screen
won't switch. You can close Screen sharing application with BACK or
EXIT button.
Note:
• Some mobile devices may not support casting.
Content Sharing
Share videos, music or pictures from your Android/iOS/PC device to the
monitor screen.
Press button to select icon, and select Advanced System > Mobile
Device Connection Tips > Content Sharing.
1. Make sure your device and the monitor are connected to the same
network.
2. Turn on the contents sharing function of your Android/iOS/PC device.
24
3. Find the monitor name in the searching list of your device and select it.
4. Wait for the connection progress to complete, and select the content you
want to share.
Note:
• The content may not be played depending on the file format.
• The content may not be played smoothly or the function may not work
properly due to the network condition.
25
Accessibility and System
Accessibility
Press button to select icon, and select Device Preferences >
Accessibility.
Accessibility function provides menu options and audio description to aid the
visually or hearing impaired.
• High contrast text
Improves contrast for visually impaired.
• Text to speech
Let you specify text-to-speech engine details and speech rate.
• Accessibility shortcut
When the shortcut is on, you can press both the back and down buttons
for 3 seconds to start an accessibility feature.
• Services
This menu function contains some service applications, you can choose to
open if you need it.
Configuring Device Preferences Settings
Press button to select icon, and select Device Preferences.
Date & time
• Automatic date & time
Set to On to use network-provided time.
You can also set the current time manually when Off is selected.
When Off is selected, the monitor Network may not be working properly.
• Set date
Set the date.
• Set time
Set the time.
• Set time zone
Select your time zone.
• Use 24-hour format
Set the time to display in a 12 or 24-hour format.
26

Language
Adjust the default Language settings for the monitor.
Keyboard
Adjust the default settings for the keyboard.
Storage
View the monitor storage.
Home screen
• Customize channels
Add or delete the app channel row from the Home screen.
• Enable video previews
Enable or disable the video previews.
• Enable audio previews
Enable or disable the audio previews.
• Reorder apps/Reorder games
Rearrange the Apps screen.
• Android TV Home/Android TV Core Services
See the information of open source software licences.
Google Assistant
View permissions about accounts and limit the search results.
Chromecast Android Shell (Chromecast built-in)
Enable your app to stream video and audio to the monitor.
Screen saver
Enable Screen saver when the monitor is idle.
Location
Use different modes to access location information. Each mode uses
different sources to estimate the monitor's location.
Usage & Diagnostics
Help improve Android performance by automatically sending diagnostics
information.
Security & restrictions
Supervise unknown sources for safety and check installed apps for harmful
behaviour.
27

Reset
Reset to clear your personal setup and information.
About
View the version information, the status of network, and other information.
You can also update the software version or change the monitor's name.
• System update
Provide software updates to continuously enhance your monitor and
correct any issues that may impact your user experience; therefore,
recommend you to keep your monitor connected to the Internet to
automatically receive updates when they are available.
• Device name
Choose a name for your monitor. The name will be shown to devices that
are available for sharing data.
Configuring Advanced System Settings
Press button to select icon, and select Advanced System.
Timer
• Sleep Timer
Set the sleep timer to automatically turn the monitor off within a specified
time: Off, 10 Minutes, 20 Minutes, 30 Minutes, 40 Minutes, 50 Minutes, 60
Minutes, 90 Minutes and 120 Minutes.
• Power On Timer Type
Set the type Off, Daily, Once.
• Power On Timer
Set the clock for the time you want the monitor to turn on automatically.
• Power Off Timer Type
Set the type Off, Daily, Once.
• Power Off Timer
Set the clock for the time you want the monitor to turn off automatically.
Setup Assistant
Use the Setup assistant for instructions to help you set up your monitor.
Store Mode
Home Mode uses less energy. Select Store Mode if the monitor will be on
display in a retail setting. Store Mode effects E-Streamer and other demo
functions.
28

Screenless Mode (only for models with Hands-free Voice
Control)
Talk to the Google Assistant even when the screen is off.
In screenless Mode, the Google Assistant is always available to help even
when the screen is not on. Just say "OK Google/Hey Google".
This feature will affect standby power consumption when it is set to On.
Note:
• The Google Assistant and some features are available on limited country/
region/language.
Send Diagnostics and Usage
Allow to send the diagnostics and usage of the report.
Serial/IP Control Port
Our monitor supports IP control feature within the local area network (LAN).
monitor can accept the spec-compliant instructions issued by the device in
the same local area network through the pre-defined network interface and
command format, like shutdown, volume up/volume down, switch channels,
etc.
Power LED
Set the Power indicator light to stay On or Off when standby mode.
Note:
• This function may not be applicable in some models/countries/regions.
Power On Mode
Monitor will be powered on based on the mode when it is reconnected with
AC power.
FAV Button Customization
You can personalize FAV remote button for quick access to customized input
source.
Note:
• This function may not be applicable in some models/countries/regions.
E-Manual
Scan QR code to display E-Manual.
29

Mobile Device Connection Tips
Follow the on-screen instructions to learn more about the Screen Sharing
and the Content Sharing.
Clear Cache
Clear cache of applications and system.
Help
• System Message
View system message, including: Serial Number, Service Code, Software
Version, etc.
Note:
• Serial Number may not be displayed depending on models/countries/
regions.
• Signal Information
Perform self diagnosis to test Video Format, Audio Format, Color Depth,
etc.
30
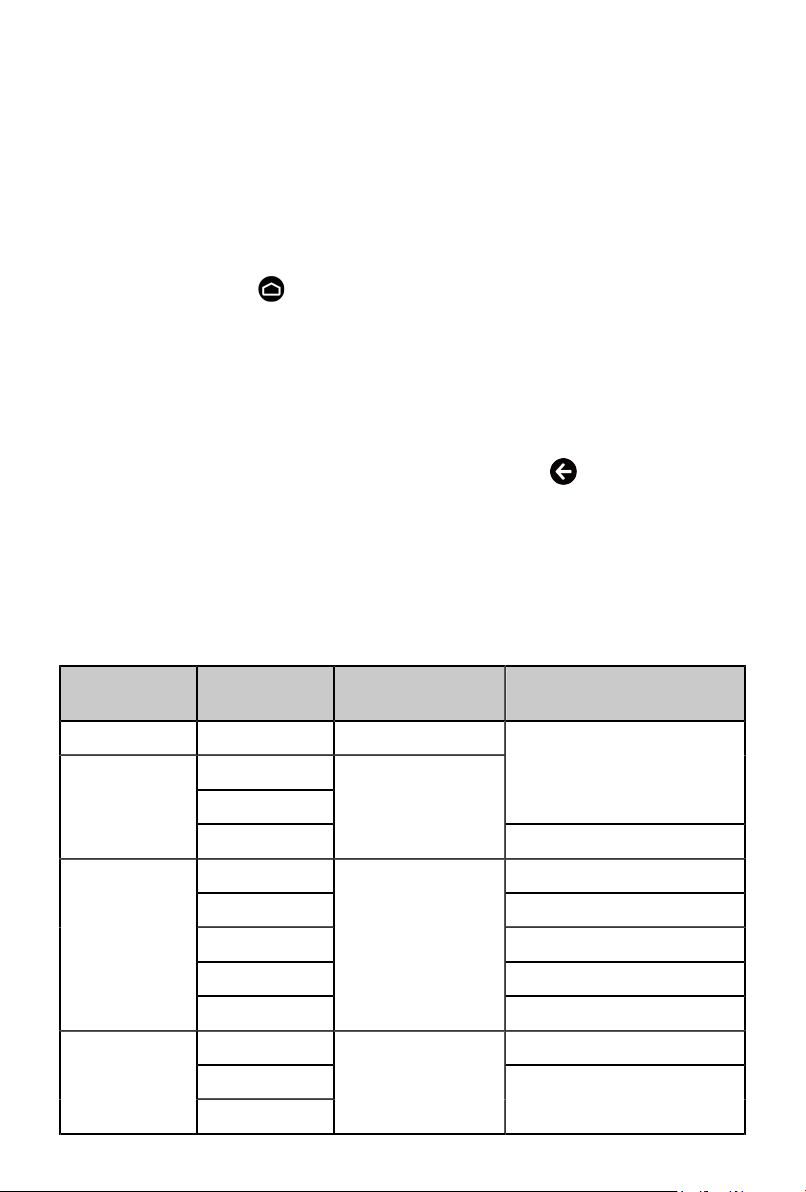
Troubleshooting
Picture Issues
When the monitor has picture problems, these steps may help resolve the
problem.
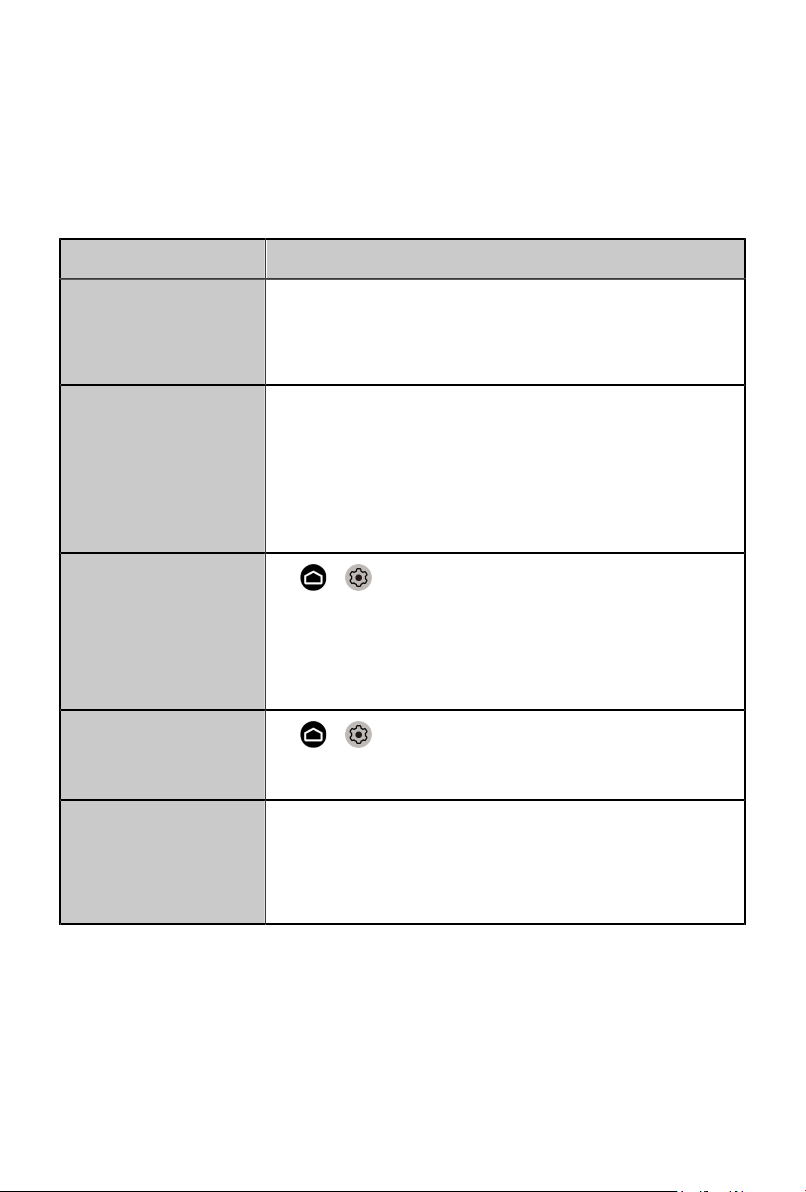
Problem Possible Solutions
No picture, or black and
white picture.
• Unplug the monitor power cord from AC outlet and re-plug
after 60 seconds.
• Check that the Color Saturation is set to 50 or higher.
• Try different monitor inputs.
The picture is distorted.
• The compression of video content may cause picture
distortions, especially in fast-moving pictures from sports
programmes and action movies.
• If the signal reception is weak or poor, screen distortion
may be visible but it is not a malfunction.
• Mobile phones used close to the monitor (within 1m) may
cause noise on analogue and digital channels.
The picture is blurry or
flickering, or cuts out
momentarily.
•
> Settings > Picture > Sharpness. You can try to
increase or decrease the Sharpness.
• If you use an external antenna, check the direction,
position and connection of the antenna.
• Adjust the direction of your antenna, or reset or fine tune
the channel.
The picture appears
red, purple, pink and
other colors.
•
> Settings > Picture > Calibration Settings >
White Balance. You can try to increase or decrease the
White Balance.
Picture distorted or
appear wavy.
• Some electrical appliances may affect the monitor. If you
turn off the appliance and the interference goes away, then
move it further away from monitor.
• Insert the power plug of the monitor into another power
outlet.
Note:
• If the problem persists, check the signal strength or refer to the external
device’s user manual.
Sound Issues
When the monitor has a sound problem, these steps may help resolve the
problem.
31
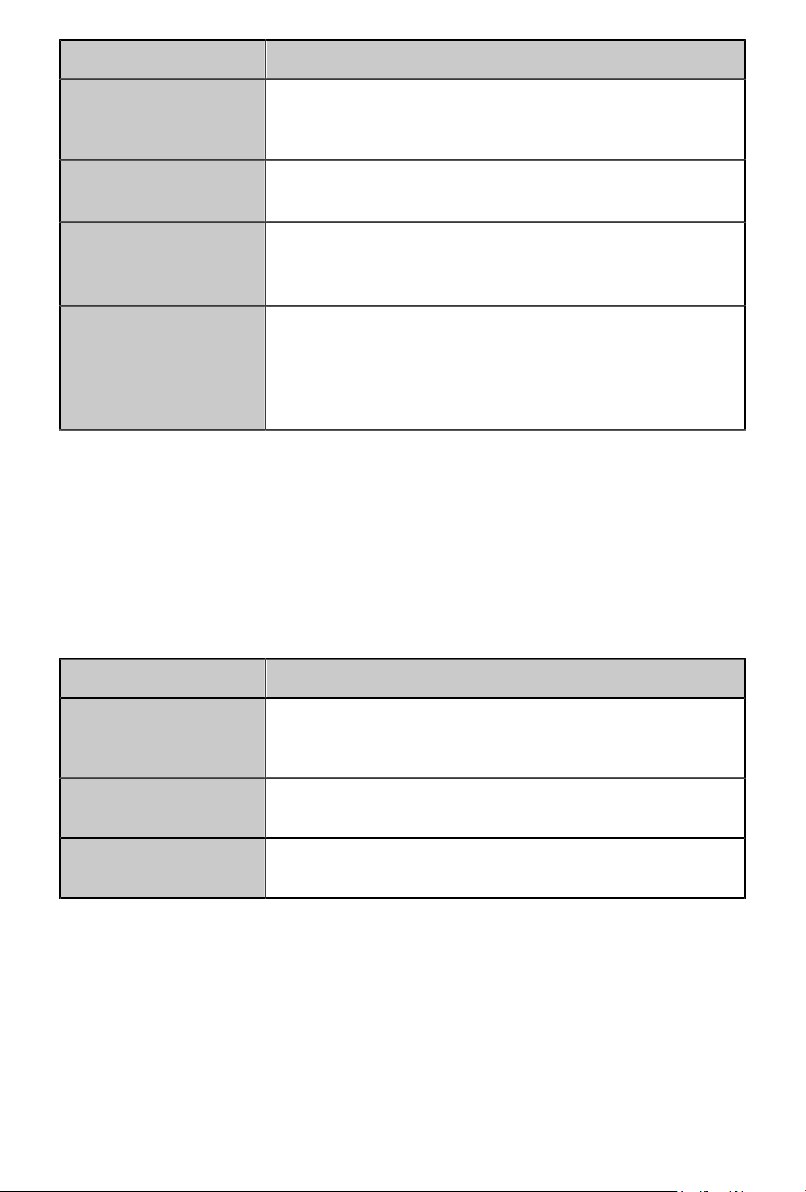
Problem Possible Solutions
There is no sound or
the sound is too low at
maximum volume.
• Check the volume control of the device (DVD, Blu-ray,
etc.) connected to your monitor.
Picture is normal, but
no sound.
• Check the volume settings.
• Check if 'Mute' mode is set to on.
The speakers are
making an odd sound.
• Make sure that the audio cable is connected to the correct
audio output connector on the external device.
• A low signal level may cause sound distortions.
Sound distorted or
appears wavy.
• Some electrical appliances may affect the monitor. If you
turn off the appliance and the interference goes away, then
move it further away from monitor.
• Insert the power plug of the monitor set into another power
outlet.
Note:
• This product does not support decoding of DTS CD bitstreams. Playback
of this format may produce undesirable noise.
Network Issues
When the monitor has difficulties in connecting to the Internet, these steps
may help resolve the problem.
Problem Possible Solutions
The monitor cannot
connect to your network
or apps.
• Make sure the monitor has a network connection.
• Contact your Internet service provider.
The wireless network
connection fails.
• Make sure your wireless modem/router is on and
connected to the Internet.
The wireless network
signal is too weak.
• Position your wireless router, modem router, or access
point in a central location. Avoid putting it in a corner.
External Device Connection Issues
When the monitor has difficulties with external device connection, these
steps may help resolve the problem.
32

Problem Possible Solutions
I have connected an
external source to my
monitor but I get no
picture and/or sound.
• Check whether the connection between the external
device and your monitor is correct.
• Make sure you have made the correct selection of input
source.
There is no sound.
• Check if the Audio Out option in the menu is ARC/eARC,
if not, you need to check whether the external power
amplifier device is connected to the ARC port or optical
port of the monitor.
•
> Settings > Sound > Advanced Settings >
Digital Audio Out. You can try to select PCM, Dolby
Audio-Dolby Digital, or Dolby Audio-Dolby Digital Plus.
• Whether the power amplifier device port is connected
correctly.
• If you select HDMI as input, you can try Menu > HDMI
Format
The remote control
does not work.
• Confirm that monitor still has power and is operational.
• Change the new batteries in the remote control.
• Check if the batteries are correctly installed.
• If some buttons don't work, but the volume buttons can
work normally, it seems there is a problem with the
application.
Apps
When some apps aren't playing, these steps help resolve the problem.
Problem Possible Solutions
Netflix can't be played.
•
> Settings > Apps > Netflix > Force stop, then
reopen to try.
• You can try to reset to the factory settings.
Disney plus can't be
played.
•
> Settings > Apps > Disney plus > Force stop,
then reopen to try.
•
> Settings > Apps > Disney plus > Clear data,
then reopen to try.
• You can try to reset to the factory settings.
Media Files
When files aren't playing, these steps may help resolve the problem.
33

Problem Possible Solutions
Some files can't be
played.
• Most files can be played back, but you might experience
problems with corrupted files or files with high-bitrate,
unsupported resolution, unsupported container or codec
formats.
Voice Control Issues
When Google Assistant isn't playing, these steps may help resolve the
problem.
Problem Possible Solutions
Google assistant can't
be played.
• You can try to log in Google account.
• If you receive "I don't understand" of the voice recognition,
please change account or log out the account.
• After logging in to the Google account, the recognition
language may be different. You need to log in to the
Google account on the web page to set the voice
language.
• For more information about Google Assistant, please
refer to Smart Function > Using Voice Control > Google
Assistant in this manual.
Other Issues
Use these steps to resolve other issues that may occur.
Problem Possible Solutions
The monitor is hot.
• Watching monitor for an extended period of time causes
the panel to generate heat. The heat from the panel is
dissipated through internal vents running along the top of
the monitor.
• After extended use, you may feel hot when touching it.
This heat, however, is not a defect and does not affect the
monitor's functionality.
The monitor smells of
plastic.
• This smell is normal and will dissipate over time.
The plastic cabinet
makes a "clicking" type
of sound.
• The "clicking" sound can be caused when the temperature
of the monitor changes. This change causes the monitor
cabinet to expand or contract, which makes the sound.
This is normal and the monitor is OK.
34

Problem Possible Solutions
When I turn on my
monitor, there is a
delay for a few seconds
before the picture
appears. Is this normal?
• Yes, this is normal. The monitor is initializing and
searching for previous setting information.
35

Using the E-Manual
Launching the E-Manual
Press button to select icon, and select Advanced System > E-
Manual.
Scan the QR Code with your smart phone to browse the E-Manual.
Disclaimer:
Instructions and images through this manual are only for reference and may
differ from the actual product.
Using the Buttons in the E-Manual
Search
You can use icon on the top of the E-Manual home screen to search for
the product feature information, and the E-Manual will provide all the titles
and content that contains the search information.
Setting
You can use icon on the top of the E-Manual home screen to adjust the
text size.
36

A
Regulatory Notices
▐ Regulatory Notices
Supplier's Declaration of Conformity
47 CFR § 2.1077 Compliance Information
Product Name: LCD monitor
Trade Name: GIGABYTE
Model Number: S55U
Responsible Party – U.S. Contact Information: G.B.T. Inc.
Address: 17358 Railroad street, City Of Industry, CA91748
Tel.: 1-626-854-9338
Internet contact information: https://www.gigabyte.com
FCC Compliance Statement:
This device complies with Part 15 of the FCC Rules, Subpart B, Unintentional Radiators.
Operation is subject to the following two conditions: (1) This device may not cause
harmful interference, and (2) this device must accept any interference received, including
interference that may cause undesired operation.
United States of America, Federal Communications Commission
Statement
This equipment has been tested and found to comply with the limits for a Class B digital
device, pursuant to Part 15 of the FCC Rules. These limits are designed to provide
reasonable protection against harmful interference in a residential installation. This
equipment generates, uses and can radiate radio frequency energy and, if not installed
and used in accordance with manufacturer’s instructions, may cause harmful interference
to radio communications. However, there is no guarantee that interference will not occur
in a particular installation. If this equipment does cause harmful interference to radio or
television reception, which can be determined by turning the equipment o and on, the user
is encouraged to try to correct the interference by one or more of the following measures:
•
Reorient or relocate the receiving antenna.
•
Increase the separation between the equipment and receiver.
•
Connect the equipment to an outlet on a circuit dierent from that to which the receiver
is connected.
•
Consult the dealer or an experienced radio/TV technician for help.

B
Radiation Exposure Statement
This equipment complies with FCC radiation exposure limits set forth for an uncontrolled
environment and it also complies with Part 15 of FCC RF Rules. This equipment should be
installed and operated with minimum distance of 20 in. (50cm) between the radiator and
your body. This transmitter must not be co-located or operated in conjunction with any other
antenna or transmitter.
FCC ID.: SARMW510
Canada, Canada-Industry Notice:
i.
the device for operation in the band 5150–5250 MHz is only for indoor use to
reduce the potential for harmful interference to co-channel mobile satellite systems;
ii.
for devices with detachable antenna(s), the maximum antenna gain permitted for
devices in the bands 5250-5350MHz and 5470-5725 MHz shall be such that the
equipment still complies with the e.i.r.p. limit;
iii.
for devices with detachable antenna(s), the maximum antenna gain permitted for
devices in the band 5725-5850MHz shall be such that the equipment still complies
with the e.i.r.p. limits as appropriate; and
iv.
for devices with detachable antenna(s), the maximum antenna gain permitted for
devices in the band 5725-5850MHz shall be such that the equipment still complies
with the e.i.r.p. limits as appropriate; and
v.
where applicable, antenna type(s), antenna models(s), and worst-case tilt angle(s)
necessary to remain compliant with the e.i.r.p. elevation mask requirement set forth in
section 6.2.2.3 shall be clearly indicated.
This device complies with Industry Canada’s licence-exempt RSSs. Operation is subject to
the following two conditions:
(1)
this device may not cause interference, and
(2)
this device must accept any interference, including interference that may cause
undesired operation of the device.
Le présent appareil est conforme aux CNR d’Industrie Canada applicables aux appareils
radio exempts de licence. L’exploitation est autorisée aux deux conditions suivantes :
1)
l’appareil ne doit pas produire de brouillage;
2)
l’appareil doit accepter tout brouillage radioélectrique subi, même si le brouillage est
susceptible d’encompromettre le fonctionnement.
IC ID.27123-MW510
Regulatory Notices

C
Regulatory Notices
Canada, Canadian Department of Communications Statement
This digital apparatus does not exceed the Class B limits for radio noise emissions from
digital apparatus set out in the Radio Interference Regulations of the Canadian Department
of Communications. This class B digital apparatus complies with Canadian ICES-003.
Canada, Avis de conformité à la réglementation d'Industrie Canada
Cet appareil numérique de la classe B est conforme à la norme NMB-003 du Canada.
European Union (EU) CE Declaration of Conformity
This device complies with the following directives: Electromagnetic Compatibility Directive
2014/30/EU, Low-voltage Directive 2014/35/EU, Radio Equipment Directive 2014/53/EU,
ErP Directive 2009/125/EC, RoHS directive (recast) 2011/65/EU & the 2015/863 Statement.
This product has been tested and found to comply with all essential requirements of the
Directives.
European Union (EU) RoHS (recast) Directive 2011/65/EU & the
European Commission Delegated Directive (EU) 2015/863 Statement
GIGABYTE products have not intended to add and safe from hazardous substances (Cd,
Pb, Hg, Cr+6, PBDE, PBB, DEHP, BBP, DBP and DIBP). The parts and components
have been carefully selected to meet RoHS requirement. Moreover, we at GIGABYTE
are continuing our eorts to develop products that do not use internationally banned toxic
chemicals.
European Union (EU) Community Waste Electrical & Electronic
Equipment (WEEE) Directive Statement
GIGABYTE will fulll the national laws as interpreted from the 2012/19/EU WEEE (Waste
Electrical and Electronic Equipment) (recast) directive. The WEEE Directive species the
treatment, collection, recycling and disposal of electric and electronic devices and their
components. Under the Directive, used equipment must be marked, collected separately,
and disposed of properly.
End of Life Directives-Recycling
The symbol shown below is on the product or on its packaging, which
indicates that this product must not be disposed of with other waste.
Instead, the device should be taken to the waste collection centers for
activation of the treatment, collection, recycling and disposal procedure.

D
Regulatory Notices
WEEE Symbol Statement
The symbol shown below is on the product or on its packaging, which
indicates that this product must not be disposed of with other waste.
Instead, the device should be taken to the waste collection centers for
activation of the treatment, collection, recycling and disposal procedure.
Déclaration de Conformité aux Directives de l’Union européenne (UE)
Cet appareil portant la marque CE est conforme aux directives de l’UE suivantes: directive
Compatibilité Electromagnétique 2014/30/UE, directive Basse Tension 2014/35/UE, directive
européenne 2014/53/UE dite RED, directive 2009/125/CE en matière d’écoconception, la
directive RoHS II 2011/65/UE & la déclaration 2015/863. La conformité à ces directives est
évaluée sur la base des normes européennes harmonisées applicables.
European Union (EU) CE-Konformitätserklärung
Dieses Produkte mit CE-Kennzeichnung erfüllen folgenden EU-Richtlinien: EMV-Richtlinie
2014/30/EU, Niederspannungsrichtlinie 2014/35/EU, Funkanlagenrichtlinie 2014/53/
EU, Ökodesign-Richtlinie 2009/125/EC, RoHS-Richtlinie 2011/65/EU erfüllt und die
2015/863 Erklärung. Die Konformität mit diesen Richtlinien wird unter Verwendung der
entsprechenden Standards zurEuropäischen Normierung beurteilt.
For more information about where you can drop o your waste equipment for recycling,
please contact your local government oce, your household waste disposal service or
where you purchased the product for details of environmentally safe recycling.
CE declaração de conformidade
Este produto com a marcação CE estão em conformidade com das seguintes Diretivas UE:
Diretiva Baixa Tensão 2014/35/EU; Diretiva equipamentos de rádio 2014/53/EU; Diretiva
CEM 2014/30/EU; Diretiva Conceção Ecológica 2009/125/CE; Diretiva RSP 2011/65/UE
e a declaração 2015/863. A conformidade com estas diretivas é vericada utilizando as
normas europeias harmonizadas.
CE Declaración de conformidad
Este producto que llevan la marca CE cumplen con las siguientes Directivas de la Unión
Europea: Directiva EMC 2014/30/EU, Directiva de bajo voltaje 2014/35/EU, Directiva de
equipos radioeléctricos 2014/53/EU, Directiva de Ecodiseño 2009/125/EC, Directiva RoHS
2011/65/EU y la Declaración 2015/863. El cumplimiento de estas directivas se evalúa
mediante las normas europeas armonizadas.

E
Regulatory Notices
I prodotti con il marchio CE sono conformi con una o più delle seguenti Direttive UE, come
applicabile: Direttiva EMC 2014/30/UE, Direttiva sulla bassa tensione 2014/35/UE, Direttiva
2014/53/UE sulle apparecchiature radio, Direttiva Ecodesign EMC 2009/125/EC, Direttiva
RoHS 2011/65/EU e Dichiarazione 2015/863. La conformità con tali direttive viene valutata
utilizzando gli Standard europei armonizzati applicabili.
Deklaracja zgodności UE Unii Europejskiej
Urządzenie jest zgodne z następującymi dyrektywami: Dyrektywa kompatybilności
elektromagnetycznej 2014/30/UE, Dyrektywa niskonapięciowej 2014/35/UE, Dyrektywa
radiowa 2014/53/UE, Dyrektywa ErP 2009/125/WE, Dyrektywa RoHS 2011/65/UE i
dyrektywa2015/863. Niniejsze urządzenie zostało poddane testom i stwierdzono jego
zgodność z wymaganiami dyrektywy.
ES Prohlášení o shodě
Toto zařízení splňuje požadavky Směrnice o Elektromagnetické kompatibilitě 2014/30/EU,
Směrnice o Nízkém napětí 2014/35/EU, Směrnice o rádiových zařízeních 2014/53/EU,
Směrnice ErP 2009/125/ES, Směrnice RoHS 2011/65/EU a 2015/863. Tento produkt byl
testován a bylo shledáno, že splňuje všechny základní požadavky směrnic.
EK megfelelőségi nyilatkozata
A termék megfelelnek az alábbi irányelvek és szabványok követelményeinek, azok
a kiállításidőpontjában érvényes, aktuális változatában: EMC irányelv 2014/30/EU,
Rádiókészülék irányelv 2014/53/EU, Kisfeszültségű villamos berendezésekre vonatkozó
irányelv2014/35/EU, Rádióberendezések forgalmazása Környezetbarát tervezésről szóló
irányelv 2009/125/EK, RoHS irányelv 2011/65/EU és 2015/863.
Δήλωση συμμόρφωσης ΕΕ
Είναι σε συμμόρφωση με τις διατάξεις των παρακάτω Οδηγιών της Ευρωπαϊκής Κοινότητας:
Οδηγία 2014/30/ΕΕ σχετικά με την ηλεκτρομαγνητική συμβατότητα, Οοδηγία χαμηλή τάση
2014/35/EU, Οδηγία 2014/53/ΕΕ σε ραδιοεξοπλισμό, Οδηγία 2009/125/ΕΚ σχετικά με τον
οικολογικό σχεδιασμό, Οδηγία RoHS 2011/65/ΕΕ και 2015/863. Η συμμόρφωση με αυτές
τις οδηγίες αξιολογείται χρησιμοποιώντας τα ισχύοντα εναρμονισμένα ευρωπαϊκά πρότυπα.
CE Dichiarazione di conformità
F
Regulatory Notices
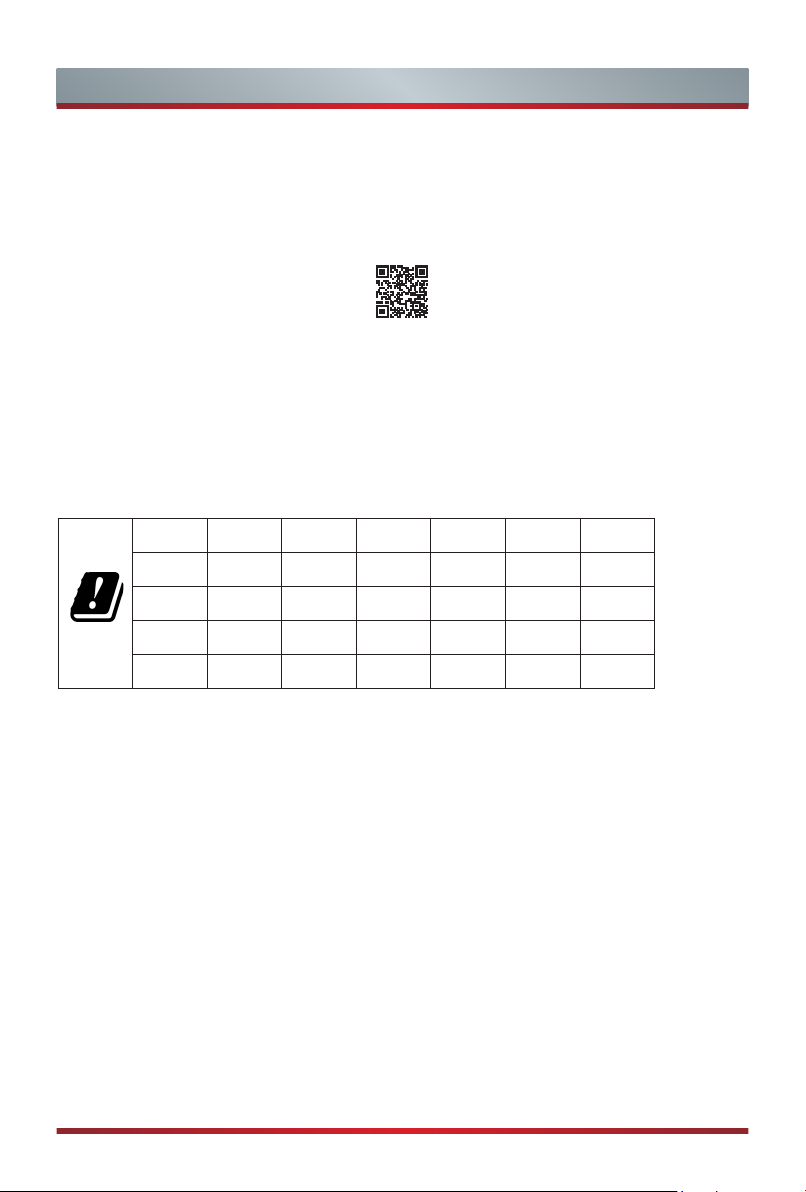
Commission Delegated Regulation (EU) 2019/2013 with regard to
energy labelling of electronic displays - Compliance Information
The information registered in the European Product Registry for Energy Labelling (EPREL)
product database is accessible by scanning the below QR-Code:
European Community Directive R&TTE Directive Compliance
Statement:
This equipment complies with all the requirements and other relevant provisions of Radio
Equipment Directive 2014/53/EU.
This equipment is suitable for home and oce use in all the European Community Member
States and EFTA Member States. The low band 5.15 -5.35 GHz is for indoor use only.
AT BE BG CH CY CZ DE
DK EE EL ES FI FR HR
HU IE IS IT LI LT LU
LV MT NL PL PT RO SE
SI SK TR UK
Wireless module manufacturer: Qingdao Hisense Communications Co., Ltd.
Wireless module model name: MW510
Taiwan NCC Wireless Statements /
無線設備警告聲明
:
低功率電波輻射性電機管理辦法
第十二條 :
經型式認證合格之低功率射頻電機,非經許可,公司、商號或使用者均不得
擅自變更頻率、加大功率或變更原設計之特性及功能。
第十四條 :
低功率射頻電機之使用不得影響飛航安全及干擾合法通信;經發現有干擾現
象時,應立即停用,並改善至無干擾時方得繼續使用。前項合法通信,指依電信法規定
作業之無線電通信。低功率射頻電機須忍受合法通信或工業、科學及醫療用電波輻射性
電機設備之干擾。
警語:使用過度恐傷害視力
注意事項 : (1) 使用 30 分鐘請休息 10 分鐘。
(2) 未滿 2 歲幼兒不看螢幕,
2 歲以上每天看螢幕不要超過 1 小時。
G
Regulatory Notices
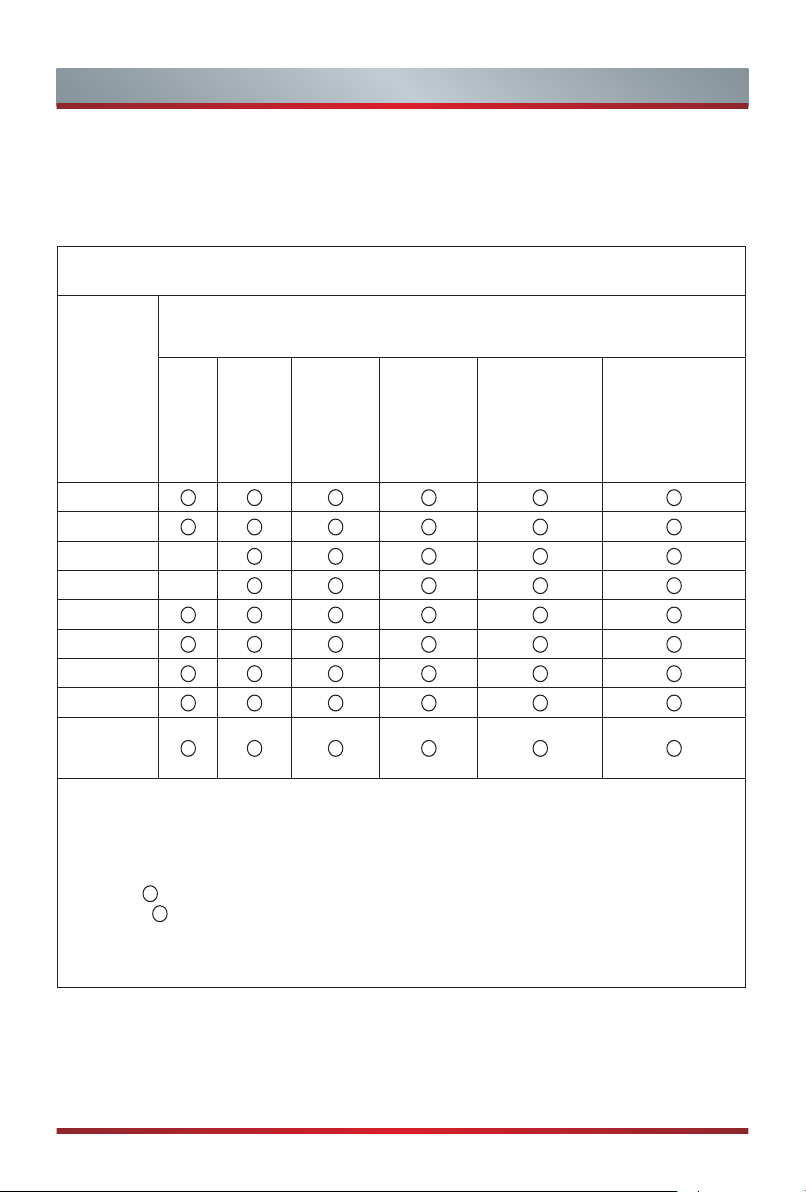
限用物質含有情況標示聲明書
Declaration of the Presence Condition of the Restricted Substances
Marking
設備名稱:液晶顯示器 型號(型式):S55U
Equipment name Type designation (Type)
單元
Unit
限用物質及其化學符號
Restricted substances and its chemical symbols
鉛
Lead
(Pb)
汞
Mercury
(Hg)
鎘
Cadmium
(Cd)
六價鉻
Hexavalent
chromium
(Cr
+6
)
多溴聯苯
Polybrominated
biphenyls (PBB)
多溴二苯醚
Polybrominated
diphenyl ethers
(PBDE)
金屬外框
後殼
液晶面板
—
電路板組件
—
底座
電源線
其他線材
揚聲器
配件(遙控
器等)
備考 1. 〝超出 0.1 wt %〞及〝超出 0.01 wt %〞係指限用物質之百分比含量超出百分比
含量基準值。
Note 1:〝Exceeding 0.1 wt %〞 and〝exceeding 0.01 wt %〞 indicate that the percentage
content of the restricted substance exceeds the reference percentage value of
presence condition.
備考 2
. “ ”係指該項限用物質之百分比含量未超出百分比含量基準值。
Note 2:〝 〞 indicates that the percentage content of the restricted substance does not
exceed the percentage of reference value of presence.
備考 3
. “
—
”係指該項限用物質為排除項目。
Note 3:The〝
—
〞indicates that the restricted substance corresponds to the exemption
.

H
Safety Precautions
▐ Safety Precautions
Read through the following Safety Precautions before using the monitor.
•
Only use the accessories that are provided with the monitor or that which are
recommended by the manufacturer.
•
Keep the plastic packaging bag for the product in a place that cannot be reached by
children.
•
Before connecting the monitor to the power outlet, make sure that the voltage rating of
the power cable is compatible with the power specication in the country where you are
located.
•
The power cord plug must be connected to a properly wired power outlet.
•
Do not touch the plug with wet hands, otherwise easily cause electric shock.
•
Place the monitor in a stable and well-ventilated place.
•
Do not place the monitor near any heat sources such as electric radiators or direct
sunlight.
•
The holes or openings on the monitor are for ventilation. Do not cover or block the
ventilation holes with any objects.
•
Do not use the monitor near water, drinks, or all types of liquids. Failure to do so
may result in electric shock or damage to the monitor.
•
Make sure to unplug the monitor from the power outlet before cleaning.
•
As the screen surface is easy to be scratched, avoid touching the surface with any
hard or sharp object.
•
Use a soft lint-free cloth instead of a tissue to wipe the screen. You may use a glass
cleaner to clean the monitor if required. However, never spray the cleaner directly
onto the screen.
•
Disconnect the power cable if the monitor is not being used for a long period of
time.
•
Do not attempt to disassemble or repair the monitor yourself.
•
The plug on the power supply cord is used as the disconnect device, the socket-
outlet shall be installed near the equipment and easily accessible.

I
Safety Precautions
Stability Hazard Precautions
The product may fall, causing serious personal injury or death. To prevent injury, this product
must be securely attached to the oor/wall in accordance with the installation instructions.
Many injuries, particularly to children, can be avoided by taking simple precautions
such as:
•
ALWAYS use stands or installation methods recommended by the manufacturer of the
product set.
•
ALWAYS use furniture that can safely support the product.
•
ALWAYS ensure the product is not overhanging the edge of the supporting furni-
ture.
•
ALWAYS educate children about the dangers of climbing on furniture to reach the
product or its controls.
•
ALWAYS route cords and cables connected to your product so they cannot be
tripped over, pulled or grabbed.
•
NEVER place the product on tall furniture (for example, cupboards or bookcases)
without anchoring both the furniture and the product to a suitable support.
•
NEVER place the product on cloth or other materials that may be located between
the product and supporting furniture.
•
NEVER place items that might tempt children to climb, such as toys and remote
controls, on the top of the product or furniture on which the product is placed.
•
If the existing product is going to be retained and relocated, the same consider-
ations as above should be applied.
•
To prevent personal injury or damage to the product caused by tipping over due to
earthquakes or other shocks, make sure to install the product in a stable location
and take measures to prevent falling.