
Copyright
© 2022 GIGA-BYTE TECHNOLOGY CO., LTD. All rights reserved.
The trademarks mentioned in this manual are legally registered to their
respective owners.
Disclaimer
Information in this manual is protected by copyright laws and is the
property of GIGABYTE.
Changes to the specifications and features in this manual may be made by
GIGABYTE without prior notice.
No part of this manual may be reproduced, copied, translated,
transmitted, or published in any form or by any means without GIGABYTE’s
prior written permission.
• In order to assist in the use of this monitor, carefully read the User
Guide
• For more information, check on our website at:
https://www.gigabyte.com
The terms HDMI and HDMI High-Definition Multimedia Interface, and the
HDMI logo are trademarks or registered trademarks of HDMI Licensing
Administrator, Inc. in the United States and other countries.
2022 – 05
Rev. A00

SAFETY PRECAUTIONS
Safety Precautions
Read through the following Safety Precautions before using the
monitor.
• Only use the accessories that are provided with the monitor or that
which are recommended by the manufacturer.
• Keep the plastic packaging bag for the product in a place that cannot
be reached by children.
• Before connecting the monitor to the power outlet, make sure that
the voltage rating of the power cable is compatible with the power
specification in the country where you are located.
• The power cord plug must be connected to a properly wired and
grounded power outlet.
• Do not touch the plug with wet hands, otherwise easily cause electric
shock.
• Place the monitor in a stable and well-ventilated place.
• Do not place the monitor near any heat sources such as electric
radiators or direct sunlight.
• The holes or openings on the monitor are for ventilation. Do not
cover or block the ventilation holes with any objects.
• Do not use the monitor near water, drinks, or all types of liquids.
Failure to do so may result in electric shock or damage to the
monitor.
• Make sure to unplug the monitor from the power outlet before
cleaning.
• As the screen surface is easy to be scratched, avoid touching
the surface with any hard or sharp object.
• Use a soft lint-free cloth instead of a tissue to wipe the screen. You
may use a glass cleaner to clean the monitor if required.
However, never spray the cleaner directly onto the screen.
• Disconnect the power cable if the monitor is not being used for a
long period of time.
• Do not attempt to disassemble or repair the monitor yourself.

Stability Hazard Precautions
The product may fall, causing serious personal injury or death. To
prevent injury, this product must be securely attached to the floor/wall in
accordance with the installation instructions.
Many injuries, particularly to children, can be avoided by taking simple
precautions such as:
• ALWAYS use stands or installation methods recommended by the
manufacturer of the product set.
• ALWAYS use furniture that can safely support the product.
• ALWAYS ensure the product is not overhanging the edge of the
supporting furniture.
• ALWAYS educate children about the dangers of climbing on furniture
to reach the product or its controls.
• ALWAYS route cords and cables connected to your product so they
cannot be tripped over, pulled or grabbed.
• NEVER place a product in an unstable location.
• NEVER place the product on tall furniture (for example, cupboards or
bookcases) without anchoring both the furniture and the product to
a suitable support.
• NEVER place the product on cloth or other materials that may be
located between the product and supporting furniture.
• NEVER place items that might tempt children to climb, such as toys
and remote controls, on the top of the product or furniture on which
the product is placed.
• If the existing product is going to be retained and relocated, the
same considerations as above should be applied.
• To prevent personal injury or damage to the product caused by
tipping over due to earthquakes or other shocks, make sure to install
the product in a stable location and take measures to prevent falling.

Gaming Monitor U
ser Guide
- Contents5 -
Contents
SAFETY PRECAUTIONS ...........................................3
Safety Precautions . . . . . . . . . . . . . . . . . . . . . . . . . . . . . . . . 3
Stability Hazard Precautions. . . . . . . . . . . . . . . . . . . . . . . . . .4
INTRODUCTION .................................................6
Unpacking . . . . . . . . . . . . . . . . . . . . . . . . . . . . . . . . . . . . . 6
Package Contents. . . . . . . . . . . . . . . . . . . . . . . . . . . . . . . . .8
Product Overview . . . . . . . . . . . . . . . . . . . . . . . . . . . . . . . . 9
GETTING STARTED ..............................................11
Installing the Monitor Base . . . . . . . . . . . . . . . . . . . . . . . . . 11
Adjusting the Viewing Angle . . . . . . . . . . . . . . . . . . . . . . . . 13
Installing a Wall-Mount Bracket (Optional) . . . . . . . . . . . . . . . 14
Making Connections . . . . . . . . . . . . . . . . . . . . . . . . . . . . . .15
USING THE DEVICE..............................................16
Turning the Power On/Off . . . . . . . . . . . . . . . . . . . . . . . . . . 16
User Comfort Recommendations . . . . . . . . . . . . . . . . . . . . . .17
Selecting the Input Source . . . . . . . . . . . . . . . . . . . . . . . . . . 17
OPERATIONS ...................................................18
Quick Menu . . . . . . . . . . . . . . . . . . . . . . . . . . . . . . . . . . . 18
Configure the Device Settings. . . . . . . . . . . . . . . . . . . . . . . .27
APPENDICES ...................................................37
Specifications . . . . . . . . . . . . . . . . . . . . . . . . . . . . . . . . . . 37
Supported Timing List . . . . . . . . . . . . . . . . . . . . . . . . . . . . .38
Troubleshooting . . . . . . . . . . . . . . . . . . . . . . . . . . . . . . . . 40
Basic Care. . . . . . . . . . . . . . . . . . . . . . . . . . . . . . . . . . . . .41
GIGABYTE Service Information . . . . . . . . . . . . . . . . . . . . . . . 41
SAFETY INFORMATION ..........................................43
Regulatory Notices . . . . . . . . . . . . . . . . . . . . . . . . . . . . . . .43
G
aming Monitor User Guide
- 6 -
INTRODUCTION
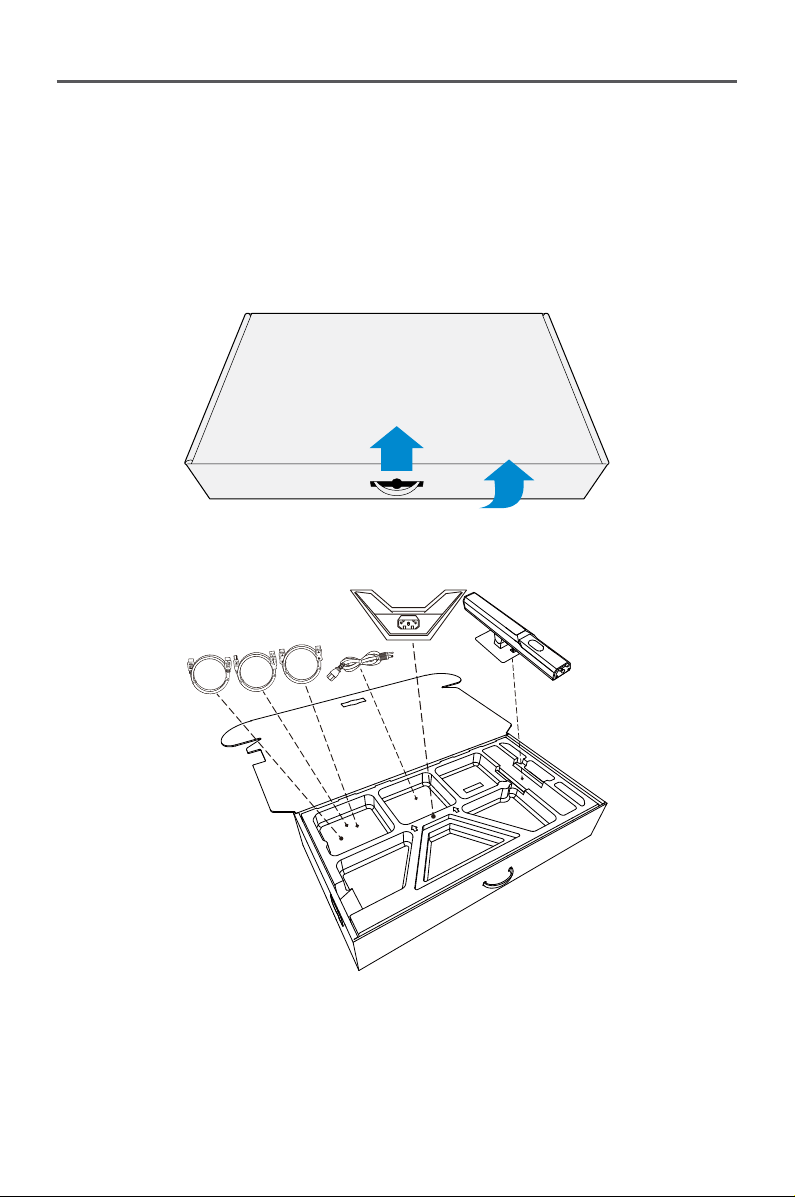
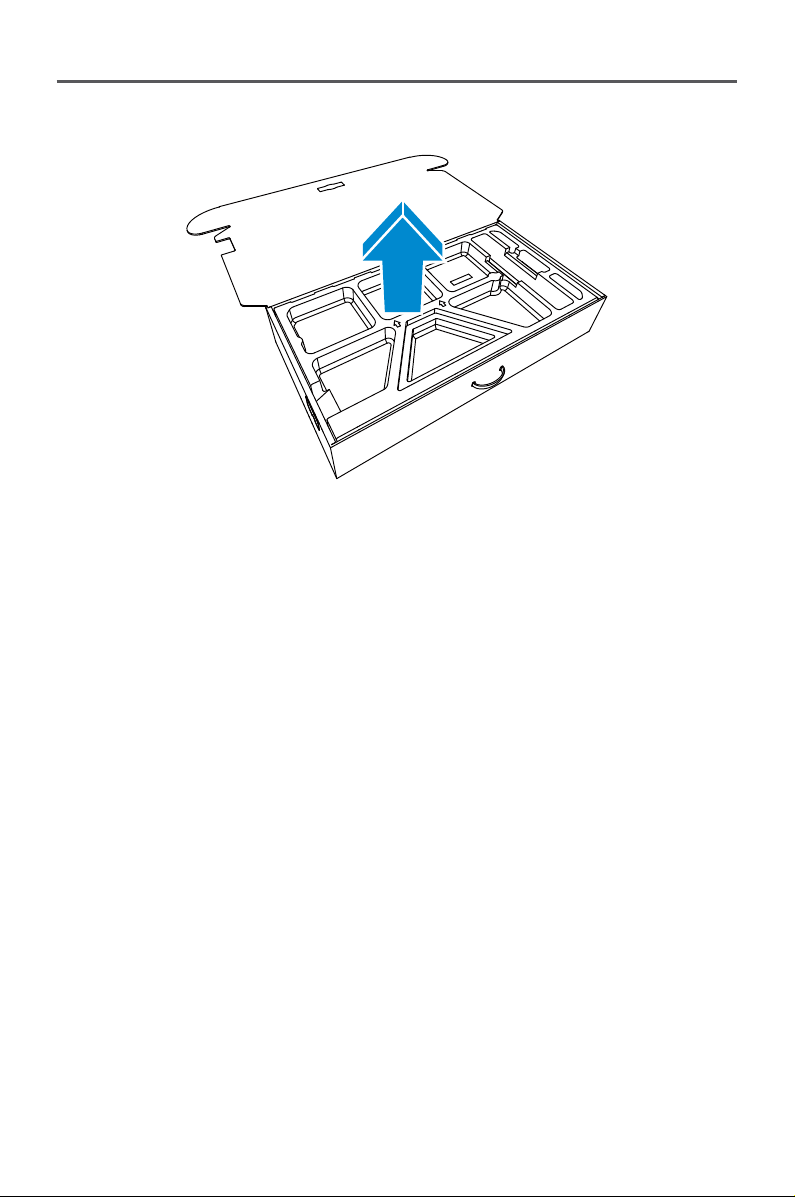
Unpacking
1. Open the upper cover of the packaging box. Then observe the
unpacking label attached on the inner cover.
2. Making sure the box is in the correct orientation, carefully lay the box
on the stable surface.
UP
3. Remove the transparent wrapper securing the EPS foams. Then
remove the items from the upper EPS foam.
Gaming Monitor U
ser Guide
- 7 -
4. Remove the upper EPS foam. Then you can remove the monitor from
the lower EPS foam.
G
aming Monitor User Guide
- 8 -
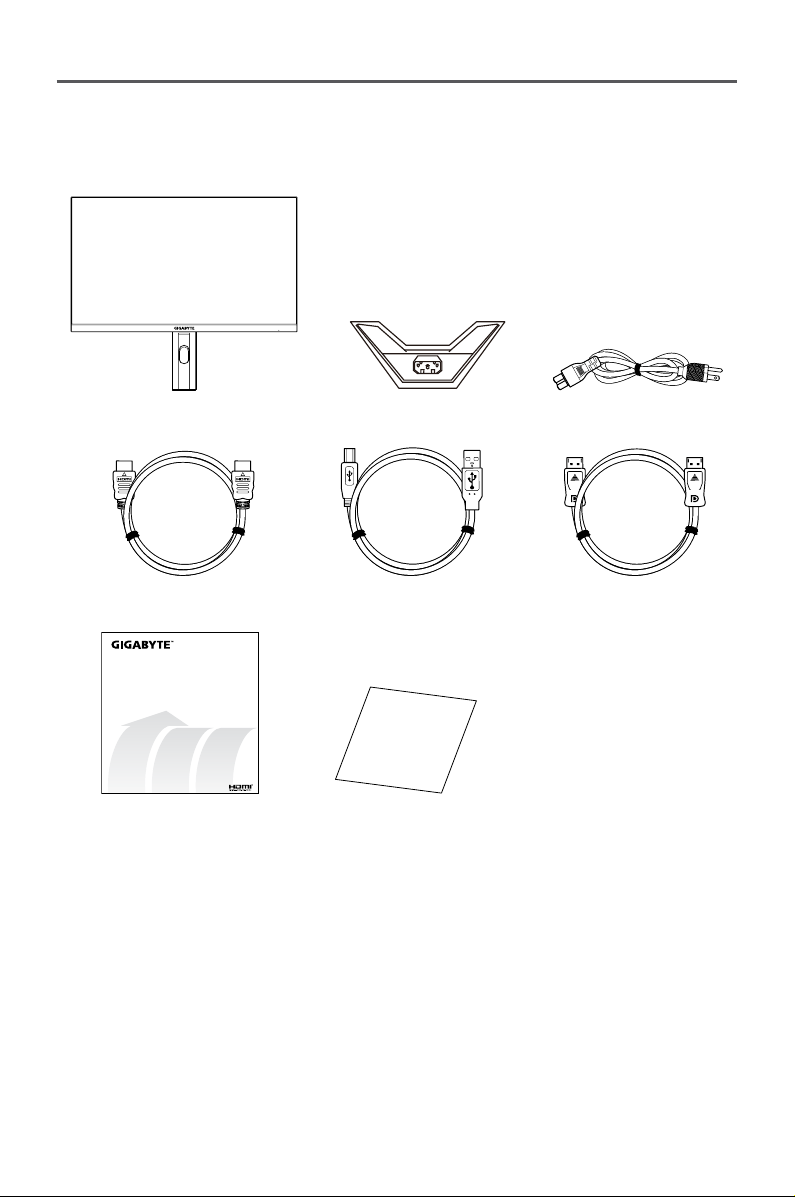
Package Contents
The following items come with your packaging box. If any of them is
missing, please contact your local dealer.
Monitor Monitor Base Power Cable
HDMI Cable USB Cable DP Cable
Multilingual
Installation
Guide
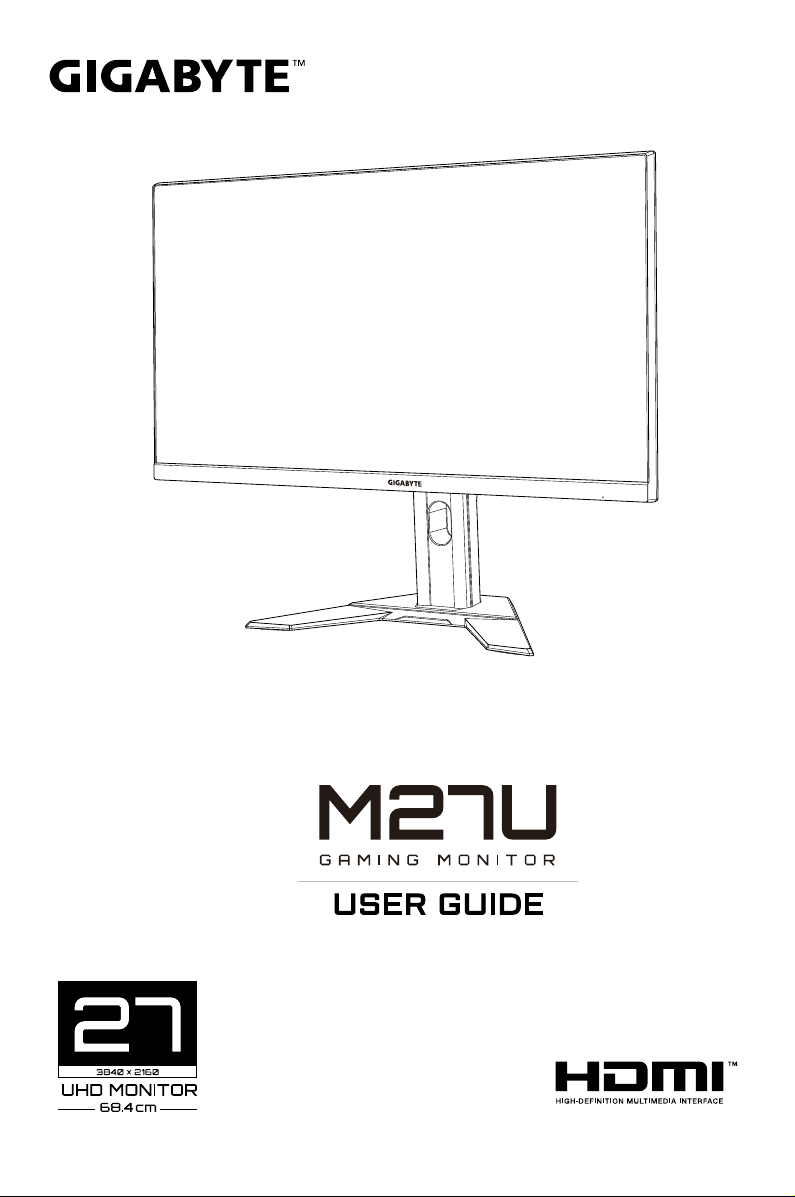
M27U
Warranty Card
Quick Start Guide Warranty Card
Note: Please keep the packaging box and packing materials for future
transportation of the monitor.
Gaming Monitor U
ser Guide
- 9 -
Product Overview
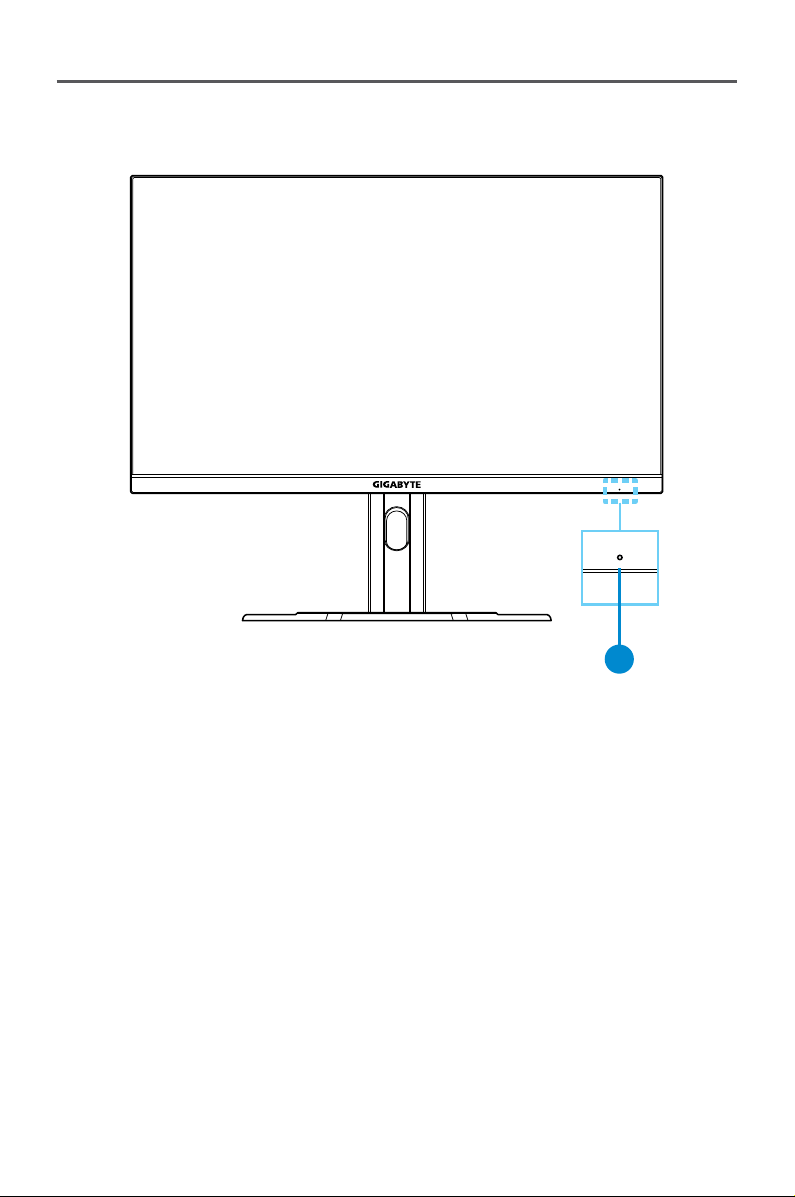
Front view
1
1 Power LED
G
aming Monitor User Guide
- 10 -
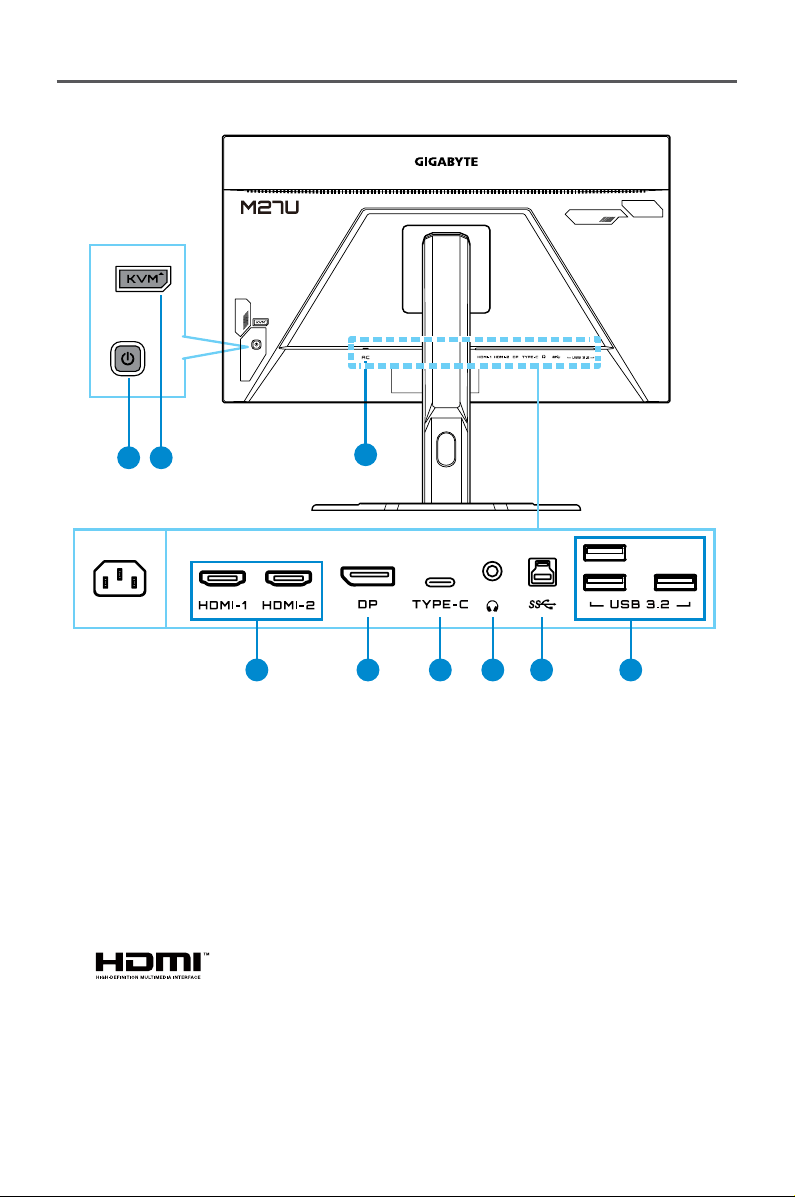
Rear view
3
1 2
7
5 6 8 94
1 Control button 6 USB Type-C port
2
KVM button 7 Headphone jack
3
AC Power in 8 USB upstream port
4
HDMI ports (x2) 9 USB 3.2 ports (x3)
5
DisplayPort
Note:
The HDMI logo and High-Definition Multimedia
Interface are trademarks or registered trademarks of
HDMI Licensing LLC.
Gaming Monitor U
ser Guide
- 11 -
GETTING STARTED
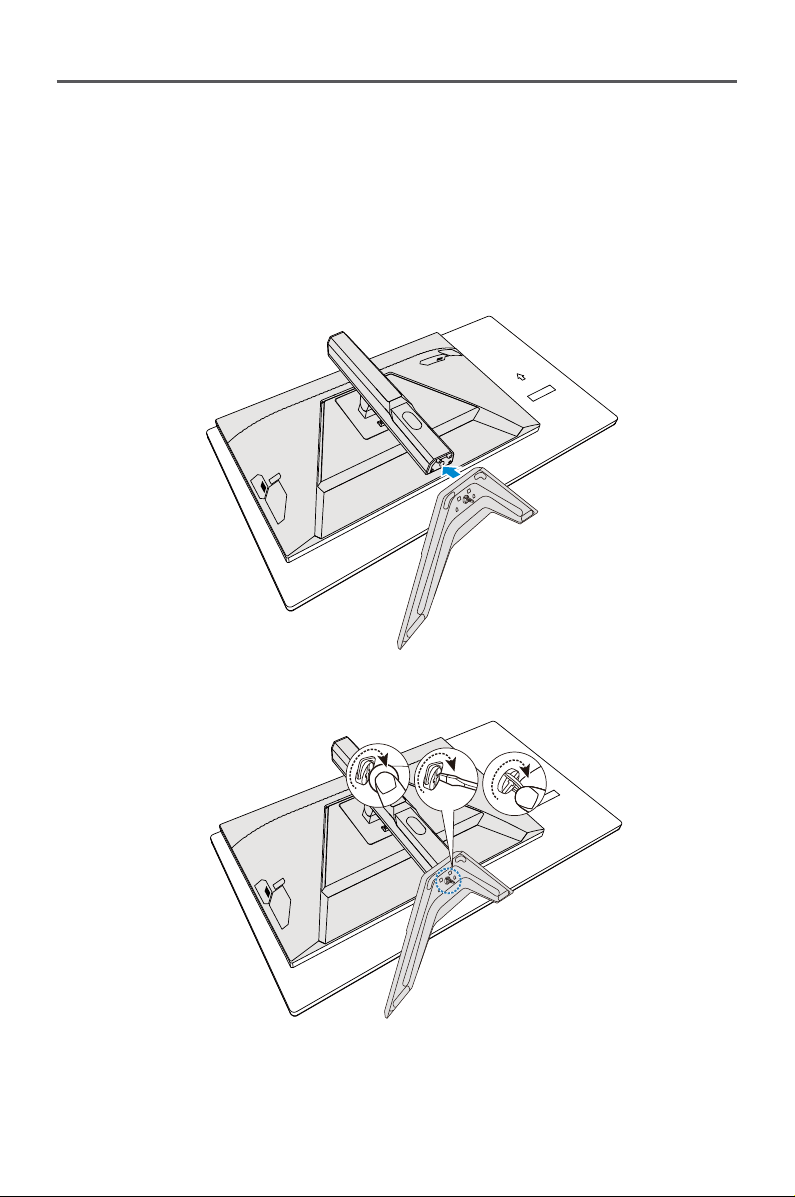
Installing the Monitor Base
1. Place the monitor on the lower EPS foam, with the screen facing
down.
2. Align the monitor base with the standoff underneath the stand. Then
attach the base onto the stand.
3. Lift the screw ring and turn it clockwise to secure the monitor base in
place.
G
aming Monitor User Guide
- 12 -
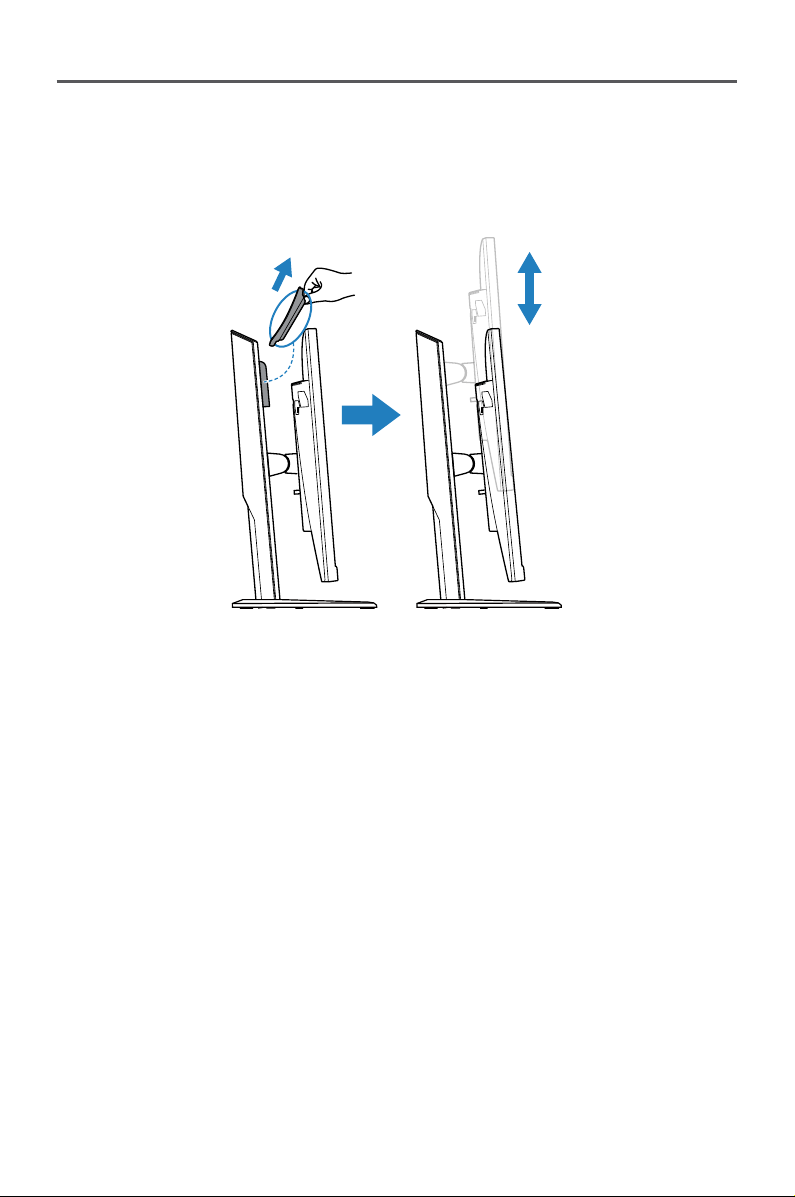
4. Lift the monitor to an upright position and place it on a table.
5. Remove the small block of EPS foam located in between the rear of
the screen and the stand. Then remove the safety plate from its slot.
Note: By removing the safety plate, you can now adjust the screen to the
desired height.
Gaming Monitor U
ser Guide
- 13 -
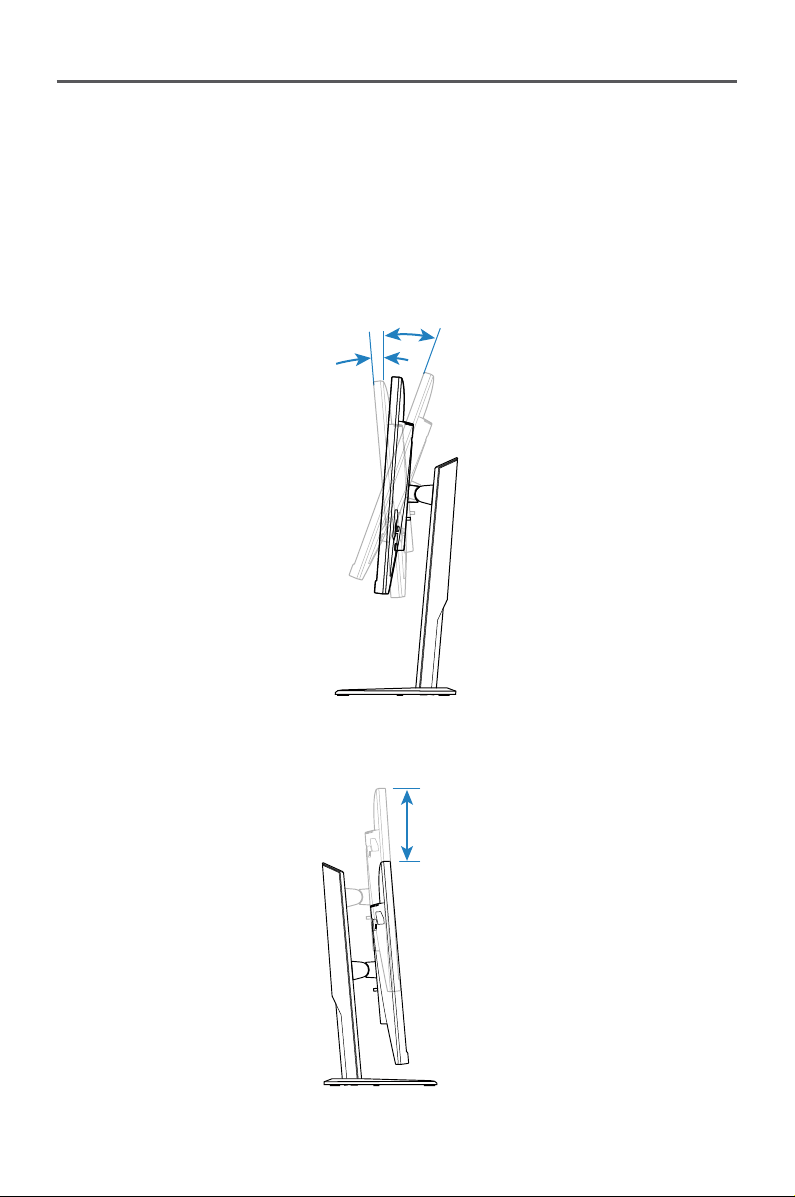
Adjusting the Viewing Angle
Note: Hold the monitor base so that the screen does not topple when you
make the adjustment.
Adjusting the Tilt Angle
Tilt the screen forward or backward to the desired viewing angle (-5˚ to
20˚).
-5°
20°
Adjusting the Screen Height
Lower or raise the screen to the desired height (0 to 130mm).
130 mm
G
aming Monitor User Guide
- 14 -
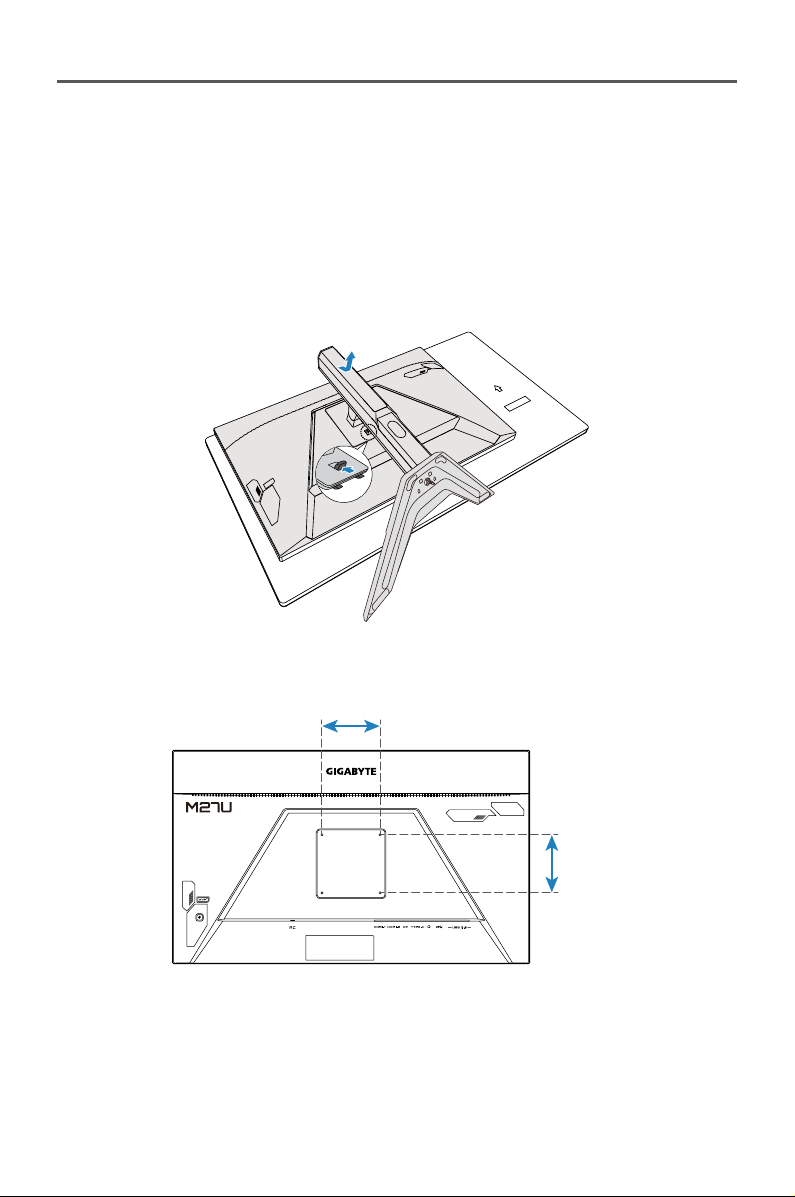
Installing a Wall-Mount Bracket (Optional)
Use only a 100 x 100 mm VESA compatible wall mount kit.
1. Place the monitor on the lower EPS foam, with the screen facing
down.
2. Push the release button upwards to disengage the stand from the
monitor.
Then remove the stand.
3. Attach the mounting bracket to the mounting holes at the rear of the
monitor. Then use the screws to secure the bracket in place.
100 mm
100 mm
Note: To mount the monitor on the wall, refer to the installation guide
that is included in the wall-mount bracket kit. VESA mounting screw size:
M4 x 20mm minimum.
Gaming Monitor U
ser Guide
- 15 -
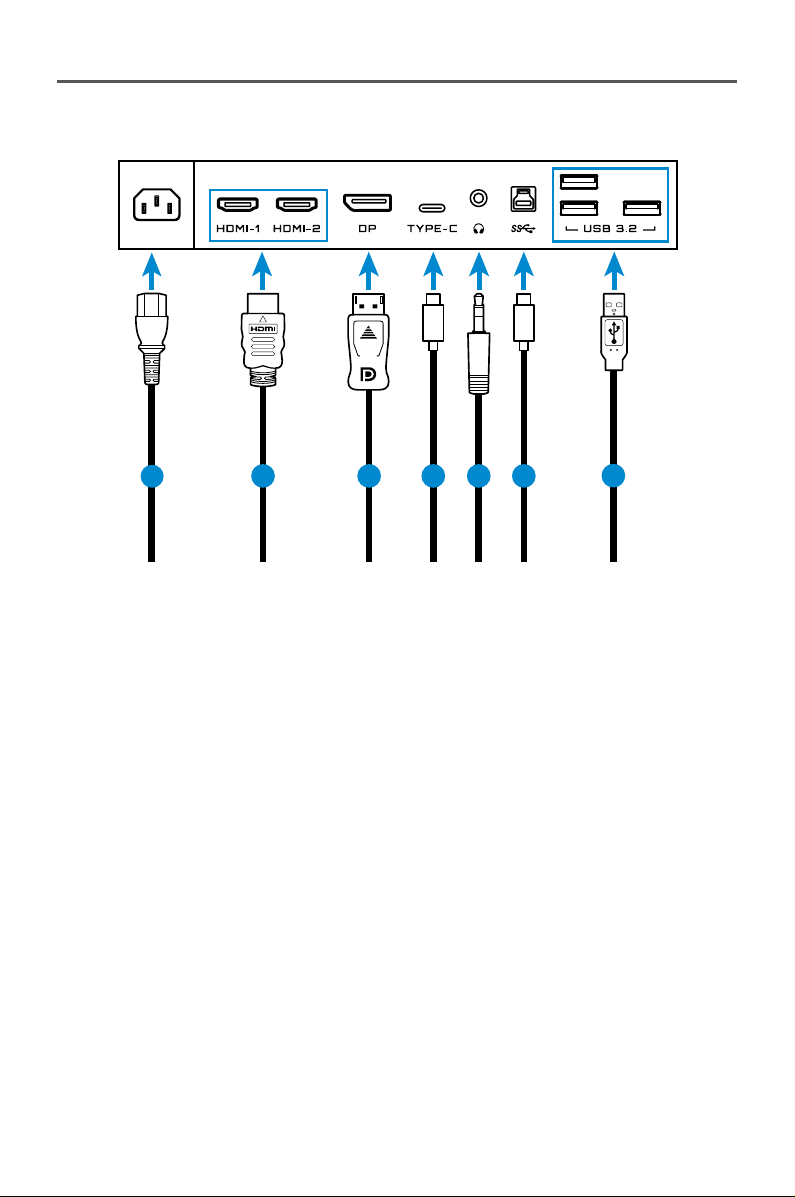
Making Connections
52 43 6
7
1
1 Power cable 5 Headphone cable
2
HDMI cable 6 USB (A-Male to B-Male) cable
3
DisplayPort cable 7 USB cable
4
USB Type-C cable

G
aming Monitor User Guide
- 16 -
USING THE DEVICE
Turning the Power On/Off
Power On
1. Connect one end of the power cable to the AC IN jack at the rear of the
monitor.
2. Connect other end of the the power cable to a power outlet.
3. Press the Control button to turn on the monitor. The Power LED will
light in white, indicating the monitor is ready to use.
Note: If no signal, the monitor will show No Signal notification for a while.
Then, the monitor will go to power saving mode and the Power LED lights
white and starts blinking with a period of one second.
Power Off
Press the Control button for 2 seconds to turn off the monitor.
Note: When the Main menu appears on the screen, you can also turn off
the monitor by moving the Control button down (
). Refer to page 19.
Gaming Monitor U
ser Guide
- 17 -
User Comfort Recommendations
The monitor adopts Flicker-Free technology which clears the eye visible
monitor flicker and prevents users from suffering eye strain and fatigue.
The following are some tips for comfortable viewing of your monitor:
• Optimal viewing distances for monitors range from approximately 510
mm to 760 mm (20” to 30”).
• A general guideline is to position the monitor such that the top
of the screen is at or slightly below your eye-height when you are
comfortably seated.
• Use adequate lighting for the type of work you are performing.
• Take regular and frequent breaks (at least for 10 minutes) every half-
hour.
• Be sure to periodically look away from your monitor screen and focus
on a far object for at least 20 seconds during the breaks.
• Eye exercise can help reduce eye strain. Repeat these exercises
frequently: (1) look up and down (2) slowly roll your eye (3) move your
eyes diagonally.
Selecting the Input Source
1. Move the Control button right ( )
to enter the Input menu.
2. Move the Control button up/down
(
) to select the desired input
source. Then press the Control
button to confirm.
Input
HDMI 1
HDMI2
DisplayPort
Select Exit
Type-C
G
aming Monitor User Guide
- 18 -
OPERATIONS
Quick Menu
Hot Key
By default, the Control button has been assigned with the specific
function.
Note: To change the preset hot key function, refer to the “Quick Switch”
section on page 34.
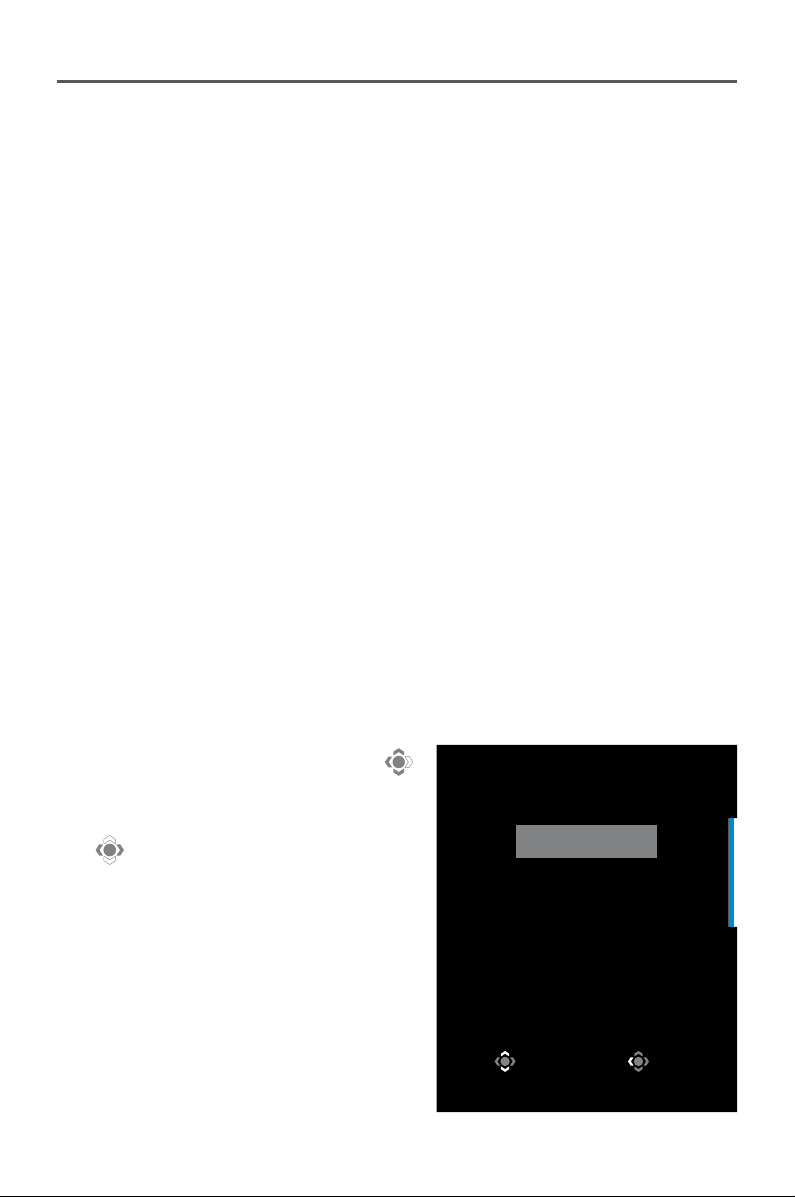
To access the hot key function, do the following:
• Move the Control button up (
) to enter the Black Equalizer menu.
Move the Control button up/down
(
) to adjust Black Equalizer the
setting and press the Control button
to confirm.
Adjust Exit
Black Equalizer
50
Gaming Monitor U
ser Guide
- 19 -
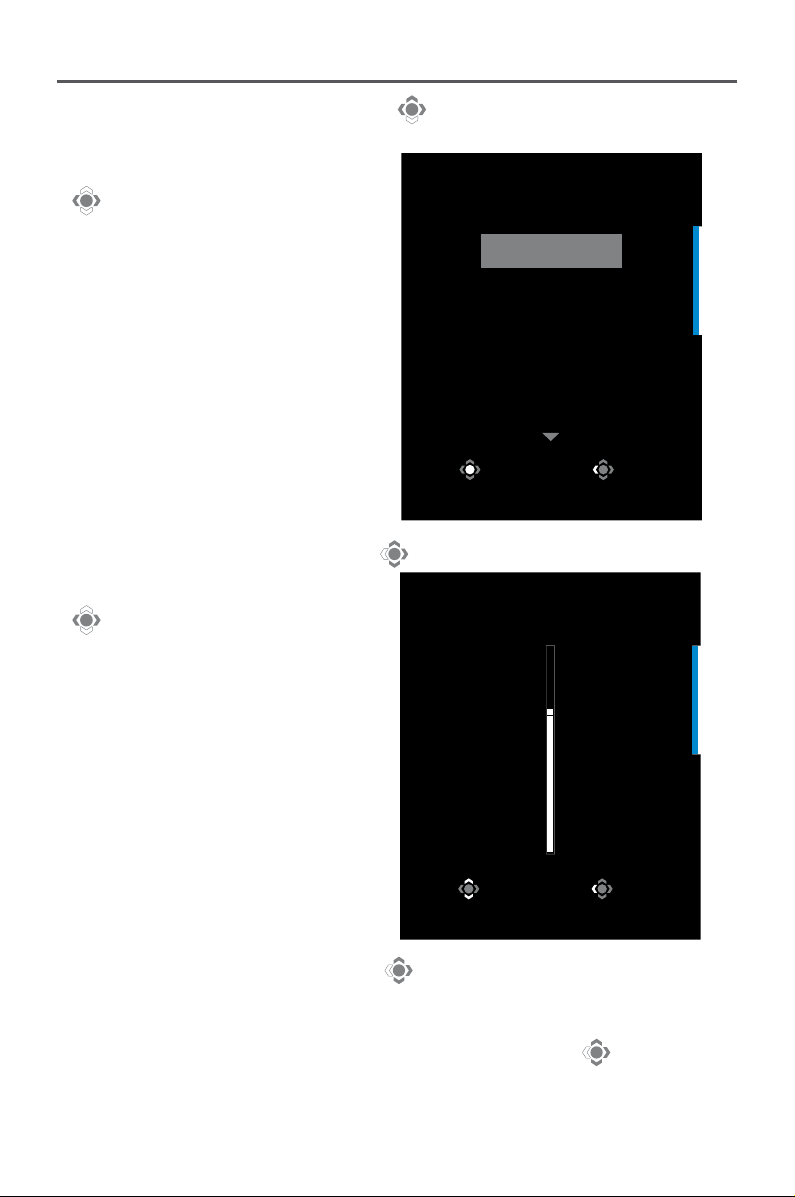
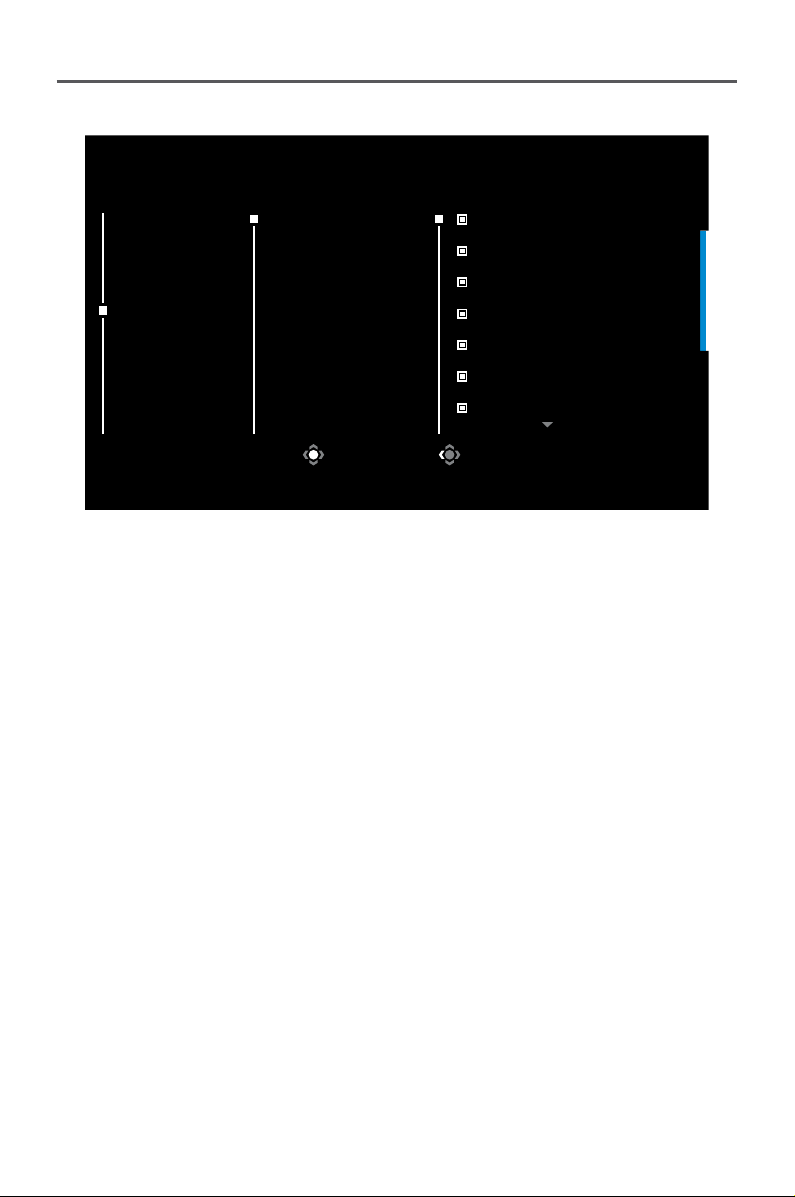
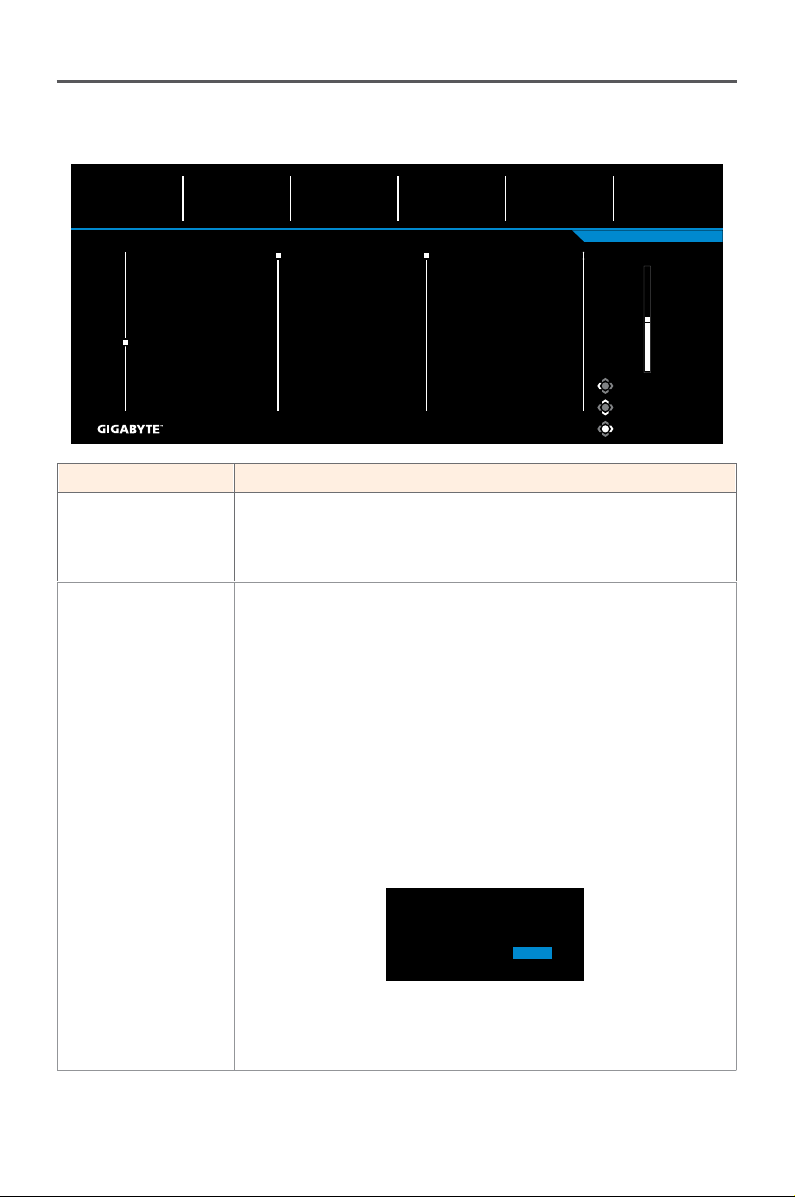
• Move the Control button down ( ) to enter the Picture Mode
menu.
Move the Control button up/down
(
) to select the desired option
and press the Control button to
confirm.
Exit
Picture Mode
Standard
FPS
RTS/RPG
Movie
Reader
sRGB
Select
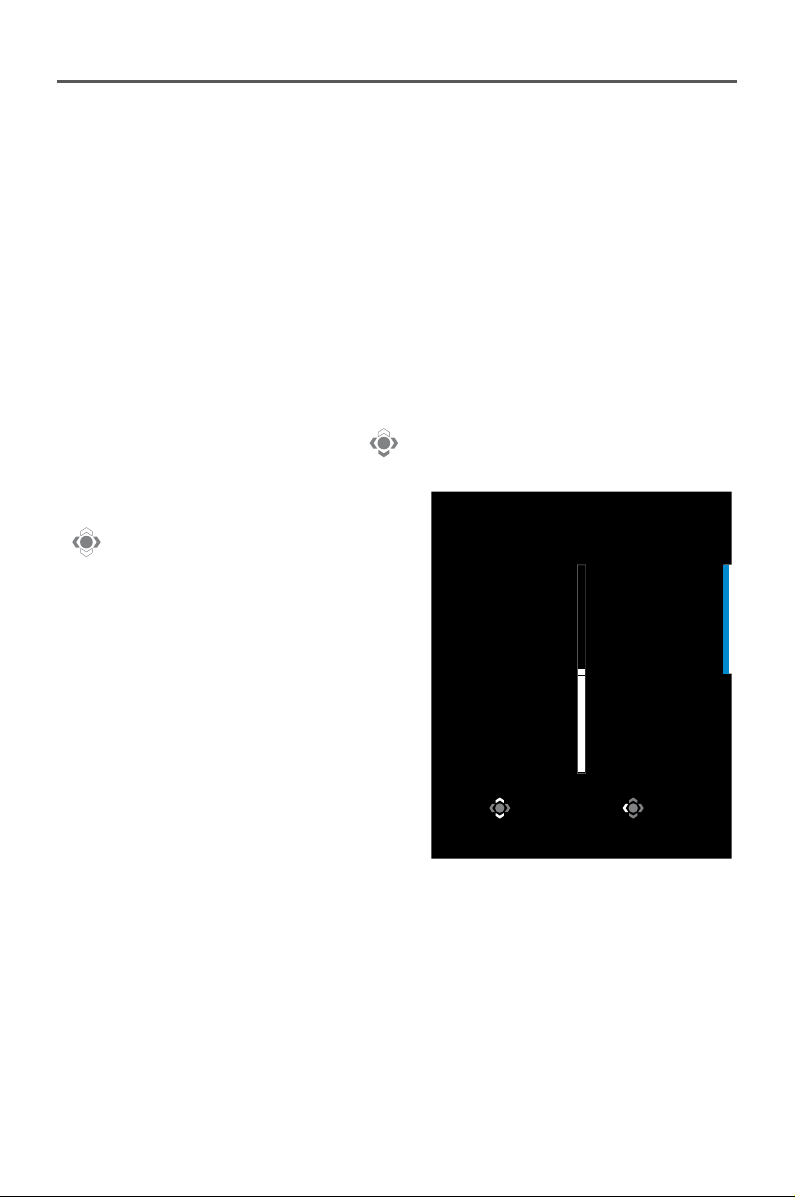
• Move the Control button left ( ) to enter the Volume menu.
Move the Control button up/down
(
) o adjust the headphone
volume level and press the Control
button to confirm.
Adjust Exit
Volume
70
• Move the Control button left ( ) to enter the the Input menu.
Refer to the “Selecting the Input Source” section.
Note: To close the menu, move the Control button left (
).
G
aming Monitor User Guide
- 20 -
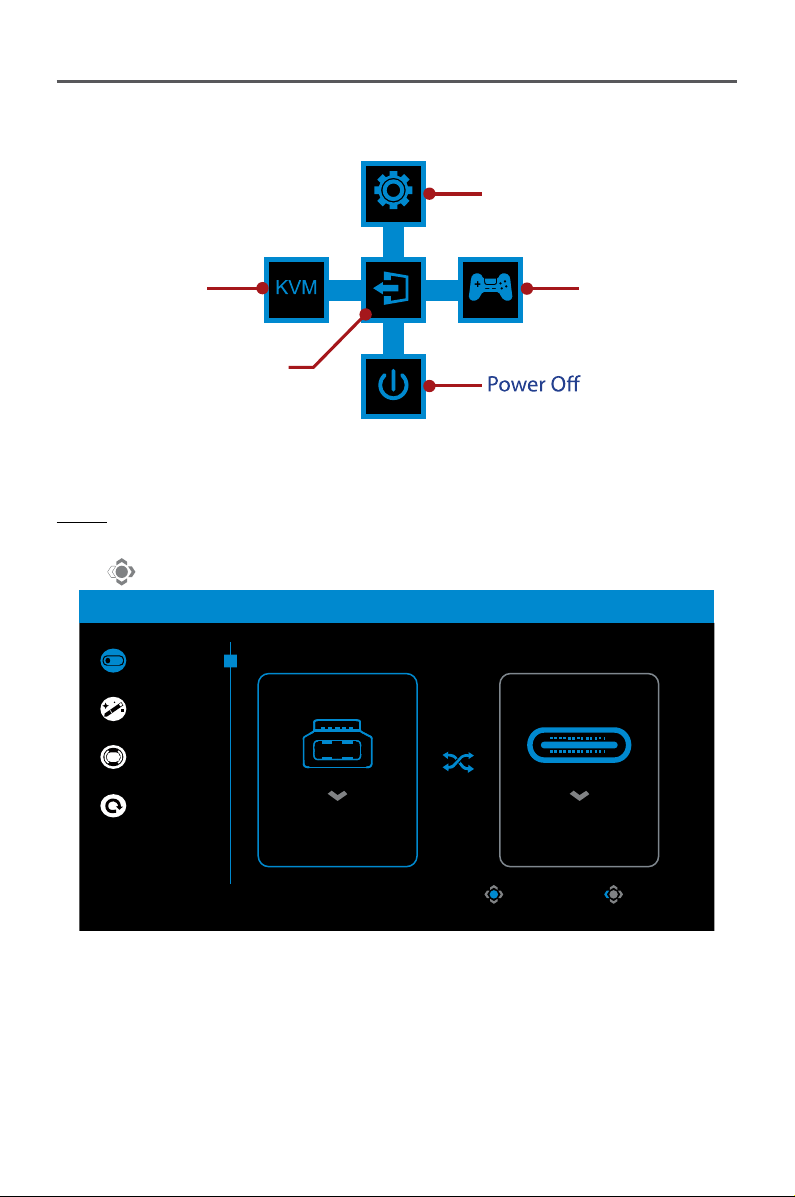
Function Key Guide
Press the Control button to display the Main menu.
EXIT
SETTING
POWER OFF
GAME ASSISTMULTI TASK
Game Assist
Settings
KVM
(Multi Task)
Exit
Then use the Control button to select the desired function and configure
the related settings.
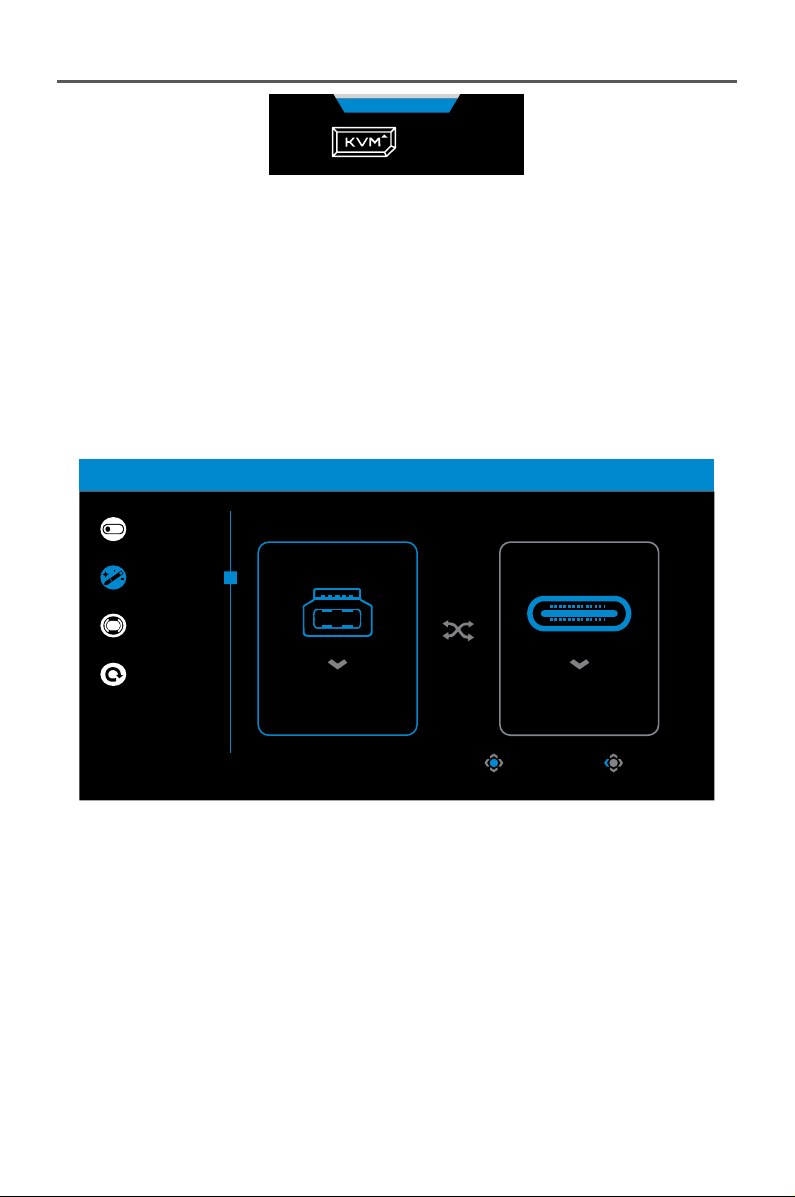
KVM
When the Main menu appears on the screen, move the Control button
left (
) to enter the KVM menu.
Select Exit
KVM Switch
KVM Wizard
KVM ON
KVM Reset
KVM
CONTROL 1
HDMI 1
STATUS
CONTROL 2
Type-C
• KVM Switch: Switch the input source that has been assigned to USB-B
or Type-C connection in the KVM Wizard settings.
When there are several input signals connected to the device, a
message box will appear on the screen once the system detected USB
Type-C input signal.
Gaming Monitor U
ser Guide
- 21 -
KVM
Press to switch device.
To switch to USB Type-C input source, simply press the KVM button or
the Control button.
However, when there is no input signal from currently selected input
source, the system will return to the previous connected input source.
Note: This option will be disabled if the KVM button function is disabled
(KVM OFF).
• KVM Wizard: Configure the KVM related settings.
Set the input source to be bound with USB Type-B connection first,
and then following with USB Type-C connection.
Select Exit
KVM Switch
KVM Wizard
KVM ON
KVM Reset
KVM
CONTROL 1
Type-C
STATUS
CONTROL 2
Type-C
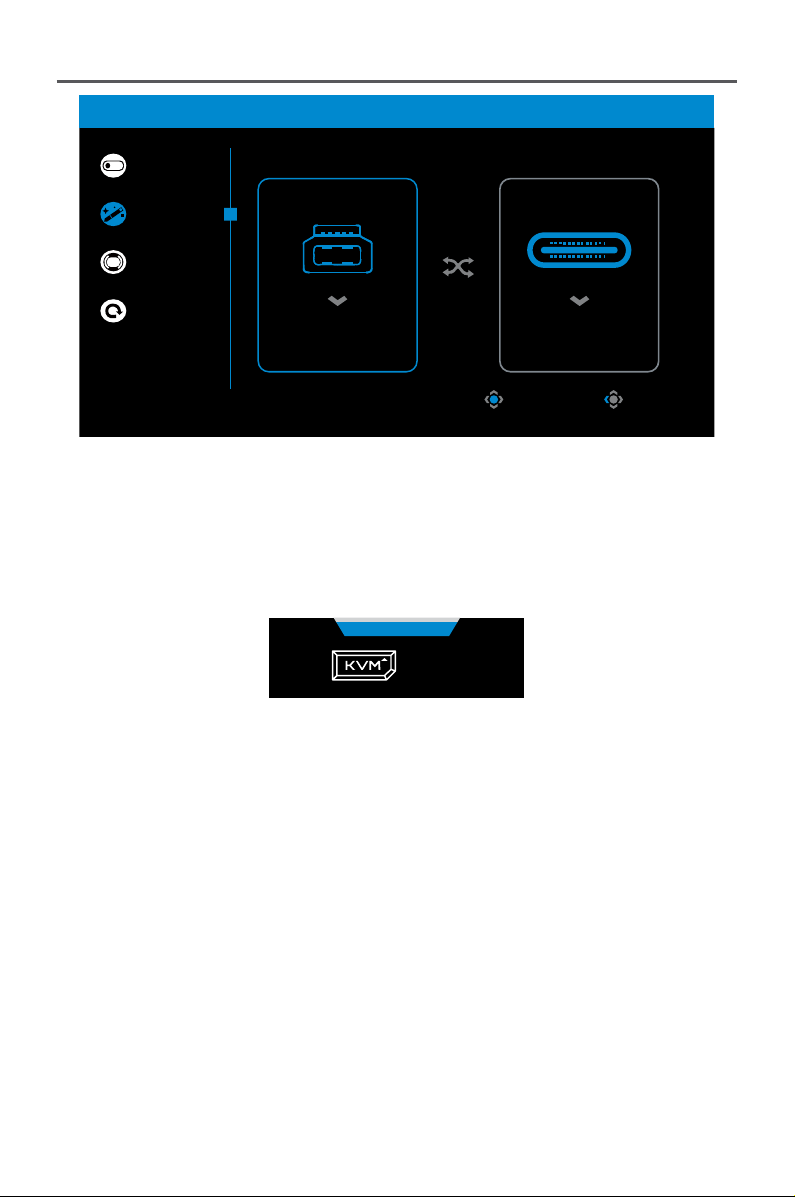
Note: If you set the USB-B Display setting to Type-C, the TYPE-C
Display menu option will automatically be disabled. You will then see
the KVM status in the KVM Wizard page as below.
G
aming Monitor User Guide
- 22 -
Select Exit
KVM Switch
KVM Wizard
KVM ON
KVM Reset
KVM
CONTROL 1
Type-C
STATUS
CONTROL 2
Type-C
• KVM ON/OFF: Enable/Disable the KVM button function.
√ Select ON to enable the KVM button function. Once the system
detected USB Type-C input signal, a message box will appear on
the screen.
KVM
Press to switch device.
Press the KVM button or the Control button to switch to USB
Type-C input source.
Note: When the KVM button function is enabled, the KVM ON will
be displayed on the left panel.
√ Select OFF to disable the KVM button function.
Note: When the KVM button function is disabled, the KVM OFF
will be displayed on the left panel.
• KVM Reset: Restore the KVM default settings.
√ HDMI 1 input source is bound with USB Type-B connection.
√ USB Type-C input source is bound with USB Type-C connection.
√ The KVM ON/OFF function is set to ON.

Gaming Monitor U
ser Guide
- 23 -
Game Assist
When the Main menu appears on the screen, move the Control button
right (
) to enter the Game Assist menu.
Select Exit
GameAssist
GAME INFO
Crosshair
Dashboard
Gaming Timer
Gaming Counter
Refresh Rate
Info Location
OFF
Count Up
Count Down
Display
Alignment
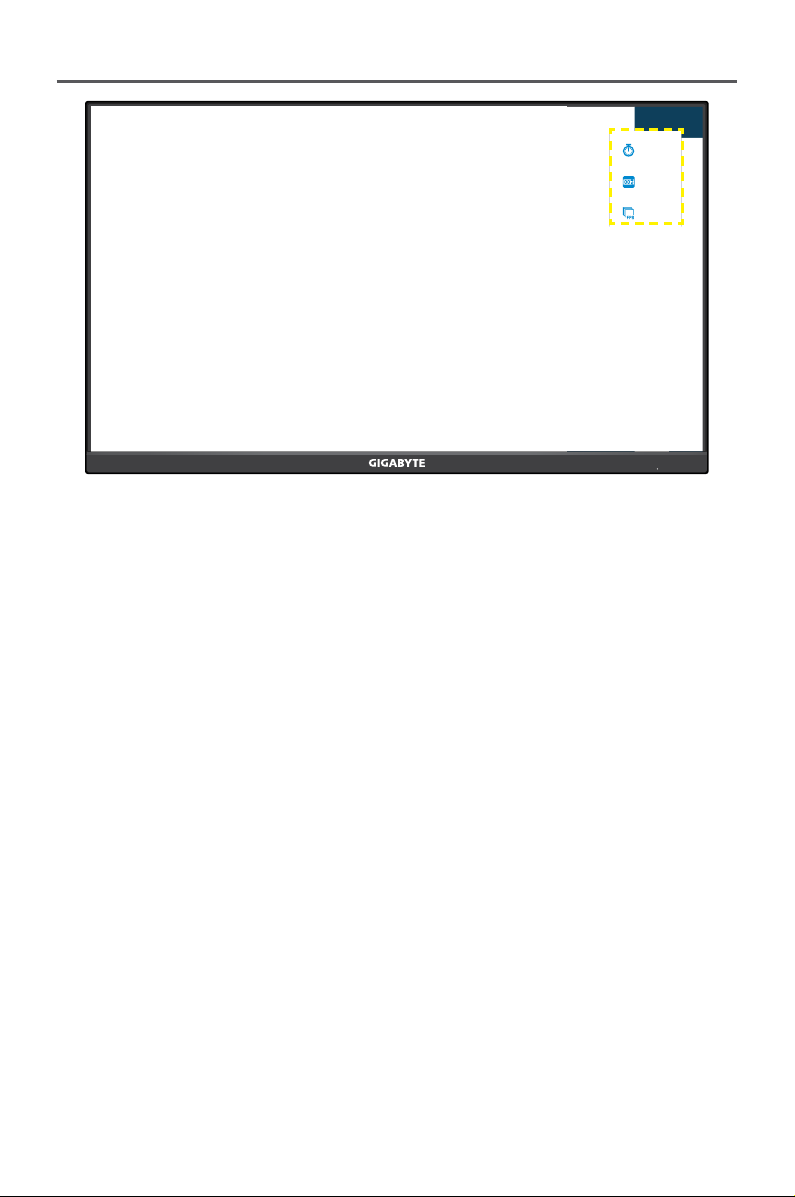
• GAME INFO: Configure the FPS (First Person Shooting) game related
settings.
√ Select Gaming Timer to select countdown timer mode. To disable
this function, set the setting to OFF.
√ Select Gaming Counter or Refresh Rate to enable/disable the
gaming counter or real-time refresh rate setting.
√ Select Info Location to specify the location of the information to be
shown on the screen.
G
aming Monitor User Guide
- 24 -
00:00
00
60
• Crosshair: Select the desired crosshair type to suit your gaming
environment. It makes aiming much easier.
Gaming Monitor U
ser Guide
- 25 -
• Dashboard: Configure the dashboard settings.
Select Exit
GameAssist
CPU Temperature
CPU Frequency
CPU Fan Speed
CPU Usage Rate
GPU Temperature
GPU Frequency
GPU Fan Speed
ON
OFF
Dashboard Location
GAME INFO
Crosshair
Dashboard
Display
Alignment
√ ON: Enable the function. Then select the desired option(s) to be
shown on the screen.
√ OFF: Disable the function.
√ Dashboard Location: Specify the location of the Dashboard
information to be shown on the screen. Once the Dashboard
configuration is complete, it will transfer the system data to the SOC
through the USB port and display the value of the selected
function(s) on the screen.
G
aming Monitor User Guide
- 26 -
CPU Temperature
CPU Frequency
CPU Fan Speed
CPU Usage Rate
GPU Temperature
GPU Frequency
GPU Fan Speed
GPU Usage Rate
AORUS Mouse DPI
Note: Make sure the USB cable is properly connected to the USB upstream
port of the monitor and the USB port of your computer.
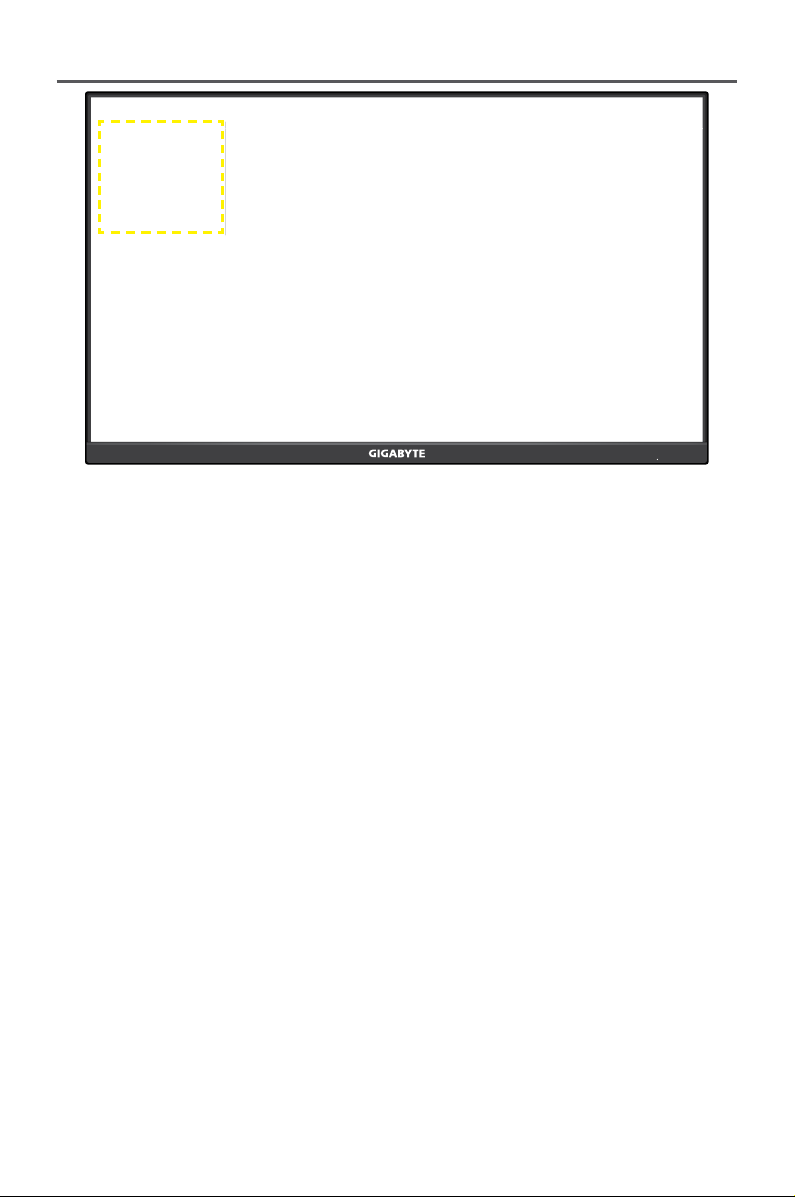
• Display Alignment: When the function is enabled, it displays the
alignment lines on the four sides of the screen, providing handy tool
for you to line up multiple monitors perfectly.
Gaming Monitor U
ser Guide
- 27 -
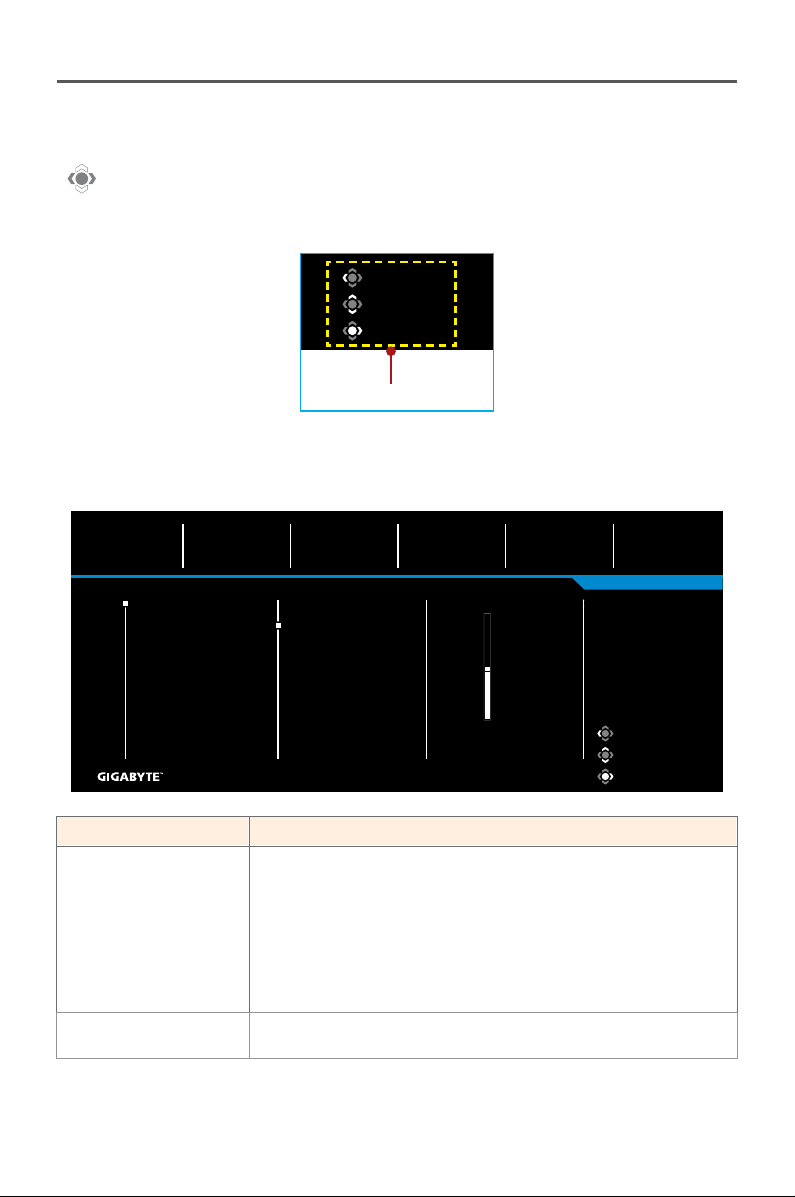
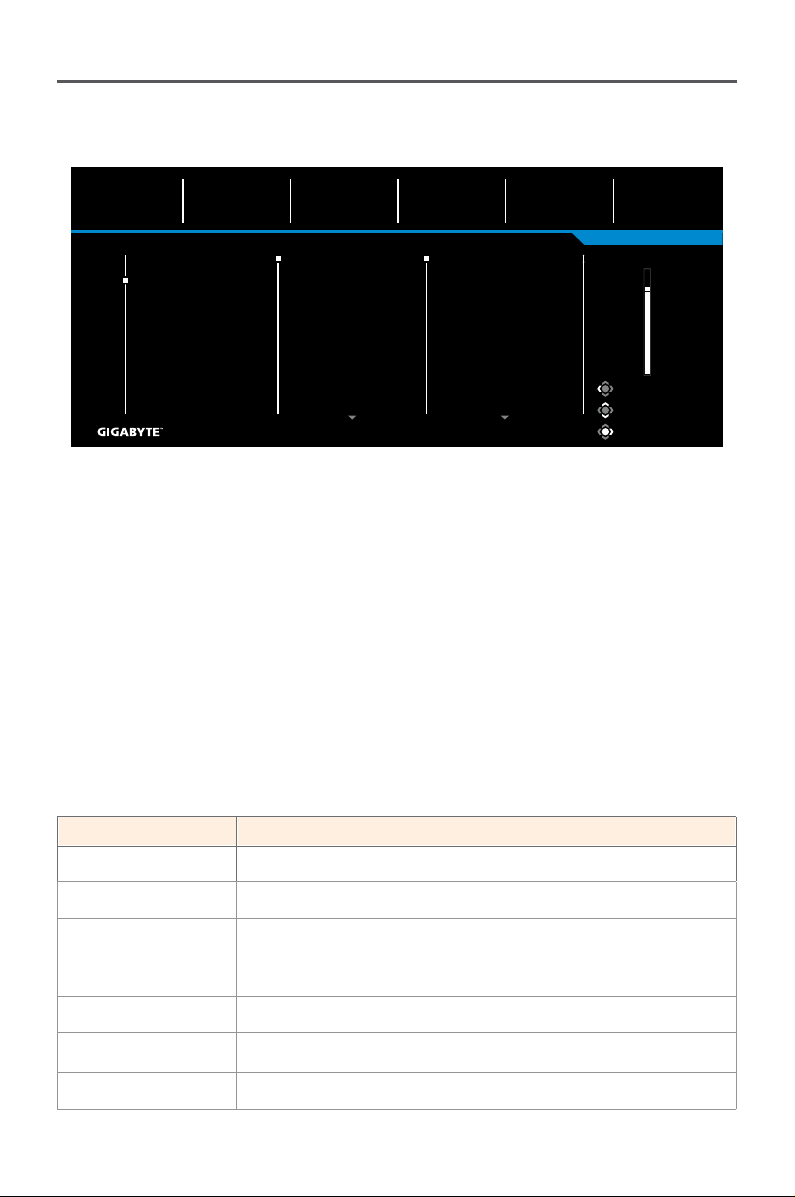
Configure the Device Settings
When the Main menu appears on the screen, move the Control button up
(
) to enter the Settings menu.
Note: Use the Control button to navigate through the menu and make
adjustments.
Exit
Move/Adjust
Enter/Confirm
Button Guide
Gaming
Configure the game related settings.
Exit
Move/Adjust
Enter/Confirm
Gaming
Picture
Display
PIP/PBP
System
Language
Save Settings
Reset all
Aim Stabilizer sync
Black Equalizer
Super Resolution
Display Mode
Overdrive
AMD FreeSync Premium Pro
Picture Mode Standard
Resolution
3840x2160
Black Equalizer
13
Aim Stabilizer sync
OFF
Overdrive
Smart OD
Refresh Rate
60 HZ
10
AMD FreeSync
Premium
OFF
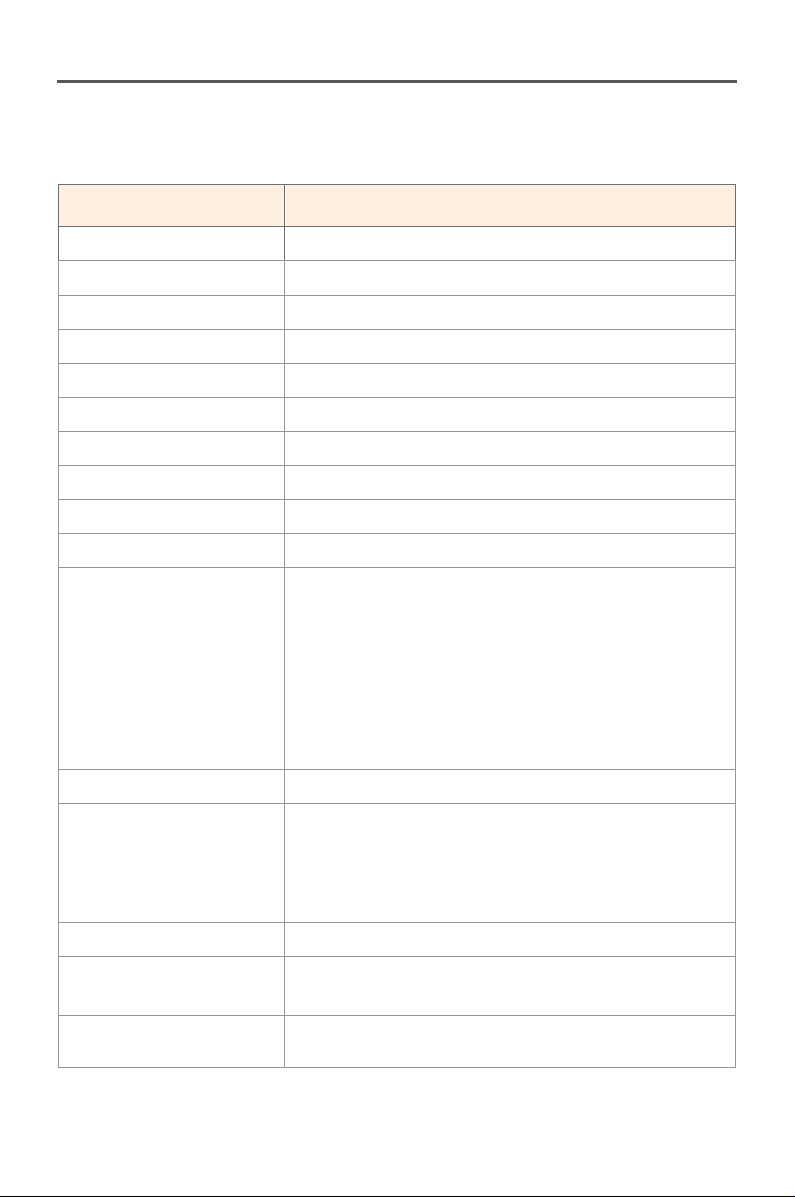
Item Description
Aim Stabilizer sync When this function is enabled, it reduces the motion
blur in a fast moving games.
Note: This function is not available under the
following conditions:
- when the frequency setting is lower than 100Hz.
- when the current source is HDR.
Black Equalizer Adjust the brightness of the black areas.
G
aming Monitor User Guide
- 28 -
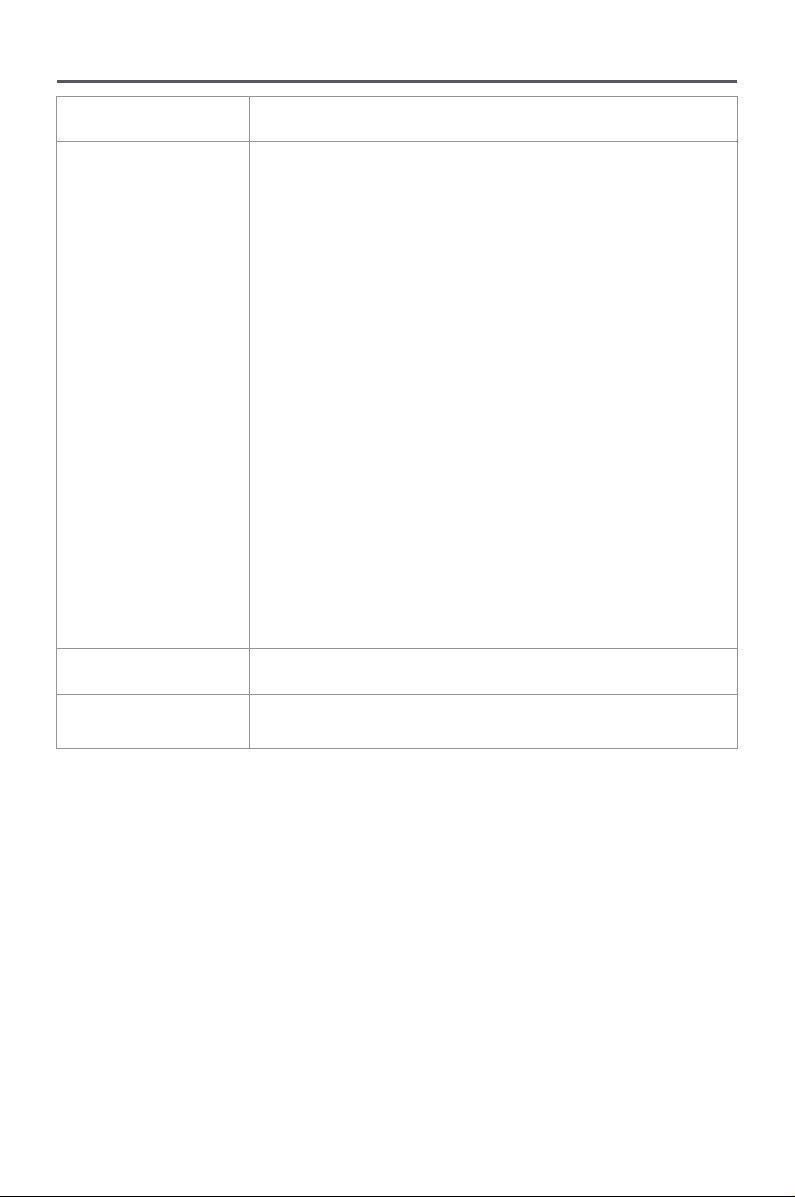
Super Resolution Sharpen the low resolution images.
Display Mode Select the aspect ratio of the screen.
• Full: Scale the input image to fill the screen.
Ideal for 16:9 aspect images.
• Aspect: Display the input image without
geometric distortion filling as much of the
screen as possible.
• 1:1: Display the input image in its native
resolution without scaling.
• 22”W(16:10): Display the input image as if on a
22”W monitor of 16:10 aspect ratio.
• 23”W(16:9): Display the input image as if on a
23”W monitor of 16:9 aspect ratio.
• 23.6”W(16:9): Display the input image as if on a
23.6”W monitor of 16:9 aspect ratio.
• 24”W(16:9): Display the input image as if on a
24”W monitor of 16:9 aspect ratio.
Note: 1:1, 22”W(16:10), 23”W(16:9), 23.6”W(16:9),
and 24”W(16:9) options will be disabled when the
AMD FreeSync Premium function is activated.
Overdrive Improve the response time of the LCD monitor.
AMD FreeSync
Premium Pro
When this function is enabled, it eliminates the
screen lag and tearing while playing games.
Gaming Monitor U
ser Guide
- 29 -
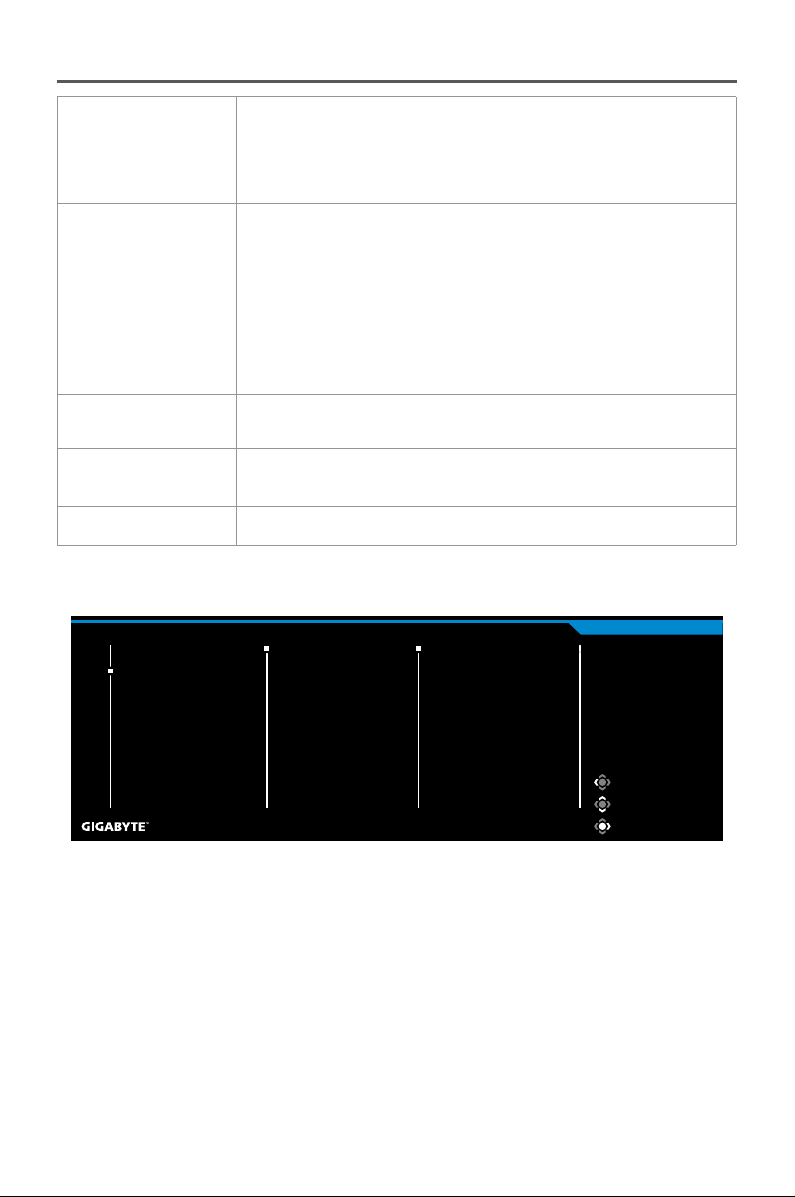
Picture
Configure the image related settings.
Exit
Move/Adjust
Enter/Confirm
Gaming
Picture
Display
PIP/PBP
System
Language
Save Settings
Reset all
Standard
FPS
RTS/RPG
Movie
Reader
sRGB
Custom 1
Picture Mode Standard
SDR
Brightness
50
Contrast
50
Sharpness
5
Gamma
2.2
Color Temperature
Normal
Brightness
Contrast
6 axis Color
Color Vibrance
Sharpness
Gamma
Color Temperature
70
Select the one of the preset picture mode.
• Standard: For editing documents or browsing websites.
• FPS: For playing FPS (First Person Shooting) games.
• RTS/RPG: For playing RTS (Real-Time Strategy) or RPG (Role-Playing
Game) games.
• Movie: For watching movies.
• Reader: For viewing documents.
• sRGB: For viewing photos and graphics on the computer.
• Custom 1: Customized picture mode settings.
• Custom 2: Customized picture mode settings.
• Custom 3: Customized picture mode settings.
Then you can configure the following image settings.
Item Description
Brightness Adjust the brightness of the image.
Contrast Adjust the contrast of the image.
6-axis Color An advanced color adjustment that user can
individually customize hue and saturation for each
axis color.
Color Vibrance Adjust the intensity of the more muted colors.
Sharpness Adjust the sharpness of the image.
Gamma Adjust the middle level of luminance.
G
aming Monitor User Guide
- 30 -
Color
Temperature
Select the color temperature.
Note: Select User Define to customize the color
temperature by adjusting the red (R), green (G), or
blue (B) level according to your preference.
Low Blue Light Reduce the amount of blue light exposure from the
screen.
• Level 0: No change.
• Level 1~10: The higher the level, the more blue
light will be reduced.
Note: Level 10 is optimized setting. It is compliance
with TUV Low Blue Light Certification.
DCR Adjust the black level of the image to achieve the
optimum contrast.
Local
Dimming
Improve the blackness of images displayed on the
monitor.
Reset Picture Reset all Picture settings to the default settings.
Note: The following picture modes will be shown only when the input
source has HDR content.
Exit
Move/Adjust
Enter/Confirm
Gaming
Picture
Display
PIP/PBP
System
Language
Save Settings
Reset all
HDR
Picture Mode Standard
Dark Enhance
Color Enhance
Light Enhance
Local Dimming
HDR_Game
HDR_Movie
Reset Picture
• Dark Enhance: Enhance the Darkness performance.
• Color Enhance: Enhance the Color performance.
• Light Enhance: Enhance the Brightness performance.
• Local Dimming: Select the dimming level to improve the contrast.
Gaming Monitor U
ser Guide
- 31 -
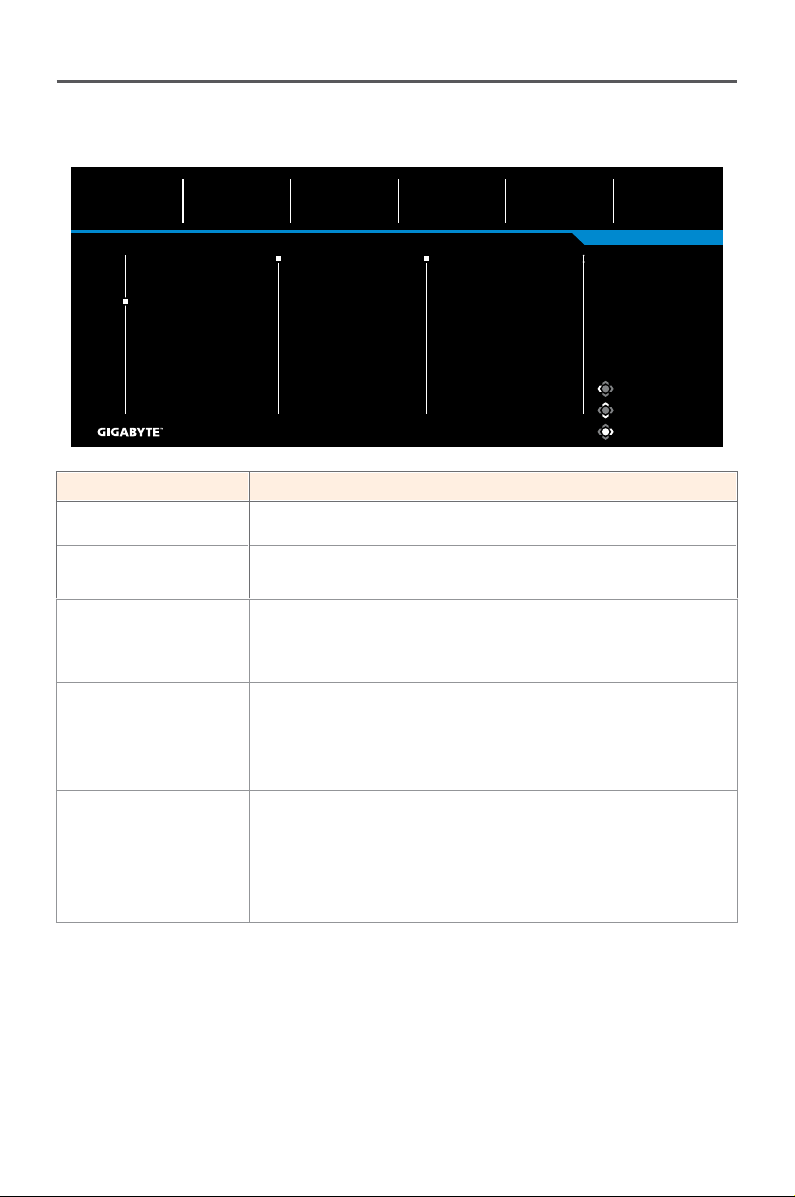
Display
Configure the display screen related settings.
Exit
Move/Adjust
Enter/Confirm
Gaming
Picture
Display
PIP/PBP
System
Language
Save Settings
Reset all
Input
Picture Mode Standard
HDMI 1
HDMI 2
DisplayPort
Type-C
SDR
Brightness
50
Contrast
50
Sharpness
5
Gamma
2.2
Color Temperature
Normal
RGB Range
Overscan
Apply Picture Mode
DP Refresh Rate
Item Description
Input Select the input source.
DP Refresh Rate Switch the Refresh Rate of DisplayPort to higher
timing.
RGB Range Select an appropriate RGB range setting or let the
monitor to detect it automatically.
Note: This option is only available for HDMI input.
Overscan When this function is enabled, it slightly enlarges
the input image to hide the outermost edges of the
image.
Note: This option is only available for HDMI input.
Apply Picture Mode
When this function is selected, if change any one of
the settings related Picture options such as
Brightness, Contrast etc., could be applied to all of
Input sources or specific one.
G
aming Monitor User Guide
- 32 -
PIP/PBP
Configure the multi-picture related settings.
Exit
Move/Adjust
Enter/Confirm
Gaming
Picture
Display
PIP/PBP
System
Language
Save Settings
Reset all
OFF
PIP
PBP
Picture Mode Standard
SDR
Brightness
50
Contrast
50
Sharpness
5
Gamma
2.2
Color Temperature
Normal
Item Description
OFF Disable the PIP/PBP function.
PIP Split the screen into 2 parts (main window and inset
window).
• Source: Change the input source for the inset
window.
• PIP Size: Adjust the inset window size.
• Location: Move the inset window position.
• Display Switch: Swap the two windows.
• Audio Switch: Select which audio source you
want to hear the sound from.
Note: PIP would only support when vertical
frequency is over 100Hz.
PBP Display 1x1 split screen (left and right windows).
• Source: Change the input source for the right
window.
• PBP Mode: Adjust the aspect ratio of window.
• Display Switch: Swap the two windows.
• Audio Switch: Select which audio source you
want to hear the sound from.
Note: PIP/PBP is not compatible with HDR and AMD FreeSync Premium
functions.
Gaming Monitor U
ser Guide
- 33 -
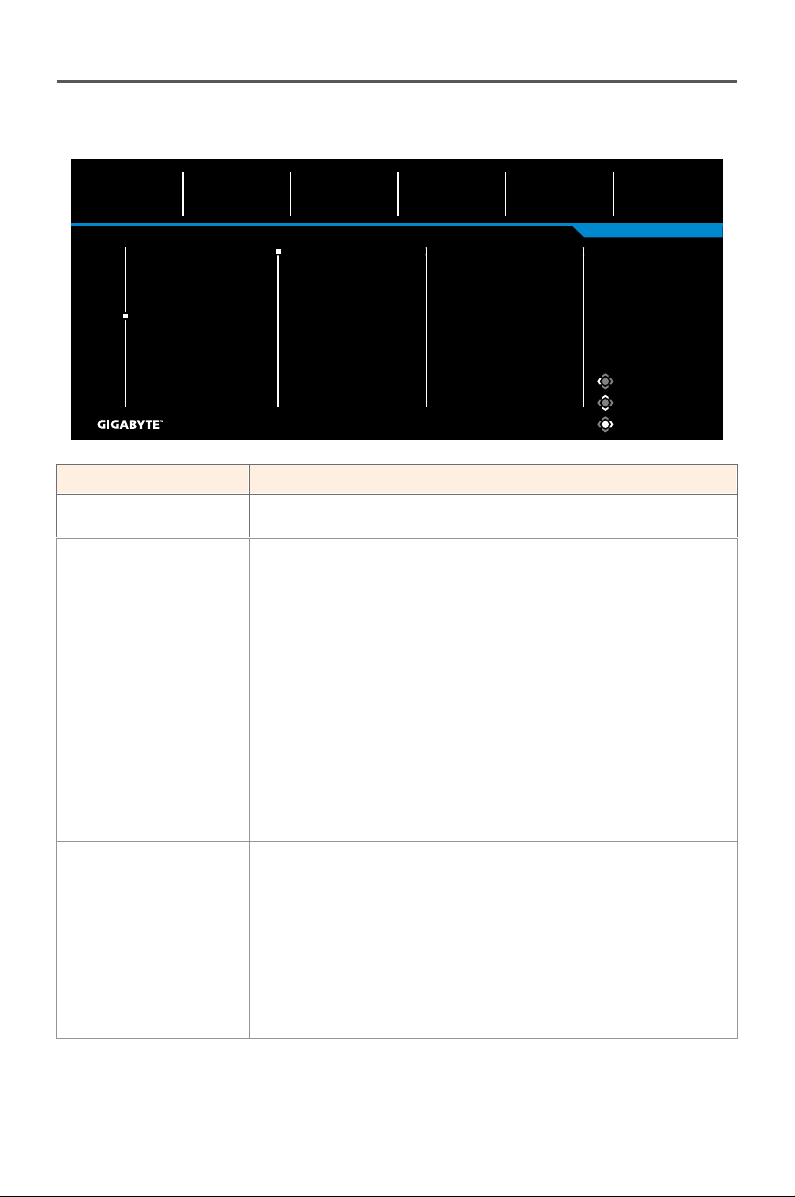
System
Configure the system related settings.
Exit
Move/Adjust
Enter/Confirm
Gaming
Picture
Display
PIP/PBP
System
Language
Save Settings
Reset all
Audio
OSD Settings
Quick Switch
Other Settings
Picture Mode Standard
Volume
Mute
SDR
Brightness
50
Contrast
50
Sharpness
5
Gamma
2.2
Color Temperature
Normal
50
Item Description
Audio Configure the audio settings.
• Volume: Adjust the volume level.
• Mute: Enable/Disable the mute function.
OSD Settings Configure the on-screen display (OSD) menu related
settings.
• Display Time: Set the length of time the OSD
menu remains on the screen.
• OSD Transparency: Adjust the OSD menu
transparency.
• OSD Lock: When this function is enabled, no OSD
adjustment is allowed.
Note: To disable the OSD lock function, press
the Control key. When the message appears on
the screen, select Yes to confirm.
The button is locked
confirm to unlock OSD
YesNo
• OSD Size: Enable or disable adjusting the OSD
menu window.
• OSD Pivot: Set the OSD menu orientation.
G
aming Monitor User Guide
- 34 -
Quick Switch Assign the function of the hot keys.
Available options: Aim Stabilizer sync, Black Equalizer,
Low Blue Light, Volume, Input, Contrast, Brightness,
and Picture Mode.
The default setting of the hot keys as below:
Up ( ): Black Equalizer
Down ( ): Picture Mode
Right ( ): Input
Left ( ): Volume
Other Settings • Resolution Notice: When this function is enabled,
the recommended resolution message will
appear on the screen when the monitor switches
to another input source.
• Input Auto Switch: When this function is enabled,
it automatically switches to an available input
source.
• Auto Power OFF: When this function is enabled,
the monitor will automatically turn off after a
certain amount of time.
• LED Indicator: By default, the LED indicator is set
to Always ON.
Always ON: The Power LED lights white
during operation in standby mode.
Always OFF: Turn off the Power LED.
Standby ON: The Power LED lights white in
standby mode.
When the power supply is switched off, the
Power LED will remain off.
• Type-C Compatibility: Turn this option on to
improve mobile devices compatibility.
• HDMI Version: Select the HDMI version.
Gaming Monitor U
ser Guide
- 35 -
Other Settings
(continue)
• HDMI-CEC: When enable this function, CEC device
like PS5, XBOX could turn on the monitor when
they are waken up and switch off the display
when they enter either Standby or off mode.
• USB(A/C) Charge: Enable or disable the USB
Type-A charging and USB Type-C charging(5V/3A,
9V/3A,12V/3A,15V/3A) function in standby mode.
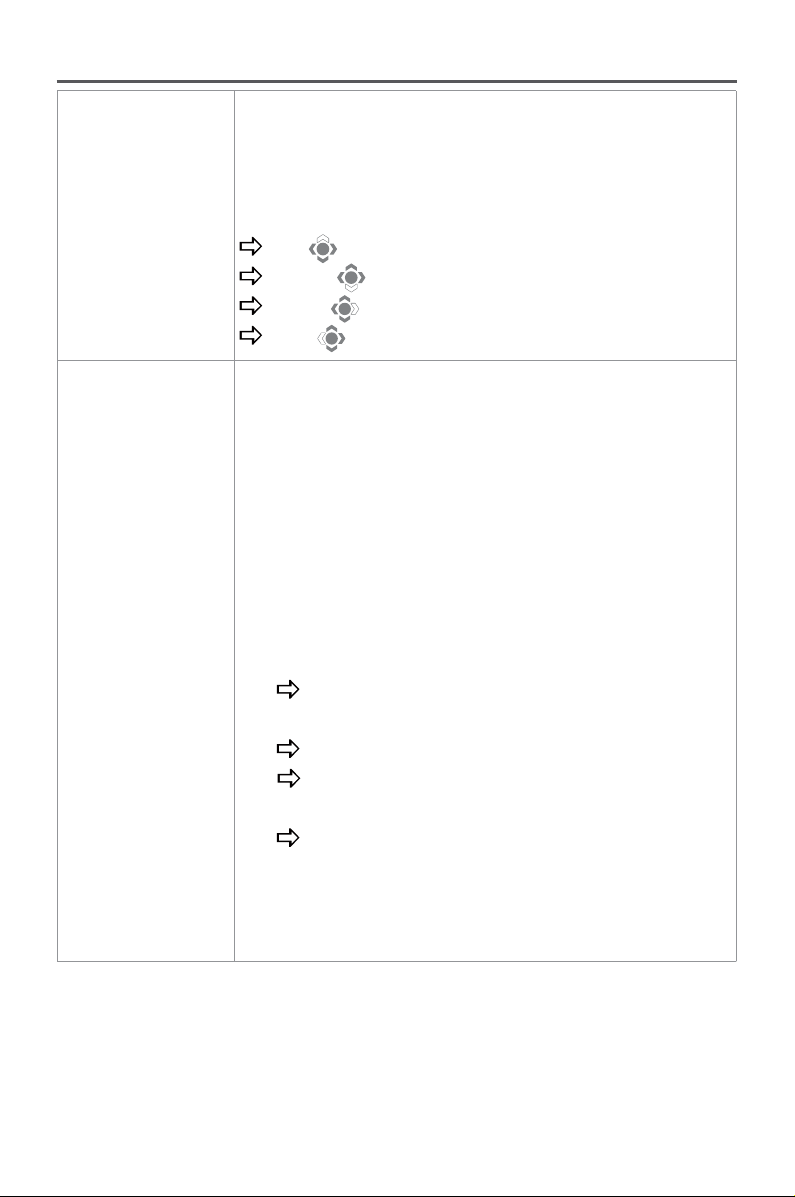
Language
Select an available language for the OSD menu.
Exit
Move/Adjust
Enter/Confirm
Gaming
Picture
Display
PIP/PBP
System
Language
Save Settings
Reset all
Picture Mode Standard
SDR
Brightness
50
Contrast
50
Sharpness
5
Gamma
2.2
Color Temperature
Normal
English
Deutsch
Français
Русский
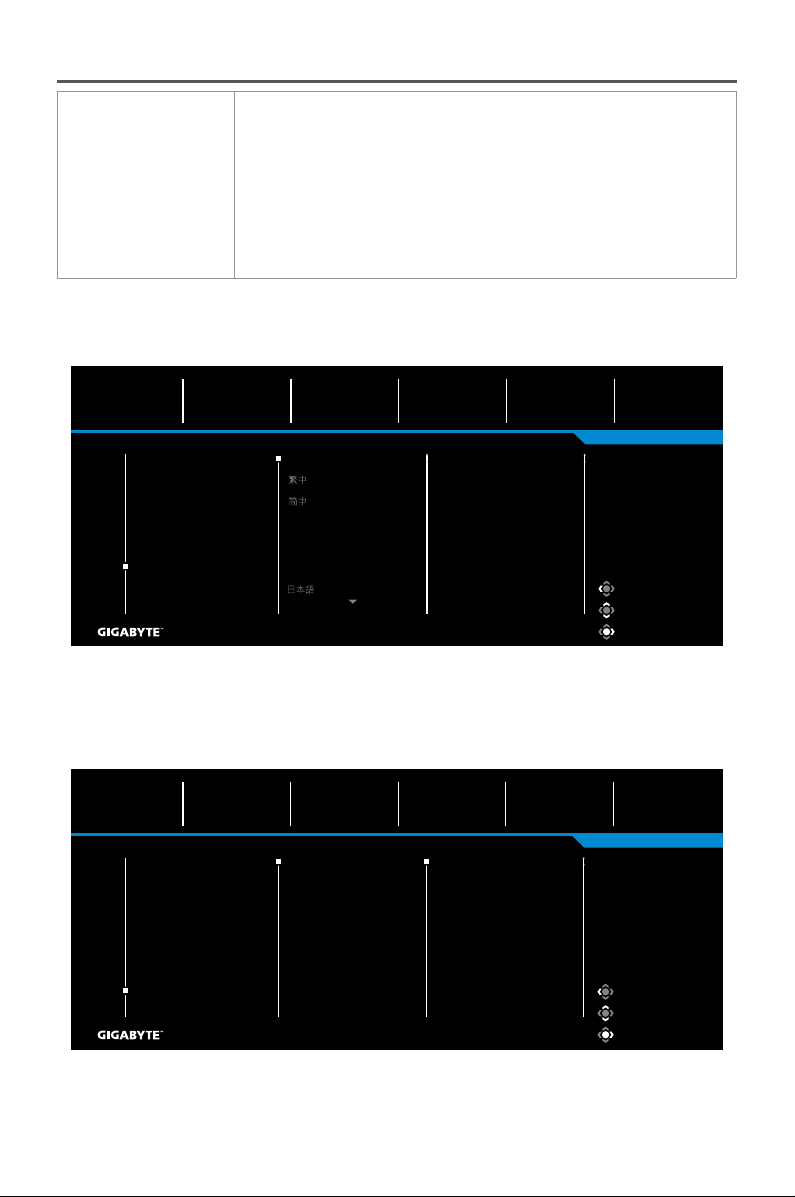
Save Settings
Set the personalized OSD configurations for Setting1, Setting2, or
Setting3.
Exit
Move/Adjust
Enter/Confirm
Gaming
Picture
Display
PIP/PBP
System
Language
Save Settings
Reset all
Setting 1
Setting 2
Setting 3
Picture Mode Standard
Save
Load
SDR
Brightness
50
Contrast
50
Sharpness
5
Gamma
2.2
Color Temperature
Normal
G
aming Monitor User Guide
- 36 -
Item Description
Save Save the customized settings.
Load Load the saved settings
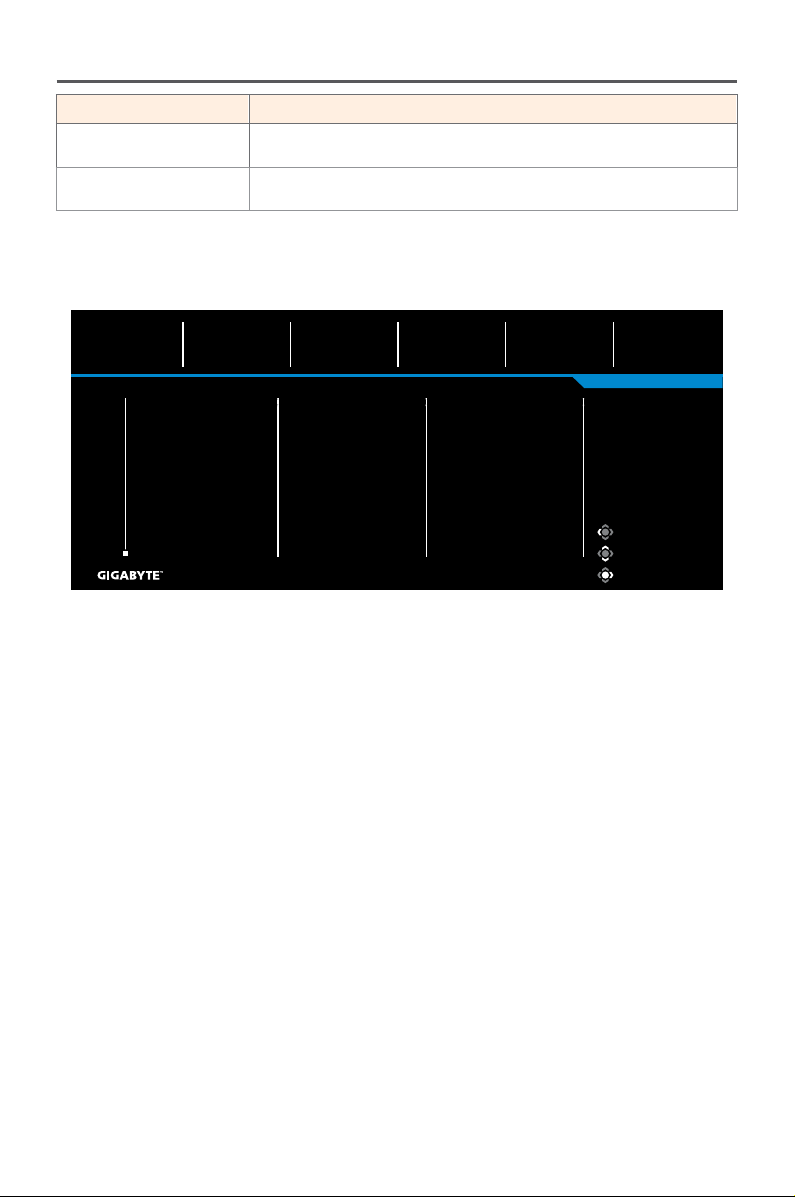
Reset all
Restore the monitor to its factory default settings.
Exit
Move/Adjust
Enter/Confirm
Gaming
Picture
Display
PIP/PBP
System
Language
Save Settings
Reset all
Picture Mode Standard
SDR
Brightness
50
Contrast
50
Sharpness
5
Gamma
2.2
Color Temperature
Normal
Gaming Monitor U
ser Guide
- 37 -
APPENDICES
Specifications
Item Specifications
Panel Size 27-inch
Aspect Ratio 16:9
Resolution 3840 x 2160
LED Life 30,000 hours
Pixel Pitch 155.25 x 155.25
Brightness 400nits (typ.)
Contrast Ratio 1000:1 (typ.)
Display colors 1.07 Billion colors (8bit + FRC)
Active Display Area 596.16 (H) x 335.34 (V)
Viewing Angle 178°(H) / 178°(V)
Input/Output Terminals • 2x HDMI 2.1
• 1x DP1.4
• 1x Headphone
• 1x USB upstream
• 3x USB 3.2 (downstream, 5V/1.5A)
• 1x USB Type-C(5V/3A,9V/2A,12V/1.5A,
15V/1.2A)
Power Supply AC 100~240V at 50/60Hz
Power Consumptions • On Mode: 30W
• Standby: 0.5W
• Off: 0.3W
Note:The test condition follows CEC standards.
Dimensions (W x H x D) 615.67x517.65x193.63mm(with stand)
Weight
• 6.48 kg (with stand)
• 4.56 kg (without stand)
Temperature Range
(operation)
0°C to 40°C
Note: Specifications subject to change without notice.
G
aming Monitor User Guide
- 38 -
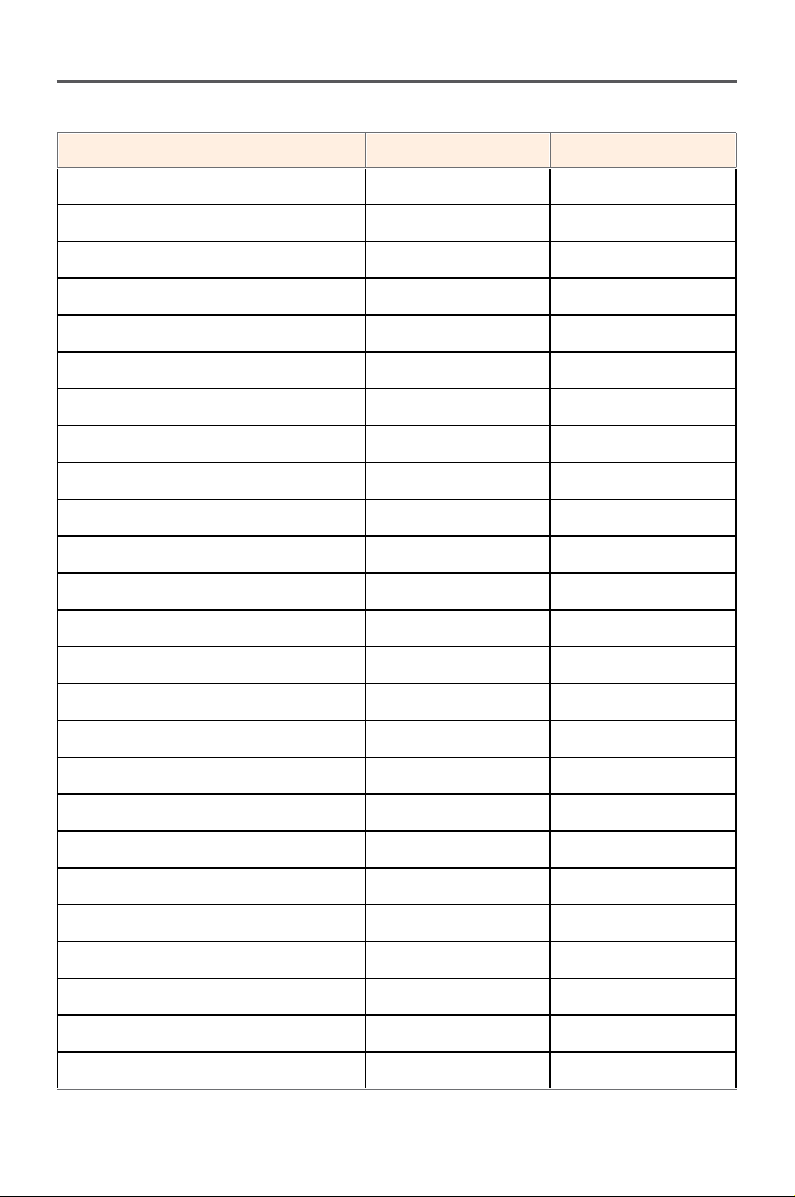
Supported Timing List
Timing List HDMI DP(Type-C)
720X400 / 70Hz V V
720X400 / 88Hz V V
640X480 / 60Hz V V
640X480 / 67Hz V V
640X480 / 72Hz V V
640X480 / 75Hz V V
800X600 / 56Hz V V
800X600 / 60Hz V V
800X600 / 72Hz V V
800X600 / 75Hz V V
832X624 / 75Hz V V
1024X768 / 87Hz V V
1024X768 / 60Hz V V
1024X768 / 70Hz V V
1024X768 / 75Hz V V
1280X1024 / 75Hz V V
1152X870 / 75Hz V V
1152X864 / 75Hz V V
1280X720 / 60Hz V V
1280X800 / 60Hz V V
1280X960 / 60Hz V V
1280X1024 / 60Hz V V
1440X900 / 60Hz V V
1600X900 / 60Hz V V
1680X1050 / 60Hz V V
Gaming Monitor U
ser Guide
- 39 -
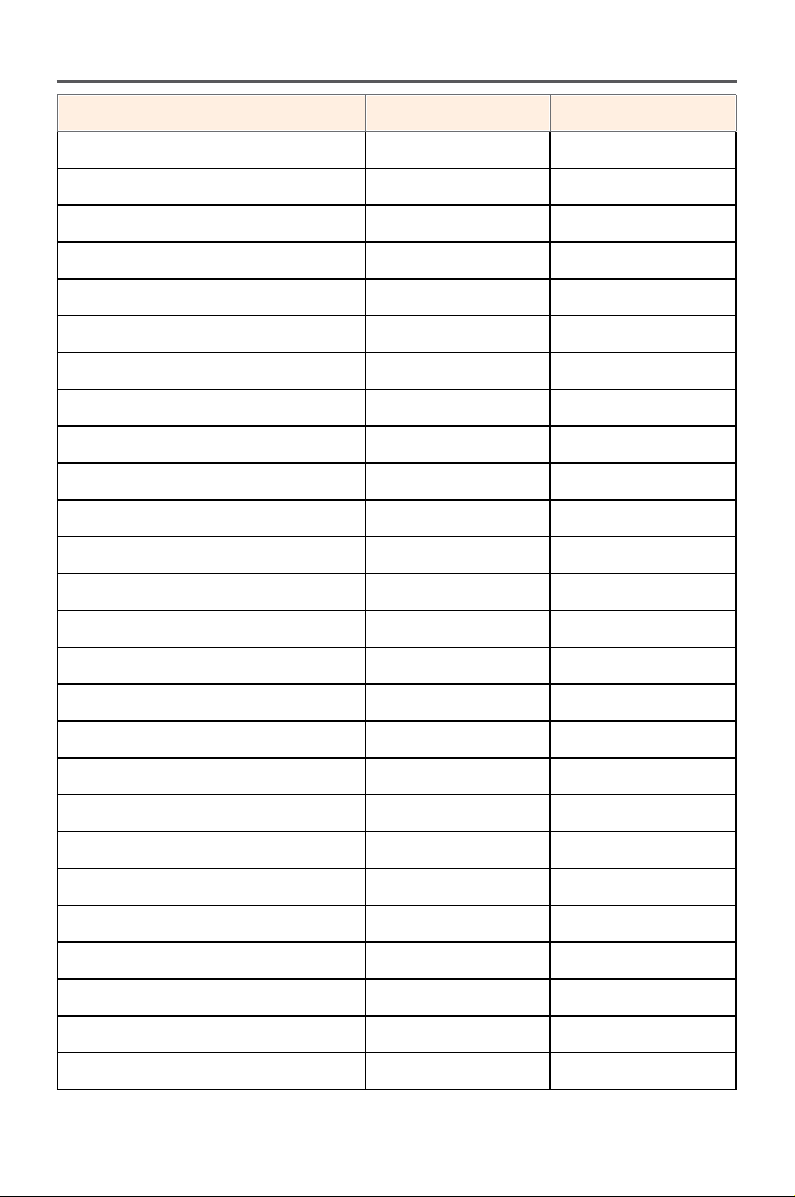
Timing List HDMI DP(Type-C)
720X480 / 60Hz V V
1280X720 / 50hz V V
1280X720 / 60hz V V
1280X720 / 100hz V V
1440X480 / 60hz V V
1920X1080 / 24Hz V X
1920X1080 / 50hz V V
1920X1080 / 60hz V V
1920X1080 / 100hz V V
1920X1080 / 120Hz V V
3840X2160 / 24Hz V X
3840X2160 / 25Hz V X
3840X2160 / 30Hz V X
3840X2160 / 50Hz V V
3840X2160 / 60Hz V V
3840X2160 / 100Hz V V
3840X2160 / 120Hz V V
1920x1080 / 144Hz V V
2560x1440 / 60Hz V V
2560x1440 / 120Hz V V
2560x1440 / 144Hz V V
3840x2160 / 144Hz V V
3840x2160 / 150Hz V V
3840x2160 / 160Hz(Optional) X V
1280x1440 / 60Hz(PBP) V V
1920x2160 / 60Hz(PBP) V V
G
aming Monitor User Guide
- 40 -
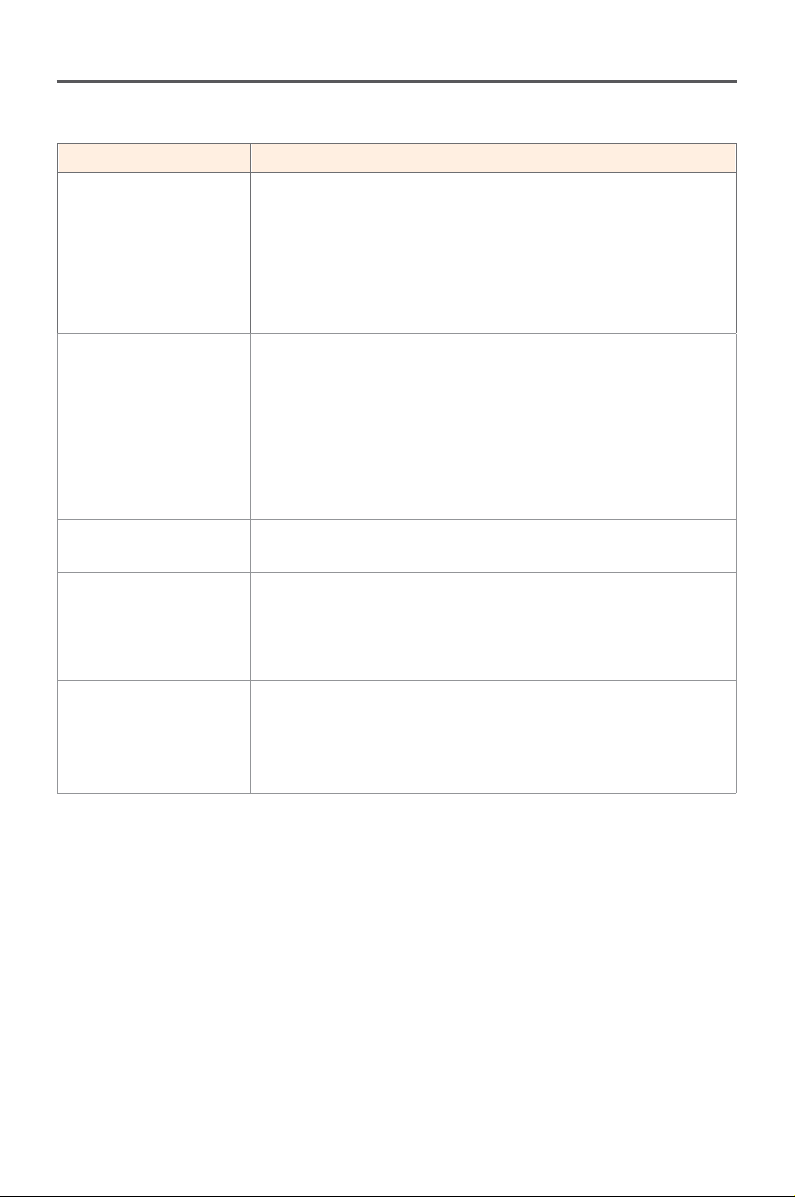
Troubleshooting
Problem Possible Solution(s)
No power • Make sure the power cable is properly
connected to the power source and the
monitor.
• Check the cable and plug to make sure they are
not broken.
• Make sure the monitor is turned on.
No image appears
on the screen
• Make sure the monitor and the computer
are properly connected and both devices are
turned on.
• Make sure you have selected the correct input
source. Refer to page 17 or 31.
• Adjust the Brightness and Contrast settings.
Refer to page 29.
The image does not
fill the entire screen
• Try different Display Mode (aspect ratio)
setting. Refer to page 28.
The colors are
distorted
• Make sure the input signal cable is properly
connected.
• Configure the image related settings. Refer to
the “Picture” section.
No sound or
volume is low
• Make sure the headphone cable is properly
connected.
• Adjust the volume level. Refer to page 19 or 33.
• Adjust your computer sound related settings.
Note: If the problem persists, please contact our customer service for
further assistance.

Gaming Monitor U
ser Guide
- 41 -
Basic Care
When the screen becomes dirty, do the following to clean the screen:
• Wipe the screen with your soft, lint-free cloth to remove any residual
dust.
• Spray or apply the cleaning fluid onto a soft cloth. Then wipe the
screen gently with the damp cloth.
Note:
• Make sure that the cloth is damp, but not wet.
• When wiping, avoid applying excessive pressure on the screen.
• Acidic or abrasive cleaners can damage the screen.
GIGABYTE Service Information
More service information, please visit GIGABYTE official website:
https://www.gigabyte.com/

G
aming Monitor User Guide
- 42 -
FLICKER-FREE
Without causing eye strain and other injuries.
General Description
M27U is a color active matrix liquid crystal display with a Light Emitting
Diode (LED) backlight assembly without LED driver. The matrix employs
a-Si thin film transistor as the active element. It is a transmissive type
display operating in the normally black mode. It has a 27 inch diagonally
measured active display area with UHD resolution(3840 horizontal by
2160 vertical pixel array) Each pixel is divided into red, green and blue
sub-pixels or dots which are arranged in vertical stripes. Gray scale or the
brightness of the sub-pixel color is determined with a 8bit+ FRC gray scale
signal for each dot, thus, presenting a palette of more than 1.07 Billion
colors. It has been designed to apply eDP (HBR2, 5.4Gbps) interface. It is
intended to support displays where high brightness, super wide viewing
angle, high color saturation, and high color are important.

Gaming Monitor U
ser Guide
- 43 -
SAFETY INFORMATION
Regulatory Notices
United States of America, Federal Communications
Commission Statement
Supplier’s Declaration of Conformity
47 CFR § 2.1077 Compliance Information
Product Name: LCD monitor
Trade Name: GIGABYTE
Model Number: M27U
Responsible Party – U.S. Contact Information: G.B.T.Inc.
Address:17358 Railroad street, City Of Industry, CA91748
Tel.:1-626-854-9338
Internet contact information: https://www.gigabyte.com
FCC Compliance Statement:
This device complies with Part 15 of the FCC Rules, Subpart B,
Unintentional Radiators.
Operation is subject to the following two conditions:(1) This device may
not cause harmful interference, and (2) this device must accept any
interference received, including interference that may cause undesired
operation.
This equipment has been tested and found to comply with the limits for a
Class B digital device, pursuant to Part 15 of the FCC Rules.These limits are
designed to provide reasonable protection against harmful interference in
a residential installation.This equipment generates, uses and can radiate
radio frequency energy and, if not installed and used in accordance with
manufacturer’s instructions, may cause harmful interference to radio
communications.However, there is no guarantee that interference will
not occur in a particular installation.If this equipment does cause harmful
interference to radio or television reception, which can be determined by
turning the equipment off and on, the user is encouraged to try to correct
the interference by one or more of the following measures:
• Reorient or relocate the receiving antenna.
• Increase the separation between the equipment and receiver.

G
aming Monitor User Guide
- 44 -
• Connect the equipment to an outlet on a circuit different from that to
which the receiver is connected.
• Consult the dealer or an experienced radio/TV technician for help.
Canadian Department of Communications Statement
This digital apparatus does not exceed the Class B limits for radio noise
emissions from digital apparatus set out in the Radio Interference
Regulations of the Canadian Department of Communications. This class B
digital apparatus complies with Canadian ICES-003.
Avis de conformité à la réglementation d’Industrie Canada
Cet appareil numérique de la classe B est conforme à la norme NMB-003
du Canada.
European Union (EU) CE Declaration of Conformity
This device complies with the following directives: Electromagnetic
Compatibility Directive 2014/30/EU, Low-voltage Directive 2014/35/
EU, ErP Directive 2009/125/EC, RoHS directive (recast) 2011/65/EU & the
2015/863 Statement.
This product has been tested and found to comply with all essential
requirements of the Directives.
European Union (EU) RoHS (recast) Directive 2011/65/EU & the
European Commission Delegated Directive (EU) 2015/863 Statement
GIGABYTE products have not intended to add and safe from hazardous
substances (Cd, Pb, Hg, Cr+6, PBDE, PBB, DEHP, BBP, DBP and DIBP).
The parts and components have been carefully selected to meet RoHS
requirement. Moreover, we at GIGABYTE are continuing our efforts
to develop products that do not use internationally banned toxic
chemicals.
European Union (EU) Community Waste Electrical & Electronic
Equipment (WEEE) Directive Statement
GIGABYTE will fulfill the national laws as interpreted from the 2012/19/
EU WEEE (Waste Electrical and Electronic Equipment) (recast) directive.
The WEEE Directive specifies the treatment, collection, recycling and
disposal of electric and electronic devices and their components. Under
the Directive, used equipment must be marked, collected separately, and
disposed of properly.
Gaming Monitor U
ser Guide
- 45 -
WEEE Symbol Statement
MThe symbol shown below is on the product or on its
packaging, which indicates that this product must not be
disposed of with other waste. Instead, the device should be
taken to the waste collection centers for activation of the
treatment, collection, recycling and disposal procedure.
For more information about where you can drop off your waste
equipment for recycling, please contact your local government office, your
household waste disposal service or where you purchased the product for
details of environmentally safe recycling.
End of Life Directives-Recycling
The symbol shown below is on the product or on its
packaging, which indicates that this product must not be
disposed of with other waste. Instead, the device should be
taken to the waste collection centers for activation of the
treatment, collection, recycling and disposal procedure.
Déclaration de Conformité aux Directives de l’Union
européenne (UE)
Cet appareil portant la marque CE est conforme aux directives de l’UE
suivantes: directive Compatibilité Electromagnétique 2014/30/UE,
directive Basse Tension 2014/35/UE, directive 2009/125/CE en matière
d’écoconception, la directive RoHS II 2011/65/UE & la déclaration
2015/863.
La conformité à ces directives est évaluée sur la base des normes
européennes harmonisées applicables.
European Union (EU) CE-Konformitätserklärung
Dieses Produkte mit CE-Kennzeichnung erfüllen folgenden EU- Richtlinien:
EMV-Richtlinie 2014/30/EU, Niederspannungsrichtlinie 2014/30/EU,
Ökodesign-Richtlinie 2009/125/EC, RoHS-Richtlinie 2011/65/ EU erfüllt
und die 2015/863 Erklärung.
Die Konformität mit diesen Richtlinien wird unter Verwendung der
entsprechenden Standards zurEuropäischen Normierung beurteilt.

G
aming Monitor User Guide
- 46 -
CE declaração de conformidade
Este produto com a marcação CE estão em conformidade com das
seguintes Diretivas UE:Diretiva Baixa Tensão 2014/35/EU; Diretiva CEM
2014/30/EU; Diretiva Conceção Ecológica 2009/125/CE; Diretiva RSP
2011/65/UE e a declaração 2015/863.
A conformidade com estas diretivas é verificada utilizando as normas
europeias harmonizadas.
CE Declaración de conformidad
Este producto que llevan la marca CE cumplen con las siguientes
Directivas de la Unión Europea:Directiva EMC 2014/30/EU, Directiva de
bajo voltaje 2014/35/EU, Directiva de Ecodiseño 2009/125/EC, Directiva
RoHS 2011/65/EU y la Declaración 2015/863.
El cumplimiento de estas directivas se evalúa mediante las normas
europeas armonizadas.
CE Dichiarazione di conformità
I prodotti con il marchio CE sono conformi con una o più delle seguenti
Direttive UE, come applicabile:Direttiva EMC 2014/30/UE, Direttiva sulla
bassa tensione 2014/35/UE, Direttiva Ecodesign EMC 2009/125/EC,
Direttiva RoHS 2011/65/EU e Dichiarazione 2015/863.
La conformità con tali direttive viene valutata utilizzando gli Standard
europei armonizzati applicabili.
Deklaracja zgodności UE Unii Europejskiej
Urządzenie jest zgodne z następującymi dyrektywami:Dyrektywa
kompatybilności elektromagnetycznej 2014/30/UE, Dyrektywa
niskonapięciowej 2014/35/UE, Dyrektywa ErP 2009/125/WE, Dyrektywa
RoHS 2011/65/UE i dyrektywa2015/863.
Niniejsze urządzenie zostało poddane testom i stwierdzono jego
zgodność z wymaganiami dyrektywy.
ES Prohlášení o shodě
Toto zařízení splňuje požadavky Směrnice o Elektromagnetické
kompatibilitě 2014/30/EU, Směrnice o Nízkém napětí 2014/35/EU,
Směrnice ErP 2009/125/ES, Směrnice RoHS 2011/65/EU a 2015/863.
Tento produkt byl testován a bylo shledáno, že splňuje všechny základní
požadavky směrnic.

Gaming Monitor U
ser Guide
- 47 -
EK megfelel ségi nyilatkozata
A termék megfelelnek az alábbi irányelvek és szabványok
követelményeinek, azok a kiállításidőpontjában érvényes, aktuális
változatában: EMC irányelv 2014/30/EU, Kisfeszültségű villamos
berendezésekre vonatkozó irányelv2014/35/EU, Környezetbarát
tervezésről szóló irányelv 2009/125/EK, RoHS irányelv 2011/65/EU és
2015/863.
Δήλωση συμμόρφωσης ΕΕ
Είναι σε συμμόρφωση με τις διατάξεις των παρακάτω Οδηγιών της
Ευρωπαϊκής Κοινότητας: Οδηγία 2014/30/ΕΕ σχετικά με την
ηλεκτρομαγνητική συμβατότητα, Οοδηγία χαμηλή τάση 2014/35/EU,
Οδηγία 2009/125/ΕΚ σχετικά με τον οικολογικό σχεδιασμό, Οδηγία RoHS
2011/65/ΕΕ και 2015/863.
Η συμμόρφωση με αυτές τις οδηγίες αξιολογείται χρησιμοποιώντας τα
ισχύοντα εναρμονισμένα ευρωπαϊκά πρότυπα.
Japan Class 01 Equipment Statement
安全にご使用いただくために
接地接続は必ず電源プラグを電源につなぐ前に行って下さい。
また、接地接続を外す場合は、必ず電源プラグを電源から切り離し
てから行って下さい。
Japan VCCI Class B Statement
クラスB VCCI 基準について
この装置は、クラスB情報技術装置です。この装置は、家庭環境で
使用することを目的としていますが、この装置がラジオやテレビジ
ョン受信機に近接して使用されると、受信障害を引き起こすことが
あります。
取扱説明書に従って正しい取り扱いをして下さい。
VCCI-B

G
aming Monitor User Guide
- 48 -
China RoHS Compliance Statement
中国《废弃电器电子产品回收处理管理条例》提示性说明
为了更好地关爱及保护地球,当用户不再需要此产品或产品寿命终止
时,请遵守国家废弃电器电子产品回收处理相关法律法规,将其交给
当地具有国家认可的回收处理资质的厂商进行回收处理。
环保使用期限
Environment-friendly use period
10
此标识指期限(十年),电子电气产品中含有的有害物
质在正常使用的条件下不会发生外泄或突变,电子电气
产品用户使用该电子电气产品不会对环境造成严重污染
或对其人身、财产造成严重损害的期限。
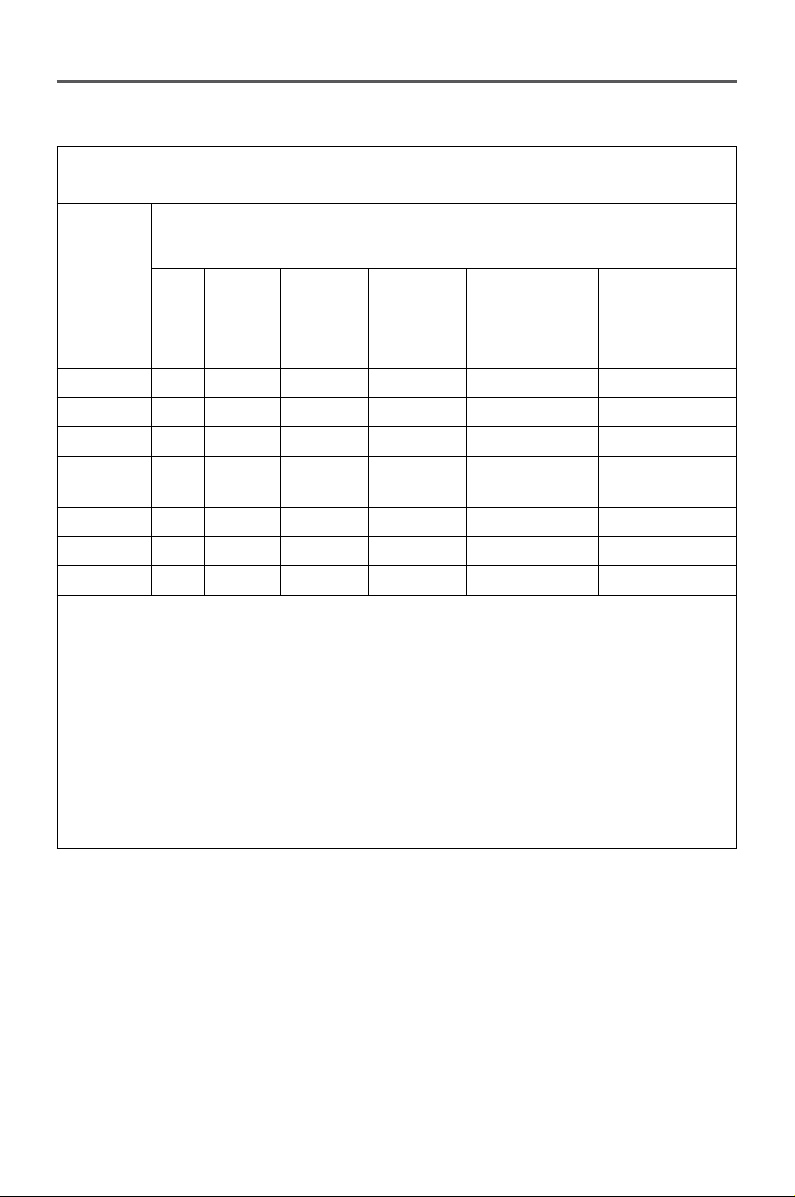
产品中有害物质名称及含量 :
部件名称
有害物质
铅
(Pb)
汞
(Hg)
鎘
(Cd)
六价铬
(Cr+6)
多溴联苯
(PBB)
多溴二苯醚
(PBDE)
印刷电路板及其
电子组件
X
O O O O O
液晶面板
X
O O O O O
外壳
O O O O O O
外部信号连接头
及线材
X
O O O O O
本表格依据 SJ/T 11364 的规定编制。
This table is prepared in compliance with the requirements
of SJ/T 11364
○: 表示该有害物质在该部件所有均质材料中的含量均在 GB/T
26572 规定的限量要求以下。
X: 表示该有害物质至少在该部件的某一均质材料中的含量超出 GB/T
26572 规定的限量要求
。
Gaming Monitor U
ser Guide
- 49 -
限用物質含有情況標示聲明書:
Declaration of the Presence Condition of the Restricted Substances Marking
設備名稱:液晶顯示器,型號(型式):M27U
Equipment name Type designation(Type)
單元
Unit
限用物質及其化學符號
Restricted substances and its chemical symbols
铅
Lead
(Pb)
汞
Mercury
(Hg)
鎘
Cadmium
(Cd)
六价铬
Hexavalent
chromium
(Cr+6)
多溴联苯
Polybrominated
biphenyls
(PBB)
多溴二苯醚
Polybrominated
diphenyls ethers
(PBDE)
塑料外框
O O O O O O
後殼
O O O O O O
液晶面板
— O O O O O
電路板組
件
— O O O O O
底座
O O O O O O
電源線
— O O O O O
其他線材
— O O O O O
備考1.“超出0.1 wt%”及“超出0.01 wt%”係指限用物質之百分比含量超出百分比
含量基準值。
Note 1:"Exceeding 0.1 wt%" and "exceeding 0.01 wt%" indicate that the percentage
content of the restricted substance exceeds the reference percentage value of presence
condition.
備考2. "O"係指該項限用物質之百分比含量未超出百分比含量基準值。
Note 2: "O" indicates that the percentage content of the restricted substance does not
exceed the percentage of reference value of presence.
備考3. "—"係指該項限用物質为排除项目。
Note 3: The"—" indicates that the restricted substance corresponds to the exemption.