1
Model 24VCHRG-HS-DPC
QUICK GUIDE
24V LITHIUM-ION HIGH-SPEED
DUAL PORT CHARGER
R
R
© 2022 Snow Joe
®
, LLC
All rights reserved. Original instructions.
SAVE THESE INSTRUCTIONS
Form No. SJ-24VCHRG-HS-DPC-880E-M
EN
mWARNING! READ AND UNDERSTAND ALL INSTRUCTIONS. Failure to follow all
instructions listed below may result in electric shock, re and/or serious personal injury.
mCAUTION! To reduce the risk of injury, charge the 24V iON+ lithium-ion battery packs
only in its designated 24V iON+ lithium-ion charger. Other types of chargers present risk of re,
personal injury and damage. Do not wire a battery pack to a power supply plug or car cigarette
lighter. Such misuse will permanently disable or damage the battery packs.
• Avoid dangerous environments – Do not charge the battery packs in rain, snow or in
damp or wet locations. Do not use the battery packs or charger in the presence of explosive
atmospheres (gaseous fumes, dust or ammable materials) because sparks may be
generated when inserting or removing the battery pack, which could lead to a re.
• Charge in a well-ventilated area – Do not block the charger vents. Keep them clear to allow
for proper ventilation. Do not allow smoking or open ames near a charging battery pack.
Vented gases may explode.
NOTE: The safe temperature range for the batteries is 41°F – 105ºF (5°C – 40.5°C). Do not
charge the batteries outside in freezing weather; charge it at room temperature.
• Maintain charger cord – When unplugging the charger, pull the plug, not the cord, from
the receptacle to reduce the risk of damage to the electrical plug and cord. Never carry the
charger by its cord or yank it by the cord to disconnect it from the receptacle. Keep the cord
away from heat, oil and sharp edges. Make sure the cord will not be stepped on, tripped over
or subjected to damage or stress when the charger is in use. Do not use the charger with a
damaged cord or plug. Replace a damaged charger immediately.
• Do not use an extension cord unless it is absolutely necessary – Using the wrong,
damaged or improperly wired extension cord poses a risk of re and electric shock.
• Charger is rated for 120 volt AC only – The charger must be plugged into an appropriate
receptacle.
• Use only recommended attachments – Use of an attachment not recommended or sold by
the battery charger or battery pack manufacturer may result in risk of re, electric shock or
personal injury.
• Unplug charger when not in use – Make sure to remove the battery packs from
unplugged charger.
mWARNING! To reduce the risk of electric shock, always unplug the charger before
performing any cleaning or maintenance. Do not allow water to ow into the charger. Use a
Ground Fault Circuit Interrupter (GFCI) to reduce shock hazards.
• Store your charger in a cool, dry place – Do not store charger where temperatures may
exceed 105ºF (40.5ºC), such as in direct sunlight or inside a vehicle or metal building during
the summer.
Charge times vary. Refer to battery specications.
Charger Input ................................................................................................................. 400 – 480 W
Charger Output .................................................................................................................. 26V* Max
Net Weight ................................................................................................................. 3.5 lbs (1.6 kg)
*Initial no-load voltage, when fully charged, peaks at 26 volts; nominal voltage under typical load is 25.2 volts.
Battery Charge Level Indicator
Each battery pack is equipped with a push button for checking the charge level. Simply press the
push button to read o the battery charge level from the LEDs of the battery indicator:
• All 3 level monitoring LEDs are lit: Battery charge level is high.
• 2 level monitoring LEDs are lit: Battery charge level is decreasing. Stop work as
soon as possible.
• 1 level monitoring LED is lit: Battery is at. Stop work IMMEDIATELY and charge the battery.
Otherwise the battery’s service life will be greatly shortened.
When to Charge the iON+ Lithium-Ion Batteries
NOTE: The 24V iON+lithium-ion battery packs do not develop a “memory” when charged after
only a partial discharge. Therefore, it is not necessary to run down the battery pack before
connecting it with the charger.
• Use the battery charge indicator lights to determine when to charge your 24V iON+
lithium-ion battery packs.
• You can “top-o” your battery packs’ charge before starting a big job or after a
long day of use.
Charge the Battery
1. Press the push lock buttons on the battery to pull it out of the equipment.
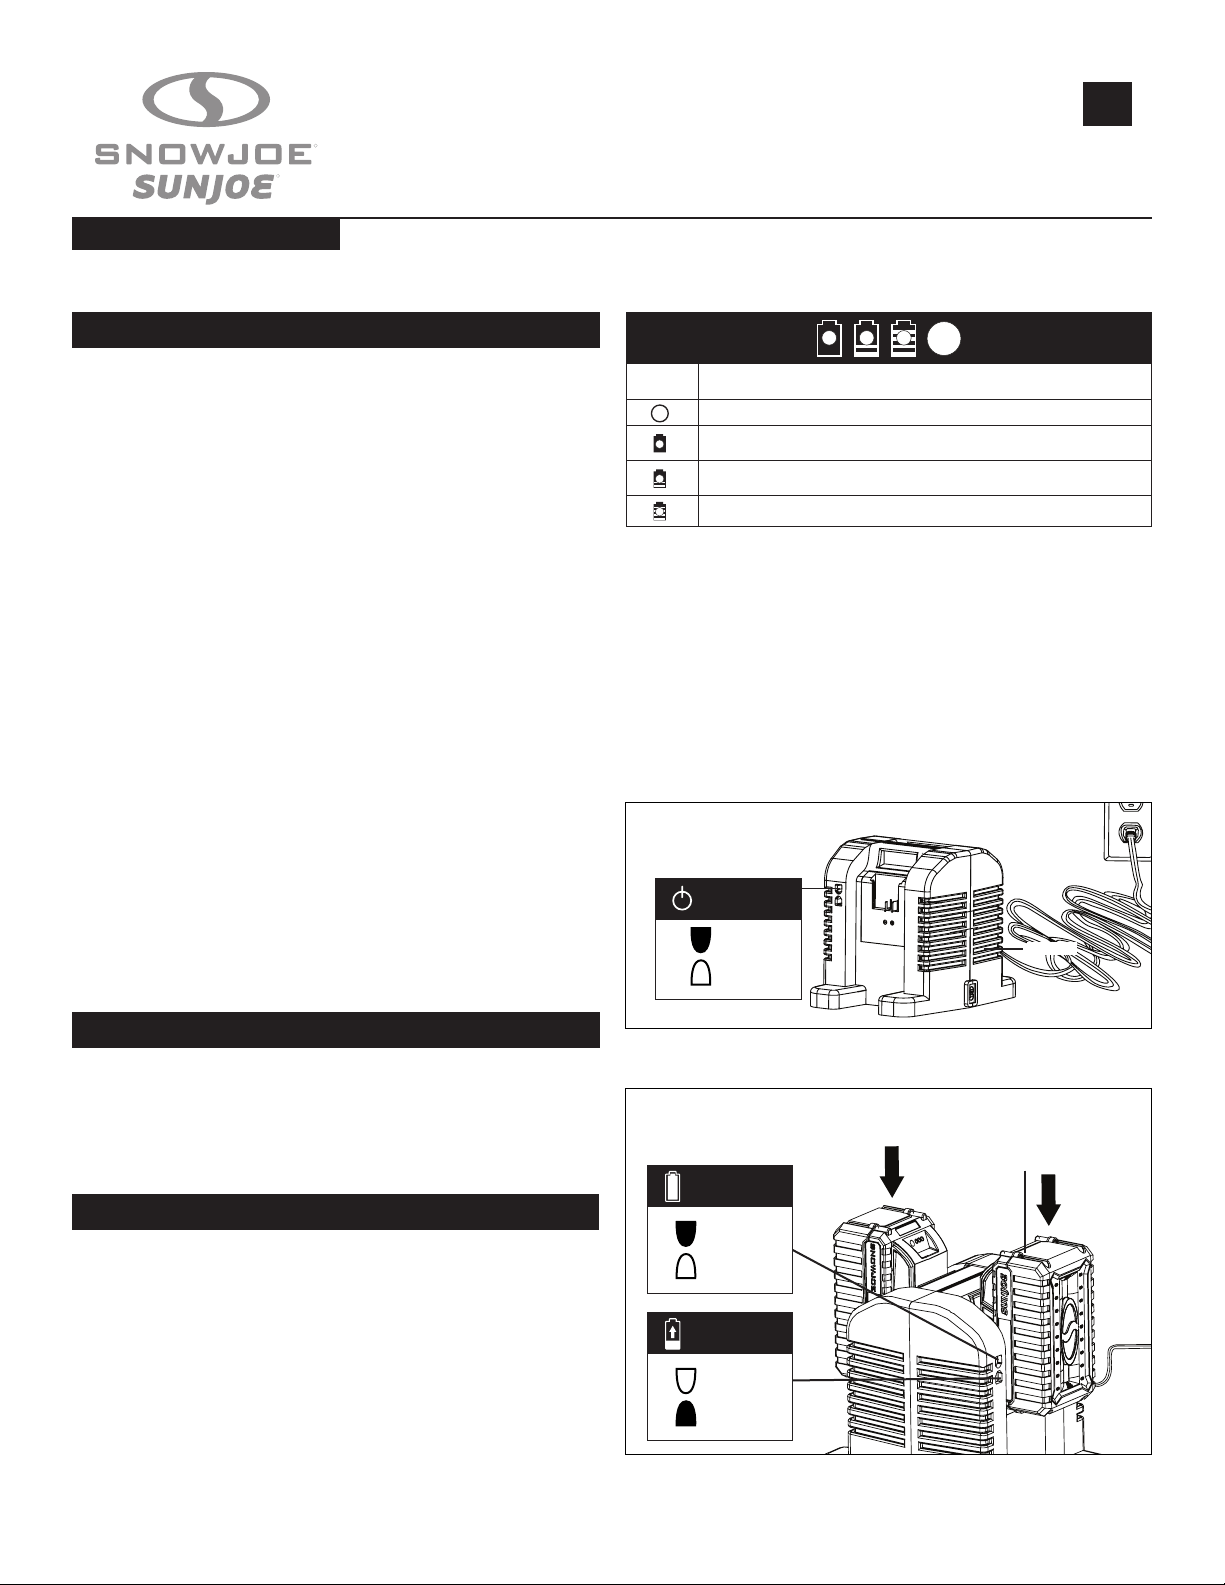
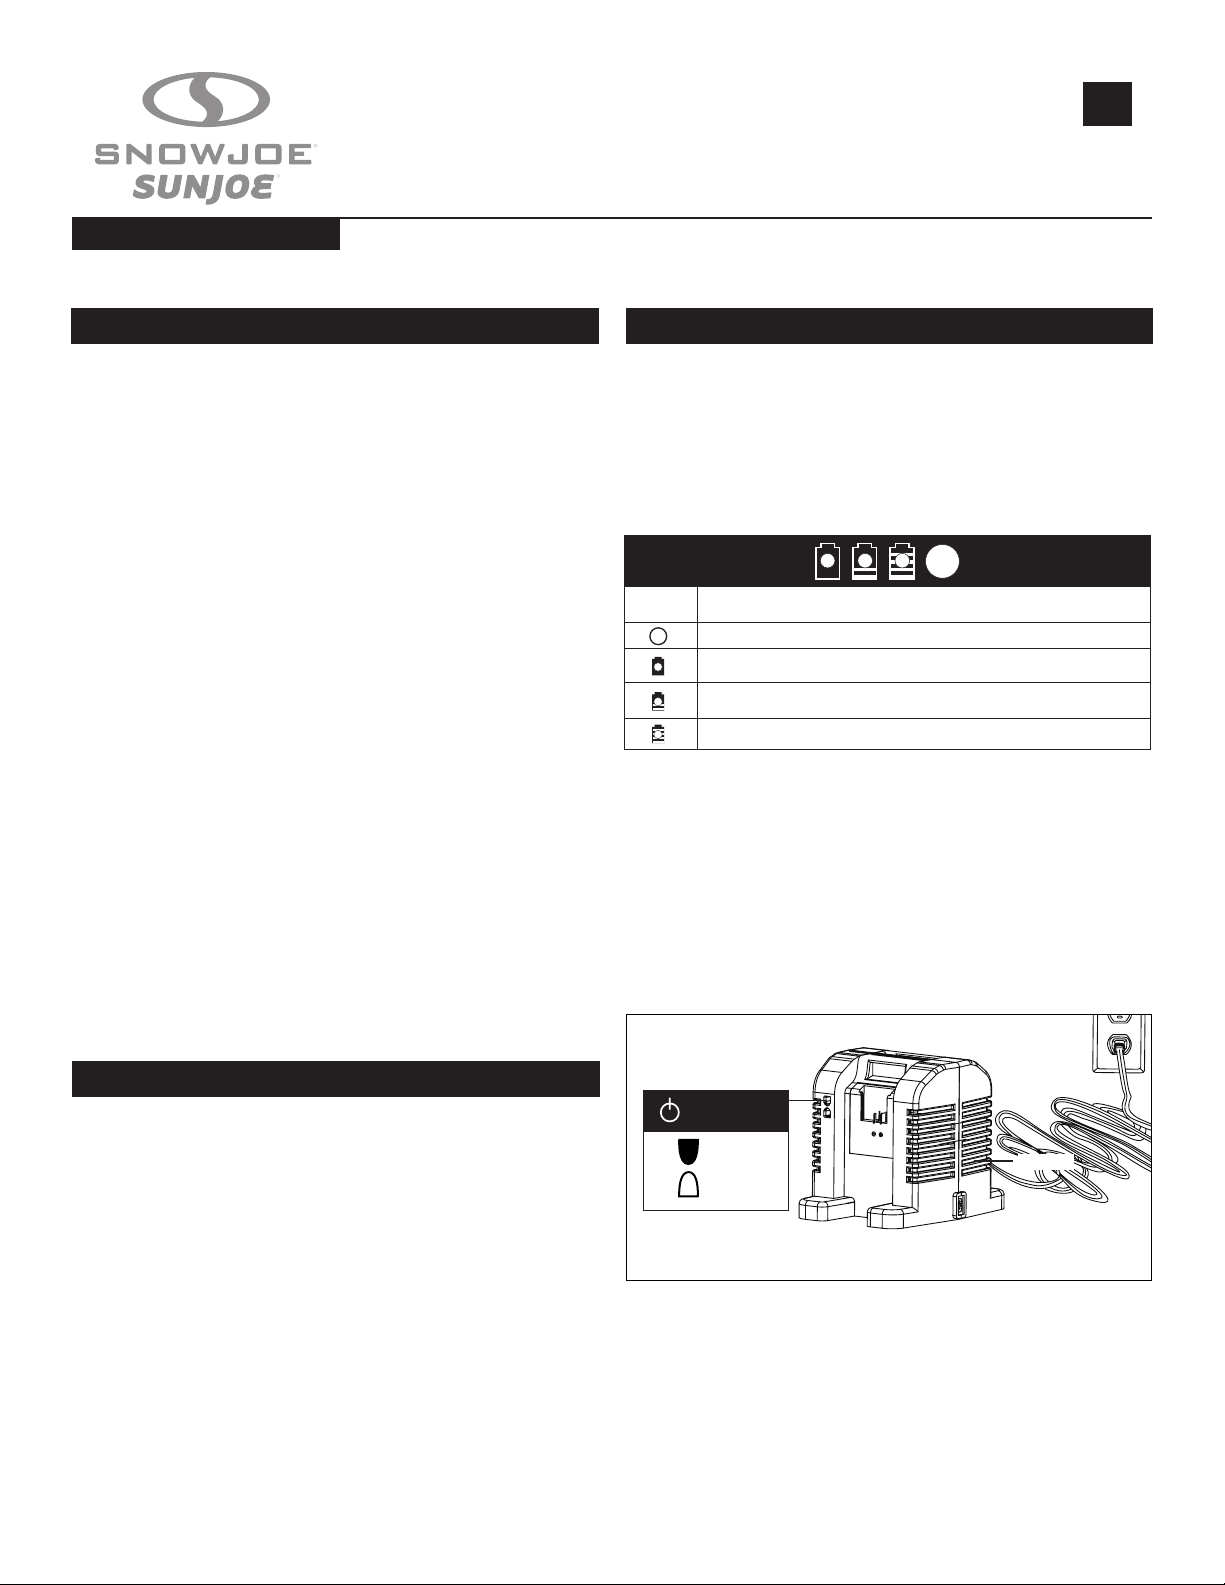
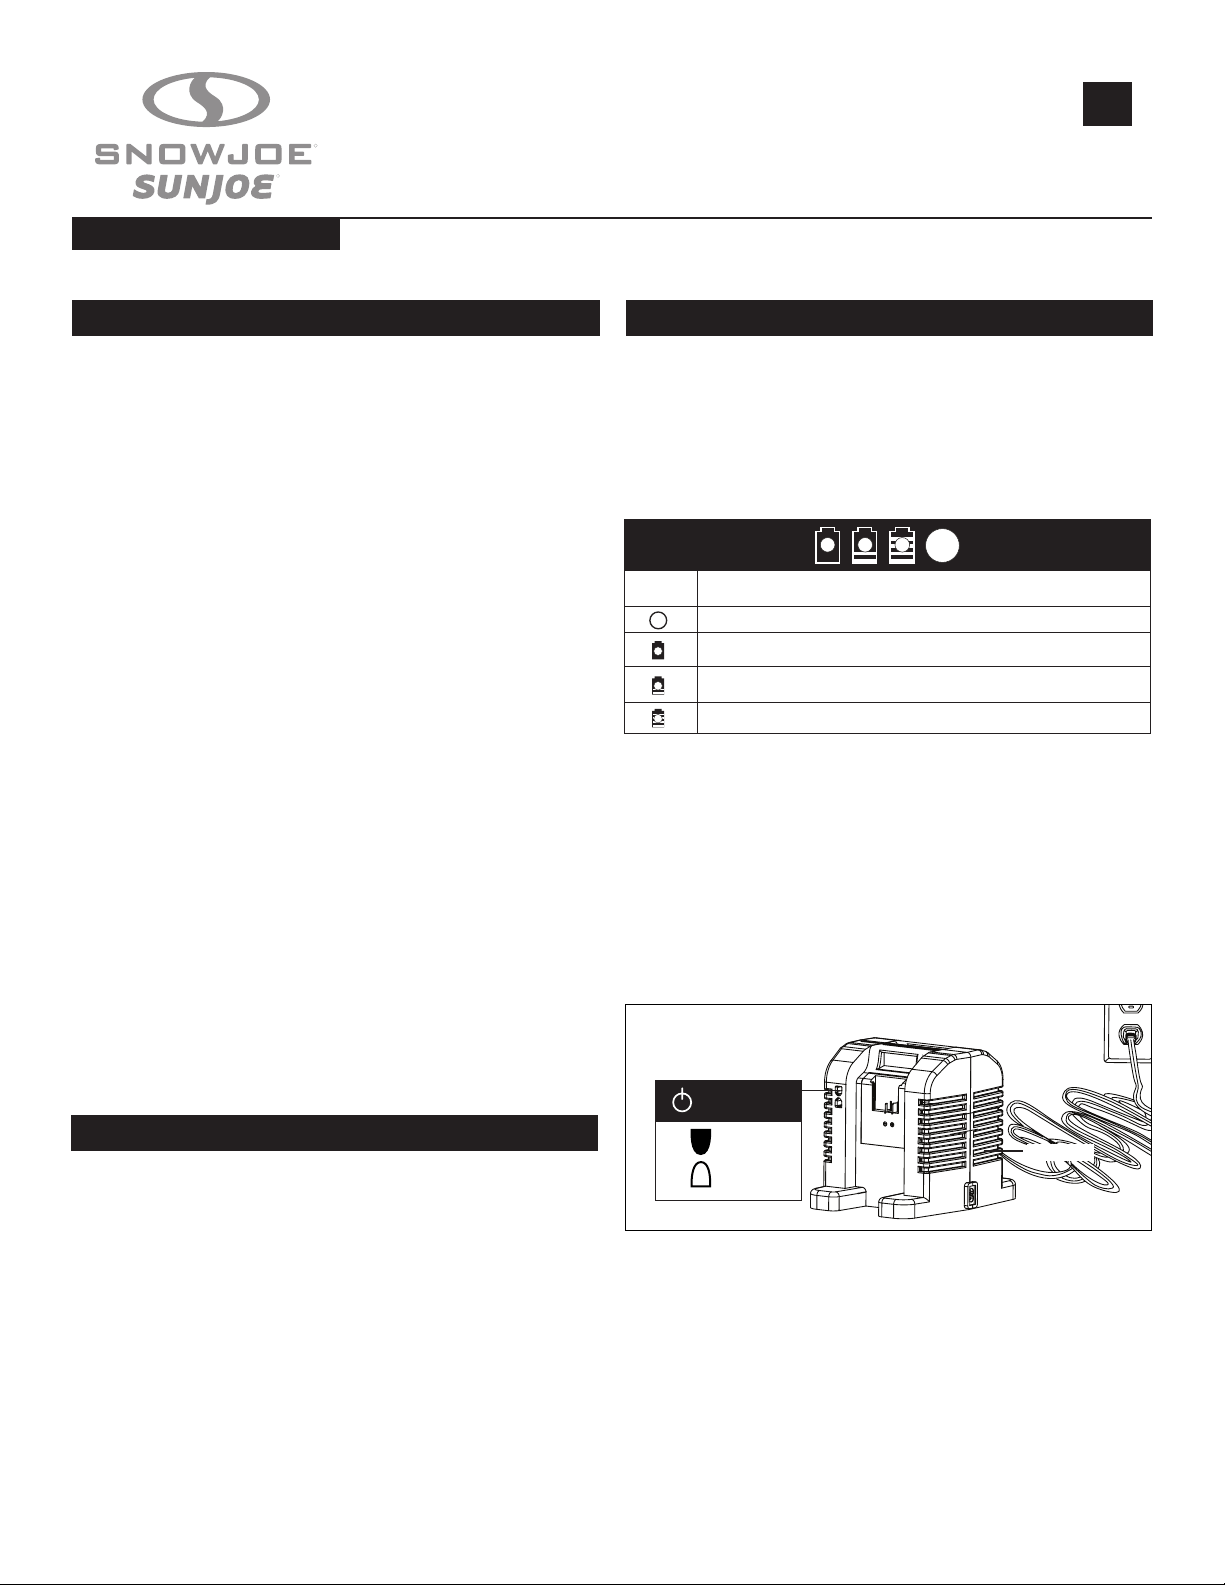
2. Check that the mains voltage is the same as that marked on the rating plate of the battery
charger. Then, insert the charger’s plug into the electrical wall outlet. When you plug in the
charger, the top right green light will illuminate and stay green (Fig. 1).
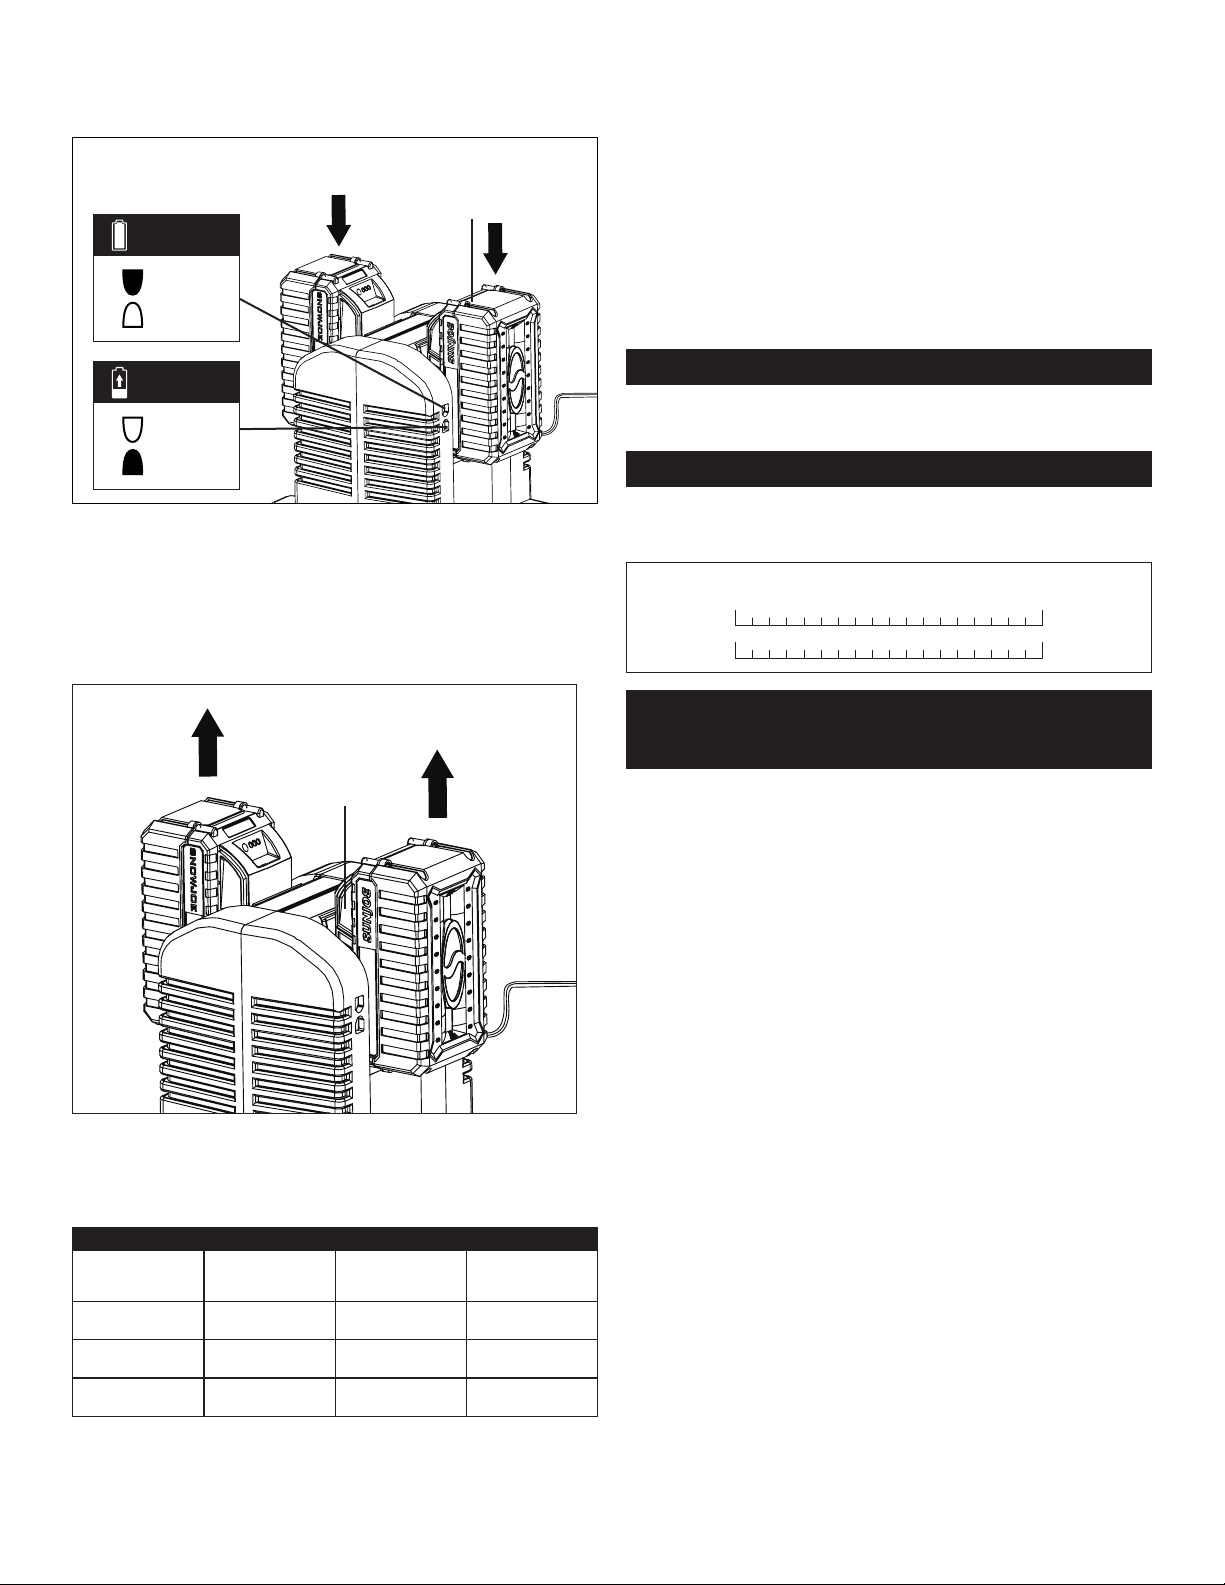
3. Place the battery packs into the charger by sliding the packs to lock them into position.
When you insert the batteries into the charger, the top green light will go o, and the bottom
red light will illuminate to indicate that the batteries are charging (Fig. 2).
SAFETY INSTRUCTION
TECHNICAL DATA
OPERATION
Charge level button
The battery is at 30% capacity and requires charging
The battery is at 60% capacity and requires charging soon
The battery is at full capacity
Light IndicatorsLights
Fig. 1
Charger
green
Power on
Battery packs
Fully
Charged
green
Charging
red
Fig. 2
2
4. When the top light turns green and bottom red light turns o, the batteries are fully charged
(Fig. 2).
5. If the light indicators do not come on at all, check that the battery packs are fully seated
into the bay. Remove the battery packs and reinsert. If the problem persists, contact an
authorized Snow Joe
®
+ Sun Joe
®
dealer or call the Snow Joe
®
+ Sun Joe
®
customer service
center at 1-866-SNOWJOE (1-866-766-9563) for assistance.
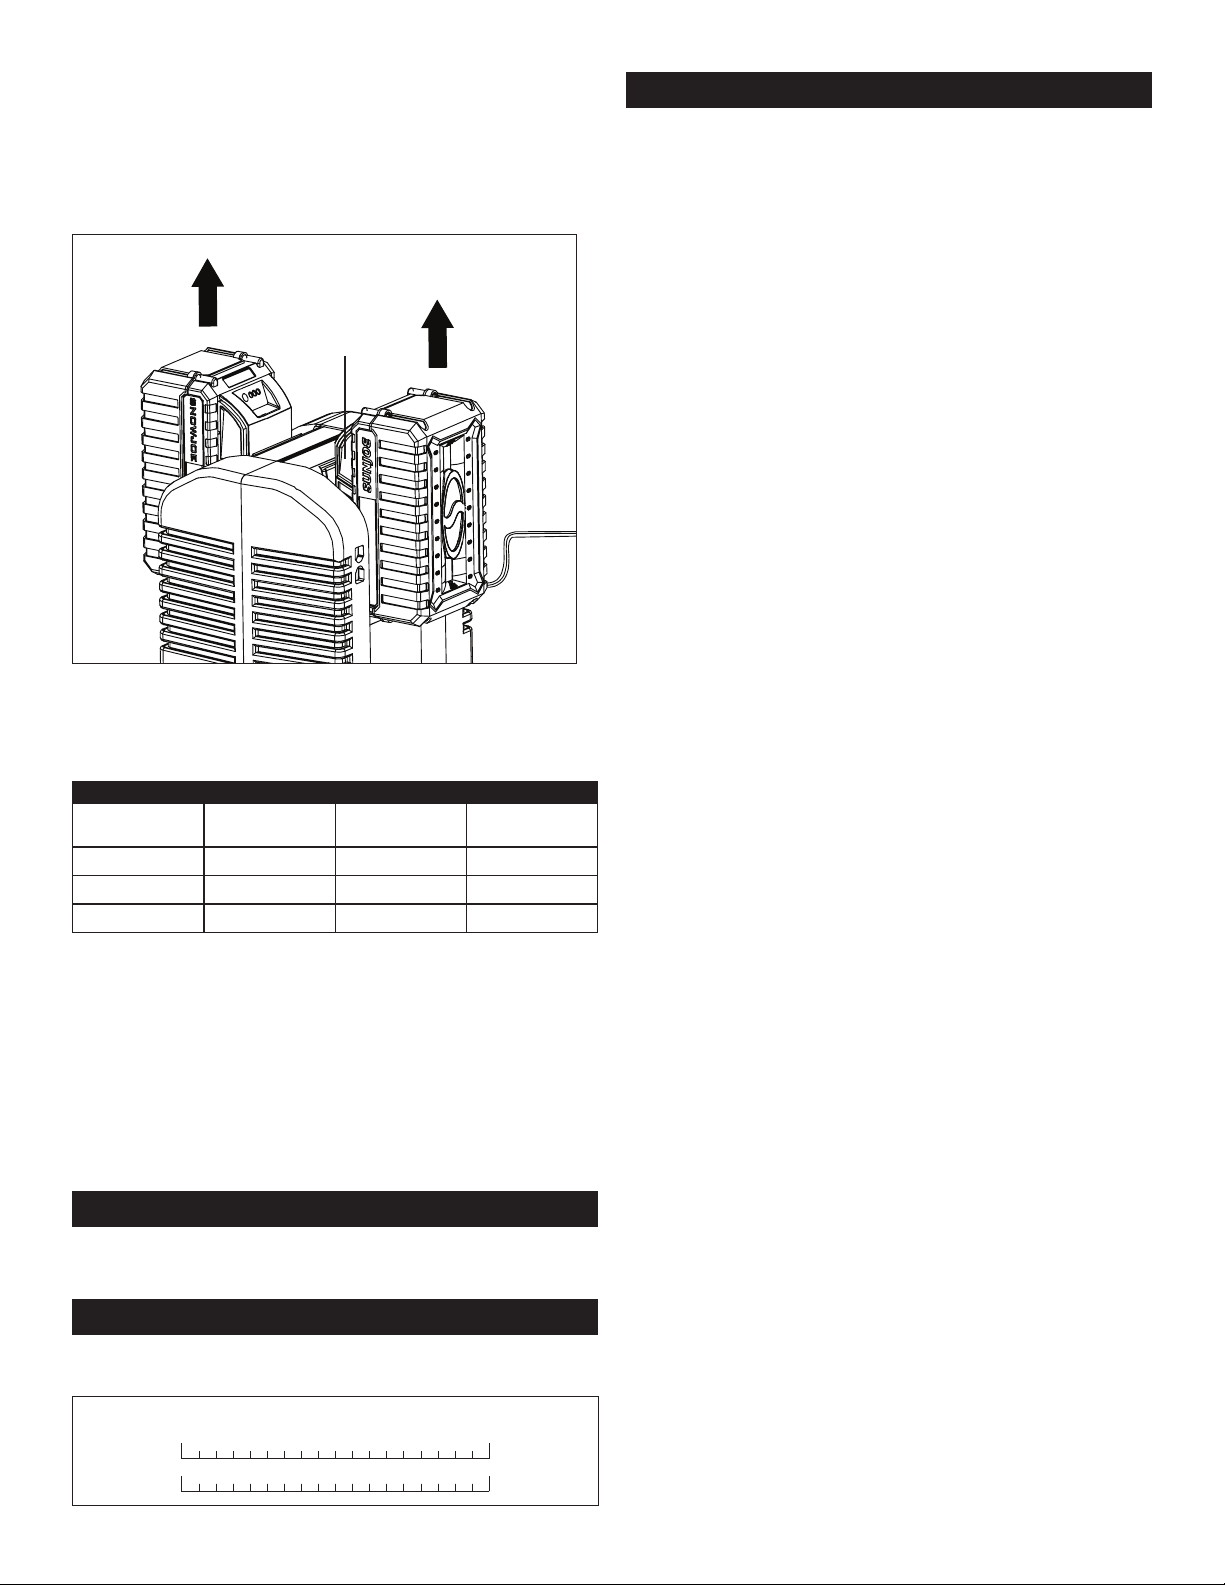
6. When charging is complete, remove the batteries from the charger by pressing the push lock
buttons and sliding the batteries upward to unlock them from the charger
(Fig. 3).
Charge a Hot or Cold Battery Pack
The green indicator light on the charger base indicates that the battery pack temperature is
outside the charging range. Once the pack is within the acceptable range, normal charging will
take place and the red light will be continuous. Hot or cold battery packs may take longer to
charge.
Battery + Charger O-Season Storage
1. Do not expose your battery packs or charger to water, rain or allow them to get wet. This
could permanently damage the charger and the battery packs. Do not use oil or solvents
to clean or lubricate your battery packs as the plastic casing can become brittle and crack,
causing a serious risk of injury.
2. Store the battery packs and charger at room temperature away from moisture. Do not store
in damp locations where corrosion of terminals may occur. As with other battery pack types,
permanent capacity loss can result if the battery packs are stored for long periods of time at
high temperatures (over 120ºF/49ºC).
3. 24V iON+ lithium-ion battery packs maintain their charge during storage longer than other
battery pack types. As a general practice, it is best to unplug the battery charger and
remove the battery packs when they are not in use. Recharge the battery packs every 6
months to 60% capacity (2 lights on) during o-season storage to maintain optimal battery
performance.
If your Snow Joe
®
+ Sun Joe
®
24VCHRG-HS-DPC lithium-ion high-speed dual port charger
requires service or maintenance, please call the Snow Joe
®
+ Sun Joe
®
customer service center at
1-866-SNOWJOE (1-866-766-9563).
When contacting the company, or arranging service from an authorized dealer, you will need to
provide the model and serial numbers, which can be found on the decal located on the housing of
the unit. Copy these numbers into the space provided below.
Federal Communications Commission (FCC)
Class B Device:
NOTE: This equipment has been tested and found to comply with the limits for a Class B digital
device, pursuant to part 15 of the FCC Rules. These limits are designed to provide reasonable
protection against harmful interference in a residential installation. This equipment generates, uses
and can radiate radio frequency energy and, if not installed and used in accordance with the
instructions, may cause harmful interference to radio communications. However, there is no
guarantee that interference will not occur in a particular installation. If this equipment does cause
harmful interference to radio or television reception, which can be determined by turning the
equipment o and on, the user is encouraged to try to correct the interference by one or more of
the following measures:
• Reorient or relocate the receiving antenna.
• Increase the separation between the equipment and receiver.
• Connect the equipment into an outlet on a circuit dierent from that to which the
receiver is connected.
• Consult the dealer or an experienced radio/TV technician for help.
Push lock button
Fig. 3
Lithium-Ion Charging Status
Battery Pack
Temperature
Charger Base
Indicator Light
Battery Pack
Indicator Light
Charging Status
Too hot
Green Flashing together Not charging
Normal range
Red Flashing one by one Normal charging
Too cold
Green Flashing together Not charging
SERVICE AND SUPPORT
MODEL + SERIAL NUMBER
Record the following numbers from the UPC label on your new product:
Model #:
Serial #:
2 4 V C H R G - H S - D P C

R4_01282020
SNOW JOE
®
+ SUN JOE
®
CUSTOMER PROMISE
OUR WARRANTY:
Snow Joe
warrants new, genuine, powered and non-powered Products to be free from defects in material or workmanship when used
for ordinary household use for a period of two years from the date of purchase by the original, end-user purchaser when purchased
from Snow Joe or from one of Snow Joe’s authorized sellers with proof of purchase. Because Snow Joe is unable to control the quality
of its Products sold by unauthorized sellers, unless otherwise prohibited by law, this Warranty does not cover Products purchased from
unauthorized sellers. If your Product does not work or there’s an issue with a specic part that is covered by the terms of this Warranty,
Snow Joe will elect to either (1) send you a free replacement part, (2) replace the Product with a new or comparable product at no
charge, or (3) repair the Product. How cool is that!
This Warranty gives you specific legal rights, and you may also have other rights which vary from State to State.
PRODUCT REGISTRATION:
Snow Joe strongly encourages you to register your Product. You can register online at snowjoe.com/register, or by printing and
mailing in a registration card available online from our website, or by calling our Customer Service Department at 1-866-SNOWJOE
(1-866-766-9563), or by e-mailing us at [email protected]. Failure to register your Product will not diminish your warranty rights.
However, registering your Product will allow Snow Joe to better serve you with any of your customer service needs.
WHO CAN SEEK LIMITED WARRANTY COVERAGE:
This Warranty is extended by Snow Joe to the original purchaser and original owner of the Product.
WHAT IS NOT COVERED?
This Warranty does not apply if the Product has been used commercially or for non-household or rental applications. This Warranty also
does not apply if the Product was purchased from an unauthorized seller. This Warranty also does not cover cosmetic changes that do
not aect performance. Wearing parts like belts, augers, chains and tines are not covered under this Warranty, and can be purchased
at snowjoe.com or by calling 1-866-SNOWJOE (1-866-766-9563).
ABOVE ALL ELSE, Snow Joe, LLC (“Snow Joe”) is dedicated to you, our customer. We strive to make your experience as pleasant as
possible. Unfortunately, there are times when a Snow Joe
®
, Sun Joe
®
, or Aqua Joe
®
product (“Product”) does not work or breaks under
normal operating conditions. We think it’s important that you know what you can expect from us. That’s why we have a Limited Warranty
(“Warranty”) for our Products.
3
4
Modelo 24VCHRG-HS-DPC
GUÍA RÁPIDA
R
R
Forma Nº SJ-24VCHRG-HS-DPC-880S-M
©2022 Snow Joe
®
, LLC
Derechos reservados. Instrucciones originales.
GUARDE ESTAS INSTRUCCIONES
CARGADOR DE DOBLE PUERTO DE ALTA VELOCIDAD
PARA BATER AS DE IONES DE LITIO DE 24 V
ES
m ¡ADVERTENCIA! LEA Y ENTIENDA TODAS LAS INSTRUCCIONES. No seguir las
instrucciones indicadas a continuación puede resultar en un choque eléctrico, incendio y/o
lesiones personales graves.
m ¡PRECAUCIÓN! Para reducir el riesgo de lesiones, cargue las baterías de iones de litio
iON+ de 24 V solo con su cargador de batería de iones de litio designado, el iON+ de 24 V. Otros
tipos de cargadores presentan riesgos de incendios, lesiones personales y daños materiales. No
conecte una batería a un enchufe de suministro de electricidad o encendedor de cigarrillos en un
automóvil. Dicho uso indebido dañará o deshabilitará permanentemente la batería.
• Evite entornos peligrosos: no cargue las baterías bajo la lluvia o nieve, ni en entornos
húmedos o mojados. No use las baterías ni el cargador en atmósferas explosivas (gases,
polvo o materiales inamables), ya que al insertar o retirar las baterías se pueden generar
chispas que causen un incendio.
• Cargue la batería en un área bien ventilada: no bloquee los conductos de ventilación del
cargador. Manténgalos despejados para permitir una ventilación adecuada. No permita que
se fume o haya llamas abiertas cerca de una batería siendo cargada. Los gases presentes
pueden explotar.
NOTA: el rango seguro de temperaturas para las baterías es de 41°F (5°C) a 105°F (40.5°C).
No cargue las baterías en exteriores a temperaturas congelantes. Cárguelas a temperatura
ambiente en interiores.
• Cuide el cable del cargador: al desenchufar el cargador tire del enchufe, no del cable,
para desconectarlo del tomacorriente y así evitar el riesgo de daños al enchufe y cable
de alimentación. Nunca transporte el cargador colgado de su cable, ni tire del cable para
desconectarlo del tomacorriente. Mantenga el cable alejado del calor, aceites y bordes
alados. Asegúrese de que el cable no sea pisado, que la gente no se tropiece con éste,
ni que esté sujeto a daños o tensiones mientras el cargador esté siendo usado. No use el
cargador con un cable o enchufe dañado. Reemplace un cargador dañado inmediatamente.
• No use un cable de extensión a menos que sea absolutamente necesario: usar un
cable de extensión incorrecto, dañado o conectado de forma inapropiada puede causar un
incendio o choque eléctrico.
• El cargador está especicado solo para 120 V CA: el cargador debe estar enchufado a un
tomacorriente apropiado.
• Use solo accesorios recomendados: el uso de un accesorio no recomendado ni vendido
por el fabricante de la batería o cargador de batería puede resultar en un riesgo de un choque
eléctrico, incendio o lesiones personales.
• Desenchufe el cargador cuando no esté siendo usado: asegúrese de retirar las baterías
de un cargador desenchufado.
m ¡ADVERTENCIA! Para reducir el riesgo de un choque eléctrico, desenchufe siempre
el cargador antes de llevar a cabo cualquier tarea de limpieza o mantenimiento. No permita que
entre agua dentro del cargador. Use un interruptor de circuito por falla a tierra (GFCI) para reducir
el riesgo de un choque eléctrico.
• Guarde su cargador en un lugar fresco y seco: no guarde el cargador donde las
temperaturas puedan exceder los 105ºF (40.5ºC), como bajo la luz directa del sol o dentro de
un vehículo o construcción metálica durante el verano.
Los tiempos de carga pueden variar. Consulte las especicaciones de la batería.
Entrada del cargador ............................................................................................ De 400 W a 480 W
Salida del cargador .......................................................................................................... 26 V máx*.
Peso neto .................................................................................................................... 3.5 lb (1.6 kg)
*El voltaje inicial sin carga, cuando la batería está cargada por completo, alcanza un máximo de 26 V. El voltaje
nominal bajo una carga típica es de 25.2 V.
Indicador de nivel de carga de la batería
Cada batería tiene un botón para comprobar su nivel de carga. Simplemente presione el botón
para leer el nivel de carga de la batería en los LED indicadores de la batería.
• Los tres LED indicadores de nivel están encendidos: el nivel de carga de la batería es
elevado.
• Dos LED indicadores de nivel están encendidos: el nivel de carga de la batería está
disminuyendo. Deje de trabajar tan pronto como sea posible.
• Un LED indicador de nivel está encendido: el nivel de carga de la batería está bajo. Deje de
trabajar INMEDIATAMENTE y cargue la batería, de otro modo, la vida útil de la batería se
reducirá en gran medida.
Cuándo cargar la batería de iones de litio iON+
NOTA: las baterías de iones de litio iON+ no crean una “memoria” al ser cargadas luego de
una descarga parcial. Por tanto, no hay necesidad de agotar la batería antes de conectarla al
cargador.
• Use las luces indicadoras de carga de batería para determinar cuándo cargar sus baterías de
iones de litio iON+ de 24 V.
• Usted puede cargar por completo sus baterías antes de empezar un trabajo grande, o luego
de un uso prolongado.
Carga de las baterías
1. Presione los botones de trabado en la batería para poder extraer la batería del equipo.
2. Compruebe que el voltaje de la red sea el mismo que el indicado en la placa de
especicaciones del cargador de baterías. Luego, inserte el enchufe del cargador en el
tomacorriente de pared. Al enchufar el cargador, la luz verde superior derecha se iluminará y
permanecerá verde (Fig. 1).
INSTRUCCIONES DE SEGURIDAD
DATOS TÉCNICOS
OPERACIÓN
Botón de nivel de carga
La batería está cargada a un 30% y requiere ser cargada de inmediato
La batería está cargada a un 60% y requiere ser cargada pronto
La batería está cargada por completo
SignicadoLuces
Cargador
Verde
Encendido
Fig. 1

5
3. Coloque las baterías en el cargador deslizándolas para trabarlas en su posición. Cuando
usted inserte las baterías dentro del cargador, la luz verde de la derecha se apagará, y la luz
roja de la izquierda se encenderá indicando que las baterías se están cargando.
4. Cuando la luz superior se torne verde y la luz roja inferior se apague, las baterías estarán
completamente cargadas (Fig. 2).
5. Si las luces indicadoras no aparecen del todo, verique que las baterías estén asentadas
por completo en sus compartimientos. Retire las baterías y reinsértelas. Si el problema
persiste, contacte a un distribuidor autorizado Snow Joe
®
+ Sun Joe
®
o comuníquese con la
central de servicio al cliente Snow Joe
®
+ Sun Joe
®
llamando al 1-866-SNOWJOE (1-866-
766-9563) para obtener ayuda.
6. Cuando se haya completado la carga, retire las baterías del cargador presionando los
botones de trabado y deslizando las baterías hacia arriba para destrabarlas del cargador
(Fig. 3).
Carga de una batería caliente o fría
La luz verde indicadora en la base del cargador indica que la temperatura de la batería está fuera
del rango de carga. Una vez que la batería esté a una temperatura dentro del rango aceptable, se
cargará normalmente y la luz roja será continua. Las baterías frías o calientes pueden tardar más
tiempo en cargarse.
Almacenamiento de las baterías y el cargador fuera de temporada
1. No exponga sus baterías o cargador al agua o lluvia, ni permita que se mojen. Esto podría
dañar permanentemente las baterías y el cargador. No use aceites o solventes para limpiar
o lubricar sus baterías ya que las cubiertas de plástico pueden tornarse quebradizas y
romperse, causando un grave riesgo de lesiones personales.
2. Guarde las baterías y el cargador a una temperatura ambiente, lejos de la humedad. No los
guarde en lugares húmedos donde los terminales se puedan corroer. Como con cualquier
otro tipo de baterías, puede ocurrir una pérdida permanente de capacidad si las baterías
son almacenadas por largos periodos de tiempo a elevadas temperaturas (más de 120ºF
[49ºC]).
3. Las baterías de iones de litio iON+ mantienen su carga durante el almacenamiento por más
tiempo que otras baterías. Como costumbre, es mejor desenchufar el cargador y retirar
las baterías cuando no estén en uso. Recargue las baterías cada seis meses al 60% de su
capacidad (dos luces encendidas) durante el almacenamiento fuera de temporada para
mantener un rendimiento óptimo.
Si su cargador de alta velocidad de doble puerto para baterías de iones de litio 24VCHRG-HS-DPC
de Snow Joe
®
+ Sun Joe
®
requiere servicio o mantenimiento, comuníquese con la central de
servicio al cliente Snow Joe
®
+ Sun Joe
®
llamando al 1-866-SNOWJOE (1-866-766-9563).
Al contactar a la empresa, ordenar partes de repuesto o programar una reparación en un
centro autorizado, usted necesitará proporcionar el modelo y número de serie, los cuales se
encuentran en la etiqueta ubicada en la carcasa de la unidad. Copie estos números en el espacio
proporcionado a continuación.
Federal Communications Commission
(Comisión Federal de Comunicaciones o
FCC):
Dispositivo Clase B:
NOTA: este equipo ha sido probado y cumple con los límites de la Clase B de dispositivos
digitales, de acuerdo con la Parte 15 de las normas de la FCC. Estos límites están diseñados para
proporcionar protección razonable contra interferencias dañinas en una instalación residencial.
Este equipo genera, usa y puede irradiar energía de radiofrecuencia y, si no se instala y utiliza de
acuerdo con las instrucciones, puede provocar interferencias perjudiciales en las comunicaciones
radiofónicas. No obstante, no hay garantía alguna de que no se produzcan interferencias en una
instalación concreta. Si este equipo llegara a causar una interferencia perjudicial para la recepción
de radio o televisión (la cual se puede determinar apagando y encendiendo el equipo), se
recomienda que el usuario trate de corregir la interferencia tomando una o más de las siguientes
medidas:
• Reorientar o reubicar la antena receptora.
• Aumentar la distancia entre el equipo y el receptor.
• Conectar el equipo a un tomacorriente distinto a los del circuito al que está
conectado el receptor.
• Consultar con un comerciante o con un técnico experimentado de radio y televisión.
Baterías
Cargada por
completo
Verde
Cargando
Roja
Fig. 2
Botón de trabado
Fig. 3
Estado de carga de batería de iones de litio
Temperatura de
batería
Luz indicadora de
base de cargador
Luz indicadora de
batería
Estado de carga
Demasiado caliente
Verde Parpadeando juntas No está cargándose
Rango normal
Roja
Parpadeando una
por una
Carga normal
Muy fría
Verde Parpadeando juntas No está cargándose
SERVICIO Y SOPORTE
MODELO Y NÚMERO DE SERIE
Registre los siguientes números que se encuentran en la etiqueta UPC de su
nuevo producto:
Modelo:
Nº de serie:
2 4 V C H R G - H S - D P C

LA PROMESA DE SNOW JOE
®
+ SUN JOE
®
AL CLIENTE
NUESTRA GARANTÍA:
Snow Joe
garantiza que sus Productos motorizados y no motorizados, nuevos y genuinos, están libres de defectos materiales o de
mano de obra al ser usados en tareas domésticas normales durante un periodo de dos (2) años a partir de la fecha de compra por parte
del comprador original y usuario nal, cuando este último los compra a través de Snow Joe o un vendedor autorizado por Snow Joe y
ha obtenido un comprobante de compra. Ya que Snow Joe no puede controlar la calidad de sus Productos vendidos por vendedores
no autorizados, a menos que la ley lo prohíba esta Garantía no cubre Productos adquiridos a través de vendedores no autorizados.
Si su Producto no funciona, o hay un problema con una parte especíca que está cubierta por los términos de esta Garantía, Snow
Joe elegirá entre: (1) enviarle una parte de repuesto gratuita; (2) reemplazar el Producto con uno nuevo o similar sin costo alguno; o (3)
reparar el Producto. ¡Un excelente soporte!
Esta Garantía le da derechos legales específicos, y usted puede también tener otros derechos según el Estado.
REGISTRO DEL PRODUCTO:
Snow Joe le recomienda enfáticamente registrar su Producto. Usted puede registrar su Producto en línea visitando
snowjoe.com/register, imprimiendo y enviando por correo una tarjeta de registro disponible en línea en nuestro sitio
Web, llamando a nuestra central de servicio al cliente al 1-866-SNOWJOE (1-866-766-9563), o enviándonos un e-mail a
[email protected]. Si usted no registra su Producto sus derechos de garantía no disminuirán; sin embargo, registrar su Producto
permitirá que Snow Joe le pueda atender mejor si usted tiene alguna necesidad como cliente.
¿QUIÉN PUEDE SOLICITAR COBERTURA DE GARANTÍA LIMITADA?
Esta Garantía es otorgada por Snow Joe al comprador original y propietario original del Producto.
¿QUÉ NO ESTÁ CUBIERTO?
Esta Garantía no se aplica si el Producto ha sido usado de forma comercial o en aplicaciones no domésticas o de alquiler. Esta Garantía
tampoco se aplica si el Producto fue adquirido desde un vendedor no autorizado. Esta garantía tampoco cubre cambios cosméticos
que no afecten el funcionamiento del Producto. Las partes desgastables como correas, brocas y cuchillas no están cubiertas por esta
Garantía, y pueden ser compradas visitando snowjoe.com o llamando al 1-866-SNOWJOE (1-866-766-9563).
POR SOBRE TODO, en Snow Joe, LLC (“Snow Joe”) estamos dedicados a usted, nuestro cliente. Nos esforzamos por hacer
que su experiencia sea lo más placentera posible. Desafortunadamente, hay veces en que un producto Snow Joe
®
, Sun Joe
®
,
o Aqua Joe
®
(el “Producto”) no funciona o sufre un desperfecto bajo condiciones normales de operación. Creemos que es importante
que usted sepa que puede conar en nosotros. Es por eso que tenemos esta Garantía Limitada (la “Garantía”) para nuestros Productos.
R4_01282020
6

8
Modèle 24VCHRG-HS-DPC
GUIDE RAPIDE
R
R
Formulaire n° SJ-24VCHRG-HS-DPC-880F-M
© 2022 by Snow Joe
®
, LLC
Tous droits réservés. Instructions d’origine.
CONSERVER CES INSTRUCTIONS
DOUBLE CHARGEUR ULTRA RAPIDE
AU LITHIUMION 24 V
FR
mAVERTISSEMENT! LIRE ET COMPRENDRE TOUTES LES CONSIGNES. Le non-
respect de toutes les consignes pourrait être à l’origine d’une secousse électrique, d’un incendie
et/ou de dommages corporels.
mMISE EN GARDE! Pour réduire le risque de blessure, charger les blocs-piles au lithium-
ion iON+ de 24 V uniquement dans le chargeur au lithium-ion iON+ de 24 V désigné. Les autres
types de chargeurs présentent des risques d’incendie et de dommages corporels et matériels. Ne
brancher aucune batterie sur le secteur ou sur l’allume-cigare d’une voiture. Le bloc-piles serait
dénitivement et irrémédiablement endommagé.
• Évitez les environnements dangereux : ne chargez pas les blocs-piles sous la pluie, sous
la neige ou dans les endroits humides. N’utilisez pas les blocs-piles ou le chargeur lorsque
l’atmosphère est explosive (euents gazeux, poussière ou matières inammables), des
étincelles pouvant se produire lors de l’insertion ou du retrait des blocs-piles, ce qui pourrait
provoquer un incendie.
• Chargez dans un endroit bien ventilé : ne bloquez pas les orices de ventilation du
chargeur. Dégagez le voisinage immédiat du chargeur pour qu’il soit bien ventilé. Interdisez
de fumer et n’autorisez la présence d’aucune amme nue à proximité d’un bloc-piles se
chargeant. Le gaz dispersé dans l’atmosphère peut exploser.
REMARQUE : la zone de température de sécurité pour les batteries est comprise entre 5 °C
et 40,5 °C. Ne chargez pas les batteries à l’extérieur lorsqu’il gèle; chargez-les à température
ambiante.
• Prenez soin du cordon du chargeur : lorsque vous débranchez le chargeur, tirez sur la
che dans la prise et non sur le cordon pour éviter d’endommager la che électrique et le
cordon. Ne tirez jamais le chargeur par le cordon et ne tirez pas brusquement sur le cordon
pour le retirer de la prise. Maintenez le cordon éloigné de la chaleur, de l’huile et des arêtes
tranchantes. Pendant l’utilisation du chargeur, assurez-vous que personne ne marche sur
le cordon, ne trébuche dessus et qu’il ne peut être ni endommagé ni soumis à des tensions
ou des pressions. N’utilisez pas le chargeur si sa che ou son cordon est endommagé.
Remplacez immédiatement tout
chargeur endommagé.
• N’utilisez pas de rallonge électrique, à moins que cela soit absolument nécessaire :
l’utilisation d’une rallonge électrique mal adaptée, endommagée ou mal branchée présente
des risques d’incendie et de secousse électrique.
• Le chargeur est prévu uniquement pour 120 VCA : il doit être branché dans une prise
appropriée.
• Utilisez uniquement des accessoires recommandés : l’utilisation d’un accessoire non
recommandé ou vendu par le fabricant des blocs-piles ou du chargeur peut provoquer un
incendie, une secousse électrique ou des dommages corporels.
• Débranchez tout chargeur non utilisé : assurez-vous de retirer les blocs-piles d’un chargeur
débranché.
mAVERTISSEMENT! Pour réduire le risque de secousse électrique, toujours débrancher
le chargeur avant d’eectuer un nettoyage ou un entretien. Ne pas laisser d’eau couler dans le
chargeur. Pour réduire le risque d’électrocution, utiliser un disjoncteur diérentiel de fuite de terre
(DDFT).
• Rangez les blocs-piles et le chargeur dans un endroit frais et sec : ne rangez pas les
blocs-piles ou le chargeur lorsque la température peut être supérieure à 40,5 °C, par exemple
directement sous les rayons du soleil, à l’intérieur d’un véhicule ou dans un cabanon à
structure métallique pendant l’été.
Les temps de charge varient. Consultez les spécications des batteries.
Entrée du chargeur ..........................................................................................................400 – 480 W
Sortie du chargeur ............................................................................................................ 26 V* max.
Poids ....................................................................................................................................... 1,6 kg
*Tension initiale à vide; grimpe à 26 volts une fois à charge complète; la tension nominale sous charge typique est de
25,2 volts.
Témoins de charge de batterie
Chaque bloc-piles est équipé d’un bouton-poussoir pour vérier le niveau de charge. Appuyez
simplement sur le bouton-poussoir pour lire le niveau de charge de la batterie à l’aide des témoins
de charge :
• Les témoins de charge sont tous les trois allumés : le niveau de charge de batterie est élevé.
• Deux témoins de charge sont allumés : le niveau de charge de batterie diminue. Arrêtez votre
travail dès que possible.
• Un témoin de charge est allumé : la batterie est épuisée. Arrêtez IMMÉDIATEMENT votre
travail et chargez la batterie. Sinon, la longévité de la batterie s’en trouvera considérablement
réduite.
Quand charger les batteries au lithium-ion iON+
REMARQUE : les blocs-piles au lithium-ion iON+ ne présentent pas « d’eet mémoire » lorsqu’ils
sont chargés après une simple décharge partielle. C’est pourquoi il n’est pas nécessaire de
décharger le bloc-piles avant de l’insérer dans le chargeur.
• Utilisez les témoins de charge de batterie pour déterminer quand charger vos blocs-piles au
lithium-ion iON+.
• Vous pouvez « compléter » la charge des blocs-piles avant de démarrer un gros travail ou
après une longue journée d’utilisation.
Comment charger les batteries
1. Appuyez sur le bouton-poussoir de verrouillage sur les blocs-piles pour les sortir de l’outil
ou de la machine en les tirant.
2. Vériez que la tension de secteur est la même que celle marquée sur la plaque signalétique
du chargeur de batteries. Insérez ensuite la che du chargeur dans une prise murale. Quand
vous branchez le chargeur, le voyant vert en haut à droite s’allume et reste vert (Fig. 1).
CONSIGNES DE SÉCURITÉ
DONNÉES TECHNIQUES
UTILISATION
Bouton de niveau de charge
La batterie est à 30 % de sa capacité et nécessite d’être chargée
La batterie est à 60 % de sa capacité et nécessite d’être chargée bientôt
La batterie est à charge complète
IndicationsTémoins
Fig. 1
Chargeur
vert
Sous
tension
9
3. Insérez les blocs-piles dans le chargeur en les faisant glisser jusqu’à ce qu’ils se mettent en
place en se verrouillant. Lorsque vous insérez les batteries dans le chargeur, le voyant vert
en haut à droite s’éteint et le voyant rouge en haut à gauche s’allume pour indiquer que les
batteries se chargent (Fig. 2).
4. Lorsque le témoin en haut passe au vert et le témoin rouge en bas s’éteint, les batteries
sont à charge complète (Fig. 2).
5. Si les témoins de charge ne s’allument pas du tout, vériez que les blocs-piles reposent
bien dans leur compartiment. Retirez les blocs-piles et réinsérez-les. Si le problème
persiste, communiquez avec un revendeur Snow Joe
®
+ Sun Joe
®
agréé ou appelez le
service à la clientèle Snow Joe
®
+ Sun Joe
®
au 1 866-SNOWJOE (1 866-766-9563) pour de
l’aide.
6. Une fois que les blocs-piles sont à charge complète, retirez-les du chargeur en appuyant
sur les boutons-poussoirs de verrouillage de chaque bloc-piles et en les faisant glisser vers
le haut pour les dégager du chargeur (Fig. 3).
Charger un bloc-piles chaud ou froid
Un témoin clignotant en vert sur la base du chargeur indique que la température du bloc-piles
est en dehors de la zone normale pour se charger. Une fois que la température du bloc-piles est
redevenue acceptable, il se charge normalement et le voyant passe au rouge sans clignoter. Les
blocs-piles chauds ou froids prennent davantage de temps pour se charger.
Rangement hors-saison des batteries et du chargeur
1. N’exposez pas les blocs-piles ou le chargeur à l’eau, à la pluie ou à tout ce qui pourrait
les rendre humides. Le chargeur et les blocs-piles pourraient être endommagés de façon
permanente. N’utilisez ni huile ni solvants pour nettoyer ou lubrier les blocs-piles, et ce
dans la mesure où le boîtier en plastique pourrait devenir cassant, se ssurer et risquer de
blesser quelqu’un.
2. Rangez les blocs-piles et le chargeur à température ambiante et dans un endroit non
humide. Ne les rangez pas dans un endroit humide où les bornes pourraient se corroder.
Comme pour les autres types de blocs-piles, une perte de capacité permanente peut se
produire si les blocs-piles sont rangés pendant de longues périodes à des températures
élevées (supérieures à 49 °C).
3. Les blocs-piles au lithium-ion iON+ restent chargés plus longtemps que les autres types
de blocs-piles lorsqu’ils ils sont rangés. En règle générale, il est préférable de débrancher
le chargeur de batteries et de retirer les blocs-piles lorsque vous ne les utilisez pas. Hors-
saison, avant de les ranger et pour maintenir leur rendement optimal, rechargez les blocs-
piles tous les six mois jusqu’à 50 % de leur capacité (deux témoins allumés).
Si votre double chargeur ultra rapide au lithium-ion Snow Joe
®
+ Sun Joe
®
24VCHRG-HS-DPC
nécessite une réparation ou un entretien, veuillez appeler le service à la clientèle Snow Joe
®
+
Sun Joe
®
au 1-866-SNOWJOE (1-866-766-9563).
Lorsque vous communiquez avec l’entreprise pour commander des pièces ou prendre rendez-
vous pour une intervention technique chez un revendeur agréé, vous devez fournir les numéros de
modèle et de série qui se trouvent sur l’étiquette autocollante apposée sur le produit. Copiez ces
numéros dans l’espace réservé ci-dessous.
FCC (Commission fédérale des
communications)
Appareil de Classe B :
REMARQUE : ce matériel a été testé et il a été constaté qu’il est conforme aux limites des
appareils numériques de Classe B, conformément à la Partie 15 des Règles de la FCC. Ces limites
sont conçues pour fournir une protection raisonnable contre le brouillage préjudiciable dans une
installation résidentielle. Ce matériel génère, utilise et peut rayonner une énergie de fréquence
radio et, s’il n’est pas installé et utilisé conformément aux instructions, peut être à l’origine d’un
brouillage préjudiciable aux communications radio. Toutefois, il n’est pas exclu que le brouillage
aecte une installation particulière. Si cet appareil est à l’origine de brouillage préjudiciable à la
réception radio et télévision, ce qui peut être déterminé en éteignant et en allumant l’appareil,
l’utilisateur est invité à supprimer le brouillage en prenant une ou plusieurs des mesures
suivantes :
• Réorienter ou repositionner l’antenne de réception.
• Augmenter la distance entre l’appareil et le récepteur.
• Brancher l’appareil dans la sortie d’un circuit diérent de celui dans lequel le
récepteur est branché.
• Pour de l’aide, consulter le revendeur ou un technicien radio/télévision qualié.
Blocs-piles
À charge
complète
vert
Charge
en cours
rouge
Fig. 2
Bouton-poussoir de
verrouillage
Fig. 3
Statut de charge lithium-ion
Température du
bloc-piles
Témoin indicateur
sur la base du
chargeur
Témoin indicateur
sur le bloc-piles
Statut de charge
Trop chaude
Vert Clignotant ensemble
Aucune charge en
cours
Zone normale
Rouge
Clignotant l’un après
l’autre
Charge en cours
normale
Trop froide
Vert Clignotant ensemble
Aucune charge en
cours
SERVICE APRÈS-VENTE ET ASSISTANCE TECHNIQUE
NUMÉROS DE MODÈLE ET DE SÉRIE
Veuillez noter les numéros suivants sur l’étiquette du CUP de votre nouveau produit :
N° de modèle :
N° de série :
2 4 V C H R G - H S - D P C

10
LA PROMESSE DE SNOW JOE
®
+ SUN JOE
®
À SES CLIENTS
NOTRE GARANTIE:
Snow Joe
déclare et garantit que les Produits neufs, d’origine, électriques ou non électriques sont exempts de vices de matière ou
de fabrication et, lorsqu’ils font l’objet d’une utilisation résidentielle et ménagère ordinaire, les garantit pendant une période de deux
ans à compter de la date d’achat au détail par l’acheteur primitif auprès de Snow Joe ou d’un des revendeurs agréés de Snow Joe,
preuve d’achat à l’appui. Étant donné que Snow Joe ne peut pas contrôler la qualité de ses Produits vendus par des revendeurs non
agréés, sauf stipulation contraire de la loi, la présente Garantie ne couvre pas les Produits achetés auprès de vendeurs non agréés. Si
votre Produit ne fonctionne pas ou si une pièce spécique couverte par les modalités de la présente Garantie fait l’objet d’un problème
quelconque, Snow Joe choisira (1) de vous envoyer une pièce de rechange gratuite, (2) de remplacer le Produit par un produit neuf ou
comparable, gratuitement, ou (3) de réparer le Produit. Génial, n’est-ce pas?
La présente Garantie vous donne des droits judiciaires spécifiques, et vous pouvez également avoir d’autres droits qui peuvent
varier d’une province ou d’un territoire à l’autre.
ENREGISTREMENT DU PRODUIT:
Snow Joe vous recommande vivement d’enregistrer votre Produit. Vous pouvez l’enregistrer en ligne sur le site
snowjoe.com/register, ou en imprimant et en envoyant par courrier une carte d’enregistrement oerte en ligne sur notre site Web, ou
par téléphone en appelant notre Service à la clientèle au 1-866-SNOWJOE (1-866-766-9563), ou encore en nous envoyant un courriel à
l’adresse [email protected]. Le fait de ne pas enregistrer l’achat de votre Produit n’a aucune conséquence sur vos droits concernant
la garantie. Toutefois, l’enregistrement de votre Produit permettra à Snow Joe de mieux répondre au moindre besoin que vous pourriez
avoir en matière de service à la clientèle.
QUI PEUT REVENDIQUER LA COUVERTURE DE LA GARANTIE?
La présente Garantie est étendue par Snow Joe à l’acheteur et propriétaire primitif du Produit.
QU’EST-CE QUI N’EST PAS COUVERT?
La présente Garantie ne s’applique pas si le Produit a été utilisé commercialement, pour des travaux non résidentiels ou s’il fait l’objet
d’une location. La présente Garantie ne s’applique pas non plus si le Produit a été acheté auprès d’un revendeur non agréé. La présente
garantie ne couvre pas non plus les changements cosmétiques qui n’aectent pas le rendement. Les pièces d’usure comme les
courroies, les tarières, les chaînes et les dents ne sont pas couvertes au titre de la présente Garantie et peuvent être achetées en ligne
sur le site snowjoe.com ou en appelant le 1-866-SNOWJOE (1-866-766-9563).
Vous êtes notre client et Snow Joe, LLC (« Snow Joe ») SE MET EN QUATRE pour vous servir. Nous nous eorçons de vous rendre
l’utilisation de nos produits aussi plaisante que possible. Malheureusement, il peut arriver qu’un produit Snow Joe
®
, Sun Joe
®
ou
Aqua Joe (« Produit ») ne fonctionne pas ou se casse dans des conditions d’utilisation normales. Nous pensons qu’il est important que
vous sachiez ce que vous pouvez attendre de nous. C’est pourquoi nous avons une garantie limitée (« Garantie ») pour nos Produits.
R4_01282020

11

snowjoe.com
