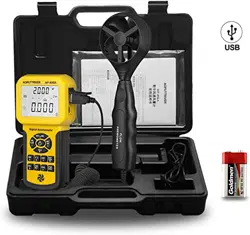
Loading ...

- 2 -
SPECIFICATIONS
1. Wind Velocity Range:
Unit
Wind Velocity
Resolution
Lowest
Point of
start value
Accuracy
m/s
0.0-45.0
0.001
0.3
±3%+0.1rdg
Ft/min
0.0-8800
0.01/0.1/1
60
±3%+20rdg
Knots
0.0-88.0
0.001/0.01
0.6
±3%+0.2rdg
Km/h
0.0-140.0
0.001
1.0
±3%+0.4rdg
Mph
0.0-100
0.001/0.01
0.7
±3%+0.2rdg
2. Wind flow range:
CMM: 0-999900m
3
/min
CFM: 0-999900 ft
3
/min
Unit
Range
Resolution
Area
CMM(M
3
/MIN)
0-999900
0.001-100
0.001-9999
CFM(FT
3
/MIN)
0-999900
0.001-100
0.001-9999
3. Unit Conversation:
m/s
Ft/min
Knots
Km/h
Mph
m/s
1
196.87
1.944
3.60
2.24
Ft/min
0.00508
1
0.00987
0.01829
0.01138
Knots
0.5144
101.27
1
1.8519
1.1523
Km/h
0.2778
54.69
0.54
1
0.6222
Mph
0.4464
87.89
0.8679
1.6071
1
4. Air Temperature Range:
Unit
Scale
Resolution
Accuracy
℃
0.0-45.0
0.1
±1.0℃
℉
32.0-113.0
0.1
±1.8℉
5 . Operation Conditions:
Temperature
Humidity
Host
0-50℃(32-122℉)
≤80%RH
Wind velocity sensors
0-60℃(32-140℉)
6. Storage Conditions:
Temperature
-10-60℃(14-140℉)
Humidity
≤80%RH
7. Power supply : 6F22 9V×1
8. Low battery indicating : 6.8V±0.2V
9. Stand by current ≤2μA
10. Operating Current Approx.18mA
11. Battery use life :20H (Continuous Use )
12. Dimensions:
Meter:163×85×34.5 ㎜
Vane: 251×72×30 ㎜
13. Net Weight :320.5g (Not Included Battery )
2. Operation
Measurement of Wind Velocity and Temperature
Recover the battery door , and install the batteries properly as shown in
figure 1.
Press the “ ” key, all the symbols will be shown on the screen for 1
second, then the unit goes into current wind velocity and temperature
measuring mode, the LCD screen shows as following figure2:
Figure 2
Select your desired wind velocity and temperature unit
(1) Press the “UNIT” key, the wind velocity unit will be auto change
from (m/s、km/h、ft/min、knots、mph), (default unit is m/s)
(2) Press the “℃/℉” , The temperature will be change between ℃/
℉ mode, defaulted as ℃.
Hold the Anemometer with your hand, place the vane in the air flow with
the air direction matching the direction of the arrows printed on the
inner walls of the vane (Pleas do not extruded the wind velocity sensors
leaf. Otherwise will cause the inaccuracy measurement)
Figure3
(1) Wait for two Sec, to make the data stability
(2) Place the vane in the same direction of the wind to capture the
accurate data.
(3) Press “LIGHT” Key to start the Backlight Function, Signal will be
display on the LCD press7 sec the led will lighten while the Vane
is revolving ,then press "LIGHT" BUTTON the LED will cut
off ,signal will disappear and the light function will turn off.
Wind /Air Temperature Measurement
(1) Wind temperature will test out when testing Wind Velocity, Small
Vanes pattern will showing along with the display of "TEMP"
Symbol.
(2) Press button ℃/℉ to Switch ℃/℉ or (number 6 key).
Note:
a If current is in wind flow measuring mode (on the left top of the
LCD will show "FLOW", you can turn it into wind velocity
measuring mode by pressing the "VEL/FLOW' key, vice versa.
b The defaulted model is last time you has setting
Measurement of Wind flow
Press the “VEL/FLOW” key to get into “FLOW” mode at this time the
LCD screen as shown in figure 4 :
Figure 4
(if the area value has been set before the last setting will be shown)
Select your desired unit of wind flow and duct area:
a Press the “UNIT” key, the wind flow unit will convert between
CMM and CFM
b Press the “UNIT” key, the area unit will convert between “M
2
” and
“FT
2
”.
c Area unit: "M
2
" and "FT
2
" will convert according with the
conversion of the wind flow unit.
If wind flow unit is CMM, the area unit will be “M
2
”;
If wind flow unit is CFM. the area unit will be “FT
2
”.
Press the “AREA” key, the numbers in the middle of the LCD will be
disappeared at this time press numeric keys to enter a new duct area,
such as1.2, then press the “ENTER” key to confirm. At this time the
LCD screen as shown in figure 5:
Figure 5
Place the vane in the duct area, take measurement of current wind flow
value right away. As shown in figure 6 :
Figure 6
Loading ...
Loading ...
Loading ...
