Loading ...
Loading ...
Loading ...
16
6. Check that the intake tube and spout are not clogged with
milk residues;
7. Replace the dial (in correspondence to the word "INSERT"),
spout and milk intake tube;
8. Place the lid back on the milk container (E2).
13.11 Cleaning the hot water nozzle
Each time you prepare milk, clean the connection nozzle (A8)
with a sponge to remove milk residues from the gaskets (g.
21).
14.
DESCALING
Important!
• Before use, read the instructions and the labelling on the
descaler pack.
• You should use De’Longhi descaler only. Using unsuita-
ble descalers, or failing to perform the descale procedure
correctly, could lead to the machine developing faults not
covered by the manufacturer's guarantee.
Descale the appliance when "DESCALING NEEDED" "PRESS OK TO
START (~45min)" appears on the display: To descale immedi-
ately, press
and follow the operations from point 3.
To descale the appliance later, press . The
symbol appears on the display to remind you that the appliance
needs descaling. (the message appears each time you turn the
appliance on).
To access the descaling menu:
1. Pressthe " " button (C3) to enter the menu;
2. Press "DESCALE" and follow the instructions on the
display;
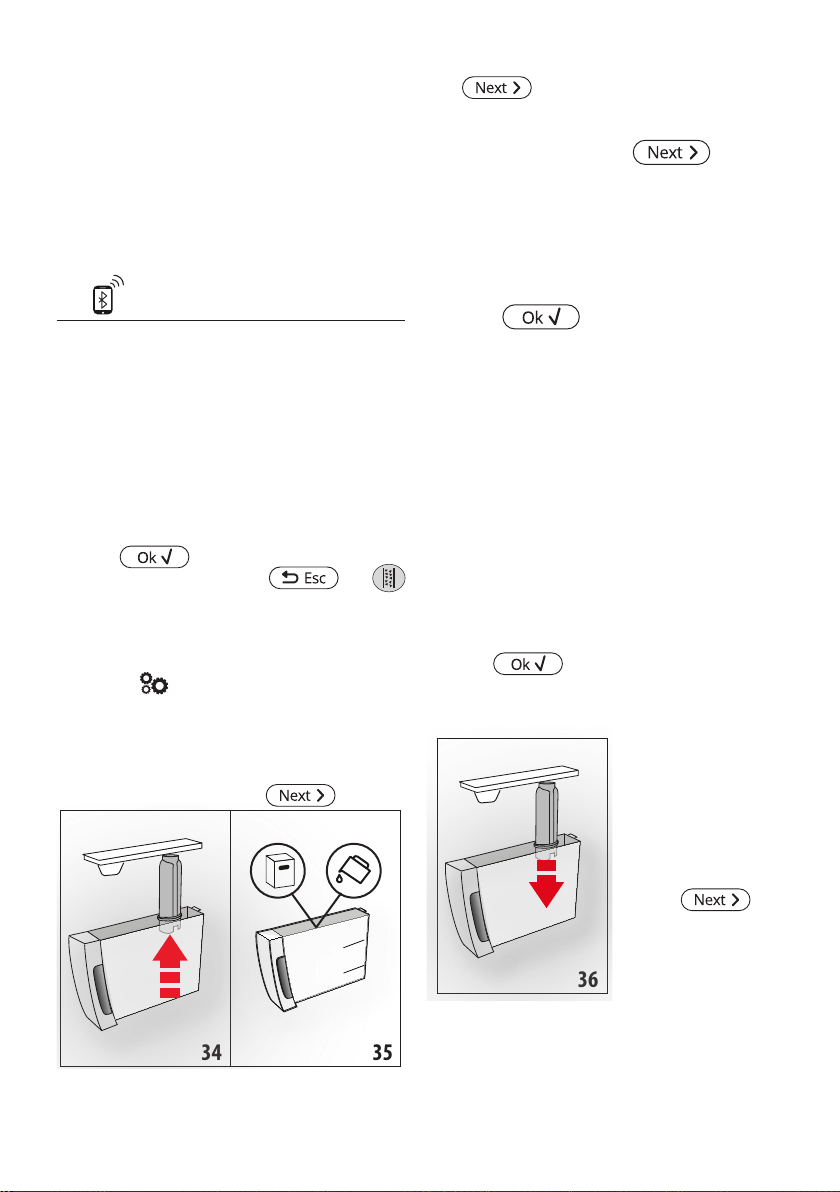
3. "REMOVE WATER FILTER" (g. 34): extract the water tank
(A17), remove the water softener lter (D7) (if present)
and empty the water tank. Press
;
34 35
A
B
A B
+
4. "DESCALER (LEVEL A)" "AND WATER (LEVEL B)" (g. 35);
Pour the descaler into the tank up to the level A marked
inside the tank (equal to one 100ml pack), then add water
(one litre) up to level B and put the water tank back. Press
;
5. "EMPTY DRIP TRAY" (g. 22):
6. Remove, empty and replace the drip tray (A15) and
grounds container (A11). Press
;
7. "POSITION 2l CONTAINER" "OK TO START":
Place an empty container with a minimum capacity of 2 litres
under the hot water spout (D6) and coee spouts (A9) (g. 9);
Important! Danger of scalding
Hot water containing acid ows from the hot water and coee
spouts. Take care to avoid contact with splashes of this solution.
8. Press "
" to conrm that you have added
the descaling solution. "DESCALING UNDERWAY" "PLEASE
WAIT" is displayed: The descale programme starts and
the descaler liquid comes out of the hot water and coee
spouts. A series of rinses is performed automatically to re-
move all the scale residues inside the coee machine;
After about 25 minutes, descaling stops;
9. "RINSE AND FILL WATER TANK" "UP TO MAX LEVEL" (g.
4): the appliance is now ready to rinse with fresh water.
Empty the container used to collect the descaler solution.
Extract the water tank, empty, rinse under running water,
ll with fresh water up to the MAX level and put back in
the appliance;
10. "POSITION 2l CONTAINER" "OK TO START RINSING": Place
the container used to collect the descaler solution empty
under the coee spouts and hot water spout (g. 9) and
press
;
11. Hot water is delivered rst from the coee spouts, then
from the hot water spout and "RINSING UNDERWAY" is
displayed;
12. When the water in the
tank has run out, empty
the container used to
collect the rinsing water;
13. (If the lter is installed)
"INSERT FILTER" "INTO
ITS HOUSING" (g. 36).
Press " " and
extract the water tank.
Replace the water sof-
tener lter if removed
previously;
14. "RINSE AND FILL WATER TANK" "UP TO MAX LEVEL" (g. 4):
Fill the tank up to the MAX level with fresh water;
15. "INSERT WATER TANK" (g. 5): Put the water tank back in
the appliance;
36
Loading ...
Loading ...
Loading ...