

9
10
16
17
Wait or the original setting.reset
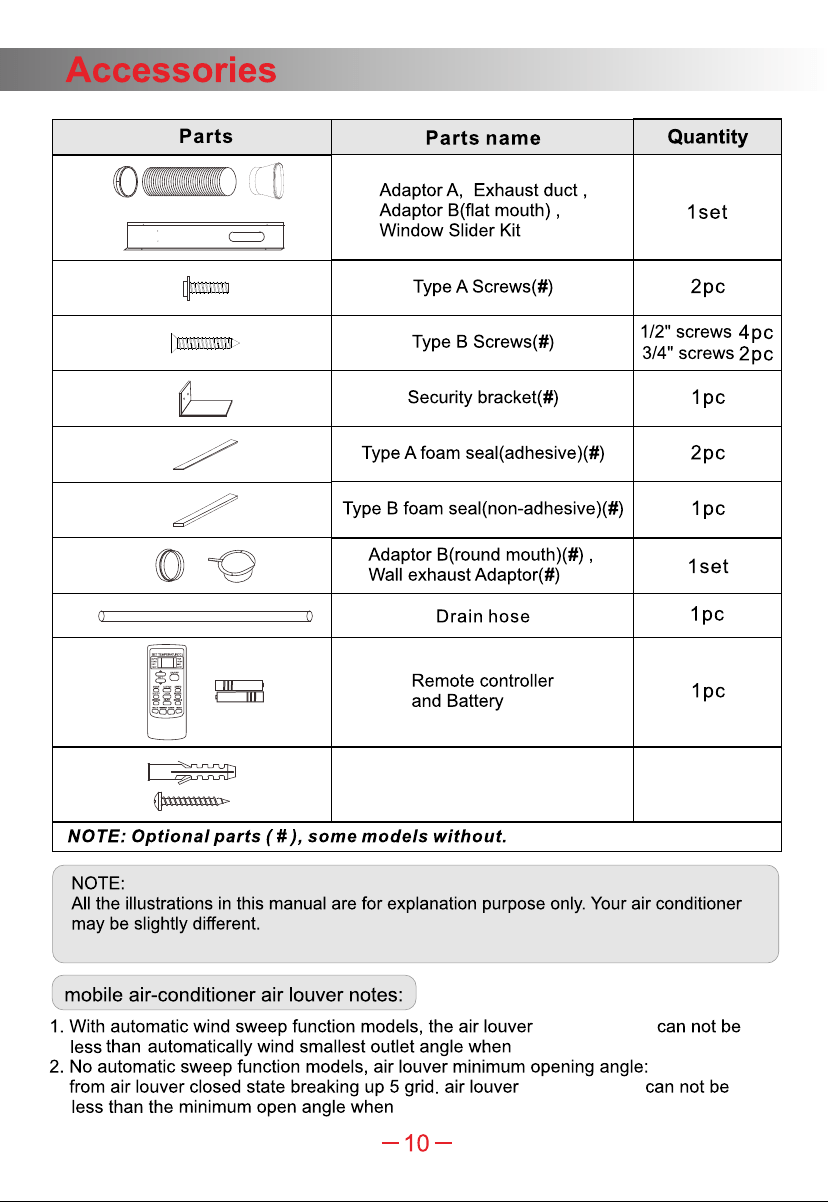
Note:
purpose only. Your air conditioner may be slightly different.
The actual shape shall prevail.They are subject to change
without notice for future improuement.
All the illustrations in this manual are for explanation
17
11
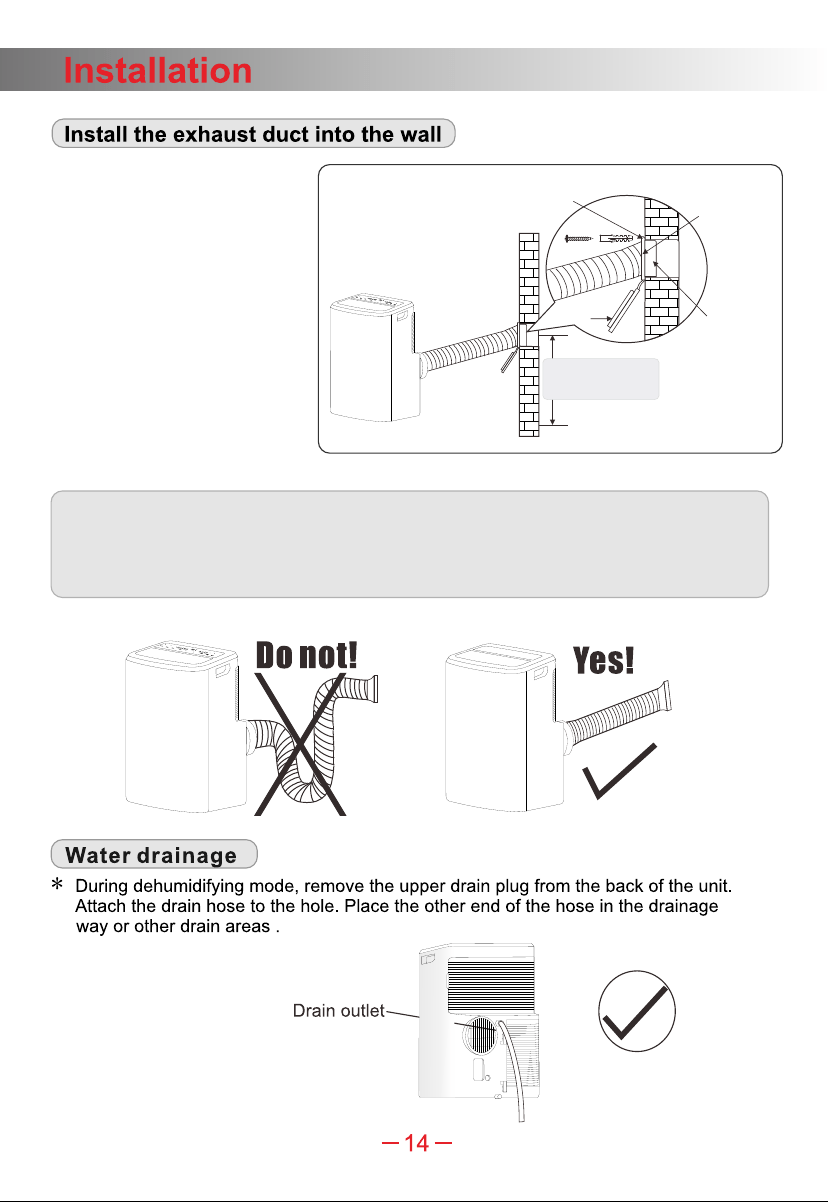
Note: 1.The duct can be compressed to 270mm minimum and extended to 1500mm
maximum. It is better to keep the duct length to a minimum length.
2.Stretching or bending the duct excessively will affect the cooling efficiency.
(As the following fig. Shows)
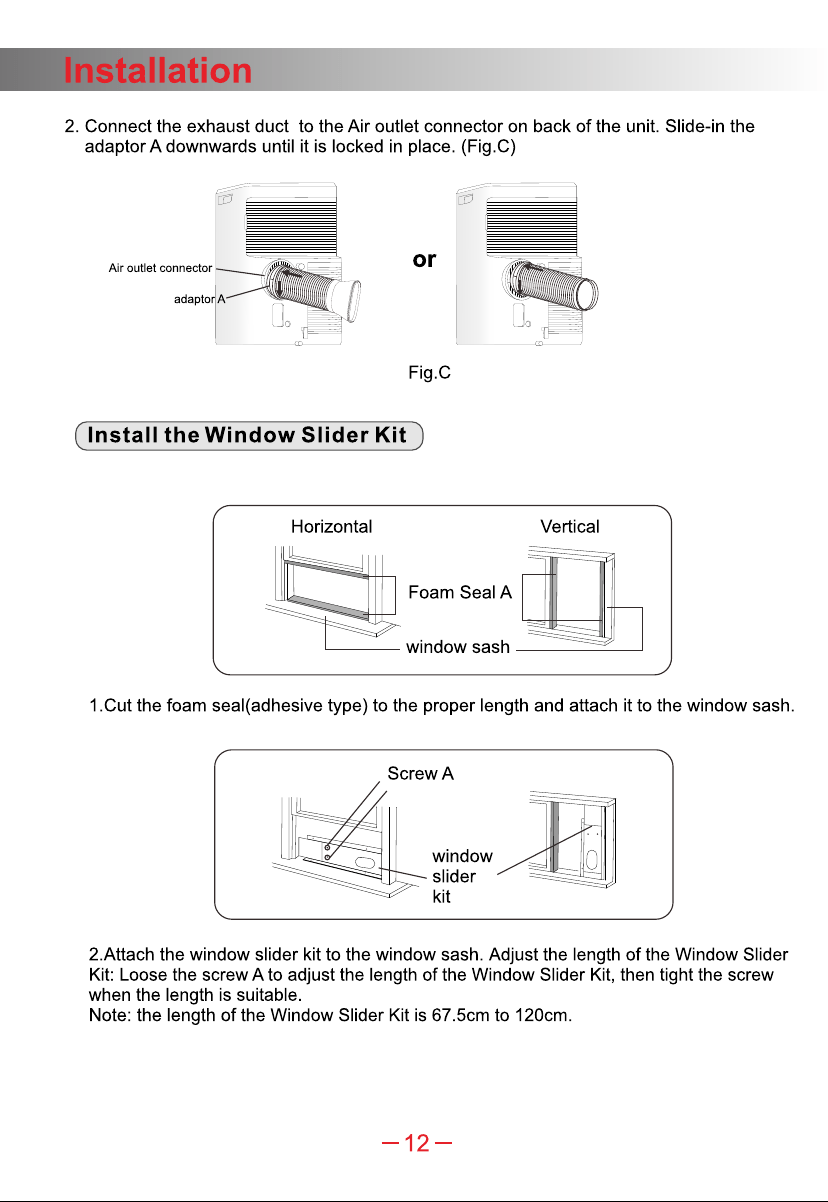
maximum:120cm
minimum:60cm
Adaptor
cap
Wall exhaust
adaptor
Adaptor B
(round mouth)
Note: Cover the hole
using the adaptor cap
when not in use.
Expansion screw sleeve
position
Fig.G
1. Prepare a hole in the wall.
Install the wall exhaust
adaptor onto the wall by
using 4 expansion screw
sleeve and type C screws,
be sure to fix thoroughly.
2. Connect the exhaust duct to
wall exhaust adaptor.(Fig.G)
Ambient light
( )only for some models
Function of magnetic remote control : If there is a Magnetic Holder indicator
label near the control panel, the original remote controller can magnetically
match the label area.
“ ”
●The customer should have a qualified power supply coincident with that printed on
the tag of the air conditioner.
●Must use dedicated circuit and efficient grounding outlet matching with the plug of the
air conditioner.
●The appliance should be installed in accordance with national wiring regulation.
●The plug should be easily accessible after installation.
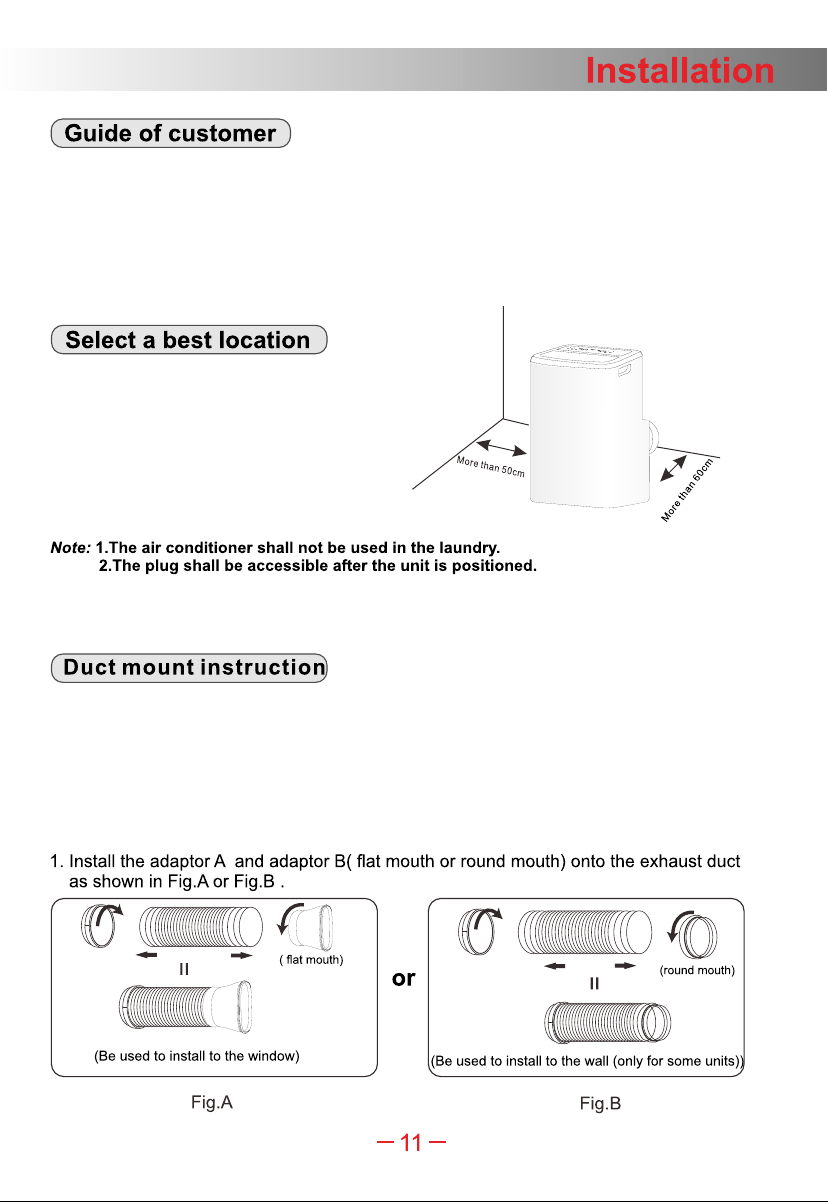
1.Install the mobile air conditioner in a flat
and spacious location where the air outlets
will not be obstructed.
2.A minimum clearance from walls or other
obstacles should be kept, as fig.
3.The gradient can't be more than 10 degrees
with the horizontal plane, while placing
and using the unit.
·In cooling, heating and drying mode, the exhaust duct needs to be installed while in
fan mode, the exhaust duct is not needed.
·According to the actual needs, the exhaust duct can be moderately compressed and
tensed, but cannot be arbitrarily stretched and bent.
·The exhaust duct can be connected with Windows or installed into the wall.
With the actual needs, you can make the installation with accessories of the unit.
FigD
11
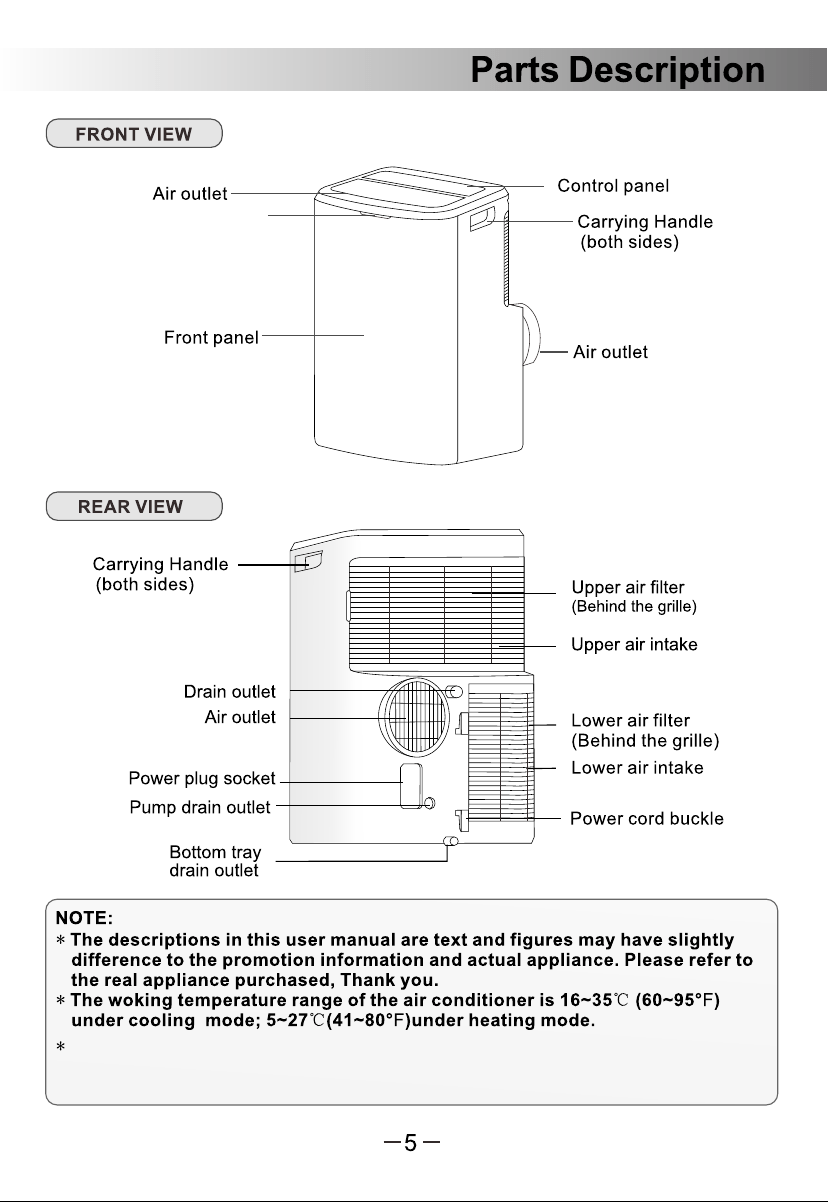
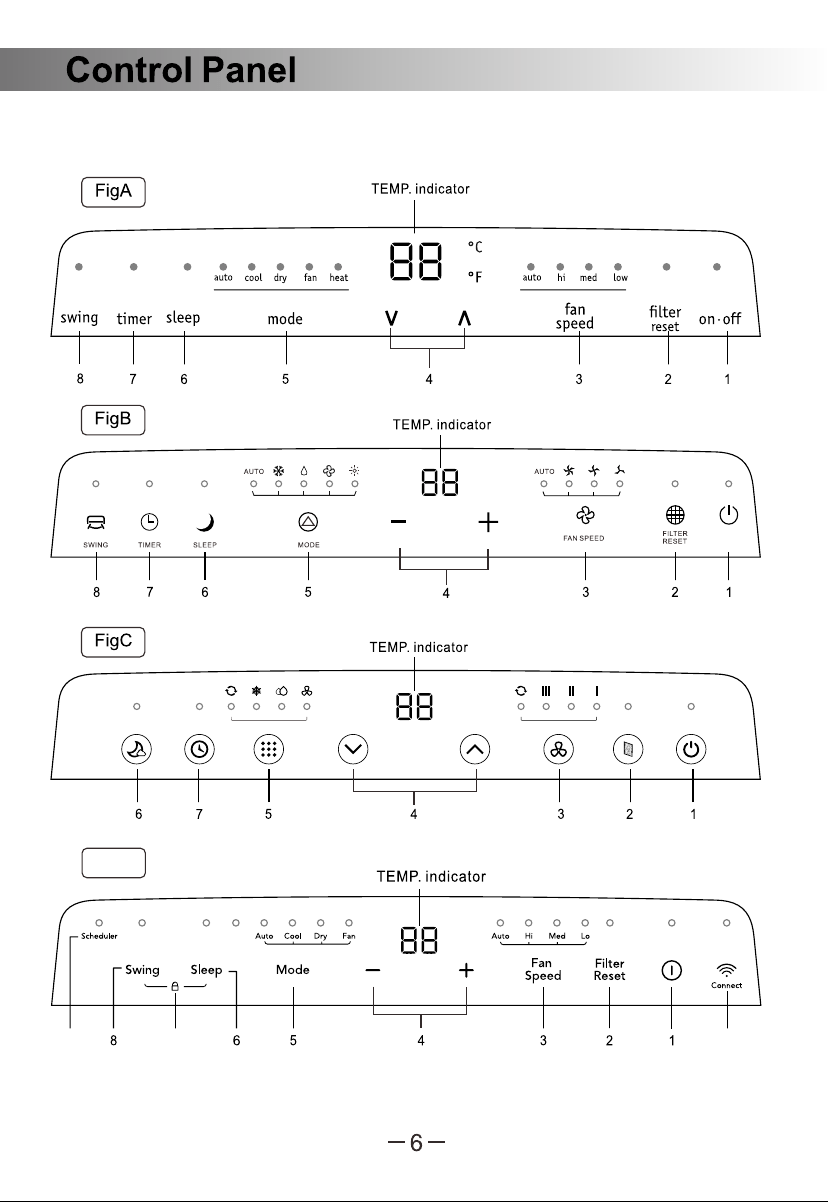
There are four kinds of control panel, Fig A, Fig B, Fig C and Fig D, the actual shape shall
prevail.
910
Expansion screw sleeve (#),
Type C Screws(#)
4pc
4pc
The actual shape shall prevail.They are subject to change
without notice for future improuement.
opening angle
opening angle
use .it
use .it
Press this button to the unit .turn on or off

11.
Weekly timing function
When the weekly timer function is turned on through the APP, the scheduler
illuminate.
light will
Display function of the ambient light (only applicable to models with ambient light):
In non-sleep mode, the ambient light can be turned on or turned off through APP or
pressing and holding the “ ” and “ ” buttons on the panel for 3 seconds.
+
Press the “ ” and “ ” buttons at the same time and hold for at least 3 seconds
to activate or deactivate the child-lock function.
10.
Child-lock
(only Fig D)
9.
Press and hold the button for 5 seconds,the WI-FI turn on for matching and the
ambient light blinks white,it stops when the time is over 10 minutes.
After the WI-FI is successfully connected, the ambient light is fixed white for 10 seconds,
and then it restores previous display status.
“ ”
(only Fig D)
Expansion screw sleeve (#),
Type C Screws(#)
4pc
4pc
The actual shape shall prevail.They are subject to change
without notice for future improuement.
opening angle
opening angle
use .it
use .it
Press this button to the unit .turn on or off
●The customer should have a qualified power supply coincident with that printed on
the tag of the air conditioner.
●Must use dedicated circuit and efficient grounding outlet matching with the plug of the
air conditioner.
●The appliance should be installed in accordance with national wiring regulation.
●The plug should be easily accessible after installation.
1.Install the mobile air conditioner in a flat
and spacious location where the air outlets
will not be obstructed.
2.A minimum clearance from walls or other
obstacles should be kept, as fig.
3.The gradient can't be more than 10 degrees
with the horizontal plane, while placing
and using the unit.
·In cooling, heating and drying mode, the exhaust duct needs to be installed while in
fan mode, the exhaust duct is not needed.
·According to the actual needs, the exhaust duct can be moderately compressed and
tensed, but cannot be arbitrarily stretched and bent.
·The exhaust duct can be connected with Windows or installed into the wall.
With the actual needs, you can make the installation with accessories of the unit.
FigD
11
There are four kinds of control panel, Fig A, Fig B, Fig C and Fig D, the actual shape shall
prevail.
910
Ambient light
( )only for some models
Function of magnetic remote control : If there is a Magnetic Holder indicator
label near the control panel, the original remote controller can magnetically
match the label area.
“ ”
Note: 1.The duct can be compressed to 270mm minimum and extended to 1500mm
maximum. It is better to keep the duct length to a minimum length.
2.Stretching or bending the duct excessively will affect the cooling efficiency.
(As the following fig. Shows)
maximum:120cm
minimum:60cm
Adaptor
cap
Wall exhaust
adaptor
Adaptor B
(round mouth)
Note: Cover the hole
using the adaptor cap
when not in use.
Expansion screw sleeve
position
Fig.G
1. Prepare a hole in the wall.
Install the wall exhaust
adaptor onto the wall by
using 4 expansion screw
sleeve and type C screws,
be sure to fix thoroughly.
2. Connect the exhaust duct to
wall exhaust adaptor.(Fig.G)
9
10
16
17
Wait or the original setting.reset
Note:
purpose only. Your air conditioner may be slightly different.
The actual shape shall prevail.They are subject to change
without notice for future improuement.
All the illustrations in this manual are for explanation
17
11