
Write the model and serial
numbers here:
Model # _________________
Serial # _________________
Find these numbers on a label on
the side of the air conditioner.
GE is a trademark of the General Electric Company. Manufactured under trademark license.
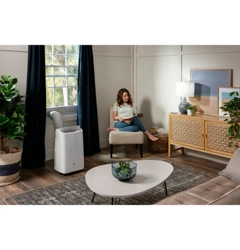
OWNER’S MANUAL
AND INSTALLATION
INSTRUCTIONS
AIR CONDITIONER
Portable Room
49-5001143 Rev. 0 09-25
APHS07
APHS08
IMPORTANT SAFETY
INFORMATION ............. 3
CONTROLS .................4
CARE AND CLEANING ....... 7
INSTALLATION
INSTRUCTIONS ............. 9
TROUBLESHOOTING ....... 13
WIFI SETUP ............... 14
LIMITED WARRANTY ........15
CONSUMER SUPPORT .......16
Before you begin
(on some models)
Record the GE module number and
password for wifi setup. To locate this
information, see page 16.
GE Module Number #____________
Password #____________________

2 49-5001143 Rev. 0
THANK YOU FOR MAKING GE APPLIANCES A PART OF YOUR HOME.
Whether you grew up with GE Appliances, or this is your first, we’re happy to have you in the family.
We take pride in the craftsmanship, innovation and design that goes into every GE Appliances
product, and we think you will too. Among other things, registration of your appliance ensures that we
can deliver important product information and warranty details when you need them.
Register your GE appliance now online. Helpful websites and phone numbers are available in the
Consumer Support section of this Owner’s Manual. You may also mail in the pre-printed registration
card included in the packing material.
349-5001143 Rev. 0
IMPORTANT SAFETY INSTRUCTIONS
WARNING
To reduce the risk of fire, electrical
shock, injury to persons, or damage
when using the air conditioner, follow basic precautions,
including the following:
• Read all of the instructions before using this appliance.
• Plug into a grounded 3 prong outlet.
• Do not remove ground prong.
• Do not use an adapter.
• Do not use an extension cord.
• Do not operate the air conditioner if it has a damaged
cord or plug, if it is not working properly, or if it has
been damaged or dropped.
• The air conditioner should be serviced only by qualified
service personnel. Call an authorized service company
for examination, repair, or adjustment.
• Disconnect power before servicing.
• Disconnect power before cleaning.
NOTE: Turning off power by pressing the Power button
does NOT disconnect the appliance from the power
supply.
• Do not install or use the air conditioner in any area
where the atmosphere contains combustible gases
or where the atmosphere is contaminated. Avoid any
chemicals coming in contact with your air conditioner.
• Do not store anything directly on top of the air
conditioner.
• Use two or more people to move and install air
conditioner.
• Never operate the air conditioner without the filters in
place.
• Do not use the air conditioner near a bathtub, shower
or wash basin or other wet area.
• This appliance is not intended for use by persons
(including children) with reduced physical, sensory
or mental capabilities or lack of experience and
knowledge, unless they have been given supervision
or instruction concerning use of the appliance by a
person responsible for their safety.
• Children should be supervised to ensure that they do
not play with the appliance.
READ AND SAVE THESE INSTRUCTIONS
IMPORTANT SAFETY INFORMATION
READ ALL INSTRUCTIONS BEFORE USING THE APPLIANCE
IMPORTANT SAFETY INFORMATION
• Do not use means to accelerate the defrosting
process or to clean, other than those recommended
by the manufacturer.
• The appliance shall be stored in a room without
continuously operating ignition sources (for example:
open flames, an operating gas appliance or an
operating electric heater.
• Do not pierce or burn refrigerant tubing. Be aware that
refrigerants may not contain an odor.
• Keep ventilation openings clear of obstruction.
• When handling, installing, and operating the
appliance, care should be taken to avoid damage to
the refrigerant tubing.
• Do not drill holes in the unit.
• Maintenance, cleaning, and service should only
be performed by technicians properly trained and
qualified in the use of flammable refrigerants.
• GE Appliances does not support any servicing of the
air conditioner.
• Dispose of air conditioner in accordance with Federal
and Local Regulations. Flammable refrigerants require
special disposal procedures. Contact your local
authorities for the environmentally safe disposal of
your air conditioner.
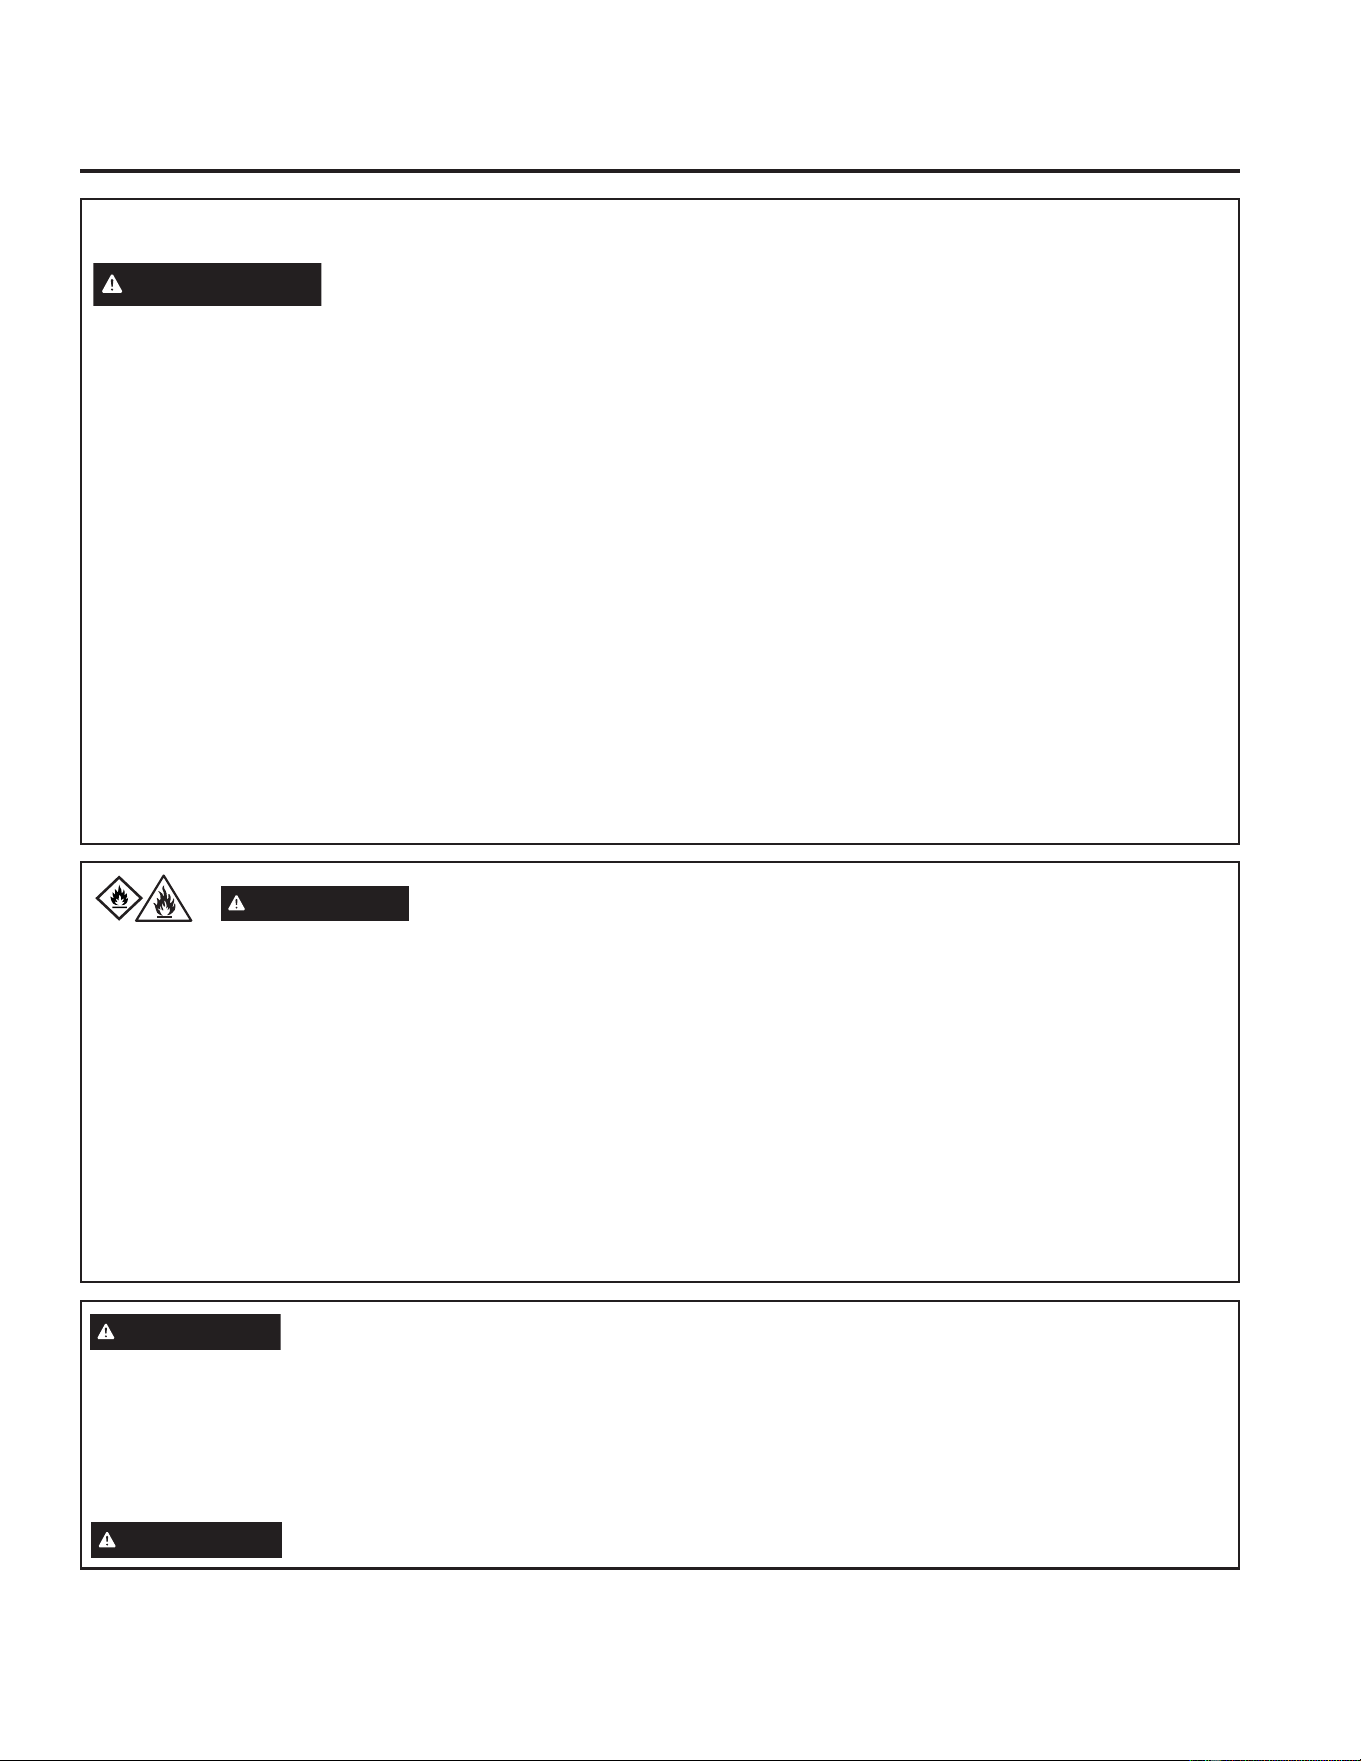
WARNING
Risk of Fire or Explosion. This unit contains flammable refrigerant.
Additional safety precautions must be followed.
WARNING
How to Insert the Batteries in the
Remote Control
Ŷ3UHVVWKHWDEDQGUHPRYHWKHEDWWHU\FRYHURQWKH
back of the remote.
Ŷ,QVHUWQHZEDWWHULHVPDNLQJVXUHWKDWWKHDQG
of battery are installed correctly.
Ŷ5HDWWDFKWKHFRYHUE\VOLGLQJLWEDFNLQWRSRVLWLRQ
NOTES:
ŶUse 2 “AAA” (1.5 volt) alkaline batteries. Do not use
rechargeable batteries
Ŷ5HPRYHWKHEDWWHULHVIURPWKHUHPRWHFRQWUROLIWKH
system is not going to be used for a long time.
ŶDo not mix old and new batteries. Do not mix
alkaline, standard (carbon-zinc) or rechargeable
(ni-cad, ni-mh, etc) batteries.
WARNING
Caution for Ingestion. The battery may cause suffocation if swallowed by children.
A2L
4 49-5001143 Rev. 0
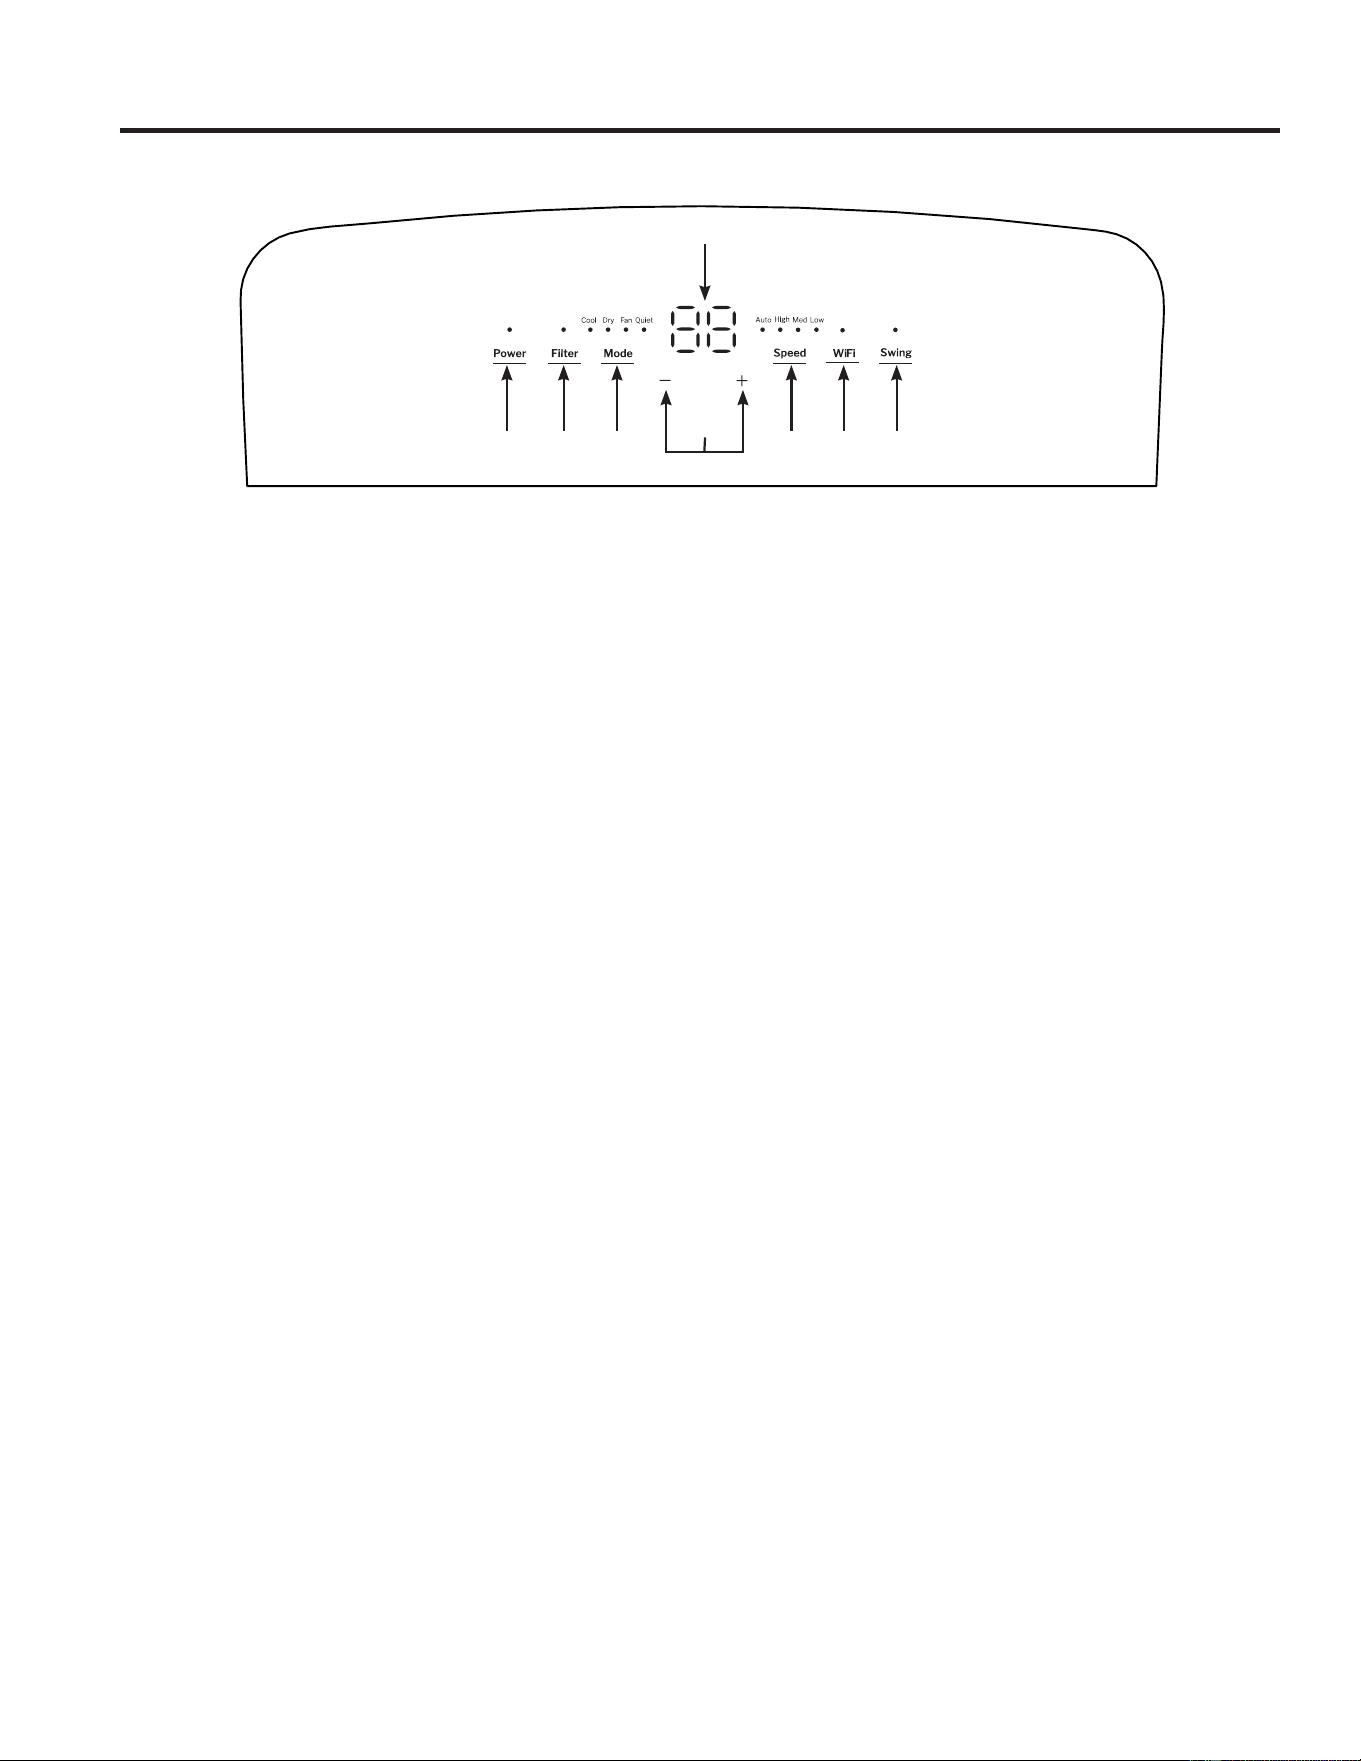
Features and appearance will vary.
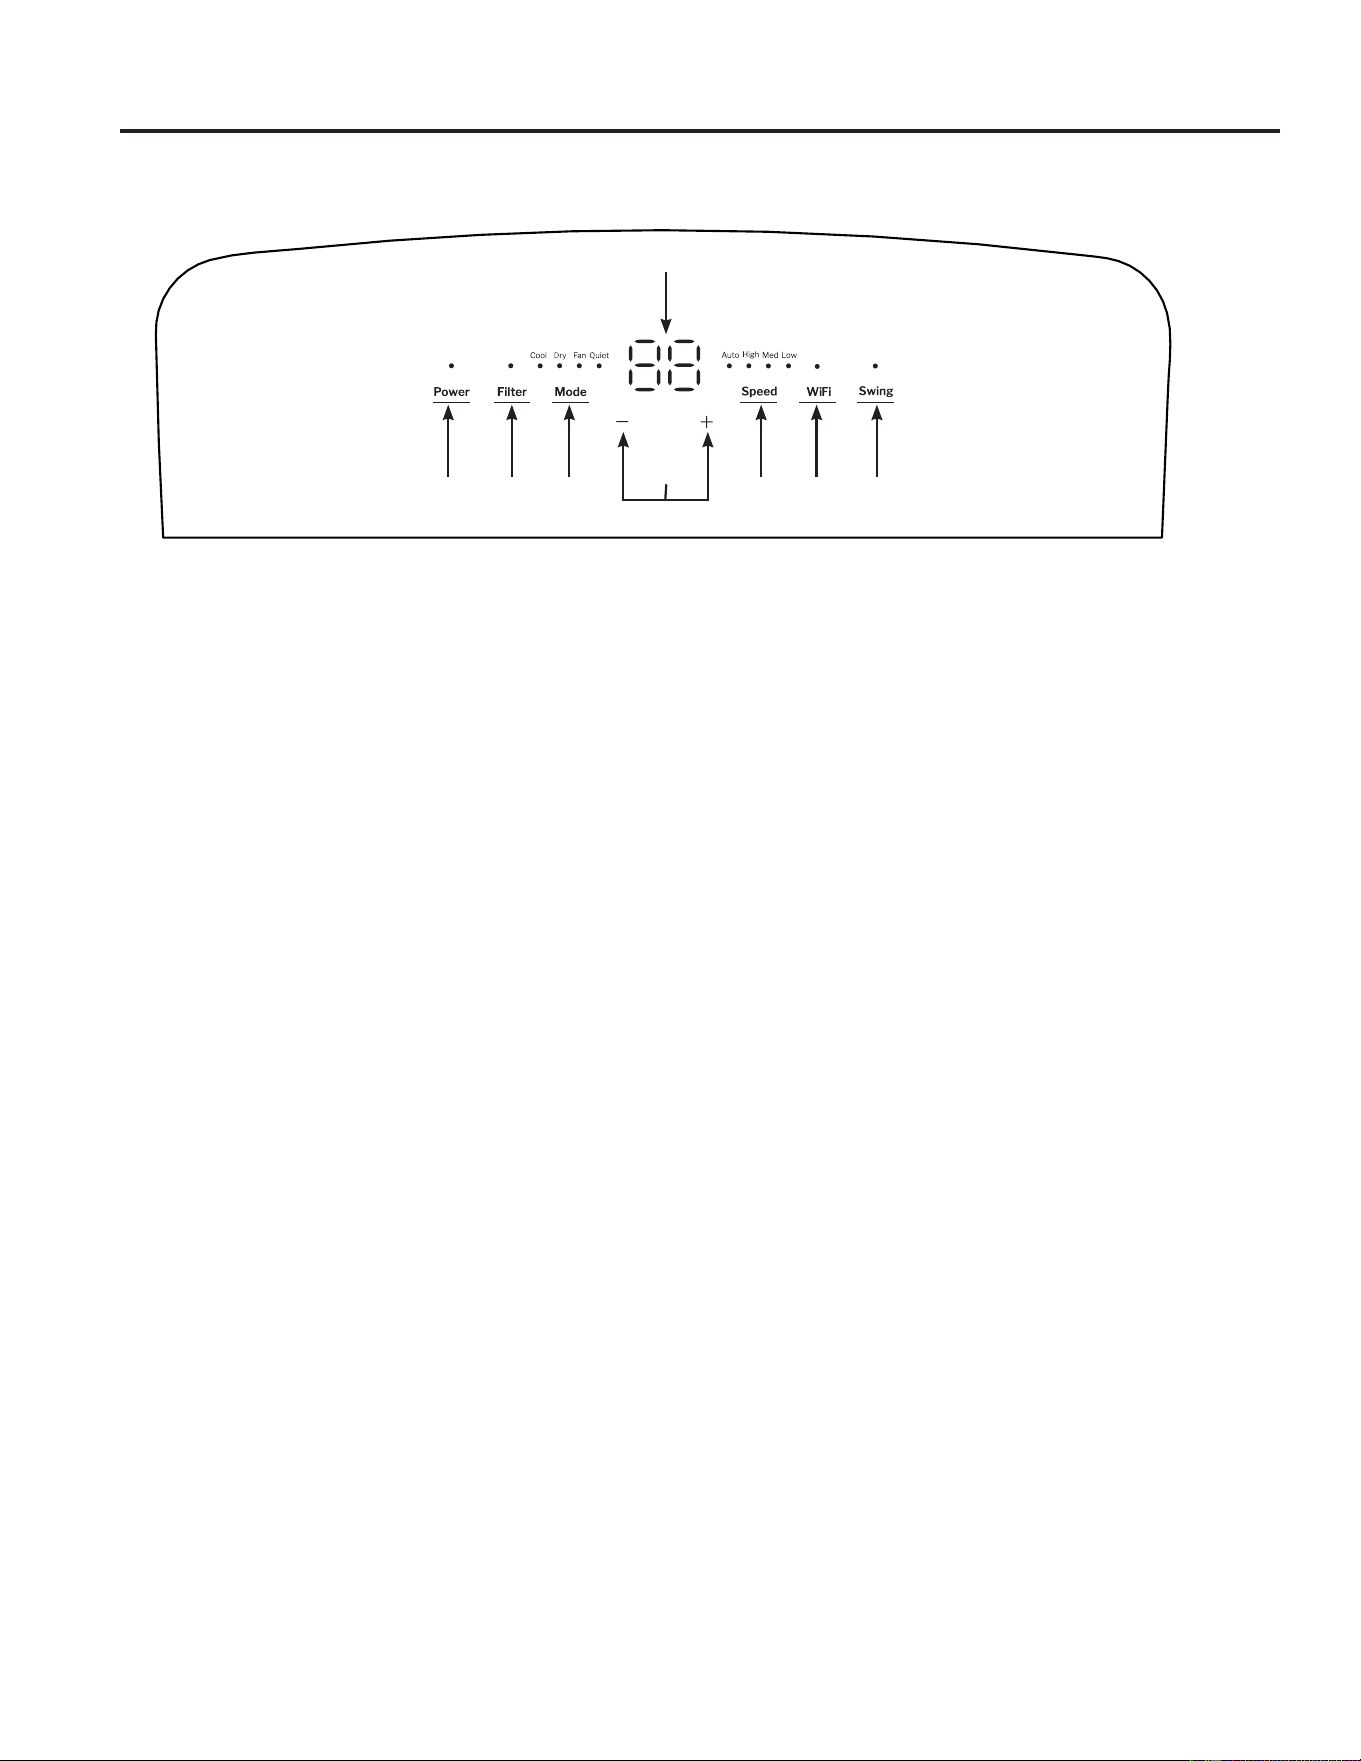
Lights next to the buttons on the air conditioner control panel indicate the selected settings.
A. Control Panel Display
Displays the Set Temperature in degrees Fahrenheit or
degrees Celsius, or the hours remaining in a Time Delay.
B. Power Button
Turns the air conditioner on or off.
NOTE: Turning off power by pressing the Power
button does NOT disconnect the appliance from the
power supply. Press the Power Button. The power
indicator and Temperature display will illuminate.
Select desired settings. After one minute, the display
lights will turn off. Press any button on the unit or
the remote, the display will illuminate. Then press
corresponding buttons to change unit function.
NOTE: if changing functions from the remote, it may
require multiple presses to synchronize remote to the unit.
C. Mode Button
Press the Mode button to toggle among the operating
options. The corresponding indicator will illuminate:
Cool – Cools the room to the set temperature
Fan – Circulates the air in the room without cooling
Dry – Reduces the humidity in the room
Quiet – Reduces noise of unit while cooling
D. Fan Speed Button
The fan speed can be adjusted to Low, Medium, High,
or Auto while the air conditioner is operating. Auto
adjusts the fan speed automatically to provide ideal
cooling based on the room temperature.
NOTE: The fan speed cannot be adjusted when the
unit is in Dry mode.
Press the Speed button to toggle among speeds. The
corresponding fan speed indicator will illuminate.
E. Temperature Set Controls
Adjusts the Temperature or Hours in Time Delay.
To Set the Temperature:
1. Press the Mode button until the Cool mode is
selected.
2. Press the Up Arrow or Down Arrow buttons to
select the desired temperature.
NOTE: The temperature cannot be set when the air
conditioner is in Fan mode.
NOTE: The Up Arrow and Down Arrow buttons, when
pressed at the same time, allow you to select between
displaying the temperature in ºF or ºC.
F. Swing Button
When the portable air conditioner is turned on, the
louver will automatically open to the upright position
(do not pry it open or push it shut). Press the Swing
button to cycle through fixed positions or activate
continuous swing.
G. WiFi Button:
To turn on the WiFi function press the WiFi button.
To turn off the WiFi function press and hold the WiFi
button for 3 seconds.
Refer to the “WiFi Setup” section for more information
on how to connect your Portable AC to your router
and installing the SmartHQ App.
H. Filter Reset Button
This feature automatically notifies you that the air
filter must be cleaned. The indicator light will come on
after 250 hours of operation. Clean the air filter (refer
to Care and Cleaning Section, Page 9), place it back
in the front panel, and press the Filter Reset button.
The light will turn off.
Controls
USING THE AIR CONDITIONER
A
CD
B
E
F
HG

549-5001143 Rev. 0
Controls
Cool Mode
Use the Cool mode for cooling.
To set the Cool mode:
1. Press the Mode button until the Cool indicator light is
lit.
2. Press the Speed button to set Low, Medium, High, or
Auto fan speed.
3. Press + or - to set the desired temperature.
After settings have been made, the display will change
back to show the room temperature.
The temperature control is used to maintain the room
temperature. The compressor will cycle on and off
to keep the room at the set level of comfort. Set the
temperature control at a lower number and the indoor
air will become cooler. Set the temperature control at a
higher number and the indoor air will become warmer.
NOTE: ,IWKHDLUFRQGLWLRQHULVRIIDQGLVWKHQWXUQHGRQ
while set to Cool, it will take approximately 3 minutes for
the compressor to start and cooling to begin.
Cooling Descriptions
For Normal Cooling — Select the Cool mode and
High, Medium, Low or Auto fan speed with a middle set
temperature.
For Maximum Cooling — Select the Cool mode and
+,*+IDQVSHHGZLWKDORZHUVHWWHPSHUDWXUH
For Quieter & Nighttime Cooling — Select the Quiet
mode.
NOTE: ,I\RXVZLWFKIURP&RRO'U\RU4XLHWPRGH
setting to OFF, wait 3 minutes before restarting.
Dry Mode—Dehumidification
Use the Dry mode to provide dehumidification only.
The fan will run at a fixed speed at this setting, so a
fan speed cannot be set. For best performance in Dry
mode, do not attach the exhaust hose to the window.
Additionally, make sure all windows and doors are
closed.
To set the Dry mode:
• Press the Mode button until the Dry indicator light is lit.
NOTE: ,I\RXVZLWFKIURPDDry setting to Off or to a fan
setting, wait at least 3 minutes before switching back to
a Dry setting.
,IXVLQJWKHXQLWLQWKHDry mode as a dehumidifier for an
extended time.
1. Unplug the power cord.
2. Connect a ½” outer diameter flexible drain hose (not
included) to the upper drain port and drain to floor
drain.
3. Reconnect the power cord and press the Mode button
until the Dry indicator light is lit.
Fan Mode
Use the Fan mode to provide air circulation and filtering
without cooling.
To set the Fan mode:
• Press the Mode button until the desired indicator light
for High, Medium, Low, or Auto fan speed is lit.
Since fan only settings do not provide cooling, a set
temperature will not be displayed. After Fan speed has
been set, the display will change back to show the room
temperature.
The exhaust hose and window kit do not need to be
installed when operating in fan mode.
Quiet Mode
Use the Quiet mode to reduce the noise of the unit while
cooling.
To set the Quiet mode:
1. Press the Mode button until the Quiet indicator light is lit.
2. Press + or - to set the desired temperature.
After settings have been made, the display will change back
WRVKRZWKHURRPWHPSHUDWXUH,QQuiet mode the unit sets
the fan speed automatically. Changing the fan speed while
in Quiet mode will put the unit in Cool mode.
Power Outage Recovery Feature
,QWKHFDVHRIDSRZHURXWDJHRULQWHUUXSWLRQWKHXQLWZLOO
automatically re-start in the settings last used after the
power is restored.
NOTE: ,IWKHDelay was set before the power outage, it
will need to be reset after power is restored.
The display will always default to show the room temperature.
When the air conditioner is turned on, it will automatically start in the last mode and fan settings selected.
USING THE AIR CONDITIONER
6 49-5001143 Rev. 0
Controls
USING THE AIR CONDITIONER
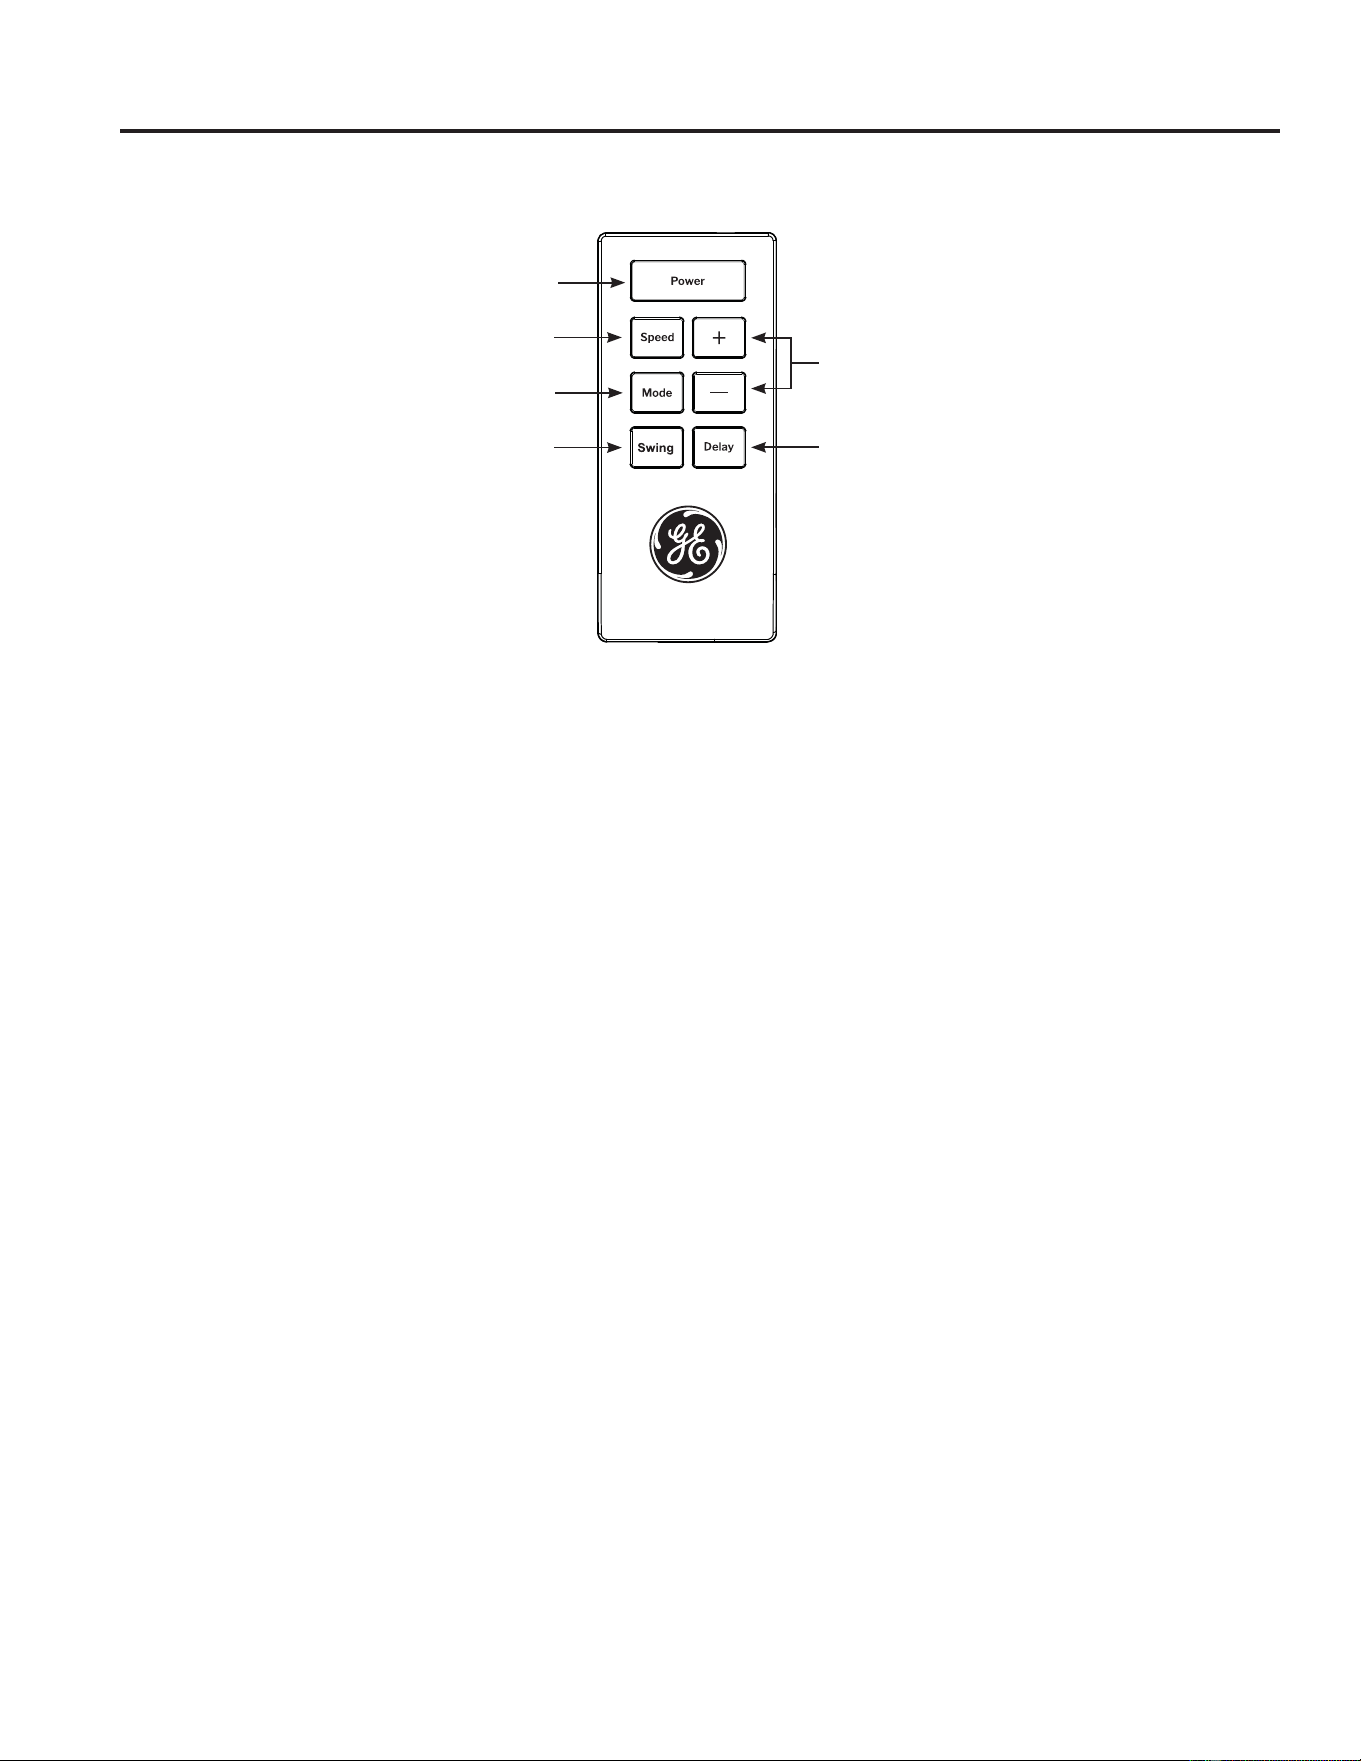
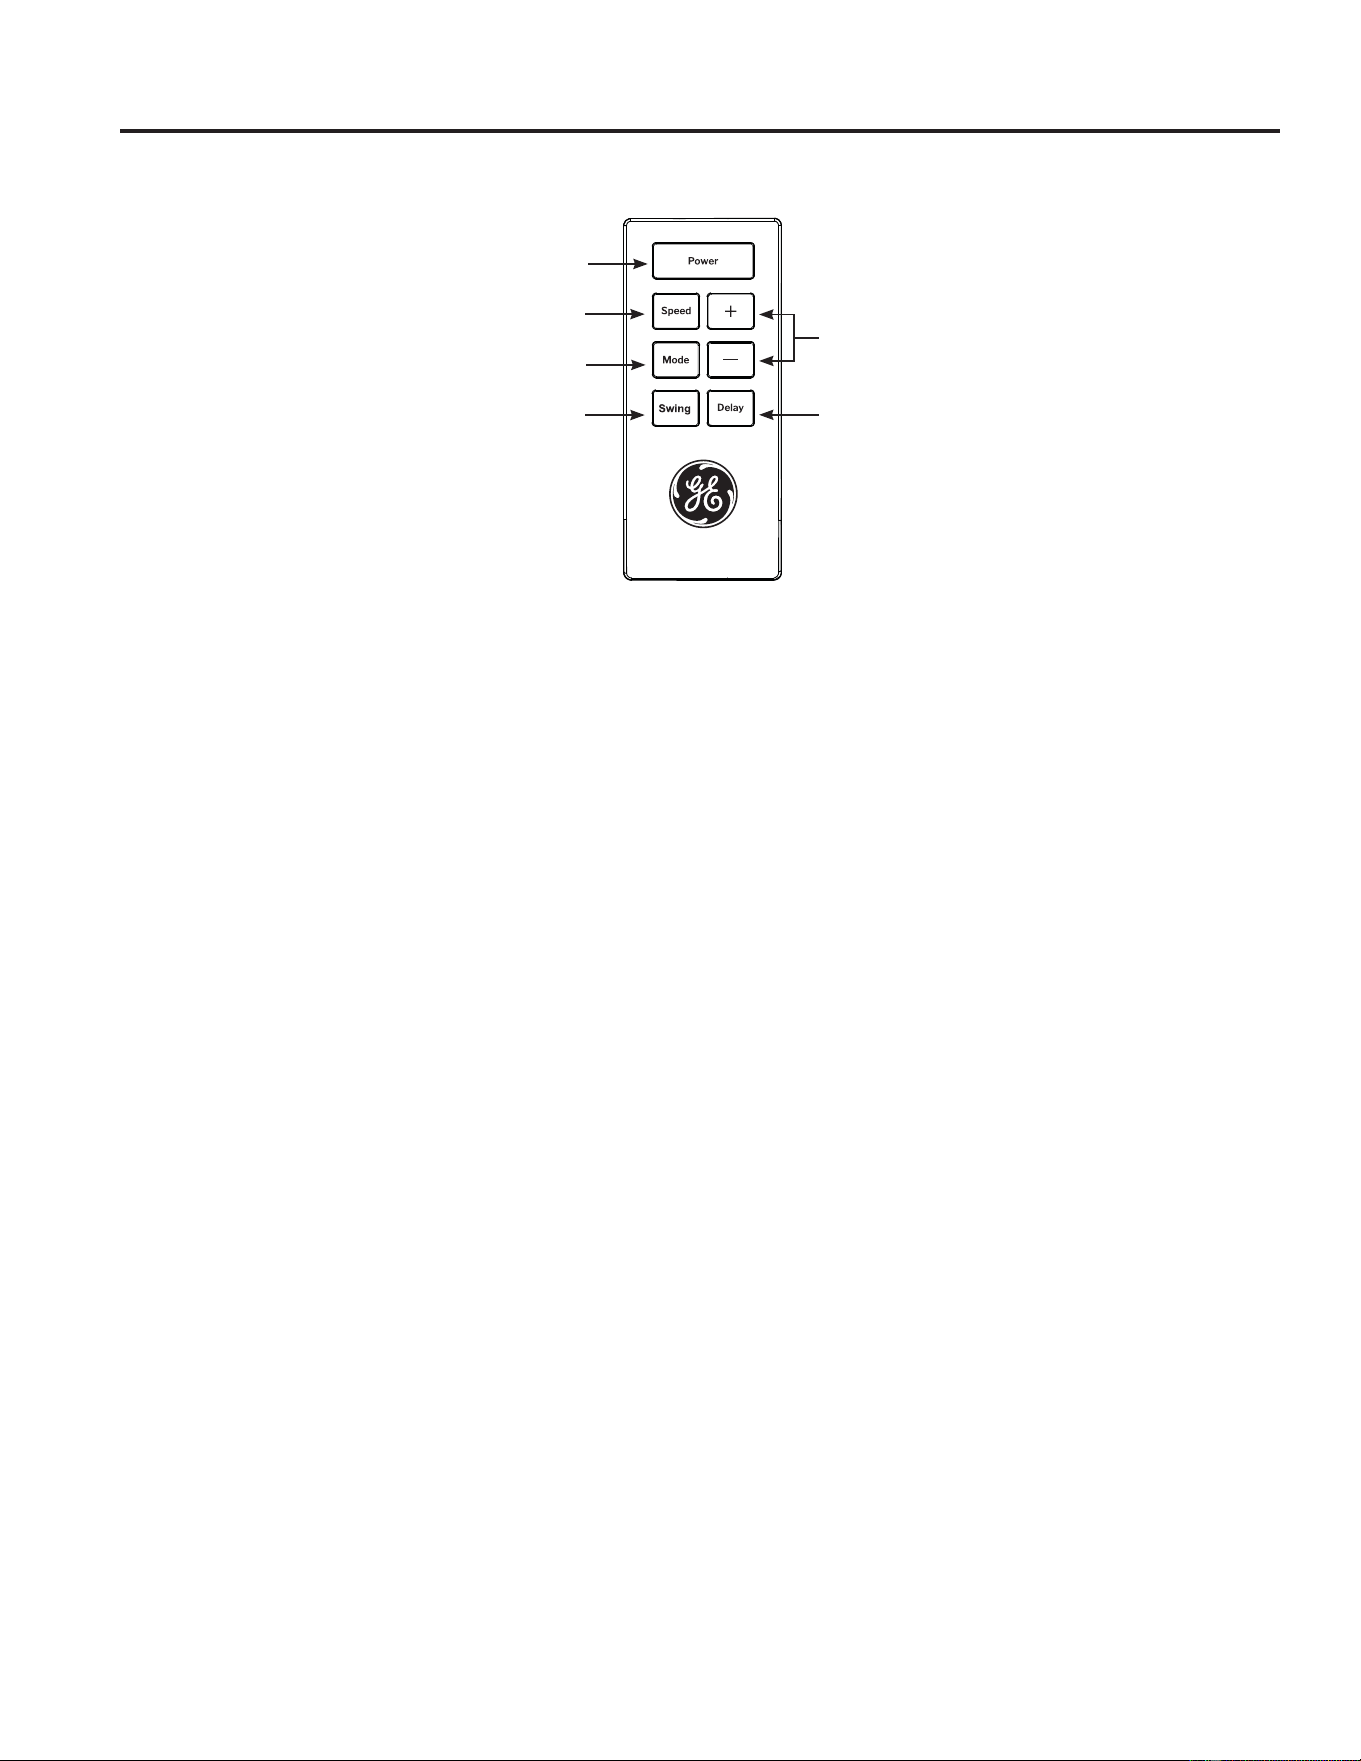
Features and appearance may vary.
,FRQVRQWKHUHPRWHFRQWUROLQGLFDWHWKHVHOHFWHGVHWWLQJV
Remote Control
,QVHUWWKHWZREDWWHULHVSURYLGHG
2. Aim the remote control at the signal receiver on the
control panel to operate the air conditioner.
A. Power
Turns the air conditioner on or off.
NOTE: Turning off power by pressing the Power
button does NOT disconnect the appliance from the
power supply.
• Press the Power button. The Power indicator will
illuminate.
B. Mode
Press the Mode button to toggle among the operating
options. The corresponding indicator will illuminate:
Cool – Cools the room to the set temperature
Dry – Reduces the humidity in the room
Fan – Circulates the air in the room without cooling
Quiet – Reduces noise of unit while cooling
C. + / - Button for Temperature and Timer
,Q Cool, Dry, or Quiet mode, press the + or – button to
increase or decrease the temperature setting.
To Set the Temperature:
1. Press the Mode button until the Cool mode is
selected.
2. Press the + or – buttons to select the Temperature.
NOTE: The temperature cannot be set when the air
conditioner is in either Fan or Dry mode.
To Set the Timer:
1. Press the + or – buttons to select the desired hours
to turn on or off.
D. Speed
Press the Speed button to choose High, Medium, Low,
or Auto fan speed.
NOTE: The fan speed cannot be adjusted when the
unit is in Dry mode.
• Press the Speed button to toggle among the three
speeds. The corresponding fan speed indicator will
illuminate.
E. Delay
Press the Delay button and use the + or – buttons to
program a time (from 1-hour to 24-hours) for the air
conditioner to turn Off or On.
While the air conditioner is in operation:
1. Press the Delay button.
2. Press the + / - buttons to select the number of hours
you want the air conditioner to continue to operate
before turning Off.
3. Wait approximately 60 seconds for the Turn-Off time
to be saved.
While the air conditioner is off:
1. Press the Delay button.
2. Press the + / - buttons to select the number of hours
you want the air conditioner to continue to operate
before turning On.
3. Wait approximately 60 seconds for the Turn-On time
to be saved.
To cancel the delay:
1. Press the Delay button once to display the hours
remaining on the current delay.
2. Press the Delay button again and the delay will be
canceled.
F. Swing
The louver on your portable air conditioner will open
automatically (do not pry it open or push it shut).
1. When your AC is turned on, the louver will swing up
and down.
2. Press the auto swing button to fix the louver in your
desired position.
NOTE: The Air Conditioner LED display will turn off
1 minute after the last button is pushed. To Turn on
the LED display, press any button on the unit or the
remote, then press corresponding function to change
settings. The remote may require multiple pushes to
synchronize remote to the unit.
A
B
C
E
D
F
749-5001143 Rev. 0
Care and Cleaning
CARE AND CLEANING
Air Filter
The air filters should be cleaned at least every two
weeks for your unit to operate at optimum efficiency.
CAUTION
DO NOT operate the air conditioner
without a filter because dirt and lint will clog it and
reduce performance.
To remove:
1. Unplug or disconnect power.
2. Pull to remove the filter panels.
3. Remove the filters from the panels.
4. Wash or vacuum the dust from the air filters.
NOTE,IZDVKHGJHQWO\VKDNHWKHILOWHUWRUHPRYHWKH
excess water and dust particles trapped in the filter.
5. Reinstall the filters onto the panels.
6. Replace both filter panels
7. Plug in or reconnect power
Cleaning
1. Unplug or disconnect power.
2. Use only a soft cloth dampened with water to clean
the cabinet.
NOTE:
• Do not use a liquid or spray cleaner to clean the air
conditioner.
• DO NOT use chemicals, abrasives, ammonia,
chlorine bleach, concentrated detergents, solvents or
scouring pads. Some of these chemicals/items may
damage and/or discolor your air conditioner.
3. Dry thoroughly with a soft cloth.
4. Plug in or reconnect power.
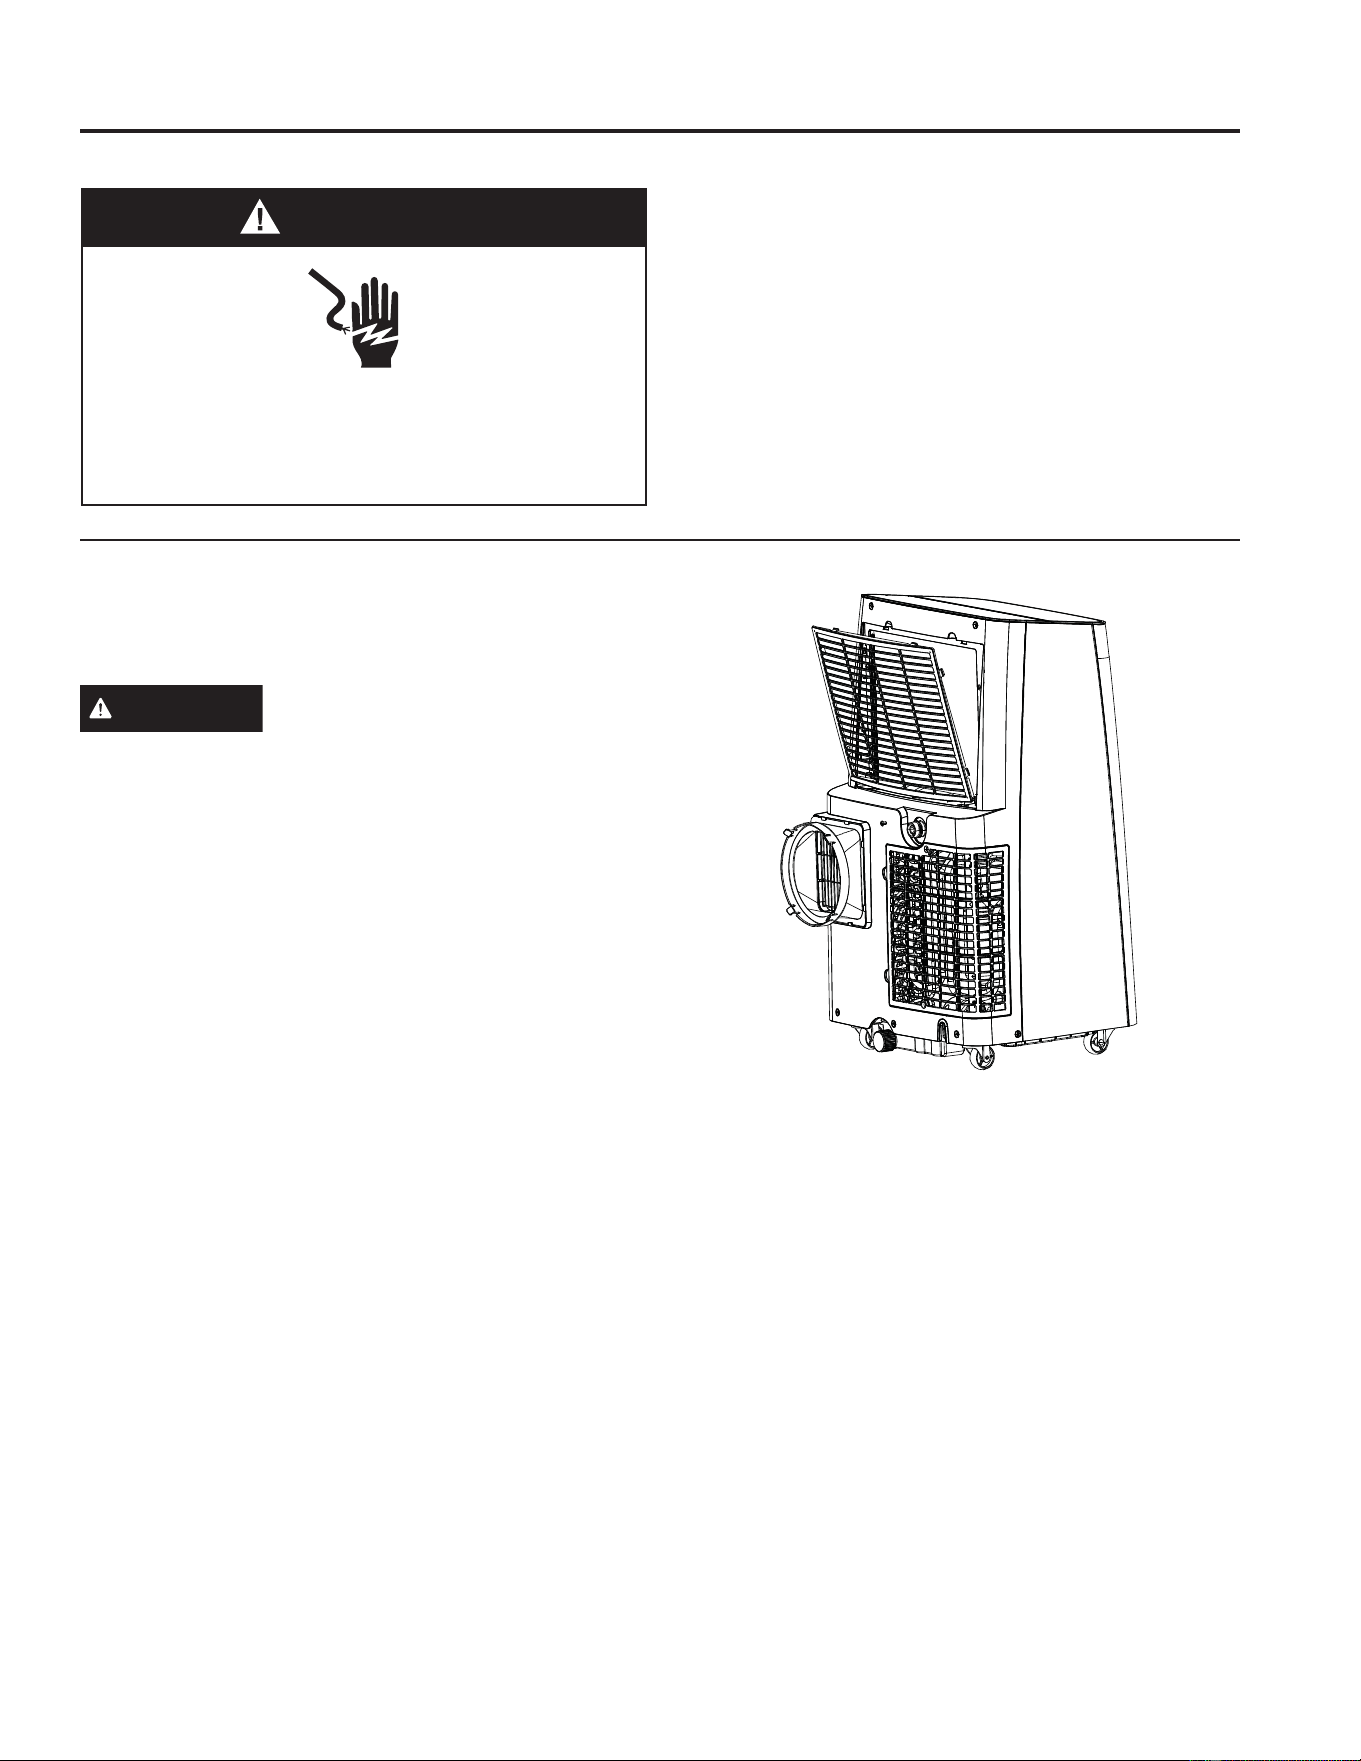
WARNING
Electrical Shock Hazard
Disconnect power before cleaning.
Failure to do so can result in death or electrical
shock.
8 49-5001143 Rev. 0
How to Insert the Batteries in the Remote Control
1. Remove the battery cover by sliding it according to the
arrow direction.
,QVHUWQHZEDWWHULHVPDNLQJVXUHWKDWWKHDQG±
of battery are installed correctly.
3. Reattach the cover by sliding it back into position.
NOTES:
Ŷ8VH³$$$´YROWDONDOLQHEDWWHULHV'RQRWXVH
rechargeable batteries.
Ŷ5HPRYHWKHEDWWHULHVIURPWKHUHPRWHFRQWUROLIWKH
system is not going to be used for a long time.
Ŷ'RQRWPL[ROGDQGQHZEDWWHULHV'RQRWPL[DONDOLQH
standard (carbon-zinc) or rechargeable (ni-cad, ni-mh,
etc) batteries.
Storage
If the unit is not being used for a long period of time:
To Empty the Internal Water Tank:
1. Unplug or disconnect power.
'UDLQWKHZDWHUIURPWKHZDWHUWDQN6HH³,QWHUQDO
Water Tank section” above.)
3. Use the original packaging to repack the unit to avoid
a buildup of dust or dirt.
4. Store the air conditioner in a cool, Dry location.
Care and Cleaning
CARE AND CLEANING
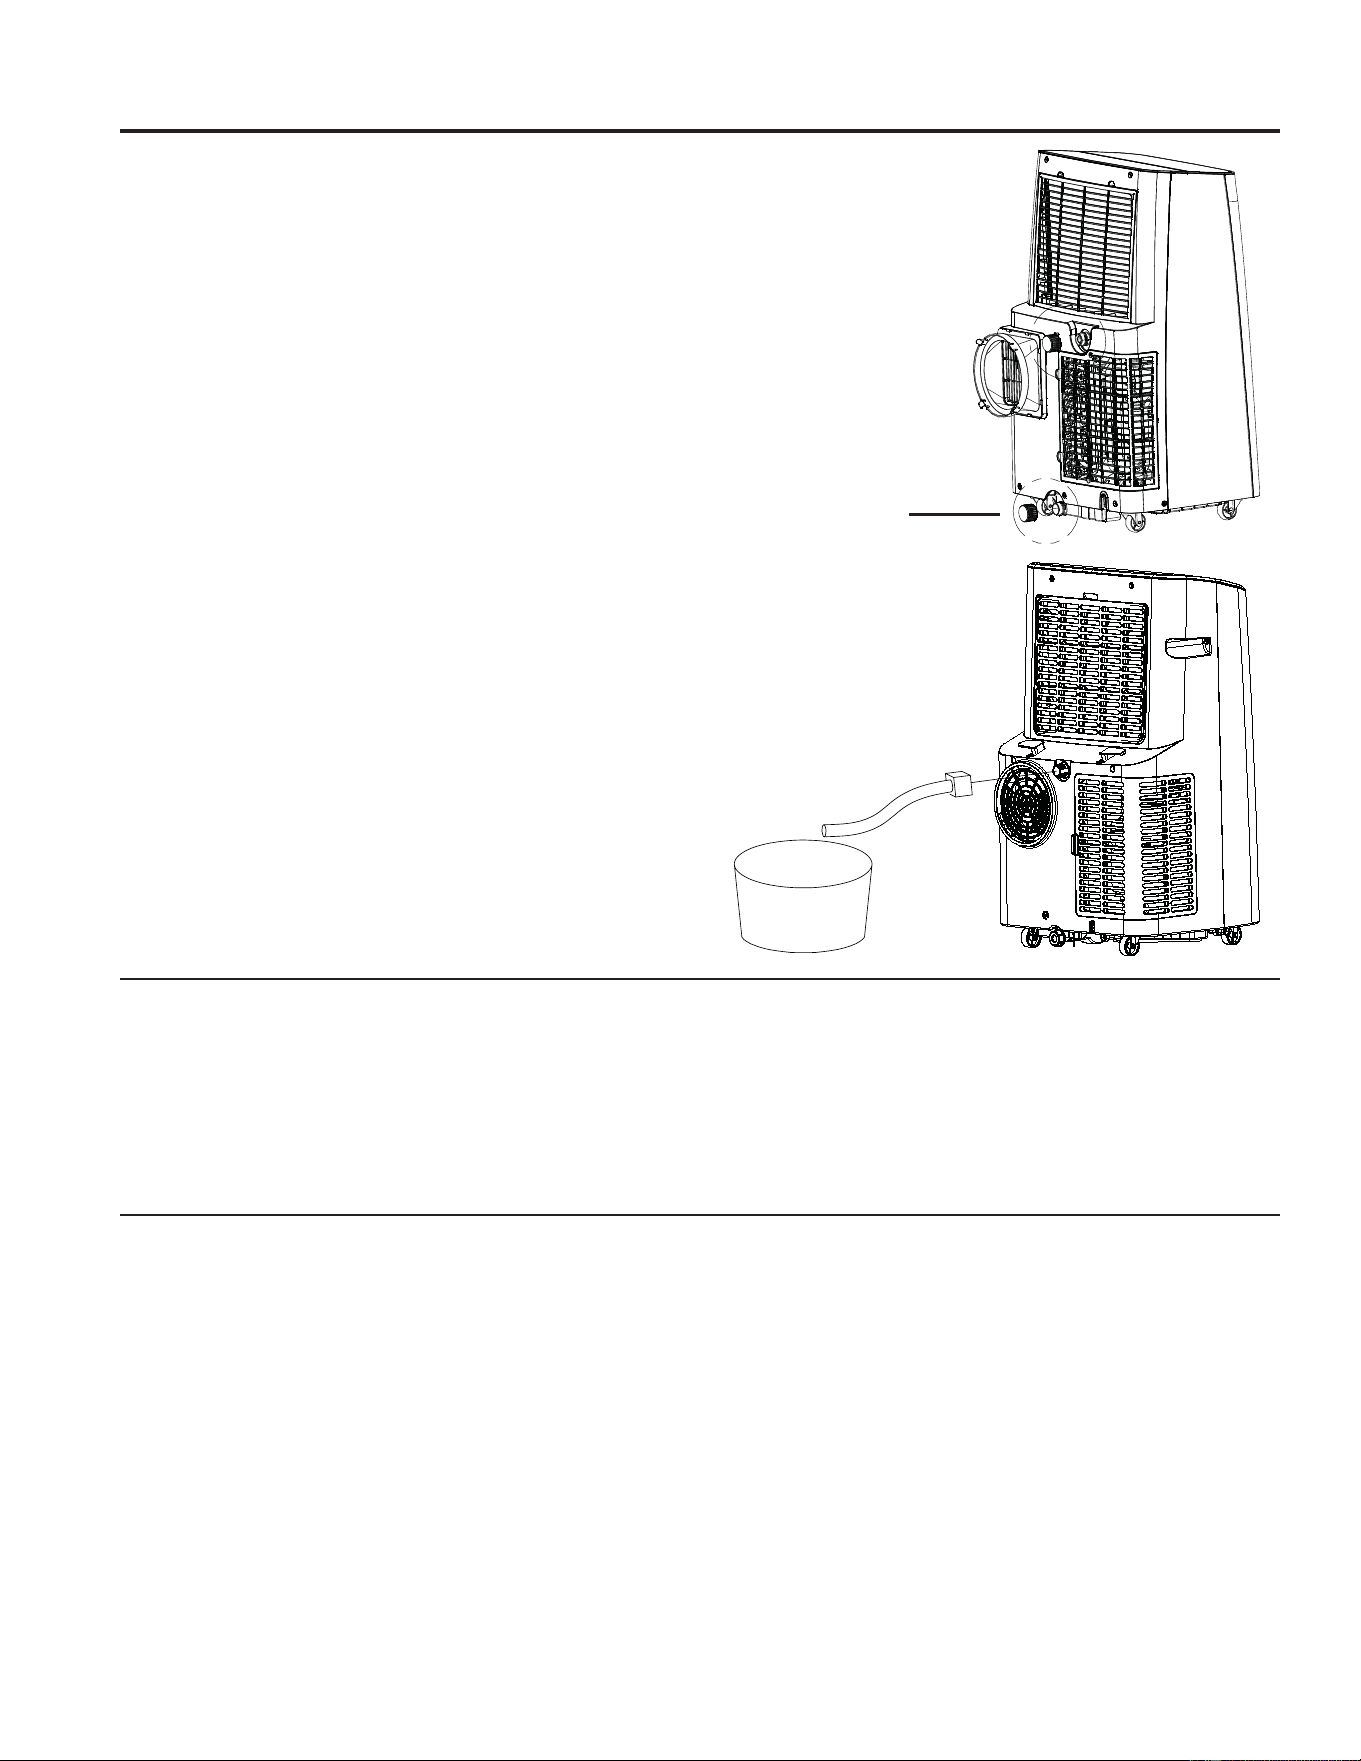
Internal Water Tank
The Water Full indicator (“FL” on the control panel
display) illuminates when the internal water tank has
filled with condensed water. The unit will not cool until
the tank has been emptied to prevent overflow and
possible damage to the floor under the AC.
To Empty the Internal Water Tank:
1. Unplug or disconnect power.
2. Place a shallow 1 1/2 quart or larger pan (not
included) below the lower drain located on the back
(near the bottom) of the air conditioner.
3. Remove the cap and the rubber plug and drain the
water tank.
4. Re-insert the drain plug and screw the cap snugly
into place.
5. Plug in or reconnect power.
Continuous Draining
(optional and only in dry mode)
1. Remove the top drain cap.
2. Connect a hose with a garden hose connection to
the outlet.
3. Route the drain hose to a suitably sized container*
or a floor drain.
* Be sure to use a large container (3 gallons or larger
is recommended) and monitor the water level in the
container continuously. The unit will not shut off when
the container is full. An overflowing container can
cause flooding and damage to the floor.”
Rubber Plug
949-5001143 Rev. 0
Installation Instructions
LOCATION REQUIREMENTS
• Place the air conditioner on a flat, level surface. For
optimal performance place portable 20” from exterior
wall. For all other sides a minimum distance of 30”
should be maintained.
• Keep the air conditioner free of any obstructions
such as drapes, curtains, blinds, etc.
• The exhaust hose should be free of any
obstructions.
• Do not place the air conditioner on an unstable
or raised surface because it could fall and cause
damage or injury.
•
Do not place the air conditioner in direct sunlight
or near a heat source such as baseboard heaters,
stoves, etc.
• The window panel can be installed in a window
with a minimum 20” (55.88 cm) to a maximum 46”
(121.92) opening.
INSTALLATION INSTRUCTIONS
Questions? Call GE Appliances at 866.907.1655 or visit our Website at: GEAppliances.com.
BEFORE YOU BEGIN
Read these instructions completely and carefully.
• IMPORTANT — Save these instructions for
local inspector’s use.
• IMPORTANT — Observe all governing codes
and ordinances.
• Note to Installer – Be sure to leave these
instructions with the Consumer.
• Note to Consumer – Keep these instructions for
future reference.
• Skill level –,QVWDOODWLRQRIWKLVDSSOLDQFHUHTXLUHV
basic mechanical skills.
• Completion time – Approximately 1 hour
• We recommend that two people install this product.
• Proper installation is the responsibility of the
installer.
• Product failure due to improper installation is not
covered under the Warranty.
• You MUST use all supplied parts and use proper
installation procedures as described in these
instructions when installing this air conditioner.
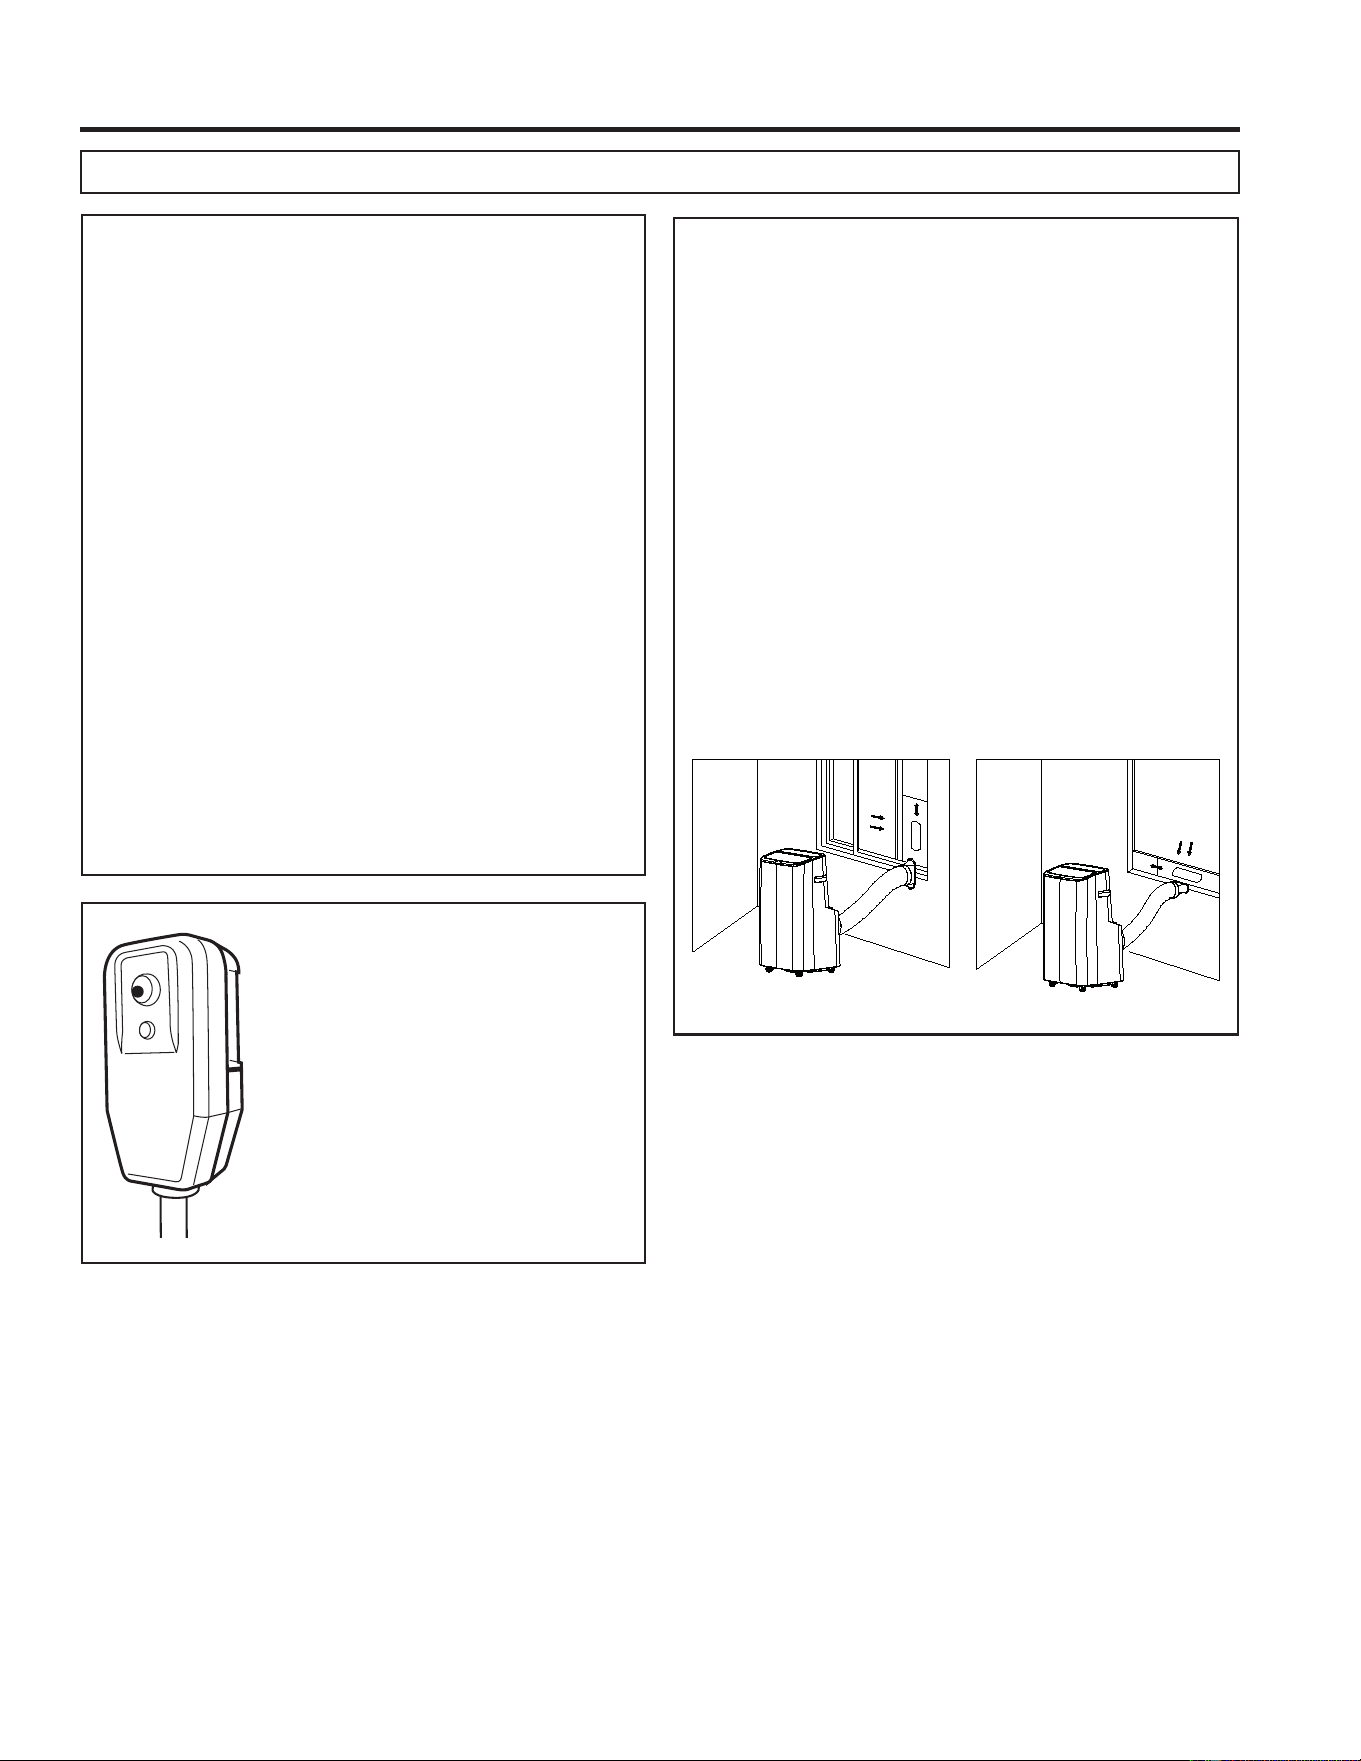
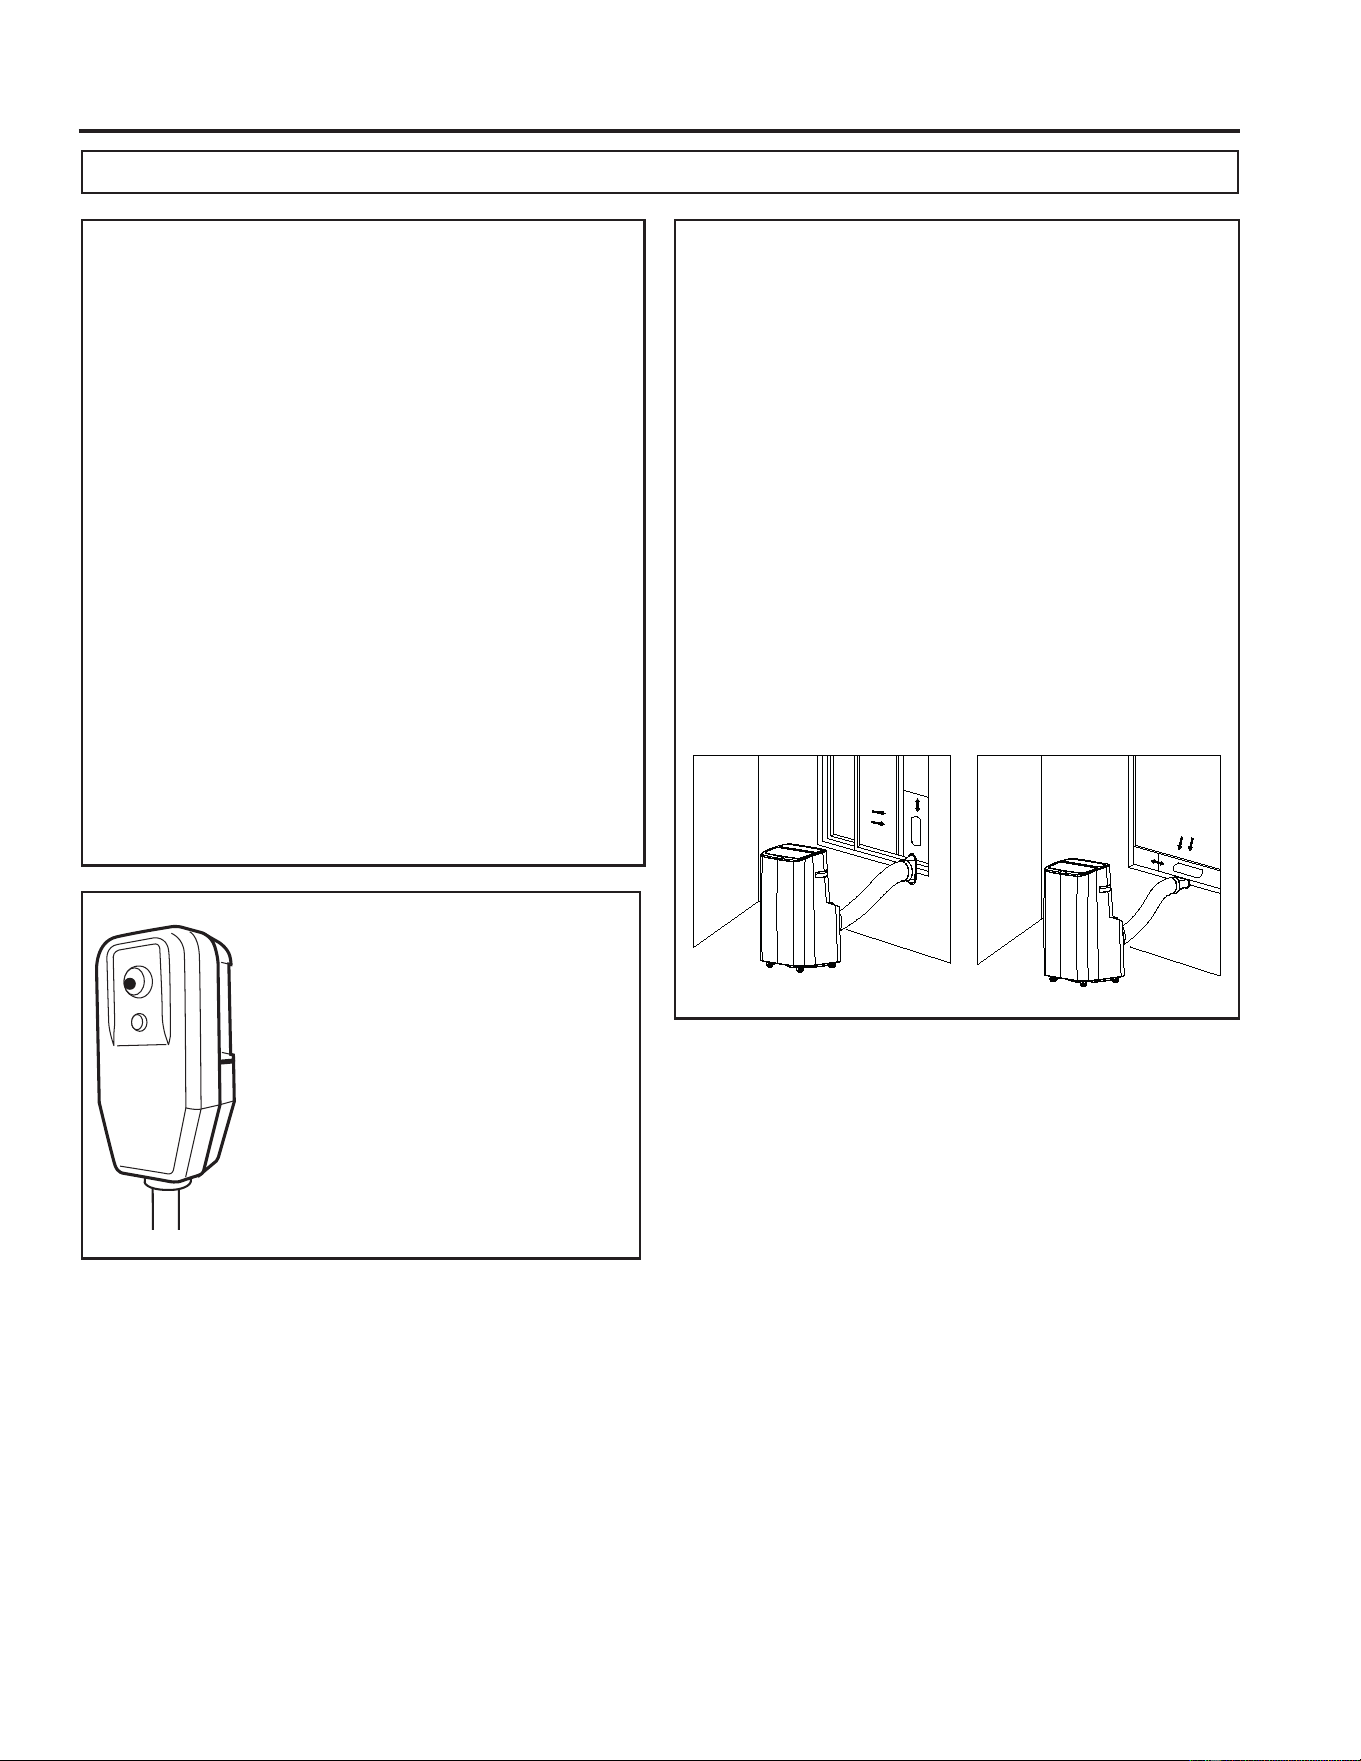
Power cord includes a current
interrupter device. A test and reset
button is provided on the plug case.
The device should be tested on
a periodic basis by first pressing
the TEST button and then the
RESET button while plugged into
WKHRXWOHW,IWKH7(67EXWWRQGRHV
not trip or if the RESET button will
not stay engaged, discontinue use
of the air conditioner and contact a
qualified service technician.
RESET
TEST
10 49-5001143 Rev. 0
INSTALLATION INSTRUCTIONS
Installation Instructions
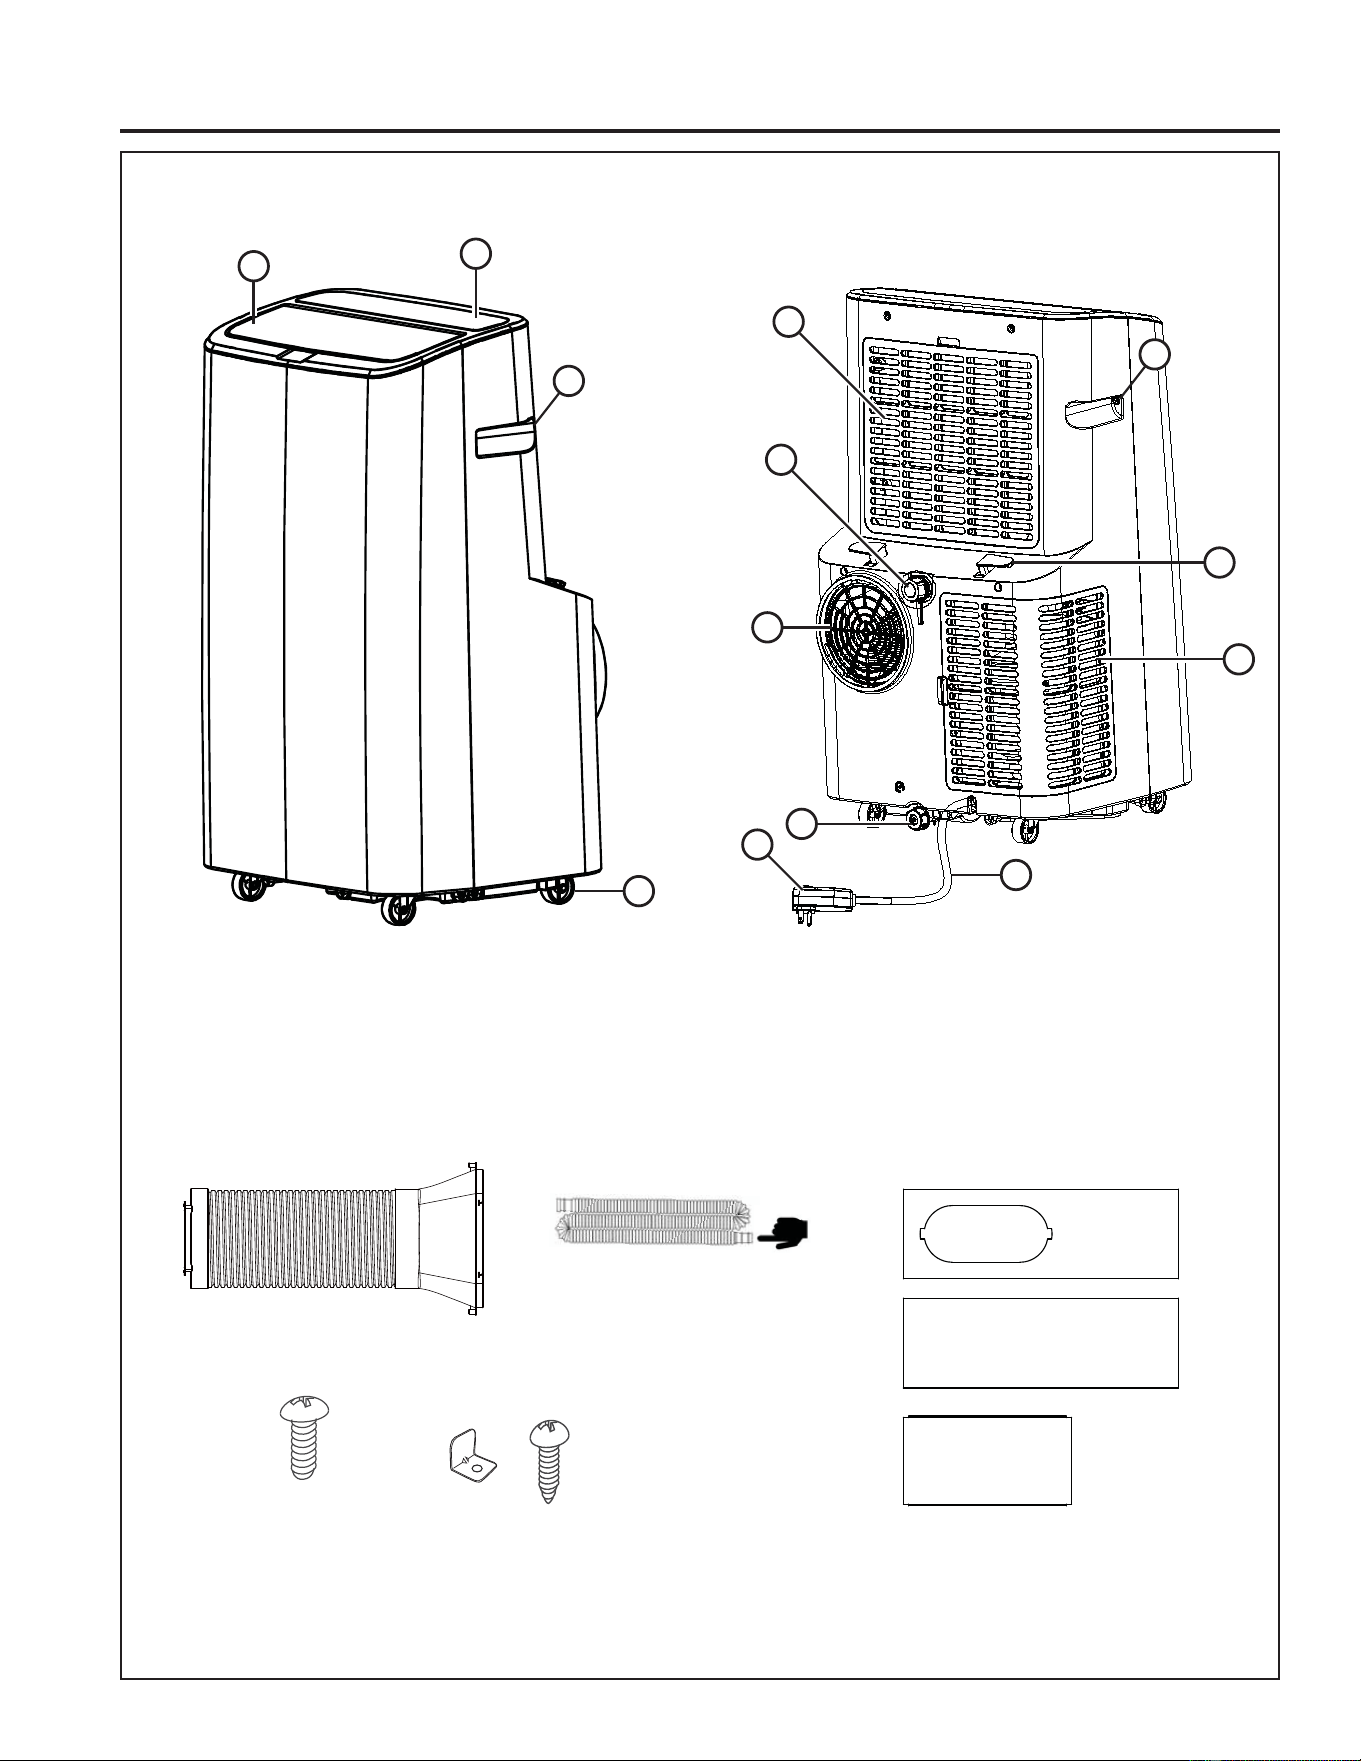
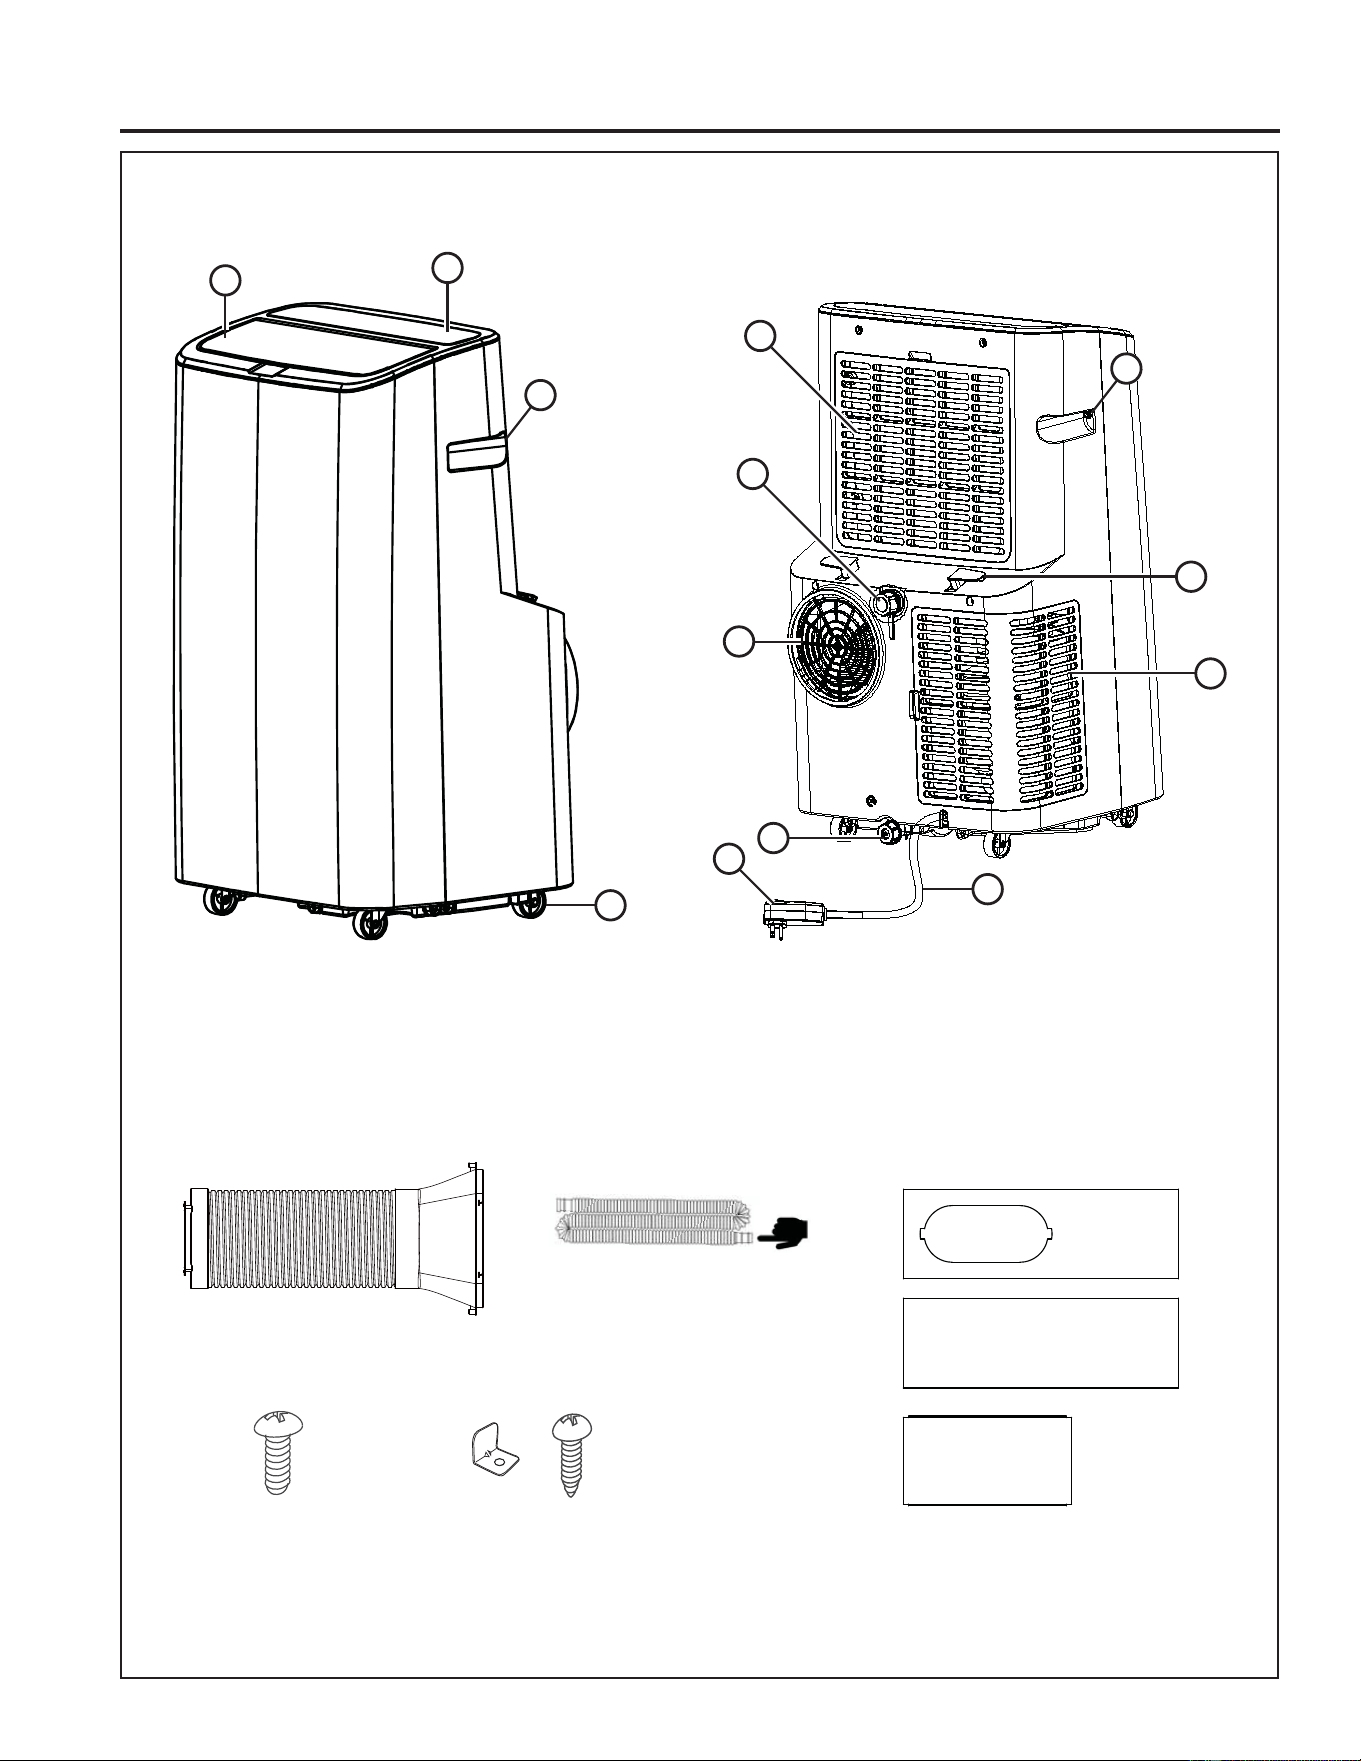
1. Auto Swing Louver
2. Controls
3. Built-in Handle
4. Casters (4)
5. Upper Filter Panel
6. Top Continuous Drain
7. Exhaust Vent
8. Lower Drain
/'&,3OXJ
10. Cord Winder (2)
11. Lower Filter Panel
12. Power Cord
13. Remote Control
14. 2 AAA batteries
PARTS INCLUDED
(Appearance may vary)
1
2
3
4
8
7
5
6
9
10
11
12
3
Exhaust Hose Assembly
Drain hose
*Smaller side connects to unit
Window slider screws (x4) Window lock
bracket with screw
Window Panels
1149-5001143 Rev. 0
Installation Instructions
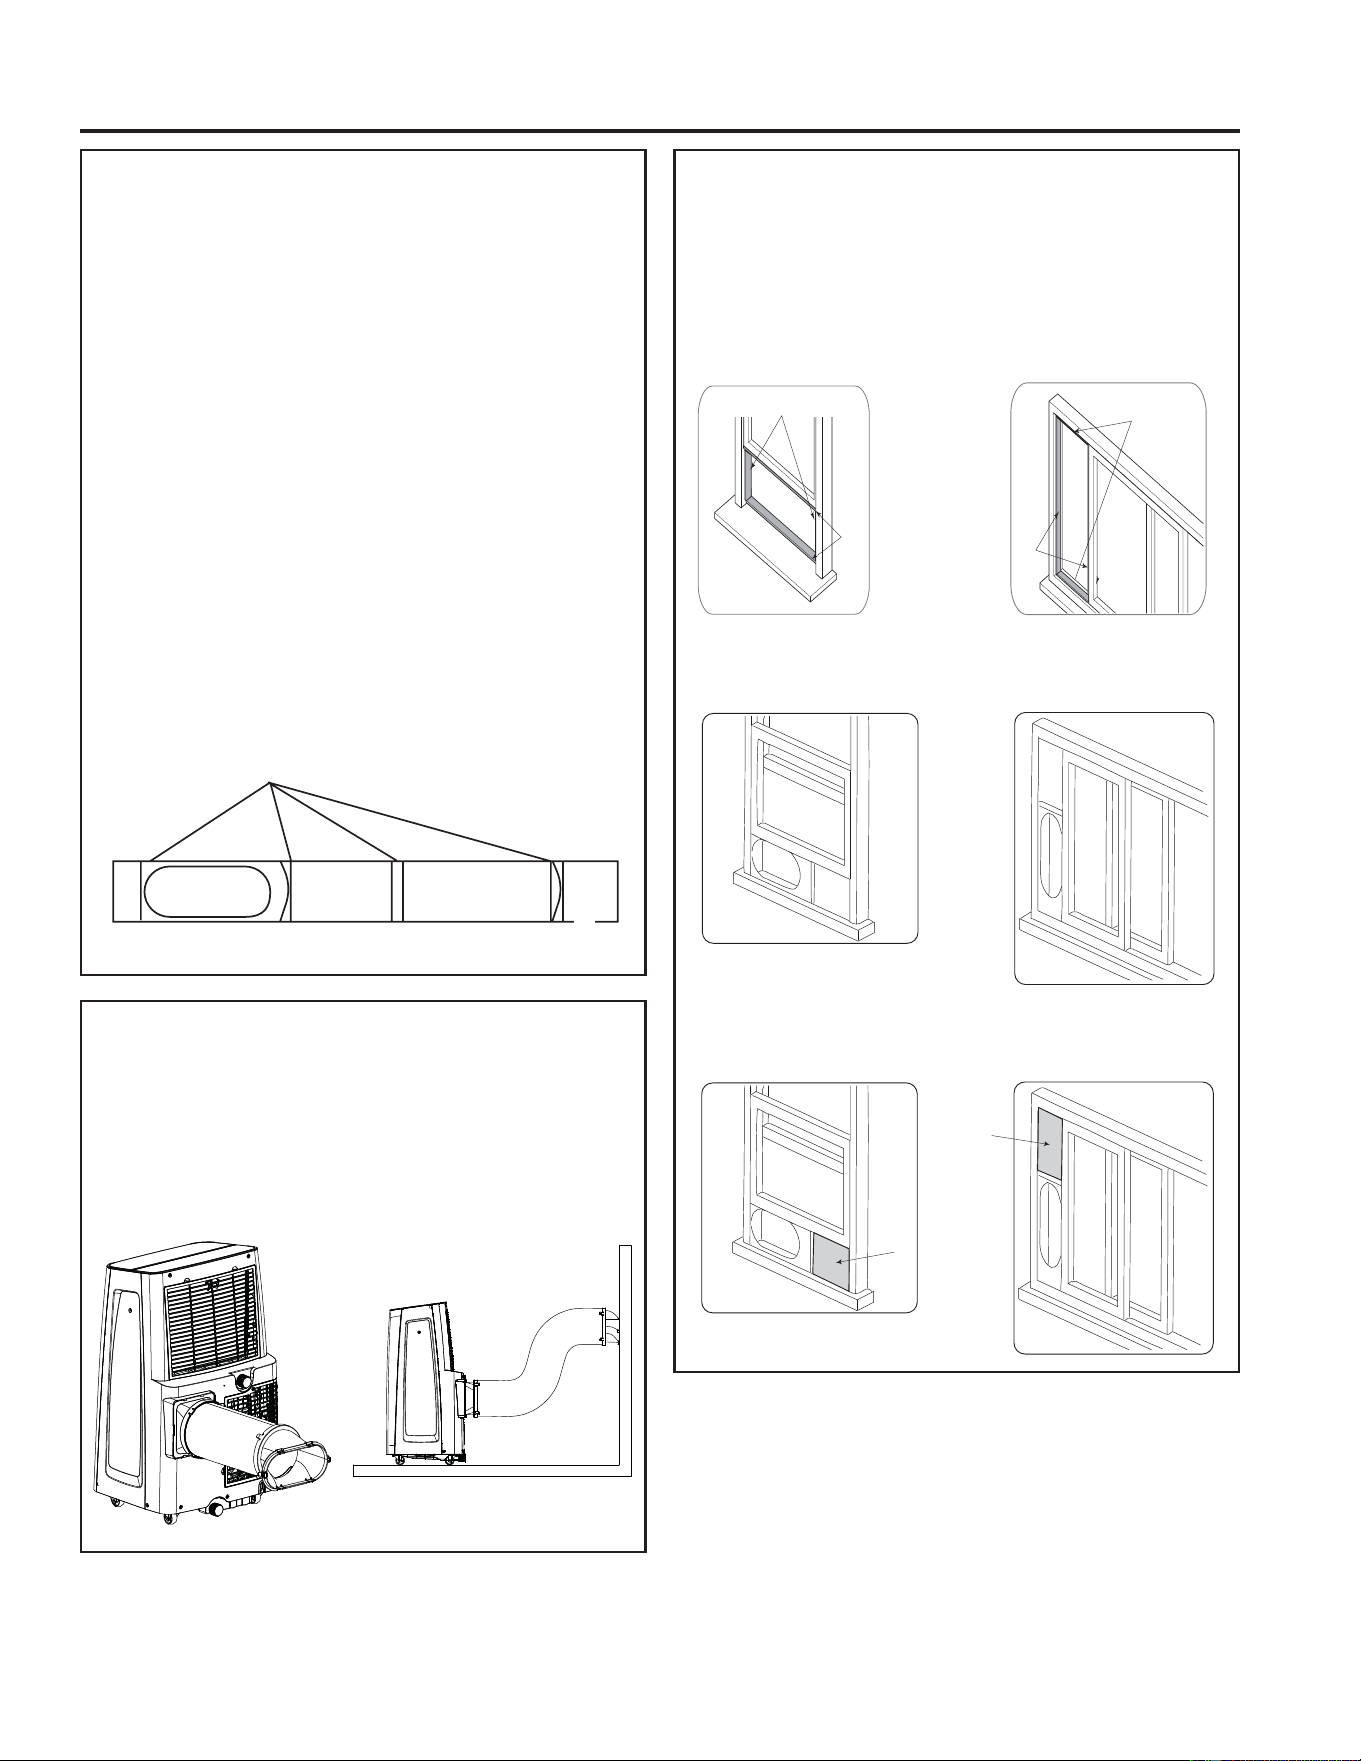
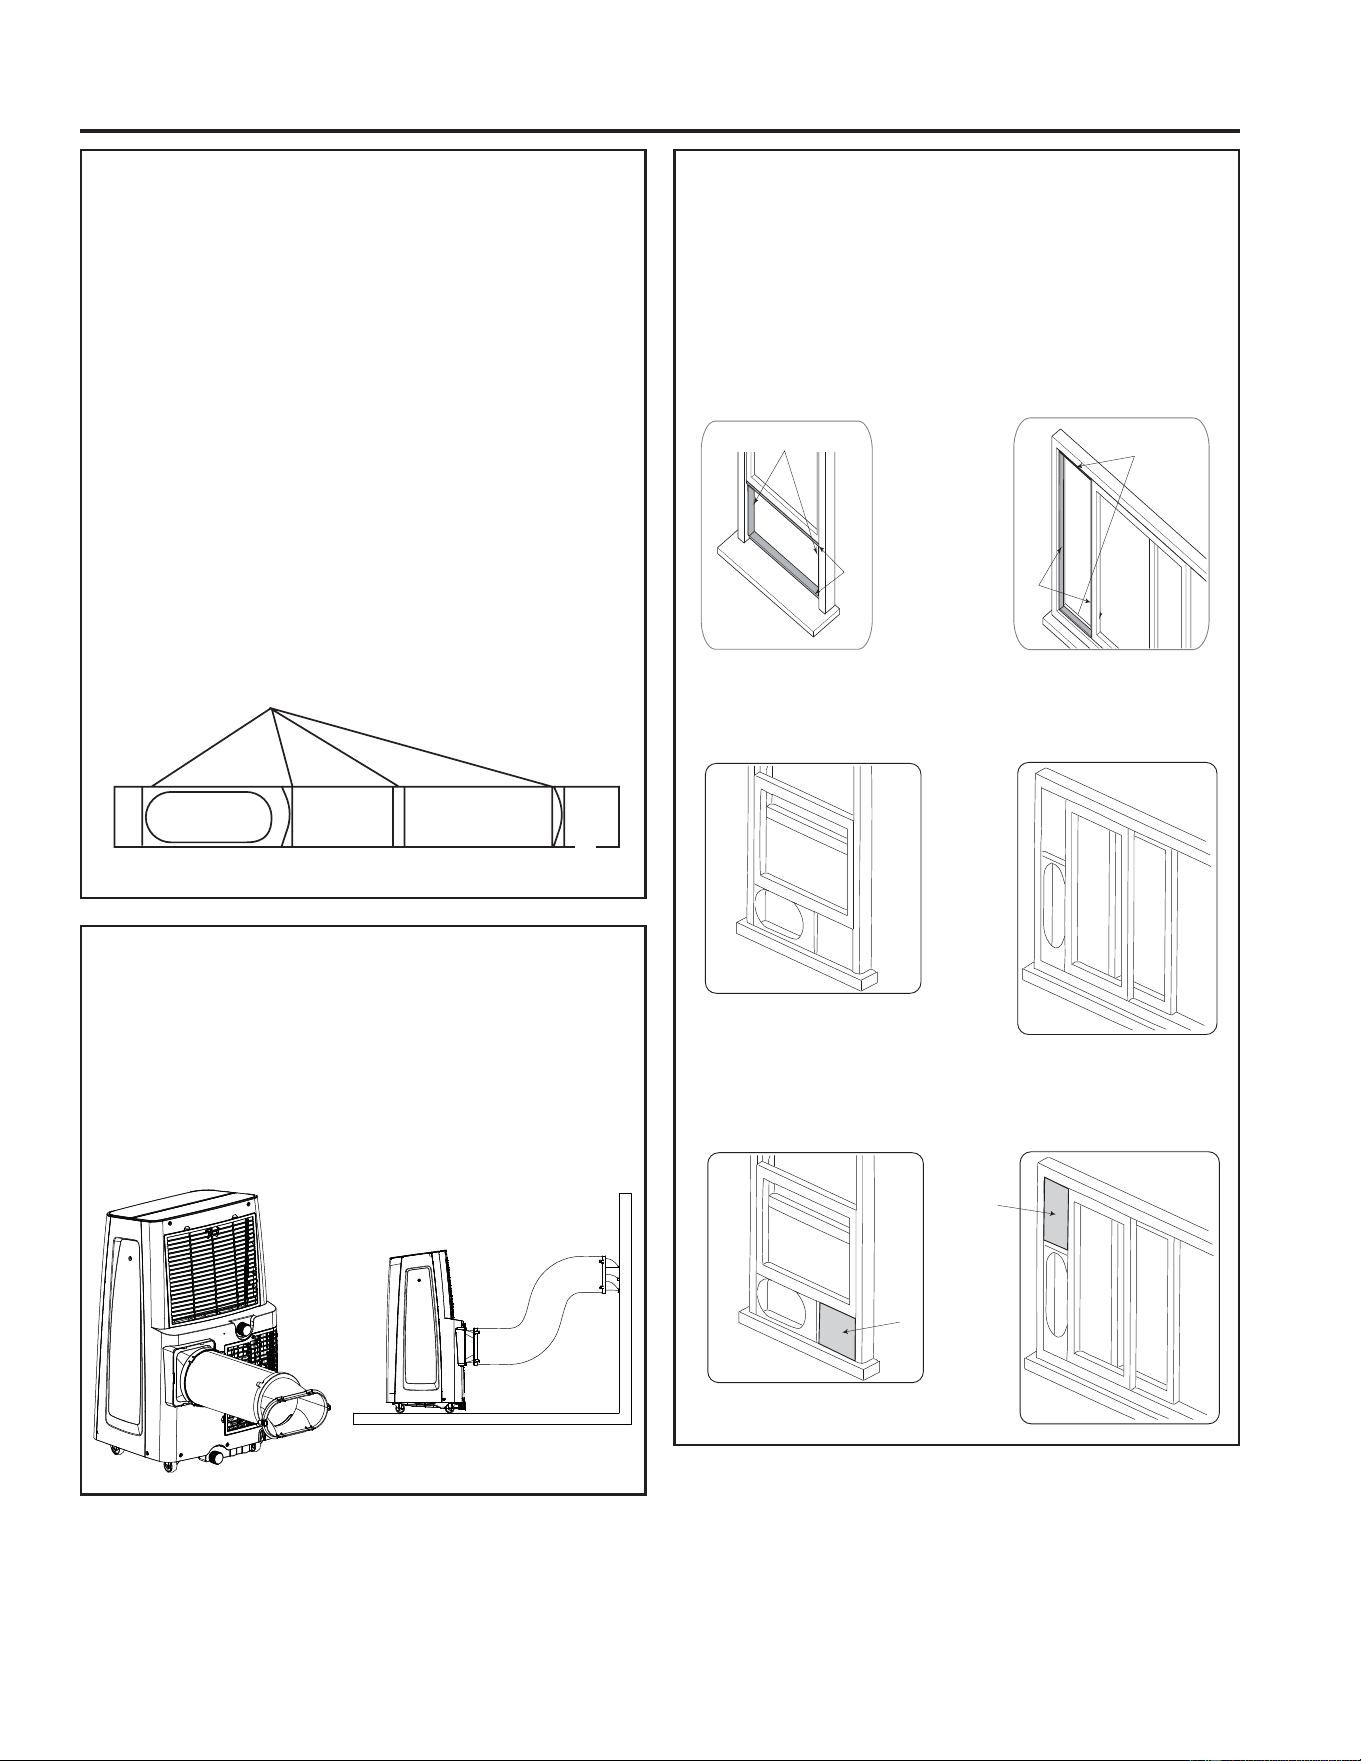
EXHAUST HOSE ASSEMBLY
Pull out the hose
1. Snap the adapters onto the ends of the hose.
2. Slide the rectangular adapter into the exhaust
vent on the back of the Air Conditioner and slide
it towards the center of the unit until the snaps
engage.
WINDOW KIT ASSEMBLY
Step one: prepare the window sliders
1. Measure the window opening. For a 20” opening,
use only the Window Kit panel with the Exhaust
Hose Adapter opening. For openings from 20” to
30”, attach the connector panel to the adapter panel.
For openings from 30” to 36”, also insert the next
larger panel. For openings larger than 36”, use the
adapter panel, connector panel, and the largest
panel.
NOTE: Window kit length range 20” – 48”
2. Assemble as many sliders as necessary to fit the
ZLQGRZ,IWKHZLQGRZRSHQLQJLVOHVVWKDQWKH
minimum length of a single slider, use the slider
that has the hole in it and cut it to the correct length.
Make sure not to cut the end that has the hole
as this is necessary to attach the exhaust hose
adapter.
3. Use the window slider screws to secure the window
sliders at the correct length.
INSTALLING THE WINDOW KIT
The instructions below can be used for a hung window
application (shown on the left) or an optional sliding
window application (shown on the right).
1. Cut foam seals to the correct lengths and attach
them to position A and B on the window frame as
shown below.
2. ,QVHUWWKHZLQGRZVOLGHUNLWLQWRWKHZLQGRZRSHQLQJ
and close the window the secure it in place.
3. Cut the foam pad to match the window kit and attach
it to position C as shown to decrease heat loss.
B
A
B
A
C
C
screw
D A B E
C
INSTALLATION INSTRUCTIONS
12 49-5001143 Rev. 0
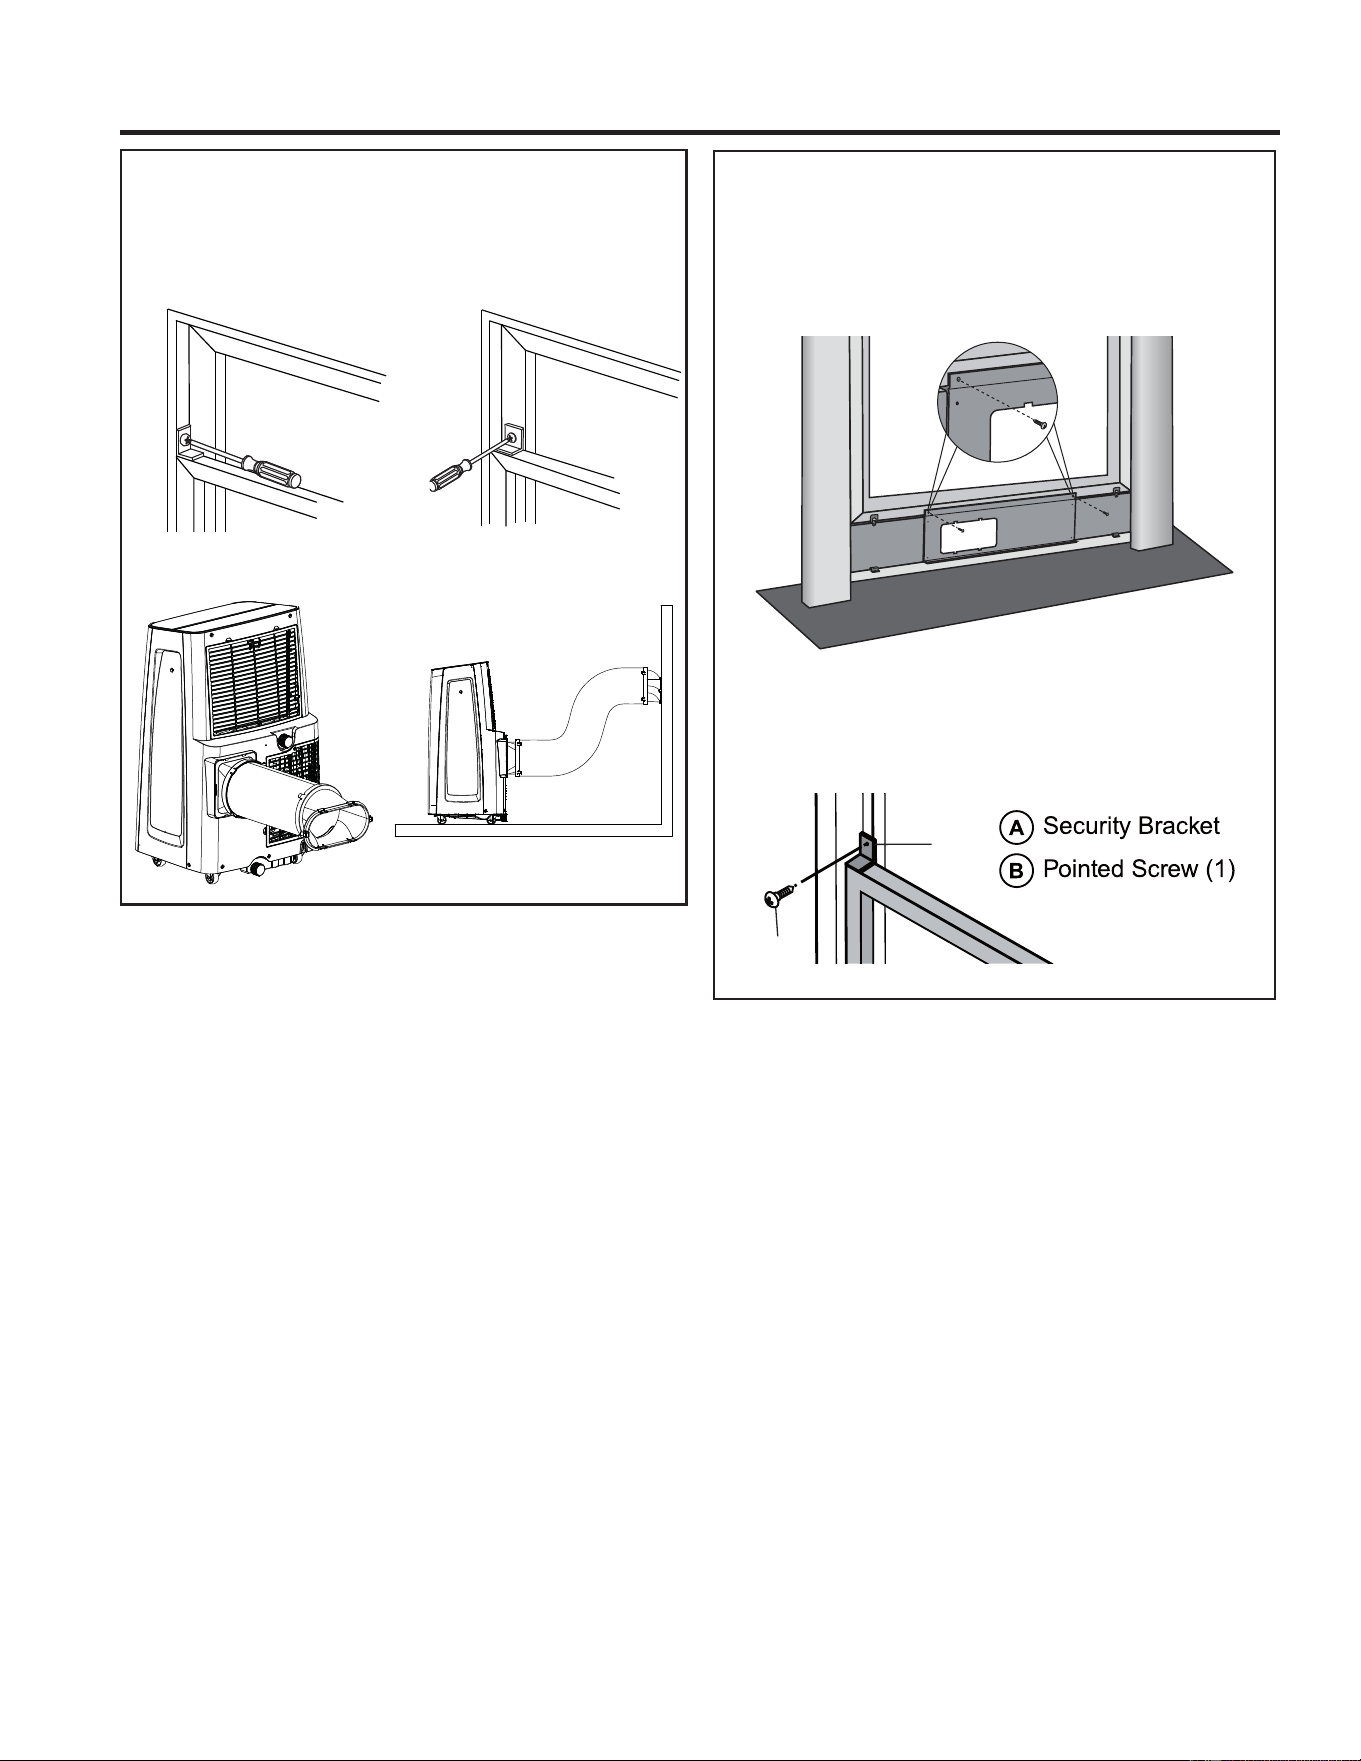
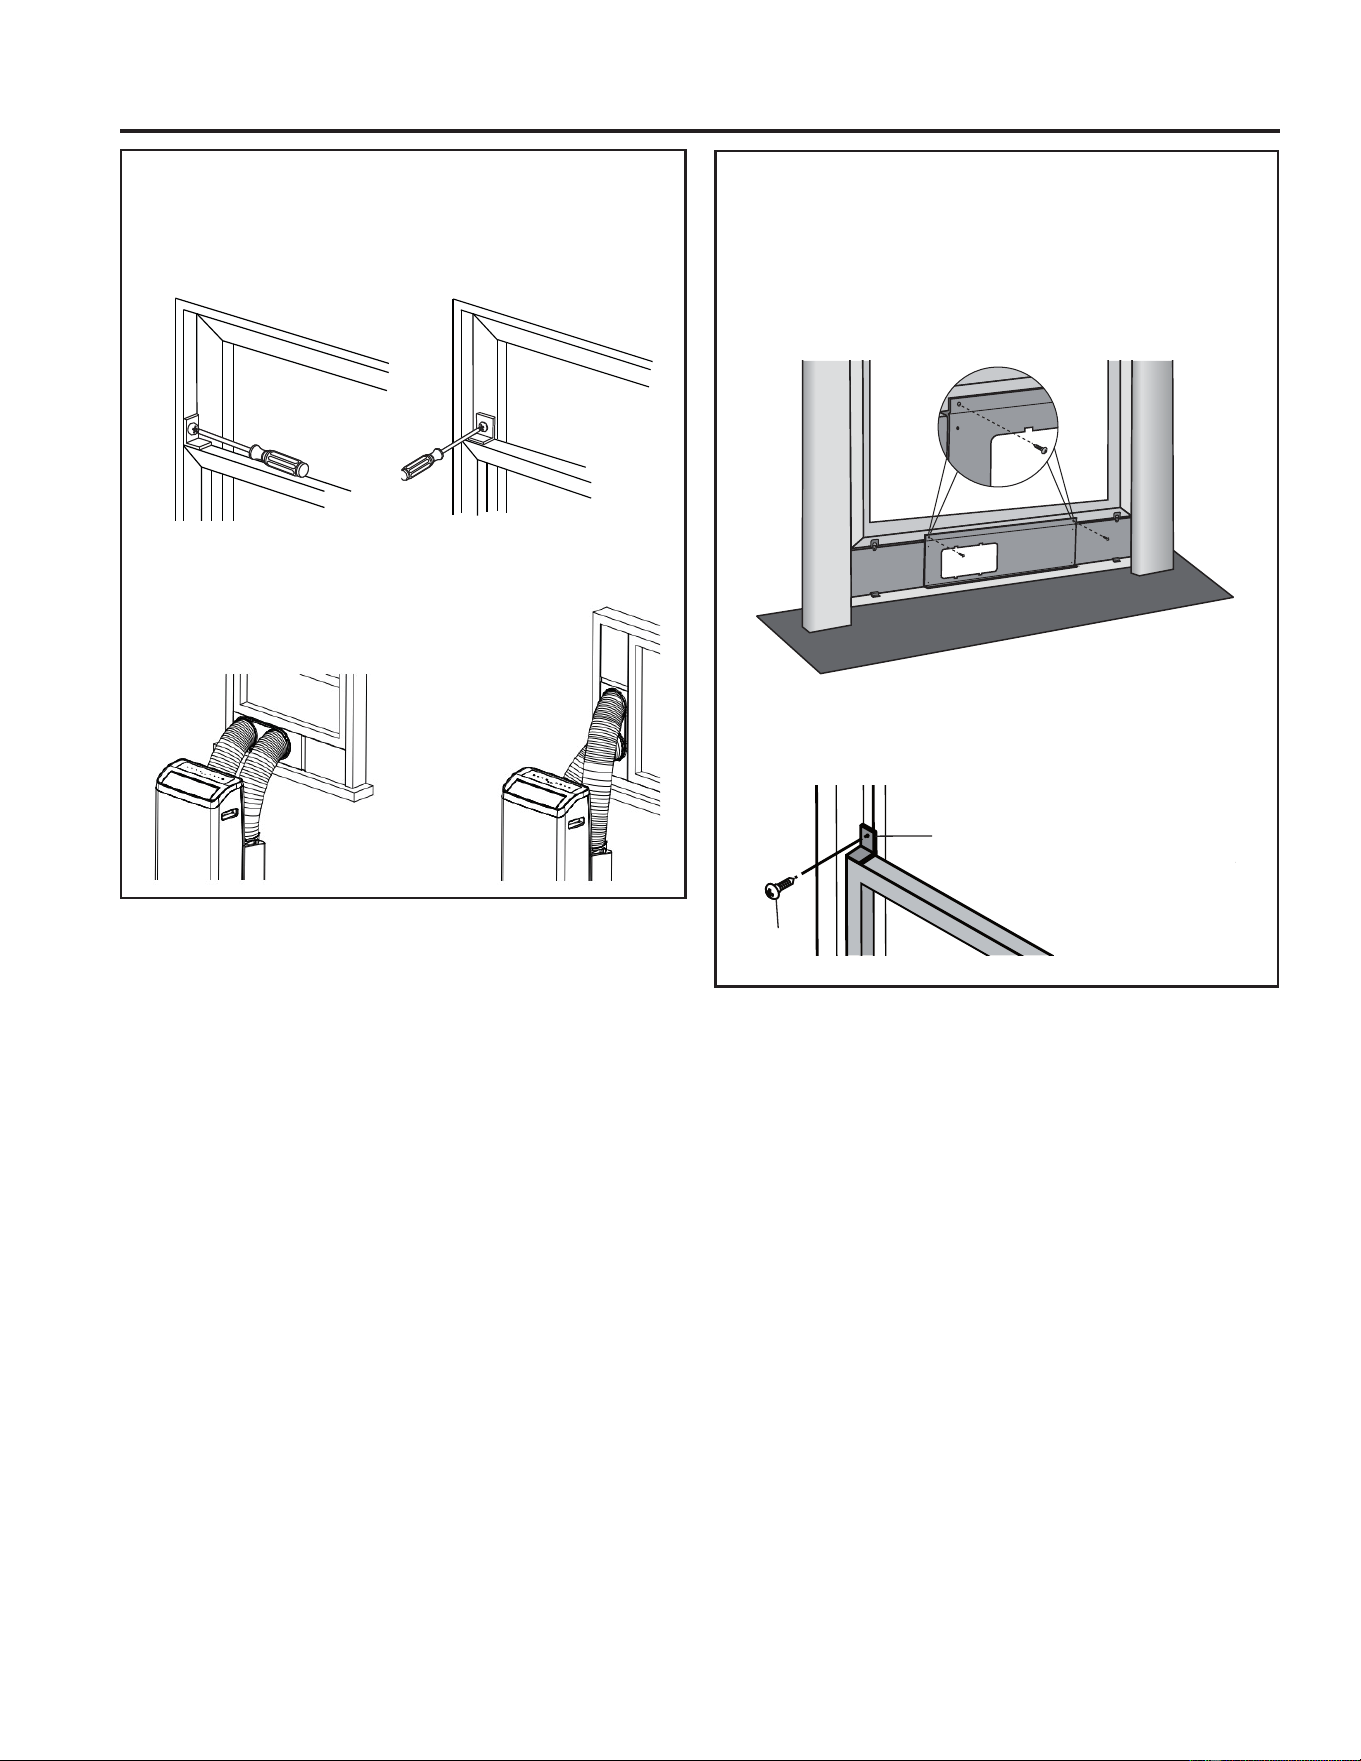
INSTALLING THE WINDOW KIT
(cont.)
4. ,IGHVLUHGLQVWDOOWKHVHFXULW\EUDFNHWZLWKDVFUHZDV
shown.
5. Attach the air outlet adapter onto the window slider
kit.
Installation Instructions
Wood
Vinyl
INSTALL MAIN WINDOW PANEL
AND EXTENSION PANELS (cont.)
6. Place the window panel assembly in the window,
and using the screws provided, fasten the
assembly to the window sill and window frame.
7. Using one pointed screw, install the Security
bracket to the window.
NOTE: The security bracket prevents the window
from being opened from the outside.
B
A
INSTALLATION INSTRUCTIONS
1349-5001143 Rev. 0
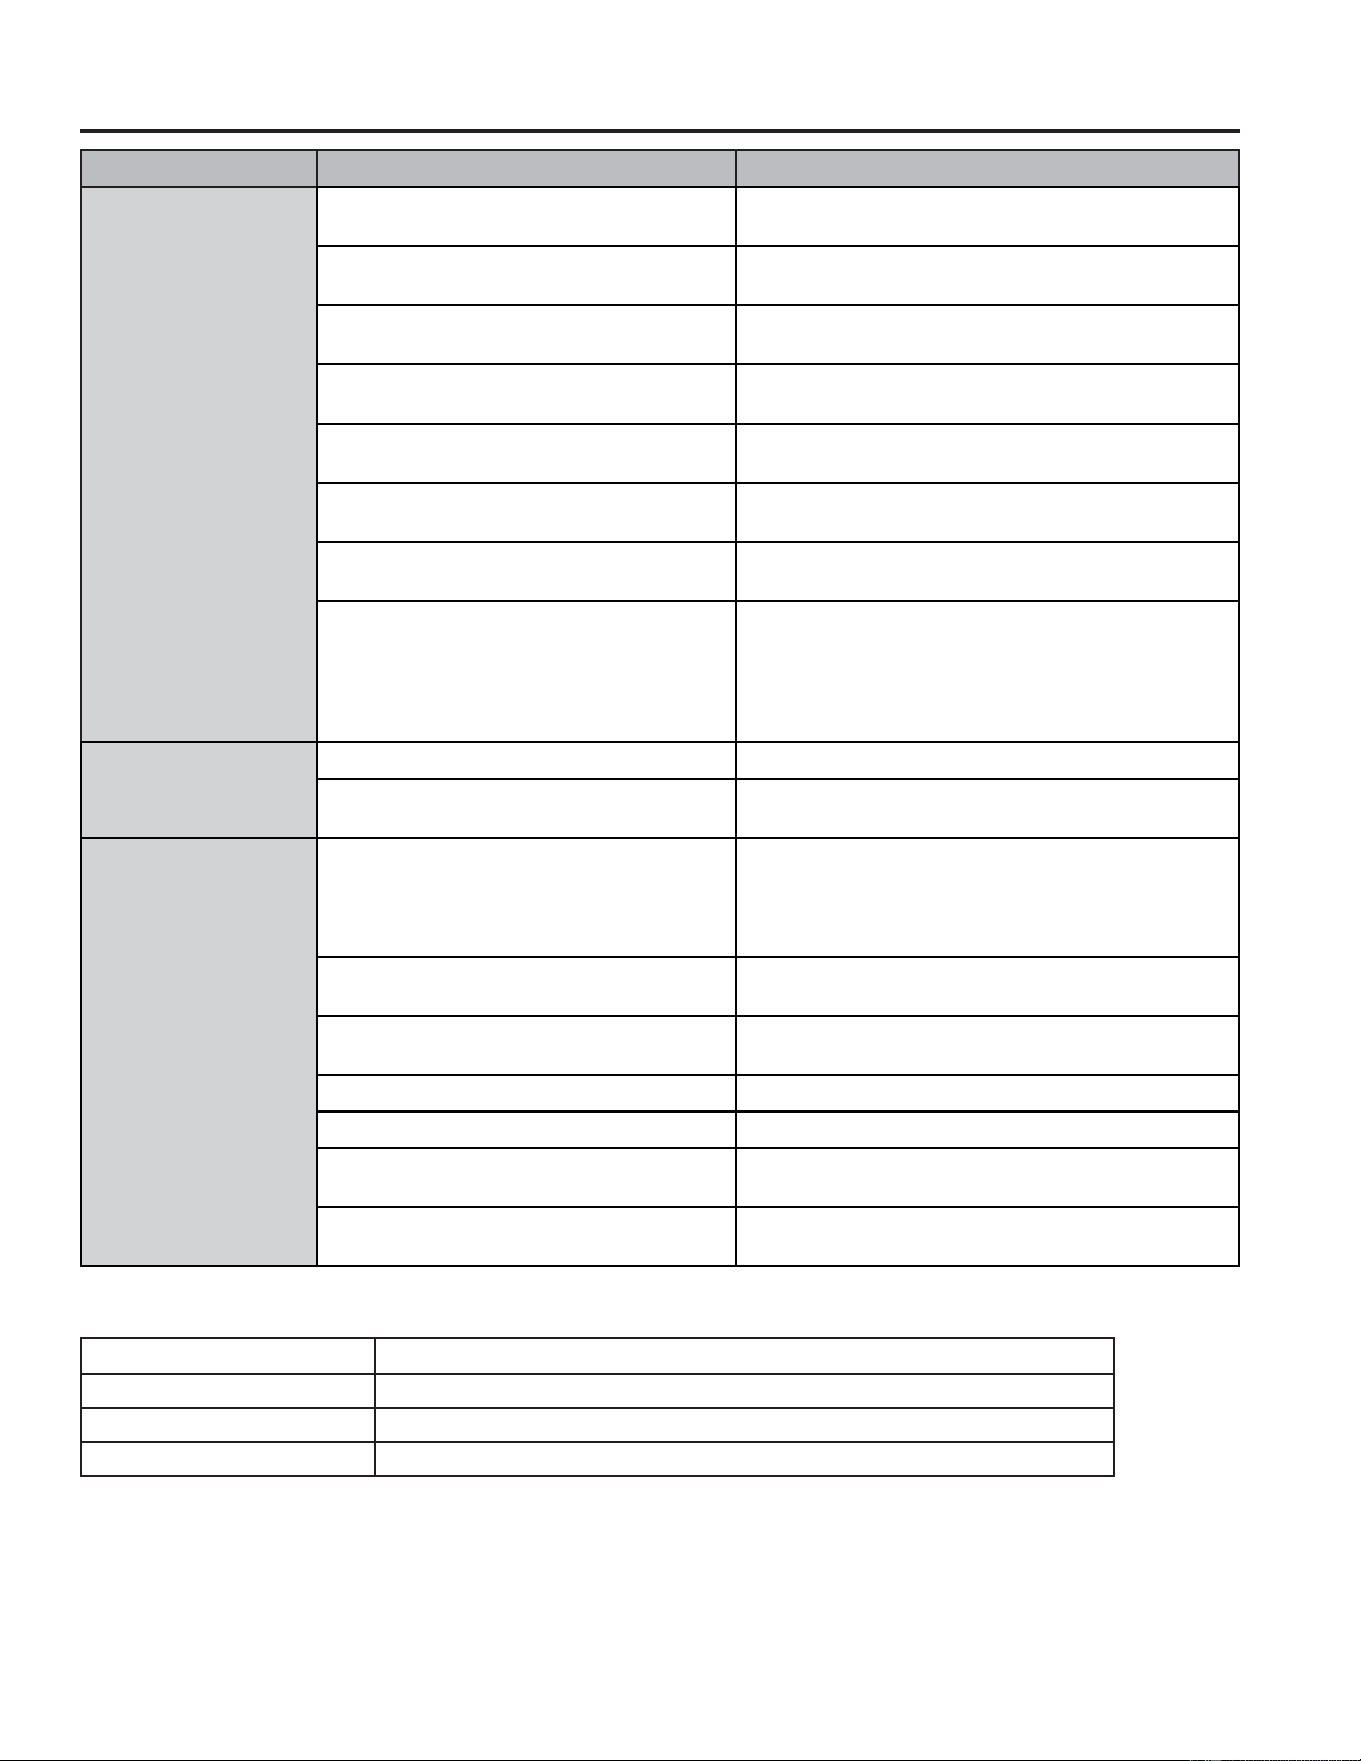
TROUBLESHOOTING TIPS
Troubleshooting Tips
Problem Possible Causes Solution
Unit does not start or
operate
Power supply cord is not plugged into an
outlet.
Plug the power cord into a grounded 3 prong
outlet.
Power supply cord has tripped. Press and release the RESET button on the
power supply cord.
The Power button has not been pressed. Press the Power button on the Control Panel or
Remote Control to turn ON the air conditioner.
There is no power to the electrical outlet. Plug a working Electronic Device into the outlet to
check for power.
A household fuse has blown or a circuit
breaker has tripped.
Replace the fuse or reset the circuit breaker.
The control was programmed for a Time
Delay.
Cancel the Time Delay. See “Control Panel.”
The batteries in the remote control are
dead.
Replace the batteries.
The internal water tank is full.
NOTE: The air conditioner automatically
turns off, and the Water Full indicator
(“FL” on the control panel display)
illuminates to alert you of this condition.
Empty the water tank. See “Care and Cleaning.”
Remote control is not
working
Batteries are dead. Replace the batteries.
Batteries are installed incorrectly. Make sure the batteries are inserted in the
correct position.
Air conditioner is
working but the room
is not cooling.
The room temperature is hot.
NOTE: On extremely hot and humid
days,the air conditioner will take longer
to cool the room.
Allow time for the room to cool when you first turn
on the unit.
Make sure the air conditioner has an adequate
BTU rating for the size of the room being cooled.
The control is set incorrectly to Fan or
Dry mode.
Set the Mode to Cool and the Fan Speed to High.
Airflow is restricted. Remove any obstacles to the airflow and redirect
airflow for uniform cooling.
Temperature set too high. Lower the set temperature.
Air filters are dirty or restricted. Clean the air filter. See “Care and Cleaning.”
Air conditioner installed incorrectly Check the exhaust hose and window panel for
proper installation.
Doors and windows are open. Close the doors and windows to the room being
cooled to prevent cooled air from escaping.
Error Codes
Error Codes Meaning
E1 Abnormal room temperature sensor
EP Abnormal refrigeration system sensor
FL The internal water tank is full, refer to draining instructions on page 8
14 49-5001143 Rev. 0
WiFi Setup (on some models)
REGULATORY INFORMATION
FCC/IC Compliance Statement:
This device complies with Part 15 of the FCC Rules. Operation
is subject to the following two conditions:
1. This device may not cause harmful interference.
2. This device must accept any interference received, including
interference that may cause undesired operation.
This equipment has been tested and found to comply with
the limits for a Class B digital device, pursuant to Part 15
of the FCC Rules. These limits are designed to provide
reasonable protection against harmful interference in a
residential installation. This equipment generates uses and
can radiate radio frequency energy and, if not installed and
used in accordance with the instructions, may cause harmful
interference to radio communications. However, there is
no guarantee that interference will not occur in a particular
LQVWDOODWLRQ,IWKLVHTXLSPHQWGRHVFDXVHKDUPIXOLQWHUIHUHQFH
to radio or television reception, which can be determined by
turning the equipment off and on, the user is encouraged to
try to correct the interference by one or more of the following
measures:
• Reorient or relocate the receiving antenna.
,QFUHDVHWKHVHSDUDWLRQEHWZHHQWKHHTXLSPHQWDQGUHFHLYHU
• Connect the equipment into an outlet on a circuit different
from that to which the receiver is connected.
• Consult the dealer or an experienced radio/television
technician for help.
Labelling: Changes or modifications to this unit not expressly
approved by the manufacturer could void the user’s authority to
operate the equipment.
*Select Models Only
7KLVSURGXFWKDV:L)LFDSDELOLW\DQGUHTXLUHV,QWHUQHW
connectivity and a wireless router to enable interconnection
with an Energy Management System, and/or with other
external devices, systems or applications.
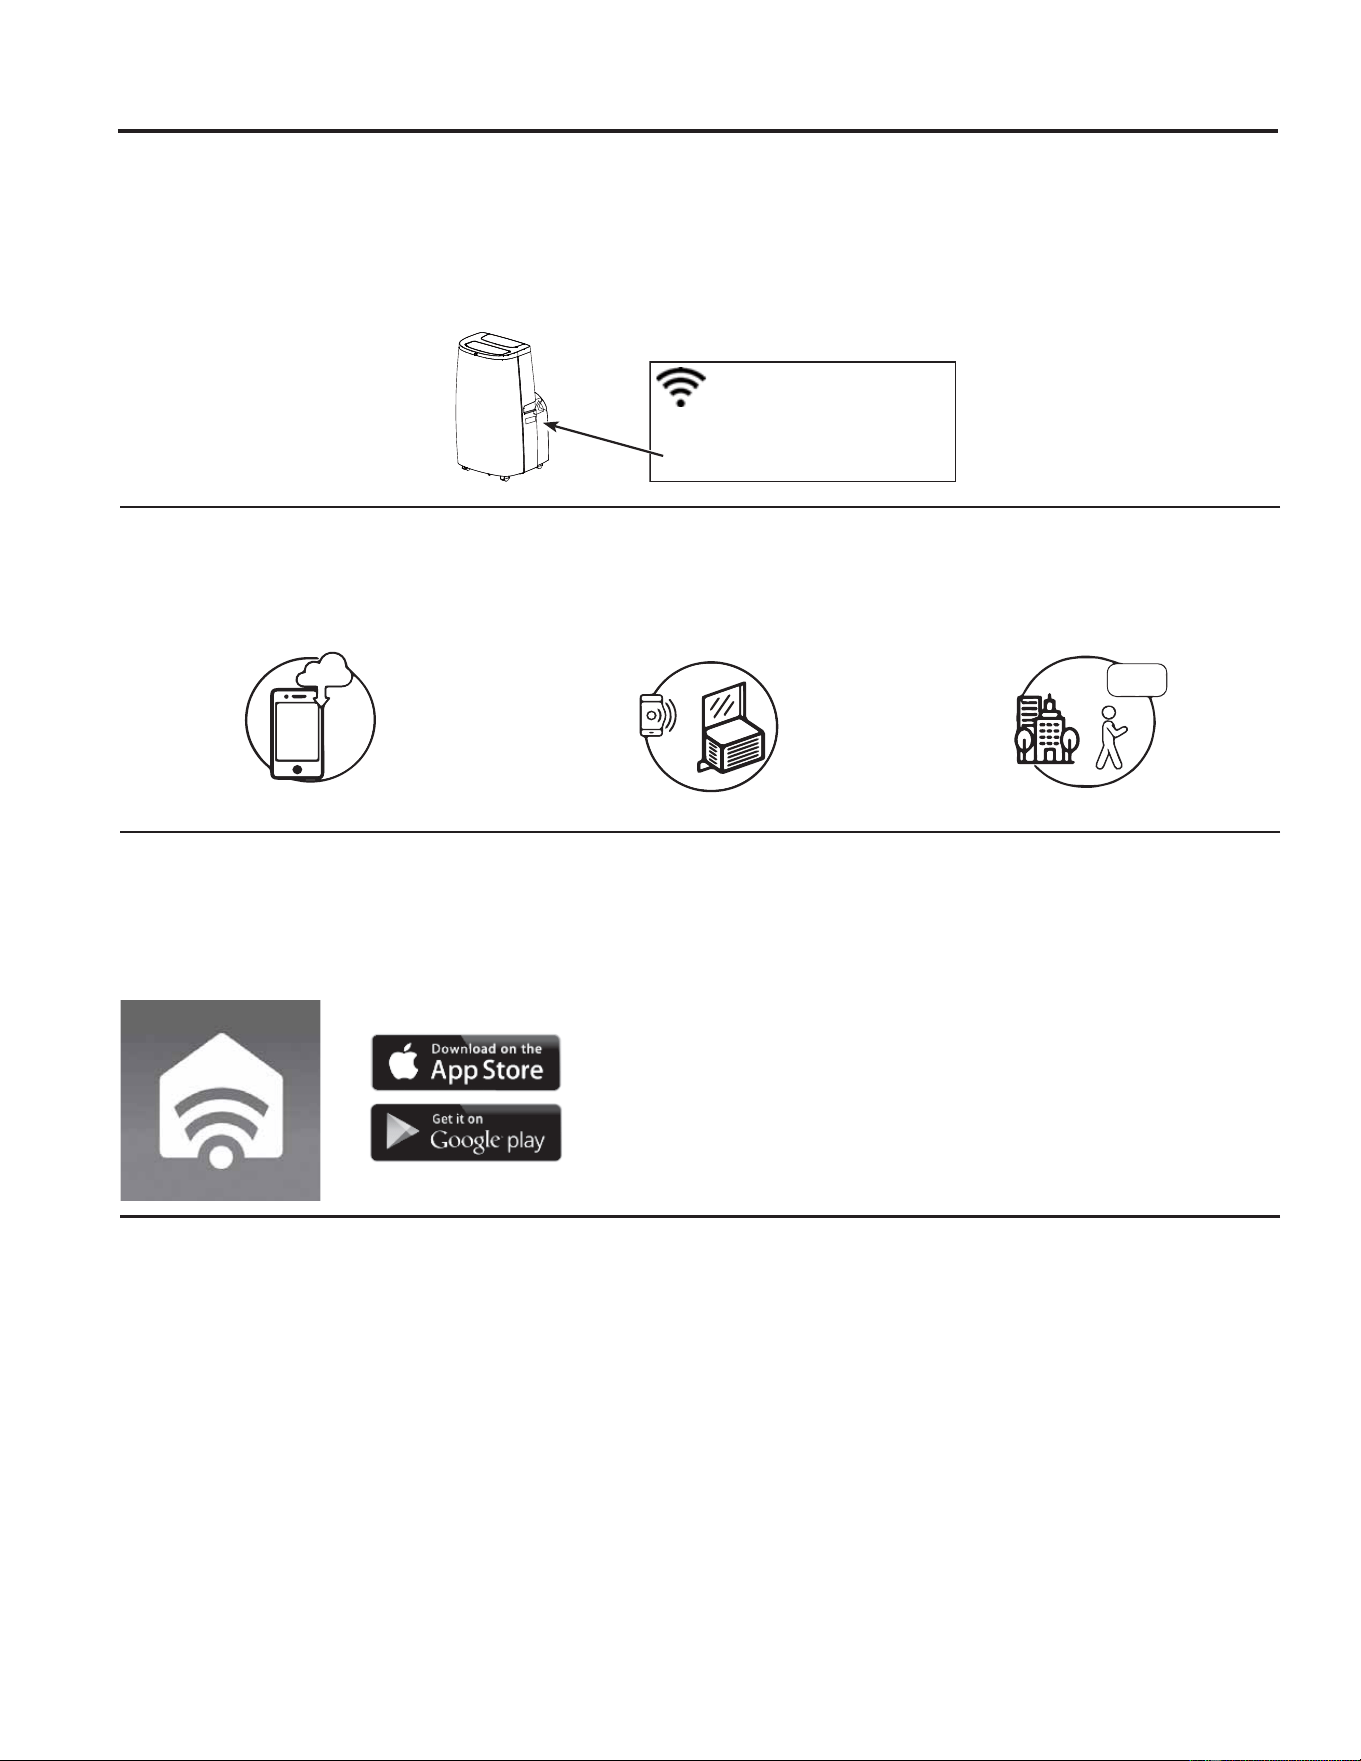
How it Works
Download the SmartHQ app
Use the app to connect your room air
conditioner to WiFi
Once connected, use the app to turn
down your air conditioner as you
leave work.
CHANGE TEMP
TO 65
WIFI SETUP
GE Appliances SmartHQ (for customers in the United States)
GE Appliances SmartHQ Enabled*,I\RXU$LU&RQGLWLRQHU$&KDVD&RQQHFWHG$SSOLDQFH,QIRUPDWLRQODEHOORFDWHG
on the outside as shown below, your AC is GE Appliances SmartHQ Enabled. A WiFi communication card is built into
the product allowing it to communicate with your smart phone for remote monitoring, control and notifications. Please
visit GEAppliances.com/connect to learn more about connected appliance features, and to learn what connected
appliance apps will work with your smart phone. Please call 800.220.6899 for assistance.
Network: GE_MODULE_XXXX
PASSWORD: XXXXXXXX
MAC ID: XX-XX-XX-XX-XX-XX
CONTAINS FCCID: ZKJ-WCATA006
CONTAINS IC:
10229A-WCATA006
Getting Started
To connect your room air conditioner, you’ll need the
GE Appliances App. The app will walk you through the
connection process. Download the app from iTunes or
Google Play.
All connected appliance data is held in strict accordance
with the GE Appliances Connected Data Privacy Policy.
Visit GEAppliances.com/privacy/privacy_policy_
connected to view this policy.
Questions about SmartHQ
Get answers you need about setting up WiFi appliances
and connecting to your home network in our support
articles.
Visit products.GEAppliances.com/appliance/gea-
support-search-content to view wifi connect room air
conditioner support articles.
1549-5001143 Rev. 0
Limited Warranty
Staple your receipt here. Proof of the original purchase date
is needed to obtain service under the warranty.
EXCLUSION OF IMPLIED WARRANTIES - Your sole and exclusive remedy is product repair as provided in this
Limited Warranty. Any implied warranties, including the implied warranties of merchantability or fitness for a particular
purpose, are limited to one year or the shortest period allowed by law.
For US Customers: This limited warranty is extended to the original purchaser and any succeeding owner for products
SXUFKDVHGIRUKRPHXVHZLWKLQWKH86$,IWKHSURGXFWLVORFDWHGLQDQDUHDZKHUHVHUYLFHE\D*($SSOLDQFHV
Authorized Servicer is not available, you may be responsible for a trip charge or you may be required to bring the
SURGXFWWRDQ$XWKRUL]HG*($SSOLDQFHV6HUYLFHORFDWLRQIRUVHUYLFH,Q$ODVNDWKHOLPLWHGZDUUDQW\H[FOXGHVWKHFRVW
of shipping or service calls to your home.
Some states do not allow the exclusion or limitation of incidental or consequential damages. This limited warranty
gives you specific legal rights, and you may also have other rights which vary from state to state. To know what your
legal rights are, consult your local or state consumer affairs office or your state’s Attorney General.
Warrantor US:
GE Appliances, a Haier company
Louisville, KY 40225
• Customer instruction. This owner’s manual provides
information regarding operating instructions and user
controls.
• ,PSURSHULQVWDOODWLRQ,I\RXKDYHDQLQVWDOODWLRQ
problem, or if the air conditioner is of improper
capacity, contact your dealer or installer. You
are responsible for providing adequate electrical
connecting facilities.
• Failure of the product resulting from modifications
to the product or due to unreasonable use including
failure to provide reasonable and necessary
maintenance.
• Replacement of house fuses or resetting of circuit
breakers.
• Failure due to corrosion on models not corrosion-
protected.
• Damage to the product caused by improper power
supply voltage, accident, fire, floods or acts of God.
• ,QFLGHQWDORUFRQVHTXHQWLDOGDPDJHFDXVHGE\
possible defects with this air conditioner.
• Damage caused after delivery.
What Will Not Cover:
For The Period Of: Will Replace:
One Year
From the date of the
original purchase
Replacement, repair, or refund of the original retail price for any product which fails due to a
GHIHFWLQPDWHULDOVRUZRUNPDQVKLS,IWKHXQLWLVH[FKDQJHGWKHUHSODFHPHQWXQLWLVZDUUDQWHG
for the remainder of your product’s original one-year warranty period. GE Appliances
will, at its sole discretion, replace the product with a product of the same or comparable
functionality and quality or refund the original retail price.
•
Properly pack your unit. We recommend using the
original carton and packing materials.
• Return the product to the retail location where it was
purchased.
• ,QFOXGHLQWKHSDFNDJHDFRS\RIWKHVDOHVUHFHLSW
or other evidence of date of original purchase. Also
print your name and address and a description of the
defect.
In Order to Make a Warranty Claim During Your Retailer’s Allowable Return Period:
In Order to Make a Warranty Claim During the Remainder of the One-Year Warranty:
LIMITED WARRANTY
• Locate your sales receipt and make note of the model and serial number.
• Call 800-432-2737 to initiate a warranty claim.
• You will be asked to provide your name, address, receipt information, model and serial number.
• Warranty claims may require electronic or mailed-in evidence of purchase.

16 49-5001143 Rev. 0
Printed in China
Consumer Support
GE Appliances Website
Have a question or need assistance with your appliance? Try the GE Appliances Website 24 hours a day, any day
of the year! You can also shop for more great GE Appliances products and take advantage of all our on-line support
VHUYLFHVGHVLJQHGIRU\RXUFRQYHQLHQFH,QWKH86GEAppliances.com
Register Your Appliance
Register your new appliance on-line at your convenience! Timely product registration will allow for enhanced
communication and prompt service under the terms of your warranty, should the need arise. You may also mail in
WKHSUHSULQWHGUHJLVWUDWLRQFDUGLQFOXGHGLQWKHSDFNLQJPDWHULDO,QWKH86GEAppliances.com/register
Schedule Service
Expert GE Appliances repair service is only one step away from your door. Get on-line and schedule your service at
\RXUFRQYHQLHQFHDQ\GD\RIWKH\HDU,QWKH86GEAppliances.com/service or call 800-432-2737 during normal
business hours.
Extended Warranties
Purchase a GE Appliances extended warranty and learn about special discounts that are available while your
warranty is still in effect. You can purchase it on-line anytime. GE Appliances Services will still be there after your
ZDUUDQW\H[SLUHV,QWKH86GEAppliances.com/extended-warranty or call 800.626.2224 during normal
business hours.
Remote Connectivity
For assistance with wireless network connectivity (for models with remote enable),visit our website at
GEAppliances.com/connect or call 800.220.6899 in the US.
Parts and Accessories
,QGLYLGXDOVTXDOLILHGWRVHUYLFHWKHLURZQDSSOLDQFHVFDQKDYHSDUWVRUDFFHVVRULHVVHQWGLUHFWO\WRWKHLUKRPHV
9,6$0DVWHU&DUGDQG'LVFRYHUFDUGVDUHDFFHSWHG2UGHURQOLQHWRGD\KRXUVHYHU\GD\
,QWKH86GEApplianceparts.com or by phone at 877.959.8688 during normal business hours.
Instructions contained in this manual cover procedures to be performed by any user. Other servicing
generally should be referred to qualified service personnel. Caution must be exercised, since improper
servicing may cause unsafe operation.
Contact Us
,I\RXDUHQRWVDWLVILHGZLWKWKHVHUYLFH\RXUHFHLYHIURP*($SSOLDQFHVFRQWDFWXVRQRXU:HEVLWHZLWKDOOWKH
details including your phone number, or write to:
,QWKH86*HQHUDO0DQDJHU&XVWRPHU5HODWLRQV_*($SSOLDQFHV$SSOLDQFH3DUN_/RXLVYLOOH.<
GEAppliances.com/contact
CONSUMER SUPPORT

49-5001143 Rev. 0 09-25
APHS07
APHS08
ACCONDICIONADORES DE AIRE
PARA SALA
Escriba los números de modelo
y serie aquí:
# de Modelo _____________
# de Serie _______________
Puede encontrar estos números
en una etiqueta en el costado
del acondicionador de aire.
GE es una marca registrada de General Electric Company. Fabricado bajo licencia de marca.
MANUAL DEL
PROPIETARIO Y
INSTRUCCIONES
DE INSTALACIÓN
INFORMACIÓN IMPORTANTE
DE SEGURIDAD ............. 3
CONTROLES ............... 4
CUIDADO Y LIMPIEZA ....... 7
INSTRUCCIONES DE
INSTALACIÓN .............. 9
SOLUCIONAR PROBLEMAS . .13
CONFIGURACIÓN WIFI ..... 14
GARANTÍA LIMITADA ........15
SOPORTE AL CLIENTE .......16
Antes de comenzar
(en algunos modelos)
Registre el número de módulo de GE
Appliances y su contraseña para la
configuración del wifi. Para ubicar esta
información, consulte la página 16.
# módulo de GE Appliances ___________
# de Contraseña:_____________________

2 49-5001143 Rev. 0
GRACIAS POR HACER QUE GE APPLIANCES SEA PARTE DE SU HOGAR.
Ya sea que haya crecido usando GE Appliances, o que ésta es su primera vez, nos complace
tenerlo en la familia.
Sentimos orgullo por el nivel de arte, innovación y diseño de cada uno de los electrodomésticos de
GE Appliances, y creemos que usted también. Entre otras cosas, el registro de su electrodoméstico
asegura que podamos entregarle información importante del producto y detalles de la garantía
cuando los necesite.
Registre su electrodoméstico GE ahora a través de Internet. Sitios Web y números telefónicos útiles
están disponibles en la sección de Soporte para el Consumidor de este Manual del Propietario.
También puede enviar una carta en la tarjeta de inscripción preimpresa que se incluye con
el material embalado.
49-5001143 Rev. 0 3
INFORMACIÓN DE SEGURIDAD
INFORMACIÓN IMPORTANTE DE SEGURIDAD
LEA TODAS LAS INSTRUCCIONES ANTES DE USAR
LEA Y GUARDE ESTAS INSTRUCCIONES
INSTRUCCIONES IMPORTANTES DE SEGURIDAD
ADVERTENCIA
Para reducir el riesgo de incendio,
choque eléctrico, lesiones a personas o daños al utilizar el
acondicionador de aire, siga precauciones básicas,
incluyendo las siguientes:
• Lea todas las instrucciones antes de usar este
electrodoméstico.
• Conecte a un contacto de pared de conexión a tierra de 3
terminales.
• No quite el terminal de conexión a tierra.
• No use un adaptador.
• No use un cable eléctrico de extensión.
• No ponga a funcionar el acondicionador de aire si tiene un
cable o enchufe dañado, si no funciona correctamente o si
se ha dañado o caído.
• El acondicionador de aire solo debe ser reparado por
personal de servicio competente. Llame a la compañía de
servicio técnico autorizada para su inspección, reparación o
ajuste.
• Desconecte el suministro de energía antes de darle servicio
técnico.
• Desconecte el suministro de energía antes de limpiarlo..
NOTA: Si apaga la unidad presionando el botón Power
(Encendido), esto NO desconecta el electrodoméstico del
suministro de energía.
• No instale ni utilice el acondicionador de aire en áreas
donde la atmósfera contenga gases combustibles o donde
la atmósfera esté contaminada. Evite que cualquier producto
químico entre en contacto con el acondicionador de aire.
• No almacene nada directamente encima del acondicionador
de aire.
• Con la ayuda de dos o más personas, mueva e instale el
acondicionador de aire.
• Nunca haga funcionar el acondicionador de aire si los filtros
de aire no están colocados en su lugar.
• No utilice el acondicionado de aire cerca de una tina, ducha
o lavabo ni otra zona húmeda.
• Este electrodoméstico no deberá ser usado por personas
(incluyendo niños) con capacidades físicas, sensoriales
o mentales reducidas o con falta de experiencia y
conocimiento, a menos que cuenten con supervisión o
instrucción con relación al uso de este electrodoméstico por
parte de una persona responsable de su seguridad.
• Los niños deberán ser supervisados a fin de asegurar que
no se juegue con el electrodoméstico.
• A fin de acelerar el proceso de descongelación o para
limpiar, no use ningún método que no sea el recomendado
por el fabricante.
• Este electrodoméstico deberá ser guardado en una sala
donde no haya fuentes de encendido continuas (por
ejemplo: llamas abiertas, un electrodoméstico que funcione
a gas o un calefactor que funcione a electricidad).
• No perfore ni queme el tubo refrigerante. Tenga presente
que los refrigerantes no deben tener olor.
• Mantenga las aberturas de la ventilación libres de
obstrucciones.
• Al mover, instalar y operar el electrodoméstico, se deberá
tener cuidado para evitar dañar la tubería del refrigerante.
• No realice perforaciones en la unidad.
• El mantenimiento, la limpieza y el servicio técnico sólo
deberán ser realizados por técnicos adecuadamente
entrenados y calificados en el uso de refrigerantes
inflamables.
• GE no suministra servicio técnico para el acondicionador de
aire.
• Descarte el electrodoméstico de acuerdo con las
Regulaciones Federales y Locales. Los refrigerantes
inflamables requieren procedimientos de descarte
específicos. A fin de descartar su acondicionador de aire
de forma ambientalmente segura, comuníquese con las
autoridades locales.
Riesgo de Incendio o Explosión. Esta unidad contiene refrigerante inflamable.
Se deben seguir las precauciones adicionales de seguridad.
ADVERTENCIA
ADVERTENCIA
Cómo Insertar las Baterías en el
Control Remoto
Ŷ3UHVLRQHODOHQJHWD\UHWLUHODWDSDGHODEDWHUtDVREUHOD
parte trasera del control remoto.
Ŷ,QVHUWHODVEDWHUtDVQXHYDVDVHJXUiQGRVHGHTXHHO\
(–) de las mismas se instalen de forma correcta.
Ŷ9XHOYDDFRORFDUODWDSDGHVOL]DQGRODPLVPDQXHYDPHQWH
hasta su posición.
Ŷ8VHEDWHUtDVDOFDOLQDV³$$$´YROW1RXVHEDWHUtDV
recargables.
Ŷ5HWLUHODVEDWHUtDVGHOFRQWUROUHPRWRVLHOVLVWHPDQRVHUi
usado por un período prolongado.
Ŷ1RXVHSLODVYLHMDV\QXHYDVDOPLVPRWLHPSR1RFRPELQH
baterías alcalinas, estándar (carbono-zinc) o recargables
(ni-cad, ni-mh, etc.).
Precaución sobre Ingestión. La batería podrá causar sofocación si es tragada por niños.
ADVERTENCIA
A2L
4 49-5001143 Rev. 0
Las luces al lado de las teclas de toque en el panel de control del acondicionador de aire indicarán los ajustes
seleccionados. Las funciones y el aspecto pueden variar.
USO DEL ACONDICIONADOR DE AIRE
Controles
A. Pantalla del Panel de Control
Exhibe la Temperatura Configurada en grados Fahrenheit o
en grados Celsius, o las horas restantes en Time Delay.
B. Botón de Encendido
Activa ON/OFF en el acondicionador de aire.
NOTA: Apagar el encendido presionando el botón Power
NO desconecta el electrodoméstico del suministro de
corriente.
Presione el botón Power (Encendido). La pantalla del
indicador de encendido y temperatura se iluminará;
seleccione las configuraciones deseadas luego de un
minuto una vez que las luces de Display (Pantalla) se hayan
apagado. Presionar cualquier botón de la unidad o unidad
remota hará que la pantalla se ilumine. Luego presione los
botones correspondientes para cambiar la función de la
unidad.
NOTA: Si se cambian las funciones desde el control remoto,
se podrá requerir presionar botones varias veces para
sincronizar el control remoto con la unidad.
C. Botón de Modo
Presione el botón Mode (Modo) para pasar a través de las
opciones de funcionamiento. El indicador correspondiente
se iluminará:
Cool (Enfriamiento) – Refrigera la sala en la temperatura
configurada.
Dry (Deshumidificar)– Reduce la humedad de la sala.
Fan 9HQWLODFLyQ – Hace circular el aire de la sala sin
refrigerar.
Quiet (Silencioso) – Reduce el ruido de la unidad mientras
refrigera.
D. Botón de Velocidad del Ventilador
La velocidad del ventilador se podrá ajustar en Low (Baja),
Medium (Media), o High (Alta) cuando el acondicionador
de aire se encuentre en funcionamiento. La función Auto
(Automático) ajusta la velocidad del ventilador de forma
automática para brindar una refrigeración ideal en base a la
temperatura de la sala.
NOTA: La velocidad del ventilador no se podrá ajustar
cuando la unidad se encuentre en el modo Dry (Seco).
Presione el botón Speed 9HORFLGDGSDUDDOWHUQDUHQWUH
las diferentes velocidades. El indicador de velocidad del
ventilador correspondiente se iluminará.
E. Controles de Configuración del Temperatura
Ajusta Temperature o Hours en Time Delay.
To Set the Temperature:
3UHVLRQHHOERWyQ0RGHKDVWDTXHVHVHOHFFLRQHHOPRGR
Cool.
2. Presione los botones Up Arrow o Down Arrow para
seleccionar la temperatura deseada.
NOTA:
La temperatura no se podrá configurar cuando
el acondicionador de aire se encuentre en el modo Fan
9HQWLODFLyQ
NOTA: Los botones Up Arrow y Down Arrow, cuando
se presionen al mismo tiempo, le permitirán realizar la
selección para exhibir la temperatura en °F o °C.
F. Botón de Balanceo
Cuando el acondicionador de aire portátil se encienda, la
rejilla se abrirá automáticamente hasta la posición vertical
(no la abra haciendo palanca ni la empuje para cerrarla).
Presione el botón Swing (Balanceo) para pasar a través de
los ciclos de las posiciones fijas o para activar el balanceo
continuo.
G. Botón WiFi:
Para activar la función WiFi presione el botón WiFi. Para
apagar la función WiFi, mantenga presionado el botón WiFi
GXUDQWHVHJXQGRV&RQVXOWHODVHFFLyQGH³&RQILJXUDFLyQ
GHO:L)L´SDUDDFFHGHUDPiVLQIRUPDFLyQVREUHFyPR
conectar el acondicionador de aire portátil al enrutador e
instalar la aplicación SMARTHQ.
H. Botón de Reinicio del Filtro
Esta función automática le notificará que es necesario
realizar la limpieza del filtro de aire. La luz indicadora
VHHQFHQGHUiOXHJRGHKRUDVGHIXQFLRQDPLHQWR
Limpie el filtro de aire (consulte la sección de Cuidado y
Limpieza, Página 9), vuelva a colocarlo en el panel frontal,
y presione el botón Filter Reset (Reinicio del Filtro). La luz
se apagará.
A
CD
B
E
F
H
G

49-5001143 Rev. 0
Controles
Modo de Refrigeración
8VHHOPRGRCool (Refrigeración) para enfriar.
Para configurar el modo Cool:
3UHVLRQHODWHFODMode hasta que la luz indicadora de Cool
esté encendida.
2. Presione la tecla Speed para configurar la velocidad del
ventilador en Low, Medium, High o Auto.
3UHVLRQHR±SDUDFRQILJXUDUODWHPSHUDWXUDGHVHDGD
8QDYH]DSOLFDGDVODVFRQILJXUDFLRQHVODSDQWDOODYROYHUiD
mostrar la temperatura ambiente.
El control de temperatura se usa para mantener la temperatura
del ambiente. El compresor realizará el ciclo de encendido
y apagado para mantener la sala en el nivel de confort
configurado. Configure el control de temperatura en un número
más bajo, y el aire interior comenzará a ser más frío. Configure
el control de temperatura en un número más alto, y el aire
interior comenzará a ser más caliente.
NOTA: Si el acondicionador de aire está apagado y
luego es encendido en la configuración Cool, pasarán
aproximadamente 3 minutos hasta que el compresor se inicie y
comience la refrigeración.
Descripciones de Refrigeración
Para un Enfriamiento Normal—Seleccione el modo Cool y la
velocidad del ventilador en High, Medium, Low o Auto con una
temperatura en la configuración intermedia.
Para un Enfriamiento Máximo—Seleccione el modo Cool y la
velocidad del ventilador en High con una temperatura en una
configuración baja.
Para un Enfriamiento Más Suave y Nocturno—Seleccione el
modo Quiet.
NOTA: Si pasa de la configuración del modo Cool, Dry o
Quiet a OFF, espere 3 minutos antes del reinicio.
Modo Dry (Seco) - Deshumidificación
8VHHOPRGRDry sólo para aplicar la deshumidificación.
El ventilador funcionará en una velocidad fija en esta
configuración, de modo que no será posible configurar la
velocidad de la ventilación. Para un mejor rendimiento del
modo Dry (Seco), no adhiera la manguera de descarga a
la ventana. De forma adicional, asegúrese de que todas las
ventanas y puertas estén cerradas.
Para configurar el modo Dry:
• Presione la tecla Mode hasta que la luz indicadora de Dry
esté encendida
En el modo Dry, no se mostrará una temperatura configurada.
8QDYH]FRQILJXUDGRHOPRGRDry, la pantalla volverá a mostrar
la temperatura ambiente.
NOTA: Si pasa de una configuración de Dry a Off o a una
configuración del ventilador, espere por los menos 3 minutos
antes de volver a pasar a una configuración de Dry.
Si usará la unidad en el modo Dry como deshumidificador
durante un período de tiempo prolongado:
'HVHQFKXIHHOFDEOHGHFRUULHQWH
&RQHFWHXQDPDQJXHUDGHGUHQDMHIOH[LEOHGHò´GH
diámetro exterior (no incluida) al puerto de drenaje superior
y drene hacia el drenaje del piso.
9XHOYDDFRQHFWDUHOFDEOHGHFRUULHQWH\SUHVLRQHODWHFOD
Mode hasta que la luz indicadora de Dry esté encendida.
Modo de Ventilación
8VHHOPRGRFan para brindar circulación de aire y filtrar sin
refrigerar.
Para configurar el modo Fan:
• Presione la tecla Mode hasta que la luz indicadora deseada
de velocidad en High, Medium, Low, o Auto esté encendida.
Debido a que las configuraciones de sólo ventilador no brindan
refrigeración, no será exhibida una temperatura configurada.
8QDYH]FRQILJXUDGDODYHORFLGDGGHFan, la pantalla volverá a
mostrar la temperatura ambiente.
Función de Recuperación por Corte de Suministro
En caso de corte de suministro o interrupción, la unidad se
reiniciará de forma automática en las configuraciones usadas
por última vez una vez restablecido el servicio.
NOTA: Si Delay fue configurado antes del corte de corriente,
será necesario reiniciar el mismo una vez restablecido el
servicio.
La pantalla siempre mostrará la temperatura del ambiente por omisión.
Cuando el acondicionador de aire sea encendido, se iniciará de forma automática en las configuraciones de modo y ventilación
que fueron usadas por última vez.
USO DEL ACONDICIONADOR DE AIRE
Modo Silencioso
8VHHOPRGRQuiet (Silencioso) para reducir el ruido de la unidad
mientras ésta enfría.
Para configurar el modo Quiet (Silencioso):
3UHVLRQHHOERWyQMode (Modo) hasta que la luz indicadora de
Quiet (Silencioso) se ilumine.
2. Presione los botones + o – para configurar la temperatura
deseada.
8QDYH]DSOLFDGDVODVFRQILJXUDFLRQHVODSDQWDOODYROYHUi
a mostrar la temperatura ambiente. En el modo Quiet
(Silencioso), la unidad configura la velocidad del ventilador
automáticamente. Cambiar la velocidad del ventilador mientras
se encuentra en el modo Quiet (Silencioso) hará que la unidad
pase al modo Cool (Frío).
6 49-5001143 Rev. 0
Las luces al lado de las teclas de toque en el panel de control del acondicionador de aire indicarán los ajustes
seleccionados. Las funciones y el aspecto pueden variar.
USO DEL ACONDICIONADOR DE AIRE
Controles
Control Remoto
,QVHUWHODVGRVEDWHUtDVLQFOXLGDV
2. Apunte el control remoto al receptor de señal en el panel
de control para operar el aire acondicionado.
A. Botón Power (Encendido)
ENCIENDE/APAGA el acondicionador de aire.
NOTA: Si apaga la unidad presionando el botón Power
(Encendido), esto NO desconecta el electrodoméstico del
suministro de energía.
• Presione el botón Power (Encendido). La luz indicadora de
Power (Encendido) se iluminará.
B. Botón Mode (Modo)
Presione el botón Mode (Modo) para alternar entre las
opciones de operación. El indicador correspondiente se
iluminará:
Cool (Enfriamiento): enfría la habitación a la temperatura
jada
Dry (Deshumidificar): reduce la humedad en la habitación
Fan9HQWLODGRUKDFHFLUFXODUHODLUHGHODKDELWDFLyQVLQ
enfriar.
Quiet (Silencioso) – Reduce el ruido de la unidad mientras
ésta enfría.
C. Botón + / - para las funciones Temperature (Temperatura)
y Timer (Temporizador)
En los modos Cool (Frío), Dry (Seco), o Quiet (Silencioso),
presione los botones + o – para incrementar o reducir la
configuración de temperatura.
Para jar la temperatura:
3UHVLRQHHOERWyQ Mode (Modo) hasta que se seleccione
el modo Cool (Enfriamiento).
2. Presione los botones con las flechas hacia arriba o hacia
abajo para seleccionar la temperatura.
NOTA: La temperatura no se puede fijar si el acondicionador
de aire está en el modo Fan9HQWLODGRURDRY
(Deshumidificar).
D.
Speed 9HORFLGDG
Presione el botón Speed 9HORFLGDGSDUDHOHJLUHQWUHODV
velocidades de ventilación High (Alta), Medium (Media),
Low (Baja), o Auto (Automática).
NOTA: La velocidad del ventilador no se podrá ajustar
cuando la unidad se encuentre en el modo Dry.
• Presione el botón Speed para alternar entre las tres
velocidades. El indicador de velocidad del ventilador
correspondiente se iluminará.
E. Delay (Retraso)
Presione el botón Delay (Retraso) y use los botones + o –
SDUDSURJUDPDUXQWLHPSRHQWUHKRUD\KRUDVSDUD
que el acondicionador de aire quede configurado en On
(Encendido) u Off (Apagado).
Mientras el acondicionador de aire se encuentre en
funcionamiento:
3UHVLRQHHOERWyQDelay (Retraso).
2. Presione los botones + / – para seleccionar la cantidad de
horas que desea que el acondicionador de aire continúe
funcionando antes de que el mismo se apague.
(VSHUHDSUR[LPDGDPHQWHVHJXQGRVKDVWDTXHHOWLHPSR
de Apagado quede registrado.
Mientras el acondicionador de aire se encuentre apagado:
3UHVLRQHHOERWyQDelay (Retraso).
2. Presione los botones + / - para seleccionar la cantidad de
horas que desea que el acondicionador de aire continúe
funcionando antes de que el mismo se encienda.
(VSHUHDSUR[LPDGDPHQWHVHJXQGRVKDVWDTXHHOWLHPSR
de Encendido quede registrado.
Para cancelar el retraso:
3UHVLRQHHOERWyQDelay (Retraso) una vez para exhibir las
horas restantes en el retraso actual.
2. Presione el botón Delay (Retraso) nuevamente y el mismo
será cancelado.
F. Swing (Balanceo)
La rejilla de su acondicionador de aire portátil se abrirá de
forma automática (no la abra con fuerza ni la presione para
su cierre).
&XDQGRVXDFRQGLFLRQDGRUGHDLUHHVWpHQFHQGLGROD
rejilla realizará el balanceo hacia arriba y abajo.
2. Presione el botón Auto Swing para fijar la rejilla en la
posición deseada.
NOTA: La pantalla LED del acondicionador de aire se apagará
PLQXWRGHVSXpVGHKDEHUSUHVLRQDGRHO~OWLPRERWyQ
Para encender la pantalla LED, presione cualquier botón de
la unidad o del control remoto. Luego presione la función
correspondiente del control para cambiar las configuraciones;
es posible que sea necesario presionar el control remoto
varias veces para su sincronización con la unidad.
A
B
C
E
D
F

49-5001143 Rev. 0 7
Cuidado y Limpieza
CUIDADO Y LIMPIEZA
Filtros De Aire
Los filtros de aire deben limpiarse al menos una vez a la
semana para garantizar que la unidad funcione con una
eficiencia óptima.
PRECAUCIÓN
No opere el acondicionador de aire si
los filtros de aire no están en su lugar.
Para eliminar:
'HVHQFKXIHRGHVFRQHFWHODFRUULHQWH
2. Presione hacia usted para retirar los paneles de los filtros.
3. Retire los filtros de los paneles.
4. Lave o aspire el polvo de los filtros de aire.
NOTA: Si se lavó, de forma suave sacuda el filtro para eliminar
el exceso de agua y las partículas de polvo atrapadas en el
filtro.
9XHOYDDLQVWDODUORVILOWURVHQORVSDQHOHV
6. Reemplace ambos paneles de los filtros.
7. Enchufe o vuelva conectar la corriente.
Limpieza
'HVHQFKXIHRGHVFRQHFWHHOVXPLQLVWURGHHQHUJtD
2. Útil solamente un paño dulce humedecido con agua
para limpiar el gabinete.
NOTA:
• No use un limpiador líquido o con rociador para limpiar
el acondicionador de aire.
• No usar productos químicos, abrasivos, amoníaco,
blanqueador con cloro, detergentes concentrados,
solventes o estropajos de metal. Algunos de estos
artículos / productos químicos pueden dañar y / o
decolorar su acondicionador de aire.
9HELHQFRQXQSDxRGXOFH
4. Enchufe o vuelva a conectar el suministro de energía..
Riesgo de descarga eléctrica
Desconecte la fuente de alimentación antes de limpiar.
El incumplimiento de estas instrucciones puede provocar
la muerte o una descarga eléctrica
ADVERTENCIA

8 49-5001143 Rev. 0
Cuidado y Limpieza
CUIDADO Y LIMPIEZA
Tanque De Agua Interior
El indicador de agua llena se ilumina cuando el tanque
de agua interno está lleno de agua de condensación.
La unidad no enfriará hasta que el tanque haya sido
vaciado, a fin de evitar desbordes y posibles daños sobre
el piso debajo del acondicionador de aire.
9DFLDUHOGHSyVLWRGHDJXDLQWHUQR
'HVFRQHFWHRGHVFRQHFWHODIXHQWHGHDOLPHQWDFLyQ
eléctrica.
2. Coloque un recipiente hueco con una capacidad
PtQLPDGHFXDUWRQRLQFOXLGRGHEDMRGHOD
piscina de drenaje inferior en la parte posterior del
acondicionador de aire (cerca de la parte inferior).
3. Retire la tapa y el tapón de goma y drene el tanque
de agua.
9XHOYDDLQVWDODUHOWDSyQGHGUHQDMH\DSULHWH
firmemente la tapa.
&RQHFWHHOGLVSRVLWLYRRYXHOYDDFRQHFWDUODIXHQWH
de alimentación.
Drenaje Continuo
(opción, y sólo en el modo seco)
5HWLUHODWDSDGHOGUHQDMHVXSHULRU
2. Conecte una manguera con conexión para
manguera de jardín en el tomacorriente.
3. Dirija la manguera de drenaje hasta un recipiente
de un tamaño adecuado* o hasta un drenaje en el
piso.
* Asegúrese de usar un recipiente grande (se
recomienda uno de 3 galones o más) y monitoree el
nivel de agua del recipiente de forma continua. La
unidad no se apagará cuando el recipiente esté lleno.
8QUHFLSLHQWHTXHVHGHVERUGHSRGUiRFDVLRQDUXQD
inundación y daños sobre el piso.
Cómo Insertar Las Pilas En El Control Remoto
5HWLUHODFXELHUWDGHODSLODGHVOL]iQGRODGHDFXHUGRFRQOD
dirección de la flecha.
2. Inserte pilas nuevas cerciorándose de que los polos
SRVLWLYRV\QHJDWLYRV±HVWiQRULHQWDGRVFRUUHFWDPHQWH
3. Coloque la cubierta otra vez deslizándola en su lugar.
NOTAS:
Ŷ8VHSLODVDOFDOLQDV³$$$´GHYROWLRV1RXVHSLODV
recargables.
Ŷ5HWLUHODVSLODVGHOFRQWUROUHPRWRVLQRYDDXVDUHOVLVWHPD
por un período prolongado.
Ŷ1RPH]FOHEDWHUtDVQXHYDV\YLHMDV1RPH]FOHEDWHUtDV
alcalinas, estándar (carbono-cinc) orecargables (ni-cad,ni-
mh,etc.
Rangement
Durante largos periodos de infantilización del dispositivo:
'HVFRQHFWHRGHVFRQHFWHODIXHQWHGHDOLPHQWDFLyQ
eléctrica.
2. Drene el agua del tanque de agua. (Consulte la
³VHFFLyQGHO7DQTXHGH$JXD,QWHULRUªPiVDUULED
3. Coloque la unidad en su embalaje original para evitar
la acumulación de polvo o suciedad.
4. Guarde el aire acondicionado en un lugar fresco y
seco.
Tapón de Goma
49-5001143 Rev. 0 9
INSTRUCCIONES DE INSTALACIÓN
Instrucciones de instalación
REQUISITOS DE UBICACIÓN
• Coloque el acondicionador de aire sobre una
supercie plana y nivelada en una ubicación que esté
DOPHQRVD´GHODSDUHG
• Mantenga el acondicionador de aire libre de
obstrucciones como cortinas con pliegues, cortinas,
persianas, etc.
• La manguera de escape debe estar libre de
cualquier obstrucción.
• No coloque el acondicionador de aire en una
supercie inestable o elevada, ya que podría caerse
y provocar daños o lesiones.
• No exponga el acondicionador de aire a la luz
directa del sol o cerca una fuente de calor como
zócalos radiantes, estufas, etc.
• El panel de la ventana puede instalarse en una
YHQWDQDFRQXQDDEHUWXUDPtQLPDGH´FP
KDVWDXQPi[LPRGH´FP
¿Preguntas? Llame a GE Appliances al 866.907.1655 o visite nuestro sitio web en: GEAppliances.com.
ANTES DE INICIAR
Lea estas instrucciones completa y cuidadosamente.
• IMPORTANTE — Guarde estas instrucciones
para uso del inspector local.
• IMPORTANTE — Observe todos los códigos y
órdenes de ley.
• Nota al instalador – Asegúrese de dejar estas
instrucciones con el consumidor.
• Nota al consumidor – Conserve estas instrucciones
para referencia futura.
• Nivel de destreza – La instalación de este aparato
requiere de destrezas mecánicas básicas.
• Tiempo de ejecución ±$SUR[KRUD
• Recomendamos dos personas para la instalación de este
producto.
• La instalación apropiada es la responsabilidad del
instalador.
• La falla del producto debido a una instalación inadecuada
no está cubierta por la garantía.
• Cuando instale este acondicionador de aire, DEBE usar
todas las piezas suministradas y usar procedimientos
adecuados de instalación.
El cable de alimentación incluye
un dispositivo para interrupción de
corriente. Se incluye un botón de
prueba y de reinicio en el dispositivo.
El dispositivo debe ponerse a prueba
periódicamente: primero se presiona
el botón de TEST (prueba) y luego
RESET (reinicio) mientras se encuentra
enchufado al tomacorriente. Si el botón
TEST no se dispara o si el botón RESET
no queda enganchado, deje de utilizar el
acondicionador de aire y comuníquese
con un técnico calificado.
RESET
TEST
49-5001143 Rev. 0
INSTRUCCIONES DE INSTALACIÓN
Instrucciones de instalación
PARTES INCLUIDAS
(Apariencia puede variar)
5HMLOODFRQ%DODQFHR$XWRPiWLFR
2. Controles
3. Manija Incorporada
4. Rueditas (4)
3DQHOGHO)LOWUR6XSHULRU
6. Drenaje Superior Continuo
9HQWLODFLyQGH6DOLGD
8. Drenaje Inferior
9. Enchufe LDCI
(QUROODGRUGHO&DEOH
3DQHOGHO)LOWUR,QIHULRU
&DEOHGH&RUULHQWH
&RQWURO5HPRWR
SLODV$$$
1
2
3
4
8
7
5
6
9
10
11
12
3
Ensamble de la Manguera de Salida
Manguera de drenaje
*El lado más pequeño se
conecta a la unidad
Tornillos del deslizador
de ventana (x4)
Soporte de bloqueo de
ventana con tornillo
3DQHOHVGH9HQWDQD
49-5001143 Rev. 0
Instrucciones de instalación
ENSAMBLE DE LA MANGUERA DE
SALIDA
Retire la manguera
Calce los adaptadores en los extremos de la manguera.
2. Deslice el adaptador rectangular en la ventilación de
salida sobre la parte trasera del Acondicionador de Aire
y deslice el mismo hacia el centro de la unidad hasta que
las pestañas queden calzadas.
ENSAMBLE DEL KIT DE VENTANA
Paso uno: Prepare los deslizadores de ventana
0LGDODDEHUWXUDGHODYHQWDQD3DUDXQDDSHUWXUDGH´
XVHVyORHOSDQHOGHO.LWGH9HQWDQDFRQHO$GDSWDGRUGH
OD0DQJXHUDGH6DOLGDDELHUWR3DUDXQDDEHUWXUDGH´D
´DGKLHUDHOSDQHOGHOFRQHFWRUDOSDQHOGHODGDSWDGRU
3DUDDSHUWXUDVGH´D´WDPELpQLQVHUWHHOVLJXLHQWH
SDQHOPiVJUDQGH3DUDDSHUWXUDVPD\RUHVD´XVHHO
panel del adaptador, el panel del conector, y el panel más
grande.
NOTA: El rango de longitud del kit de ventana es ´±´
2. Ensamble tantos deslizadores como sea necesario
para calzar la ventana. Si la abertura de la ventana es
inferior a la longitud mínima de un solo deslizador, use
el deslizador con agujero y corte el mismo en la longitud
correcta. Asegúrese de no cortar el extremo que posee el
agujero, ya que éste será necesario para la adhesión del
adaptador de la manguera de salida.
3. 8VHORVWRUQLOORVSDUDGHVOL]DGRUHVGHYHQWDQDSDUD
asegurar estos últimos en la
longitud correcta.
INSTALACIÓN DEL KIT DE VENTANA
Se podrán usar las siguientes instrucciones para colgar
la aplicación de ventana (mostradas a la izquierda) o una
aplicación opcional de deslizamiento de ventana (mostrada a
la derecha).
Corte selladores de gomaespuma en las longitudes
correctas y adhiera los mismos en las posiciones A y
B sobre el marco de la ventana, como se muestra a
continuación.
2. Inserte el kit del deslizador de ventana en la abertura de la
ventana y cierre esta última para asegurar el mismo en su
posición.
3. Corte la almohadilla de gomaespuma para que coincida
con el kit de ventana y adhiera la misma en la posición C
como se muestra para reducir la pérdida de aire.
Tornillo
D A B E
C
B
A
B
A
C
C
INSTRUCCIONES DE INSTALACIÓN
49-5001143 Rev. 0
Instrucciones de instalación
INSTALACIÓN DEL KIT DE VENTANA
(cont.)
4. Si lo desea, instale el soporte de seguridad con un tornillo
como se muestra.
5. Adhiera el adaptador de salida de aire al kit del deslizador
de ventana.
Wood
9LQ\O
INSTRUCCIONES DE INSTALACIÓN
INSTALE EL PANEL DE VENTANA
PRINCIPAL Y LOS PANELES
EXTENSIBLES (cont.)
6. Coloque el ensamble del panel de ventana en la ventana,
y usando los tornillos provistos, ajuste el ensamble al
alféizar de la ventana y al marco de la ventana.
7.
8WLOL]DQGRXQWRUQLOORGHSXQWDLQVWDOHHOVRSRUWHGH
seguridad a la ventana. NOTA: El soporte de seguridad
impide que la ventana sea abierta desde la parte exterior.
B
A
A. Soporte de seguridad
B7RUQLOORSXQWLDJXGR
49-5001143 Rev. 0
SOLUCIONAR PROBLEMAS
Solucionar problemas
Problema Causas posibles Qué hacer
La unidad no se pone en
marcha ni funciona
El cable de suministro de energía no está
enchufado en un toma corriente.
Conecte el cable eléctrico a un toma corriente de
3 terminales con conexión a tierra.
El cable de suministro de energía se ha disparado. Presione y libere RESET (Restablecer) en el cable de
suministro de energía.
El botón Power (Encendido) no se ha presionado. Presione el botón Power (Encendido) en el panel de control o
el control remoto para ENCENDER el acondicionador de aire.
El toma corriente eléctrico no recibe suministro
eléctrico.
Enchufe un Dispositivo Electrónico en funcionamiento en el
toma corriente para verificar si hay energía.
Se ha fundido un fusible de la casa o se ha
disparado un cortacircuitos.
Reemplace el fusible o reposicione el cortacircuitos.
El control fue programado para un tiempo diferido. &DQFHOHHOWLHPSRGLIHULGR9HD³3DQHOGHFRQWURO´
Las pilas del control remoto están agotadas. Reemplace las pilas.
El tanque de agua interno está lleno.
NOTA: El acondicionador de aire se apaga
automáticamente y el indicador Water Full
³)/´HQODSDQWDOODGHOSDQHOGHFRQWUROVHLOXPLQD
para avisarle de este estado.
9DFtHHOWDQTXHGHDJXD9HD³&XLGDGR\/LPSLH]D´
El control remoto no
funciona
Las pilas están agotadas. Reemplace las pilas.
Las pilas están insertadas de forma incorrecta. Asegúrese de que las pilas se inserten en la posición
correcta.
El acondicionador de aire
está funcionando, perola
habitación no se enfría.
La temperatura de la habitación está caliente.
NOTA: En días muy calurosos y húmedos,el
acondicionador de aire necesitará más tiempo para
enfriar la habitación.
Dé tiempo para que la habitación se enfríe cuando enciende
la unidad por primera vez.
Asegúrese de que el acondicionador de aire tenga una
FDWHJRUtDGH%788QLGDG7pUPLFD
Británica) adecuada para el tamaño de la habitación que
desea enfriar.
El control se ha fijado incorrectamente en modo
)DQ9HQWLODGRUR'U\6HFR
Fije el modo Cool (Enfriamiento) y la velocidad del ventilador
en High (Alta).
El flujo de aire ha disminuido. Quite los obstáculos que bloquean el flujo de aire y redirija el
flujo de aire para lograr un enfriamiento uniforme.
La temperatura está fijada demasiada alta. Baje la temperatura fijada.
Los filtros de aire están sucios u obstruidos. /LPSLHHOILOWURGHDLUH9HD³&XLGDGR\/LPSLH]D´
El acondicionador de aire se ha instalado
incorrectamente.
9HULILTXHTXHODPDQJXHUDGHHVFDSH\HOSDQHOGHODYHQWDQD
estén correctamente instalados.
Las puertas y las ventanas están abiertas. Cierre las puertas y las ventanas de la habitación que desea
enfriar para evitar que el aire enfriado se escape.
Códigos de Error
Códigos de Error Significado
( Sensor de temperatura ambiente atípico
EP Sensor del sistema de refrigeración atípico
FL El tanque de agua interior está lleno; consulte las instrucciones sobre
drenaje en la página 8.
49-5001143 Rev. 0
Configuración WiFi (en algunos modelos)
INFORMACIÓN REGULATORIA
Declaración de Cumplimiento con FCC/IC:
(VWHGLVSRVLWLYRQRSRGUiFDXVDULQWHUIHUHQFLDVSHUMXGLFLDOHV
2. Este dispositivo debe aceptar cualquier interferencia recibida,
incluidas las interferencias que puedan provocar un funcionamiento
no deseado.
Este equipo fue probado y cumple con los límites establecidos para
XQGLVSRVLWLYRGLJLWDOGHFODVH%VHJ~QODSDUWHGHOD1RUPDWLYDGH
la FCC. Estos límites fueron diseñados para brindar una protección
razonable contra interferencias nocivas en una instalación residencial.
Este equipo genera, usa y puede emitir energía de radiofrecuencia
y, si no se instala y utiliza de acuerdo con las instrucciones, puede
ocasionar interferencias perjudiciales sobre las comunicaciones
radiales. Sin embargo, no se garantiza que no se presenten
interferencias en una instalación en particular. Si este equipo provoca
interferencias perjudiciales para la recepción de radio o televisión, lo
que puede comprobar encendiendo y apagando el equipo, se aconseja
al usuario que intente corregir la interferencia a través de una o más
de las siguientes medidas:
• Reoriente o reubique la antena receptora.
• Aumente la separación entre el equipo y el receptor.
• Conecte el equipo a un tomacorriente de un circuito diferente al
tomacorriente al cual se encuentra conectado el receptor.
• Para solicitar ayuda, consulte al comerciante minorista o a un técnico
experimentado de radio/ televisión.
Etiqueta: Las modificaciones sobre esta unidad no aprobadas
expresamente por parte del fabricante podrían anular la autoridad del
usuario para utilizar el equipo.
*Modelos Selectos Únicamente
Este producto tiene capacidad Wi-Fi y requiere conectividad a Internet
y un enrutador inalámbrico para permitir la interconexión con un
Sistema de administración de energía y / o con otros dispositivos,
sistemas o aplicaciones externos.
Cómo Funciona
Descargue la Aplicación de SmartHQ
8VHODDSOLFDFLyQSDUDFRQHFWDUVX
acondicionador de aire para sala al WiFi
8QDYH]FRQHFWDGDXVHODDSOLFDFLyQSDUDDSDJDU
su acondicionador de aire al salir del trabajo.
CHANGE TEMP
TO 65
CONFIGURACIÓN WIFI
GE Appliances SmartHQ (Para clientes en Estados Unidos)
GE Appliances SmartQ Habilitado* Si su acondicionador de aire posee una etiqueta de Información del Electrodoméstico
Conectado ubicada en la parte externa como se muestra a continuación, su acondicionador de aire cuenta con GE SmartHQ
Habilitado. 8QDWDUMHWDGHFRPXQLFDFLyQGH:L)LHVWiLQFRUSRUDGDHQHOSURGXFWRSHUPLWLHQGRODFRPXQLFDFLyQGHOPLVPRFRQVX
teléfono inteligente para el monitoreo remoto, control y notificaciones. Para aprender más sobre las funciones del electrodoméstico
conectado, y para saber qué aplicaciones de electrodomésticos conectados funcionarán con su teléfono inteligente, visite
GEAppliances.com/connect. Para asistencia, llame al 1-800-220-6899.
Network: GE_MODULE_XXXX
PASSWORD: XXXXXXXX
MAC ID: XX-XX-XX-XX-XX-XX
CONTAINS FCCID: ZKJ-WCATA006
CONTAINS IC:
10229A-WCATA006
Puesta en marcha
A fin de conectar su acondicionador de aire para sala,
necesitará la Aplicación de GE Appliances. La aplicación
lo guiará a través del proceso de conexión. Descargue la
aplicación de iTunes o Google Play.
Los datos de todos los electrodomésticos conectados
son guardados en estricto cumplimiento con la Política de
Privacidad de Datos de Conexión de GE Appliances. Para
acceder a esta política, visite geappliances.com/privacy/
privacy_policy_connected.
Preguntas acerca de SmartHQ
Acceda a respuestas necesarias sobre la configuración de
electrodomésticos con WiFi y la conexión a su red hogareña a
través de nuestros artículos de soporte.
Para acceder a los artículos de soporte la conexión wifi del
acondicionador de aire para sala, visite products.geappliances.
com/appliance/gea-support-search-content.
49-5001143 Rev. 0
Abroche su recibo aquí. Para acceder al servicio técnico de acuerdo
con la garantía deberá contar con la prueba de la fecha original de
compra.
GARANTÍA LIMITADA
Garantía de su acondicionador de aire—garantía limitada de un año.
Abroche su recibo aquí. Para acceder al servicio técnico de acuerdo con la garantía deberá contar con la prueba de la fecha
original de compra.
(;&/86,Ï1'(*$5$17Ë$6,03/Ë&,7$6²6X~QLFD\H[FOXVLYDDOWHUQDWLYDHVODUHSDUDFLyQGHOSURGXFWRFRPRVHLQGLFDHQOD
Garantía Limitada. Las garantías implícitas, incluyendo garantías implícitas de comerciabilidad o conveniencia sobre un propósito
particular, se limitan a un año o al período más corto permitido por la ley.
3DUD&OLHQWHVGH((88(VWDJDUDQWtDOLPLWDGDVHH[WLHQGHDOFRPSUDGRURULJLQDO\DFXDOTXLHUGXHxRVXEVLJXLHQWHGHSURGXFWRV
FRPSUDGRVSDUDXVRKRJDUHxRGHQWURGH((886LHOSURGXFWRHVWiHQXQiUHDGRQGHQRVHHQFXHQWUDGLVSRQLEOHXQ3URYHHGRU
Autorizado del Servicio Técnico de GE Appliances, usted será responsable por el costo de un viaje o se podrá requerir que traiga
el producto a una ubicación del Servicio Técnico de GE Appliances Autorizado para recibir el servicio. En Alaska, la garantía
limitada excluye el costo de envío o llamadas del servicio técnico a su hogar.
Algunos estados no permiten la exclusión o limitación de daños fortuitos o consecuentes. Esta garantía limitada le da derechos
legales específicos y es posible que tenga otros derechos legales que varían entre un estado y otro. Para conocer cuáles son sus
derechos legales, consulte a la oficina de asuntos del consumidor local o estatal o al Fiscal de su estado.
*DUDQWHHQ((88
GE Appliances, a Haier company
/RXLVYLOOH.<
Ŷ,QVWUXFFLyQDOFOLHQWH(VWHPDQXDOGHOSURSLHWDULR
brinda información relacionada con instrucciones de
funcionamiento y controles del usuario.
Ŷ,QVWDODFLyQLQDGHFXDGD6LWLHQHXQSUREOHPDGHLQVWDODFLyQ
o el acondicionador de aire no posee la capacidad
adecuada, contacte a su vendedor minorista o instalador.
Usted es responsable de brindar instalaciones de conexión
eléctrica adecuadas.
Ŷ)DOODGHOSURGXFWRFRPRUHVXOWDGRGHPRGLILFDFLRQHVVREUH
el mismo o debido a un uso irrazonable, incluyendo la falta
de mantenimiento razonable o necesario.
Ŷ5HHPSOD]RGHIXVLEOHVGHOKRJDURUHLQLFLRGHGLV\XQWRUHV
Ŷ)DOODVFRPRFRQVHFXHQFLDGHFRUURVLyQHQPRGHORVVLQ
protección contra ésta.
Ŷ'DxRVRFDVLRQDGRVVREUHHOSURGXFWRSRUQLYHOGH
suministro de voltaje inadecuado, accidente, incendio,
inundaciones o catástrofes naturales.
Ŷ'DxRVFRQVHFXHQWHVRLQFLGHQWDOHVFDXVDGRVSRUSRVLEOHV
defectos del acondicionador de aire.
Ŷ'DxRFDXVDGRGHVSXpVGHODHQWUHJD
Qué No Será Cubierto:
Por el Período de: Reemplazaremos:
8Q$xR
Desde la fecha de la
compra original
Reemplazo, reparación o reembolso del costo minorista original de cualquier producto que
falle debido a un defecto en los materiales o la fabricación. Si la unidad es cambiada, la unidad
de reemplazo posee garantía por el resto del período de la garantía original de un año sobre su
producto. GE Appliances reemplazará, a su exclusivo criterio, el producto por otro de la misma o de
una funcionalidad y calidad comparable o hará un reembolso por el precio minorista original.
Ŷ
Embale la unidad correctamente. Le recomendamos usar la
caja de cartón y los materiales de embalaje originales.
Ŷ(QWUHJXHHOSURGXFWRHQODXELFDFLyQGHOYHQGHGRU
minorista donde fue adquirido.
Ŷ
Incluya en el paquete una copia del receptor de la venta u
otro comprobante de la fecha de compra original. También
escriba su nombre y domicilio y una descripción del
defecto.
Para hacer un reclamo de garantía durante el período de devolución permitido de su minorista:
A Fin de Realizar un Reclamo sobre la Garantía Durante el Resto de la Garantía de un Año:
Ŷ8ELTXHVXUHFLERGHYHQWDRULJLQDO\KDJDXQDQRWDGHVXPRGHOR\Q~PHURGHVHULH
Ŷ/ODPHDOSDUDLQLFLDUXQDUHFODPDFLyQGHJDUDQWtD
Ŷ Se solicitará su nombre, domicilio, información del recibo, y números de modelo y serie.
Ŷ Las reclamaciones de garantía podrán requerir una prueba de compra enviada de forma electrónica o por correo.
49-5001143 Rev. 0
SOPORTE PARA EL CONSUMIDOR
Impreso en China
Soporte al Cliente
GE Appliances Sitio Web
¿Desea realizar una consulta o necesita ayuda con su electrodoméstico? ¡Intente a través del Sitio Web de Electrodomésticos
GH*($SSOLDQFHVODVKRUDVGHOGtDFXDOTXLHUGtDGHODxR8VWHGWDPELpQSXHGHFRPSUDUPiVJUDQGLRVRVSURGXFWRVGH*(
Appliances y sacar ventaja de todos nuestros servicios a través de Internet diseñados para su conveniencia.
(Q((88GEAppliances.com
Registre su Electrodoméstico
£5HJLVWUHVXHOHFWURGRPpVWLFRQXHYRDWUDYpVGH,QWHUQHWVHJ~QVXFRQYHQLHQFLD8QUHJLVWURSXQWXDOGHVXSURGXFWRSHUPLWLUi
una mejor comunicación y un servicio más puntual de acuerdo con los términos de su garantía, en caso de surgir la necesidad.
También puede enviar una carta en la tarjeta de inscripción pre-impresa que se incluye con el material embalado.
(Q((88GEAppliances.com/register
Servicio Programado
El servicio de reparación de expertos de GE Appliances está a sólo un paso de su puerta. ¡Conéctese a través de Internet y
SURJUDPHVXVHUYLFLRDVXFRQYHQLHQFLDFXDOTXLHUGtDGHODxR(Q((88GEAppliances.com/service o llame al
durante el horario comercial habitual.
Garantías Extendidas
Adquiera una garantía extendida de GE Appliances y aprenda sobre descuentos especiales que están disponibles mientras su
garantía aún está vigente. La puede adquirir en cualquier momento a través de Internet. Los Servicios de GE Appliances aún
HVWDUiQDOOtFXDQGRVXJDUDQWtDFDGXTXH(Q((88GEAppliances.com/extended-warrantyROODPHDOGXUDQWH
el horario comercial habitual.
Conectividad Remota
Para solicitar asistencia con la conectividad de red inalámbrica (para modelos con activación remota), visite nuestro sitio Web en
GEAppliances.com/connectROODPHDOHQ((88
Piezas y Accesorios
Individuos calificados para realizar el servicio técnico de sus propios electrodomésticos podrán solicitar el envío de piezas o
DFFHVRULRVGLUHFWDPHQWHDVXVKRJDUHVVHDFHSWDQODVWDUMHWDV9,6$0DVWHU&DUG\'LVFRYHU2UGHQHDWUDYpVGH,QWHUQHWKR\
GXUDQWHODVKRUDVGHOGtD(Q((88GEApplianceparts.comRSRUWHOpIRQRDOGXUDQWHHOKRUDULRFRPHUFLDO
habitual.
Las instrucciones que figuran en este manual cubren los procedimientos que serán realizados por cualquier usuario.
Otros servicios técnicos generalmente deberían ser derivados a personal calificado del servicio. Se deberá tener
cuidado, ya que una reparación indebida podrá ocasionar que el funcionamiento no sea seguro.
Contáctenos
Si no se encuentra satisfecho con el servicio que recibió de GE Appliances, comuníquese con nosotros a través de nuestro sitio
Web con todos los detalles, incluyendo su número telefónico, o escriba a:
(Q((88*HQHUDO0DQDJHU&XVWRPHU5HODWLRQV_*($SSOLDQFHV$SSOLDQFH3DUN_/RXLVYLOOH.<
GEAppliances.com/contact