
SPOTBOT
®
Portable Deep Cleaner
_______________
USER GUIDE
2114, 2117 SERIES
www.BISSELL.com
2
IMPORTANT SAFETY INSTRUCTIONS
WARNING
TO REDUCE THE RISK OF FIRE, ELECTRIC SHOCK OR INJURY:
» Use only BISSELL® cleaning products intended for use in this machine to
prevent internal component damage. See the Cleaning Formulas section
of this guide.
» Connect to a properly grounded outlet only. See grounding instructions.
Do not modify the 3-prong grounded plug.
» Unplug from electrical socket when not in use, before cleaning,
maintaining or servicing the appliance.
» Do not expose to rain. Store indoors.
» Do not allow to be used as a toy. Close attention is necessary when used
by or near children.
» Do not use for any purpose other than described in this user guide. Use
only manufacturer’s recommended attachments.
» Do not use with damaged cord or plug. If appliance is not working as
it should, has been dropped, damaged, left outdoors, or dropped into
water, have it repaired at an authorized service center.
» Do not pull or carry by cord, use cord as a handle, close a door on cord, or
pull cord around sharp edges or corners. Do not run appliance over cord.
Keep cord away from heated surfaces.
» Do not unplug by pulling on cord. To unplug, grasp the plug, not the cord.
» Do not handle plug or appliance with wet hands.
» Do not put any object into openings. Do not use with any opening
blocked; keep openings free of dust, lint, hair, and anything that may
reduce air flow.
» Keep hair, loose clothing, fingers, and all parts of body away from
openings and moving parts.
» Turn OFF all controls before plugging or unplugging appliance.
» Use extra care when cleaning on stairs.
» Do not use to pick up flammable or combustible materials (lighter fluid,
gasoline, kerosene, etc.) or use in areas where they may be present.
» Do not use appliance in an enclosed space filled with vapors given off
by oil-based paint, paint thinner, some moth-proofing substances,
flammable dust, or other explosive or toxic vapors.
» Do not use to pick up toxic material (chlorine bleach, ammonia, drain
cleaner, etc.).
» Do not pick up anything that is burning or smoking, such as cigarettes,
matches or hot ashes.
» Keep appliance on a level surface.
» Do not carry the appliance while in use.
» Plastic film can be dangerous. To avoid danger of suffocation, keep away
from children.
» Do not immerse in water or liquid.
» Liquid must not be directed towards equipment containing electrical
components.
» Do not immerse. Use only on surfaces moistened by the cleaning process.
Use only BISSELL® cleaning products intended for use with this machine.
» Use only the type and amount of liquids specified under the operations
section of this guide.
» Use only on carpet moistened by cleaning process.
READ ALL INSTRUCTIONS BEFORE USING YOUR PORTABLE DEEP CLEANER.
When using an electrical appliance, basic precautions should be observed, including the following:
This model is for household use only. Commercial use of this unit voids the manufacturer’s warranty.
SAVE THESE INSTRUCTIONS
FOR FUTURE USE
WARNING
Improper connection of the equipment-grounding
conductor can result in a risk of electrical shock. Check
with a qualified electrician or service person if you
aren’t sure if the outlet is properly grounded. DO NOT
MODIFY THE PLUG. If it will not fit the outlet, have a
proper outlet installed by a qualified electrician. This
appliance is designed for use on a nominal 120-volt
circuit, and has a grounding attachment plug that
looks like the plug in the illustration. Make certain
that the appliance is connected to an outlet having
the same configuration as the plug. No plug adapter
should be used with this appliance.
GROUNDING INSTRUCTIONS
This appliance must be connected to a grounded
wiring system. If it should malfunction or break down,
grounding provides a safe path of least resistance for
electrical current, reducing the risk of electrical shock.
The cord for this appliance has an
equipment-grounding conductor
and a grounding plug. It must
only be plugged into an outlet
that is properly installed and
grounded in accordance with
all local codes and ordinances.
Grounded
Outlet
Grounding Pin
www.BISSELL.com
3
Safety Instructions...........2
Product View................4
Special Features .............5
Cleaning Formulas...........6
Operations ............... 7-12
Maintenance & Care ........13
Troubleshooting ............14
Warranty ...................15
Service .....................15
Product Registration........16
Parts & Supplies ............16
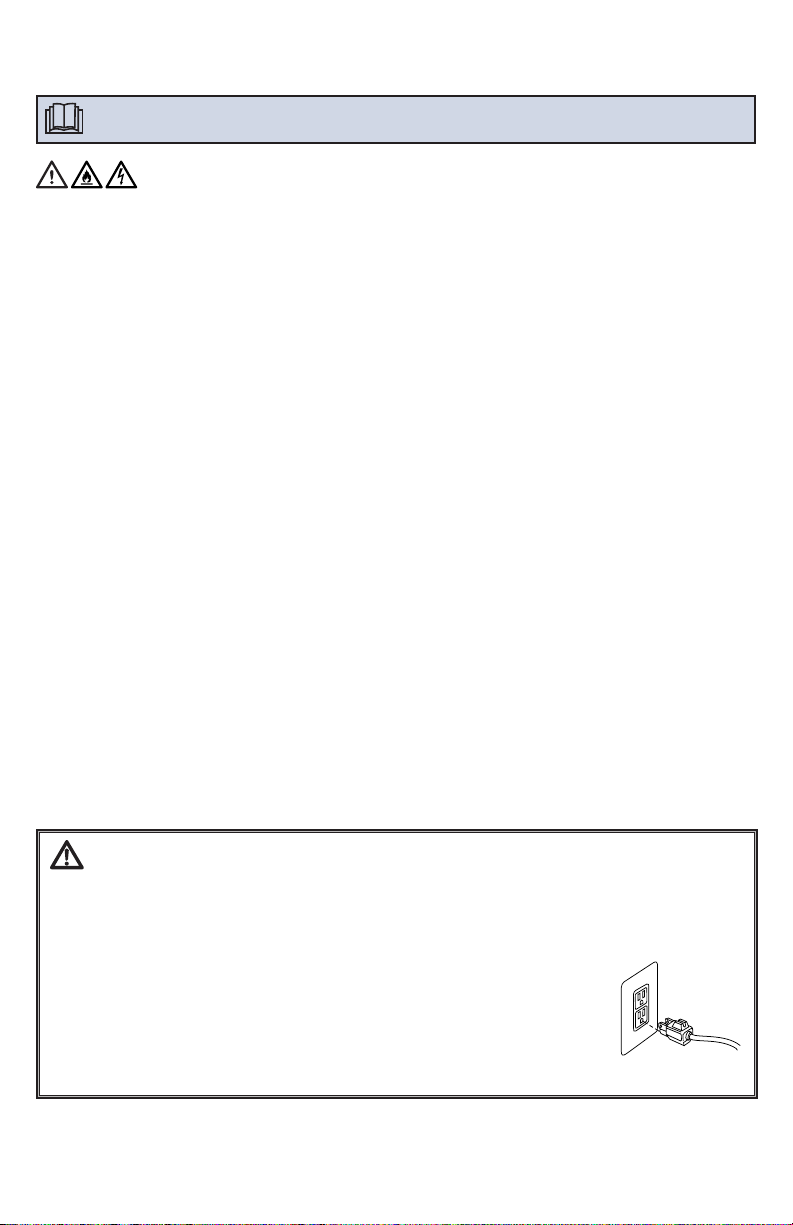
Package Contents
Thanks for buying a BISSELL® portable carpet cleaner!
We love to clean and we’re excited to share one of our innovative products
with you. We want to make sure your carpet cleaner works as well in two
years as it does today, so this guide has tips on using (page 9), maintaining
(page 13), and if there is a problem, troubleshooting (page 14).
In just a few simple preparation steps, you’ll be ready to deep clean. Flip to
page 7 and let’s get started!
1.
2. 3.
1. SpotBot® Unit
2. Tough Stain Tool
3. BISSELL Formula
4. BISSELL Boost Formula*
5. HydroRinse™ Self Cleaning Hose Tool*
6. 3-N-1 Stair Tool*
*Select models only.
4. 5. 6.

www.BISSELL.com
4
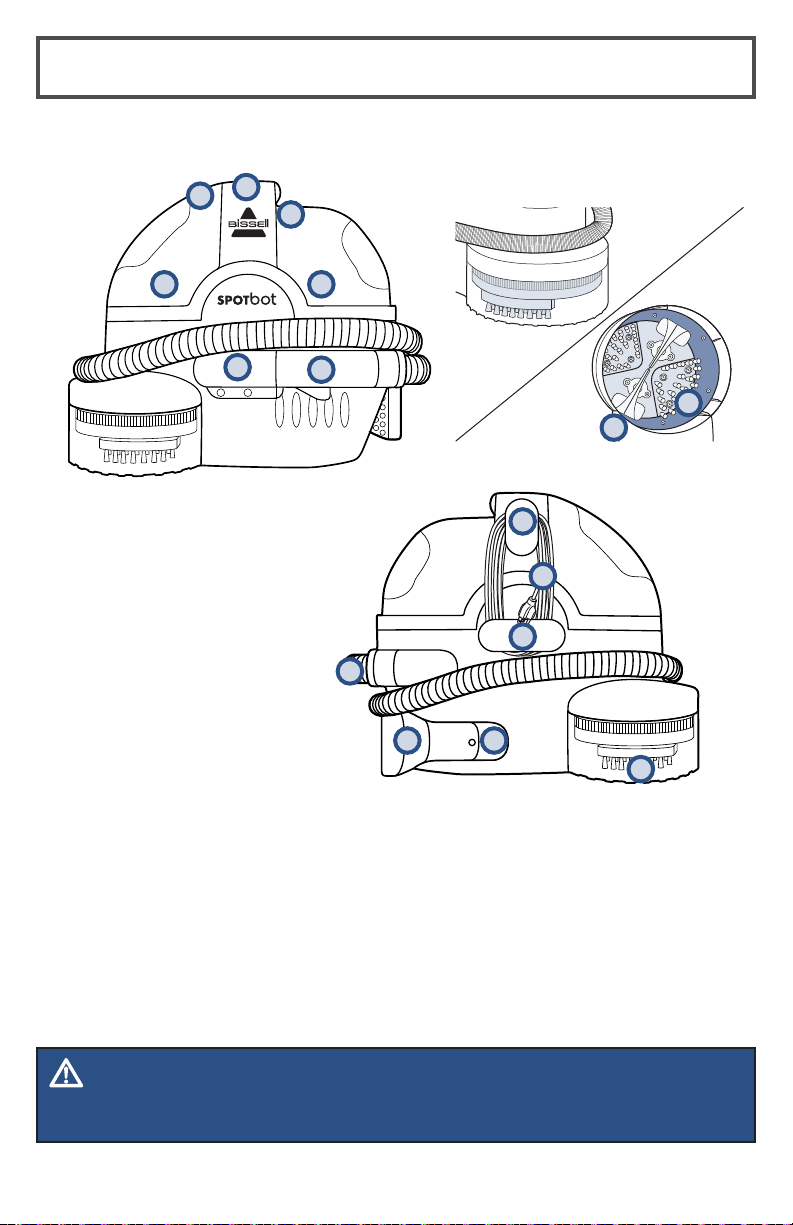
Product View
WARNING
Do not plug in your deep cleaner until you are familiar with all instructions
and operating procedures.
1 Dirty Water Tank
2 Tank Release Latch
3 Carry Handle
4 Automatic Smart System
Control Panel
5 Clean Water/Solution Tank
6 Hose Connector
7 Spray Trigger
8 Cord Wraps
9 Power Cord
10 Vacuum Flex Hose
11 Tough Stain Tool
12 Tough Stain Tool Storage
13 Cleaning Window
14 Scrubbing Brushes
15 Suction Nozzles
1
2
3
4
5
6
7
8
9
8
10
11 12
13
14
15

www.BISSELL.com
5
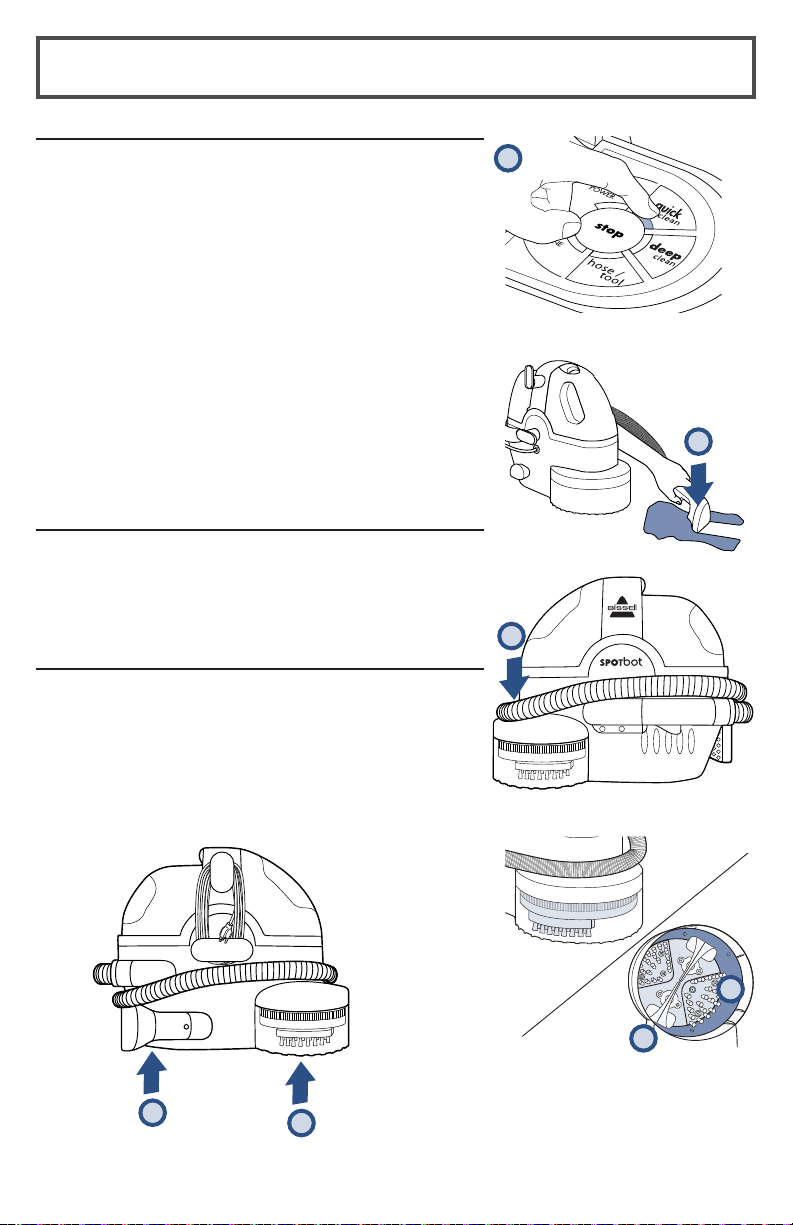
Special Features
Front view
4 - Preset Cleaning Cycles Control PaneI
Located on top of the unit, you will find the
control panel. Select the cleaning cycle you
would like to use (detailed instructions on
page 9). The “Power” and “Done” are not
buttons; “Power” is an indicator light to tell
you when the SpotBot® is “ON”. “Done” is an
indicator light to tell you when the cleaning
cycle is done.
7 - Spray Trigger
Press the Spray Trigger to release water and
formula onto the area to be cleaned. (Only use
in hose/tool mode)
10 - Vacuum Flex Hose
Wraps around the center of the unit, and serves
as the travel path for dirty water and formula
suctioned into the Dirty Water Tank.
The hose can also be unwrapped and used with
the Tough Stain Tool for manual cleaning in hose/
tool mode.
Back view
12 - Tough Stain Tool Storage
Stored on board for your convenience.
13 - Cleaning window
Provides an area to see the hands-free
cleaning action.
NOTE: Unwrap Power Cord
completely before operating the unit.
Underside view
14 - Scrubbing Brushes
Automatically spray, brush and remove both
surface and tough stains and odors.
15 - Suction Nozzles
Provides suction path when using the
hands-free cleaning cycles.
4
7
14
15
12
13
10
www.BISSELL.com
6
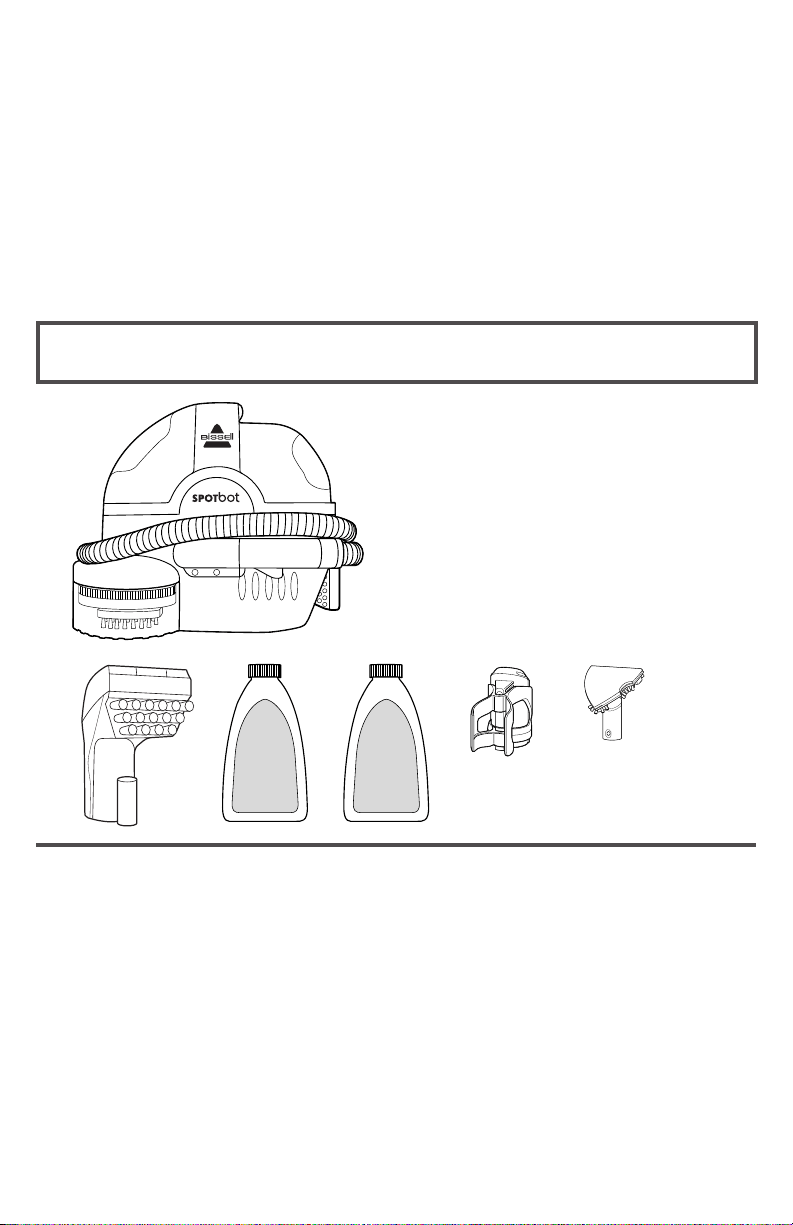
Always use genuine BISSELL deep cleaning formulas. Non-BISSELL cleaning solutions
may harm the machine and may void the warranty.
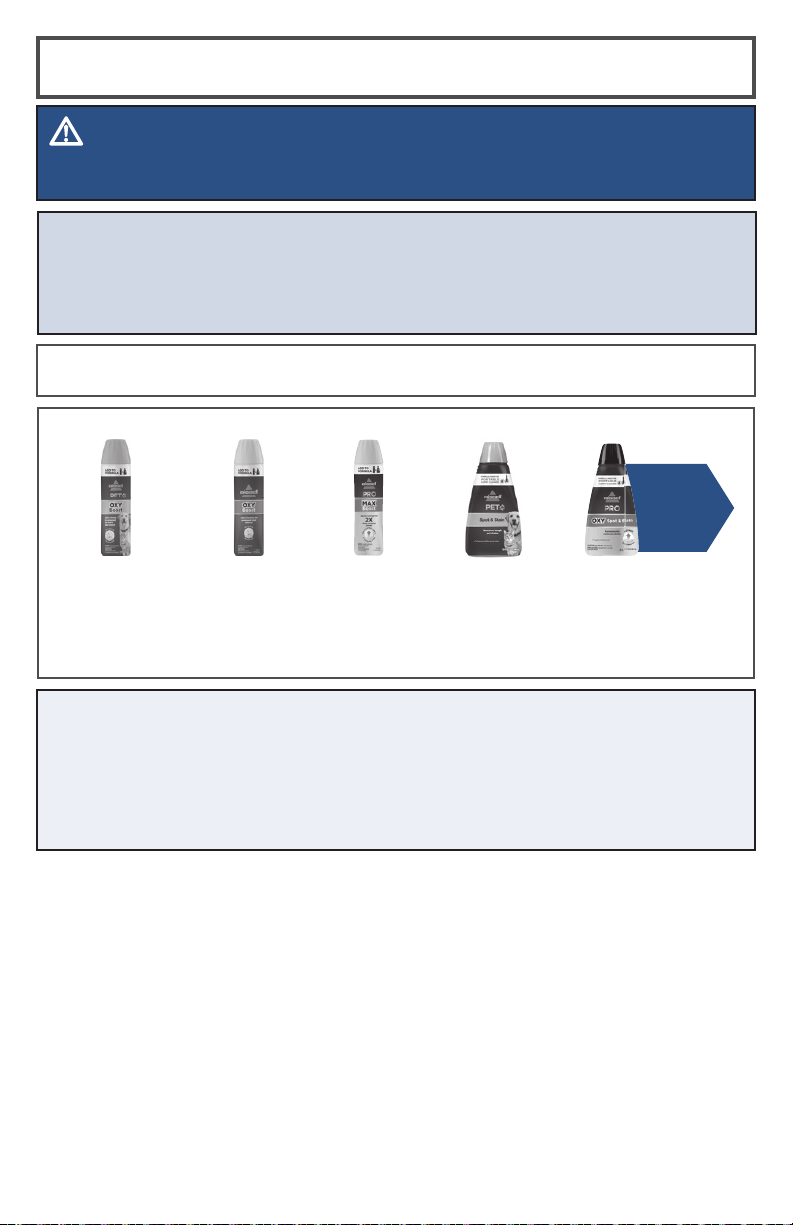
Cleaning Formulas
WARNING
To reduce the risk of fi re and electric shock due to internal component damage,
use only BISSELL® cleaning formulas intended for use with the deep cleaner.
Certain trademarks used under license from The Procter & Gamble Company or its affiliates.
A note about BISSELL formula
One of the eff ective stain removing ingredients in Oxy Boost and Pet Oxy
Boost is Hydrogen Peroxide. Certain people may be aff ected by the product
when it comes into contact with their skin; it may turn the skin white and/
or cause tingling. Washing your hands after use and applying hand lotion will
remove any possible white discoloration.
NOTICE: Use only BISSELL portable machine formulas (with Boost if desired) in
your cleaner. Use of cleaning formulas which contain lemon, pine oil or vinegar
may damage this appliance and void the warranty. Chemical spot cleaners or
solvent-based soil removers also should not be used. These products may react
with the plastic materials used in your cleaner, causing cracking or pitting.
BISSELL Oxy
Boost formula
for carpet &
upholstery
BISSELL Boost
Pro formula
for carpet &
upholstery
BISSELL
Professional Spot
& Stain + Oxy
BISSELL 2X® Pet
Stain & Odor
Use Professional
formula for
optimal cleaning
results!
BISSELL Pet Oxy
Boost Formula
for carpet &
upholstery
www.BISSELL.com
7
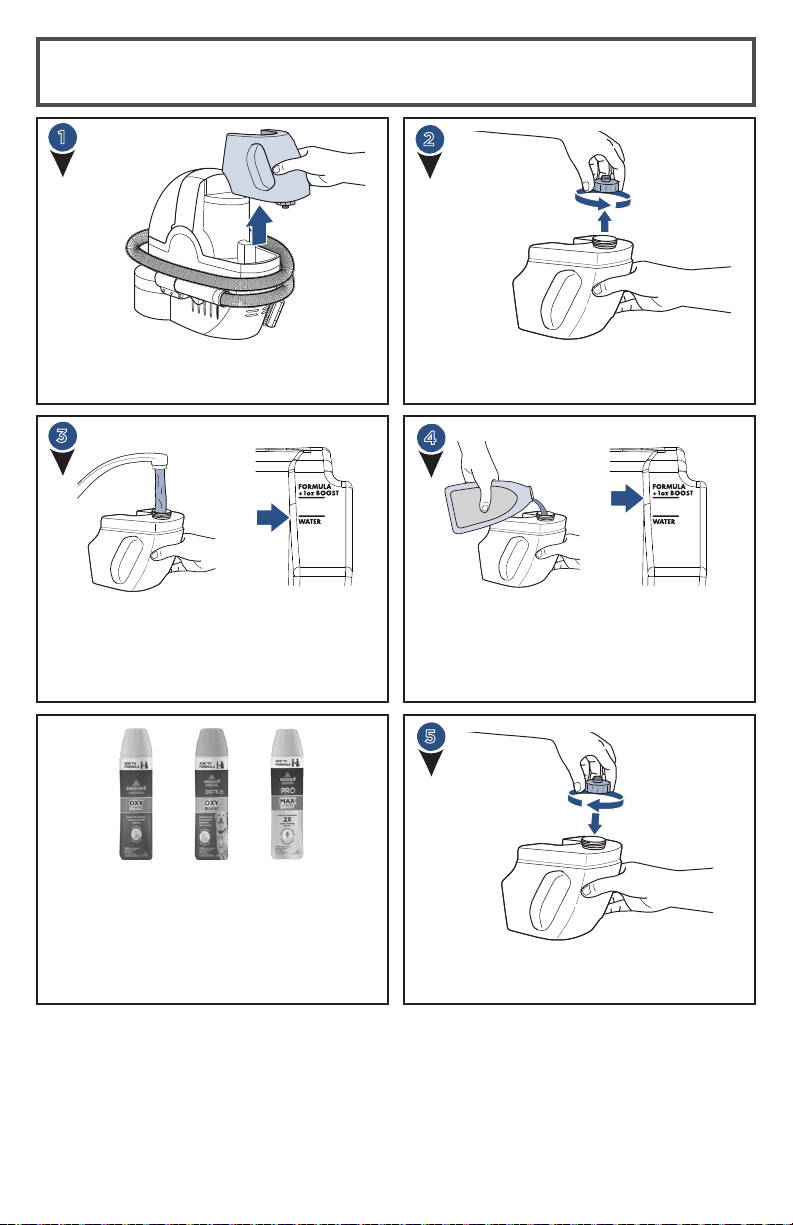
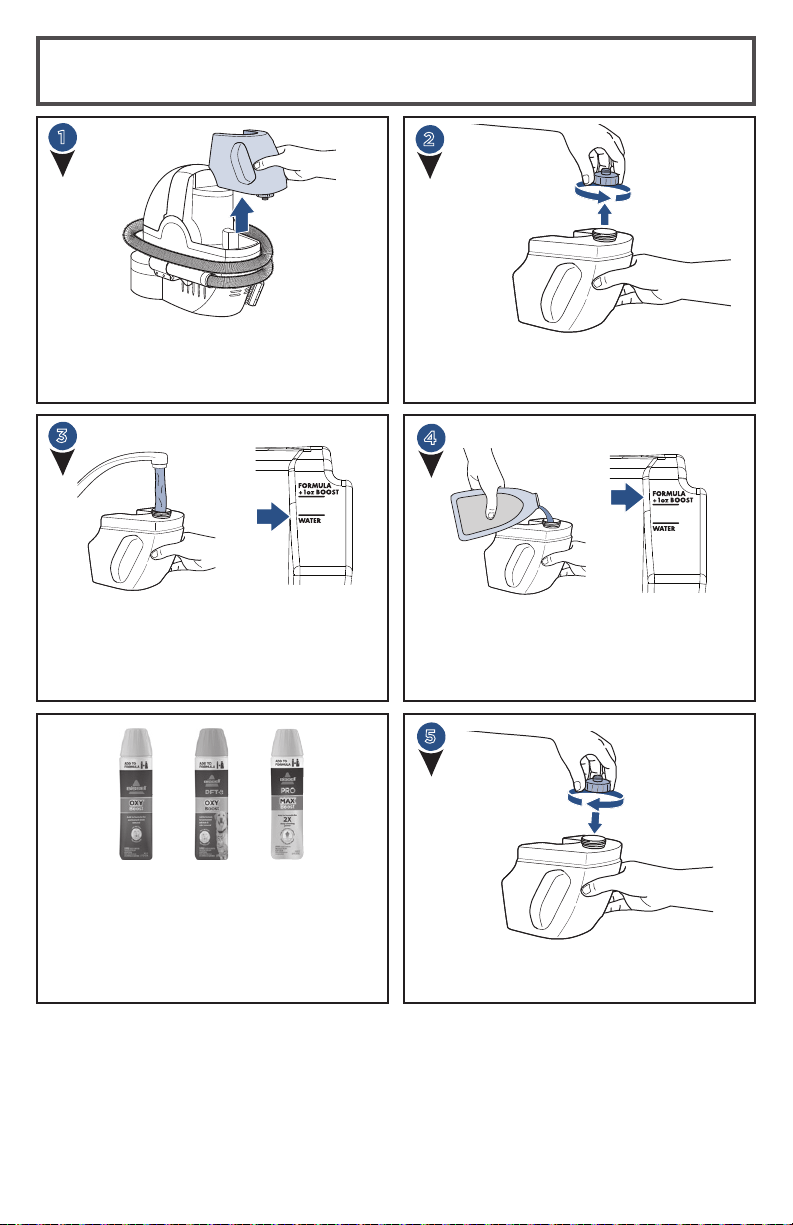
Filling Your Clean Water Tank:
Portable Machine Formula (2X Concentrated)
Pour in more power with
BISSELL Boosts
• Fill tank with water and 2X formula
(Step 4 above).
• Add 1 ounce of any BISSELL Boost.
Add hot
(140°F/60°C MAX)
tap water to
water fill line.
Do not use boiling water. Do not heat
water or tank in microwave.
Unscrew the black cap at the bottom of
the Clean Water Tank.
Twist the cap back into place and set
tank back on unit.
Add formula by following the
indicated “formula” fill line on your
clean tank.
1
4
2
3
5
Remove the Clean Water/Solution Tank by
lifting it straight up and then away from
the unit.
www.BISSELL.com
8
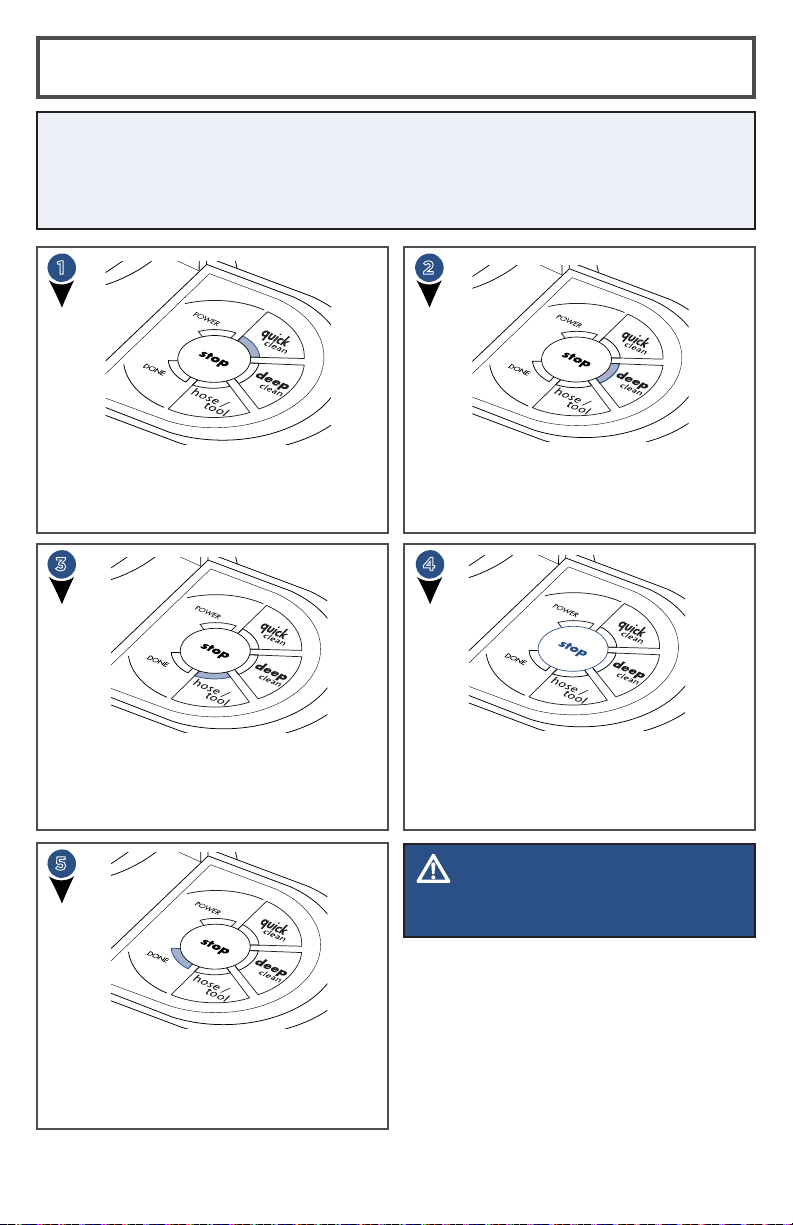
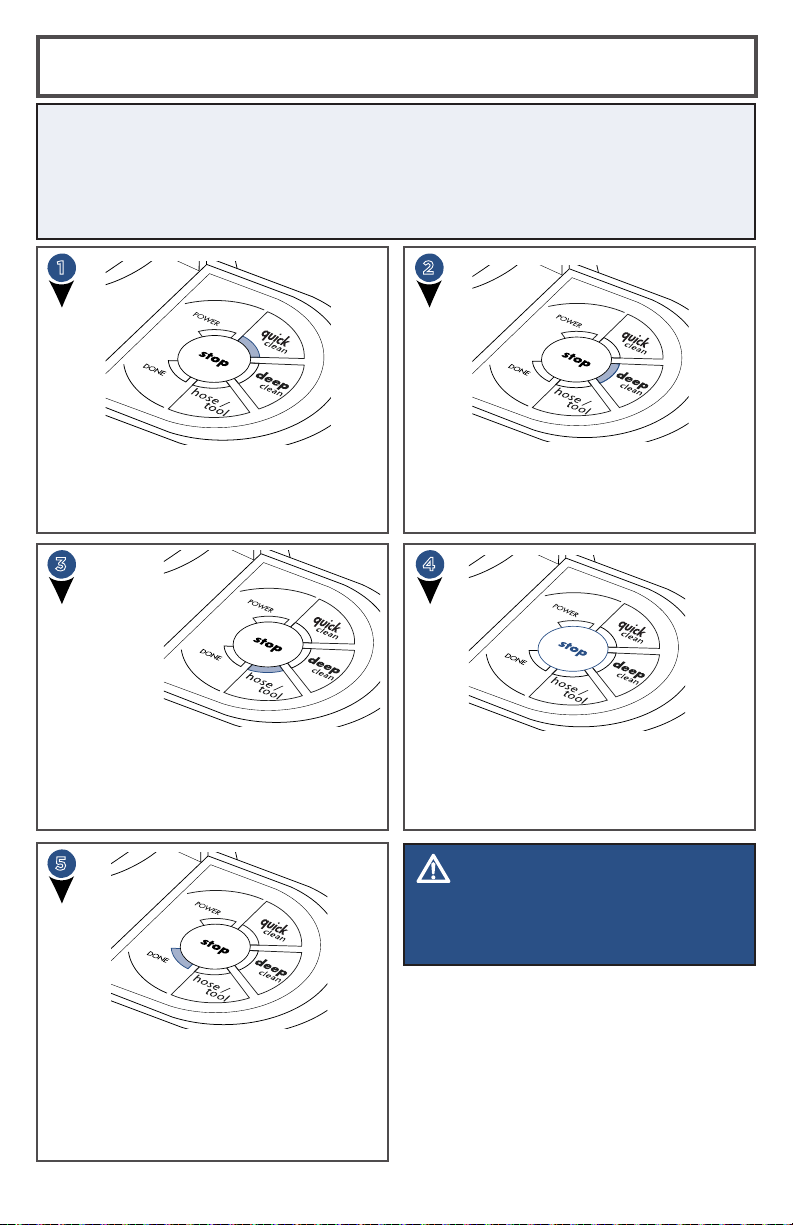
Using the Automatic Cleaning Cycles
1
Quick Clean This cycle has been designed
for stains that are on the surface of your
carpeting. This cycle will run for approxi-
mately 3 minutes.
Hose/Tool By selecting this option you
can clean spots and stains using the hose
and tool on surfaces such as upholstery,
stairs, car interiors or any other hard to
reach area.
Done This light will illuminate and you will
hear a series of “beeps” when the cleaning
cycle is complete. Press the STOP button
to turn the machine OFF. The machine will
not beep when turned OFF.
Deep Clean Use on stains that have had
time to set-in. These are typically the most
difficult stain types to remove. This cycle
runs for approximately 6 minutes.
Stop By pressing the red stop button, you
will stop the cleaning cycle completely. To
begin cleaning again, you will need to start
over and select a cleaning cycle.
4
2
3
5
Tips Before Using Your SpotBot®
• Dry vacuum the area first, before spot cleaning with the SpotBot.
• Some spots and spills require that you pick up the chunky debris with a rag
or towel before you begin cleaning in the automatic or manual cycles.
WARNING
Keep spray away from face. Failure to do
so may result in personal injury.
www.BISSELL.com
9
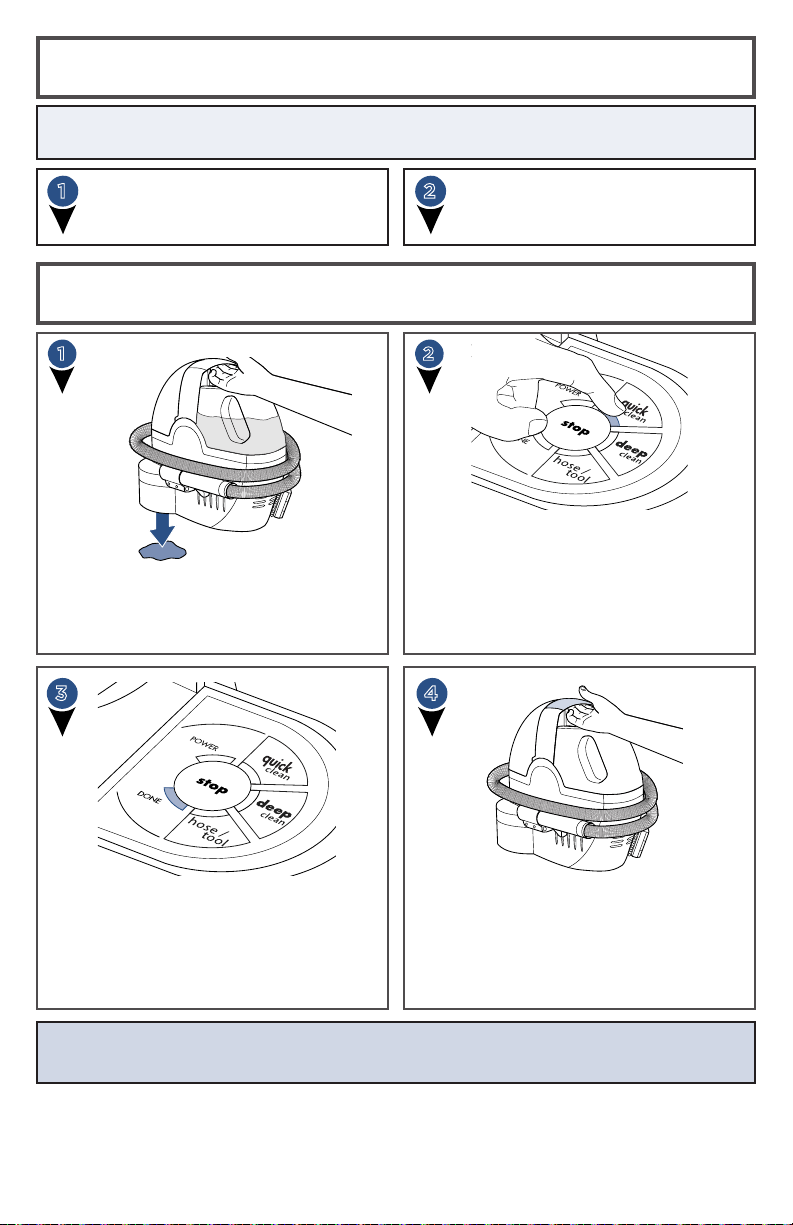
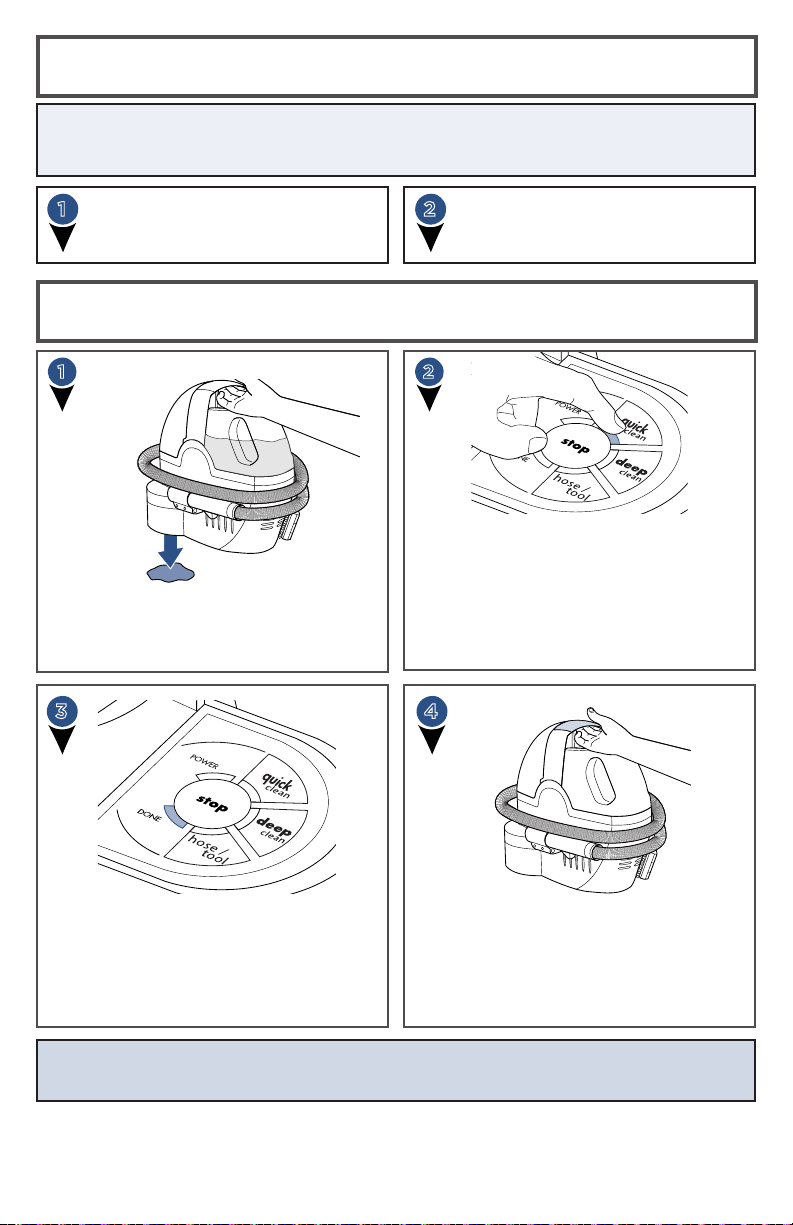
Hands-Free Cleaning
Important! Please check manufacturer’s tag before cleaning area rugs for any
specialized cleaning instructions. Not for use on silk or delicate area rugs.
Getting Started
21
Select which cleaning cycle (Quick Clean
or Deep Clean) you would like to use.
SpotBot® will begin spraying, brushing
and suctioning the soiled area, in a pre-
programmed cycle. Both cycles have been
tested and proven to deliver superior
cleaning results, taking the guesswork and
effort out of cleaning for you.
Pick up the unit and check the area that
was cleaned.
If you use BISSELL® Oxy Boost, it will
continue to work for the next six to eight
hours, cleaning your spots and stains all
the way to the backing of the carpet.
Place the unit directly over the spot or
stain, making sure the stain is in the center
of the cleaning area.
When the cleaning cycle you have
selected is complete, the Done light will
illuminate and the machine will sound a
series of “beeps”. Press the STOP button
to turn the machine OFF. The machine
will not beep when turned OFF
3 4
Before using, test a small
inconspicuous area for
colorfastness.
Select “Hose/Tool” and follow
manual cleaning instructions on
page 10 to test.
21
NOTICE: To prevent damage to Berber carpets, avoid repeated cleaning cycles in
the same area.
www.BISSELL.com
10
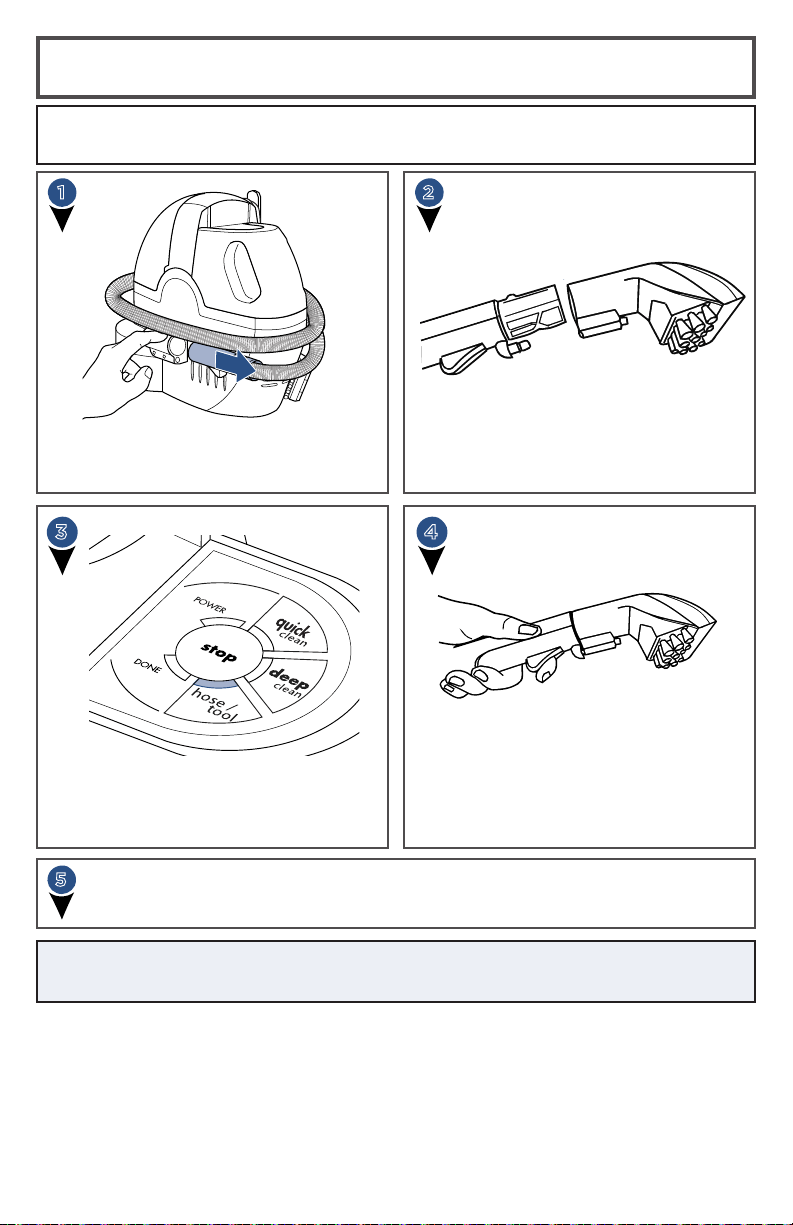
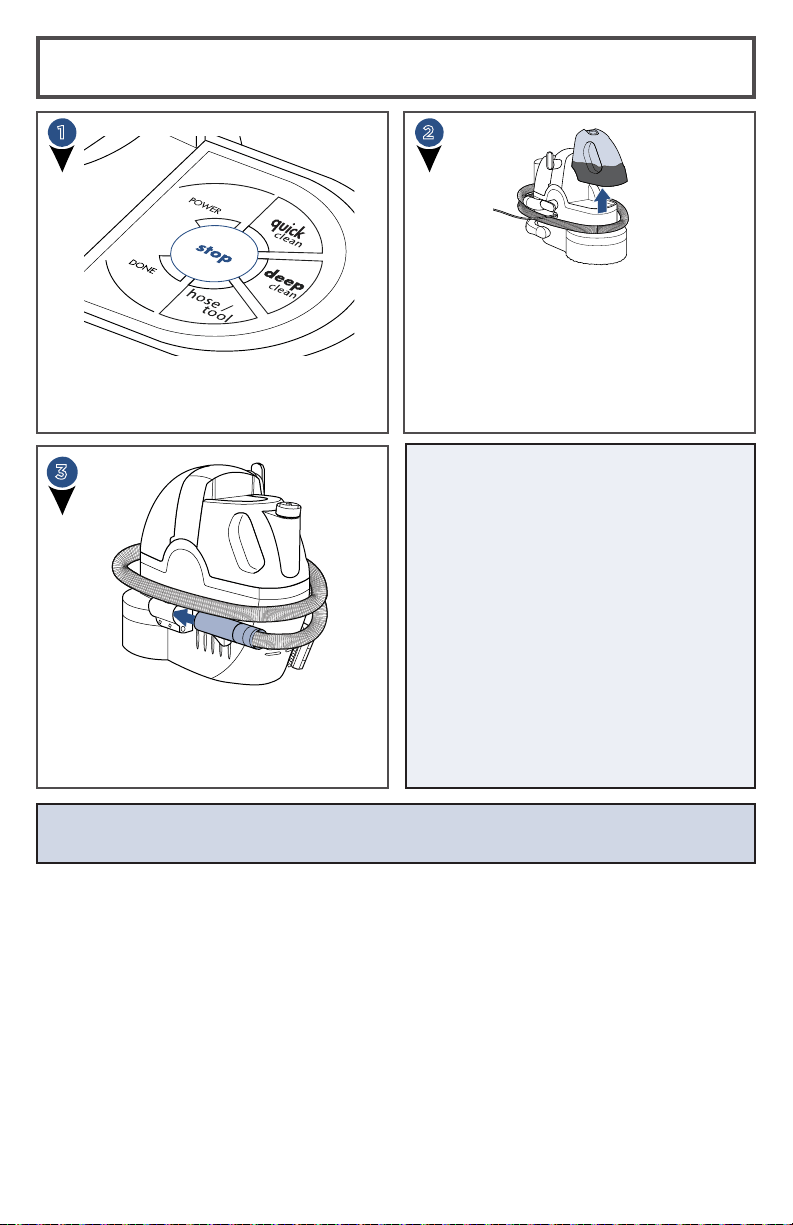
Manual Cleaning
Check upholstery stung before cleaning. Colored stung may bleed through
the fabric when it becomes wet. Check manufacturer’s tag before cleaning.
21
Remove the Tough Stain Tool from the
back of the unit, then attach it onto the
grip of the hose.
Press the Spray Trigger button to spray
the soiled area, then slowly move tool
back and forth over the area.
Release the trigger to suck up the dirty
solution. Work in small sections until the
area is clean.
Remove the hose from the unit by
pressing the release button and pulling
outward on end of hose.
Select the Hose/Tool button on the
control panel to start the SpotBot®.
3 4
5
If the stain is still visible, repeat step 4 as necessary.
NOTE: In manual mode, the SpotBot® is equipped with a safety feature which will
shut the unit OFF after 30 minutes.
www.BISSELL.com
11
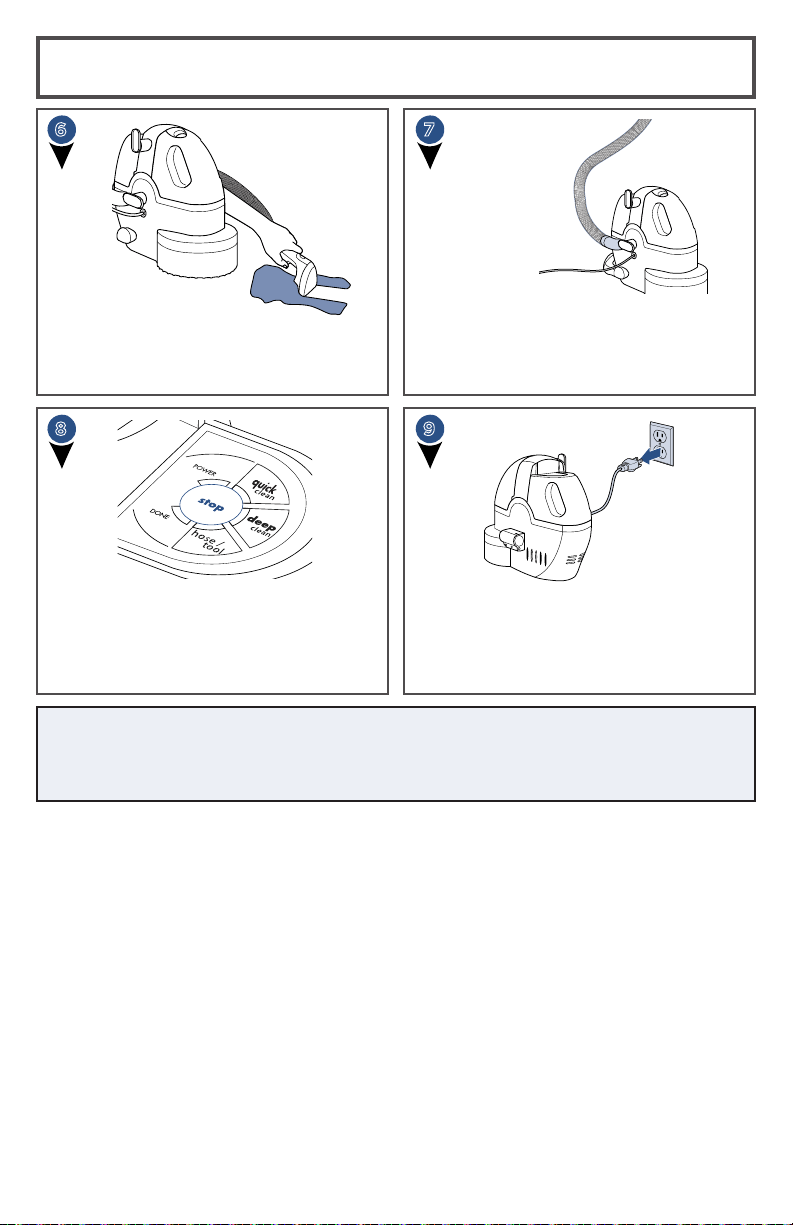
Tips While Cleaning
• Periodically clean out the black valve inside of the Dirty Water Tank.
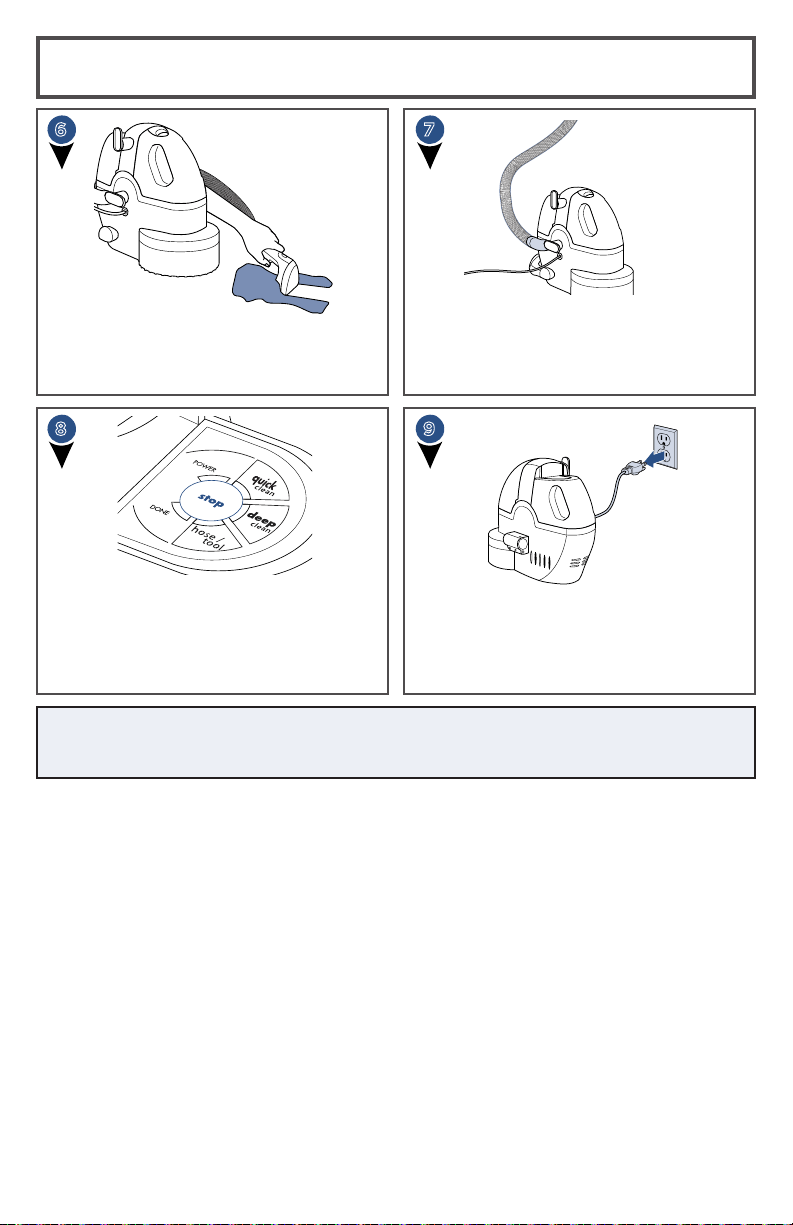
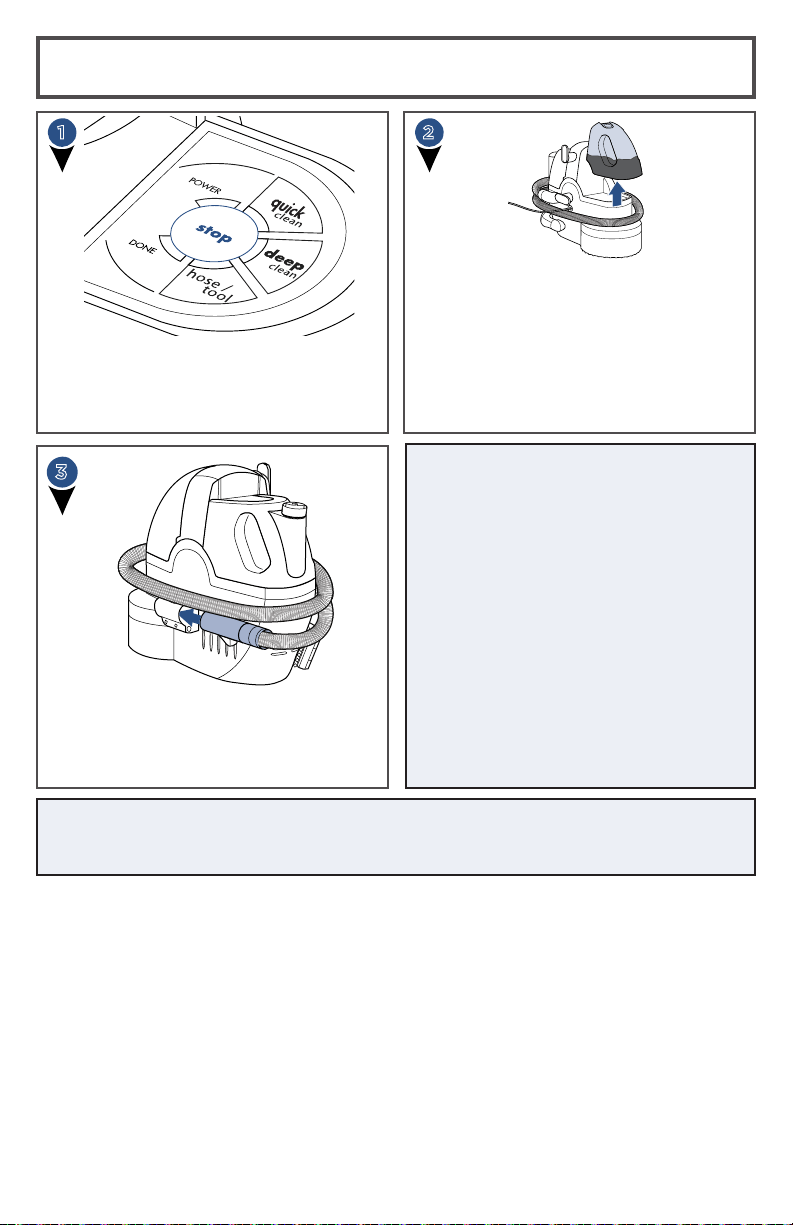
When the cleaning is complete, lightly
drag the suction nozzle across the stain
without pressing the trigger. This will help
dry the cleaned area.
Press the STOP button to turn OFF the
machine, then disconnect the cleaning
tool from the Vacuum Flex Hose by
pushing down on the button lock and
pulling straight off (do not twist tools
to remove them).
Before turning OFF the SpotBot®, suction
up clean water to thoroughly rinse out the
inside of the Vacuum Flex Hose. Then, lift
the Vacuum Flex Hose upwards to drain
any remaining water into the dirty tank.
Unplug the machine and wrap the cord
around the Cord Wraps. Attach the Tough
Stain Brush to the base of machine. Wrap
the hose around the machine and secure
into the Hose Connector.
7
9
6
8
Manual Cleaning
www.BISSELL.com
12
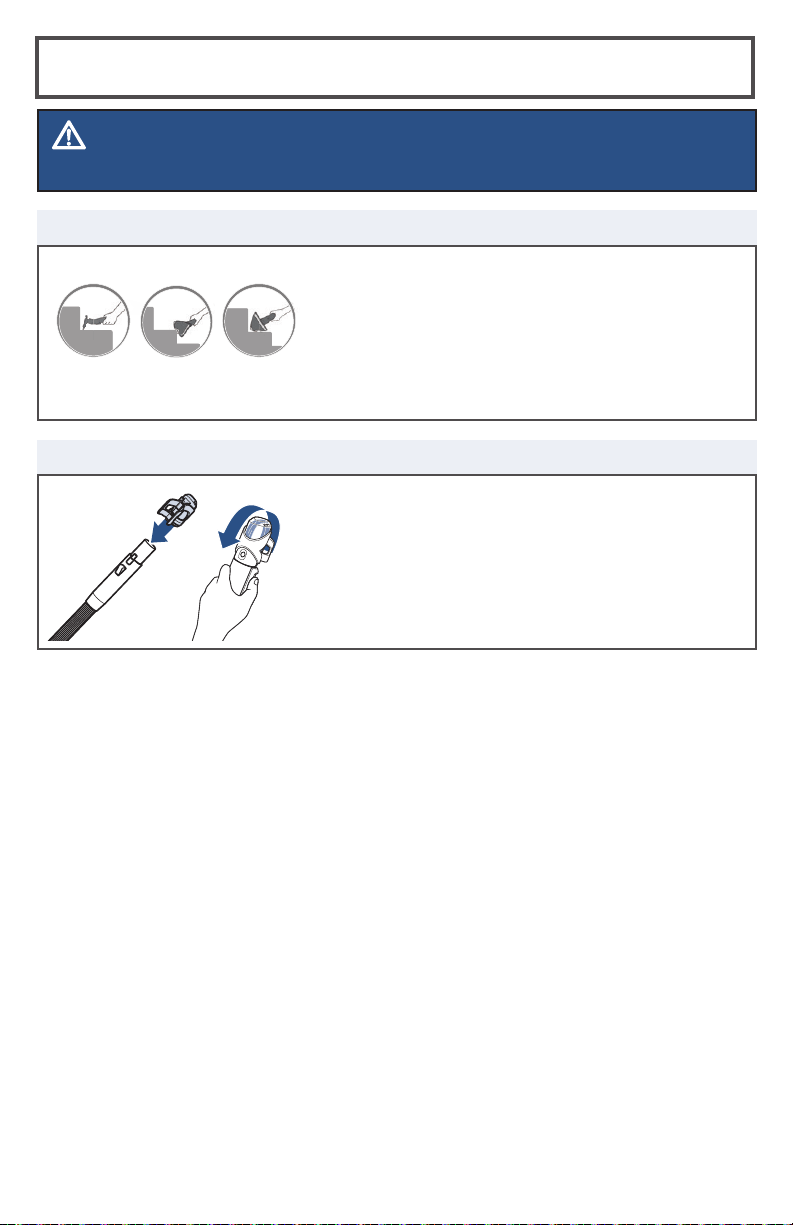
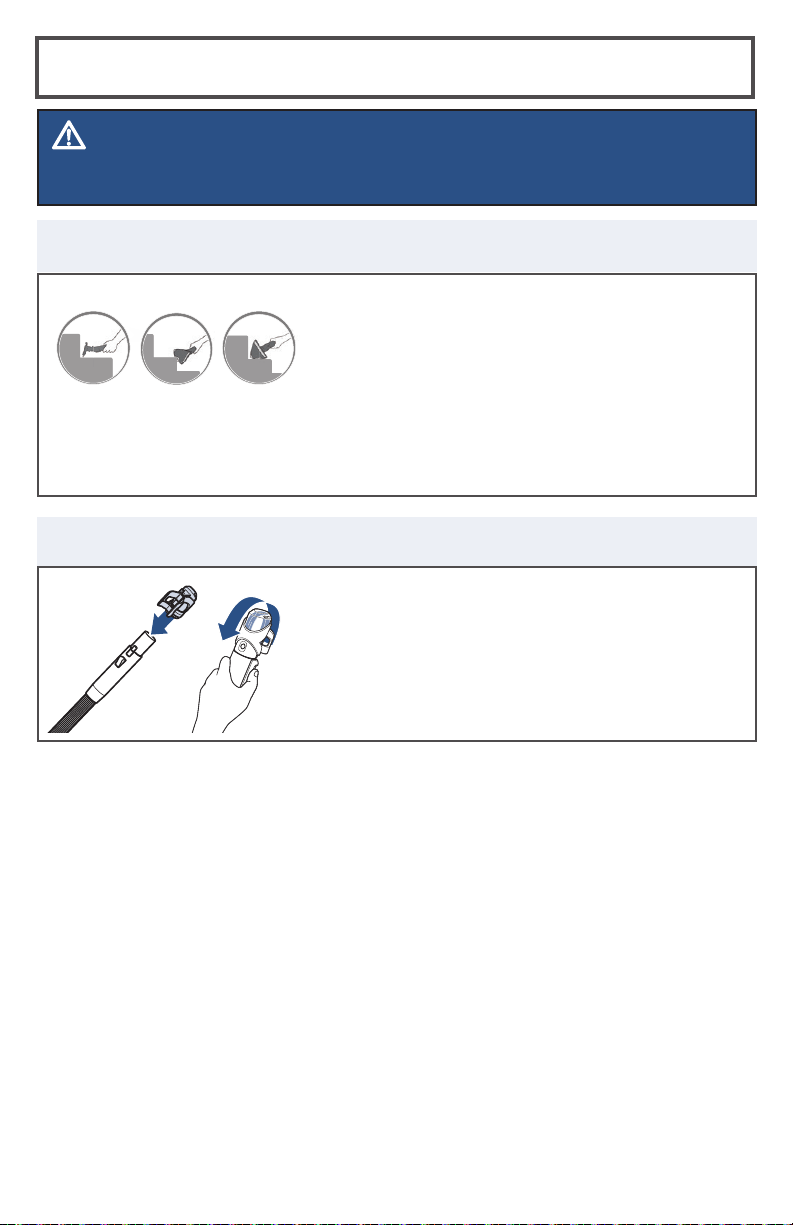
CLEANING WITH THE HYDRORINSE™ TOOL (select models)
CLEANING WITH THE 3-N-1 STAIR TOOL (select models)
WARNING
Keep spray away from face. Failure to do so may result in personal injury.
1 2 3
FLAT
NOSE
CREVICE
Attach the 3-n-1 Stair Tool to the cleaning hose. This
versatile 3-way tool sprays, scrubs and suctions up
dirt and stains from the outer curves, corner and tread
of a carpeted stairs. Twist the tool head to desired
setting to clean. The downward facing edge is the
active cleaning mode: (a) use the flat area to clean
top of stairs, (b) use pointed edge to clean inside
crevice, (c) use indented area to clean outer corner.
Attach the HyrdoRinse™ tool to the cleaning hose.
Hold the hose and attachment in an upright position.
Then hold down the trigger to rinse the hose for 30
seconds.
The HydroRinse tool can be stored on the right
handle or on the hose in between use.
A
B
C
Cleaning with Tools
www.BISSELL.com
13
Tips for Storing
• If a significant amount of water and
solution remains in the clean tank,
your unit can be stored with liquid in
the clean tank. However, if you have
added Oxy Boost into the clean
tank, it cannot be stored in the unit
and should be emptied and rinsed.
• Keep your machine clean and clean
out the black valve periodically
inside of the Dirty Water Tank.
• Store machine in a protected, dry
area.
Maintenance and Care
21
Empty and rinse the Dirty Water Tank
after each use. To remove the tank, lift
up the dirty tank latch and pull the tank
out. Dump out the dirty water and rinse.
Replace the tank into the unit for storage.
After using the automated feature on
SpotBot®, wipe the window and brushing
area with a soft cloth.
Press the STOP button to turn the unit OFF.
Unplug the Power Cord from the outlet.
Wrap Power Cord around the cord wrap.
If you were using your SpotBot® manually,
wrap the Vacuum Flex Hose around the
unit and secure the hose into the Hose
Connector on the front of the unit.
3
NOTICE: To reduce the risk of a leaking condition, do not store unit where
freezing may occur. Damage to internal components may result.

www.BISSELL.com
14
Troubleshooting
WARNING
To reduce the risk of electric shock, turn power OFF and disconnect plug from
electrical outlet before performing maintenance or troubleshooting checks.
Problem Possible causes Remedies
AUTOMATED CLEANING
SpotBot® will
not run
Power Cord not plugged in Check electrical plug
Blown fuse/tripped breaker Replace household fuse or reset breaker
Vacuum Flex Hose is not snapped
into place securely
Check to make sure the Vacuum Flex
Hose is snapped into place
Unusual or
odd noise
Clean Water/Solution Tank is
out of fluid
Fill tank
Reduced or
no spray
Clean Water/Solution tank is out
of fluid
Fill tank
Clean Water/Solution tank is not
inserted into the unit securely
Gently press the tank until you see
"bubbles" coming from the base
No suction
Tank is full Empty tank
Dirty Water Tank latch
is not down
Push latch down, securely into place
Black valve on the Dirty
Water Tank is missing
Replace black valve onto tank
MANUAL CLEANING
Cleaner will
not run
Power Cord not plugged in Check electrical plug
Blown fuse/tripped breaker Replace household fuse or reset breaker
Hose not removed from receiver Remove hose
SpotBot® shut OFF automatically
during use
Press Pause/Resume button to resume
manual cleaning
Unusual or
odd noise
Clean Water/Solution Tank is
out of fluid
Fill tank
Reduced or
no spray
Spray tip clogged on Tough Stain
Tool
Clean spray tip
Clean Water/Solution Tank is out
of fluid
Fill tank
Clean Water/Solution Tank is not
inserted into the unit securely
Gently press the tank until you see
“bubbles” coming from the base
No suction
Tank is full Empty tank
Dirty Water Tank latch is not down Push latch down, securely into place
Black valve on the Dirty
Water Tank is missing
Replace black valve onto tank

www.BISSELL.com
15
If your BISSELL® product should
require service:
Contact BISSELL Consumer Care to locate a
BISSELL Authorized Service Center in your
area. If you need information about repairs or
replacement parts, or if you have questions about
your warranty, contact BISSELL Consumer Care.
This warranty gives you specific legal rights,
and you may also have other rights which
may vary from state to state. If you need
additional instruction regarding this warranty
or have questions regarding what it may
cover, please contact BISSELL Consumer
Care by E-mail or telephone as described
below.
It may be necessary to obtain some of your
personal information, such as a mailing
address, to fulfill terms of this warranty. Any
personal data will be handled pursuant to
BISSELL’s Privacy Policy, which can be found
online at www.BISSELL.com/privacy-policy.
Limited Two-Year Warranty
Subject to the *Exceptions and Exclusions
from the Terms of the Limited Warranty,
upon receipt of the product BISSELL will
repair or replace (with new, refurbished,
lightly used, or remanufactured components
or products), at BISSELL’s option, free
of charge from the date of purchase by
the original purchaser, for two years, any
defective or malfunctioning part.
See information below on "If your BISSELL
product should require service”.
This warranty applies to product used for
personal, and not commercial or rental,
service. This warranty does not apply to
fans or routine maintenance components
such as filters, belts or brushes. Damage or
malfunction caused by negligence, abuse,
neglect, unauthorized repair, or any other use
not in accordance with the user guide is not
covered. This warranty will only be valid if the
product is used in the same country in which
it was sold.
BISSELL is not liable for incidental or
consequential damages of any nature
associated with the use of this product.
BISSELL’s liability will not exceed the
purchase price of the product.
Some states do not allow the exclusion or
limitation of incidental or consequential
damages, so the above limitation or
exclusion may not apply to you.
*Exceptions and Exclusions from the
Terms of the Limited Warranty
This warranty is exclusive and in lieu of
any other warranties, either oral or written.
Any implied warranties, which may arise
by operation of law, including the implied
warranties of merchantability and fitness for
a particular purpose, are limited to the two-
year duration from the date of purchase as
described above.
Some states do not allow limitations on how
long an implied warranty lasts, so the above
limitation may not apply to you.
Warranty
NOTE: Please keep your original sales receipt. It provides proof of date of purchase in the
event of a warranty claim.
Service
Please do not return this product
to the store.
Other maintenance or service not included
in the manual should be performed by an
authorized service representative.
Website:
www.BISSELL.com/service-centers
E-mail:
www.BISSELL.com/email-us
Call:
BISSELL Consumer Care
1-800-237-7691
Monday – Friday: 8am - 10pm ET
Saturday: 9am - 8pm ET
Sunday: 10am - 7pm ET

16
©2019 BISSELL Inc.
Grand Rapids, Michigan
All rights reserved. Printed in China.
Part Number 162-0328 03/19 RevF
Visit our website at: www.BISSELL.com
Registering is quick, easy and offers you benefits over the lifetime of your product.
You’ll receive:
Visit www.BISSELL.com/registration!
Visit the BISSELL website: www.BISSELL.com
When contacting BISSELL, have model number of cleaner available.
Please record your Model Number: ___________________
Please record your Purchase Date: ___________________
NOTE: Please keep your original sales receipt. It provides proof of purchase
date in the event of a warranty claim. See Warranty page for details.
BISSELL Rewards Points
Automatically earn points for
discounts and free shipping on
future purchases.
Faster Service
Supplying your information now
saves you time should you need
to contact us with questions
regarding your product.
Product Support
Reminders and Alerts
We’ll contact you with any
important product maintenance
reminders and alerts.
Special Promotions
Optional: Register your email
to receive notice of offers,
contests, cleaning tips, and more!
Love yr BISSELL® product?
Don’t keep it a secret.
Let us, and millions of others, know what you think!
Leave your star-rating on BISSELL.com
www.BISSELL.com
Parts & Supplies
For Parts and Supplies, go to www.BISSELL.com and enter your model
number in the search field.
Register your product today!
www.BISSELL.com
17
SPOTBOT
®
Limpiadora profunda
portátil
_______________
GUÍA DEL USUARIO
SERIE 2114, 2117

www.BISSELL.com
18
INSTRUCCIONES IMPORTANTES DE SEGURIDAD
ADVERTENCIA
PARA REDUCIR EL RIESGO DE INCENDIOS,
CHOQUE ELÉCTRICO O LESIONES:
» Utilice solamente los productos de limpieza de BISSELL® para ser usados en
esta máquina para evitar daños a los componentes internos. Consulte la
sección de líquidos de limpieza de esta guía.
» Enchufe solo en un tomacorriente correctamente conectado a tierra.
Consulte las instrucciones para la puesta a tierra. No modifique el enchufe
de 3 clavijas con conexión a tierra.
» Desenchufe del tomacorriente cuando no se use y antes de efectuar tareas
de servicio.
» No exponga a la lluvia. Almacene en interiores.
» No permita que se use como un juguete. Se debe estar muy atento cuando
la usan los niños o cuando se usa cerca de ellos.
» No la utilice para ningún otro propósito que no sean los que se describen
en esta guía del usuario. Use únicamente los accesorios que recomienda
el fabricante.
» No la use si el cordón o el enchufe están dañados. Si el electrodoméstico no
funciona como debiera, si se lo ha dejado caer, dañado, dejado al aire libre,
o si se ha caído en el agua, haga que lo reparen en un centro de servicio
autorizado.
» No arrastre ni cargue por el cordón eléctrico ni utilice el cordón como si
fuera una manija. No cierre la puerta sobre el cordón ni tire del mismo
sobre bordes ni esquinas filosas. No pase el electrodoméstico por arriba del
cordón. Mantenga el cordón alejado de superficies calientes.
» No desenchufe tirando del cordón. Al desenchufar, agarre el enchufe, no
el cordón.
» No toque el electrodoméstico ni el enchufe con las manos mojadas.
» No coloque ningún objeto en las aberturas. No use con aberturas
bloqueadas. Mantenga las aberturas libres de polvo, pelusas, pelos y
cualquier cosa que pueda reducir el flujo de aire.
» Mantenga el pelo, la ropa holgada, los dedos y cualquier parte del cuerpo
lejos de las aberturas y piezas móviles.
» Apague todos los controles antes de enchufar o desenchufar el
electrodoméstico.
» Tenga mucho cuidado al limpiar en escaleras.
» No la use para recoger materiales inflamables ni combustibles (fluido para
encendedores, gasolina, queroseno, etc.) ni la use en áreas donde pueda
haberlos.
» No utilice el electrodoméstico en un espacio cerrado lleno de vapores de
pintura al aceite, disolventes de pintura, ciertas sustancias antipolillas,
polvos inflamables u otros vapores explosivos o tóxicos.
» No la use para recoger materiales tóxicos (blanqueador con cloro,
amoníaco, limpiador de drenajes, etc.).
» No aspire nada que se esté quemando o humeando, como cigarrillos,
fósforos o cenizas calientes.
» Mantenga el electrodoméstico sobre una superficie nivelada.
» No cargue el electrodoméstico mientras está en uso.
» La película de plástico puede ser peligrosa. Para evitar el riesgo de asfixia,
procura mantenerla fuera del alcance de los niños.
» No lo sumerjas en agua ni en ningún líquido.
» No se deben arrojar líquidos hacia los equipos que contengan piezas
eléctricas.
» No sumerjas el producto en líquidos. Úsalo solo en superficies firmes que
hayan quedado húmedas tras limpiarlas. Utiliza únicamente productos de
limpieza BISSELL® destinados a esta limpiadora.
» Utiliza exclusivamente el tipo y la cantidad de líquido que se especifican en
la sección defuncionamiento de esta guía.
» Usa el producto solo en moquetas que han quedado húmedas tras
limpiarlas.
Este modelo está diseñado solamente para uso doméstico. El uso comercial de esta unidad anula la garantía del fabricante.
GUARDE ESTAS INSTRUCCIONES
PARA USO FUTURO
ADVERTENCIA
La conexión incorrecta del conector de conexión
a tierra del equipo puede resultar en un riesgo de
choque eléctrico. Compruebe con un electricista o
una persona de servicio calificada si no está seguro
si está correctamente conectado a tierra. NO
MODIFIQUE EL ENCHUFE. Si no cabe correctamente
en el tomacorriente, haga que un electricista calificado
instale uno correctamente. Este electrodoméstico está
diseñado para ser usado en un circuito de 120 voltios
nominales, y tiene un enchufe con puesta a tierra
similar al enchufe del dibujo. Asegúrese de que el
electrodoméstico esté conectado a un tomacorriente
que tenga la misma configuración del enchufe.
No se debe usar un adaptador para enchufes
con este electrodoméstico.
INSTRUCCIONES PARA LA
CONEXIÓN A TIERRA
Este artefacto se debe conectar a un sistema de
cableado con conexión a tierra. Si falla o se
descompone, la conexión a tierra proporciona una vía
segura de menor resistencia para la corriente eléctrica,
reduciendo el riesgo de choque eléctrico. El cordón de
este electrodoméstico tiene un conductor de conexión a
tierra del equipo y un enchufe con conexión a tierra.
Se debe enchufar solamente
en un tomacorriente
correctamente instalado
y con conexión a tierra de
acuerdo con todos los
códigos y ordenanzas.
Tomacorriente
con puesta
a tierra
Clavija de
puesta a tierra
LEA TODAS LAS INSTRUCCIONES ANTES DE USAR SU LIMPIADORA PROFUNDA PORTÁTIL.
Cuando se utiliza un electrodoméstico es necesario tomar precauciones básicas, que incluyen las siguientes:

www.BISSELL.com
19
Instrucciones de seguridad...2
Vista del producto ..........4
Características especiales ....5
Fórmulas de limpieza ........5
Funcionamiento ..........7-12
Mantenimiento y cuidado ...13
Identificación de fallas ......14
Garantía....................15
Servicio ....................15
Registro del producto.......16
Piezas y suministros ........16
Contenido del paquete
¡Muchas gracias por comprar una limpiadora de
alfombras BISSELL®!
Nos gusta mucho limpiar y nos entusiasma compartir uno de nuestros
productos innovadores con usted. Queremos asegurarnos de que su limpiadora
de alfombras funcione tan bien dentro de dos años como funciona hoy, por eso,
esta guía incluye consejos sobre el uso (página 25), mantenimiento (página 29)
y si hay un problema, identificación de fallas (página 30).
En solamente unos pocos pasos sencillos de preparación, usted estará listo para
hacer una limpieza profunda. ¡Vaya a la página 23 y pongámonos en marcha!
1. Unidad SpotBot®
2. Herramienta para manchas rebeldes
3. Fórmula BISSELL
4. Fórmula BISSELL Boost*
5. Accesorio de autolimpieza
HydroRinse™ para la manguera*
6. Accesorio para escalera 3 en 1*
*Solo en modelos específicos
1.
2. 3.
4. 5. 6.
www.BISSELL.com
20
Vista del producto
ADVERTENCIA
No enchufe su limpiadora profunda hasta que se haya familiarizado con todas
las instrucciones y los procedimientos de operación.
1 Tanque de agua sucia/
recolección
2 Cierre de liberación del tanque
3 Manija de transporte
4 Panel de Control Automatic
Smart System
5 Tanque de agua limpia/
solución
6 Conector de manguera
7 Gatillo para el rocío
8 Soportes para envolver el
cordón
9 Cordón eléctrico
10 Manguera flexible de aspiración
11 Accesorio para manchas
difíciles
12 Almacenamiento del accesorio
para manchas difíciles
13 Ventana de limpieza
14 Cepillos avanzados
15 Boquilla de succión
1
2
3
4
5
6
7
8
9
8
10
11 12
13
14
15
www.BISSELL.com
21
Características especiales
Vista de frente
4 - Panel de control de ciclos de limpieza preseleccionados
Ubicado en la parte superior de la unidad, encontrará el panel
de control. Seleccione el ciclo de limpieza que quisiera usar
(hay instrucciones detalladas en la página 9). “Encendido”
y “Listo” no son botones; “Encendido” es una luz indicadora
que le indica cuando la SpotBolt® está “encendida”. “Listo” es
una luz indicadora que le indica cuando se ha completado el
ciclo de limpieza.
7 - Gatillo para el rocío
Presione el gatillo para soltar agua y fórmula sobre el área de
la alfombra a ser limpiada. (Use solamente en el modo hose/
tool).
10 - Manguera flexible de aspiración
Se envuelve alrededor del centro de la unidad y sirve como vía
de recorrido para el agua sucia y la fórmula aspirada dentro del
tanque para agua sucia/recolección.
También se puede desenvolver y usar con la herramienta para
manchas rebeldes para la limpieza manual en el modo
manguera/herramienta.
Vista inferior
12 - Cepillos avanzados
Cepillan, limpian y cuidan la alfombra.
13 - Boquillas de succión
Proporciona la vía de succión cuando se usa los ciclos de
limpieza sin manos.
Vista posterior
14 - Almacenamiento del accesorio para manchas difíciles
Almacenado a bordo para su conveniencia.
15 - Ventana de limpieza
Proporciona un área para ver la acción de limpieza sin manos.
NOTA: desenvuelva completamente el cordón eléctrico antes
de usar la unidad.
4
14
15
7
10
12
13
www.BISSELL.com
22
Use siempre fórmulas auténticas BISSELL para la limpieza profunda. Las soluciones de
limpieza que no son de BISSELL pueden dañar la máquina y anularán la garantía.
Fórmulas de limpieza
ADVERTENCIA
Para reducir el riesgo de incendio y choques eléctricos debido a daños de componentes
internos, use sólo líquidos de limpieza BISSELL® para la limpiadora profunda.
Una nota sobre la formula de BISSELL
•
Uno de los ingredientes efi caces para eliminar manchas en Oxi Boost y Pet Oxy Boost
es el peróxido de hidrógeno. Es posible que el producto afecte algunas personas
cuando entra en contacto con la piel, es posible que vuelva el color de la piel blanco
y/o que cause cosquilleo. Lavarse las manos después de usarlo y aplicar loción
eliminará la posibilidad de decoloración blanca. Este efecto también puede ocurrir
usando BISSELL DeepClean + Antibacterial 2-in-1 formula.
AVISO: use solo las fórmulas para máquinas portátiles BISSELL (con la característica de boost si
lo desea) en su limpiadora. El uso de fórmulas de limpieza, que contienen limón, aceite de pino o
vinagre, podría dañar el electrodoméstico y anular la garantía. Tampoco deben utilizarse limpiadores
de manchas químicos o removedores para pisos a base de solventes. Estos productos pueden tener
una reacción con los materiales plásticos utilizados en su limpiadora, causando roturas o picaduras.
Algunas marcas se usan bajo licencia de The Procter & Gamble Company o sus afiliados.
Fórmula BISSELL
Oxy Boost para
alfombras y
tapicería
Fórmula BISSELL
Boost Pro para
alfombras y
tapicería
Fórmula
BISSELL
Professional Spot
& Stain + Oxy
Fórmula
BISSELL 2X® Pet
Stain & Odor
Utilice la fórmula
Professional
para obtener
resultados
de limpieza
óptimos.
Fórmula BISSELL
Pet Oxy Boost
para alfombras
y tapicería
www.BISSELL.com
23
Llenado del tanque de agua limpia:
Fórmula para máquina portátil (concentrada 2X)
Vierta más potencia en la
máquina con BISSELL Boost
• Llene el tanque con agua y fórmula
2X (Paso 4anterior)
• Añada 1 onza de cualquier BISSELL
Boost.
Para llenar el tanque de agua limpia/solución,
extraiga el tanque de agua limpia alzándolo de
manera recta hacia arriba y luego separando
de la unidad.
Agregue agua corriente caliente hasta la
línea de llenado del agua.
No utilice agua hirviendo. No caliente el agua
ni el tanque en el horno de microondas.
Destornille la tapa amarilla en la parte
superior del tanque de agua limpia.
Gire la tapa de nuevo en su sitio y
coloque el tanque de nuevo en la unidad.
Agregue fórmula siguiendo la línea
de llenado que dice “formula” en su
tanque de agua limpia.
1
4
2
3
5
www.BISSELL.com
24
Usando los ciclos de limpieza automáticos
1
Quick Clean (Limpieza rápida) Este ciclo ha
sido diseñado para manchas que están sobre
la superficie de su alfombra. Este ciclo funciona
durante aproximadamente 3 minutos.
Hose/Tool
(Manguera
/Accesorio)
Al seleccionar esta
opción usted puede limpiar manchas usando la
manguera y la herramienta en superficies como
tapizados, escaleras, interior de automóviles y
otras superficies difíciles de alcanzar.
Done (Listo) Se iluminará esta luz y
escuchará una serie de “tonos” cuando se
haya completado el ciclo de limpieza. Presione
el botón STOP (apagado) para encender la
unidad o para apagarla. La máquina no emitirá
tonos cuando se apaga.
Deep clean (Limpieza profunda) Use en
manchas que hayan tenido tiempo de fijarse.
Estas son típicamente las manchas más difíciles
de eliminar. Este ciclo funciona durante
aproximadamente 6 minutos.
Stop (Detener) Al presionar el botón rojo,
detiene completamente el ciclo de limpieza.
Para comenzar a limpiar de nuevo, tendrá que
comenzar de nuevo y seleccionar un ciclo de
limpieza.
4
2
3
5
Consejos antes de usar su SpotBot®
• Aspire el área en seco primero, antes de hacer la limpieza de manchas con la
SpotBot®.
• Algunas manchas y derrames requieren que recoja la suciedad gruesa con un paño o
una toalla antes de comenzar a limpiar en los ciclos automáticos o manuales.
ADVERTENCIA
Mantenga el rocío lejos de la cara. Si no se
cumple con esto podrían sobrevenir lesiones
personales.
www.BISSELL.com
25
Limpieza sin manos
¡Importante! Por favor inspeccione el rótulo del fabricante antes de limpiar
tapetes para ver si tienen instrucciones especializadas para la limpieza. No lo
use en seda o tapetes delicados.
Cómo empezar
21
Levente la unidad y compruebe el área
que se ha limpiado.
Si usa BISSELL® Oxy Boost, seguirá
trabajando durante las próximas seis a ocho
horas, limpiando sus manchas completamente
hasta el respaldo de la alfombra.
Coloque la unidad directamente arriba de
la mancha, asegurándose de que la man-
cha esté en el centro del área de limpieza.
Cuando se haya completado el ciclo que
ha seleccionado, se iluminará la luz Done
y la máquina emitirá una serie de “tonos”.
Presione el botón STOP para apagar la
máquina. La máquina no emitirá tonos
cuando se apaga.
3 4
Antes de usar pruebe en un área poco
visible si los colores son firmes.
Seleccione “Hose/Tool” y siga las
instrucciones de limpieza del manual
en la página 11 para probar.
21
ATENCIÓN: para evitar daños a las alfombras Berber, evite los ciclos de limpieza
repetidos en la misma área.
Seleccione qué tipo de ciclo de limpieza (Quick
Clean (limpieza rápida) o Deep clean (limpieza
profunda) quisiera usar. SpotBot® comenzará a
rociar, cepillar y aspirar el área
manchada, en un
ciclo previamente programado.
Se ha probado
ambos ciclos y probaron entregar resultados de
limpieza superiores, eliminando las conjeturas y
el trabajo de la limpieza para usted.

www.BISSELL.com
26
Limpieza manual
•
Inspeccione el relleno del tapizado antes de limpiar. Los rellenos de color mojados
pueden desteñir y manchar el tapizado. Antes de limpiar compruebe primero el rótulo del
fabricante.
21
Extraiga el cepillo para manchas rebeldes de la
parte posterior de la unidad, luego instálelo en
la empuñadura de la manguera.
Presione el botón del gatillo de rocío para
rociar el área manchada, luego mueva la
herramienta lentamente hacia atrás y adelante
sobre el área.
Suelte el gatillo para aspirar la solución sucia.
Trabaje en secciones pequeñas hasta que el
área esté limpia.
Extraiga la manguera de la unidad presionando
el botón de liberación.
Seleccione el botón Hose/Tools
(Manguera/accesorio) en el panel de
control para poner en marcha la SpotBot®.
3 4
5
Si la mancha todavía sigue visible, repita el paso 4 en la medida que sea
necesario.
NOTA: en el modo manual, la SpotBot® está equipada con una característica de
seguridad que apagará la unidad después de 30 minutos.
www.BISSELL.com
27
Consejos mientras limpia
• Limpie periódicamente la válvula negra dentro del tanque de agua sucia /
recolección.
Cuando haya completado la limpieza, arrastre
ligeramente la boquilla de succión a través de
la mancha sin presionar el gatillo. Esto ayudará
a secar el área que se ha limpiado.
Presione el botón STOP para apagar la
máquina, luego desconecte la herramienta de
limpieza de la manguera flexible de succión
empujando hacia abajo en el bloqueo de botón
y tirando para sacarla (no gire las herramientas
para extraerlas).
Antes de apagar
la SpotBot®, aspire
agua limpia para
enjuagar completamente el interior
de la manguera flexible de aspiración. A
continuación, levante la manguera flexible de
aspiración hacia arriba para drenar el agua
restante dentro del tanque de agua sucia.
Desenchufe la máquina y envuelva el cordón
alrededor de los soportes para el cordón.
Instale el cepillo para manchas rebeldes en la
base de la máquina. Envuelva la manguera
alrededor de la máquina y asegúrela adentro
del conector de la manguera.
7
9
6
8
Limpieza manual
www.BISSELL.com
28
LIMPIEZA CON EL ACCESORIO HYDRORINSE™ (solo en modelos
seleccionados)
LIMPIEZA CON EL ACCESORIO PARA ESCALERAS 3 EN 1 (solo en modelos
seleccionados)
ADVERTENCIA
Mantenga el chorro alejado del rostro. El incumplimiento de dicho paso puede provocar
lesiones personales.
1 2 3
FLAT
NOSE
CREVICE
Fije el accesorio para escaleras 3 en 1 a la manguera
de limpieza. Este versátil accesorio de 3 vías rocía,
restriega y aspira la suciedad y las manchas de las
curvas exteriores, las esquinas y los escalones de las
escaleras alfombradas. Gire el cabezal del accesorio
hasta el ajuste deseado para limpiar. El borde
orientado hacia abajo es el modo de limpieza activo:
(a) use el área plana para limpiar la parte superior de
las escaleras; (b) use el borde en punta para limpiar
las ranuras interiores; (c) use el área dentada para
limpiar las esquinas exteriores.
Fije el accesorio HyrdoRinse™ a la manguera de
limpieza.
Sostenga la manguera y el accesorio en posición
vertical. Luego, mantenga presionado el gatillo
durante 30 segundos para enjuagar la manguera.
El accesorio HydroRinse™ se puede almacenar en el
mango derecho o en la manguera entre cada uso.
A
B
C
Limpieza con accesorios
www.BISSELL.com
29
Consejos para el
almacenamiento
• Si en el tanque de limpieza queda una
cantidad significativa de agua y solución,
su unidad puede almacenarse con el líquido
en el tanque de limpieza. Sin embargo,
si ha añadido Oxy Boost en el tanque de
limpieza, este no se puede guardar en la
unidad y debe vaciarla y enjuagarla.
• Mantenga la máquina limpia y limpie
periódicamente la válvula negra dentro del
tanque de recolección/agua sucia.
• Almacene la máquina en un área seca y
protegida.
Mantenimiento y cuidado
21
Vacíe y enjuague el tanque de agua sucia/
recolección después de cada uso. Para extraer
el tanque, levante el cierre del tanque de agua
sucia y tire del tanque para sacarlo. Deseche
el agua sucia y enjuague. Vuelva a instalar el
tanque en la unidad para almacenar. Después
de usar la característica automatizada de la
SpotBot®, limpie el área de la ventana y de
cepillado con un paño suave.
Presione el botón STOP (apagado) para apagar
la unidad. Desenchufe el cordón de alimentación
del tomacorriente. Envuelva el cordón alrededor
del soporte para enrollar el cordón.
Si está usando manualmente su SpotBot®,
envuelva la manguera flexible de succión
alrededor de la unidad y asegure la mangu-
era en el conector para manguera en la parte
delantera de la unidad.
3
NOTA: guarde la limpiadora en un área protegida y seca. Debido a que este producto usa
agua no se lo debe guardar donde corra riesgo de congelarse. Si se congela dañará los
componentes internos y anulará la garantía.

www.BISSELL.com
30
Identificación de fallas
ADVERTENCIA
Para reducir el riesgo de choque eléctrico, apague el interruptor de encendido y desconecte el enchufe del
tomacorriente antes de efectuar tareas de mantenimiento o hacer una comprobación para identificar fallas.
Problema Causas posibles Acciones correctivas
LIMPIEZA AUTOMATIZADA
SpotBot® no
funciona
El cordón de alimentación no está enchufado Compruebe el enchufe eléctrico
Fusible quemado o disyuntor disparado Reemplace el fusible o restablezca el disyuntor
La manguera flexible de aspirado no se ha
calzado de manera segura en su sitio
Compruebe para asegurar que la manguera
flexible de vacío haya calzado en su sitio
Ruido inusual
o raro
El tanque de agua limpia/solución no tiene
solución
Llene el tanque de agua limpia/solución
Rocío a baja
intensidad o sin
rocío
El tanque de agua limpia/solución no tiene
solución
Llene el tanque de agua limpia/solución
No se ha insertado en la unidad de manera
segura el tanque de agua limpia/solución
Presione suavemente el tanque de agua limpia/solución
hasta que vea "burbujas" saliendo de la base del tanque
No hay
succión
El tanque está lleno Tanque vacío
El cierre del tanque de agua sucia/recolección
no está hacia abajo
Empuje el cierre hacia abajo, de manera segura en su
sitio
Falta la válvula negra en el tanque de agua
sucia/recolección
Vuelva a instalar la válvula negra en el tanque de agua
sucia/recolección
LIMPIEZA MANUAL
La limpiadora no
funciona
El cordón de alimentación no está enchufado Compruebe el enchufe eléctrico
Fusible quemado o disyuntor disparado Reemplace el fusible o restablezca el disyuntor
No se extrajo la manguera del receptor Extraiga la manguera
SpotBot® se apaga automáticamente durante
el uso
Presione el botón pausa/continuar para seguir con la
limpieza manual
Ruido inusual
o raro
El tanque de agua limpia/solución no tiene
líquido
Llene el tanque de agua limpia/solución
Rocío a baja
intensidad o sin
rocío
La punta de rociado está obturada en el
cepillo para manchas rebeldes
Limpie las puntas de rociado
El tanque de agua limpia/solución no tiene
líquido
Llene el tanque de agua limpia/solución
No se ha insertado en la unidad de manera
segura el tanque de agua limpia/solución
Presione suavemente el tanque de agua limpia/solución
hasta que vea "burbujas" saliendo de la base del tanque
No hay succión
El tanque está lleno Tanque vacío
El cierre del tanque de agua sucia/recolección
no está hacia abajo
Empuje el cierre hacia abajo, de manera segura en su
sitio
Falta la válvula negra en el tanque de agua
sucia/recolección
Vuelva a instalar la válvula negra en el tanque de agua
sucia/recolección

www.BISSELL.com
31
Si su producto BISSELL necesita
reparación:
Póngase en contacto con Atención al Consumidor de
BISSELL para ubicar un Centro de servicio autorizado
de BISSELL en su área. Si necesita información sobre
reparaciones o piezas de repuesto, o si tiene preguntas
sobre la garantía, póngase en contacto con Atención al
Consumidor de BISSELL.
Esta garantía le otorga derechos legales específicos,
pero podría tener también otros derechos que
varían según el estado. Si necesita instrucciones
adicionales con respecto a esta garantía o tiene
preguntas sobre lo que esta cubre, póngase en
contacto con Atención al Consumidor de BISSELL
por correo electrónico o teléfono, como se describe
a continuación.
Quizá sea necesario obtener algunos de sus datos
personales, como la dirección de correo electrónico,
para completar los términos de esta garantía.
Cualquier dato personal se tratará conforme a la
Política de privacidad de BISSELL, que se encuentra
en línea en www.BISSELL.com/privacy-policy.
Garantía limitada de tres años
Sujeta a las *Excepciones y exclusiones de los
términos de la garantía limitada, presentando el
comprobante de compra del producto, BISSELL
reparará o reemplazará (con componentes o
productos nuevos, refaccionados, levemente
utilizados o fabricados nuevamente), a discreción
de BISSELL, sin costo a partir de la fecha de
compra del comprador original y durante tres
años, cualquier pieza defectuosa o con mal
funcionamiento.
Consulte la información a continuación sobre
“Si su producto BISSELL necesita un servicio de
mantenimiento”.
Esta garantía se aplica al producto utilizado para
el servicio personal y no comercial o de alquiler.
Esta garantía no se aplica a los ventiladores o
a los componentes de mantenimiento de rutina
como filtros, correas o cepillos. Los daños o el mal
funcionamiento causados por negligencia, uso
inadecuado, descuido, reparación no autorizada
o cualquier otro uso que no se ajuste a la Guía del
usuario no están cubiertos. Esta garantía solo será
válida si el producto se utiliza en el mismo país en el
cual se vendió.
BISSELL no se hace responsable de ningún daño
accidental o resultante de ninguna naturaleza
relacionado con el uso de este producto. La
responsabilidad de BISSELL no superará el precio
de compra del producto.
Algunos estados no permiten la exclusión o
limitación de los daños accidentales o resultantes,
de modo que es posible que las exclusiones o
limitaciones anteriores no se apliquen en su caso.
*Excepciones y exclusiones de los términos
de la garantía limitada
Esta garantía es exclusiva y reemplaza a cualquier
otra garantía oral o escrita. Cualquier garantía
implícita que pueda surgir por una operación
legal, que incluya las garantías implícitas de
comerciabilidad e idoneidad para un fin en
particular, está limitada a tres años de duración
a partir de la fecha de compra como se detalló
anteriormente.
Algunos estados no permiten limitaciones sobre el
tiempo de duración de una garantía implícita, de
modo que la limitación antes descrita puede que no
se aplique en su caso.
Garantía
NOTA: conserve el recibo de venta original. Es el comprobante de la fecha de compra en
caso de una reclamación de garantí
Reparación
No devuelva este producto a la tienda.
Cualquier otro mantenimiento o reparación que
no se incluya en el manual debe ser realizado por
un representante de servicio autorizado.
Sitio Web::
www.BISSELL.com/service-centers
Correo electrónico:
www.BISSELL.com/email-us
Llame a:
Atención al Consumidor de BISSELL
1-800-237-7691
De lunes a viernes: de 8 a. m. a 10 p. m., hora del Este
Sábados: de 9 a. m. a 8 p. m., hora del Este
Domingos: de 10 a. m. a 7 p. m., hora del Este

32
©2019 BISSELL Inc.
Grand Rapids, Michigan
All rights reserved. Printed in China.
Part Number 162-0328 03/19 RevF
Visit our website at: www.BISSELL.com
El registro es rápido, fácil y le ofrece beneficios durante la vida útil de su producto.
Usted recibirá:
¡Visite www.BISSELL.com/registration ahora mismo!
Visítenos en línea en: BISSELL.com
Al comunicarse con BISSELL, tenga a mano el número de modelo de la limpiadora.
Anote su número de modelo: ___________________
Anote su fecha de compra: ___________________
NOTA: Guarde el recibo original de compra. Servirá como comprobante de
la fecha de compra en caso de que necesite hacer un reclamo de garantía.
Consulte la Garantía para ver los detalles.
Puntos de recompensa de
BISSELL
Gane puntos automáticamente
para descuentos y envío gratis de
compras futuras.
Servicio más rápido
Si suministra su información ahora
le ahorrará tiempo en caso de que
necesite comunicarse con nosotros
con preguntas sobre su producto.
Recordatorios y alertas de
apoyo para su producto
Nos comunicaremos con usted con
recordatorios de mantenimiento y
alertas importantes sobre el
producto.
Promociones especiales
Opcional: ¡Registre su correo
electrónico y reciba avisos de
ofertas, concursos, sugerencias
para la limpieza y mucho más!
¿Le encta su producto BISSELL®?
No se guarde el secreto. Comparta su opinión con
nosotros y con millones de personas.
Deje su calificación con estrellas en BISSELL.com
www.BISSELL.com
Piezas y suministros
Por piezas y suministros vaya a BISSELL.com e ingrese el número de su
modelo en el campo de búsqueda.
¡Registre su producto hoy mismo!
