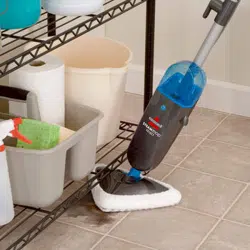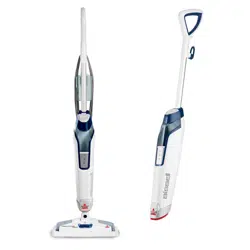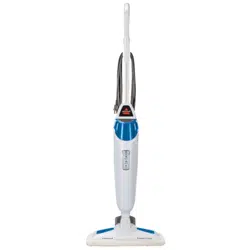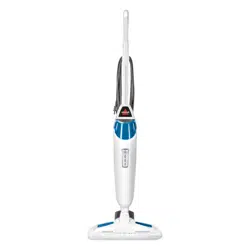

POWERFRESH
®
SLIM STEAM
MOP
_______________
USER GUIDE
2181 SERIES

www.BISSELL.com
2
IMPORTANT SAFETY INSTRUCTIONS
WARNING
TO REDUCE THE RISK OF FIRE, ELECTRIC SHOCK,
OR INJURY:
» This appliance can be used by children 8 years old and
above, and persons with reduced physical, sensory
and mental capabilities or lack of experience and
knowledge if they have been given supervision or
instruction concerning use of the appliance in a safe
way and understand the hazards involved. Cleaning
and user maintenance shall not be made by children
without supervision.
» Children should be supervised to ensure that they do
not play with the appliance.
» If the cord is damaged, it must be replaced by the
manufacturer, its service agent or similarly qualified
persons in order to avoid a hazard.
» Use extra care when cleaning on stairs.
» Do not use with damaged cord or plug.
» Do not use outdoors.
» Always turn off this appliance before connecting or
disconnecting the nozzle. Do not direct steam at
people, animals, or at electrical outlets.
» Unplug from outlet when not in use and before
conducting maintenance or troubleshooting.
» Do not leave steam cleaner unattended.
» Do not expose hair, loose clothing, fingers or body
parts to openings or moving parts.
» Do not service steam cleaner when it is plugged in.
» Do not handle steam cleaner with wet hands.
» Do not use steam cleaner if it has been dropped,
damaged, left outdoors or dropped into water, return it
to a service center.
» Do not pull or carry by cord, use cord as a handle,
close door on cord, pull cord around sharp corners or
edges, or expose cord to heated surfaces.
» Do not unplug by pulling on cord.
» Do not use appliance in an enclosed space filled with
vapor given off by oil-base paint, paint thinner, some
moth proofing substances, flammable dust, or other
explosive or toxic vapors.
» Do not allow to be used as a toy.
» Do not use on leather, wax polished furniture or floors,
synthetic fabrics, velvet or other delicate, steam-
sensitive materials.
» Do not immerse in water or liquid.
» Not for space heating purposes.
» Do not use for any purpose other than described in
this User’s Guide.
» Use only manufacturer’s recommended attachments
– use of attachments not provided or sold by BISSELL
may cause fire, electric shock or injury.
» Never put descaling, aromatic, alcoholic, detergent or
vinegar products into the steam cleaner, as this may
damage it or make it unsafe for use.
» Unplug by grasping the plug, not the cord.
» Close attention is necessary when used by or near
children.
» Keep the appliance out of reach of children when it is
energized or cooling down.
» The foot surfaces are liable to get hot during use.
» Do not open the aperture during use.
READ ALL INSTRUCTIONS BEFORE USING YOUR STEAM MOP.
When using an electrical appliance, basic precautions should be observed, including the following:
Always connect to a polarized outlet (left slot is wider than right). Unplug from outlet when not in use and before conducting maintenance.
This model is for household use only. Commercial use of this unit voids the manufacturer’s warranty.
SAVE THESE INSTRUCTIONS
FOR FUTURE USE
THESE SYMBOLS MEAN WARNING:
Any use of steam has the potential
danger of scalding.
WARNING
SURFACE MAY BE HOT. AVOID CONTACT.
www.BISSELL.com
3
Thanks for buying a BISSELL
PowerFresh® Slim Steam Mop
Safety Instructions...........2
Product View................4
Assembly ...................5
Operations ...............6-10
Maintenance & Care ......11-13
Troubleshooting ............14
Warranty ...................15
Service .....................15
Product Registration........16
Consumer Care.............16
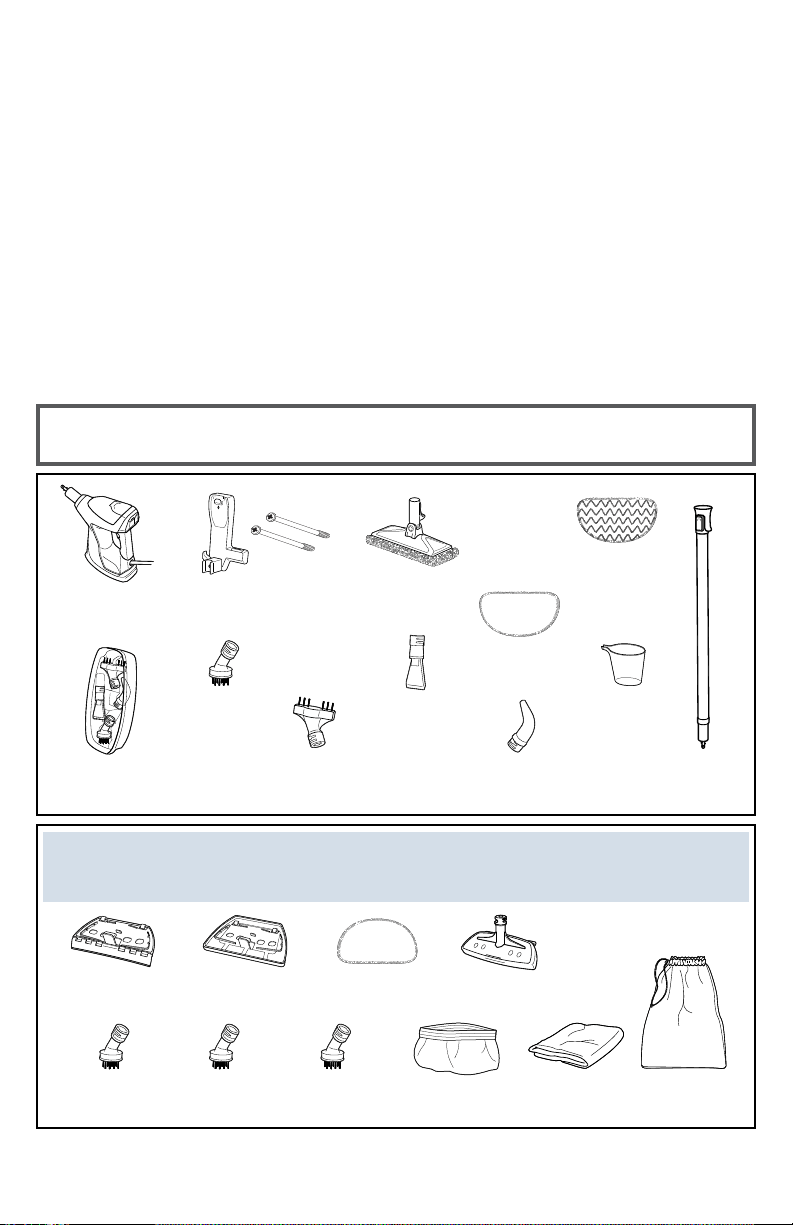
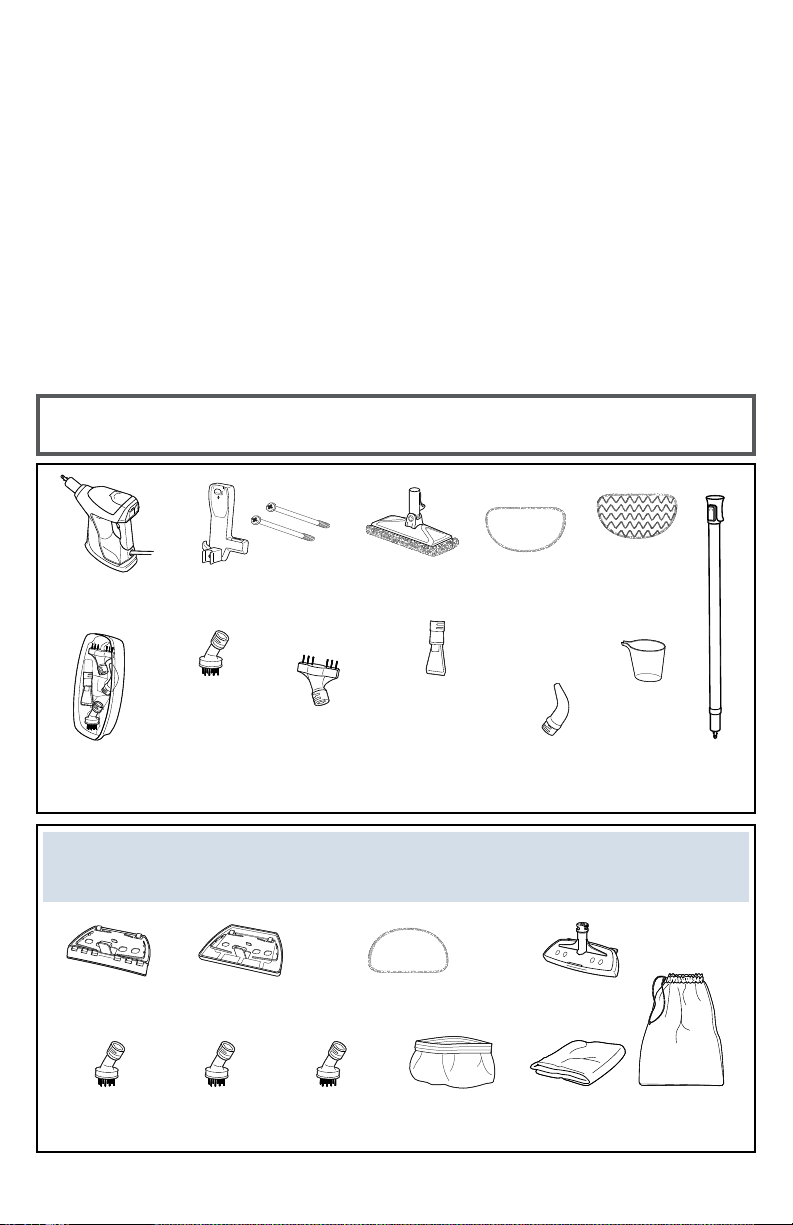
What’s In The Box?
Handheld
Pod
Extension
Wand
Wall Mount &
Screws
Mop Pad
Foot
White Mop
Pad
Scrubby Mop
Pad
Tool Box with
Tools
Water
Cup
Green Bristle
Brush
(comes in toolbox)
Grout
Tool
(comes in toolbox)
Angle
Concentrator Tool
(comes in toolbox)
Flat Scraper
Tool
(comes in toolbox)
Window
Squeegee
Flat Surface
Mop Pad
Fabric Steamer
Cloth
Fabric
Steamer
Flat Surface
Tool
Black Bristle
Brush
Brass Bristle
Brush
Tool BagMicrofiber
Towel
Red Bristle
Brush
Your steam mop needs a little assembly before you can put it to work,
so flip to page 5 and let’s get started!
VARIES BY MODEL
Standard accessories may vary by model. To identify what should be included with your purchase, please refer to the “Carton
Contents” list located on the carton top flap.
www.BISSELL.com
4
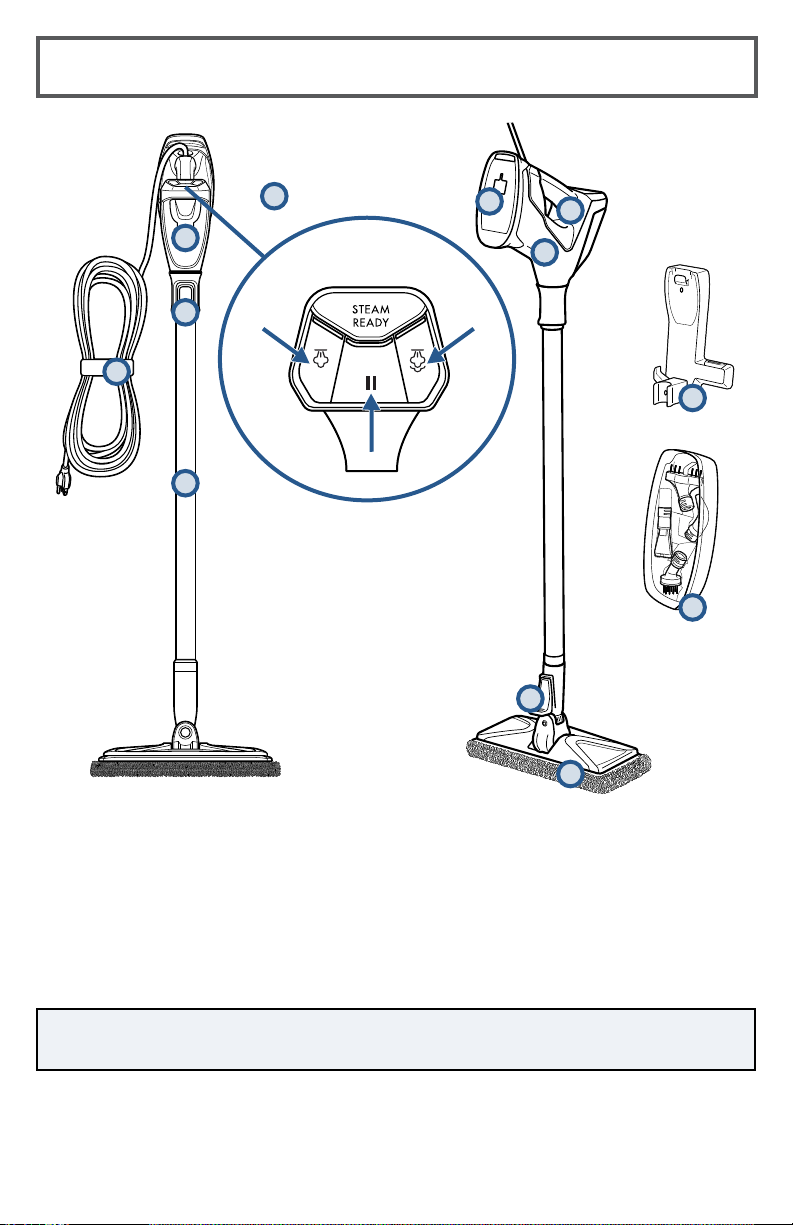
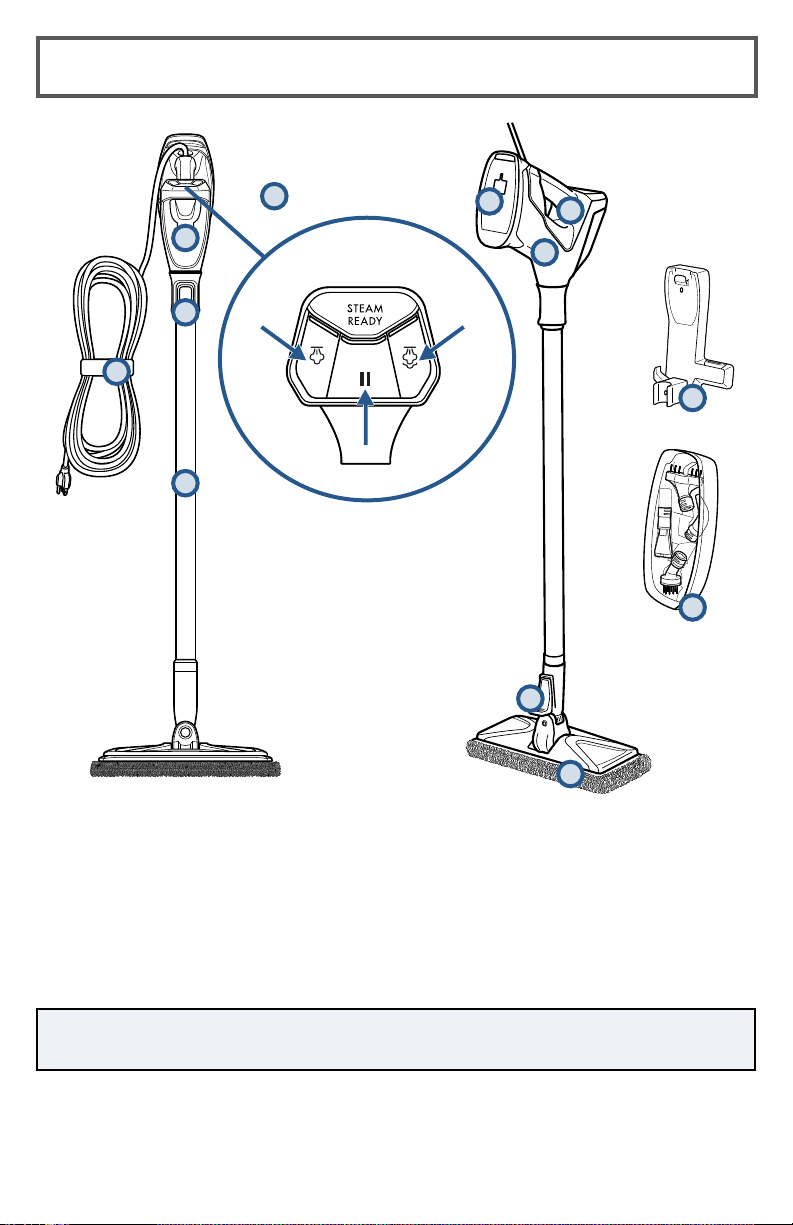
Getting to Know Your Steam Mop
3
2
7
4
5
6
8
9
1 SmartSet Steam Control
2 Easy Fill Water Tank
3 Handheld Pod Release Button
4 Power Cord with Wrap Strap
5 Extension Wand
6 Handheld Pod
7 Steam Trigger
8 Wall Mount Storage Clip Area
9 Extension Wand Release Pedal
10 Mop Pad Foot
11 Wall Mount
12 Tool Box
12
10
NOTE: Tool Box stores Green Bristle Brush, Angle Concentrator Tool, Grout Tool,
and Flat Scraper Tool.
PAUSE
HI Steam
LOW Steam
1
11
www.BISSELL.com
5
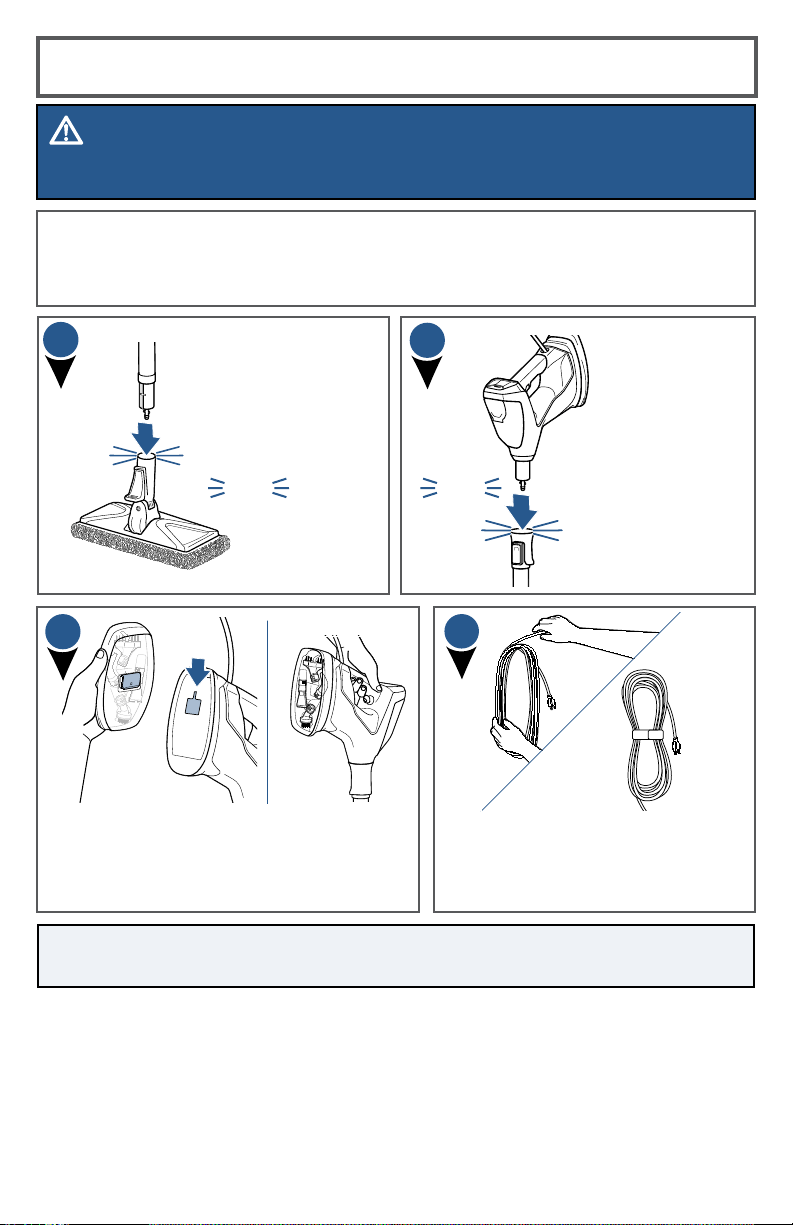
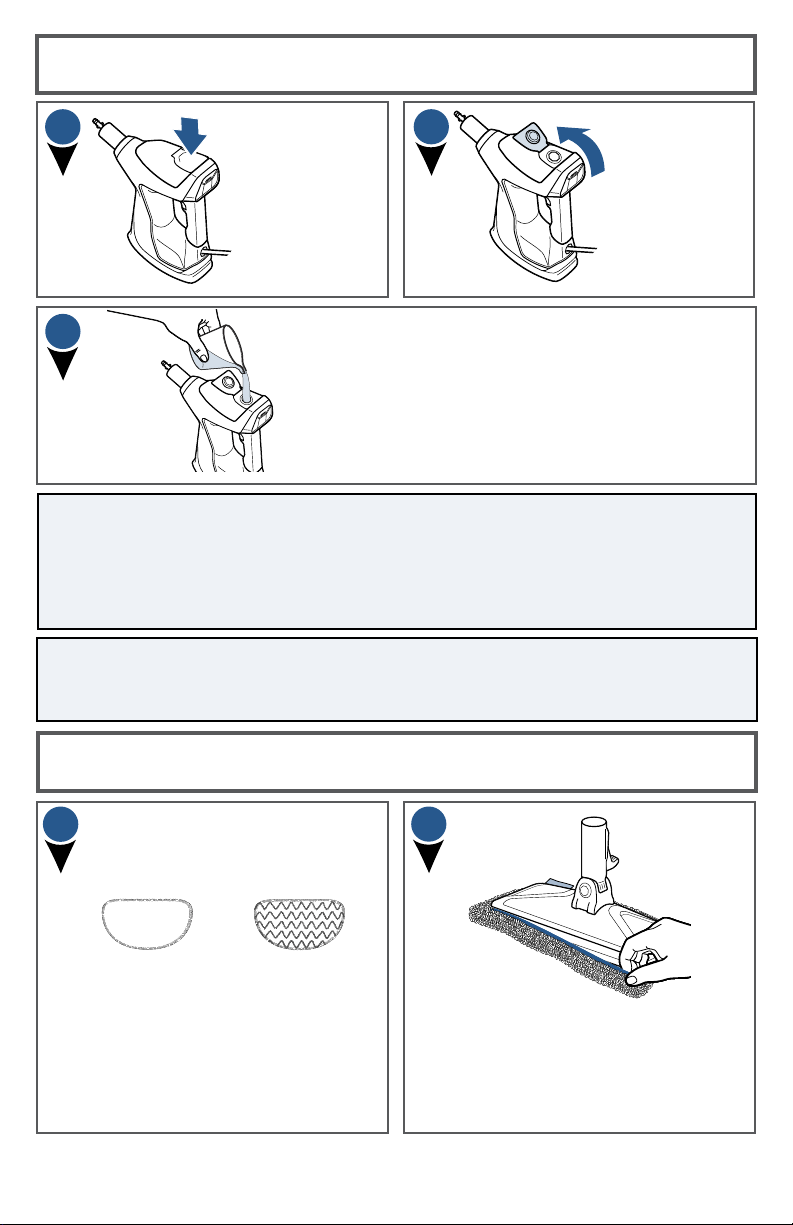
Assembly
WARNING
Do not plug in your PowerFresh® Slim Steam Mop until you are familiar with all instructions
and operating procedures.
Your BISSELL PowerFresh® Slim Steam
Mop assembles quickly and easily. It is
packaged with the following items:
• Handheld Pod
• Extension Wand
• Mop Pad Foot
click
Then, insert the
Handheld Pod to the
Extension Wand until
it clicks into place.
Attach the Extension
Wand to the Mop Pad
Foot by snapping it
into place.
NOTE: For instructions on attaching the Wall Mount and Storage, please refer to
page 12.
3
4
Wrap the cord around the palm of
your hand into a circle. Then, place
the wrap strap around the cord and
back onto itself to secure.
click
1
2
Attach the tool box to the Handheld Pod by
aligning the clip on the back side of the Tool
Box to the opening on the bottom of the
Handheld Pod and slide down into place.
www.BISSELL.com
6
Filling Your Water Tank
A few notes about filling the Water Tank:
• The Water Tank’s capacity is 350 mL (12 oz).
DO NOT USE CHEMICALS IN THE WATER TANK OF YOUR POWERFRESH®
SLIM STEAM MOP.
• Other solutions may harm the machine and void the warranty.
NOTE:
Use of distilled water or demineralized water is recommended to prolong the
life of your steam mop. To add a fresh scent as you clean, try BISSELL demineralized
waters in various scents like Citrus, Eucalyptus Mint and Spring Breeze.
Pull the water
tank cap straight
up to open.
1
2
The clean water
tank is located
on the top of the
Handheld Pod.
3
Use water cup provided and fill with distilled or
demineralized water, recommended in place of tap water.
Close the water tank cap after filling.
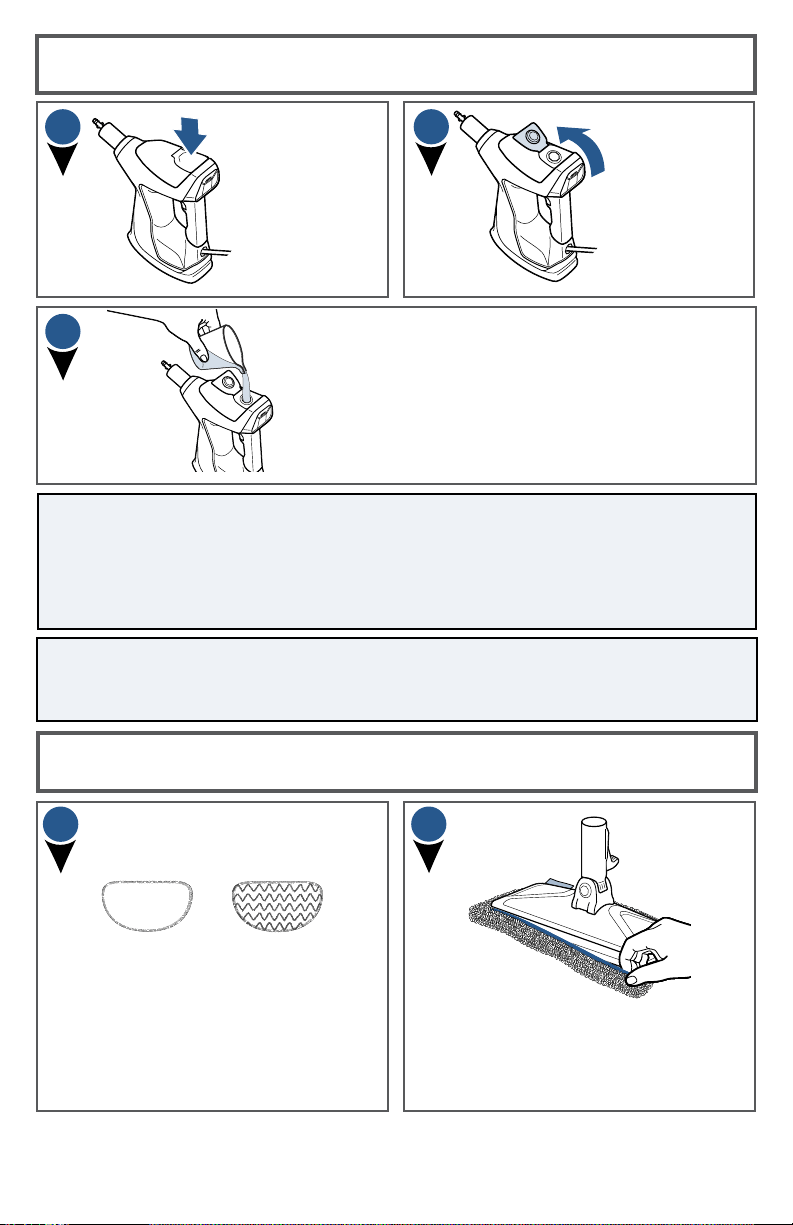
Attaching
Microfiber Mop Pads
The White Mop Pad is best for everyday
use on delicate flooring like sealed
hardwoods and laminate. The Scrubby
Mop Pad is recommended for durable
surfaces like tile.
To attach mop pad, wrap mop pad
around the bottom of the foot, making
sure the gray stitching is located on the
front of the foot and the Quick Grip
Release™ Tab is located on the back.
1
2
Scrubby
Mop Pad
White
Mop Pad
Your PowerFresh® Slim Steam
Mop may have come with two
different pads.
www.BISSELL.com
7
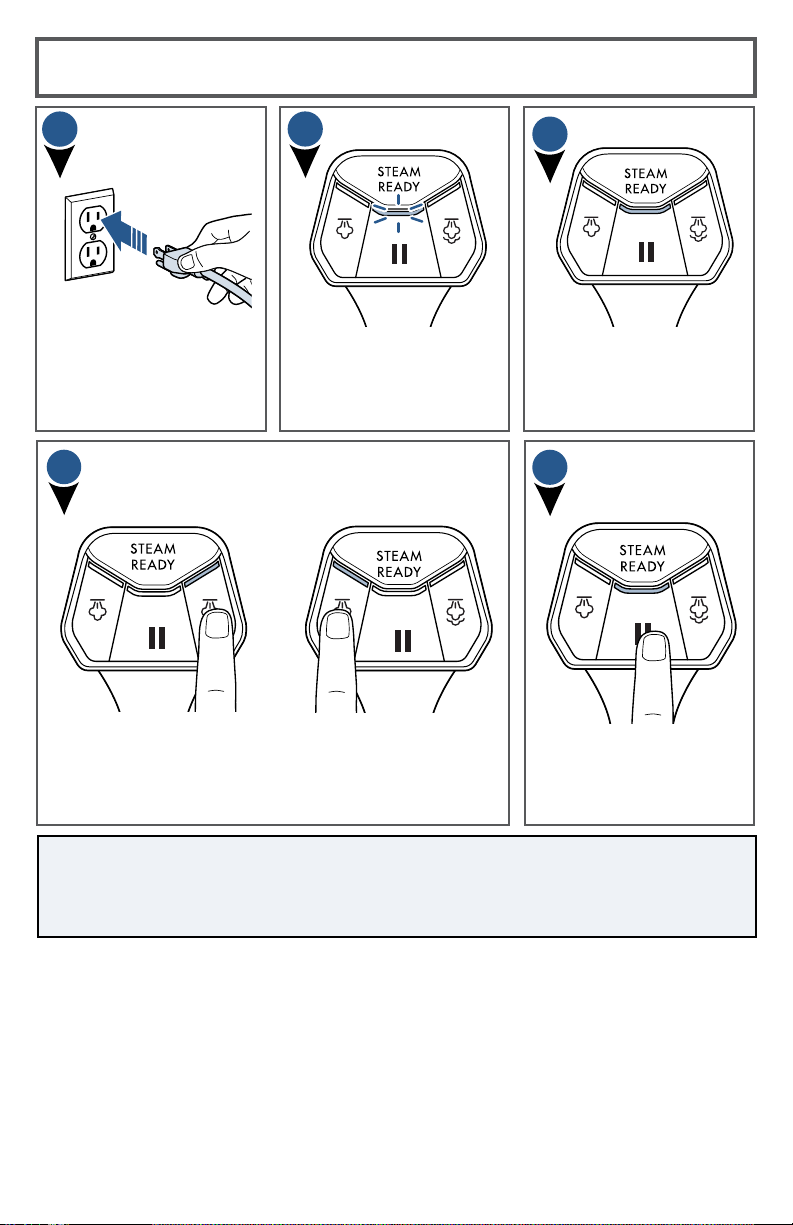
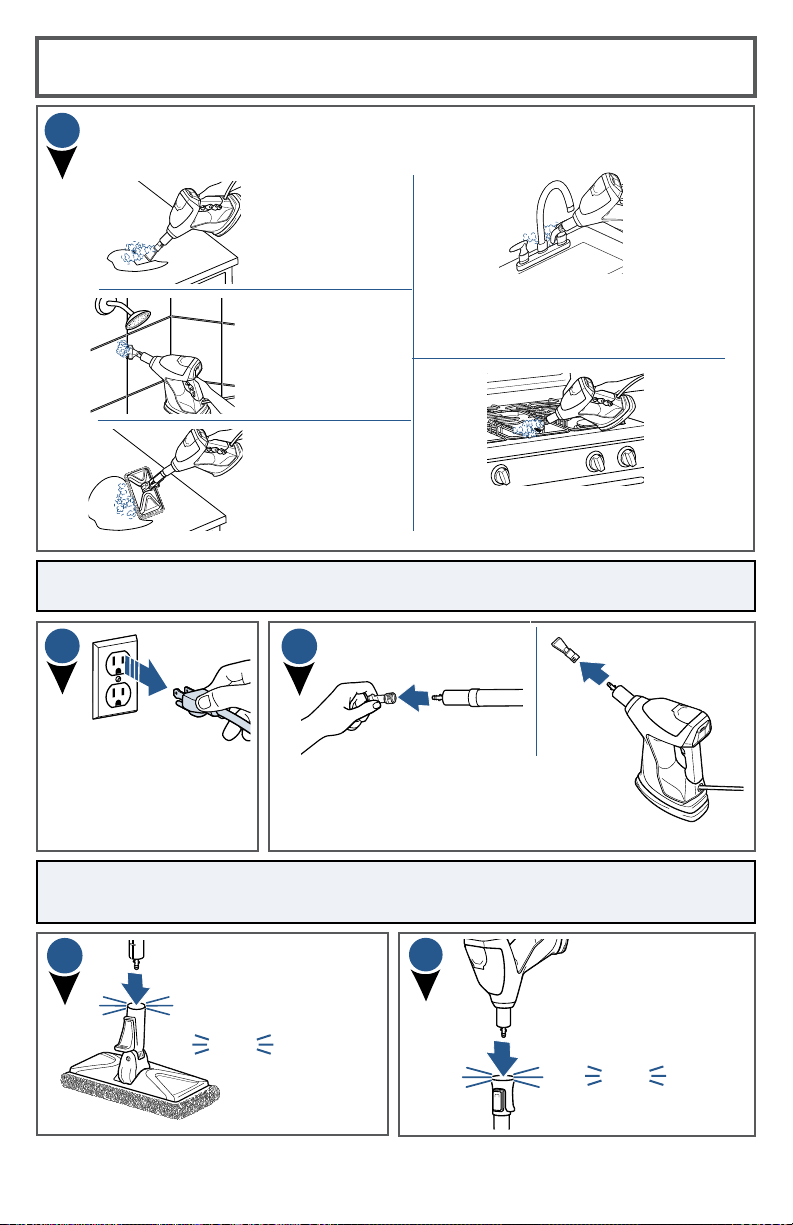
Using SmartSet
™
Steam Control
When the unit is plugged
in, the STEAM READY
light will start to blink.
Plug machine into a
properly grounded outlet.
After 30 seconds, the
STEAM READY light will
turn to a solid light. This
means the steam mop is
heated and ready to use.
Now, select a desired steam level based on your
cleaning needs.
To turn steam OFF, press
the PAUSE button once.
2
3
4
5
NOTE: You must wait until the STEAM READY light is a solid color before
selecting your desired steam level. Upon the first use of your steam mop
or first use after refilling the water tank, the pump may make a “knocking”
sound. This is normal and will diminish after a few seconds.
Push the HI STEAM
button once to turn ON.
Use HI STEAM when
cleaning durable floors
or sticky messes.
Push the LOW STEAM
button once to turn ON.
Use LOW STEAM for
delicate floors or for light,
everyday cleaning.
1
www.BISSELL.com
8
Cleaning Your Hard Floors
NOTE: Before you clean, thoroughly sweep or vacuum floor prior to cleaning
with the PowerFresh® Slim Steam Mop.
YOUR STEAM MOP IS DESIGNED TO CLEAN HARD FLOORING SUCH AS CERAMIC
TILE, LAMINATE, MARBLE, STONE AND SEALED HARDWOOD FLOORS. USE OF YOUR
STEAM MOP ON WAXED OR SOME UNWAXED FLOORS MAY RESULT IN A DIMINISHED
GLOSSINESS. THE STEAM MOP IS NOT FOR USE ON UNSEALED FLOORS. FOR BEST
RESULTS, TEST IN AN INCONSPICUOUS AREA AND CHECK THE CARE INSTRUCTIONS
FROM YOUR FLOORING MANUFACTURER.
Make sure the STEAM READY
light is solid before selecting the
appropriate steam level based on
your hard floor cleaning needs.
4
6
To easily maneuver and clean
tight spaces such as baseboards,
behind the toilet, and around
furniture, take advantage of the
swivel steering.
When finished cleaning, turn
off the machine by pressing
the PAUSE button and
unplugging the unit.
For best results to
sanitize an area of your
floor, use the microfiber
cloth pads and slowly
and evenly stroke your
steam mop back and
forth at least three
times over the area
using continuous steam.
Remove the pad after
use and wash.
Push the trigger
underneath the handle
of the Handheld Pod
to release steam.
NOTE: Your Steam Mop may have already come assembled with a mop pad
on the foot. If not, refer to instructions on page 6 in the “Attaching Microfiber
Mop Pads” section to learn how to attach the mop pad.
7
Plug machine
into a properly
grounded outlet.
Step on the side of
the foot to recline the
body of the machine
to begin cleaning.
1
2
3
5
www.BISSELL.com
9
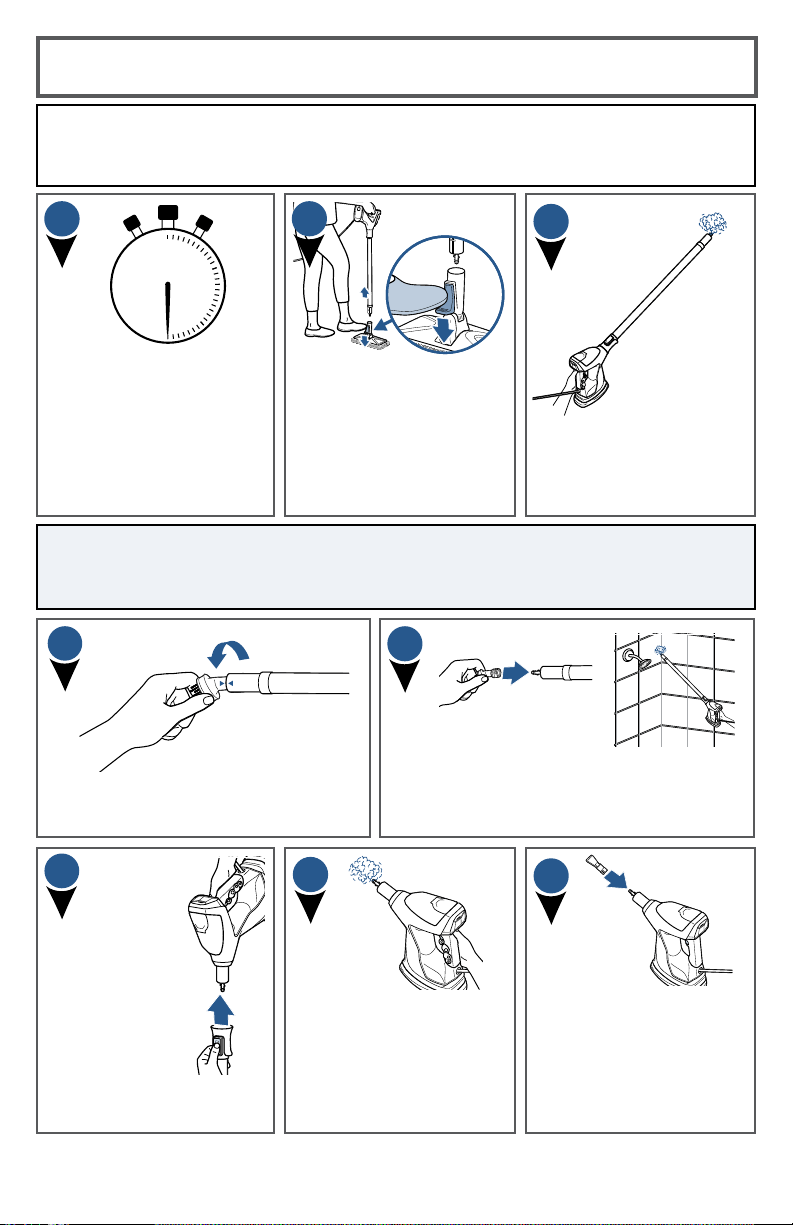
Above Floor Cleaning
Be sure the desired steam
setting is selected, then push
the trigger located under the
handle of the Handheld Pod
to release steam.
To clean above floors
using the Extension
Wand, step down on
the pedal located on the
back of the steam mop
and lift up to release the
Extension Wand.
Attach desired tool to end of Extension Wand
to clean above floors and hard to reach areas
such as ceilings, showers, baseboards, and
sliding door tracks.
1
2
3
Cleaning With Tools:
Make sure steam is no
longer coming from the
nozzle by releasing the
trigger and pressing
the pause button. Then
connect the desired tool.
To convert the
steam mop into a
handheld steamer,
push the release
button on top
of the Extension
Wand and lift up
to detach the
Handheld Pod
from the Extension
Wand.
Your BISSELL PowerFresh® Slim Steam Mop has the ability to clean above floors
or in tight spaces when using the Extension Wand. It also has the convenience
of converting into a handheld steamer when removing the Extension Wand.
NOTE: Do not step on the back pedal to recline the unit. When removing the
Extension Wand from the foot, make sure to lift away from your body as the
bottom of the wand may release steam.
4
5
Before changing from
mopping to the handheld
feature or disconnecting a
tool from the handheld pod
or extension wand, make
sure steam is no longer
coming from the nozzle by
releasing the trigger and
pressing the PAUSE button.
30
Cleaning Without Tools:
Push the trigger located
under the handle of the
Handheld Pod to release
steam from the end of
the Handheld Pod.
6
7
Align arrow on tool to arrow on end of
nozzle (on extension wand or handheld
steamer) and twist into place.
8
www.BISSELL.com
10
Above Floor Cleaning (continued)
NOTE: Additional tools are available for purchase on BISSELL.com.
Use the Flat
Scraping Tool to
steam and scrape
off those sticky
messes on floors,
countertops, etc.
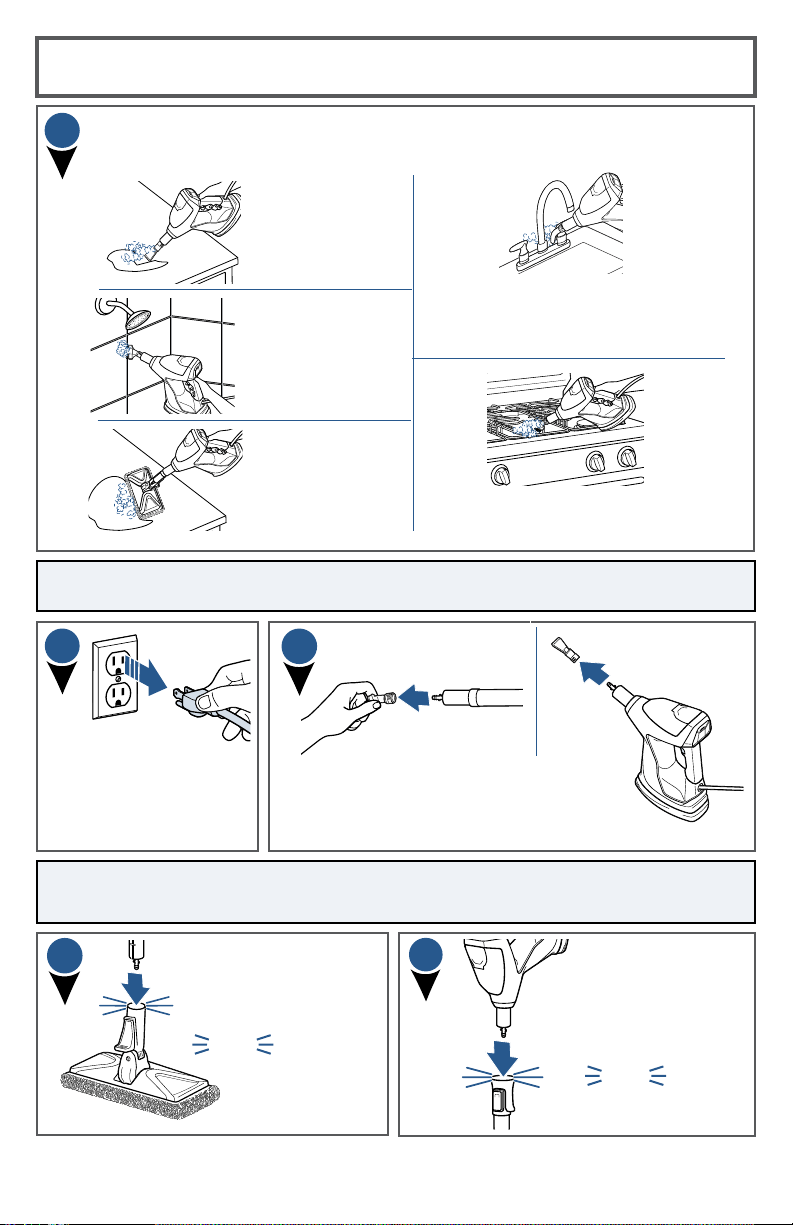
Use the Angle Concentrator Tool to
steam clean hard-to-reach corners and
crevices where dirt and grime build-up
in the home, like sinks and faucets.
Use the Grout
Tool to remove
dirt and grime
from grout.
Use the Green Bristle Brush to clean
around stove tops, sinks, showers, etc.
When finished
cleaning, turn OFF the
machine by pressing
the PAUSE button and
unplug the unit.
Wait for the steam to stop, then remove tools
from the Extension Wand and/or Handheld
Pod before reassembling your machine.
Insert foot back
into the end of the
Extension Wand until
it clicks into place.
8
11
Based on your cleaning needs, connect desired tool to the end of the Extension
Wand or the Handheld Pod. Select cleaning tools are included with this model.
click
click
Then, insert the
Handheld Pod back
into the Extension
Wand until it clicks
into place.
12
Use the Mop Pad
Foot to steam
larger areas such
as shower walls,
countertops,
stairs, etc.
10
9
CAUTION: Let steam cool down before removing tools. The end of the
extension wand or handheld pod will be hot.
www.BISSELL.com
11
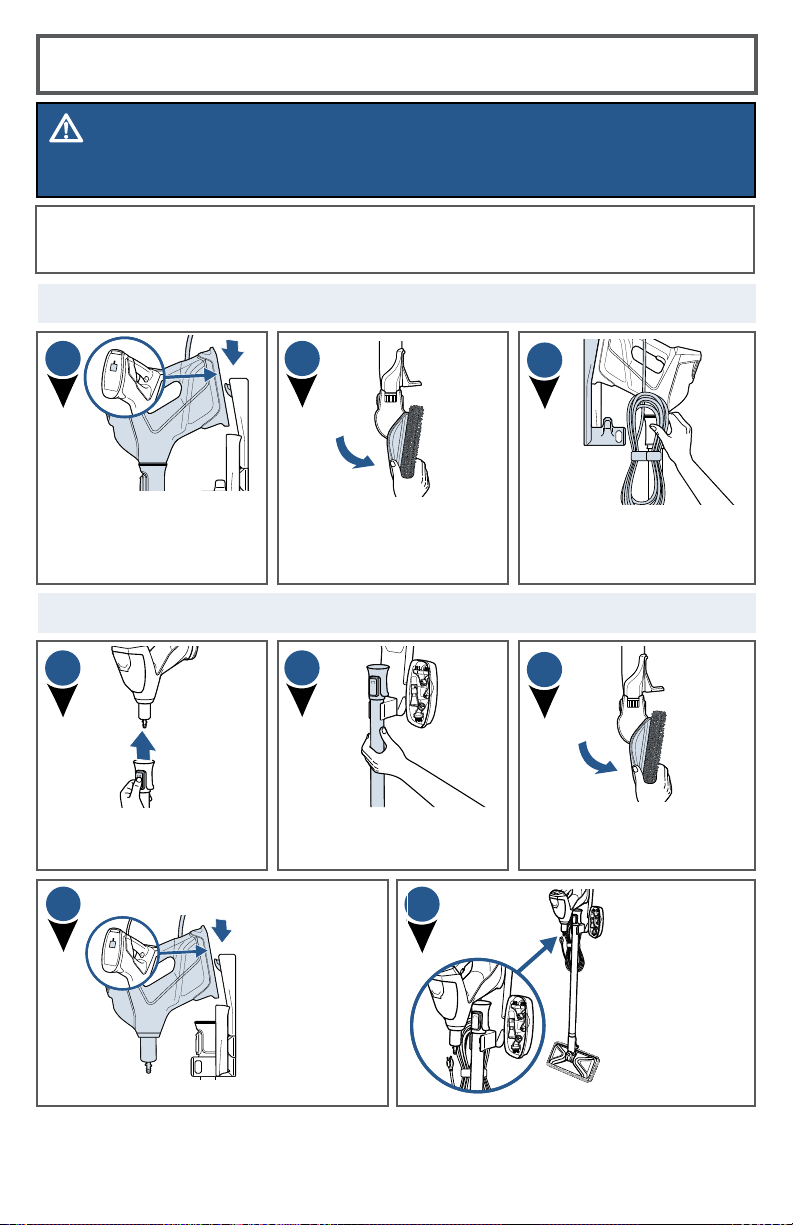
Cleaning Your Steam Mop
WARNING
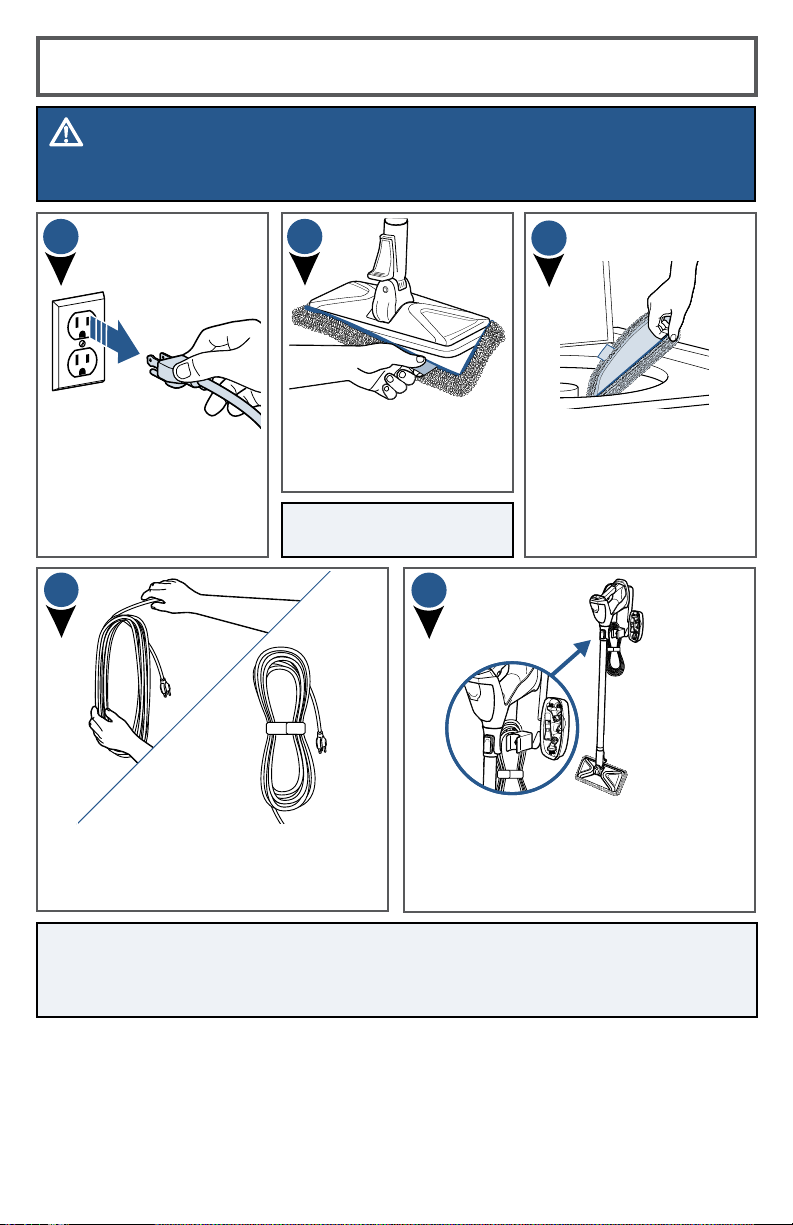
To reduce the risk of fire, electric shock or injury, turn power OFF and disconnect plug from
electrical outlet before performing maintenance or troubleshooting.
Carefully remove mop
pad using the Quick
Grip Release Tab from
the mop head.
Turn machine OFF
and unplug from the
grounded outlet.
Mop pads can be machine
washed in warm water.
Use only non-bleach liquid
detergents. Do not use
fabric softeners or bleach.
For best results, air dry.
Wrap the cord around the palm of your
hand into a circle. Then, place the wrap
strap around the cord and back onto
itself to secure.
1
2
3
NOTE: Mop pad and lower
assembly may be hot.
Store on the Wall Mount that is
securely mounted to a wall in a
protected, dry area. Store with dry
pads as wet mop pads may damage
wood and other delicate hard floors.
5
NOTE: Unit does not stand up on its own. If you are not using the Wall
Mount, make sure your steam mop is stored in a safe place, in the upright
position against a firm surface to prevent from falling over.
4
www.BISSELL.com
12
Setting Up The Wall Mount
WARNING
To reduce the risk of fire, electric shock or injury, turn power OFF and disconnect plug from
electrical outlet before performing maintenance or troubleshooting.
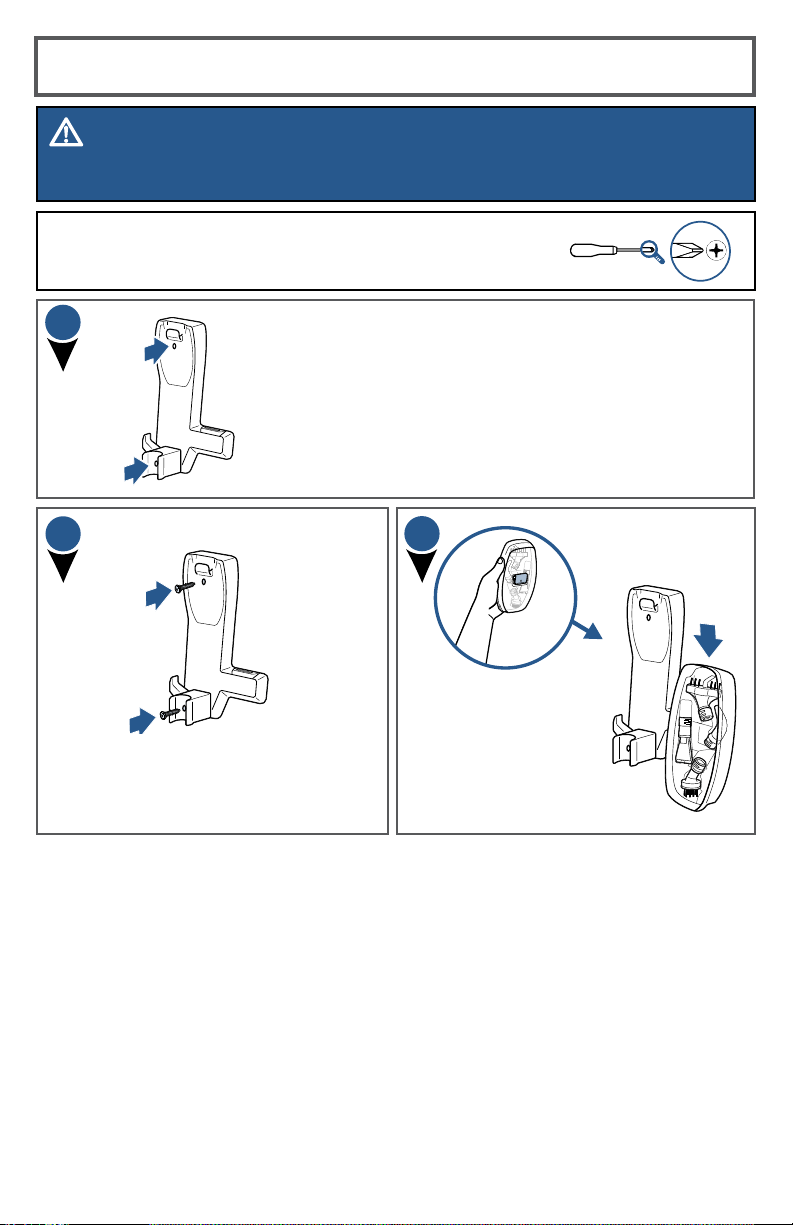
A Phillips Head Screwdriver is needed to install the wall mount. If
installing onto drywall, use plastic anchors with provided screws.
Place the wall mount against the wall in the area where
you’ve determined you would like to store your machine.
Place each screw through the two holes
in the wall mount. Use a screwdriver or
drill to affix to the wall.
1
2
Find the clip on the
back of the Tool
Box and hook it into
the right side of the
Wall Mount.
3

www.BISSELL.com
13
Your BISSELL PowerFresh® Slim Steam Mop can be stored in 2 dierent ways
using the Wall Mount.
OPTION 2:
Using The Wall Mount Storage
WARNING
To reduce the risk of fire, electric shock or injury, turn power OFF and disconnect plug from
electrical outlet before performing maintenance or troubleshooting.
Clip the extension wand
into the holder.
Detach the Extension
Wand from Handheld Pod.
Bend the Mop Pad Foot
downward in a slanted
position.
1
2
3
Find the
opening on
the back of
the Handheld
Pod and hook
it onto the top
lip of the Wall
Mount.
Hang the power
cord and tool
bag on the left-
side hook.
4
5
OPTION 1:
Bend the Mop Pad Foot
downward in a slanted
position.
Find the opening on the
back of the Handheld Pod
and hook it onto the top
lip of the Wall Mount.
Hang the power cord and
tool bag on the left-side
hook.
1
2
3

www.BISSELL.com
14
Problem Possible causes Remedies
Reduced
steam OR
no steam
Water tank empty.
Refill tank.
Steam level not selected. Select steam level by pushing steam
level button.
Wand not installed properly. Push the wand all the way into the
handheld pod until you hear a click.
Foot not installed properly. Insert the Extension Wand into foot
until you hear a click.
PAUSE button is pressed. Once STEAM READY light is solid,
select desired steam level (HI or
LO) then push the trigger under
the handle of the Handheld Pod to
release steam.
Streaking
Dirty mop pad. Remove and wash pad per
instructions before further use.
Use on waxed or oiled floor. If you have used floor polishes or
wax on your floors, steam products
may decrease glossiness. Refer to
the wax or polish manufacturer. If
you don’t wax or polish your floors,
check the floor care instructions
from your flooring manufacturer.
Leaking
Mop pad is too wet. Remove and replace with dry mop
pad and intermittently press the
steam trigger for less steam.
Steam level is too high. Lower the steam level.
Crack in unit or water tank. Check to see if there are any cracks
on the unit or tank and check to
make sure the rubber gasket on
the tank is still attached and seated
properly in the unit.
Knocking
Noise
First use or water tank is empty. Fill water tank and knocking will
diminish after a few seconds.
Metal tube cannot reach water. Shake the pod to let the tube reach
the water level.
Troubleshooting
WARNING
To reduce the risk of electric shock, turn power switch o and disconnect plug from
electrical outlet before performing maintenance or troubleshooting checks.

www.BISSELL.com
15
If your BISSELL product should require service:
Contact BISSELL Consumer Care to locate a BISSELL Authorized Service Center in your area.
If you need information about repairs or replacement parts, or if you have questions about
your warranty, contact BISSELL Consumer Care.
This warranty gives you specific legal rights,
and you may also have other rights which
may vary from state to state. If you need
additional instruction regarding this warran-
ty or have questions regarding what it may
cover, please contact BISSELL Consumer
Care by E-mail, telephone, or regular mail
as described below.
Limited Two-Year Warranty
Subject to the *EXCEPTIONS AND
EXCLUSIONS identified below, upon receipt
of the product BISSELL will repair or replace
(with new or remanufactured components
or products), at BISSELL’s option, free of
charge from the date of purchase by the
original purchaser, for two years any
defective or malfunctioning part.
See information below on "If your BISSELL
product should require service".
This warranty applies to product used for
personal, and not commercial or rental
service. This warranty does not apply to
fans or routine maintenance components
such as filters, belts, or brushes. Damage or
malfunction caused by negligence, abuse,
neglect, unauthorized repair, or any other
use not in accordance with the User's Guide
is not covered.
BISSELL IS NOT LIABLE FOR INCIDENTAL
OR CONSEQUENTIAL DAMAGES OF ANY
NATURE ASSOCIATED WITH THE USE OF
THIS PRODUCT. BISSELL’S LIABILITY WILL
NOT EXCEED THE PURCHASE PRICE OF
THE PRODUCT.
Some states do not allow the exclusion or
limitation of incidental or consequential
damages, so the above limitation or
exclusion may not apply to you.
*EXCEPTIONS AND EXCLUSIONS FROM
THE TERMS OF THE LIMITED WARRANTY
THIS WARRANTY IS EXCLUSIVE AND
IN LIEU OF ANY OTHER WARRANTIES
EITHER ORAL OR WRITTEN. ANY IMPLIED
WARRANTIES WHICH MAY ARISE
BY OPERATION OF LAW, INCLUDING
THE IMPLIED WARRANTIES OF
MERCHANTABILITY AND FITNESS FOR
A PARTICULAR PURPOSE, ARE LIMITED
TO THE TWO YEAR DURATION FROM
THE DATE OF PURCHASE AS DESCRIBED
ABOVE.
Some states do not allow limitations on
how long an implied warranty lasts so the
above limitation may not apply to you.
Website:
www.BISSELL.com/service-centers
E-mail:
www.BISSELL.com/email-us
Call:
BISSELL Consumer Care
1-800-237-7691
Monday – Friday 8am - 10pm ET
Saturday 9am - 8pm ET
Sunday 10am - 7pm ET
Warranty
Service
Please do not return this product to the store.
Other maintenance or service not included in the manual should be
performed by an authorized service representative.
For any questions or concerns, BISSELL is happy to be of service.
Contact us directly at 1-800-237-7691.
NOTE: Please keep your original sales receipt. It provides proof of date of
purchase in the event of a warranty claim.

16
©2017 BISSELL Homecare, Inc
Grand Rapids, Michigan
All rights reserved. Printed in China
Part Number 161-3501 08/17 RevB
Visit our website at: www.BISSELL.com
Registering is quick, easy and offers you benefits over the lifetime of your product.
You’ll receive:
Visit www.BISSELL.com/registration!
Visit us online at: BISSELL.com
When contacting BISSELL, have model number of
cleaner available.
Please record your
Model Number: ___________________________
Please record your
Purchase Date: ___________________________
NOTE: Please keep your original sales receipt.
It provides proof of purchase date in the event
of a warranty claim. See Warranty page for
additional details.
BISSELL Rewards Points
Automatically earn points for
discounts and free shipping on
future purchases.
Faster Service
Supplying your information now
saves you time should you need to
contact us with questions regarding
your product.
Product Support Reminders
and Alerts
We’ll contact you with any
important product maintenance
reminders and alerts.
Special Promotions
Optional: Register your email
to receive notice of offers,
contests, cleaning tips and more!
Parts & Supplies
For Parts and Supplies, go to BISSELL.com and
enter your model number in the search field.
Register your product today!
We c’t wait
to ar from y!
We really do read
your comments, tweets,
and posts.
Rate this product on
BISSELL.com
or any of our retailer sites
and let us (and millions of
your closest friends)
know what you think!
For cleaning tips and more visit www.BISSELL.com or find us at:
BISSELL BISSELLClean BISSELL BISSELLBISSELLClean

POWERFRESH
®
SLIM STEAM
_______________
GUÍA DEL
USUARIO
SERIE 2181
www.BISSELL.com
2
INSTRUCCIONES IMPORTANTES DE SEGURIDAD
ADVERTENCIA
PARA REDUCIR EL RIESGO DE INCENDIOS,
CHOQUE ELÉCTRICO O LESIONES:
» Este aparato puede ser utilizado por niños de 8
años o mayores, y las personas con disminución
física, sensorial y mental, y falta de capacidades y
experiencia, y conocimientos que sean supervisados
o instruidos acerca del uso del electrodoméstico
de una manera segura y que entiendan los riesgos
involucrados. La limpieza y el mantenimiento del
usuario no será hecha por los niños sin supervisión.
» Los niños deben ser supervisados para asegurar que
no jueguen con el electrodoméstico.
» Si el cable está dañado, debe ser cambiado por
el fabricante, su agente de servicio o por personal
igualmente calificado para evitar peligros.
» Tenga mucho cuidado al limpiar en escaleras.
» No lo use si el cordón o el enchufe están dañados.
» No lo use al aire libre.
» Apague siempre el electrodoméstico antes de conectar
o desconectar la boquilla. No apunte el vapor a
personas, animales o tomacorrientes.
» Desenchufe del tomacorriente cuando no se usa
y antes de efectuar tareas de mantenimiento o
solucionar problemas.
» No desatienda la limpiadora a vapor.
» No exponga pelo, ropa suelta, dedos ni partes del
cuerpo a las aberturas ni a las piezas móviles.
» No realice tareas de servicio en la limpiadora a vapor
mientras está enchufada.
» No toque la limpiadora a vapor con las manos mojadas
» No use la limpiadora a vapor si se ha caído, dañado,
dejado a la intemperie o caído al agua, devuélvala a un
centro de servicio.
» No arrastre ni cargue por el cordón eléctrico ni utilice
el cordón como si fuera una manija. No cierre la puerta
sobre el cordón ni tire del mismo sobre bordes ni
esquinas filosas. No exponga el cordón a superficies
calientes.
» No desenchufe tirando del cordón.
» No utilice el electrodoméstico en un espacio cerrado
lleno de vapores de pintura al aceite, disolventes
de pintura, ciertas sustancias antipolillas, polvos
inflamables u otros vapores explosivos o tóxicos.
» No permita que se use como un juguete.
» No use sobre artículos de cuero, muebles o pisos
encerados, materiales sintéticos, terciopelos u otros
materiales delicados sensibles al vapor.
» No sumergir en agua o líquidos.
» No utilizar para calentar ambientes.
» No lo utilice para ningún otro propósito que no sean
los que se describen en esta guía del usuario.
» Use solamente accesorios recomendados por el
fabricante – el uso de accesorios no proporcionados
o vendidos por BISSELL pueden causar incendios,
choque eléctrico o lesiones.
» Nunca coloque desincrustantes, productos aromáticos,
alcohólicos, detergentes o vinagre en la limpiadora a
vapor, ya que podría dañarla o hacer que sea peligrosa
para usar.
» Desenchufe agarrando el enchufe, no el cordón.
» Se debe estar muy atento cuando la usan los niños o
cuando se usa cerca de ellos.
» Mantenga el aparato fuera del alcance de los niños
cuando esté activado o mientras se enfría.
» Las superficies del cabezal motriz posiblemente se
calienten durante el uso.
» No abra la abertura durante el uso.
LEA TODAS LAS INSTRUCCIONES ANTES DE USAR SU TRAPEADOR A
VAPOR.
Cuando se utiliza un electrodoméstico es necesario tomar precauciones básicas, que incluyen las siguientes: Conecte siempre a un tomacorriente
polarizado (la ranura izquierda es más ancha que la derecha). Desenchufe del tomacorriente cuando no se use y antes de efectuar tareas de mantenimiento.
Este modelo está diseñado solamente para uso doméstico. El uso comercial de esta unidad anula la garantía del fabricante.
GUARDE ESTAS INSTRUCCIONES
PARA USO FUTURO
ESTOS SIMBOLOS SIGNIFICAN ADVERTENCIA:
Cualquier uso de vapor tiene el peligro
potencial de causar quemaduras.
ADVERTENCIA
LA SUPERFICIE PUEDE ESTAR CALIENTE. EVITE EL CONTCTO.
www.BISSELL.com
3
Gracias por comprar un
BISSELL PowerFresh® Slim Steam
Instrucciones de seguridad...2
Diagrama del producto ......4
Ensamblaje..................5
Operaciones ..............6-10
Mantenimiento y cuidado
..11-13
Solución de problemas......14
Garantía....................15
Servicio ....................15
Registro del producto.......16
Atención al consumidor.....16
¿Qué hay en la caja?
Unidad de
mano
Tubo de
extensión
Soporte para
pared y tornillos
Pie de la
almohadilla
del trapeador
Almohadilla
blanca para
trapeador
Almohadilla
para fregar del
trapeador
Caja de
herramientas con
herramientas
Taza de
agua
Cepillo de
cerdas verdes
(viene en la caja de
herramientas)
Herramienta
de lechada
(viene en la caja de
herramientas)
Herramienta
concentradora angular
(viene en la caja de herramientas)
Herramienta
raspadora plana
(viene en la caja de
herramientas)
Su trapeador a vapor necesita un poco de ensamblaje antes de que se
pueda poner a trabajar, pase a la página 5 y ¡Comencemos!
VARÍA CON MODELO
Los accesorios estándar varían de un modelo a otro. Para identificar qué se debiera haber incluido con su compra, por favor
consulte la lista del “Contenido de la caja” situado en la tapa superior de la caja.
Escurridor de
ventana
Almohadilla de trapeador para
superficies planas
Paño de tejido de
tela para vapor
Tejido de tela para
vapor
Herramienta para
superficies planas
Cepillo de cerdas
negras
Cepillo de
cerdas de latón
Bolsa de
herramientas
Toalla de
microfibras
Cepillo de
cerdas rojas
www.BISSELL.com
4
Familiarización con su trapeador a vapor
3
2
7
4
5
6
8
9
1 Control del vapor SmartSet
2 Tanque de llenado rápido
3 Botón de liberación de la unidad de mano
4 Cordón de alimentación con correa de
envolver
5 Tubo de extensión
6 Unidad de mano
7 Gatillo para el vapor
8 Área del clip para el almacenamiento del
soporte para pared
9 Pedal de liberación del tubo de extensión
10 Pie de la almohadilla del trapeador
11 Soporte para pared
12 Caja de herramientas
12
10
NOTA: La caja de herramienta almacena el cepillo de cerdas verdes, herramienta concentradora angular,
herramienta de lechada, y herramienta plana de raspar.
PAUSA
Vapor ALTO
Vapor BAJO
1
11

www.BISSELL.com
5
Ensamblaje
ADVERTENCIA
No enchufe su PowerFresh® Slim Steam antes de que se haya familiarizado con todas las
instrucciones y los procedimientos de operación.
Su BISSELL PowerFresh® Slim Steam se ensambla
rápida y fácilmente. Está empaquetado con los
siguientes artículos:
• Unidad de mano
• Tubo de extensión
• Pie de almohadilla del trapeador
clic
A continuación, inserte la
unidad de mano en el tubo
de extensión hasta que
encaje en su lugar.
Fije el tubo de extensión
al pie para almohadilla del
trapeador encajándolo
en su sitio.
NOTA: Para obtener instrucciones sobre cómo fijar el soporte para pared y el almacenamiento,
consulte la página 12.
3
4
Enrolle el cable alrededor de la palma de la
mano en un círculo. A continuación, coloque la
correa alrededor del cable y sobre sí mismo para
asegurarla.
clic
1
2
Instale la caja de herramientas en la unidad de mano
alineando el clip en la parte posterior de la caja de
herramientas con la abertura en la parte inferior de la
unidad de mano y deslice hacia abajo en su sitio.
www.BISSELL.com
6
Llenado del tanque de agua
Algunas notas acerca de cómo llenar el depósito de agua:
• El depósito de agua tiene una capacidad de 350 mL (12 oz).
NO USE SUSTANCIAS QUIMICAS EN EL TANQUE DE AGUA DE SU POWERFRESH® SLIM STEAM.
• Otros líquidos de limpieza pueden dañar la máquina y anular la garantía.
NOTA: Se recomienda el uso de agua destilada o desmineralizada para prolongar la vida de trapeador a
vapor. Para agregar un aroma fresco mientras limpia, pruebe aguas desmineralizadas BISSELL con aromas
de cítrico, eucaliptus de menta y brisa primaveral.
Tire de la tapa del
tanque de agua hacia
arriba para abrir.
1
2
El tanque de agua
limpia está ubicado en
la parte superior de la
unidad de mano
3
Utilice siempre la taza para agua proporcionada y llene con agua destilada
o desmineralizada, recomendado en lugar de agua del grifo.
Cierre el tapón del depósito de agua después del llenado
Instalación de almohadillas de microfibras para trapeador
La almohadilla blanca para trapeador es mejor
para uso diario sobre pisos delicados como los de
maderas duras y laminados sellados. Se recomienda la
almohadilla para fregar para las superficies duraderas
como mosaicos.
Para instalar la almohadilla de trapeador, envuelva
la almohadilla alrededor de la parte inferior del pie,
asegurándose que la costura gris esté situada en
la parte delantera del pie y la lengüeta Quick Grip
Release™ esté ubicada en la parte posterior.
1
2
Almohadilla
para fregar
del trapeador
Almohadilla blanca
para trapeador
Es posible que su PowerFresh® Slim Steam
haya venido con dos almohadillas distintas.

www.BISSELL.com
7
Uso del control del vapor SmartSet™
Cuando la unidad está enchufada,
empezará a parpadear la luz
STEAM READY (vapor listo).
Enchufe la máquina en un
tomacorriente conectado
correctamente a tierra.
Después de 30 segundos, la
luz STEAM READY (vapor listo)
cambiará a una luz continua. Esto
significa que el trapeador a vapor
está caliente y listo para ser usado.
Ahora, seleccione un nivel de vapor deseado en base de sus
necesidades de limpieza.
Para apagar el vapor presione una
vez el botón PAUSE.
2
3
4
5
NOTA: Debe esperar hasta que la luz STEAM READY quede encendida de manera continua antes de
seleccionar el nivel de vapor deseado. Después del primer uso del trapeador a vapor o el primer uso
después de llenar el tanque de agua, la bomba puede emitir un sonido de “golpeteo”. Esto es normal y
debe disminuir después de un par de segundos.
Presione una vez el botón HI STEAM
(vapor alto) una vez para colocar en
ON (encendido). Utilice HI STEAM
(vapor alto) cuando limpie pisos
duraderos o suciedades pegajosas.
Presione una vez el botón LOW
STEAM (vapor bajo) una vez
para colocar en ON (encendido).
Utilice LOW STEAM (vapor bajo)
para suelos delicados o para una
limpieza ligera diaria.
1

www.BISSELL.com
8
Limpieza de pisos duros
NOTA: Barra o aspire a fondo el piso antes de limpiar con el PowerFresh® Slim Steam.
EL TRAPEADOR A VAPOR ESTÁ DISEÑADO PARA LA LIMPIEZA DE PISOS DUROS COMO DE BALDOSAS DE
CERÁMICA, LAMINADOS, MÁRMOL, PIEDRA Y PISOS DE MADERA DURA SELLADA. EL USO DEL TRAPEADOR A
VAPOR EN PISOS ENCERADOS Y ALGUNOS SIN ENCERAR PUEDE DISMINUIR EL BRILLO DEL PISO. NO SE DEBE
USAR EL TRAPEADOR A VAPOR EN PISOS SIN SELLAR. PARA OBTENER MEJORES RESULTADOS, HAGA UNA
PRUEBA EN UN SITIO POCO VISIBLE Y VERIFIQUE LAS INSTRUCCIONES DE MANTENIMIENTO DEL FABRICANTE
DE SU PISO.
Asegúrese de que la luz STEAM READY
esté encendida permanentemente antes de
seleccionar el nivel de vapor adecuado en base
a sus necesidades de limpieza para pisos duros.
4
6
Para maniobrar con facilidad y limpiar
espacios estrechos como zócalos, detrás
del inodoro y alrededor de los muebles,
aproveche la dirección basculante.
Cuando haya terminado de limpiar,
apague la máquina presionando el
botón PAUSE (pausa) y desenchufe
la unidad.
Para obtener los mejores
resultados al higienizar un área
del piso, use las almohadillas
de tela de microfibras y de
manera lenta y uniforme
pase el trapeador a vapor
hacia adelante y atrás por lo
menos tres veces sobre el área
usando vapor continuo. Quite
la almohadilla después de usar
y lávela.
Presione el gatillo debajo del
mango de la unidad de mano
para liberar el vapor.
NOTA: Es posible que su trapeador a vapor ya haya llegado ensamblado con una almohadilla de
trapeador en el pie. Si no, consulte las instrucciones en la página 6 de la sección “Instalación de
almohadillas de microfibra para trapeador” para aprender cómo instalar la almohadilla de trapeador.
7
Enchufe la máquina en un
tomacorriente conectado
correctamente a tierra.
Pise en el lado del pie para
reclinar el cuerpo de la
máquina para comenzar la
limpieza.
1
2
3
5

www.BISSELL.com
9
Limpieza arriba del piso
Asegúrese de que se haya
seleccionado la posición de vapor
deseada, y a continuación, presione el
gatillo situado debajo del mango de la
unidad de mano para liberar el vapor.
Para limpiar arriba de pisos
utilizando el tubo de extensión,
pise en pedal situado en la parte
posterior del trapeador a vapor
y levante para soltar el tubo de
extensión.
Fije la herramienta deseada en el extremo del tubo de
extensión para limpiar arriba de pisos y zonas de difícil
acceso tales como techos, duchas, zócalos, y rieles de
puertas corredizas.
1
2
3
Limpieza con herramientas:
Asegúrese de que el vapor ya no
salga de la boquilla soltando el
gatillo y presionando el botón de
pausa. A continuación, conecte la
herramienta deseada.
Para convertir el
trapeador a vapor
en un vaporizador
de mano, empuje el
botón de liberación
situado en la parte
superior del tubo
de extensión y
desconecte la unidad
de mano del tubo de
extensión.
Su BISSELL PowerFresh® Slim Steam tiene la capacidad para limpiar arriba de pisos o en espacios
estrechos cuando se usa el tubo de extensión. También tiene la conveniencia de convertirse en un
vaporizador de mano al extraer el tubo de extensión.
NOTA: No pise en el pedal de atrás para reclinar la unidad. Al extraer el tubo de extensión del pie,
asegúrese de levantar separando del cuerpo pues la parte inferior del tubo puede liberar vapor.
Antes de cambiar de trapear a la
característica de unidad de mano
o de desconectar una herramienta
de la unidad de mano o del tubo
de extensión, asegúrese de que no
salga vapor de la boquilla soltando el
gatillo y presionando el botón PAUSE
(pausa).
30
Limpieza sin herramientas:
Presione el gatillo situado debajo
del mango de la unidad de mano
para liberar vapor desde el final
de la unidad de mano.
4
5
6
7
Alinee la flecha en la herramienta con la flecha en
el extremo de la boquilla (en la varilla de extensión
o en la limpiadora a vapor) y gire la herramienta
colocándola en su sitio.
8
www.BISSELL.com
10
Limpieza arriba del piso (continuación)
NOTE: Hay herramientas adicionales disponibles para la compra en BISSELL.com.
Utilice la herramienta
de raspado plana para
vaporizar y raspar las
suciedades pegajosas en
pisos, encimeras, etc.
Utilice la herramienta de concentrador angular
para limpiar con vapor esquinas a las que es difícil
llegar y grietas donde la tierra y la suciedad se haya
acumulado en la casa, como fregaderos y grifos.
Utilice la herramienta
para lechada para
eliminar tierra y
suciedad de la lechada.
Utilice el cepillo de cerdas verdes para limpiar
alrededor de las hornallas de la cocina, lavabos,
duchas, etc.
Cuando haya terminado de
limpiar, apague la máquina
presionando el botón PAUSE
(pausa) y desenchufe la
unidad.
Espere a que se detenga el vapor, a continuación, retire
las herramientas del tubo de extensión y/o de la unidad de
manoantes de volver a ensamblar la máquina.
Inserte el pie de nuevo en el
extremo del tubo de extensión
hasta que encaje con un
chasquido en su lugar.
8
11
En base a sus necesidades de limpieza, conecte la herramienta deseada en el extremo del tubo de extensión
o la unidad de mano. Se han incluido herramientas de limpieza selectas junto con este modelo.
clic
clic
A continuación, inserte la
unidad de mano en el tubo
de extensión hasta que
encaje con un chasquido en
su lugar.
12
Utilice el pie con
almohadilla del
trapeador para limpiar
a vapor áreas como
paredes de duchas,
encimeras, escaleras, etc.
10
9
PRECAUCIÓN: Deje que el vapor se enfríe antes de extraer las herramientas. El extremo del tubo de
extensión o de la unidad de mano estará caliente.

www.BISSELL.com
11
Limpieza del trapeador a vapor
ADVERTENCIA
Para reducir el riesgo de incendio, choque eléctrico o lesiones, apague (OFF) en el encendido y desconecte el
enchufe del tomacorriente eléctrico antes de efectuar tareas de mantenimiento o identificar fallas.
Con cuidado extraiga la almohadilla
del trapeador usando la lengüeta de
liberación “Quick Grip” de la cabeza
del trapeador.
Apague la máquina
y desenchúfela del
tomacorriente de la pared.
Se puede lavar la almohadilla
del trapeador a máquina en
agua caliente. Use solamente
detergentes líquidos sin lejía. No
use ablandadores de tela o lejía.
Para obtener mejores resultados,
seque al aire.
Enrolle el cable alrededor de la palma de la mano
formando un círculo. A continuación, coloque la
correa alrededor del cable y sobre sí misma para
asegurarla.
1
2
3
NOTA: La almohadilla del trapeador y el
ensamblaje inferior pueden estar calientes.
Almacene en el soporte para pared que está
montado de forma segura en una pared en una zona
protegida y seca. Almacene con almohadillas secas
pues las almohadillas de trapeador mojadas pueden
dañar la madera y otros pisos duros delicados.
5
NOTA: La unidad no queda parada por su propia cuenta. Si no está utilizando el soporte para pared,
asegúrese de que el trapeador a vapor está guardado en un lugar seguro, en posición vertical contra
una superficie firme para evitar que se caiga.
4

www.BISSELL.com
12
Instalación del soporte para pared
ADVERTENCIA
Para reducir el riesgo de incendio, choque eléctrico o lesiones, apague (OFF) en el encendido y desconecte el
enchufe del tomacorriente eléctrico antes de efectuar tareas de mantenimiento o identificar fallas.
Se necesita un destornillador Phillips para instalar el soporte de montaje en pared.
Si instala en tabla enyesada, utilice los anclajes de plástico con tornillos suministrados.
Coloque el soporte de montaje en pared contra la pared en el área donde
quisiera almacenar la máquina.
Coloque cada uno de los tornillos a través de los dos
agujeros en la pared. Utilice un destornillador o un
taladro para fijar a la pared.
1
2
3
Encuentre el clip en la parte
posterior de la caja de
herramientas y engánchelo en
el lado derecho del montaje
de pared.
www.BISSELL.com
13
Se puede almacenar el BISSELL PowerFresh® Slim Steam de 2 formas diferentes usando el soporte para
pared.
OPCION 2:
Uso del montaje para el almacenamiento en la pared
ADVERTENCIA
Para reducir el riesgo de incendio, choque eléctrico o lesiones, apague (OFF) en el encendido y desconecte el
enchufe del tomacorriente eléctrico antes de efectuar tareas de mantenimiento o identificar fallas.
Inserte el tubo de extensión en
el soporte.
Suelte el tubo de extensión de la
unidad de mano.
Doble el pie de la almohadilla
del trapeador hacia abajo en una
posición inclinada.
1
2
3
Encuentre la
abertura en la parte
posterior de la
unidad de mano y
enganche en el labio
superior del montaje
para pared.
4
5
OPCION 1:
Doble el pie de la almohadilla
del trapeador hacia abajo en
una posición inclinada.
Encuentre la abertura en la parte
posterior de la unidad de mano y
enganche en el labio superior del
montaje para pared.
Cuelgue el cable de alimentación
y la bolsa de herramientas en el
gancho del lado izquierdo.
1
2
3
Cuelgue el cable de
alimentación y la bolsa
de herramientas en
el gancho de la parte
izquierda.

www.BISSELL.com
14
Identificación de fallas
WARNING
Para reducir el riesgo de incendio, choque eléctrico o lesiones, apague (OFF) en el encendido y desconecte el
enchufe del tomacorriente eléctrico antes de efectuar tareas de mantenimiento o identificar fallas.
Problema Causas posibles Acciones correctivas
Poco vapor
O
sin vapor
Tanque de agua vacío.
Vuelva a llenar el tanque
No se ha seleccionado el nivel de
vapor
Seleccione el nivel de vapor
presionando el botón de nivel de
vapor
No está bien instalado el tubo Empuje la varilla completamente en
la unidad de mano hasta que oiga
un clic
No está bien instalado el pie Inserte la varilla de extensión en el pie
hasta que oiga un chasquido
El botón PAUSE está presionado Una vez que se encienda
permanentemente la luz STEAM
READY (vapor listo), seleccione el
nivel de vapor deseado (HI o LO)
(alto o bajo) y luego presione el
disparador abajo del mango de la
unidad de mano para liberar vapor
Deja rayas
Almohadilla del trapeador sucia Quite y lave la almohadilla de
acuerdo a las instrucciones antes de
volver a usar
Uso en pisos encerados o
aceitados
Si ha utilizado lustres para pisos
o cera en sus pisos, los productos
a vapor pueden reducir el brillo.
Consulte con el fabricante del lustre
o la cera. Si no encera o pule sus
pisos, mire las instrucciones para el
cuidado de fabricante de sus pisos
Tiene fugas
La almohadilla del trapeador está
demasiado húmeda
Retire y cambie con una almohadilla
de trapeador seca y presione
intermitentemente el gatillo del
vapor para tener menos vapor
Es muy alto el nivel de vapor Baje el nivel de vapor
Grieta en la unidad o el depósito
de agua
Compruebe si hay grietas en la
unidad o el depósito y compruebe
para asegurarse de que la junta
de caucho en el depósito aún siga
conectada y asentada correctamente
en la unidad
Ruido de
golpeteo
Primera utilización o el depósito
de agua está vacío
Llene el depósito de agua y el
golpeteo disminuirá después de
unos pocos segundos
El tubo de metal no puede
alcanzar el agua
Agite la unidad de mano para dejar
que el tubo alcance el nivel del agua

www.BISSELL.com
15
Si su producto BISSELL requiere servicio:
Comuníquese con Atención al Consumidor de BISSELL para ubicar un centro de servicio autorizado de BISSELL en su área.
Si necesita información sobre reparaciones o repuestos o si tiene preguntas sobre su garantía, comuníquese con el
departamento de atención al consumidor de BISSELL.
Esta garantía le concede derechos legales
específicos, y es posible que tenga otros
derechos que pueden variar de un estado a otro.
Si necesita instrucciones adicionales con respecto
a esta garantía o si tiene preguntas con respecto
a lo que puede cubrir, comuníquese con el
departamento de atención al cliente de BISSELL
por correo electrónico, teléfono o correo postal
como se describe a continuación.
Garantía limitada de dos años
Sujeta a las *EXCEPCIONES Y EXCLUSIONES
identificadas a continuación, una vez que
BISSELL reciba el producto y a su propio criterio,
BISSELL reparará o reemplazará gratuitamente
(con componentes o productos nuevos o
remanufacturados) durante dos años a partir de
la fecha de compra del comprador original,
cualquier pieza defectuosa o fallada.
Consulte la información a continuación sobre
“Si su producto BISSELL necesita servicio”.
Esta garantía se aplica a productos usados
para fines personales y no es para servicios
comerciales o de alquiler. Esta garantía no se
aplica a los ventiladores ni a los componentes
de mantenimiento periódico como filtros, correas
o cepillos. No cubre los daños o desperfectos
causados por negligencia, abuso o descuido,
reparación no autorizada o cualquier otro uso no
contemplado en la guía del usuario.
BISSELL NO ES RESPONSABLE DE DAÑOS
INCIDENTALES O CONSECUENTES DE NINGUNA
NATURALEZA RELACIONADOS CON EL USO DE
ESTE PRODUCTO. LA RESPONSABILIDAD DE
BISSELL NO SERÁ MAYOR QUE EL PRECIO DE
COMPRA DEL PRODUCTO.
Algunos estados no permiten la exclusión
o limitación de los daños incidentales o
consecuentes, por lo que la limitación o la
exclusión antedicha tal voz no se aplique a
usted.
*EXCEPCIONES Y EXCLUSIONES DE LOS
TÉRMINOS DE LA GARANTÍA LIMITADA
ESTA GARANTÍA ES EXCLUSIVA Y REEMPLAZA
CUALQUIER OTRA GARANTÍA YA SEA ORAL O
ESCRITA. CUALQUER GARANTIA IMPLICITA QUE
PUEDA SURGIR DE LA OPERACIÓN DE LA LEY,
INCLUIDAS CUALQUIER GARANTÍA IMPLÍCITA
DE COMERCIABILIDAD Y APTITUD PARA UN FIN
EN PARTICULAR, SE LIMITA A LA DURACIÓN
DE DOS AÑOS A PARTIR DE LA FECHA DE
COMPRA SEGÚN SE DESCRIBE ARRIBA.
Algunos estados no permiten limitaciones sobre
la duración de una garantía implícita, de modo
que la limitación antes mencionada puede que
no se aplique a usted.
Sitio web:
www.BISSELL.com/service-centers
Correo electrónico:
www.BISSELL.com/email-us
Llame al:
Atención al Consumidor de BISSELL
1-800-237-7691
Lunes a viernes 8 am - 10 pm hora del este
Sábados 9 am - 8 pm hora del este
Domingos 10 am - 7 pm hora del este
Garantía
Servicio
Por favor no devuelva este producto al establecimiento donde lo compró.
Todo trabajo de mantenimiento o servicio no incluido en el manual deberá ser realizado por un
representante de servicio autorizado. .
Si tiene alguna pregunta o inquietud, BISSELL lo atenderá con mucho gusto.
Comuníquese directamente con nosotros llamando al 1-800-237-7691.
NOTA: Guarde el recibo original de compra. Servirá como comprobante de la fecha de compra en caso de
que necesite hacer un reclamo bajo la garantía.

16
©2017 BISSELL Homecare, Inc Grand Rapids, Michigan
Todos los derechos reservados.
Impreso en China
Pieza número 161-3501 08/17 RevB
Visite nuestro sitio web en: WWW.BISSELL.COM
El registro es rápido, fácil y le ofrece beneficios durante la vida útil de su producto.
Usted recibirá:
¡Visite www.BISSELL.com/registration!
Visítenos en línea en: BISSELL.com
Al comunicarse con BISSELL, tenga a mano el número de
modelo de la limpiadora.
Anote su
número de modelo: __________________________________
Anote su fecha
de compra: ________________________________________
NOTA: Guarde el recibo original de compra. Servirá como
comprobante de la fecha de compra en caso de que
necesite hacer un reclamo de garantía. Consulte la página
de garantía para obtener detalles adicionales.
Puntos de recompensa
de BISSELL
Gane puntos automáticamente para descuentos
y envío gratis de compras futuras.
Servicio más rápido
Si suministra su información ahora le ahorrará
tiempo en caso de que necesite comunicarse
con nosotros con preguntas sobre su producto.
Recordatorios y alertas de apoyo
para su producto
Nos comunicaremos con usted con
recordatorios de mantenimiento y alertas
importantes sobre el producto.
Promociones especiales
Optativo: ¡Registre su correo electrónico y reciba
avisos de ofertas, concursos, sugerencias para la
limpieza y mucho más!
Piezas y suministros
Por piezas y suministros vaya a BISSELL.com e ingrese el
número de su modelo en el campo de búsqueda.
¡Registre su producto hoy mismo!
¡Esperos
impacienmen
sus noticias!
Realmente queremos leer sus
comentarios, tweets y mensajes.
¡Califique este producto en
BISSELL.com
o en cualquier sitio de nuestros
minoristas y comuníquenos
su opinión (a nosotros y a miles
de sus amigos más íntimos)!
Por consejos para la limpieza y más, visite www.BISSELL.com o encuéntrenos en:
BISSELL BISSELLClean BISSELL BISSELLBISSELLClean