Loading ...
Loading ...
2
Copyright Notes:
This product incorporates copyright protecon technology that is protected by
method claims of certain U.S. patents and other intellectual property rights owned
by Macrovision Corporaon and other rights owners.
Use of this copyright protecon technology must be authorized by Macrovision
Corporaon, and is intended for home and other limited viewing uses only unless
otherwise authorized by Macrovision Corporaon. Reverse engineering or
disassembly is prohibited.
Region Management informaon:
This product is designed and manufactured to respond to the Region Management
Informaon that is recorded on DVD disc. If the Region number described
on the DVD disc does not correspond to the Region number of this digital
video player. the disc cannot be played on by this digital video player.
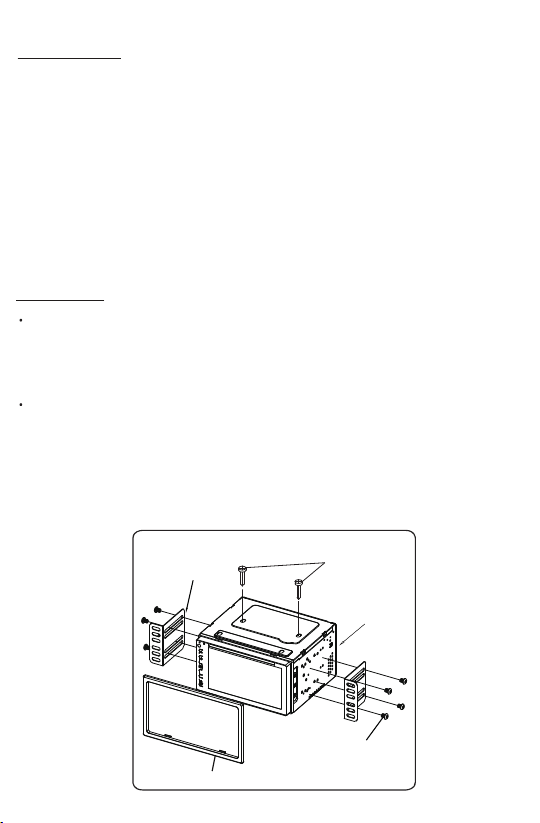
INSTALLATION:
Before Installaon:
- We recommend you to let a professional technician install the unit in vehicle.
- Disconnect negave baery terminal of vehicle.
- Revome the trim ring from unit (if installed).
- Remove 2 transit screws lacated on top of the unit.
Installaon Process:
- Carefully remove the exisng head unit.
- Before finally installing this product, connect wiring harness temporarily and
make sure it’s all connected up properly and test the head unit if it can work
properly. (Consult a qualified technician if you unsure)
- Mount this video player using both “L” mounng metal brackets and screws
(M5x6bm) to the vehicle.
Note: if you need other screws to fix other terminal, please buy from your dealer
according to the drilling of holes size.
Head Unit
Plasc Trimring
Screws
(M5x6BM)
Metal Brackets
Remove 2 screws
before installaon.
Loading ...
Loading ...
Loading ...