USER’S MANUAL
IMPORTANT:
Do not operate this digital video player while the vehicle is moving.
This is a safety feature to prevent driver distracon.
It’s illegal in most country for the driver to view video while the vehicle is moving.
The digital video funcons will be only operated when vehicle is in park and the
parking brake is engaged.
To establish a safe level:
Start your volume control at a low seng.
Slowly increase the sound unl you can hear it comfortably and clearly, and
without distoron, we want you listening for a lifeme.
Once you have established a comfortable sound level, set the dial and leave it
there.
Precauons:
1. To reduce the risk of fire, electric shock, and interference, do not aempt to
repair this product yourself. Refer all servicing to a qualified technician.
2. This car DVD player is compable with VIDEO/AUDIO discs with 12 cm size:
- DVD disc
- VCD disc
- CD, CD-R, CD-RW disc
- MP3 disc
3. Do not switch on this digital video player for long me when the vehicle’s motor
is switched off. This could cause the vehicle baery to discharge and the vehicle
can no longer be started.
4. Do not apply strong mechanical stress like drop, shock or any force to the TFT
LCD. Do not too hard hit, press or rub the TFT LCD display surface. If the display
surface is dirty, please wipe the surface soly with coon swab or clean cloth.
5. Never place any foreign objects into the openings of this product such as disc
slot, USB port, AUX IN jack. Otherwise you might damage the slots
and connectors.
6. Do not throw the baery cell of remote control into fire as this may cause an
explosion. Keep baery cells out of reach of children.
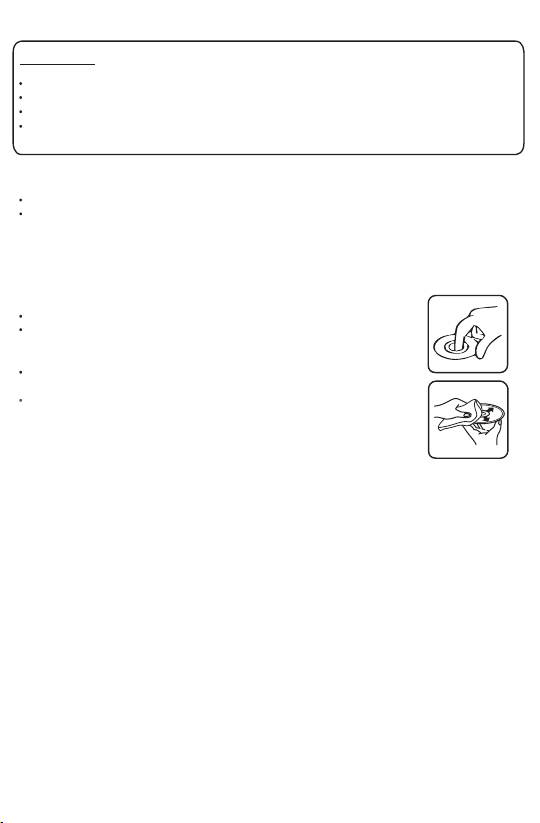
How to Handle Discs:
Handle a disc by its edges. Do not touch the playing side.
Before inserng a disc, wipe the disc outward from the disc
center with a clean, so, dry and lint-free cloth. Do not use
solvents or thinners such a petrol/benzene or cleaners.
Aer removing a disc from the disc slot, place the disc in a sleeve
or case to keep it clean and prevent scratches.
Do not sck paper or tape on the disc surface. If there is glue(or
adhesive) on the disc surface, remove it before using the disc.
1
2
Copyright Notes:
This product incorporates copyright protecon technology that is protected by
method claims of certain U.S. patents and other intellectual property rights owned
by Macrovision Corporaon and other rights owners.
Use of this copyright protecon technology must be authorized by Macrovision
Corporaon, and is intended for home and other limited viewing uses only unless
otherwise authorized by Macrovision Corporaon. Reverse engineering or
disassembly is prohibited.
Region Management informaon:
This product is designed and manufactured to respond to the Region Management
Informaon that is recorded on DVD disc. If the Region number described
on the DVD disc does not correspond to the Region number of this digital
video player. the disc cannot be played on by this digital video player.
INSTALLATION:
Before Installaon:
- We recommend you to let a professional technician install the unit in vehicle.
- Disconnect negave baery terminal of vehicle.
- Revome the trim ring from unit (if installed).
- Remove 2 transit screws lacated on top of the unit.
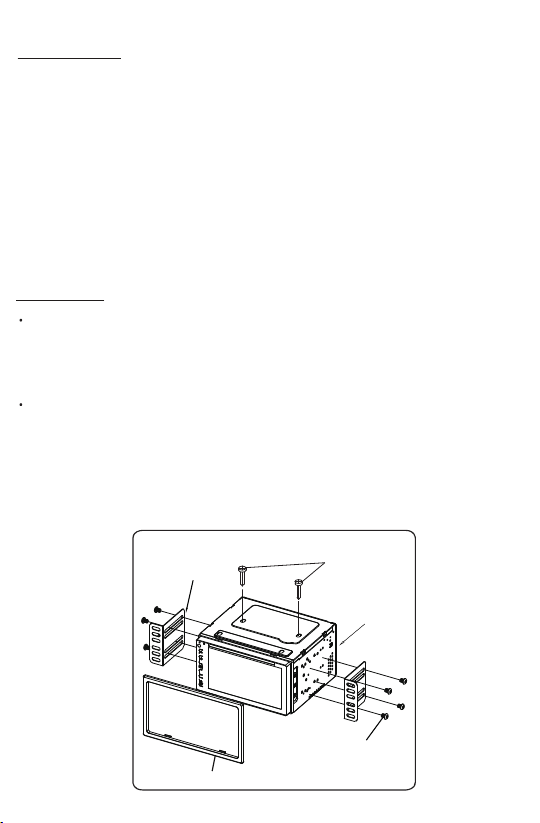
Installaon Process:
- Carefully remove the exisng head unit.
- Before finally installing this product, connect wiring harness temporarily and
make sure it’s all connected up properly and test the head unit if it can work
properly. (Consult a qualified technician if you unsure)
- Mount this video player using both “L” mounng metal brackets and screws
(M5x6bm) to the vehicle.
Note: if you need other screws to fix other terminal, please buy from your dealer
according to the drilling of holes size.
Head Unit
Plasc Trimring
Screws
(M5x6BM)
Metal Brackets
Remove 2 screws
before installaon.
3
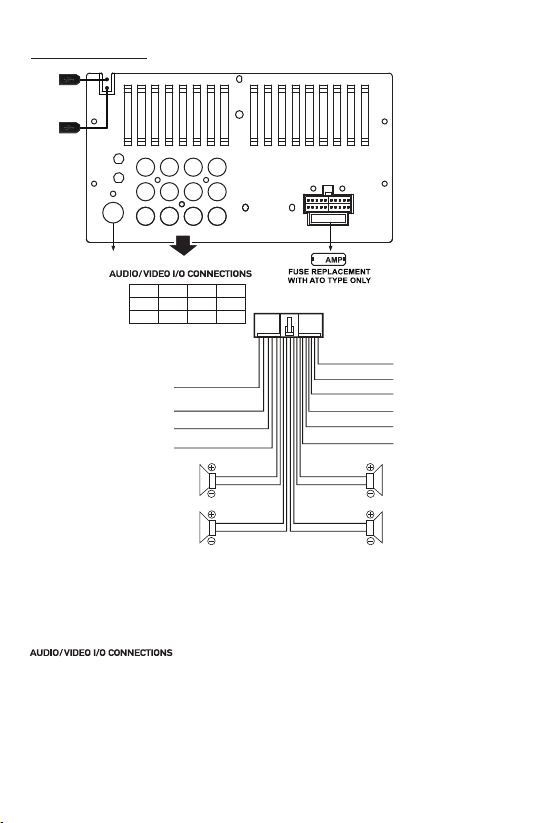
Wiring Connecons:
RED
YELLOW
BLACK
BLUE
ACC
B+
GROUND
POWER ANTENNA
FRONT LEFT
CHANNEL SPEAKER
REAR LEFT
CHANNEL SPEAKER
CAM: Rear Camera Video input Socket (Yellow)
Sub-out2: Subwoofer Output Socket 2 (Green)
Sub-out1: Subwoofer Output Socket 1 (Green)
VIN: Video input Socket (Yellow)
LIN: Left CH Audio input Socket (White)
RIN: Right CH Audio input Socket (Red)
V-OUT1: Video Output Socket 1 (Yellow)
RL: Rear Left CH RCA Output Socket (White)
RR: Rear Right CH RCA Output Socket (Red)
V-OUT2: Video Output Socket 2 (Yellow)
FL: Front Left CH RCA Output Socket (White)
FR: Front Right CH RCA Output Socket (Red)
WHITE
WHITE/BLACK
GREEN
GREEN/BLACK
SWC - GND
SWC - 1
SWC - 2
REVERSE (+)
PARKING BRAKE (B-)
ILLUMINATION (+)
FRONT RIGHT
CHANNEL SPEAKER
REAR RIGHT
CHANNEL SPEAKER
ORANGE
BROWN
BROWN / WHITE
BLACK
PINK
ORANGE / BLACK
GRAY
GRAY / BLACK
VIOLET
VIOLET/BLACK
Note: the ground connecon cable (parking brake B-) must be connected in
order for pictures to be played back to the monitor. If the cable has not been
correctly connected, warning message appears on the monitor.
10
RADIO ANTENNA JACK
10A
USB
MEDIA
(Black)
USB
CHARGER
(Red)
CAM
Sub-out2
Sub-out1
VIN
LIN
RIN
V-OUT1
RL
RR
V-OUT2
FL
FR
4
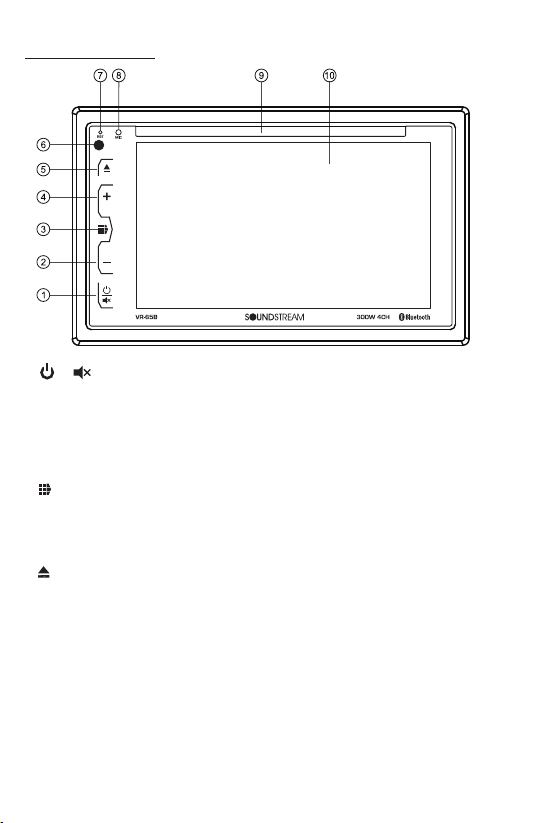
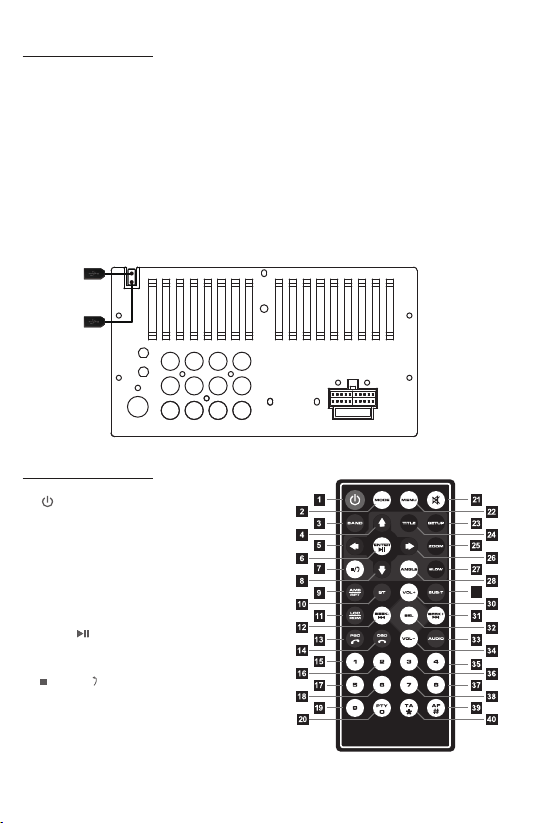
Control Panel Buons:
1. / Buon
• In power off mode, press it to turn on the unit.
Press and hold for 2 seconds to turn the unit off .
• Press the buon briefly to toggle Mute on or off.
2. Volume Decrease (-) Buon
Press VOL decrease buon (-) to decrease the volume.
3. (Main Menu) Buon
Press this menu buon to go into home page.
4. Volume Increase (+) Buon
Press VOL increase buon (+) to increase the volume.
5. (EJECT) BUTTON
Insert the disc, label side facing up, unl the mechanism senses its presence
and draws the disc in. Press it to eject the disc.
6. IR REMOTE SENSOR
7. RESET SYSTEM
The RESET buon is used to reset all paramenters to factory default sengs.
This funcon may be used when the LCD does not display normally or sound is
distorted, or when any of controls are disabled.
Gently press the RESET buon to reset the system with a thin object with a
pointed end.
8. Handsfree Microphone
Uses the bluetooth handsfree system to receive your voice when calling.
5
9. Disc Slot
10. 6.2” TFT Touch Screen
11. USB PORT
• USB port for media playback (Black USB Connector)
This USB port is designed for media playback from flash memory devices.
If you would like to play MP4/MP3/WMA/JPEG files contained in a USB flash
memory device, insert the USB flash memory into the USB port on the back of
the unit.
• USB port for USB charger (Red USB Connector)
This USB port is designed for charging for iPhone / andriod mobile phone.
The charging current consumpon is 2 ampere.
Control Panel Buons:
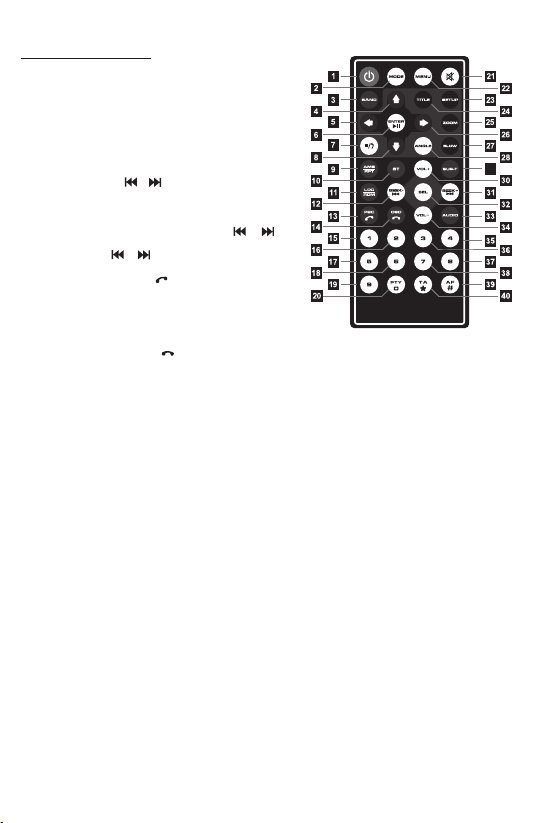
REMOTE CONTROLS:
29
1. (Power on/off) buon
Press once to turn on the unit, press again to
switch off the unit.
2. MODE(Mode Selector) buon
Press the buon briefly to select different modes:
RADIO/DISC/USB/Bluetooth/AUX IN(AV IN).
3. BAND(Band Selector) buon
In radio mode, press this buon to select band.
4/5/8/26. Cursor keys(UP, DOWN, LEFT, RIGHT)
In DVD/VCD/MP4/MP3 mode, press these buons
to move cursor in the menu to choose the item.
6. ENTER, (Play/Pause) buon
In DVD/VCD/MP4/MP3 mode, press this buon to
confirm the seng of the menu.
Press this buon to pause or resume the playback.
7. (STOP), (Return) buon
In DVD/VCD/MP4/MP3 mode, press this buon to
stop playback.
9. AMS(Auto Store/Recall Preset Staon) buon
In radio mode, press and hold this buon to store
radio staon, press this buon to recall the preset staons.
RPT(Repeat) buon
In DVD/VCD/MP4/MP3 mode, press this buon to enter different repeatedly playing modes:
Repeat tle, Repeat One, Repeat Dir(folder), Repeat All.
10A
USB
MEDIA
(Black)
USB
CHARGER
(Red)
6
REMOTE CONTROLS:
10. ST(Stereo/mono) buon
In FM recepon mode, press this buon to choose
STEREO or MONO audio effect.
11. LOC(LOC/DX), RDM(Random) buon
In FM recepon mode, press this buon to choose
local or distant recepon mode.
In DVD/VCD/MP4/MP3 mode, press this buon to
play all the tracks in random order.
12/31. SEEK-/SEEK+, /
In radio mode, press the SEEK-/SEEK+ buon to
seek tuning down or up. Press and hold the SEEK-/
SEEK+ buon to manual tuning down or up.
In DVD/VCD/MP4/MP3 mode, press the /
buon to skip to previous or next track.
Press and hold / buon to reverse and fast
forward with X2, X4,X8,X20 speed.
13. PBC(Playback Control), (Answer/Redial)
In VCD playback, press this buon to choose PBC on or
off. When PBC is on, the PBC interacve menu will be
visible on the connected monitor, user can select a desired
video or track by using the numeric keys on remote control.
In BT mode, press this buon to anser a call, make a call or redial the last dialed phone.
14. OSD(On Screen Display), (Reject or End a call) buon
In DVD/VCD playback, press this buon repeatedly to show informaon such as Title number,
Chapter number, Track number, elapsed me, remain me etc.
In BT mode, press this buon to reject or end a call.
15~20, 35~40. Numeric, *, # Keypad, PTY, TA, AF buon
In radio mode, press and hold the preset buons(1~6) to store the preset staons manually.
Press the preset buons (1~6) to recall the preset staons.
In DVD/VCD playback, press the numeric keys to choose the desired chapter, tle or track.
In BT mode, press the numeric keys to input the telephone number.
21. MUTE buon
Press this buon to silence the audio output, press again to resume volume level.
22. MENU buon
In Disc/USB playback mode, press this buon to display the root level directory of DVD disc.
23. Setup buon
Press this buon to enter the setup page, user can customize the system setup of this unit.
24. Title buon
In DVD playback, press this buon to enter tle menu (If the DVD disc with tle menu).
25. ZOOM(zoom in/out) buon
In DVD/VCD playback, press this buon repeatedly to zoom in or zoom out: X2, X3, X4, X5, X1/2,
X1/3, X1/4, off.
27.SLOW buon
In DVD/VCD playback, press this buon repeatedly to play slowly: 1/2, 1/4, 1/8, 1/16, off.
28. ANGLE buon
In DVD playback, press this buon repeatedly to switch the viewing angle if the DVD disc is
recorded with mul-angles.
29. SUB-T(Subtle language) buon
In DVD playback, press this buon repeatedly to switch the language of subtle if the DVD disc
is recorded with mul-subtles.
30/34. VOL+(Volume Increase), VOL-(Volume Decrease)
Press VOL+ or VOL- buon to increase or decrease volume level.
32. SELECT(Audio/Funcon Sengs) buon
Press this buon to choose aud and funcon items or confirm the your sengs.
33. AUDIO(Audio Language) buon
In DVD playback, press this buon repeatedly to switch the language of audio if the DVD disc is
recorded with mul- languages.
In VCD playback, press this buon repeatedly to switch L/R or stereo audio track.
29

Setup Operaons:
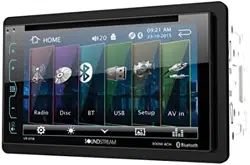
Main Menu:
In each mode, touch the icon to enter the main menu as below image.
In the main menu screen, tap the desired icon to enter each of the following
sengs : Radio, Disc(CD/VCD/DVD), Bluetooth, USB, PhoneLink, AV in.
In main menu, touch the icon to enter the setup menu, as below image.
Then user can set up or adjust the general sengs for this digital video player.
A. System:
OSD Language, Brake Detecon On/Off, Beep On/Off, Subwoofer On/Off,
Key Lights, Reversing Mute, Panel, Radio Area, Wallpaper, Time&Date, SWC, About.
• OSD Language: English, Chinese, Arabic, Hebrew, Turkish, Russian, Persian,Thai,
German, French, Portuguese, Spanish, Italian, Indonesian, Bulgarian.
• Brake Detecon: Enables or Disables the brake detecon.
This is a safety feature to prevent driver distracon. For safety, we recommend
user to enable this brake detecon funcon. When enable this funcon, user were
forbidden to watch video from this unit while this system is not detect the brake
signal of the parking brake.
• Beep On/Off: Enables or Disables beep buzzer signal to confirm use.
7
Screen
Backlight
Wallpaper
Acve Bluetooth
when blue color
Return
Home Page
Time&Date
Home
Page
Volume Acve Media
Setup
Sound effect
To show the toolbar To hide
the toolbar
Setup Operaons:
• Subwoofer On/Off: Enables or Disables the subwoofer output.
• Key Lights: To preset the color of buon illuminaon: Red, Green, Yellow, Blue,
Purple, Cyan, White, Auto(color automacally change one by one).
• Reversing Mute: Enables or Disables reversing mute funcon.
When enable this funcon, when user start up the reverse gear of vehicle, the
unit will silence the audio output of this unit automacally.
• Panel:
- Brightness: Allows user to adjust the dimmer: 0,~, 32.
- Touch Correcon: Touch this item to enter touchscreen calibraon mode,
Tap the cursor “+” connuously unll it move to next posion. Follow the cursor
to finish the calibraon of touch screen.
• Radio Area: To choose the radio area: Europe, USA, South America, Russia, Australia,
Middle East, China, Japan.
• Wallpaper: To change the wallpaper.
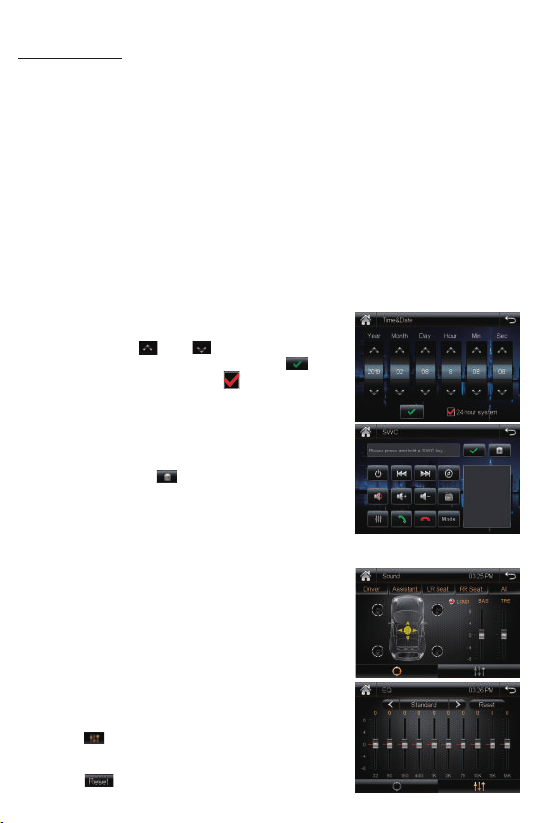
• Time & Date:
Tap the “Time&Date” to select this item in system
interface to enter the me and Date adjusng
interface, tap the and buon to adjust Year,
Month, Day, Hour, Minute, Second. Tap the buon
to confirm adjustments. Tap the buon to preset
24-Hours format as sytem clock me format.
• SWC(Steering Wheel Control)
Tap “SWC” to enter the study operaon menu.
First, make sure the SWC connecng wires have been
connected to this unit.
Before study, tap the icon to clear all previous
sengs.
Press and hold a steering wheel buon, at the same
me, tap the funcon buon on touch screen that
you want to set on to the steering wheel.
• About(System informaon)
Tap this item to view the soware version.
B. AUDIO(Sound Effect):
• Sound Presets: Tap this item to enter the sound preset
interface. Tap the “Driver”, “Assistant”, “LR Seat”,
“RR Seat”, “All” buon to quick preset audio effect for
Driver, front seat passenger, le back passenger ,
right back passenger and all passengers in car.
Tap LOUD buon to enables or disables loudness.
Drag the slider up or down to adjust the bass and
treble volume level.
• EQ Presets:
Tap the icon to enter the EQ preset interface.
User can preset audio EQ: Standard -> Classic -> Rock
-> Pop -> Jazz -> Electric -> User.
Tap the icon to clear all previous EQ sengs.
8
Setup Operaons:
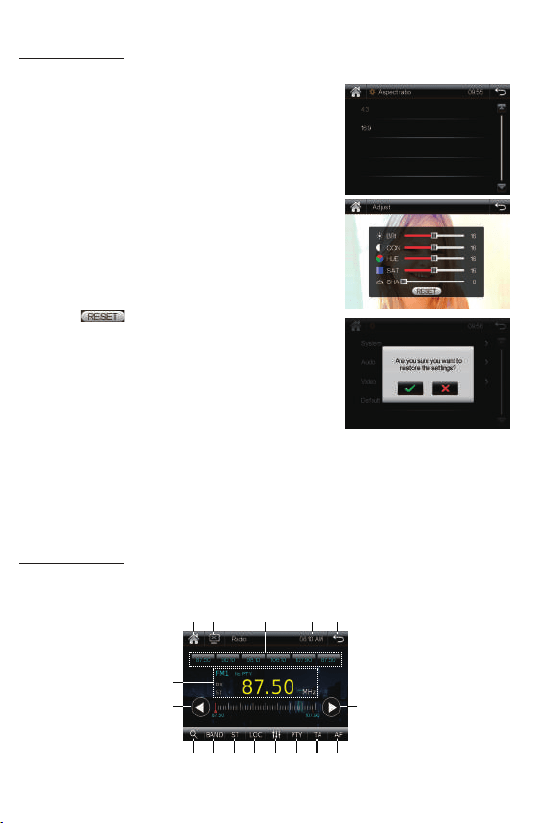
C. Video Sengs
Tap this item to set the aspect rao and video
parameter.
• Aspect Rao: 4:3 or 16:9
This is to select the appropriate TV aspect
4:3 or 16:9 according to the connected TV set.
• Adjust(Video Parameter Sengs)
Tap this item to set the Brightness, Contrast, Hue,
Saturaon, Sharpness of this TFT screen.
- Brightness: 0, ~, 32
- Contrast: 0, ~, 32
- Hue: 0, ~, 32
- Saturaon: 0, ~, 32
- Sharpness: 0, ~, 32
Tap the icon to clear all video sengs.
D. Default
Tap this item to restore to all parameters to factory
default sengs.
9
Radio Operaons:
Press the MODE buon on the remote control, or tap the “Radio” icon on touch screen
to enter radio mode.
11
1 2 543
9 10
7
6
8
12 13 14 15 16

1. Enter into the Home Page
2. Turn off the screen
3. Preset Staons
Tap and hold one of preset staon touch buons to store the preset staon.
Tap one of preset staon touch buons to recall the preset staon.
4. Time
5. Return
6. Current Radio Recepon State
7. Tune/Seek Down
Tap this buon to seek tuning down.
Tap and hold this buon to move radio frequency down one step at a me.
8. Tune/Seek Up
Tap this buon to seek tuning up.
Tap and hold this buon to move radio frequency up one step at a me.
9. AMS(Automac Memory Storing & Preset Scanning)
Tap and hold this buon for more than 2 second to store staon automacally.
Tap this buon to recall the preset staon that stored in the memories in each band.
10. Band Selector
Tap this buon repeatedly to select between FM1, FM2 , FM3, AM1, AM2 bands.
11. Stereo/Mono Recepon
Tap this buon to choose FM STEREO or MONO audio effect.
12. DX/LOC Recepon
Tap this buon to choose local or distant recepon mode.
13. SOUND Effect and EQ Seng
14. PTY(Program Types)
Tap this buon repeatedly to select one type of program from RDS staon:
News, Affairs, Info, Sport, Educate, Drama, Culture, Science, Varied, Pop M, Rock M,
Easy M, Light M, Classic, Other M, Weather, Fnance, Children, Social, Religion,
Phone in, Travel, Leisure, Jazz, Country, Naon(naonal) M, Oldies, Folk M,
Document.
15. TA(Traffic Announcement)
Tap this buon to enables or disables the alternave frequency search mode (AF).
This funcon is used for maintaining a program being listened to during a trip if its
frequency changes.
16. AF(Alternave Frequencies)
Tap the TA buon to enables or disables the TA funcon (trafficinformaon).
When this funcon is enabled, the tuner will periodically scan received frequencies
and play any traffic informaon message that may be broadcast.
10
Radio Operaons:
DVD/CD/MP3/USB Operaons:
Insert DVD/CD Disc
With the label facing up, insert a standard size DVD/CD disc into the disc slot.
Playback will begin automacally.
Eject DVD/CD Disc
To eject a disc, first press the buon to stop playback, then press the buon
on faceplate) or tap the icon on the touch sceen to eject the disc.
USB Connecon
• This black USB port is designed for media playback from flash memory devices.
If you would like to play MP4/MP3/WMA/JPEG files contained in a USB flash memory
device, please insert the USB flash memory into the USB port on the back of the unit.
The unit will play automacally MP3/MP4//JPEG files.
• This red USB port is designed for charging for iPhone / andriod mobile phone.
The charging current consumpon is 2 ampere.
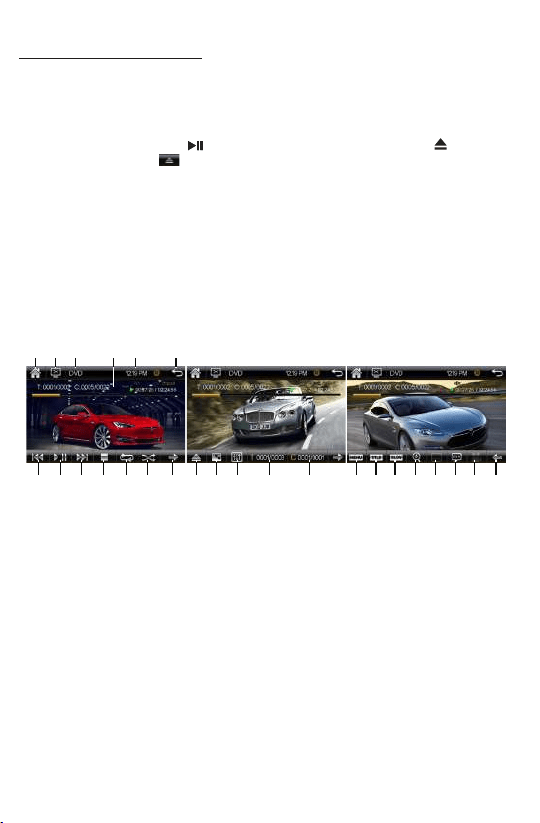
- DVD Playback
Insert a video disc in the disc slot for video disc playback. Press MODE buon on the
remote control, or tap the “DISC” icon on touch screen to switch DVD playback.
1. Enter into the Home Page 2. Turn off the screen
3. Current Media Type 4. Media Playback Informaon Display
5. Time 6. Return
7. Previous Track / Fast backward 8. Play/Pause
9. Next Track / Fast forward 10. Stop Playback
11. Repeat Playback 12. Random Playback
13. Next Page 14. Disc Eject
15. Video Parameter Sengs 16. EQ Sengs
17. Video Search by Title 18. Video Search by Chapter
19. Menu of DVD Disc 20. Title Menu
21. Slow Playback 22. Zoom In/ Zoom Out
23. Mul-Subtle Language 24. Mul-Audio Language
25. Mul-Angle View 26. Previous Page
11
41 2 3 65
7 8 9 10 11 12 13 14 15 16 17 18 19
20 21 22
23
24 25 26
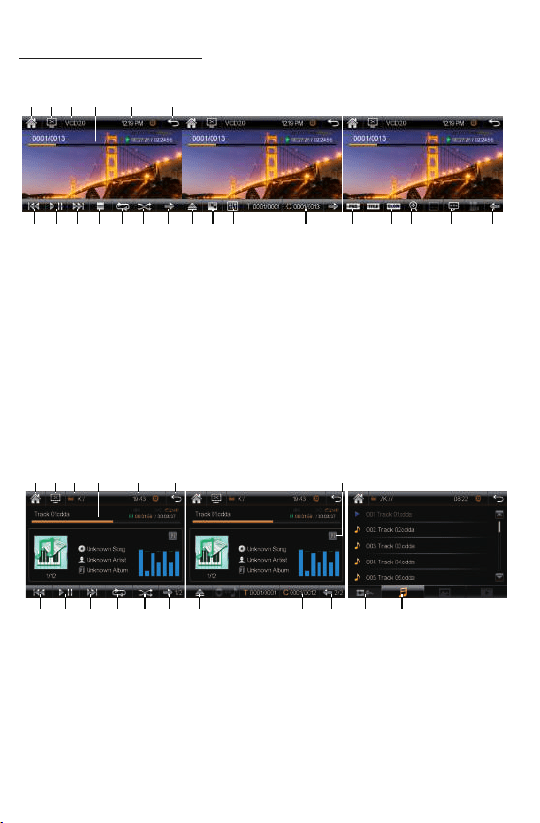
- CD, CD-R/CD-RW/ MP3 Disc Playback:
DVD/CD/MP3/USB Operaons:
- VCD Playback:
1. Enter into the Home Page 2. Turn off the screen
3. Current Media Type 4. Media Playback Informaon Display
5. Time 6. Return
7. Previous Track / Fast backward 8. Play/Pause
9. Next Track / Fast forward 10. Stop Playback
11. Repeat Playback 12. Random Playback
13. Next Page 14. Disc Eject
15. Video Parameter Sengs 16. EQ Sengs
17. Video Search by Track 18. PCB(Playback Control) On/Off
19. Slow Playback 20. Zoom In/ Zoom Out
21. Audio Track Selector 22. Previous Page
1. Enter into the Home Page 2. Turn off the screen
3. Current Media Type 4. Media Playback Informaon Display
5. Time 6. Return to List of files
7. Previous Track / Fast backward 8. Play/Pause
9. Next Track / Fast forward 10. Repeat Playback
11. Random Playback 12. Next Page
13. Disc Eject 14. Track Search
15. Previous Page 16. EQ Sengs
17. Return to Playback mode 18. Audio Files List
12
41 2 3 6
5
7 8 9 10 11 12 13 14 15 16 17
41 2 3 6
5
7 8 9 10 11 12 13 14 15 1817
18
19 20 21 22
16
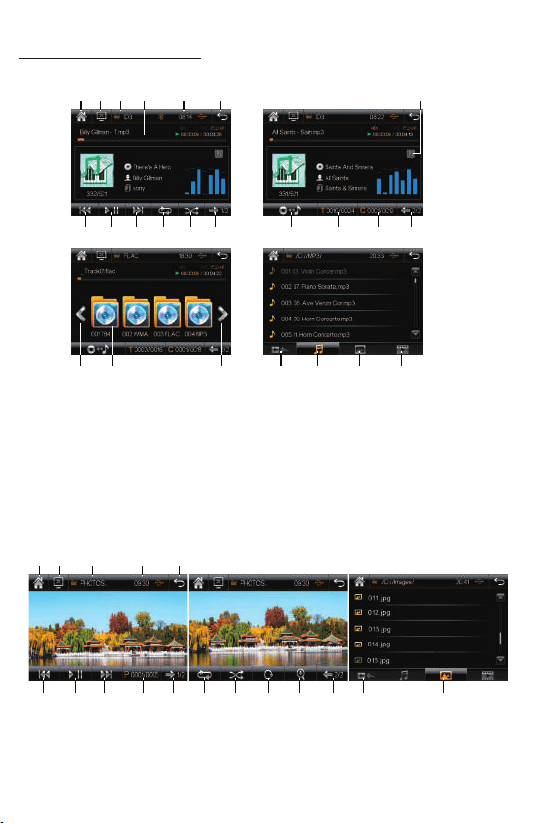
DVD/CD/MP3/USB Operaons:
- Photo Playback:
1. Enter into the Home Page 2. Turn off the screen 3. Current Media Type 4. Time
5. Return to List of files 6. Previous Photo 7. Play/Pause 8. Next Photo
9. Search Photo 10. Next Page 11. Repeat Playback 12. Random Playback
13. Rotate Photo 14. Zoom In/Out 15. Previous Page 16. Return to Playback mode
17. Picture Files List
13
1. Enter into the Home Page 2. Turn off the screen 3. Current Media Type
4. Media Playback Informaon Display 5. Time 6. Return to List of files
7. EQ Sengs 8. Previous Track / Fast backward 9. Play/Pause
10. Next Track / Fast forward 11. Repeat Playback 12. Random Playback
13. Next Page 14. List of Folder 15. Search Folder
16. Search Song in the current folder 17. Previous Page
18. Previous Page of Folder List 19. Folder Icon
20. Next page of Folder List 21. Return to Playback mode
22. Audio Files List 23. Picture Files List 24. Video Files List
- MP3 Disc/USB Playback:
4 71 2 3 6
5
8 9 10 11 12 13
1 2 3 5
4
6 7 8 9 1110 12 13 14 15
16
17
14 15 16 17
18 19 20
2221 23 24
14
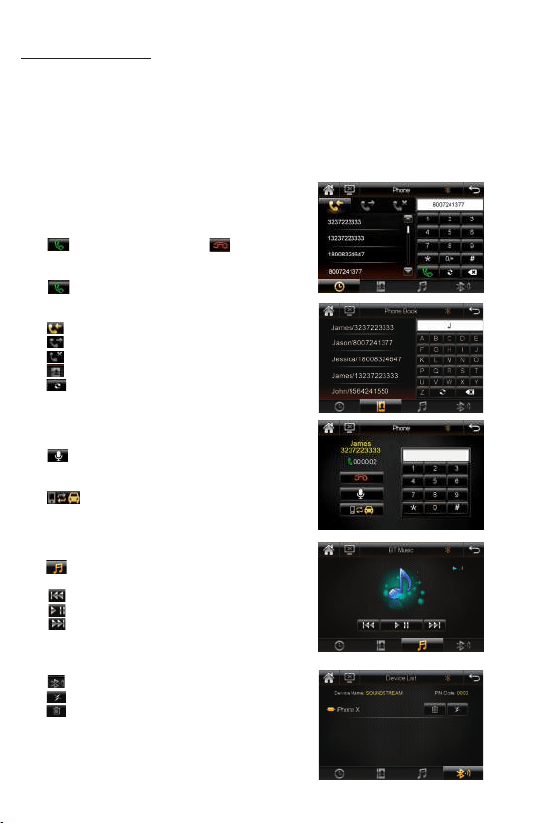
Bluetooth Operaons:
-Pairing and Connecng
Before using a Bluetooth phone with this unit, the phone must be paired and
connected. The Bluetooth signal of the unit will broadcast when the power is on.
This digital video player will displayed as "SOUNDSTREAM" on your phone.
When prompted, enter the pass code "0000" on your phone. Once paired, the
Bluetooth phone should automacally connect this unit whenever the unit is in range.
- Make a call
Input the phone number by using the keypad in
Bluetooth mode.
- Making and Ending a Call
Tap to make a call, and tap to end a call.
- Redial last dialed number
Tap to redial the last dialed phone number.
- Viewing Recent Call List
Tap icon to view the income calls.
Tap icon to view the outgoing calls.
Tap icon to view the missed calls.
Tap icon to view the contacts(phonebook).
Tap icon to download the contacts from
phone.
- Mute On/off during talking
Tap icon to toggle silence on/off during calling.
- Transferring Audio
Tap icon to transfer audio between this car
bluetooth hands-free system and mobile phone.
- Streaming Audio
Tap icon on bluetooth mode to enter the
music control playback interface.
Tap icon to skip to the previous track.
Tap icon to play or pause the music.
Tap icon to advance to the next track.
- Device List
Tap icon to view device list of phone name.
Tap to disconnect the connected phone.
Tap to remove the connected phone, user have
to reestablish bluetooth pairing and connecng
between this bluetooth hands-free system and
mobile phone.
15
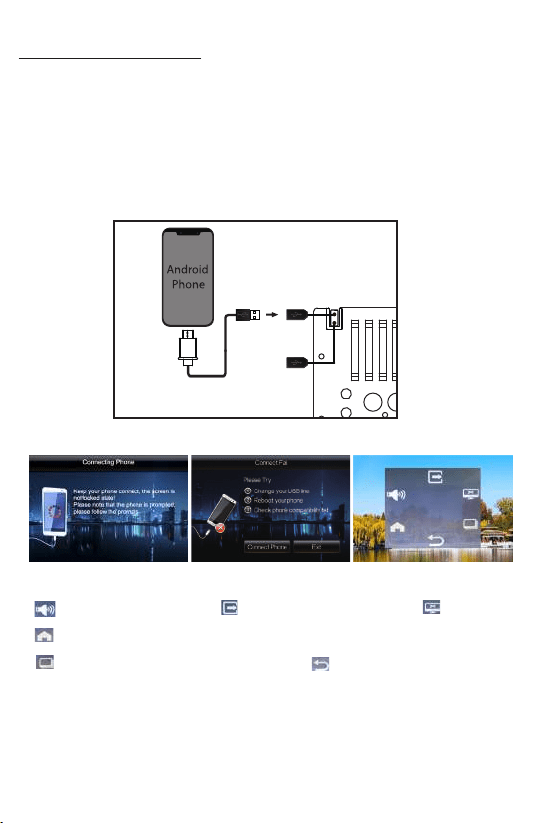
Android Phone Link Operaons:
The PhoneLink allows you to mirror the screen of select Android smartphones onto
this DVD player’s screen. Simply plug in your device to the rear USB inputs(Black
connector), and you are ready to view your favorite smartphone apps directly on this
DVD’s screen.
Screen Mirroring of Smart Devices
1) Connect the smartphone to this DVD player with a phone data cable.
2) Open the developer opons in the seng mode of your smartphone.
3) Turn on the USB debugging, then you can mirror the screen of Android smartphone
onto this DVD player’s screen.
4) This DVD player will switch into phone link mode automaically as below interface:
Using of the Icons:
1. : Volume adjustment 2. : Exit the phone link mode 3. : Screensave
4. : Return to home page of smart devices
5. : Landscape mode (Rotate the screen) 6. : Return to the previous step.
Note:
a. This DVD player support Android system only, support two-way control(both by DVD
player and connected smart devices).
b. Some phones will not support Landscape mode on the home screen.
c. The connecon must be under the screen unlocked.
d. Bluetooth must be connected, to have sound output.
USB MEDIA
(Black)
(Not Included)
(Not Included)
USB CHARGER
(Red, Charge Only)