

Safety • Assembly • Operation • Tips &Techniques • Maintenance • Troubleshooting • Parts Lists • Warranty
OF A AL
_WHH
21" Rotary Mower- Model 588
iMPORTANT
READ SAFETY RULES AND iNSTRUCTiONS CAREFULLY BEFORE OPERATION
Warning: Thisunit is equippedwithan internalcombustionengineandshouldnot beusedon or nearany unimprovedforest-covered,brush-
coveredor grass-coveredlandunlesstheengine'sexhaustsystemis equippedwitha sparkarrestermeetingapplicablelocalor statelaws(if any).
If a sparkarresteris used,it shouldbemaintainedineffectiveworkingorderby the operator.In theStateof Californiathe aboveis requiredbylaw
(Section4442of the CaliforniaPublicResourcesCode).Otherstatesmayhavesimilarlaws.Federallawsapplyonfederallands.A sparkarrester
for the muffleris availablethroughyour nearestengineauthorizedservicedealeror contactthe servicedepartment,RO.Box361131Cleveland,
Ohio44136-0019.
PRINTEDIN U.S.A.
MTD LLC, P.O. BOX 361131 CLEVELAND, OHIO 44136-0019
FORMNO.770-10111H
10/2005
This Operator's Manual is an important part of your new lawn mower, it will help you assemble,
prepare and maintain the unit for best performance. Please read and understand what it says.
Table of Contents
Slope Gauge ....................................................... 3
Safe Operation Practices ................................... 4
Setup and Adjustment ....................................... 6
Operating Your Lawn Mower .............................. 8
Maintaining Your Lawn Mower ......................... 10
Trouble Shooting .............................................. 12
Safety Labels .................................................... 13
Parts List ........................................................... 14
Finding and Recording Model Number
BEFOREYOU STARTASSEMBLING
YOUR NEW EQUIPMENT,
please locatethe model plate on the equipmentand copy the
information to the sample model plate provided to the right.
Youcan locate the model plate by standing at the operating
position and lookingdown at the rear of the deck. This
information will be necessary to use the manufacturer'sweb
site and/or obtain assistancefrom the Customer Support
Department or an authorizedservice dealer.
Model Number
Serial Number
YaRD-MaN)f(
P. O. BOX ;361131
CLEVELAND,OH 44136
www.yardman.com 330-220-4683
800-800-731 0
%, J
Customer Support
Please do NOTreturn the unit to the retailer from which it was
purchased, without first contacting Customer Support.
Ifyou have difficulty assemblingthis product or have any
questions regarding the controls, operationor maintenanceof
this unit, you can seek help from the experts.Choosefrom the
options below:
1. Visit yardman.com for many usefulsuggestions. Click
on Customer Support buttonand you will get the four
options reproducedin this sample to the right. Click on the
appropriate buttonand help is immediatelyavailable.
2. Phonea Customer Support Representative
at 1(800) 800-7310.
3. The engine manufacturer isresponsiblefor all engine-
relatedissues with regardsto performance, power-rating,
specifications,warranty and service. Pleasereferto the
engine manufacturer'sOwner's/Operator's Manual, packed
separately with your unit, for more information.
Click here to search our knowledge base.
Search by product, keyword, or phrase.
Login to check the status of your questions, modify
your inquiries, or update your personal profile.
Need local assistance? Click here to find authorized
service centers in your area.
Need a manual and/or parts list? Download
literature from recent model years.
2
O
o
o
>:.
(13
O3
(13
(13
O-
O
O
(--
O5
E
O
(13
(13
o3
(13
O-
O
o3
(13
E
(]3
(13
o
(13
C5
('5
O3
O5
(13
t"b
(13
O9
o5
(13
O-
O
O3
-5
O3
O
O
E
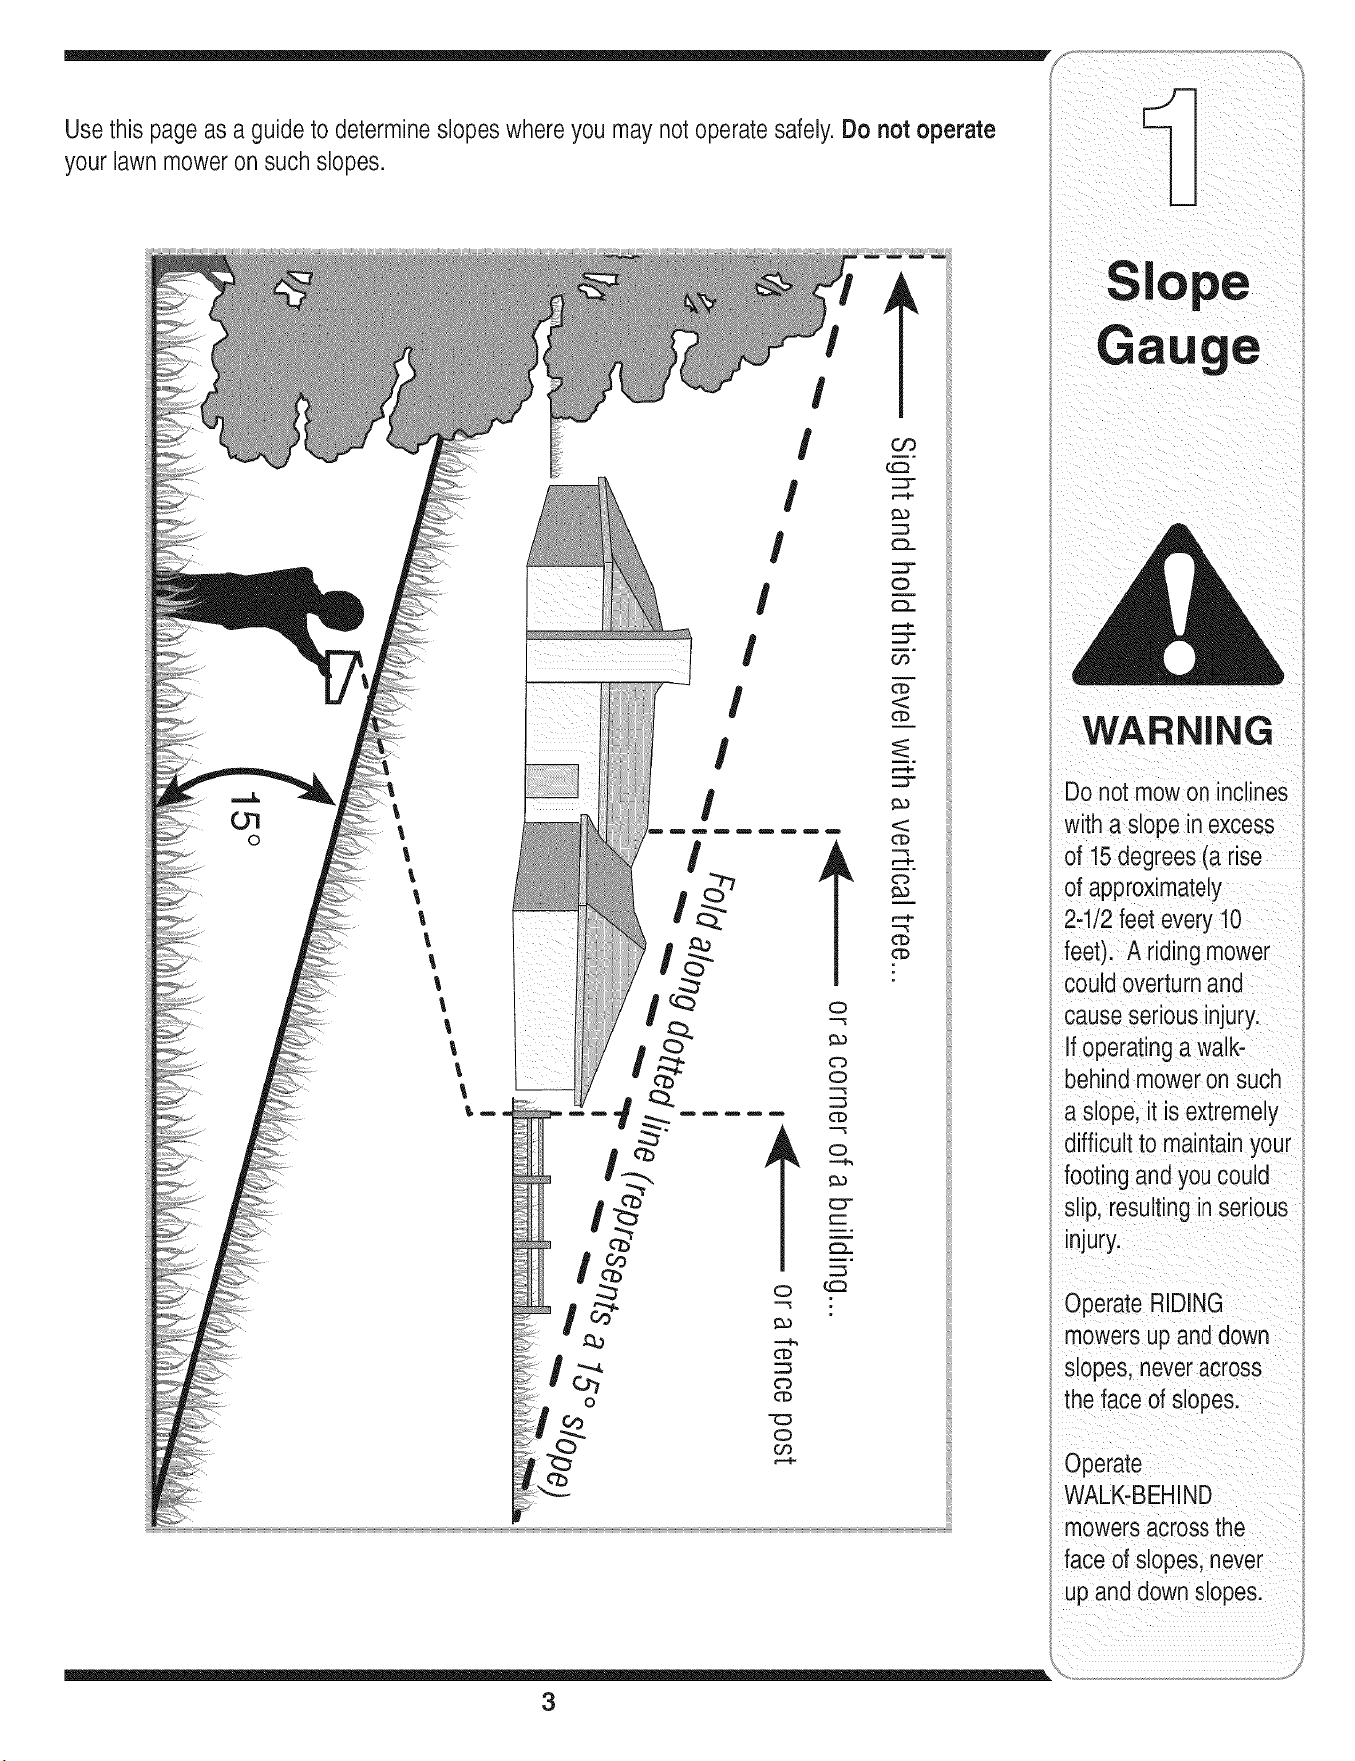
Sight and hold this levelwith a verticaltree...
also
I
15°
WARNING
This symbolpoints
out importantsafety
instructionswhich, if
notfollowed,could
endangerthe personal
i safetyand/or property
I ofyourselfand others.
Readandfollow all
instructionsinthis
manualbeforeat-
temptingto operate
i this machine. Failure
I to comply withthese
instructionsmay result
i in personalinjury.When
you see this symbol.
i HEED ITS WARNING!
Your Responsibility
Restrictthe use
of this power machine
to personswho read,
_understand
ano follow the warnings
and instructions
inthis manual
and on the machine.
WARNING: Engine Exhaust,some of its constituents, andcertain vehicle compo-
nents contain or emit chemicals knownto State of Californiato cause cancer and
birth defects or other reproductiveharm.
DANGER: This machinewas built to be operated according to the rules for safe operation in this
manual.As with any type of power equipment,carelessness or error on the part of the operator can
result in serious injury.This machine is capable of amputatinghands andfeet andthrowing objects.
Failureto observethe followingsafety instructions could result in serious injury or death.
Children
Tragicaccidentscanoccur ifoperatorisnotalert to presence
of children.Childrenare oftenattractedto mowerand mowing
activity.Theydonot understandthe dangers.Neverassume
thatchildrenwill remainwhereyou lastsawthem.
1. Keepchildrenoutof the mowingareaand underwatchful
careof a responsibleadultotherthanthe operator.
2. Bealert andturn moweroff if a childentersthearea.
3. Beforeand whilemovingbackwards,look behindanddown
forsmallchildren.
4. Useextremecare whenapproachingblindcorners,
doorways,shrubs,trees,or otherobjectsthat mayobscure
yourvisionof a child whomayrun intothe mower.
5. Keepchildrenawayfromhotor runningengines.Theycan
sufferburnsfroma hotmuffler.
6. Neverallowchildrenunder14 yearsoldto operatea power
mower.Children14yearsoldand overshouldreadand
understandoperationinstructionsandsafetyrulesinthis
manualandshouldbetrainedandsupervisedbya parent.
General Operation
1. Readthis operator'smanualcarefullyin its entiretybefore
attemptingto assemblethis machine.Read,understand,
andfollowall instructionsonthe machineandin the
manual(s)beforeoperation.Becompletelyfamiliarwith
thecontrolsandthe properuseof this machinebefore
operatingit. Keepthis manualin a safeplaceforfuture
and regularreferenceand for orderingreplacementparts.
2. Thismachineis a precisionpieceof powerequipment,
nota plaything.Therefore,exerciseextremecautionat all
times.Yourunithas beendesignedto performonejob: to
mowgrass. Do notuseit for anyotherpurpose.
3. Neverallow childrenunder 14yearsold to operatethis
machine.Children 14yearsold and overshould readand
understandthe instructionsinthis manualandshould
betrainedand supervisedby a parent.Onlyresponsible
individualswho arefamiliar withthese rulesof safe
operationshould be allowedto usethis machine.
4. Thoroughlyinspectthe areawherethe equipmentis to
beused. Removeall stones,sticks,wire,bones,toys
andotherforeignobjects, whichcouldbe trippedover or
pickedup andthrownbythe blade.Thrownobjects can
causeseriouspersonalinjury.Planyour mowingpattern
to avoiddischargeof materialtoward roads,sidewalks,
bystandersandthe like.Also,avoiddischargingmaterial
againsta wallor obstruction,whichmaycausedischarged
materialto ricochetback towardthe operator.
5. Tohelpavoidbladecontact ora thrownobjectinjury,
stay inoperatorzone behindhandlesand keepchildren,
bystanders,helpersand petsat least75 feetfrom mower
whileit is inoperation.Stop machineifanyoneenters
area.
6. Alwayswearsafetyglassesor safetygogglesduringopera-
tionandwhile performingan adjustmentor repairto protect
youreyes.Thrownobjectswhich ricochetcan causeserious
injuryto the eyes.
7. Wearsturdy,rough-soledworkshoesand close-fitting
slacksandshirts. Shirtsand pantsthatcoverthe armsand
legs andsteel-toedshoesare recommended.Neveroperate
this machinein barefeet,sandals, slipperyor light-weight
(e.g.canvas)shoes.
8. Do notputhands orfeet nearrotatingparts or undercutting
deck.Contactwithblade canamputatehandsandfeet.
9. A missingor damageddischargecovercancause blade
contactor thrownobject injuries.
10.Manyinjuriesoccuras a resultof the mowerbeing pulled
overthefoot duringa fall causedby slippingor tripping.
Do notholdon to the mowerif you are falling;releasethe
handleimmediately.
11.Neverpullthe mowerbacktowardyou whileyouare
walking.If you must backthe mowerawayfroma wall or
obstructionfirstlook downand behindtoavoidtrippingand
thenfollowthese steps:
a. Stepbackfrommowerto fully extendyourarms.
b. Be sure youare well balancedwithsurefooting.
c. Pullthe mowerbackslowly,no morethan half way
towardyou.
d. Repeatthesestepsas needed.
12.Do notoperatethe mowerwhileunderthe influenceof
alcoholordrugs.
13.Do notengagetheself-propelledmechanismon unitsso
equippedwhilestartingengine.
14.The bladecontrolhandleis a safetydevice.Neverattempt
to bypassitsoperation.Doingso makesthe safetydevice
inoperativeandmayresult in personalinjurythrough
contactwiththe rotatingblade. The bladecontrolhandle
mustoperateeasily in bothdirectionsandautomatically
returnto the disengagedpositionwhenreleased.
15.Neveroperatethe mowerinwet grass. Alwaysbesure of
yourfooting. A slipand fall can causeseriouspersonal
injury.If youfeel youare losingyourfooting,releasethe
bladecontrolhandleimmediatelyand the bladewillstop
rotatingwithinthreeseconds.
16.Mowonly in daylightor goodartificiallight. Walk,neverrun.
17.Stopthe bladewhencrossinggraveldrives, walksor roads.
18.If theequipmentshouldstartto vibrateabnormally,stopthe
engineand check immediatelyfor the cause.Vibrationis
generallya warningof trouble.
4
19.Shut theengineoff andwait untilthe bladecomesto a
completestopbefore removingthe grasscatcheror unclog-
ging thechute.
The cuttingbladecontinuesto rotatefor a fewseconds after
the engineis shutoff. Neverplaceany partof the bodyin
the bladearea untilyouare surethe blade hasstopped
rotating.
20. Neveroperatemowerwithoutpropertrail shield,discharge
cover,grass catcher,bladecontrolhandleor othersafety
protectivedevicesin placeand working.Neveroperate
mowerwithdamagedsafetydevices.Failureto do so can
resultin personalinjury.
21. Mufflerandenginebecomehotandcan causea burn.Do
nottouch.
22.Only use parts and accessoriesmadefor this machineby
manufacturer.Failureto do so canresult inpersonalinjury.
23. If situationsoccurwhich are notcoveredin this manual,
usecareand goodjudgment.Contactyourdealerfor
assistance.Telephone1-800-800-7310for the nameof your
nearestdealer.
Slope Operation
Slopesare a majorfactorrelatedto slip andfallaccidents,which
can resultinsevereinjury.Operationon slopesrequiresextra
caution.If youfeel uneasyon a slope,do notmow it.Foryour
safety,usetheslopegaugeincludedas part of this manualto
measureslopesbeforeoperatingthis uniton a slopedor hilly
area.If theslopeis greaterthan 15degrees,do not mowit.
Do:
1. Mowacrossthefaceof slopes;neverup anddown.Exercise
extremecautionwhenchangingdirectiononslopes.
2. Watchfor holes,ruts,rocks, hiddenobjects,or bumpswhich
can causeyouto slipor trip. Tallgrass can hideobstacles.
3. Alwaysbesure of yourfooting.A slip andfall cancause
serious personalinjury.If youfeel youare losingyour
balance,releasethe bladecontrolhandleimmediately,and
the bladewill stoprotatingwithin 3 seconds.
Do Not:
1. Donot mowneardrop-offs, ditchesorembankments,you
could loseyour footing orbalance.
2. Donot mowslopesgreaterthan 15degreesasshownon
the slopegauge.
3. Donot mowon wetgrass.Unstablefootingcouldcause
slipping.
Service
Safe Handling Of Gasoline:
1. To avoidpersonalinjury orpropertydamageuseextreme
care inhandlinggasoline.Gasolineis extremelyflammable
and thevaporsare explosive.Seriouspersonalinjurycan
occur whengasolineisspilled on yourself oryour clothes,
which canignite.
2. Wash yourskin andchangeclothesimmediately.
3. Useonly an approvedgasolinecontainer.
4. Neverfill containers insidea vehicle oron a truckor trailer
bedwitha plasticliner.Alwaysplacecontainerson the
groundawayfromyourvehicle beforefilling.
5. Removegas-poweredequipmentfromthe truck ortrailer
and refuelit onthe ground.If this is notpossible,then refuel
suchequipmentona trailerwitha portablecontainer,rather
than froma gasoline dispensernozzle.
6. Keepthe nozzlein contactwiththe rimof thefuel tank or
containeropeningat alltimesuntil fuelingis complete.Do
notuse a nozzlelock-opendevice.
7. Extinguishallcigarettes,cigars, pipesand othersources
of ignition.
8. Neverfuel machineindoorbecauseflammablevaporswill
accumulatein thearea.
9. Neverremovegascap oradd fuel whileengineis hot or
running. Allowengineto cool at leasttwo minutesbefore
refueling.
10.Neveroverfill fuel tank. Filltankto no morethan Y2inch
belowbottomof filler neckto providefor fuel expansion.
11.Replacegasolinecap andtightensecurely.
12.If gasolineis spilled,wipe itoff theengineand equipment.
Moveunitto anotherarea.Wait5 minutesbeforestarting
engine.
13.Neverstorethe machineorfuel containernearanopen
flame,sparkor pilotlight as ona water heater,space
heater,furnace,clothesdryeror othergas appliances.
14.Toreducefire hazard,keepmowerfree of grass, leaves,
orother debrisbuild-up.Cleanup oil orfuel spillageand
removeanyfuel soakeddebris.
15.Allowa mowerto cool at least5 minutesbeforestoring.
GeneralService:
1. Neverrun an engineindoorsorin a poorlyventilatedarea.
Engineexhaustcontainscarbonmonoxide,an odorlessand
deadlygas.
2. Beforecleaning,repairing,or inspecting,makecertainthe
bladeandall movingparts havestopped.Disconnectthe
sparkplugwire andgroundagainstthe engineto prevent
unintendedstarting.
3. Checkthe bladeandenginemountingboltsatfrequent
intervalsfor propertightness.Also,visuallyinspectbladefor
damage(e.g.,bent,cracked,worn)Replacebladewiththe
originalequipmentmanufacture's(O.E.M.)bladeonly,listed
inthis manual."Useof partswhichdo notmeetthe original
equipmentspecificationsmayleadto improperperformance
andcompromisesafety!"
4. Mowerbladesare sharp andcan cut.Wrapthebladeor wear
gloves,anduseextracautionwhenservicingthem.
5. Keepallnuts,bolts,andscrewstightto be surethe equip-
mentis insafeworkingcondition.
6. Nevertamperwithsafetydevices.Checktheir properopera-
tionregularly.
7. Afterstrikinga foreignobject,stopthe engine,discon-
nectthesparkplugwire andgroundagainsttheengine.
Thoroughlyinspectthe mowerfor anydamage.Repairthe
damagebeforestartingandoperatingthe mower.
8. Neverattemptto makea wheelor cuttingheightadjustment
whiletheengineis running.
9. Grasscatchercomponents,dischargecover,andtrail
shieldaresubjectto wear anddamagewhichcould expose
movingparts or allowobjectsto be thrown.Forsafety
protection,frequentlycheckcomponentsandreplaceim-
mediatelywithoriginal equipmentmanufacturer's(O.E.M.)
parts only,listedinthis manual."Useof parts which do
notmeetthe originalequipmentspecificationsmayleadto
improperperformanceandcompromisesafety!"
10.Do notchangetheenginegovernorsettingor over-revthe
engine.Thegovernorcontrolsthe maximumsafeoperating
speedof theengine.
11.Maintainor replacesafetylabels,as necessary.
12.Observeproperdisposallawsand regulations.Improper
disposalof fluidsand materialscan harmtheenvironment.
5
Operation
WARNING
This symbol points
out important safety
instructions, which if
not followed, could
endangerthe personal
safety and/or property
of yourselfand others.
Readand follow all
instructions inthis man-
ual before attemptingto
operate this machine.
Failureto comply with
these instructionsmay
result in personal injury.
When you see this
symbol.
HEED IT'S WARNING!
YourResponsibility
Restrictthe use
of this power machine
to personswho read.
understand
and follow the warnings
and instructions
in this manua
and on the machine.
Adjustment
NOTE:Stand behind
the mower as il you
were going to operate
it. Your righthand cor-
respondsto the right
i sideof the mower;your
left hand corresponds
to the left side of the
mower.
NOTE:"(our mower
is shipped with the
handle in the higher
height position.
NOTE: Eachend of
i the lower handle must
be placed in the same
i relative position.
iMPORTANT
I
This unit isshipped
i without gasoline or
i oil inthe engine. Fill
!i up gasoline and oil
as instructedinthe
i accompanyingengine
manual BEFORE
operatingyour mower.
Step 1
HardwarePack
Wing Nuts (2)
Step 2
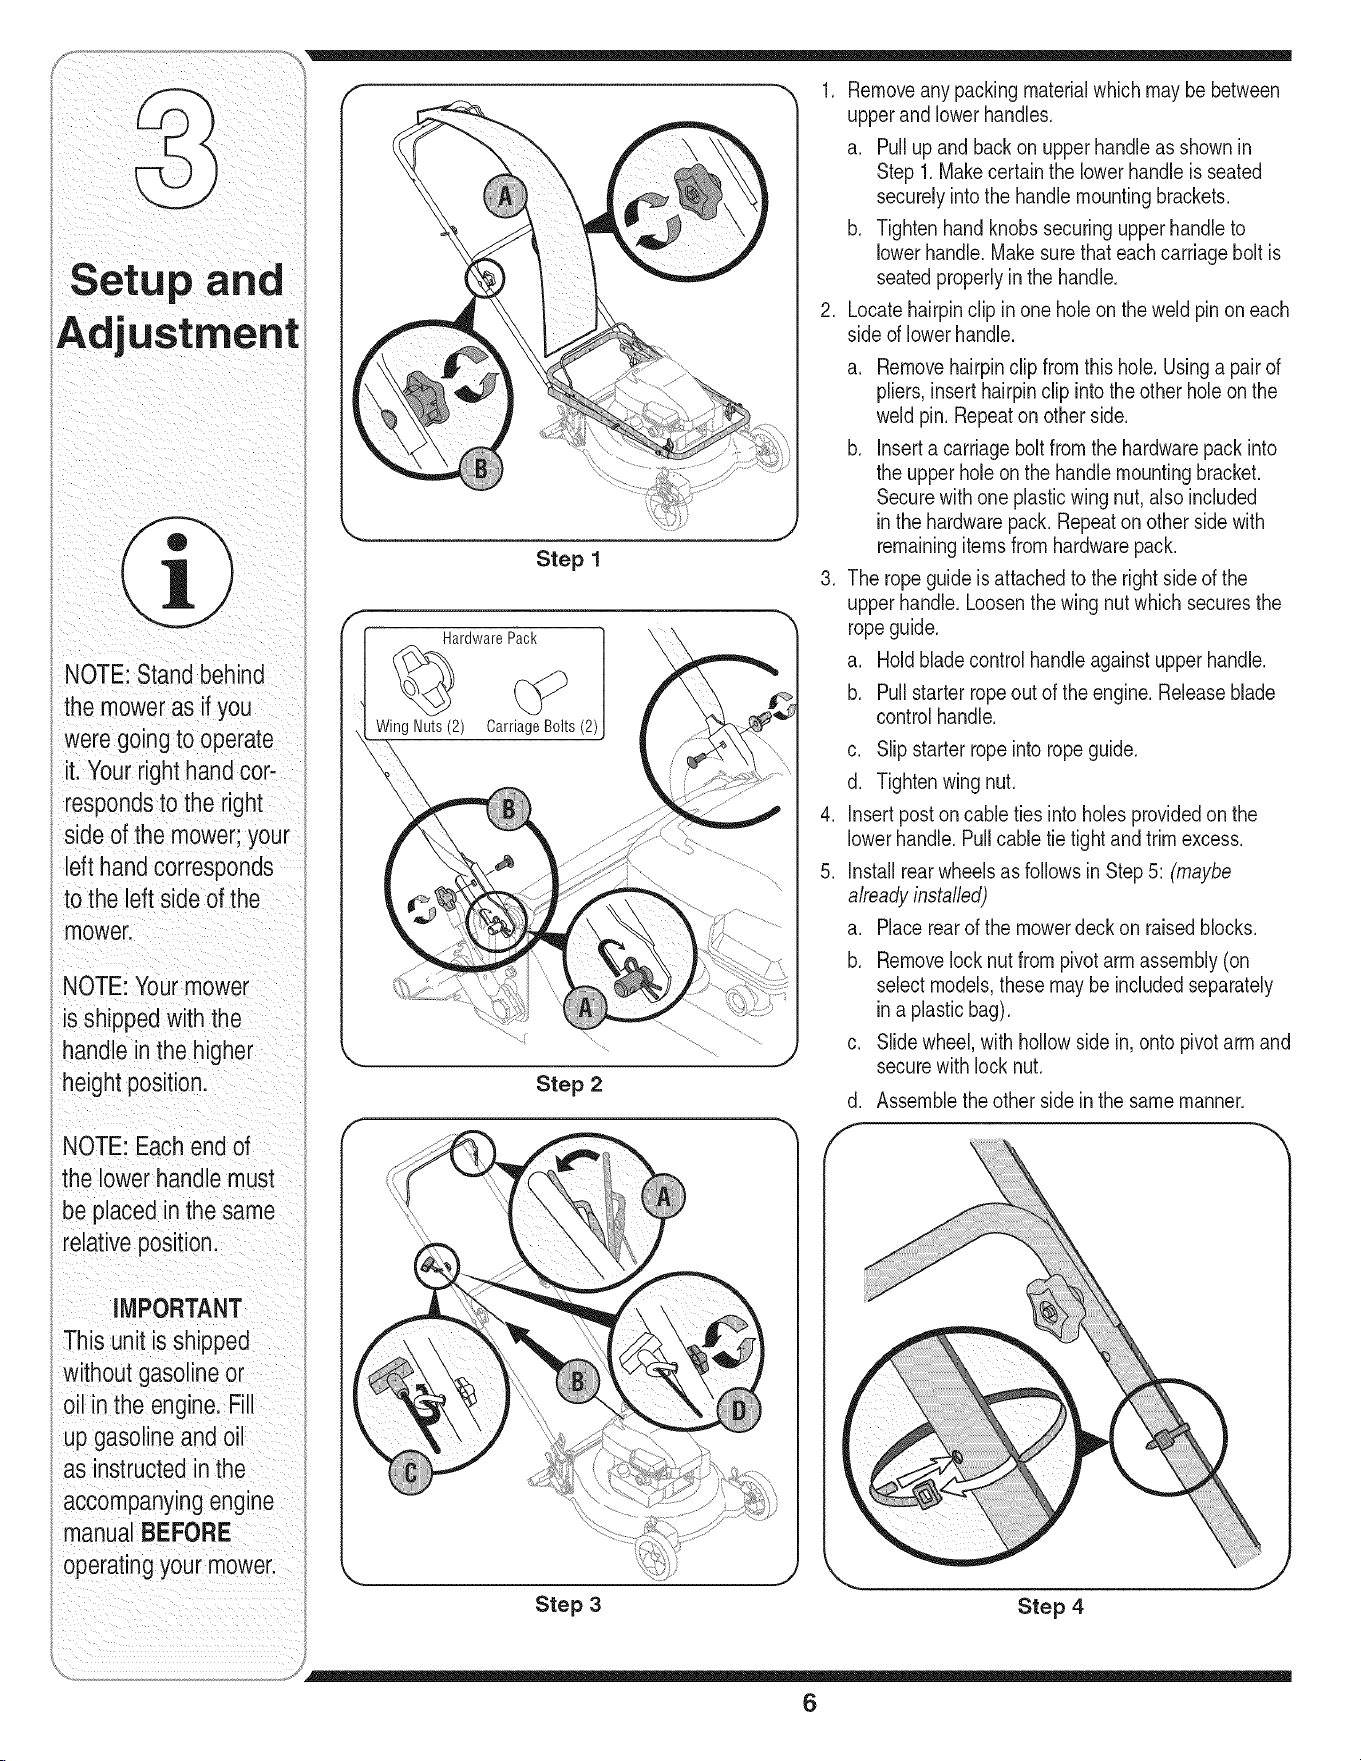
1. Removeanypackingmaterialwhichmaybebetween
upperandlowerhandles.
a. Pullupand backon upperhandleas shownin
Step 1.Makecertainthe lowerhandleis seated
securelyintothe handlemountingbrackets.
b. Tightenhandknobssecuringupperhandleto
lowerhandle.Makesurethateachcarriagebolt is
seatedproperlyin the handle.
2. Locatehairpinclip inone holeon the weldpinon each
sideof lowerhandle.
.
.
5.
a. Removehairpinclipfromthis hole.Usinga pairof
pliers,inserthairpinclip intothe other holeon the
weldpin. Repeaton otherside.
b. Inserta carriagebolt fromthe hardwarepackinto
the upperholeonthe handlemountingbracket.
Securewithone plasticwing nut,also included
inthe hardwarepack.Repeatonother sidewith
remainingitemsfromhardwarepack.
The ropeguideis attachedto the right sideof the
upperhandle.Loosenthe wingnut whichsecuresthe
ropeguide.
a. Holdbladecontrolhandleagainstupperhandle.
b. Pullstarterropeout of the engine.Releaseblade
controlhandle.
c. Slipstarterropeinto ropeguide.
d. Tightenwingnut.
Insertpostoncable tiesintoholes providedon the
lowerhandle.Pullcabletie tightandtrimexcess.
Installrearwheelsas followsin Step5: (maybe
alreadyinstalled)
a. Placerearof the mowerdeckon raisedblocks.
b. Removelocknutfrompivotarmassembly(on
selectmodels,thesemaybeincludedseparately
ina plasticbag).
c. Slidewheel,withhollowsidein, ontopivotarmand
securewithlocknut.
d. Assemblethe other sideinthe samemanner.
Step 3 Step 4
6
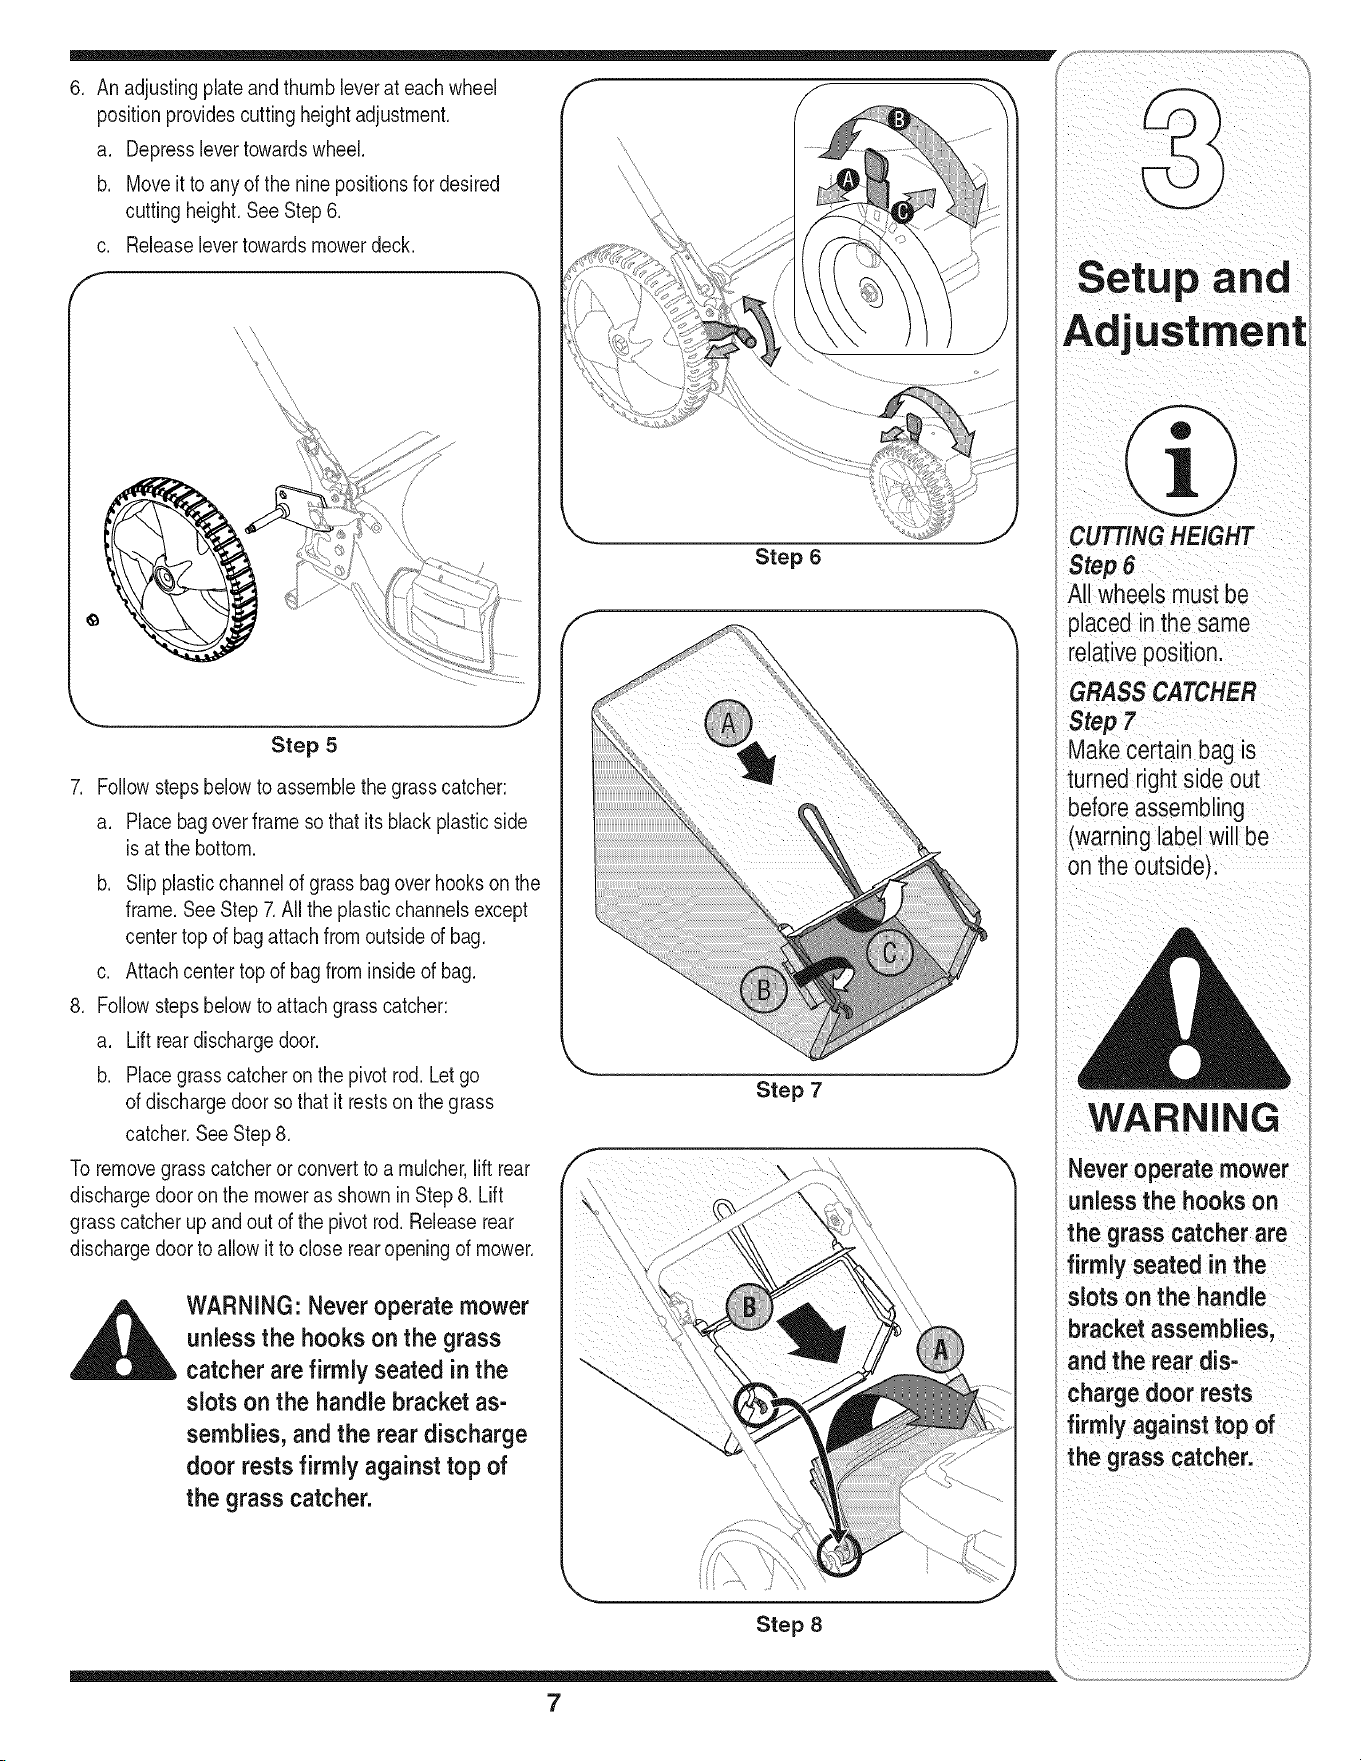
6. An adjustingplateandthumbleverat each wheel
positionprovidescuttingheightadjustment.
a. Depresslevertowardswheel.
b. Moveit to anyof the ninepositionsfor desired
cutting height.SeeStep 6.
Releaselevertowardsmowerdeck.
C.
f
J
Step 5
7. Followstepsbelowto assemblethe grasscatcher:
a. Placebagoverframesothat itsblackplasticside
is at the bottom.
b. Slip plasticchannelof grassbagoverhooksonthe
frame.SeeStep7.All the plasticchannelsexcept
centertop of bagattachfromoutsideof bag.
c. Attachcentertop of bagfrominsideof bag.
8. Followstepsbelowto attachgrasscatcher:
a. Liftreardischargedoor.
b. Placegrasscatcheron thepivotrod. Letgo
of dischargedoorsothat it restson thegrass
catcher.SeeStep8.
To removegrasscatcherorconvertto a mulcher,lift rear
dischargedooron the moweras showninStep8. Lift
grasscatcherupandout of the pivotrod.Releaserear
dischargedoorto allow it to closerearopeningof mower.
_ ARNING: Never operate mower
unless the hooks on the grass
catcher are firmly seated in the
slots on the handle bracket as-
semblies, and the rear discharge
door rests firmly against top of
the grass catcher.
Step 6
J
Step 7
Step 8
CUTTING
S,ep8
All Wheelsmust be
placed in the same
relative pos!tionl
Step 7
Make certain bagis
turned right side out
before assembling
(waming labe!will be
on the outside):
WARNING
ii_i _ _ _i ii_ i_ i _i!_ _ii
.everoperatemower
unless the hooks on
the grass catcher are
firmly seated in the
slots on the handle
bracket assembiiesl
and the rear dis:
charge door rests
firmly against top of
the grass catcher:
7
Know Your Lawn Mower
WARNING
The blade control
mechanism is a
safety device. Never
attempt to bypass its
operations.
Use extreme care
i when handhng
gasoline.Gasoline is
extremely flammable
and the vapors are
explosive. Never fuel
the machine indoors
or while the engine
is hot or running.
Extinguish cigarettes,
cigars, pipes and
other sources of
ignition.
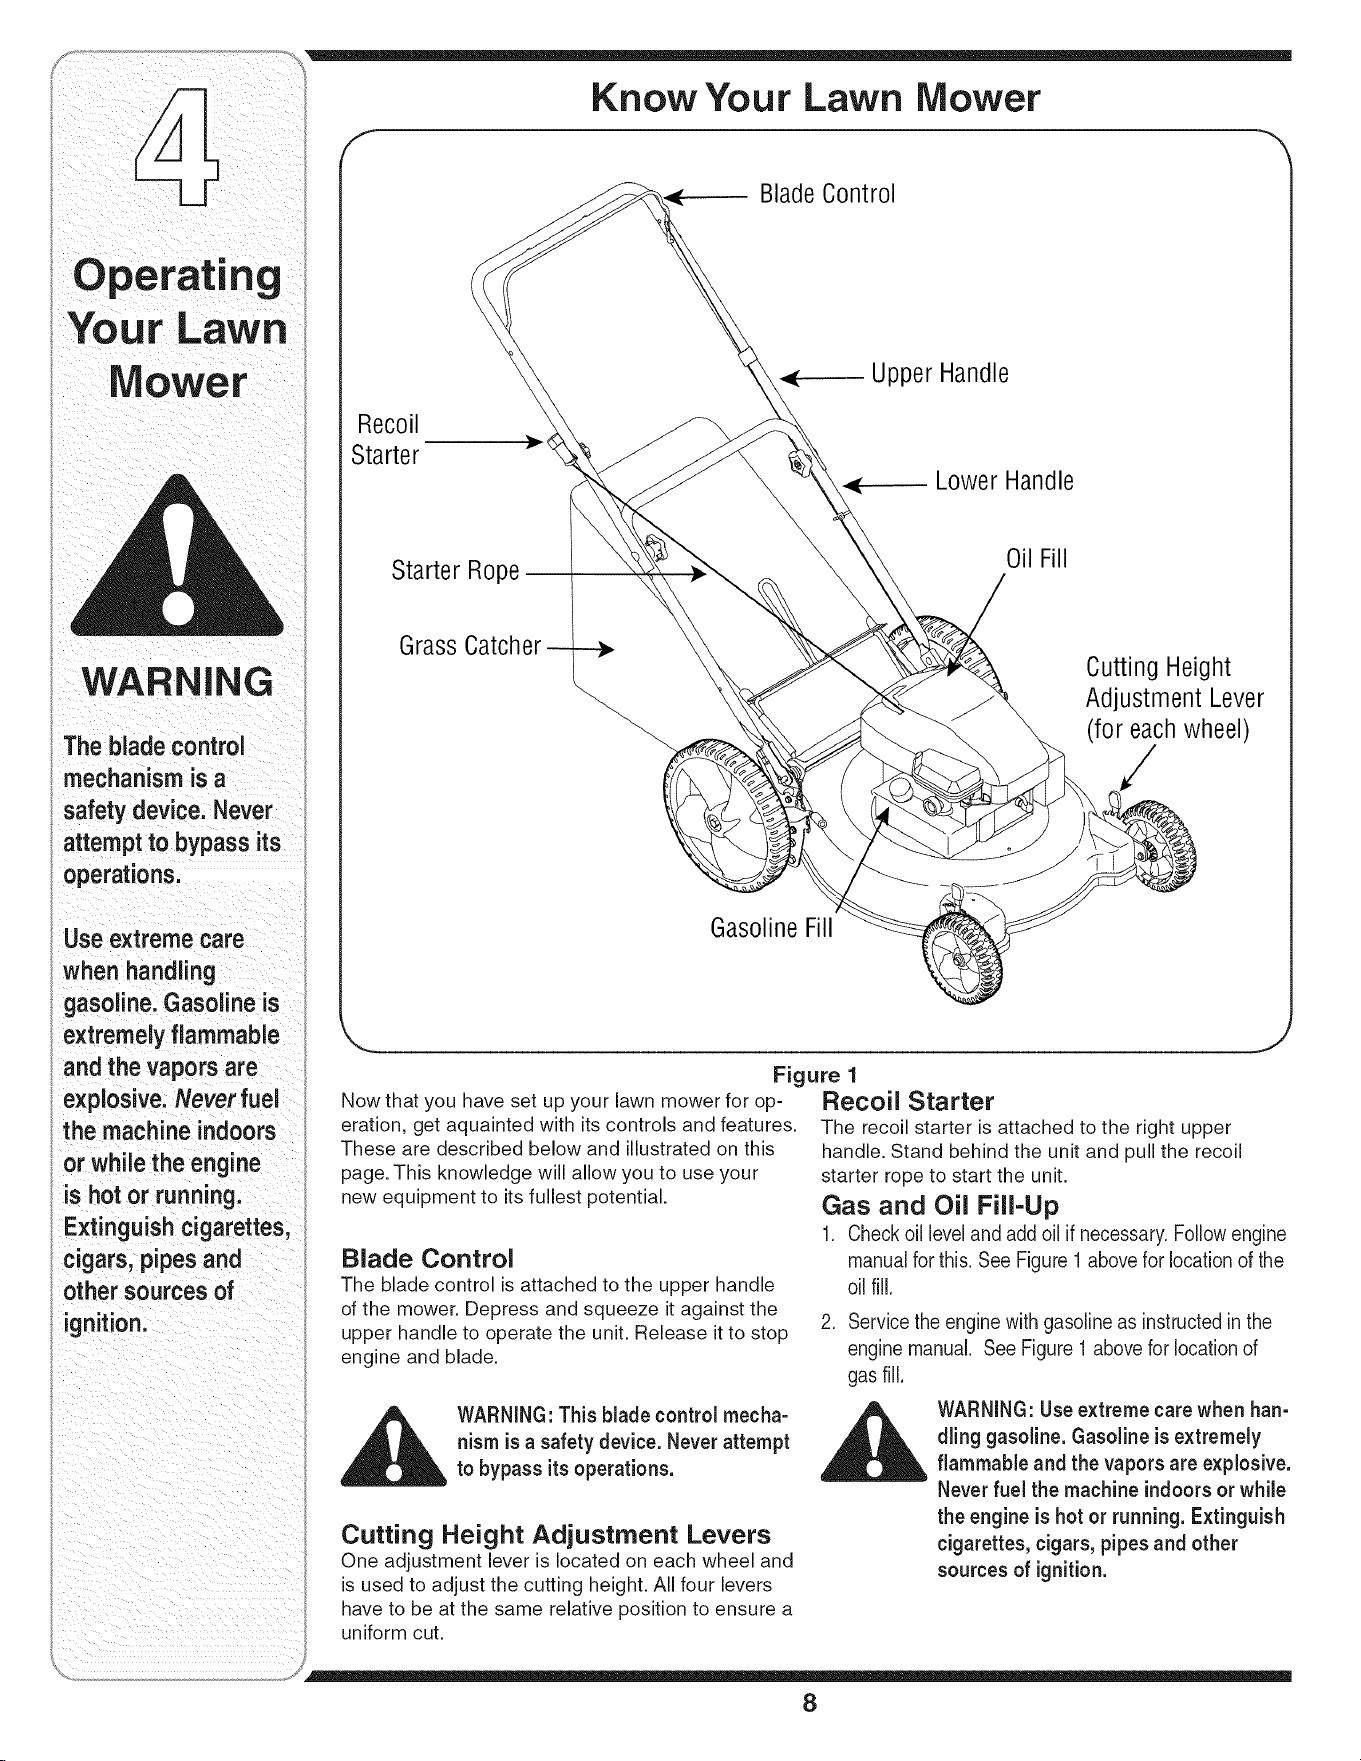
Blade Control
Recoil
Starter
Upper Handle
LowerHandle
Starter Rope-
Oil Fill
Grass Catcher
Cutting Height
Adjustment Lever
(for each wheel)
Gasoline Fill
Figure 1
Now that you have set up your lawn mower for op-
eration, get aquainted with its controls and features.
These are described below and illustrated on this
page. This knowledge will allow you to use your
new equipment to its fullest potential.
Blade Control
The blade control is attached to the upper handle
of the mower. Depress and squeeze it against the
upper handle to operate the unit. Release it to stop
engine and blade.
Recoil Starter
The recoil starter is attached to the right upper
handle. Stand behind the unit and pull the recoil
starter rope to start the unit.
Gas and Oil Fill-Up
1. Check oil level and add oil if necessary. Follow engine
manual for this. See Figure 1 above for location of the
oil fill.
2. Servicethe enginewithgasolineas instructedinthe
enginemanual. SeeFigure1abovefor locationof
gasfill.
__ WARNING:This blade control mecha-
nism is a safetydevice. Neverattempt
to bypass itsoperations.
Cutting Height Adjustment Levers
One adjustment lever is located on each wheel and
is used to adjust the cutting height. All four levers
have to be at the same relative position to ensure a
uniform cut.
_ ARNING:Useextreme carewhenhan-
dling gasoline.Gasoline is extremely
flammable and the vapors areexplosive.
Neverfuel the machine indoorsor while
the engine is hot or running. Extinguish
cigarettes, cigars, pipesand other
sources of ignition.
8
WARNING:Theoperationof any lawn
mowercan result inforeign objects
being thrownintothe eyes,whichcan
damageyoureyesseverely. Always
wearsafetyglasseswhileoperating
the mower, or while performingany
adjustments or repairson it.
Starting Engine
WARNING:Be sureno one otherthan
the operatoris standing near the lawn
mower while starting engine or operat-
ingmower. Neverrun engine indoors
or inenclosed, poorly ventilated areas.
Engineexhaust contains carbon
monoxide, an odorless anddeadly
gas. Keep hands, feet, hair and loose
clothing awayfrom any moving partson
engine and lawn mower.
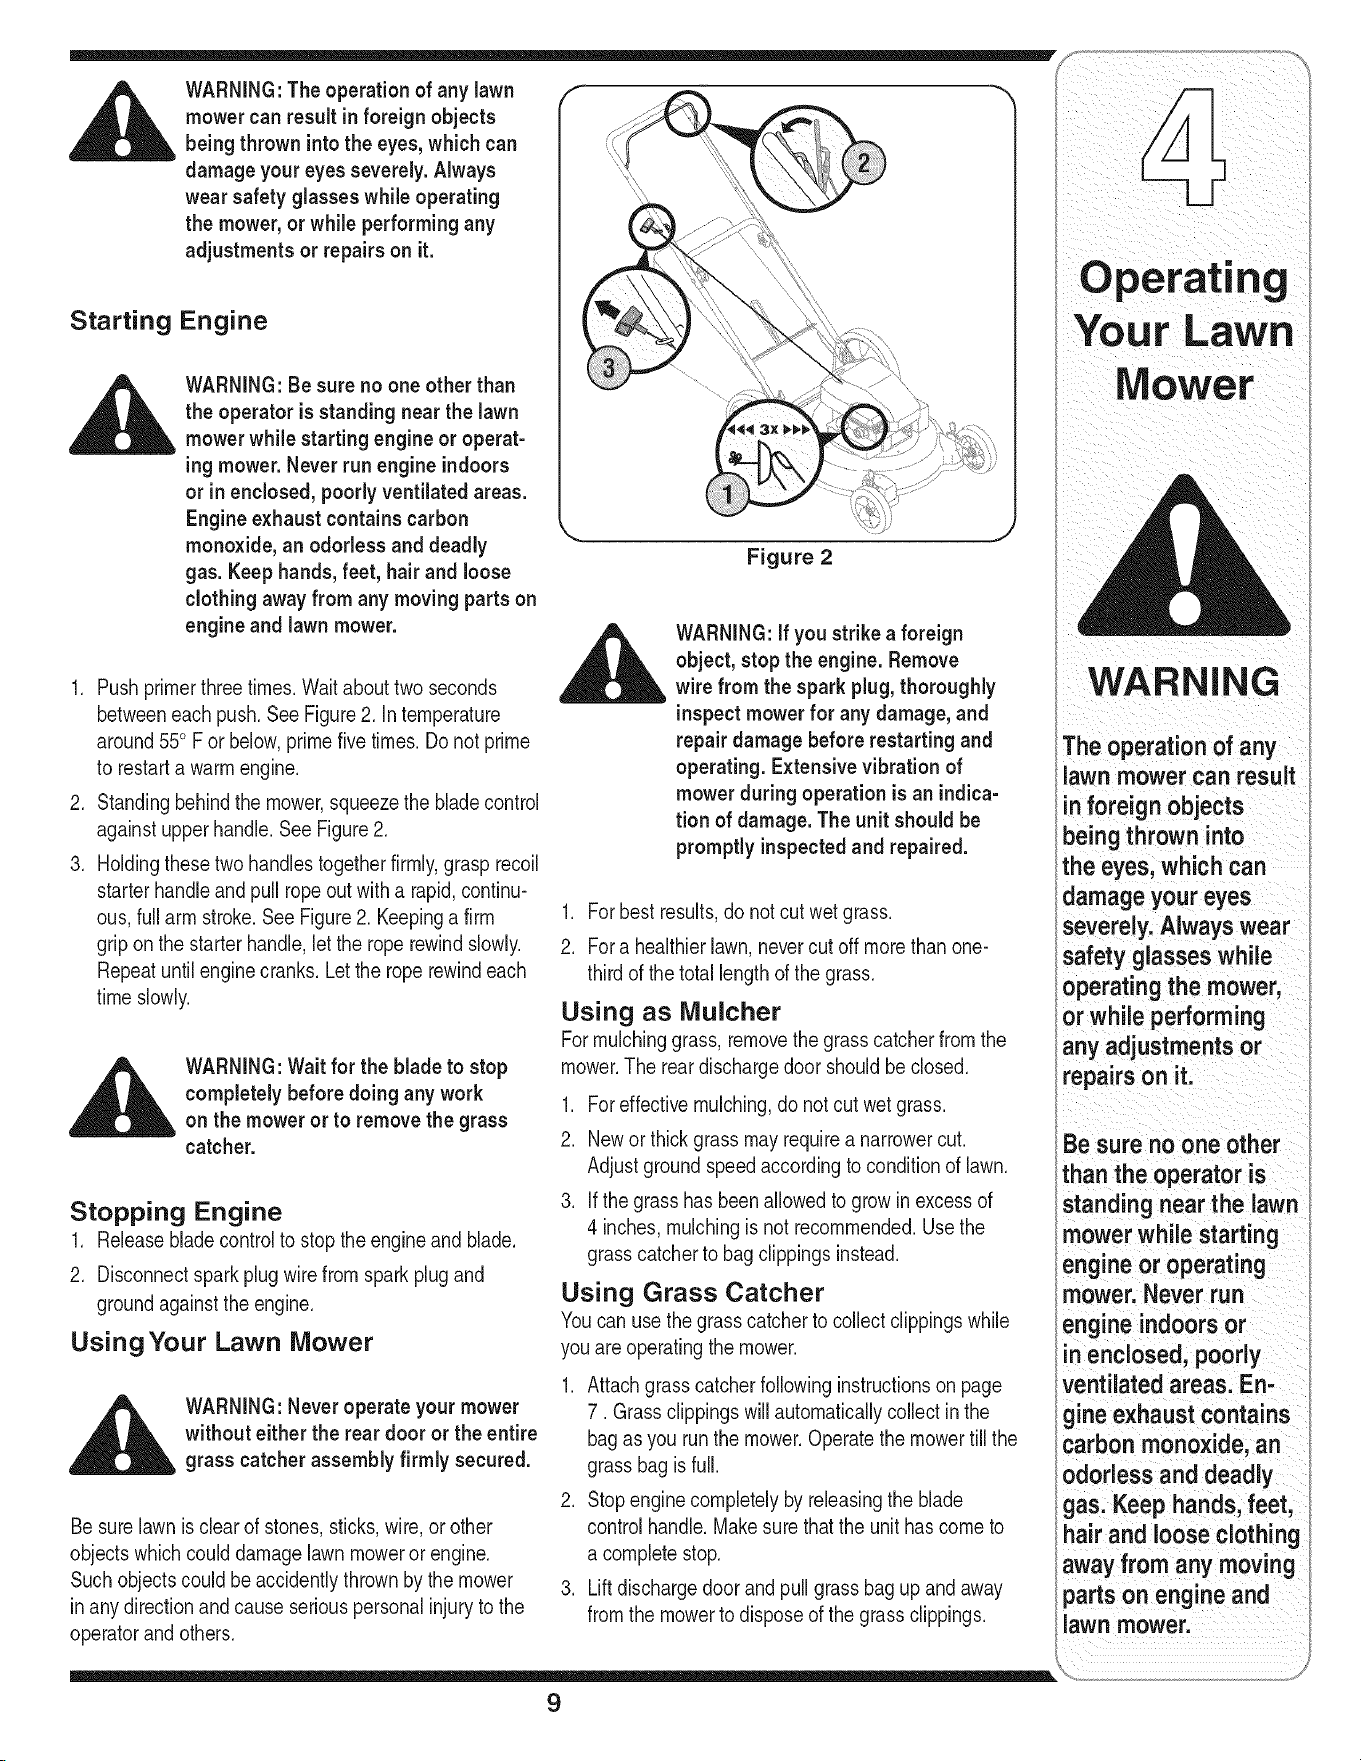
1. Pushprimerthreetimes.Waitabouttwoseconds
betweeneachpush.SeeFigure2. Intemperature
around550F or below,primefive times.Do not prime
to restarta warmengine.
2. Standingbehindthe mower,squeezethe bladecontrol
againstupperhandle.SeeFigure2.
3. Holdingthesetwo handlestogetherfirmly,grasp recoil
starterhandleand pullropeout witha rapid,continu-
ous,full arm stroke.SeeFigure2. Keepinga firm
grip onthe starterhandle,let the roperewindslowly.
Repeatuntil enginecranks.Letthe roperewindeach
timeslowly.
,_ WARNING:Wait for the blade to stop
completely before doing any work
__ on the mower or to removethe grass
catcher.
Stopping Engine
1. Releasebladecontrolto stoptheengineand blade.
2. Disconnectsparkplugwirefromsparkplugand
groundagainstthe engine.
UsingYour Lawn Mower
,__k WARNING:Neveroperate your mower
without either the rear door or the entire
grass catcher assembly firmly secured.
Besurelawnis clearof stones,sticks,wire,or other
objectswhichcoulddamagelawnmowerorengine.
Such objectscouldbe accidentlythrownby the mower
in anydirectionandcauseseriouspersonalinjuryto the
operatorandothers.
Figure 2
_klL ARNING:if you strike a foreign
object,stop the engine.Remove
wire from the sparkplug,thoroughly
inspect mower for any damage,and
repair damage before restarting and
operating. Extensivevibration of
mowerduring operation is an indica-
tion of damage.The unit should be
promptlyinspectedand repaired.
1. Forbest results,do notcut wetgrass.
2. Fora healthierlawn,nevercut offmorethan one-
thirdof the totallengthof the grass.
Using as Mulcher
Formulchinggrass,removethe grasscatcherfromthe
mower.The reardischargedoorshouldbeclosed.
1. Foreffectivemulching,do notcut wetgrass.
2. Newor thick grassmayrequirea narrowercut.
Adjustgroundspeedaccordingto conditionof lawn.
3. If thegrasshas beenallowedto growinexcessof
4 inches,mulchingis not recommended.Usethe
grasscatcherto bagclippingsinstead.
Using Grass Catcher
Youcan usethe grasscatcherto collectclippingswhile
youareoperatingthe mower.
1. Attachgrasscatcherfollowinginstructionson page
7. Grassclippingswill automaticallycollectinthe
bagas you runthe mower.Operatethe mowertill the
grassbagis full.
2. Stopenginecompletelyby releasingthe blade
controlhandle.Makesurethatthe unit hascometo
a completestop.
3. Liftdischargedoorandpullgrassbagup andaway
fromthe mowerto disposeof the grassclippings.
Mower
WARNING
The operation of any
lawn mower can result
inforeign objects
being thrown into
the eyes, which can
damage your eyes
severely. Always wear
safety glasseswhile
operating the mower,
or while performing
any adjustments or
repairs on it.
Be sure no one other
than the operator is
standing near the lawn
mower while starting
engine or operating
mower. Never run
engine indoorsor
n enclosed, poorly
ventilated areas. En-
gineexhaust contains
carbon monoxide, an
odorless and deadly
gas. Keep hands, feet,
hair and loose clothing
away from any moving
partson engine and
lawn mower.
9
Maintaining
WARNING
A waysstope,g ne;
disconnect spark
plugl andground
against enginebefore
cleaning,lubricating
We do notrecommend
the use of pressure
washers or garden
hoseto cleanyour
unit. These may cause
i
damageto electric
Componentsspindles
pulleys;bearings
the enginel The use
of water will resultin
shortened lifeand
d
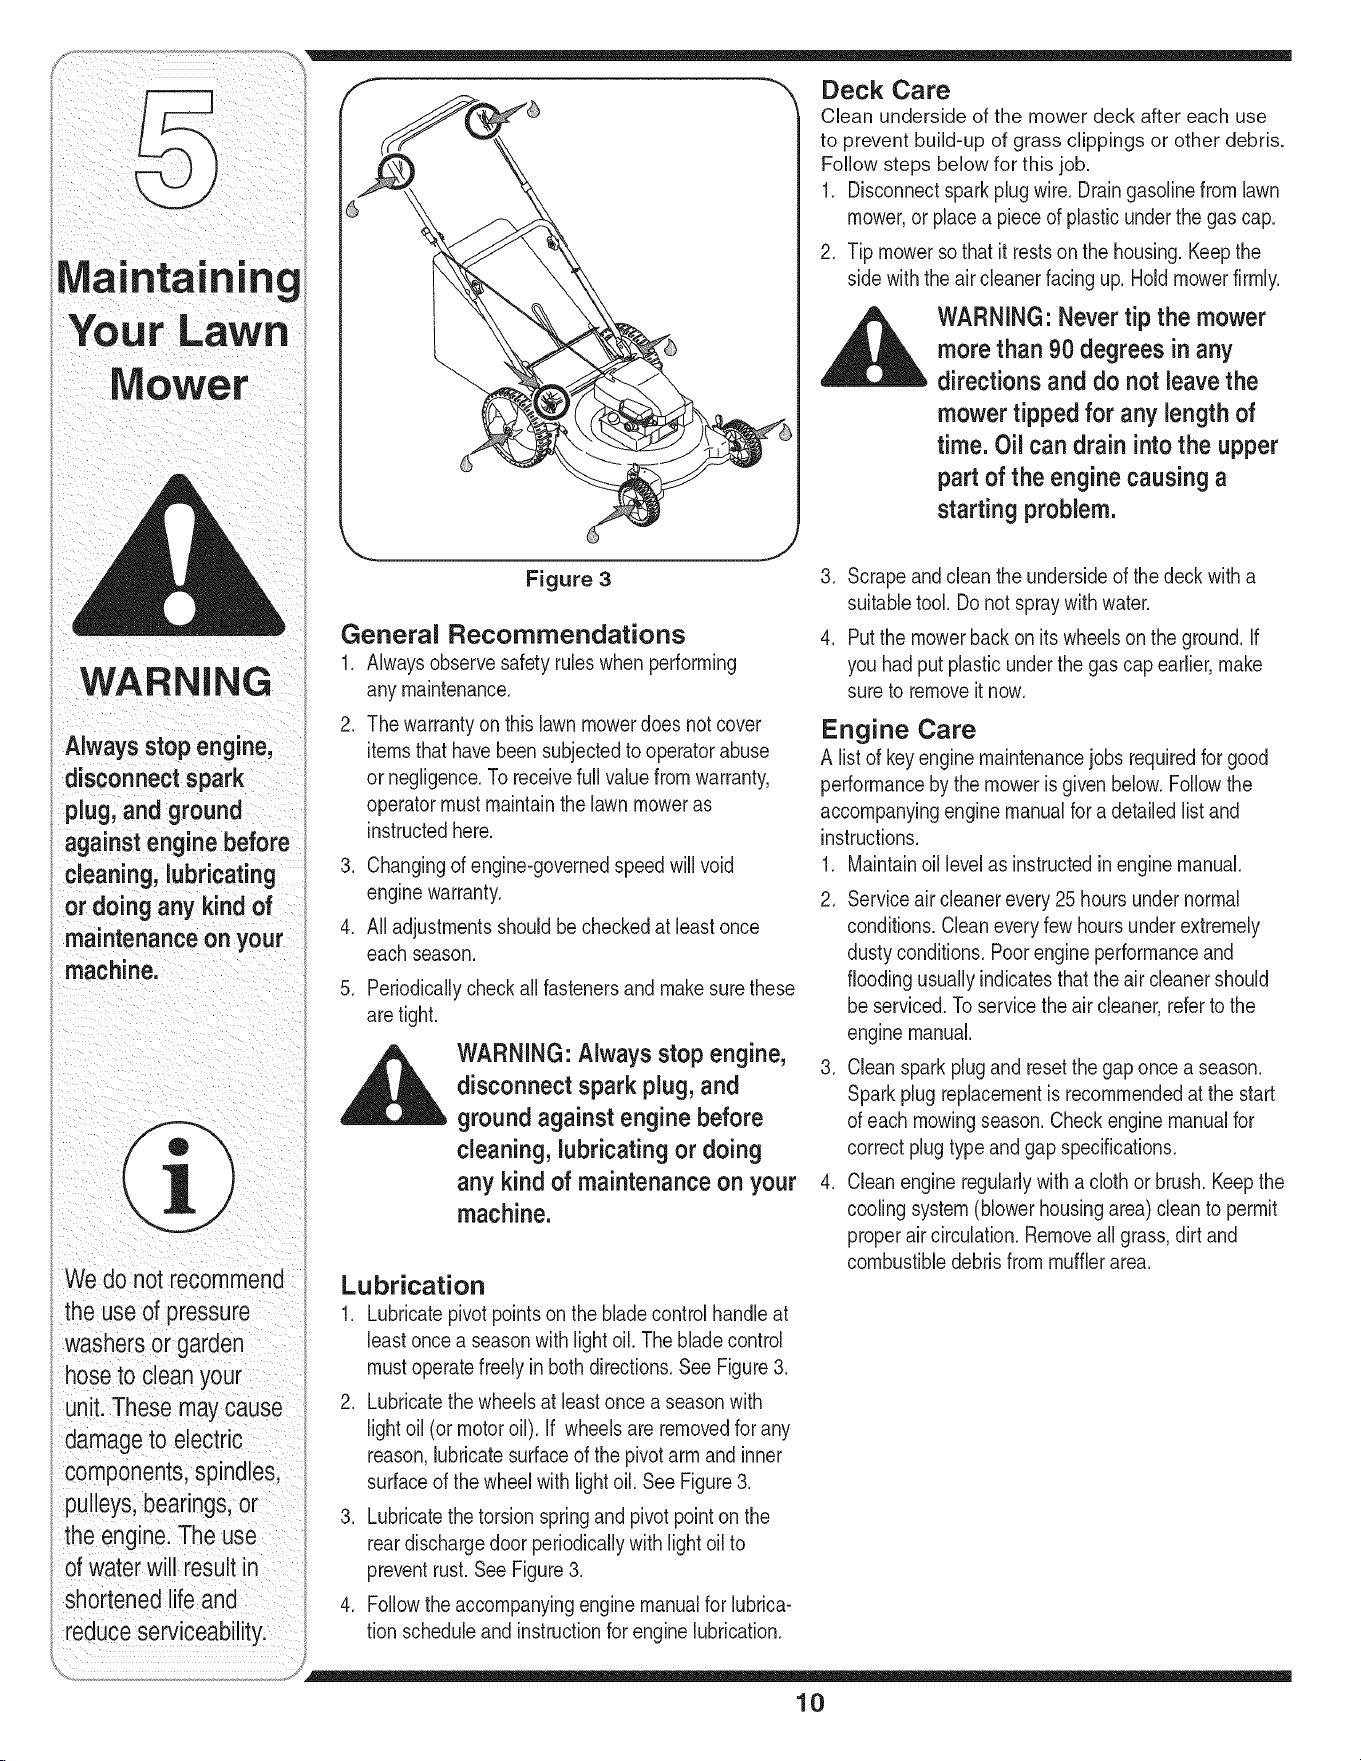
Figure 3
General Recommendations
1. Alwaysobservesafetyruleswhen performing
anymaintenance.
2. Thewarrantyon thislawnmowerdoesnot cover
itemsthathavebeensubjectedto operatorabuse
ornegligence.To receivefull valuefromwarranty,
operatormustmaintainthelawn moweras
instructedhere.
3. Changingof engine-governedspeedwill void
enginewarranty.
4. Alladjustmentsshouldbecheckedat leastonce
eachseason.
5. Periodicallycheckallfastenersand makesurethese
aretight.
,_ WARNING: Always stop engine,
disconnect spark plug, and
groundagainst engine before
cleaning, lubricating or doing
any kind of maintenanceon your
machine.
Lubrication
1. Lubricatepivotpointson thebladecontrolhandleat
leastoncea seasonwith lightoil. The bladecontrol
mustoperatefreelyinboth directions.SeeFigure3.
2. Lubricatethe wheelsat leastoncea seasonwith
lightoil (ormotoroil). If wheelsareremovedfor any
reason,lubricatesurfaceof the pivotarm andinner
surfaceof thewheelwithlight oil. SeeFigure3.
3. Lubricatethe torsionspringandpivotpointonthe
reardischargedoorperiodicallywithlightoil to
preventrust.SeeFigure3.
4. Followtheaccompanyingenginemanualfor lubrica-
tion scheduleandinstructionfor enginelubrication.
Deck Care
Clean underside of the mower deck after each use
to prevent build-up of grass clippings or other debris.
Follow steps below for this job.
1. Disconnectsparkplugwire.Draingasolinefromlawn
mower,or placea pieceof plasticunderthe gas cap.
2. Tip mowersothat it restsonthe housing.Keepthe
sidewiththe aircleanerfacingup. Hold mowerfirmly.
,_ WARNING" Never tip the mower
more than 90 degrees inany
-- directions and do not leave the
mower tipped for any length of
time. Oil can drain intothe upper
part ofthe engine causing a
starting problem.
3. Scrapeandclean the undersideof the deckwitha
suitabletool.Do notspraywithwater.
4. Putthe mowerbackonitswheelsonthe ground.If
youhadput plasticunderthe gas capearlier,make
sureto removeit now.
Engine Care
A listof keyenginemaintenancejobs requiredfor good
performanceby the moweris given below.Followthe
accompanyingenginemanualfor adetailedlistand
instructions.
1. Maintainoil levelas instructedinenginemanual.
2. Serviceaircleanerevery25 hoursundernormal
conditions.Cleaneveryfewhoursunderextremely
dustyconditions.Poorengineperformanceand
floodingusuallyindicatesthatthe aircleanershould
beserviced.Toservicethe aircleaner,referto the
enginemanual.
3. Cleansparkplugand resetthegaponce a season.
Sparkplugreplacementis recommendedat the start
of eachmowingseason.Checkenginemanualfor
correctplugtypeand gapspecifications.
4. Cleanengineregularlywitha clothorbrush.Keepthe
coolingsystem(blowerhousingarea)cleanto permit
properaircirculation.Removeall grass,dirt and
combustibledebrisfrommufflerarea.
10
Blade Care
_ ARNING: When removing the
cutting blade for sharpening or
replacement, protect your hands
with a pair of heavy gloves or use
a heavy rag to hold the blade.
Periodicallyinspectthe bladeadapterfor cracks,
especiallyif youstrikea foreignobject. Replacewhen
necessary.Followthe stepsbelowfor bladeservice.
1. Disconnectsparkplugwirefromsparkplug.Turn
moweron itsside makingsurethatthe airfilterand
the carburetorareup.
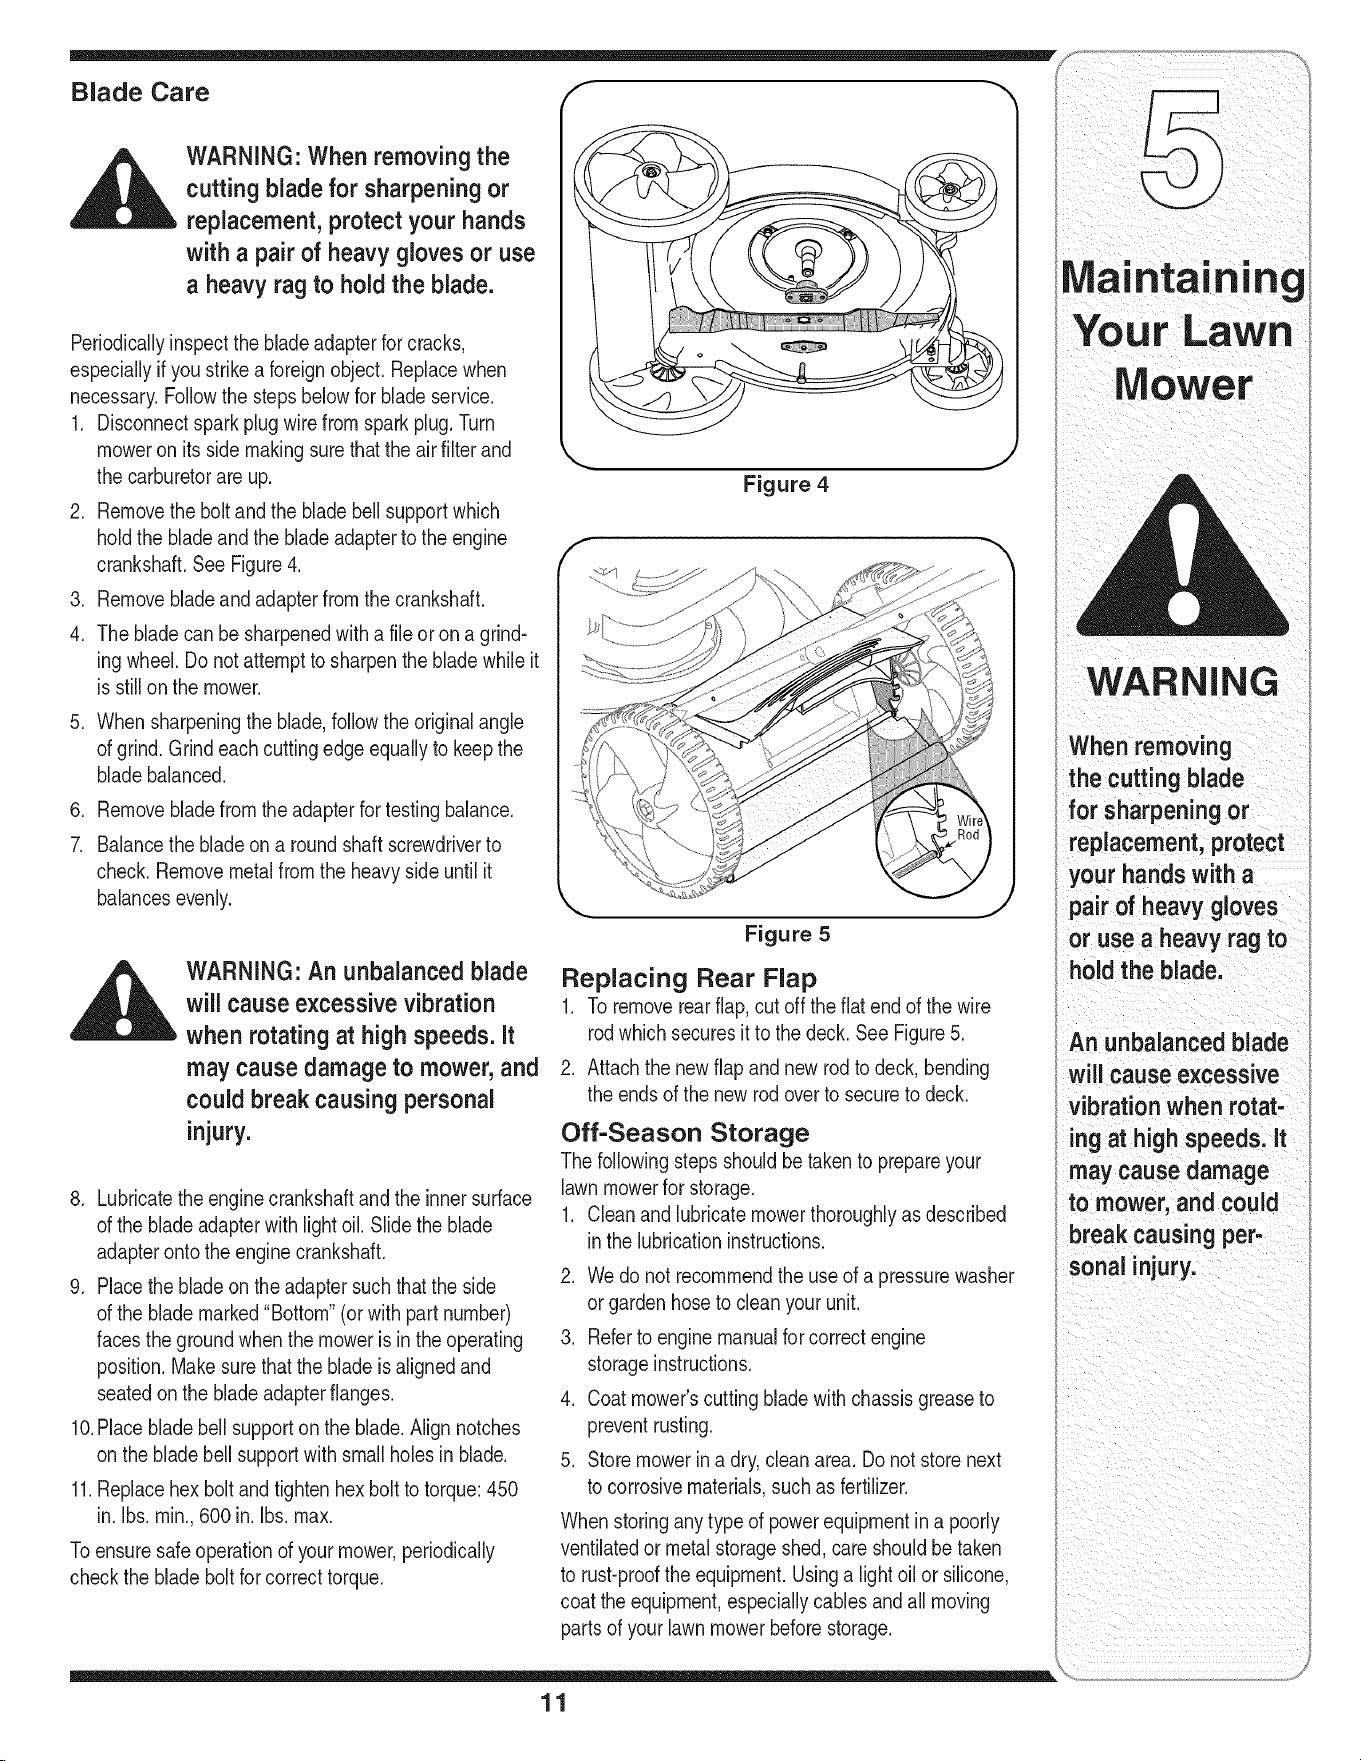
2. Removethe boltandthe bladebellsupportwhich
holdthe bladeand the bladeadapterto the engine
crankshaft.See Figure4.
3. Removebladeandadapterfromthe crankshaft.
4. The bladecan be sharpenedwitha fileor on a grind-
ingwheel.Do notattemptto sharpenthe bladewhileit
isstillonthe mower.
5. Whensharpeningthe blade,followthe originalangle
of grind. Grindeachcuttingedgeequallyto keepthe
bladebalanced.
.
7.
Removebladefromthe adapterfor testingbalance.
Balancethe bladeona roundshaftscrewdriverto
check.Removemetalfromthe heavysideuntil it
balancesevenly.
,__ WARNING: An unbalanced blade
will cause excessive vibration
when rotating at high speeds, it
may cause damage to mower, and
could break causing personal
injury.
8. Lubricatetheenginecrankshaftandthe innersurface
of the bladeadapterwithlightoil. Slidethe blade
adapteronto the enginecrankshaft.
9. Placethe bladeon the adaptersuchthatthe side
of the blademarked"Bottom"(orwithpart number)
facesthe groundwhenthe mowerisintheoperating
position.Makesurethatthe bladeisalignedand
seatedon the bladeadapterflanges.
10.Placebladebellsupportonthe blade.Alignnotches
on the bladebell supportwith smallholesinblade.
11.Replacehex boltandtightenhex boltto torque:450
in.Ibs. rain.,600 in.Ibs.max.
Toensuresafeoperationof yourmower,periodically
checkthe bladeboltfor correcttorque.
L
Figure 4
J
J
Figure 5
Replacing Rear Flap
1. To removerearflap,cutoff the flatendof the wire
rodwhichsecuresit to the deck.See Figure5.
2. Attachthe newflapand newrodto deck,bending
the endsof the newrodoverto secureto deck.
Off-Season Storage
Thefollowingstepsshouldbetakento prepareyour
lawnmowerfor storage.
1. Cleanandlubricatemowerthoroughlyas described
inthe lubricationinstructions.
2. Wedo not recommendtheuse of a pressurewasher
orgardenhoseto cleanyourunit.
3. Referto enginemanualforcorrectengine
storageinstructions.
4. Coatmower'scuttingbladewithchassisgreaseto
preventrusting.
5. Storemowerina dry,cleanarea. Donot storenext
to corrosivematerials,suchas fertilizer.
Whenstoringanytypeof powerequipmentin a poorly
ventilatedor metalstorageshed,careshouldbetaken
to rust-prooftheequipment.Usinga lightoil or silicone,
coattheequipment,especiallycablesandall moving
partsof yourlawnmowerbeforestorage.
Maintaining
Yo ur LaWn
ow er
WARNING
When removing
the cutting blade
for sharpening or
replacement, protect
your handswith a
pair of heavy gloves
or use a heavy ragto
hold the blade.
An unbalanced blade
will cause excessive
vibration when rotat-
ing at high speeds, it
may cause damage
to mower, and could
break causing per-
sonal injury.
11
For repairs beyond
the minor adjustments
listed here, contact
an authorized service
dealer.
iii _iI iii_i/_ i_Iiiii_ i_ iii_i_i_
\_i, 3J
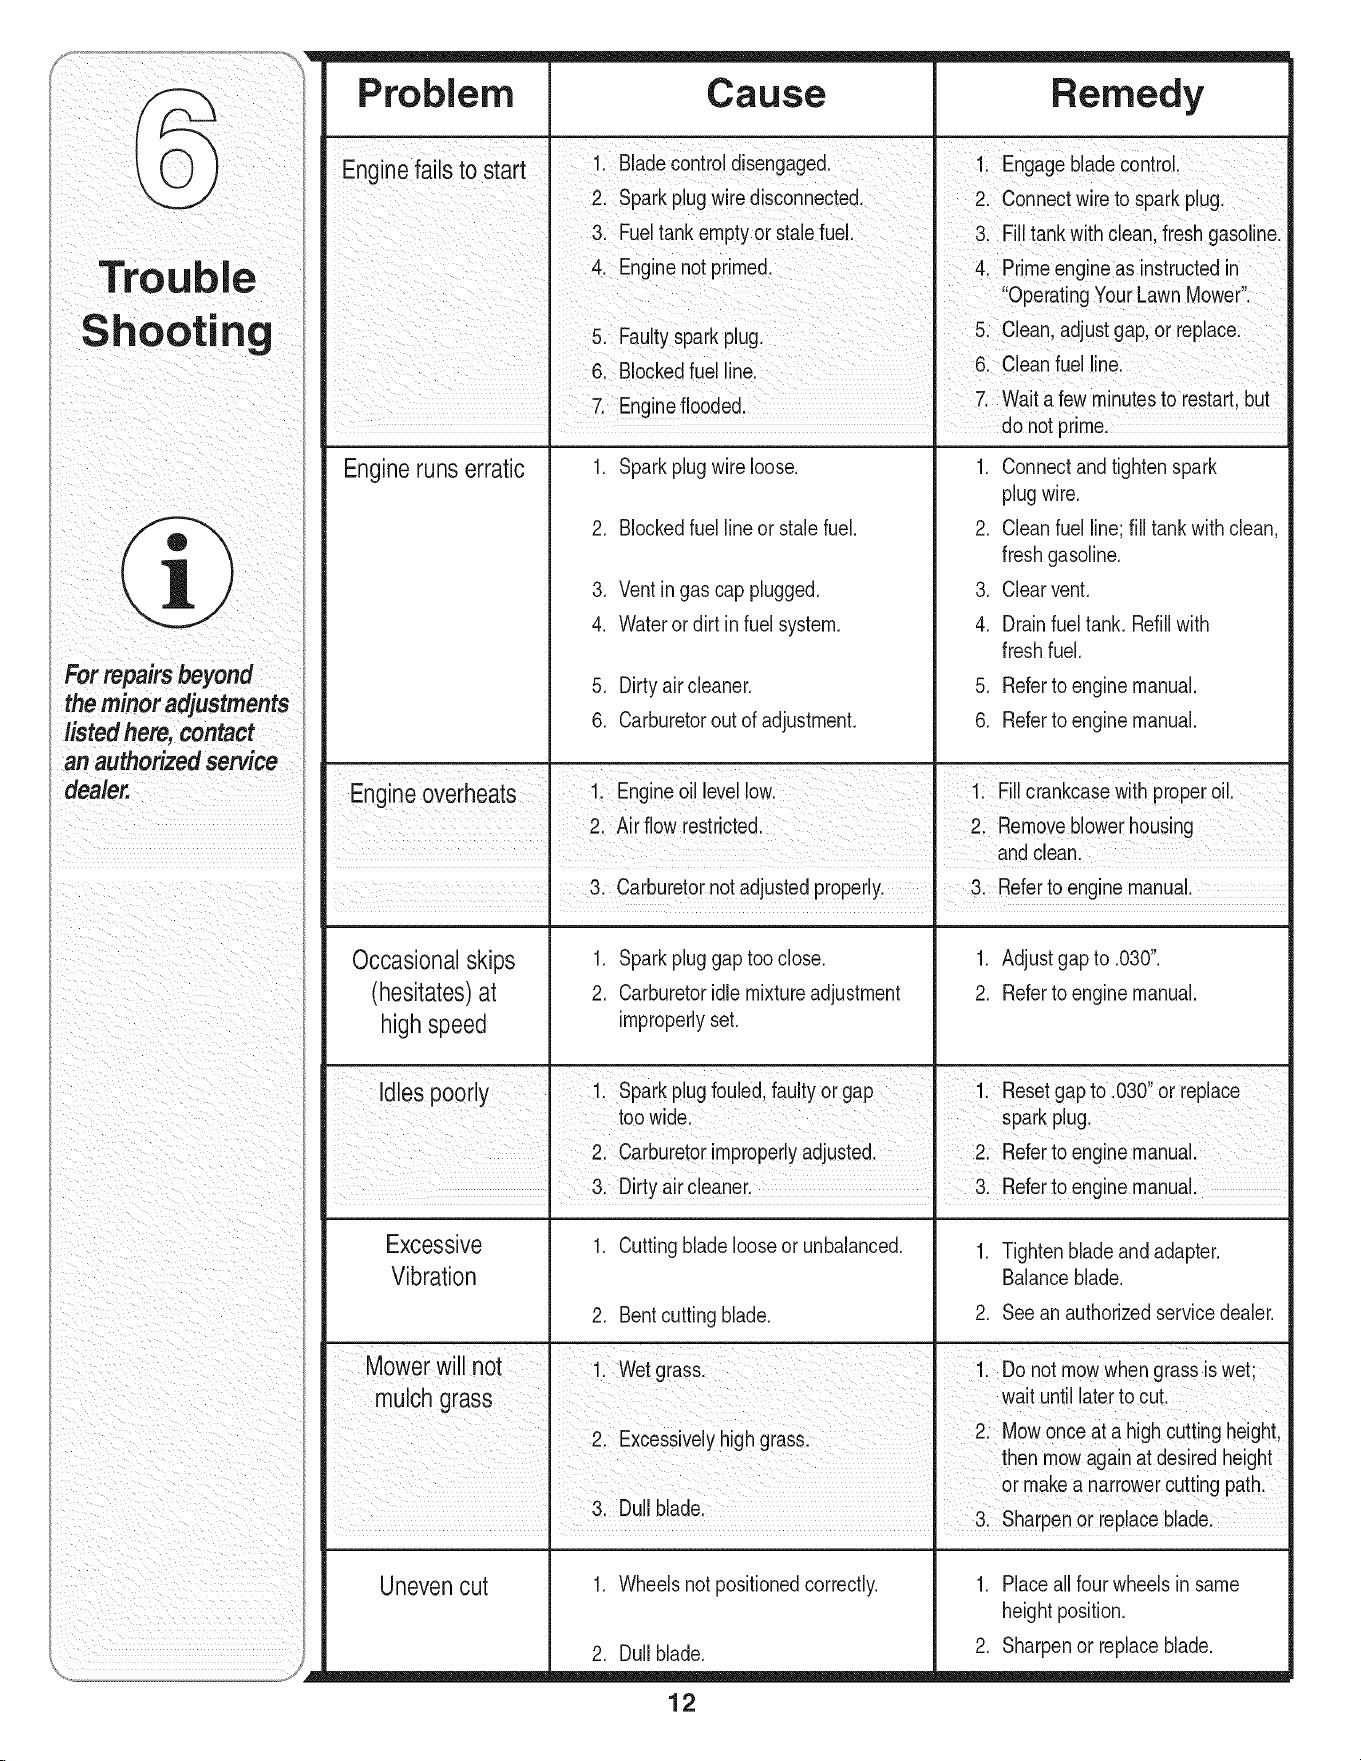
Problem Cause Remedy
En n f r Badecontro dsengaged 1 EngagebadecontrO
g ealstostat :
2. Sparkplugwire disconnected. 2. Connectwire to sparkplug.
Fuel tankemptyo[ Stalefuel. 31 Fi!l tankwithClean,freshgaSeiinel
41 Enginenotpiime& 41 Pime engineas instructedin
ioperatingYourLawnMowei:
Fau!tySpa!kplug_ adjustgap,
6 Bockedfue ne 6: Cleanfuel line
I 7. Enqineflooded. 7i Waitafew minutesto restart,but
do not prime.
Engineruns erratic
1. Sparkplugwireloose.
2. Blockedfuellineor stalefuel.
3. Ventingas cap plugged.
4. Waterordirt infuel system.
5. Dirty aircleaner.
6. Carburetorout of adjustment.
1. Connectandtightenspark
plugwire.
2. Cleanfuel line;fill tankwithclean,
freshgasoline.
3. Clearvent.
4. Drainfuel tank. Refillwith
freshfuel.
5. Referto enginemanual.
6. Referto enginemanual.
Engne overheats 1. Engineo I level ow. 1. Fillcrankcasewithproperoil.
2. Airflow restricted. 2. Removeblowerhousing
. andc ean.
u 3. Carburetornotadjustedproperly. 3. Referto enginemanual.
Occasional skips
(hesitates)at
high speed
1. Sparkpluggaptooclose.
2. Carburetoridlemixtureadjustment
improperlyset.
1. Adjustgap to .030".
2. Referto enginemanual.
des poorly 1. Sparkplugfouled,faultyorgap 1. Resetgapto .030"or replace
toowide. sparkplug.
2. Carburetorimproperlyadjusted. 2. Referto enginemanual.
3. Dirty aircleaner. 3. Referto enginemanual.
Excessive 1. Cuttingbladelooseor unbalanced. 1. Tightenbladeandadapter.
Vibration Balanceblade.
2. Bentcuttingblade. 2. Seean authorizedservicedealer.
Mower will not 1. Wetgrass. 1. Do not mowwhengrassis wet
mulch grass wait untillaterto cut.
2 Excessivel hi-h-rass 2. Mowonceat a highcuttingheight
y u u • then mowagainat desiredheight
I or makea narrowercuttingpath.
3 Dullblade
I ' ' 3. Sharpenor replaceblade.
Unevencut 1. Wheelsnot positionedcorrectly. 1. Placeall fourwheelsin same
heightposition.
2. Dull blade. 2. Sharpenor replaceblade.
12

iii i_ _ iiii
ii i _iI_ii
13
\
14

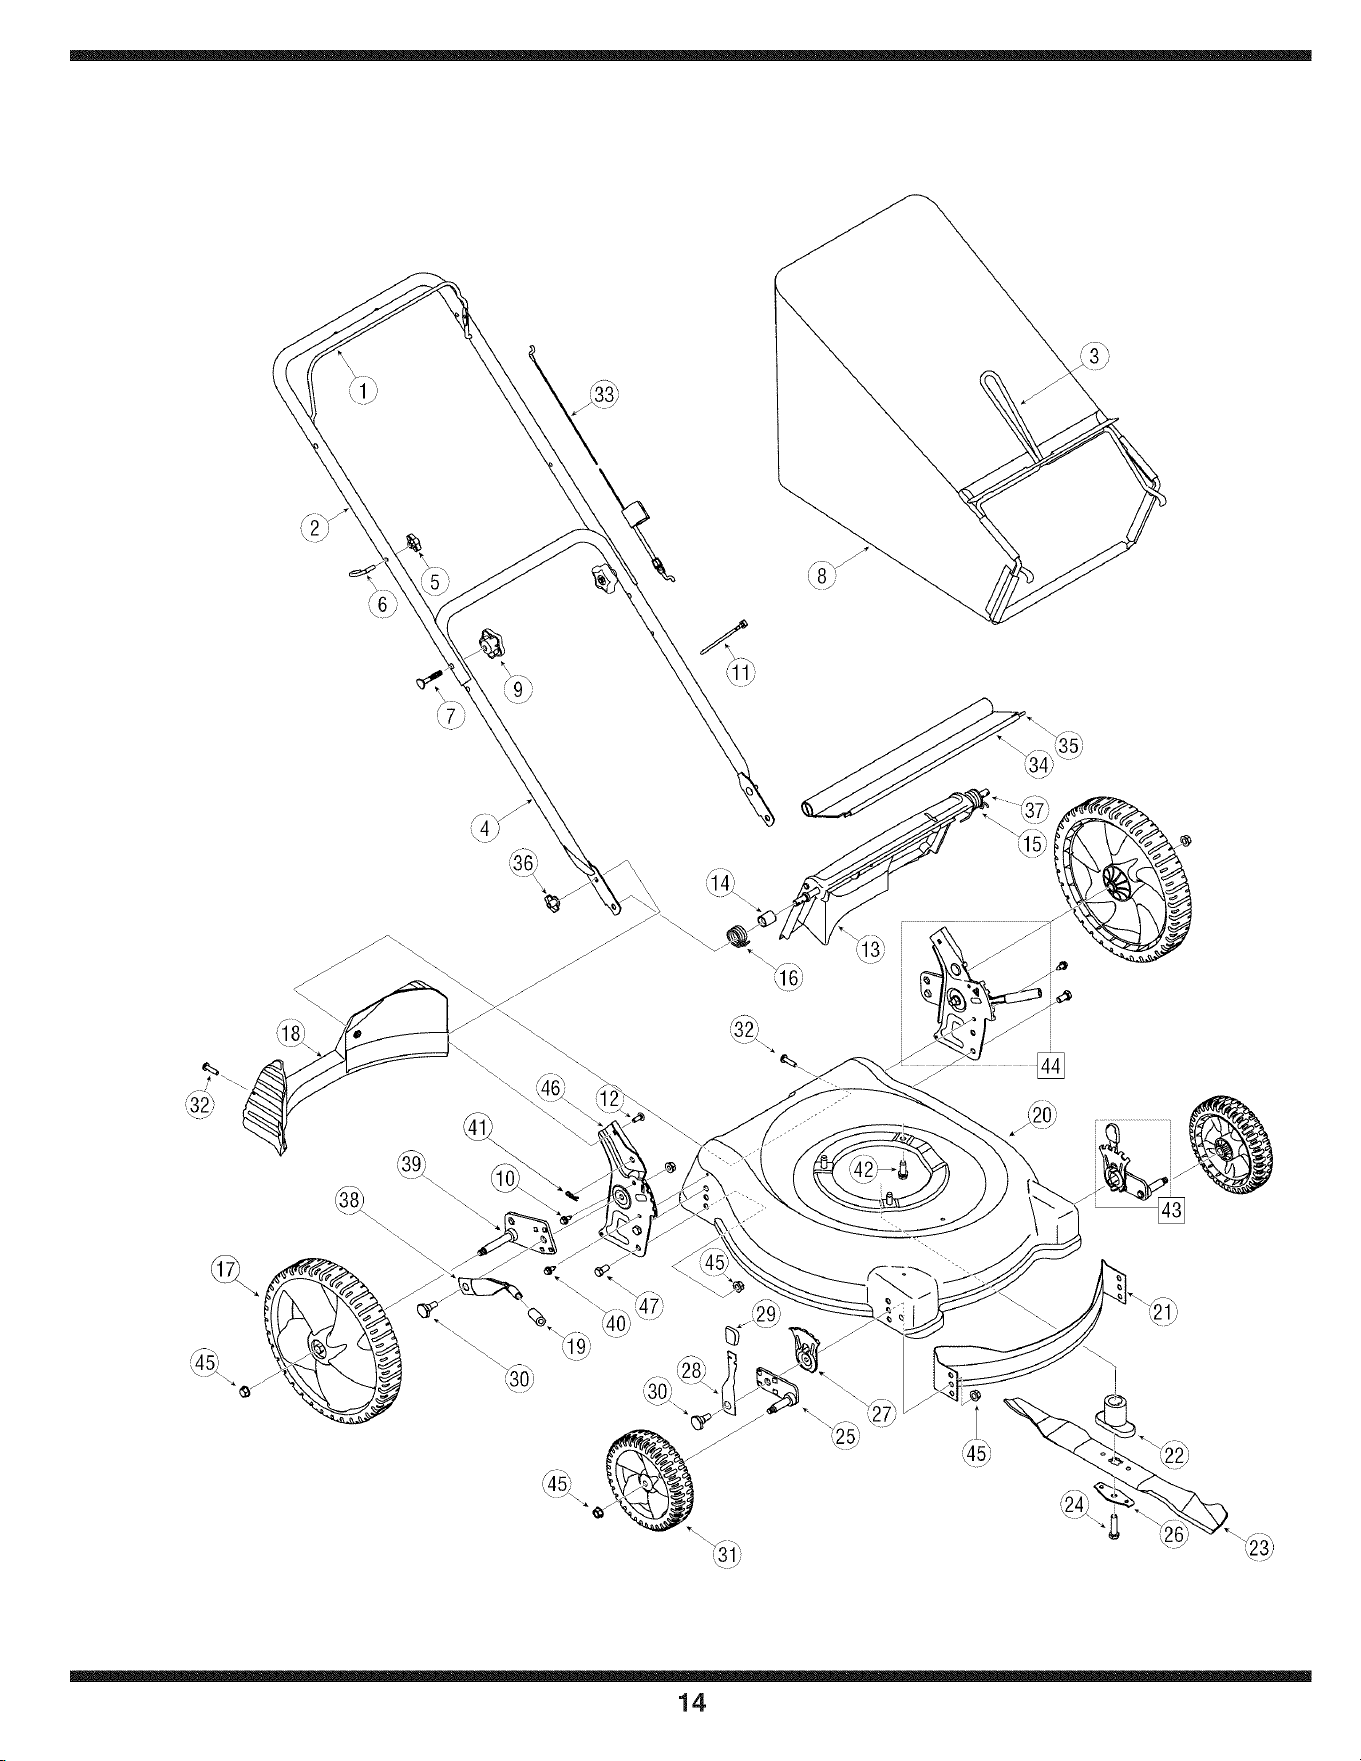
1 747-1161A BladeControlHandle
2 749-1092A UpperHandle
3 747-04080 GrassCatcherFrame
4 749-0928A LowerHandle
5 720-0279 WingNut
6 710-1205 RopeGuide
7 710-1174 CarriageBolt ,5/16-18x 2
8 664-04027 GrassBagAssembly
9 720-02072 Star Knob
10 710-0599 Screw,1/4-20x.500
11 726-0240 CableTie
12 710-0703 CarriageBolt,I/4-20
13 731-04134A RearDischargeDoor
14 750-04162 Spacer
15 732-04089A TorsionSpring- LH
16 732-04090A TorsionSpring- RH
17 734-04089 RearWheel, 12"x 1.8"
18 731-04150C RearBaffle
19 720-0312 SpringLeverGrip
20 787-01276 Deck- 21"
21 782-5002B FrontBaffle
22 748-0377C BladeAdapter
23 742-0741 MulchingBlade
24 710-1257 HexScrew, 3/8-24 x 2.5
25 687-02077A PivotArm Assembly-RH
687-02076A PivotArm Assembly-LH
26 736-0524B BladeBellSupport
27 787-01290 FrontAdjustmentPlate
28 720-0426 AdjustmentLeverKnob
29 732-0866 SpringLever
30 738-0507B ShoulderScrew
31 734-04086 FrontWheel,7"x 1.8"
32 710-04371 Screw,1/4-15x 1.250
33 746-0554 ControlCable-40.5"
34 731-04998 Trailshield
35 732-0700 TrailshieldWire
36 712-0397 WingNut,1/4-20
37 747-0996 RearDoorPivotRod
38 732-0866 SpringLever
39 687-02039A PivotArm Assembly-RH
687-02040A PivotArm Assembly-LH
40 710-1652 ABScrew
41 714-0104 HairpinClip
42 710-0654A TT SemsScrew,3/8-16x 1.0
43 687-02099A Ht. Adj.Assy.Front- LH
687-02100A Ht. Adj.Assy.Front- RH
44 687-02057 RearHandleBracketAssy.- LH
687-02056 RearHandleBracketAssy.- RH
45 712-04065 FlangeLockNut,3/8-16
46 687-02192 HandleBracketAssembly- RH
687-02191 HandleBracketAssembly- LH
47 710-0216 HexScrew,3/8-16x 0.75
15
parts;contact
1,800,800'7310
or Visit us online at
wwwlmtdproducts.com

MANUFACTURER'S LiMiTED WARRANTY FOR
YaRD-MaN,
The limitedwarrantysetforthbelowisgivenby MTDLLCwithrespectto
newmerchandisepurchasedandusedin the UnitedStates,itsposses-
sionsandterritories.
"MTD"warrantsthisproductagainstdefectsin materialandworkmanship
for a periodof two(2) yearscommencingonthe dateof originalpurchase
andwill,at its option,repairor replace,free of charge,anypart foundto
bedefectiveinmaterialsor workmanship.Thislimitedwarrantyshallonly
applyif this producthas beenoperatedandmaintainedinaccordance
withthe Operator'sManualfurnishedwiththe product,andhas not been
subjectto misuse,abuse,commercialuse,neglect,accident,improper
maintenance,alteration,vandalism,theft,fire,water,ordamagebecause
of otherperilor naturaldisaster.Damageresultingfromthe installationor
useof any part,accessoryorattachmentnotapprovedby MTDfor use
withthe product(s)coveredbythis manualwill voidyourwarrantyas to
any resultingdamage.
Normalwearpartsarewarrantedto befree fromdefectsinmaterialand
workmanshipfor a periodof thirty (30)daysfromthe dateof purchase.
Normalwearpartsinclude,butare notlimitedto itemssuchas: batteries,
belts,blades,bladeadapters,grassbags,riderdeckwheels,seats,snow
throwerskidshoes,shaveplates,augerspiralrubberandtires.
NOWTOOBTAINSERVICE:Warrantyserviceis available,WITH
PROOFOF PURCHASE,throughyour localauthorizedservicedealer.To
locatethe dealerin yourarea,checkyourYellowPages,orcontactMTD
LLCat RO.Box 361131,Cleveland,Ohio44136-0019,or call 1-800-800-
7310or logon to ourWebsiteat www.mtdproducts.com.
Thislimitedwarrantydoesnot providecoverageinthe followingcases:
a. Theengineor componentpartsthereof.Theseitemsmay
carrya separatemanufacturer'swarranty.Referto applicable
manufacturer'swarrantyfortermsandconditions.
b. Logsplitterpumps,valves,andcylindershavea separateone
yearwarranty.
c. Routinemaintenanceitemssuchas lubricants,filters,blade
sharpening,tune-ups,brakeadjustments,clutch adjustments,
deckadjustments,andnormaldeteriorationof the exteriorfinish
dueto use orexposure.
d. Servicecompletedby someoneotherthananauthorizedservice
dealer.
e.
f.
g.
MTDdoes notextendany warrantyfor productssoldor
exportedoutsideof the UnitedStates,its possessionsand
territories,exceptthosesoldthroughMTD'sauthorized
channelsof exportdistribution.
Replacementpartsthatarenot genuineMTDparts.
Transportationchargesand servicecalls.
No impliedwarranty, includingany impliedwarranty of merchant-
ability of fitness for a particularpurpose,applies after the applicable
periodof express written warranty above as to the partsas identi-
fied. No other express warranty, whether written or oral, except as
mentionedabove,given by any personor entity,includinga dealer
or retailer,with respect to any product,shallbindMTD.Duringthe
periodof the warranty, the exclusive remedyis repairor replacement
of the productas setforth above.
Theprovisionsas setforth inthis warrantyprovidethe soleand
exclusiveremedyarising from the sale.MTDshallnot beliable
for incidentalor consequentialloss or damage including,without
limitation, expensesincurredfor substituteor replacement lawncare
servicesor for rentalexpenses to temporarily replacea warranted
product.
Somestatesdo not allowtheexclusionor limitationof incidentalor
consequentialdamages,or limitationson howlonganimpliedwarranty
lasts,so the aboveexclusionsor limitationsmaynotapplyto you.
In noeventshall recoveryof any kind begreaterthan theamountof the
purchasepriceof the productsold.Alterationof safety features of the
productshall void this warranty. Youassumethe riskandliabilityfor
loss, damage,or injuryto youandyour propertyand/orto othersandtheir
propertyarisingout of the misuseor inabilityto use theproduct.
Thislimitedwarrantyshall notextendto anyoneotherthanthe original
purchaseror to the personfor whomitwaspurchasedas a gift.
HOWSTATELAWRELATESTO THiSWARRANTY: Thislimitedwar-
rantygivesyouspecificlegalrights,andyou mayalso haveother rights
whichvaryfromstateto state.
IMPORTANT: OwnermustpresentOriginalProofof Purchaseto obtain
warrantycoverage.
MTD LLC, P.O. BOX 361131 CLEVELAND, OHiO 44136=0019; Phone: 1=800=800=7310
