
Safety • Assembly • Operation • Maintenance • Troubleshooting • Engine • Parts Lists • Warranty
A O A AL
YaRD-MaN
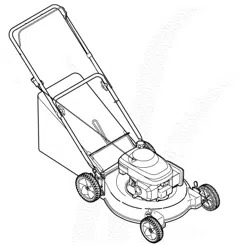
22-inch Rotary Mower- Model 26M
iMPORTANT
READ SAFETY RULES AND iNSTRUCTiONS CAREFULLY BEFORE OPERATION
Warning: Thisunit isequippedwithaninternalcombustionengineandshouldnot beusedon or nearany unimprovedforest-covered,brush-
coveredor grass-coveredlandunlesstheengine'sexhaustsystemis equippedwitha sparkarrestermeetingapplicablelocalor statelaws(if any).
If a sparkarresterisused,it shouldbe maintainedineffectiveworkingorderby the operator.In theStateof Californiathe aboveisrequiredbylaw
(Section4442of the CaliforniaPublicResourcesCode).Otherstatesmayhavesimilarlaws.Federallaws applyon federallands.A sparkarrester
for the muffleris availablethroughyour nearestengineauthorizedservicedealeror contactthe servicedepartment,RO. Box361131Cleveland,
Ohio44136-0019.
PRINTEDIN U.S.A.
MTD LLC, P.O. BOX 361131 CLEVELAND, OHiO 44136-0019
FORMNO.769-02298A
2/28/2006
This Operator's Manual is an important part of your new lawn mower, it will help you assemble,
prepare and maintain the unit for best performance. Please read and understand what it says.
Table of Contents
Slope Gauge ....................................................... 3
Safe Operation Practices ................................... 4
Setup and Adjustment ....................................... 6
Operating Your Lawn Mower .............................. 8
Maintaining Your Lawn Mower ......................... 10
Trouble Shooting .............................................. 12
Off-Season Storage and Safety Labels .......... 13
Engine Appendix .............................................. 14
Engine Safe Operation Practices ................. 14
Operating Your Engine .................................. 16
Maintaining Your Engine ............................... 18
Parts List ........................................................... 22
Warranty ............................................ Back Cover
Finding and Recording Model Number
BEFOREYOUBEGINASSEMBLINGYOURNEW
EQUIPMENT,pleaselocatethe modelplate on the
equipmentand copythe informationto the sample
model plateprovidedto the right.Youcan locatethe
model plateby standingat the operatingpositionand
lookingdown at the rear of the deck. This information
will be necessaryto use the manufacturer'sweb
site,to obtain assistancefromthe CustomerSup-
port Department,or when contactingan authorized
service dealer.
YaRD-MaN
P. O. BOX 361131
CLEVELAND,OH 44136
www.yardman.com 330-220-4683
800-800-731 0
J
Customer Support
Please do/VOTreturn the unit to the retailer from which it was purchased, without first
contacting Customer Support.
If you have difficulty assembling this product or have any questions regarding the controls, operation, or maintenanceof this
unit, you can seek help from the experts. Choose from the options below:
• Visit us on the web at www.yardman.corn
• Call a Customer Support Representativeat 1=800=800=7310.
2
O
o
1=
o
>:.
(13
O3
(13
(13
O-
O
O
(--
O5
E
O
(13
(13
o3
(13
O-
O
o3
(13
E
(]3
(13
o
(13
C5
('5
O3
O5
(13
t"b
(13
O9
o5
(13
O-
O
O3
-5
O3
O
O
E
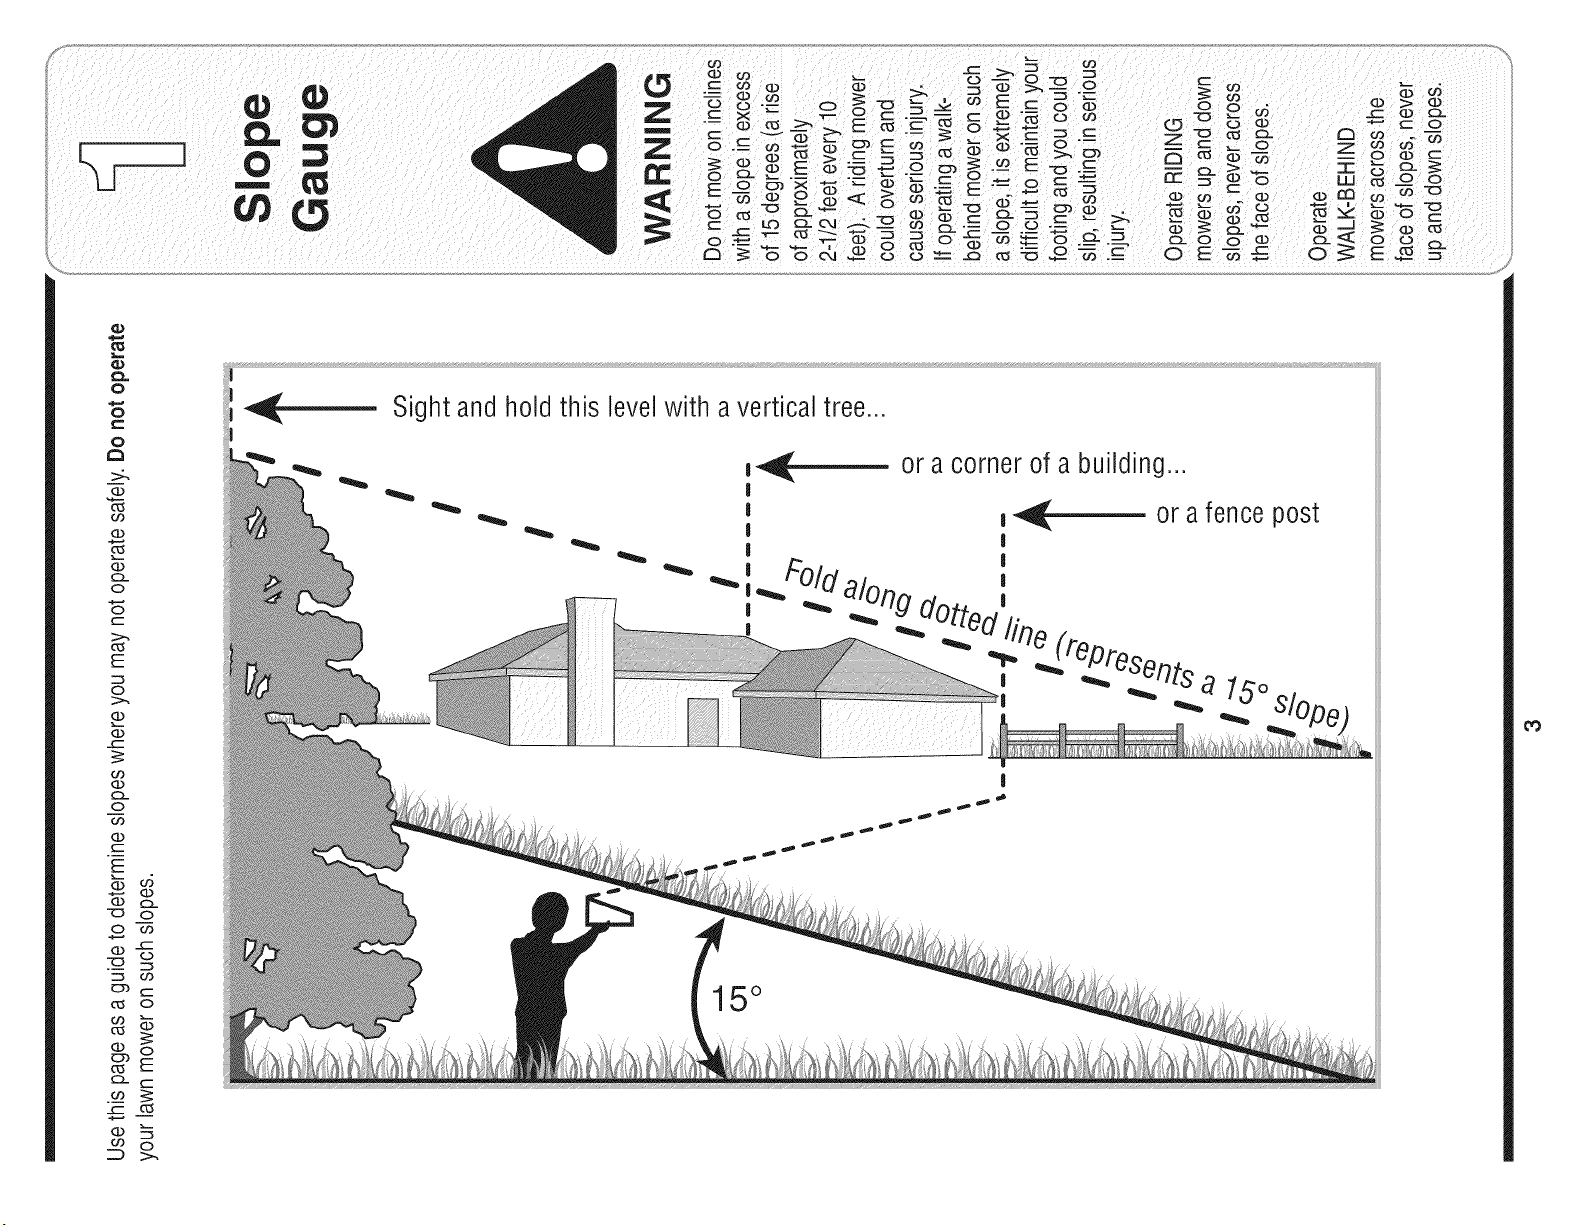
Sight and hold this levelwith a vertical tree...
also
I
15°
RNING
This symbol points
out important safety
instructionswhich, if
notfollowed, could
endangerthe personal
i safety and/or property
of yourself and others.
Readand follow all
instructions inthis man-
ual before attempting to
operatethis machine.
Failureto comply with
these instructions may
result in personal injury.
i When you see this
symbol.
HEED iTS WARNING
Your
i Flesponsibility
I Restrictthe use
i of this power machine
to persons who read.
understand
and follow the warnings
and instructions
in this manual
and on the machine.
WARNING: Engine Exhaust,some of its constituents, and certain vehicle compo-
nents contain or emit chemicals knownto State of Californiato cause cancer and
birth defects or other reproductiveharm.
DANGER: This machine was built to be operated according to the rules for safe operation in this
manual. As with any type of power equipment, carelessness or error on the part of the operator can
result in serious injury. This machine is capable of amputating hands andfeet andthrowing objects.
Failureto observe the followingsafety instructions could result in serious injury or death.
Children
Tragicaccidentscan occur if operatoris notalert to presence
of children.Childrenare oftenattractedto mowerand mowing
activity.Theydo not understandthe dangers.Neverassume
thatchildrenwill remainwhereyou lastsawthem.
1. Keepchildrenout of the mowingareaand underwatchful
careof a responsibleadultotherthanthe operator.
2. Be alert andturn moweroff if a childentersthe area.
3. Beforeand while movingbackwards,look behindanddown
forsmallchildren.
4. Useextremecare when approachingblind corners,
doorways,shrubs,trees,or other objectsthat mayobscure
yourvisionof a child whomayrun intothe mower.
5. Keepchildrenawayfrom hot or runningengines.Theycan
sufferburnsfrom a hot muffler.
6. Neverallowchildrenunder14yearsoldto operatea power
mower.Children14 yearsoldand overshouldreadand
understandoperationinstructionsandsafetyrulesinthis
manualandshouldbe trainedandsupervisedbya parent.
General Operation
1. Readthis operator'smanualcarefullyin its entiretybefore
attemptingto assemblethis machine.Read,understand,
andfollowall instructionson the machineandin the
manual(s)beforeoperation.Be completelyfamiliar with
thecontrolsandthe properuseof this machinebefore
operatingit. Keepthis manualin a safe place forfuture
and regularreferenceand for orderingreplacementparts.
2. Thismachine is a precisionpieceof powerequipment,
nota plaything.Therefore,exerciseextremecautionat all
times.Yourunithas beendesignedto performonejob: to
mowgrass. Do not use it for any otherpurpose.
3. Neverallow childrenunder 14yearsold to operatethis
machine.Children 14yearsold and overshould readand
understandthe instructionsinthis manualandshould
be trainedand supervisedby a parent.Onlyresponsible
individualswho arefamiliar withthese rulesof safe
operationshould be allowedto usethis machine.
4. Thoroughlyinspectthe areawherethe equipmentis to
be used. Removeall stones,sticks,wire,bones,toys and
otherforeignobjectswhichcouldbe tripped overor picked
up andthrownby the blade.Thrownobjectscan cause
seriouspersonalinjury.Plan yourmowingpatternto avoid
dischargeof materialtoward roads, sidewalks,bystanders
andthe like.Also, avoiddischargingmaterialagainsta
wall or obstructionwhich maycausedischargedmaterial
to ricochetbacktowardtheoperator.
5. Tohelpavoidbladecontact ora thrownobjectinjury,
stay inoperatorzone behindhandlesand keepchildren,
bystanders,helpers,and petsat least75 feet from mower
whileit is inoperation.Stop machineifanyoneenters
area.
6. Alwayswearsafetyglassesor safetygogglesduringopera-
tion andwhile performinganadjustmentor repairto protect
youreyes.Thrownobjectswhich ricochetcan causeserious
injuryto the eyes.
7. Wearsturdy, rough-soledworkshoesand close-fitting
slacksandshirts. Shirtsand pantsthatcoverthe arms and
legs andsteel-toedshoesare recommended.Neveroperate
this machinein bare feet,sandals, slipperyor lightweight
(e.g. canvas)shoes.
8. Do not puthands or feet near rotatingparts or undercutting
deck.Contactwithblade can amputatehands andfeet.
9. A missingor damageddischargecovercan cause blade
contactor thrownobject injuries.
10.Manyinjuriesoccuras a resultof the mowerbeing pulled
overthefoot duringa fall causedby slippingor tripping.
Do nothold on to the mower if you are falling;releasethe
handle immediately.
11.Neverpullthe mowerbacktowardyou whileyou are
walking.If you must backthe mowerawayfroma wall or
obstructionfirst look downand behindto avoid trippingand
thenfollowthese steps:
a. Stepback frommowerto fully extend yourarms.
b. Be sure youare well balancedwithsurefooting.
c. Pullthe mowerback slowly,no morethan half way
toward you.
d. Repeatthesestepsas needed.
12.Do not operatethe mowerwhileunderthe influenceof
alcoholor drugs.
13.Do not engage the self-propelledmechanismon units so
equippedwhilestartingengine.
14.The bladecontrol handle is a safetydevice.Neverattempt
to bypassits operation.Doingso makesthe safetydevice
inoperativeandmayresult in personalinjurythrough
contactwith the rotatingblade. The bladecontrol handle
mustoperateeasily in bothdirectionsandautomatically
returnto the disengagedpositionwhenreleased.
15.Neveroperatethe mowerinwet grass. Alwaysbe sure of
yourfooting. A slipand fall cancauseseriouspersonal
injury.If you feelyou are losing yourfooting,releasethe
bladecontrolhandleimmediatelyand the bladewillstop
rotatingwithinthreeseconds.
16.Mowonly in daylightor good artificial light. Walk,never run.
17.Stopthe bladewhencrossinggraveldrives, walksor roads.
18.If theequipmentshouldstartto vibrateabnormally,stop the
engineand check immediatelyfor the cause.Vibrationis
generallya warningof trouble.
19.Shutthe engineoff andwait untilthe bladecomesto a
completestop beforeremovingthe grasscatcheror unclog-
gingthechute.
The cuttingblade continuesto rotatefor a fewseconds
4
after theengine is shutoff. Neverplaceany part of the body
inthe bladearea untilyou are surethe bladehasstopped
rotating.
20. Neveroperatemowerwithoutpropertrailshield, discharge
cover,grass catcher,bladecontrol handle,or othersafety
protectivedevices in placeand working.Neveroperate
mowerwithdamagedsafetydevices.Failureto do so can
resultin personalinjury.
21. Mufflerandengine becomehot andcan causea burn.Do
nottouch.
22.Only use parts and accessoriesmadefor this machineby
manufacturer.Failureto do so can result inpersonalinjury.
23. If situationsoccurwhich are not coveredin this manual,
use careand goodjudgment.Contactyourdealerfor
assistance.Telephone1-800-800-7310for the nameof your
nearestdealer.
Slope Operation
Slopesare a majorfactor relatedto slip andfallaccidentswhich
can resultinsevereinjury.Operationon slopes requiresextra
caution.If you feel uneasyon a slope,do notmowit.For your
safety,usetheslopegaugeincludedas part of this manualto
measureslopesbeforeoperatingthis unit on a slopedor hilly
area.If theslope is greaterthan 15degrees,do not mowit.
Do:
1. Mowacrossthe faceof slopes; neverup anddown.
Exerciseextremecaution whenchangingdirectionon
slopes.
2. Watchfor holes,ruts,rocks, hiddenobjects,or bumpswhich
can causeyouto slip or trip. Tallgrass can hide obstacles.
3. Alwaysbe sure of yourfooting.A slip andfall can cause
serious personalinjury.If youfeel youare losingyour
balance,releasethe bladecontrolhandle immediately,and
the bladewill stoprotatingwithin 3 seconds.
Do Not:
1. Donot mowneardrop-offs, ditchesorembankments,where
you couldloseyour footingor balance.
2. Donot mowslopesgreaterthan 15degrees asshownon
the slopegauge.
3. Donot mowon wetgrass. Unstablefooting could cause
slipping.
Service
Safe Handling Of Gasoline:
1. To avoidpersonalinjury orpropertydamage useextreme
care in handlinggasoline. Gasolineis extremelyflammable
and the vapors are explosive.Serious personalinjurycan
occur whengasolineis spilled onyourself or your clothes
which can ignite.
2. Wash yourskin andchangeclothesimmediately.
3. Useonly an approvedgasolinecontainer.
4. Neverfill containers insidea vehicle or on a truckor trailer
bedwitha plasticliner.Alwaysplacecontainerson the
ground awayfromyourvehicle beforefilling.
5. Removegas-poweredequipmentfromthe truck or trailer
and refuel it on the ground.If this is notpossible,then refuel
such equipmenton a trailer witha portablecontainer,rather
than froma gasoline dispensernozzle.
6. Keepthe nozzlein contactwiththe rimof thefuel tank or
container openingat all times until fuelingis complete.Do
notuse a nozzlelock-opendevice.
7. Extinguishall cigarettes,cigars,pipes and othersources
of ignition.
8. Neverfuel machineindoorsbecauseflammablevaporswill
accumulatein thearea.
9. Neverremovegas cap or add fuel whileengine is hot or
running. Allowengineto cool at leasttwo minutesbefore
refueling.
10.Neveroverfill fuel tank. Fill tankto no morethan Y2inch
below bottomof filler neckto providefor fuel expansion.
11.Replacegasoline cap andtighten securely.
12.If gasolineis spilled,wipe it off theengine and equipment.
Moveunit to anotherarea.Wait 5 minutesbeforestarting
engine.
13.Neverstorethe machineorfuel containernear an open
flame,sparkor pilot light as on a water heater,space
heater,furnace, clothesdryer,or othergas appliances.
14.Toreducefire hazard,keepmowerfree of grass, leaves,
orother debrisbuild-up.Clean up oil orfuel spillage and
removeany fuel soakeddebris.
15.Allow a mowerto cool at least5 minutesbeforestoring.
General Service:
1. Neverrun an engine indoorsorin a poorlyventilatedarea.
Engineexhaustcontainscarbonmonoxide,an odorlessand
deadlygas.
2. Beforecleaning,repairing,or inspecting,makecertainthe
bladeandall movingparts havestopped.Disconnectthe
sparkplugwire andgroundagainstthe engineto prevent
unintendedstarting.
3. Checkthe bladeandenginemountingbolts atfrequent
intervalsfor propertightness.Also,visuallyinspectbladefor
damage(e.g.,bent,cracked,worn) Replacebladewith the
originalequipmentmanufacture's(O.E.M.)bladeonly,listed
inthis manual."Use of partswhichdo notmeetthe original
equipmentspecificationsmay leadto improperperformance
andcompromisesafety!"
4. Mowerbladesare sharp andcan cut.Wrapthe bladeor wear
gloves,anduse extracautionwhen servicingthem.
5. Keepall nuts,bolts,andscrewstight to be surethe equip-
mentis in safe workingcondition.
6. Nevertamperwithsafetydevices.Checktheir properopera-
tion regularly.
7. Afterstrikinga foreignobject,stop the engine,discon-
nectthe sparkplugwire andgroundagainsttheengine.
Thoroughlyinspectthe mowerfor any damage.Repairthe
damagebeforestartingandoperatingthe mower.
8. Neverattemptto makea wheel or cuttingheightadjustment
whiletheengine is running.
9. Grasscatchercomponents,dischargecover,andtrail
shield aresubjectto wear anddamagewhichcould expose
movingparts or allowobjectsto be thrown.For safety
protection,frequentlycheck componentsandreplaceim-
mediatelywithoriginal equipmentmanufacturer's(O.E.M.)
parts only,listed inthis manual."Use of parts which do
notmeetthe original equipmentspecificationsmayleadto
improperperformanceandcompromisesafety!"
10.Do notchangetheenginegovernorsettingor overspeedthe
engine.The governorcontrolsthe maximumsafe operating
speedof theengine.
11.Maintainor replacesafetylabels,as necessary.
12.Observeproperdisposallawsand regulations.Improper
disposalof fluidsand materialscan harmthe environment.
5
WARNING
This symbol points
out important safety
instructions which, if
not followed, could
endangerthe personal
safety and/or property
of yourself and others.
Readand follow all
instructions in this man-
ual before attempting to
operate this machine.
Failureto comply with
these instructionsmay
result in personal injury.
When you see this
symbol.
HEED iTS WARNING
Your
Responsibility
Restrictthe use
of this power machine
to persons who read.
understand
and follow the warnings
and instructions
in this manual
and on the machine.
T_:_ X
f 1. For shippingpurposes,the chutedeflectoron your
discarded before
operating the moWer.
NOTE: Your mower
s shipped with the
handle in the higher
height position.
NOTE: Each end of
the lower handle must
be placed in the same
relative oosition.
IMPORTANT
This unit is shipped
without gasoline or oil
in the engine. Fill up
gasoline and oil as
instructed in the engine
operation section
BEFORE operating
your mower.
Step 1
Step 2
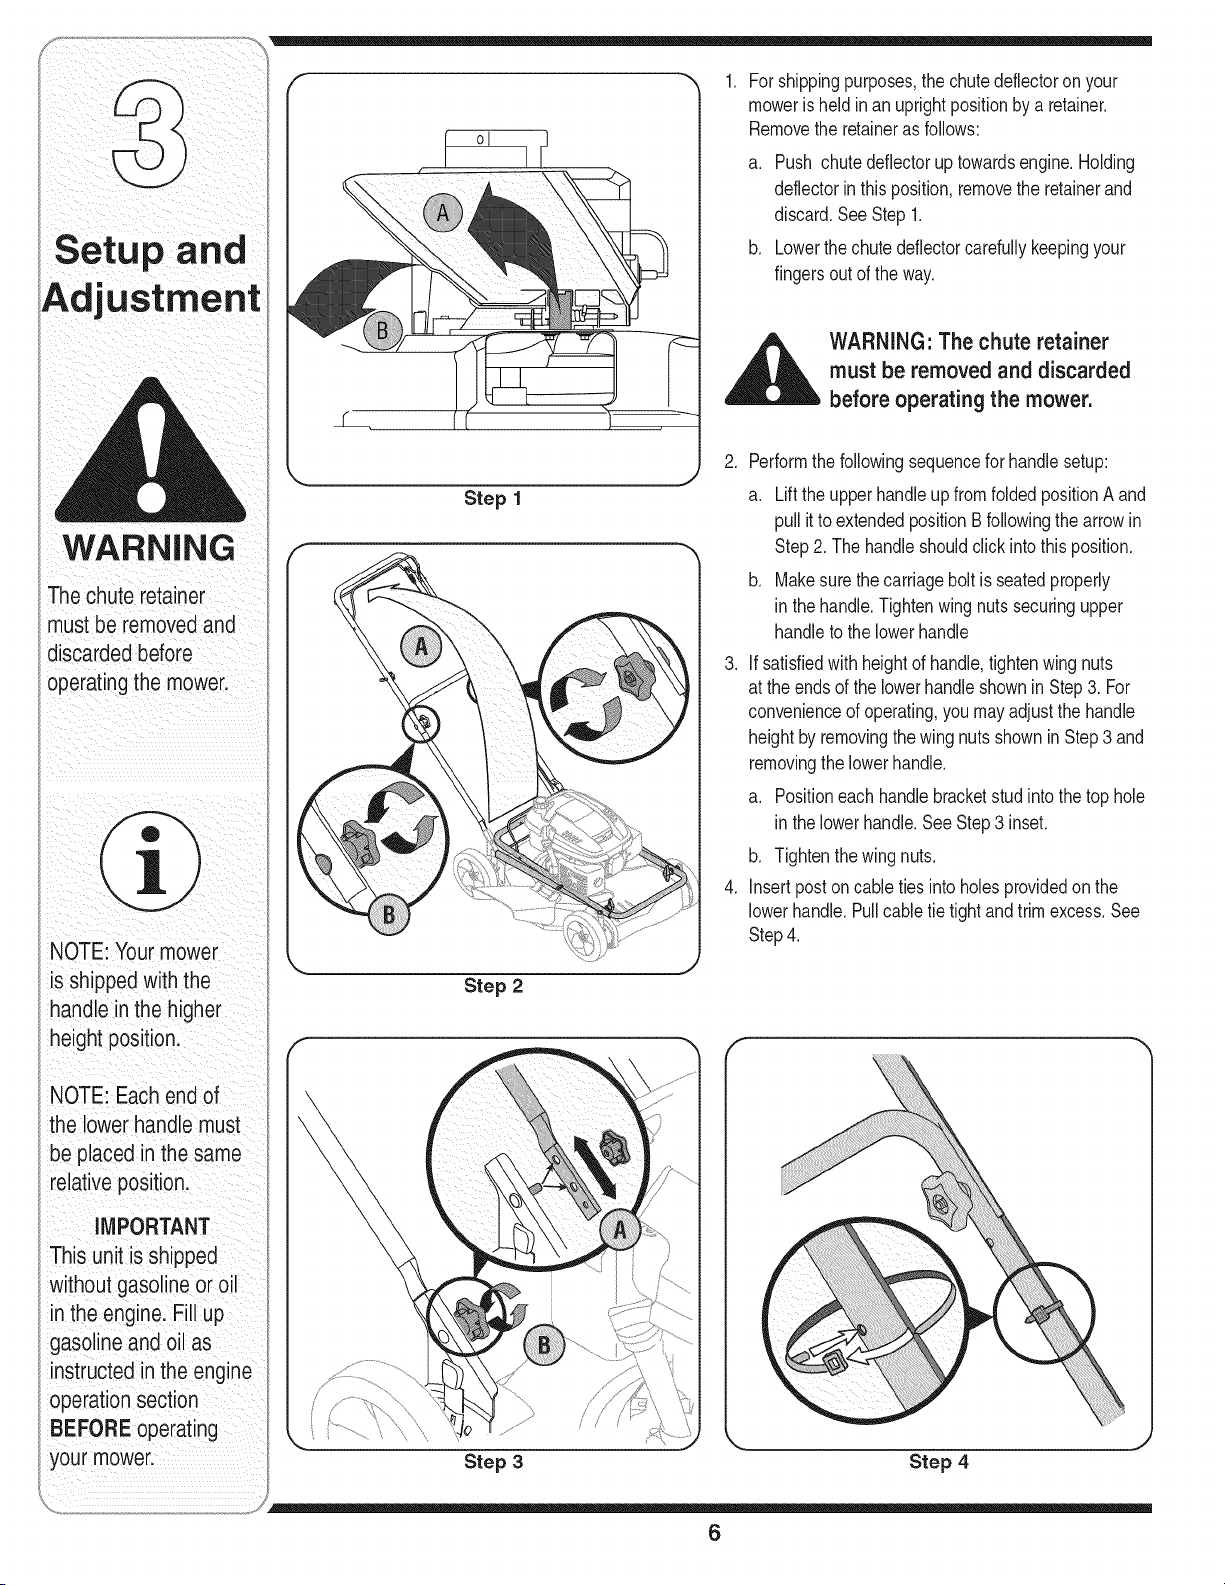
moweris heldinan uprightpositionbya retainer.
Removethe retaineras follows:
a. Push chutedeflectoruptowardsengine.Holding
deflectorin thisposition,removethe retainerand
discard.SeeStep 1.
b. Lowerthe chutedeflectorcarefullykeepingyour
fingersout of the way.
,_ WARNING: The chute retainer
must be removed and discarded
before operating the mower.
.
Performthe followingsequencefor handlesetup:
a. Liftthe upper handleup from foldedpositionA and
pullit to extendedpositionBfollowingthe arrowin
Step2. The handleshouldclickinto thisposition.
b. Makesurethe carriageboltis seatedproperly
in thehandle.Tightenwing nutssecuringupper
handleto the lowerhandle
3. If satisfiedwith heightof handle,tightenwingnuts
at the endsof the lowerhandleshownin Step3. For
convenienceof operating,youmay adjustthe handle
heightby removingthewing nutsshownin Step3 and
removingthe lowerhandle.
a. Positioneach handlebracketstud intothe top hole
in thelowerhandle.SeeStep3 inset.
b. Tightenthewing nuts.
4. Insertposton cable ties into holesprovidedon the
lowerhandle.Pullcabletie tightand trim excess.See
Step4.
f
Step 3 Step 4
6
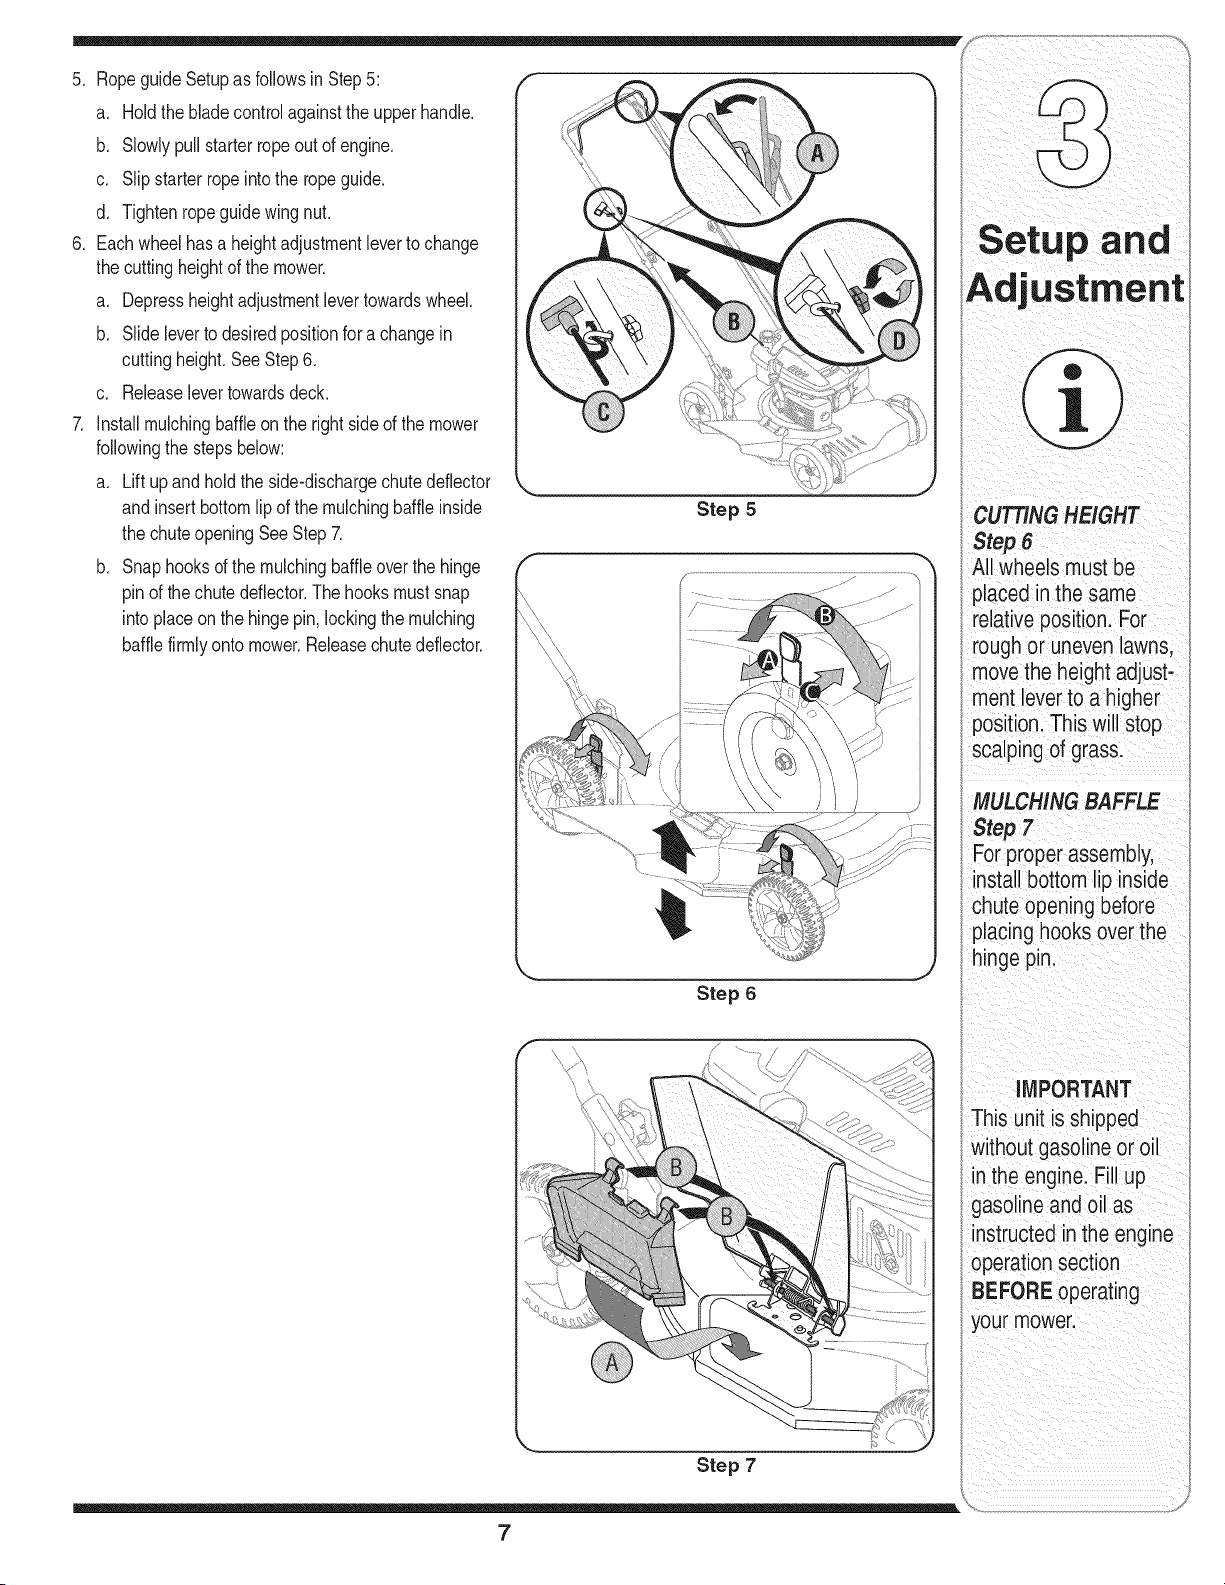
5. RopeguideSetupas followsin Step5:
a. Holdthe bladecontrolagainsttheupper handle.
b. Slowlypullstarterrope out of engine.
c. Slipstarterropeintothe ropeguide.
d. Tightenropeguidewingnut.
6. Eachwheelhasa heightadjustmentleverto change
the cuttingheightof the mower.
a. Depressheightadjustmentlevertowardswheel.
b. Slideleverto desiredpositionfor a changein
cuttingheight.SeeStep6.
c. Releaselevertowardsdeck.
7. Installmulchingbaffleonthe rightsideof the mower
followingthe stepsbelow:
a. Lift upandholdthe side-dischargechute deflector
andinsert bottomlip of the mulchingbaffleinside
the chuteopeningSeeStep7.
b. Snaphooksd the mulchingbaffle overthe hinge
pinof the chute deflector.Thehooks mustsnap
into placeon the hingepin, lockingthe mulching
bafflefirmlyonto mower.Releasechutedeflector.
Step 5
Step 6
CUTTINGHEIGHT
Step 6
All wheels must be
placed inthe same
relativeposition. For
rough or uneven lawns,
movethe height adjust-
ment leverto a higher
position,This will stop
scalping of grass.
MULCHING BAFFLE
Step 7
For properassembly,
install bottom lip inside
chute opening before
placing hooks over the
hinge pin.
iMPORTANT
This unit is shipped
without gasoline or oil
in the engine. Fill up
gasoline and oil as
instructed in the engine
operation section
BEFORE operating
your mower.
Step 7
7
WARNING
The blade control
mechanism is a
safety device. Never
attempt to bypass its
operations.
I Use extreme care
when handling
gasoline. Gasoline is
extremely flammable
and the vapors are
explosive. Never fuel
the machine indoors
or while the engine
is hot or running.
Extinguish cigarettes,
cigars, pipes and
other sources of
ignition.
Keep hands and feet
away from the chute
area on cutting deck.
Refer to warning
label on the unit.
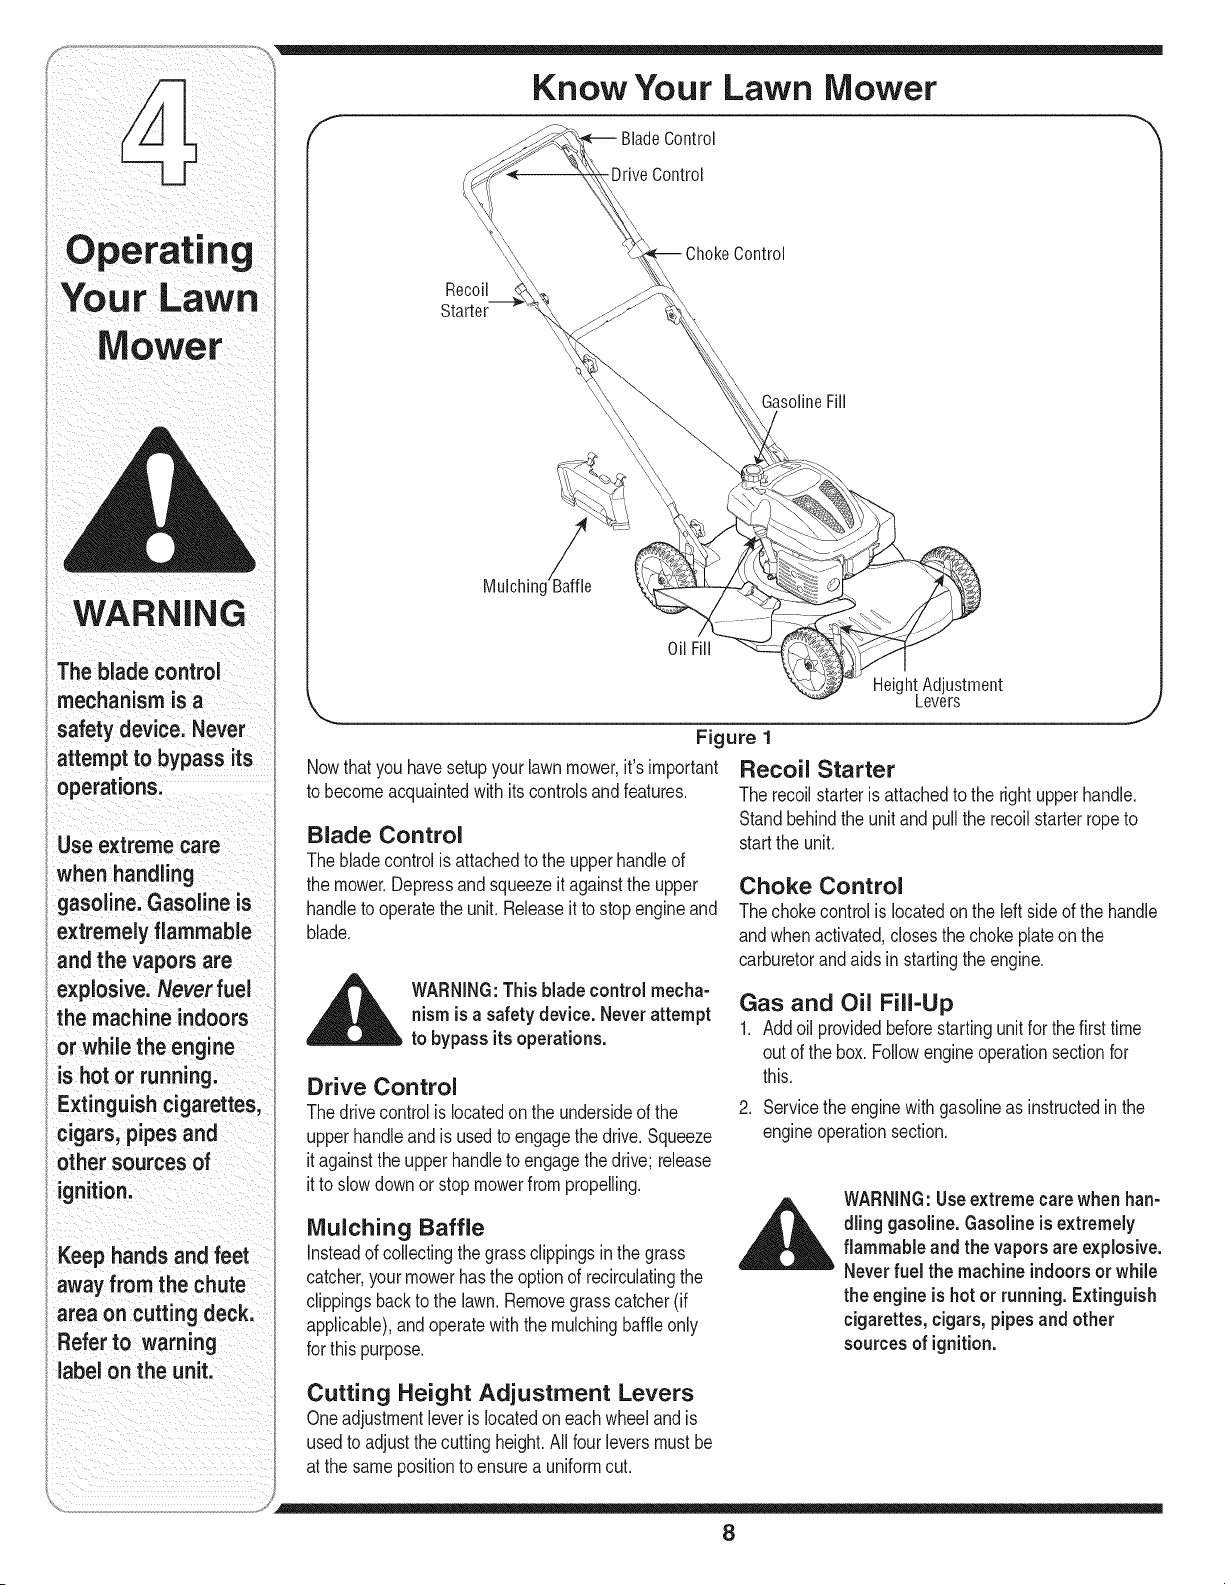
Know Your Lawn Mower
Control
Drive Control
Recoil
Starter
Control
Gasoline Fill
Mulching
Height Adjustment
Levers
Figure 1
Nowthatyou havesetupyour lawnmower,it's important
to becomeacquaintedwith its controlsand features.
Blade Control
Thebladecontrolis attachedto the upperhandleof
the mower.Depressand squeezeit againstthe upper
handleto operatethe unit. Releaseit to stopengineand
blade.
,__ WARNING:Thisblade control mecha-
nism is a safetydevice. Never attempt
to bypass its operations.
Drive Control
Thedrivecontrolislocatedon the undersideof the
upperhandleand is usedto engagethe drive.Squeeze
itagainstthe upperhandleto engagethedrive; release
itto slowdownor stopmowerfrompropelling.
Mulching Baffle
insteadof collectingthe grassclippings in the grass
catcher,yourmowerhas theoptionof recirculatingthe
clippingsbackto the lawn.Removegrass catcher(if
applicable),andoperatewith the mulchingbaffleonly
for thispurpose.
Recoil Starter
The recoilstarteris attachedto the rightupper handle.
Standbehindthe unitand pullthe recoilstarterropeto
startthe unit.
Choke Control
Thechokecontrolislocatedonthe leftsideof the handle
andwhenactivated,closesthe choke plateon the
carburetorandaidsin startingthe engine.
Gas and Oil Fill-Up
1. Addoil providedbeforestartingunitfor the firsttime
out of the box.Followengineoperationsectionfor
this.
2. Servicethe enginewithgasolineas instructedin the
engineoperationsection.
__L ARNING:Useextremecarewhenhan-
dling gasoline.Gasoline is extremely
flammable and the vapors are explosive.
Neverfuel the machine indoorsor while
the engine is hot or running. Extinguish
cigarettes, cigars, pipesand other
sources of ignition.
Cutting Height Adjustment Levers
Oneadjustmentleveris locatedon eachwheelandis
usedto adjustthe cuttingheight.All fourleversmustbe
at the samepositionto ensurea uniformcut.
8
,,,
_ ARNING:The operationof any lawn if
mowercan result in foreign objects
being thrownintothe eyes,whichcan
damageyoureyesseverely.Always
wear safetyglasseswhileoperating
the mower,or while performing any
adjustmentsor repairson it.
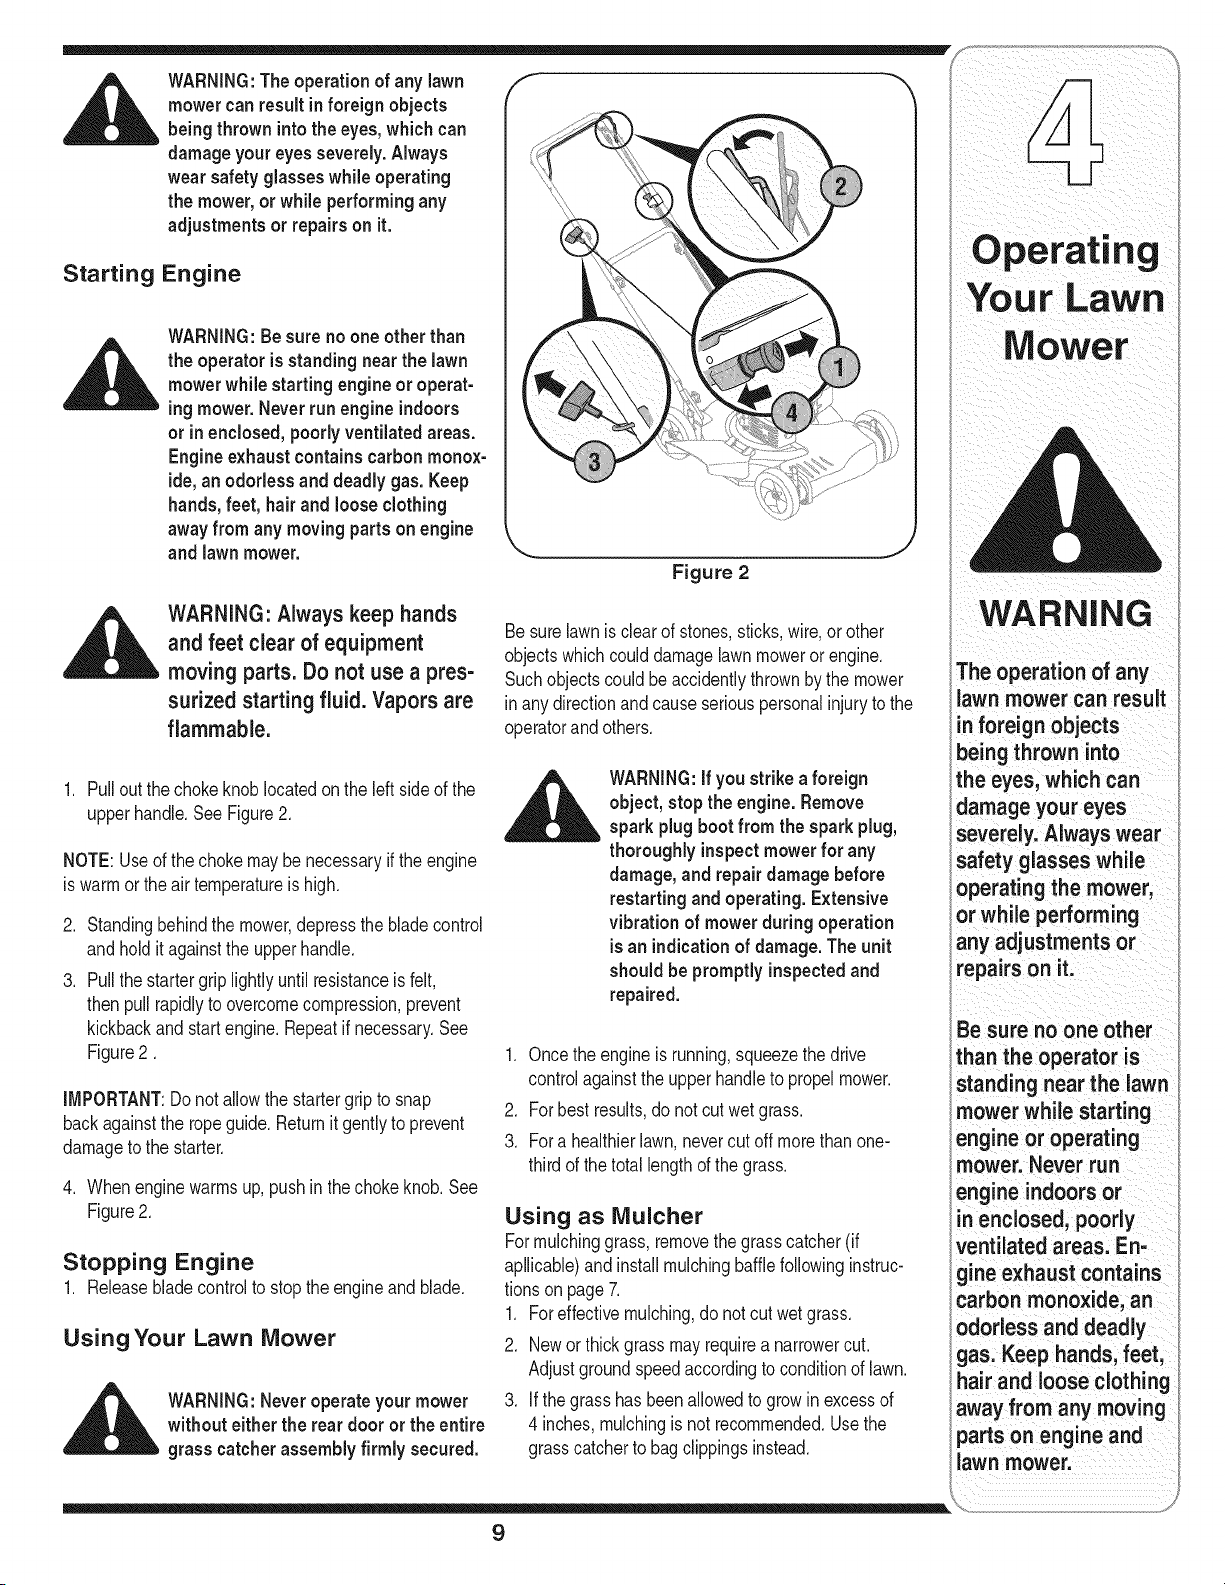
Starting Engine
WARNING:Besureno one otherthan
,_i_ the operatoris standingnearthe lawn
mowerwhilestartingengine or operat-
ingmower.Neverrun engineindoors
orin enclosed,poorly ventilatedareas.
Engine exhaustcontainscarbon monox-
ide,an odorlessand deadly gas. Keep
hands, feet, hair and loose clothing
awayfrom any moving partson engine
and lawnmower.
Figure 2
WARNING: Always keep hands
and feet clear of equipment
moving parts. Do not use a pres-
surized starting fluid. Vaporsare
flammable.
Besure lawnis clearof stones,sticks,wire,or other
objectswhichcoulddamagelawnmoweror engine.
Suchobjectscouldbeaccidentlythrownbythe mower
inany directionandcauseseriouspersonalinjuryto the
operatorand others.
1. Pullout the chokeknob locatedon the leftsideof the
upperhandle.See Figure2.
NOTE: Useof the chokemaybe necessaryifthe engine
is warmor theair temperatureishigh.
2. Standingbehindthe mower,depressthe bladecontrol
and holditagainstthe upperhandle.
3. Pullthe startergriplightly untilresistanceisfelt,
then pullrapidlyto overcomecompression,prevent
kickbackandstartengine.Repeatif necessary.See
Figure2.
IMPORTANT:Donot allowthe startergripto snap
backagainstthe rope guide.Returnitgentlyto prevent
damageto the starter.
4. Whenenginewarmsup,push inthe chokeknob.See
Figure2.
Stopping Engine
1. Releasebladecontrolto stop theengineand blade.
UsingYour Lawn Mower
_ ARNING: Neveroperate your mower
without eitherthe rear door or the entire
grass catcher assembly firmly secured.
WARNING:if you strike aforeign
object,stopthe engine.Remove
spark plug boot from the spark plug,
thoroughly inspectmower for any
damage,and repair damage before
restartingand operating.Extensive
vibration of mower during operation
is an indicationof damage.The unit
should be promptly inspectedand
repaired.
1. Oncethe engineis running,squeezethedrive
controlagainstthe upperhandleto propelmower.
2. Forbest results,do notcut wet grass.
3. Fora healthierlawn,nevercut offmorethan one-
thirdof the totallengthof the grass.
Using as Mulcher
Formulchinggrass,removethe grasscatcher(if
apllicable)andinstallmulchingbafflefollowinginstruc-
tionson page 7.
1. Foreffectivemulching,do notcut wet grass.
2. Newor thick grassmayrequirea narrowercut.
Adjustgroundspeedaccordingto conditionof lawn.
3. If thegrasshas beenallowedto growinexcessof
4 inches,mulchingis not recommended.Usethe
grasscatcherto bagclippingsinstead.
Mower
WARNING
The operation of any
lawn mower can result
inforeign objects
being thrown into
the eyes, which can
damage your eyes
severely. Always wear
safety glasses while
operating the mower,
or while performing
any adjustments or
repairs on it.
Be sure no one other
than the operator is
standing near the lawn
mower while starting
engine or operating
mower. Never run
engine indoors or
n enclosed, poorly
ventilated areas. En-
gine exhaust contains
carbon monoxide, an
odorless and deadly
gas. Keep hands, feet,
hair and loose clothing
away from any moving
parts on engine and
lawn mower.
9
A ,vavs
disconnectspark
plugl and ground
performing any type
We do not rec0mmend
i
the use of a pressure
washer or garden
hose to clean
uniL These maycause
damage to e ectriC
compOnentSspindles
pulleys; bearingS,or
the enginel The use
of water Willresult in
shorten edlife and
reduce Serviceability,
f
Figure 3
General Recommendations
1. Alwaysobservesafetyruleswhen performing
anymaintenance.
2. Thewarrantyon thislawnmowerdoesnot cover
itemsthathavebeen subjectedto operatorabuse
ornegligence.To receivefull valuefromwarranty,
operatormustmaintainthelawn moweras
instructedhere.
3. Changingof engine-governedspeedwill void
enginewarranty.
4. Alladjustmentsshouldbecheckedat leastonce
eachseason.
5. Periodicallycheckallfastenersand makesurethese
aretight.
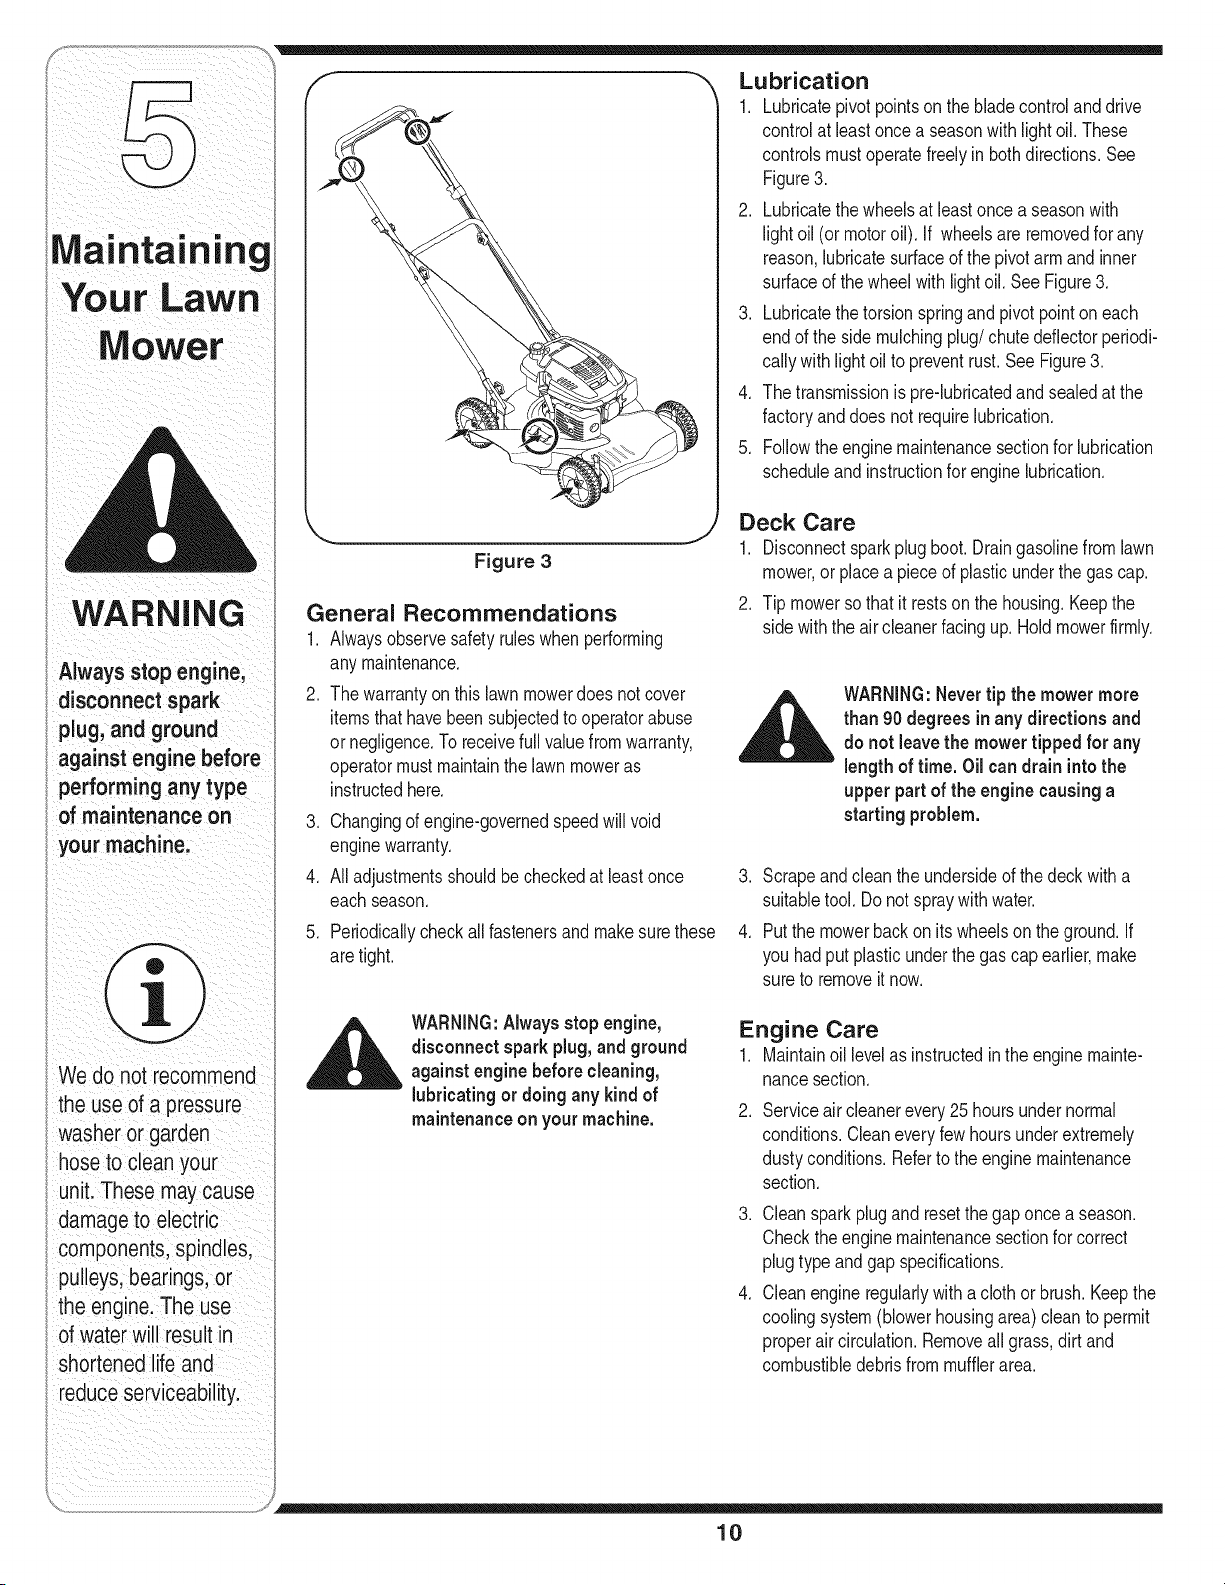
Lubrication
1. Lubricatepivotpointson thebladecontroland drive
controlat leastoncea seasonwithlightoil. These
controlsmustoperatefreely in bothdirections.See
Figure3.
2. Lubricatethe wheelsat leastoncea seasonwith
lightoil (ormotoroil). If wheelsare removedfor any
reason,lubricatesurfaceof the pivotarm andinner
surfaceof thewheelwithlight oil. See Figure3.
3. Lubricatethe torsionspringandpivot pointon each
endof the side mulchingplug/chute deflectorperiodi-
callywithlightoil to preventrust.SeeFigure3.
4. Thetransmissionis pre-lubricatedand sealedat the
factoryanddoes not requirelubrication.
5. Followtheenginemaintenancesectionfor lubrication
scheduleandinstructionfor enginelubrication.
Deck Care
1. Disconnectsparkplugboot. Draingasolinefrom lawn
mower,or placea pieceof plasticunderthe gas cap.
2. Tip mowersothat itrestsonthe housing.Keepthe
sidewiththe aircleanerfacingup. Hold mowerfirmly.
WARNING:Nevertip the mowermore
than 90 degrees in any directions and
do not leavethe mower tipped for any
length of time. Oil can drain intothe
upper part of the engine causinga
starting problem.
3. Scrapeandclean the undersideof the deck with a
suitabletool.Do notspraywith water.
4. Putthe mowerbackon itswheelson the ground.If
youhadput plasticunderthe gas capearlier,make
sureto removeitnow.
_bL ARNING:Alwaysstop engine,
disconnect spark plug, and ground
against engine before cleaning,
lubricatingor doing any kind of
maintenance on your machine.
Engine Care
1. Maintainoil levelas instructedinthe enginemainte-
nancesection.
.
Serviceaircleanerevery25 hoursundernormal
conditions.Cleaneveryfewhoursunderextremely
dustyconditions.Referto the enginemaintenance
section.
3. Cleansparkplugand resetthegaponce a season.
Checktheenginemaintenancesectionfor correct
plugtype and gap specifications.
4. Cleanengineregularlywith a clothor brush. Keepthe
coolingsystem(blowerhousingarea) cleanto permit
properaircirculation.Removeall grass,dirt and
combustibledebrisfrom mufflerarea.
10
Blade Care
__lk ARNING:Whenremovingcutting
bladefor sharpeningor replacement,
protectyourhandswitha pairof heavy
gloves or use a heavy ragto hold blade.
1. Disconnectsparkplugbootfrom sparkplug.Turn
moweron itsside makingsurethatthe airfilterand
the carburetorareup.
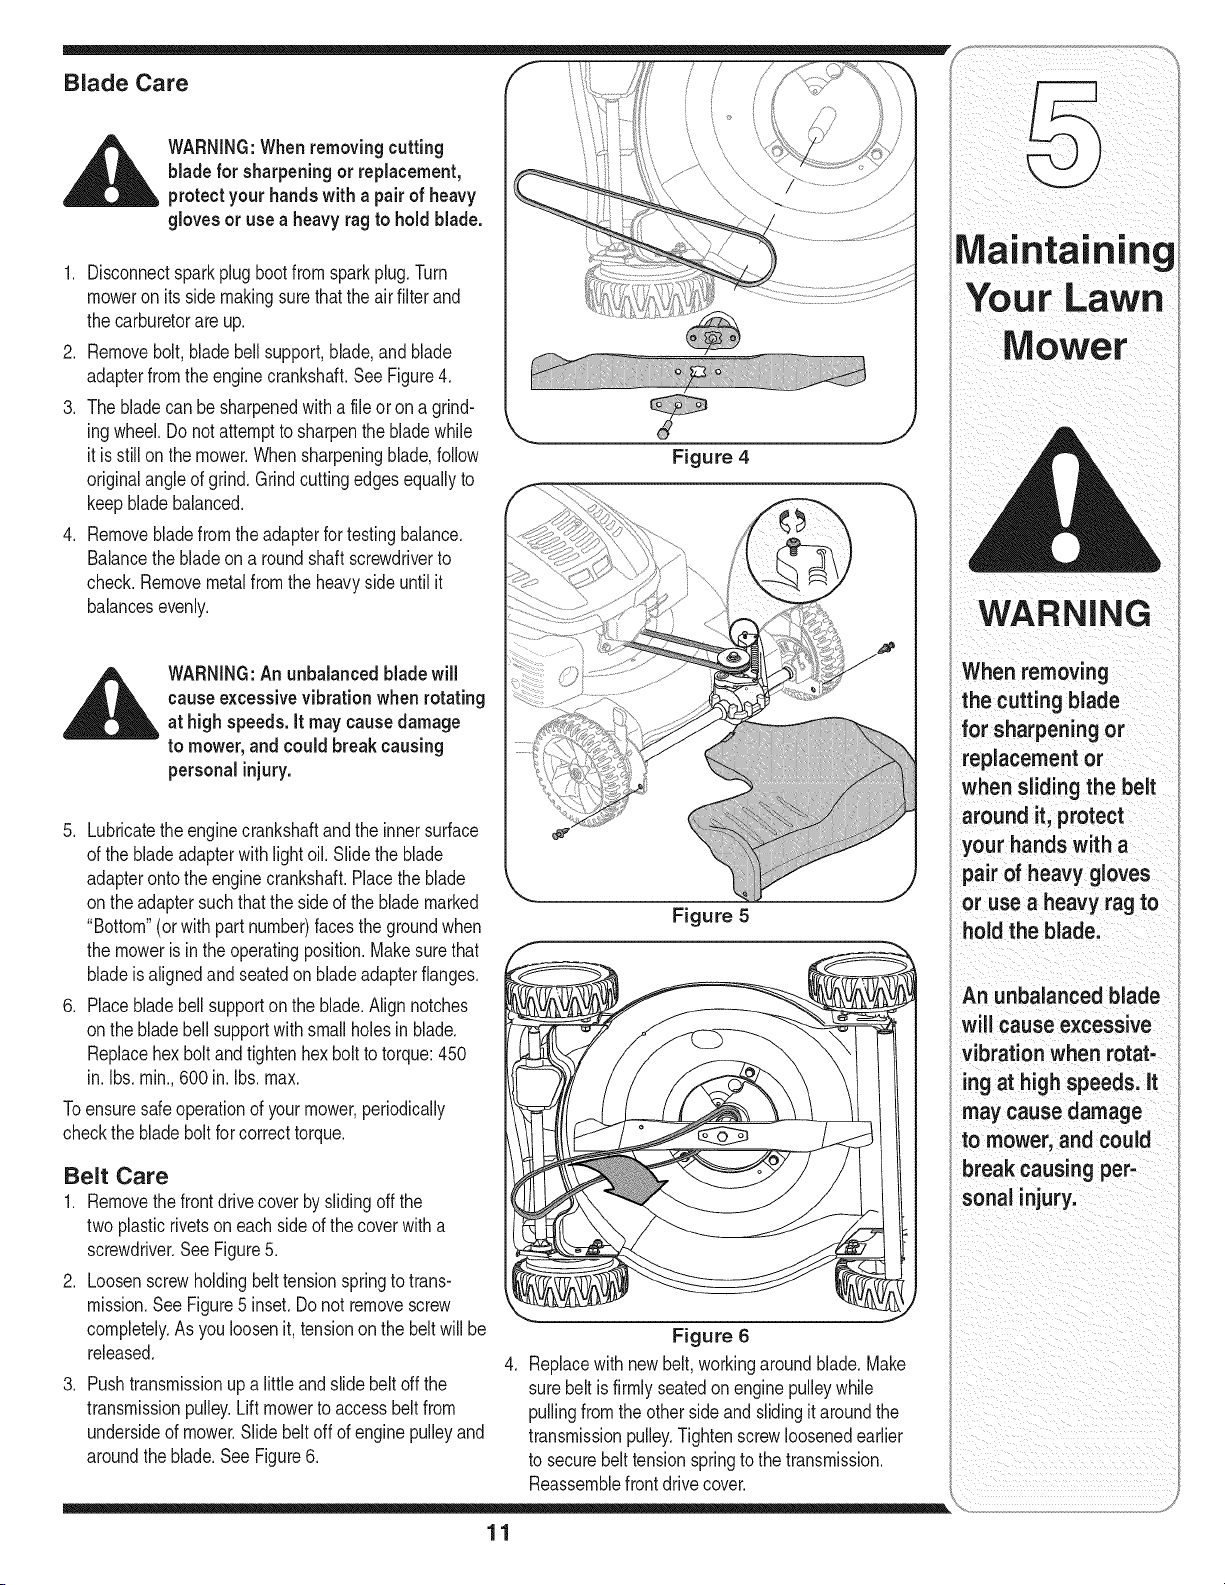
2. Removebolt,blade bell support,blade,and blade
adapterfrom the enginecrankshaft.See Figure4.
3. The bladecan be sharpenedwitha fileor on a grind-
ing wheel.Do notattemptto sharpenthe bladewhile
it is stillon the mower.Whensharpeningblade,follow
originalangleof grind.Grind cuttingedgesequallyto
keep bladebalanced.
4. Removebladefromthe adapterfor testingbalance.
Balancethe bladeon a roundshaftscrewdriverto
check.Removemetalfrom the heavysideuntil it
balancesevenly.
Figure 4
_ WARNING:Anunbalanced bladewill
causeexcessive vibration when rotating
at high speeds, it may cause damage
to mower,and could break causing
personalinjury.
5. Lubricatetheenginecrankshaftand the inner surface
of the bladeadapterwith lightoil. Slide the blade
adapteronto the enginecrankshaft.Placethe blade
on theadaptersuchthatthe sideof the blademarked
"Bottom"(or with part number)facesthe groundwhen
the moweris in the operatingposition.Makesurethat
bladeis alignedand seatedon bladeadapterflanges.
6. Placebladebell supporton the blade.Align notches
on the bladebell supportwith smallholesin blade.
Replacehex boltandtightenhex boltto torque:450
in. Ibs. rain.,600 in. Ibs.max.
Toensuresafeoperationof yourmower,periodically
checkthe bladeboltfor correcttorque.
Belt Care
1. Removethe frontdrive coverby slidingoffthe
two plasticrivetson eachside of thecoverwitha
screwdriver.SeeFigure5.
2. Loosenscrewholdingbelttensionspringto trans-
mission.SeeFigure5 inset.Donot removescrew
completely.As youloosenit, tensiononthe belt will be
released.
.
Pushtransmissionup a littleandslidebelt offthe
transmissionpulley.Lift mowerto accessbeltfrom
undersideof mower.Slide beltoff of enginepulleyand
aroundthe blade.SeeFigure6.
Figure 5
Figure 6
4. Replacewith newbelt,workingaroundblade.Make
surebelt is firmlyseatedonenginepulleywhile
pullingfromthe othersideand slidingit aroundthe
transmissionpulley.Tightenscrewloosenedearlier
to securebelt tensionspringto the transmission.
Reassemblefront drivecover.
11
_ _ i i i iii _ _ ii _i ii ii
Maintaining
You r LaWn
MOwer
WARNING
When removing
the cutting blade
for sharpening or
replacement or
when sliding the belt
around it, protect
your hands with a
pair of heavy gloves
or use a heavy rag to
hold the blade.
An unbalanced blade
will cause excessive
vibration when rotat-
ing at high speeds. It
may cause damage
to mower, and could
break causing per-
sonal injury.
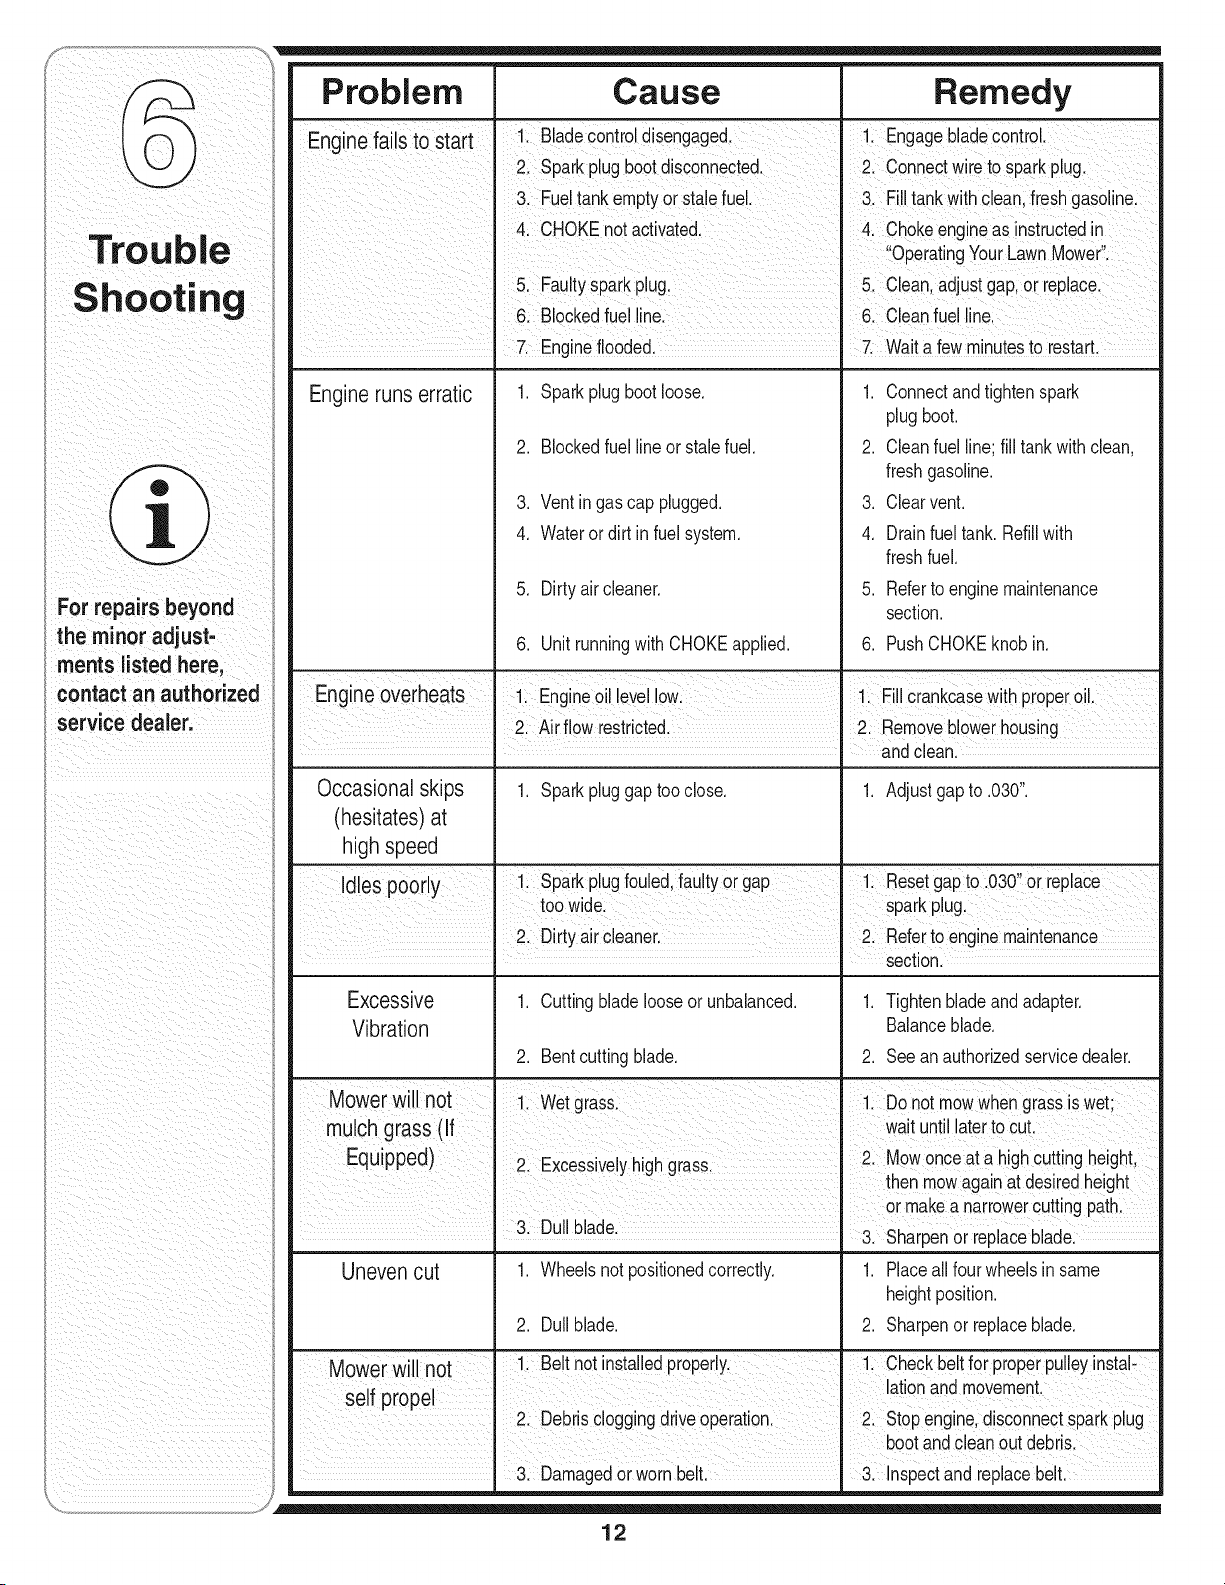
Problem Cause Remedy
En inef Isto start 1 Bade contro d sengaged 1 Engagebade contro
g a ....
2. Sparkplugbootdisconnected. 2. Connectwireto sparkplug•
3. Fueltankemptyor stalefuel• 3. Filltankwithclean,freshgasoline•
4. CHOKEnotactivated• 4 Chokeengineas instructed-in
a t ug. OperatingYourLawnMower.
Trouble
Shootin 2. F ulysparkpl 5. Clean,adjustgap orreplace
6. Blockedfuel line. 6. Cleanfuel line.
7. Engineflooded. 7. Waita fewminutesto restart.
Engineruns erratic 1. Sparkplugbootloose. 1. Connectand tightenspark
plugboot.
2. Blockedfuel lineor stalefuel. 2. Cleanfuel line;fill tankwithclean,
freshgasoline.
3. Ventingas cap plugged. 3. Clearvent.
4. Waterordirt infuel system. 4. Drainfuel tank. Refillwith
freshfuel.
5. Dirty aircleaner. 5. Referto enginemaintenance
For repairs beyond section.
the minor adjust- 6. UnitrunningwithCHOKEapplied. 6. PushCHOKEknob in.
ments listed here,
contact an authorized Engine overheats 1. Engineoil levellow. 1. Fillcrankcasewithproperoil.
service dealer. 2. Air flow restricted. 2. Removeb owerhousing
andclean.
Occasional skips 1. Sparkpluggap too close. 1. Adjustgap to .030".
(hesitates) at
high speed
Idles oorl 1 Sparkpug foued fau ty or gap 1 Resetgapto 030" or repace
P Y •
toowide. sparkplug.
2. Dirty aircleaner. 2. Referto enginemaintenance
sect on.
Excessive 1. Cuttingbladelooseor unbalanced. 1. Tightenbladeandadapter.
Vibration Balanceblade.
2. Bentcuttingblade. 2. Seean authorizedservicedealer.
not I 1. Wetgrass. 1. Donot mowwhengrassis wet;
Mower will
mulch rass (If wat unti aterto cut
g
Equ pped) 2 Excessivel h h rass 2 Mowonceat a h gh cutt ng he ght
Y g g " " then mowagain at desiredheight
I or makea narrowercuttingpath.
3 Dull blade
• " 3. Sharpenor replaceblade.
Unevencut 1. Wheelsnot positionedcorrectly. 1. Placeall fourwheelsin same
heightposition.
2. Dull blade. 2. Sharpenor replaceblade.
Mower will Rot 1. Belt notinstalledproperly. 1. Checkbeltfor properpulleyinstal-
If r I at onand movement
se pope I
2. Debrs c oggng drve operaton. 2. Stopengne,d sconnectspark pug
I bootandcleanout debris.
3. Damagedorworn belt. 3. Inspectand replacebelt.
'% ..........
12

Off-Season Storage
The followingstepsshouldbetaken to prepareyour lawn
mowerfor storage.
1. Cleanandlubricatemowerthoroughlyas describedin
the lubricationinstructions.
2. We donot recommendthe useof a pressurewasher
or gardenhoseto cleanyour unit.
3. Referto enginemanualfor correctengine
storageinstructions.
4. Coatmower'scuttingbladewithchassisgreaseto
preventrusting.
5. Storemowerina dry,cleanarea. Donot storenext
to corrosivematerials,suchas fertilizer.
Whenstoringanytypeof powerequipmentin a poorly
ventilatedor metalstorageshed,careshouldbetaken
to rust-prooftheequipment.Usinga lightoil or silicone,
coattheequipment,especiallycablesand all moving
partsof yourlawnmowerbeforestorage.
Safety Labels Found On Your Lawn Mower
engine.Readand follow Operating Instructions before running 1
Gasoline is flammable. Allow engine to cool at least /
2 minutes before refueling.
J
Engines emit carbon monoxide. DO NOT run in enclosed
area.
13
_i _i i _iii i__ i iii ii_
DO NOT remove safety
(or any) labels from
mower for any reason.
WARNING
Gasolineand itsvapors
are extremelyflam-
mableand explosive.
, Fireor explosioncan
cause severeburns
i or death.If gasolineis
spilledon yourselfor
your clothes,wash your
I skin and change clothes
_ immediately.
i Starting enginecreates
i sparking. Sparking can
I ignite nearby flamma-
I
b e gases. Explosion
and fire could result.
Unintentionalsparking
can result in fire or
electric shock. Unin-
tentional start-up can
result in entanglement,
:raumaticamputation,
or laceration.
WARNING: Gasoline and its vapors are extremely flammable and explosive. Fire or
explosion can cause severe burns or death. If gasoline is spilled on yourself or your
clothes, wash your skin and change clothes immediately.
Gasoline and its vapors are
extremely flammable and
explosive. Fire or explosion can
cause severe burns or death. If
gasoline is spilled on yourself
or your clothes, wash your skin
and change clothes immediately.
o
o
o
Whenaddingfuel,turnengineOFF and let engine
coolat least2 minutesbeforeremovinggas cap.
Fill fueltankoutdoorsor inwellventilatedarea.
Useonlyanapprovedgasolinecontainer.
Neverfill containersinsideavehicleor ona truck or
trailerbedwith a plasticliner.Alwaysplacecontain-
ers onthe groundawayfromyourvehiclebefore
filling.
• If possible,removegas-poweredequipmentfrom the
truckor trailerandrefuelit on theground.If this is
not possible,then refuelsuchequipmenton a trailer
witha portablecontainer,ratherthan froma gasoline
dispensernozzle.
• Keepthe nozzlein contactwith the rimof thefuel
tankor containeropeningat all timesuntilfueling is
complete.Do notuse a nozzlelock-opendevice.
• Do notoverfillfuel tank. Filltank to approximately
2 cmbelowlowestportionof neckto allowfor fuel
expansion.
• Keepgasolineawayfrom sparks,open flames,pilot
lights,heat,andother ignitionsources.
• Neverfuelequipmentindoorsbecauseflammable
vaporswill accumulatein the area.
• Extinguishall cigarettes,cigars,pipes,and other
sourcesof ignition.
• Checkfuelline,tank, cap, andfittings frequentlyfor
cracksor leaks.Replaceif necessary.
• Whenstartingengine,makesurespark plug,muffler,
fuelcap andair cleanerare in place.
• Do notcrank enginewith spark plug removed.
• If fuelspills,wait until it evaporatesbeforestarting
engine.
• Whenoperatingequipment,do not tip engineor
equipmentat anglewhichcausesgasolineto spill.
• Do notchoke carburetorto stopengine.
• Whentransportingequipment,transportwith fuel tank
EMPTY.
Whenstoringgasolineor equipmentwith fuel in tank,
storeawayfromfurnaces,stoves,waterheatersor
otherappliancesthathavepilot lightor other ignition
sourcebecausetheycan ignitegasolinevapors.
,_ Starting engine creates spark-
ing. Sparking can ignite nearby
__ flammable gases. Explosion and
fire could result.
• If thereisa naturalor LP gas leakagein area,do not
startengine.
• Do not usepressurizedstartingfluidsbecausevapors
areflammable.
_ ngines give off carbon mon-
oxide, an odorless, colorless,
poisonous gas. Breathing carbon
monoxide can cause nausea,
fainting, or death.
• Start and run engineoutdoors.
• Do not startor run enginein enclosedarea,evenif
doorsor windowsare open.
__ nintentional sparking can result
infire or electric shock. Unin-
tentional start-up can result in
entanglement, traumatic amputa-
tion, or laceration.
• Beforepeformingadjustmentsor repairs,disconnect
sparkplugwireand keepitawayfromspark plug.
• Whentestingfor spark,use approvedspark plug
tester.
• Do notcheckfor spark with sparkplug removed.
14

Running engine produces heat.
Engine parts, especially muffler,
become extremely hot. Severe
thermal burns can occur on
contact. Combustibledebris,
such as leaves, grass, brush, etc.,
can catch fire.
• Allow muffler,enginecylinder,and fins to cool before
touching.
• Keepchildrenawayfrom hot or runningengines.They
can sufferburnsfrom a hot muffler.
Removeaccumulatedcombustiblesfrom mufflerand
cylinderarea.
_ Rotating engine parts can
contact or entangle hands, feet,
hair, clothing, or accessories.
Traumaticamputation or severe
laceration can result.
Operateequipmentwithguardsin place.
Keephandsandfeet awayfrom rotatingparts.
SafetyAlert
• Tie up long hairand removejewelry.
Do notwear loose-fittingclothing,danglingdraw-
stringsor itemsthatcouldbecomecaught.
,__ Rapid retraction of starter cord
(kickback) will pull hand and
arm toward engine faster than
you can let go. Broken bones,
fractures, bruises or sprains
could result.
• Whenstartingengine,pull cordslowlyuntil resis-
tanceisfelt,then pull rapidly.
• Removeall externalequipment/engineloadsbefore
startingengine.
• Directcoupledequipmentcomponentssuchas, but
not limitedto blades,impellers,pulleys,sprockets,
etc.,mustbe securelyattached.
Safety Label Location
Thislabelwarnsyouof potentialhazardsthat can
causeseriousinjury.Readit carefully.See Figure1 for
explanationof symbols.
If the labelcomesoffor becomeshardto read,contact
the dealerfor replacement.
International Symbols and Meanings
A
Hot Surface
Toxic Fumes GasolineIs
Flammable
ReadOwner's
UnleadedFuel Start Run
Manual
Figure 1
15
WARNING
Running engine
produces heat. Engine
parts, especially muf-
fler, become extremely
hot. Severe thermal
burns can occur on
contact. Combustible
debris, such as leaves,
grass, brush, etc., can
catch fire.
Rotating engine parts
can contact or entangle
hands, feet. hair.cloth-
ing, or accessories.
Traumaticamputation
or severe laceration
can result.
Rapid retraction of
starter cord (kickback)
will pull hand and
arm toward engine
faster than you can
let go. Broken bones.
fractures, bruises or
sprains could result.
IMPORTANT:Thisengine
is shippedwithoutgaso-
lineoroil inthe engine.
Runningthe enginewith
insufficientoil can cause
seriousenginedamage
andvoidthe engine
warranty.
IMPORTANT:Using non-
detergentoil or2-stroke
engineoil couldshorten
the engine'sservicelife.
Besure to checkthe
engineon a level surface
withthe enginestopped.
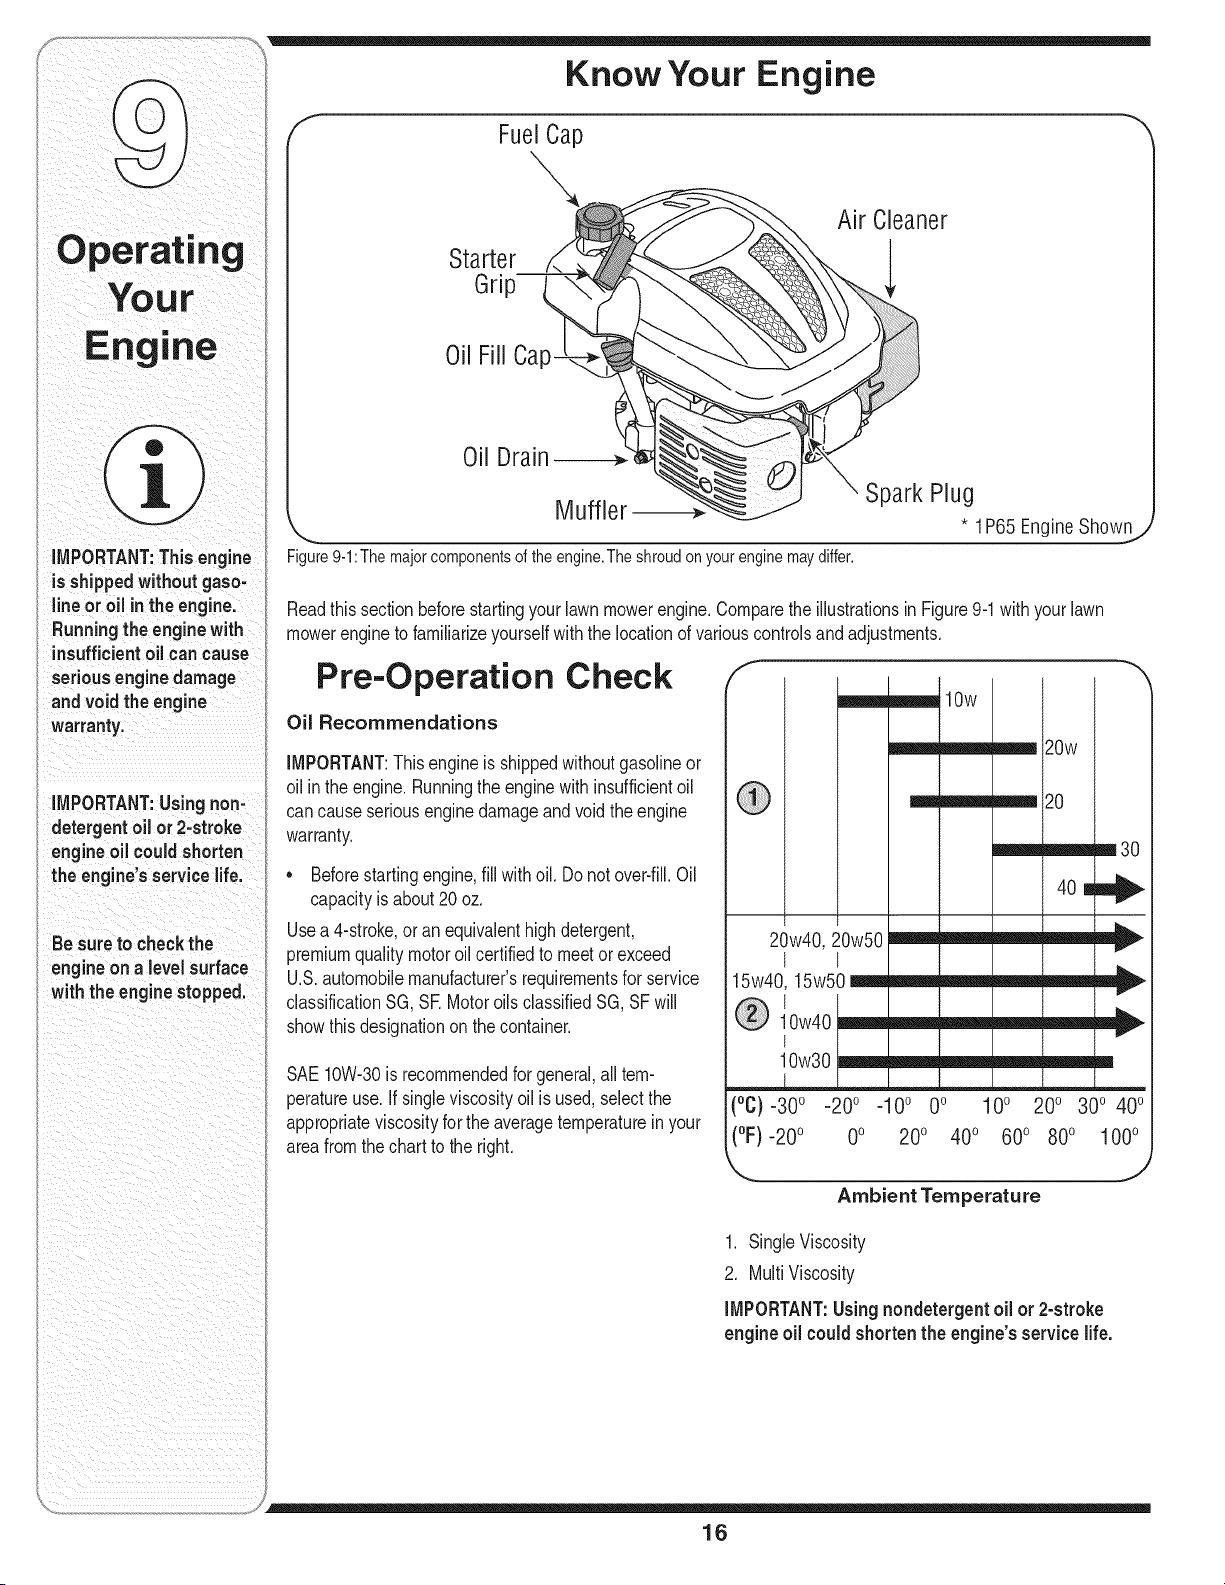
Know Your Engine
f Fuel Cap
Starter
Grip
Air Cleaner
Oil Fiii Cap
Oil Drain
Mufflel Spark Plug
: !P65Eng!neSh°w ,
Figure9-1:Themajorcomponentsoftheengine.Theshroudonyourenginemaydiffer.
Readthissectionbeforestartingyourlawnmowerengine.Comparethe illustrationsin Figure9-1with your lawn
mowerengineto familiarizeyourselfwith the locationof variouscontrolsand adjustments.
Pre-Operation Check
Oil Recommendations
IMPORTANT:This engineis shippedwithoutgasolineor
oil inthe engine.Runningthe enginewithinsufficientoil
cancauseseriousenginedamageand voidthe engine
warranty.
• Beforestartingengine,fill with oil. Donot over-fill.Oil
capacityis about20oz.
Usea 4-stroke,oran equivalenthigh detergent,
premiumqualitymotoroilcertifiedto meetor exceed
U.S.automobilemanufacturer'srequirementsfor service
classificationSG, SE Motoroils classifiedSG,SF will
showthis designationon thecontainer.
SAE10W-30is recommendedfor general,all tem-
peratureuse. If singleviscosityoil is used, selectthe
appropriateviscosityfor theaveragetemperaturein your
areafromthe chart to the right.
m30
20w40, 20w50 _ _ _ _
t I iv
15w40, 15w50 =m=_ ==== mmm _ ====hb,,
V
®,
10w40 ______
10w30 __mm=__m
(°C}-30 ° -20° -10° 0° 10° 200 300 400
(°F)-20o 0o 200 400 600 80° 1000
Ambient Temperature
1. SingleViscosity
2. MultiViscosity
IMPORTANT:Using nondetergent oil or 2-stroke
engineoil couldshortenthe engine'sservicelife.
16
.
3.
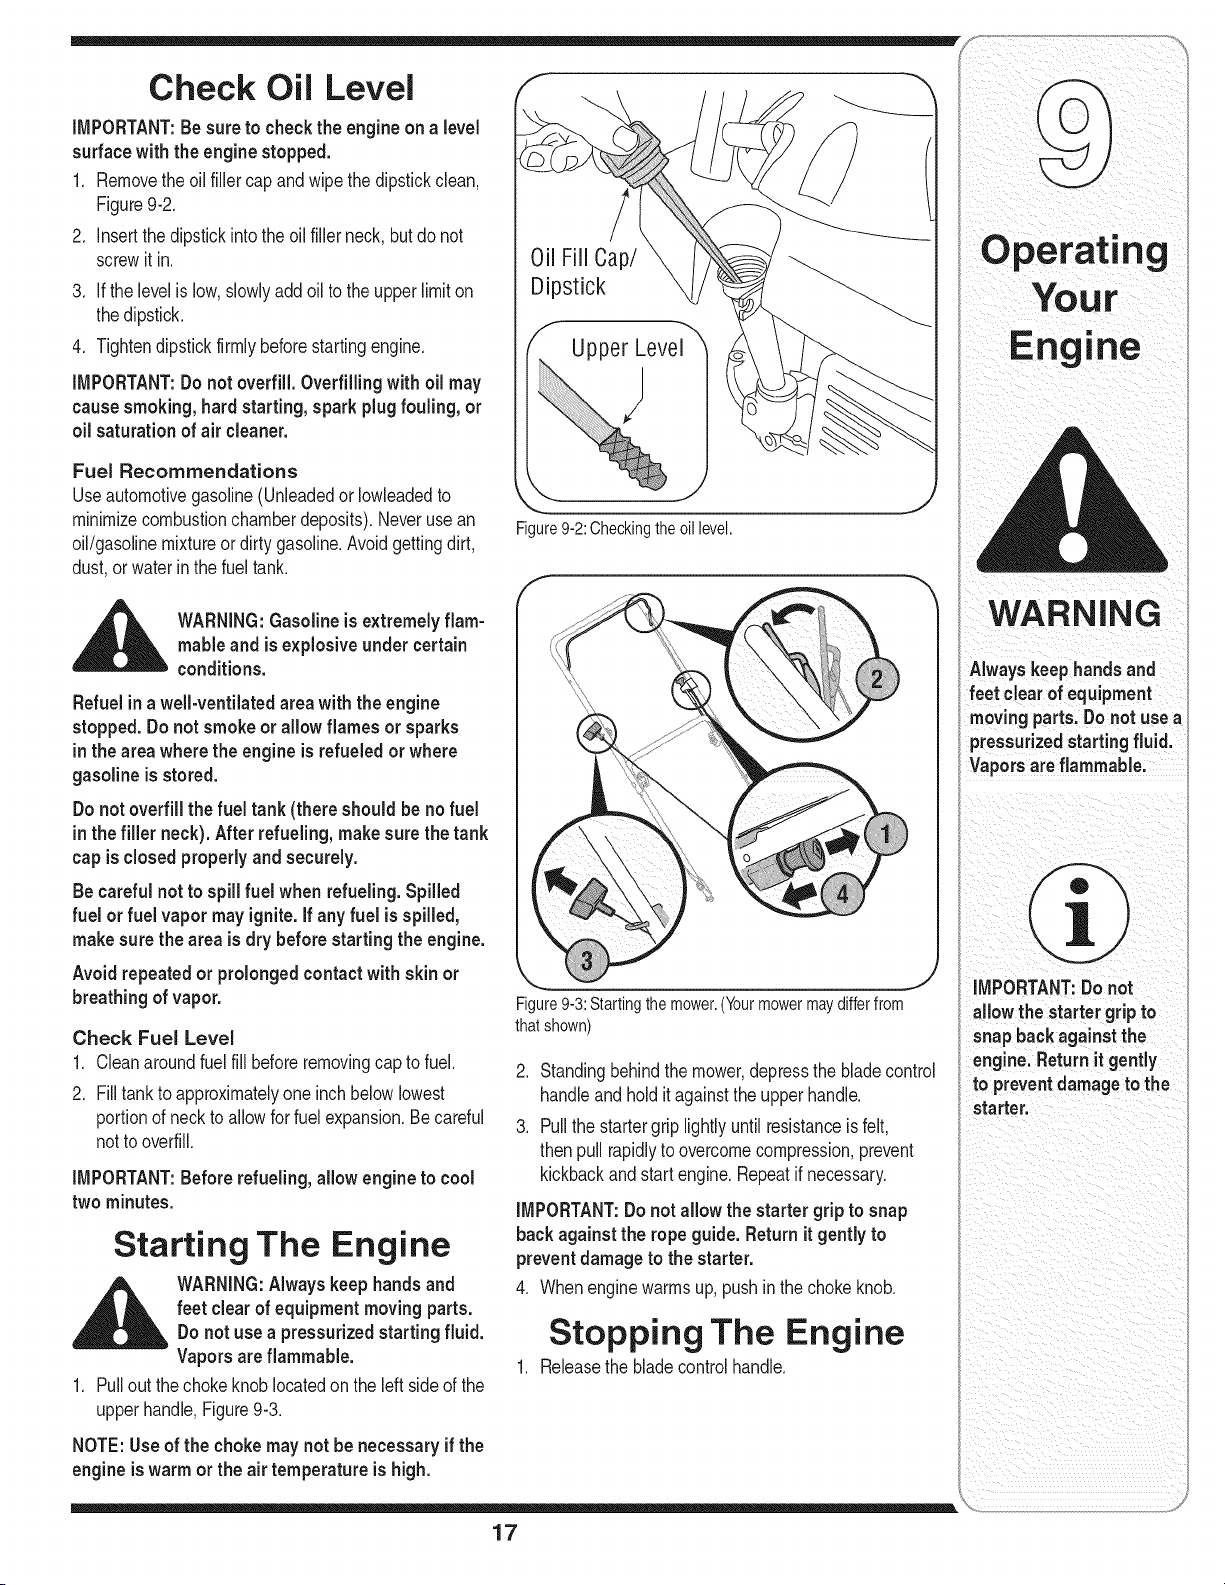
Check Oil Level
iMPORTANT:Be sure to checkthe engine on a level
surface with the engine stopped.
1. Removethe oil fillercap andwipethe dipstickclean,
Figure9-2.
Insertthe dipstickintothe oil fillerneck, butdo not
screwit in.
If the levelislow,slowlyaddoil to the upperlimit on
thedipstick.
4. Tightendipstickfirmlybeforestartingengine.
iMPORTANT:Donot overfill. Overfilling with oil may
causesmoking,hardstarting, spark plug fouling, or
oil saturation of air cleaner.
Fuel Recommendations
Useautomotivegasoline(Unleadedor Iowleadedto
minimizecombustionchamberdeposits).Neverusean
oil/gasolinemixtureor dirtygasoline.Avoidgettingdirt,
dust,or waterinthe fuel tank.
_ ARNING:Gasoline is extremelyflam-mableand is explosiveunder certain
conditions.
Refuel ina well-ventilatedarea with the engine
stopped. Do not smoke or allow flames or sparks
inthe areawhere the engine is refueledor where
gasoline is stored.
Donot overfill the fuel tank (there shouldbe no fuel
inthe filler neck). Afterrefueling, makesure the tank
cap isclosed properlyand securely.
Be careful not to spill fuel when refueling. Spilled
fuel or fuel vapor mayignite.If any fuel is spilled,
makesure the area is dry before starting the engine.
Avoidrepeatedor prolongedcontact with skin or
breathing of vapor.
Check Fuel Level
1. Cleanaroundfuelfill beforeremovingcap to fuel.
2. Filltankto approximatelyoneinchbelowlowest
portionof neckto allowfor fuelexpansion.Becareful
notto overfill.
iMPORTANT:Before refueling,allow engineto cool
two minutes.
Starting The Engine
_ ARNING:Alwayskeep hands and
feet clearof equipmentmoving parts.
Do not use a pressurizedstarting fluid.
Vapors are flammable.
1. Pullout thechokeknoblocatedon the left sideof the
upperhandle,Figure9-3.
NOTE: Useof the chokemaynot be necessary if the
engine is warm or the air temperature is high.
Figure9-2:Checkingthe oil level.
Figure9-3:Startingthe mower.(Yourmowermaydifferfrom
thatshown)
2. Standingbehindthe mower,depressthe bladecontrol
handleandhold itagainstthe upperhandle.
3. Pullthe startergrip lightlyuntil resistanceisfelt,
thenpull rapidlyto overcomecompression,prevent
kickbackandstartengine.Repeatif necessary.
iMPORTANT:Donot allow the startergrip to snap
back against the rope guide. Return it gently to
preventdamage to the starter.
4. Whenenginewarmsup, pushinthe choke knob.
Stopping The Engine
1. Releasethe bladecontrolhandle.
You r
WARNING
A!way keophandsaod
feet clear ofequipment
moving Parts, Do not usea
Pressurized starting fluid,
Vapors areflammable,
IMPORTANT:Do not
allow the starter grip to
snapback against the
engine. Returnit gently
....................
starter.
17
Shut off the engine
any maintenance;To
preventaccidental
start, upi disconnect
Beforetippingengine
or equipment to
drain oil, drain fuel
i
from tank by running
;ngine until fuel tank
; empty;
IMPORTANT
Be sure to check
engineon
surface with the engine
stopped: Drain the oil
while theengine iSstili
warm to assure rapid
and Completedraining:
i
_ ARNING:Shut off the engine before
performing any maintenance. To
prevent accidental start-up, disconnect
the spark plug boot.
IMPORTANT:Ifenginemustbe tippedto transport
equipmentorto inspector removegrass,keepspark
plugsideof engine up.Transportingor tippingengine
sparkplugdownmay causesmoking,hardstarting,
sparkplugfouling,or oil saturationof aircleaner.
Periodicinspectionandadjustmentof theengine is
essentialif highlevelperformanceis to bemaintained.
Regularmaintenancewillalso ensurea longservicelife.
The requiredserviceintervalsandthe kindof mainte-
nanceto be performedare describedin thetable below.
Followthe hourlyor calendarintervals,whicheveroccur
first.Morefrequentserviceis requiredwhenoperatingin
adverseconditions.
f
Tasks
ChangeEngine
Oil
Service Air
Cleaner
Service Spark
Plug
CleanAround
Muffler
Eachuseor
every5 hours
First5 hours
v"
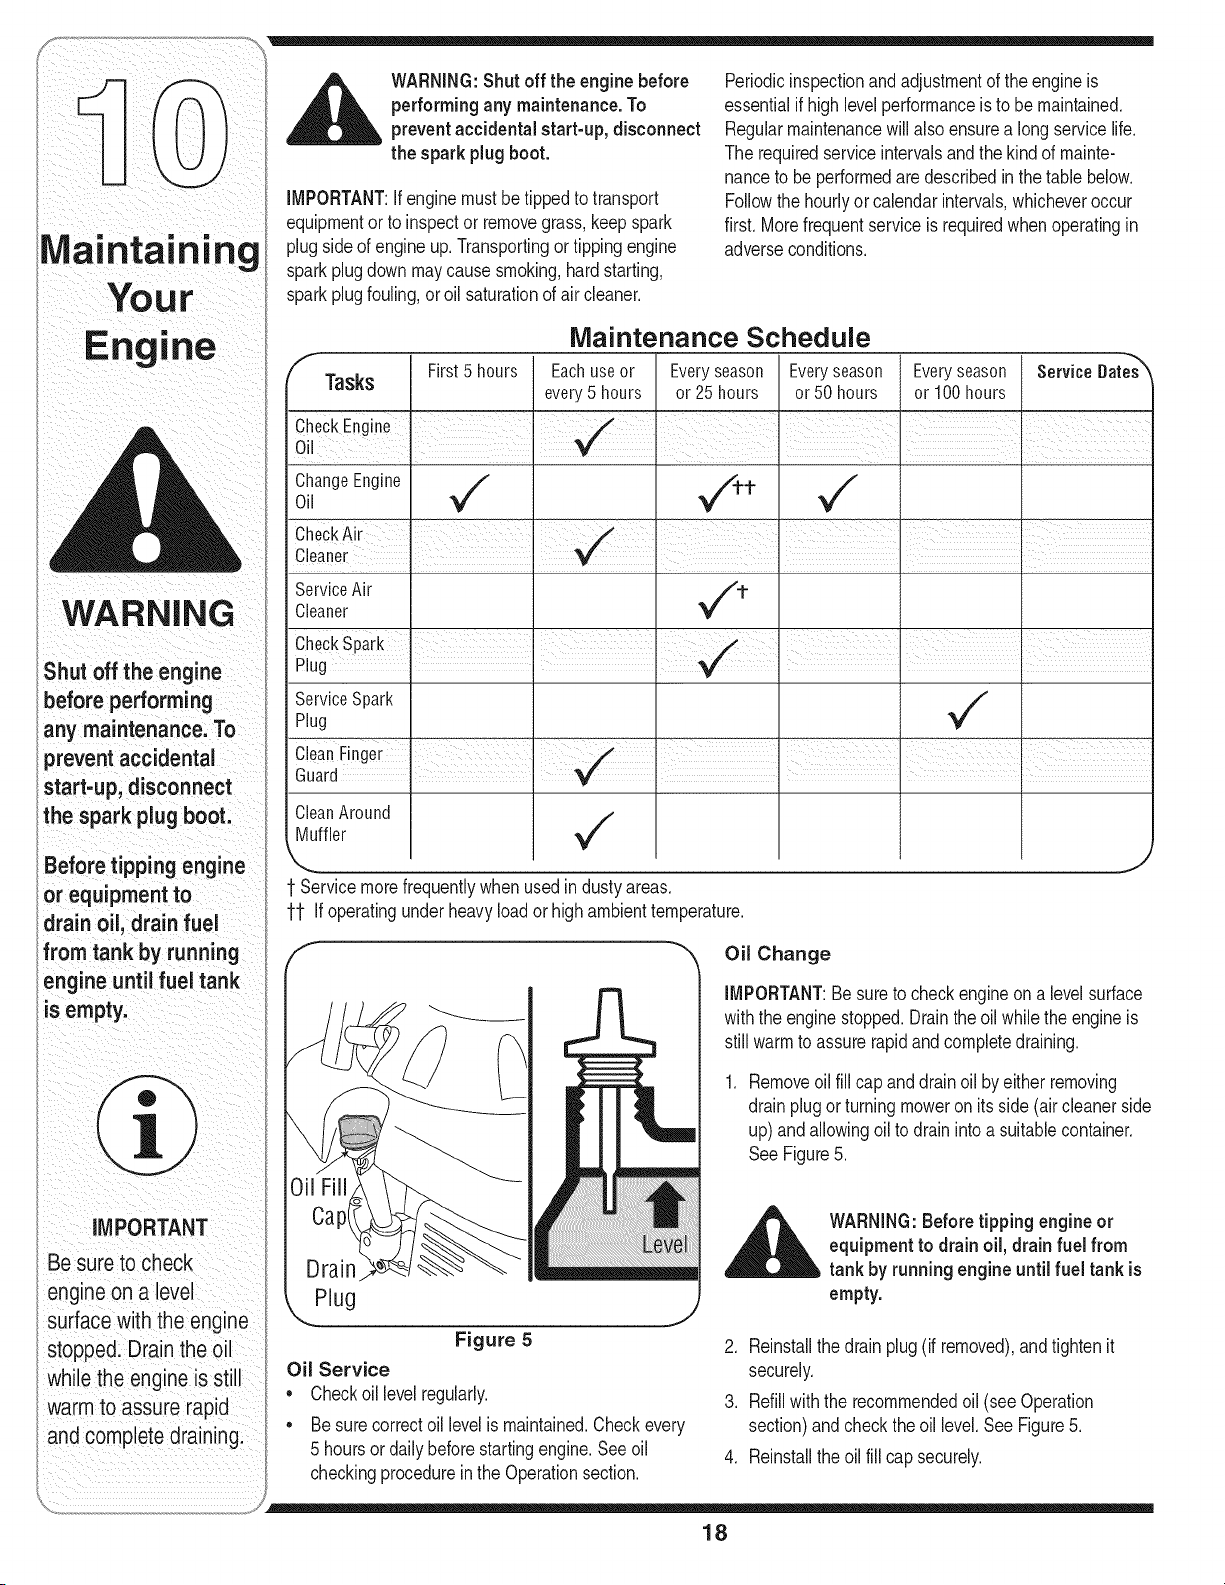
Maintenance Schedule
Everyseason Everyseason
or 25 hours or 50hours
1 Servicemorefrequentlywhenusedindustyareas.
ff Ifoperatingunder heavyloador highambienttemperature.
Everyseason
or 100hours
v"
v"
ServiceDates_
Plug
Oil Change
IMPORTANT:Be sureto checkengineona level surface
withthe enginestopped.Drainthe oil whilethe engine is
stillwarmto assurerapidandcompletedraining.
Removeoilfill cap and drain oil by eitherremoving
drainplugor turningmoweron itsside (air cleanerside
up)and allowingoil to drainintoa suitablecontainer.
SeeFigure5.
__IL WARNING:Before tipping engineor
equipmentto drain oil, drain fuel from
tank by runningengineuntil fuel tank is
empty.
Figure 5
Oil Service
• Checkoil levelregularly.
• Be sure correctoil levelis maintained.Checkevery
5 hoursordaily beforestartingengine.Seeoil
checkingprocedurein the Operationsection.
2. Reinstallthe drainplug(if removed),and tightenit
securely.
3. Refillwiththe recommendedoil (see Operation
section)andcheckthe oil level.See Figure5.
4. Reinstallthe oilfill cap securely.
18
IMPORTANT:Usedmotoroil may causeskin cancer
if repeatedlyleft in contactwith the skin for prolonged
periods.Althoughthis is unlikelyunlessyou handleused
oilon a dailybasis,it is still advisableto thoroughlywash
yourhandswithsoapand wateras soon as possible
afterhandlingusedoil.
NOTE:Pleasedisposeof usedmotoroil in a mannerthat
is compatiblewiththe environment.We suggestyoutake
it in a sealedcontainerto yourlocal servicestationfor
reclamation.Donot throwit inthe trash or pourit on the
ground.
Air Cleaner Service
Adirty aircleanerwill restrictair flow to the carburetor.
Topreventcarburetormalfunction,servicethe air cleaner
regularly.Servicemorefrequentlywhenoperatingthe
enginein extremelydustyareas.
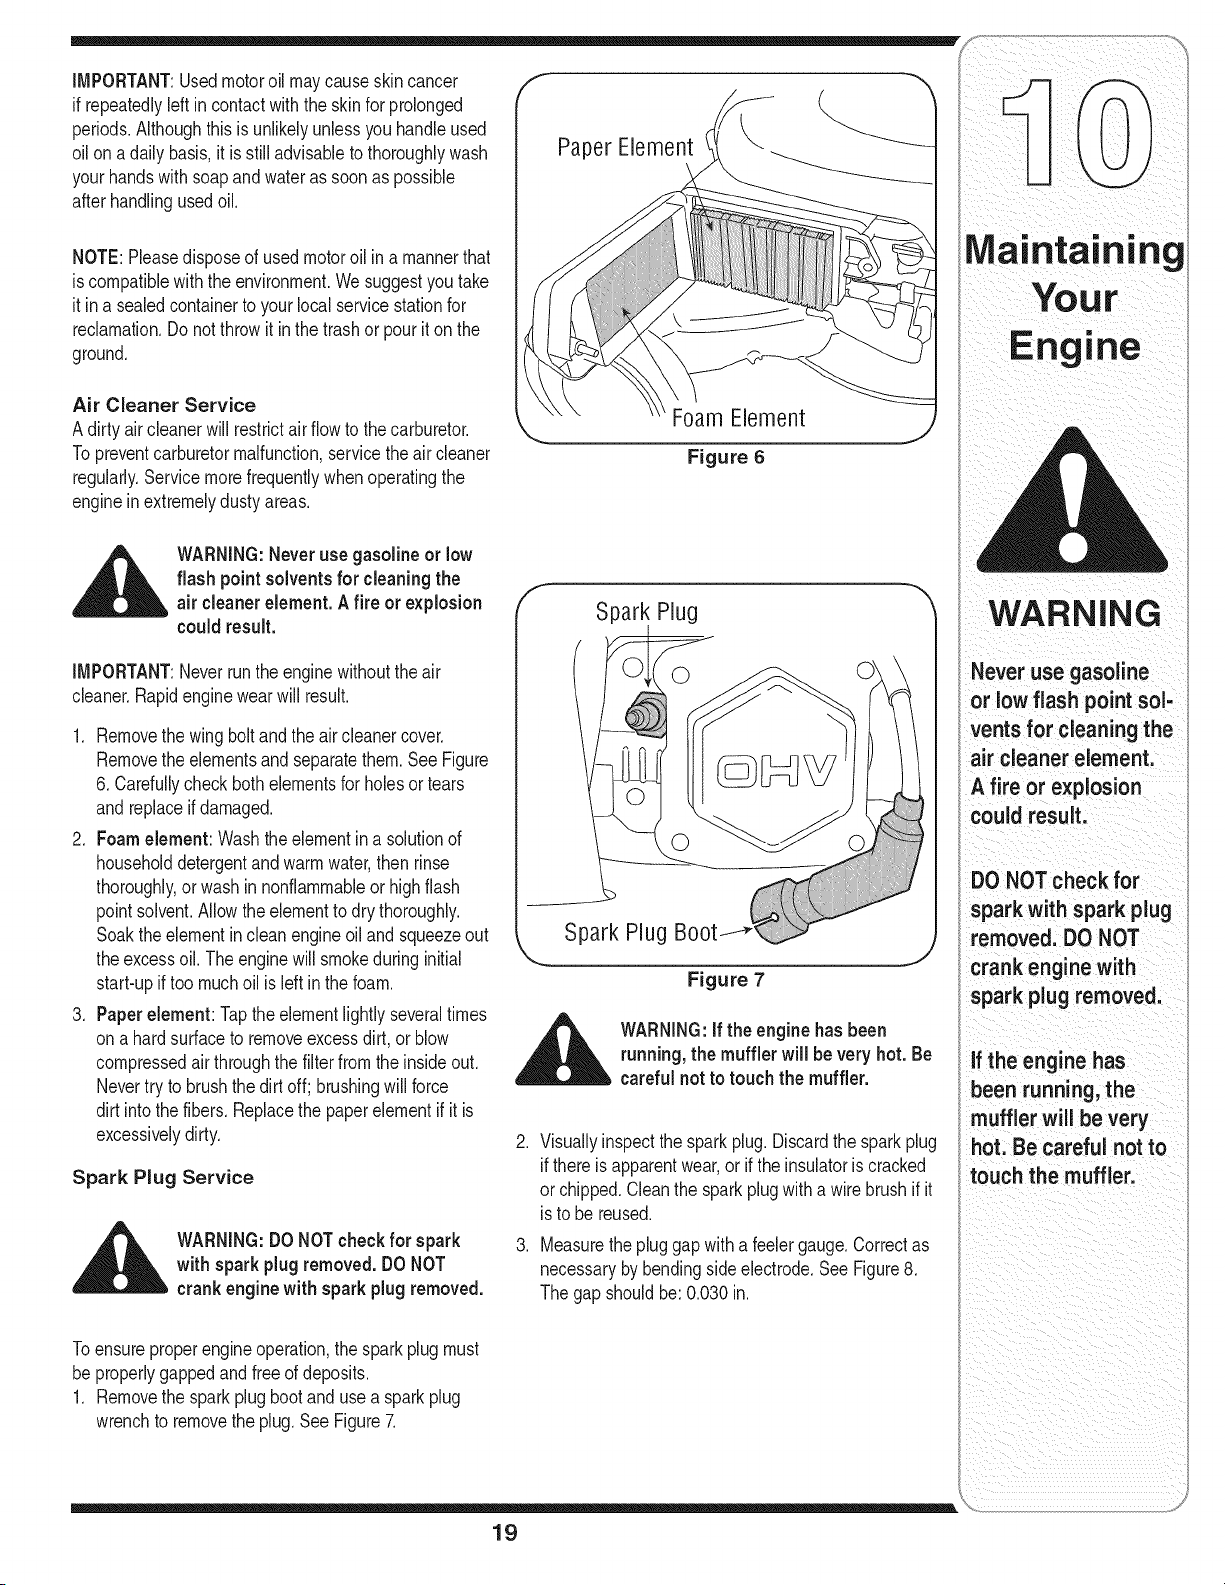
PaperElement
Foam
Figure 6
_ ARNING:Neveruse gasolineor low
flash pointsolventsfor cleaningthe
air cleanerelement. A fire or explosion
couldresult.
IMPORTANT:Neverrunthe enginewithouttheair
cleaner.Rapidenginewearwill result.
1. Removethe wing boltandthe air cleanercover.
Removethe elementsand separatethem. See Figure
6. Carefullycheckbothelementsfor holesor tears
andreplaceif damaged.
2. Foamelement:Washtheelementin a solutionof
householddetergentandwarm water,then rinse
thoroughly,or washin nonflammableorhigh flash
pointsolvent.Allowtheelementto dry thoroughly.
Soakthe elementin cleanengineoil and squeezeout
theexcessoil. The enginewill smokeduringinitial
start-upif too muchoil is left in the foam.
3. Paperelement: Taptheelementlightly severaltimes
ona hardsurfaceto removeexcessdirt, or blow
compressedair throughthe filterfrom the insideout.
Nevertry to brushthedirt off; brushingwillforce
dirt intothe fibers.Replacethe paperelementif it is
excessivelydirty.
Spark Plug Service
__IL ARNING:DO NOTcheckfor spark
with spark plugremoved.DONOT
crank engine with spark plug removed.
Figure 7
,_ WARNING:if the engine hasbeen
running,the muffler will be very hot. Be
careful not to touch the muffler.
2. Visuallyinspectthe spark plug.Discardthe sparkplug
ifthereis apparentwear,or ifthe insulatoriscracked
orchipped.Cleanthe sparkplug with a wirebrushif it
isto be reused.
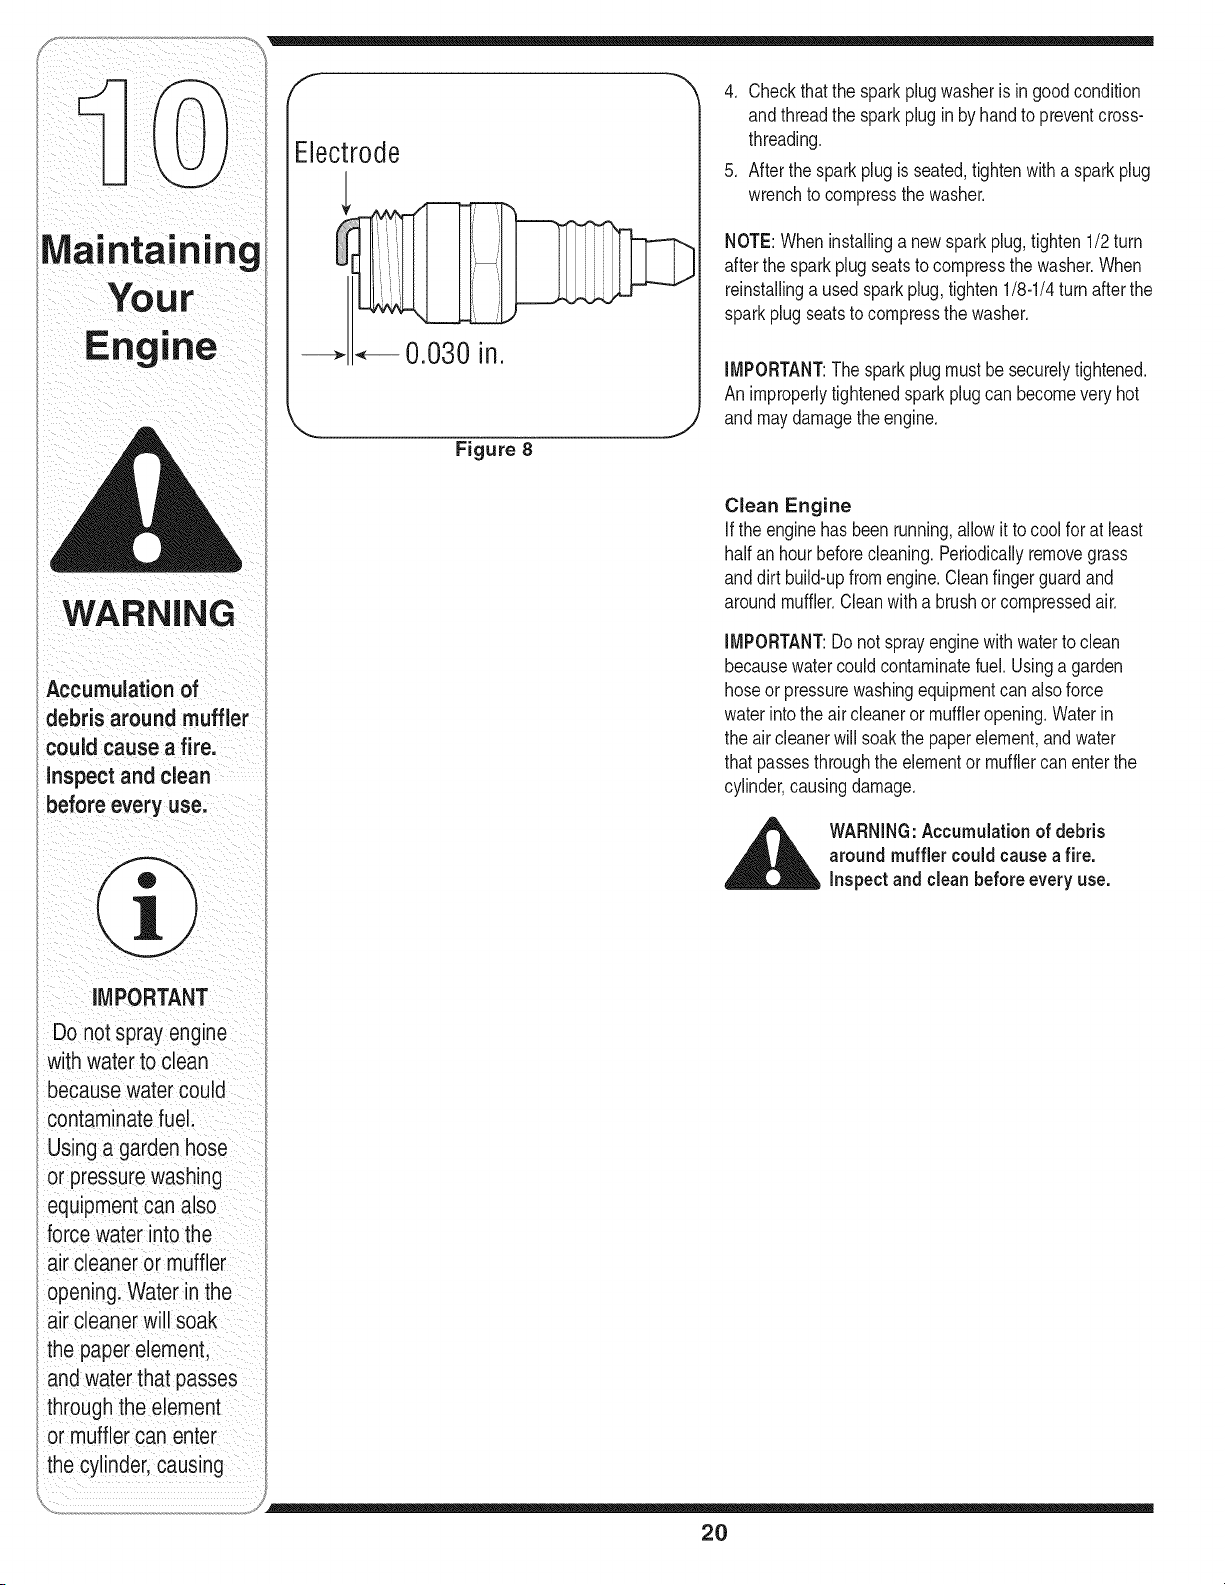
3. Measurethe pluggapwith a feelergauge.Correctas
necessaryby bendingsideelectrode.See Figure8.
Thegapshouldbe: 0.030in.
Toensureproperengineoperation,the sparkplugmust
be properlygappedand freeof deposits.
1. Removethe sparkplugbootand use a sparkplug
wrenchto removethe plug. SeeFigure7.
19
WARNING
Never use gasoline
or low flash point sol-
vents for cleaning the
air cleaner element.
A fire or explosion
could result.
DO NOTcheck for
spark with spark plug
removed. DO NOT
crank engine with
spark plug removed.
if the engine has
been running, the
muffler will be very
hot. Be careful not to
touch the muffler.
WARNING
Accumulationof
debrisaround muffler
Couldcauseafire.
inspect and
iMPORTANT
Donotsprayengine
with water tOclean
because Watercould
contaminate fuel:
Using a garden hose
or pressurewashing
equipmentcan also
force water into the
aircleaner Ormuffler
oPeninglWater in the
air cleaner Willsoak
the paper elemenL
and water that passes
through the element
or muffler Can enter
i
the cylinderi causing
f
Electrode
,, ,, 0.030 in.
J
Figure 8
4. Checkthatthe sparkplugwasheris in goodcondition
andthreadthe sparkplug in byhand to preventcross-
threading.
5. Afterthe sparkplug is seated,tightenwith a spark plug
wrenchto compressthe washer.
NOTE:Wheninstallinga newsparkplug,tighten1/2turn
afterthe sparkplug seatsto compressthe washer.When
reinstallinga usedsparkplug, tighten1/8-1/4turnafterthe
sparkplugseatsto compressthe washer.
IMPORTANT:The sparkplug mustbe securelytightened.
Animproperlytightenedsparkplugcan becomevery hot
andmay damagetheengine.
Clean Engine
If the enginehas beenrunning,allowit to coolfor at least
half anhour beforecleaning.Periodicallyremovegrass
anddirt build-upfrom engine.Cleanfingerguardand
aroundmuffler.Cleanwith a brushorcompressedair.
IMPORTANT: Do not spray engine with water to clean
because water could contaminate fuel. Using a garden
hose or pressure washing equipment can also force
water into the air cleaner or muffler opening. Water in
the air cleaner will soak the paper element, and water
that passes through the element or muffler can enter the
cylinder, causing damage.
_ ARNING:Accumulationof debris
around muffler could cause a fire.
Inspect and clean before every use.
20
Storage
Enginesstoredover30 daysneedto be drainedof fuel
to preventdeteriorationandgumfrom formingin fuel
systemoron essentialcarburetorparts. If the gasolinein
yourenginedeterioratesduringstorage,you mayneed to
havethecarburetor,andotherfuel systemcomponents,
servicedor replaced.
1. Removeall fuel fromtank by runningengineuntil it
stopsfromlack of fuel.
2. Changeoil. SeeOilChangesection.
3. Removesparkplugand pour about 1/2an ounceof
engineoil intocylinder.Replacesparkplugand crank
slowlyto distributeoil.
4. Cleangrassanddebrisfrom aroundengine,under
fingerguard,and under,aroundand behindmuffler.
Touchupanydamagedpaint,and coat other areas
thatmay rust with a lightfilmof oil.
5. Storeina clean,dryand well ventilatedarea away
fromany appliancethat operateswith a flameor
pilot light,suchas a furnace,waterheater,or clothes
dryer.Alsoavoidanyareawith a sparkproducing
electricmotor,orwherepowertoolsare operated.
6. If possible,alsoavoidstorageareaswith highhumid-
ity,becausethatpromotesrust and corrosion.
7. Keepthe enginelevelin storage.Tiltingcan cause
fuelor oil leakage.
Removing From Storage
1. Checkyour engineas describedinthe Pre-Operation
Checksectionof this manual.
2. If thefuel wasdrainedduringstoragepreparation,fill
thetankwith fresh gasoline.If you keepa container
of gasolinefor refueling,makecertainitcontainsonly
freshfuel.Gasolineoxidizesand deterioratesover
time,causinghardstarting.
3. If thecylinderwascoatedwithoil duringstorage
preparation,the enginewill smokebriefly at startup.
Thisis normal.
21
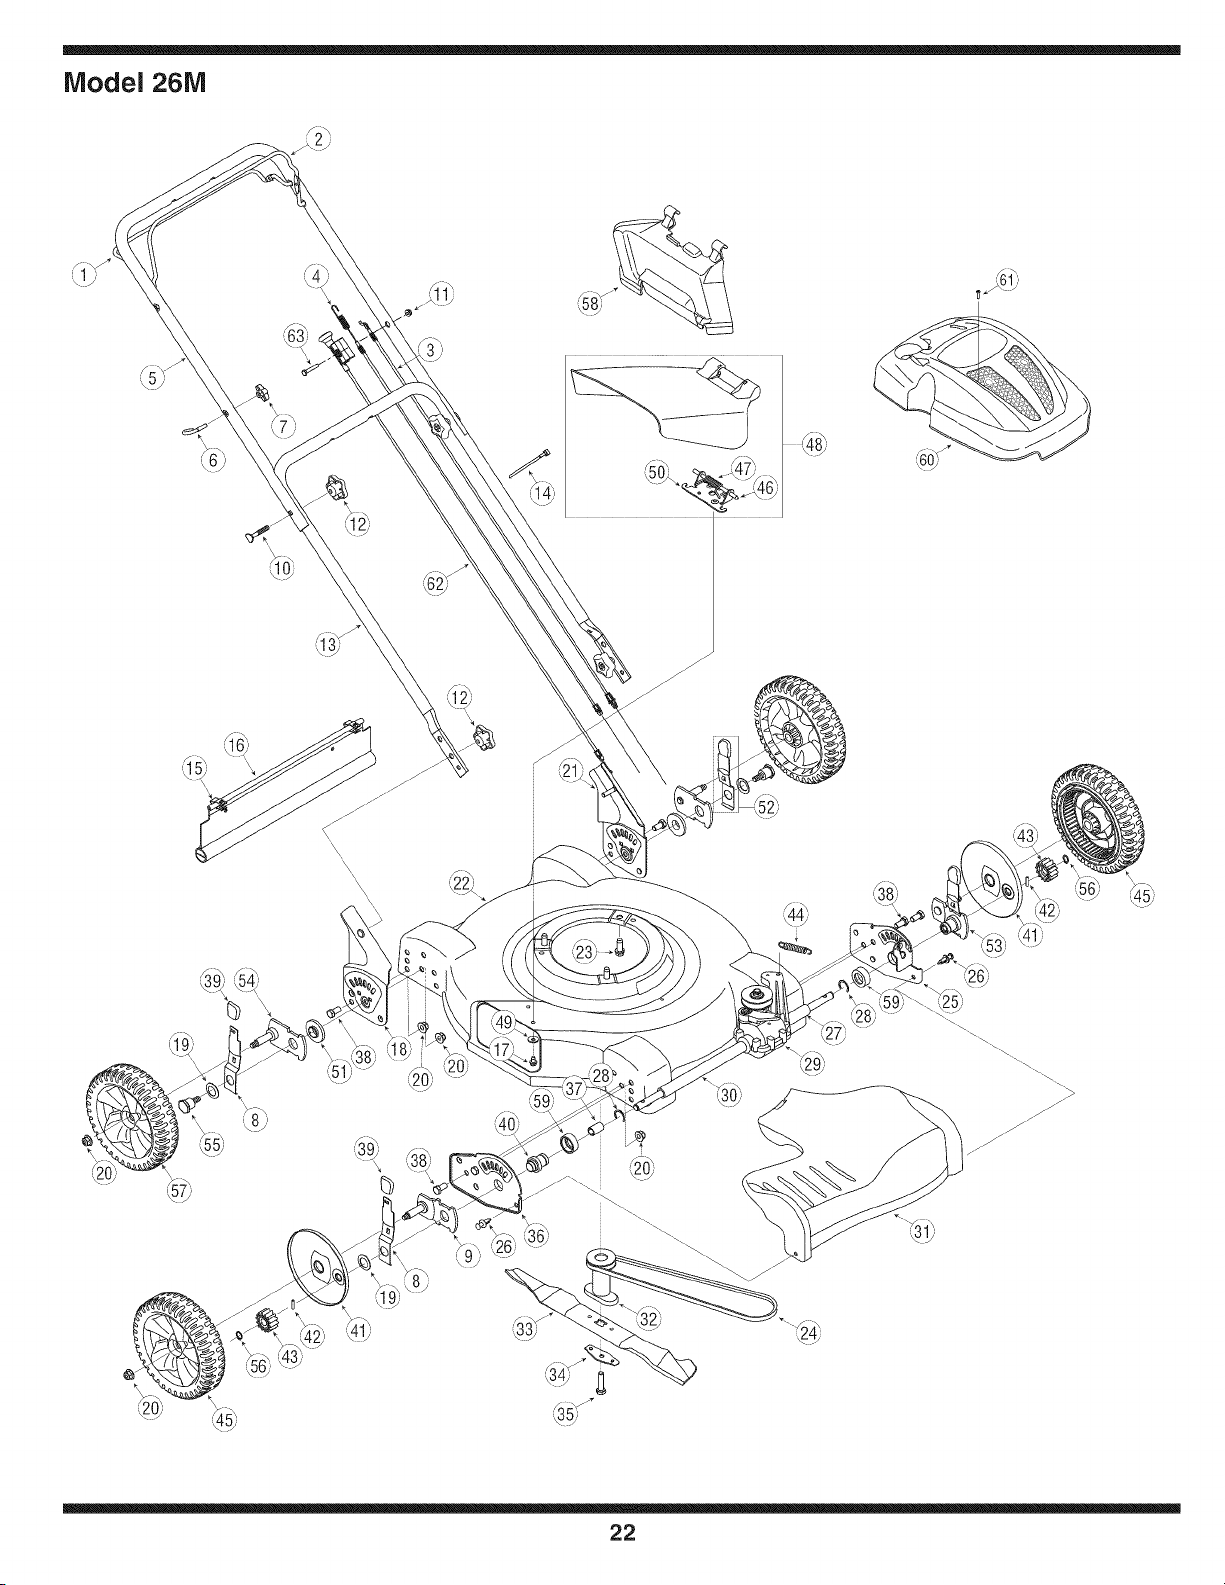
Model 261Vl
) _
J
\\
"\\
'_\\\\\
\
i
J"\_ i
jJ \\_.\
.J
j_
_J
iL41J --_-,
22
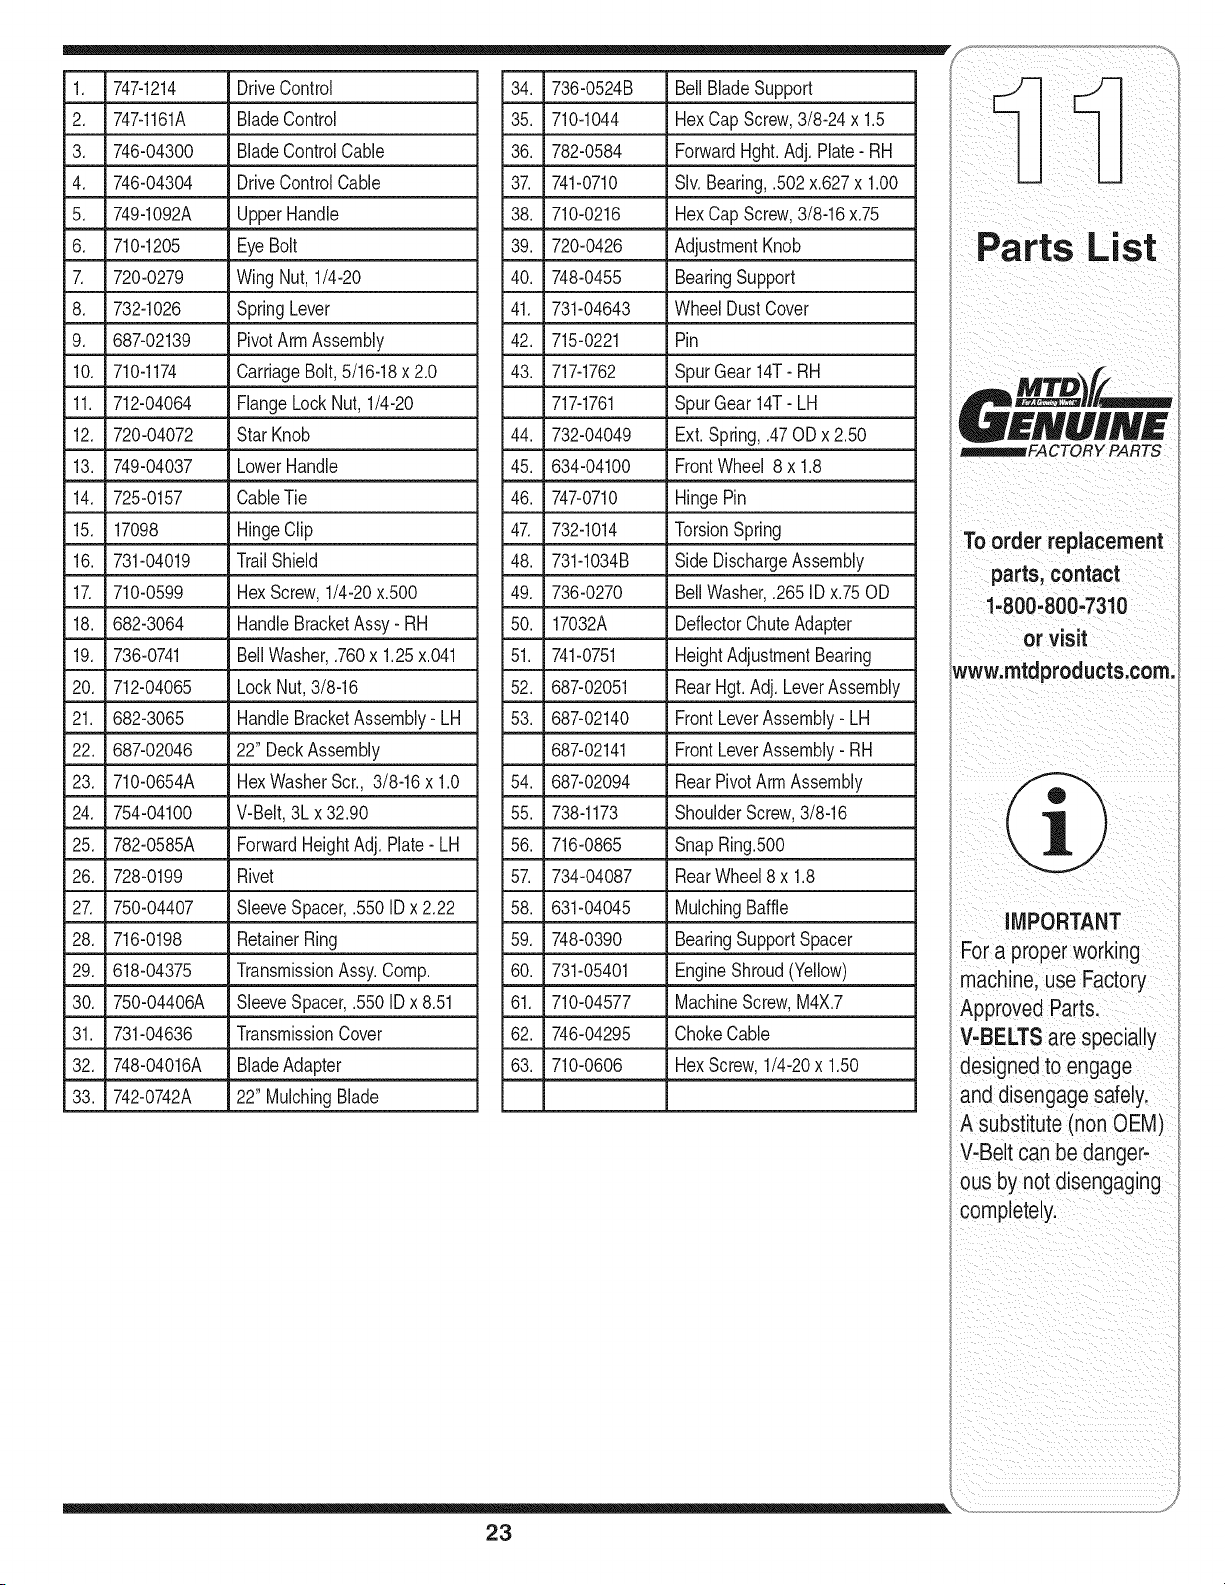
1. 747-1214 DriveControl
2. 747-1161A BladeControl
3. 746-04300 BladeControlCable
4. 746-04304 DriveControlCable
5. 749-1092A UpperHandle
6. 710-1205 EyeBolt
7. 720-0279 WingNut, 1/4-20
8. 732-1026 SpringLever
9. 687-02139 PivotArm Assembly
10. 710-1174 CarriageBolt, 5/16-18x 2.0
11. 712-04064 FlangeLockNut,1/4-20
12. 720-04072 Star Knob
13. 749-04037 LowerHandle
14. 725-0157 CableTie
15. 17098 HingeClip
16. 731-04019 TrailShield
17. 710-0599 Hex Screw,1/4-20x.500
18. 682-3064 HandleBracketAssy- RH
19. 736-0741 Bell Washer,.760x 1.25x.041
20. 712-04065 LockNut,3/8-16
21. 682-3065 HandleBracketAssembly- LH
22. 687-02046 22" DeckAssembly
23. 710-0654A Hex WasherScr., 3/8-16x 1.0
24. 754-04100 V-Belt,3Lx32.90
25. 782-0585A ForwardHeightAdj. Plate- LH
26. 728-0199 Rivet
27. 750-04407 SleeveSpacer,.550ID x 2.22
28. 716-0198 RetainerRing
29. 618-04375 TransmissionAssy.Comp.
30. 750-04406A SleeveSpacer,.550IDx 8.51
31. 731-04636 TransmissionCover
32. 748-04016A BladeAdapter
33. 742-0742A 22" MulchingBlade
34. 736-0524B BellBlade Support
35. 710-1044 Hex CapScrew,3/8-24 x 1.5
36. 782-0584 ForwardHght.Adj. Plate- RH
37. 741-0710 Sly. Bearing,.502x.627x 1.00
38. 710-0216 Hex CapScrew,3/8-16x.75
39. 720-0426 AdjustmentKnob
40. 748-0455 BearingSupport
41. 731-04643 WheelDustCover
42. 715-0221 Pin
43. 717-1762 SpurGear 14T- RH
717-1761 SpurGear 14T- LH
44. 732-04049 Ext. Spring,.47ODx 2.50
45. 634-04100 FrontWheel 8 x 1.8
46. 747-0710 HingePin
47. 732-1014 TorsionSpring
48. 731-1034B SideDischargeAssembly
49. 736-0270 Bell Washer,.265IDx.75OD
50. 17032A DeflectorChuteAdapter
51. 741-0751 HeightAdjustmentBearing
52. 687-02051 RearHgt.Adj. LeverAssembly
53. 687-02140 FrontLeverAssembly- LH
687-02141 FrontLeverAssembly- RH
54. 687-02094 RearPivotArm Assembly
55. 738-1173 ShoulderScrew,3/8-16
56. 716-0865 Snap Ring.500
57. 734-04087 RearWheel8 x 1.8
58. 631-04045 MulchingBaffle
59. 748-0390 BearingSupportSpacer
60. 731-05401 EngineShroud(Yellow)
61. 710-04577 MachineScrew,M4X.7
62. 746-04295 ChokeCable
63. 710-0606 Hex Screw,1/4-20x 1.50
_FACTORY PARTS
iiii_i_ii__!_i!_II__i!i _:i_iiii_i!_il_i_
To order replacement
parts,contact
,8oo;8oo,731o
wwwimtdproduCts:com:
IMPORTANT
For a proper working
machine, use Factory
Approved Parts.
V-BELTS are specially
designedto engage
and disengage safely.
A substitute (non OEM)
V-Belt can be danger-
ous by not disengaging
completely.
23
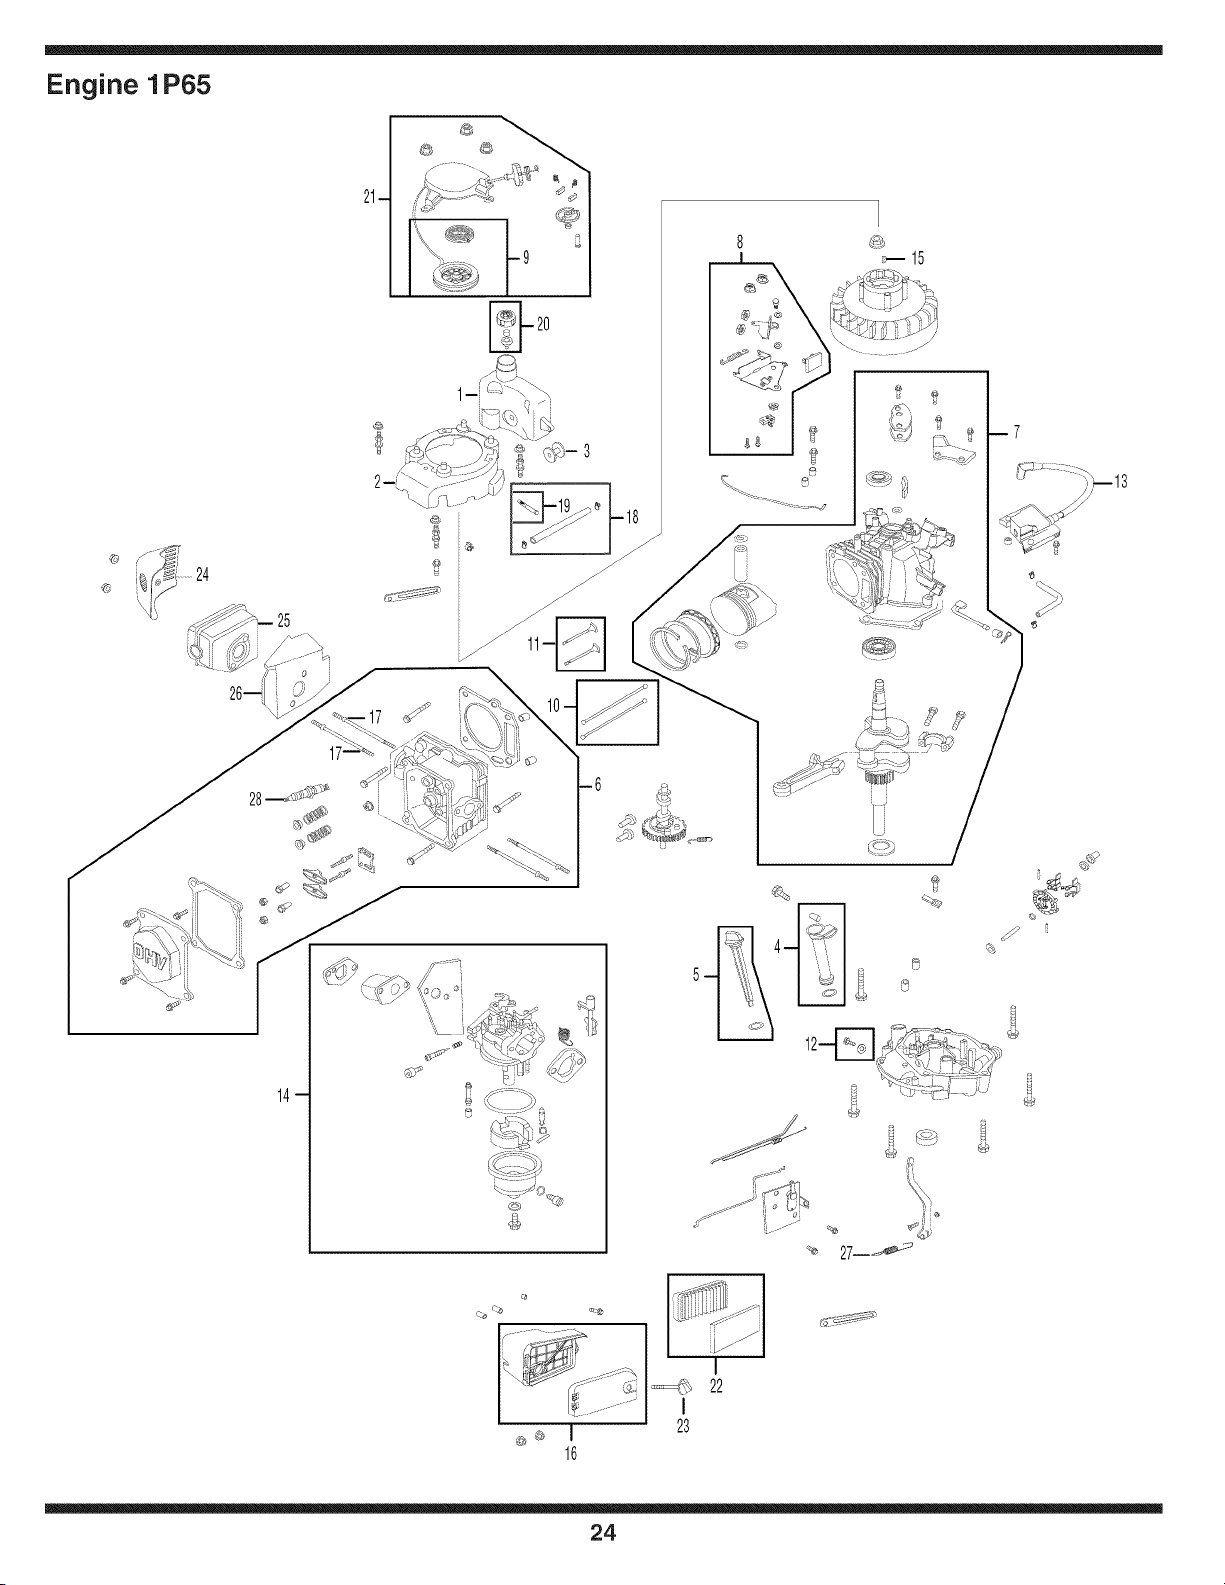
Engine 1P65
........24
@
25
21-
@
17
o
--7
14-
8
iJ
Q
24
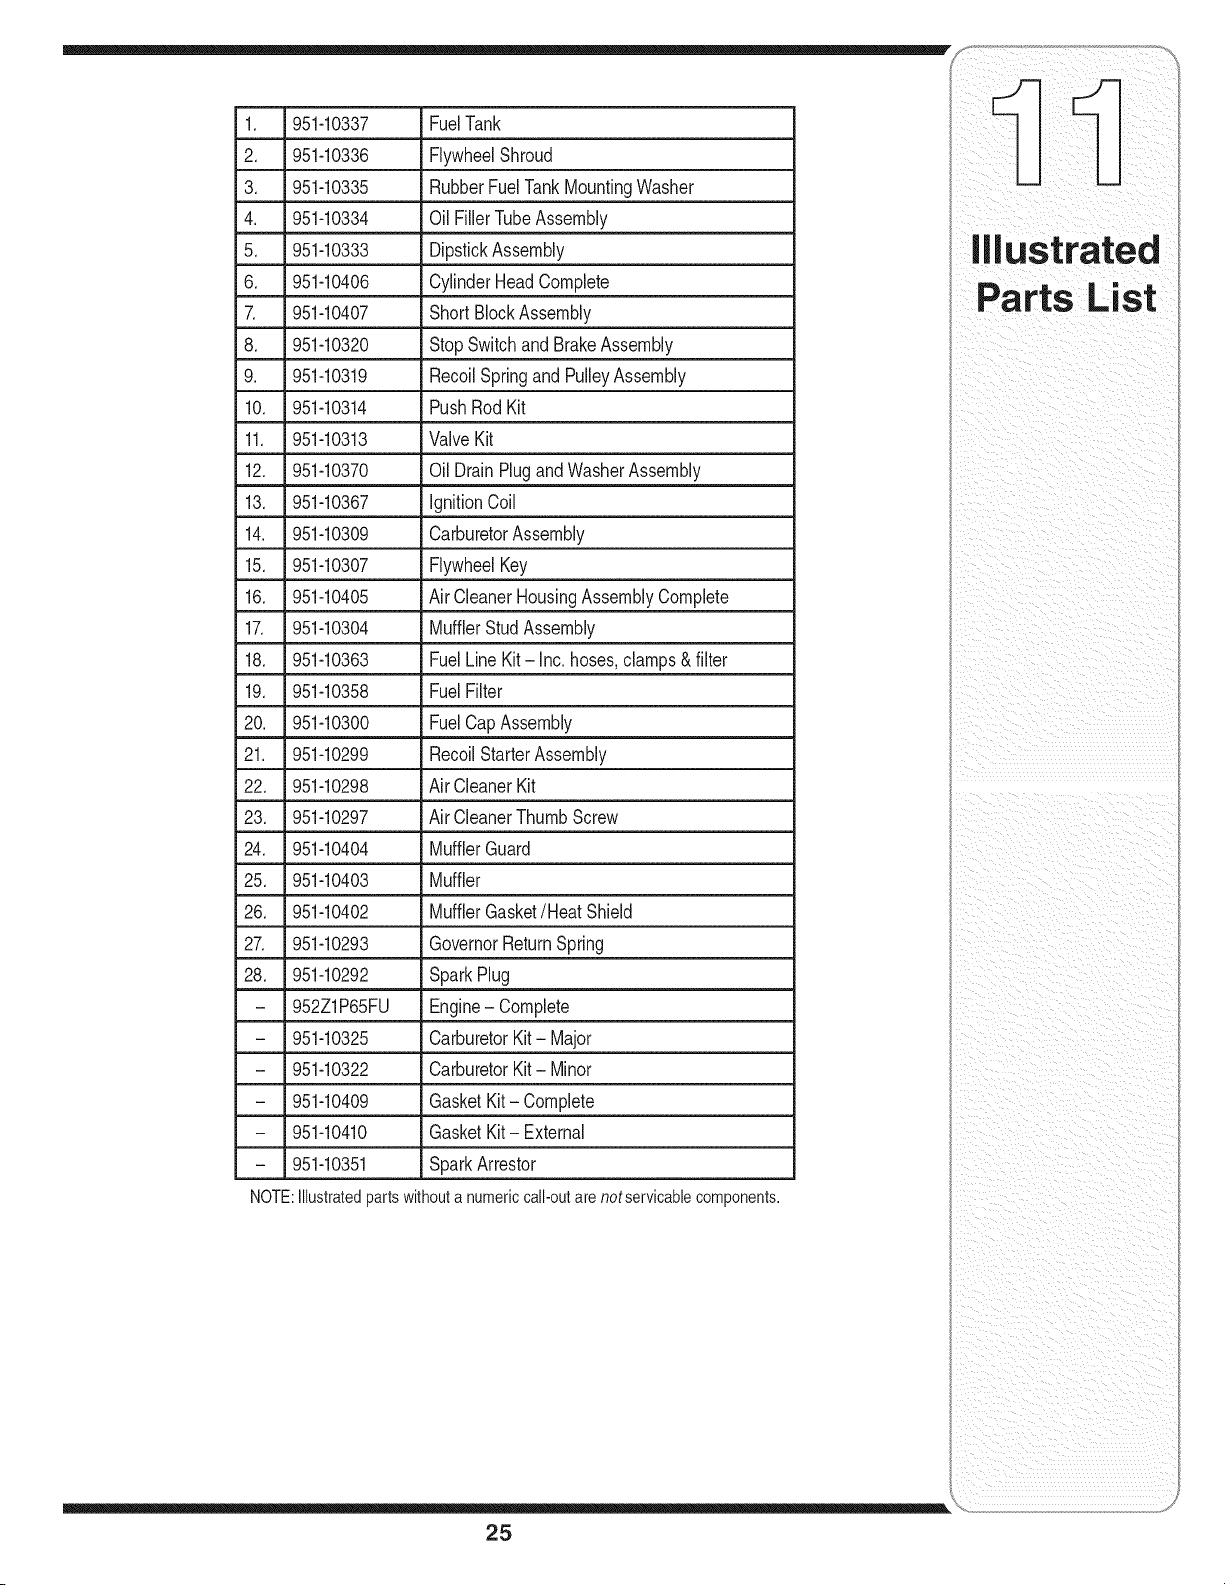
1. 951-10337 FuelTank
2. 951-10336 FlywheelShroud
3. 951-10335 RubberFuelTankMountingWasher
4. 951-10334 Oil FillerTubeAssembly
5. 951-10333 DipstickAssembly
6. 951-10406 CylinderHeadComplete
7. 951-10407 Short BlockAssembly
8. 951-10320 Stop Switchand BrakeAssembly
9. 951-10319 RecoilSpringandPulleyAssembly
10. 951-10314 PushRod Kit
11. 951-10313 ValveKit
12. 951-10370 Oil DrainPlugandWasherAssembly
13. 951-10367 IgnitionCoil
14. 951-10309 CarburetorAssembly
15. 951-10307 FlywheelKey
16. 951-10405 Air CleanerHousingAssemblyComplete
17. 951-10304 MufflerStudAssembly
18. 951-10363 FuelLineKit- Inc. hoses,clamps& filter
19. 951-10358 FuelFilter
20. 951-10300 FuelCap Assembly
21. 951-10299 RecoilStarterAssembly
22. 951-10298 Air CleanerKit
23. 951-10297 Air CleanerThumbScrew
24. 951-10404 MufflerGuard
25. 951-10403 Muffler
26. 951-10402 MufflerGasket/Heat Shield
27. 951-10293 GovernorReturnSpring
28. 951-10292 SparkPlug
- 952Z1P65FU Engine- Complete
- 951-10325 CarburetorKit- Major
- 951-10322 CarburetorKit- Minor
- 951-10409 GasketKit- Complete
- 951-10410 GasketKit- External
- 951-10351 SparkArrestor
NOTE:Illustratedpartswithouta numericcall-outarenotservicablecomponents.
x x
ii i _iI_ ii
25
MTD LLC (MTD), The United States Environment Protection Agency (U. S. EPA)
Emission Control System Warranty Statement
(Owner's Defect Warranty Rights and Obligations)
The U.S. EPAandMTDare pleasedto explaintheemissionscontrolsystemwarrantyon your modelyear2005and latersmalloff-roadengine.
Newsmalloff-roadenginesmust be designed,built and equippedto meet the stringentanti-smogstandards.MTDmustwarrantytheemission
controlsystemonyour enginefor the periodof time listed below,providedthere hasbeen no abuse,neglector impropermaintenanceof your small
off-roadengine.
Youremissioncontrolsystemmay includepartssuchas the carburetor,air cleaner,ignitionsystem,exhaustsystem,and otherassociatedemis-
sion-relatedcomponents.
Wherea warrantableconditionexists,MTDwill repairyour smalloff-roadengineat no cost to yourincludingdiagnosis,parts and labor.
MANUFACTURER'S WARRANTY COVERAGE:
Thisemissionscontrolsystemiswarrantedfor twoyears.If anyemission-relatedparton your engineisdefective,the partwill be repairedor
replacedby MTD.
OWNER'S WARRANTY RESPONSiBiLiTiES:
As the smalloff-roadengineowner,youare responsiblefor the performanceof the requiredmaintenancelistedinyourOwner'sManual.MTD
recommendsthat you retainall your receiptscoveringmaintenanceson yoursmall off-roadengine,but MTDcan notdenywarrantysolelyfor the
lackof receiptsor for yourfailureto ensurethe performanceto all scheduledmaintenance.
As the smalloff-roadengineowner,youshouldhoweverbeawarethat MTDmaydenyyour warrantycoverageifyoursmall off-roadengineor part
hasfaileddue to abuse,neglect,impropermaintenanceor unapprovedmodifications.
Youare responsiblefor presentingyoursmalloff-roadengineto an AuthorizedMTDServiceDealeras soonas a problemexists.The warranted
repairsshouldbe completedina reasonableamountof time,notto exceed30 days.
If youhaveanyquestionsregardingyour warrantyrightsand responsibilities,you shouldcontact a MTDServiceRepresentativeat 1-800-800-7310
andaddressisMTDLLC, EO. Box361131,ClevelandOH,44136-0019.
DEFECTS WARRANTY REQUIREMENTS FOR 1995 AND LATER SMALL OFF=ROAD ENGINES:
Thissectionappliesto 1995and latersmalloff-roadengines.Thewarrantyperiod beginson the datetheengine or equipmentisdeliveredto an
ultimatepurchaser.
(a) GeneralEmissionsWarrantyCovera_
MTDmustwarrantto the ultimatepurchaserandeachsubsequentpurchaserthat the engineis:
(1)Designed,built,and equippedso as to conformwith all applicableregulationsadoptedbythe Air ResourcesBoardpursuantto itsauthorityin
Chapters1and 2,Part 5, Division26 of the Healthand SafetyCode;and
(2) Freefromdefectsinmaterialsandworkmanshipthat causethe failureof a warrantedpartto be identicalinall materialrespectsto the part as
describedinthe enginemanufacturer'sapplicationfor certificationfor a periodof two years.
.(b)The warrantyonemissions-relatedpartswill be interpretedas follows:
(1)Anywarrantedpart thatisnot scheduledfor replacementas requiredmaintenanceinthe writteninstructionsrequiredby Subsection(c)
mustbewarrantedfor the warrantyperioddefinedinSubsection(a)(2). If anysuchpartfails during the periodof warrantycoverage,it mustbe
repairedor replacedby MTDaccordingto Subsection(4)below.Any suchpartrepairedor replacedunderthewarrantymustbewarrantedfor
the remainingwarrantyperiod.
(2)Any warrantedpartthat isscheduledonlyfor regularinspectioninthe writteninstructionsrequiredby Subsection(c) mustbe warrantedfor
thewarrantyperioddefinedin Subsection(a)(2).A statementinsuch writteninstructionsto the effect of "repairor replaceas necessary"will
not reducethe periodof warrantycoverage.Anysuch part repairedor replacedunderwarrantymustbe warrantedforthe remainingwarranty
period.
(3) Anywarrantedpartthat whichis scheduledfor replacementas requiredmaintenanceinthe writteninstructionsrequiredby Subsection(c)
mustbewarrantedfor the periodof timeprior to the first scheduledreplacementpointfor that part. If the partfails prior to the first scheduled
replacement,the part mustbe repairedor replacedby MTDaccordingto Subsection(4) below.Any such part repairedor replacedunder
warrantymustbewarrantedfor the remainderof the period priorto thefirst scheduledreplacementpointfor the part.
(4) Repairor replacementof any warrantedpart underthe warrantyprovisionsof thisarticlemustbe performedat no chargeto the ownerat a
warrantystation.
(5) Notwithstandingthe provisionsof Subsection(4)above,warrantyservicesor repairsmustbeprovidedat all MTDdistributioncentersthat
arefranchisedto servicethe subjectengines.
(6) Theownermustnot bechargedfordiagnosticlaborthatleadsto the determinationthata warrantedpart isinfact defective,providedthat
suchdiagnosticwork isperformedat a warrantystation.
EPA-1
(7)The enginemanufactureris liable fordamagesto otherenginecomponentsproximatelycausedbya failureunderwarrantyof anywarranted
part.
(8) Throughoutthe engine'swarrantyperioddefinedinSubsection(a)(2), MTDwill maintaina supplyof warrantedpartssufficientto meet the
expecteddemandfor such parts.
(9) Any replacementpart maybe usedin the performanceof any warrantymaintenanceor repairsandmustbe providedwithoutchargetothe
owner.Such usewill not reducethe warrantyobligationsof MTD.
(10)Add-onormodifiedparts that are not exemptedby theAir ResourcesBoardmaynot be used.The useof anynon-exemptedadd-onor
modifiedpartsshall begroundsfor disallowinga warrantyclaimmade in accordancewith this article.The enginemanufacturershall notbe
liableunderthis article to warrantfailuresof warrantedpartscausedby the useof non-exemptedadd-on or modifiedpart.
(c) MTDwill includea copyof the followingemissionwarrantypartslistwitheach newengine,usingthoseportionsof the list applicableto the
e__&gine.
(1)FuelMeteringSystem
• Coldstart enrichmentsystem(soft choke)
• Carburetorandinternalparts
• Fuel Pump
(2)Air InductionSystem
• Aircleaner
• Intakemanifold
(3) IgnitionSystem
• Sparkplug(s)
• MagnetoIgnitionSystem
(4)ExhaustSystem
(5) MiscellaneousItemsUsedinAboveSystem
• Vacuum,temperature,position,time sensitivevalvesand switches
• Connectorsandassemblies
EPA-1

MANUFACTURER'S LiMiTED WARRANTY FOR
The limitedwarrantyset forth belowisgivenby MTDLLCwith respectto
newmerchandisepurchasedandusedin the UnitedStates,itsposses-
sionsandterritories.
"MTD"warrantsthis productagainstdefectsin materialand workmanship
for a periodof two(2) yearscommencingon the dateof originalpurchase
andwill, at its option,repairor replace,free of charge,anypart foundto
bedefectivein materialsor workmanship.This limitedwarrantyshallonly
applyif this producthas beenoperatedandmaintainedin accordance
withthe Operator'sManualfurnishedwiththe product,and has not been
subjectto misuse,abuse,commercialuse,neglect,accident,improper
maintenance,alteration,vandalism,theft, fire,water,or damagebecause
of otherperilor naturaldisaster.Damageresultingfrom the installationor
useof any part,accessoryor attachmentnotapprovedby MTDfor use
withthe product(s)coveredbythis manualwill voidyourwarrantyas to
any resultingdamage.
Normalwearpartsarewarrantedto be free fromdefects in materialand
workmanshipfor a periodof thirty (30)days fromthe dateof purchase.
Normalwearpartsinclude,butare notlimitedto itemssuchas: batteries,
belts,blades,bladeadapters,grass bags, riderdeck wheels,seats, snow
throwerskidshoes,shaveplates,augerspiralrubberand tires.
HOWTO OBTAINSERVICE:Warrantyserviceis available,WITH
PROOFOF PURCHASE,throughyour localauthorizedservicedealer.To
locatethe dealerin yourarea,checkyourYellowPages,orcontactMTD
LLCat RO.Box 361131,Cleveland,Ohio44136-0019,or call 1-800-800-
7310or logon to our Website at www.mtdproducts.com.
Thislimitedwarrantydoesnot providecoverageinthe followingcases:
a. Log splitterpumps,valves,and cylindershavea separateone
yearwarranty.
b. Routinemaintenanceitemssuchas lubricants,filters, blade
sharpening,tune-ups,brakeadjustments,clutch adjustments,
deckadjustments,and normaldeteriorationof the exteriorfinish
dueto use or exposure.
c. Servicecompletedby someoneotherthanan authorizedservice
dealer.
d.
e.
f.
MTDdoes notextendany warrantyfor productssoldor
exportedoutsideof the UnitedStates,its possessionsand
territories,exceptthosesoldthroughMTD'sauthorized
channelsof exportdistribution.
Replacementpartsthat are not genuineMTDparts.
Transportationchargesand servicecalls.
No impliedwarranty, includingany impliedwarranty of merchant-
ability of fitness for a particularpurpose,applies after the applicable
periodof express written warranty above as to the partsas identi-
fied. No other express warranty, whether written or oral, except as
mentionedabove,given by any personor entity,includinga dealer
or retailer,with respect to any product,shallbind MTD.Duringthe
periodof the warranty, the exclusiveremedyis repairor replacement
of the productas set forth above.
The provisionsas setforth in this warrantyprovidethe sole and
exclusiveremedy arising from the sale. MTDshallnot be liable
for incidentalor consequentialloss or damage including,without
limitation, expensesincurredfor substituteor replacement lawn care
servicesor for rentalexpenses to temporarily replacea warranted
product.
Somestatesdo not allowtheexclusionor limitationof incidentalor
consequentialdamages,or limitationson howlonganimpliedwarranty
lasts,so the aboveexclusionsor limitationsmay notapplyto you.
In noeventshall recoveryof any kind be greaterthan theamountof the
purchasepriceof the productsold.Alterationof safety features of the
productshall void this warranty. Youassumethe riskandliabilityfor
loss, damage,or injuryto youandyour propertyand/orto othersand their
propertyarisingout of the misuseor inabilityto use theproduct.
Thislimitedwarrantyshall notextendto anyoneotherthanthe original
purchaseror to the personfor whomitwaspurchasedas a gift.
HOWSTATELAWRELATESTO THISWARRANTY: This limitedwar-
rantygivesyouspecificlegal rights,and you mayalso haveother rights
whichvary from stateto state.
IMPORTANT: OwnermustpresentOriginalProofof Purchaseto obtain
warrantycoverage.
MTD LLC, P.O. BOX 361131 CLEVELAND, OHIO 44136=0019; Phone: 1=800=800=7310