
MX-ST50B
FULL MANUAL
Imagine the possibilities
Thank you for purchasing this Samsung product.
To receive more complete service, please register
your product at www.samsung.com/register
ENG - ii
SAFETY INFORMATION
SAFETY WARNINGS
TO REDUCE THE RISK OF ELECTRIC SHOCK, DO
NOT REMOVE THE COVER (OR BACK).
NO USER-SERVICEABLE PARTS ARE INSIDE.
REFER SERVICING TO QUALIFIED SERVICE
PERSONNEL.
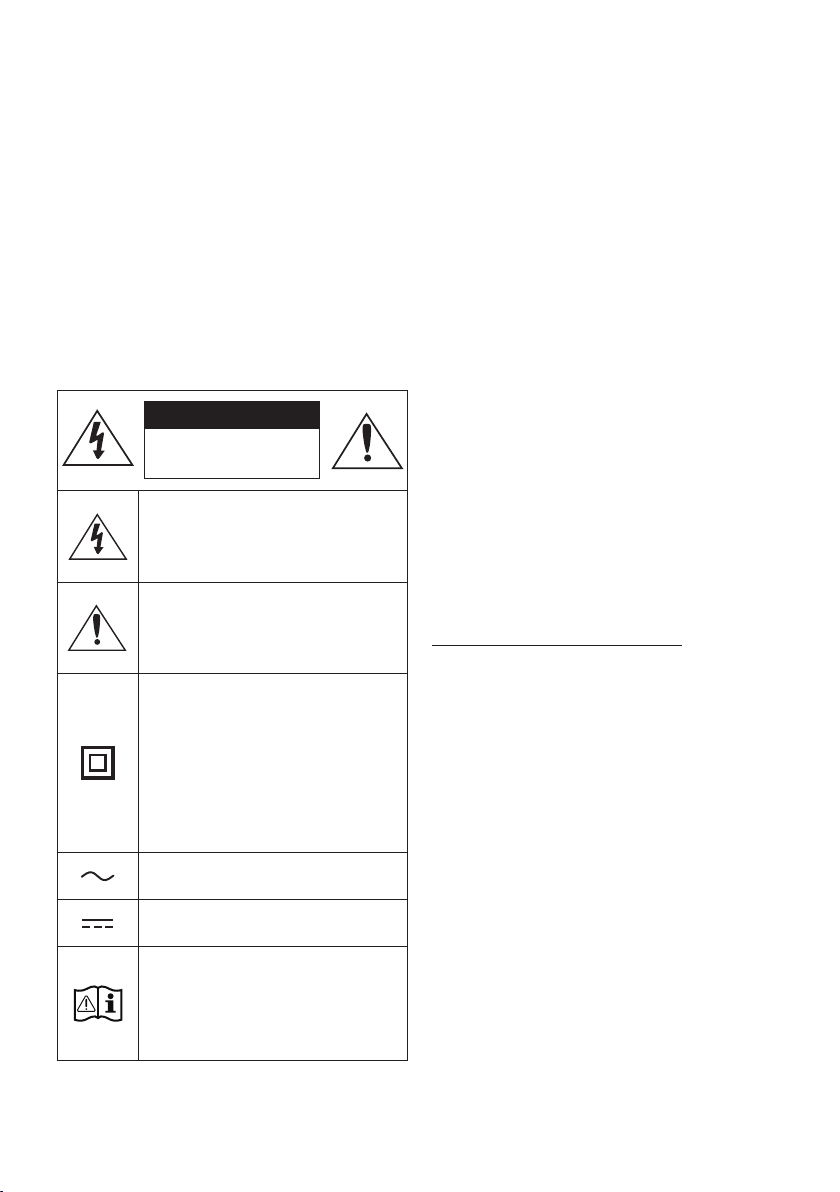
Refer to the table below for an explanation of
symbols which may be on your Samsung product.
CAUTION
RISK OF ELECTRIC SHOCK.
DO NOT OPEN.
This symbol indicates that high voltage
is present inside. It is dangerous to
make any kind of contact with any
internal part of this product.
This symbol indicates that this product
comes with important literature
concerning operation and maintenance.
Class II product : This symbol indicates
that a safety connection to electrical
earth (ground) is not required.
If this symbol is not present on a
product with a power cord, the product
MUST have a reliable connection to
protective earth (ground).
AC voltage : Rated voltage marked
with this symbol is AC voltage.
DC voltage : Rated voltage marked
with this symbol is DC voltage.
Caution. Consult Instructions for use :
This symbol instructs the user to
consult the user manual for further
safety related information.
WARNING
• To reduce the risk of re or electric shock, do
not expose this appliance to rain or moisture.
• This product contains chemicals known to the
State of California to cause cancer and birth
defects or other reproductive harm.
• The battery (battery or batteries or battery
pack) shall not be exposed to excessive heat
such as sunshine, re or the like.
CAUTION
• Do not expose this apparatus to dripping or
splashing. Do not put objects lled with
liquids, such as vases, on the apparatus.
• To turn this apparatus off completely, you
must pull the power plug out of the wall
socket. Consequently, the power plug must
be easily and readily accessible at all times.
CAUTION (for Canada)
This device contains licence-exempt
transmitter(s)/receiver(s) that comply with
Innovation, Science and Economic Development
Canada’s licence-exempt RSS(s). Operation is
subject to the following two conditions:
(1) This device may not cause interference.
(2) This device must accept any interference,
including interference that may cause undesired
operation of the device.
This device and its antenna(s) must not be co-
located or operation in conjunction with any other
antenna or transmitter.
This device may automatically discontinue
transmission if there is no information to
transmit, or an operational failure. Note that this
is not intended to prohibit the transmission of
control or signaling information or the use of
repetitive codes where required by the
technology.

ENG - iii
This Class B digital apparatus complies with
Canadian ICES-003.
Radiation Exposure Statement
This equipment complies with IC RSS-102
radiation exposure limits set forth for an
uncontrolled environment. This equipment should
be installed and operated with minimum distance
20 cm between the radiator & your body.
Important Safety Instructions
Read these operating instructions carefully
before using the unit. Follow all the safety
instructions listed below. Keep these operating
instructions handy for future reference.
1. Read these instructions.
2. Keep these Instructions.
3. Heed all warnings.
4. Follow all instructions.
5. Do not use this apparatus near water.
6. Clean only with dry cloth.
7. Do not block any ventilation openings.
Install in accordance with the manufacturer’s
instructions.
8. Do not install near any heat sources such as
radiators, heat registers, stoves, or other
apparatus (including ampliers) that produce
heat.
9. Do not defeat the safety purpose of the
polarized or grounding-type plug.
A polarized plug has two blades with one
wider than the other. A grounding type plug
has two blades and a third grounding prong.
The wide blade or the third prong are
provided for your safety. If the provided plug
does not t into your outlet, consult an
electrician for replacement of the obsolete
outlet.
10. Protect the power cord from being walked
on or pinched particularly at plugs,
convenience receptacles, and the point
where they exit from the apparatus.
11. Only use attachments/accessories specied
by the manufacturer.
12. Use only with the cart, stand,
tripod, bracket, or table
specied by the manufacturer,
or sold with the apparatus.
When a cart is used, use caution when
moving the cart/apparatus combination to
avoid injury from tip-over.
13. Unplug this apparatus during lightning
storms or when unused for long periods of
time.
14. Refer all servicing to qualied service
personnel. Servicing is required when the
apparatus has been damaged in any way,
such as power-supply cord or plug is
damaged, liquid has been spilled or objects
have fallen into the apparatus, the apparatus
has been exposed to rain or moisture, does
not operate normally, or has been dropped.
ENG - iv
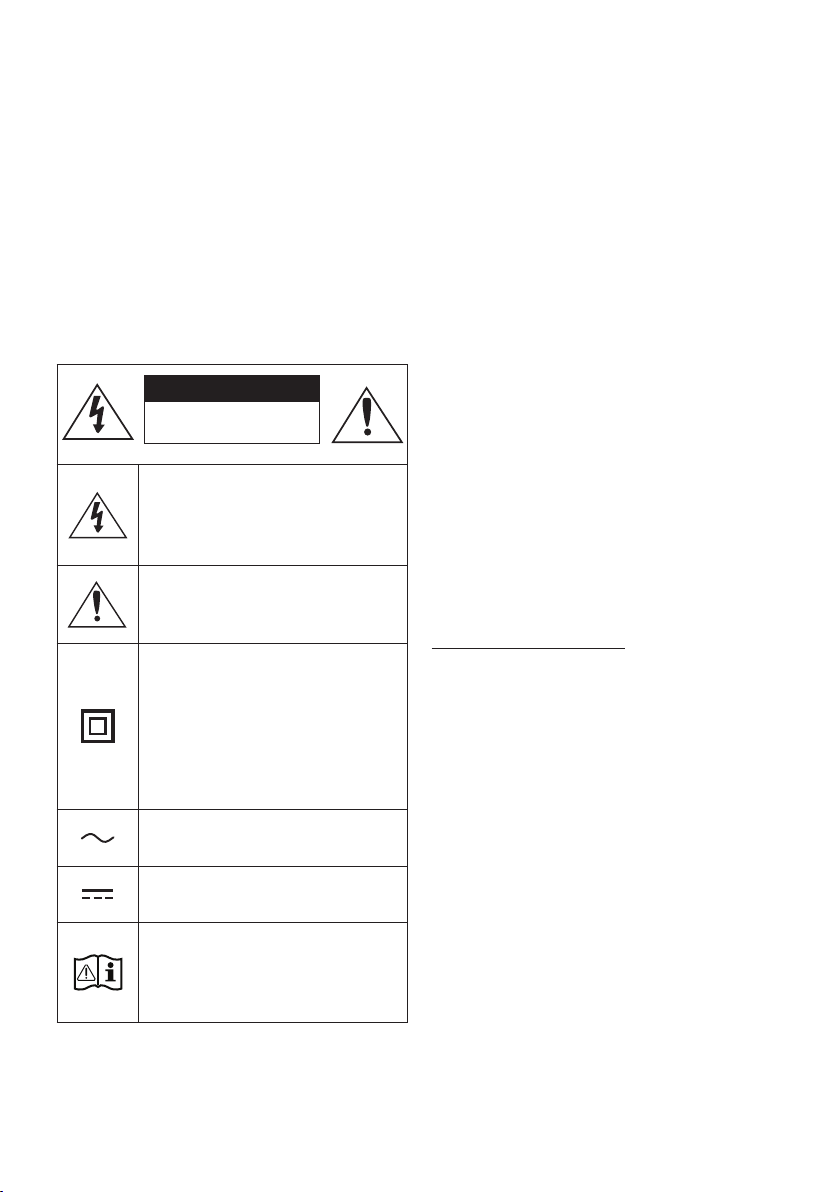
To avoid deterioration of water resistant
Check the following and use the unit correctly.
• Deformation or damage from dropping the
unit or subjecting it to mechanical shock may
cause deterioration of the water resistant.
• This unit does not have a design that is
resistant to water pressure. Use of the unit in
a location where high water pressure is
applied, such as in the shower, may cause a
malfunction.
• Do not pour high-temperature water or blow
hot air from a hair dryer or any other
applicance on the unit directly. Also never use
the unit in a place subject to high
temperatures, such as in a sauna or near a
heat source.
• Handle the cap with care. Port cover and AC
plug cover plays a very important role in
maintenance of the water resistant. When
using the unit, make sure that the cap is
closed completely. When closing the cap, be
careful not to allow foreign objects inside. If
the cap is not closed completely the water
resistant may deteriorate and may cause a
malfunction of the unit as a result of water
entering the unit.
• IPX5 cannot be met when any JACK or AC
power is plugged in.
• The product cannot be dumped to ensure it is
water resistant.
POWER
ECHOVOL
USB
(5V 2.1A)
AUX 1
MIC

ENG - v
• The Sound Tower provides durability by IPX5.
Protection against solids
IP
Protection against water
0 5
No requirements X X No requirements
No protection 0 0 No protection
Solids> 50 mm 1 1 Vertically falling water
Solids> 12 mm 2 2 Vertically water-enclosure tilted 15°
Solids> 2.5 mm 3 3 Sprayed water 60° from vertical
Solids> 1.0 mm 4 4 Splashed water from all directions
Dust Protected 5 5 Hosing jets from all directions
Dust tight 6 6 Strong hosing jets from all directions
- 7 Temporary Immersion: 1m for 30 minutes
- 8 Immersion: manufacture dened depth and time

ENG - vi
PRECAUTIONS
1. Ensure that the AC power supply in your
house complies with the power
requirements listed on the identication
sticker located on the rear of your product.
Install your product horizontally, on a
suitable base (furniture), with enough space
around it for ventilation (3~4 inches). Make
sure the ventilation slots are not covered. Do
not place the unit on ampliers or other
equipment which may become hot. This unit
is designed for continuous use.
To fully turn off the unit, disconnect the AC
plug from the wall outlet. Unplug the unit if
you intend to leave it unused for a long
period of time.
2. During thunderstorms, disconnect the AC
plug from the wall outlet. Voltage peaks due
to lightning could damage the unit.
3. Do not expose the unit to direct sunlight or
other heat sources. This could lead to
overheating and cause the unit to
malfunction.
4. Protect the product from moisture (i.e.
vases), and excess heat (e.g. a replace) or
equipment creating strong magnetic or
electric elds. Unplug the power cable from
the AC wall socket if the unit malfunctions.
Your product is not intended for industrial
use. It is for personal use only. Condensation
may occur if your product has been stored in
cold temperatures. If transporting the unit
during the winter, wait approximately
2 hours until the unit has reached room
temperature before using.
5. The battery used with this product contains
chemicals that are harmful to the
environment. Do not dispose of the battery
in the general household trash. Do not
expose the battery to excess heat, direct
sunlight, or re. Do not short circuit,
disassemble, or overheat the battery.
Danger of explosion if the battery is replaced
incorrectly. Replace only with the same or
equivalent type.
Others
• As the battery is manufactured only for this
product, do not use the battery for other
electronic appliances or other purposes.
• When discarding a dead battery, put it into a
battery collection box for recycling.
• Do not disassemble the battery.
• To protect the battery, the battery cannot be
charged when the temperature is lower than
3 °C or higher than 42 °C.
• When the battery level is low, recharge it. If
the level of the battery remains low for a long
period of time, it can cause the performance
of the battery to degrade.
• Do not apply heat to the battery and do not
put the battery in a re.
• Do not disassemble the battery.
• To protect the battery, the Sound Tower may
not operate when the temperature is lower
than -17 °C or higher than 57 °C.
ENG - vii
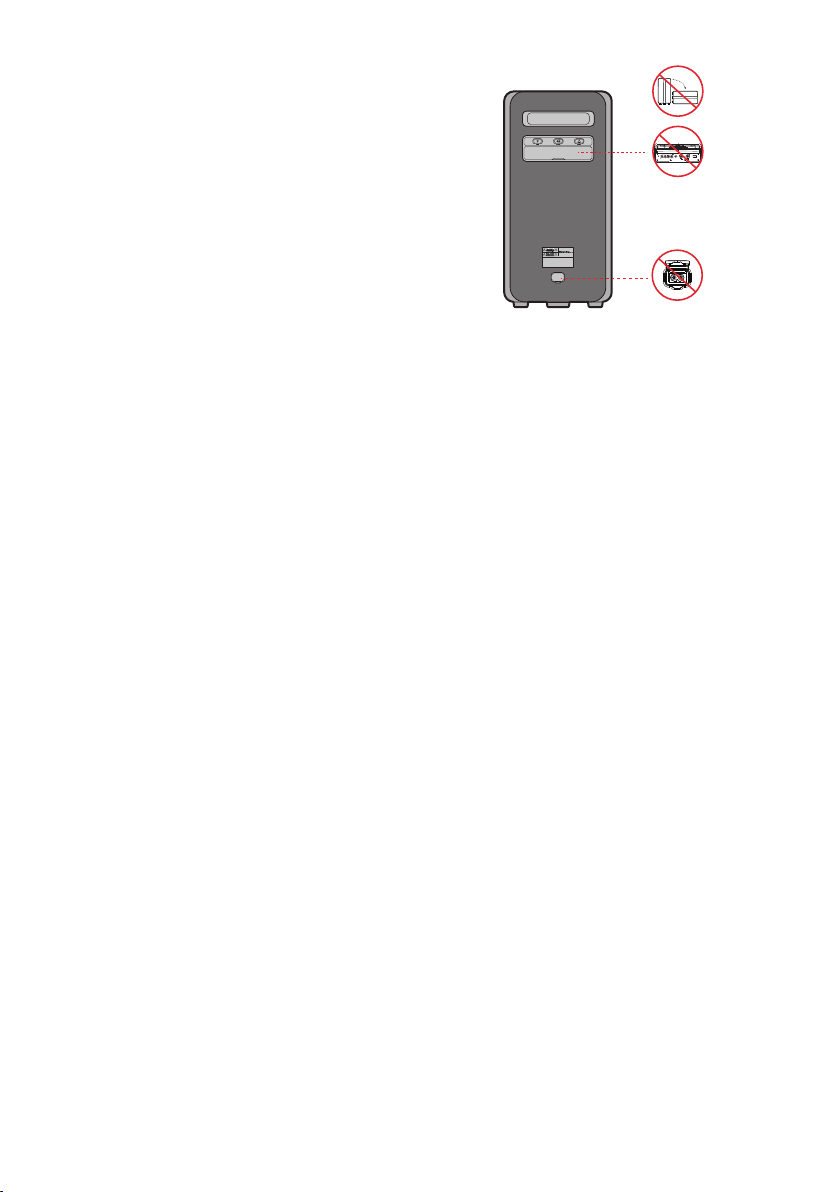
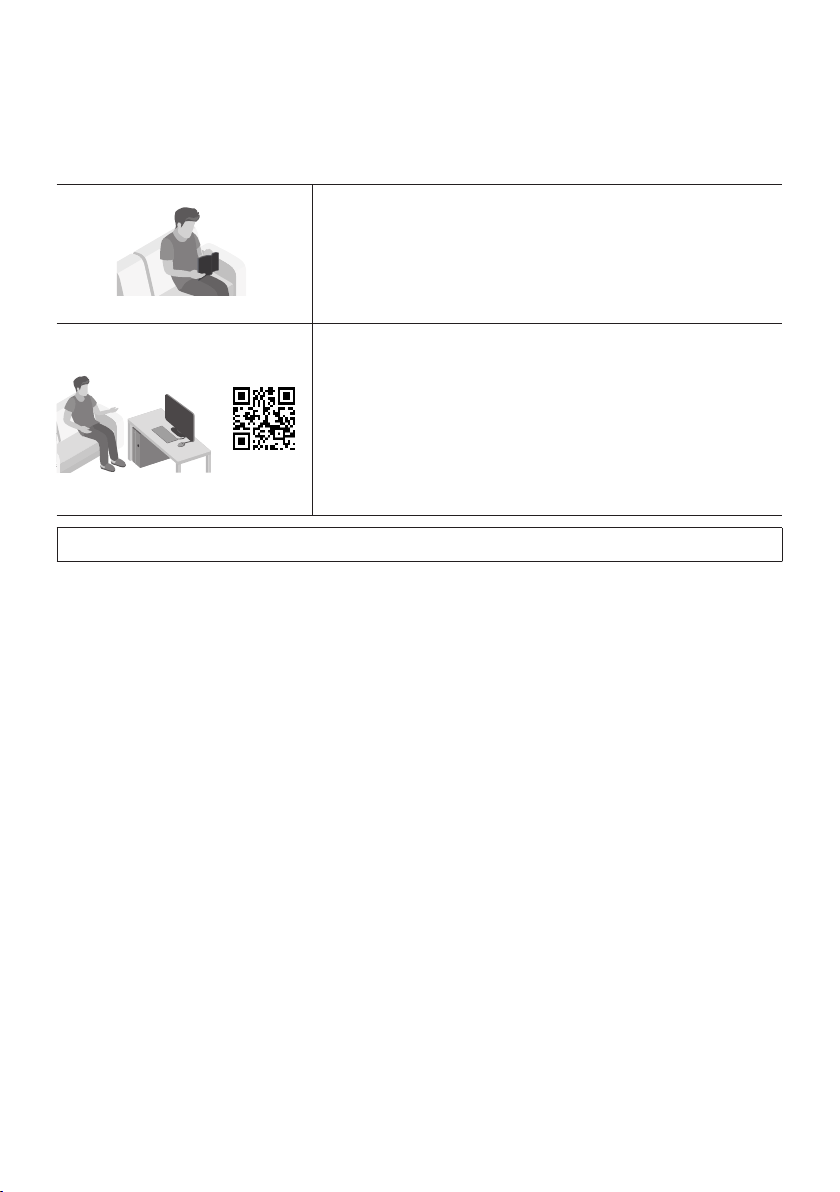
ABOUT THIS MANUAL
The user manual has two parts: this simple paper
USER MANUAL and a detailed FULL MANUAL you
can download.
USER MANUAL
See this manual for safety instructions, product installation,
components, connections, and product specications.
FULL MANUAL
You can access the FULL MANUAL on Samsung’s on-line
customer support center by scanning the QR code on the left.
To see the manual on your PC or mobile device, download the
manual in document format from Samsung’s website.
(https://www.samsung.com/us/support/downloads/)
Design and specications are subject to change without prior notice.

ENG - viii
CONTENTS
01 Checking the Components 1
Inserting Batteries before using the Remote Control
(AAA batteries X 2)
------------------------- 1
02 Product Overview 2
Top Panel of the Sound Tower
------------------------- 2
Rear Panel of the Sound Tower
------------------------- 3
03 Connecting the Sound Tower 5
Connecting Electrical Power
-------------------------
5
How to use Audio Group
-------------------------
6
04 Connecting an External Device 12
Connecting using an Analog Audio (AUX) Cable
-------------------------
12
Connecting a mobile device via Bluetooth
-------------------------
13
Connecting the Samsung TV via Bluetooth
-------------------------
16
05 Connecting a USB Storage Device 17
Software Update
-------------------------
18
Connecting an External Microphone
-------------------------
19
06 Using the Remote Control 20
How to Use the Remote Control
-------------------------
20
How to use Sound Mode
-------------------------
23
How to use the DJ Effect
-------------------------
24

ENG - ix
07 Using the Samsung Sound Tower App 25
Install Samsung Sound Tower App
-------------------------
25
Launching the Samsung Sound Tower App
-------------------------
25
08 Troubleshooting 26
09 License 27
10 Open Source License Notice 28
11 Important Notes About Service 28
12 SpecicationsandGuide 29
Specications
-------------------------
29
ENG - 1
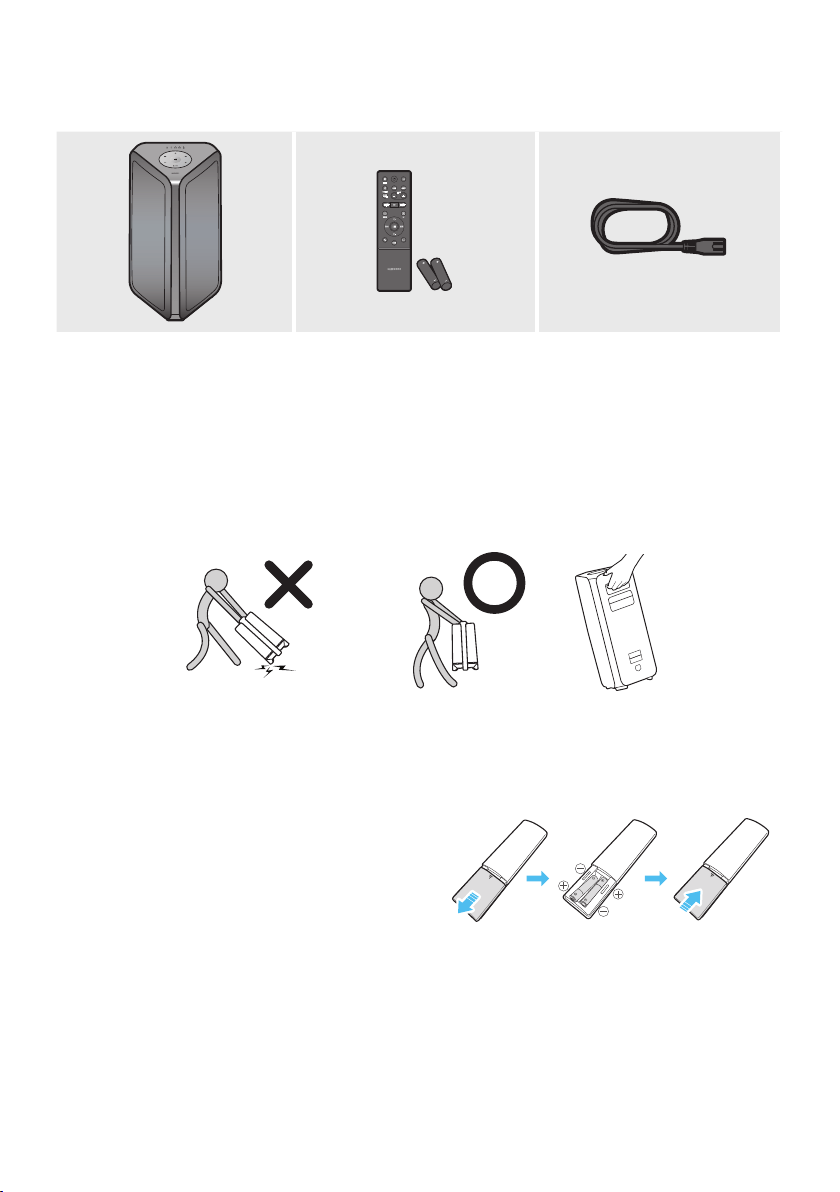
01 CHECKING THE COMPONENTS
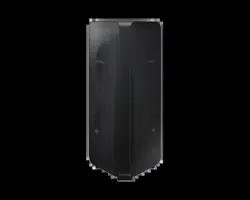
Sound Tower Main Unit Remote Control / Batteries Power Cord
• For more information about the power supply and power consumption, refer to the label attached
to the product. (Label: Rear of the Sound Tower Main Unit)
• To purchase additional components or optional cables, contact a Samsung Service Center or
Samsung Customer Care.
• When moving the product, do not drag or pull the product from the ground. Lift the product when
moving the product.
Inserting Batteries before using the Remote Control
(AAA batteries X 2)
Slide the battery cover in the direction of the arrow
until it is completely removed. Insert 2 AAA
batteries (1.5V) oriented so that their polarity is
correct. Slide the battery cover back into position.

ENG - 2
02 PRODUCT OVERVIEW
Top Panel of the Sound Tower
BASS
Remote
Sensor
When operating the Sound Tower system, please aim the front of the remote control at
the remote sensor.
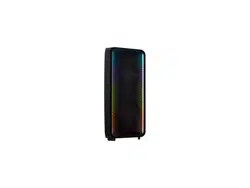
LED Indicator
Displays operating messages or current source of the Sound Tower system.
The information sources represented by each LED are as follows:
(BT) (USB) (AUX1) (AUX2) (Power/Battery)
Power Turns the Sound Tower on and off.
Light
Press the
(Light) button to turn the Lighting Mode on.
Source
Press to select a source connected to the Sound Tower.
Press and hold the
(Source)
button for more than 5 seconds
to enter the
“SEARCHING TV” mode.
Play/Pause
• Play/Pause
Press the
button to pause a music le temporarily.
When you press the button again, the music le plays.
• Demo play
Press and hold the
button for more than 5 seconds to start the Demo play while
the system is turned on. 5 LEDS ashing simultaneously and it plays demo music for
90 seconds.
– Please be careful as it may play louder than the set volume.
Volume down Press the
(Volume down) button to lower the volume.
Volume up
Press the
(Volume up) button to raise the volume.
BASS Press the BASS button to use the powerful bass sound.

ENG - 3
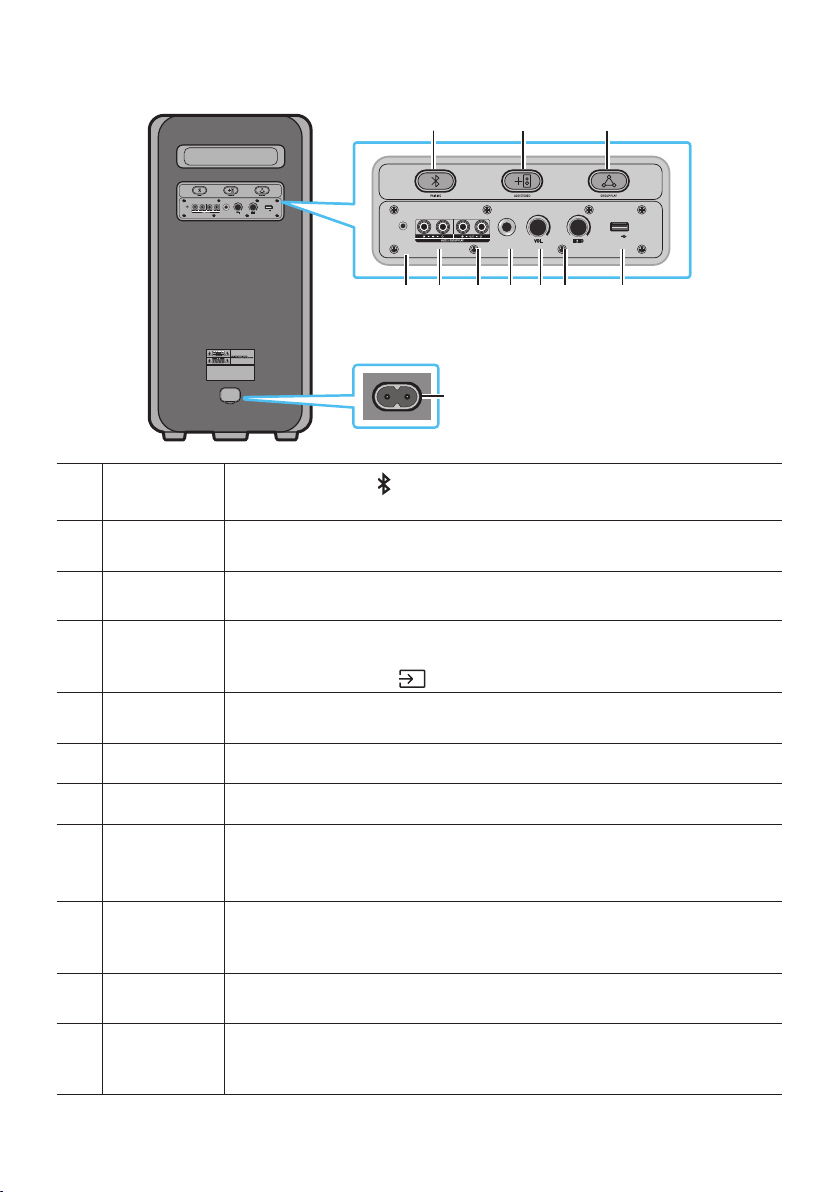
Rear Panel of the Sound Tower
POWER
ECHOVOL
USB
(5V 2.1A)
AUX 1
MIC
ECHOVOL
USB
(5V 2.1A)
AUX 1
MIC
Bluetooth
PAIRING
Press the
PAIRING button to enter pairing mode, "PAIRING" LED on the rear plane
will be fast blink.
ADD STEREO
Press the ADD STEREO button to connect to another same model Sound Tower
wirelessly.
GROUP PLAY Press the GROUP PLAY button to connect up to ten Sound Tower systems wirelessly.
USB
Connect a USB device to the USB ports on the main unit.
If you connect your cell phone to the USB port, you can charge it.
• Press the
(Source) button to select USB.
ECHO
You can give an echo effect to the sound from a connected microphone (MIC) by
adjusting the ECHO knob.
VOL Use the VOL knob to adjust the volume of a connected microphone (MIC).
MIC Connect your microphone to the MIC jack.
GROUP PLAY
OUT
Terminals
Use an Audio Cable (not supplied) to connect GROUP PLAY (OUT) terminals on the
main unit to Audio In on an external analog output device.
GROUP PLAY
IN Terminals
Use an Audio Cable (not supplied) to connect AUX2(IN) terminals on the main unit to
Audio Out on an external analog output device.
AUX1
Use an Audio (AUX) Cable (not supplied) to connect AUX1 jack on the main unit to
Audio Out on an external device.
Power
Connect the power cord to the Power jack and connect the other end of the power
cord to a wall socket to supply electrical power to the Sound Tower.
ENG - 4
Charge LED State of the Sound Tower:
Sound
Tower state
Charging state
Charge LED
(AC Mode)
Charge LED
(DC Mode)
Remark
Off Fully charged Off(black) Off (black)
Off Charging Green blinks N/A
Off Not in charging Off (black) Off (black)
The AC cable is not
inserted.
Stand by Fully charged Blue on N/A
There is no standby mode
in DC mode.
Stand by Charging Green blinks N/A
The charging LED is the
same as when Sound
Tower is shut down.
On Fully charged Blue on Blue on
When turned on, Sound
Tower mainly reects the
current battery state.
On Charging Green blinks N/A
On
Not in charging and
30%~98%power
Green on Green on
On
Not in charging and
5% ~ 29% power
Red on Red on
On
Not in charging and
below 5% power
Red on
Power off after
Light bar
orange blink
once
In DC mode shutdown, the entire system power will be turned off. So in the off state, compared with AC
mode, the following functions are not supported.
Feature
Wake up via bluetooth
Shop mode
Power Off Setting
Customer Reset
Power on via IR
Battery Charge
AUI on/off
UI feedback of LED lighting bar(front) on/off
ENG - 5
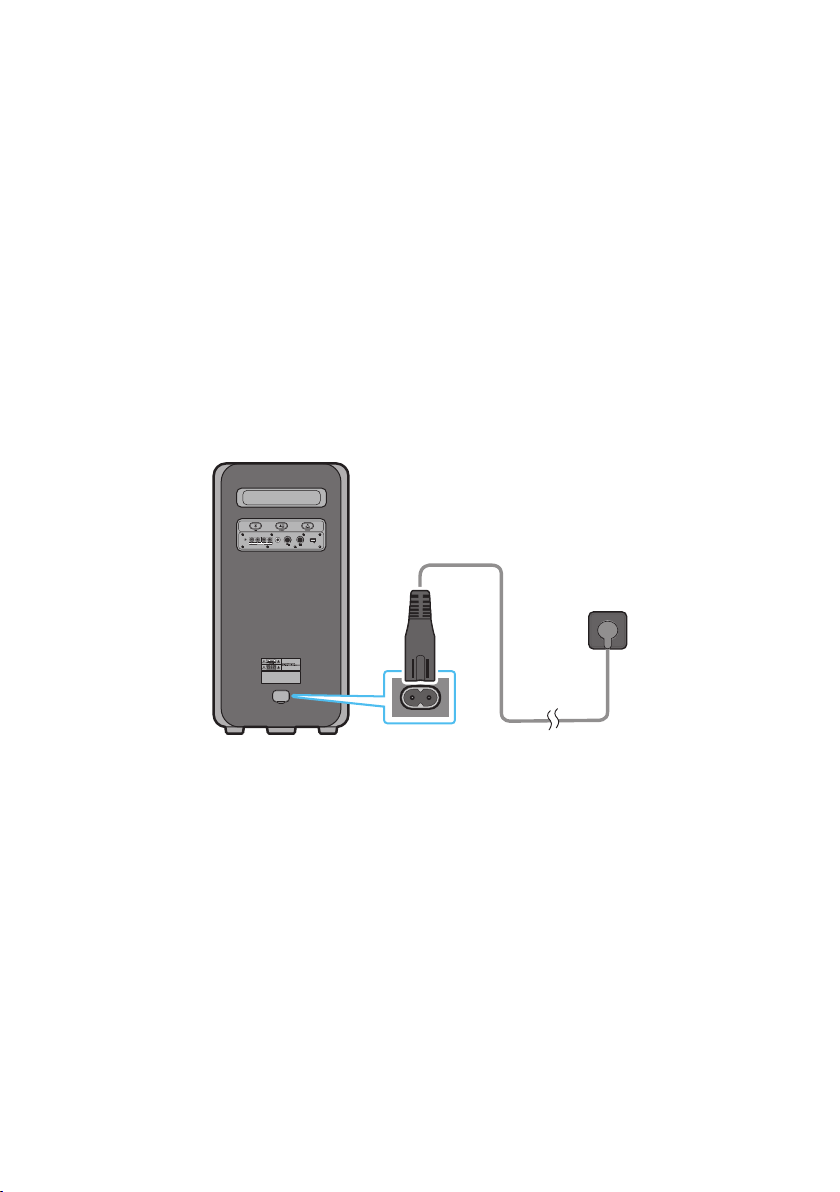
03 CONNECTING THE SOUND TOWER
Connecting Electrical Power
Use the power cord to connect the Sound Tower to an electrical outlet in the following order:
Connect the power cord to the Sound Tower and then to a wall socket.
See the illustrations below.
• When the AC cord is pressed in, the built-in battery will be charged automatically until the battery
is fully charged. The LED indicator on the top panel will show the current charging state (refer to
page ENG - 4)
• When you unplug the set to run on battery, the volume level drops dramatically.
• For more information about the required electrical power and power consumption, refer to the
label attached to the product. (Label: Rear of the Sound Tower)
Rear of Sound Tower
POWER
ECHOVOL
USB
(5V 2.1A)
AUX 1
MIC
Connecting
Electrical Power
ENG - 6
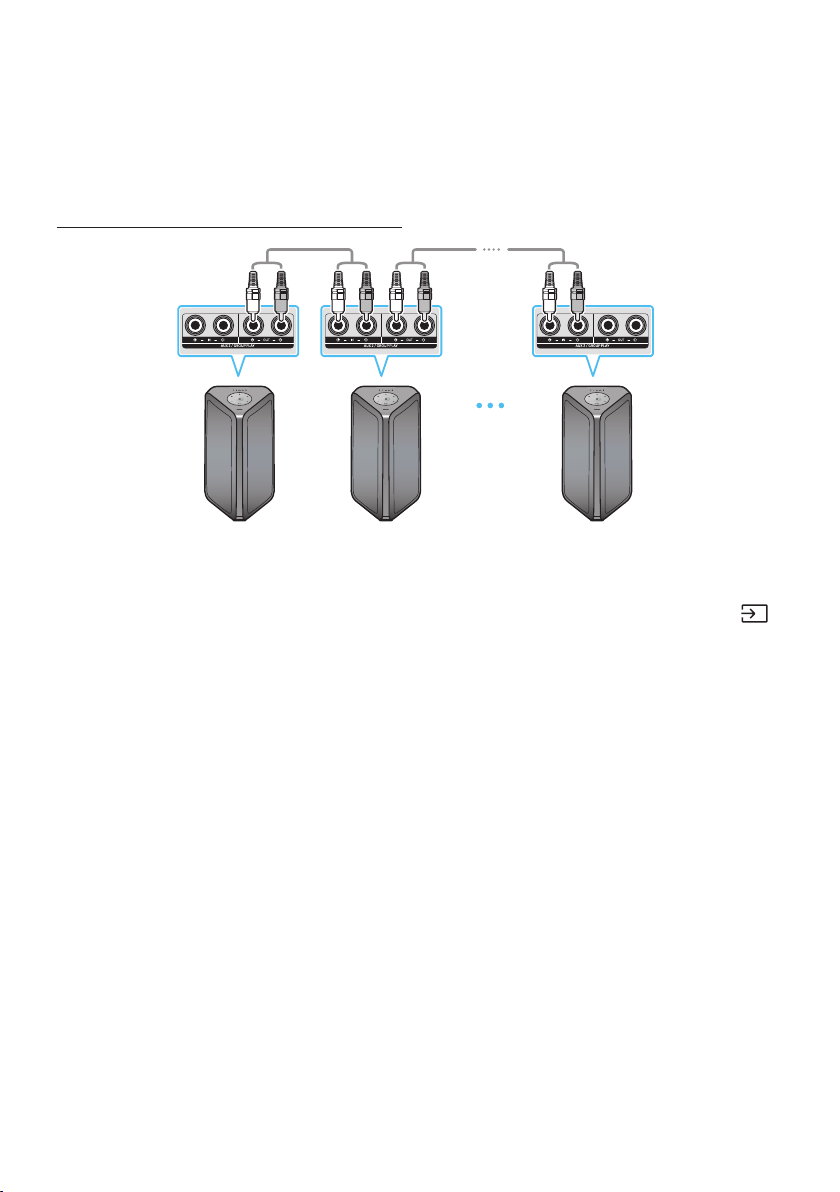
How to use Audio Group
You can connect multiple audio systems in a group to create a party environment and produce higher
sound output. Set one Sound Tower as the HOST and any music played on it will be shared among any
other Sound Tower systems in the Audio group.
Connecting the wired Group Play mode
1st
Sound Tower HOST
2nd
Sound Tower
Last
Sound Tower
Continue the
connection until
the last Sound
Tower
Set up Group Play by connecting all the systems using audio cables (not supplied). Use the AUX or
(Source) button to change the source to AUX2 for every Sound Tower system except the 1st (or HOST)
Sound Tower system.
NOTES
• The 1st Sound Tower HOST can play music from any source.
• Depending on the length or characteristics of the cable, there may be a difference in operating
distance.
ENG - 7
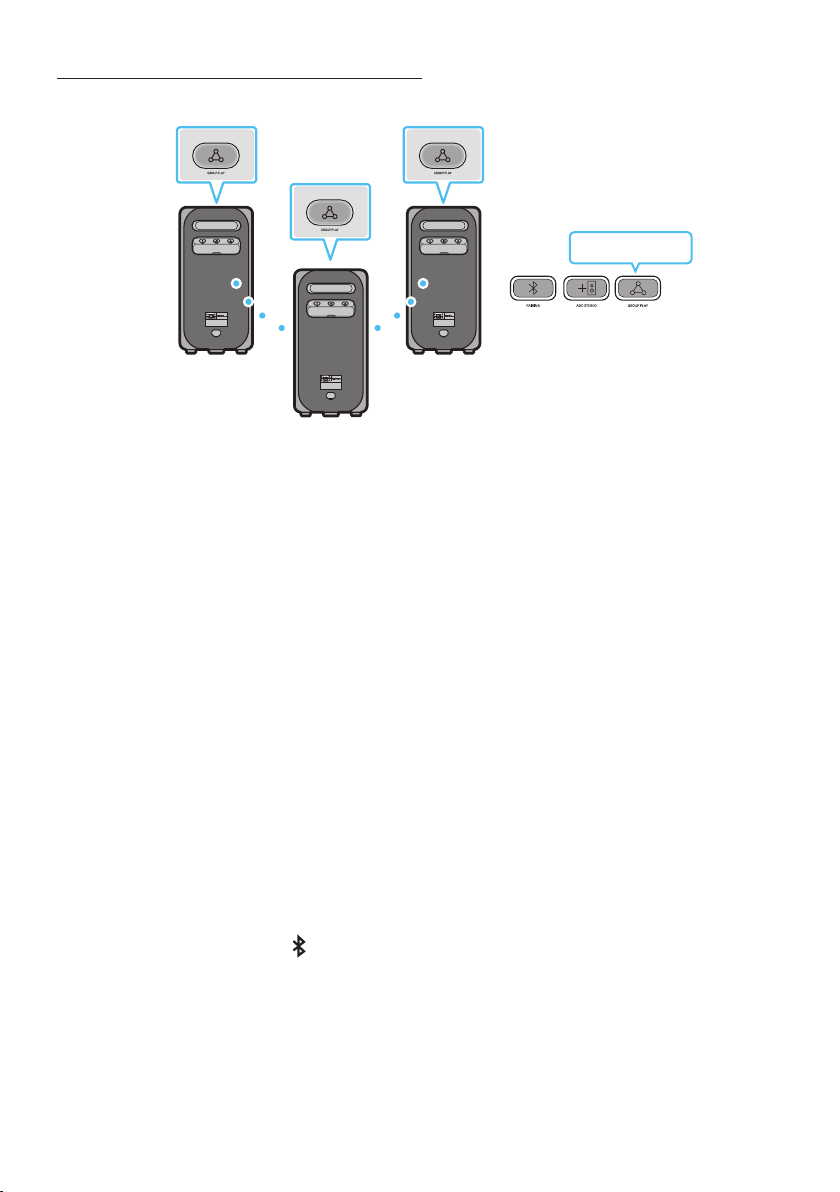
Connecting the wireless Group Play mode
You can connect up to ten Sound Tower systems with the wireless Group Play function.
POWERPOWER
POWER
HOST
SUB 1
SUB 2
Greenashing
1. Press the GROUP PLAY button on the HOST Sound Tower system, After “GROUP LED” solw blinks
10 seconds, ”GROUP PLAY”LED will be fast blink (30s).
2. Press the GROUP PLAY button on the 2nd Sound Tower system (SUB 1).”GROUP PLAY”LED will be
blink.And then SUB1 will be connected with HOST,”GROUP PLAY”LED of SUB1 and HOST will stop
blinking and turn on.
3. Press the GROUP PLAY button on the 3rd Sound Tower system (SUB 2). Tone prompt instead the
GROUP PLAY button on the system stops blinking.
4. If you want to add more Sound Tower systems, repeat step 3.
5. Play music on the HOST Sound Tower. Sound outputs from all the connected systems.
NOTES
• In Group play mode, “HOST” Sound Tower (Figure 1) can connect to the Samsung TV. After the
connection is successful, the Group play mode automatically exits.
• The wireless Group Play connection is available for MX-ST90B/MX-ST50B/MX-ST40B.
• Environmental conditions or other factors with connected devices may have effect on playback
quality.
• If the red LED is on the GROUP PLAY button, an error has occurred in the wireless Group Play
connection. Try step 1 to step 5 again.
• The ADD STEREO button and
PAIRING button on the SUB Sound Tower systems are not available
while in wireless Group Play mode.
• The ADD STEREO button on the HOST Sound Tower system is not available while in wireless Group
Play mode.
• Long press “GROUP PLAY” in BT Source state to enter Group mode as “HOST”.

ENG - 8
• All SUB units must be connected one by one. For example, after HOST is connected, press GROUP
PLAY button on SUB 1 to connect, and after SUB 1 is connected, you should connect SUB 2 and SUB
3 one by one sequentially.
• While using Group Play, currently connected Bluetooth devices are disconnected and Bluetooth
connection is disabled.
• Bluetooth devices can search and connect with the HOST Sound Tower only.
• When in Group Play mode, the SUB cannot connect to a Bluetooth device.
• If you power off and then power on the Sound Tower or select any source other than BT on a SUB
unit, in Group Play mode, the Group Play mode is disconnected.
• This product does not support aptX audio stream with Wireless Group Play mode.
Disconnecting the wireless Group Play mode
1. Press and hold the GROUP PLAY button over 5 seconds (HOST or SUB) after Group Play is
connected or press the GROUP PLAY button (HOST or SUB) before Group Play is connected.
• Tone prompt instead and the LED above the GROUP PLAY button is off.
2. If you select any source other than BT on the SUB units or turn off the HOST Sound Tower, the
Group Play mode is disconnected.
• If the disconnection is made from the HOST Sound Tower, Group Play is disconnected.
LED Indications
LED STATE Description
Green
Blink Waiting for a wireless Group Play connection.
Solid The wireless Group Play connection was successful.
Red Solid There is an error with the wireless Group Play connection.
NOTE
• In wireless connection, Playback quality can be unstable depending on Bluetooth environment.
For better play, please keep the device in wired Group Play mode.
• The rst bluetooth connection should be within 1m.
ENG - 9
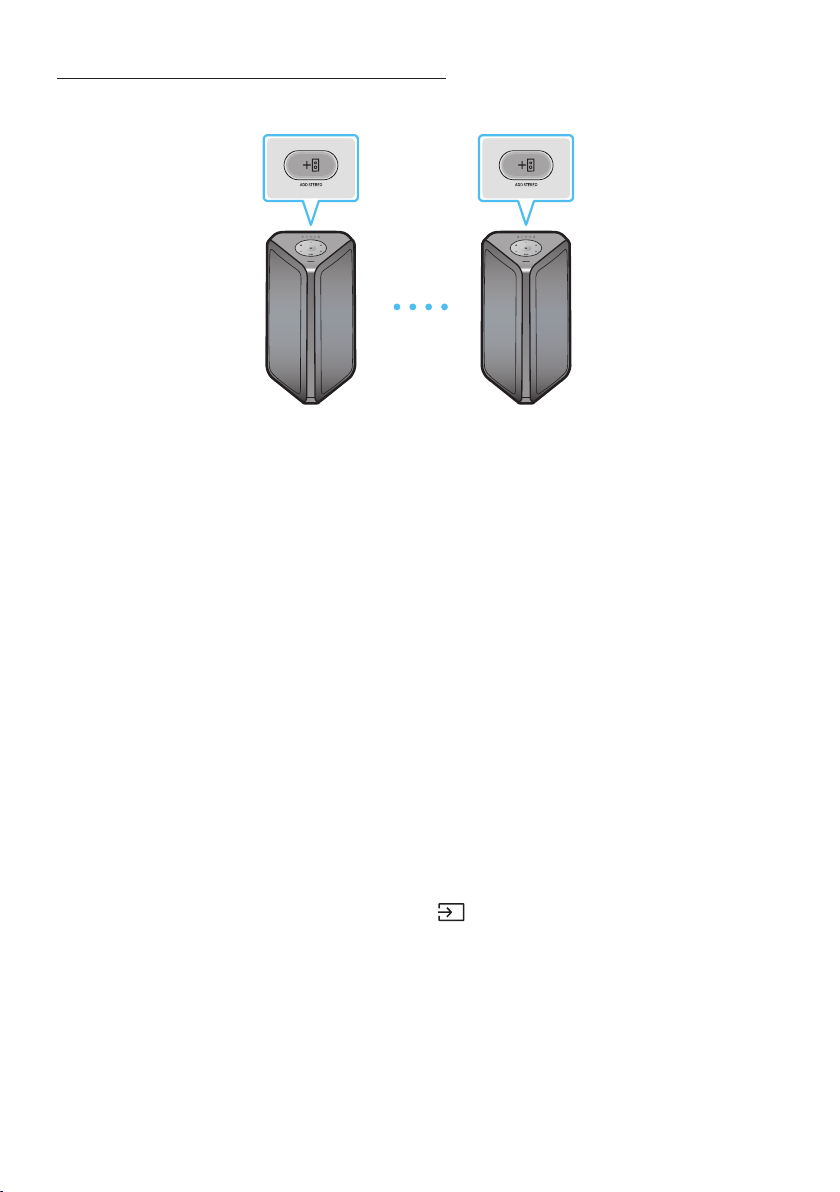
Using a Smartphone and Stereo Group mode
Connect two Sound Tower and use them with your smartphone to enjoy stereo sound.
Left Sound Tower
(MAIN)
Right Sound Tower
(SUB)
1. Press the ADD STEREO button on the left Sound Tower system. The LED blinks on the ADD
STEREO button.
2. Press the ADD STEREO button on the right Sound Tower system. The LED blinks on the ADD
STEREO button.
3. When the connection is made, tone prompt. Back plane ADD LED Green Indicator Steady on.
• The MAIN Sound Tower system outputs left channel sound and the SUB Sound Tower system
outputs right channel sound. Press the ADD STEREO button on the MAIN or SUB Sound Tower
to change the sound channel of the Sound Tower.
4. Play music by connecting your smartphone to the MAIN Sound Tower and Bluetooth.
Sound is output from both Sound Tower.
NOTES
• To use the Stereo Group mode, both Sound Tower systems must be the same model.
• Environmental conditions or other factors with connected devices may have effect on playback
quality.
• If the red LED is on the ADD STEREO, an error has occured in the Stereo Group connection. Try step
1 and step 3 again.
• Remote Controller, BT PAIRING, GROUP PLAY and
(Source) buttons on the SUB Sound Tower
systems are disabled while in Stereo Group mode.
• The GROUP PLAY button on the MAIN Sound Tower system is not available while in Stereo Group
mode.
ENG - 10
• In mode other than “BT” (ex. USB, AUX mode), music is played only in MAIN Sound Tower and music
is not played in SUB Sound Tower.
• The lighting colors between MAIN Sound Tower and SUB Sound Tower may vary.
• This product does not support aptX audio stream with Stereo Group mode.
• If you try to connect a Bluetooth device while Stereo Group is connecting, the Stereo Group mode
may fail.
Terminate the Stereo Group mode
Press the ADD STEREO button (MAIN or SUB) for at least 5 seconds while the Stereo Group is
connected.
• Tone prompt and the LED above the ADD STEREO button is off.
LED Indications
LED STATE Description
Green
Blink Waiting for a Stereo Group connection.
Solid The Stereo Group connection is successful.
Red Solid There is an error with the Stereo Group connection.
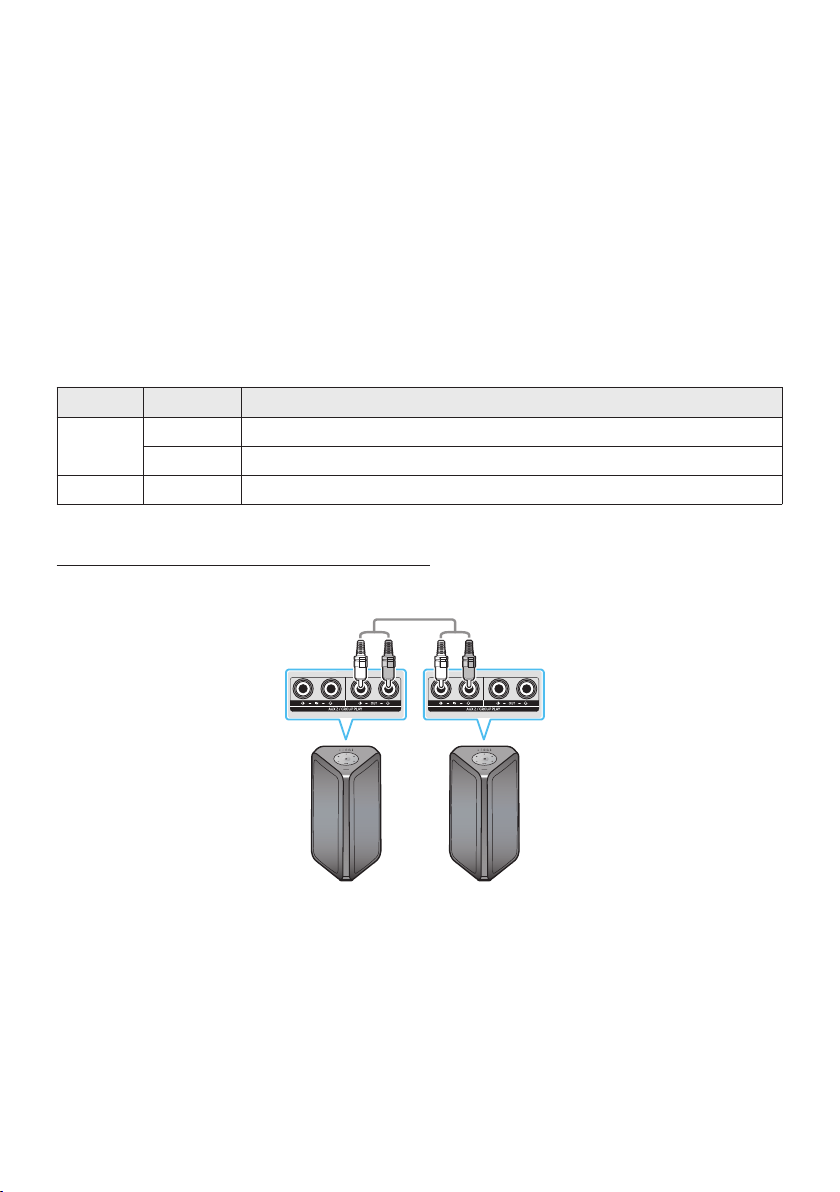
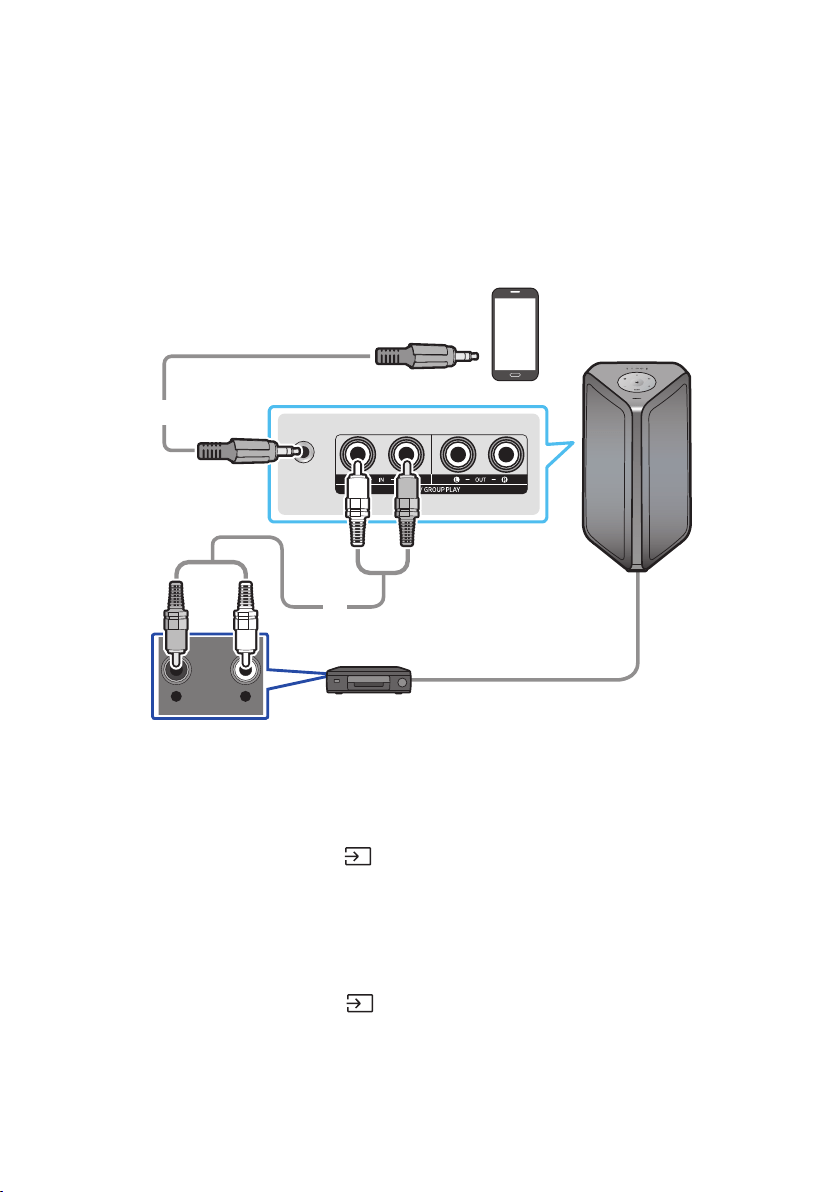
Using Samsung TV and Stereo Group mode
Connect two Sound Tower by wire and use them with Samsung TV to enjoy stereo sound.
Left Sound Tower
(MAIN)
Right Sound Tower
(SUB)
1. Connect two sound towers via stereo mode by press the ADD STEREO button on the two Sound
Tower.
2. Connect the RCA cable to the AUX2 OUT on the MAIN and AUX2 IN on the SUB as shown by using
the RCA cable (not supplied).
3. In “BT” mode, press the “AUX” button on the MAIN Sound Tower remote control for at least 5
seconds. The LED blinks on the ADD STEREO button.

ENG - 11
4. When the connection is complete, the “ADD STEREO” LED turn on and then the current output.
Tone prompt instead.
5. When the connection is complete, the SUB top panel “AUX2” LED turn on.
• The MAIN Sound Tower outputs the left channel sound and the SUB Sound Tower outputs the
right channel sound. Press the ADD STEREO button on the MAIN or SUB Sound Tower to
change the sound channel of the Sound Tower.
6. Connect a TV and MAIN Sound Tower via Bluetooth to play music. Sound is output from both
Sound Tower.
NOTES
• To use Stereo Group mode, both Sound Tower must be the same model.
• A red light on the LED on the ADD STEREO button indicates an error in the Stereo Group
connection. Try Step 1 to 5 again.
• In Stereo Group mode, the remote control, BT PAIRING, GROUP PLAY, and
(Source) buttons on
the SUB Sound Tower are disabled.
• The GROUP PLAY button on the MAIN Sound Tower is not available in Stereo Group mode.
• If Samsung TV supports a simple connection, the connection pop-up is automatically displayed on
the TV, and if you select “Yes”, it connects to the TV. If there is a previous connection history
between Samsung TV and Sound Tower, it will be connected to Samsung TV without pop-up. For a
simple connection to Samsung TV, refer to page 16.
• The lighting colors may vary between the MAIN Sound Tower and the SUB Sound Tower.
Terminating the Stereo Group mode connection
Press the ADD STEREO button (MAIN or SUB) for at least 5 seconds after the Stereo Group is
connected.
• “OFF-STEREO MODE” tone prompt and the LED on the ADD STEREO button turns off.
ENG - 12
04 CONNECTING AN EXTERNAL DEVICE
Connect to an external device via a wired or wireless network to play the external device’s sound
through the Sound Tower.
Connecting using an Analog Audio (AUX) Cable
AUX 1
- AUDIO -
R L
Mobile device / MP3 / PMP
BD / DVD player / Set-top box / Game console
0.14 inches (3.5 mm)
stereo cable (not supplied)
Audio (AUX) Cable (not supplied)
Rear of the Sound Tower
0.14 inches (3.5 mm) stereo Cable (AUX1)
1. Connect AUX1 jack on the main unit to the AUDIO OUT jack of the Source Device using an
0.14inches (3.5 mm) stereo cable.
2. Select “AUX1” mode by pressing the
(Source) button on the top panel or on the remote control.
• You can also select a source using AUX button on the remote control.
Audio Cable (AUX2)
1. Connect AUX2 (IN) terminals on the main unit to the AUDIO OUT terminals of the Source Device
using an audio cable.
2. Select “AUX2” mode by pressing the
(Source) button on the top panel or on the remote
control.
• You can also select a source using AUX button on the remote control.
ENG - 13
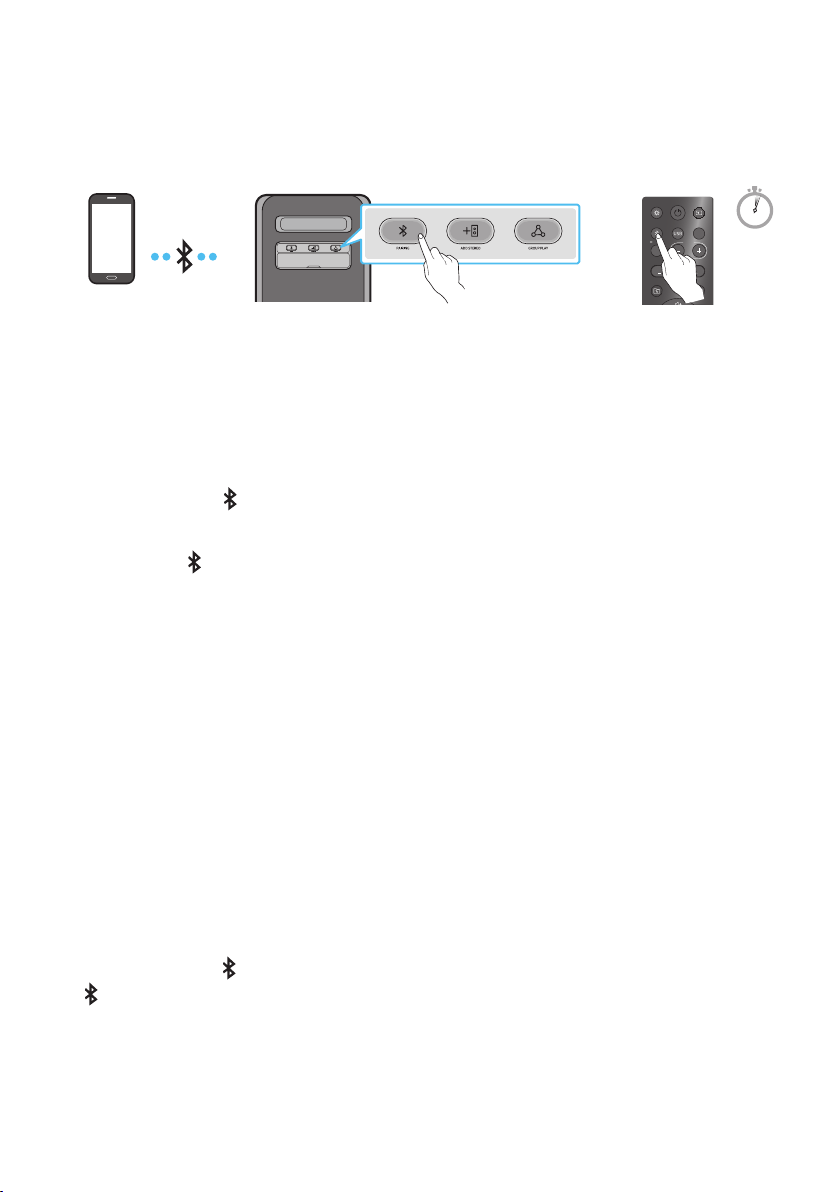
Connecting a mobile device via Bluetooth
When a mobile device is connected using Bluetooth, you can hear stereo sound without the hassle of
cabling.
LIGHT
PAIRING
TEMPO
USB
AUX
EFFECT
DOWN
UP
EFFECT
DJ
SOUND
MODE
Bluetooth
device
OR
5 Sec
* In battery mode, when the Sound Tower is power off, Bluetooth connection and the Sound Tower app are
not available.
The initial connection
1. Press and hold the
PAIRING button on the remote control for more than 5 seconds to enter the
“BT PAIRING” mode.
(OR)
Press the
PAIRING button on the rear panel.
2. On your device, select “[AV] MX-ST5B Series” from the list that appears.
• After the device is connected. The third light on the top panel blinks three times cyan, and the
bluetooth light on the rear panel is steady on.
3. Play music les from the device connected via Bluetooth through the Sound Tower.
If the device fails to connect
• Sound tower will play voice prompt via bluetooth disconnected.
• If a previously connected Sound Tower listing (e.g. “[AV] MX-ST5B Series”) appears in the list, delete
it.
• Then repeat steps 1 and 2.
What is the difference between BT READY and BT PAIRING?
• BT READY : In this mode, you can use the previously connected TV or mobile device to connect to
Sound Tower.
• BT PAIRING : In this mode, you can connect a new device to the Sound Tower.
(Press and hold the
PAIRING button on the remote control for more than 5 seconds or press the
PAIRING button on the rear of the Sound Tower to enter the “BT PAIRING” mode.)

ENG - 14
Bluetooth Multi connection
Sound Tower supports up-to two simultaneous Bluetooth device connections. Sound Tower can play
music through one of the connected Bluetooth devices without disconnecting the second device.
Bluetooth device 1 Bluetooth device 2
1. Connect Sound Tower to the rst device and the second device respectively for the rst time.
(See page 13)
2. Music can be played on only one of the two connected devices, and when the music is played on
the other device, the music on the playing device is paused.
NOTES
• If you want to connect Sound Tower to a third device, you can disconnect Sound Tower from one of
the two currently connected devices and then connect Sound Tower to the third device.
(Device include Samsung TV)
• With the Sound Tower and two devices currently connected, when pairing to a new Bluetooth
device, the devices currently connected maybe disconnected.
• You can connect to two Bluetooth devices at the same time.
• Environmental conditions or other factors with connected devices may have effect on playback
quality.
• The Sound Tower automatically turns off after 18 minutes with no command input in the ready
state.
• The Sound Tower may not perform Bluetooth search or connection correctly under the following
circumstances:
– If there is a strong electrical eld around the Sound Tower.
– If several Bluetooth devices are simultaneously paired with the Sound Tower.
– If the Bluetooth device is turned off, not in place, or malfunctions.
• Electronic devices may cause radio interference. Devices that generate electromagnetic waves
must be kept away from the Sound Tower main unit - e.g., microwaves, wireless LAN devices, etc.

ENG - 15
• Bluetooth Multi connection may not be supported depending on the connected device’s
specications.
• Removable/detachable Bluetooth devices (Ex:Dongle etc..) ,windows phone, laptops, TV, etc. do not
support Bluetooth Multi connection.
• After Bluetooth Multi connection pairing, there may be a slight delay before music starts playing
depending on the Bluetooth devices.
• If you move too far out of range from the Sound Tower without rst disconnecting your Bluetooth
device, it may take a few minutes to connect other Bluetooth devices. If you turn the Sound Tower
off and back on, you can connect other Bluetooth devices without waiting.
LED Indications
LED STATE Description
Blue
Fast Blink BT PAIRING mode
Blink BT READY mode
Solid A Bluetooth device is connected.
Using Bluetooth Power On
When the Sound Tower is turned off, you can connect your smart device via a Bluetooth connection to
turn it on. Battery status cannot use Bluetooth power on.
1. Press and hold the BASS button on the remote control or on the top panel to set the Bluetooth
Power On function on. Lighting bar will be blink white once.
2. When the Sound Tower is off, connect your smart device via Bluetooth. (For information on
Bluetooth connections, refer to your smart device’s manual.)
3. When the connection is complete, the Sound Tower turns itself on automatically in Bluetooth
mode.
• Select the desired music to play from your smart device.
NOTE
• Each time you press and hold the BASS button for 5 seconds. LED lighting bar will be blink white once
and status switched:
BLUETOOTHPOWER-ON→BLUETOOTHPOWER-OFF
ENG - 16
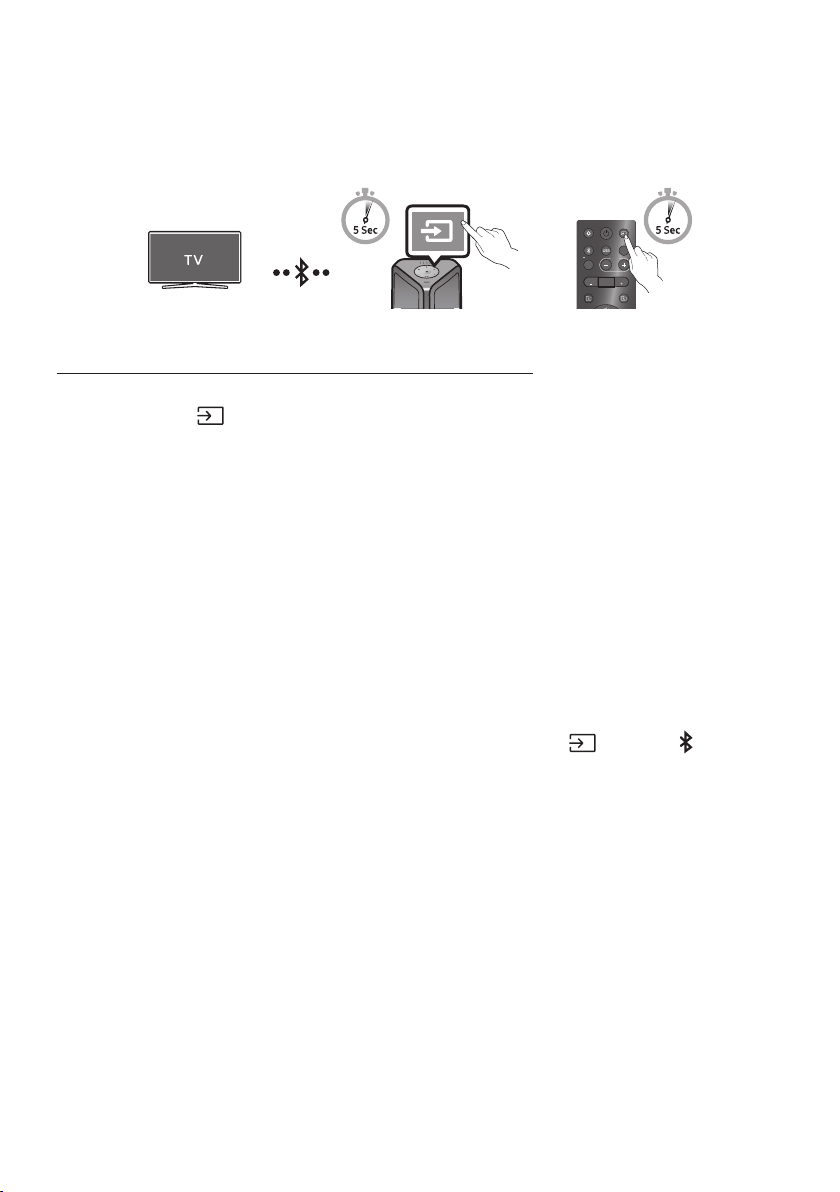
Connecting the Samsung TV via Bluetooth
If Sound Tower connected with Samsung TV via Bluetooth, Sound Tower can be controlled by TV UI.
(Volume +/-, Mute On/Off and Power On/Off)
LIGHT
PAIRING
TEMPO
USB
AUX
EFFECT EFFECT
DJ
SOUND
MODE
OR
Top Panel of the Sound Tower
Easy connect with Samsung TV (SEARCHING TV mode)
Sound Tower has “SEARCHING TV” mode for easy connect with Samsung TV.
1. Press and hold
(Source) bottom for more than 5 seconds on remote control or top panel then
Sound Tower will start to search Samsung TV. Lighting bar will blink white once and then blink
cyan, The back plane “PAIRING” LED will be slow blink. (Or, when the wired Stereo Group mode
connection is complete, the “SEARCHING TV” mode is automatically activated.)
2. If Samsung TV support easy connection, connection popup will be displayed on TV.
If Samsung TV has connected with Sound Tower before, Samsung TV will be connected without
popup.
3. If Sound Tower can not nd any Samsung TV within 5 minutes, Sound Tower will terminate
“SEARCHING TV” mode and turn to “BT PAIRING” mode. If nd any Samsung TV, Sound Tower will
request connection to those TV.
NOTES
• While in wireless Group Play mode, searching TV is not available.
• To stop searching Samsung TV, turn off the Sound Tower or press the
(Source) or PAIRING
button.
• Sound Tower does not support multi connection if Samsung TV is connected.
• While Samsung TV is connected, Sound mode is PARTY and SOUND MODE button is not available.
• While Samsung TV is connected, Sound Tower APP can not connect with Sound Tower.
• Connection popup may not be displayed according to TV spec.
• You can select and connect directly from the Bluetooth speaker list on your TV when the
connection pop-up does not appear on your TV.
• When the Sound Tower is connected to your TV by Bluetooth connection, the video on the TV and
audio from the Sound Tower may not be synchronized because the distance between the Sound
Tower and the TV is too far. It is recommended to move the Sound Tower closer to your TV within 3.3 ft
(1 meter).
ENG - 17
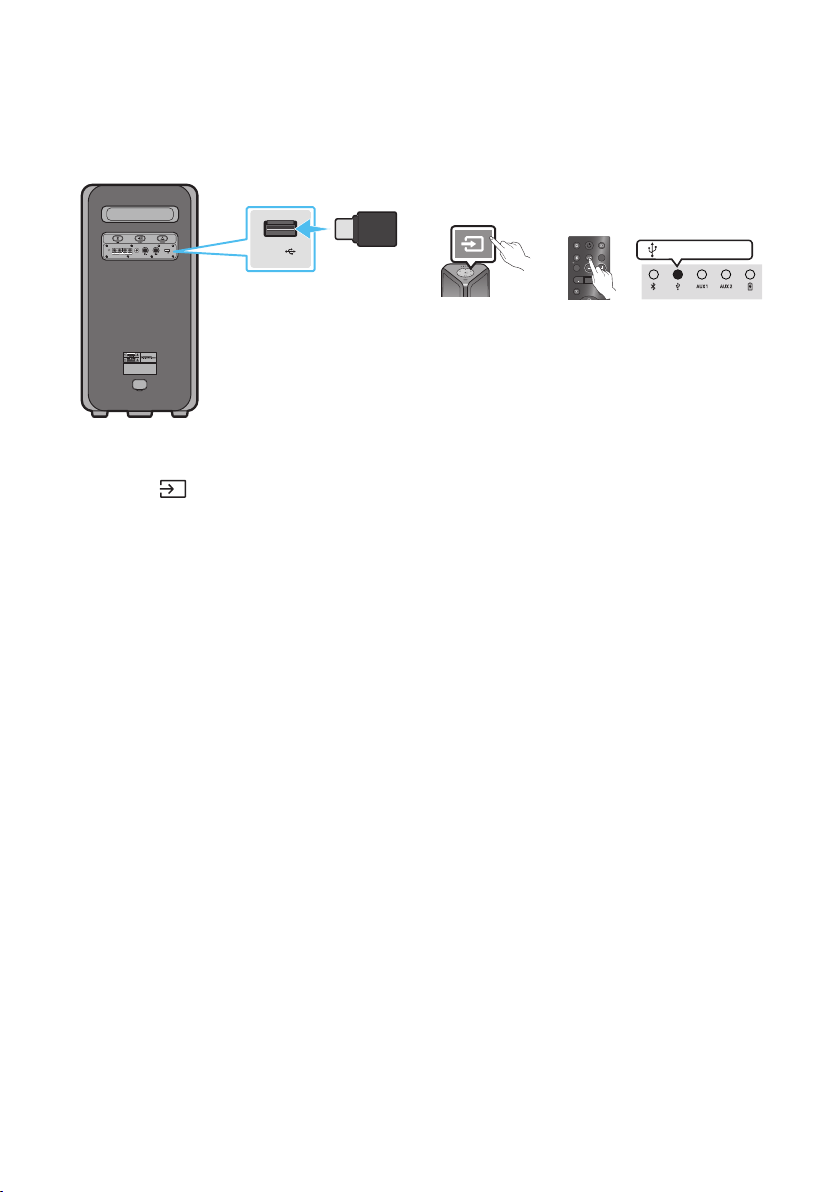
05 CONNECTING A USB STORAGE DEVICE
You can play music les located on USB storage devices through the Sound Tower.
POWER
ECHOVOL
USB
(5V 2.1A)
AUX 1
MIC
USB
(5V 2.1A)
LIGHT
PAIRING
TEMPO
USB
AUX
EFFECT EFFECT
DJ
SOUND
MODE
USB storage
device
(not supplied)
Rear of the Sound Tower
OR
white LED on
1. Connect a USB storage device to the USB jacks on your Sound Tower.
2. Press the (Source) button on the top panel or on the remote control, and then select “USB”.
• You can also select a source using USB button on the remote control.
3. The second USB indicator on the top panel is steady on.
4. Play music les from the USB storage device through the Sound Tower.
• The Sound Tower automatically turns off (Auto Power Down) if USB device is not connected,
playback stopped, or there is no input for more than 18 minutes.
NOTES
• This product only supports USB storage devices that are formatted in the FAT and FAT32 le
system.
• This product does not support HDD storage or storage on mobile devices.
• A maximum of 999 les can be played per USB storage device.
• A maximum of 256 folders can be read per USB storage device.

ENG - 18
Supported Audio Formats
File Extension Audio Codec Sampling Rate Bit Rate
*.mp3
MPEG 1 Layer3 32 kHz ~ 48 kHz 32 kbps ~ 320 kbps
MPEG 2 Layer3 16 kHz ~ 24 kHz 8 kbps ~ 160 kbps
MPEG 2.5 Layer3 8 kHz ~ 12 kHz 8 kbps ~ 160 kbps
*.wma WMA7/8/9 8 kHz ~ 48 kHz 32 kbps ~ 320 kbps
*.aac
AAC 8 kHz ~ 96 kHz < 1728 kbps
A A C- L C 8 kHz ~ 96 kHz < 1728 kbps
HE-AAC 8 kHz ~ 96 kHz < 1728 kbps
*.wav
PCM/LPCM/
IMA_ADPCM
8 kHz ~ 192 kHz < 5 Mbps
*ac - 8 kHz ~ 192 kHz < 5 Mbps
NOTES
• This product does not support WMA Professional codec.
• The above table shows supported sampling rates and bit rates. Files in formats that are not
supported will not play.
• AAC les only support the ADTS native format.
Software Update
SamsungmayofferupdatesfortheSoundTower’ssystemrmwareinthefuture.
If an update is offered, you can update the rmware by connecting a USB device with the rmware
update stored on it to the USB port on your Sound Tower. For more information about how to download
update les, go to the Samsung Electronics website at www.samsung.com/us/support/.
Then, enter or select the model number of your Sound Tower, select the Software & Apps option, and
then Downloads. Note that the option names can vary.

ENG - 19
Connecting an External Microphone
You can output your voice from the system by connecting a dynamic microphone with a normal plug
(not supplied).
MAXMIN MAXMIN
1. Turn the MIC LEVEL knob to MIN to reduce the microphone volume level.
2. Connect an optional microphone to the MIC jack on the unit.
3. Adjust the volume using the MIC “VOL” knob.
4. Adjust the Effect of the echo using the MIC “ECHO” knob.
5. Speak or sing into the connected microphone.
NOTES
• When using the wireless Group mode or stereo mode function, sound from the microphone is only
output from the system to which the microphone is connected.
• When Sound Tower is in battery mode, the MIC sound level will be lower.
ENG - 20
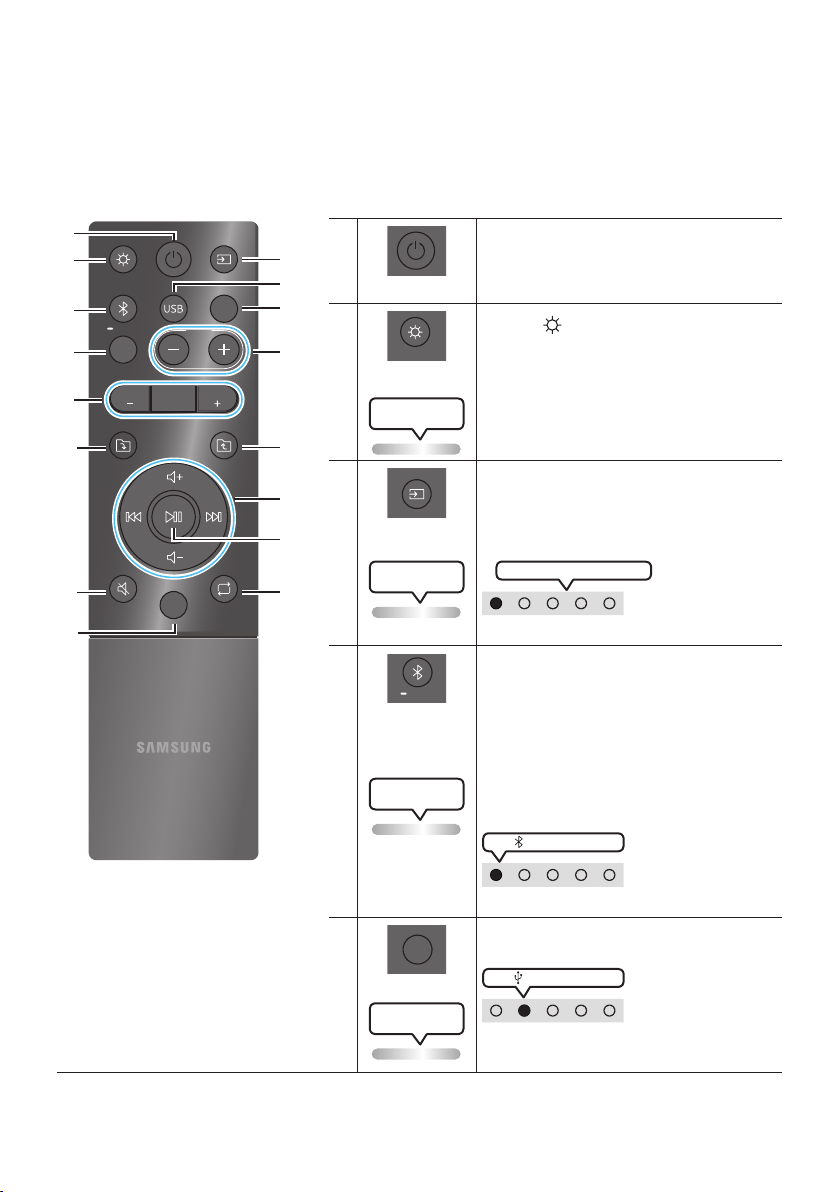
06 USING THE REMOTE CONTROL
How to Use the Remote Control
LIGHT
PAIRING
TEMPO
USB
AUX
EFFECT
DOWN
UP
BASS
EFFECT
DJ
SOUND
MODE
* To reduce battery drain, the product
does not turn on when press the power
button of remote control while the
battery is in use.
Power
Turn the Sound Tower on and off.
LIGHT
LIGHT
Press the (LIGHT) button to turn the
Lighting Mode on.
(Only during music playback is effective)
Press the button repeatedly to cycle through
the available light modes: AMBIENT, PARTY,
DANCE, THUNDERBOLT, STAR or OFF.
Lighting LED
white blink x1
Source
Press to select a source connected to the
Sound Tower.
Press the button repeatedly to cycle through
the available sources: BT, USB, AUX1 or AUX2 .
Lighting LED
white blink x1
White LED moves to right on
LED indicator on the top of the product.
Bluetooth
PAIRING
PAIRING
Press to select a source connected directly to
"BT" mode.
Press and hold the button for more than
5 seconds to enter the "BT PAIRING" mode.
You can connect the Sound Tower to a new
Bluetooth device in this mode by selecting the
Sound Tower from the Bluetooth device's
search list.
Lighting LED
Cyanashes
white LED on
LED indicator on the top of the product.
USB
USB
Press to select the USB source connected to
the Sound Tower.
white LED on
LED indicator on the top of the product.
Lighting LED
white blink x1
ENG - 21
AUX
AUX
Press to select the AUX1 or AUX2 sources connected to the Sound Tower.
AUX2 white LED on
OR
AUX1 white LED on
LED indicator on the top of the product.
Lighting LED
white blink x1
SOUND MODE
SOUND
MODE
Press the button repeatedly to cycle through the available sound effects: PARTY,
STANDARD, HIPHOP, EDM, ROCK, LATIN, HOUSE or REGGAE.
• PARTY: Term for more upbeat music effect ,like a party
• Standard: Term for raw musical effects, like no EQ.
• HIPHOP: term for Dynamic dance and music.
• EDM: A more “generalized concept” genre than electronic music.
• ROCK: Band music.
• LATIN: Term for the music of many South American countries.
• HOUSE: Fast beat dance music played on electronic instruments.
Lighting LED
white blink x1
TEMPO +, -
TEMPO
Press the TEMPO + or TEMPO - buttons to change the tempo of the music up or down.
• This function only works in the USB mode.
Lighting LED
white blink x1
DJ
DJ
This function lets you turn on the DJ effect function.
Press the button repeatedly to cycle through the available DJ sound effects:
NOISE, FILTER, CRUSH, CHORUS, WAHWAH or OFF.
• NOISE: Mixing white noise into the original sound.
• FILTER: Filter out the sound of some frequencies.
• CRUSH: Make the original sound sharp.
• CHORUS: Separate the original sound into several track and delay them
separately,then mix again. Create a chorus effect.
• WAHWAH: WAHWAH effect created by enhancing some specic frequencies of
original sound.
Lighting LED
white blink x1
EFFECT +, -
EFFECT
EFFECT
Press the EFFECT + or EFFECT - buttons to change the level of the each DJ sound
effect up or down.
Effect value default is 5, can be changed to – 15 ~ 0 ~ +15.
Lighting LED
white blink x1
Folder DOWN
DOWN
Press the (DOWN) button to move to the next folder in the USB device.
Lighting LED
white blink x1
ENG - 22
Folder UP
UP
Press the (UP) button to move to the previous folder in the USB device.
Lighting LED
white blink x1
Volume up,
Volume down /
Skip
• Volume up, Volume down
Press the (Volume up) or (Volume down) to adjust the volume level up or
down.
• Music Skip
Press the button to select the next music le. Press the button once to
play the current music again. Pass the button twice to select the previous
music le.
Press and hold the button or the button for more than 3 seconds in USB
play mode to search forward or search backward. Press and hold the button
or the button for more than 3 seconds again to get back to normal play.
Lighting LED
White Flashes
From down to up
From top to bottom
Play / Pause
Press the button to pause a music le temporarily.
When you press the button again, the music le plays.
• Auto Power Down Function
To turn off Auto Power Down function while the unit is in AUX1, AUX2 mode, press
and hold the button for more than 5 seconds. Lighting bar will be blink white
once.
Lighting LED
white blink x1
Mute
Press the (Mute) button to mute the sound.
Press it again to unmute the sound.
Lighting LED
white blink x1
Repeat
Press the (Repeat) button to use the Repeat function in “USB” mode.
Press the button repeatedly to cycle through the available repeat functions:
ONE, FOLDER, ALL, RANDOM or OFF.
Lighting LED
white blink x1
ENG - 23
BASS
BASS
Press the BASS button to use the powerful bass sound.
Press it again to return to the normal sound.
Press and hold the BASS button for more than 5 seconds to turn on or off the
BLUETOOTH POWER function.
Lighting LED
white blink x1
※
Not available
Lighting LED
Pink Flashes
From middle to end
The remote control button function is not available in the current source.
How to use Sound Mode
Your Sound Tower provides predened equalizer settings that are optimized for particular music
genres.
1. Press the SOUND MODE button on the Remote control.
2. Each time you press the SOUND MODE button, the Sound Tower cycles through the available
sound effects: PARTY, STANDARD, HIPHOP, EDM, ROCK, LATIN, HOUSE or REGGAE.
NOTES
• Default sound mode is PARTY.
• When turned off, press and hold the button on product or remote control for more than 5 seconds
to turn on in the default Sound Mode setting.

ENG - 24
How to use the DJ Effect
The DJ Effect function lets you add DJ sound effects to your music. The level of each effect is
adjustable.
1. Press the DJ button on the Remote control.
2. Each time you press the DJ button, the Sound Tower cycles through the available DJ Effects:
• NOISE: Create white noise and mixed with the original sound through the lter and output.
• FILTER : Creates an effect similar to the sound of only treble or bass.
• CRUSH: Creates an effect that makes the original sound sharper.
• CHORUS : Creates an effect similar to a singing chorus.
• WAHWAH : Creates a ‘Wah~ Wah~’ effect.
• DJ EFFECT OFF : Turns off the DJ Effect.
3. Press the EFFECT + or EFFECT - buttons to raise or lower the level of each of the DJ sound effects
from -15 to +15.
NOTE
• When turned off, press and hold the button on product or remote control for more than 5
seconds to turn on in the default DJ Effect setting.
ENG - 25
07 USING THE SAMSUNG SOUND TOWER
APP
Install Samsung Sound Tower App
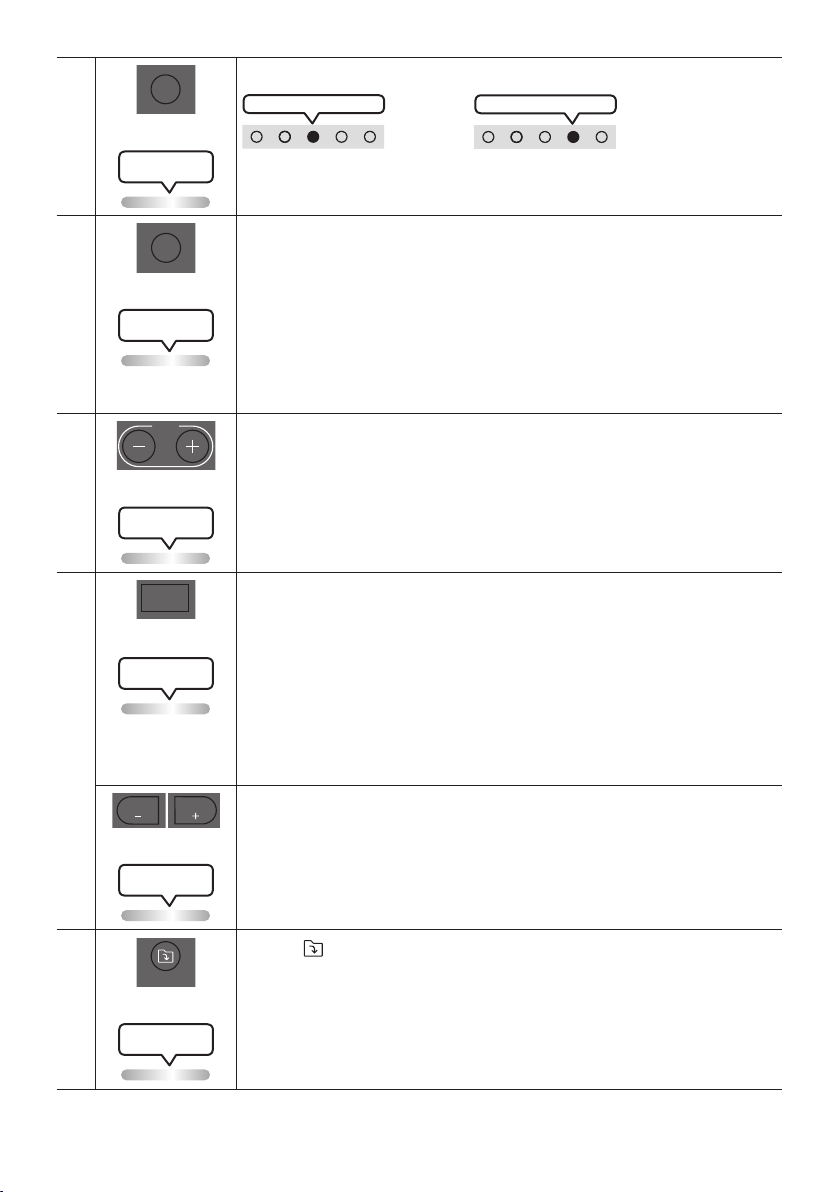
To control this product with your Smart Device and the Samsung Sound Tower app, download the
Samsung Sound Tower App from the Google Play Store or Apple App Store, and install it on your Smart
Device.
NOTES
• The Samsung Sound Tower app is compatible with Android mobile phone devices running Android
OS 8.0 or later.
• The Samsung Sound Tower app is compatible with Apple mobile devices running iOS 11.0 or later.
Market search : Samsung Sound Tower
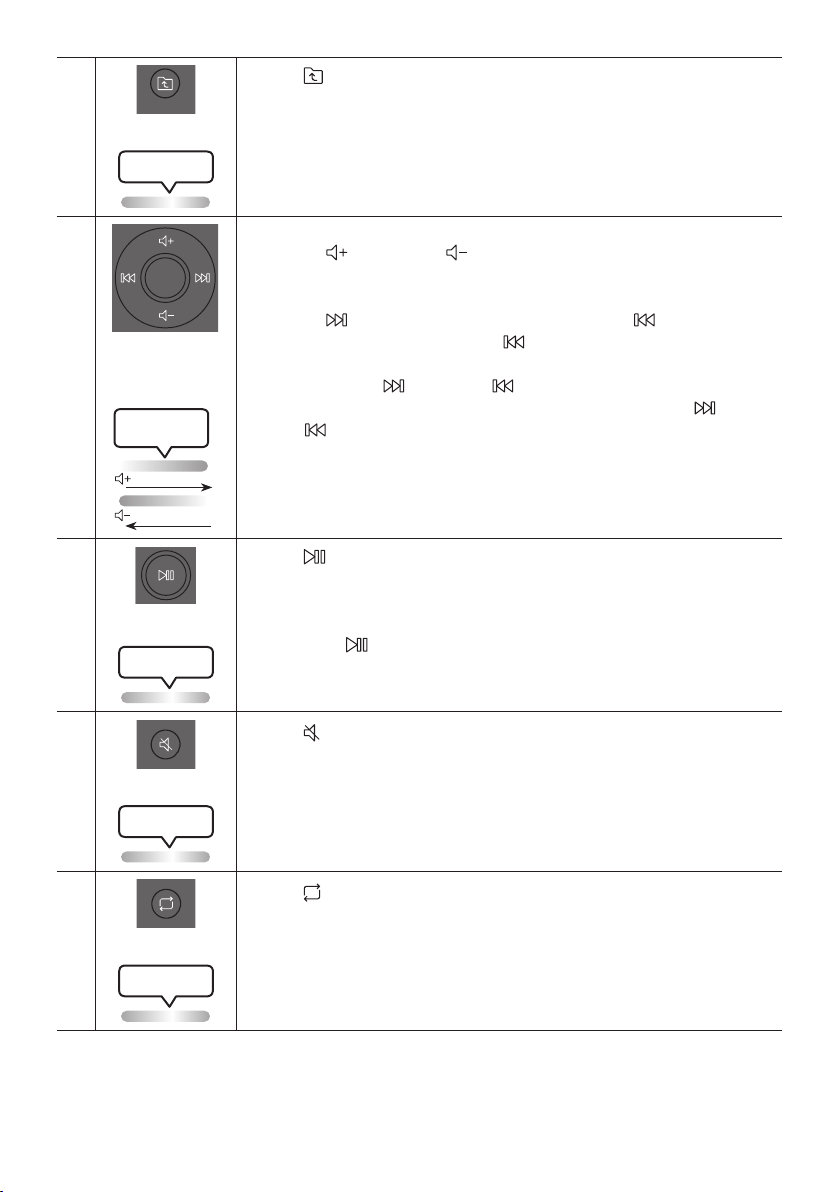
Launching the Samsung Sound Tower App
To launch and use the Samsung Sound Tower app, touch the Samsung Sound Tower icon on your smart
device, and then follow the directions on the screen.
Samsung
Multiroom
Samsung Sound Tower
Samsung Sound Tower
ENG - 26
08 TROUBLESHOOTING
Refer to the table below if this product does not function properly. If the problem you are experiencing
is not listed below or if the instructions below do not help, turn off the product, disconnect the power
cord, and contact Samsung Electronics at 1-800-SAMSUNG (1-800-726-7864).
The unit will not turn on.
; The battery may be fully discharged.
Please connect the power plug and try to
turn it on.
A function does not work when the button is
pressed.
; After removing the power plug, turn off the
Sound Tower. And insert power plug again,
turn on the Sound Tower.
; Power cycle the external device and try
again.
; If there is no signal, the Sound Tower
automatically turns off after a certain
period of time. Turn on the power.
Sound dropouts occur in BT mode.
; See the Bluetooth connection sections on
page 13.
Sound is not produced.
Is the Mute function on?
; Press the
(Mute) button to cancel the
mute function.
Is the volume set to minimum?
; Adjust the Volume.
The remote control does not work.
Are the batteries drained?
; Replace them with new batteries.
Is the distance between the remote control
and Sound Tower main unit too far?
; Move the remote control closer to the
Sound Tower main unit.
Stereo Group connection is not working.
Is the system in wireless Group Play mode?
; Disconnect the wireless Group Play mode
and try Stereo Group connection again.
It cannot make a Bluetooth connection.
Is the system connected to another system in
wireless Group Play mode or Stereo Group
mode?
; Try Bluetooth connection again after
disconnecting the wireless Group Play or
Stereo Group connection.
Are the two Bluetooth devices already
connected?
; Try Bluetooth connection again after
disconnecting other Bluetooth connections.
The PAIRING button is not working.
Is the system in wireless Group Play mode or
Stereo Group mode?
; Try again after disconnecting the wireless
Group Play or Stereo Group connection.
I want to switch the HOST (MAIN) system to
the other in wireless Group Play or Stereo
Group connection.
; Disconnect Group Play mode, press the
Speaker which you want make to HOST
rst, and after it use Group LED to judge
instead connect the others one by one.
; With Stereo Group mode, MAIN is xed.
You can not change others as MAIN.
I want to play AUX1 or AUX2 more than 8 hours
without control input.
; Press and hold the remote control
button for more than 5 seconds in AUX1 or
AUX2 mode to disable Auto Power Down
Function. Change from ON-AUTO POWER
DOWN to OFF-AUTO POWER DOWN.
ENG - 27
I can’t connect a SUB to Group play.
; After 1 hour, the HOST will block any
additional SUB from being added.
Press the GROUP PLAY button on HOST,
the SUB can be reconnected.
It cannot make a “Wireless/Wired Group/Add
Stereo/Bluetooth” connection.
Is the distance between systems too far?
; It is recommended to make a “Wireless/
Wired Group/Add Stereo/Bluetooth” pairing
within 3.3 ft (1 meter) from the system.
; The recommended operating distance
between Sound Tower systems is closer than
32.8 ft (10 meters).
09 LICENSE
The Bluetooth® word mark and logos are
registered trademarks owned by the Bluetooth
SIG, Inc. and any use of such marks by Samsung
Electronics Co., Ltd. is under license. Other
trademarks and trade names are those of their
respective owners.
Qualcomm aptX is a product of Qualcomm
Technologies, Inc. and/or its subsidiaries.
Qualcomm is a trademark of Qualcomm
Incorporated, registered in the United States and
other countries. aptX is a trademark of Qualcomm
Technologies International, Ltd., registered in the
United States and other countries.
[ENERGY STAR]
ENERGYSTARqualiedmodelonly
– Your Samsung product is ENERGY STAR
qualied in its factory default setting.
Change to certain features, settings and
functionality in this product can change the
power consumption, possibly beyond the
limits required for ENERGY STAR
qualication.
– Environmental Protection Agency and
Department of Energy. ENERGY STAR is a
joint program of the Government agencies,
designed to promote energy efcient
products and practices.
Refer to www.energystar.gov for more
information of the ENERGY STAR Program.
ENERGYSTARqualiedmodelonly
(Applicable to Thin Client models only)
As an ENERGY STAR® Partner, SAMSUNG has
determined that this product meets the
ENERGY STAR® guidelines for energy
efciency.
– The ENERGY STAR Program has been to
reduced greenhouse gas emissions and
save energy through voluntary labeling.
– Power management setting of this product
have been enabled by default, and have
various timing setting from 1 minutes to 5
hours.
– The product can wake with a button press
on the chassis from sleep mode.
ENERGYSTARqualiedmodelonly(Theother
models)
– As an ENERGY STAR Partner, Samsung has
determined that this product or product
models meets the ENERGY STAR guideline
for energy efciency.
To send inquiries and requests for questions
regarding open sources, contact Samsung
Open Source (http://opensource.samsung.com)

ENG - 28
10 OPEN SOURCE
LICENSE NOTICE
To send inquiries and requests for questions
regarding open sources, contact Samsung Open
Source (http://opensource.samsung.com)
11 IMPORTANT
NOTES ABOUT
SERVICE
Figures and illustrations in this User Manual are
provided for reference only and may differ from
actual product appearance.
ENG - 29
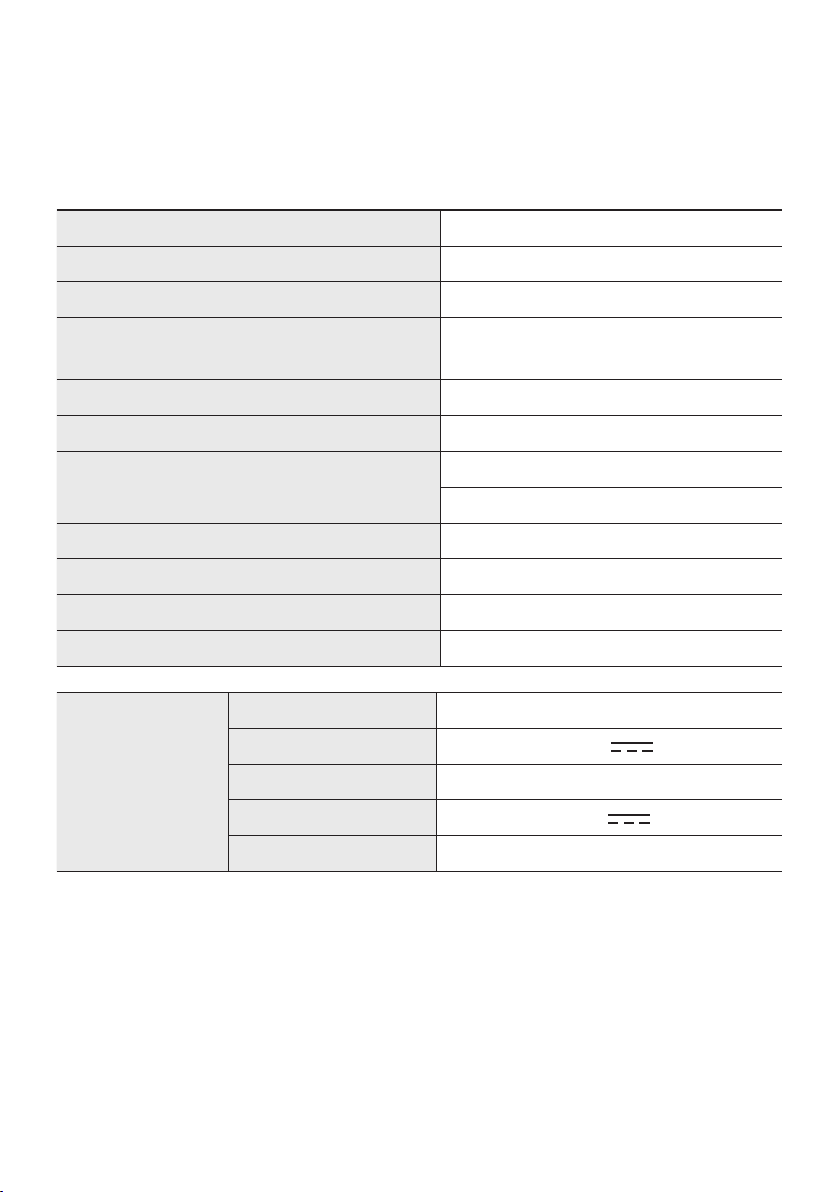
12 SPECIFICATIONS AND GUIDE
Specications
Model Name MX-ST50B
USB 5V/2.1A
Weight 26.32lbs (11.94kg)
Dimensions (W x H x D)
12.9×26.2×11.9 inches
(329×665×301mm)
Operating Temperature Range +41°F to +95°F (+5°C to +35°C)
Operating Humidity Range 10 % ~ 75 %
AMPLIFIER Rated Output power
Power cord plug-in 240W
Battery 90W
Overall Power Consumption 65W
Battery Type Lithium-ion 72Wh
Battery play time up to 18hrs
Battery charge time <3.5hrs
Li-ion Rechargeable
Battery
Battery Model EB-T24C-00, 2INR19/65-4
Nominal Voltage 7.34 V
Rate Capacity 9800 mAh, 71.93 Wh
Limited Charge Voltage 8.4 V
Typical Capacity 10000 mAh, 73.40 Wh
NOTES
• Samsung Electronics Co., Ltd reserves the right to change the specications without notice.
• Weight and dimensions are approximate.
• Battery Play time and Battery charge time vary with use conditions.
• In an extremely cold or hot environment, charging stops for safety. To resolve these issues,
disconnect the AC power cord and connect it again in an operating temperature between 5°C and
35°C (41°F and 95°F).
LIMITED WARRANTY TO ORIGINAL PURCHASER
Samsung Electronics Canada Inc.(SECA), warrants that this product is free from
defective material and workmanship.
SECA further warrants that if this product falls to operate properly within the specied
warranty period and the failure is due to improper workmanship or defective
materials, SECA will repair or replace the product at its option.
All warranty repairs must be performed by a SECA Authorized Service Center. (The name and
address of the location nearest you can be obtained by calling toll free: 1- 800- SAMSUNG)
LABOR
One year (Carry- in)
PARTS
One year
On carry-in models, transportation to and from the service center is the customer’s
responsibility.
The original dated sales receipt must be retained by the customer and is the only
acceptable proof of purchase. It must be presented to the authorized service center at
the time service is requested.
EXCLUSIONS (WHAT IS NOT COVERED)
This warranty does not cover damage due to accident, re, ood and/ or other acts of
God; misuse, incorrect line voltage, improper installation, improper or unauthorized
repairs, commercial use or damage that occurs in shipping. Exterior and interior nish,
lamps, glass are not covered under this warranty. Customer adjustments which are
explained in the instruction manual are not covered under the terms of this warranty.
This warranty will automatically be voided for any unit found with a missing or altered
serial number. This warranty is valid only on products purchased and used in Canada.
Samsung Electronics Canada Inc
2050 Derry Rd West
Mississauga, On. L5N 0B9
Tel: 1-800-SAMSUNG (726-7864)
Fax: (905) 542- 1199
Website: www.samsung.com/ca

© 2022 Samsung Electronics Co., Ltd. All rights reserved.
Contact SAMSUNG WORLD WIDE
If you have any questions or comments relating to Samsung products, please contact the SAMSUNG customer
care Center.
HEADQUARTERS
Samsung Electronics Canada Inc. 2050 Derry Road West, Mississauga, Ontario L5N 0B9 Canada
TEL: 1-800-SAMSUNG (1-800-726-7864)
www.samsung.com/ca/support
Country Samsung Service Center
Web Site
`
North America
CANADA 1-800-SAMSUNG (726-7864)
www.samsung.com/ca/support (English)
www.samsung.com/ca_fr/support (French)
U.S.A 1-800-SAMSUNG (726-7864) www.samsung.com/us/support

MX-ST50B
MANUEL COMPLET
Imaginez les possibilités
Merci d’avoir choisi un appareil Samsung.
Pour recevoir une assistance plus complète,
veuillez enregistrer votre produit sur
www.samsung.com/register
FRA - ii
INFORMATIONS RELATIVES À LA SÉCURITÉ
AVERTISSEMENTS
POUR ÉVITER LES RISQUES DE CHOC
ÉLECTRIQUE, NE DÉMONTEZ PAS LE CAPOT.
L’APPAREIL NE CONTIENT PAS DE PIÈCES
RÉPARABLES PAR L’UTILISATEUR. S’ADRESSER À
UN SERVICE APRÈS-VENTE QUALIFIÉ.
Reportez-vous au tableau ci-dessous pour
comprendre les symboles pouvant gurer sur
votre produit Samsung.
MISE EN GARDE
RISQUE DE CHOC
ÉLECTRIQUE NE PAS
OUVRIR
Ce symbole indique la présence d'une
haute tension à l'intérieur. Tout contact
avec une pièce interne de l'appareil
présente un danger.
Ce symbole vous informe qu'une
documentation importante relative au
fonctionnement et à l'entretien est
fournie avec le produit.
Produit de catégorie II: Ce symbole
indique qu'il ne nécessite pas une
connextion de sécurité à la terre
(masse). Si ce symbole n'est pas présent
sur un produit équipé d'un cordon
d'alimentation, le produit DOIT être
raccordé à la terre de manière able à
des ns de protection.
Tension CA: Ce symbole indique que la
tension nominale est la tension CA.
Tension CC : Ce symbole indique que la
tension nominale est la tension CC.
Attention, consultez les instructions aux
ns d'utilisation : Ce symbole indique à
l'utilisateur qu'il doit consulter le guide
d'utilisation pour avoir de l'information
au sujet de la sécurité.
AVERTISSEMENT
• An de diminuer les risques d’incendie ou de
choc électrique, n’exposez pas cet appareil à
la pluie ou à l’humidité.
• Ce produit contient des produits chimiques
qui peuvent, selon l’État de Californie, être
cancérigènes ou causer des anomalies
congénitales ou des troubles génésiques.
• La pile (pile, piles ou bloc-batteries) ne doit
pas être exposée à une chaleur excessive,
telle que la lumière du soleil, le feu, etc.
MISE EN GARDE
• Veillez à éviter toute projection sur l’appareil.
Ne placez jamais de récipients contenant un
liquide (ex. : vase) dessus.
• La prise d’alimentation fait ofce de système
de déconnexion. Elle doit donc rester
disponible en permanence.
ATTENTION (Pour le Canada)
L’émetteur/récepteur exempt de licence contenu
dans le présent appareil est conforme aux CNR
d’Innovation, Sciences et Développement
économique Canada applicables aux appareils
radio exempts de licence. L’exploitation est
autorisée aux deux conditions suivantes :
1) L’appareil ne doit pas produire de brouillage;
2) L’appareil doit accepter tout brouillage
radioélectrique subi, même si le brouillage est
susceptible d’en compromettre le fonctionnement.
Cet appareil et son ou ses antennes ne doivent
pas etre installés a proximité ou etre utilisés
conjointement avec une autre antenne ou un
autre émetteur.
Le dispositif pourrait automatiquement cesser
d’émettre en cas d’absence d’informations à
transmettre, ou une défaillance opérationnelle.
Notez que ce n’est pas l’intention d’interdire la
transmission des informations de contrôle ou de

FRA - iii
signalisation ou l’utilisation de codes répétitifs
lorsque requis par la technologie.
Cet appareil numerique de la classe B est
conforme a la norme NMB-003 du Canada.
Declaration d’exposition aux radiations:
Cet equipement est conforme aux limites
d’exposition aux rayonnements IC RSS-102
etablies pour un environnement non controle.
Cet equipement doit etre installe et utilise avec
un minimum de 20 cm de distance entre la source
de rayonnement et votre corps.
Consignes de sécurité importantes
Lisez attentivement ces consignes avant d’utiliser
l’appareil. Veillez à respecter toutes les consignes
répertoriées ci-après. Conservez ces instructions à
portée de main pour vous y référer ultérieurement.
1. Lisez attentivement ces consignes.
2. Conservez-les précieusement.
3. Tenez compte de tous les avertissements
mentionnés.
4. Respectez toutes les instructions sans
exception.
5. N’utilisez pas cet appareil à proximité de
l’eau.
6. Nettoyez-le à l’aide d’un tissu sec.
7. Ne bloquez pas les ouvertures de ventilation.
Installez l’appareil conformément aux
instructions du fabricant.
8. N’installez pas le lecteur à proximité d’une
source de chaleur de type radiateur, registre
de chaleur, cuisinière ou tout autre appareil
(y compris les récepteurs AV) générateur de
chaleur.
9. Ne désactivez pas le dispositif de sécurité de
la che de mise à la terre ou de la che
polarisée. Une che polarisée comporte
deux lames dont l’une est plus large que
l’autre. Une che de mise à la terre comporte
deux lames et une troisième broche de mise
à la terre. La lame la plus large et la
troisième broche sont destinées à assurer
votre sécurité. Si la che fournie ne s’insère
pas dans la prise utilisée, faites appel à un
électricien pour faire remplacer celle-ci.
10. Placez le cordon d’alimentation de sorte qu’il
ne puisse être ni piétiné ni pincé,
particulièrement au niveau de la che, de la
prise de courant et du point de sortie de
l’appareil.
11. Utilisez exclusivement les xations/
accessoires spéciés par le fabricant.
12. Utilisez exclusivement le
meuble à roulettes, le socle, le
trépied, le support ou la table
recommandés par le fabricant
ou vendus avec l’appareil.
Si l’appareil est posé sur un meuble à
roulettes, déplacez l’ensemble avec
précaution pour éviter de faire tomber le
lecteur et de vous blesser.
13. Débranchez l’appareil en cas d’orage ou
lorsqu’il est inutilisé pendant une période
prolongée.
14. Conez toutes les réparations à un technicien
qualié. Votre appareil doit impérativement
être réparé lorsqu’il a été endommagé de
quelque manière que ce soit :
détérioration
du cordon ou de la che d’alimentation,
projection de liquide sur l’appareil, chute
d’objets à l’intérieur de l’appareil, exposition
à la pluie ou à l’humidité, dysfonctionnement,
chute.

FRA - iv
Pour éviter la détérioration de l’étanchéité
Vériez ce qui suit et utilisez l’unité comme il se
doit.
• Toute déformation ou tout dommage
découlant de la chute de l’unité ou d’un choc
mécanique peut entraîner la détérioration de
l’étanchéité.
• Cette unité n’est pas conçue pour résister à la
pression de l’eau.L’utilisation de l’unité dans
un endroit soumis à une haute pression d’eau,
comme une douche, peut entraîner un
dysfonctionnement.
• Ne versez pas d’eau très chaude directement
sur l’unité et ne dirigez pas l’air chaud d’un
séchoir à cheveux ou d’un autre appareil vers
celle-ci.De plus, n’utilisez jamais l’unité dans
un endroit soumis à de hautes températures,
comme un sauna, et ne le placez pas à
proximité d’une source de chaleur.
• Manipulez le capuchon avec soin. Le
couvercle du port et le couvert CA de la prise
jouent un rôle important dans le maintien de
l’étanchéité. Lorsque vous utilisez l’unité,
assez-vous que le capuchon est refermé
complètement. Lorsque vous fermez le
capuchon, prenez garder de n’y laisser
pénétrer aucun objet étranger. Si le capuchon
n’est pas bien fermé, l’étanchéité pourrait se
détériorer et l’eau qui pénètre dans l’unité
pourrait entraîner son dysfonctionnement.
• La norme d’étanchéité IPX5 ne peut être
respectée lorsque la PRISE ou l’alimentation
en c.a. sont branchées.
• Le produit ne peut pas être placé à
l’horizontale pour s’assurer qu’il est étanche.
POWER
ECHOVOL
USB
(5V 2.1A)
AUX 1
MIC

FRA - v
• La tour de son offre une durabilité conforme à la norme IPX5.
Protection contre les
particules solides
IP
Protection contre l’eau
0 5
Aucune condition requise X X Aucune condition requise
Pas de protection 0 0 Pas de protection
Particules solides > 50 mm 1 1 Écoulement d’eau vertical
Particules solides > 12 mm 2 2 Écoulement d’eau vertical - boîtier incliné à 15°
Particules solides > 2,5 mm 3 3 Projection d’eau à 60° de la verticale
Particules solides > 1,0 mm 4 4 Projection d’eau dans toutes les directions
Protégé contre la
poussière
5 5 Jets d’eau dans toutes les directions
Étanche à la poussière 6 6 Jets d’eau puissants dans toutes les directions
- 7 Immersion temporaire : 1 m pendant 30 minutes
- 8
Immersion : profondeur et durée dénies par le
fabricant

FRA - vi
PRÉCAUTIONS
1. Assurez-vous que le bloc d’alimentation CA
chez vous est conforme aux exigences de
puissance gurant sur la plaque
d’identication située à en dessous de votre
produit. Installez votre produit
horizontalement, sur un socle approprié
(meuble), en laissant un espace sufsant
pour la ventilation sur le pourtour 3~4 po.
Faites attention à ne pas obstruer les orices
de ventilation. Ne posez pas l’ensemble sur
un amplicateur ou un autre appareil
susceptible de chauffer. Cet ensemble est
conçu pour une utilisation en continu.
Pour éteindre totalement l’appareil,
débranchez la che c.a. de la prise murale.
Débranchez l’appareil si vous prévoyez une
longue période d’inactivité.
2. En cas d’orage, débranchez la che de
l’appareil de la prise murale. Les surtensions
occasionnées par l’orage pourraient
endommager votre appareil.
3. N’exposez pas l’ensemble aux rayons directs
du soleil ou à toute autre source de chaleur.
Cela pourrait causer une surchauffe du l et
causer un dysfonctionnement de l’unité.
4. Protégez le produit de l’humidité (comme les
vases) et d’une chaleur excessive (comme
une cheminée) ou de tout équipement
capable de créer des champs magnétiques
ou électriques. Débranchez le câble
d’alimentation en cas de dysfonctionnement.
Votre produit n’est pas prévu pour un usage
industriel. Ce produit ne peut être utilisé qu’à
des ns personnelles. Une condensation
peut se former si le produit ou un disque a
été stocké à basse température. Si vous
devez transporter l’ensemble pendant l’hiver,
attendez environ 2 heures que l’appareil ait
atteint la température de la pièce avant de
l’utiliser.
5. Les piles utilisées dans ce produit peuvent
contenir des produits chimiques dangereux
pour l’environnement. Ne jetez pas les piles
dans votre poubelle habituelle. Ne vous
débarrassez pas des piles en les faisant
brûler. Les piles ne doivent pas être court-
circuitées, démontées ou subir de surchauffe.
MISE EN GARDE : Le remplacement
incorrect des piles peut entraîner un danger
d’explosion. Remplacez-les uniquement par
des produits similaires ou équivalents.
Autre
• La pile n’est fabriquée que pour ce produit, ne
l’utilisez donc pas dans d’autres appareils
électroniques ni à d’autres ns.
• Lorsque vous jetez une pile déchargée,
placez-la dans un collecteur de piles pour
qu’elle soit recyclée.
• Ne démontez pas la pile.
• Pour protéger le moteur et la pile, la pile ne
peut être rechargée à des températures
inférieures à 3 °C ou supérieures à 42 °C.
• Lorsque la pile est faible, rechargez-la.Si la
pile est faible pendant une longue période de
temps, son rendement pourrait diminuer.
• N’appliquez pas de chaleur sur la pile et ne la
jetez pas au feu.
• Ne démontez pas la pile.
• Pour protéger le moteur et la pile, la tour de
son ne peut fonctionner à des températures
inférieures à -17 °C ou supérieures à 57 °C.
FRA - vii
À PROPOS DE CE MANUEL
Le manuel utilisateur se compose de deux éléments : la version papier simpliée du MANUEL
D’UTILISATEUR et un MANUEL COMPLET détaillé que vous pouvez télécharger.
MANUEL D’UTILISATEUR
Consultez ce manuel pour obtenir des instructions relatives à la
sécurité, ainsi que des informations sur l’installation du produit,
les composants, les connexions et les caractéristiques du
produit.
MANUEL COMPLET
Vous pouvez accéder au MANUEL COMPLET sur le centre
d’assistance à la clientèle en ligne de Samsung en scannant le
code QR sur la gauche. Pour visualiser le manuel sur votre
ordinateur ou appareil mobile, téléchargez-le au format
document depuis le site Web de Samsung.
(https://www.samsung.com/us/support/downloads/)
La conception et les spécications sont susceptibles d’être modiées sans préavis.

FRA - viii
SOMMAIRE
01 VÉRIFICATION DES COMPOSANTS 1
Insertion des piles avant d’utiliser la télécommande (piles AAA X 2)
------------------------- 1
02 Présentation du produit 2
Panneau supérieur du Sound Tower
------------------------- 2
Panneau arrière du Sound Tower
------------------------- 3
03 CONNEXION DU Sound Tower 5
Comment utiliser le Groupe Audio
-------------------------
6
04 Connexion d’un appareil externe 12
Connexion à l’aide d’un câble audio analogique (AUX)
-------------------------
12
Connexion d’un appareil mobile via Bluetooth
-------------------------
13
Se connecter au Samsung TV via Bluetooth
-------------------------
16
05 Connexion d’un périphérique de stockage USB 17
Mise à jour du logiciel
-------------------------
18
Connexion d’un microphone externe
-------------------------
19
06 Utilisation de la télécommande 20
Comment utiliser la télécommande
-------------------------
20
Comment utiliser le mode Son
-------------------------
23
Comment utiliser l’effet DJ
-------------------------
24

FRA - ix
07 À l’aide de l’application Samsung Sound Tower 25
Installer l’application Samsung Sound Tower
-------------------------
25
Lancement de l’application Samsung Sound Tower
-------------------------
25
08 Résolution des problèmes 26
09 Licence 27
10 Avis de Licences Libres 28
11 REMARQUE IMPORTANTE CONCERNANT LE SERVICE 28
12 Spécicationsetguide 29
Spécications
-------------------------
29

FRA - 1
01 VÉRIFICATION DES COMPOSANTS
Unité principale du Sound Tower Télécommande / Piles Cordon d’alimentation
• Pour obtenir de l’information sur la source d’alimentation et la consommation électrique, veuillez
vous reporter à l’étiquette apposée sur le produit. (Étiquette : Arrière de l’unité principale du Sound
Tower)
• Pour acheter des composants supplémentaires ou des câbles en option, veuillez contacter un
centre de service Samsung ou le service clientèle Samsung.
• Lorsque vous déplacez le produit, ne le traînez pas ou ne le tirez pas du sol. Soulevez le produit
lorsque vous le déplacez.
• La conception et les spécications sont susceptibles d’être modiées sans préavis.
Insertion des piles avant d’utiliser la télécommande (piles AAA X 2)
Faites glisser le couvercle du compartiment à piles
dans le sens de la èche jusqu’à ce qu’il soit
complètement retiré. Insérez 2 piles AAA (1,5V)
orientées de façon à ce que leur polarité soit
correcte. Remettez le couvercle du compartiment à
piles en place.

FRA - 2
02 PRÉSENTATION DU PRODUIT
Panneau supérieur du Sound Tower
BASS
Capteur à
distance
Lorsque vous utilisez le système Sound Tower, dirigez l'avant de la télécommande vers
le capteur de la télécommande.
Voyant LED
Afche les messages opérationnels ou la source actuelle du système de la tour de son.
Les sources d'information représentées par chaque DEL sont les suivantes :
(BT) (USB) (AUX1) (AUX2) (Alimentation/Pile)
Alimentation Active et désactive Sound Tower.
Lumière Appuyez sur la touche
(Lumière) pour activer le Mode d'éclairage.
Source
Appuyez sur ce bouton pour sélectionner une source connectée au Sound Tower.
Appuyez et maintenez la touche
(Source) pour plus de 5 secondes an d’entrer le
mode “SEARCHING TV”.
Lecture/
Pause
• Lecture/Pause
Appuyez sur la touche
pour interrompre temporairement un morceau.
Si vous appuyez à nouveau sur le bouton, le morceau lu.
• Lecture de la démo
Appuyez sur le bouton de la télécommande plus de 5 secondes pour lancer la
lecture Demo pendant que le système est allumé.Cinq voyants DEL clignotent
simultanément, et la musique de démonstration joue pendant 90 secondes.
– Soyez prudent car il peut jouer plus fort que le volume déni.
Baisser le
volume
Appuyez sur le bouton (Baisser le volume) pour régler le niveau de volume vers le bas.
Augmenter
le volume
Appuyez sur la touche
(Augmenter le volume) an d’augmenter le volume.
BASS Appuyez sur le bouton BASS pour utiliser le son de basse puissant.
FRA - 3
Panneau arrière du Sound Tower
POWER
ECHOVOL
USB
(5V 2.1A)
AUX 1
MIC
ECHOVOL
USB
(5V 2.1A)
AUX 1
MIC
Bluetooth
PAIRING
Appuyez sur le bouton
PAIRING pour entrer en mode pairing. Le voyant DEL
« PAIRING » sur le panneau arrière clignotera rapidement.
ADD STEREO
Appuyez sur le bouton ADD STEREO pour vous connecter sans l à une autre tour de
son d’un même modèle.
GROUP PLAY
Appuyez sur la touche GROUP PLAY pour vous connecter sans l jusqu’à dix systèmes
Sound Tower.
USB
Connectez un périphérique USB aux ports USB de l'unité principale.
Vous pouvez charger votre téléphone cellulaire en le branchant au port USB.
• Appuyez sur la touche
(Source) pour sélectionner USB.
ECHO
Vous pouvez donner au son un effet d'écho à partir d'un microphone branché (MIC) en
réglant le bouton ECHO.
VOL Utilisez le bouton VOL pour régler le volume d'un microphone branché (MIC).
MIC Branchez votre microphone à la prise MIC.
Terminaux
GROUP PLAY
OUT
Utilisez un câble audio (non fourni) pour connecter les bornes GROUP PLAY (OUT) de
l'unité principale à l'entrée audio sur une sortie analogique externe.
Terminaux
GROUP PLAY
IN
Utilisez un câble audio (non fourni) pour connecter les terminaux AUX2 (IN) de l'unité
principale à la Sortie audio sur une sortie analogique externe.
AUX1
Utilisez un câble audio (AUX) (non fourni) pour connecter la prise AUX1 de l'unité
principale à la sortie audio d'un appareil externe.
Alimentation
Branchez le cordon d'alimentation à la prise d’alimentation et branchez l'autre
extrémité du cordon d'alimentation à une prise murale pour alimenter le Sound Tower
en électricité.
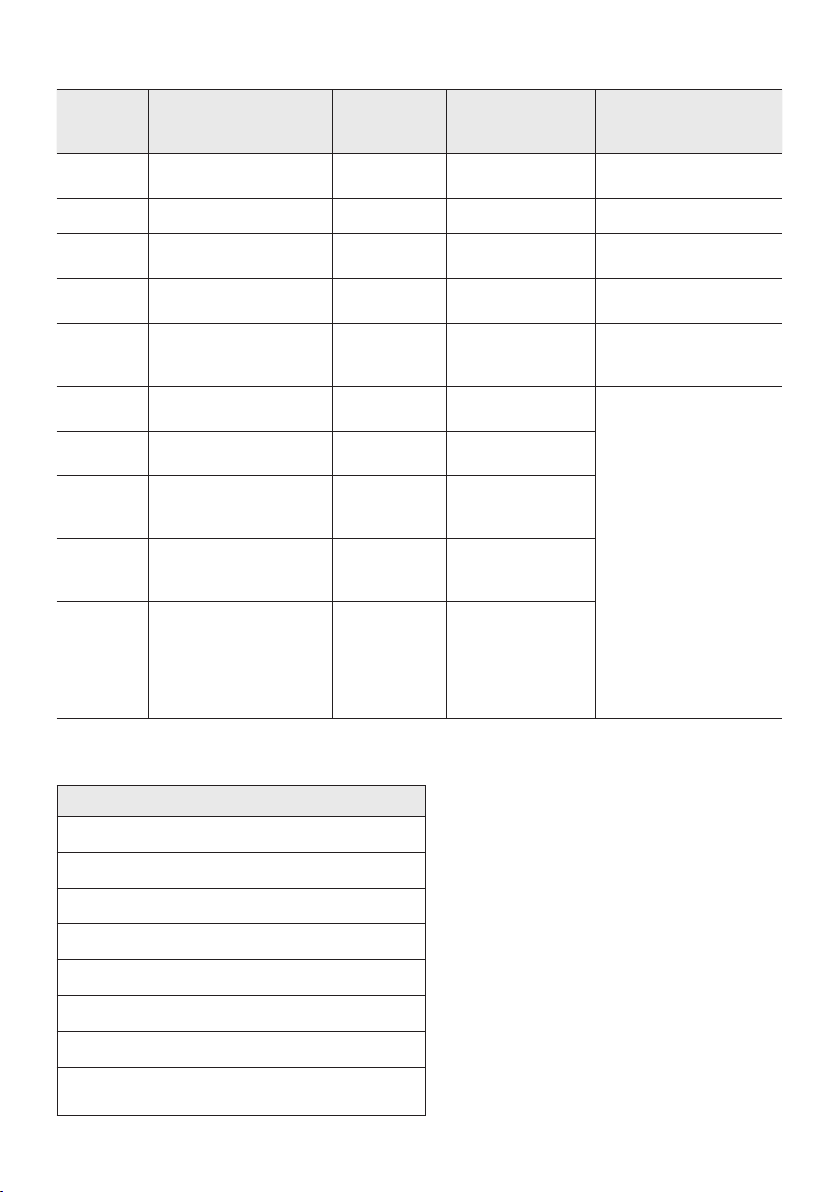
FRA - 4
État de la DEL de charge de la tour de son :
État de
la tour
de son
État de la charge
LED de
charge
(mode AC)
LED de charge
(mode DC)
Remarque
Éteinte
Complètement
chargée
Éteint (noir) Éteint (noir)
Éteinte En cours de recharge Green blinks S. O.
Éteinte
Pas en cours de
recharge
Éteint (noir) Éteint (noir)
Le câble AC n’est pas
branché.
Veille
Complètement
chargée
Bleu allumé S. O.
Il n’y a pas de mode
veille en mode DC.
Veille En cours de recharge
Le voyant
vert clignote
S. O.
Le LED de la charge est
le même que lorsque la
tour de son est éteinte.
Allumée
Complètement
chargée
Bleu allumé Bleu allumé
When turned on,
Sound Tower mainly
reects the current
battery state.
Allumée En cours de recharge
Le voyant
vert clignote
S. O.
Allumée
Pas en cours de
recharge et niveau de
charge de 30 % à 98 %
Voyant vert
allumé
Voyant vert
allumé
Allumée
Pas en cours de
recharge et niveau de
charge de 5 % à 29 %
Voyant
rouge
allumé
Voyant rouge
allumé
Allumée
Pas en cours de
recharge et niveau de
charge inférieur à 5 %
Voyant
rouge
allumé
Mettez l’appareil
hors tension après
que le voyant
orange de la barre
lumineuse a
clignoté une fois
Lors de l’arrêt en mode CC, l’alimentation du système entier est mise hors tension. Par conséquent, à
l’état d’arrêt, par rapport au mode CA, les fonctions suivantes ne sont pas prises en charge.
Fonctionnalités
Réveil par Bluetooth
Mode magasin
Réglage de la mise hors tension
Réinitialisation client
Mise sous tension par télécommande infrarouge
Charge de pile
AUI on/off
On/Off de la rétroaction IU de la barre lumineuse
DEL (avant)
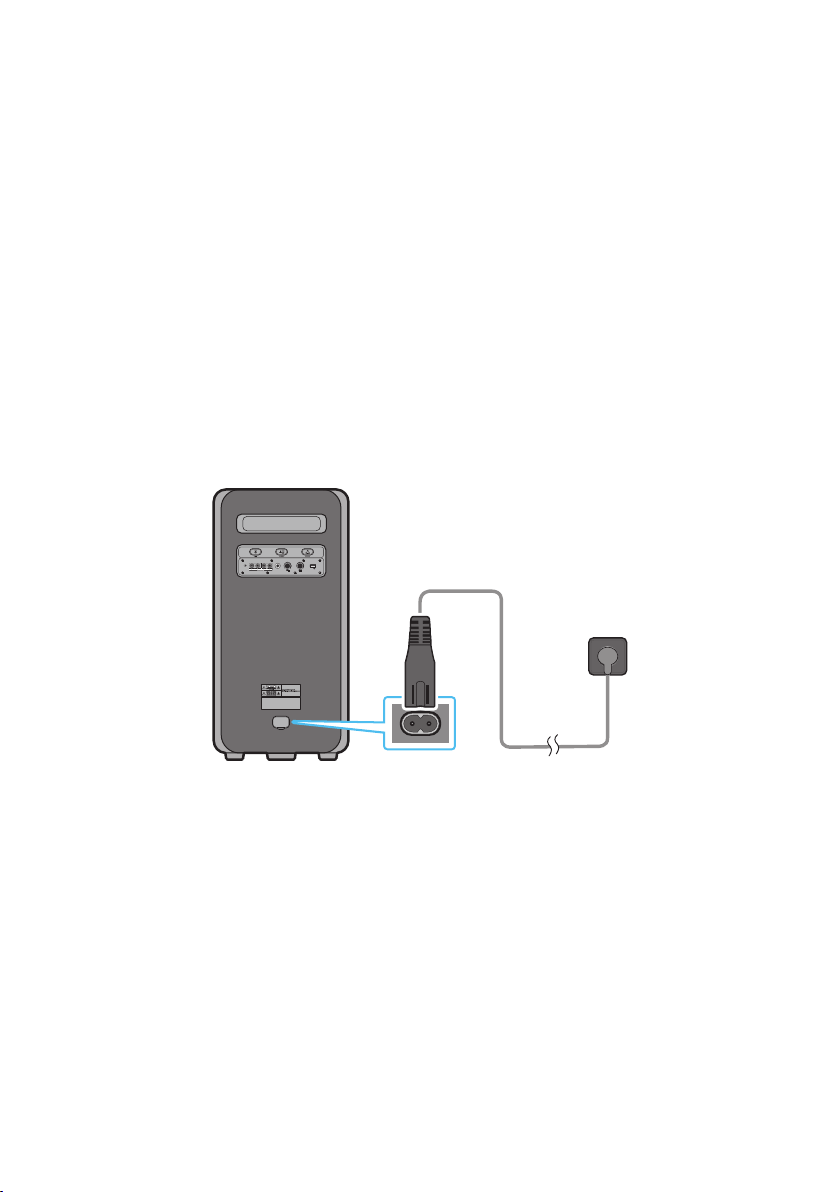
FRA - 5
03 CONNEXION DU SOUND TOWER
Branchement de l’alimentation électrique
Utilisez le cordon d’alimentation pour brancher le Sound Tower à une prise électrique dans l’ordre suivant :
Branchez le cordon d’alimentation sur le Sound Tower, puis sur une prise murale.
Voir les illustrations ci-dessous.
• Lorsque vous branchez le cordon CA, la pile intégrée sera chargée automatiquement jusqu’à ce
qu’elle atteigne le niveau de charge complet. Le voyant DEL situé dans le panneau supérieur
afchera l’état de charge actuel (reportez-vous à la page FR - 4)
• Lorsque vous désactivez le réglage de fonctionnement sur pile, le niveau du volume baisse
considérablement.
• Pour obtenir de l’information sur la source d’alimentation et la consommation électrique, veuillez
vous reporter à l’étiquette apposée sur le produit. (Étiquette: Arrière du Sound Tower)
Arrière du Sound Tower
POWER
ECHOVOL
USB
(5V 2.1A)
AUX 1
MIC
Branchement de
l’alimentation
électrique
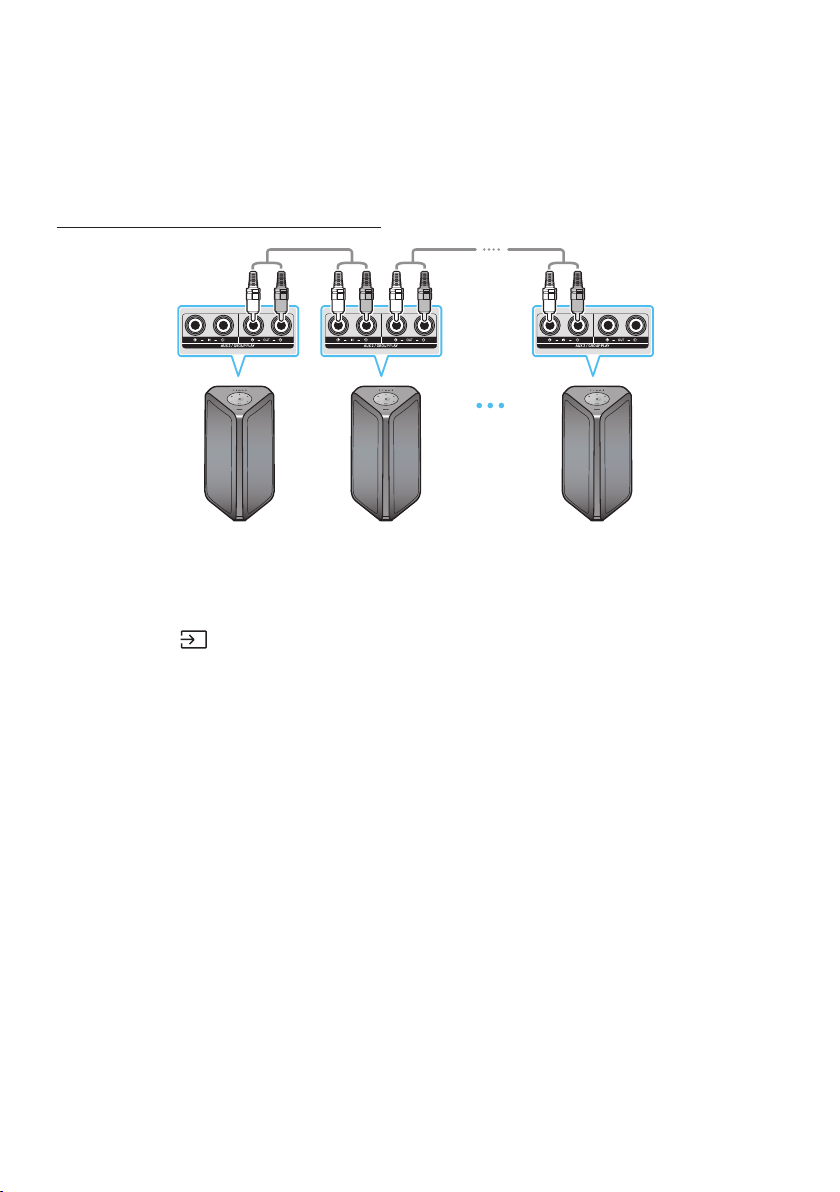
FRA - 6
Comment utiliser le Groupe Audio
Vous pouvez connecter plusieurs systèmes audio dans un groupe pour créer un environnement de fête
et produire un son plus puissant. Régler une Sound Tower comme HOST et toute musique jouée sur
celle-ci sera partagée entre tous les autres systèmes de Sound Tower du groupe Audio.
Connexion du mode Group Play câblé
1ère
Sound Tower HOST
2e Sound Tower Dernier Sound
Tower
Continuez la
connexion
Jusqu’au dernier
Sound Tower
Réglez le Group Play en branchant tous les systèmes à l’aide des câbles audio (non fournis). Utilisez la
touche AUX ou le
(Source) pour changer la source à AUX2 pour chaque système Sound Tower à
l’exception du 1er système (ou HOST) Sound Tower.
REMARQUES
• La 1ère Sound Tower HOST peut jouer de la musique à partir de n’importe quelle source.
• Selon la longueur ou les caractéristiques du câble, il peut y avoir une différence de distance de
détection.
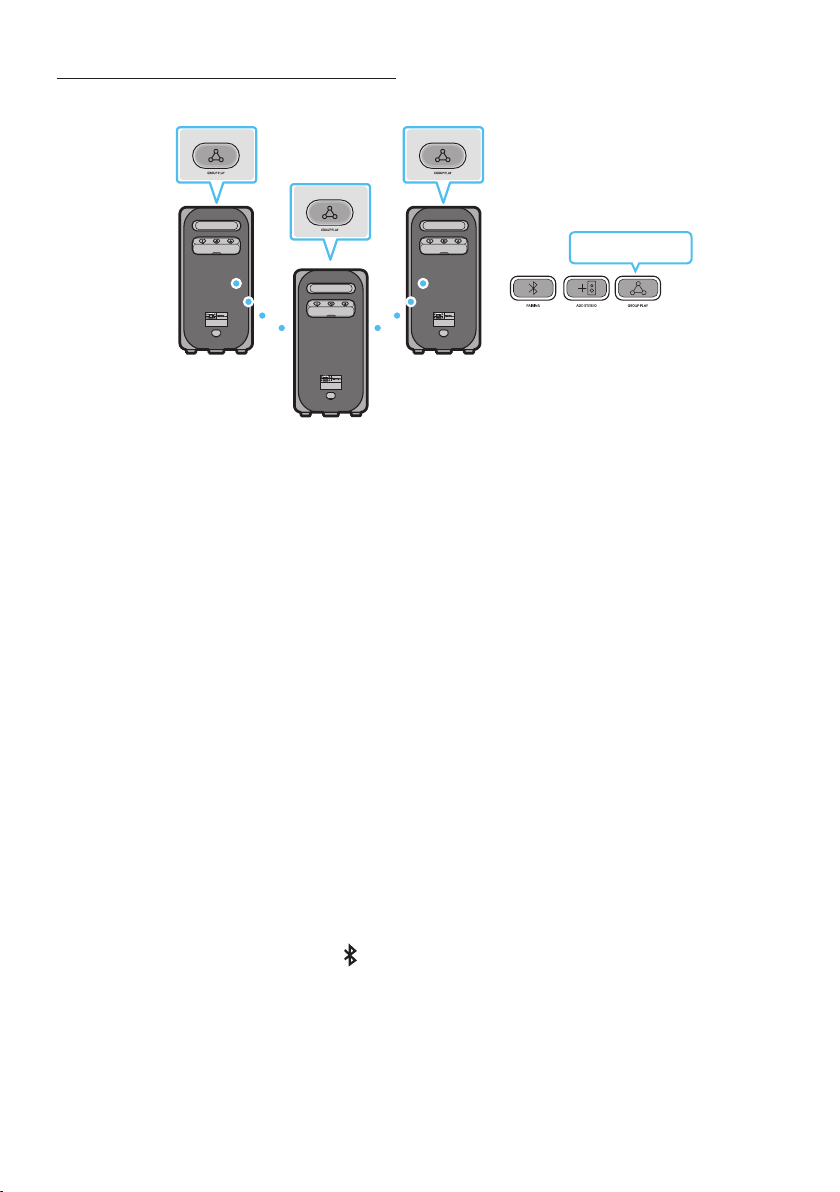
FRA - 7
ConnexiondumodeGroupPlaysansl
Vous pouvez connecter jusqu’à dix systèmes Sound Tower par fonction Group Play sans l.
POWERPOWER
POWER
HOST
SUB 1
SUB 2
Clignotement en vert
1. Appuyez sur le bouton GROUP PLAY du système de la tour de son HOST. Le « voyant LED du
GROUPE » clignotera doucement. Après 10 secondes, le voyant LED « GROUP PLAY » clignotera
rapidement (30 secondes).
2. Appuyez sur le bouton GROUP PLAY du deuxième système de la tour de son (SUB 1). Le voyant LED
« GROUP PLAY » clignotera. Puis, SUB1 sera connecté à l’HOST. Les voyants LED de GROUP PLAY
du SUB1 et de l’HOST cesseront de clignoter et s’allumeront.
3. Appuyez sur la touche GROUP PLAY du 3e système Sound Tower (SUB 2). Un son est émis, et le
bouton GROUP PLAY du système cesse de clignoter.
4. Si vous souhaitez ajouter d’autres systèmes Sound Tower, répétez l’étape 3.
5. Jouer de la musique sur HOST Sound Tower. Les sorties sonores de tous les systèmes connectés.
REMARQUES
• En mode Group Play, la tour de son « HOST » (Figure 1) peut se connecter au téléviseur Samsung.
Après la réussite de la connexion, l’unité sort automatiquement du mode Group Play.
• La connexion Group Play sans l est disponible pour MX-ST90B/MX-ST50B/MX-ST40B.
• Les conditions climatiques ou autres facteurs peuvent avoir un effet sur les appareils branches et
sur la qualité de la lecture.
• Si la LED rouge se trouve sur la touche GROUP PLAY, une erreur s’est produite dans la connexion
sans l Group Play. Recommencez les étapes 1 à 5.
• Le bouton ADD STEREO et le bouton
PAIRING des systèmes SUB Sound Tower ne sont pas
disponibles en mode de Group Play sans l.
• Le bouton ADD STEREO du système HOST Sound Tower n’est pas disponible en mode de Group
Play sans l.

FRA - 8
• Maintenez le bouton « GROUP PLAY » enfoncé sous l’état de la source BT pour vous connecter à
l’Group mode comme « HOST ».
• Toutes les unités SUB doivent être connectées une par une. Par exemple, une fois que HOST est
connecté, appuyer sur le bouton GROUP PLAY sur le SUB 1 pour se connecter, et une fois que le SUB
1 est connecté, vous devez connecter le SUB 2 et le SUB 3 un par un de manière séquentielle.
• Tout en utilisant le Group Play les appareils Bluetooth branchés présentement seront débranchés
et la connexion Bluetooth sera activée.
• Les appareils Bluetooth ne peuvent effectuer des recherches et se connecter qu’avec HOST Sound
Tower.
• En mode Group Play, les SUB ne peuvent pas se connecter à un appareil Bluetooth.
• Si vous éteignez puis allumer Sound Tower ou sélectionner une source autre que BT sur une unité
SUB, en mode Group Play, le mode Group Play est désactivé.
• Ce produit ne prend pas en charge le ux audio aptX avec le mode Group Play sans l.
DéconnexiondumodeGroupPlaysansl
1. Appuyez sur le bouton GROUP PLAY et maintenez-le enfoncé pendant 5 secondes (HOST ou SUB)
une fois le Group Play connecté ou appuyez sur le bouton GROUP PLAY (HOST ou SUB) avant la
connexion du Group Play.
• Un son est émis, et le voyant LED qui se trouve au-dessus du bouton GROUP PLAY est éteint.
2. Si vous sélectionner une source autre que BT sur les unités SUB ou si vous désactiver HOST Sound
Tower, le mode de Group Play est désactivé.
• Si la déconnexion est faite à partir de HOST Sound Tower, Group Play est désactivé.
Indications par LED
LED ÉTAT Description
Vert
Clignotement En attente d'une connexion Group Play.
On La connexion sans l Group Play est réussie.
Rouge On Une erreur est survenue lors de la connexion sans l Group Play.
REMARQUE
• La qualité de la relecture peut être instable en fonction de l’environnement Bluetooth avec une
connexion sans l.
Veuillez maintenir l’appareil en mode Group Play câblé an de mieux jouer.
• La première connexion Bluetooth doit avoir lieu dans une portée de 1 m.
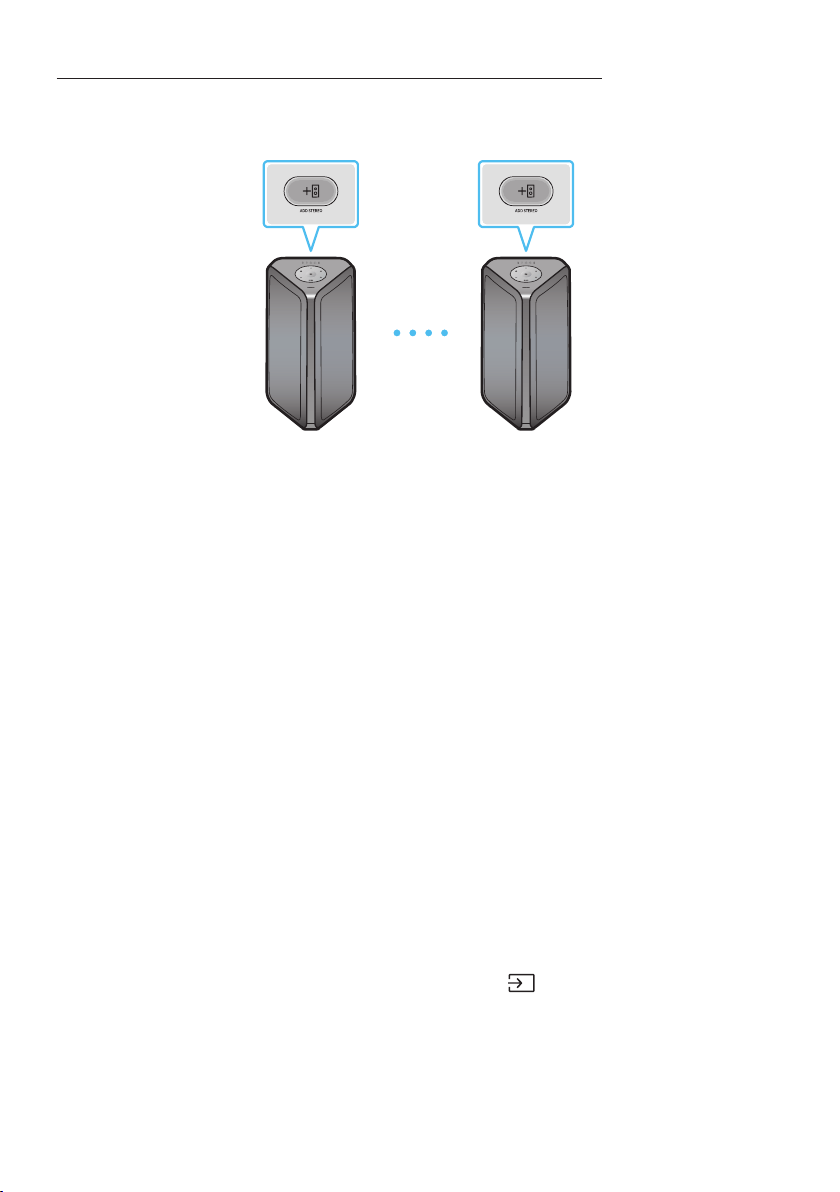
FRA - 9
Utilisation d’un téléphone intelligent et du mode Stereo Group
Connecter deux Sound Tower et utilisez-les avec votre téléphone intelligent pour proter d’un son
stéréo.
Sound Tower à
gauche (MAIN)
Sound Tower à droite
(SUB)
1. Appuyez sur le bouton ADD STEREO du système Sound Tower de gauche. Le voyant LED du bouton
ADD STEREO clignote.
2. Appuyez sur le bouton ADD STEREO du système Sound Tower de droite. Le voyant LED du bouton
ADD STEREO clignote.
3. Lorsque la connexion est établie, un son se fait entendre.Fond de panier : le voyant LED vert
s’allume et reste xe.
• Le système de MAIN Sound Tower émet le son du canal gauche et le système de SUB Sound
Tower émet le son du canal droit. Appuyer sur le bouton ADD STEREO de MAIN ou SUB Sound
Tower pour changer le canal sonore de Sound Tower.
4. Jouer de la musique en connectant votre téléphone intelligent à MAIN Sound Tower et au
Bluetooth. Le son est produit par les deux Sound Tower.
REMARQUES
• Pour utiliser le mode Groupe Stereo, les deux systèmes Sound Tower doivent être du même
modèle.
• Les conditions climatiques et tout autre facteur liés aux appareils connectés peuvent avoir un effet
sur la qualité de la lecture.
• Si la LED rouge est sur la touche ADD STEREO, une erreur s’est produite dans la connexion du
Groupe Stereo. Essayez à nouveau l’étape 1 et l’étape 3.
• La télécommande, les boutons BT PAIRING, GROUP PLAY et
(Source) des systèmes SUB Sound
Tower sont désactivés en mode Stereo Group.
• Le bouton GROUP PLAY du système MAIN Sound Tower n’est pas disponible en mode Stereo Group.
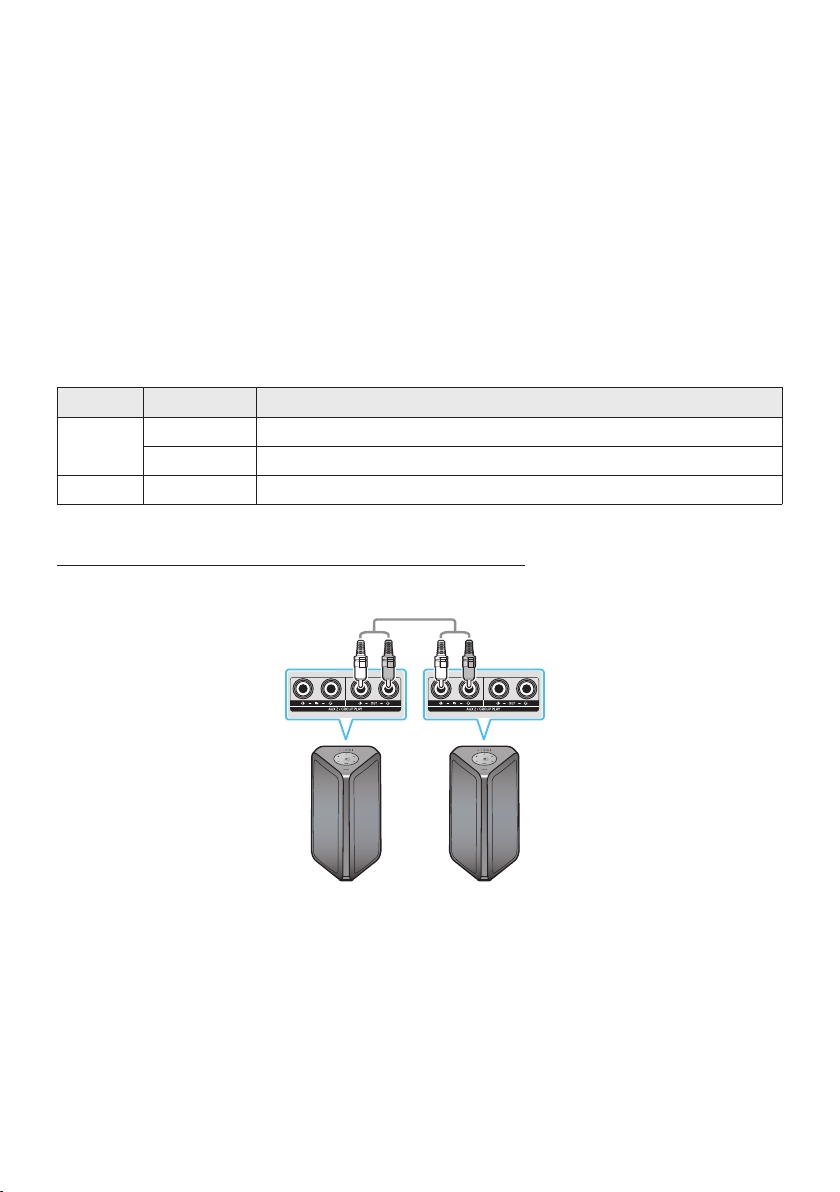
FRA - 10
• En mode autre que “BT” (exemple USB, mode AUX), la musique est jouée uniquement dans MAIN
Sound Tower et la musique n’est pas jouée dans SUB Sound Tower.
• Les couleurs d’éclairage entre MAIN Sound Tower et SUB Sound Tower peuvent varier.
• Ce product ne prend pas en charge le ux audio aptX avec le Stereo Groupe mode.
• Si vous essayez de connecter un appareil Bluetooth lorsque le Groupe Stereo est branché, le mode
Groupe Stereo échouera.
Terminer le Stereo Groupe mode
Appuyez sur le bouton ADD STEREO (MAIN ou SUB) pendant au moins 5 secondes lorsque le Stereo
Group est connecté.
• Un son est émis, et le voyant LED qui se trouve au-dessus du bouton ADD STEREO est éteint.
Indications par LED
LED ÉTAT Description
Vert
Clignotement En attente d'une connexion au Groupe Stereo.
On La connexion Groupe Stereo est réussie.
Rouge On Une erreur est survenue lors de la connexion Groupe Stereo.
Utilisation d’un Samsung TV et du mode Stereo Group
Connecter deux Sound Tower par l et utilisez-les avec Samsung TV pour proter d’un son stéréo.
Sound Tower à
gauche (MAIN)
Sound Tower à
droite (SUB)
1. Branchez deux Sound Tower via le mode Stereo en appuyant sur le bouton ADD STEREO des deux
Sound Tower.
2. Connecter le câble RCA à la sortie AUX2 OUT sur le MAIN et à l’entrée AUX2 IN sur le SUB comme
indiqué en utilisant le câble RCA (non fourni).
3. En mode “BT”, appuyer sur le bouton “AUX” de la télécommande de MAIN Sound Tower pendant au
moins 5 secondes. Le voyant LED du bouton ADD STEREO clignote.

FRA - 11
4. Lorsque la connexion est établie, le voyant DEL « ADD STEREO » s’allume, suivi de la sortie en
cours d’utilisation. Un son se fait entendre.
5. Lorsque la connexion est établie, le voyant LED « AUX2 » du panneau supérieur du SUB s’allume.
• MAIN Sound Tower émet le son du canal gauche et la SUB Sound Tower émet le son du canal
droit. Appuyer sur le bouton ADD STEREO de MAIN ou SUB Sound Tower pour changer le canal
sonore de Sound Tower.
6. Connecter un TV et MAIN Sound Tower via Bluetooth pour jouer de la musique. Le son est produit
par les deux Sound Tower.
REMARQUES
• Pour utiliser le mode Stereo Group, les deux Sound Tower doivent être du même modèle.
• Un voyant rouge sur la LED du bouton ADD STEREO indique une erreur dans la connexion du Stereo
Group. Essayer à nouveau les étapes 1 à 5.
• En mode Stereo Group, la télécommande, les boutons BT PAIRING, GROUP PLAY et
(Source) de
la SUB Sound Tower sont désactivés.
• Le bouton GROUP PLAY de MAIN Sound Tower n’est pas disponible en mode Stereo Group.
• Si la télévision Samsung est compatible avec une connexion simple, la fenêtre contextuelle de
connexion s’afche automatiquement sur la télévision, et si vous sélectionnez “Oui”, elle se
connecte à la télévision. S’il existe un précédent historique de connexion entre Samsung TV et la
Sound Tower, celle-ci sera connectée à Samsung TV sans fenêtre contextuelle. Pour une connexion
simple à Samsung TV, référez-vous à la page 16.
• Les couleurs de l’éclairage peuvent varier entre MAIN Sound Tower et SUB Sound Tower.
MettrenàlaconnexionenmodeStereoGroup
Appuyer sur le bouton ADD STEREO (MAIN ou SUB) pendant au moins 5 secondes après que Stereo
Group est connecté.
• Le « OFF-STEREO MODE » émet un son, puis le voyant LED qui se trouve sur le bouton ADD
STEREO s’éteint.
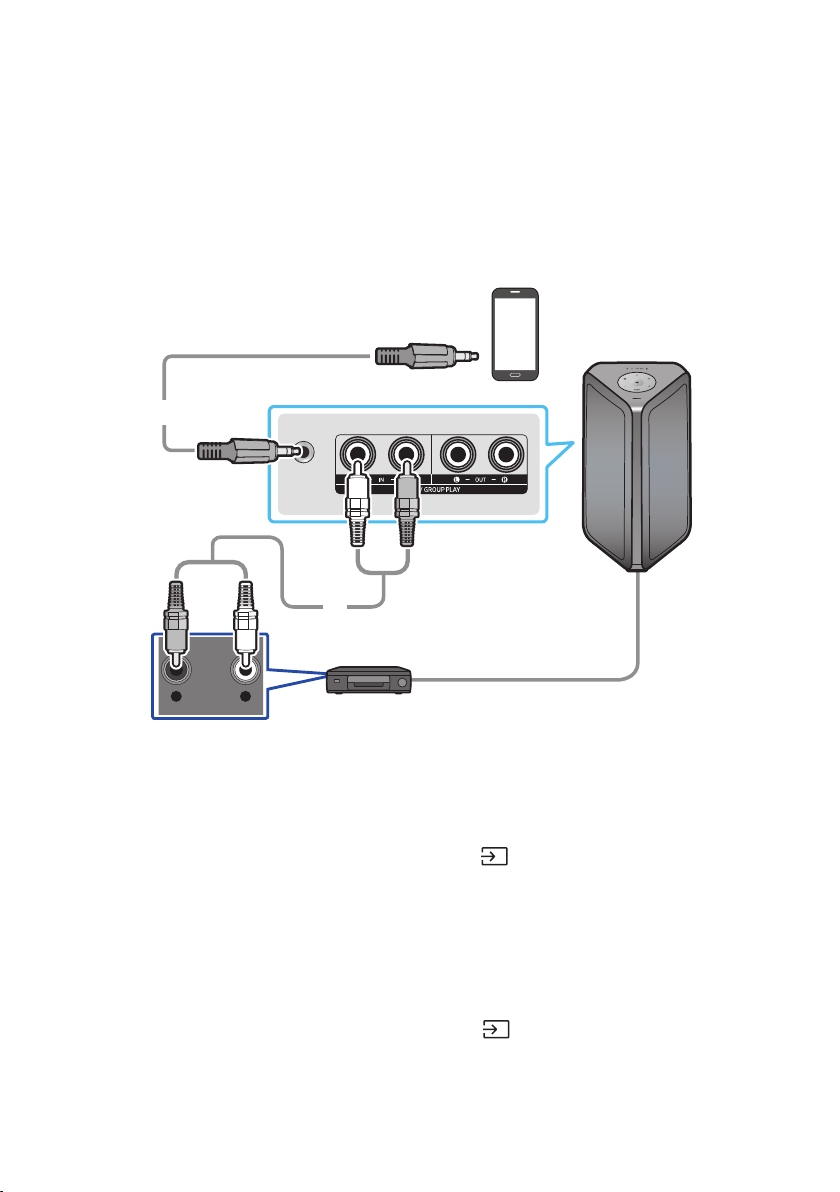
FRA - 12
04 CONNEXION D’UN APPAREIL EXTERNE
Connectez-vous à un appareil externe via un réseau câblé ou sans l pour écouter le son de l’appareil
externe via le Sound Tower.
Connexion à l’aide d’un câble audio analogique (AUX)
AUX 1
- AUDIO -
R L
Appareil mobile / MP3 / PMP
BD / Lecteur DVD / Box / Console de jeu
Câble stéréo de 0,14 po
(3,5mm)
(non fourni)
Câble audio (AUX) (non fourni)
Arrière du Sound Tower
Câble stéréo de 0,14 po (3,5mm) (AUX1)
1. Connectez la prise AUX1 de l’unité principale à la prise AUDIO OUT du périphérique source à l’aide
d’un câble stéréo de 0,14 po (3,5mm).
2. Sélectionnez le mode “AUX1” en appuyant sur la touche
(Source) du panneau supérieur ou de
la télécommande.
• Vous pouvez également sélectionner une source à l’aide de la touche AUX de la télécommande.
Câble audio (AUX2)
1. Connecter les bornes AUX2 (IN) de l’unité principale aux bornes AUDIO OUT du périphérique
source à l’aide d’un câble audio.
2. Sélectionnez le mode “AUX2” en appuyant sur la touche
(Source) du panneau supérieur ou de
la télécommande.
• Vous pouvez également sélectionner une source à l’aide de la touche AUX de la télécommande.
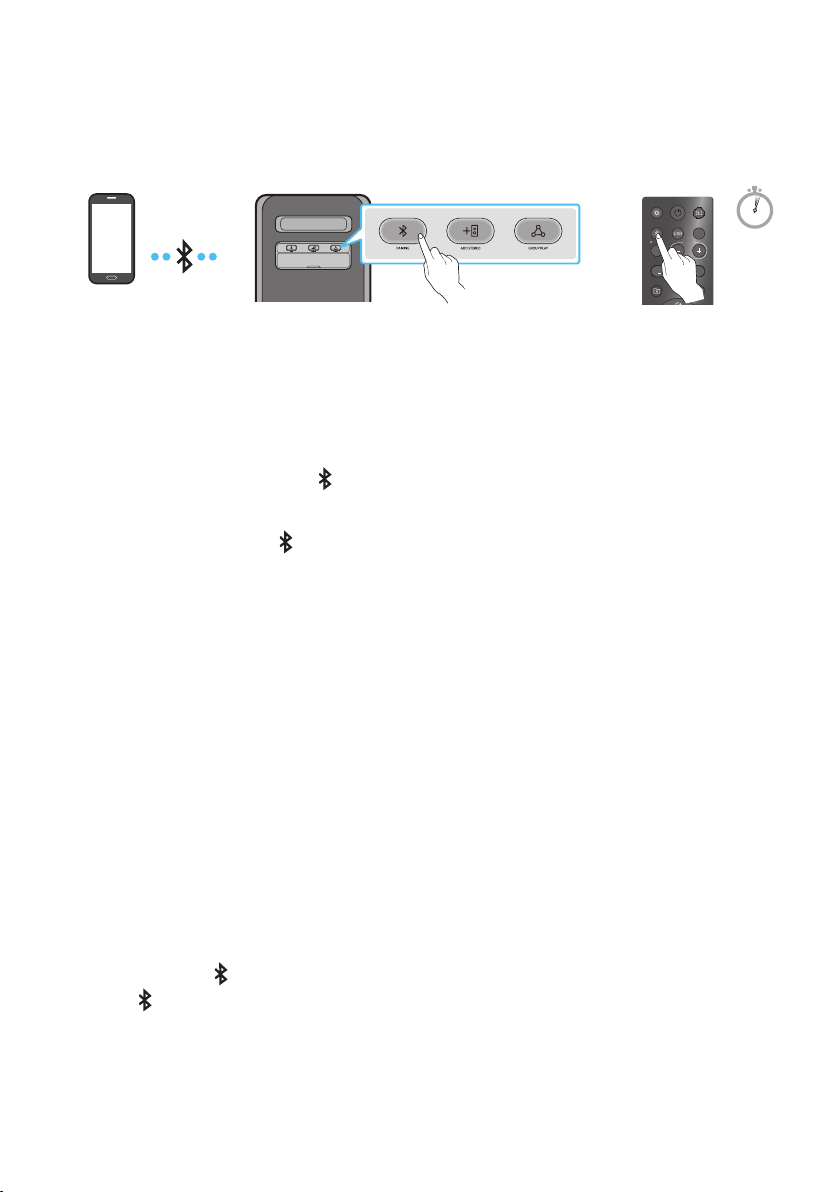
FRA - 13
Connexion d’un appareil mobile via Bluetooth
Lorsqu’un appareil mobile est connecté à l’aide de Bluetooth, vous pouvez entendre le son stéréo sans
les tracas du câblage.
LIGHT
PAIRING
TEMPO
USB
AUX
EFFECT
DOWN
UP
EFFECT
DJ
SOUND
MODE
Périphérique
Bluetooth
OU
5 Sec
* En mode Pile, lorsque l’alimentation de la tour de son est débranchée, la connexion Bluetooth et
l’application Sound Tower ne sont pas disponibles.
Périphérique Bluetooth
1. Appuyez et maintenez la touche PAIRING sur la télécommande pour plus de 5 secondes an
d’entrer le mode “BT PAIRING”.
(OU)
Appuyez sur le bouton
PAIRING du panel arrière.
2. Sur votre appareil, sélectionnez “[AV] MX-ST5B Series” dans la liste qui apparaît.
• Après la connexion de l’appareil.Le troisième voyant du panneau supérieur clignote trois fois en
cyan, et le voyant du bluetooth du panneau arrière s’allume et reste xe.
3. Lecture de chiers musicaux à partir de l’appareil connecté via Bluetooth au moyen du Sound
Tower.
Si l’appareil ne parvient pas à se connecter
• La tour de son lira une invite vocale indiquant que la connexion a échoué.
• Si un listing Sound Tower précédemment connecté (par exemple “[AV] MX-ST5B Series”) apparaît
dans la liste, supprimez-le.
• Répétez ensuite les étapes 1 et 2.
Quelle est la différence entre BT READY et BT PAIRING ?
• BT READY : Dans ce mode, vous pouvez utiliser le téléviseur ou l’appareil mobile précédemment
connecté pour vous connecter à la tour de son.
• BT PAIRING : Dans ce mode, vous pouvez connecter un nouvel appareil au Sound Tower. (Maintenez
enfoncé le bouton
PAIRING de la télécommande pendant plus de 5 secondes ou appuyez sur le
bouton PAIRING à l’arrière de Sound Tower pour passer en mode “BT PAIRING”.)
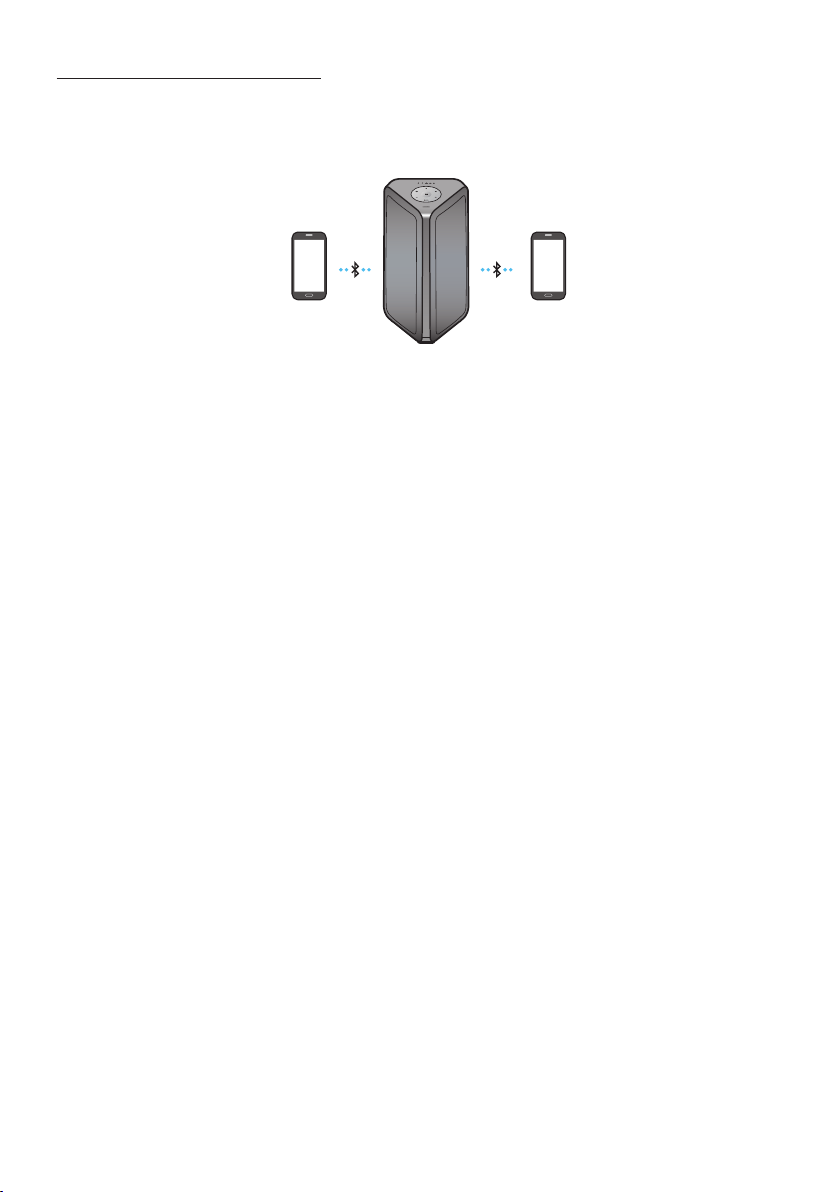
FRA - 14
Connexion multiple Bluetooth
Sound Tower prend en charge jusqu’à deux connexions simultanées d’appareils Bluetooth. Sound Tower
peut jouer de la musique via l’un des appareils Bluetooth connectés sans déconnecter le second
appareil.
Périphérique
Bluetooth 1
Périphérique
Bluetooth 2
1. Connectez pour la première fois Sound Tower au premier appareil et au second appareil
respectivement. (voir la page 13)
2. La musique ne peut être jouée que sur l’un des deux appareils connectés, et lorsque la musique est
jouée sur l’autre appareil, la musique sur l’appareil de lecture est mise en pause.
REMARQUES
• Si vous souhaitez connecter Sound Tower à un troisième appareil, vous pouvez déconnecter Sound
Tower de l’un des deux appareils actuellement connectés, puis connecter Sound Tower au troisième
appareil. (L’appareil comprend le téléviseur Samsung)
• Si le Sound Tower et les deux appareils sont connectés, lors du couplage avec un nouvel appareil
Bluetooth, les appareils connectés peuvent être déconnectés.
• Vous pouvez vous connecter à deux appareils Bluetooth en même temps.
• Les conditions climatiques ou autres facteurs peuvent avoir un effet sur les appareils branches et
sur la qualité de la lecture.
• Le Sound Tower s’éteindra automatiquement après 18 minutes si aucune commande n’est entrée
dans le statut prêt.
• Il se peut que le Sound Tower n’effectue pas correctement la recherche ou la connexion Bluetooth
dans les circonstances suivantes :
– S’il y a un fort champ électrique autour du Sound Tower.
– Si plusieurs périphériques Bluetooth sont appairés simultanément avec le Sound Tower.
– Si le périphérique Bluetooth est éteint, n’est pas en place ou fonctionne mal.
• Les appareils électroniques peuvent causer des interférences radio. Les appareils qui génèrent des
ondes électromagnétiques doivent être tenus éloignés de l’unité principale du Sound Tower - par
exemple, les micro-ondes, les appareils LAN sans l, etc.
• Il se peut que la connexion Bluetooth Multi ne soit pas prise en charge en fonction des
spécications de l’appareil connecté.
• Appareils Bluetooth amovible/détachable (ex. Dongle etc.), téléphones windows, ordinateurs, TV,
etc. ne supportent pas la connection Multi Bluetooth.

FRA - 15
• Une fois que la connexion Multi Bluetooth est jumelée, il pourrait y avoir un léger délai avant la
lecture de la musique débute sur les appareils Bluetooth.
• Si vous vous éloignez trop du Sound Tower sans en premier déconnecter votre appareil Bluetooth, il
se peut que cela prenne quelques minutes avant qu’une connexion à un autre appareil Bluetooth
soit établie. Si vous éteignez et rallumez le Sound Tower, vous pouvez connecter d’autres appareils
Bluetooth sans attendre.
Indications par LED
LED ÉTAT Description
Bleu
Clignotement rapide Mode BT PAIRING
Clignotement Mode BT READY
On Un périphérique Bluetooth est connecté.
Utilisant la mise sous tension du Bluetooth (Bluetooth Power On)
Lorsque le Sound Tower est éteint, vous pouvez connecter votre appareil intelligent au produit via une
connexion Bluetooth pour l’allumer. L’état de la pile ne peut pas utiliser la mise sous tension Bluetooth.
1. Appuyez et maintenez enfoncée la touche BASS de la télécommande ou du panneau supérieur
pour activer la fonction de la mise sous tension du Bluetooth. La barre lumineuse clignotera une
fois en blanc.
2. Lorsque le Sound Tower est éteint, connectez votre appareil intelligent au produit via Bluetooth
(pour plus d’informations sur les connexions Bluetooth, reportez-vous au manuel de votre appareil
intelligent).
3. Une fois la connexion établie, le Sound Tower s’allume automatiquement en mode Bluetooth.
• Sélectionnez la musique que vous souhaitez écouter à partir de votre appareil intelligent.
REMARQUE
• Chaque fois que vous ap-puyez sur le bou-ton BASS et que vous le maintenez en-foncé pen-dant 5
secondes. La barre lu-mineuse clig-notera une fois en blanc et l’état changera :
BLUETOOTHPOWER-ON→BLUETOOTHPOWER-OFF
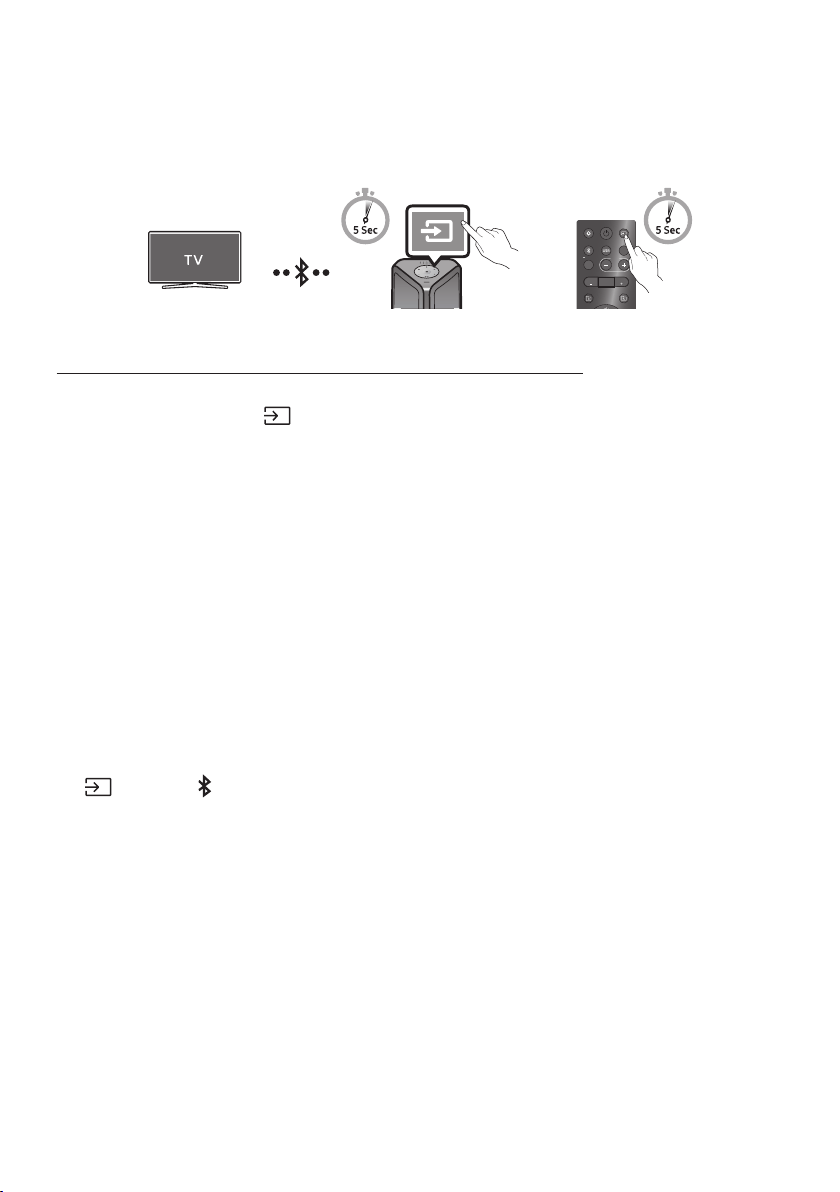
FRA - 16
Se connecter au Samsung TV via Bluetooth
En cas de connexion de Sound Tower avec un Samsung TV via Bluetooth, Sound Tower peut être
contrôlé par l’interface utilisateur du TV. (Volume +/-, mise en sourdine et mise sous tension)
LIGHT
PAIRING
TEMPO
USB
AUX
EFFECT EFFECT
DJ
SOUND
MODE
OU
Panneau supérieur du Sound Tower
Connexion facile avec la Samsung TV (mode SEARCHING TV)
Sound Tower est doté du mode “SEARCHING TV” qui permet de se connecter facilement à Samsung TV.
1. Ap-puyez sur le bou-ton
(Source) et maintenez-le en-foncé pen-dant 5 secondes sur la
télé-com-man-de ou le pan-neau supé-rieur. La tour de son com-mencera alors à chercher le
télévi-seur Sam-sung. La barre lu-mineuse clig-notera une fois en blanc, puis clig-notera en cyan.
Le voy-ant DEL « PAIRING » clig-notera len-te-ment.
(Ou, lorsque la connexion en mode Stereo Group câblé est terminée, le mode “SEARCHING TV” est
automatiquement activé).
2. Lorsque Samsung TV est compatible avec une connexion facile, une fenêtre contextuelle de
connexion s’afche sur la télévision. Lorsque Samsung TV est déjà connecté à Sound Tower, il est
connecté sans fenêtre contextuelle.
3. Lorsque Sound Tower ne peut trouver aucun Samsung TV dans un délai de 5 minutes, Sound Tower
met n au mode “SEARCHING TV” et se met en mode “BT PAIRING”. En cas de recherche d’un
Samsung TV, Sound Tower va demander la connexion à ce TV.
NOTES
• En mode de Group Play sans-l, la fonction de recherche sur la télévision n’est pas disponible.
• Pour ne plus chercher sur la Samsung TV, désactiver le Sound Tower ou appuyer sur le bouton
(Source) ou PAIRING.
• Sound Tower est incompatible avec la multi-connexion si Samsung TV est connecté.
• Tant que la Samsung TV est connectée, le mode son est PARTY et le bouton SOUND MODE n’est
pas disponible.
• Tant que Samsung TV est connecté, Sound Tower APP ne peut pas se connecter avec Sound Tower.
• Le fenêtre contextuelle de connexion ne peut pas être reproduite selon les spécications de la
télévision.
• Il est possible de sélectionner et de se connecter automatiquement à partir de la liste des haut-
parleurs Bluetooth de votre télévision si la fenêtre contextuelle de connexion n’apparaît pas sur
votre TV.
• Lorsque la tour de son est con-nectée à votre télévi-seur par con-nex-ion Blue-tooth, la vidéo du
télévi-seur et l’au-dio prov-enant de la tour de son pour-raient ne pas être syn-chro-nisées parce que
la dis-tance entre la tour de son et le télévi-seur est trop grande. Il est recomman-dé de dé-placer la
tour de son plus près de votre télévi-seur, à 1 mètre.
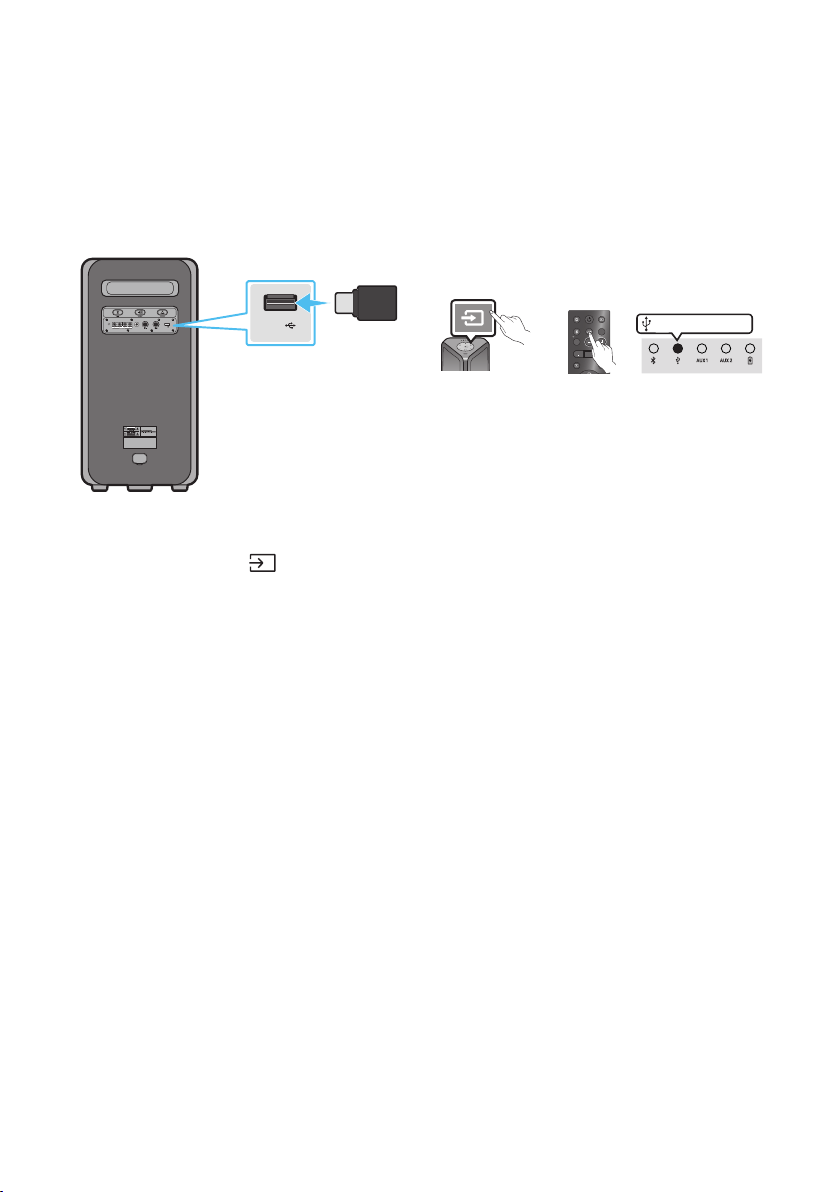
FRA - 17
05 CONNEXION D’UN PÉRIPHÉRIQUE DE
STOCKAGE USB
Vous pouvez lire des chiers musicaux situés sur des périphériques de stockage USB via le Sound
Tower.
POWER
ECHOVOL
USB
(5V 2.1A)
AUX 1
MIC
USB
(5V 2.1A)
LIGHT
PAIRING
TEMPO
USB
AUX
EFFECT EFFECT
DJ
SOUND
MODE
Périphérique de
stockage USB
(non fourni)
Arrière du Sound Tower
OU
Voyant DEL blanc allumé
1. Connectez un périphérique de stockage USB à la prise USB de votre Sound Tower.
2. Appuyez sur la touche (Source) du panneau supérieur ou de la télécommande, puis
sélectionnez “USB”.
• Vous pouvez également sélectionner une source à l’aide de la touche USB de la télécommande.
3. Le deuxième voy-ant USB du pan-neau supéri-eur reste allumé.
4. Lecture de chiers musicaux à partir du périphérique de stockage USB via le Sound Tower.
• Le Sound Tower s’éteindra automatiquement (Allumé auto éteint) si l’appareil USB n’est pas
branché, la lecture s’arrêtera ou si aucune autre commande n’est donnée pour plus de 18
minutes.
REMARQUES
• Ce produit ne prend en charge que les périphériques de stockage USB formatés dans le système de
chiers FAT et FAT32.
• Ce produit ne prend pas en charge le stockage des disques durs (HDD) et des appareils mobiles.
• Un maximum de 999 chiers peuvent être lus par périphérique de stockage USB.
• Un maximum de 256 dossiers peuvent être lus par périphérique de stockage USB.

FRA - 18
Formats audio pris en charge
Extensiondechier Codec audio
Fréquence
d'échantillonnage
Débit binaire
*.mp3
MPEG 1 Layer3 32 kHz ~ 48 kHz 32 kbps ~ 320 kbps
MPEG 2 Layer3 16 kHz ~ 24 kHz 8 kbps ~ 160 kbps
MPEG 2,5 Layer3 8 kHz ~ 12 kHz 8 kbps ~ 160 kbps
*.wma WMA7/8/9 8 kHz ~ 48 kHz 32 kbps ~ 320 kbps
*.aac
AAC 8 kHz ~ 96 kHz < 1728 kbps
A A C- L C 8 kHz ~ 96 kHz < 1728 kbps
HE-AAC 8 kHz ~ 96 kHz < 1728 kbps
*.wav
PCM/LPCM/
IMA_ADPCM
8 kHz ~ 192 kHz < 5 Mbps
*ac - 8 kHz ~ 192 kHz < 5 Mbps
REMARQUES
• Ce produit ne supporte pas le codec WMA Professional.
• Le tableau ci-dessus montre les taux d’échantillonnage et les débits binaires pris en charge. Les
chiers dans des formats qui ne sont pas pris en charge ne seront pas lus.
• Les chiers AAC ne supportent que le format natif ADTS.
Mise à jour du logiciel
SamsungpeutoffrirdesmisesàjourpourlermwaredusystèmeSoundToweràl’avenir.
Si une mise à jour est proposée, vous pouvez mettre à jour le rmware en connectant un périphérique
USB avec la mise à jour du rmware stockée sur celui-ci au port USB de votre Sound Tower. Pour plus
d’informations sur la façon de télécharger les chiers de mise à jour, rendez-vous sur le site Web de
Samsung Electronics à l’adresse www.samsung.com/us/support/.
Ensuite, entrez ou sélectionnez le numéro de modèle de votre Sound Tower, sélectionnez l’option
Logiciels et applications, puis Téléchargements. Notez que les noms des options peuvent varier.
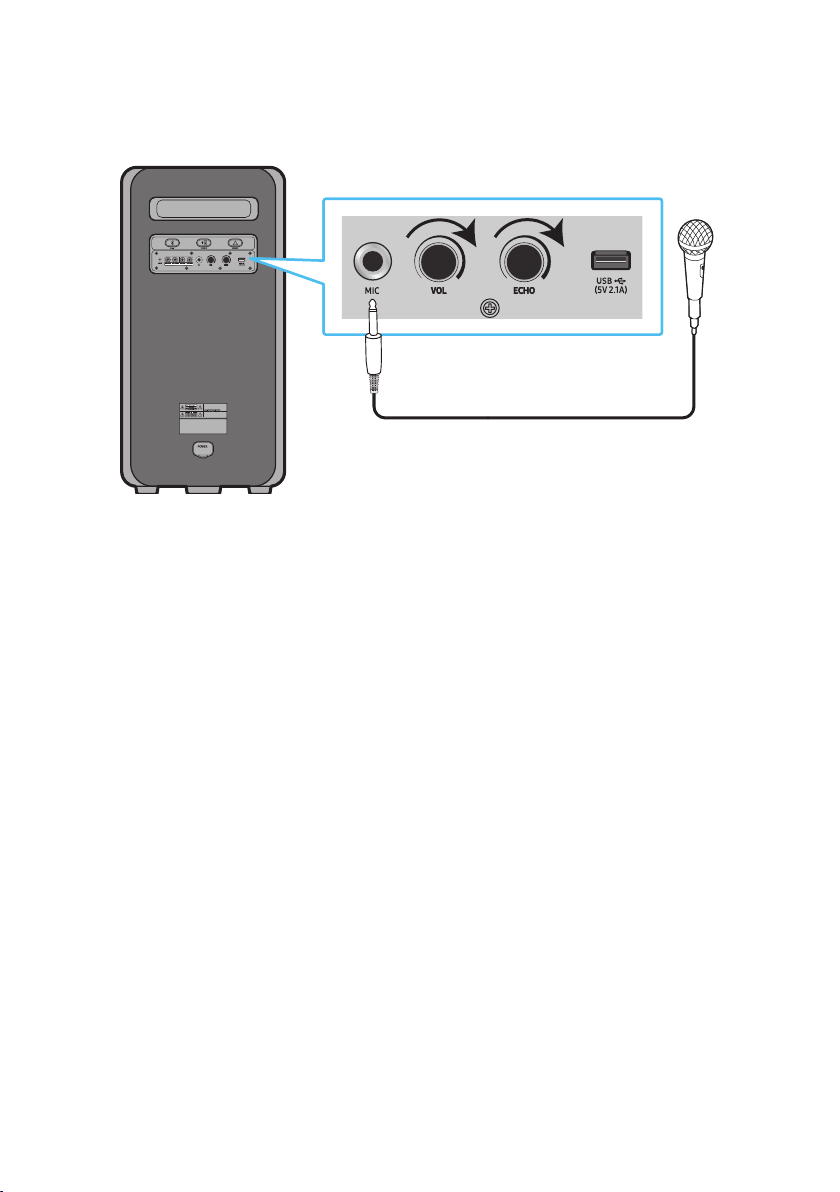
FRA - 19
Connexion d’un microphone externe
Vous pouvez diffuser votre voix à partir du système en branchant un microphone dynamique avec une
prise normale (non fournie).
MAXMIN MAXMIN
1. Tournez le bouton MIC LEVEL sur MIN pour réduire le niveau de volume du microphone.
2. Branchez un microphone optionnel à la prise MIC sur l’unité.
3. Réglez le volume à l’aide du bouton MIC “VOL.
4. Réglez l’effet de l’écho à l’aide du bouton MIC “ECHO.
5. Parlez ou chantez dans le microphone branché.
REMARQUES
• Lors de l’utilisation du mode Groupe sans l ou du mode stéréo, le son provenant du microphone
est diffusé uniquement à partir du système auquel le microphone est branché.
• Lorsque la tour de son est en mode pile, le niveau de son MIC sera inférieur.
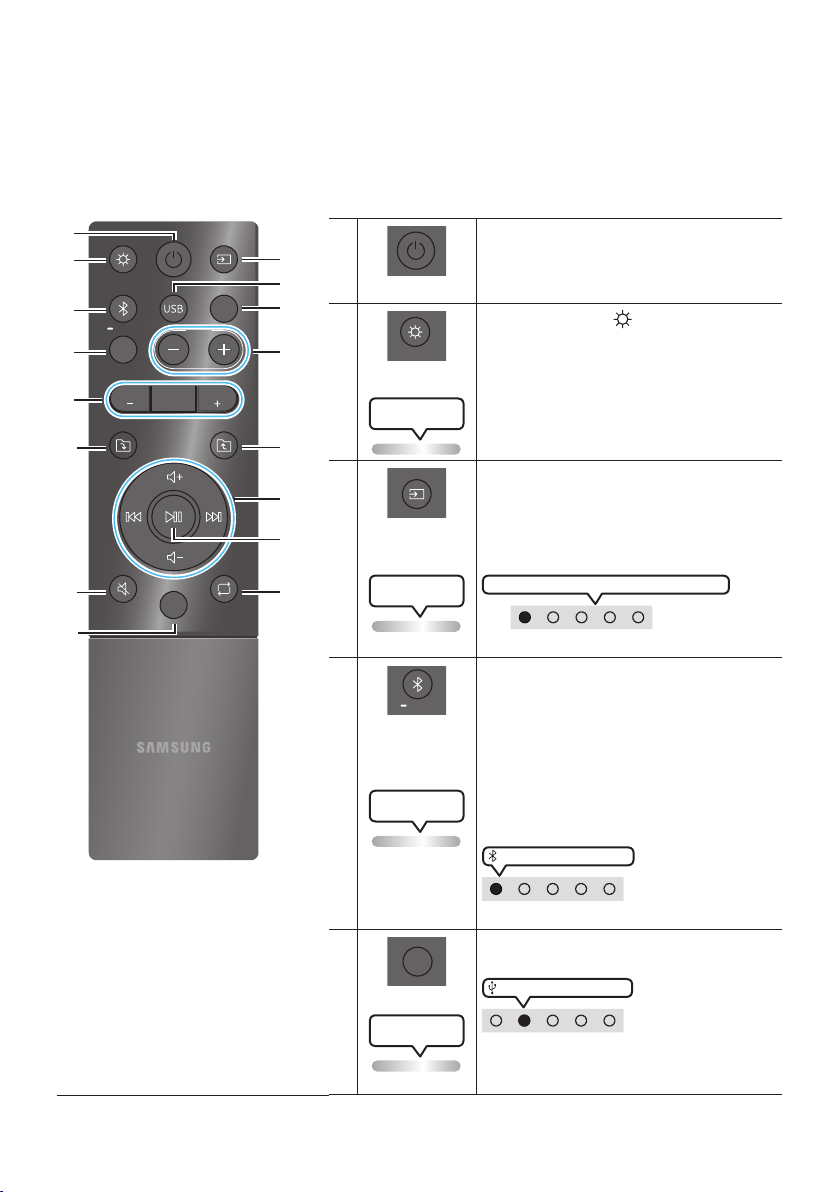
FRA - 20
06 UTILISATION DE LA TÉLÉCOMMANDE
Comment utiliser la télécommande
LIGHT
PAIRING
TEMPO
USB
AUX
EFFECT
DOWN
UP
BASS
EFFECT
DJ
SOUND
MODE
* Pour réduire l'épuisement de la pile, le
produit ne s'allume pas lorsque vous
appuyez sur le bouton d'alimentation
de la télécommande quand la pile est
en cours d'utilisation.
Alimentation
Active et désactive le Sound Tower.
LIGHT
LIGHT
Appuyez sur le bouton
(LIGHT) pour activer le
mode d'éclairage.
((Seulement pendant la lecture de musique)
A chaque pression sur la touche, le mode
d'éclairage souhaité est sélectionné en choisissant
AMBIENT, PARTY, DANCE, THUNDERBOLT,
STAR ou OFF.
Le voyant DEL blanc
Lighting clignote une fois
Source
Appuyer sur pour sélectionner une source
connectée au Sound Tower.
Chaque fois que vous appuyez sur la touche pour
sélectionner une source souhaitée en choisissant
BT, USB, AUX1 ou AUX2
Le voyant DEL blanc
Lighting clignote une fois
Le voyant DEL blanc se déplace vers la droite
Voyant DEL en haut du produit.
Bluetooth
PAIRING
PAIRING
Appuyer sur pour sélectionner une source
directement en mode «BT».
Maintenez appuyée la touche pendant plus de
5 secondes pour entrer dans le mode « BT
PAIRING ».
Vous pouvez connecter Sound Tower à un
nouveau périphérique Bluetooth dans ce mode
en sélectionnant le Sound Tower dans la liste
de recherche du périphérique Bluetooth.
Le voyant DEL cyan
Lighting clignote
Voyant DEL blanc allumé
Voyant DEL en haut du produit.
USB
USB
Appuyer pour sélectionner les sources USB
connectées au Sound Tower.
Voyant DEL blanc allumé
Voyant DEL en haut du produit.
Le voyant DEL blanc
Lighting clignote une fois

FRA - 21
AUX
AUX
Appuyer sur pour sélectionner les sources AUX1 ou AUX2 connectées au Sound
Tower.
AUX2 Voyant DEL blanc allumé
ou
AUX1 Voyant DEL blanc allumé
Voyant DEL en haut du produit.
Le voyant DEL blanc
Lighting clignote une fois
SOUND MODE
SOUND
MODE
A chaque pression sur la touche, on sélectionne l'effet sonore souhaité parmi PARTY,
STANDARD, HIPHOP, EDM, ROCK, LATIN, HOUSE ou REGGAE.
• PARTY: Terme décrivant un effet musical enjoué, comme une fête
• Standard: Terme décrivant des effets musicaux bruts, comme l’absence
d’égalisation.
• HIPHOP: terme décrivant une danse et une musique dynamiques.
• EDM: Un genre de « concept plus général » que la musique électronique.
• ROCK: Musique de groupe.
• LATIN: Terme décrivant la musique de nombreux pays d’Amérique du Sud.
• HOUSE: Musique dansante rythmée jouée sur des instruments électroniques.
Le voyant DEL blanc
Lighting clignote une fois
TEMPO +, -
TEMPO
Appuyer sur les boutons TEMPO + ou TEMPO - pour changer le tempo de la musique
vers le haut ou le bas.
• La fonction est uniquement disponible dans les modes USB.
Le voyant DEL blanc
Lighting clignote une fois
DJ
DJ
Cette fonction permet d'activer la fonction d'effet DJ.
A chaque pression sur la touche, on sélectionne l'effet sonore DJ désiré en choisissant
NOISE, FILTER , CRUSH, CHORUS, WAHWAH ou OFF.
• NOISE: Mixer le bruit blanc dans le son original.
• FILTER: Filtrer le son pour le débarrasser de certaines fréquences.
• CRUSH: Rendre aigu le son d’origine.
• CHORUS: Séparer le son d’origine en plusieurs pistes et les retarder séparément,
puis les mixer à nouveau. Créer un effet de chorale.
• WAHWAH: Effet WAHWAH créé en améliorant certaines fréquences spéciques du son
d’origine.
Le voyant DEL blanc
Lighting clignote une fois
EFFECT +, -
EFFECT
EFFECT
Appuyer sur les boutons EFFECT + ou EFFECT - pour changer le niveau de chaque
effet sonore DJ vers le haut ou le bas.
La valeur d'effet par défaut est 5 et peut être modiée à – 15 ~ 0 ~ +15.
Le voyant DEL blanc
Lighting clignote une fois
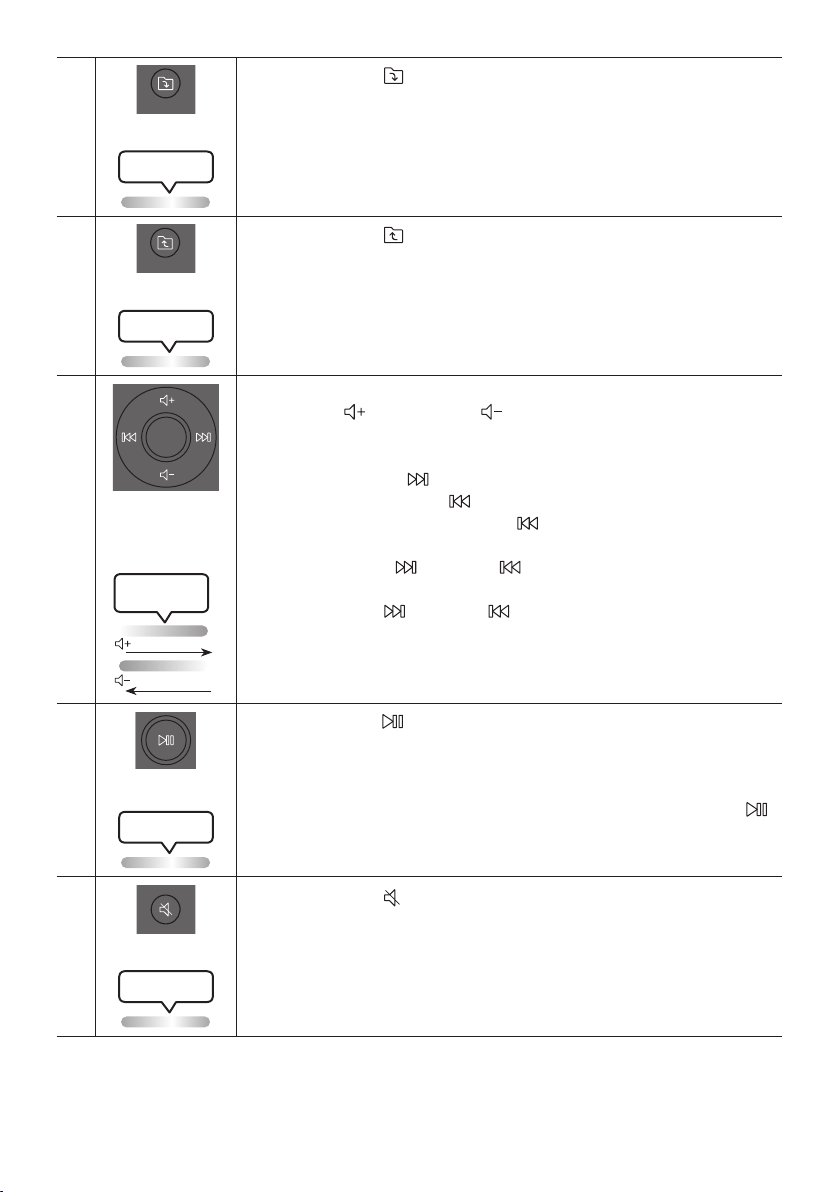
FRA - 22
Dossier DOWN
DOWN
Appuyer sur le bouton
(DOWN) pour passer au dossier suivant du périphérique
USB.
Le voyant DEL blanc
Lighting clignote une fois
Dossier UP
UP
Appuyer sur le bouton
(UP) pour passer au dossier précédent du périphérique
USB.
Le voyant DEL blanc
Lighting clignote une fois
Volume haut,
Volume bas /
Passer
• Volume haut, Volume bas
Appuyer sur
(Volume haut) ou
(Volume bas) pour régler le niveau de
volume haut ou bas.
• Passer la musique
Appuyez sur le bouton pour passer au chier de musique suivant. Appuyez
une fois de plus sur le bouton pour lire de nouveau le morceau en cours de
lecture. Appuyez deux fois sur le bouton pour passer au chier de musique
précédent.
Maintenez le bouton ou le bouton enfoncé pendant plus de 3 secondes en
mode lecture USB pour rechercher vers l’avant ou vers l’arrière . Maintenez à
nouveau le bouton ou le bouton enfoncé pendant plus de 3 secondes pour
revenir à la lecture normale.
Le voyant DEL blanc
Lighting clignote
De bas en haut
De haut en bas
Lecture / Pause
Appuyer sur la touche pour interrompre temporairement un chier musical.
Lorsque vous appuyer de nouveau sur la touche, le chier musical est lu.
• Fonction de mise hors tension automatique
Pour désactiver la fonction Auto Power Down (arrêt de l’alimentation
automatique) lorsque l’unité est en mode AUX1, AUX2, appuyez sur le bouton
et maintenez-le enfoncé pendant plus de 5 secondes. La barre lumineuse
clignotera une fois en blanc.
Le voyant DEL blanc
Lighting clignote une fois
Muet
Appuyer sur le bouton
(Muet) pour couper le son.
Appuyer de nouveau sur cette touche pour rétablir le son.
Le voyant DEL blanc
Lighting clignote une fois
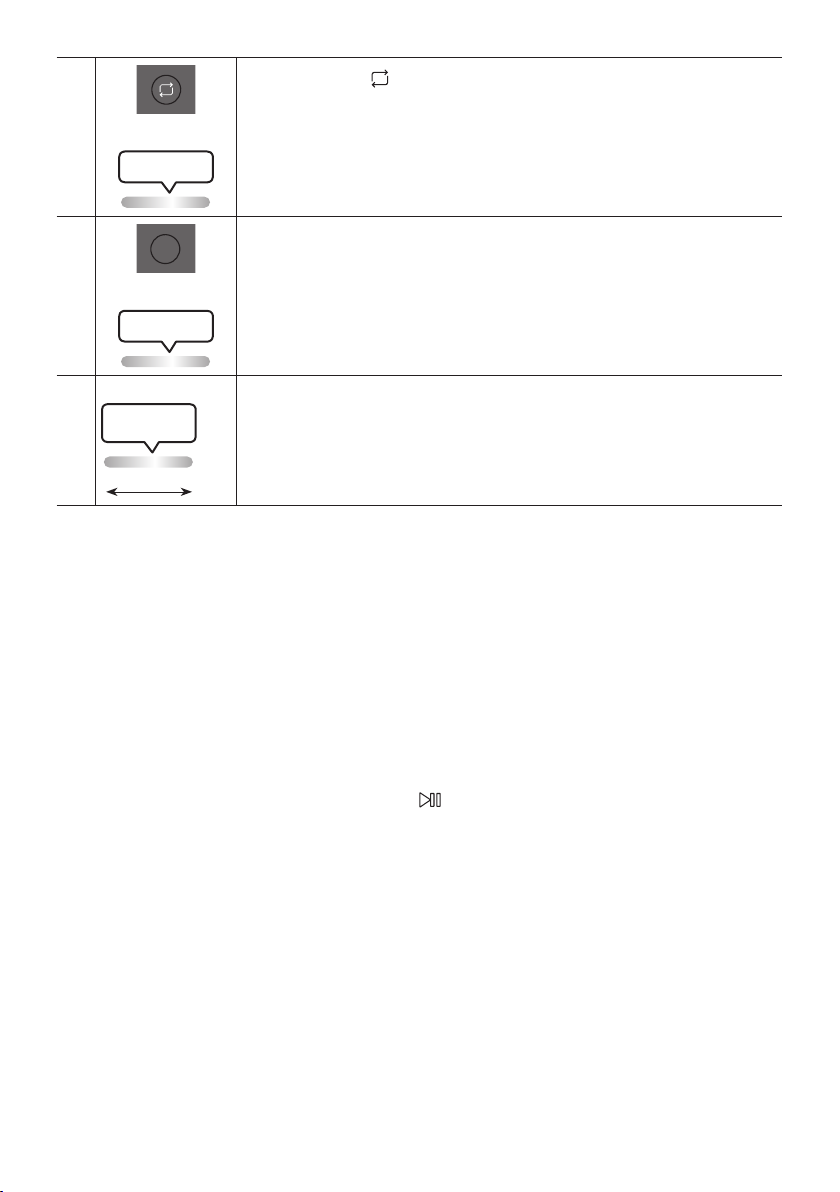
FRA - 23
Répéter
Appuyer sur la touche
(Répéter) pour utiliser la fonction Repeat en mode «USB».
A chaque pression sur la touche, il est possible de sélectionner la fonction de répétition
désirée en choisissant ONE, FOLDER, ALL, RANDOM ou OFF.
Le voyant DEL blanc
Lighting clignote une fois
BASS
BASS
Appuyer sur le bouton BASS pour utiliser le son de basse puissant.
Appuyez de nouveau sur ce bouton pour revenir au son normal.
Maintenez le bouton BASS enfoncé pendant plus de 5 secondes pour activer ou
désactiver la fonction BLUETOOTH POWER.
Le voyant DEL blanc
Lighting clignote une fois
※
Non disponible
Le voyant DEL rose
Lighting clignote
Dumilieuàlan
La fonction du bouton de télécommande n'est pas disponible dans la source actuelle.
Comment utiliser le mode Son
Votre Sound Tower fournit des réglages d’égaliseur prédénis qui sont optimisés pour un genre musical
particulier.
1. Appuyez sur la touche SOUND MODE de la télécommande.
2. Chaque fois que vous appuyez sur la touche SOUND MODE pour sélectionner l’effet sonore
souhaité en choisissant PARTY, STANDARD, HIPHOP, EDM, ROCK, LATIN, HOUSE ou REGGAE.
REMARQUES
• La valeur par défaut du mode sonore est PARTY.
• Lorsque éteint, appuyez et maintenez la touche sur l’appareil ou la télécommande pour plus de 5
secondes an d’allumer celui-ci dans le réglage par défaut Mode Sonore.

FRA - 24
Comment utiliser l’effet DJ
La fonction d’Effet DJ vous permet d’activer l’effet sonore d’Effet DJ. Le niveau de chaque effet est
réglable.
1. Appuyez sur la touche DJ de la télécommande.
2. Chaque fois que vous appuyez sur la touche DJ, le Sound Tower cyclera parmi les Effets DJ
disponibles.
• NOISE : Créez du bruit blanc et mixé avec le son original à travers le ltre et la sortie.
• FILTER : Crée un effet similaire au son des aigus ou des basses uniquement.
• CRUSH: Crée un effet qui rend le son original plus aigu.
• CHORUS : Crée un effet similaire à un chœur chantant.
• WAHWAH : Crée un effet ‘Wah~ Wah’.
• DJ EFFECT OFF : Désactive l’effet DJ.
3. Appuyez sur les touches EFFECT + ou EFFECT - pour augmenter ou diminuer le niveau des effets
sonores DJ de -15 à +15.
REMARQUE
• Lorsqu’éteint, appuyez et maintenez la touche pour plus de 5 secondes an d’allumer le réglage
par défaut Effet DJ.

FRA - 25
07 À L’AIDE DE L’APPLICATION SAMSUNG
SOUND TOWER
Installer l’application Samsung Sound Tower
Pour contrôler ce produit avec votre appareil intelligent et l’application Samsung Sound Tower,
téléchargez l’application Samsung Sound Tower sur Google Play Store ou sur l’App Store d’Apple, puis
installez-la sur votre appareil intelligent.
REMARQUES
• L’application Samsung Sound Tower est compatible avec les téléphones mobiles Android
fonctionnant sous Android OS 8.0 ou ultérieur.
• L’application Samsung Sound Tower est compatible avec les appareils mobiles Apple fonctionnant
sous iOS 11.0 ou une version ultérieure.
Recherche de marché : Samsung Sound Tower
Lancement de l’application Samsung Sound Tower
Pour lancer et utiliser l’application Samsung Sound Tower, touchez l’icône Samsung Sound Tower sur
votre appareil intelligent, puis suivez les instructions à l’écran.
Samsung
Multiroom
Samsung Sound Tower
Samsung Sound Tower
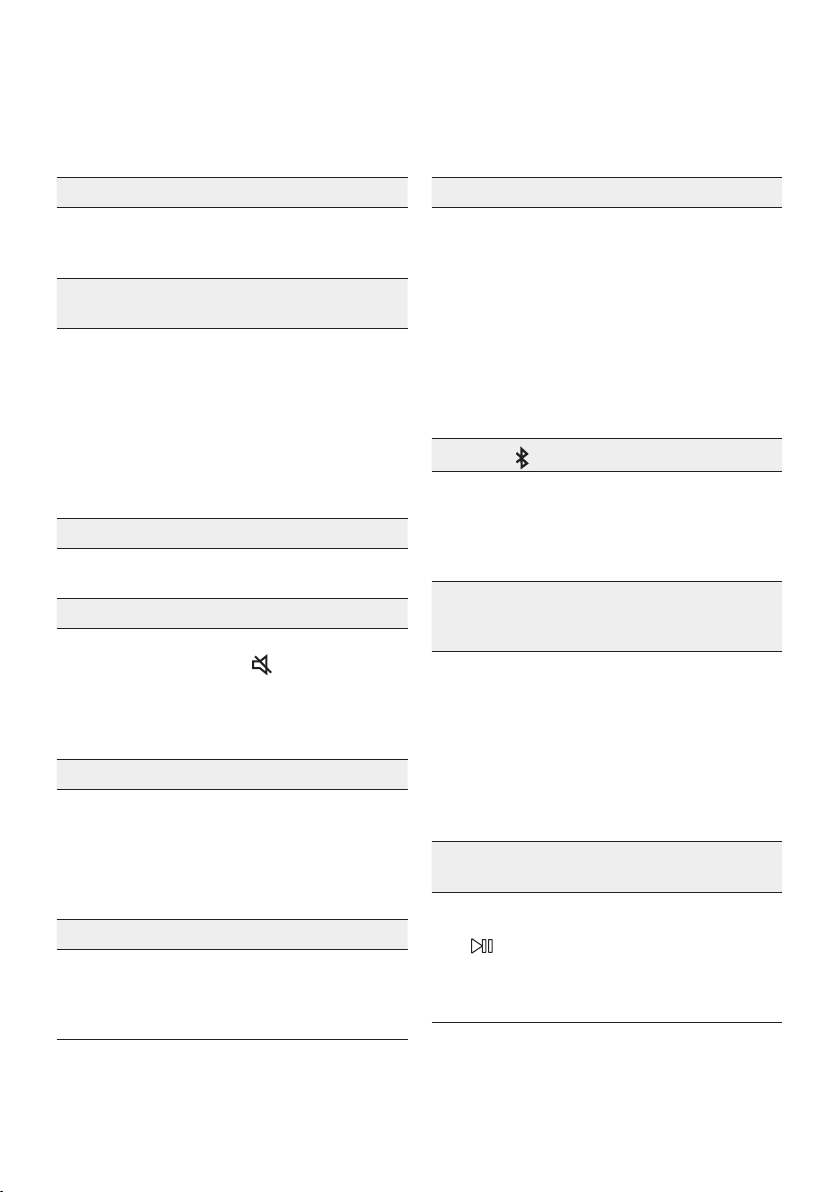
FRA - 26
08 RÉSOLUTION DES PROBLÈMES
Avant de contacter l’assistance, effectuez les vérications suivantes.
L’appareil ne s’allume pas.
; La pile pour-rait être com-plètement dé-char-
gée. Veuillez brancher la che d’alimenta-tion
et es-sayez de la met-tre sous ten-sion.
Lorsque j’appuie sur un bouton, la fonction ne
s’active pas.
; Après avoir retiré la che d’alimentation,
éteignez la tour de son. Insérez à nouveau
la che d’alimentation et allumez la tour de
son.
; Mettez l’appareil externe sous tension et
réessayez.
; S’il n’y a pas de signal, la tour de son s’éteint
automatiquement après un certain temps.
Allumez le produit.
Le son est interrompu en mode BT.
; Reportez-vous aux sections Connexion
Bluetooth à la page 13.
• Il n’y a pas de son.
La fonction Mise en sourdine est-elle activée ?
; Appuyez sur la touche (Mise en
sourdine) pour annuler la fonction de mise
en sourdine.
Le volume est-il réglé au minimum ?
; Réglez le volume.
La télécommande ne fonctionne pas.
Les piles sont-elles déchargées ?
; Remplacez-les par des nouvelles piles.
La distance entre la télécommande et l’unité
principale du Sound Tower est-elle trop grande ?
; Approchez la télécommande de l’unité
principale du Sound Tower.
La connexion du Groupe Stereo ne fonctionne pas.
Lesystèmeest-ilenmodeGroupPlaysansl?
; Déconnectez le mode Group Play sans l et
essayez à nouveau la connexion de groupe
Stereo.
Il ne peut pas établir de connexion Bluetooth.
Le système est-il connecté à un autre
systèmeenmodeGroupPlaysanslouen
mode Groupe Stereo ?
; Essayez à nouveau la connexion Bluetooth
après avoir déconnecté le Group Play sans
l ou la connexion du Groupe Stereo.
Les deux périphériques Bluetooth sont-ils
déjà connectés ?
; Essayer à nouveau la connexion Bluetooth
après avoir déconnecté les autres
connexions Bluetooth.
La touche
PAIRING ne fonctionne pas.
Lesystèmeest-ilenmodeGroupPlaysansl
ou en mode Groupe Stereo ?
; Essayez à nouveau après avoir déconnecté
la connexion sans l du Group Play ou du
Groupe Stereo.
Je veux transférer le système hôte à l’autre
systèmedansuneconnexionsanslGroup
Play ou Groupe Stereo.
; Déconnectez le mode Group Play, puis
appuyez sur le haut-parleur que vous
souhaitez dénir comme HOST en premier.
Par la suite, utilisez le voyant LED du
groupe pour connecter les autres haut-
parleurs un après l’autre.
; En mode Groupe Stereo, l’hôte est xe.
Vous ne pouvez pas changer les autres en
tant qu’hôte.
Je veux lire AUX1 ou AUX2 plus de 8 heures
sans saisie de commande.
• Pour désactiver la fonction de mise hors
tension automatique, maintenez le bouton
de la télécommande enfoncé pendant
plus de cinq secondes en mode AUX1 ou
AUX2.Passez du mode ON-AUTO POWER
DOWN au mode OFF-AUTO POWER DOWN.
FRA - 27
Je ne peux pas connecter un esclave au Group Play.
; Après 1 heure, l’hôte bloquera tous
appareils esclaves additionnels d’être
ajoutés. Appuyez sur le bouton GROUP
PLAY du HOST. Le SUB peut être connecté
de nouveau.
Ilnepeutpasétabliruneconnexion“Sansl/
Groupe câblé/Ajouter stéréo/Bluetooth”.
La distance entre les systèmes est-elle trop
grande ?
; Il est recommandé d’effectuer un
appariement “Sans l/Groupe câblé/
Ajouter stéréo/Bluetooth” à moins de 3,3 pi
(1 mètre) du système.
; Il est recommandé que la distance de
fonctionnement entre les systèmes Sound
Tower soit inférieure à 32,8 pi (10 mètres).
09 LICENCE
The Bluetooth® word mark and logos are
registered trademarks owned by the Bluetooth
SIG, Inc. and any use of such marks by Samsung
Electronics Co., Ltd. is under licence. Other
trademarks and trade names are those of their
respective owners.
Qualcomm aptX is a product of Qualcomm
Technologies, Inc. and/or its subsidiaries.
Qualcomm is a trademark of Qualcomm
Incorporated, registered in the United States and
other countries. aptX is a trademark of Qualcomm
Technologies International, Ltd., registered in the
United States and other countries.
[ENERGY STAR]
ENERGYSTARqualiedmodelonly
– Your Samsung product is ENERGY STAR
qualied in its factory default setting.
Change to certain features, settings and
functionality in this product can change the
power consumption, possibly beyond the
limits required for ENERGY STAR
qualication.
– Environmental Protection Agency and
Department of Energy. ENERGY STAR is a
joint program of the Government agencies,
designed to promote energy efcient
products and practices.
Refer to www.energystar.gov for more
information of the ENERGY STAR Program.
ENERGYSTARqualiedmodelonly
(Applicable to Thin Client models only)
As an ENERGY STAR® Partner, SAMSUNG has
determined that this product meets the
ENERGY STAR® guidelines for energy
efciency.
– The ENERGY STAR Program has been to
reduced greenhouse gas emissions and
save energy through voluntary labeling.
– Power management setting of this product
have been enabled by default, and have
various timing setting from 1 minutes to 5
hours.
– The product can wake with a button press
on the chassis from sleep mode.
ENERGYSTARqualiedmodelonly(Theother
models)
– As an ENERGY STAR Partner, Samsung has
determined that this product or product
models meets the ENERGY STAR guideline
for energy efciency.

FRA - 28
10 AVIS DE
LICENCES LIBRES
Pour transmettre des demandes et des questions
portant sur les sources ouvertes, communiquez
avec Samsung par courriel
(http://opensource.samsung.com)
11 REMARQUE
IMPORTANTE
CONCERNANT LE
SERVICE
Les chiffres et les illustrations contenus dans ce
Guide d’utilisation sont fournis à titre de référence
uniquement et pourraient ne pas représenter
exactement le produit.
FRA - 29
12 SPÉCIFICATIONS ET GUIDE
Spécications
Nom de modèle MX-ST50B
USB 5V/2,1A
Poids 26,32lbs (11,94kg)
Dimensions (L x H x P) 12,9×26,2×11,9 po (329×665×301mm)
Plage de températures en fonctionnement +41°F à +95°F (+5°C à +35°C)
Plage d’humidité en fonctionnement 10 % à 75 %
AMPLIFICATEUR Puissance de sortie nominale
Branchement du
cordon d’alimentation
240 W
Pile 90 W
Consommation électrique globale 65W
Type de pile Lithium-ion 72 Wh
Temps de lecture de la pile jusqu’à 18 h
Temps de charge de la pile <3,5 h
Pile re-chargeable
Li-ion
Modèle de pile EB-T24C-00, 2INR19/65-4
Ten-sion nomi-nale 7,34 V
Ca-pacité nomi-nale 9800 mAh, 71,93 Wh
Ten-sion de charge lim-itée
8,4 V
Ca-pacité type 10000 mAh, 73,40 Wh
REMARQUES
• Samsung Electronics Co. se réserve le droit de modier les spécications sans préavis.
• Le poids et les dimensions sont approximatifs.
• La durée de lecture de la pile et le temps de charge de la pile varient selon les conditions
d’utilisation.
• Dans un environnement extrêmement froid ou chaud, la charge s’arrête pour des raisons de
sécurité. Pour résoudre ces problèmes, débranchez le cordon d’alimentation c.a. et branchez-le à
nouveau dans une température de fonctionnement comprise entre 5 °C et 35 °C (41 °F à 95 °F).
FRA - 30
GARANTIE LIMITÉE À L’ACHETEUR INITIAL
Samsung Electronics Canada Inc. (SECA) garantit ce produit contre tout défaut de fabrication.
SECA garantit aussi que si cet appareil ne fonctionne pas convenablement durant la
période de garantie SECA se réservera le droit de réparer ou de remplacer l’appareil
défectueux.
Toutes les réparations sous garantie doivent être effectuées par un Centre de service
autorisé SECA. Le nom et l’adresse du Centre de service le plus près de chez vous peut
être obtenu en composant sans frais le 1- 800- SAMSUNG ou en visitant notre site web
au www.samsung.ca
MAIN-D’OEUVRE
UN (1) AN (AU COMPTOIR)
PIÈCES
UN (1) AN
Pour tous les modèles portatifs, le transport de l’appareil sera la responsabilité du client.
Le reçu de vente original doit être conservé par le client car cela constitue la seule preuve
d’achat acceptée. Le client doit le présenter au Centre de service agréé au moment où il
fait la demande d’une réparation sous garantie.
EXCLUSIONS (CE QUI N’EST PAS COUVERT)
Cette garantie ne couvre pas les dommages causés par un accident, un incendie, une
inondation, un cas de force majeure, un mauvais usage ou une tension incorrecte.
La garantie ne couvre pas une mauvaise installation, une mauvaise réparation, une
réparation non autorisée et tout usage commercial ou dommages survenus durant le
transport. Le ni extérieur et intérieur de même que les lampes ne sont pas couverts par
cette garantie. Les ajustements par le client qui sont expliqués dans le guide de l’utilisateur
ne sont pas couverts en vertu de cette garantie. Cette garantie sera automatiquement
annulée pour tout appareil qui aurait un numéro de série manquant ou modié. Cette
garantie est valable seulement sur les appareils achetés et utilisés au Canada.
Samsung Electronics Canada Inc
2050 Derry Rd West
Mississauga, On. L5N 0B9
Tel: 1-800-SAMSUNG (726-7864)
Fax: (905) 542- 1199
Website: http://www.samsung.com/ca_fr

© 2022 Samsung Electronics Co., Ltd. Tous droits réservés.
Comment contacter Samsung dans le monde
Si vous avez des suggestions ou des questions concernant les produits Samsung, veuillez contacter le Service
Consommateurs Samsung.
SIÈGE SOCIAL
Samsung Electronics Canada Inc. 2050 Derry Road West, Mississauga, Ontario L5N 0B9 Canada
TEL: 1-800-SAMSUNG (1-800-726-7864)
www.samsung.com/ca_fr/support
Pays Centre de service Samsung
Site Web
`
Amérique du Nord
CANADA 1-800-SAMSUNG (726-7864)
www.samsung.com/ca/support (English)
www.samsung.com/ca_fr/support (French)
U.S.A 1-800-SAMSUNG (726-7864) www.samsung.com/us/support