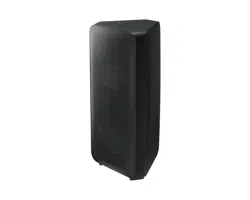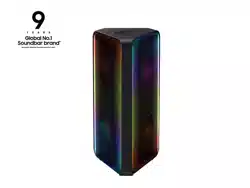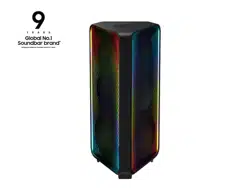

MX-ST50B
FULL MANUAL
Imagine the possibilities
Thank you for purchasing this Samsung product.
To receive more complete service, please register
your product at www.samsung.com/register
ENG - ii
SAFETY INFORMATION
SAFETY WARNINGS
TO REDUCE THE RISK OF ELECTRIC SHOCK, DO
NOT REMOVE THE COVER (OR BACK).
NO USER-SERVICEABLE PARTS ARE INSIDE.
REFER SERVICING TO QUALIFIED SERVICE
PERSONNEL.
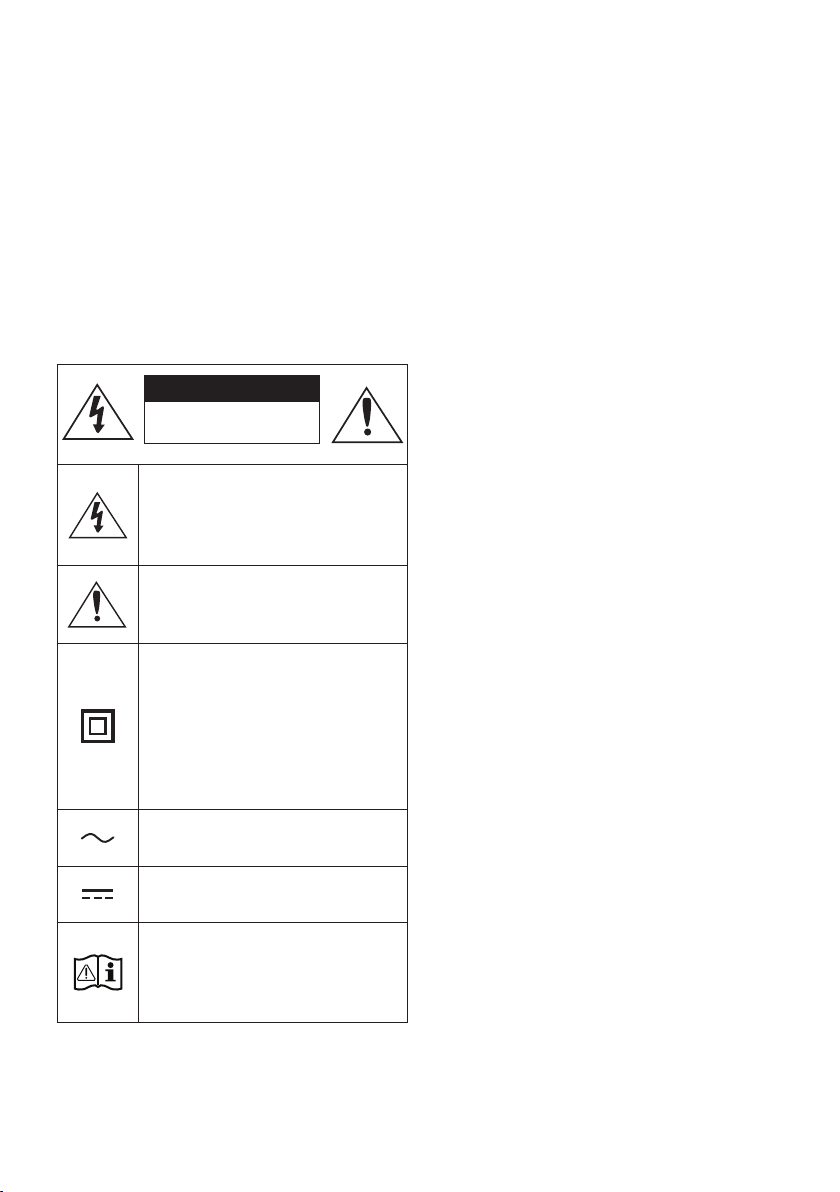
Refer to the table below for an explanation of
symbols which may be on your Samsung product.
CAUTION
RISK OF ELECTRIC SHOCK.
DO NOT OPEN.
This symbol indicates that high voltage
is present inside. It is dangerous to
make any kind of contact with any
internal part of this product.
This symbol indicates that this product
comes with important literature
concerning operation and maintenance.
Class II product : This symbol indicates
that a safety connection to electrical
earth (ground) is not required.
If this symbol is not present on a
product with a power cord, the product
MUST have a reliable connection to
protective earth (ground).
AC voltage : Rated voltage marked
with this symbol is AC voltage.
DC voltage : Rated voltage marked
with this symbol is DC voltage.
Caution. Consult Instructions for use :
This symbol instructs the user to
consult the user manual for further
safety related information.
WARNING
• To reduce the risk of re or electric shock, do
not expose this appliance to rain or moisture.
• This product contains chemicals known to the
State of California to cause cancer and birth
defects or other reproductive harm.
• The battery (battery or batteries or battery
pack) shall not be exposed to excessive heat
such as sunshine, re or the like.
CAUTION
• TO PREVENT ELECTRIC SHOCK, MATCH WIDE
BLADE OF PLUG TO WIDE SLOT, FULLY
INSERT.
• This apparatus shall always be connected to a
AC outlet with a protective grounding
connection.
• To disconnect the apparatus from the mains,
the plug must be pulled out from the mains
socket, therefore the mains plug shall be
readily operable.
• Do not expose this apparatus to dripping or
splashing. Do not put objects lled with
liquids, such as vases, on the apparatus.
• To turn this apparatus off completely, you
must pull the power plug out of the wall
socket. Consequently, the power plug must
be easily and readily accessible at all times.
ENG - iii
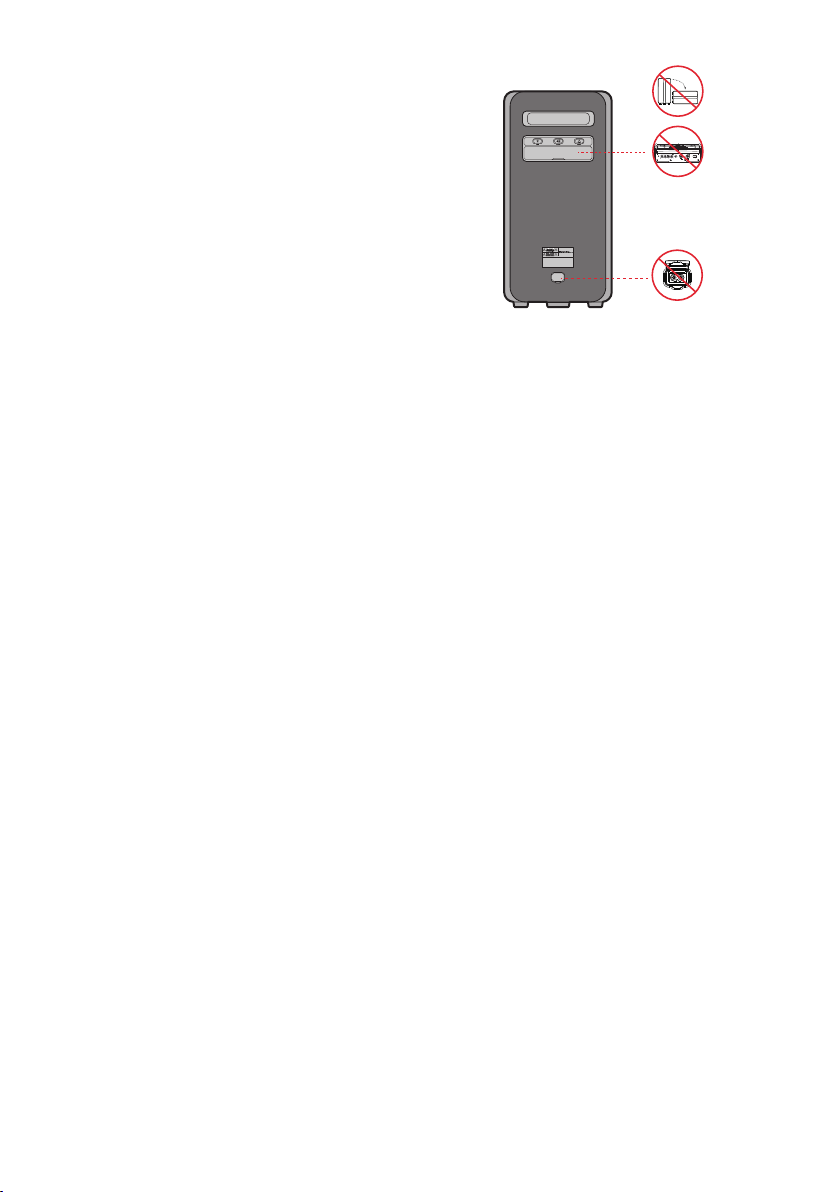
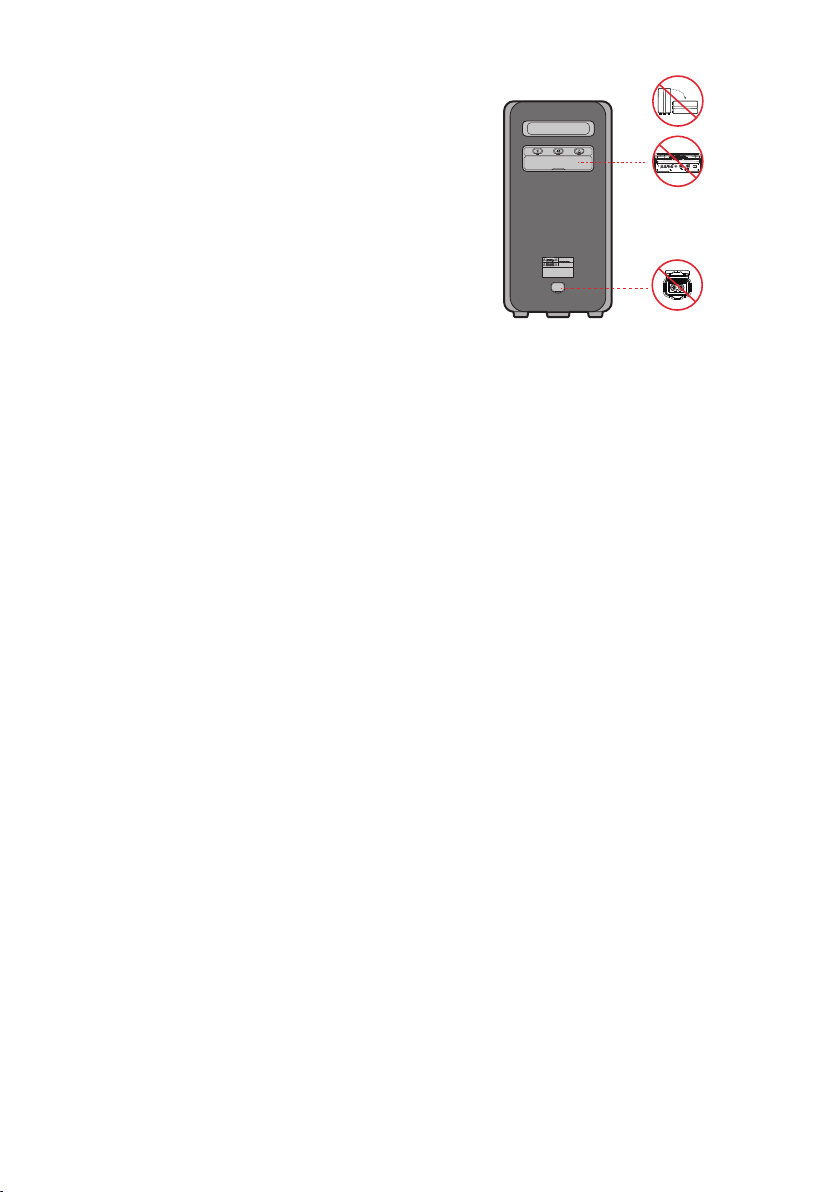
To avoid deterioration of water resistant
Check the following and use the unit correctly.
• Deformation or damage from dropping the
unit or subjecting it to mechanical shock may
cause deterioration of the water resistant.
• This unit does not have a design that is
resistant to water pressure. Use of the unit in
a location where high water pressure is
applied, such as in the shower, may cause a
malfunction.
• Do not pour high-temperature water or blow
hot air from a hair dryer or any other
applicance on the unit directly. Also never use
the unit in a place subject to high
temperatures, such as in a sauna or near a
heat source.
• Handle the cap with care. Port cover and AC
plug cover plays a very important role in
maintenance of the water resistant. When
using the unit, make sure that the cap is
closed completely. When closing the cap, be
careful not to allow foreign objects inside. If
the cap is not closed completely the water
resistant may deteriorate and may cause a
malfunction of the unit as a result of water
entering the unit.
• IPX5 cannot be met when any JACK or AC
power is plugged in.
• The product cannot be dumped to ensure it is
water resistant.
POWER
ECHOVOL
USB
(5V 2.1A)
AUX 1
MIC

ENG - iv
• The Sound Tower provides durability by IPX5.
Protection against solids
IP
Protection against water
0 5
No requirements X X No requirements
No protection 0 0 No protection
Solids> 50 mm 1 1 Vertically falling water
Solids> 12 mm 2 2 Vertically water-enclosure tilted 15°
Solids> 2.5 mm 3 3 Sprayed water 60° from vertical
Solids> 1.0 mm 4 4 Splashed water from all directions
Dust Protected 5 5 Hosing jets from all directions
Dust tight 6 6 Strong hosing jets from all directions
- 7 Temporary Immersion: 1m for 30 minutes
- 8 Immersion: manufacture dened depth and time

ENG - v
PRECAUTIONS
Ensure that the AC power supply in your
house complies with the power
requirements listed on the identication
sticker located on the rear of your product.
Install your product horizontally, on a
suitable base (furniture), with enough space
around it for ventilation (7~10 cm). Make sure
the ventilation slots are not covered. Do not
place the unit on ampliers or other
equipment which may become hot. This unit
is designed for continuous use.
To fully turn off the unit, disconnect the AC
plug from the wall outlet. Unplug the unit if
you intend to leave it unused for a long
period of time.
1. During thunderstorms, disconnect the AC
plug from the wall outlet. Voltage peaks due
to lightning could damage the unit.
2. Do not expose the unit to direct sunlight or
other heat sources. This could lead to
overheating and cause the unit to
malfunction.
3. Protect the product from moisture (i.e.
vases), and excess heat (e.g. a replace) or
equipment creating strong magnetic or
electric elds. Unplug the power cable from
the AC wall socket if the unit malfunctions.
Your product is not intended for industrial
use. It is for personal use only. Condensation
may occur if your product has been stored in
cold temperatures. If transporting the unit
during the winter, wait approximately
2 hours until the unit has reached room
temperature before using.
4. The battery used with this product contains
chemicals that are harmful to the
environment. Do not dispose of the battery
in the general household trash. Do not
expose the battery to excess heat, direct
sunlight, or re. Do not short circuit,
disassemble, or overheat the battery.
Danger of explosion if the battery is replaced
incorrectly. Replace only with the same or
equivalent type.
Others
• As the battery is manufactured only for this
product, do not use the battery for other
electronic appliances or other purposes.
• When discarding a dead battery, put it into a
battery collection box for recycling.
• Do not disassemble the battery.
• To protect the battery, the battery cannot be
charged when the temperature is lower than
3 °C or higher than 42 °C.
• When the battery level is low, recharge it. If
the level of the battery remains low for a long
period of time, it can cause the performance
of the battery to degrade.
• Do not apply heat to the battery and do not
put the battery in a re.
• Do not disassemble the battery.
• To protect the battery, the Sound Tower may
not operate when the temperature is lower
than -17 °C or higher than 57 °C.
ENG - vi
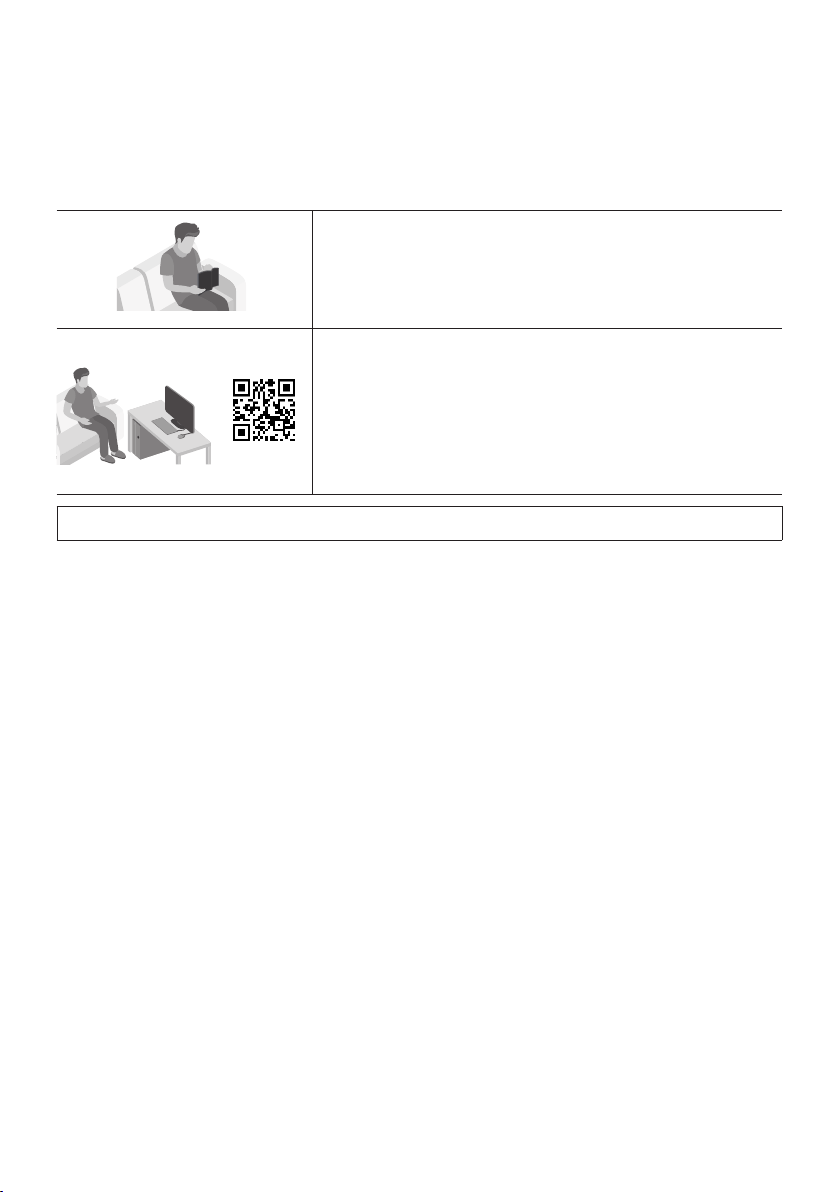
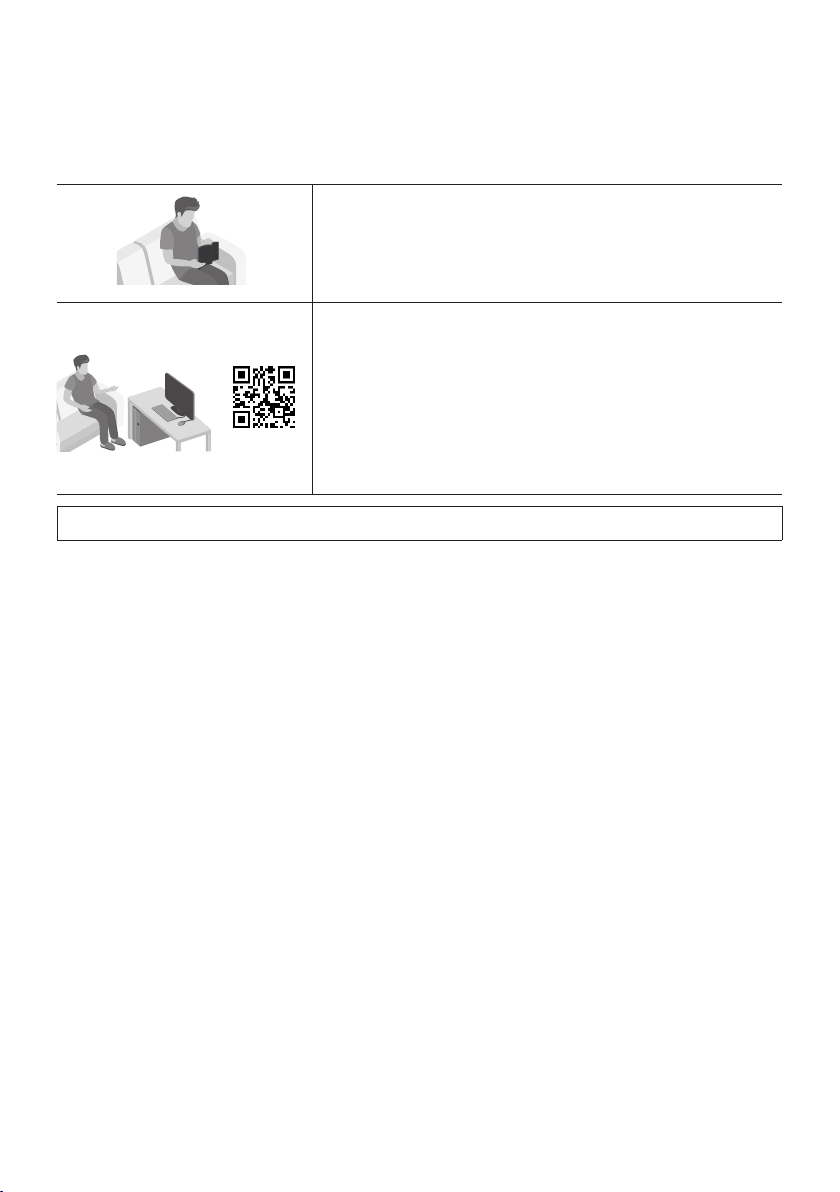
ABOUT THIS MANUAL
The user manual has two parts: this simple paper
USER MANUAL and a detailed FULL MANUAL you
can download.
USER MANUAL
See this manual for safety instructions, product installation,
components, connections, and product specications.
FULL MANUAL
You can access the FULL MANUAL on Samsung’s on-line
customer support center by scanning the QR code on the left.
To see the manual on your PC or mobile device, download the
manual in document format from Samsung’s website.
(https://www.samsung.com/us/support/downloads/)
Design and specications are subject to change without prior notice.

ENG - vii
CONTENTS
01 Checking the Components 2
Inserting Batteries before using the Remote Control
(AAA batteries X 2)
------------------------- 2
02 Product Overview 3
Top Panel of the Sound Tower
------------------------- 3
Rear Panel of the Sound Tower
------------------------- 4
03 Connecting the Sound Tower 6
Connecting Electrical Power
-------------------------
6
How to use Audio Group
-------------------------
7
04 Connecting an External Device 13
Connecting using an Analog Audio (AUX) Cable
-------------------------
13
Connecting a mobile device via Bluetooth
-------------------------
14
Connecting the Samsung TV via Bluetooth
-------------------------
17
05 Connecting a USB Storage Device 18
Software Update
-------------------------
19
Connecting an External Microphone
-------------------------
20
06 Using the Remote Control 21
How to Use the Remote Control
-------------------------
21
How to use Sound Mode
-------------------------
24
How to use the DJ Effect
-------------------------
25

ENG - viii
07 Using the Samsung Sound Tower App 26
Install Samsung Sound Tower App
-------------------------
26
Launching the Samsung Sound Tower App
-------------------------
26
08 Troubleshooting 27
09 License 28
10 Open Source License Notice 29
11 Important Notes About Service 29
12 SpecicationsandGuide 30
Specications
-------------------------
30
ENG - 2
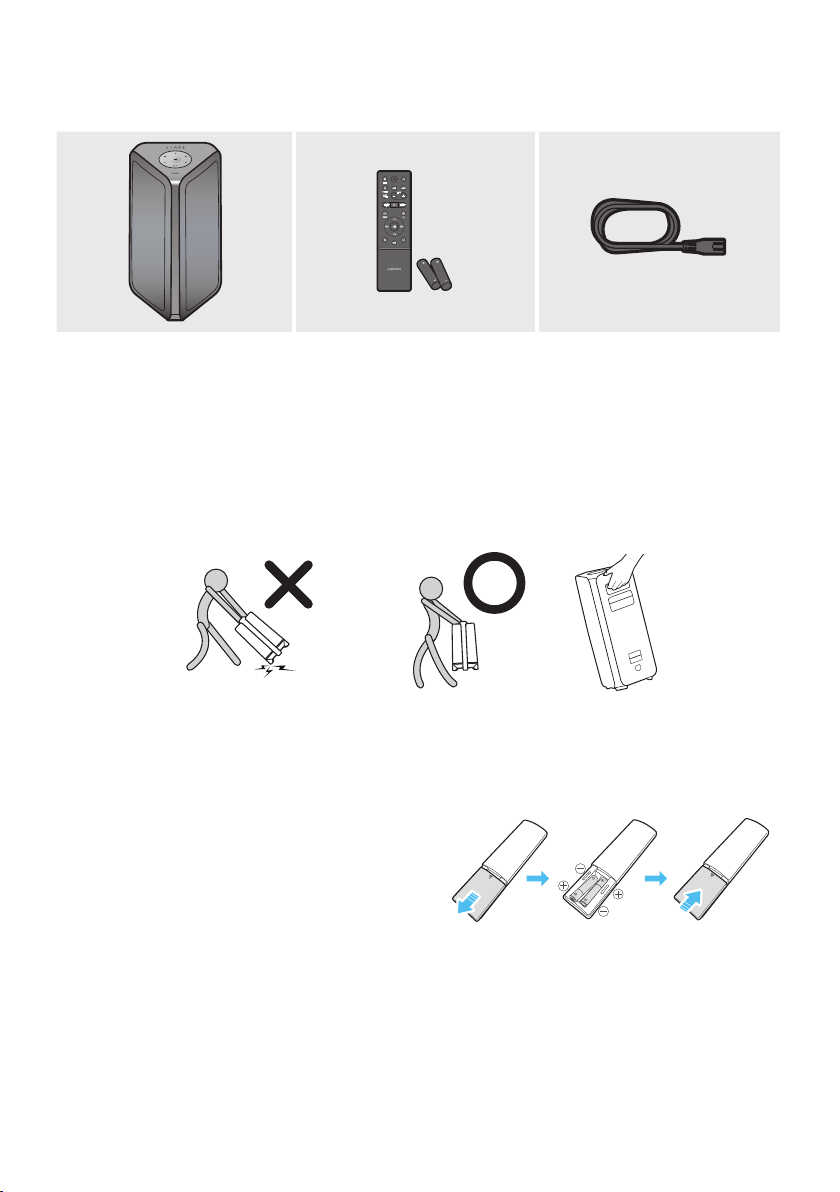
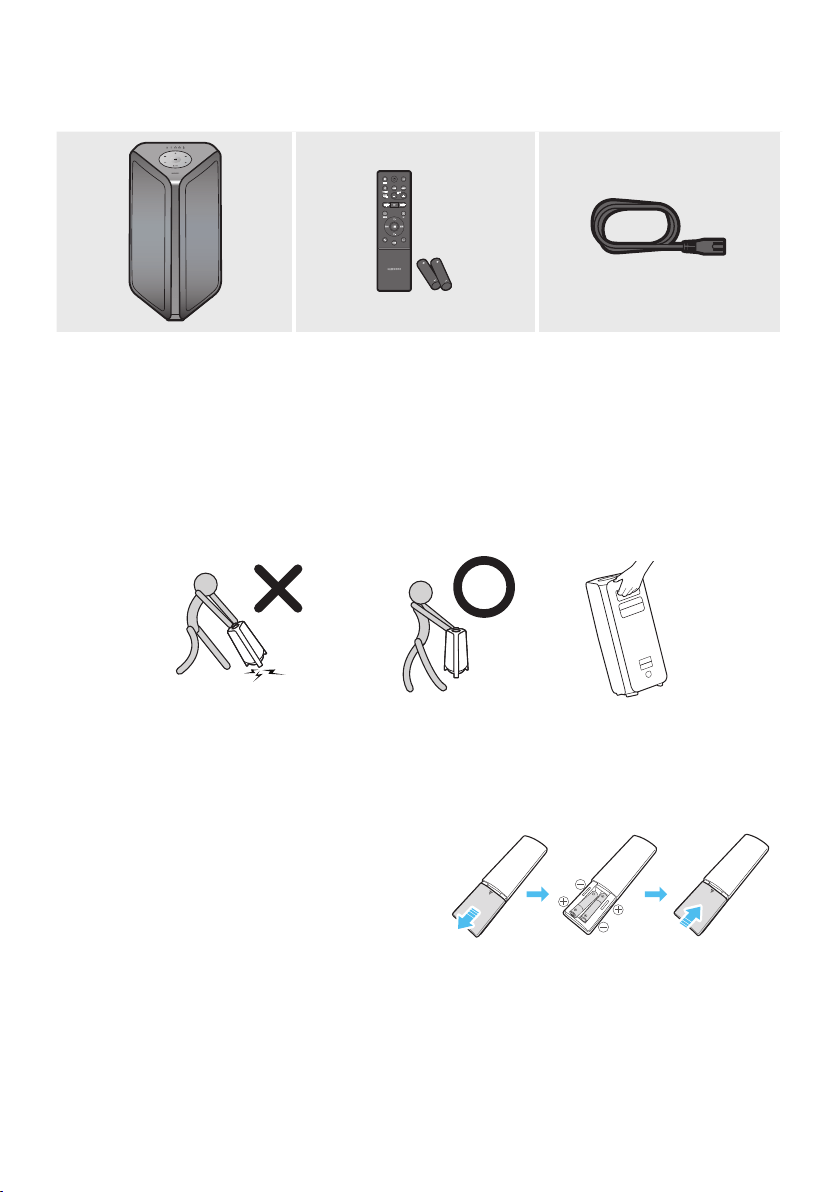
01 CHECKING THE COMPONENTS
Sound Tower Main Unit Remote Control / Batteries Power Cord
• For more information about the power supply and power consumption, refer to the label attached
to the product. (Label: Rear of the Sound Tower Main Unit)
• To purchase additional components or optional cables, contact a Samsung Service Center or
Samsung Customer Care.
• When moving the product, do not drag or pull the product from the ground. Lift the product when
moving the product.
Inserting Batteries before using the Remote Control
(AAA batteries X 2)
Slide the battery cover in the direction of the arrow
until it is completely removed. Insert 2 AAA
batteries (1.5V) oriented so that their polarity is
correct. Slide the battery cover back into position.
ENG - 3
02 PRODUCT OVERVIEW
Top Panel of the Sound Tower
BASS
Remote
Sensor
When operating the Sound Tower system, please aim the front of the remote control at
the remote sensor.
LED Indicator
Displays operating messages or current source of the Sound Tower system.
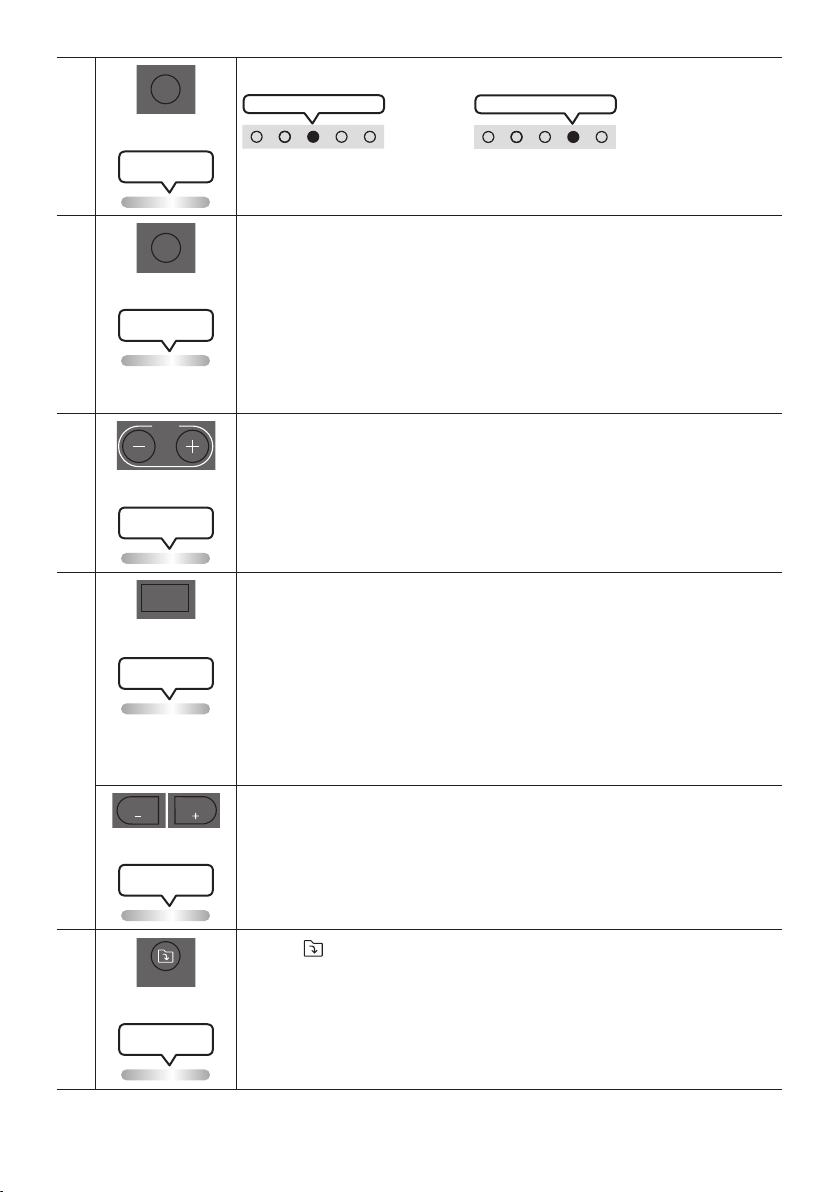
The information sources represented by each LED are as follows:
(BT) (USB) (AUX1) (AUX2) (Power/Battery)
Power Turns the Sound Tower on and off.
Light
Press the
(Light) button to turn the Lighting Mode on.
Source
Press to select a source connected to the Sound Tower.
Press and hold the
(Source)
button for more than 5 seconds
to enter the
“SEARCHING TV” mode.
Play/Pause
• Play/Pause
Press the
button to pause a music le temporarily.
When you press the button again, the music le plays.
• Demo play
Press and hold the
button for more than 5 seconds to start the Demo play while
the system is turned on. 5 LEDS ashing simultaneously and it plays demo music for
90 seconds.
– Please be careful as it may play louder than the set volume.
Volume down Press the
(Volume down) button to lower the volume.
Volume up
Press the
(Volume up) button to raise the volume.
BASS Press the BASS button to use the powerful bass sound.

ENG - 4
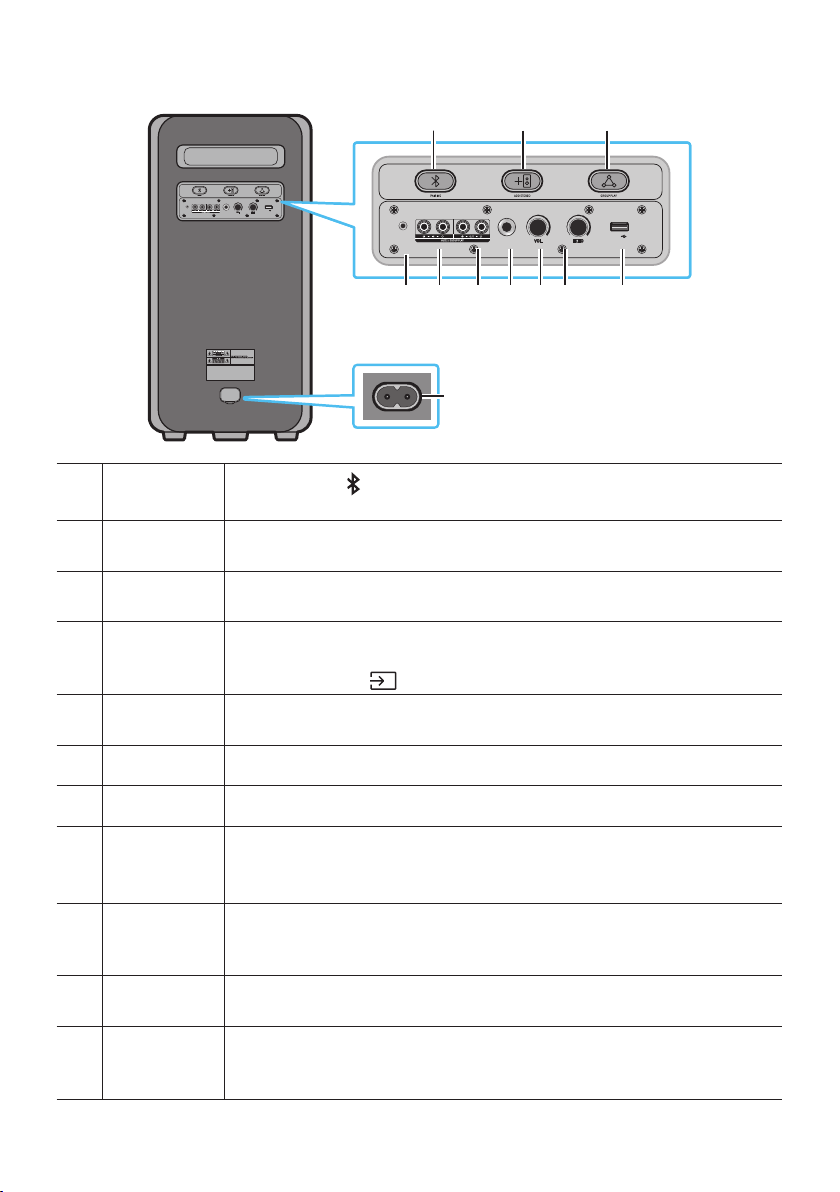
Rear Panel of the Sound Tower
POWER
ECHOVOL
USB
(5V 2.1A)
AUX 1
MIC
ECHOVOL
USB
(5V 2.1A)
AUX 1
MIC
Bluetooth
PAIRING
Press the
PAIRING button to enter pairing mode, "PAIRING" LED on the rear plane
will be fast blink.
ADD STEREO
Press the ADD STEREO button to connect to another same model Sound Tower
wirelessly.
GROUP PLAY Press the GROUP PLAY button to connect up to ten Sound Tower systems wirelessly.
USB
Connect a USB device to the USB ports on the main unit.
If you connect your cell phone to the USB port, you can charge it.
• Press the
(Source) button to select USB.
ECHO
You can give an echo effect to the sound from a connected microphone (MIC) by
adjusting the ECHO knob.
VOL Use the VOL knob to adjust the volume of a connected microphone (MIC).
MIC Connect your microphone to the MIC jack.
GROUP PLAY
OUT
Terminals
Use an Audio Cable (not supplied) to connect GROUP PLAY (OUT) terminals on the
main unit to Audio In on an external analog output device.
GROUP PLAY
IN Terminals
Use an Audio Cable (not supplied) to connect AUX2(IN) terminals on the main unit to
Audio Out on an external analog output device.
AUX1
Use an Audio (AUX) Cable (not supplied) to connect AUX1 jack on the main unit to
Audio Out on an external device.
Power
Connect the power cord to the Power jack and connect the other end of the power
cord to a wall socket to supply electrical power to the Sound Tower.
ENG - 5
Charge LED State of the Sound Tower:
Sound
Tower state
Charging state
Charge LED
(AC Mode)
Charge LED
(DC Mode)
Remark
Off Fully charged Off(black) Off (black)
Off Charging Green blinks N/A
Off Not in charging Off (black) Off (black)
The AC cable is not
inserted.
Stand by Fully charged Blue on N/A
There is no standby mode
in DC mode.
Stand by Charging Green blinks N/A
The charging LED is the
same as when Sound
Tower is shut down.
On Fully charged Blue on Blue on
When turned on, Sound
Tower mainly reects the
current battery state.
On Charging Green blinks N/A
On
Not in charging and
30%~98%power
Green on Green on
On
Not in charging and
5% ~ 29% power
Red on Red on
On
Not in charging and
below 5% power
Red on
Power off after
Light bar
orange blink
once
In DC mode shutdown, the entire system power will be turned off. So in the off state, compared with AC
mode, the following functions are not supported.
Feature
Wake up via bluetooth
Shop mode
Power Off Setting
Customer Reset
Power on via IR
Battery Charge
AUI on/off
UI feedback of LED lighting bar(front) on/off
ENG - 6
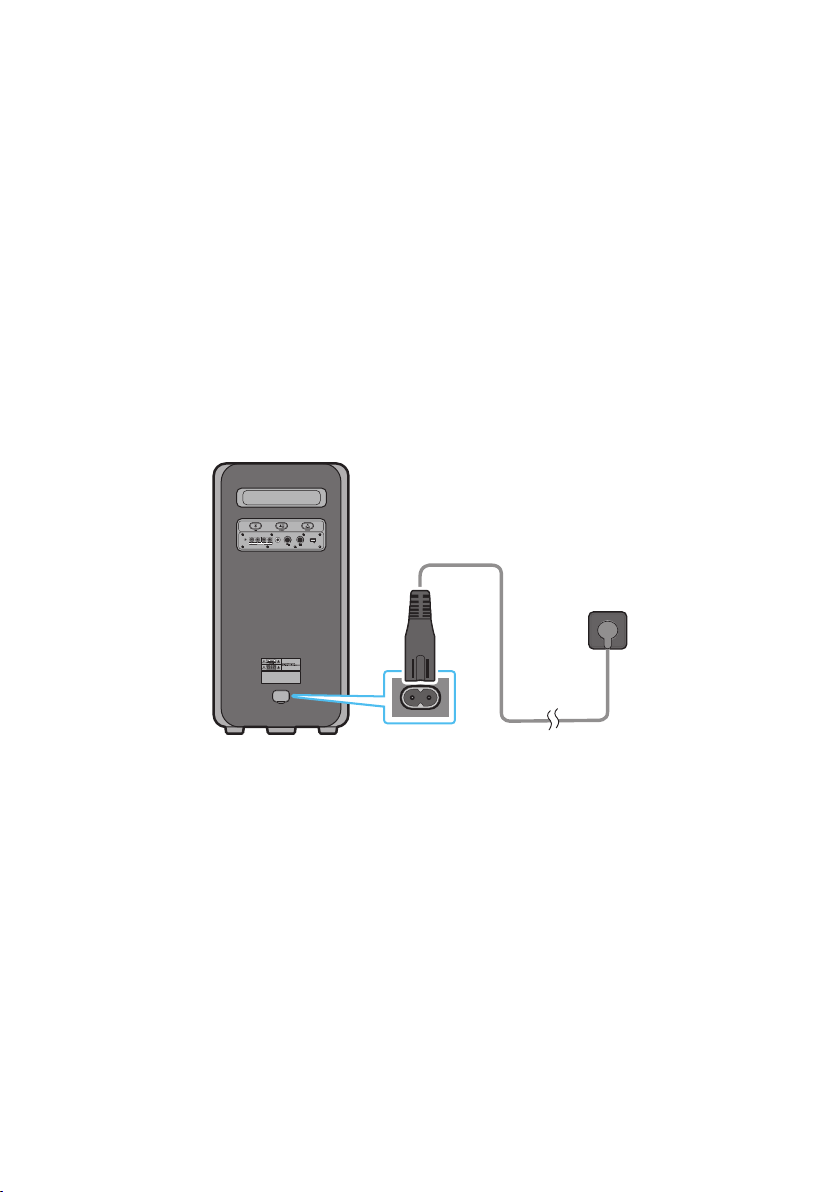
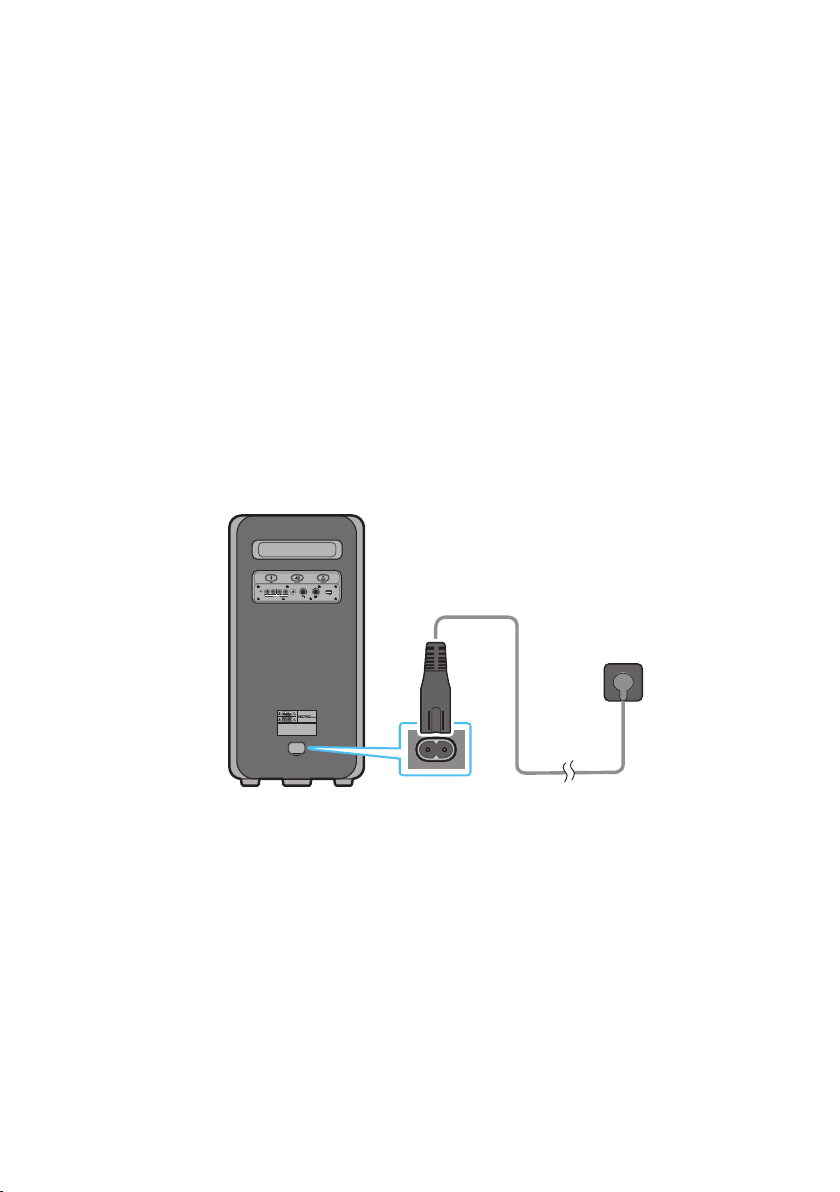
03 CONNECTING THE SOUND TOWER
Connecting Electrical Power
Use the power cord to connect the Sound Tower to an electrical outlet in the following order:
Connect the power cord to the Sound Tower and then to a wall socket.
See the illustrations below.
• When the AC cord is pressed in, the built-in battery will be charged automatically until the battery
is fully charged. The LED indicator on the top panel will show the current charging state (refer to
page ENG - 4)
• When you unplug the set to run on battery, the volume level drops dramatically.
• For more information about the required electrical power and power consumption, refer to the
label attached to the product. (Label: Rear of the Sound Tower)
Rear of Sound Tower
POWER
ECHOVOL
USB
(5V 2.1A)
AUX 1
MIC
Connecting
Electrical Power
ENG - 7
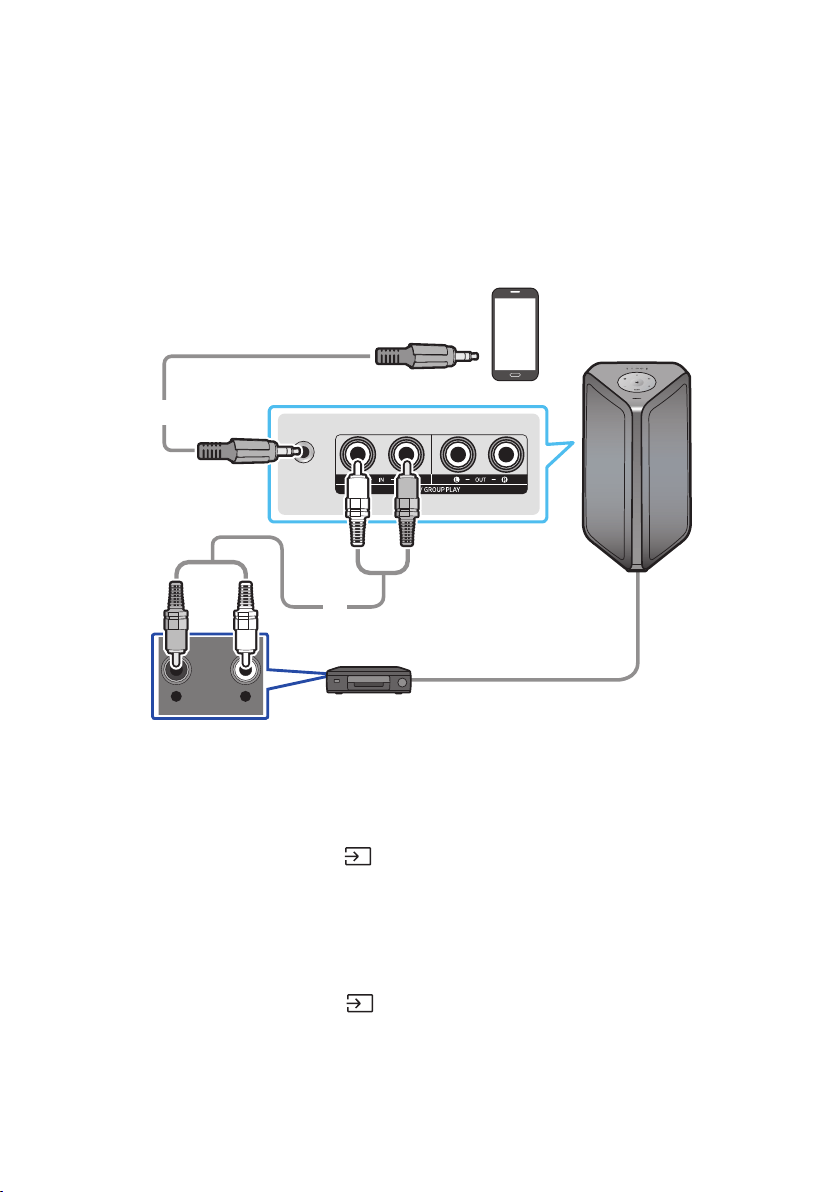
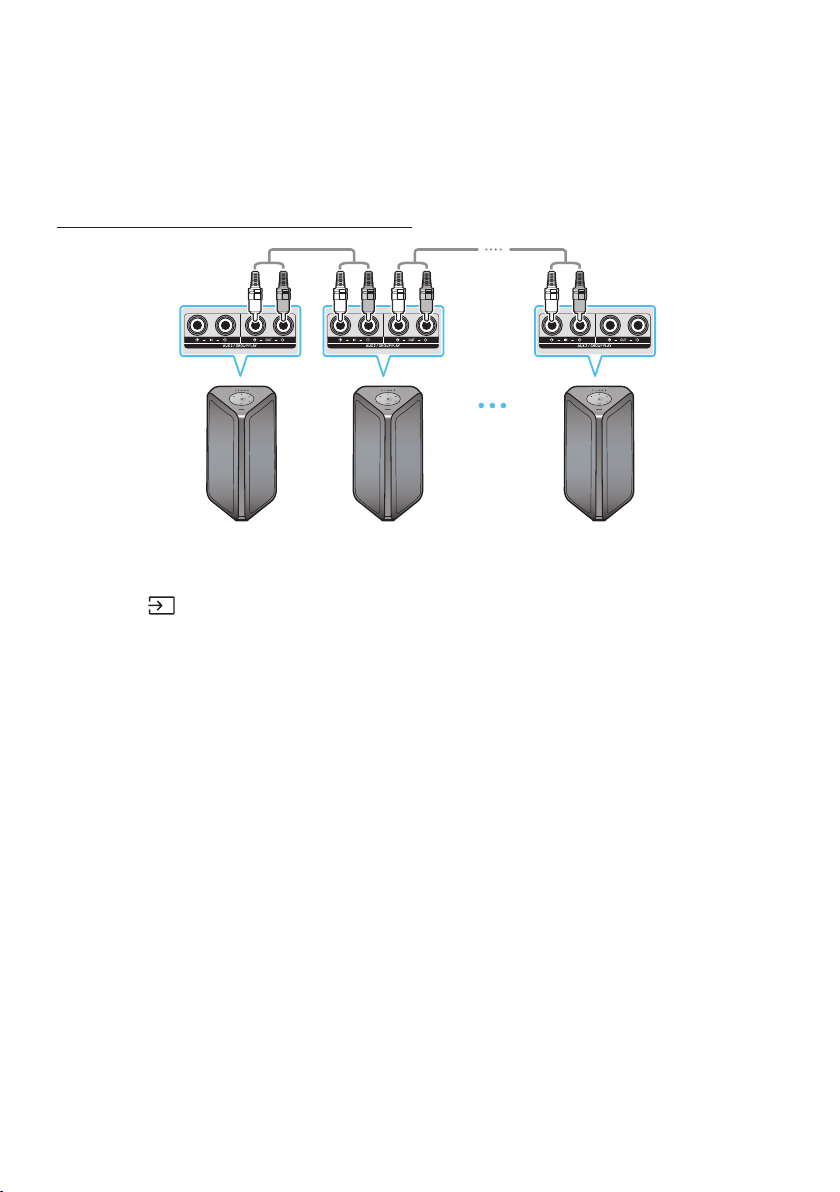
How to use Audio Group
You can connect multiple audio systems in a group to create a party environment and produce higher
sound output. Set one Sound Tower as the HOST and any music played on it will be shared among any
other Sound Tower systems in the Audio group.
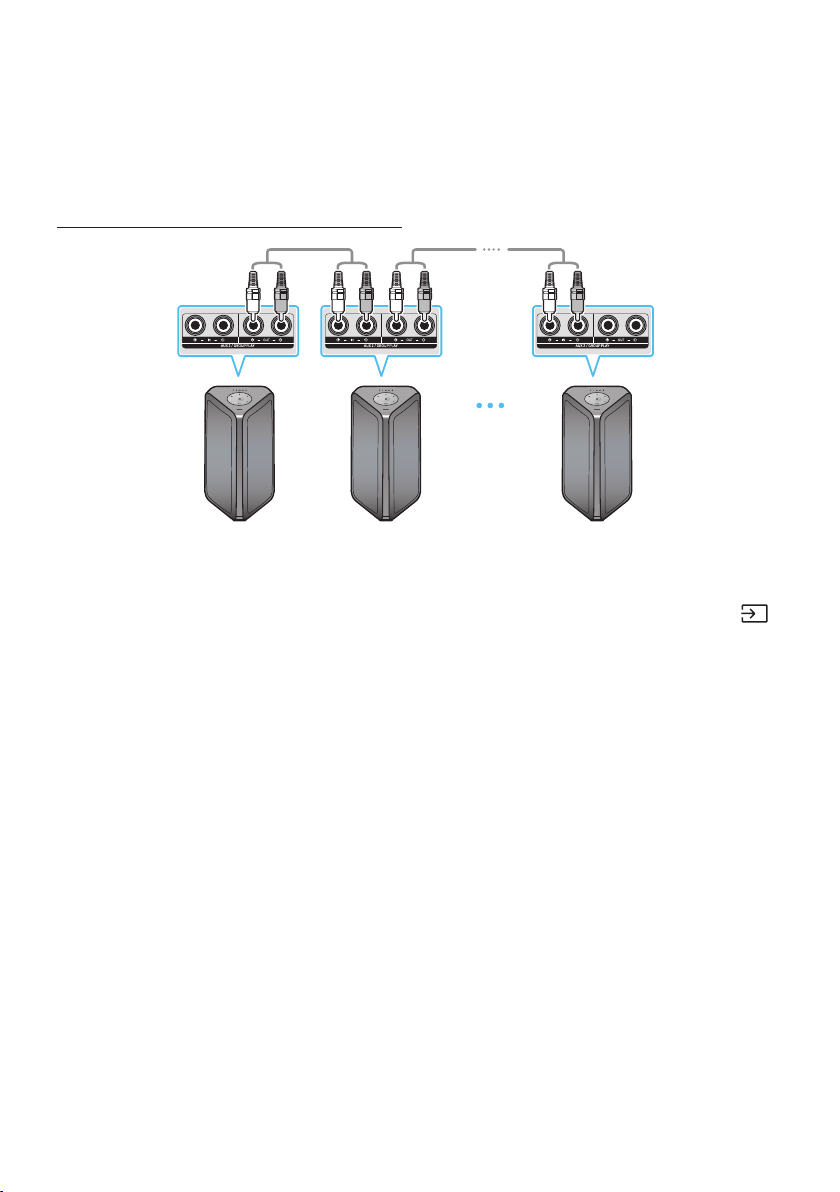
Connecting the wired Group Play mode
1st
Sound Tower HOST
2nd
Sound Tower
Last
Sound Tower
Continue the
connection until
the last Sound
Tower
Set up Group Play by connecting all the systems using audio cables (not supplied). Use the AUX or
(Source) button to change the source to AUX2 for every Sound Tower system except the 1st (or HOST)
Sound Tower system.
NOTES
• The 1st Sound Tower HOST can play music from any source.
• Depending on the length or characteristics of the cable, there may be a difference in operating
distance.
ENG - 8
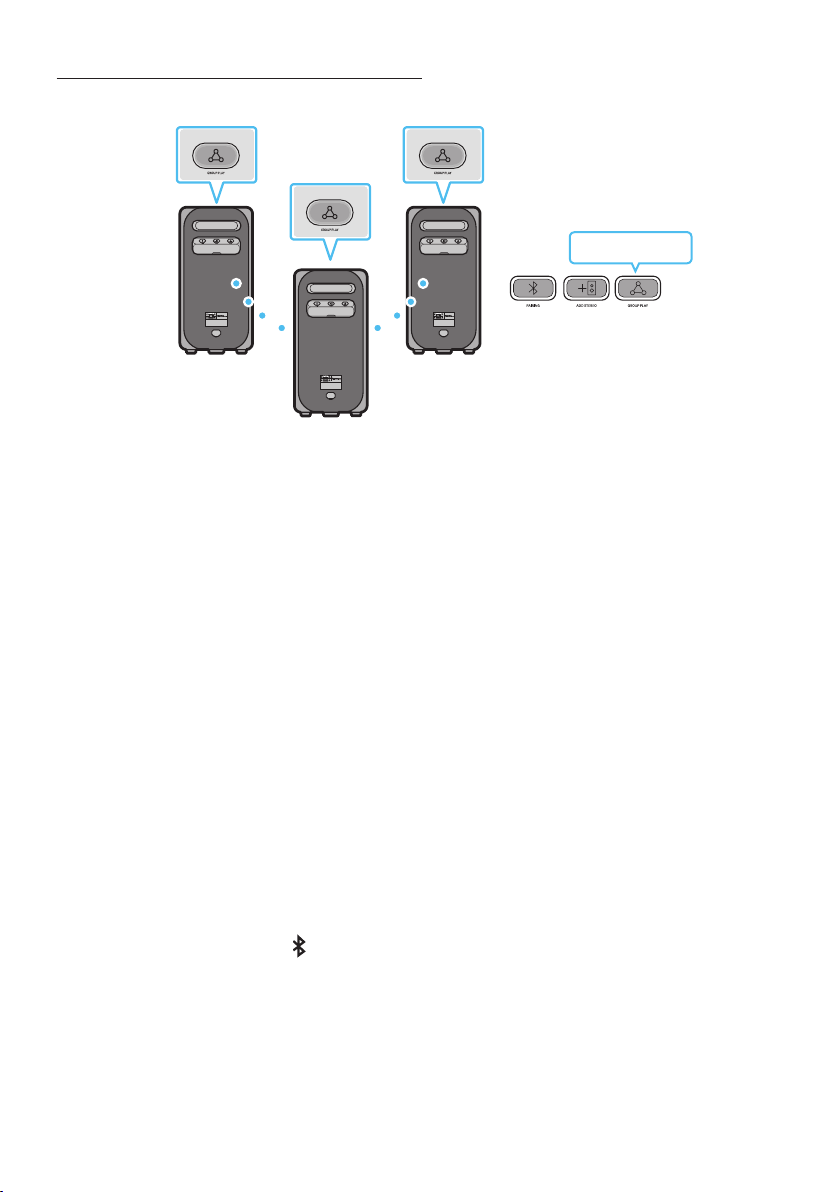
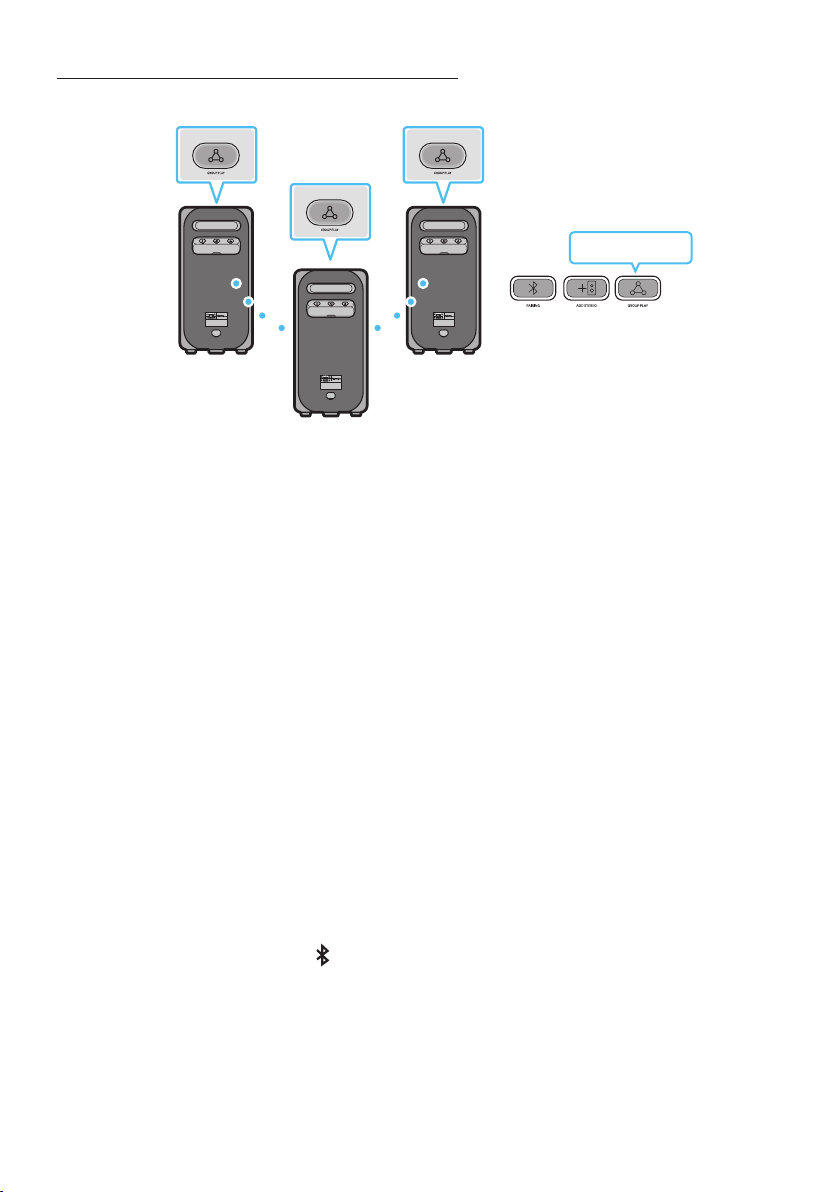
Connecting the wireless Group Play mode
You can connect up to ten Sound Tower systems with the wireless Group Play function.
HOST
SUB 1
SUB 2
POWERPOWER
POWER
Greenashing
Press the GROUP PLAY button on the HOST Sound Tower system, After “GROUP LED” solw blinks
10 seconds, ”GROUP PLAY”LED will be fast blink (30s).
Press the GROUP PLAY button on the 2nd Sound Tower system (SUB 1).”GROUP PLAY”LED will be
blink.And then SUB1 will be connected with HOST,”GROUP PLAY”LED of SUB1 and HOST will stop
blinking and turn on.
Press the GROUP PLAY button on the 3rd Sound Tower system (SUB 2). Tone prompt instead the
GROUP PLAY button on the system stops blinking.
4. If you want to add more Sound Tower systems, repeat step 3.
5. Play music on the HOST Sound Tower. Sound outputs from all the connected systems.
NOTES
• In Group play mode, “HOST” Sound Tower (Figure 1) can connect to the Samsung TV. After the
connection is successful, the Group play mode automatically exits.
• The wireless Group Play connection is available for MX-ST90B/MX-ST50B/MX-ST40B.
• Environmental conditions or other factors with connected devices may have effect on playback
quality.
• If the red LED is on the GROUP PLAY button, an error has occurred in the wireless Group Play
connection. Try step 1 to step 5 again.
• The ADD STEREO button and
PAIRING button on the SUB Sound Tower systems are not available
while in wireless Group Play mode.
• The ADD STEREO button on the HOST Sound Tower system is not available while in wireless Group
Play mode.
• Long press “GROUP PLAY” in BT Source state to enter Group mode as “HOST”.

ENG - 9
• All SUB units must be connected one by one. For example, after HOST is connected, press GROUP
PLAY button on SUB 1 to connect, and after SUB 1 is connected, you should connect SUB 2 and SUB
3 one by one sequentially.
• While using Group Play, currently connected Bluetooth devices are disconnected and Bluetooth
connection is disabled.
• Bluetooth devices can search and connect with the HOST Sound Tower only.
• When in Group Play mode, the SUB cannot connect to a Bluetooth device.
• If you power off and then power on the Sound Tower or select any source other than BT on a SUB
unit, in Group Play mode, the Group Play mode is disconnected.
• This product does not support aptX audio stream with Wireless Group Play mode.
Disconnecting the wireless Group Play mode
1. Press and hold the GROUP PLAY button over 5 seconds (HOST or SUB) after Group Play is
connected or press the GROUP PLAY button (HOST or SUB) before Group Play is connected.
• Tone prompt instead and the LED above the GROUP PLAY button is off.
2. If you select any source other than BT on the SUB units or turn off the HOST Sound Tower, the
Group Play mode is disconnected.
• If the disconnection is made from the HOST Sound Tower, Group Play is disconnected.
LED Indications
LED STATE Description
Green
Blink Waiting for a wireless Group Play connection.
Solid The wireless Group Play connection was successful.
Red Solid There is an error with the wireless Group Play connection.
NOTE
• In wireless connection, Playback quality can be unstable depending on Bluetooth environment.
For better play, please keep the device in wired Group Play mode.
• The rst bluetooth connection should be within 1m.
ENG - 10
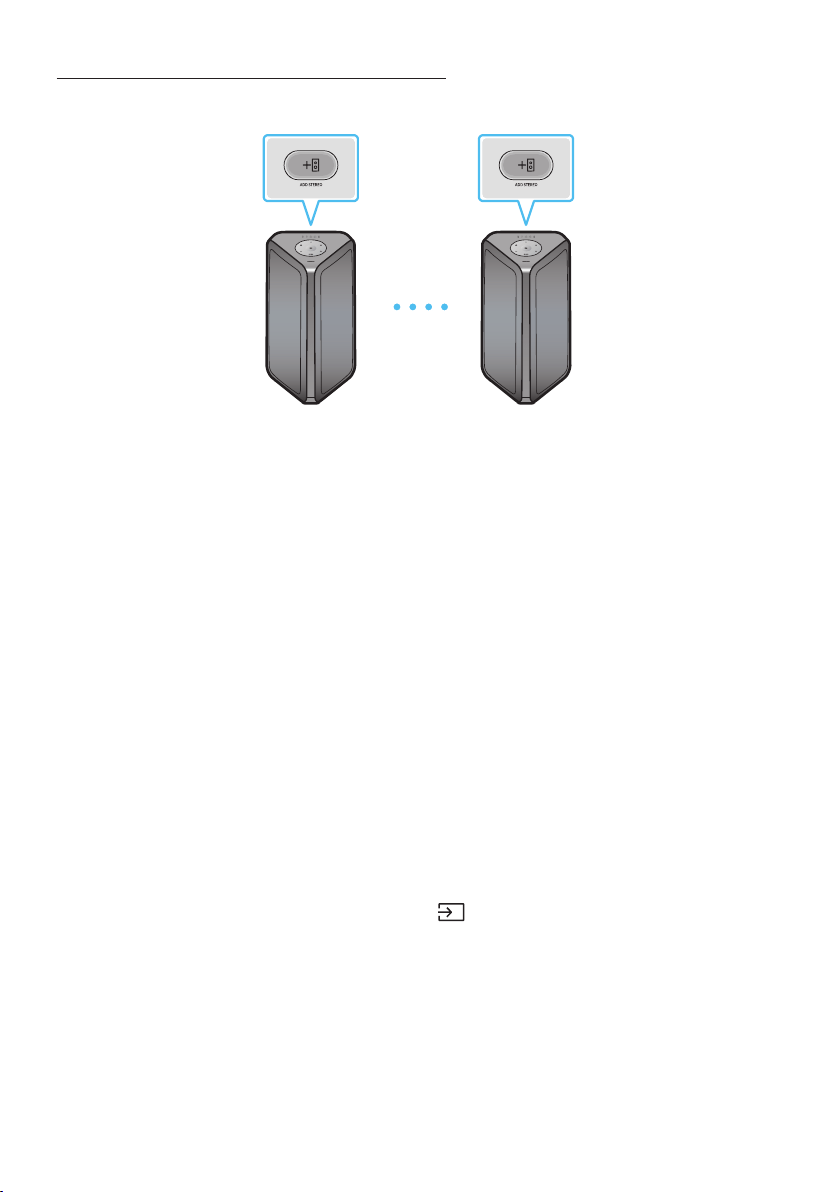
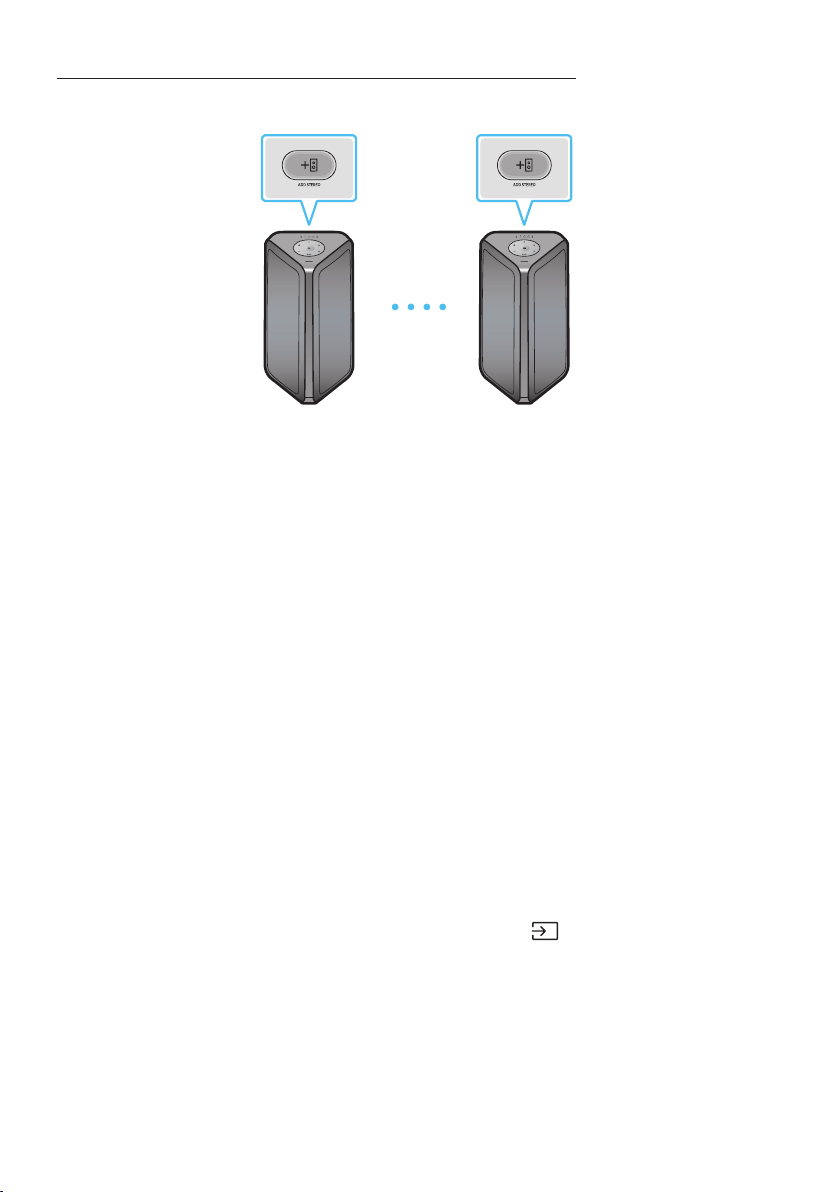
Using a Smartphone and Stereo Group mode
Connect two Sound Tower and use them with your smartphone to enjoy stereo sound.
Left Sound Tower
(MAIN)
Right Sound Tower
(SUB)
Press the ADD STEREO button on the left Sound Tower system. The LED blinks on the ADD
STEREO button.
Press the ADD STEREO button on the right Sound Tower system. The LED blinks on the ADD
STEREO button.
3. When the connection is made, tone prompt. Back plane ADD LED Green Indicator Steady on.
• The MAIN Sound Tower system outputs left channel sound and the SUB Sound Tower system
outputs right channel sound. Press the ADD STEREO button on the MAIN or SUB Sound Tower
to change the sound channel of the Sound Tower.
4. Play music by connecting your smartphone to the MAIN Sound Tower and Bluetooth.
Sound is output from both Sound Tower.
NOTES
• To use the Stereo Group mode, both Sound Tower systems must be the same model.
• Environmental conditions or other factors with connected devices may have effect on playback
quality.
• If the red LED is on the ADD STEREO, an error has occured in the Stereo Group connection. Try step
1 and step 3 again.
• Remote Controller, BT PAIRING, GROUP PLAY and
(Source) buttons on the SUB Sound Tower
systems are disabled while in Stereo Group mode.
• The GROUP PLAY button on the MAIN Sound Tower system is not available while in Stereo Group
mode.
ENG - 11
• In mode other than “BT” (ex. USB, AUX mode), music is played only in MAIN Sound Tower and music
is not played in SUB Sound Tower.
• The lighting colors between MAIN Sound Tower and SUB Sound Tower may vary.
• This product does not support aptX audio stream with Stereo Group mode.
• If you try to connect a Bluetooth device while Stereo Group is connecting, the Stereo Group mode
may fail.
Terminate the Stereo Group mode
Press the ADD STEREO button (MAIN or SUB) for at least 5 seconds while the Stereo Group is
connected.
• Tone prompt and the LED above the ADD STEREO button is off.
LED Indications
LED STATE Description
Green
Blink Waiting for a Stereo Group connection.
Solid The Stereo Group connection is successful.
Red Solid There is an error with the Stereo Group connection.
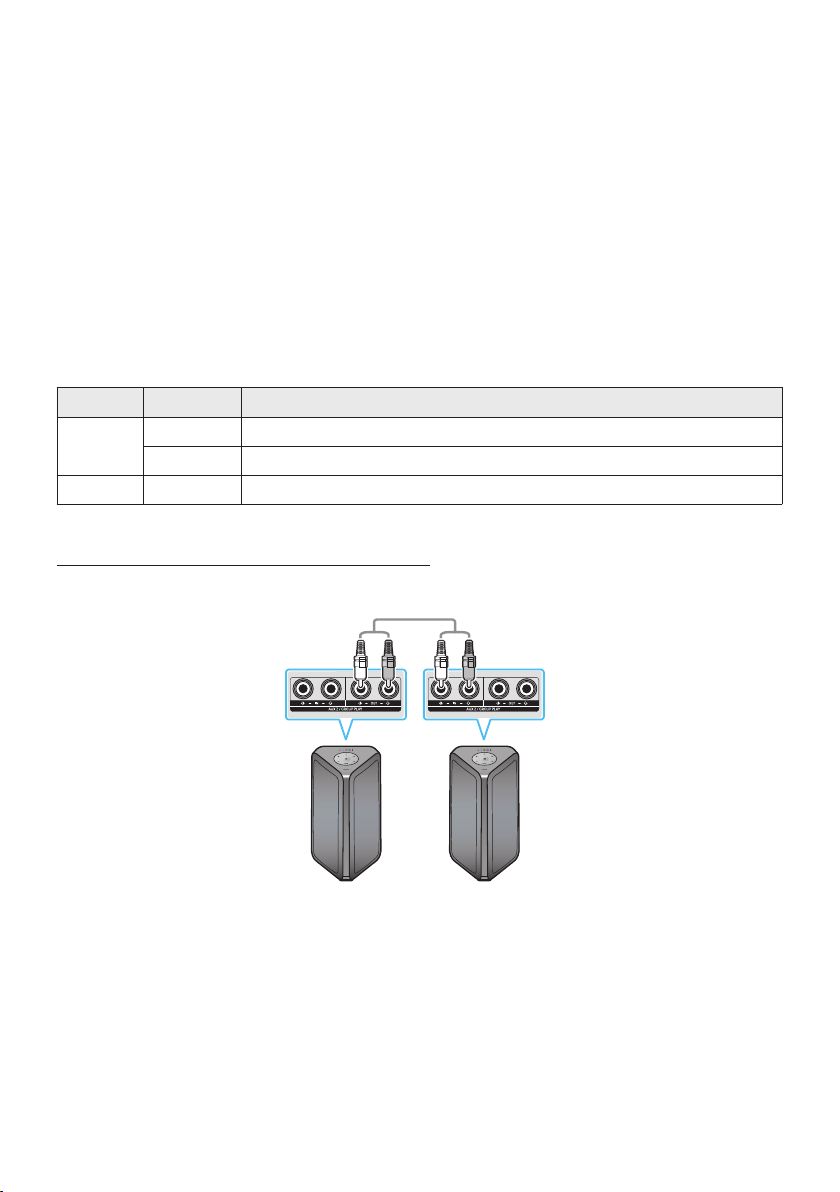
Using Samsung TV and Stereo Group mode
Connect two Sound Tower by wire and use them with Samsung TV to enjoy stereo sound.
Left Sound Tower
(MAIN)
Right Sound Tower
(SUB)
Connect the RCA cable to the AUX2 OUT on the MAIN and AUX2 IN on the SUB as shown by using
the RCA cable (not supplied).
In “BT” mode, press the “AUX” button on the MAIN Sound Tower remote control for at least 5
seconds. The LED blinks on the ADD STEREO button.
3. When the connection is complete, the “ADD STEREO” LED turn on and then the current output.
Tone prompt instead.

ENG - 12
4. When the connection is complete, the SUB top panel “AUX2” LED turn on.
• The MAIN Sound Tower outputs the left channel sound and the SUB Sound Tower outputs the
right channel sound. Press the ADD STEREO button on the MAIN or SUB Sound Tower to
change the sound channel of the Sound Tower.
5. Connect a TV and MAIN Sound Tower via Bluetooth to play music. Sound is output from both
Sound Tower.
NOTES
• To use Stereo Group mode, both Sound Tower must be the same model.
• A red light on the LED on the ADD STEREO button indicates an error in the Stereo Group
connection. Try Step 1 to 5 again.
• In Stereo Group mode, the remote control, BT PAIRING, GROUP PLAY, and
(Source) buttons on
the SUB Sound Tower are disabled.
• The GROUP PLAY button on the MAIN Sound Tower is not available in Stereo Group mode.
• If Samsung TV supports a simple connection, the connection pop-up is automatically displayed on
the TV, and if you select “Yes”, it connects to the TV. If there is a previous connection history
between Samsung TV and Sound Tower, it will be connected to Samsung TV without pop-up. For a
simple connection to Samsung TV, refer to page 17.
• The lighting colors may vary between the MAIN Sound Tower and the SUB Sound Tower.
Terminating the Stereo Group mode connection
Press the ADD STEREO button (MAIN or SUB) for at least 5 seconds after the Stereo Group is
connected.
• “OFF-STEREO MODE” tone prompt and the LED on the ADD STEREO button turns off.
ENG - 13
04 CONNECTING AN EXTERNAL DEVICE
Connect to an external device via a wired or wireless network to play the external device’s sound
through the Sound Tower.
Connecting using an Analog Audio (AUX) Cable
AUX 1
- AUDIO -
R L
Mobile device / MP3 / PMP
BD / DVD player / Set-top box / Game console
3.5 mm
stereo cable (not supplied)
Audio (AUX) Cable (not supplied)
Rear of the Sound Tower
3.5 mm stereo Cable (AUX1)
1. Connect AUX1 jack on the main unit to the AUDIO OUT jack of the Source Device using an 3.5 mm
stereo cable.
2. Select “AUX1” mode by pressing the
(Source) button on the top panel or on the remote control.
• You can also select a source using AUX button on the remote control.
Audio Cable (AUX2)
1. Connect AUX2 (IN) terminals on the main unit to the AUDIO OUT terminals of the Source Device
using an audio cable.
2. Select “AUX2” mode by pressing the
(Source) button on the top panel or on the remote
control.
• You can also select a source using AUX button on the remote control.
ENG - 14
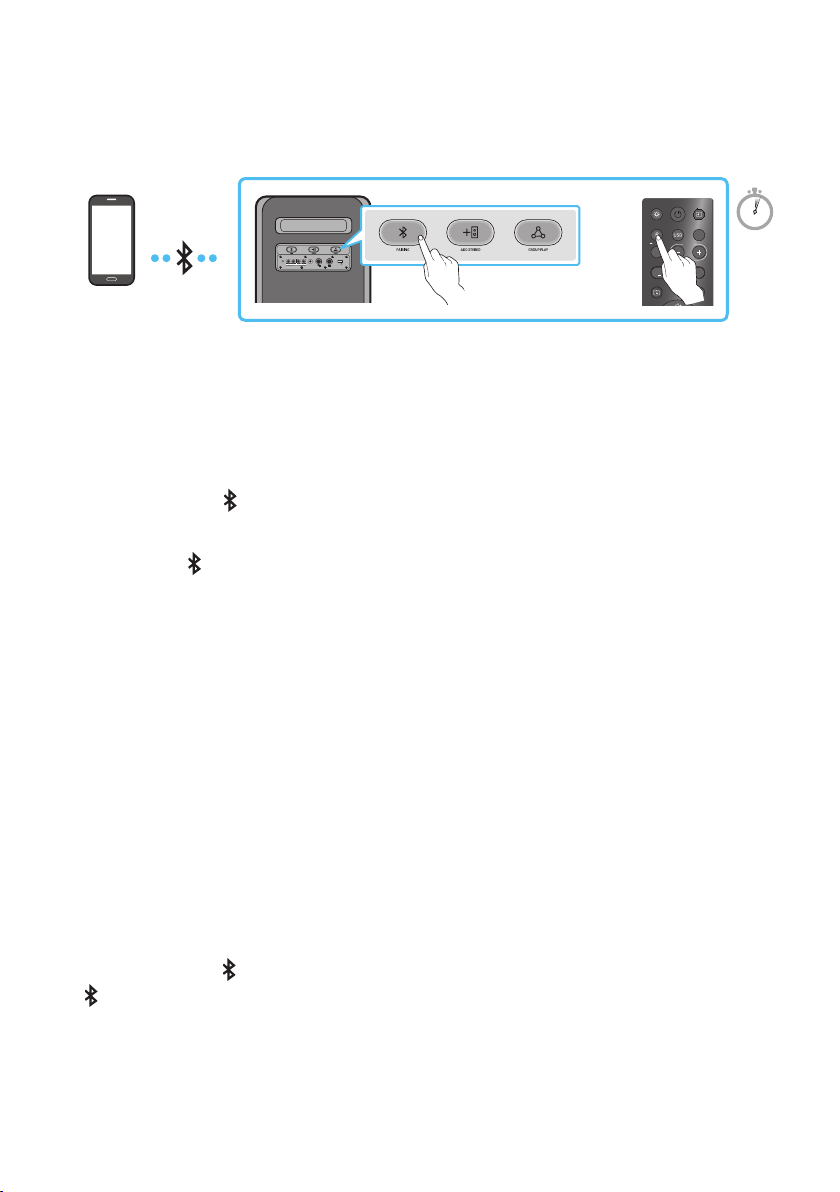
Connecting a mobile device via Bluetooth
When a mobile device is connected using Bluetooth, you can hear stereo sound without the hassle of
cabling.
ECHOVOL
USB
(5V 2.1A)
AUX 1
MIC
LIGHT
PAIRING
TEMPO
USB
AUX
EFFECT
DOWN
UP
EFFECT
DJ
SOUND
MODE
Bluetooth
device
OR
5 Sec
* In battery mode, when the Sound Tower is power off, Bluetooth connection and the party audio app are
not available.
The initial connection
1. Press and hold the
PAIRING button on the remote control for more than 5 seconds to enter the
“BT PAIRING” mode.
(OR)
Press the
PAIRING button on the rear panel.
2. On your device, select “[AV] MX-ST5B Series” from the list that appears.
• After the device is connected. The third light on the top panel blinks three times cyan, and the
bluetooth light on the rear panel is steady on.
3. Play music les from the device connected via Bluetooth through the Sound Tower.
If the device fails to connect
• Sound tower will play voice prompt via bluetooth disconnected.
• If a previously connected Sound Tower listing (e.g. “[AV] MX-ST5B Series”) appears in the list, delete
it.
• Then repeat steps 1 and 2.
What is the difference between BT READY and BT PAIRING?
• BT READY : In this mode, you can use the previously connected TV or mobile device to connect to
Sound Tower.
• BT PAIRING : In this mode, you can connect a new device to the Sound Tower.
(Press and hold the
PAIRING button on the remote control for more than 5 seconds or press the
PAIRING button on the rear of the Sound Tower to enter the “BT PAIRING” mode.)

ENG - 15
Bluetooth Multi connection
Sound Tower supports up-to two simultaneous Bluetooth device connections. Sound Tower can play
music through one of the connected Bluetooth devices without disconnecting the second device.
Bluetooth device 1 Bluetooth device 2
1. Connect Sound Tower to the rst device and the second device respectively for the rst time.
(See page 14)
2. Music can be played on only one of the two connected devices, and when the music is played on
the other device, the music on the playing device is paused.
NOTES
• If you want to connect Sound Tower to a third device, you can disconnect Sound Tower from one of
the two currently connected devices and then connect Sound Tower to the third device.
(Device include Samsung TV)
• With the Sound Tower and two devices currently connected, when pairing to a new Bluetooth
device, the devices currently connected maybe disconnected.
• You can connect to two Bluetooth devices at the same time.
• If asked for a PIN code when connecting a Bluetooth device, enter <0000>.
• Environmental conditions or other factors with connected devices may have effect on playback
quality.
• The Sound Tower automatically turns off after 18 minutes with no command input in the ready
state.
• The Sound Tower may not perform Bluetooth search or connection correctly under the following
circumstances:
– If there is a strong electrical eld around the Sound Tower.
– If several Bluetooth devices are simultaneously paired with the Sound Tower.
– If the Bluetooth device is turned off, not in place, or malfunctions.
• Electronic devices may cause radio interference. Devices that generate electromagnetic waves
must be kept away from the Sound Tower main unit - e.g., microwaves, wireless LAN devices, etc.

ENG - 16
• Bluetooth Multi connection may not be supported depending on the connected device’s
specications.
• Removable/detachable Bluetooth devices (Ex:Dongle etc..) ,windows phone, laptops, TV, etc. do not
support Bluetooth Multi connection.
• After Bluetooth Multi connection pairing, there may be a slight delay before music starts playing
depending on the Bluetooth devices.
• If you move too far out of range from the Sound Tower without rst disconnecting your Bluetooth
device, it may take a few minutes to connect other Bluetooth devices. If you turn the Sound Tower
off and back on, you can connect other Bluetooth devices without waiting.
LED Indications
LED STATE Description
Blue
Fast Blink BT PAIRING mode
Blink BT READY mode
Solid A Bluetooth device is connected.
Using Bluetooth Power On
When the Sound Tower is turned off, you can connect your smart device via a Bluetooth connection to
turn it on. Battery status cannot use Bluetooth power on.
1. Press and hold the BASS button on the remote control or on the top panel to set the Bluetooth
Power On function on. Lighting bar will be blink white once.
2. When the Sound Tower is off, connect your smart device via Bluetooth. (For information on
Bluetooth connections, refer to your smart device’s manual.)
3. When the connection is complete, the Sound Tower turns itself on automatically in Bluetooth
mode.
• Select the desired music to play from your smart device.
NOTE
• Each time you press and hold the BASS button for 5 seconds. LED lighting bar will be blink white once
and status switched:
BLUETOOTHPOWER-ON→BLUETOOTHPOWER-OFF
ENG - 17
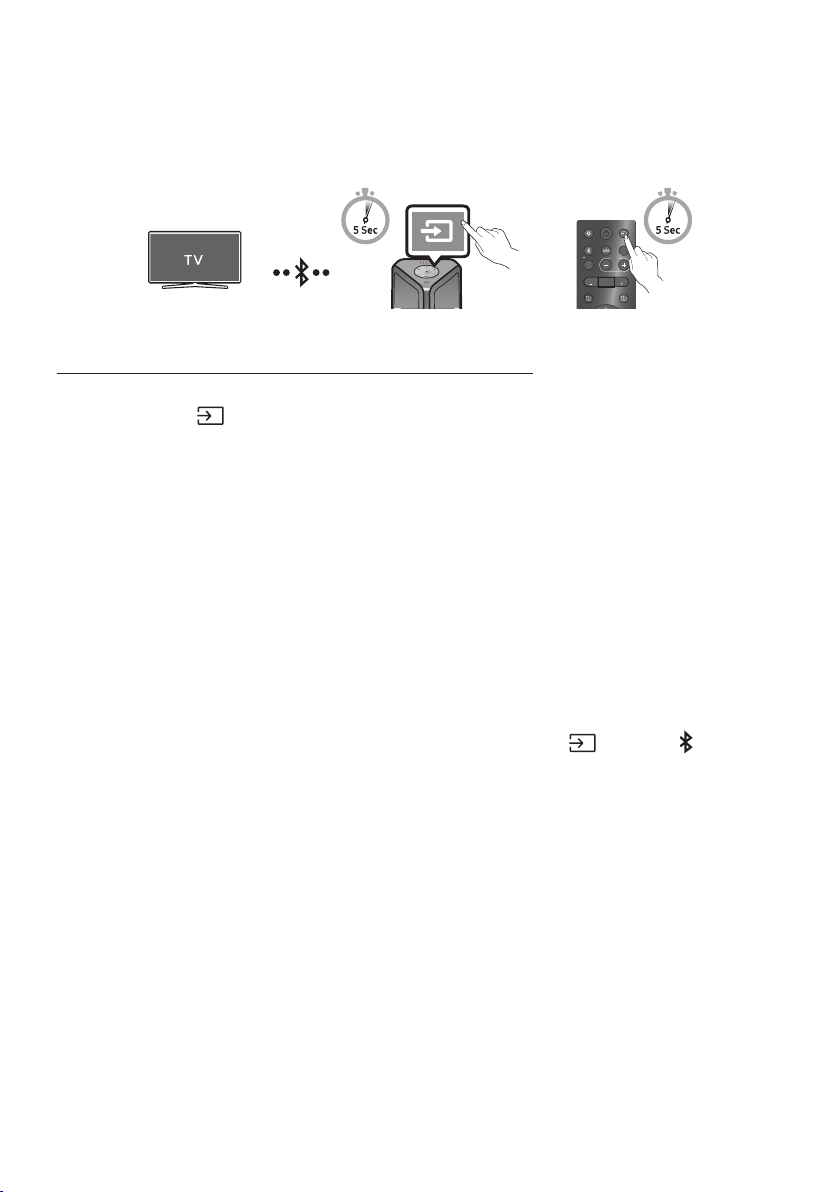
Connecting the Samsung TV via Bluetooth
If Sound Tower connected with Samsung TV via Bluetooth, Sound Tower can be controlled by TV UI.
(Volume +/-, Mute On/Off and Power On/Off)
LIGHT
PAIRING
TEMPO
USB
AUX
EFFECT EFFECT
DJ
SOUND
MODE
OR
Top Panel of the Sound Tower
Easy connect with Samsung TV (SEARCHING TV mode)
Sound Tower has “SEARCHING TV” mode for easy connect with Samsung TV.
1. Press and hold
(Source) bottom for more than 5 seconds on remote control or top panel then
Sound Tower will start to search Samsung TV. Lighting bar will blink white once and then blink
cyan, The back plane “PAIRING” LED will be slow blink. (Or, when the wired Stereo Group mode
connection is complete, the “SEARCHING TV” mode is automatically activated.)
2. If Samsung TV support easy connection, connection popup will be displayed on TV.
If Samsung TV has connected with Sound Tower before, Samsung TV will be connected without
popup.
3. If Sound Tower can not nd any Samsung TV within 5 minutes, Sound Tower will terminate
“SEARCHING TV” mode and turn to “BT PAIRING” mode. If nd any Samsung TV, Sound Tower will
request connection to those TV.
NOTES
• While in wireless Group Play mode, searching TV is not available.
• To stop searching Samsung TV, turn off the Sound Tower or press the
(Source) or PAIRING
button.
• Sound Tower does not support multi connection if Samsung TV is connected.
• While Samsung TV is connected, Sound mode is PARTY and SOUND MODE button is not available.
• While Samsung TV is connected, Sound Tower APP can not connect with Sound Tower.
• Connection popup may not be displayed according to TV spec.
• You can select and connect directly from the Bluetooth speaker list on your TV when the
connection pop-up does not appear on your TV.
• When the Sound Tower is connected to your TV by Bluetooth connection, the video on the TV and
audio from the Sound Tower may not be synchronized because the distance between the Sound
Tower and the TV is too far. It is recommended to move the Sound Tower closer to your TV within 3.3 ft
(1 meter).
ENG - 18
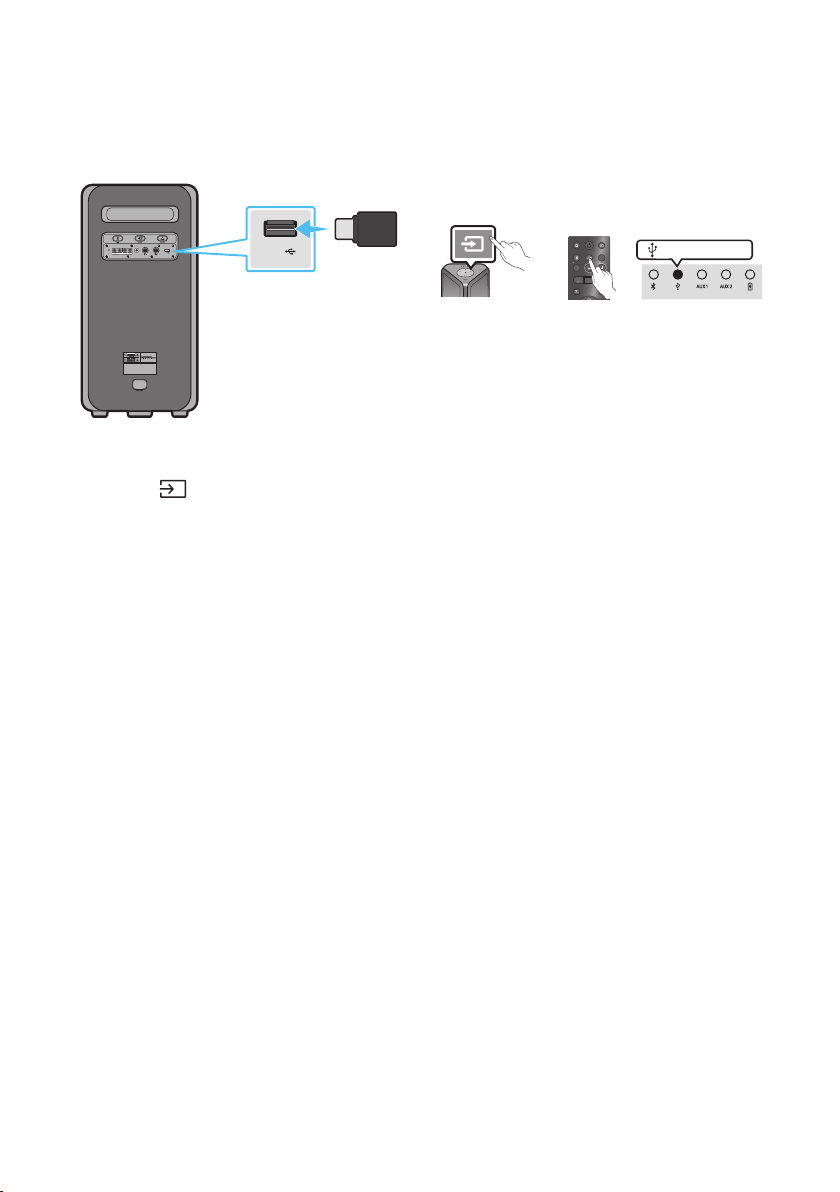
05 CONNECTING A USB STORAGE DEVICE
You can play music les located on USB storage devices through the Sound Tower.
POWER
ECHOVOL
USB
(5V 2.1A)
AUX 1
MIC
USB
(5V 2.1A)
LIGHT
PAIRING
TEMPO
USB
AUX
EFFECT EFFECT
DJ
SOUND
MODE
USB storage
device
(not supplied)
Rear of the Sound Tower
OR
white LED on
1. Connect a USB storage device to the USB jacks on your Sound Tower.
2. Press the (Source) button on the top panel or on the remote control, and then select “USB”.
• You can also select a source using USB button on the remote control.
3. The second USB indicator on the top panel is steady on.
4. Play music les from the USB storage device through the Sound Tower.
• The Sound Tower automatically turns off (Auto Power Down) if USB device is not connected,
playback stopped, or there is no input for more than 18 minutes.
NOTES
• This product only supports USB storage devices that are formatted in the FAT and FAT32 le
system.
• This product does not support HDD storage or storage on mobile devices.
• A maximum of 999 les can be played per USB storage device.
• A maximum of 256 folders can be read per USB storage device.

ENG - 19
Supported Audio Formats
File Extension Audio Codec Sampling Rate Bit Rate
*.mp3
MPEG 1 Layer3 32 kHz ~ 48 kHz 32 kbps ~ 320 kbps
MPEG 2 Layer3 16 kHz ~ 24 kHz 8 kbps ~ 160 kbps
MPEG 2.5 Layer3 8 kHz ~ 12 kHz 8 kbps ~ 160 kbps
*.wma WMA7/8/9 8 kHz ~ 48 kHz 32 kbps ~ 320 kbps
*.aac
AAC 8 kHz ~ 96 kHz < 1728 kbps
A A C- L C 8 kHz ~ 96 kHz < 1728 kbps
HE-AAC 8 kHz ~ 96 kHz < 1728 kbps
*.wav
PCM/LPCM/
IMA_ADPCM
8 kHz ~ 192 kHz < 5 Mbps
*ac - 8 kHz ~ 192 kHz < 5 Mbps
NOTES
• This product does not support WMA Professional codec.
• The above table shows supported sampling rates and bit rates. Files in formats that are not
supported will not play.
• A AC les only support the ADTS native format.
Software Update
SamsungmayofferupdatesfortheSoundTower’ssystemrmwareinthefuture.
If an update is offered, you can update the rmware by connecting a USB device with the rmware
update stored on it to the USB port on your Sound Tower. For more information about how to download
update les, go to the Samsung Electronics website at www.samsung.com/us/support/.
Then, enter or select the model number of your Sound Tower, select the Software & Apps option, and
then Downloads. Note that the option names can vary.

ENG - 20
Connecting an External Microphone
You can output your voice from the system by connecting a dynamic microphone with a normal plug
(not supplied).
MAXMIN MAXMIN
1. Turn the MIC LEVEL knob to MIN to reduce the microphone volume level.
2. Connect an optional microphone to the MIC jack on the unit.
3. Adjust the volume using the MIC “VOL” knob.
4. Adjust the Effect of the echo using the MIC “ECHO” knob.
5. Speak or sing into the connected microphone.
NOTES
• When using the wireless Group mode or stereo mode function, sound from the microphone is only
output from the system to which the microphone is connected.
• When Sound Tower is in battery mode, the MIC sound level will be lower.

ENG - 21
06 USING THE REMOTE CONTROL
How to Use the Remote Control
LIGHT
PAIRING
TEMPO
USB
AUX
EFFECT
DOWN
UP
BASS
EFFECT
DJ
SOUND
MODE
* To reduce battery drain, the product
does not turn on when press the power
button of remote control while the
battery is in use.
Power
Turn the Sound Tower on and off.
LIGHT
LIGHT
Press the (LIGHT) button to turn the
Lighting Mode on.
(Only during music playback is effective)
Press the button repeatedly to cycle through
the available light modes: AMBIENT, PARTY,
DANCE, THUNDERBOLT, STAR or OFF.
Lighting LED
white blink x1
Source
Press to select a source connected to the
Sound Tower.
Press the button repeatedly to cycle through
the available sources: BT, USB, AUX1 or AUX2 .
Lighting LED
white blink x1
White LED moves to right on
LED indicator on the top of the product.
Bluetooth
PAIRING
PAIRING
Press to select a source connected directly to
"BT" mode.
Press and hold the button for more than
5 seconds to enter the "BT PAIRING" mode.
You can connect the Sound Tower to a new
Bluetooth device in this mode by selecting the
Sound Tower from the Bluetooth device's
search list.
Lighting LED
Cyanashes
white LED on
LED indicator on the top of the product.
USB
USB
Press to select the USB source connected to
the Sound Tower.
white LED on
LED indicator on the top of the product.
Lighting LED
white blink x1
ENG - 22
AUX
AUX
Press to select the AUX1 or AUX2 sources connected to the Sound Tower.
AUX2 white LED on
OR
AUX1 white LED on
LED indicator on the top of the product.
Lighting LED
white blink x1
SOUND MODE
SOUND
MODE
Press the button repeatedly to cycle through the available sound effects: PARTY,
STANDARD, HIPHOP, EDM, ROCK, LATIN, HOUSE or REGGAE.
• PARTY: Term for more upbeat music effect ,like a party
• Standard: Term for raw musical effects, like no EQ.
• HIPHOP: term for Dynamic dance and music.
• EDM: A more “generalized concept” genre than electronic music.
• ROCK: Band music.
• LATIN: Term for the music of many South American countries.
• HOUSE: Fast beat dance music played on electronic instruments.
Lighting LED
white blink x1
TEMPO +, -
TEMPO
Press the TEMPO + or TEMPO - buttons to change the tempo of the music up or down.
• This function only works in the USB mode.
Lighting LED
white blink x1
DJ
DJ
This function lets you turn on the DJ effect function.
Press the button repeatedly to cycle through the available DJ sound effects:
NOISE, FILTER, CRUSH, CHORUS, WAHWAH or OFF.
• NOISE: Mixing white noise into the original sound.
• FILTER: Filter out the sound of some frequencies.
• CRUSH: Make the original sound sharp.
• CHORUS: Separate the original sound into several track and delay them
separately,then mix again. Create a chorus effect.
• WAHWAH: WAHWAH effect created by enhancing some specic frequencies of
original sound.
Lighting LED
white blink x1
EFFECT +, -
EFFECT
EFFECT
Press the EFFECT + or EFFECT - buttons to change the level of the each DJ sound
effect up or down.
Effect value default is 5, can be changed to – 15 ~ 0 ~ +15.
Lighting LED
white blink x1
Folder DOWN
DOWN
Press the (DOWN) button to move to the next folder in the USB device.
Lighting LED
white blink x1
ENG - 23
Folder UP
UP
Press the (UP) button to move to the previous folder in the USB device.
Lighting LED
white blink x1
Volume up,
Volume down /
Skip
• Volume up, Volume down
Press the (Volume up) or (Volume down) to adjust the volume level up or
down.
• Music Skip
Press the button to select the next music le. Press the button once to
play the current music again. Pass the button twice to select the previous
music le.
Press and hold the button or the button for more than 3 seconds in USB
play mode to search forward or search backward. Press and hold the button
or the button for more than 3 seconds again to get back to normal play.
Lighting LED
White Flashes
From down to up
From top to bottom
Play / Pause
Press the button to pause a music le temporarily.
When you press the button again, the music le plays.
• Auto Power Down Function
To turn off Auto Power Down function while the unit is in AUX1, AUX2 mode, press
and hold the button for more than 5 seconds. Lighting bar will be blink white
once.
Lighting LED
white blink x1
Mute
Press the (Mute) button to mute the sound.
Press it again to unmute the sound.
Lighting LED
white blink x1
Repeat
Press the (Repeat) button to use the Repeat function in “USB” mode.
Press the button repeatedly to cycle through the available repeat functions:
ONE, FOLDER, ALL, RANDOM or OFF.
Lighting LED
white blink x1
ENG - 24
BASS
BASS
Press the BASS button to use the powerful bass sound.
Press it again to return to the normal sound.
Press and hold the BASS button for more than 5 seconds to turn on or off the
BLUETOOTH POWER function.
Lighting LED
white blink x1
※
Not available
Lighting LED
Pink Flashes
From middle to end
The remote control button function is not available in the current source.
How to use Sound Mode
Your Sound Tower provides predened equalizer settings that are optimized for particular music
genres.
1. Press the SOUND MODE button on the Remote control.
2. Each time you press the SOUND MODE button, the Sound Tower cycles through the available
sound effects: PARTY, STANDARD, HIPHOP, EDM, ROCK, LATIN, HOUSE or REGGAE.
NOTES
• Default sound mode is PARTY.
• When turned off, press and hold the button on product or remote control for more than 5 seconds
to turn on in the default Sound Mode setting.

ENG - 25
How to use the DJ Effect
The DJ Effect function lets you add DJ sound effects to your music. The level of each effect is
adjustable.
1. Press the DJ button on the Remote control.
2. Each time you press the DJ button, the Sound Tower cycles through the available DJ Effects:
• NOISE: Create white noise and mixed with the original sound through the lter and output.
• FILTER : Creates an effect similar to the sound of only treble or bass.
• CRUSH: Creates an effect that makes the original sound sharper.
• CHORUS : Creates an effect similar to a singing chorus.
• WAHWAH : Creates a ‘Wah~ Wah~’ effect.
• DJ EFFECT OFF : Turns off the DJ Effect.
3. Press the EFFECT + or EFFECT - buttons to raise or lower the level of each of the DJ sound effects
from -15 to +15.
NOTE
• When turned off, press and hold the button on product or remote control for more than 5
seconds to turn on in the default DJ Effect setting.
ENG - 26
07 USING THE SAMSUNG SOUND TOWER
APP
Install Samsung Sound Tower App
To control this product with your Smart Device and the Samsung Sound Tower app, download the
Samsung Sound Tower App from the Google Play Store or Apple App Store, and install it on your Smart
Device.
NOTES
• The Samsung Sound Tower app is compatible with Android mobile phone devices running Android
OS 6.0 or later.
• The Samsung Sound Tower app is compatible with Apple mobile devices running iOS 10.0 or later.
Market search : Samsung Sound Tower
Launching the Samsung Sound Tower App
To launch and use the Samsung Sound Tower app, touch the Samsung Sound Tower icon on your smart
device, and then follow the directions on the screen.
Samsung
Multiroom
Samsung Sound Tower
Samsung Sound Tower
ENG - 27
08 TROUBLESHOOTING
Refer to the table below if this product does not function properly. If the problem you are experiencing
is not listed below or if the instructions below do not help, turn off the product, disconnect the power
cord, and contact Samsung Electronics at 1-800-SAMSUNG (1-800-726-7864).
The unit will not turn on.
; The battery may be fully discharged.
Please connect the power plug and try to
turn it on.
A function does not work when the button is
pressed.
Is there static electricity in the air?
; Disconnect the power plug and connect it
again.
Sound dropouts occur in BT mode.
; See the Bluetooth connection sections on
page 14.
Sound is not produced.
Is the Mute function on?
; Press the
(Mute) button to cancel the
mute function.
Is the volume set to minimum?
; Adjust the Volume.
The remote control does not work.
Are the batteries drained?
; Replace them with new batteries.
Is the distance between the remote control
and Sound Tower main unit too far?
; Move the remote control closer to the
Sound Tower main unit.
Stereo Group connection is not working.
Is the system in wireless Group Play mode?
; Disconnect the wireless Group Play mode
and try Stereo Group connection again.
It cannot make a Bluetooth connection.
Is the system connected to another system in
wireless Group Play mode or Stereo Group
mode?
; Try Bluetooth connection again after
disconnecting the wireless Group Play or
Stereo Group connection.
Are the two Bluetooth devices already
connected?
; Try Bluetooth connection again after
disconnecting other Bluetooth connections.
The PAIRING button is not working.
Is the system in wireless Group Play mode or
Stereo Group mode?
; Try again after disconnecting the wireless
Group Play or Stereo Group connection.
I want to switch the HOST (MAIN) system to
the other in wireless Group Play or Stereo
Group connection.
; Disconnect Group Play mode, press the
Speaker which you want make to HOST
rst, and after it use Group LED to judge
instead connect the others one by one.
; With Stereo Group mode, MAIN is xed.
You can not change others as MAIN.
I want to play AUX1 or AUX2 more than 8 hours
without control input.
; Press and hold the remote control
button for more than 5 seconds in AUX1 or
AUX2 mode to disable Auto Power Down
Function. Change from ON-AUTO POWER
DOWN to OFF-AUTO POWER DOWN.
ENG - 28
I can’t connect a SUB to Group play.
; After 1 hour, the HOST will block any
additional SUB from being added.
Press the GROUP PLAY button on HOST,
the SUB can be reconnected.
It cannot make a “Wireless/Wired Group/Add
Stereo/Bluetooth” connection.
Is the distance between systems too far?
; It is recommended to make a “Wireless/
Wired Group/Add Stereo/Bluetooth” pairing
within 1 meter from the system.
; The recommended operating distance
between Sound Tower systems is closer than
10 meters.
09 LICENSE
The Bluetooth® word mark and logos are
registered trademarks owned by the Bluetooth
SIG, Inc. and any use of such marks by Samsung
Electronics Co., Ltd. is under license. Other
trademarks and trade names are those of their
respective owners.
Qualcomm aptX is a product of Qualcomm
Technologies, Inc. and/or its subsidiaries.
Qualcomm is a trademark of Qualcomm
Incorporated, registered in the United States and
other countries. aptX is a trademark of Qualcomm
Technologies International, Ltd., registered in the
United States and other countries.
[ENERGY STAR]
ENERGYSTARqualiedmodelonly
– Your Samsung product is ENERGY STAR
qualied in its factory default setting.
Change to certain features, settings and
functionality in this product can change the
power consumption, possibly beyond the
limits required for ENERGY STAR
qualication.
– Environmental Protection Agency and
Department of Energy. ENERGY STAR is a
joint program of the Government agencies,
designed to promote energy efcient
products and practices.
Refer to www.energystar.gov for more
information of the ENERGY STAR Program.
ENERGYSTARqualiedmodelonly
(Applicable to Thin Client models only)
As an ENERGY STAR® Partner, SAMSUNG has
determined that this product meets the
ENERGY STAR® guidelines for energy
efciency.
– The ENERGY STAR Program has been to
reduced greenhouse gas emissions and
save energy through voluntary labeling.
– Power management setting of this product
have been enabled by default, and have
various timing setting from 1 minutes to 5
hours.
– The product can wake with a button press
on the chassis from sleep mode.
ENERGYSTARqualiedmodelonly(Theother
models)
– As an ENERGY STAR Partner, Samsung has
determined that this product or product
models meets the ENERGY STAR guideline
for energy efciency.
To send inquiries and requests for questions
regarding open sources, contact Samsung
Open Source (http://opensource.samsung.com)

ENG - 29
10 OPEN SOURCE
LICENSE NOTICE
To send inquiries and requests for questions
regarding open sources, contact Samsung Open
Source (http://opensource.samsung.com)
11 IMPORTANT
NOTES ABOUT
SERVICE
Figures and illustrations in this User Manual are
provided for reference only and may differ from
actual product appearance.
ENG - 30
12 SPECIFICATIONS AND GUIDE
Specications
Model Name MX-ST50B
USB 5V/2.1A
Weight 11.94kg
Dimensions (W x H x D) 329×665×301mm
Operating Temperature Range +5°C to +35°C
Operating Humidity Range 10 % ~ 75 %
AMPLIFIER Rated Output power
Power cord plug-in 240W
Battery 90W
Overall Power Consumption 65W
Battery Type Lithium-ion 72Wh
Battery play time up to 18hrs
Battery charge time <3.5hrs
Li-ion Rechargeable
Battery
Battery Model EB-T24C-00, 2INR19/65-4
Nominal Voltage 7.34 V
Rate Capacity 9800 mAh, 71.93 Wh
Limited Charge Voltage 8.4 V
Typical Capacity 10000 mAh, 73.40 Wh
NOTES
• Samsung Electronics Co., Ltd reserves the right to change the specications without notice.
• Weight and dimensions are approximate.
• Battery Play time and Battery charge time vary with use conditions.
• In an extremely cold or hot environment, charging stops for safety. To resolve these issues,
disconnect the AC power cord and connect it again in an operating temperature between 5°C and
35°C.
SPA - ii
INFORMACIÓN DE SEGURIDAD
ADVERTENCIAS DE SEGURIDAD
PARA REDUCIR EL PELIGRO DE DESCARGA
ELÉCTRICA, NO RETIRE LA TAPA (NI LA PARTE
TRASERA).
NO CONTIENE ELEMENTOS QUE DEBA
REEMPLAZAR EL USUARIO. EN CASO DE AVERÍA,
SOLICITE LA AYUDA DE PERSONAL
ESPECIALIZADO.
Consulte la tabla a continuación para obtener una
explicación de los símbolos que podrían aparecer
en su producto Samsung.
PRECAUCIÓN
RIESGO DE ELECTROCUCION.
NO ABRIR.
Este símbolo indica que el dispositivo
contiene alto voltaje. Es peligroso
establecer cualquier tipo de contacto
con cualquier parte interna del
producto.
Este símbolo indica que con este
producto se incluye documentación
importante relativa a la operación y el
mantenimiento.
Producto de Clase II: Este símbolo indica
que no es necesaria una conexión
eléctrica de seguridad (toma de tierra).
Si un producto con un cable de
alimentación no tiene este símbolo, el
producto DEBE tener una conexión
segura a una puesta a tierra.
Voltaje CA: Este símbolo indica que la
tensión nominal marcada con el símbolo
es CA.
Voltaje CC: Este símbolo indica que la
tensión nominal marcada con el símbolo
es CC.
Precaución, consulte las instrucciones
antes de usar: Este símbolo indica que
se debe consultar el manual del usuario
para obtener información relacionada
con la seguridad.
ADVERTENCIA
• Para reducir el riesgo de incendio o de
descarga eléctrica, no exponga este aparato a
la lluvia ni a lahumedad.
• Este producto contiene sustancias químicas
que el estado de California sabe que causan
cáncer y defectos al nacer u otros daños
relacionados con la reproducción.
• La batería (batería, baterías o paquete de
batería) no debe exponerse a temperaturas
altas extremas, como las causadas por la luz
del sol, el fuego u otros elementos o
situaciones similares.
PRECAUCIÓN
• PARA EVITAR DESCARGAS ELÉCTRICA S,
INTRODUZCA TOTALMENTE EL ENCHUFE.
• Este aparato deberá conectarse siempre a
una toma de alimentación principal con una
conexión a tierra de protección.
• Para desconectar el aparato de la fuente de
alimentación, el enchufe deberá ser
desconectado de la toma principal, lo que
signica que deberá disponer de fácil acceso
al enchufe principal.
• No debe exponer este aparato a gotas ni
salpicaduras de agua. No coloque en el
aparato objetos con líquido, como jarrones.
• Para apagar completamente este aparato,
debe desconectar su enchufe de la toma de
corriente. Por tanto, el enchufe debe estar
accesible en todo momento.
SPA - iii
Para evitar el deterioro del material
resistente al agua
Verique el siguiente ajuste y use la unidad
correctamente.
• La deformación o el daño causados por la
caída de la unidad o por someterla a un golpe
mecánico puede deteriorar el material
resistente al agua.
• Esta unidad no tiene un diseño resistente a la
presión de agua.Si la unidad se usa en un
lugar en el que se aplica una presión de agua
alta, como en la ducha, puede funcionar mal.
• Evite el contacto directo de la unidad con el
agua a alta temperatura o con el aire caliente
soplado mediante un secador de cabello o
cualquier otro electrodoméstico.Tampoco use
nunca la unidad en un lugar sujeto a altas
temperaturas, como en un sauna o cerca de
una fuente de calor.
• Manipule la tapa con cuidado. La cubierta del
puerto y la del enchufe de CA son muy
importantes para mantener la resistencia al
agua. Cuando use la unidad, compruebe que
la tapa esté completamente cerrada. Cuando
cierre la tapa, tenga cuidado de no permitir
que haya objetos extraños en su interior. Si la
tapa no está completamente cerrada, el
material resistente al agua puede
deteriorarse y hacer que la unidad funcione
mal debido al ingreso de agua en su interior.
• No se cumple el estándar IPX5 si hay
conectado cualquier ENCHUFE y el suministro
eléctrico de CA.
• El producto no debe colocarse de forma
horizontal para comprobar que sea resistente
al agua.
POWER
ECHOVOL
USB
(5V 2.1A)
AUX 1
MIC

SPA - iv
• La torre de sonido cumple el estándar IPX5 de durabilidad.
Protección contra sólidos
IP
Protección contra el agua
0 5
Sin requisitos X X Sin requisitos
Sin protección 0 0 Sin protección
Sólidos > 50 mm 1 1 Agua que cae en forma vertical
Sólidos > 12 mm 2 2
Agua que cae en forma vertical: gabinete inclinado 15º
Sólidos > 2.5 mm 3 3 Agua rociada a 60º en sentido vertical
Sólidos > 1.0 mm 4 4 Agua salpicada desde todas las direcciones
Protección contra el polvo 5 5 Chorros de manguera desde todas las direcciones
Hermética al polvo 6 6
Chorros de manguera fuertes desde todas las
direcciones
- 7 Inmersión temporal: 1 m durante 30 minutos
- 8
Inmersión: profundidad y tiempo denidos por el
fabricante

SPA - v
PRECAUCIONES
Asegúrese de que la fuente de alimentación
de CA de su hogar cumpla con los requisitos
mencionados en la etiqueta de identicación
ubicada en la parte inferior del producto.
Instale el producto horizontalmente, sobre
una base adecuada (mueble), con espacio
suciente a su alrededor para ventilación
(7~10 cm). Asegúrese de que los oricios de
ventilación no queden tapados. No coloque
la unidad sobre amplicadores o cualquier
otro equipo que pueda generar calor. Esta
unidad se ha diseñado para utilizarse de
forma continua. Para apagar completamente
la unidad, desconecte el enchufe de CA de la
toma de corriente. Desenchufe la unidad si
no va utilizarla durante un tiempo
prolongado.
1. Durante tormentas, desconecte el enchufe
principal de CA de la toma de corriente.
Los picos de tensión debidos a rayos podrían
dañar la unidad.
2. No exponga la unidad a la luz directa del sol
ni a otras fuentes de calor. Podrían
sobrecalentarla y provocar una avería en la
unidad.
3. Proteja el reproductor contra la humedad
por ejemplo, jarrones) y calor excesivo (p. ej.:
chimeneas) o equipos que creen campos
magnéticos o eléctricos potentes.
Desconecte el cable de alimentación de la
fuente de CA si la unidad no funciona
correctamente. El producto no ha sido
creado para uso industrial. Este producto es
sólo para uso personal. Es posible que se
produzca condensación en el producto o en
el disco en situaciones de temperaturas
bajas. Si tiene que transportar el producto
durante el invierno, espere 2 horas
aproximadamente antes de usarlo hasta que
la unidad haya alcanzado la temperatura de
la sala.
4. Las pilas utilizadas en este producto
contienen productos químicos que son
peligrosos para el medio ambiente. No tire
las pilas con el resto de la basura doméstica.
No deseche las pilas en el fuego. No
cortocircuite, desmonte ni sobrecaliente las
baterías.
PRECAUCIÓN : Si las pilas se reemplazan de
manera incorrecta existe peligro de
explosión. Reemplácelas únicamente por el
mismo tipo o un tipo equivalente.
Otros
• Como la batería está fabricada especialmente
para este producto, no la use con otros
dispositivos electrónicos ni para ningún otro
propósito.
• Cuando deseche una batería que ya no sirve,
colóquela en la caja de recolección de
baterías para su reciclaje.
• No desensamble la batería.
• Para proteger el motor y la batería, esta no
debe cargarse si la temperatura es inferior a 3
ºC o superior a 42 ºC.
• Si el nivel de la batería es bajo, cárguela.Si el
nivel de la batería permanece bajo mucho
tiempo, puede afectar su rendimiento.
• No caliente la batería ni la eche al fuego.
• No desensamble la batería.
• Para proteger el motor y la batería, la torre de
sonido no debe estar en funcionamiento si la
temperatura es inferior a -17 ºC o superior a
57 ºC.
SPA - vi
INFORMACIÓN SOBRE ESTE MANUAL
El manual del usuario tiene dos partes: este MANUAL DEL USUARIO sencillo y un MANUAL COMPLETO
detallado que puede descargar.
MANUAL DEL USUARIO
Consulte este manual para obtener información sobre
instrucciones de seguridad, instalación del producto,
componentes, conexiones y especicaciones del producto.
MANUAL COMPLETO
Puede acceder al MANUAL COMPLETO en el Centro de
Atención al Cliente en línea de Samsung escaneando el código
QR. Para consultar el manual en su computadora o dispositivo
móvil, descárguelo desde el sitio web de Samsung en formato
de documento.
(https://www.samsung.com/us/support/downloads/)
El diseño y las especicaciones están sujetos a cambio sin previo aviso.

SPA - vii
CONTENTS
01 VericacióndelosComponentes 2
Insertar las baterías antes de usar el control remoto (baterías tipo AAA X 2)
----------------------
2
02 Descripción del producto 3
Panel superior del Sound Tower
------------------------- 3
Panel trasero del Sound Tower
------------------------- 4
03 Conectando el Sound Tower 6
Conexión de energía eléctrica
-------------------------
6
Cómo usar el Audio Group
-------------------------
7
04 Conectar un dispositivo externo 13
Conexión mediante un cable de audio analógico (AUX)
-------------------------
13
Conectar un dispositivo móvil a través de Bluetooth
-------------------------
14
Conectar el TV Samsung a través de Bluetooth
-------------------------
17
05 Conectar un dispositivo de almacenamiento USB 18
Actualización de software
-------------------------
19
Conexión de un micrófono externo
-------------------------
20
06 Cómo usar el control remoto 21
Cómo usar el control remoto
-------------------------
21
Cómo usar el modo de sonido
-------------------------
24
Cómo usar el efecto DJ
-------------------------
25

SPA - viii
07 Uso de la aplicación Samsung Sound Tower 26
Instale la aplicación Samsung Sound Tower
-------------------------
26
Inicio de la aplicación Samsung Sound Tower
-------------------------
26
08 Solución de Problemas 27
09 Licencia 28
10 Aviso Sobre Licencia de código abierto 29
11 Nota Importante Sobre el Servicio 29
12 EspecicacionesyGuía 30
Especicaciones
-------------------------
30
SPA - 2
01 VERIFICACIÓN DE LOS COMPONENTES
Unidad principal Sound Tower ControlRemoto/Baterías Cable de alimentación
• Para la fuente de alimentación y el consumo de energía, consulte la etiqueta pegada en el producto.
(Etiqueta: está ubicada en la parte trasera de la unidad principal del Sound Tower)
• Para comprar componentes adicionales o cables optativos, comuníquese con un Centro de Servicios
de Samsung o con el Centro de Atención al Cliente de Samsung.
• Al movilizar el producto, no lo arrastre ni tire de él desde el suelo. Levante el producto cuando lo
mueva.
• El diseño y las especicaciones están sujetos a cambio sin previo aviso.
Insertarlasbateríasantesdeusarelcontrolremoto(bateríastipo
AAA X 2)
Deslice la tapa de las baterías en la dirección
indicada por la echa hasta retirarla
completamente. Inserte 2 baterías AAA (1.5V) en la
orientación correcta para que su polaridad sea la
correcta. Deslice la tapa de las baterías
nuevamente a su posición.

SPA - 3
02 DESCRIPCIÓN DEL PRODUCTO
Panel superior del Sound Tower
BASS
Sensor del
control remoto
Al utilizar el sistema Sound Tower, por favor apunte la parte frontal del control remoto
al sensor del control remoto.
Indicador
LED
Muestra mensajes sobre el funcionamiento o la fuente actual del sistema de la torre de
sonido.
Las fuentes de información que representa cada LED son las siguientes:
(BT) (USB) (AUX1) (AUX2)
(alimentación/batería)
Encendido Activa y desactiva el Sound Tower.
Luz Presione el botón de
(Luz) para activar el modo de iluminación.
Fuente
Presione para seleccionar una fuente conectada al Sound Tower.
Mantenga presionado el botón
(Fuente) durante más de 5 segundos para ingresar
el modo “SEARCHING TV”.
Reproducir /
pausa
• Reproducir/pausa
Presione el botón
para pausar un archivo de música temporalmente.
Cuando presione el botón nuevamente, se reproducirá el archivo de música.
• Reproducción de demostración
Mantenga presionado el botón durante más de 5 segundos para iniciar la
reproducción de la demostración mientras el sistema está encendido. Cinco
indicadores LED parpadean de forma simultánea y se reproduce la música de la
demostración durante 90 segundos.
– Por favor, tenga cuidado, ya que puede sonar más alto que el volumen establecido.
Bajar volumen Presione el botón (Bajar volumen) para bajar el nivel de volumen.
Subir volumen
Presione el botón
(Subir volumen) para aumentar el volumen.
BASS Presione el botón BASS para usar el potente sonido de los bajos.
SPA - 4
Panel trasero del Sound Tower
POWER
ECHOVOL
USB
(5V 2.1A)
AUX 1
MIC
ECHOVOL
USB
(5V 2.1A)
AUX 1
MIC
Bluetooth
PAIRING
Presione el botón
PAIRING para ingresar al modo de vinculación; el LED "PAIRING"
en el plano posterior parpadeará rápidamente.
ADD STEREO
Presione el botón ADD STEREO para conectar con otro modelo igual de la torre de
sonido de forma inalámbrica.
GROUP PLAY
Presione el botón GROUP PLAY para conectar hasta diez sistemas Sound Tower de
forma inalámbrica.
USB
Conecte un dispositivo USB a los puertos USB de la unidad principal.
Si conecta el teléfono móvil al puerto USB, puede cargarlo.
• Presione el botón
(Fuente) para seleccionar el puerto USB.
ECHO
Puede darle efecto de eco al sonido con un micrófono conectado (MIC). Solo debe
ajustar la perilla ECHO.
VOL Utilice la perilla VOL para ajustar el volumen de un micrófono conectado (MIC).
MIC Conecte el micrófono al enchufe MIC.
Terminales de
GROUP PLAY
OUT
Use un cable de audio (no suministrado) para conectar los terminales GROUP PLAY
(OUT) de la unidad principal a la entrada de audio en un dispositivo con salida
analógica externa.
Terminales de
GROUP PLAY
IN
Use un cable de audio (no suministrado) para conectar los terminales AUX2 (IN) de la
unidad principal a la salida de audio en un dispositivo con salida analógica externa.
AUX1
Utilice un cable de audio (AUX) (no suministrado) para usar el conector AUX1 de la
unidad principal a la salida de audio en un dispositivo externo.
Encendido
Conecte el cable de Encendido al conector de alimentación y conecte el otro extremo
del cable de alimentación a una toma de corriente para suministrar energía eléctrica
al Sound Tower.

SPA - 5
Estado del LED de carga de la torre de sonido:
Estado de la
torre de
sonido
Estado de carga
LED de carga
(modo AC)
LED de carga
(modo DC)
Comentario
Apagado Totalmente cargado
Apagado
(negro)
Apagado (negro)
Apagado Cargando Green blinks No disp.
Apagado No está cargando
Apagado
(negro)
Apagado (negro)
El cable AC no está
insertado.
En espera Totalmente cargado Azul encendido No disp.
No hay modo de espera en
el modo DC.
En espera Cargando
Parpadeo en
color verde
No disp.
El LED de carga es el mismo
que cuando la torre de
sonido está apagada.
Encendido Totalmente cargado Azul encendido Azul encendido
When turned on, Sound
Tower mainly reects the
current battery state.
Encendido Cargando
Parpadeo en
color verde
No disp.
Encendido
No está cargando y
hay entre 30 y 98 %
de carga
Verde
encendido
Verde encendido
Encendido
No está cargando y
hay entre 5 y 29 %
de carga
Rojo encendido Rojo encendido
Encendido
No está cargando y
queda menos del 5 %
de carga
Rojo encendido
Se apaga
después de que
el color naranja
de la barra de
luces parpadea
una vez
En el modo de apagado de CC, se corta toda la alimentación del sistema. Por lo tanto, en ese estado, a
diferencia del modo de CA, no se admiten las siguientes funciones.
Función
Activación a través de Bluetooth
Modo de tienda
Ajuste de apagado
Reinicio del cliente
Encendido mediante IR
Carga de la batería
Encendido/Apagado de AUI
Encendido/Apagado de las indicaciones de la IU
de la barra de iluminación LED (frente)
SPA - 6
03 CONECTANDO EL SOUND TOWER
Conexióndeenergíaeléctrica
Utilice el cable de alimentación para conectar Sound Tower a una toma de corriente eléctrica en el
siguiente orden:
Conecte el cable de alimentación al Sound Tower y luego a una toma de corriente.
Vea las ilustraciones que se muestran a continuación.
• Cuando se conecta el cable de CA, la batería integrada se cargará automáticamente hasta quedar
totalmente cargada. El indicador LED ubicado en el panel superior mostrará el estado de carga
actual (consulte la página SPA - 4).
• Cuando desenchufa la unidad para que funcione con la batería, el nivel del volumen baja
notoriamente.
• Para la fuente de alimentación y el consumo de energía, consulte la etiqueta pegada en el producto.
(Etiqueta: está ubicada en la parte trasera del Sound Tower)
Parte trasera del
Sound Tower
POWER
ECHOVOL
USB
(5V 2.1A)
AUX 1
MIC
Conexióndeenergía
eléctrica
SPA - 7
Cómo usar el Audio Group
Puede conectar varios sistemas de audio en un grupo para crear un ambiente de esta y producir una
salida de sonido más alta. Establecer una Sound Tower como el HOST y cualquier música que se
reproduzca en ella es compartida entre cualquier otro sistema de Sound Tower en el grupo de Audio.
Conexión del modo Group Play por cable
1er Sound Tower HOST 2do Sound Tower Ultimo Sound Tower
Continúe la
conexión hasta el
último Sound
Tower
Congure Group Play al conectar todos los sistemas con cables de audio (no proporcionados). Use el
botón AUX o
(Fuente) para cambiar la fuente a AUX2 en todos los sistemas Sound Tower, excepto el
primer Sound Tower (o HOST).
NOTAS
• La 1er Sound Tower HOST puede tocar música de cualquier fuente.
• Dependiendo de la longitud o características del cable, puede haber una diferencia en la distancia
de operación.
SPA - 8
Conexión del modo inalámbrico de Group Play
Puede conectar hasta diez sistemas Sound Tower mediante la función inalámbrica de Group Play.
HOST
SUB 1
SUB 2
POWERPOWER
POWER
Parpadeo en verde
Presione el botón GROUP PLAY en el sistema de la torre de sonido HOST. El LED de “GROUP PLAY”
parpadeará. Después de 10 segundos, el LED de GROUP PLAY parpadeará rápidamente (30 s).
Presione el botón GROUP PLAY en el segundo sistema de torre de sonido (SUB 1). El LED de
GROUP PLAY parpadeará. Luego, el SUB1 se conectará con HOST, el LED de GROUP PLAY
correspondiente a SUB1 y HOST dejará de parpadeará y se encenderá.
Presione el botón GROUP PLAY en el 3er sistema Sound Tower (SUB 2). El indicador de tono y el
botón GROUP PLAY en el sistema dejan de parpadear.
4. Si desea agregar más sistemas Sound Tower, repita el paso 3.
5. Reproducir música en HOST Sound Tower. Las salidas de sonido de todos los sistemas conectados.
NOTAS
• En el modo Group play, la torre de sonido “HOST” (Figura 1) se puede conectar a Samsung TV. Una
vez lograda la conexión, la unidad sale del modo Group play automáticamente.
• La conexión inalámbrica Group Play está disponible para los modelos MX-ST90B/MX-ST50B/
MX-ST40B.
• Es posible que las condiciones ambientales u otros factores relacionados con los dispositivos
conectados afecten la calidad de reproducción.
• Si el LED rojo está encendido en el botón GROUP PLAY se ha producido un error en la conexión
inalámbrica de Group Play. Intente los pasos del 1 al paso 5 nuevamente.
• El botón ADD STEREO y el botón
PAIRING de los sistemas de SUB Sound Tower no están
disponibles en el modo inalámbrico de Group Play.
• El botón ADD STEREO del sistema de HOST Sound Tower no está disponible en el modo inalámbrico
de Group Play..

SPA - 9
• Presione “GROUP PLAY” durante varios segundos en el estado Fuente de BT para ingresar a Group
mode como “HOST”.
• Las unidades SUB deben ser conectadas una por una. Por ejemplo, después de conectar el HOST,
pulse el botón GROUP PLAY en el SUB 1 para conectar, y después de conectar el SUB 1, debe
conectar el SUB 2 y el SUB 3 uno por uno secuencialmente.
• Cuando usa Group Play, los dispositivos Bluetooth conectados en ese momento se desconectan y la
conexión Bluetooth se desactiva.
• Los dispositivos Bluetooth sólo pueden buscar y conectarse con la HOST Sound Tower.
• En el modo de Group Play, los SUB no pueden conectarse a un dispositivo Bluetooth.
• Si se apaga y luego se enciende la Sound Tower o se selecciona cualquier otra fuente que no sea BT
en una unidad SUB, en el modo Group Play, el modo de Group Play se desconecta.
• Este producto no es compatible con la transmisión de audio aptX con el modo inalámbrico de Group
Play.
Desconectar el modo inalámbrico de Group Play
1. Presione y mantenga presionado el botón GROUP PLAY durante 5 segundos (HOST o SUB) después
de que el Group Play se haya conectado o presione el botón GROUP PLAY (HOST o SUB) antes de
que Group Play se haya conectado.
• El indicador de tono y el LED que se encuentra encima de GROUP PLAY se apagarán.
2. Si selecciona cualquier fuente que no sea BT en las unidades SUB o apaga la HOST Sound Tower, el
modo de Group Play se desconecta.
• Si la desconexión se realiza desde la HOST Sound Tower, Group Play se desconecta.
Indicaciones LED
LED ESTADO Descripción
Verde
Parpadeo Esperando una conexión inalámbrica de Group Play.
Encendido La conexión Group Play inalámbrica se completó satisfactoriamente.
Rojo Encendido Hay un error en la conexión Group Play inalámbrica.
NOTA
• En la conexión inalámbrica, la calidad de reproducción puede ser inestable, dependiendo de la
función de Bluetooth.
• La primera conexión Bluetooth debería estar dentro de 1 m de distancia.
SPA - 10
UsandounteléfonointeligenteyelmododeGroupeStereo
Conecta dos Sound Tower y utilízalas con tu teléfono inteligente para disfrutar del sonido estéreo.
Izquierda Sound Tower
(MAIN)
Derecho Sound Tower
(SUB)
Presione el botón ADD STEREO en el sistema Sound Tower izquierdo. Parpadea el LED del botón
ADD STEREO.
Presione el botón ADD STEREO en el sistema Sound Tower derecho. Parpadea el LED del botón
ADD STEREO.
3. Cuando se establece la conexión, sonará el indicador de tono.El indicador LED verde de ADD
ubicado en el panel posterior se enciende en color verde jo.
• El sistema de MAIN Sound Tower genera un sonido de canal izquierdo y el sistema SUB Sound
Tower genera un sonido de canal derecho. Pulsar el botón ADD STEREO en la MAIN o SUB
Sound Tower para cambiar el canal de sonido de Sound Tower.
4. Reproducir música conectando el teléfono inteligente a MAIN Sound Tower y al Bluetooth. Los
sonidos se transmiten desde ambas Sound Tower.
NOTAS
• Para usar el modo Stereo Group, ambos sistemas Sound Tower deben ser del mismo modelo.
• Es posible que las condiciones ambientales u otros factores relacionados con los dispositivos
conectados afecten la calidad de reproducción.
• Si el LED rojo está en el botón ADD STEREO se ha producido un error en la conexión del Stereo
Group. Intente el paso 1 y el paso 3 nuevamente.
• Los controles remotos, BT PAIRING, GROUP PLAY y los botones
(Fuente) de los sistemas de
SUB Sound Tower están desactivados cuando están en modo de Groupe Stereo.
• El botón GROUP PLAY del sistema de MAIN Sound Tower no está disponible mientras esté en modo
Groupe Stereo.
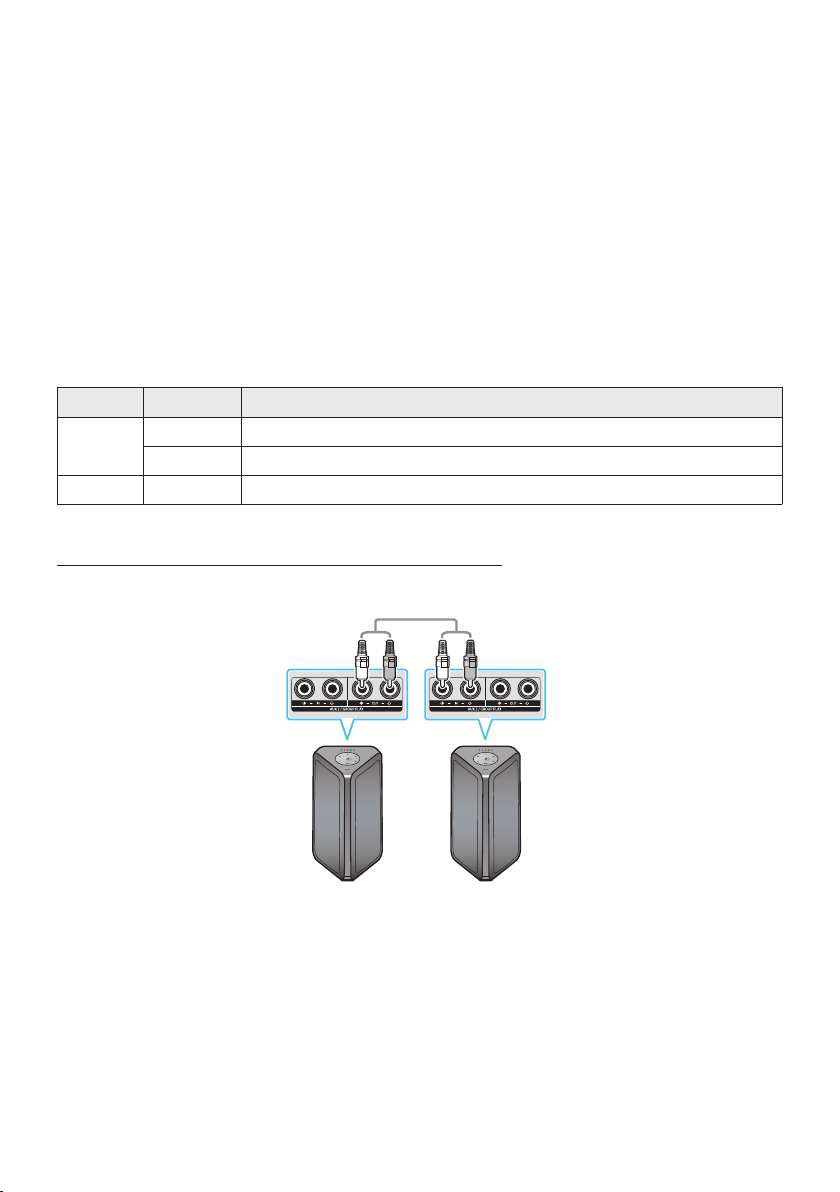
SPA - 11
• En el modo distinto a “BT” (ejemplo USB, modo AUX), la música se reproduce sólo en la MAIN Sound
Tower y la música no se reproduce en la SUB Sound Tower.
• Los colores de iluminación entre la MAIN Sound Tower y la SUB Sound Tower pueden variar.
• Este producto no es compatible con la transmisión de audio aptX con el modo Grupo Stereo.
• Si intenta conectar un dispositivo Bluetooth mientras se está conectando el grupo Stereo, el modo
grupo Stereo fallará.
Terminar el modo de Grupo Stereo
Presione el botón ADD STEREO (PRINCIPAL o SUB) durante al menos 5 segundos mientras Stereo
Group esté conectado.
• El indicador de tono y el LED que se encuentra encima de ADD STEREO se apagan.
Indicaciones LED
LED ESTADO Descripción
Verde
Parpadeo Esperando una conexión de Stereo Group.
Encendido La conexión grupo Stereo se completó satisfactoriamente
Rojo Encendido Hay un error en la conexión grupo Stereo.
Utilizar la Samsung TV y el modo de Groupe Stereo
Conectar dos Sound Tower por cable y utilizarlas con la TV Samsung para disfrutar del sonido estéreo.
Izquierda Sound
Tower (MAIN)
Derecho Sound Tower
(SUB)
Conectar el cable RCA a la AUX2 OUT en el MAIN y AUX2 IN en el SUB como se muestra usando el
cable RCA (no incluido).
En modo “BT”, pulsar el botón “AUX” del control remoto de MAIN Sound Tower durante al menos 5
segundos. Parpadea el LED del botón ADD STEREO.
5. Cuando la conexión esté completa, se enciende el LED “ADD STEREO” y, luego, la salida actual. Use
en cambio el indicador de tono.

SPA - 12
6. Una vez que se establece la conexión, se enciende el LED de “AUX2” del panel superior de SUB.
• MAIN Sound Tower transmite el sonido del canal izquierdo y la SUB Sound Tower transmite el
sonido del canal derecho. Pulsar el botón ADD STEREO en la MAIN o SUB Sound Tower para
cambiar el canal de sonido de Sound Tower.
7. Conectar un televisión y MAIN Sound Tower por Bluetooth para reproducir música. El sonido sale
de ambas Sound Tower.
NOTAS
• Para utilizar el modo de Groupe Stereo, ambas Sound Tower deben ser del mismo modelo.
• Una luz roja en el LED del botón ADD STEREO indica un error en la conexión del Groupe Stereo.
Intenta de nuevo los pasos 1 a 5.
• En el modo de Groupe Stereo, el control remoto, BT PAIRING, GROUP PLAY, y los botones
(Fuente) de SUB Sound Tower están desactivados.
• El botón GROUP PLAY de la MAIN Sound Tower no está disponible en modo Groupe Stereo.
• Si el Samsung TV es compatible con una conexión simple, la pop-up de conexión se muestra
automáticamente en el televisor, y si selecciona “Sí”, se conecta al televisión. Si existe una historia
de conexión previa entre Samsung TV y Sound Tower, se conectará a Samsung TV sin pop-up. Para
una conexión simple a Samsung TV, consulta la página 17.
• Los colores de la iluminación pueden variar entre la MAIN Sound Tower y SUB Sound Tower.
Terminando la conexión del modo de Groupe Stereo
Pulse el botón ADD STEREO (MAIN o SUB) durante al menos 5 segundos después de conectar el Groupe
Stereo.
• El indicador de tono en “OFF-STEREO MODE” y el LED del botón ADD STEREO se apagan.
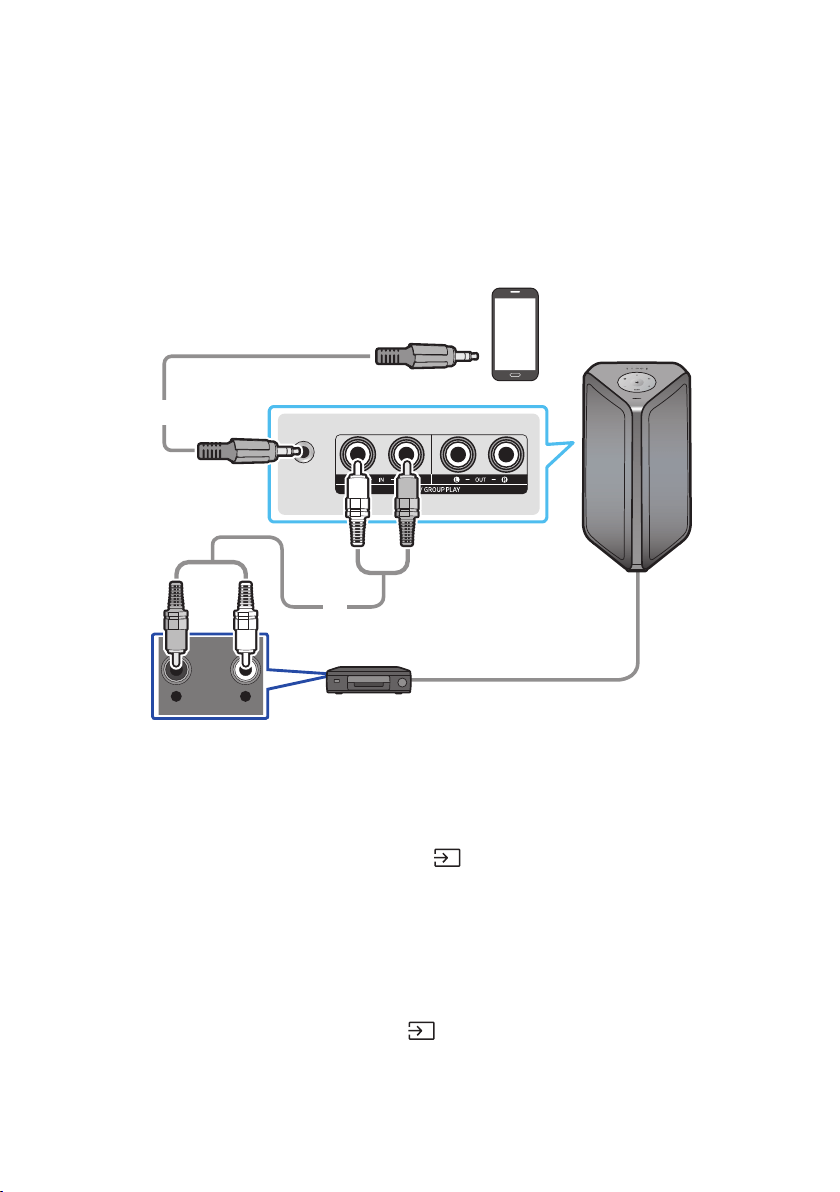
SPA - 13
04 CONECTAR UN DISPOSITIVO EXTERNO
Conéctese a un dispositivo externo a través de una red cableada o inalámbrica para reproducir el sonido
del dispositivo externo a través de Sound Tower.
Conexión mediante un cable de audio analógico (AUX)
AUX 1
- AUDIO -
R L
Dispositivo móvil / MP3 / PMP
ReproductordeBD/DVD/decodicador/consoladejuegos
Cableestéreode3,5mm
(no suministrado)
Cable de audio (AUX) (no suministrado)
La parte trasera del Sound Tower
Cableestéreode3,5mm(AUX1)
1. Conecte en el conector AUX1 de la unidad principal al conector AUDIO OUT del dispositivo fuente
usando un cable estéreo de 3,5 mm.
2. Seleccione el modo “AUX1” presionando el botón
(Fuente) en el panel superior o en el control
remoto.
• También puede seleccionar una fuente usando el botón AUX en el control remoto.
Cable de audio (AUX2)
1. Conecte en el conector de entrada AUX2 (IN) de la unidad principal al conector de salida AUDIO
OUT del dispositivo fuente utilizando un cable de audio.
2. Seleccione el modo “AUX2” presionando el botón (Fuente) en el panel superior o en el control remoto.
• También puede seleccionar una fuente usando el botón AUX en el control remoto.
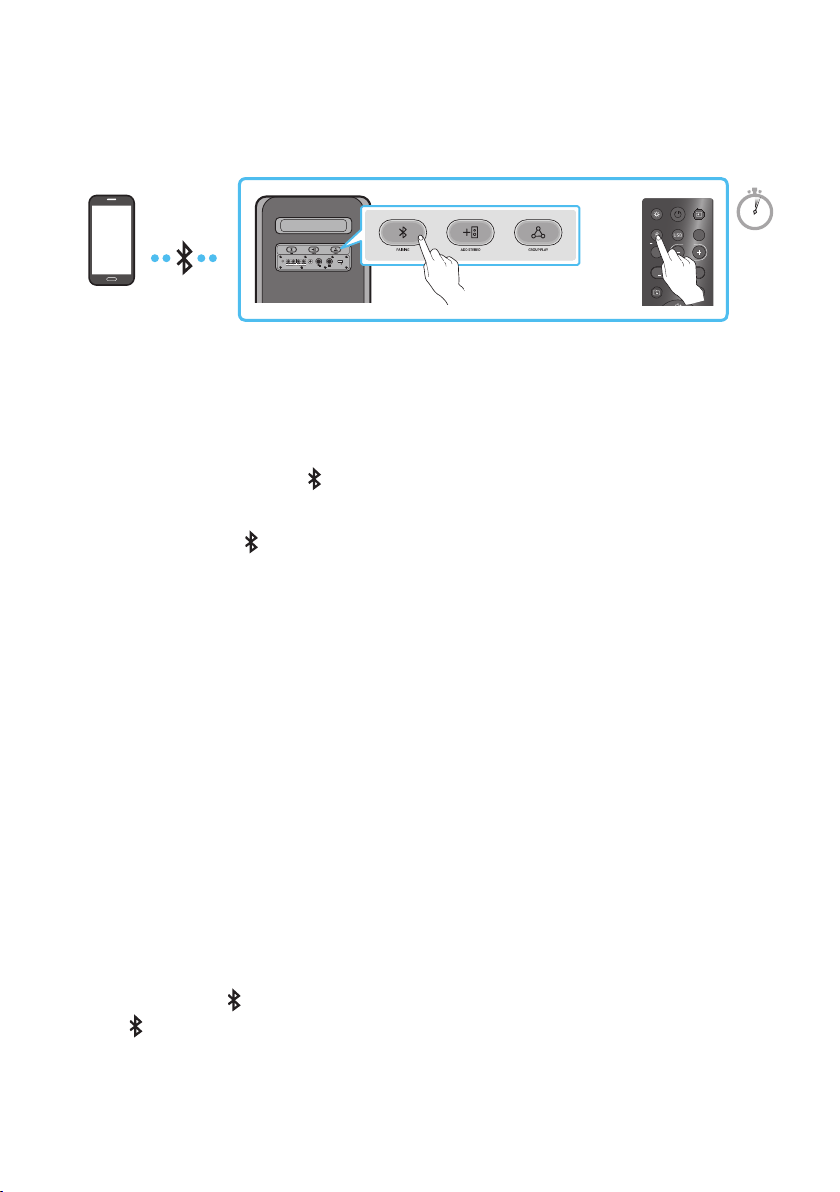
SPA - 14
ConectarundispositivomóvilatravésdeBluetooth
Cuando se conecta un dispositivo móvil mediante Bluetooth, puede escuchar el sonido estéreo sin la
necesidad del cableado.
ECHOVOL
USB
(5V 2.1A)
AUX 1
MIC
LIGHT
PAIRING
TEMPO
USB
AUX
EFFECT
DOWN
UP
EFFECT
DJ
SOUND
MODE
Dispositivo
Bluetooth
O
5 Sec
* En el modo de batería, si la torre de sonido está apagada, la conexión Bluetooth y la app Party Audio
no están disponibles.
La conexión inicial
1. Mantenga presionado el botón PAIRING en el control remoto durante más de 5 segundos para
ingresar el modo “BT PAIRING”.
(O)
Presione el botón
PAIRING en el panel posterior.
2. En su dispositivo, seleccione “[AV] MX-ST5B Series” de la lista que aparece.
• Una vez que el dispositivo esté conectado.La tercera luz en el panel superior parpadea tres
veces en color cian y la luz de bluetooth en el panel posterior permanece encendida.
3. Reproduzca archivos de música desde el dispositivo conectado por medio de Bluetooth a través de
Sound Tower.
Si el dispositivo no se conecta
• La torre de sonido reproducirá una noticación de voz para avisar que Bluetooth está
desconectado.
• Si aparece una lista de Sound Tower previamente conectada (por ejemplo, “[AV] MX-ST5B Series”)
en la lista, elimínela.
• Luego repita los pasos 1 y 2.
¿Cuál es la diferencia entre BT READY y BT PAIRING?
• BT READY : En este modo, puede usar el TV o cualquier otro dispositivo móvil que se haya
conectado antes para conectarse a la torre de sonido.
• BT PAIRING : En este modo, puede conectar un nuevo dispositivo a Sound Tower. (Mantenga
presionado el botón
PAIRING en el control remoto durante más de 5 segundos o presione el
botón PAIRING en la parte posterior de Sound Tower para ingresar al modo “BT PAIRING”.)

SPA - 15
Conexión Bluetooth Multi
Sound Tower admite hasta dos conexiones simultáneas de dispositivos Bluetooth. Sound Tower puede
reproducir música a través de uno de los dispositivos Bluetooth conectados sin desconectar el segundo
dispositivo.
Dispositivo
Bluetooth 1
Dispositivo
Bluetooth 2
1. Conecte Sound Tower al primer dispositivo y al segundo dispositivo respectivamente por primera
vez. (Vea la página 14)
2. La música se puede reproducir solo en uno de los dos dispositivos conectados, y cuando la música
se reproduce en el otro dispositivo, la música en el dispositivo de reproducción se detiene.
NOTAS
• Si desea conectar Sound Tower a un tercer dispositivo, puede desconectar Sound Tower de uno de
los dos dispositivos conectados actualmente y luego conectar Sound Tower al tercer dispositivo.
(El dispositivo incluye Samsung TV).
• Con Sound Tower y dos dispositivos actualmente conectados, cuando se empareja con un nuevo
dispositivo Bluetooth, los dispositivos actualmente conectados pueden desconectarse.
• Puede conectarse a dos dispositivos Bluetooth al mismo tiempo.
• Si se le solicita un código PIN al conectar un dispositivo Bluetooth, ingrese <0000>.
• Es posible que las condiciones ambientales u otros factores relacionados con los dispositivos
conectados afecten la calidad de reproducción.
• El Sound Tower se apaga automáticamente después de 18 minutos sin ingreso de comandos cuando
está listo para usar.
• Es posible que el Sound Tower no realice la búsqueda o conexión Bluetooth correctamente en las
siguientes circunstancias:
– Si hay un campo eléctrico fuerte alrededor del Sound Tower.
– Si varios dispositivos Bluetooth se emparejan simultáneamente con Sound Tower.
– Si el dispositivo Bluetooth está apagado, no está en su lugar, o funciona mal.
• Los dispositivos electrónicos pueden causar interferencias de radio. Los dispositivos que generan
ondas electromagnéticas deben mantenerse alejados de la unidad principal de Sound Tower, por
ejemplo, microondas, dispositivos de inalámbricos LAN, etc.
• La conexión Bluetooth Multi puede no ser compatible dependiendo de las especicaciones del
dispositivo al que se conecte.
• Los dispositivos Bluetooth extraíbles/removibles (p. ej., dongle, etc.), los teléfonos de Windows, las
computadoras portátiles, los televisores, etc., no pueden realizar conexiones Bluetooth múltiples.

SPA - 16
• Después de completar las conexiones Bluetooth múltiples, es posible que haya una leve demora
antes de que la música comience a reproducirse, según los dispositivos de Bluetooth.
• Si se aleja demasiado del rango del Sound Tower sin desconectar primero el dispositivo de
Bluetooth, es posible que deba esperar unos minutos antes de conectar otro dispositivo Bluetooth.
Si apaga y luego enciende nuevamente el Sound Tower, podrá conectar otros dispositivos Bluetooth
sin tener que esperar.
Indicaciones LED
LED ESTADO Descripción
Azul
Parpadeo rápido Modo BT PAIRING
Parpadeo Modo BT READY
Encendido Un dispositivo Bluetooth está conectado.
Usando el Bluetooth Power On
Cuando Sound Tower está apagado, puede conectar su dispositivo inteligente al producto a través de
una conexión Bluetooth para encenderlo. En el estado de batería, no se puede activar Bluetooth.
1. Mantenga presionado el botón BASSen el control remoto o en el panel superior para activar la
función de Bluetooth Power On. La barra de iluminación parpadeará en blanco una vez.
2. Cuando Sound Tower esté apagado, conecte su dispositivo inteligente al producto a través de
Bluetooth. (Para obtener información sobre las conexiones Bluetooth, consulte el manual de su
dispositivo inteligente).
3. Cuando se completa la conexión, Sound Tower se enciende automáticamente en modo Bluetooth.
• Seleccione la música que desea reproducir desde su dispositivo inteligente.
NOTA
• Cada vez, mantenga presionado el botón BASS durante 5 segundos. La barra de iluminación LED
parpadeará en blanco una vez y se cambiará el estado:
BLUETOOTHPOWER-ON→BLUETOOTHPOWER-OFF
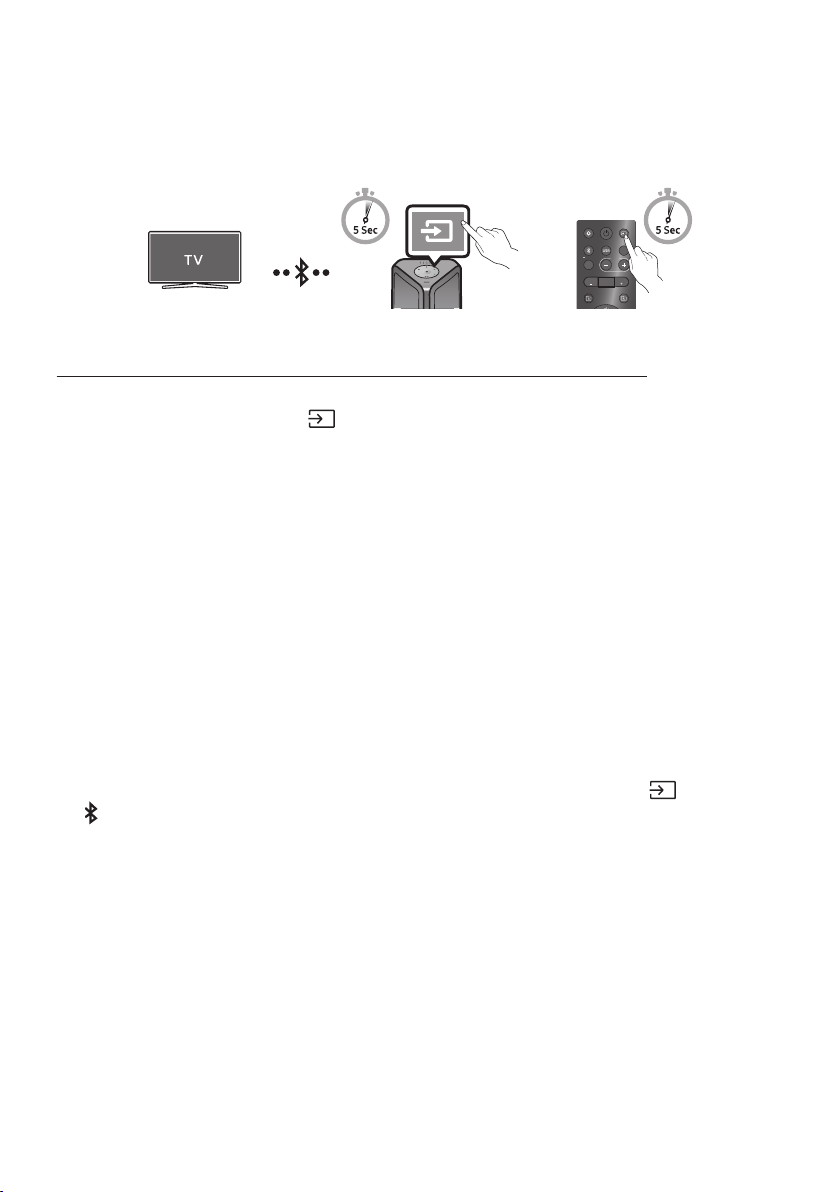
SPA - 17
ConectarelTVSamsungatravésdeBluetooth
Si Sound Tower se conecta con el TV Samsung a través de Bluetooth, Sound Tower puede controlarse
mediante TV UI. (Volumen +/-, Silencio encendido/apagado y Alimentación encendido/apagado)
LIGHT
PAIRING
TEMPO
USB
AUX
EFFECT EFFECT
DJ
SOUND
MODE
O
Panel superior del Sound Tower
ConéctesefácilmenteconlaTVdeSamsung(modoSEARCHINGTV)
Sound Tower tiene el modo “SEARCHING TV” para conectarse fácilmente con la TV de Samsung.
1. Mantenga presionado el botón
(Fuente) durante más de 5 segundos en el control remoto o el
panel superior y, luego, la torre de sonido comenzará a buscar el dispositivo Samsung TV. La barra
de iluminación parpadeará una vez en color blanco y, luego, parpadeará en cian. El LED “PAIRING”
del plano posterior parpadeará lentamente.
(O, cuando la conexión del modo de Groupe Stereo se completa, el modo “SEARCHING TV “ se
activa automáticamente.)
2. Si el TV de Samsung admite una conexión fácil, se mostrará una ventana emergente de conexión
en el TV.
Si la TV de Samsung se ha conectado con antes con Sound Tower, la TV de Samsung se conectará
sin la ventana emergente.
3. Si Sound Tower no puede encontrar ningún televisor Samsung en 5 minutos, Sound Tower
terminará el modo “SEARCHING TV” y cambiará al modo “BT PAIRING”. Si encuentra alguna TV de
Samsung, Sound Tower solicitará la conexión a ese TV.
NOTAS
• Si bien está en el modo inalámbrico Group Play, no se encuentra disponible la opción buscar TV.
• Para dejar de buscar un TV de Samsung, apague el Sound Tower o pulse el botón
(Fuente) o
PAIRING.
• Sound Tower no admite conexión múltiple si el TV de Samsung está conectado.
• Mientras el TV de Samsung está conectado, el modo de sonido es PARTY y el botón SOUND MODE
no está disponible.
• Si bien la TV de Samsung está conectada, la aplicación Sound Tower no puede conectarse con
Sound Tower.
• La ventana emergente de conexión puede no mostrarse de acuerdo con las especicaciones de la
TV.
• Puede seleccionar y conectarse directamente desde la lista de altavoces Bluetooth en su TV cuando la
ventana emergente de conexión no aparece en su TV.
• Cuando la torre de sonido está conectada al TV mediante Bluetooth, el video de la TV y el audio de la
torre de sonido no se pueden sincronizar si la distancia entre la torre de sonido y el TV es demasiado
amplia. Se recomienda acercar la torre de sonido para que quede a menos de 1 metro del TV.
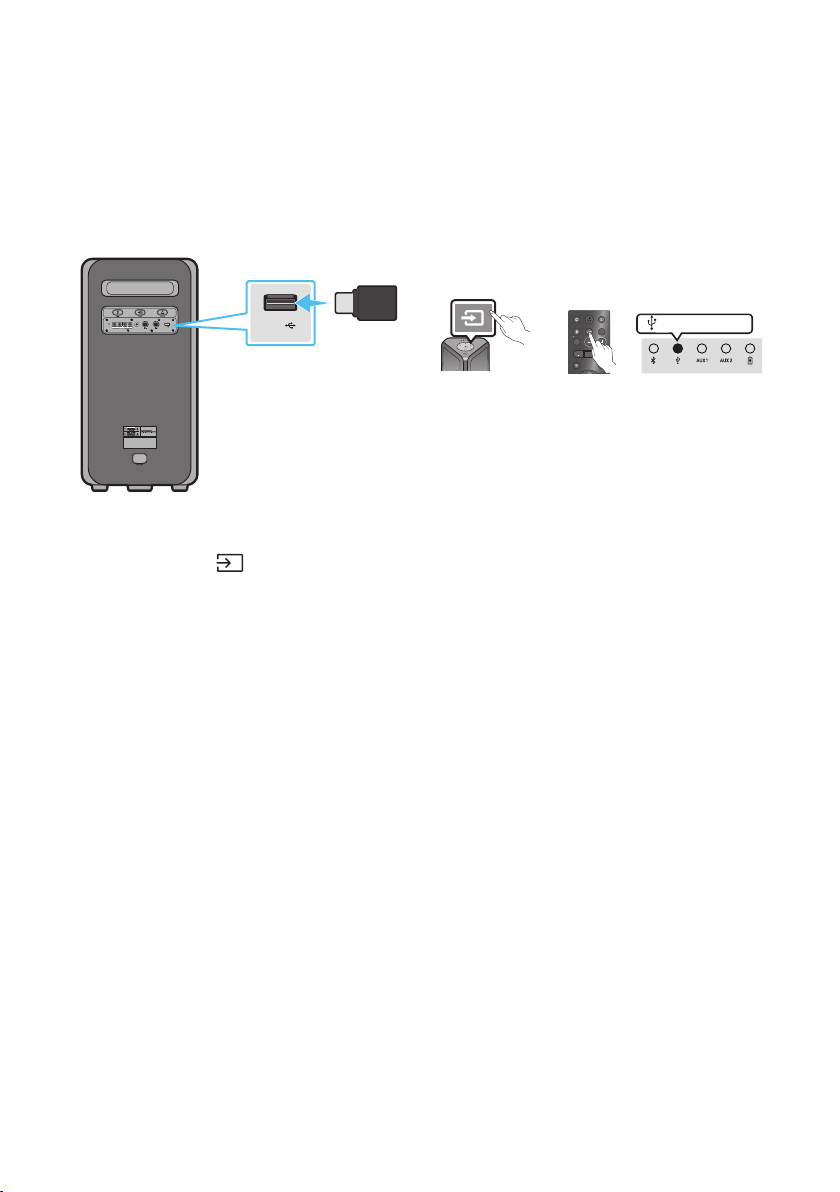
SPA - 18
05 CONECTAR UN DISPOSITIVO DE
ALMACENAMIENTO USB
Puede reproducir archivos de música ubicados en dispositivos de almacenamiento USB a través del
Sound Tower.
POWER
ECHOVOL
USB
(5V 2.1A)
AUX 1
MIC
USB
(5V 2.1A)
LIGHT
PAIRING
TEMPO
USB
AUX
EFFECT EFFECT
DJ
SOUND
MODE
Dispositivo de
almacenamiento
USB
(no suministrado)
Parte trasera del Sound Tower
O
LED blanco encendido
1. Conecte un dispositivo de almacenamiento USB a las tomas USB en su Sound Tower.
2. Presione el botón (Fuente) en el panel superior o en el control remoto y luego seleccione
“USB”.
• También puede seleccionar una fuente usando el botón USB en el control remoto.
3. El segundo indicador USB en el panel superior permanece encendido.
4. Reproduzca sus archivos de música desde el dispositivo de almacenamiento USB a través de Sound
Tower.
• El Sound Tower se apaga automáticamente (apagado automático) si el dispositivo USB no está
conectado, si la reproducción se detuvo o si no hay ningún tipo de ingreso durante más de
18minutos.
NOTAS
• Este producto solo admite dispositivos de almacenamiento USB formateados en el sistema de
archivos FAT y FAT32.
• Este producto no es compatible con Discos Duros y almacenamientos en dispositivos móviles.
• Se puede reproducir un máximo de 999 archivos por dispositivo de almacenamiento USB.
• Se puede leer un máximo de 256 carpetas por dispositivo de almacenamiento USB.

SPA - 19
Formatos de audio compatibles
Extensión de archivo Códec de audio Tasa de muestreo Velocidad de bits
*.mp3
MPEG 1 Layer3 32 kHz ~ 48 kHz 32 kbps ~ 320 kbps
MPEG 2 Layer3 16 kHz ~ 24 kHz 8 kbps ~ 160 kbps
MPEG 2.5 Layer3 8 kHz ~ 12 kHz 8 kbps ~ 160 kbps
*.wma WMA7/8/9 8 kHz ~ 48 kHz 32 kbps ~ 320 kbps
*.aac
AAC 8 kHz ~ 96 kHz < 1728 kbps
A A C- L C 8 kHz ~ 96 kHz < 1728 kbps
HE-AAC 8 kHz ~ 96 kHz < 1728 kbps
*.wav
PCM/LPCM/
IMA_ADPCM
8 kHz ~ 192 kHz < 5 Mbps
*ac - 8 kHz ~ 192 kHz < 5 Mbps
NOTAS
• Este producto no es compatible con el códec WMA Professional.
• La tabla anterior muestra las tasas de muestreo y las tasas de bits admitidas. Los archivos en
formatos que no son compatibles no se reproducirán.
• Los archivos A AC solo admiten el formato nativo ADTS.
Actualización de software
SamsungpuedeofreceractualizacionesparaelrmwaredelsistemaSoundTowerenelfuturo.
Si se ofrece una actualización, puede actualizar el rmware conectando un dispositivo USB con la
actualización de rmware almacenada en él al puerto USB en su Sound Tower. Para obtener más
información sobre cómo descargar archivos de actualización, diríjase al sitio web de Samsung
Electronics en www.samsung.com/us/support/.
Luego, ingrese o seleccione el número de modelo de su Sound Tower, seleccione la opción Software y
aplicaciones y luego Descargas. Tenga en cuenta que los nombres de las opciones pueden variar.
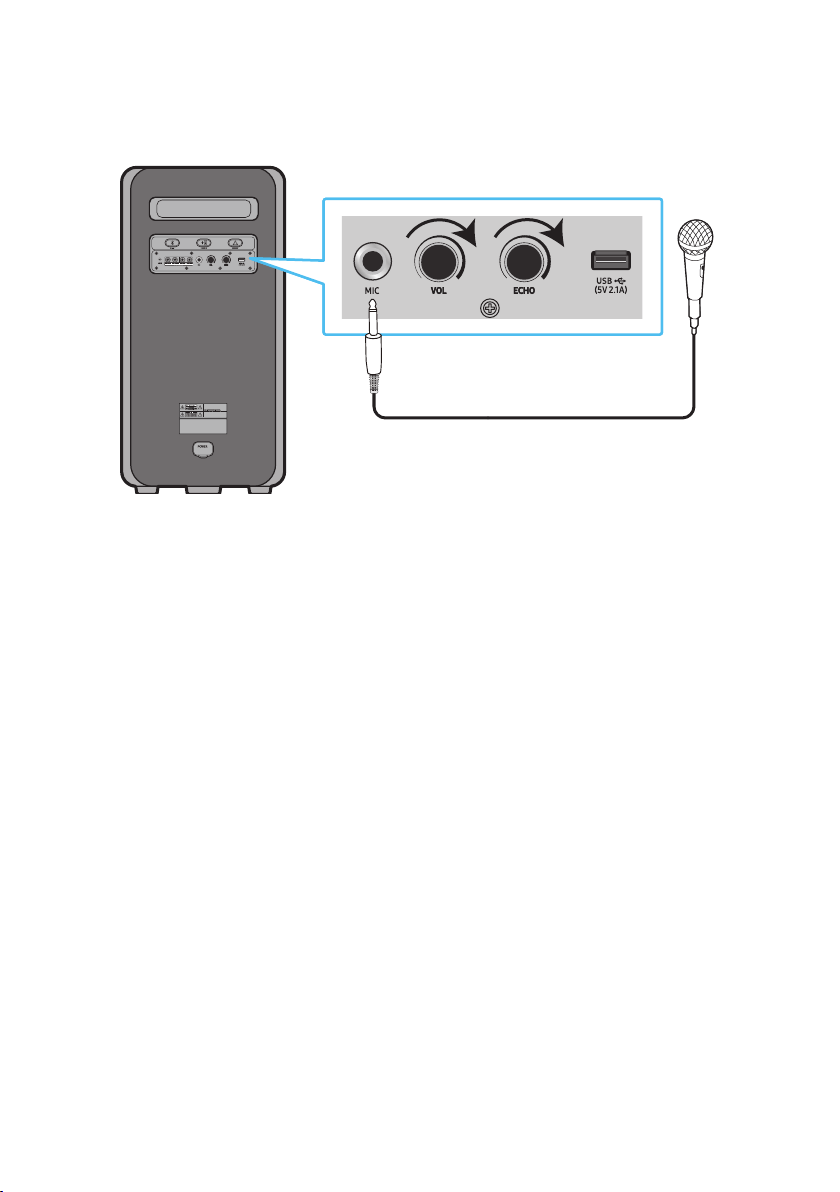
SPA - 20
Conexión de un micrófono externo
Puede hacer que su voz salga desde el sistema si conecta un micrófono dinámica con un enchufe
normal (no incluido).
MAXMIN MAXMIN
1. Gire la perilla MIC LEVEL hasta MÍN para bajar el nivel del volumen del micrófono.
2. Conecte un micrófono opcional al conector MIC de la unidad.
3. Ajuste el volumen mediante la perilla MIC “VOL”.
4. Ajuste el efecto del eco mediante la perilla MIC “ECHO”.
5. Hable o cante con el micrófono conectado.
NOTAS
• Cuando se usa el modo de Group Play inalámbrico o la función de Stereo, el sonido del micrófono
solo sale del sistema al cual está conectado el micrófono.
• Cuando la torre de sonido está en el modo de batería, el nivel de sonido del MIC será más bajo.
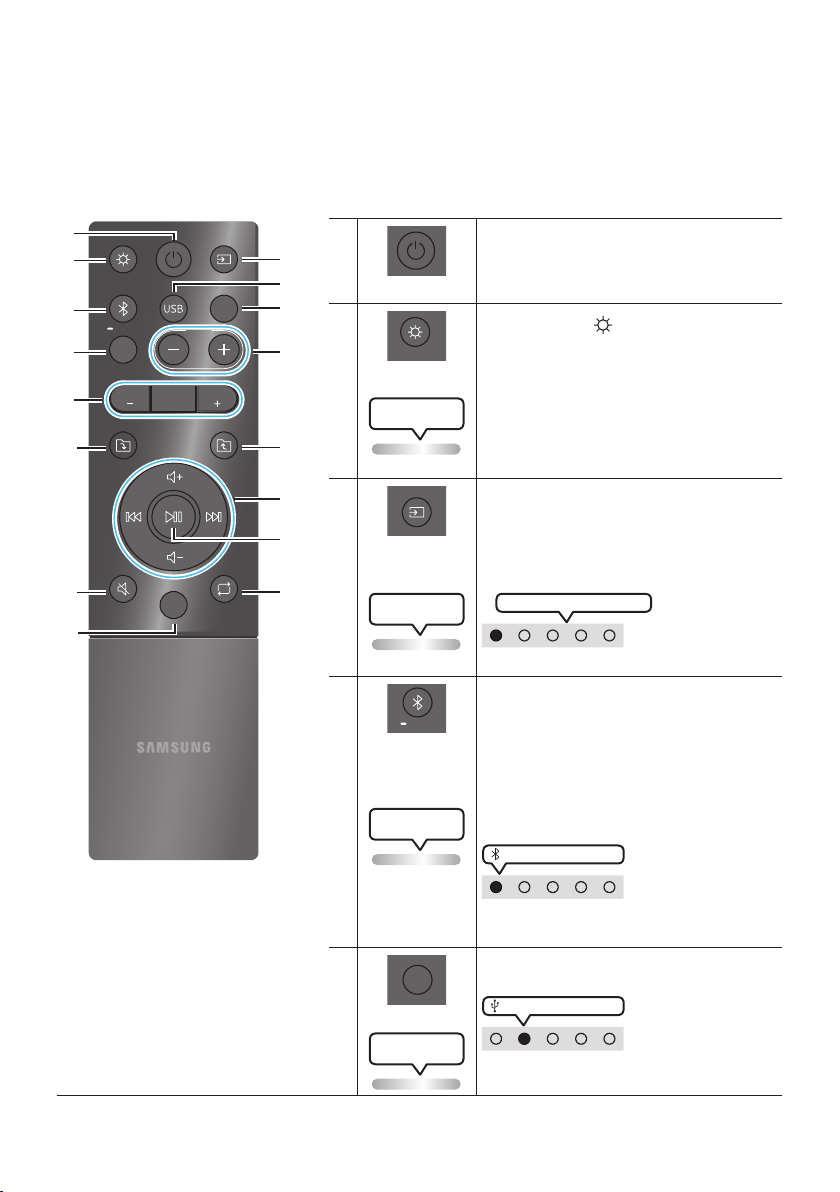
SPA - 21
06 CÓMO USAR EL CONTROL REMOTO
Cómo usar el control remoto
LIGHT
PAIRING
TEMPO
USB
AUX
EFFECT
DOWN
UP
BASS
EFFECT
DJ
SOUND
MODE
* Para reducir el consumo de la batería,
el producto no se enciende si presiona
el botón de encendido del control
remoto mientras la batería está en uso.
Encendido
Activa y desactiva el Sound Tower.
LIGHT
LIGHT
Presione el botón (LIGHT) para activar el
modo de iluminación.
(Solo tiene efecto durante la reproducción de
música).
Cada vez que presiona el botón para
seleccionar el modo de iluminación deseado,
seleccione AMBIENT, PARTY, DANCE,
THUNDERBOLT, STAR o OFF.
LED de iluminación
parpadea 1 vez en blanco
Fuente
Presione para seleccionar una fuente
conectada al Sound Tower.
Cada vez que presiona el botón para
seleccionar la fuente deseada, seleccione BT,
USB, AUX1 o AUX2 .
LED de iluminación
parpadea 1 vez en blanco
El LED blanco se mueve hacia la derecha
Indicador LED en la parte superior del producto.
Bluetooth
PAIRING
PAIRING
Presione para seleccionar una fuente
directamente al modo “BT”.
Mantenga presionado el botón durante más de 5
segundos para ingresar el modo "BT PAIRING".
Puede conectar el Sound Tower a un nuevo
dispositivo Bluetooth en este modo
seleccionando Sound Tower de la lista de
búsqueda del dispositivo Bluetooth.
Parpadea el LED de
iluminación color cian
LED blanco encendido
Indicador LED en la parte superior del
producto.
USB
USB
Presione para seleccionar las fuentes USB
conectadas a Sound Tower.
LED blanco encendido
Indicador LED en la parte superior del
producto.
LED de iluminación
parpadea 1 vez en blanco
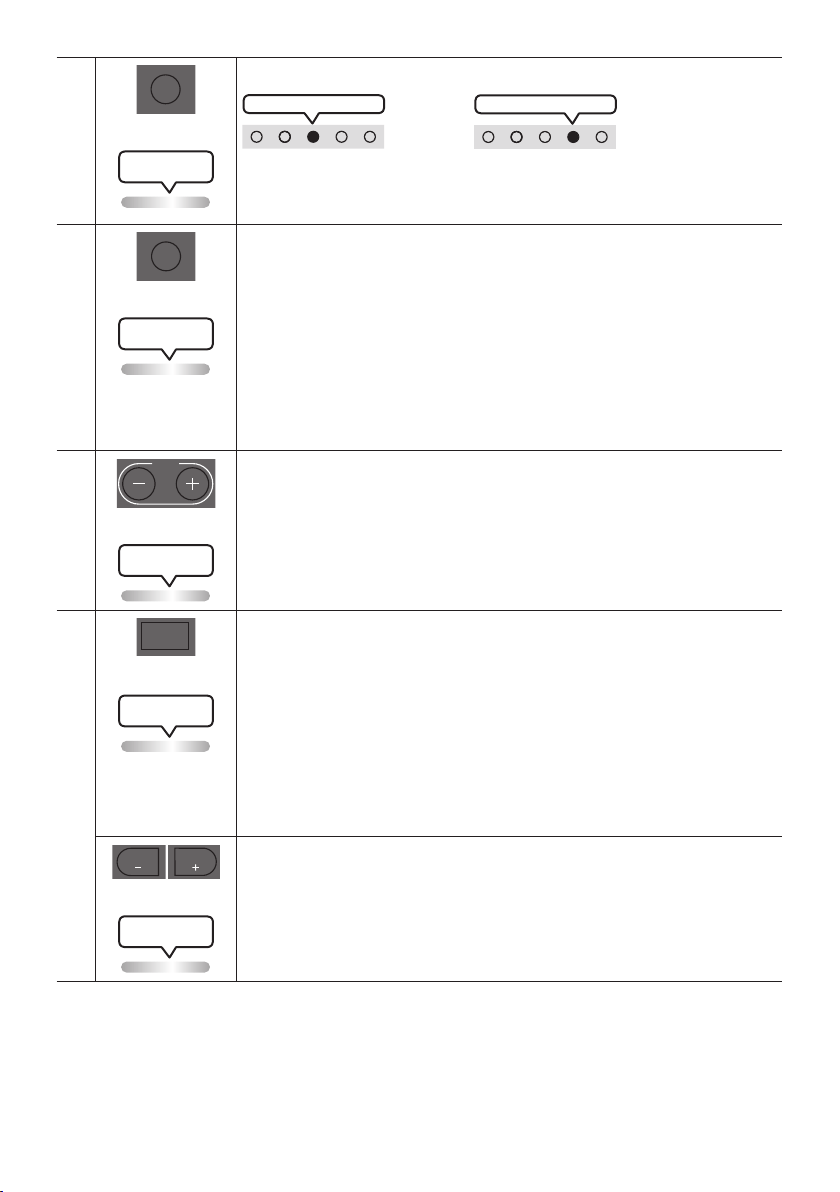
SPA - 22
AUX
AUX
Presione para seleccionar las fuentes AUX1 o AUX2 conectadas a Sound Tower.
AUX2 LED blanco encendido
O
AUX1 LED blanco encendido
Indicador LED en la parte superior del producto.
LED de iluminación
parpadea 1 vez en blanco
SOUND MODE
SOUND
MODE
Cada vez que presiona el botón para seleccionar el efecto de sonido deseado, elija
PARTY, STANDARD, HIPHOP, EDM, ROCK, LATIN, HOUSE o REGGAE.
• PARTY: Término para referirse a un efecto musical alegre, como una esta.
• Standard: Término para referirse a efectos musicales sin personalización, como
cuando no hay EQ.
• HIPHOP: Término para referirse a la música y danza dinámica.
• EDM: Un género “de concepto más generalizado” que la música electrónica.
• ROCK: Música de bandas.
• LATIN: Término para referirse a la música de muchos países sudamericanos.
• HOUSE: Música rápida para bailar que se toca con instrumentos electrónicos.
LED de iluminación
parpadea 1 vez en blanco
TEMPO +, -
TEMPO
Presione los botones TEMPO + o TEMPO - para cambiar el tempo de la música hacia
arriba o hacia abajo.
• Esta función está disponible solo en los modos USB.
LED de iluminación
parpadea 1 vez en blanco
DJ
DJ
Esta función le permite activar la función de efecto de DJ.
Cada vez que presiona el botón puede seleccionar el efecto de sonido de DJ deseado
entre NOISE, FILTER, CRUSH, CHORUS, WAHWAH o OFF.
• NOISE: Combinación de ruido blanco con el sonido original.
• FILTER: Filtrado del sonido para dejar a un lado ciertas frecuencias.
• CRUSH: Hace que el sonido original tenga mejor denición.
• CHORUS: Separa el sonido original en varias pistas, las retrasa por separado y,
luego, las vuelve a mezclar. Crea un efecto coral.
• WAHWAH: Efecto WAHWAH que se crea mejorando algunas frecuencias especícas del
sonido original.
LED de iluminación
parpadea 1 vez en blanco
EFFECT +, -
EFFECT
EFFECT
Presione los botones EFFECT + or EFFECT - para cambiar el nivel de cada efecto de
sonido de DJ hacia arriba o hacia abajo.
El valor predeterminado del efecto es 5, pero se puede cambiar a –15 ~ 0 ~ +15.
LED de iluminación
parpadea 1 vez en blanco
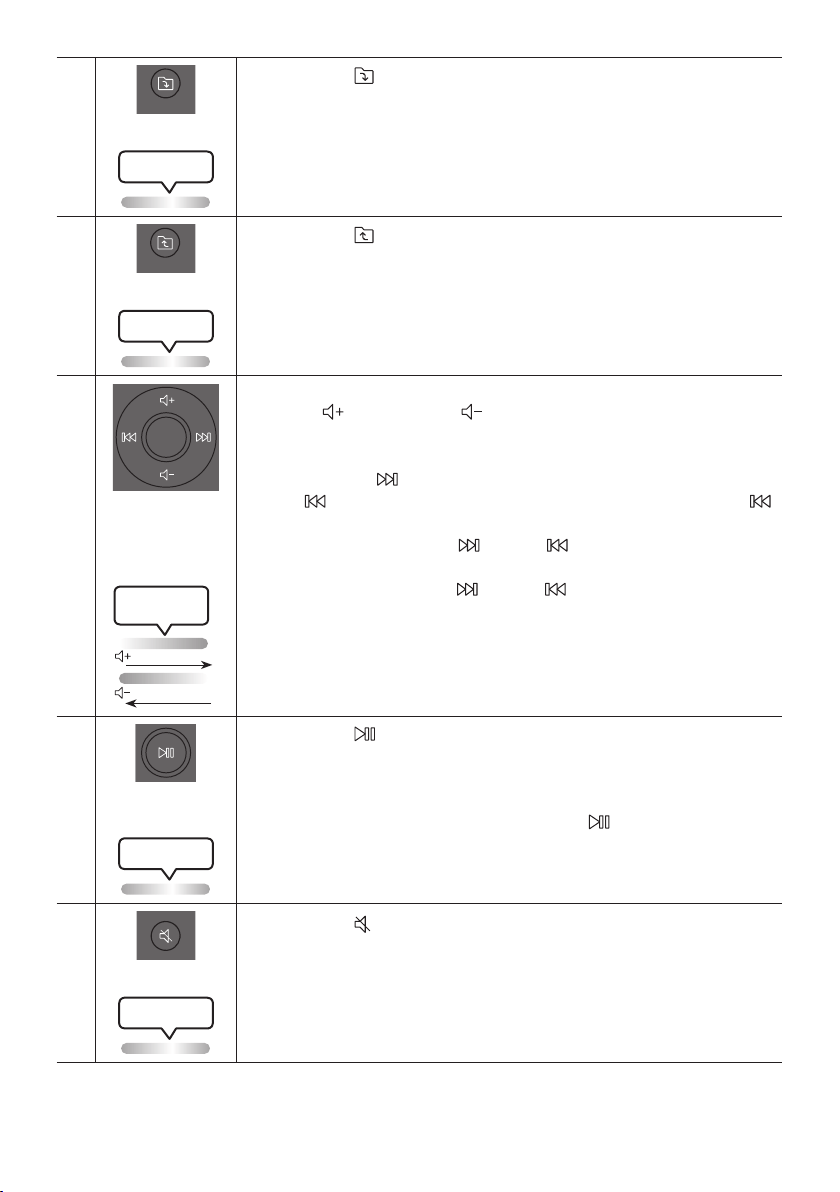
SPA - 23
Carpeta DOWN
DOWN
Presione el botón (DOWN) para pasar a la siguiente carpeta en el dispositivo USB.
LED de iluminación
parpadea 1 vez en blanco
Carpeta UP
UP
Presione el botón (UP) para ir a la carpeta anterior en el dispositivo USB.
LED de iluminación
parpadea 1 vez en blanco
Subir el
volumen,
Bajar el volumen
/ Saltar
• Subir el volumen, Bajar el volumen
Presione (Subir volumen) o (Bajar volumen) para ajustar el nivel de
volumen hacia arriba o hacia abajo.
• Saltar música
Presione el botón para seleccionar el siguiente archivo de música. Presione el
botón una vez para volver a reproducir la música actual. Presione el botón
dos veces para seleccionar el archivo de música anterior.
Mantenga presionado el botón o el botón durante más de 3 segundos en el
modo de reproducción USB para buscar hacia adelante o hacia atrás. Vuelva a
mantener presionado el botón o el botón durante más de 3 segundos para
volver a la reproducción normal.
Parpadea el LED de
iluminación color blanco
De abajo hacia arriba
De arriba hacia abajo
Reproducir /
pausa
Presione el botón para pausar temporalmente un archivo de música.
Cuando presione el botón nuevamente, se reproducirá el archivo de música.
• Función de apagado automático
Para desactivar la función de apagado automático mientras las unidad está en el
modo AUX1 o AUX2, mantenga presionado el botón durante más de 5
segundos. La barra de iluminación parpadeará en blanco una vez.
LED de iluminación
parpadea 1 vez en blanco
Silencio
Presione el botón (Silencio) para silenciar el sonido.
Presiónelo nuevamente para activar el sonido.
LED de iluminación
parpadea 1 vez en blanco
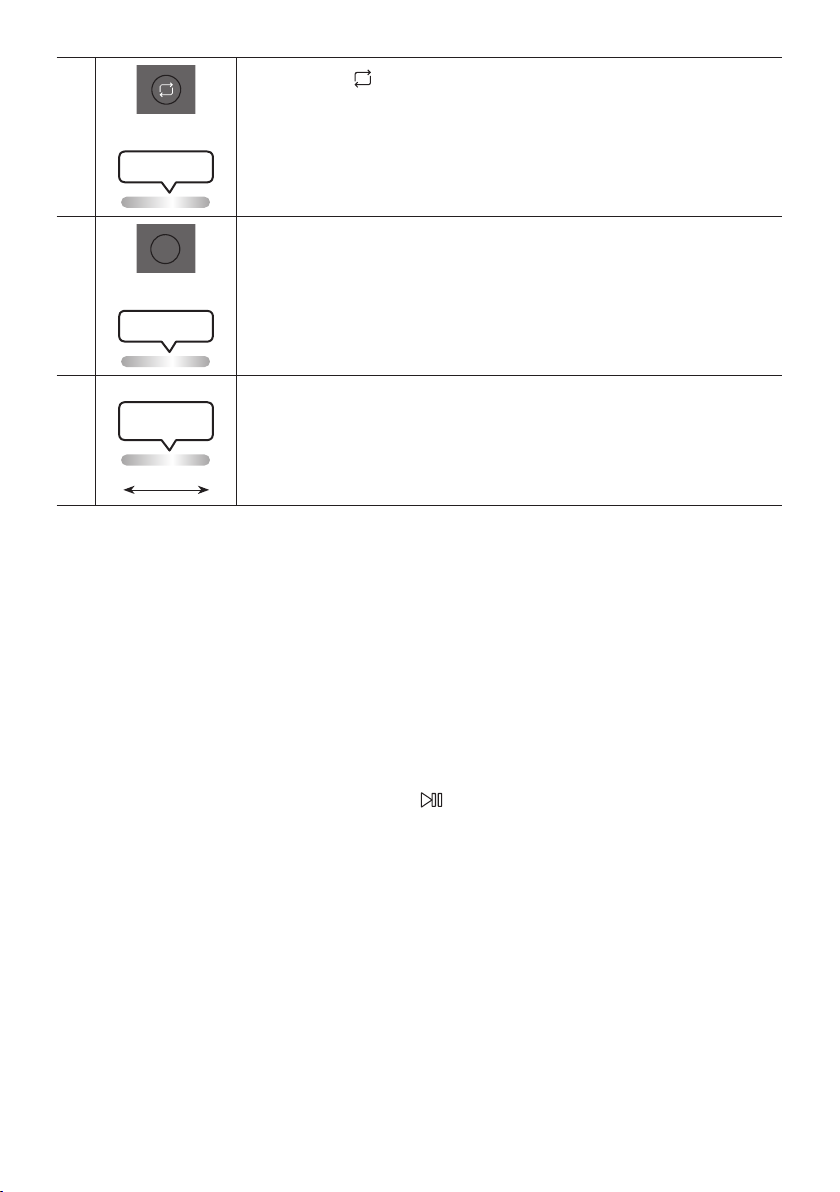
SPA - 24
Repetir
Presione el botón (Repetir) para usar la función Repetir en los modos “USB”.
Cada vez que presiona el botón para seleccionar la función de repetición deseada,
elija ONE, FOLDER, ALL, RANDOM o OFF.
LED de iluminación
parpadea 1 vez en blanco
BASS
BASS
Presione el botón BASS para usar el potente sonido de los bajos.
Vuelva a presionarlo para volver al sonido normal.
Mantenga presionado el botón BASS durante más de 5 segundos para activar o
desactivar la función BLUETOOTH POWER.
LED de iluminación
parpadea 1 vez en blanco
※
No disponible
Parpadea el LED de
iluminación color rosa
Desdeelcentrohastaelnal
La función del botón del control remoto no está disponible con la fuente actual.
Cómo usar el modo de sonido
Su Sound Tower le proporciona conguraciones de ecualizador predenidas que están optimizadas
para un género musical particular.
1. Presione el botón SOUND MODE en el control remoto.
2. Cada vez que presione el botón SOUND MODE para seleccionar el efecto de sonido deseado, elija
PARTY, STANDARD, HIPHOP, EDM, ROCK, LATIN, HOUSE o REGGAE.
NOTAS
• El valor predeterminado del modo de sonido es PARTY.
• Si está apagado, mantenga presionado el botón en el producto o en el control remoto durante
más de 6 segundos para encender el sistema con el ajuste predeterminado modo sonido.

SPA - 25
Cómo usar el efecto DJ
La función DJ Effect le permite activar el efecto de sonido DJ Effect. El nivel de cada efecto es ajustable.
1. Presione el botón DJ en el control remoto.
2. Cada vez que presiona el botón DJ, el Sound Tower cambia entre los efectos de DJ disponibles:
• NOISE: Crea ruido blanco y se mezcla con el sonido original a través del ltro y la salida.
• FILTRO: Crea un efecto similar al sonido de solo agudos o graves.
• CRUSH: Crea un efecto que hace que el sonido original sea más nítido.
• CORO: Crea un efecto similar a un coro de canto.
• WAHWAH: Crea un efecto ‘Wah ~ Wah ~’.
• DJ EFFECT OFF: apaga el efecto DJ.
3. Presione el botón EFFECT + o EFFECT - para aumentar o disminuir el nivel de cada efecto de sonido
de DJ de -15 a +15.
NOTA
• Cuando está apagado, mantenga presionado el botón en el producto o en el control remoto
durante más de 5 segundos para encender el sistema en el ajuste predeterminado efecto de DJ.

SPA - 26
07 USO DE LA APLICACIÓN SAMSUNG
SOUND TOWER
Instale la aplicación Samsung Sound Tower
Para controlar este producto con su dispositivo inteligente y la aplicación Samsung Sound Tower,
descargue la aplicación Samsung Sound Tower de Google Play Store o Apple App Store e instálela en su
dispositivo inteligente.
NOTAS
• La aplicación Samsung Sound Tower es compatible con dispositivos de teléfonos móviles Android
con sistema operativo Android 6.0 o posterior.
• La aplicación Samsung Sound Tower es compatible con dispositivos móviles Apple con iOS 10.0 o
posterior.
Búsqueda en la tienda: Samsung Sound Tower
Inicio de la aplicación Samsung Sound Tower
Para iniciar y usar la aplicación Samsung Sound Tower, toque el ícono Samsung Sound Tower en su
dispositivo inteligente y luego siga las instrucciones en la pantalla.
Samsung
Multiroom
Samsung Sound Tower
Samsung Sound Tower

SPA - 27
08 SOLUCIÓN DE PROBLEMAS
Antes de buscar ayuda, verique lo siguiente.
La unidad no se enciende.
; La batería podría estar completamente
descargada. Conecte el enchufe e intente
encenderla.
Una función no responde cuando se presiona
el botón.
¿Hay electricidad estática en el aire?
; Desconecte el enchufe de alimentación y
vuelva a conectarlo.
Ocurren fallas de sonido en el modo BT.
; Consulte las secciones de conexión
Bluetooth en la página 14.
El sonido no se produce.
¿Está activada la función de silencio?
; Presione el botón
(Silencio) para
cancelar la función de silencio.
¿Elvolumenestáconguradoalmínimo?
; Ajuste el volumen.
El control remoto no responde.
¿Sehanagotadolasbaterías?
; Reemplace con baterías nuevas.
¿La distancia entre el control remoto y la
unidad principal de Sound Tower es
demasiado grande?
; Acerque el control remoto a la unidad
principal de Sound Tower.
La conexión del Stereo Group no funciona.
¿Está el sistema en modo inalámbrico de
Group Play?
; Desconecte el modo inalámbrico Group
Play e intente nuevamente la conexión
Stereo Group.
No puede hacer una conexión Bluetooth.
¿El sistema está conectado a otro sistema en
modo inalámbrico de Group Play o en modo
Stereo Group?
; Intente la conexión Bluetooth nuevamente
después de desconectar la conexión
inalámbrica de Group Play o Stereo Group.
¿Ya están conectados los dos dispositivos
Bluetooth?
; Intente la conexión Bluetooth nuevamente
después de desconectar otras conexiones
Bluetooth.
El botón
PAIRINGno funciona.
¿Está el sistema en modo inalámbrico de
Group Play o en modo Stereo Group?
; Intente nuevamente después de desactivar
la conexión inalámbrica de Group Play o
Stereo Group.
Quiero cambiar el sistema HOST (MAIN) por el
otro en la conexión Group Play o en la
conexión de Groupe Stereo.
; Desconecte el modo Group Play, presione
el altavoz que desea utilizar como HOST
primero y, luego utilice el Group LED para
conectar los demás uno por uno.
; Con el modo Groupe Stereo, el MAIN es jo.
No puedes cambiar a otros como MAIN.
Quiero utilizar las conexiones AUX1 o AUX2
por más de 8 horas sin interactuar con la
unidad.
; Mantenga presionado el botón
en el
control remoto durante más de 5 segundos
en el modo AUX1 o AUX2 para desactivar la
Función de apagado automático.Cambie de
ON-AUTO POWER DOWN a OFF-AUTO
POWER DOWN.
SPA - 28
No puedo conectar un SUB con el Group play.
; Después de 1 hora, el HOST bloqueará
cualquier SUB adicional para que no se
añada. Presione el botón GROUP PLAY en
el HOST. El SUB puede volver a conectarse.
No puede establecer una conexión “Wireless /
Wired Group / Add Stereo / Bluetooth”
¿Es muy grande la distancia entre sistemas?
; Es recomendado realizar el
emparejamiento del sistema “Wireless /
Wired Group / Add Stereo / Bluetooth” a
menos de 1 metro.
; Es recomendado que la distancia de
funcionamiento entre los sistemas Sound
Tower sea inferior a 10 metros.
09 LICENCIA
The Bluetooth® word mark and logos are
registered trademarks owned by the Bluetooth
SIG, Inc. and any use of such marks by Samsung
Electronics Co., Ltd. is under licence. Other
trademarks and trade names are those of their
respective owners.
Qualcomm aptX is a product of Qualcomm
Technologies, Inc. and/or its subsidiaries.
Qualcomm is a trademark of Qualcomm
Incorporated, registered in the United States and
other countries. aptX is a trademark of Qualcomm
Technologies International, Ltd., registered in the
United States and other countries.
[ENERGY STAR]
ENERGYSTARqualiedmodelonly
– Your Samsung product is ENERGY STAR
qualied in its factory default setting.
Change to certain features, settings and
functionality in this product can change the
power consumption, possibly beyond the
limits required for ENERGY STAR
qualication.
– Environmental Protection Agency and
Department of Energy. ENERGY STAR is a
joint program of the Government agencies,
designed to promote energy efcient
products and practices.
Refer to www.energystar.gov for more
information of the ENERGY STAR Program.
ENERGYSTARqualiedmodelonly
(Applicable to Thin Client models only)
As an ENERGY STAR® Partner, SAMSUNG has
determined that this product meets the
ENERGY STAR® guidelines for energy
efciency.
– The ENERGY STAR Program has been to
reduced greenhouse gas emissions and
save energy through voluntary labeling.
– Power management setting of this product
have been enabled by default, and have
various timing setting from 1 minutes to 5
hours.
– The product can wake with a button press
on the chassis from sleep mode.
ENERGYSTARqualiedmodelonly(Theother
models)
– As an ENERGY STAR Partner, Samsung has
determined that this product or product
models meets the ENERGY STAR guideline
for energy efciency.

SPA - 29
10 AVISO SOBRE
LICENCIA DE
CÓDIGO ABIERTO
Para enviar consultas sobre fuentes abiertas,
póngase en contacto con Samsung a través del
correo electrónico
(http://opensource.samsung.com)
11 NOTA
IMPORTANTE
SOBRE EL
SERVICIO
Las guras e ilustraciones de este Manual del
usuario se facilitan sólo como referencia y pueden
diferir del aspecto real del producto.
SPA - 30
12 ESPECIFICACIONES Y GUÍA
Especicaciones
Nombre del modelo MX-ST50B
USB 5V/2,1A
Peso 11,94kg
Dimensiones (An x Al x Pr) 329×665×301mm
Rango de temperatura de servicio +5°C a +35°C
Rango de humedad de servicio 10 % a 75 %
AMPLIFICADOR
Potencia nominal de salida
Enchufe del cable de
alimentación
240 W
Batería 90 W
Requisitos de electricidad (solo México) 110-127V ~50/60Hz (méxico sólo)
Consumo general de energía (solo México) 65W (méxico sólo)
Tipo de batería Ion de litio de 72 Wh
Tiempo de actividad de la batería hasta 18 horas
Tiempo de carga de la batería <3.5 h
Batería recargable
de ion de litio
Modelo de la batería EB-T24C-00, 2INR19/65-4
Voltaje nominal 7,34 V
Capacidad nominal 9800 mAh, 71,93 Wh
Voltaje de carga limitado 8,4 V
Capacidad típica 10000 mAh, 73,40 Wh

SPA - 31
NOTAS
• Samsung Electronics Co., Ltd se reserva el derecho a cambiar las especicaciones sin previo aviso.
• Los pesos y dimensiones son aproximados.
• El tiempo de actividad de la batería y el tiempo de carga de la batería cambian según las
condiciones de uso.
• En un entorno sumamente frío o caliente, la carga se detiene por seguridad. Para resolver estos
problemas, desconecte el cable de suministro eléctrico de CA y vuelva a conectarlo cuando haya
una temperatura operativa de entre 5 ºC y 35 ºC.
© 2022 Samsung Electronics Co., Ltd. All rights reserved.
Contact SAMSUNG WORLD WIDE
If you have any questions or comments relating to Samsung products, please contact the SAMSUNG customer
care Center.
Country Samsung Service Center
Web Site
`
Latin America
MEXICO 800-SAMSUNG www.samsung.com/mx/support
BRAZIL
0800 555 0000 (Demais cidades e regiões)
4004-0000 (Capitais e grandes centros)
www.samsung.com/br/support
COSTA RICA 00-800-1-SAMSUNG (726-7864)
www.samsung.com/latin/support (Spanish)
www.samsung.com/latin_en/support (English)
DOMINICAN REPUBLIC 1-800-751-2676
ECUADOR 1-800-SAMSUN (72-6786)
EL SALVADOR 8000-SAMSUNG (726-7864)
GUATEMALA 1-800-299-0033
HONDURAS 800-2791-9111
JAMAICA 1-800-SAMSUNG (726-7864) www.samsung.com/latin_en/support (English)
NICARAGUA 001-800-5077267
www.samsung.com/latin/support (Spanish)
www.samsung.com/latin_en/support (English)
PANAMA 800-0101
PUERTO RICO 1-800-682-3180
TRINIDAD & TOBAGO 1-800-SAMSUNG (726-7864)
VENEZUELA 0-800-100-5303
COLOMBIA
Bogotá en el 600 12 72
Sin costo en todo el pais 01 8000 112 112
Y desde tu celular #726
www.samsung.com/co/support
CHILE 800 726 786
www.samsung.com/cl/support
BOLIVIA 800 107 260
PERU 080077708 Desde teléfonos fi jos, públicos o celulares www.samsung.com/pe/support
ARGENTINA 0800-555-SAMS (7267) www.samsung.com/ar
URUGUAY 0800-SAMS (7267) www.samsung.com/uy
PA RAGUAY 0800-11-SAMS (7267) www.samsung.com/py
--------------SOLO MÉXICO---------------
IMPORTADO POR : SAMSUNG ELECTRONICS MÉXICO S.A. DE C.V.
GENERAL MARIANO ESCOBEDO 476 PISO 8
COL. ANZURES, DELEGACIÓN MIGUEL HIDALGO MÉXICO, CIUDAD DE MÉXICO C.P. 11590
TEL : 01 (55) 5747-5100 / 01 800 726 7864