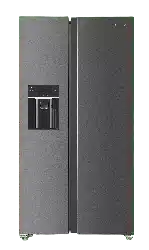

Product images are for illustrative purposes only and may differ from the actual product.
SIDE-BY-SIDE
REFRIGERATOR
FREEZER
RB5210FHXI
User Manual
ENG SRB

2
ENG
In the interest of your safety and to ensure the correct use,
before installing and first using the appliance, read this
user manual carefully, including its hints and warnings. To
avoid unnecessary mistakes and accidents, it is important
to ensure that all people using the appliance are
thoroughly familiar with its operation and safety features.
Save these instructions and make sure that they remain
with the appliance if it is moved or sold, so that everyone
using it through its life will be properly informed on
appliance use and safety.
For the safety of life and property keep to the precautions
of these user instructions as the manufacturer is not
responsible for damages caused by omission.
Children and vulnerable people safety
• This appliance can be used by children aged of 8
years and above and persons with reduced physical,
sensory or mental capabilities, or lack of experience and
knowledge if they have supervision or have been given
instructions concerning the use of the appliance in a
safe way and understand the hazards involved.
• Children aged from 3 to 8 years are allowed to load and
unload this appliance.
• Children should be supervised to ensure that they do
not play with the appliance.
• Cleaning and user maintenance should not be done by
children unless they are aged from 8 years and above
and supervised.
• Keep all packaging well away from children. There is risk
of suffocation.
• If you are discarding the appliance pull the plug out
of the socket, cut the connection cable (as close to the
appliance as you can) and remove the door to prevent
SAFETY INFORMATION

3
ENG
playing children from suffering electric shock or closing
themselves in.
• If this appliance features a magnetic door seal to replace
an older appliance having a spring lock (latch) on the
door or lid, be sure to make that spring lack unusable
before you discard the old appliance. This will prevent it
from becoming a death trap for a child.
General safety
Keep ventilation openings, in the appliance enclosure or
in the built-in structure, clear of obstruction.
Do not use mechanical devices or other means to
accelerate the defrosting process, other than those
recommended by the manufacturer.
Do not damage the refrigerant circuit.
Do not use other electrical appliances (such as ice cream
makers) inside of refrigerating appliances, unless they are
approved for this purpose by the manufacture.
Do not touch the light bulb if it has been on for a long
period of time because it could be very hot.
1
When positioning the appliance, ensure the supply cord
is not trapped or damaged.
Do not locate multiple portable socket-outlets or portable
power suppliers at the rear of the appliance.
• Do not store explosive substances such as aerosol cans
with a flammable propellant in this appliance.
• The refrigerant isobutene (R600a) is contained within
the refrigerant circuit of the appliance, a natural gas with
a high level of environmental compatibility, which is
nevertheless flammable.
• During transportation and installation of the appliance,
be certain that none of the components of the
refrigerant circuit become damaged.

4
ENG
- avoid open flames and sources of ignition
- thoroughly ventilate the room in which the appliance is
situated
• It is dangerous to alter the specifications or modify this
product in any way. Any damage to the cord may cause
a short circuit, fire and/or electric shock.
• This appliance is intended to be used in a household
and similar applications such as
- staff kitchen areas in shops, offices and other working
environments;
- farm houses and by clients in hotels, motels and other
residential type environments;
- bed and breakfast type environments;
- catering and similar non-retail applications.
Any electrical components (plug, power cord,
compressor and etc.) must be replaced by a certified
service agent or qualified service personnel.
The light bulb supplied with this appliance is a “special
use light bulb” usable only with the appliance supplied.
This “special use lamp” is not usable for domestic
lighting.
1
• Power cord must not be lengthened.
• Make sure that the power plug is not squashed or
damaged by the back of the appliance. A squashed or
damaged power plug may overheat and cause a fire.
• Make sure that you can come to the main plug of the
appliance.
• Do not pull the main cable.
• If the power plug socket is loose, do not insert the
power plug. There is a risk of electric shock or fire.
• You must not operate the appliance without the lamp.

5
ENG
• This appliance is heavy. Care should be taken when
moving it.
• Do not remove nor touch items from the freezer
compartment if your hands are damp/wet, as this could
cause skin abrasions or frost/freezer burns.
• Avoid prolonged exposure of the appliance to direct
sunlight.
Daily use
• Do not put hot things on the plastic parts in the
appliance.
• Do not place food products directly against the rear
wall.
• Frozen food must not be re-frozen once it has been
thawed out.
2
• Store pre-packed frozen food in accordance with the
frozen food manufacture, s instructions.
2
• Appliance, s manufactures storage recommendations
should be strictly adhered to. Refer to relevant
instructions.
• Do not place carbonated of fizzy drinks in the freezer
compartment as it creates pressure on the container,
which may cause it to explode, resulting in damage to
the appliance.
2
• Ice lollies can cause frost burns if consumed straight
from the appliance.
2
To avoid contamination of food, please respect the
following
instructions
• Opening the door for long periods can cause
a significant increase of the temperature in the
compartments of the appliance.
• Clean regularly surfaces that can come in contact with

6
ENG
food and accessible drainage systems.
• Clean water tanks if they have not been used for 48h;
flush the water system connected to a water supply if
water has not been drawn for 5 days.
• Store raw meat and fish in suitable containers in the
refrigerator, so that it is not in contact with or drip onto
other food.
• Two-star frozen-food compartments (if they are
presented in the appliance) are suitable for storing pre-
frozen food, storing or making ice-cream and making
ice cubes.
• One-, two- and three -star compartments (if they are
presented in the appliance) are not suitable for the
freezing of fresh food.
• If the appliance is left empty for long periods, switch off,
defrost, clean, dry and leave the door open to prevent
mount developing within the appliance.
Care and cleaning
• Before maintenance, switch off the appliance and
disconnect the main plug from the power socket.
• Do not clean the appliance with metal objects.
• Do not use sharp objects to remove frost from the
appliance. Use a plastic scraper.
2
• Regularly examine the drain in the refrigerator for
defrosted water. If necessary, clean the drain. If the
drain is blocked, water will collect at the bottom of the
appliance.
3
Installation
• For electrical connection carefully follow the instructions
given in specific paragraphs.
• Unpack the appliance and check if there are damages

7
ENG
on it. Do not connect the appliance if it is damaged.
Report possible damages immediately to the place you
bought it. In that case retain packing.
• It is advisable to wait at least four hours before
connecting the appliance to allow the oil to flow back in
the compressor.
• Adequate air circulation should be provided around the
appliance, lacking this leads to overheating. To achieve
sufficient ventilation, follow the instructions relevant to
installation.
• Wherever possible the spacers of the product should
be against a wall to avoid touching or catching warm
parts (compressor, con- denser) to prevent possible
burn.
• The appliance must not be located close to radiators or
cookers.
• Make sure that the main plug is accessible after the
installation of the appliance.
Service
• Any electrical work required to do the servicing of
the appliance should be carried out by a qualified
electrician or competent person.
• This product must be serviced by an authorized Service
Center, and only genuine spare parts must be used.
Energy saving
• Do not put hot food in the appliance;
• Do not pack food close together as this prevents air
circulating;
• Make sure food does not touch the back of the
compartment(s);
• If electricity goes off, do not open the door(s);
8
ENG
• Do not open the door(s) frequently;
• Do not keep the door(s) open for a long time;
• Do not set the thermostat on exceeding cold
temperatures;
• All accessories, such as drawers, shelves balconies,
should be kept there for lower energy consumption.
1
If there is a light in the compartment.
2
If there is a freezer compartment.
3
If there is a fresh-food storage compartment.
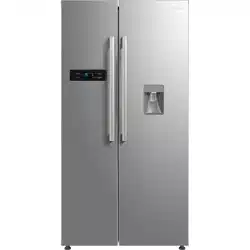
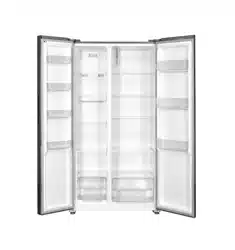
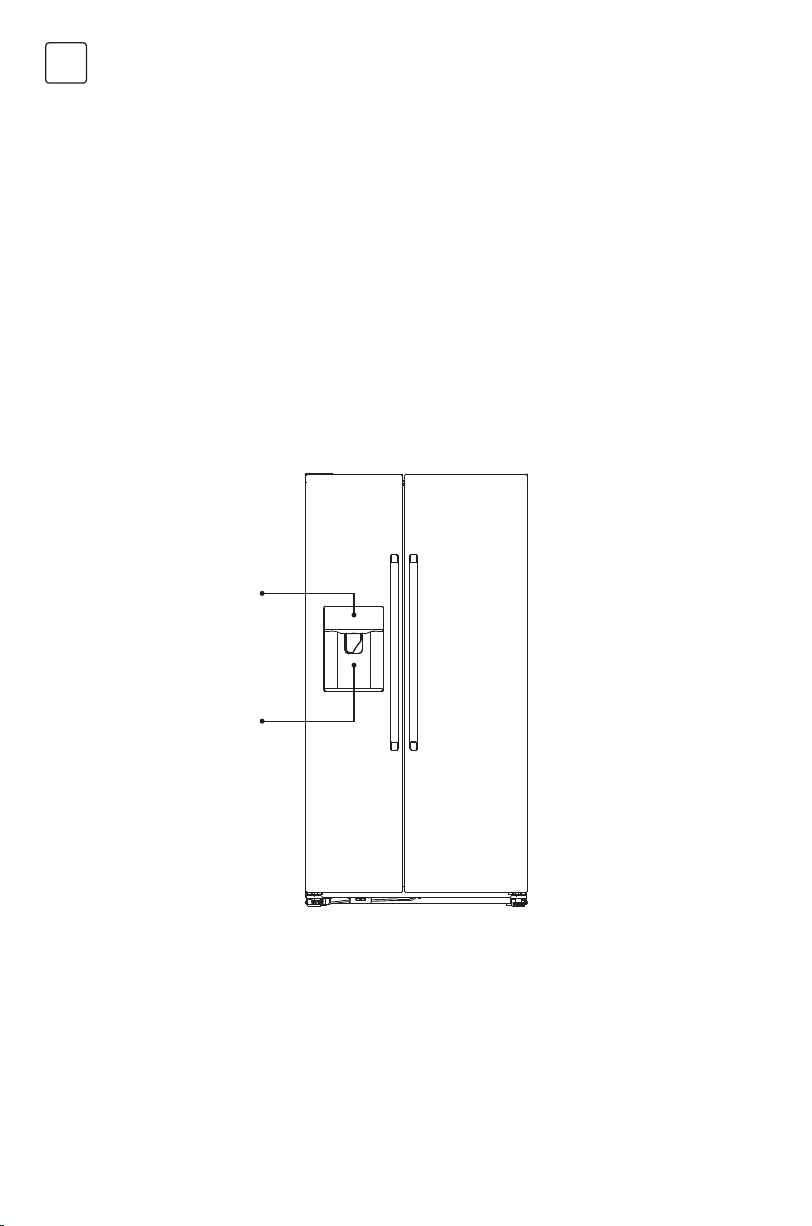
OVERVIEW
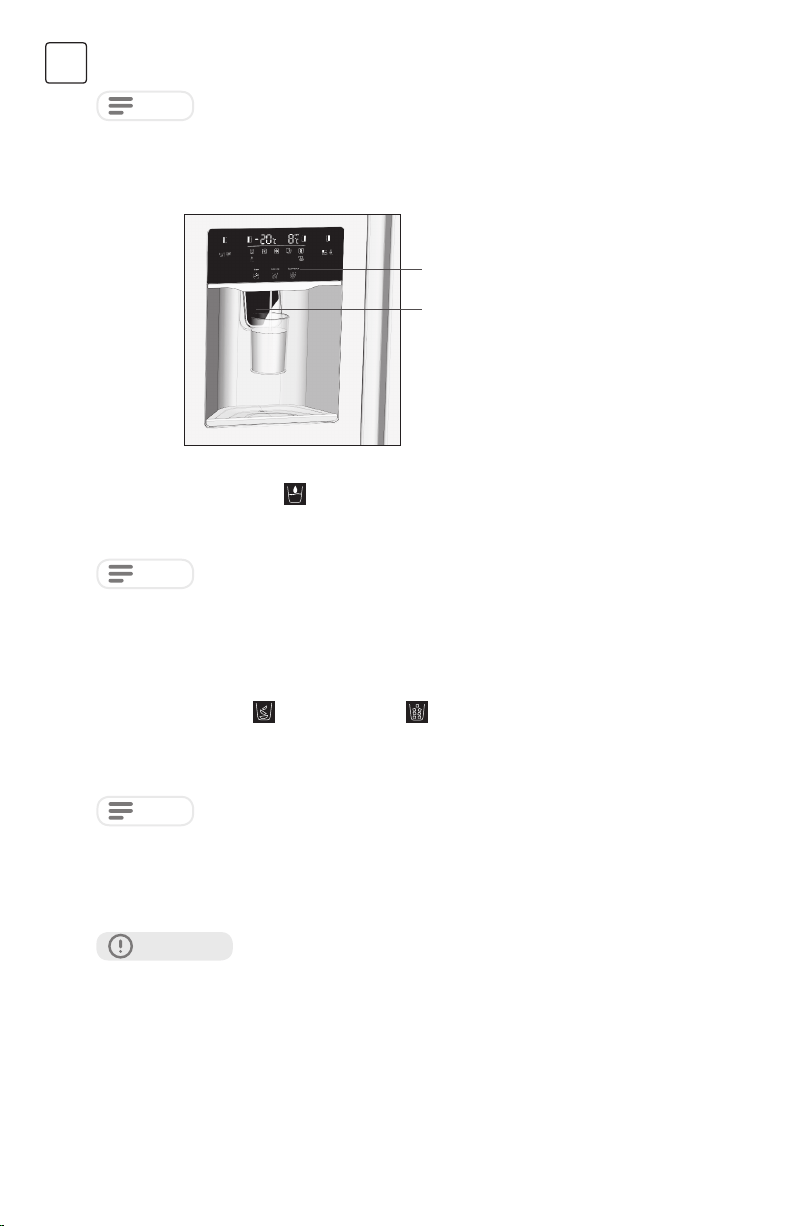
Control panel
Water/ ice
Dispenser
9
ENG
Note: Picture is for reference only.
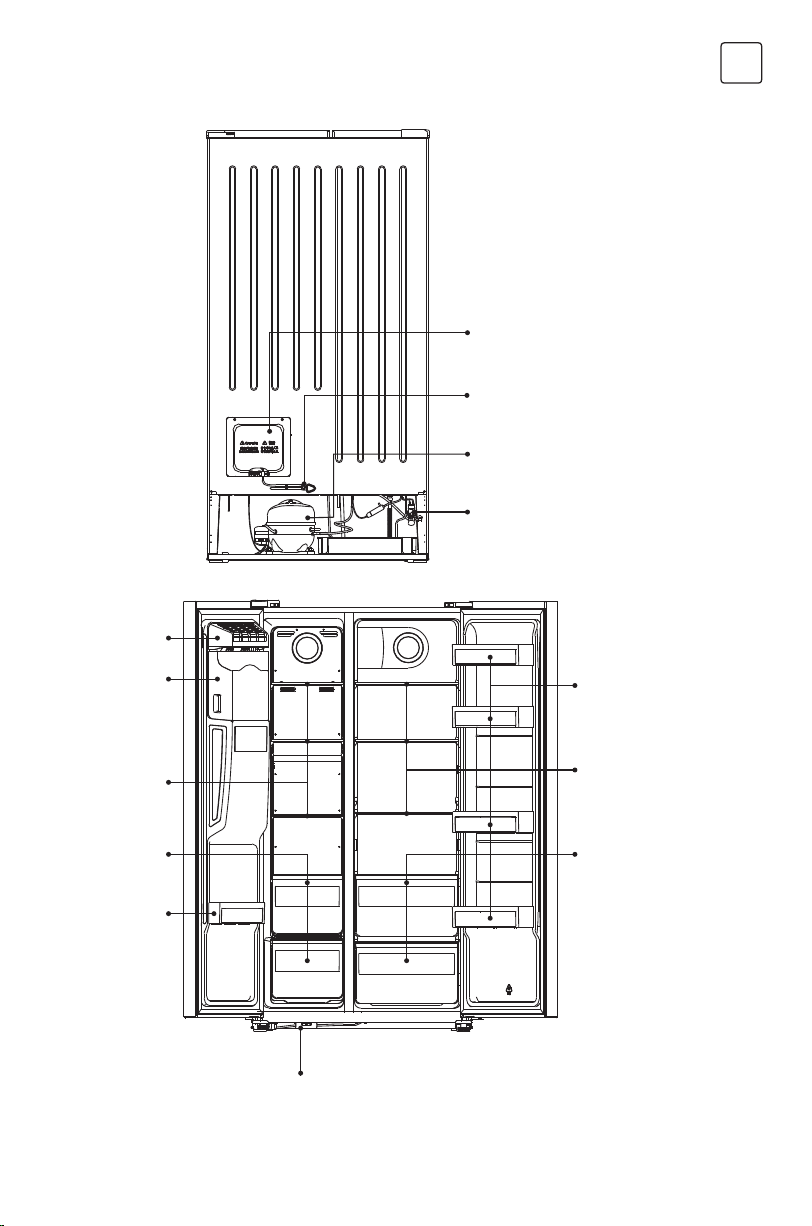
(Remove away the metal compressor room cover)
Main control board
Power cord
Compressor
External main water valve
Ice box cover
Ice storage box
Freezer shelves*3
Freezer drawers*2
Freezer balcony*1
Water pipe connector
Fridge crispers*2
Fridge shelves*3
Fridge balcony*4
10
ENG
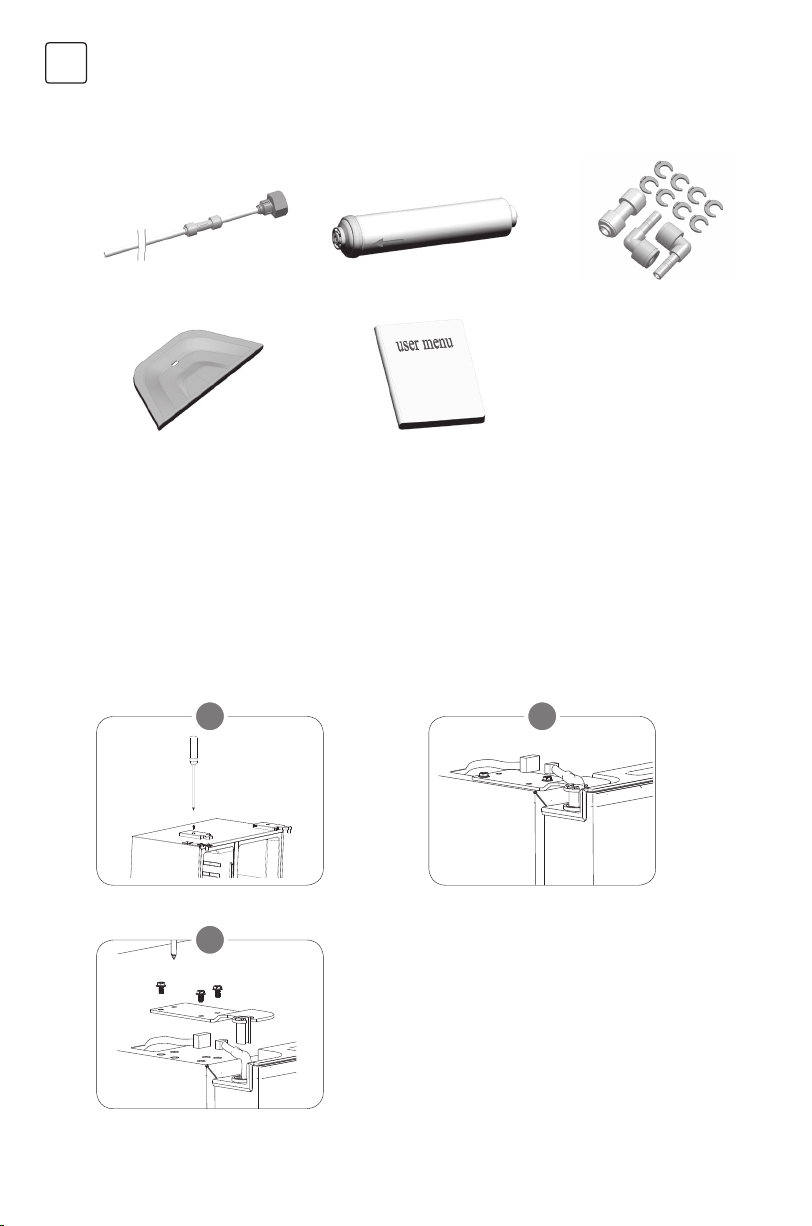
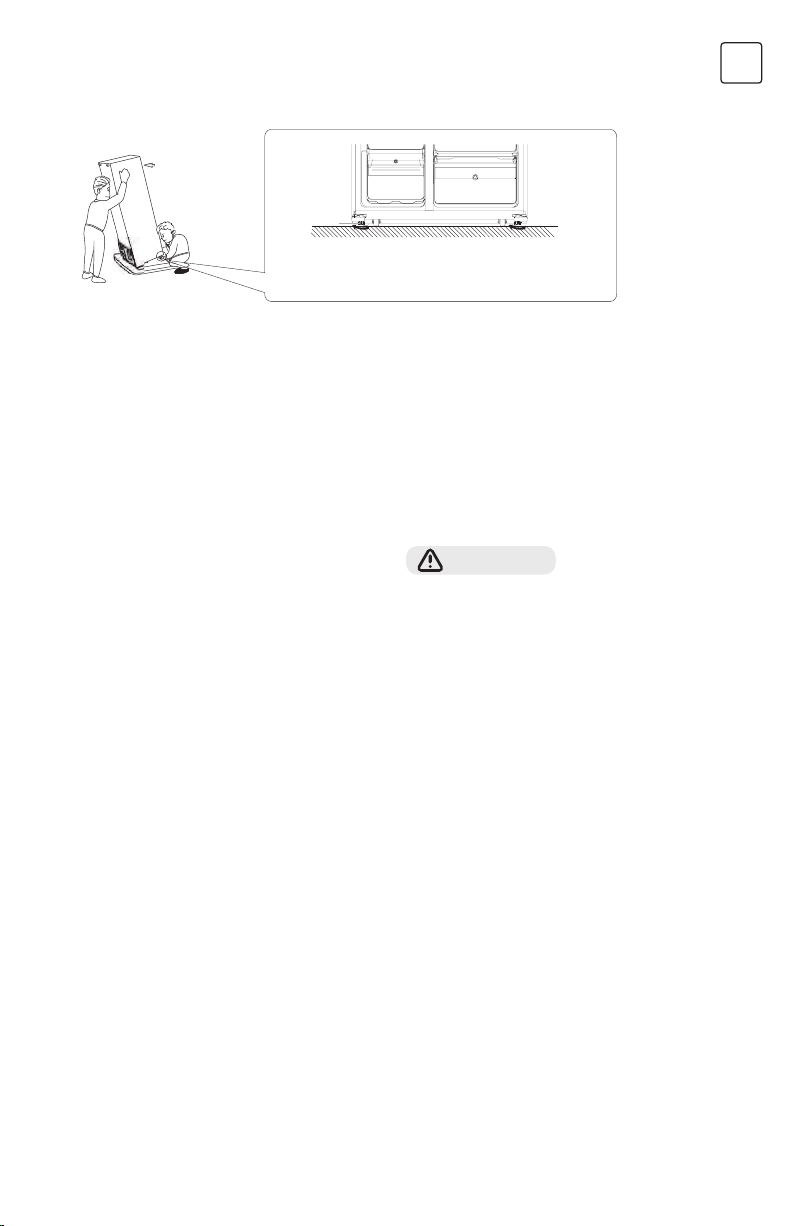
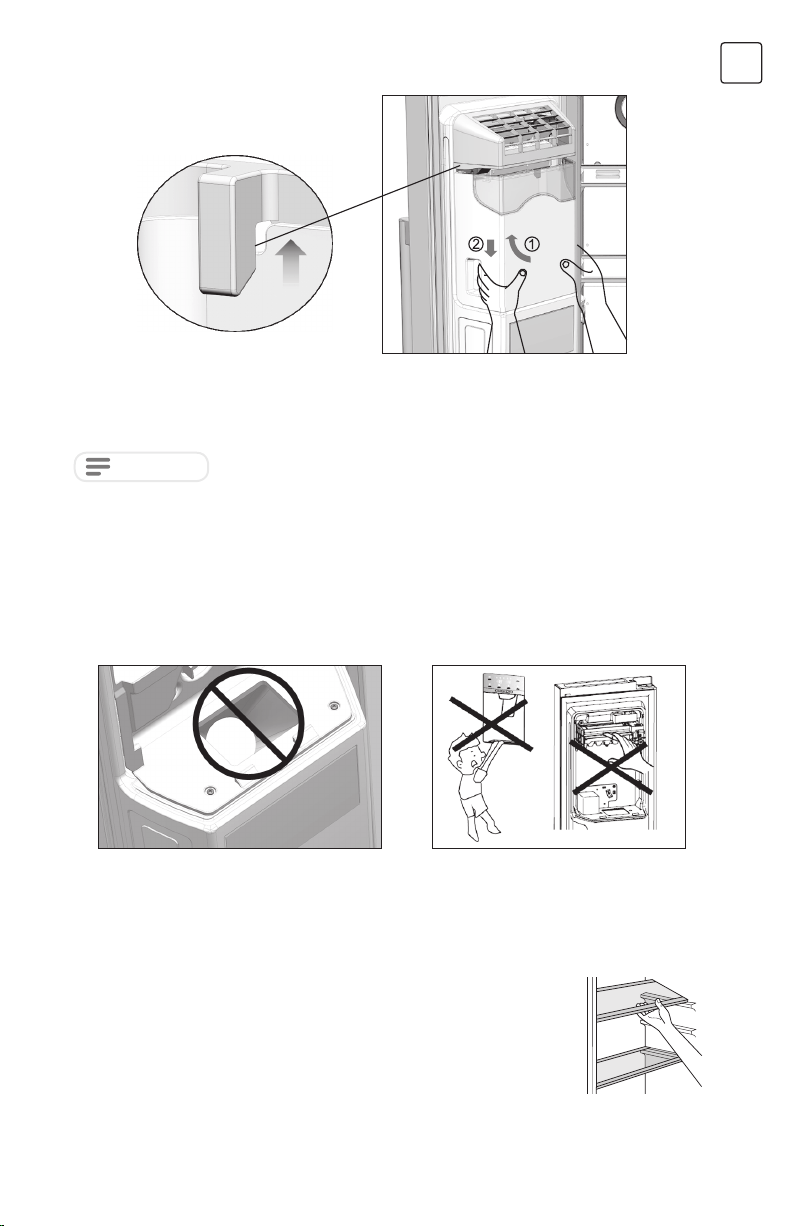
Remove the doors
Tool required: Philips screwdriver, Flat bladed screwdriver.
• Ensure the unit is unplugged and empty.
• To take the door off, it is necessary to tilt the unit backwards. You should rest the unit on something solid
so that it will not slip during the door reversing process.
• All parts removed must be saved to do the reinstallation of the door.
• Do not lay the unit flat as this may damage the coolant system.
• It’s better that 2 people handle the unit during assembly.
Unscrew hinge cover by Philips screwdriver. Disconnect the harness.
Unscrew top hinge.
1
3
2
INSTALLATION
Product accessories
Water pipe parts x1
Dispenser water tray x1
Water filter x1
User manual x1
Water pipe connector x1
Water filter connector x2
Anti-slip clips x8
11
ENG
Lift the door and place it on a soft pad. Then
remove another door as same process.
There is a water pipe connector at the bottom of the refrigerator freezer. Remove it from the protective
cover and disconnect from the water pipe, and remember to pull the water pipe out of the lower hinge.
5 6
Unscrew bottom hinges.
After the appliance is positioned! install the doors as reversed process.
4
7
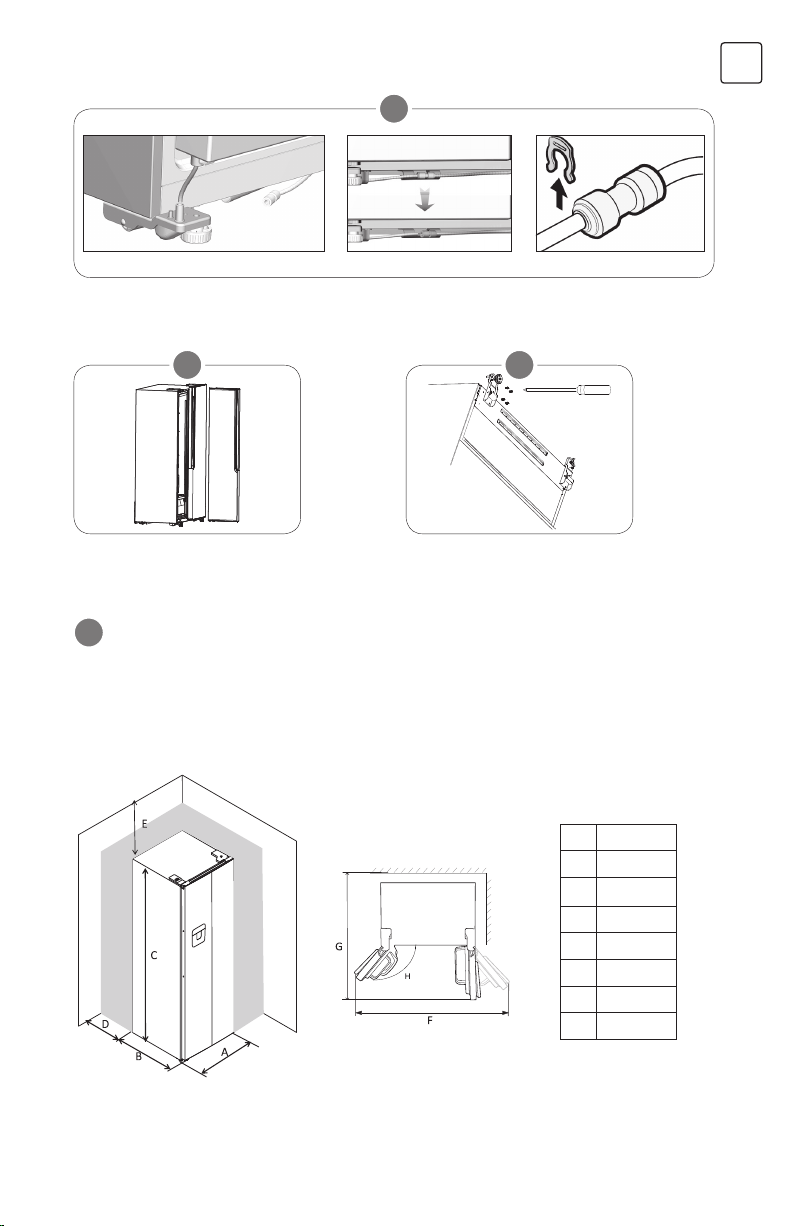
Space Requirement
• Keep enough space of door open.
• Keep at least 50mm gap at two sides and back.
A 900
B 660
C 1770
D min=50
E min=50
F 1800
G 1560
H 135°

12
ENG
Levelling the refrigerator
Positioning
Install this appliance at a location where the
ambient temperature corresponds to the climate
class indicated on the rating plate of the appliance:
For refrigerating appliances with climate class:
• extended temperate: this refrigerating
appliance is intended to be used at ambient
temperatures ranging from 10 °C to 32 °C (SN);
• temperate: this refrigerating appliance is
intended to be used at ambient temperatures
ranging from 16 °C to 32 °C (N);
• subtropical: this refrigerating appliance is
intended to be used at ambient temperatures
ranging from 16 °C to 38 °C (ST);
• tropical: this refrigerating appliance is intended
to be used at ambient temperatures ranging
from 16 °C to 43 °C (T);
Location
The appliance should be installed well away
from sources of heat such as radiators, boilers,
direct sunlight etc. Ensure that air can circulate
freely around the back of the cabinet to ensure
best performance. If the appliance is positioned
below an overhanging wall unit, the minimum
distance between the top of the cabinet and
the wall unit must be at least 100 mm. Ideally,
however, the appliance should not be positioned
below overhanging wall units. Accurate leveling is
ensured by one or more adjustable feet at the base
of the cabinet.
This refrigerating appliance is not intended to be
used as a built-in appliance.
WARNING!
It must be possible to disconnect the appliance
from the mains power supply; the plug must
therefore be easily accessible after installation.
Electrical connection
Before plugging in, ensure that the voltage and
frequency shown on the rating plate correspond
to your domestic power supply. The appliance
must be grounded. The power supply cable plug
is provided with a contact for this purpose. If the
domestic power supply socket is not grounded,
connect the appliance to a separate grounder in
compliance with current regulations, consulting a
qualified electrician.
The manufacturer declines all responsibility if the
above safety precautions are not observed. This
appliance complies with the E.E.C. Directives.
Doors
- Clockwise rotate feet to highten them by hand
- Anticlockwise rotate feet to lower them by hand
13
ENG
DAILY USE
IMPORTANT!
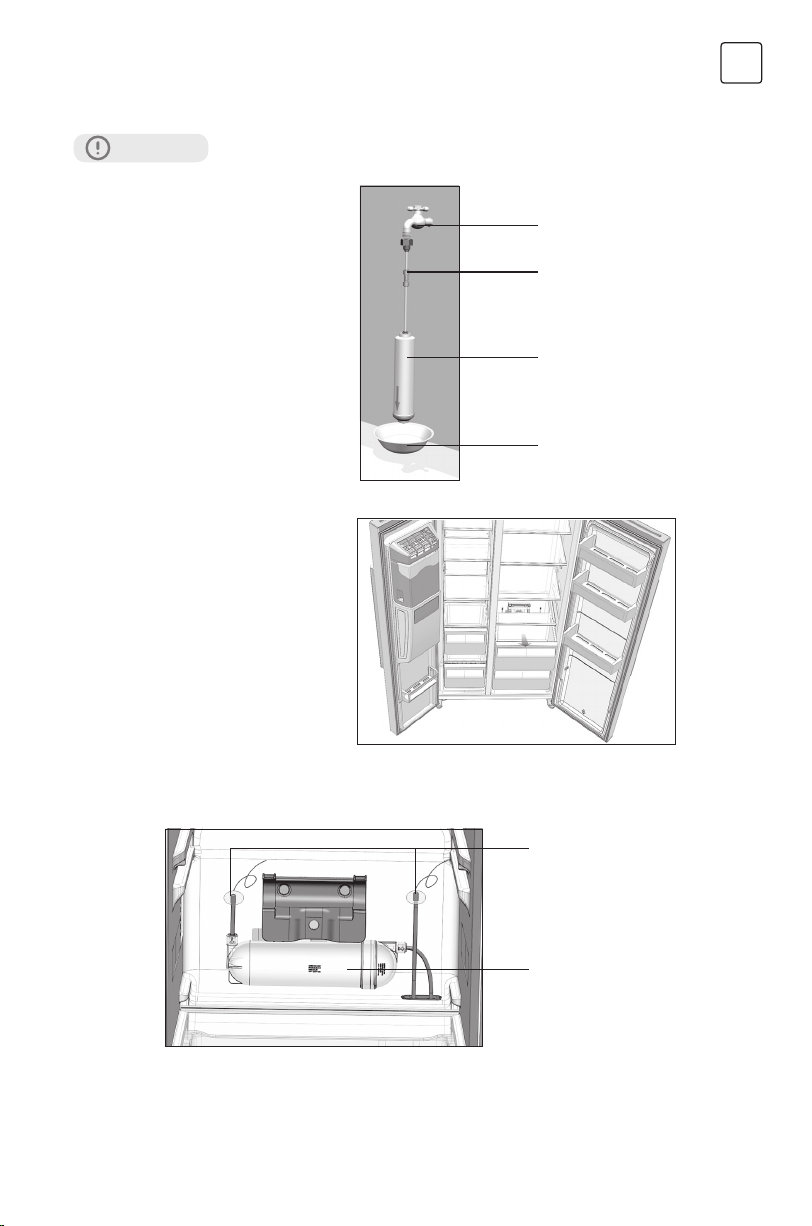
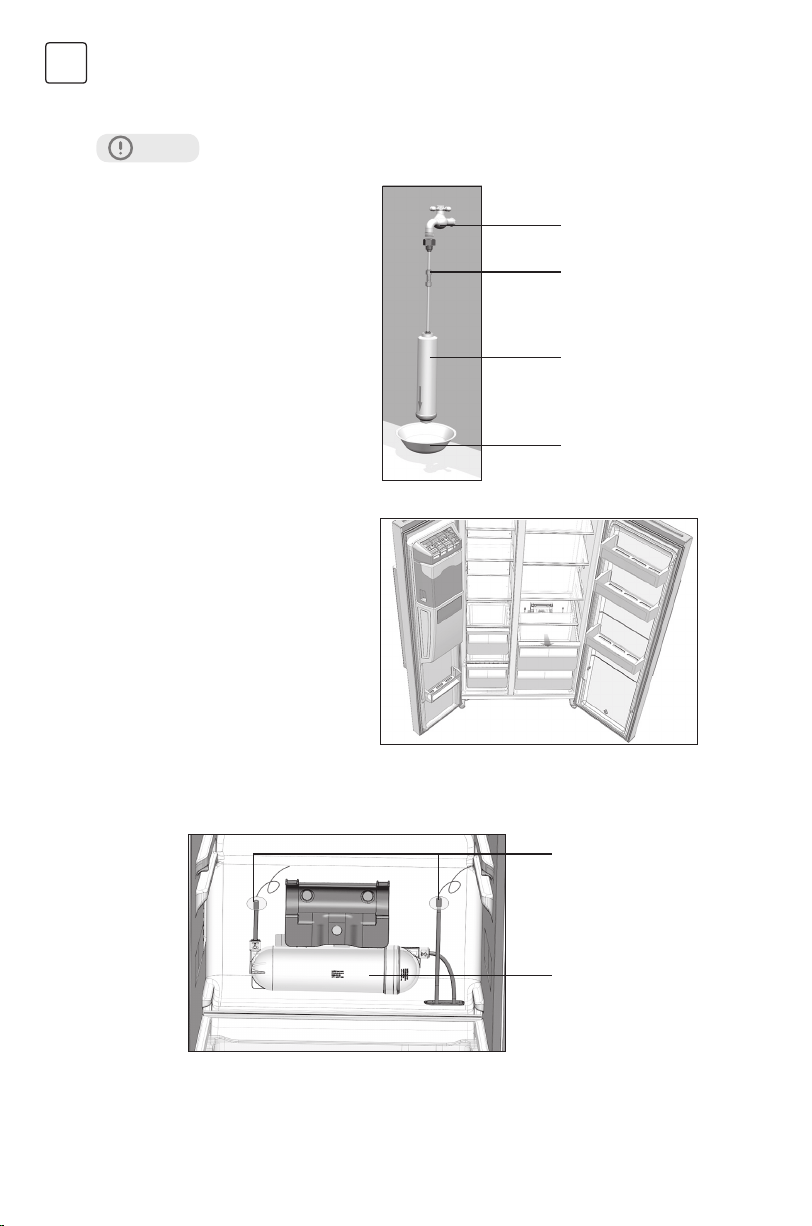
How to install the water filter and water pipe
Water source
Connect tube
Filter
Basin
1. Before installing, the filter should be
rinsing with water for 5 minutes or 5L of
water to ensure that the toner in the filter
is rinsed clean.
2. Open the refrigerator door and take out
the crispers.
3. Take out the rubber plugs on both sides of the water box.
Rubber plugs
Water box
14
ENG
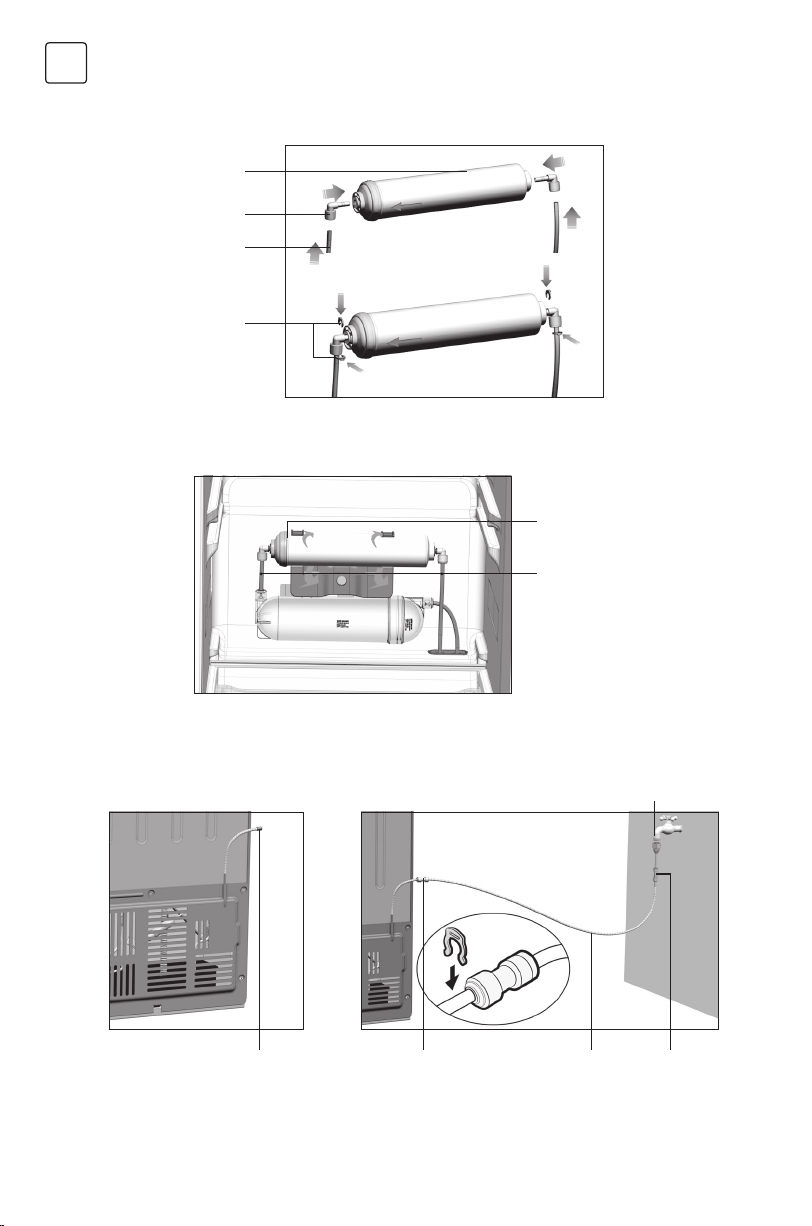
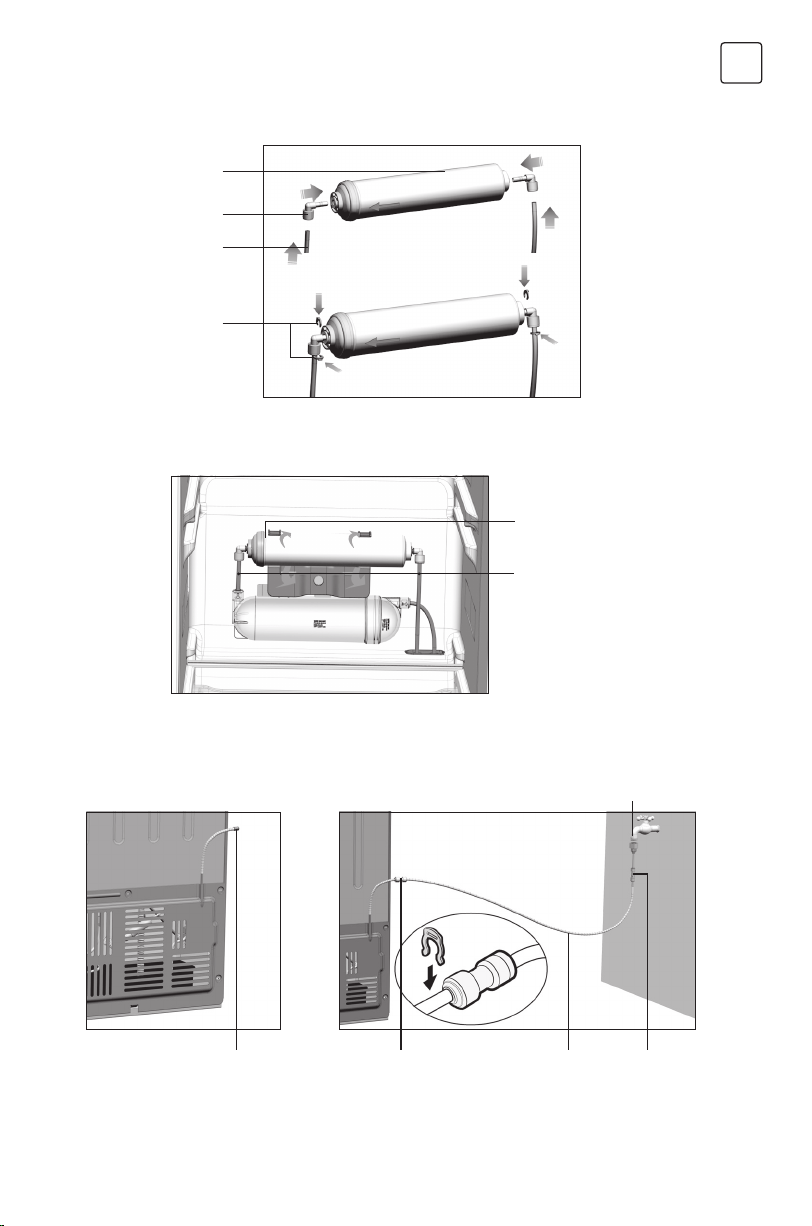
4. Take out the water filter from the accessory bag, insert the connectors on both sides of the filter, then
connect the water pipe and clamp into the anti-slip clips (pay attention to the direction of the filter arrow)
5. Assemble the water filter parts with retaining bracket above the water box, and connect the water pipes
of water box with water filter.
6. Take off the rubber plug. Connect the water pipe part to the main valve on the compressor cover with
connector, and remember to insert the anti- slip clips, then connect the end of the water pipe with the
nut to the water source.
Water filter
Connectors
Water pipes
Anti-slip clips
Fix the water filter parts
Connect the water pipes
of water box with filter
Water source
Take off the rubber plug Connect the water pipe with
connector,and remember to
insert anti-slip clips on both
side of connector.
Water pipe Connect the end
of the water pipe
with the nut to the
water source
15
ENG
CAUTION!
• The external water source must be clean and the water pressure should be 1.5~7 bar to guarantee
proper working.
• Check the water pipe connection, check whether there are any other things inside the ice making
machine and ice storage box.
• After accessing the water source, open the faucet and check whether there is leakage between the
faucet and the connecting pipe. If there is leakage, check the connection of the pipe.
• Select the water function, use a large cup to press the dispenser, keep the water exhausting for 5
minutes until the water is clean and smooth, during the process the water taken out is not drinkable.
• Select the function of taking ice and breaking ice, use a large cup to press the dispenser, and check the
normal operation of the internal motor through the sound judgment.
• Wait for 3 minutes and check whether the water inlet valve of the refrigerator, the water pipe connectors
and water filter are leaking or not.
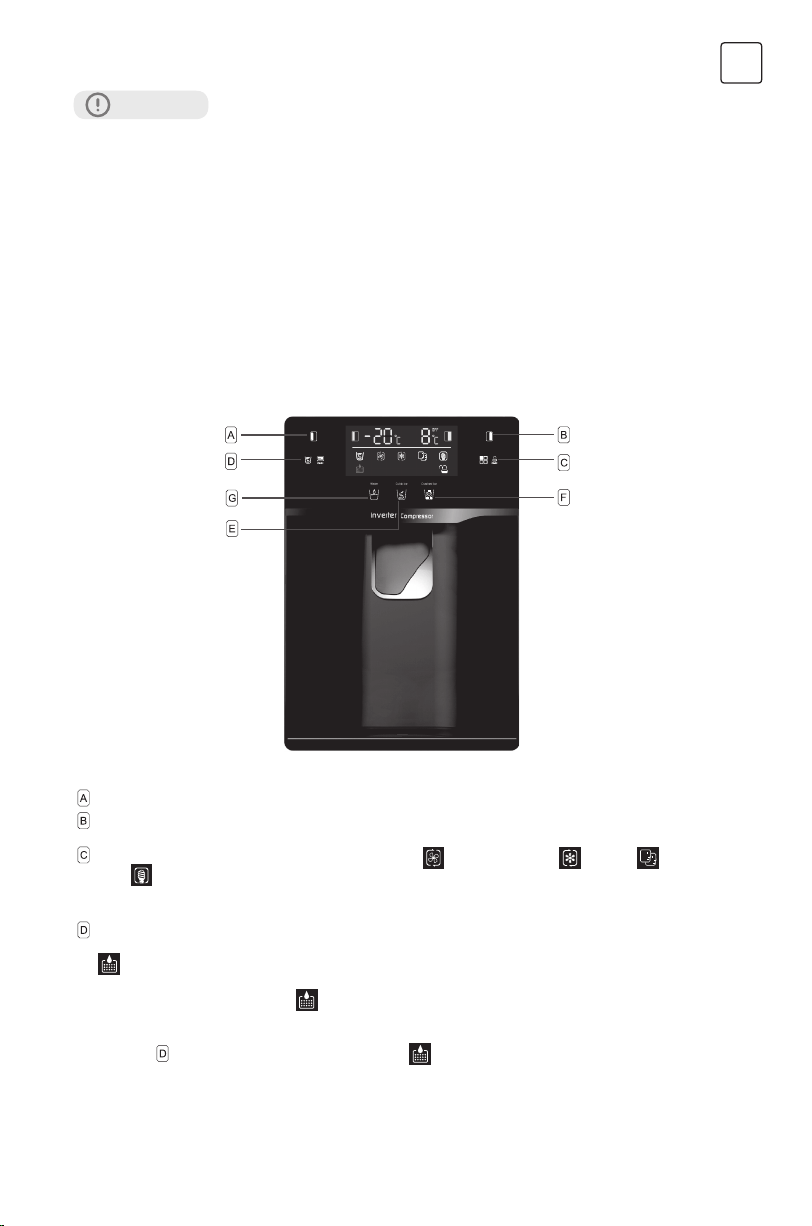
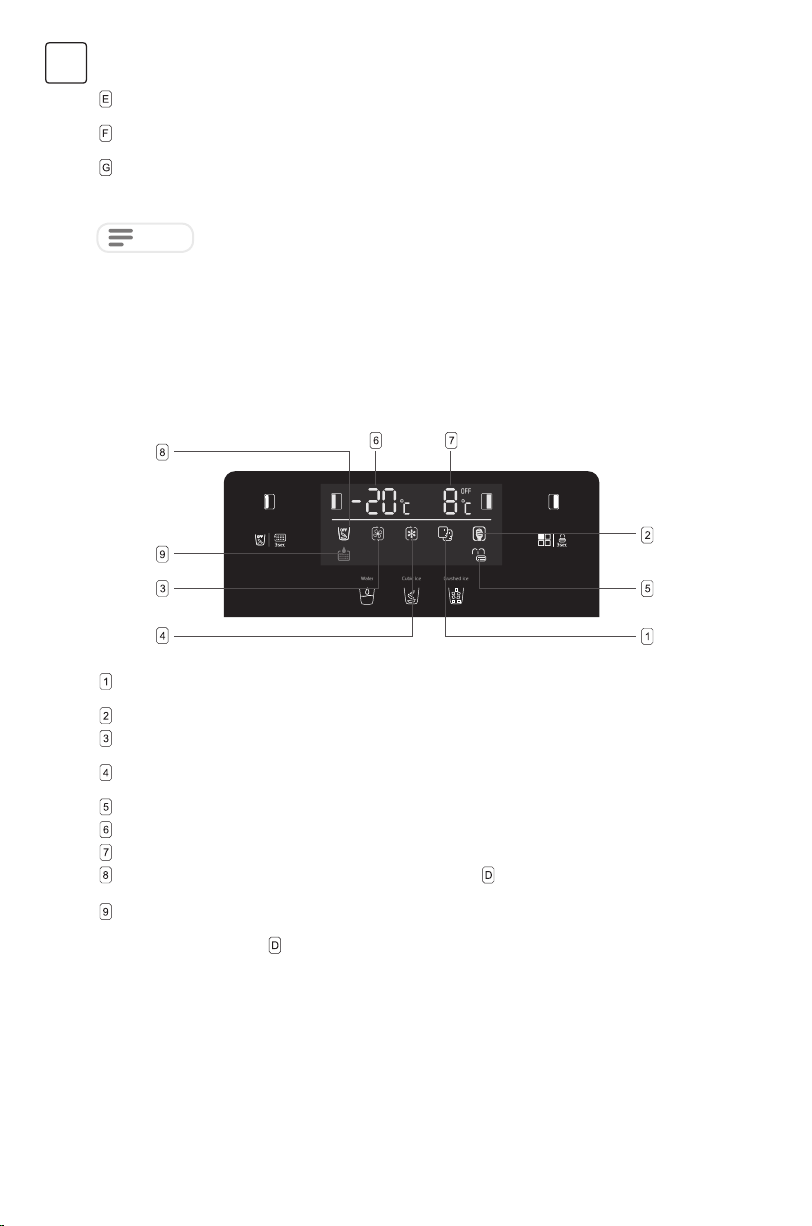
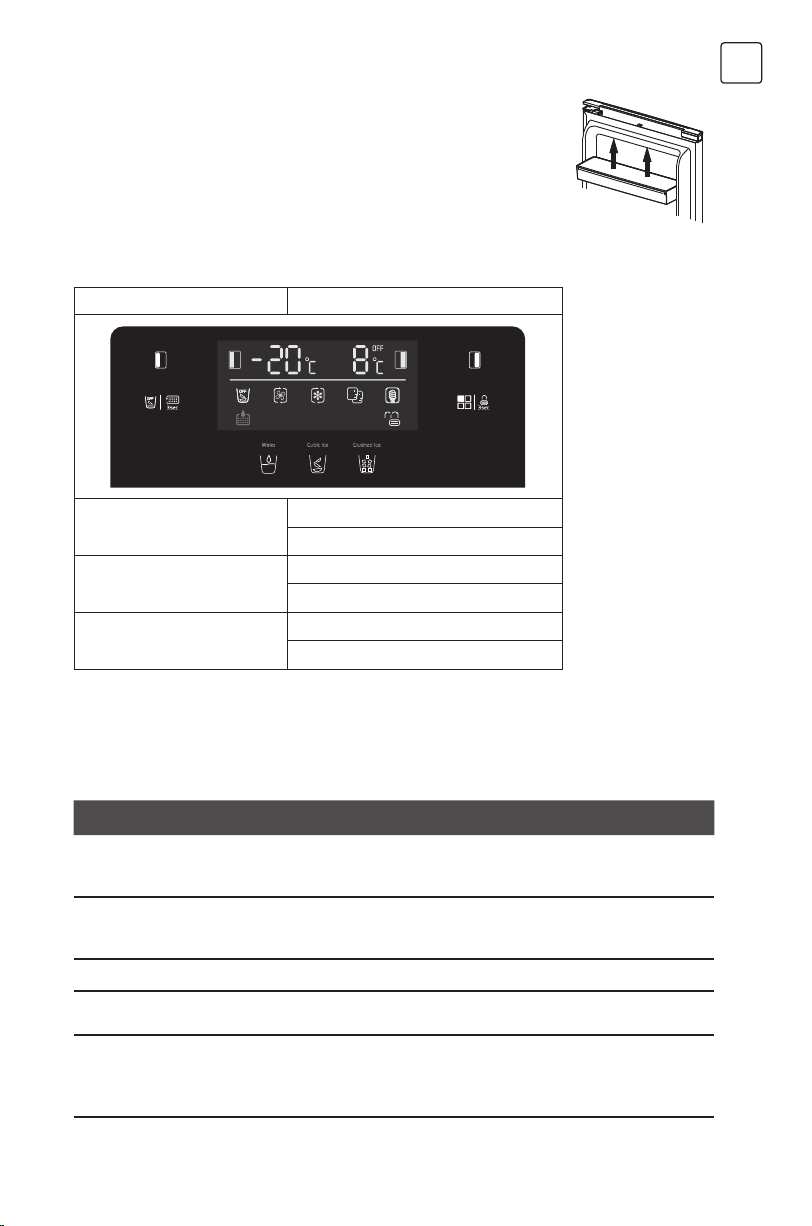
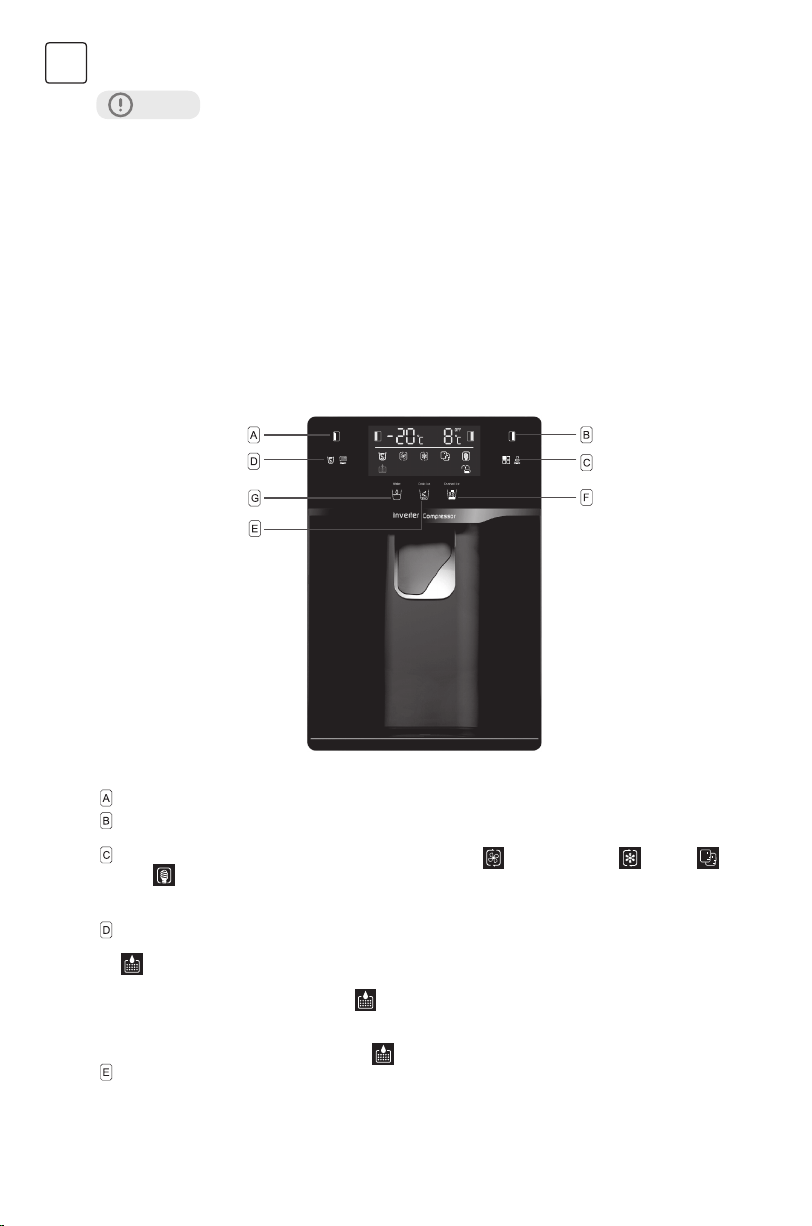
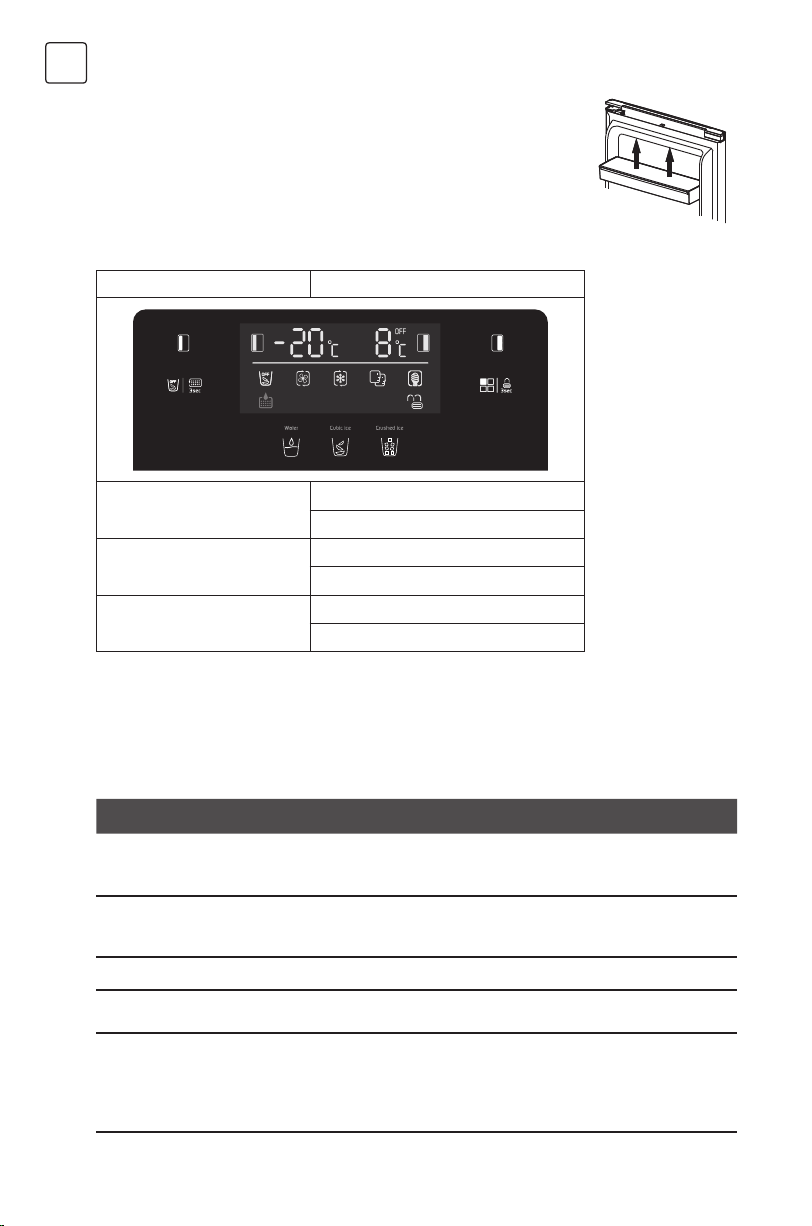
Using the Control Panel
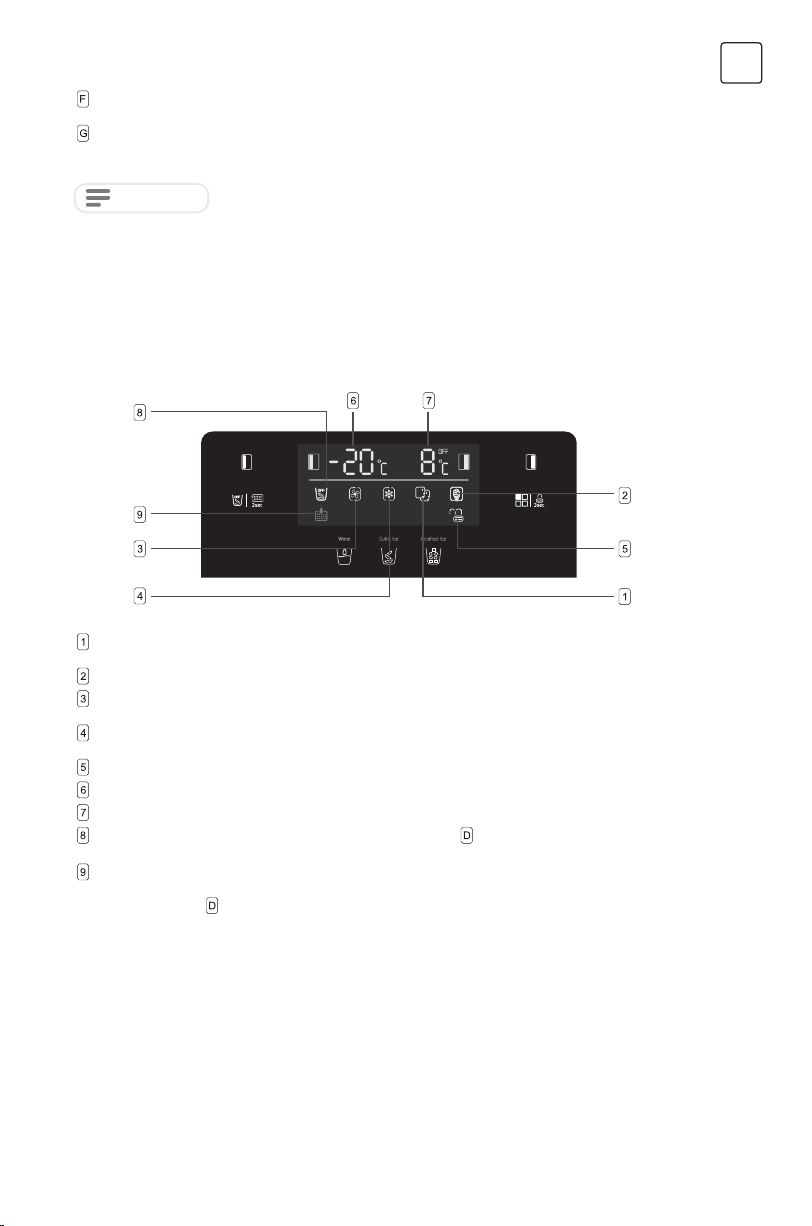
Buttons
Press to adjust temperature of freezer compartment (left side) from -14°C to -22°C.
Press to adjust temperature of fridge compartment (right side) from 2°C to 8°C and “OFF”. If select
“OFF”, fridge compartment will be turned off.
Press to select running mode from SUPER COOLING , SUPER FREEZER , SMART ,
ECO
and USER’S SETTING (no symbol in display).
Press 3 SEC. button and hold for 3 seconds to lock other bottons.
Press it and hold for 3 second to unlock other bottons.
Press the ice off button to control the ice maker. If you want to close the ice maker, press this
button, then the product will stop making ice until you press this button again.
“ change your water filter”.
In general, you should need the water filter every 6 months to ensure the highest water quality.
After half a year, the display icon
will be lit up for reminding you should replace a new water
filter. You can purchase a new water filter from the retailer where you buy the refrigerator or the
after-sales system. After you finish replacing a new water filter inside the refrigerator, you should
Press this
button and hold for 3s, the display icon will be extinguished, and the water filter
will be reset.
16
ENG
Press this button to receive cubed ice. You can press this button to choose the type of ice to be
dispensed.
Press this button to receive crush ice. You can press this button to choose the type of ice to be
dispensed.
Press this button to receive cooling water. You can press this button to choose cooling water to
be dispensed.
NOTE
• When the freezer door is opened or child lock is on, the dispenser will not work. you need to close the
door or unlock the child lock to receive the cubed ice, crushed ice, cooling water you want.
• You don’t need ice, turn the function off to save energy.(see ice off above)
• If water is not dispensed or dispensed slowly, you need to replace the water filter because it may
become clogged.
• Some areas have large amounts of lime in the water, which causes the water filter to clog more quickly.
Display
SMART mode, the refrigerator sets the temperature of two compartments automatically
according to internal temperature and ambient temperature.
ECO mode, the refrigerator runs in lowest energy consumption setting.
SUPER COOLING cools the fridge compartment to the lowest temperature for approx. 2 hours.
Then the temperature set before super mode is automatically restored.
SUPER FREEZING cools the freezer compartment to the lowest temperature for approx. 6 hours.
Then the temperature set before super mode is automatically restored.
LOCK, the symbol will light on if buttons are locked.
Display the setting temperature of freezer compartment.
Display the setting temperature of fridge compartment.
ICE OFF mode, the symbol will light on when you touch the button to close the ice maker, it
means the refrigerator will stop making ice any more.
REMIND CHANGING WATER FILTER mode, the symbol will light on when the water filter has
been used for 6 months to remind you replace a new water filter in time. Until you replace a new
filter and keep press the
button for 3s, the symbol will be extinguished.

17
ENG
NOTE
• ECO mode: Select this mode when you want to save power.
• Super cooling mode: This mode allows you to cool foods quickly and will be automatically deactivated
after hours of operation.
• Super freezing mode: This mode allows you to freeze foods quickly and will be automatically
deactivated after 50 hours of operation.
Door Open Alarm
First use
Door Open Alarm
When any door is left open or not closed completely for about 60 seconds, the appliance will sound
an alarm. Close the fridge door then the alarm will stop.
If the door is not well closed, then the alarm will sound 5 times every 30 seconds untill the doors are
If doors are open for 10 continuous minutes without closing, the internal LED light would be turned
off automatically.
Child safety lock
This function is designed to prevent children from operating the appliance.
• To activate the function, press and hold
for about 3 seconds. The lock indicator light
will illuminate indicating the safety lock function is activated.
• To deactivate the function, press and hold
for about 3 seconds. The unlock indicator light
will illuminate indicating the safety lock function is deactivated.
Cleaning the interior
Before using the appliance for the first time, wash the interior and all internal accessories with lukewarm
water and some neutral soap so as to remove the typical smell of a brand new product,
then dry thoroughly.
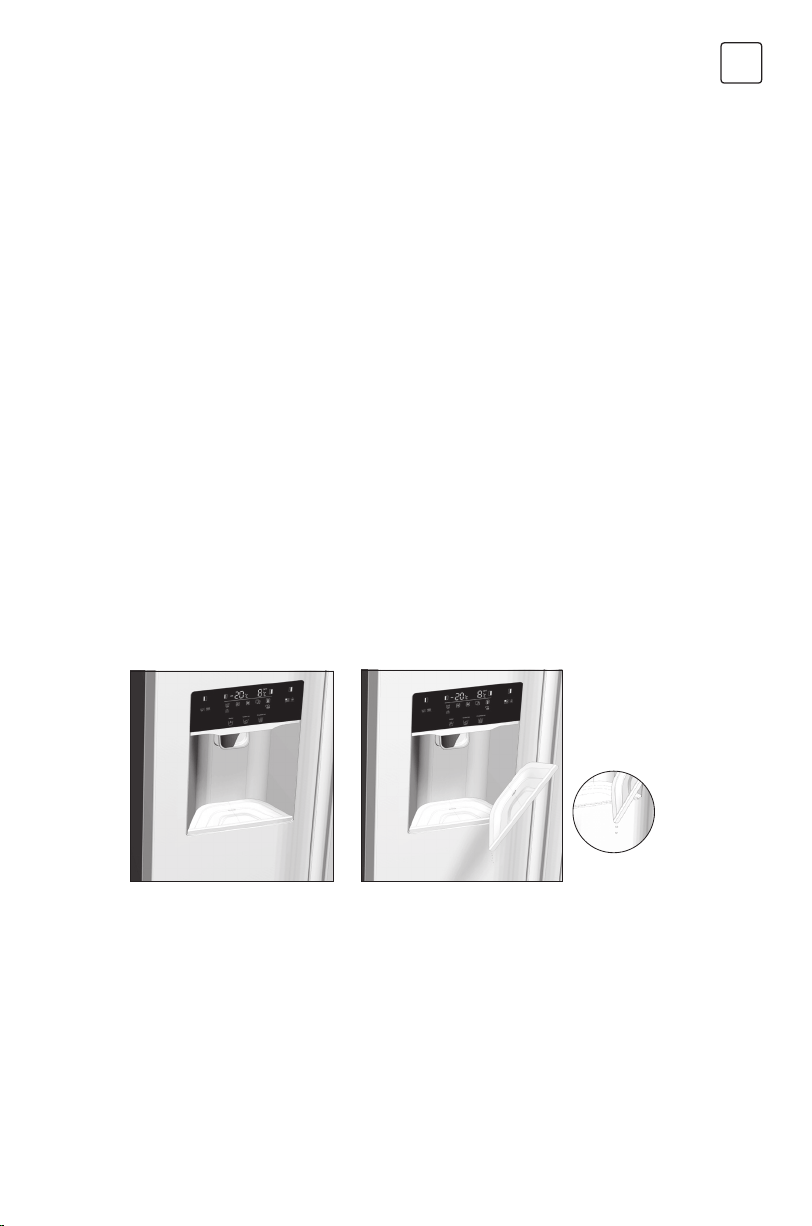
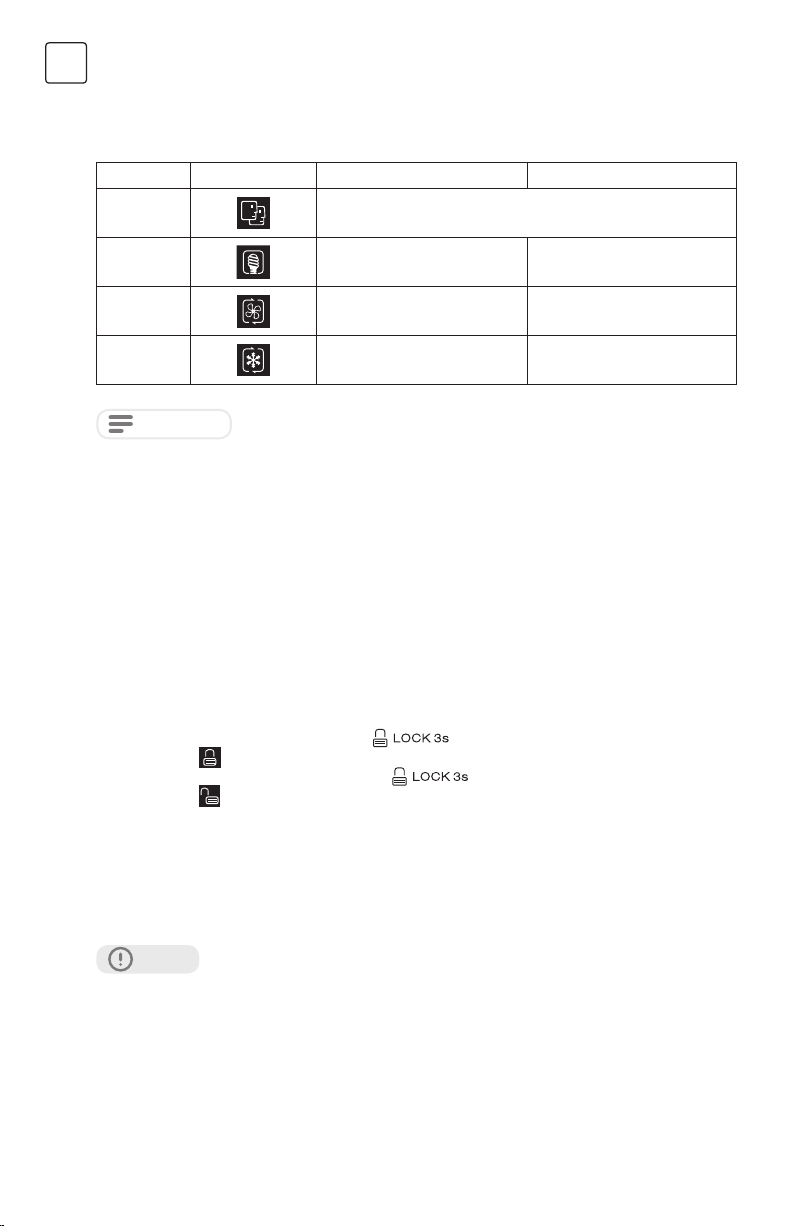
How to use the dispenser?
You can get cubed ice, crushed ice and cooling water by pressing the paddle switch, which is selected by
displaying the operation panel;
Do not use detergents or abrasive powders, as these will damage the finish.
If one door keeps open for 60 seconds, periodical alarm will be arisen until the door is closed .
Mode Indicator light Freezer temperature display Fridge temperature display
Smart
The temperature display for freezer and fridge will change
based on ambient temperature (see the table below).
ECO
-15°C +8°C
Super
cooling
No change +2°C
Super
freezing
-25°C No change
IMPORTANT!
18
ENG
NOTE
If the paddle switch is pressed continuously for more than 3 minutes, the dispenser will stop working to
protect the electrical components. If you need more cooling water or ice, you can release the paddle
switch and press it again to get more water or ice as you want.
Get cooling water
Select the cooling water mode
, place the cup in the middle of the paddle switch, press the paddle
switch to receive water, and stop pressing the paddle switch after taking an appropriate amount of
water, and the water will stop flowing automatically.
NOTE
• Wait for 2 seconds before taking the cup away to avoid the water splash out.
• If cooler water is needed, fill the glass with ice before taking;
• If more than 800ml of water is taken at one time, water with high temperature may be taken out. In this
case, it is recommended to wait half an hour for a cold drink;
Get ice
Select the cube ice mode
or crushed ice mode to get ice type as you want.
Place the cup in the middle of the paddle switch, press the paddle switch to receive ice, and stop
pressing the paddle switch after taking an appropriate amount of ice, and the ice will stop flowing
automatically.
NOTE
• Wait for 2 seconds before taking the cup away to avoid the ice splash out.
• To prevent ice from falling out of the cup, place the cup as close to the dispenser outlet as possible.
• When taking ice, the internal motor runs to churn ice and break ice, which may produce some noise.
• After taking ice, please use it as soon as possible to avoid melting ice.
Cubed ice, crushed ice, cooling water mode
Paddle switch
IMPORTANT!
This section tells you how to avoid most issues you would happen. We recommend that you read through
them carefully before using the appliance.
1. When taking water for the first time or not taking water for a long time, please take out 1~2L of water
and pour it away;
2. When using the ice maker for the first time or not using it for a long time, the first box of ice cubes
should not be used;
3. It is recommended to use a cup with a diameter of more than 70mm to take water and ice;
4. Do not use fragile containers to take ice cubes, so as to avoid damage caused by broken containers;
19
ENG
5. Do not put your hands or tools into the opening part of the distributor, so as to avoid causing failure
to the internal mechanism;
6. Do not pull the paddle switch too much force, so as to avoid the failure of the paddle switch;
7. The ice maker automatically makes ice without manual operation. When the ice storage box is filled
with ice (about 1.6kg), the ice maker automatically stops making ice;
8. In the smart mode, the daily ice production capacity of the refrigerator is about 1.2kg;
9. When the freezer door is open, the ice water distributor is locked and cannot carry out water or ice;
10. When the freezer door is open, if the ice maker is performing the making ice procedure, some ice will
fall into the ice storage box.
11. If the ice is not discharged smoothly, please check whether the ice outlet of the distributor is blocked
by ice. If so, clean up the ice before taking it;
12. After the refrigerator is powered on in the first time, turn on the ice maker, the ice maker will start
making ice about 10 hours later;
13. During the process of using, you may hear the sound of water valve opening, water flowing and ice
falling, which is normal;
14. If you are on vacation or do not need ice cubes for a long time, please turn off the ice making function
and take out the ice cubes in the ice box to avoid the ice cubes become frozen together to block the
outlet.
15. In case of power failure, please clean the food in the refrigerator in time, and clean the ice in the ice
storage box to avoid ice melting.
16. Do not eat the ice cubes when they have odor. Check if the filter has expired or if there are unsealed
foods with pungent odor in the refrigerator.
How to clean and care the dispenser?
Use a soft towel to clean the refrigerator and ensure to disconnect the power supply before cleaning it.
Please use clean water when cleaning, do not use benzene, diluent, sodium hypochlorite, abrasive,
bleach and other chemical reagents. Do not spray detergent directly on the display screen, otherwise
the printed text on the display screen may fall off.
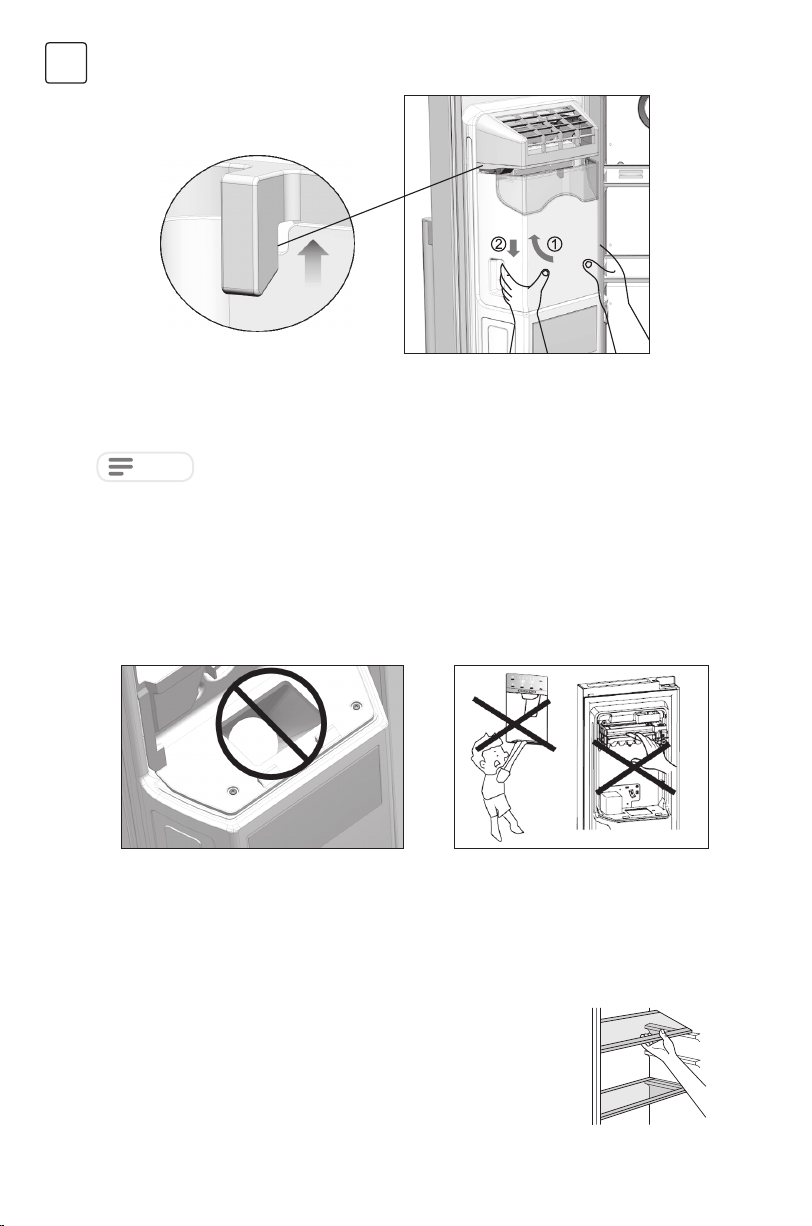
1. Take down the water box of the distributor regularly and pour out the water inside, and wipe it clean.
2. Clean the ice storage box regularly
If the ice is not used for a long time or the freezer door is frequently opened, the ice in the ice storage
box may melt and became frozen together, which makes the distributor outlet blocked. The ice in the
ice storage box needs to be removed manually.
When cleaning the ice storage box, it is necessary to turn off the ice maker function to avoid the ice
falling into the refrigerator or the floor.
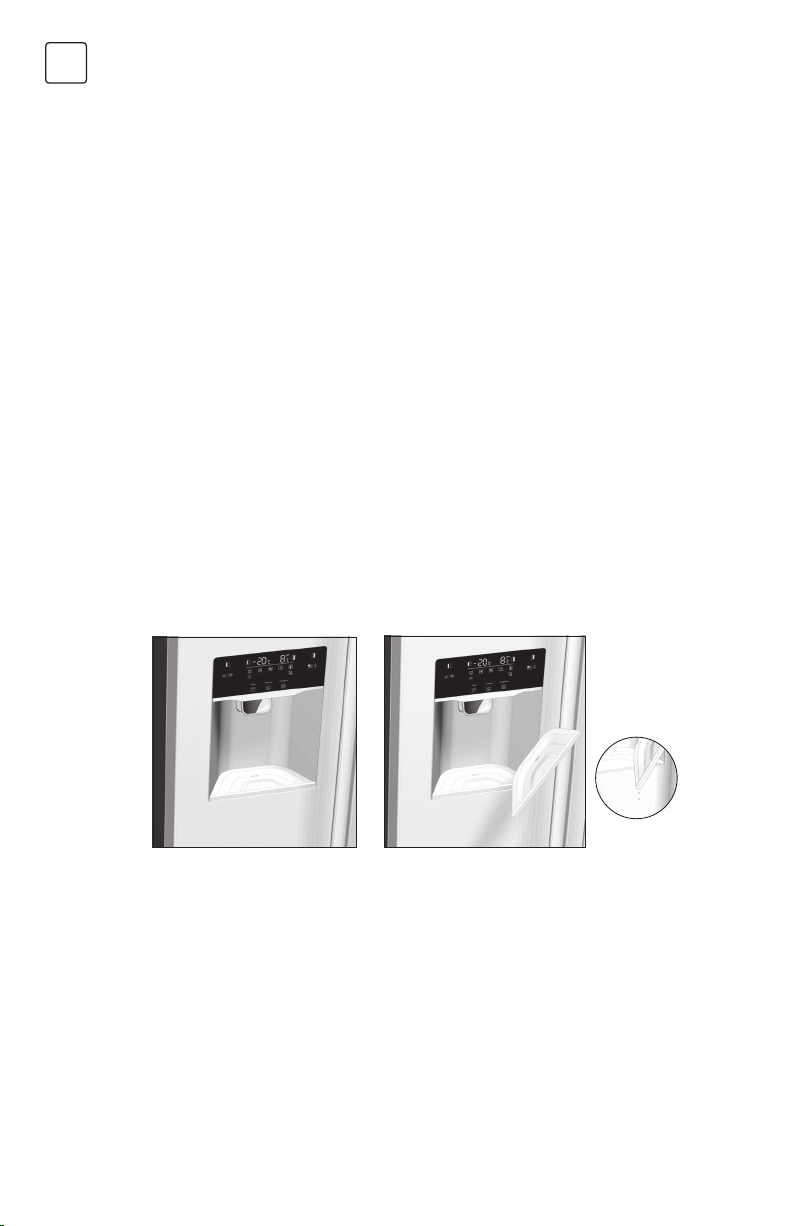
3. How to assemble and disassemble the ice storage box
Grasp the ice storage box with both hands on the buckle, lift the ice storage box up about 10mm with
a little force, and then drag the ice storage box out of the fixed buckle;
20
ENG
After taking out the ice storage box, take out the internal ice manually and carefully, and then clean
with clean water.
After cleaning the ice storage box, install it as reversed process.
NOTE
• Do not use acid, chemical solvents (alcohol, dishwashing liquid) and other scrubbing;
• After cleaning, it is necessary to dry the ice box thoroughly before installing in the refrigerator to avoid
ice freezing;
• Use a clean towel to clean the ice outlet, do not press the internal structure with too much force to avoid
damaging the internal mechanism;
• Do not place anything else in the ice outlet to avoid blocking the ice outlet;
• Do not allow child to climb on the refrigerator, or it may fall down to hurt people.
• Do not put your fingers, hands, or any other unsuitable objects in the ice chute or ice bucket. This can
cause personal injury or material damage.
Thawing
• Deep-frozen or frozen food, prior to be used,
can be thawed in the fridge compartment or
at room temperature, depending on the time
available for this operation.
• Small pieces may even be cooked still frozen,
directly from the freezer. In this case, cooking
will take longer.
Ice-cube
This appliance may be equipped with one or more
ice-cube to produce ice.
Accessories
Movable shelves
The walls of the refrigerator are equipped with
a series of runners so that the shelves can be
positioned as desired.
21
ENG
Environment Temperature Temperature Setting
Summer
Fridge set on 4°C
Freezer set on -18°C
Normal
Fridge set on 4°C
Freezer set on -18°C
Winter
Fridge set on 4°C
Freezer set on -18°C
Temperature setting recommendation
Positioning the door balconies
To permit storage of food packages of various sizes, the door
balconies can be placed at different heights. To make these
adjustments proceed as follows: gradually pull the balcony in the
direction of the arrows until it comes free, then reposition as required.
Daily use
Position different food in different compartments according to be below table
Refrigerator compartments Type of food
Door or balconies of fridge
compartment
• Foods with natural preservatives, such as jams,juices, drinks,
condiments.
• Do not store perishable foods.
Crisper drawer
• Fruits, herbs and vegetables should be placed separately in the
crisper bin.
• Do not store bananas, onions, potatoes, garlic in the refrigerator.
Fridge shelf – middle • Dairy products, eggs
Fridge shelf – top
• Foods that do not need cooking, such as ready-to-eat foods, deli
meats, leftovers.
Freezer drawer(s)/shelf
• Foods for long-term storage.
• Bottom drawer/shelf for raw meat, poultry, fish.
• Middle drawer/shelf for frozen vegetables, chips.
• Top drawer/shelf for ice cream, frozen fruit, frozen, baked goods.
Information above give users recommendation of temperature setting.
22
ENG
Impact on Food Storage
• Under Recommended setting, the best storage time of fridge is no more than 3 days.
• Under Recommended setting, the best storage time of freezer is no more than 1 month.
• The best storage time may reduce under other settings.
Hints for freezing
To help you make the most of the freezing process,
here are some important hints:
• the maximum quantity of food which can be
frozen in 24 hrs. is shown on the rating plate;
• the freezing process takes 24 hours. No further
food to be frozen should be added during this
period;
• only freeze top quality, fresh and thoroughly
cleaned, foodstuffs;
• prepare food in small portions to enable it to
be rapidly and completely frozen and to make it
possible subsequently to thaw only the quantity
required;
• wrap up the food in aluminum foil or polythene
and make sure that the packages are airtight;
• do not allow fresh, unfrozen food to touch food
which is already frozen, thus avoiding a rise in
temperature of the latter;
• lean foods store better and longer than fatty
ones; salt reduces the storage life of food;
• water ices, if consumed immediately after
removal from the freezer compartment, can
possibly cause the skin to be freeze burnt;
• removal from the freezer compartment, can
possibly cause the skin to be freeze burnt;
• it is advisable to show the freezing in date on
each individual pack to enable you to keep tab
of the storage time.
Hints for storage of frozen
food
To obtain the best performance from this
appliance, you should:
• make sure that the commercially frozen
foodstuffs were adequately stored by the
retailer;
• be sure that frozen foodstuffs are transferred
from the food store to the freezer in the shortest
possible time;
• do not open the door frequently or leave it
open longer than absolutely necessary.
• Once defrosted, food deteriorates rapidly and
cannot be refrozen.
• Do not exceed the storage period indicated by
the food manufacture.
Hints for fresh food
refrigeration
To obtain the best performance:
• Do not store warm food or evaporating liquids
in the refrigerator
• Do cover or wrap the food, particularly if it has a
strong flavor
Hints for refrigeration
• Meat (all types): wrap in polythene bags and
place on the glass shelves above the vegetable
drawer.
• For safety, store in this way only one or two days
at the most.
• Cooked foods, cold dishes, etc...: these should
be covered and may be placed on any shelf.
• Fruit and vegetables: these should be
thoroughly cleaned and placed in the special
drawer(s) provided.
• butter and cheese: these should be placed
in special airtight containers or wrapped in
aluminum foil or polythene bags to exclude as
much air as possible.
• Milk bottle: these should have a cap and should
be stored in the balconies on the door.
• Bananas, potatoes, onions and garlic, if not
packed, must not be kept in the fridge.
Cleaning
For hygienic reasons the appliance interior,
including interior accessories, should be cleaned
regularly.
CAUTION!
The appliance may not be connected to the mains
during cleaning. Danger of electrical shock! Before
cleaning switch the appliance off and remove the
plug from the mains, or switch off or turn out the
circuit breaker or fuse. Never clean the appliance
with a steam cleaner. Moisture could accumulate in
electrical components, danger of electrical shock!
Hot vapors can lead to the damage of plastic parts.
The appliance must be dry before it is placed back
into service.
HELPFUL HITS AND TIPS
23
ENG
IMPORTANT! Ethereal oils and organic solvents
can attack plastic parts, e.g. lemon juice or the
juice form orange peel, butyric acid, cleanser that
contain acetic acid.
• Do not allow such substances to come into
contact the appliance parts.
• Do not use any abrasive cleaners
• Remove the food from the freezer. Store them in
a cool place, well covered.
• Switch the appliance off and remove the plug
from the mains, or switch off the circuit breaker
or fuse.
• Clean the appliance and the interior accessories
with a cloth and lukewarm water. After cleaning
wipe with fresh water and rub dry.
• After everything is dry place appliance back into
service.
CAUTION!
Before troubleshooting, disconnect the power supply. Only a qualified electrician of competent person
must do the troubleshooting that is not in this manual.
IMPORTANT! There are some sounds during normal use (compressor, refrigerant circulation).
TROUBLESHOOTING
Problem Possible cause Solution
Appliance does not work
Power plug is not plugged in or
is loose
Insert power plug.
Fuse has blown or is defective Check fuse, replace if necessary.
Socket is defective
Socket malfunctions are to be
corrected by an electrician.
Appliance freezes or cools too
much
Temperature is set too cold or
the appliance runs at SUPER
modes.
Turn the temperature regulator
to a warmer setting temporarily.
The food is not frozen enough.
Temperature is not properly
adjusted.
Please look in the initial
Temperature Setting section.
Door was open for an extended
period.
Open the door only as long as
necessary.
A large quantity of warm food
was placed in the appliance
within the last 24 hours.
Turn the temperature regulation
to a colder setting temporarily.
The appliance is near a heat
source.
Please look in the installation
location section.
Heavy build up of frost on the
door seal.
Door seal is not air tight.
Carefully warm the leaking
sections of the door seal with
a hair dryer (on a cool setting).
At the same time shape the
warmed door seal by hand such
that it sits correctly.
Unusual noises
Appliance is not level. Re-adjust the feet.
The appliance is touching the
wall or other objects.
Move the appliance slightly.
A component, e.g. a pipe, on the
rear of the appliance is touching
another part of the appliance or
the wall.
If necessary, carefully bend the
component out of the way.
24
ENG
If the malfunction shows again, contact the Service Center. These data are necessary to help you quickly
and correctly. Write the necessary data here, refer to the rating plate.
Side panels are hot
It’s normal. Heat exchange is in
the side panels.
Take gloves to touch side panels
if need.
Dispenser couldn’t get cooling
water
Failing to access the water
source or open the water valve
Make sure the water source and
the valve is open
The filter is not installed correctly
Check whether the filter
direction is reversed
The water valve or connectors
are not installed correctly
Check whether water valve or
connectors are reversed
The water is not cooled enough
The fridge temperature is set
too high
Set the fridge temperature lower
Take too much water in one
time (1L)
Wait for the water cool down
Take the water so often Wait for the water cool down
Dispenser couldn’t get ice
No ice inside the storage box
Wait for the ice maker to finish
making ice (the first time on the
refrigerator needs to be fully
cooled, the ice maker will start
making ice);
Failing to access the water
source or open the water valve
Make sure the water source and
the valve is open
The “ice off” mode is working, it
will stop making ice
Turn off the “ice off “ mode
The pressure of water source is
not enough
Ensure the source water
pressure is 1.5 ~ 7 bar
The water valve or connectors
are not installed correctly
Check whether water valve or
connectors are reversed
The filter is not installed correctly
Check whether the filter
direction is reversed
The ice cubes are frozen
together in the storage box to
block the ice outlet
Remove the frozen ice cubes
There is something hard in the
storage box, which prevents the
motor from running
Remove the thing which blocks
the outlet
The doors is not closed totally
which will make the cold air
leak out
Ensure the doors is closed
totally
The cubed ice or water is too
small
The pressure of water source is
not enough
Ensure the source water
pressure is 1.5 ~ 7 bar
The water filter is blocked,
because it has been used too
long time
Replace a new water filter
The water flow meter is fault Contact maintenance personnel

25
ENG
Environment Protection
This appliance does not contain gasses which could
damage the ozone layer, in either its refrigerant circuit or
insulation materials. The appliance shall not be discarded
together with the urban refuse and rubbish. The insulation
foam contains flammable gases: the appliance shall
be disposed according to the appliance regulations
which can be obtained from your local authorities. Avoid
damaging the cooling unit, especially the heat exchanger.
The materials used on this appliance marked by the
symbol are recyclable.
The symbol on the product or on its packaging
indicates that this product may not be treated as
household waste. Instead it should be taken to the
appropriate collection point for the recycling of electrical
and electronic equipment. By ensuring this product is
disposed of correctly, you will help prevent potential
negative consequences to the environment and human
health, which could otherwise be caused by inappropriate
waste handling of this product. For more detailed
information about recycling of this product, please
contact your local council, your household waste disposal
service or the shop where you purchased the product.
Packaging materials
The materials with the symbol are recyclable.
Dispose the packaging in a suitable collection container
to recycle it.
Disposal of the appliance
1. Disconnect the mains plug from the mains socket.
2. Cut off the mains cable and discard it.

26
ENG
WARNING!
During using, service and disposal the
appliance, please pay attention to symbol
similar as left side, which is located on rear of
appliance (rear panel or compressor) and with
yellow or orange color.
It’s risk of fire warning symbol. There are
flammable materials in refrigerant pipes and
compressor.
Please be far away fire source during using,
service and disposal.
27
ENG
PRODUCT INFORMATION SHEET
COMMISSION DELEGATED REGULATION (EU) 2019/2016
with regard to energy labelling of refrigerating appliances
Supplier's name or trademark: Tesla
Supplier's address: Tesla Electronics, Litijska 47, 1000 Ljubljana, SI
Model identifier: RB5210FHXI
Type of refrigerating appliance:
Low-noise appliance: Design type: freestanding
Wine storage appliance: Other refrigerating appliance:
General product parameters:
Parameter Value Parameter Value
Overall
dimensions
(millimetre)
Height
Total volume (dm³ or l)Width
Depth
EEI Energy efficiency class
Airborne acoustical noise
emissions (dB(A) re 1 pW)
Airborne acoustical noise
emission class
Annual energy consumption
(kWh/a)
Climate class:
Minimum ambient temperature
(ºC), for which the refrigerating
appliance is suitable
Maximum ambient temperature
(ºC), for which the refrigerating
appliance is suitable
Winter setting
Compartment Parameters:
Compartment type
Compartment parameters and values
Compartment
volume
(dm³ or l)
Recommended
temperature
setting for
optimised food
storage (ºC)
These settings
shall not
contradict
the storage
conditions set
out in Annex IV,
Table 3
Freezing
capacity
(kg/24h)
Defrosting
type (auto-
defrost=A,
manual
defrost=M)
Pantry
Wine storage
Cellar
Fresh food
Chill
28
ENG
0-star or icemaking
1-star
2-star
3-star
4-star
2-star section
Variable temperature
compartment
For 4-star compartments
Fast freeze facility
Light source parameters:
Type of light source
Energy efficiency class
Minimum duration of the guarantee offered by the manufacturer: 24 months
Additional information:
Weblink to the manufacturer’s website, where the information in point4(a) Annex of Commission
Regulation (EU) 2019/2019 is found: tesla.info
Link to the EU EPREL database
The QR code on the energy label supplied with the appliance provides a web link to the registration
of this appliance in the EU EPREL database. Keep the energy label for reference together with the user
manual and all other documents provided with this appliance.
It is possible to find information related to the performance of the product in the EU EPREL database using
the link https://eprel.ec.europa.eu and the model name and product number that you can find on the
rating plate of the appliance.
For more detailed information about the energy label, visit www.theenergylabel.eu.

29
SRB
Radi sopstvene bezbednosti obezbedite sigurnu
upotrebu, pre instalacije i prve upotrebe uređaja,
pročitajte ovo korisničko uputstvo, uključujući i savete
i upozorenja. Da biste izbegli nepotrebne greške i
nezgode, važno je da se postarate da sve osobe koje
koriste uređaj budu detaljno upoznate s njegovim
operacijama i bezbedonosnim funkcijama. Sačuvajte ova
uputstva i pobrinite se da budu u sklopu uređaja ako
bude premešten ili prodat, kako bi svako, ko ga koristi
tokom svog života bio upoznat sa pravilnom upotrebom i
bezbednošću uređaja.
Imajte na umu ovo korisničko uputstvo radi svoje lične
sigurnosti i sigurnosti imovine, budući da proizvođač nije
odgovoran za štetu učinjenu propustima.
Bezbednost dece i nesamostalnih osoba
• Ovaj uređaj mogu koristiti deca starosti 8 ili više godina
i osobe sa smanjenim fizičkim, čulnim ili mentalnim
sposobnostima, ili manjkom iskustva i znanja ukoliko
su pod nadzorom, ili su im data uputstva u vezi sa
bezbednom upotrebom uređaja, i svesni su mogućeg
rizika.
• Deci uzrasta od 3 do 8 godina je dozvoljeno da stavljaju
predmete u i uzimaju predmete iz ovog uređaja.
• Deca bi trebalo da budu pod nadzorom, kako biste
osigurali da se ne igraju uređajem.
• Čišćenjem i održavanjem ne bi trebalo da se bave
deca, osim ako nisu starosti 8 ili više godina i moraju biti
pod obaveznim nadzorom.
• Svu ambalažu čuvajte van domašaja dece. Postoji
opasnost od gušenja.
• Ukoliko ste odlučili da više ne koristite uređaj, prekinite
napajanje uređaja strujom, presecite kabl za napajanje
BEZBEDNOSNA UPUTSTVA

30
SRB
(što je bliže moguće uređaju) i uklonite vrata, kako biste
sprečili mogućnost da deca, koja se igraju, pretrpe
strujni udar ili se zatvore u uređaj.
• Ukoliko ovaj uređaj ima magnetnu gumu na vratima, a
želite da njime zamenite stariji uređaj, koji se zatvarao
pomoću opruge na vratima ili poklopcu, onemogućite
funkcionisanje zatvaranja starijeg uređaja pomoću
opruge. Na ovaj način ćete sprečiti da uređaj postane
smrtonosna zamka za dete.
Opšta bezbednost
Održavajte ventilacione otvore u kućištu frižidera ili
ugradnoj strukturi čistima od začepljenja.
Nemojte koristiti mehaničke uređaje ili druge naprave
kako biste ubrzali proces odmrzavaja, osim proizvoda
preporučenih od strane proizvođača uređaja.
Nemojte oštetiti sistem za hlađenje.
Nemojte stavljati druge električne uređaje (kao što su
uređaji za pravljenje sladoleda) u uređaj za hlađenje,
osim ako ih proizvođač nije odobrio u ovu svrhu.
Ne dirajte sijalicu ukoliko radi duže vremena, jer može
biti veoma vruća.
1
Prilikom postavljanja uređaja, uverite se da ništa ne
pritiska priključni kabl, kao i da kabl nije oštećen.
Ne postavljajte višestruke prenosive utičnice ili prenosivo
napajanje iza uređaja.
• Nemojte čuvati eksplozivne supstance, kao što su
ambalaže sprejeva sa zapaljivim gasom u ovom
uređaju.
• Supstanca za hlađenje, izobutan (R600a), se nalazi u
sistemu za hlađenje uređaja, to je prirodni gas s visokim
nivoom ekološke kompatibilnosti, ali izuzetno zapaljiv.
• Pobrinite se da tokom transporta ili postavljanja uređaja

31
SRB
ne bude oštećena nijedna komponenta sistema za
hlađenje uređaja.
- izbegavajte otvoren plamen i izvore zapaljivosti
- temeljno provetrite prostoriju, u kojoj se nalazi uređaj
• Opasno je menjati specifikacije ili modifikovati proizvod
na bilo koji način. Bilo kakvo oštećenje kabla može
prouzrokovati kratak spoj, požar i/ili strujni udar.
• Ovaj uređaj je namenjen za upotrebu u domaćinstvima
i za slične primene, kao što su
- prostori za zaposlene u kuhinji, u prodavnicama,
kancelarije i druga radna okruženja;
- poljoprivredna domaćinstva i od strane hotelskih i
motelskih gostiju, kao i drugih vrsta ovakvih objekata;
- objekti koji pružaju uslugu noćenja sa doručkom;
- ketering i slične neprodajne namene.
Bilo koju električnu komponentu (utikač, kabl za
napajanje, kompresor itd.) mora zameniti ovlašćeni
serviser ili kvalifikovano osoblje.
Sijalica, dostavljena sa ovim uređajem, je “sijalica za
specijalnu namenu” i može se koristiti samo za uređaj uz
koji je dostavljena. Ova “sijalica za specijalnu namenu” se
ne može koristiti za kućno osvetljenje.
1
• Kabl za napajanje se ne sme produžavati.
• Proverite da li je utikač, na zadnjoj strani uređaja,
zgnječen ili oštećen. Zgnječen ili oštećen utikač može
dovesti do pregrevanja i izazvati požar.
• Pobrinite se da vam glavni utikač uređaja bude
dostupan.
• Nemojte izvlačiti glavni kabl.
• Ukoliko utičnica nije fiksirana, nemojte priključivati
aparat. Postoji rizik od strujnog udara ili vatre.
• Ne smete raditi ništa na uređaju bez osvetljenja.

32
SRB
• Uređaj je težak. Budite oprezni tokom pomeranja
uređaja.
• Nemojte uklanjati ili dodirivati elemente iz dela za
zamrzavanje ako su vam ruke vlažne/mokre, budući da
to može prouzrokovati ogrebotine ili promrzline na koži.
• Izbegavajte duže izlaganje aparata direktnoj sunčevoj
svetlosti.
Dnevna upotreba
• Ne stavljajte vruće stvari na plastične delove uređaja.
• Ne stavljate prehrambene proizvode uza zadnji zid.
• Zamrznuta hrana se ne sme ponovo zamrzavati nakon
što se otopi.
2
• Već zapakovanu zamrznutu hranu čuvajte u skladu
sa instrukcijama proizvođača, u vezi sa zamrznutom
hranom.
2
• Striktno se pridržavajte preporuka proizvođača u
pogledu držanja stvari u uređaju. Pridržavajte se
relevantnih instrukcija.
• Ne stavljate gazirana pića u deo za zamrzavanje, budući
da to stvara pritisak, koji može prouzrokovati pucanje
ambalaže, što može dovesti do oštećenja uređaja.
2
• Voćni sladoledi mogu izazvati promrzline ukoliko se
konzumiraju odmah po uzimanju iz uređaja.
2
Kako biste izbegli kontaminiranje hrane, pratite sledeća
uputstva
• Držanje uređaja otvorenim tokom dugih vremenskih
perioda može da dovede do značajnog rasta
temperature unutar odeljaka uređaja.
• Redovno čistite površine koje mogu da dođu u dodir sa
hranom, kao i pristupačne delove odvodnog sistema.
• Očistite rezervoare za vodu ukoliko ih niste koristili
tokom vremenskog perioda dužeg od 48 h; ukoliko

33
SRB
tokom vremenskog perioda od 5 dana niste uzimali
vodu iz uređaja, isperite sistem za protok vode vodom
iz vodovodne mreže.
• Sirovo meso i ribu unutar frižidera držite u
odgovarajućim posudama, kako ove namirnice ne bi
došle u dodir sa ili kako ne bi kapale po ostaloj hrani.
• Odeljci za smrznutu hranu označeni sa dve zvezdice
(ukoliko postoje u okviru uređaja) pogodni su za
držanje prethodno smrznute hrane, za držanje ili
pravljenje sladoleda i za pravljenje kockica leda.
• Odeljci označeni jednom, dvema i trima zvezdicama
(ukoliko postoje u okviru uređaja) nisu pogodni za
zamrzavanje sveže hrane.
• Ukoliko će uređaj biti prazan tokom dužeg vremenskog
perioda, isključite ga, odledite, očistite i osušite, a zatim
ostavite vrata uređaja otvorenim kako biste sprečili
razvoj buđi u unutrašnjosti uređaja.
Održavanje i čišćenje
• Pre održavanja, isključite uređaj, ili prekinite dotok
električne energije.
• Uređaj nemojte čistiti metalnim predmetima.
• Ne koristite oštre predmete, da bi uklonili led sa
uređaja. Koristite plastična sredstva za struganje.
2
• Redovno proveravajte odvod za odleđenu vodu u
frižideru. Ukoliko je potrebno, očistite odvod. Ukoliko je
odvod blokiran, voda će se sakupljati na dnu uređaja
3
Instalacija uređaja
• Za priključivanje na električnu mrežu, pažljivo pratite
uputstva data u specifičnim delovima uputstva.
• Raspakujte uređaj i proverite da li postoje na njemu
oštećenja. Ne povezujte uređaj na struju, ukoliko je

34
SRB
oštećen. Moguća oštećenja odmah prijavite u mestu, gde
ste ga kupili. U tom slučaju zadržite ambalažu uređaja.
• Preporučuje se, da sačekate najmanje četiri sata pre
nego što priključite uređaj, kako bi se ulje vratilo u
kompresor.
• Potrebno je obezbediti adekvatno strujanje vazduha
oko uređaja, nepostojanje ovoga može dovesti do
pregrevanja. Za postizanje odgovarajućeg protoka
vazduha, pratite uputstva potrebna za instalaciju
uređaja.
• Gde god je moguće, razmaknica mora biti postavljena
između uređaja i zida, kako bi se izbeglo dodirivanje
ili hvatanje za vruće delove (kompresor, kondenzator)
kako bi se izbegle moguće opekotine.
• Uređaj ne sme biti postavljen blizu radijatora ili
štednjaka.
• Pobrinite se da bude obezbeđen lak pristup glavnom
utikaču i nakon postavljanja uređaja.
Servisiranje
• Bilo kakvo servisiranje uređaja, koje zahteva
električne radove, treba da bude obavljen od strane
kvalifikovanog električara ili kompetentne osobe.
• Samo ovlašćeni centar za servisiranje može obaviti
popravke na uređaju, i mogu se koristiti samo originalni
rezervni delovi.
Ušteda energije
• Ne stavljate vruću hranu u uređaj;
• Ne pakujte svu hranu zajedno, budući da to sprečava
cirkulaciju vazduha;
• Pobrinite se da hrana ne dotiče zadnji deo pregrade(a);
• Ukoliko nestane struje, ne otvarajte vrata;
• Ne otvarajte često vrata;
35
SRB
• Ne držite vrata otvorena drugo;
• Nemojte postavljati termostat na izuzetno niske
temperature
• Potrebno je sve dodatne elemente, poput fioka, polica,
polica u vratima uređaja, tamo držati u cilju smanjenja
utroška energije.
1
Ukoliko u uređaju postoji.
2
Ukoliko postoji deo za zamrzavanje.
3
Ukoliko postoji deo za čuvanje sveže hrane
PREGLED
Kontrolni panel
Dispenzer za
vodu/led
36
SRB
Ova ilustracija je samo okvirna, molimo vas da za detalje pogledajte svoj uređaj.
(Uklonite metalni poklopac prostorije kompresora)
Glavna kontrolna tabla
Kabl za napajanje
Kompresor
Spoljni glavni ventil za vodu
Poklopac kutije
za led
Kutija za
skladištenje leda
Police frižidera *3
Fioke zamrzivača*2
Police u vratima
frižidera *1
Priključak za vodovodnu cev
Fridge crispers*2
Police frižidera *3
Police u vratima
frižidera *4

37
SRB
UGRADNJA UREĐAJA
Dodatna oprema
Delovi cevi za vodu x1
Posuda za vodu za doziranje x1
Filter za vodu x1
Uputstvo za upotrebu x1
Konektor za vodu x1
Konektor filtera za vodu x2
Protivklizne kopče x8
Uklonite vrata
Potreban alat: Philips odvijač, ravni odvijač.
• Pobrinite se da uređaj bude isključen i prazan.
• Da biste skinuli vrata, potrebno je da uređaj nagnete unazad. Uređaj treba da bude postavljen na tvrdu
podlogu, kako se ne bi dogodilo da isklizne prilikom uklanjanja vrata.
• Svi uklonjeni delovi moraju biti sačuvani radi ponovnog instaliranja vrata.
• Uređaj nemojte stavljati u horizontalan položaj, jer to može oštetiti sistem za hlađenje.
• Preporučuje se da dve osobe učestvuju u montiranju .
Odšrafite polopac šarke Filipsovim odvrtačem. Isključite napajanje.
Odšrafite gornju šarku.
1
3
2

38
SRB
Podignite vrata i odložite ih na meku podlogu.
Zatim uklonite druga vrata kao u prethodnom
procesu.
4. Na dnu zamrzivača frižidera nalazi se priključak cevi za vodu. Skinite ga sa zaštitnog poklopca i odvojite
od vodovodne cevi i ne zaboravite da izvučete cev za vodu iz donje šarke.
5 6
Odšrafite donje šarke.
Nakon što je uređaj pozicioniran, instalirajte vrata obratnim procesom.
4
7
Potrebe prostora
• Ostavite dovoljno mesta za otvaranje vrata.
• Ostavite najmanje 50mm razmaka s obe strane
A 900
B 660
C 1770
D min=50
E min=50
F 1800
G 1560
H 135°
39
SRB
Nivelisanje jedinice
Pozicioniranje
Postavite ovaj uređaj na mesto čija sobna
temperatura odgovara klimatskoj klasi navedenoj
na pločici sa podacima o uređaju:
Kod uređaja za rashlađivanje sa sledećim
klimatskim klasama:
• prošireno umerena: ovaj uređaj za rashlađivanje je
namenjen za upotrebu na sobnim temperaturama
koje se kreću u opsegu od 10°C do 32°C (SN);
• umerena: ovaj uređaj za rashlađivanje je namenjen
za upotrebu na sobnim temperaturama koje se
kreću u opsegu od 16°C do 32°C (N);
• suptropska: ovaj uređaj za rashlađivanje je
namenjen za upotrebu na sobnim temperaturama
koje se kreću u opsegu od 16°C do 38°C (ST);
• tropska: ovaj uređaj za rashlađivanje je namenjen
za upotrebu na sobnim temperaturama koje se
kreću u opsegu od 16°C do 43°C (T);
Lokacija
Uređaj treba da bude postavljen daleko od izvora
toplote, kao što su radijatori, bojleri, izlaganje
direktnim sunčevim zracima itd. Postarajte se
da vazduh slobodno cirkuliše oko zadnjeg dela
frižidera, kako biste osigurali najbolju učinak.
Ukoliko je uređaj postavljen ispod visećeg dela,
minimalni razmak između vrha uređaja i visećeg
dela treba da bude bar 100 mm. Idealno bi bilo
da uređaj ne bude postavljen ispod visećeg dela.
Odgovarajuća nivelacija se postiže uz pomoć
jedne ili više podesnih nožica, u zavisnosti od
uređaja.
Nije predviđeno da se ovaj uređaj za rashlađivanje
upotrebljava kao ugradni uređaj;
UPOZORENJE!
Prekidanje napajanja uređaja mora biti
omogućeno; iz tog razloga, utičnica mora biti
dostupna nakon postavljanja uređaja.
Povezivanje na struju
Pre uključivanja, proverite da napon i frekvencija
prikazana na tablici specifikacije odgovaraju
naponu struje domaćinstva. Uređaj mora biti
uzemljen. Kabl za napajanje električnom energijom
je opremljen kontaktom za ovu namenu.
Vrata
• Okrećite nožice u smeru kretanja kazaljke na satu
kako biste ih ručno produžili.
• Okrećite nožice u smeru suprotnom od smera
kretanja kazaljke na satu kako biste ih ručno skratili.
40
SRB
SVAKODNEVNA UPOTREBA
VAŽNO!
Kako instalirati filter za vodu i vodovodnu cev
Dovod vode
Priključna cev
Filter
Posuda za otpadnu vodu /
odvod
1. Pre instaliranja, filter treba ispirati vodom
5 minuta ili 5L vode kako bi se osiguralo
da je toner u filteru ispran.
2. Otvorite vrata frižidera i izvadite crispers.
3. Izvadite gumene čepove sa obe strane kutije za vodu.
Gumeni čepovi
Kutija za vodu
41
SRB
4. Izvadite filter za vodu iz vrećice sa priborom, umetnite konektore sa obe strane filtera, zatim povežite cev
za vodu i učvrstite je u kopče protiv klizanja (obratite pažnju na smer strelice filtera)
5. Sastavite delove filtera za vodu sa potpornim držačem iznad kutije za vodu i povežite vodovodne cevi
kutije za vodu sa filterom za vodu.
6. Skinite gumeni čep. Povežite deo cevi za vodu sa glavnim ventilom na poklopcu kompresora sa
konektorom, i ne zaboravite da umetnete kopče protiv klizanja, a zatim povežite kraj cevi za vodu sa
navrtkom na izvor vode.
Filter za vodu
Konektori
Vodovodne cevi
Klipovi protiv klizanja
Fix the water filter parts
Connect the water pipes
of water box with filter
Dovod vode
Skinite gumeni čep Povežite cev za vodu sa
konektorom i ne zaboravite da
umetnete kopče protiv klizanja
sa obe strane konektora.
Vodovodna
cev
Spojite kraj
vodovodne cevi
sa navrtkom na
dovod vode
42
SRB
OPREZ!
• Spoljni izvor vode mora biti čist i pritisak vode treba da bude 1,5~7 bara da bi se garantovao pravilan
rad.
• Proverite priključak cevi za vodu, proverite da li ima još nekih stvari unutar mašine za pravljenje leda i
kutije za skladištenje leda.
• Nakon pristupa dovodu vode, otvorite slavinu i proverite da li postoji curenje između slavine i priključne
cevi. Ako postoji curenje, proverite priključak cevi.
• Izaberite funkciju vode, koristite veliku šolju da pritisnete dozator, držite taster za vodu da bi curila 5
minuta dok voda ne bude čista i glatka, tokom ovog procesa curenja voda nije za piće.
• Izaberite funkciju uzimanja leda i lomljenja leda, upotrebite veliku šolju da pritisnete dozator i proverite
normalan rad unutrašnjeg motora kroz zdravu procenu.
• Sačekajte 3 minuta i proverite da li ventil za dovod vode u frižideru, priključi cevi za vodu i filter za vodu
cure ili ne.
Korišćenje kontrolne table
Tasteri
Pritisnite da podesite temperaturu zamrzivača (leva strana) od -14°C do -22°C
Pritisnite da podesite temperaturu zamrzivača (desna strana) od 2°C do 8°C i “OFF”. Ako izaberete
“OFF”, frižider će se isključiti.
Pritisnite da izaberete režim rada između SUPER COOLING , SUPER FREEZER , SMART ,
ECO
i USER|S SETTING (bez simbola na displeju).
Pritisnite 3 SEC. dugme i držite 3 sekunde da biste zaključali druga dugmad.
Pritisnite ga i držite 3 sekunde da biste otključali druge dugmad.
Pritisnite dugme za isključivanje leda da biste kontrolisali ledomat. Ako želite da zatvorite ledomat,
pritisnite ovo dugme, tada će proizvod prestati da pravi led dok ponovo ne pritisnete ovo dugme.
„promenite filter za vodu“.
U principu, filter za vodu bi vam trebao biti potreban svakih 6 meseci kako biste osigurali najviši
kvalitet vode. Posle pola godine, ikona
na displeju će svetleti kao podsetnik da treba da
zamenite novi filter za vodu. Možete kupiti novi filter za vodu od prodavca u kome kupujete frižider
ili postprodajni sistem. Nakon što završite sa zamenom novog filtera za vodu u frižideru, trebalo bi da
pritisnete ovo dugme i držite ga 3s, ikona
na ekranu će se ugasiti, a filter za vodu će se resetovati.
Pritisnite ovo dugme da primite kockice leda. Možete pritisnuti ovo dugme da biste izabrali vrstu leda
za doziranje.
43
SRB
Pritisnite ovo dugme da biste primili drobljeni led. Možete pritisnuti ovo dugme da biste izabrali vrstu
leda za doziranje.
Pritisnite ovo dugme da primite rashladnu vodu. Možete pritisnuti ovo dugme da odaberete
rashladnu vodu koja će se ispuštati.
NAPOMENA
• Kada su vrata zamrzivača otvorena ili je zaključavanje za decu uključeno, dozator neće raditi. potrebno
je da zatvorite vrata ili otključate bravu za decu da biste dobili kockice leda, drobljenog leda, rashladne
vode koju želite.
• Ne treba vam led, isključite funkciju da biste uštedeli energiju. (pogledajte led isključen gore)
• Ako se voda ne ispušta ili se ispušta sporo, potrebno je da zamenite filter za vodu jer se može začepiti.
• Neka područja imaju velike količine kreča u vodi, što uzrokuje brže začepljenje filtera za vodu.
Displej
SMART režim, frižider automatski podešava temperaturu dva odeljka prema unutrašnjoj temperaturi
i temperaturi okoline.
ECO režim, frižider radi na najnižoj potrošnji energije.
SUPER COOLING hladi odeljak frižidera na najnižu temperaturu u trajanju od pribl. 2 sata. Tada se
automatski vraća temperatura podešena pre super režima
SUPER FREEZING hladi odeljak zamrzivača na najnižu temperaturu u trajanju od pribl. 6 sati. Tada se
automatski vraća temperatura podešena pre super režima.
LOCK, simbol će se upaliti ako su dugmad zaključana.
Prikažite podešenu temperaturu zamrzivača.
Prikažite podešenu temperaturu odeljka frižidera.
Mode ICE OFF, simbol će se upaliti kada dodirnete dugme da biste zatvorili ledomat, što znači da
će frižider prestati da pravi led.
PODSETNIK ZA PROMENU FILTERA VODE simbol će se upaliti kada se filter za vodu koristi 6
meseci da vas podseti da na vreme zamenite novi filter za vodu. Dok ne zamenite novi filter i držite
pritisnuto dugme
3s, simbol će se ugasiti.
44
SRB
• ECO režim: Izaberite ovaj režim kada želite da uštedite energiju.
• Režim super hlađenja: Ovaj režim vam omogućava da brzo ohladite hranu i automatski će se
deaktivirati nakon 6 sati rada.
• Režim super zamrzavanja: Ovaj režim vam omogućava da brzo oslobodite hranu i automatski će se
deaktivirati nakon 50 sati rada.
Alarm za otvorena vrata
First use
Alarm za otvorena vrata
Kada bilo koja vrata ostanu otvorena ili nisu potpuno zatvorena oko 60 sekundi, uređaj će oglasiti alarm.
Zatvorite vrata frižidera i alarm će prestati.
Ako vrata nisu dobro zatvorena, alarm će se oglasiti 5 puta svakih 30 sekundi dok se vrata dobro ne zatvore.
Ako su vrata otvorena 10 minuta neprekidno bez zatvaranja, unutrašnje LED svetlo će se automatski
isključiti.
Sigurnosna brava za decu
Ova funkcija je dizajnirana da spreči decu da rade sa uređajem.
• Da biste aktivirali funkciju, pritisnite i držite
oko 3 sekunde. Lampica indikatora
zaključavanja
će svetleti pokazujući da je funkcija sigurnosnog zaključavanja aktivirana.
• Da biste deaktivirali funkciju, pritisnite i držite
oko 3 sekunde. Indikatorska lampica za
otključavanje
će svetleti pokazujući da je funkcija sigurnosnog zaključavanja deaktivirana.
Prvo korišćenje čišćenje unutrašnjosti
Pre prve upotrebe uređaja, operite unutrašnjost i sve unutrašnje dodatke mlakom vodom i neutralnim
sapunom kako biste uklonili tipičan miris potpuno novog proizvoda, a zatim ga dobro osušite.
Kako koristiti dozator?
Možete da dobijete kockice leda, drobljenog leda i vode za hlađenje pritiskom na prekidač, koji se bira
prikazivanjem operativnog panela;
Nemojte koristiti deterdžente ili abrazivne prahove, jer će oni oštetiti završni sloj.
Ako su vrata otvorena 60 sekundi, periodični alarm će se javljati sve dok se vrata ne zatvore.
Režim Svetlo indikatora Prikaz temperature zamrzivača Prikaz temperature frižidera
Smart
Prikaz temperature za zamrzivač i frižider će se promeniti u
zavisnosti od temperature okoline (pogledajte tabelu ispod).
ECO
-15°C +8°C
Super
cooling
Nema promene +2°C
Super
freezing
-25°C Nema promene
NAPOMENA
VAŽNO!
45
SRB
Ako je prekidač pritisnut neprekidno duže od 3 minuta, dozator će prestati da radi kako bi zaštitio
električne komponente. Ako vam je potrebno više vode za hlađenje ili leda, možete otpustiti prekidač i
ponovo ga pritisnuti da dobijete više vode ili leda koliko želite.
Uzmite vodu za hlađenje
Izaberite režim vode za hlađenje
, stavite šolju u sredinu prekidača za lopatice, pritisnite prekidač za
lopatice da biste primili vodu i prestanite da pritiskate prekidač nakon što uzmete odgovarajuću količinu
vode i voda će automatski prestati da teče.
NAPOMENA
• Sačekajte 2 sekunde pre nego što odnesete šolju kako biste izbegli prskanje vode.
• Ako je potrebna hladnija voda, napunite čašu ledom pre uzimanja;
• Ako se istovremeno uzme više od 800 ml vode, može se izvaditi voda visoke temperature. U ovom
slučaju, preporučuje se sačekati pola sata za hladno piće;
Uzmi led
Izaberite režim kocke leda
ili režim drobljenog leda da biste dobili vrstu leda kakvu želite.
Postavite šolju u sredinu prekidača za lopatice, pritisnite prekidač za lopatice da primite led i prestanite da
pritiskate prekidač nakon što uzmete odgovarajuću količinu leda i led će automatski prestati da teče.
NAPOMENA
• Sačekajte 2 sekunde pre nego što odnesete šolju da biste izbegli prskanje leda.
• Da biste sprečili da led ispadne iz šolje, postavite šolju što bliže izlazu iz dozatora.
• Prilikom uzimanja leda, unutrašnji motor radi kako bi izbio led i lomio led, što može izazvati buku.
• Nakon uzimanja leda, koristite ga što je pre moguće da biste izbegli topljenje leda.
Led u kockama, zdrobljeni led, režim vode za hlađenje
Prekidač za lopatice
Ovaj odeljak vam govori kako da izbegnete većinu problema koji bi vam se desili. Preporučujemo da ih
pažljivo pročitate pre upotrebe uređaja.
1. Kada uzimate vodu prvi put ili ne uzimate vodu duže vreme, izvadite 1~2L vode i sipajte je;
2. Kada prvi put koristite ledomat ili ga ne koristite duže vreme, prvu kutiju kockica leda ne treba koristiti;
3. Za uzimanje vode i leda preporučuje se upotreba šolje prečnika većeg od 70 mm;
4. Nemojte koristiti lomljive posude za uzimanje kockica leda, kako biste izbegli štetu uzrokovanu
polomljenim posudama;
5. Ne stavljajte ruke ili alate u otvor razvodnika, kako biste izbegli kvar na unutrašnjem mehanizmu;
NAPOMENA
VAŽNO!
46
SRB
6. Ne povlačite lopaticu previše silom, kako biste izbegli kvar lopatice;
7. Aparat za led automatski pravi led bez ručnog rada. Kada se kutija za skladištenje leda napuni ledom
(oko 1,6 kg), ledomat automatski prestaje da pravi led;
8. U pametnom režimu, dnevni kapacitet proizvodnje leda u frižideru je oko 1,2 kg;
9. Kada su vrata zamrzivača otvorena, distributer ledene vode je zaključan i ne može da iznese vodu ili
led;
10. Kada su vrata zamrzivača otvorena, ako ledomat obavlja proceduru pravljenja leda, malo leda će pasti
u kutiju za skladištenje leda.
11. Ako se led ne ispušta glatko, proverite da li je izlaz za led na razdelniku blokiran ledom. Ako jeste,
očistite led pre nego što ga uzmete;
12. Nakon što se frižider prvi put uključi, uključite aparat za pravljenje leda, ledomat će početi da pravi led
oko 10 sati kasnije;
13. Tokom procesa korišćenja, možete čuti zvuk otvaranja ventila za vodu, protok vode i padanje leda, što
je normalno;
14. Ako ste na odmoru ili vam ne trebaju kockice leda duže vreme, isključite funkciju pravljenja leda i
izvadite kockice leda u kutiji za led kako biste izbegli da se kockice leda zamrznu i blokiraju izlaz.
15. U slučaju nestanka struje, očistite hranu u frižideru na vreme i očistite led u kutiji za skladištenje leda
da biste izbegli topljenje leda.
16. Ne jedite kockice leda kada imaju miris. Proverite da li je filter istekao ili da li u frižideru ima
nezapečaćene hrane oštrog mirisa.
Kako očistiti i negovati dozator?
Koristite mekani peškir da očistite frižider i obavezno isključite napajanje pre čišćenja.
Prilikom čišćenja koristite čistu vodu, nemojte koristiti benzol, razređivač, natrijum hipohlorit, abraziv,
izbeljivač i druge hemijske reagense. Nemojte prskati deterdžent direktno na ekran, inače odštampani
tekst na ekranu može da otpadne.
1. Redovno skidajte kutiju za vodu sa distributera i sipajte vodu unutra i obrišite je.
2. Redovno čistite kutiju za skladištenje leda
Ako se led ne koristi duže vreme ili se vrata zamrzivača često otvaraju, led u kutiji za skladištenje leda se
može otopiti i zamrznuti, što dovodi do blokiranja izlaza distributera. Led u kutiji za skladištenje leda treba
ručno ukloniti.
Kada čistite kutiju za skladištenje leda, potrebno je isključiti funkciju ledomata kako bi se izbeglo da led
padne u frižider ili pod.
3. Kako sastaviti i rastaviti kutiju za skladištenje leda
Uhvatite kutiju za skladištenje leda sa obe ruke za kopču, podignite kutiju za skladištenje leda za oko 10
mm uz malu silu, a zatim izvucite kutiju za skladištenje leda iz fiksne kopče;
47
SRB
Nakon što izvadite kutiju za skladištenje leda, izvadite unutrašnji led ručno i pažljivo, a zatim očistite čistom
vodom.
Nakon čišćenja kutije za skladištenje leda, instalirajte je obrnutim postupkom.
NAPOMENA
• Ne koristite kiseline, hemijske rastvarače (alkohol, tečnost za pranje sudova) i druga sredstva za ribanje;
• Nakon čišćenja, potrebno je dobro osušiti ledenicu pre postavljanja u frižider kako bi se izbeglo
zamrzavanje leda;
• Koristite čist peškir za čišćenje otvora za led, nemojte pritiskati unutrašnju strukturu previše sile da ne
biste oštetili unutrašnji mehanizam;
• Ne stavljajte ništa drugo u otvor za led kako biste izbegli blokiranje izlaza za led;
• Ne dozvolite detetu da se penje na frižider, inače može pasti i povrediti ljude.
• Ne stavljajte prste, ruke ili bilo koje druge neprikladne predmete u otvor za led ili kantu za led. To može
prouzrokovati telesne povrede ili materijalnu štetu
Odmrzavanje
• Duboko zamrznuta ili zaleđena hrana, pre
upotrebe, može biti odmrznuta ili u pregradama
frižidera ili na sobnoj temperaturi, u zavisnosti
od raspoloživog vremena.
• Manji komadi se mogu čak pripremati za jelo
iako su i dalje zaleđeni, direktno iz zamrzivača. U
ovom slučaju priprema hrane traje druže.
Kocke leda
Ovaj uređaj možda nije opremljen jednom ili više
posuda za pravljenje kocki leda.
Prateći elementi
Police koje se mogu
pomerati
Zidovi frižidera imaju niz
žljebova, tako da se police
mogu podešavati po želji.
48
SRB
Gorenavedeni podaci predstavljaju preporuke u vezi sa temperaturnim podešavanjima, koje su
namenjene korisnicima.
Sobna temperatura Temperaturna podešavanja
Letnja
Frižider je podešen na 4°C
Zamrzivač je podešen na -18°C
Normalna
Frižider je podešen na 4°C
Zamrzivač je podešen na -18°C
Zimska
Frižider je podešen na 4°C
Zamrzivač je podešen na -18°C
Preporuka za temperaturna podešavanja
Podešavanje polica na vratima
Kako biste omogućili odlaganje hrane različitih veličina, police
na vratima mogu biti podešena na različite nivoe. Kako biste ovo
prilagodili, učinite sledeće: postepeno spuštajte policu u smeru
strelice, dok se bude slobodna, a onda je pozicionirajte po potrebi.
Dnevna upotreba
Različitu hranu stavljajte u različite odeljke u skladu sa podacima navedenim u sledećoj tabeli:
Odeljci frižidera Vrsta hrane
Vrata ili police u vratima odeljka
za frižider
• Hrana sa prirodnim konzervansima, poput džemova, sokova, pića,
dodataka jelu.
• Nemojte držati lako kvarljivu hranu.
Crisper fioka za čuvanje svežine
(fioka za salatu)
• Voće, začinsko bilje i povrće treba držati zasebno, u crisper fioci za
čuvanje svežine.
• Nemojte držati banane, crni luk, krompir ili beli luk u frižideru.
Polica frižidera – središnja • Mlečni proizvodi, jaja
Polica frižidera – gornja
• Hrana koju nije potrebno kuvati, poput gotove hrane, mesnih
prerađevina, ostataka hrane.
Fioka(e)/polica zamrzivača
• Namirnice koje se drže tokom dužeg vremenskog perioda.
• Donja fioka/polica za sveže meso, živinsko meso, ribu.
• Srednja fioka/polica za smrznuto povrće, pomfrit.
• Gornja fioka/polica za sladoled, smrznuto voće, smrznutu kuvanu
hranu.
49
SRB
Uticaj na čuvanje hrane
• Pri preporučenim podešavanjima, hranu je u frižideru najbolje čuvati ne duže od 3 dana.
• Pri preporučenim podešavanjima, hranu je u zamrzivaču najbolje čuvati ne duže od 1 meseca.
• Preporučeni period čuvanja hrane može postati kraći pri drugim vrednostima podešavanja.
Saveti za zamrzavanje
Kako bismo vam pomogli da što bolje iskoristite
proces zamrzavanja, evo nekih važnih saveta:
• maksimalna količina hrane koja može biti
zaleđena u 24 sata je navedena na tablici
specifikacije;
• proces zamrzavanja traje 24 sata. Tokom
ovog perioda nemojte dodavati još hrane,
predviđene da se zamrzne.
• zamrzavajte samo kvalitetnu, svežu i potpuno
očišćenu hranu;
• hrana treba da bude podeljena u manje
porcije, kako bi bilo omogućeno brže i potpuno
zamrzavanje, i kako bi se kasnije mogla
odmrznuti samo potrebna količina;
• hranu zavijte u aluminijumsku ili polietilensku
foliju i pobrinite se da pakovanja ne propuštaju
vazduh;
• nemojte da dozvolite da sveža, nezaleđena
hrana dodiruje već zaleđenu, kako biste izbegli
porast temperature;
• nemasna hrana se čuva bolje i duže od masne;
so smanjuje vek trajanja čuvane hrane;
• ukoliko se kockice leda upotrebe odmah nakon
što su izvađene iz zamrzivača, mogu izazvati
promrzline na koži;
• uklanjanje hrane iz dela za zamrzavanje može
izazvati promrzline na koži;
• savetuje se, da na svakom paketiću smrznute
hrane navedete datum zamrzavanja, da biste
znali koliko dugo se čuva.
Saveti za čuvanje zamrznute
hrane
Kako biste dobili najbolji učinak od ovog uređaja,
treba da:
• da proverite, da je komercijalno zamrznutu
hranu adekvatno čuvao prodavac;
• postarajte se da hrana bude prenesena
od prodavnice do zamrzivača u najkraćem
mogućem roku;
• ne otvarajte vrata često, i ne ostavljajte ih
otvorena duže nego što je potrebno. Hrana koja
se jednom odmrzne brzo propada i ne može
biti ponovo zamrznuta.
• Nemojte prekoračivati rok za čuvanje, koji je
naznačio proizvođač.
Saveti za hlađenje sveže
hrane
Kako biste dobili najbolji učinak:
• Ne čuvajte vruću hranu ili tečnosti koje isparavaju
u frižideru
• Pokrijte ili uvijte hranu, naročito ako ima jak miris
Saveti za čuvanje hrane u
frižideru
• Meso: uvijte u polietilenske kese i stavite na
staklene police iznad fioke za povrće.
• Radi sigurnosti, hranu na ovaj način čuvajte
jedan dan, najviše dva.
• Kuvana hrana, hladna jela, itd...: treba ih pokriti i
mogu se odložiti na bilo koju policu.
• Voće i povrće: treba da bude temeljno oprano
i odloženo u fioke, namenjene za njihovo
čuvanje.
• buter i sir: treba da budu stavljeni u specijalne
posude koje ne propuštaju vazduh, ili zavijeni u
aluminijumske folije ili polietilenske kese kako bi
se uklonilo što više vazduha.
• Boce s mlekom/jogurtom: treba da budu
zatvorene i da se čuvaju u policama na vratima.
• Banane, krompir, luk i beli luk, ukoliko nisu
zapakovani, ne smeju biti čuvani u frižideru.
Čišćenje
Iz higijenskih razloga unutrašnjost uređaja,
uključujući i unutrašnje elemente, treba čistiti
redovno.
OPREZ!
Uređaj ne sme biti povezan strujom tokom
čišćenja. Postoji opasnost od strujnog udara! Pre
čišćenja uređaja, isključite ga i prekinite dotok
električne energije, ili isključite automatsku sklopku
ili osigurač. Uređaj nikako ne čistite paročistačem.
Vlaga može da se nakupi u električnim
komponentama, opasnost od strujnog udara! Vrela
isparenja mogu dovesti do oštećenja plastičnih
delova. Uređaj mora biti suv pre ponovne
upotrebe.
KORISNI SAVETI
50
SRB
VAŽNO! Eterična ulja i organski rastvarači mogu
nagristi plastične delove, na primer limunov sok, ili
sok od pomorandžine kore, karboksilne kiseline ili
sredstva koja sadrže sirćetnu kiselinu.
• Ne dozvolite da ovakve supstance dođu u
kontakt sa delovima uređaja.
• Nemojte koristi abrazivna sredstva za čišćenje
• Uklonite hranu iz zamrzivača. Hranu čuvajte na
hladnom mestu, i dobro je pokrijte.
• Isključite uređaj i prekinite dotok električne
energije, ili isključite automatsku sklopku ili
osigurač.
• Očistite uređaj i unutrašnje elemente tkaninom i
mlakom vodom. Nakon čišćenja isperite čistom
vodom i osušite krpom.
• Nakon što sve bude suvo, ponovo uključite
uređaj.
OPREZ!
Pre rešavanja problema, prekinite napajanje električnom energijom. Samo kvalifikovani električar ili
kompetentna osoba treba da reši problem koji nije naveden u ovom uputstvu.
VAŽNO! Postoje određeni zvukovi, koje uređaj proizvodi tokom normalne upotrebe (kompresor, rashladni
deo uređaja).
REŠAVANJE PROBLEMA
Problem Mogući uzrok Rešenje
Uređaj ne radi
Utikač nije uključen ili je prekinut Utaknite utikač.
Osigurač je ispao ili je
neispravan.
Proverite osigurač, zamenite ga
ako je potrebno.
Utičnica je neispravna.
Kvarove utikača treba da
popravi električar.
Uređaj zamrzava ili hladi previše
Podešena temperatura je
previše niska ili uređaj radi u
režimu SUPER.
Okrenite privremeno regulator
temperature na neku višu
temperaturu.
Hrana se nedovoljno zamrzava
Temperatura nije pravilno
podešena.
Pogledajte odeljak o početnom
podešavanju temperature u
odeljku Podešavanja.
Vrata su bila otvorena duže
vremena.
Držite vrata otvorenim samo
onoliko, koliko je potrebno.
Velika količina tople hrane je
stavljena u uređaj u poslednja
24 sata.
Okrenite privremeno regulator
temperature na neku nižu
temperaturu.
Uređaj je blizu izvora toplote.
Molimo vas, pogledajte odeljak
za lokaciju i instalaciju.
Nagomilan led na gumi na
vratima.
Guma na vratima propušta
vazduh.
Pažljivo zagrejte deo koji
propušta na gumi na vratima
fenom za kosu (podešenom na
hladno). Istovremeno podesite,
zagrejani deo gume na vratima
rukom, tako da pravilno naleže.
Neobični zvukovi
Uređaj nije nivelisan. Ponovo podesite nožice.
Uređaj dodiruje zid ili druge
predmete.
Malo pomerite uređaj.
Deo, kao što je cevovod na
zadnjoj strani uređaja, dodiruje
druge delove uređaja ili zid.
Ukoliko je potrebno, pažljivo
uklonite deo koji predstavlja
prepreku.

51
SRB
Ukoliko se kvar pojavi ponovo, kontaktirajte Servisni centar.
Ove informacije su potrebne, kako bi Vam se pomoglo u što kraćem roku i što ispravnije. Ovde unesite
potrebne podatke, u skladu sa tablicom specifikacije.
Bočni panel je vreo
Ovo je normalno. Delovi koji
obavljaju funkciju izmenjivanja
toplote se nalaze na bočnim
stranama.
Ukoliko je potrebno, stavite
rukavice prilikom dodirivanja
ovih strana.
Dispenzer nije mogao da
dobije rashladnu vodu
Nemogućnost pristupa dotoku
vode ili otvaranje ventila za vodu
Uverite se da su izvor vode i
ventil otvoreni
Filter nije pravilno instaliran
Proverite da li je smer filtera
obrnut
Vodeni ventil ili konektori nisu
pravilno instalirani
Proverite da li su ventil za vodu ili
konektori obrnuti
Voda nije dovoljno ohlađena
Temperatura frižidera je
podešena na previsoku
Podesite nižu temperaturu
frižidera
Uzmi previše vode u jednom
trenutku (1L)
Sačekajte da se voda ohladi
Uzimajte vodu tako često Sačekajte da se voda ohladi
Dispenzer nije mogao
da dobije led
Nema leda u kutiji za
skladištenje
Sačekajte da ledomat završi
pravljenje leda (prvi put u
frižideru treba da se potpuno
ohladi, ledomat će početi da
pravi led);
Nepristup izvorištu vode ili
otvorite ventil za vodu
Uverite se da su izvor vode i
ventil otvoreni
Režim „isključen led“ radi,
prestaće da pravi led
Isključite režim „isključen led“.
Pritisak izvora vode nije dovoljan
Uverite se da je pritisak izvorne
vode 1,5 ~ 7 bara
Vodeni ventil ili konektori nisu
pravilno instalirani
Proverite da li su ventil za vodu ili
konektori obrnuti
Filter nije pravilno instaliran
Proverite da li je smer filtera
obrnut
Kocke leda su zamrznute
zajedno u kutiji za skladištenje
da blokiraju izlaz za led
Uklonite zamrznute kockice leda
U kutiji za skladištenje ima nešto
tvrdo, što sprečava rad motora
Uklonite stvar koja blokira izlaz
Vrata nisu potpuno zatvorena,
što će dovesti do curenja
hladnog vazduha
Uverite se da su vrata potpuno
zatvorena
Kockice leda ili vode su
premale
Pritisak izvora vode nije dovoljan
Uverite se da je pritisak izvorne
vode 1,5 ~ 7 bara
Filter za vodu je blokiran jer je
korišćen predugo
Zamenite novi filter za vodu
Merač protoka vode je
neispravan
Kontaktirajte osoblje za
održavanje
52
SRB
Zaštita životne sredine
Ovaj uređaj ne sadrži gasove, koji mogu oštetiti
ozonski omotač, ni u sistemu za hlađenje, ni u
materijalima za izolaciju. Uređaj ne bi trebalo odlagati
zajedno sa gradskim ili kućnim otpadom. Izolaciona
pena sadrži zapaljive gasove: uređaj bi trebalo odložiti
u skladu sa propisima za uređaje, koje su izdale lokale
vlasti. Izbegavajte pravljenje oštećenja dela za hlađenje,
posebno dela za razmenu toplote. Materijali korišćeni
za ovaj uređaj, mogu se reciklirati ukoliko su označeni
simbolom za reciklažu.
Oznaka na proizvodu, ili njegovom pakovanju,
ukazuje da ovaj proizvod ne sme biti tretiran kao
otpad nastao u domaćinstvu. Umesto toga, treba ga
ostaviti na odgovarajućem mestu, na kojem se sakuplja
električna i elektronska oprema. Osiguravanjem da je
proizvod ispravno odložen, pomoćićete sprečavanju
potencijalnih negativnih posledica po životnu sredinu i
ljudsko zdravlje, koje inače mogu biti uzrokovane
nepravilnim odlaganjem otpada ovog uređaja. Za više
detalja o recikliranju ovog proizvoda, molimo vas da
kontaktirate svoju lokalni organ za zaštitu životne sredine,
preduzeće za odlaganje komunalnog otpada ili
prodavnicu, u kojoj ste kupili proizvod.
Materijali ambalaže
Materijali označeni ovim simbolom mogu se reciklirati.
Ambalažu odložite u odgovarajući konterjner za
prikupljanje otpada za reciklažu.
Odlaganje uređaja
1. Prekinite napajanje uređaja strujom.
2. Odsecite kabl za napajanje i odložite ga.
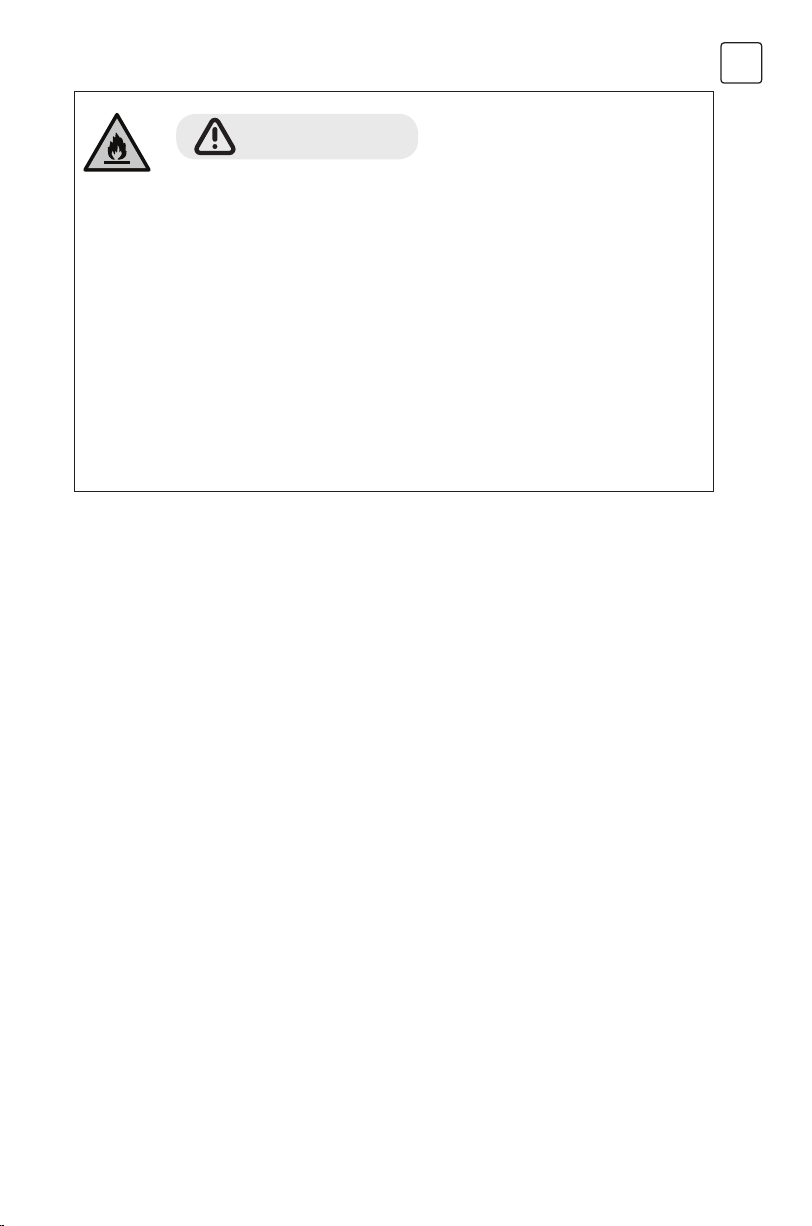
53
SRB
UPOZORENJE!
Prilikom upotrebe, servisiranja i odlaganja
uređaja, imajte u vidu oznaku žute ili
narandžaste boje, sličnu onoj prikazanoj na
slici levo, koja se nalazi na poleđini uređaja
(tabla ili kompresor na poleđini uređaja).
Ova oznaka predstavlja simbol rizika od
požara. U cevima za rashladno sredstvo i u
kompresoru se nalaze zapaljivi materijali.
Molimo Vas da tokom upotrebe, servisiranja i
odlaganja, uređaj držite dalje od izvora vatre.

54
SRB
LIST SA INFORMACIJAMA O PROIZVODU
DELEGIRANA UREDBA KOMISIJE (EU) 2019/2016
Naziv ili zaštitni znak dobavljača: Tesla
Adresa dobavljača: Tesla Electronics, Litijska 47, 1000 Ljubljana, Sl
Identifikaciona oznaka modela: RB5210FHXI
Tip uređaja za rashlađivanje:
Uređaj sa niskim nivoom buke: Tip dizajna: samostojeći
Uređaj za čuvanje vina: Ostali uređaji za rashlađivanje:
Opšti parametri proizvoda:
Parametar Vrednost Parametar Vrednost
Ukupne
dimenzije (u
milimetrima)
Visina
Ukupna zapremina (dm
3
ili l)Širina
Dubina
Indeks energetske efikasnosti
– EEI
Klasa energetske efikasnosti
Emisija buke u vazduhu
(dB(A) re 1 pW)
Klasa emisije buke u vazduhu
Godišnja potrošnja energije
(kWh/a)
Klimatska klasa:
Minimalna ambijentalna
temperatura (˚C), koja je
odgovarajuća za ovaj uređaj za
rashlađivanje
Maksimalna ambijentalna
temperatura (˚C), koja je
odgovarajuća za ovaj uređaj za
rashlađivanje
Podešavanja za zimu
Parametri odeljaka:
Tip odeljka
Parametri odeljka i vrednosti
Zapremina
odeljka
(dm
3
ili l)
Preporučeno
podešavanje
temperature za
optimizovano
čuvanje hrane (˚C)
Ova podešavanja
ne smeju biti u
suprotnosti sa
uslovima čuvanja
definisanim u
Aneksu IV, tabela 3
Kapacitet
zamrzavanja
(kg/24h)
Tip otapanja
(automatsko
otapanje=A,
manuelno
otapanje=M)
Ostava
Ostava za vino
Podrum
Sveža hrana
Rashlađivanje
55
SRB
0 zvezdica ili
pravljenje leda
1 zvezdica
2 zvezdice
3 zvezdice
4 zvezdice
Odeljak sa 2 zvezdice
Odeljak sa
varijabilnom
temperaturom
Za odeljke sa 4 zvezdice
Prostor za brzo zamrzavanje
Parametri izvora osvetljenja:
Tip izvora osvetljenja
Klasa energetske efikasnosti
Minimalno trajanje garancije koju daje proizvođač: 24 meseca
Dodatne informacije:
Link ka veb-sajtu proizvođača gde se mogu pronaći informacije iz tačke 4(a) Aneksa Uredbe Komisije
(EU) 2019/2019: tesla.info

tesla.info