Loading ...
Loading ...
Loading ...

7
ENGLISH
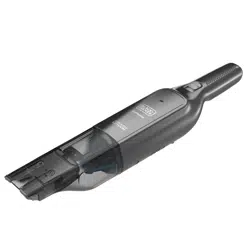
Accessory Tools (Fig.F)
This vacuum comes with two accessorytools.
‑ Brush
8
.
‑ Crevicetool
9
.
• Either accessory tool can be fitted directly to the nozzle
6
as shown in Fig. F.
Extendable Suction Tool (Fig.A, E)
An extendable suction tool
7
is built into the nozzle
6
.
1. Pull the extendable suction tool
7
outward until it locks
intoposition.
2. The extendable suction tool can be opened by folding
the sides outward. There are multiple angles of operation
asshown.
3. To store the extendable suction tool into the nozzle
fold the sides inward together as shown and press the
stopping rib
21
.
4. Push the extendable suction tool into the nozzle until it
locks intoposition.
NOTE: If the extendable suction tool pulls completly out
from the dust bowl it can be pressed back in and will lock
intoposition.
Switching ON and OFF (Fig.D)
1. To turn the vac on, slide the ON/OFF switch
1
forward to
the "I" position.
2. To turn the vac off, slide the ON/OFF switch
1
backward
to the "O"position.
3. Return the product to the charger immediately after use
so that it will be ready and fully charged for the next
use. Ensure that the product is fully engaged with the
chargerplug.
OPERATION FIG. A
WARNING: TO REDUCE THE RISK OF
ELECTRIC SHOCK – USE INDOORSONLY.
WARNING: To reduce the risk of
serious personal injury, turn unit OFF before
making any adjustments or removing/installing
attachments or accessories. An accidental start‑up
can causeinjury.
WARNING: Projectile/Respiratory Hazard:
Never use the vac without its filter(10.
WARNING: When not in use position the
unit with the rear of the vacuum facing a wall so that
any inadvertent fall of the unit would contact a wall
and not people orpets.
Assembly (Fig. D)
1. Align the top of the extension tube
7
with the vacuum
inlet
?
as shown in Fig.D.
2. Push the extension tube
7
onto the vacuum inlet
?
so it
locks intoposition.
3. Align the bottom of the extension tube
7
with the floor
brush
?
as shown in Fig.D.
4. Push the bottom of the extension tube
7
onto the floor
brush
?
so it locks intoposition.
5. To remove an accessory, press the accessory release
latch
?
located on the vacuum inlet or the bottom
of the extension tube and gently pull the connected
accessoryoff.
ASSEMBLY AND ADJUSTMENTS
WARNING: To reduce the risk of
serious personal injury, turn unit off and lock
off the tool before making any adjustments or
removing/installing attachments or accessories.
An accidental start‑up can causeinjury.
Charging the Battery (Fig.B, C)
(HLVC315B Only)
WARNING: For use only with the supplied
charger.
From new, the rechargeable cells of the product need a
minimum charge time of 10hours for HLVC315B to ensure
fullpower.
1. The switch must be in the OFF position, the appliance
will not charge if it is in any other position.
2. Fig C - Place the charging station
14
on a flat, stable
surface near a 120 Volt 60 Hz electrical outlet.
3. Place the appliance onto the charging station
14
as
shown in Fig. C.
NOTE: The appliance can then be stored on the charging
station
14
when not in use.
4. Plug the charger
15
into any standard 120Volt 60Hz
electricaloutlet.
5. The charge indicator LED
13
on the center of the main
housing
4
will illuminate whilecharging.
6. The charge indicator LED
13
will turn off upon
completion ofcharging.
NOTE: While charging, the charger may get warm,
this is perfectly normal and safe. It is safe to leave the
appliance connected to the charger indefinitely. The
charger automatically reduces power consumption when
charging iscomplete.
WARNING: Do not charge the battery
at ambient temperatures below 39°F (4°C) or above
104°F (40°C).
Loading ...
Loading ...
Loading ...