ENENFRESDEITRUPTKO
⽇本語
繁體
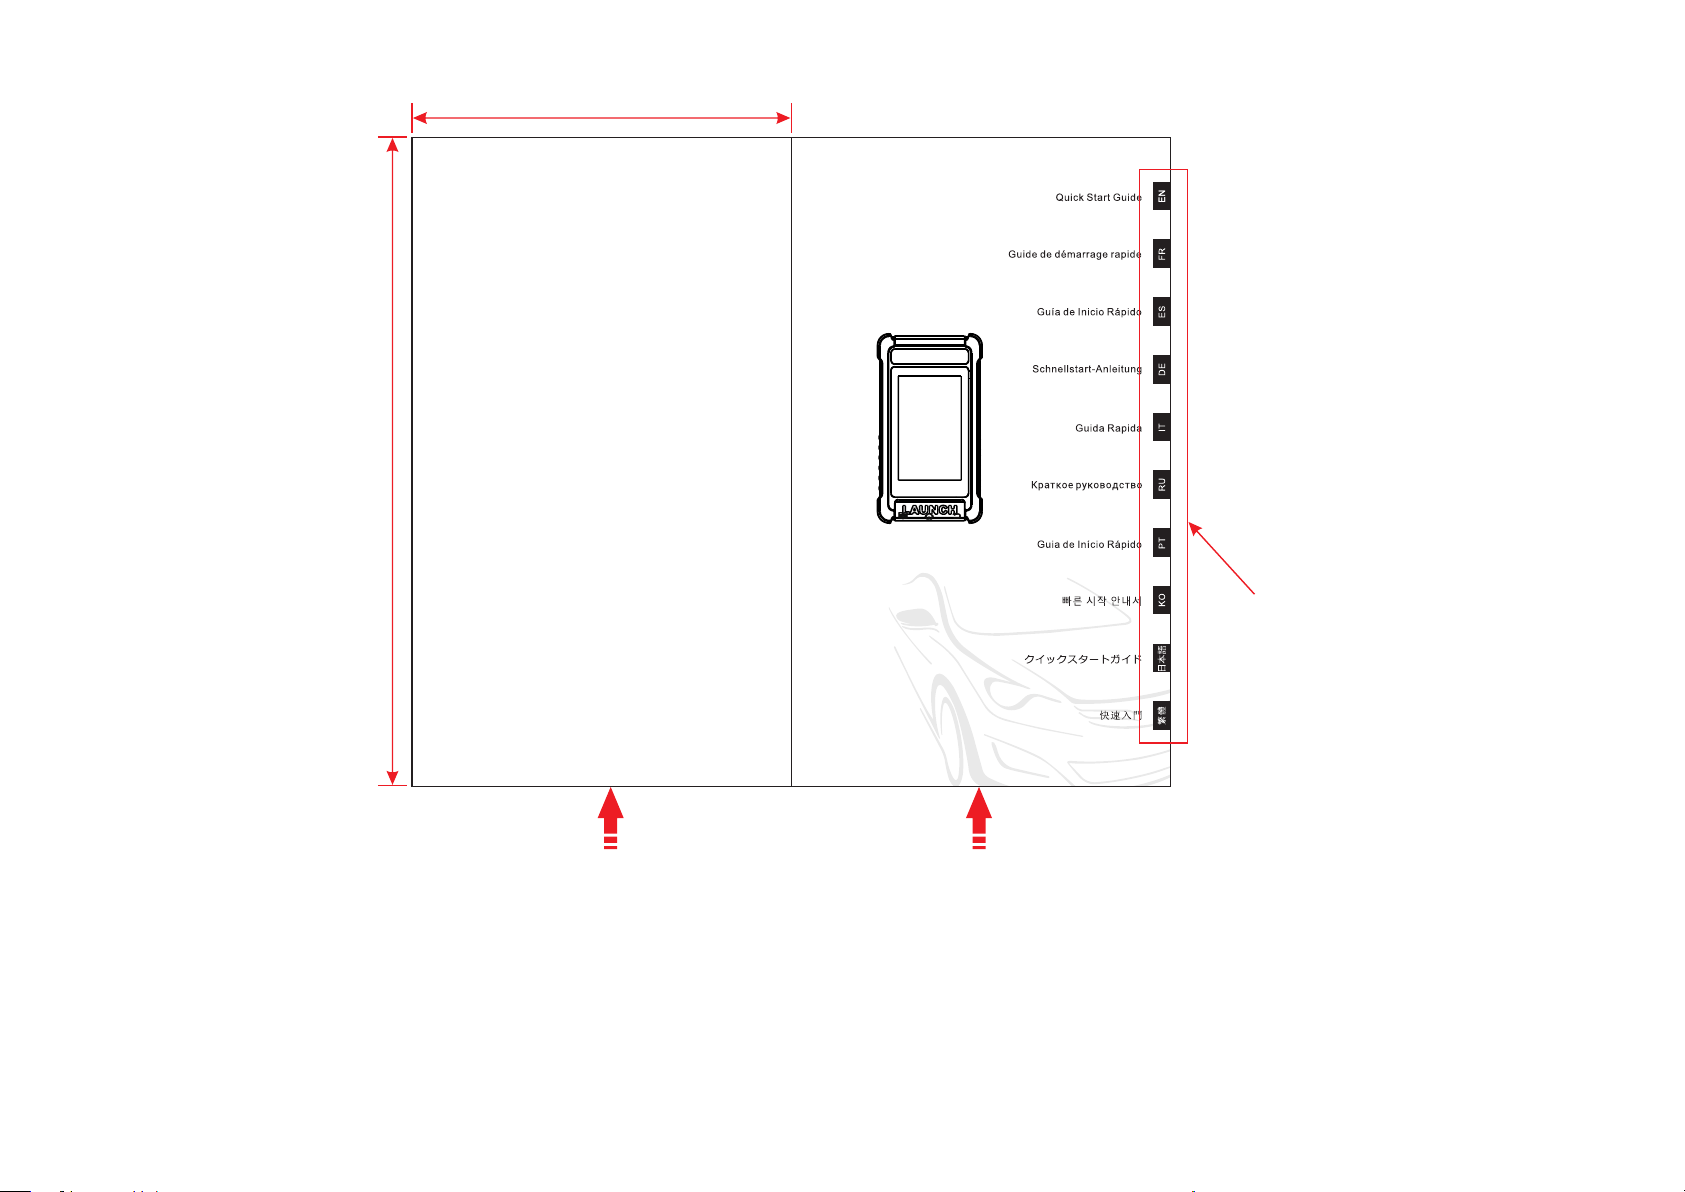
Quick Start Guide
Guide de démarrage rapide
Guía de Inicio Rápido
Schnellstart-Anleitung
Guida Rapida
Краткое руководство
Guia de Início Rápido
빠른 시작 안내서
クイックスタートガイド
快速入 門
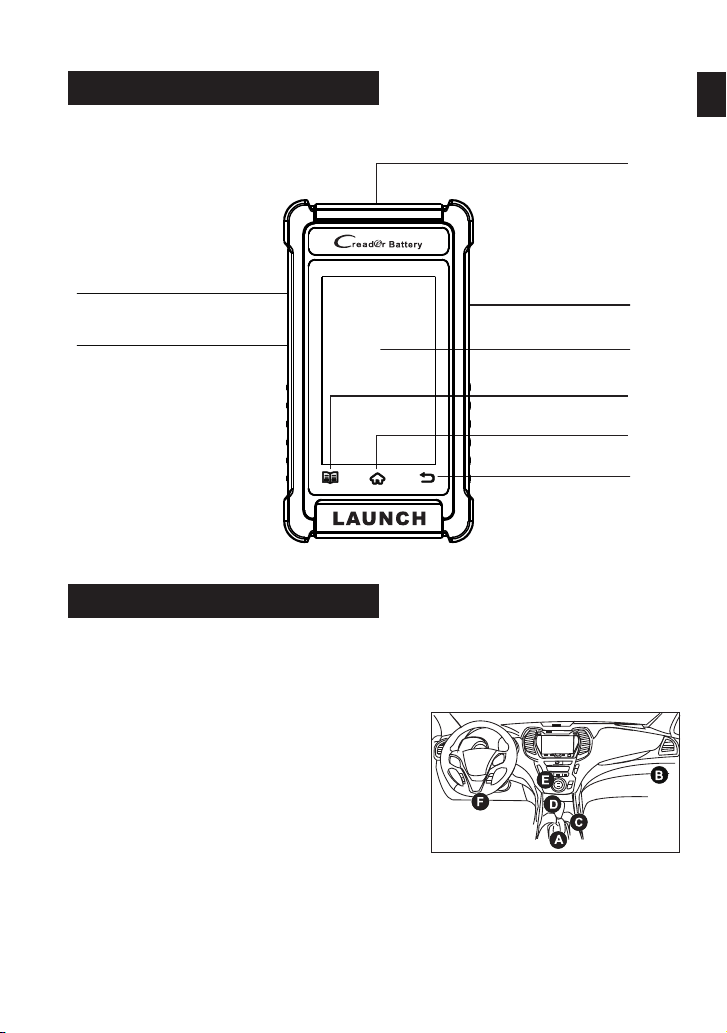
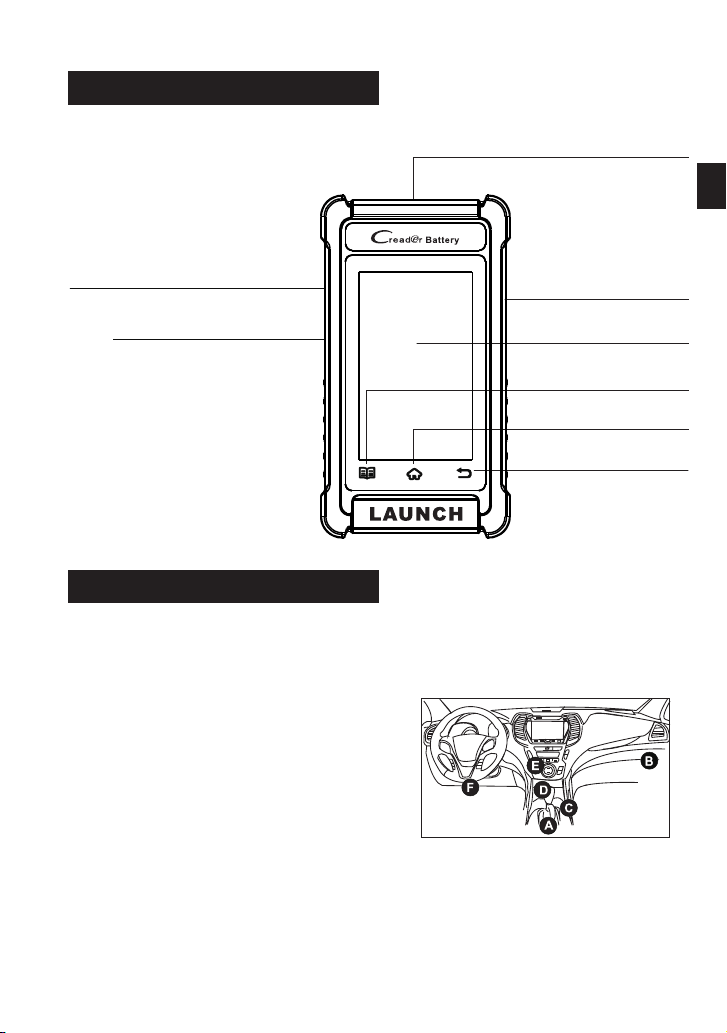
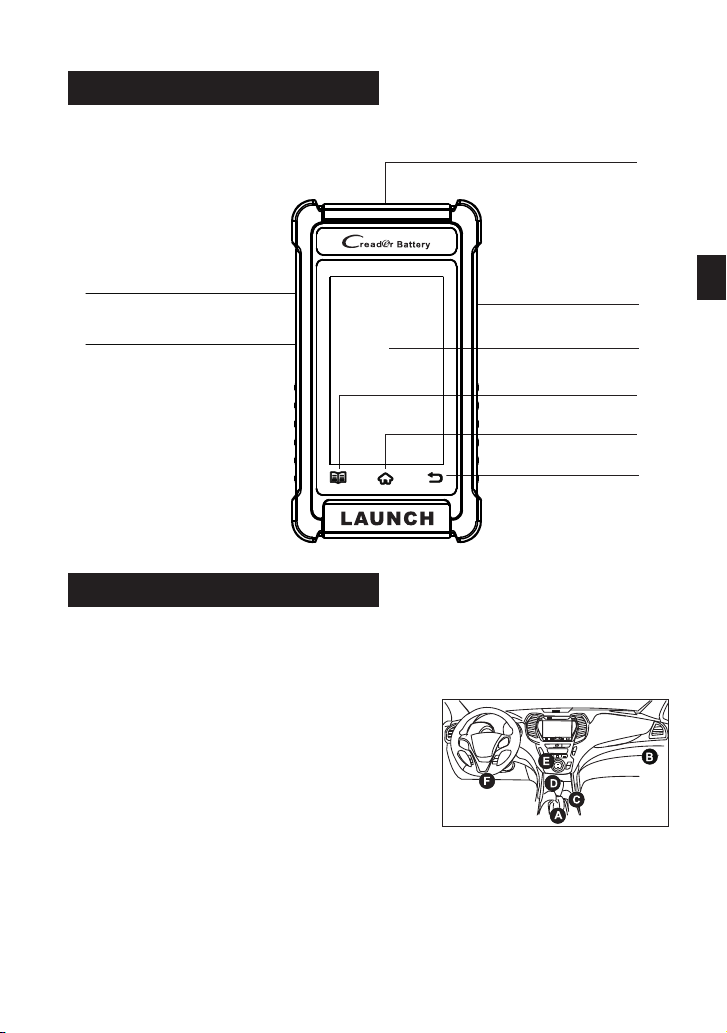
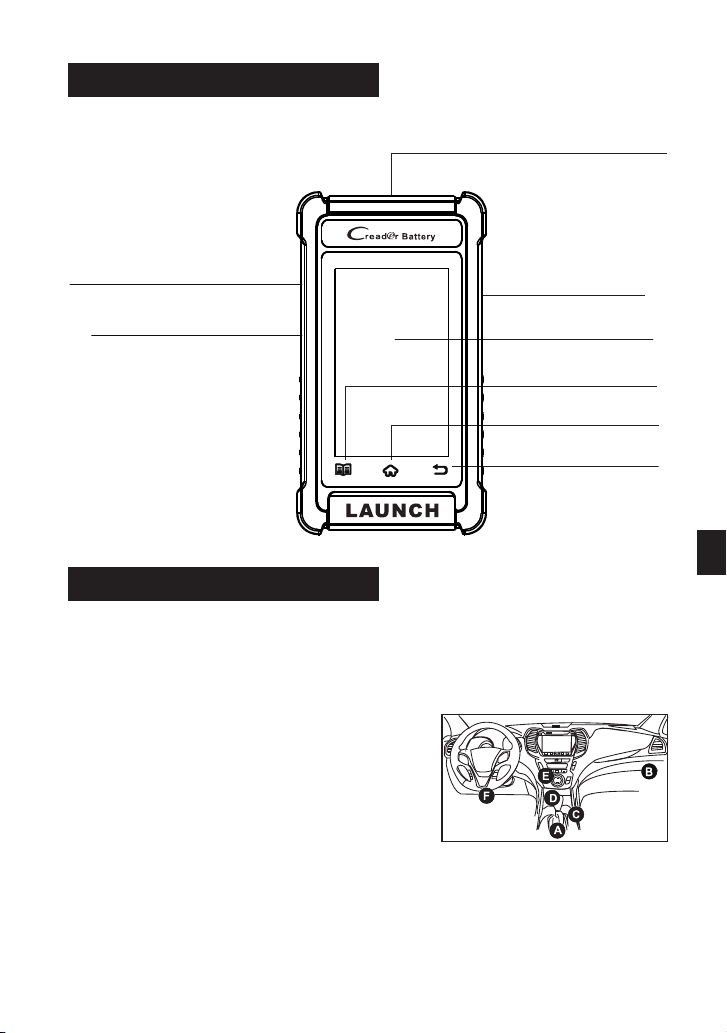
Components & Controls
Powering Up
TouchScreen
SettingButton
PowerButton
HomeButton
ReturnButton
DB15 Diagnostic Connector
Memory Card Slot
(Reserved for future use)
Charging Port
The tool can receive power via either of the following ways:
Method 1: Via Diagnostic Cable
*Note: TheDLCisusuallylocated12
inchesfrom thecenteroftheinstrument
panel(dash), underoraroundthe
driver’ssidefor mostvehicles. See
diagram for possible DLC location.
Connect the diagnostic cable of the tool
to the vehicle’s DLC (Data Link
Connector) port.
Method 2: Via Data Cable
Connect one end of the included data cable to charging port of the tool,
and the other end to the PC.
ENEN

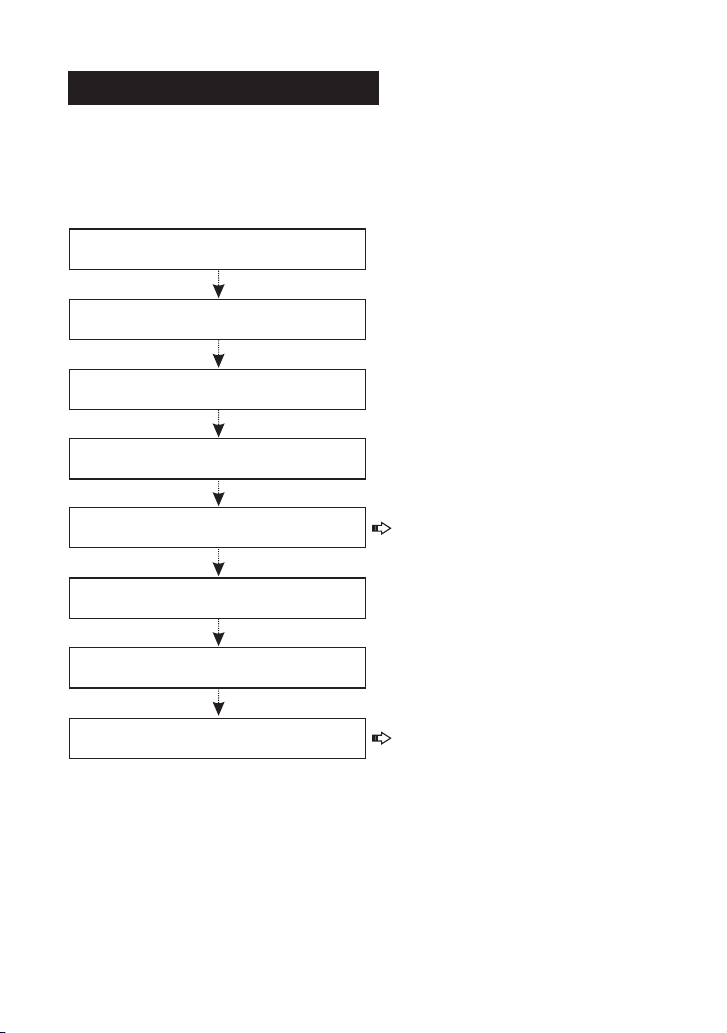
Getting Started
Follow the steps below to proceed.
The first time you use this tool, you will need to make some system
settings and keep the diagnostic software updated with the latest version.
Now the tool is ready for use.
Tap “Start” on Welcome screen
Select system language
Select time zone
WLAN setup
Configure workshop information
Sign user agreement
Job Menu appears
Tap “Upgrade”
*Note: After completing this
step, the system will append it on
the report every time a report is
successfully generated.
*Note: To enjoy more capabilities
and better service, it is strongly
recommended to update the tool
on regular basis.
If you have any questions on the operation of the tool, please contact
customer service number: +86-755-25938674.
For more detailed operations, please refer to the User Manual.
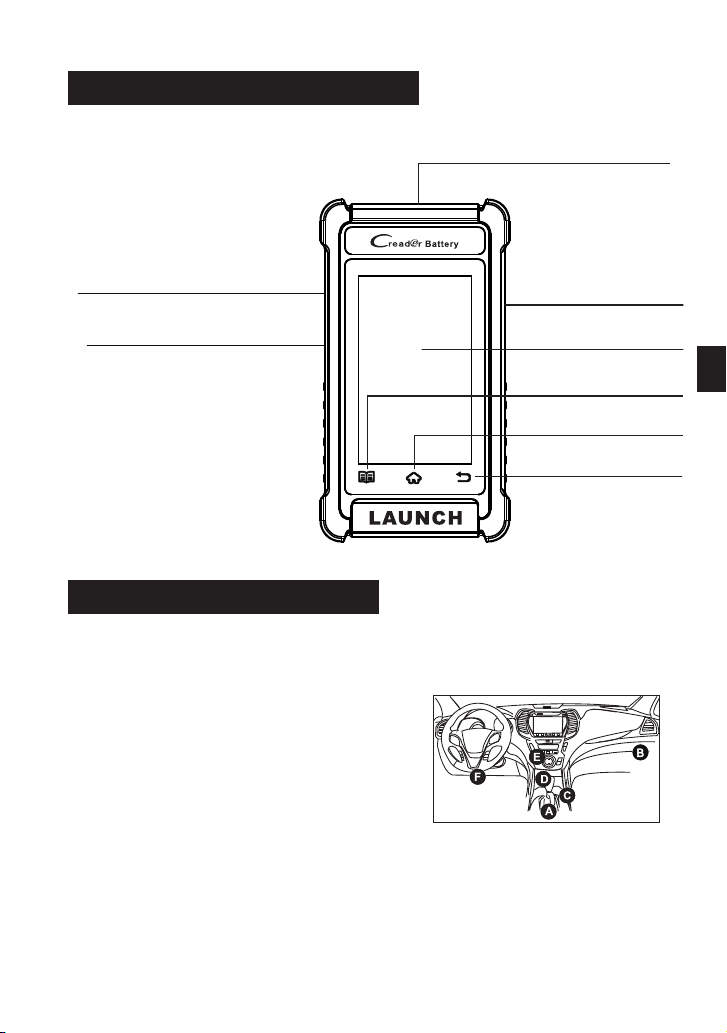
Composant & commandes
Mise sous tension
L'outil peut être alimenté de l'une des manières suivantes:
Méthode 1 : via un câble de diagnostic
Connectez le câble de diagnostic de
l'outil au port DLC (Connecteur de
liaison de données) du véhicule.
*Remarque: le DLC est généralement situé à
12 pouces du centre du tableau de bord
(tableau de bord), sous ou autour du côté
conducteur pour la plupart des véhicules.
Voyez le diagramme pour l'emplacement
possible du DLC.
Connectez une extrémité du câble de données inclus au port de charge
de l'outil et l'autre extrémité au PC.
Méthode 2 : via un câble de données
FR
Écran tactile
Bouton de réglage
Bouton d'accueil
Bouton de retour
Emplacement pour
carte mémoire
(Réservé pour une utilisation future)
Port de charge
Touche Alimentation
Connecteur de diagnostic DB-15

Commencer
Suivez les étapes ci-dessous pour continuer.
La première fois que vous utilisez cet outil, vous devrez effectuer
certains paramètres système et maintenir le logiciel de diagnostic à jour
avec la dernière version.
L'outil est maintenant prêt à être utilisé.
Appuyez sur "Start"
sur l'écran d'accueil
Sélectionnez la langue du système
Sélectionnez le fuseau horaire
Configuration WLAN
Configurer les informations
de l'atelier
Signer le contrat d'utilisation
Le menu Travail apparaît
Appuyez sur « Mettre à niveau »
*Remarque : Une fois cette étape
terminée, le système l'ajoutera au
rapport chaque fois qu'un rapport
sera généré avec succès.
*Remarque : Pour profiter de plus
de fonctionnalités et d'un meilleur
service, il est fortement
recommandé de mettre à jour l'outil
régulièrement.
Si vous avez des questions sur le fonctionnement de l'outil, veuillez contacter
le numéro du service client : +86-755-25938674.
Pour des opérations plus détaillées, veuillez vous référer au manuel de
l'utilisateur.
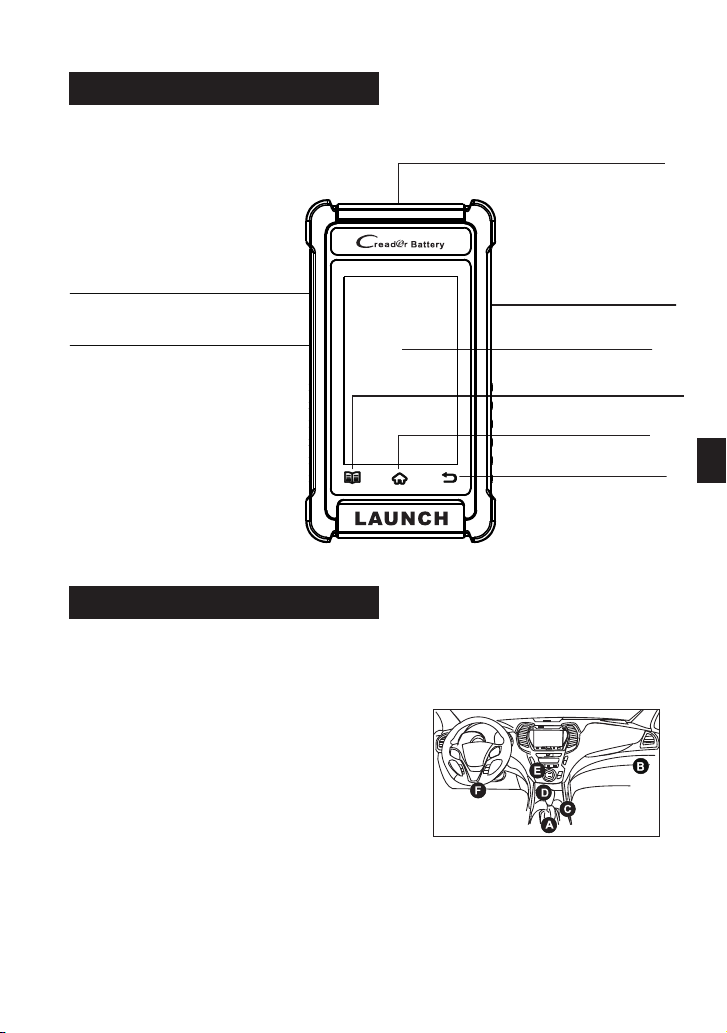
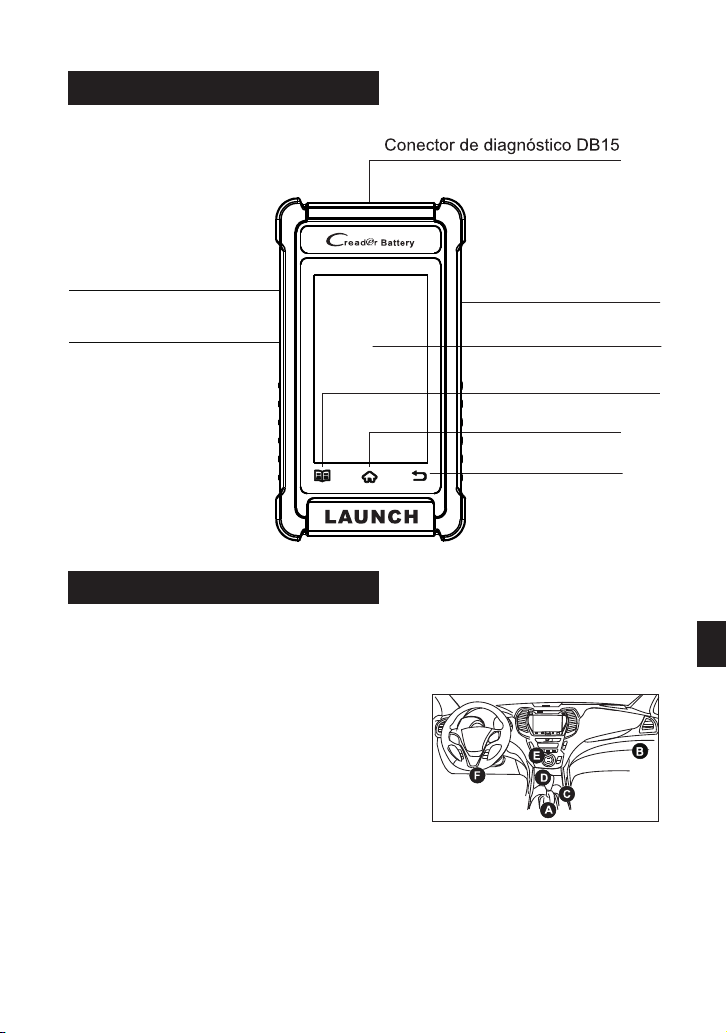
Componentes & Controles
Encendiendo
Pantalla Táctil
Botón de Ajuste
Botón INICIO
Botón Retorno
Ranura para
Tarjeta de Memoria
(Reservado para uso futuro)
Puerto de carga
La herramienta puede recibir energía a través de cualquiera de las
siguientes formas:
Conecte el cable de diagnóstico de la
herramienta al puerto DLC (Data Link
Connector-Conector de Enlace de Datos)
del vehículo.
Método 1: A través del Cable de
Diagnóstico
Conecte un extremo del cable de datos incluido al puerto de carga de la
herramienta y el otro extremo al PC.
Método 2: A través del Cable de Datos
*Nota: El DLC generalmente se encuentra a 12 pulgadas del centro del panel de
instrumentos (tablero), debajo o alrededor del lado del conductor para la mayoría
de los vehículos. Consulte el diagrama para la posible ubicación de DLC.
ES
Tecla Encendido
DB-15 Conector de Diagnóstico

Empezando
La primera vez que utilice esta herramienta, deberá realizar algunos
ajustes del sistema y mantener el software de diagnóstico actualizado
con la última versión.
Siga los pasos a continuación para continuar.
Ahora la herramienta está lista para su uso.
Toque "Inicio" en la
pantalla de bienvenida
Seleccionar idioma del sistema
Seleccionar zona horaria
Configuración de WLAN
Configurar la información del taller
Firmar acuerdo de usuario
Aparece el Menú Trabajo
Toque "Actualizar"
*Nota: Después de completar este
paso, el sistema lo adjuntará al
informe cada vez que se genere
correctamente un informe.
*Nota: Para disfrutar de más
capacidades y un mejor servicio,
se recomienda encarecidamente
actualizar la herramienta de forma
regular.
Si tiene alguna pregunta sobre el funcionamiento de la herramienta, por favor,
póngase en contacto con el número de servicio al cliente: +86-755-25938674.
Para operaciones más detalladas, por favor, consulte el Manual del Usuario.
Komponenten & Bedienelemente
Einschalten
Touchscreen
Einstellungstaste
HOME-Taste
Zurück-Taste
Speicherkartensteckplatz
(Reserviert für zukünftige Verwendung)
Ladeanschluss
Das Gerät kann auf eine der folgenden Arten mit Strom versorgt werden:
*Hinweis: Der DLC befindet sich bei den
meisten Fahrzeugen normalerweise 12 Zoll
von der Mitte der Instrumententafel
(Armaturenbrett) entfernt unter oder um die
Fahrerseite. Siehe Diagramm für möglichen
Ort von DLC.
Methode 1: Über Diagnosekabel
Schließen Sie das Diagnosekabel des
Geräts an den DLC-Anschluss
(Datenübertragungsstecker) des
Fahrzeugs an.
Methode 2: Über Datenkabel
Verbinden Sie ein Ende des mitgelieferten Datenkabels mit dem
Ladeanschluss des Geräts und das andere Ende mit dem PC.
DE
POWER-Taste
DB-15-Diagnosestecker

Erste Schritte
Befolgen Sie die folgenden Schritte, um fortzufahren.
Wenn Sie dieses Gerät zum ersten Mal verwenden, müssen Sie einige
Systemeinstellungen vornehmen und die Diagnosesoftware auf dem
neuesten Stand halten.
Jetzt ist das Gerät einsatzbereit.
Tippen Sie auf dem
Begrüßungsbildschirm auf „Start“
Wählen Sie die Systemsprache aus
Wählen Sie die Zeitzone aus
WLAN-Einstellung
Konfigurieren Sie die
Werkstatt-Informationen
Unterschreiben Sie die
Nutzungsvereinbarung
Job-Menü erscheint
Tippen Sie auf "Upgrade"
*Hinweis: Nach Abschluss dieses
Schritts hängt das System sie jedes
Mal an den Bericht an, wenn ein
Bericht erfolgreich erstellt wurde.
*Hinweis: Um mehr Funktionen und
besseren Service zu genießen, wird
dringend empfohlen, das Gerät
regelmäßig zu aktualisieren.
Detailliertere Bedienungen finden Sie im Benutzerhandbuch.
Bei Fragen zur Bedienung des Geräts wenden Sie sich bitte an die
Kundendienstnummer: +86-755-25938674.
Componente e Controlli
Accensione
Schermo Tattile
Tasto di impostazione
Tasto Home
Pulsante Indietro
Slot per la scheda di memoria
(Riservato per uso futuro)
Porta di ricarica
Lo strumento può ricevere alimentazione tramite uno dei seguenti modi:
*Nota: Il DLC si trova di solito a 12 pollici
dal centro del quadro strumenti (cruscotto),
sotto o attorno al lato del conducente per la
maggior parte dei veicoli. Vedi diagramma
per la posizione DLC possibile.
Collegare il cavo diagnostico dello
strumento alla porta DLC(Connettore
Link Dati) del veicolo.
Metodo 1: Tramite cavo diagnostico
Collegare un'estremità del cavo dati incluso alla presa di ricarica dello
strumento, e l'altra estremità al PC.
Metodo 2: Tramite cavo dati
IT
Chiave d'accensione
Connettore di diagnostica DB-15
Guida introduttiva
La prima volta che si utilizza questo strumento, sarà necessario
effettuare alcune impostazioni di sistema e mantenere software di
diagnostica AGGIORNATO con l'ultima versione.
Attenersi alla seguente procedura per procedere.
Ora lo strumento è già per utilizzare.
Tocca 'Start' nella schermata
iniziale
Selezionare la lingua del sistema
Selezionare il fuso orario
Configurazione WLAN
Configurare le informazioni
dell'officina
Firma contratto utente
Viene visualizzato il menù Lavoro
Tocca 'Aggiornamento'
*Nota: Dopo aver completato
questo step, il sistema lo
aggiungerà al rapporto ogni volta
un report viene generato con
successo.
*Nota: Per godere di più
funzionalità e un servizio migliore,
si consiglia vivamente di
aggiornare lo strumento su base
regolare.
Per operazioni più dettagliate, fare riferimento al Manuale dell'utente.
In caso di domande sul funzionamento dello strumento, contattare il numero del
servizio clienti: +86-755-25938674.
Компоненты и управление
Включение питания
Этот инструмент может получать питание одним из следующих
способов:
Метод 1: Через диагностический
кабель
*Замечание: В большинстве автомобилей
данный разъем обычно расположен на
расстоянии 12 дюймов от центра приборной
панели в зоне водителя. См. диаграмму для
возможного расположения DLC.
Подключите диагностический кабель
инструмента к порту DLC
(диагностический разъём) автомобиля.
Подключите один конец прилагаемого кабеля для передачи данных к
порту зарядки инструмента, а другой конец - к ПК.
Метод 2: Через кабель для передачи данных
RU
Сенсорный экран
Кнопка настройки
Кнопка HOME
Кнопка возврата
Слот для карты памяти
(зарезервирован для
будущего использования)
Порт зарядки
Кнопка питания
Диагностический разъём DB-15

Начало работы
При первом включении прибора требуется сделать некоторые
системные настройки и выполнить обновление до последней версии.
Чтобы продолжить, следуйте инструкциям ниже.
Теперь прибор готов к использованию.
Нажмите “Пуск” на
экране приветствия
Выберите язык системы
Выберите часовой пояс
Настройка WLAN
Настроить информацию
о мастерской
Подписать пользовательское
соглашение
Главное меню появляется
Нажмите 'Обновить'
*Замечание: После завершения
этого шага система будет
добавлять его в отчет каждый раз,
когда отчет будет успешно
создан.
*Замечание: Чтобы получить
больше функций и лучший опыт,
мы рекомендуем вам регулярно
обновлять ПО на своих
устройствах.
Если у Вас есть какие-либо вопросы по этим продуктам, свяжитесь с
нашими специалистами по обслуживанию по телефону: +86-755-25938674.
Вы можете обратиться к руководству пользователя для получения
подробной информации.
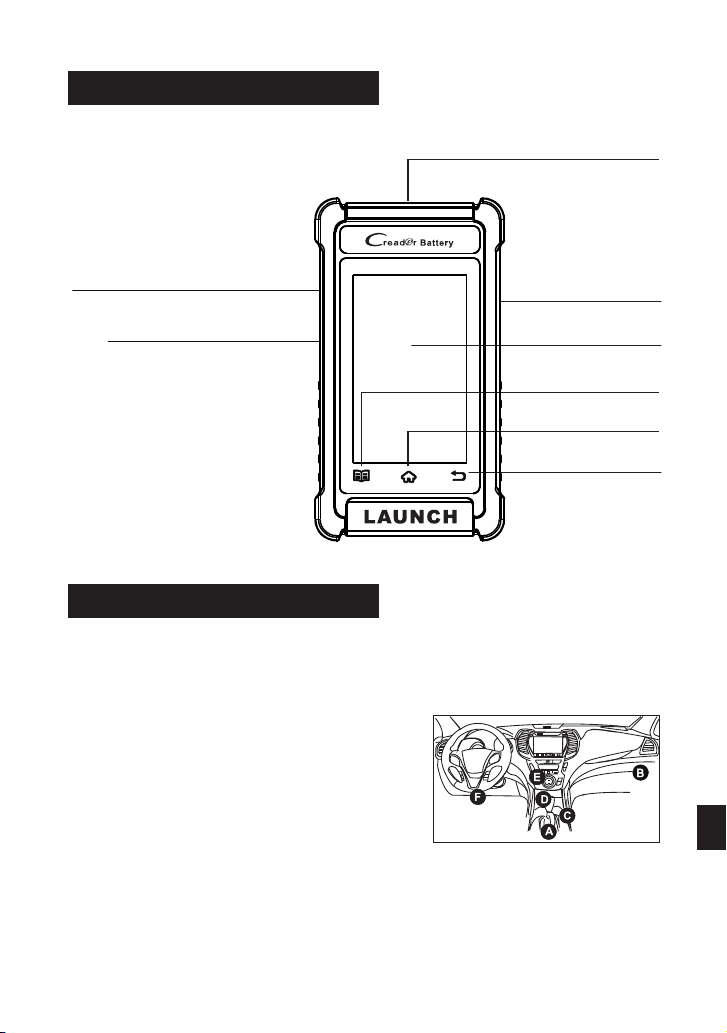
Componente & controles
Ligando
Tela sensível ao toque
Botão de configuração
Botão HOME
Botão de retorno
Ranhura para cartão
de memória
(Reservado para uso futuro)
Porta de carregamento
A ferramenta pode receber energia por uma das seguintes maneiras:
Método 1: via cabo de diagnóstico
Conecte o cabo de diagnóstico da
ferramenta à porta de DLC (Conector de
link de dados) do veículo.
*Nota: O DLC está geralmente localizado a 12
polegadas do centro do painel de instrumentos
(painel), abaixo ou ao redor do lado do
motorista para a maioria dos veículos. Veja o
diagrama para a possível localização do DLC.
Método 2: via cabo de dados
Conecte uma extremidade do cabo de dados incluído à porta de
carregamento da ferramenta e a outra extremidade ao PC.
PT
Chave de ENERGIA

Começando
Na primeira vez que usar esta ferramenta, você precisará fazer algumas
configurações do sistema e manter o software de diagnóstico atualizado
com a versão mais recente.
Siga as etapas abaixo para prosseguir.
Agora a ferramenta está pronta para uso.
Toque em “Iniciar” na
tela de boas-vindas
Selecione o idioma do sistema
Selecione o fuso horário
Configuração de WLAN
Configure as informações da oficina
Assinar contrato de usuário
Menu de Trabalhos aparece
Toque em “Atualizar”
*Nota: Depois de concluir esta
etapa, o sistema irá anexá-lo ao
relatório sempre que um relatório
for gerado com sucesso.
*Observação: para desfrutar de
mais capacidades e melhor serviço,
é altamente recomendável atualizar
a ferramenta regularmente.
Se você tiver alguma dúvida sobre a operação da ferramenta, por favor, entre em
contato com o número de atendimento ao cliente: +86-755-25938674.
Para operações mais detalhadas, por favor, consulte o Manual do Usuário.

부품 및 컨트롤
전원 켜기
터치 스크린
설정 버튼
홈 버튼
리턴 버튼
메모리 카드 슬롯
(향후 사용을 위해 예약됨)
충전 포트
이 도구는 다음 방법 중 하나를 통해 전원을 공급받을 수 있습니다.
방법 1: 진단 케이블을 통해
도구의 진단 케이블을 차량의 DLC(데이터
링크 커넥터) 포트에 연결합니다.
*주의: DLC는 일반적으로 계기판 중앙(대
시)에서 12인치 떨어진 곳에 있으며, 대부분
차량의 운전석 아래 또는 주변에 있습니다.
가능한 DLC 위치는 다이어그램을 참조하
십시오.
포함된 데이터 케이블의 한쪽 끝을 도구의 충전 포트에 연결하고 다른 쪽 끝을
PC에 연결합니다.
방법 2: 데이터 케이블을 통해
KO
전원 버튼

시작하기
이 도구를 처음 사용하는 경우 일부 시스템을 설정하고 진단 소프트웨어를 최
신 버전으로 업데이트해야 합니다.
계속하려면 아래 단계를 따르십시오.
이제 도구를 사용할 준비가 되었습니다.
시작 화면에서 '시작' 누름
시스템 언어 선택
시간대 선택
WLAN 설정
작업장 정보 구성
사용자 동의서 서명
작업 메뉴 표시
'업데이트' 누름
*주의: 이 단계를 완료하면 시스템
은 리포트가 성공적으로 생성될 때
마다 리포트에 추가합니다.
*주의: 더 많은 기능과 더 나은 서
비스를 누리려면 도구를 정기적으
로 업데이트하는 것이 좋습니다.
도구 작동에 대해 질문이 있는 경우 고객 서비스 센터로 연락 주시기 바랍니
다. +8 6-7 55- 259 386 74.
자세한 작업은 사용자 매뉴얼을 참조하십시오.
コンポーネントと制御
電源投 入
タッチスクリー ン
設定ボタン
ホームボタン
戻るボタン
メモリーカード スロ ット
(今後のために予約されている)
充電ポート
ツールは、次のいずれかの方法で電力を受け取ることができます。
ツールの診断ケーブルを車両のDLC
(データリンクコネクタ)ポートに接続
します。
⽅法1:診断ケーブル経由
*注:D LCは通常 、 インス ト ルメン ト パ ネ
ルの 中 心 (ダッ シ ュ)か ら12イ ン チ、ほ
とん どの車 両で は 運転 席側の 下また は周
囲 に 配 置 さ れ ま す 。 可 能 なD L Cの 場 所 に
ついては、図を参照してください。
⽅法2:データケーブル経由
付 属 の デー タ ケ ーブ ル の 一方 の 端 を ツ ー ル の 充 電 ポ ー ト に 接 続 し 、 も
う一方の端をPCに接続します。
⽇本語
電源キー
DB-15 コネクター

開始
この ツ ールを 初 めて 使 用する と きは、 い くつ か のシス テ ム設定 を 行い、
診断ソフトウェアを最新バージョンに更新しておく必要があります。
続行するには、以下の手順に従ってください。
これで、ツールを使用する準備が整いました。
ようこそ画面で 「開 始」
をタップします
システム言語を 選択 する
タイムゾーンを 選択 する
WLANセットア ップ
ワークショップ 情報 を構 成す る
ユーザー契約に 署名 する
ジョブメニュー が表 示さ れる
「アップグレー ド」 をタ ップ する
*注 : こ の 手 順 を 完 了 す る と 、
レ ポ ー ト が 正 常 に 生 成 さ れ る た
び に 、 シ ス テ ム が レ ポ ー ト に 追
加します。
*注 : よ り 多 く の 機 能 と よ り 良
い サ ー ビ ス を 享 受 す る に は 、
ツ ー ル を 定 期 的 に 更 新 す る こ と
を強くお勧めします。
詳細な操作については、ユーザーマニュアルを参照してください。
ツールの 操作 につ いて 質問 があ る場 合は 、カ スタ マー サービス番号+ 8 6 -
7 5 5 - 2 5 9 3 8 6 7 4にお問い合わせください。
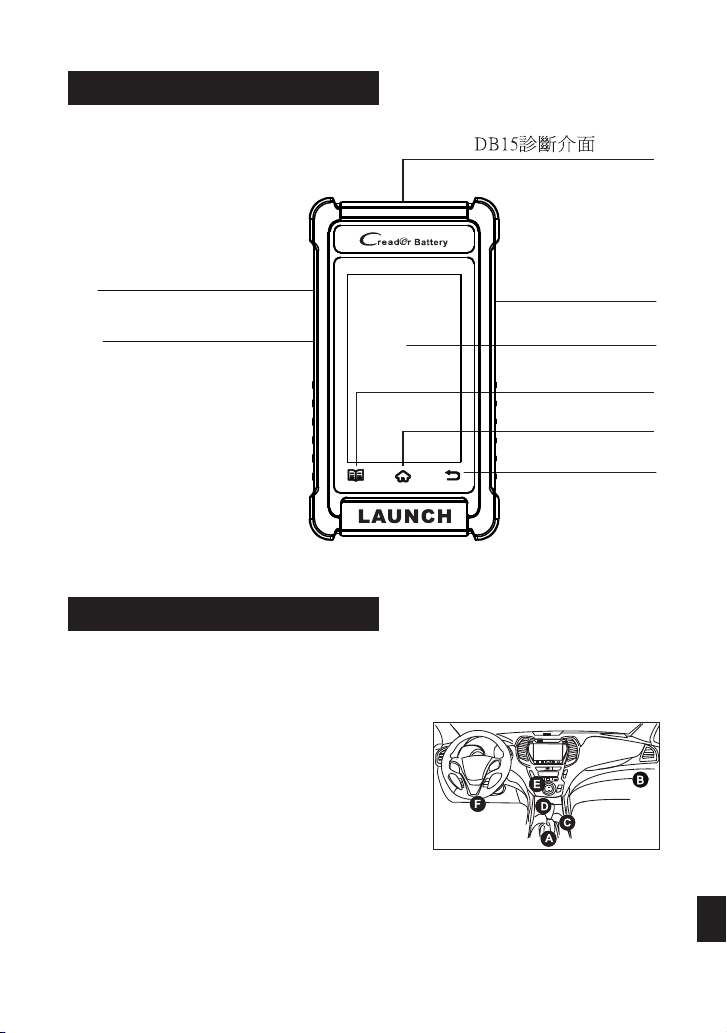
認識產品
供電
觸控式螢幕
設置按鈕
主頁按鈕
返回按鈕
記憶體卡插槽
(供後續功能擴展使用)
充電孔
設備可通過以下任何一種方式取電:
方法1:通過診斷主線
將設備的診斷主線連接至車輛的OBD II診斷
座。
*備註:車輛診斷座一般安裝在駕駛員側,
離儀 錶 盤中央12英寸 的地方 。 用戶可 參照
右圖所示位置進行查找。
將資料線一端連接至設備的充電孔,另一端連接至電腦USB插孔中。
方法2:通過資料線
繁體
電源鍵

首次使用
首次使用時,使用者需進行如下系統設置。設置完成後,請及時更新診斷軟
體。
按照如下步驟進行操作:
現在設備可以正常使用了。
在歡迎頁面上點擊“開始”
選擇系統語言
選擇時區
設置無線網路
設置維修廠資訊
簽訂使用者協議
進入主菜單
點擊“升級”
*備註:設置完維修廠資訊後,每
次診斷完車輛後保存的診斷報告上
都會有該維修廠資訊。
*備註:為讓用戶可以享用更多功
能和更好的體驗,推薦使用者定期
更新設備和軟體。
如果在使用過程中遇到任何問題,可聯繫客服中心:+86-755-25938674。
更多詳細操作,請參照產品說明書。

LAUNCH
LAUNCH
最后一页即封底 首页即封面
封面的语言标签要与
内文页边的语言标签
保持相同位置
装订方式:骑马钉
制作要求:
制作方法:文档大小为128mm(宽)x182mm(高)。封面和内页统一采用80g内页纸,黑白印刷。
182mm
128mm
