
1
Lumalou
™
BETTER BEDTIME
ROUTINE SYSTEM
OWNER’S
MANUAL
GLD09

22
LET'S GET STARTED
1
Download the app ..................................................... 5
2
Mount the Lumalou™ unit and the cord wrap cleat
to the wall .................................................................. 7
3
Pair your device (not included)
to the Lumalou™ unit ...............................................15
4
Setup routines ..........................................................17
5
Set sleep and wake times .......................................18
6
Ready to use ........................................................... 20
33
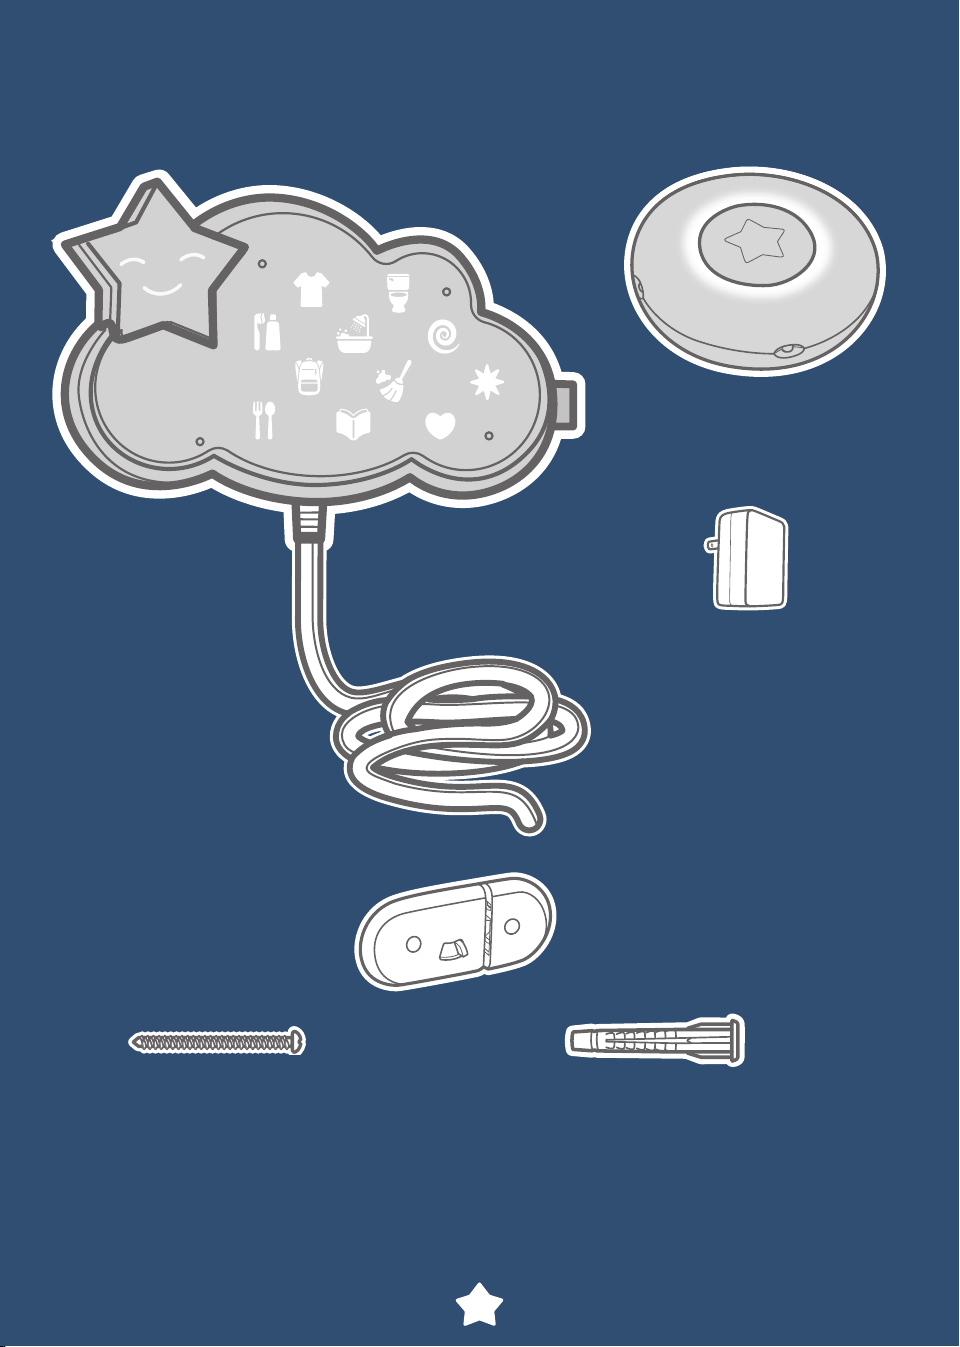
HERE IS WHAT YOU GET
M4 x 25,4 mm Screw 7,6 mm x 25,4 mm
Wall Anchor
x 4 x 4
Includes a cord wrap cleat and wall mounting fasteners.
You supply the drill, drill bit
3
/16" (4,76 mm), hammer,
screwdriver and about 20 minutes of your time.
Remote uses
2 AAA batteries

4
Keep this instruction sheet for future reference, as it contains
important information.
The AC adapter and the Lumalou™ unit are not toys.
Adult assembly is required to mount the Lumalou™ unit and
the cord storage cleat to the wall and install the batteries in
the remote. Tools needed for assembly: electric drill,
3
/16"(4,76 mm) drill bit, hammer and Phillips screwdriver
(tools not included).
Includes two AAA batteries for remote.
Requires an AC adapter (input 100-240 VAC, 50/60Hz,
output: 5 VDC, 1A, 5W) for operation (included).
Current/Power Rating: 0.3A MAX
x2
1,5V
AAA
(LR03)
BEFORE YOU BEGIN
WARNING
Strangulation Hazard – Children have STRANGLED in cords.
Keep the cord out of the reach of children (more than 3 feet-
0,9 meters) away.
5
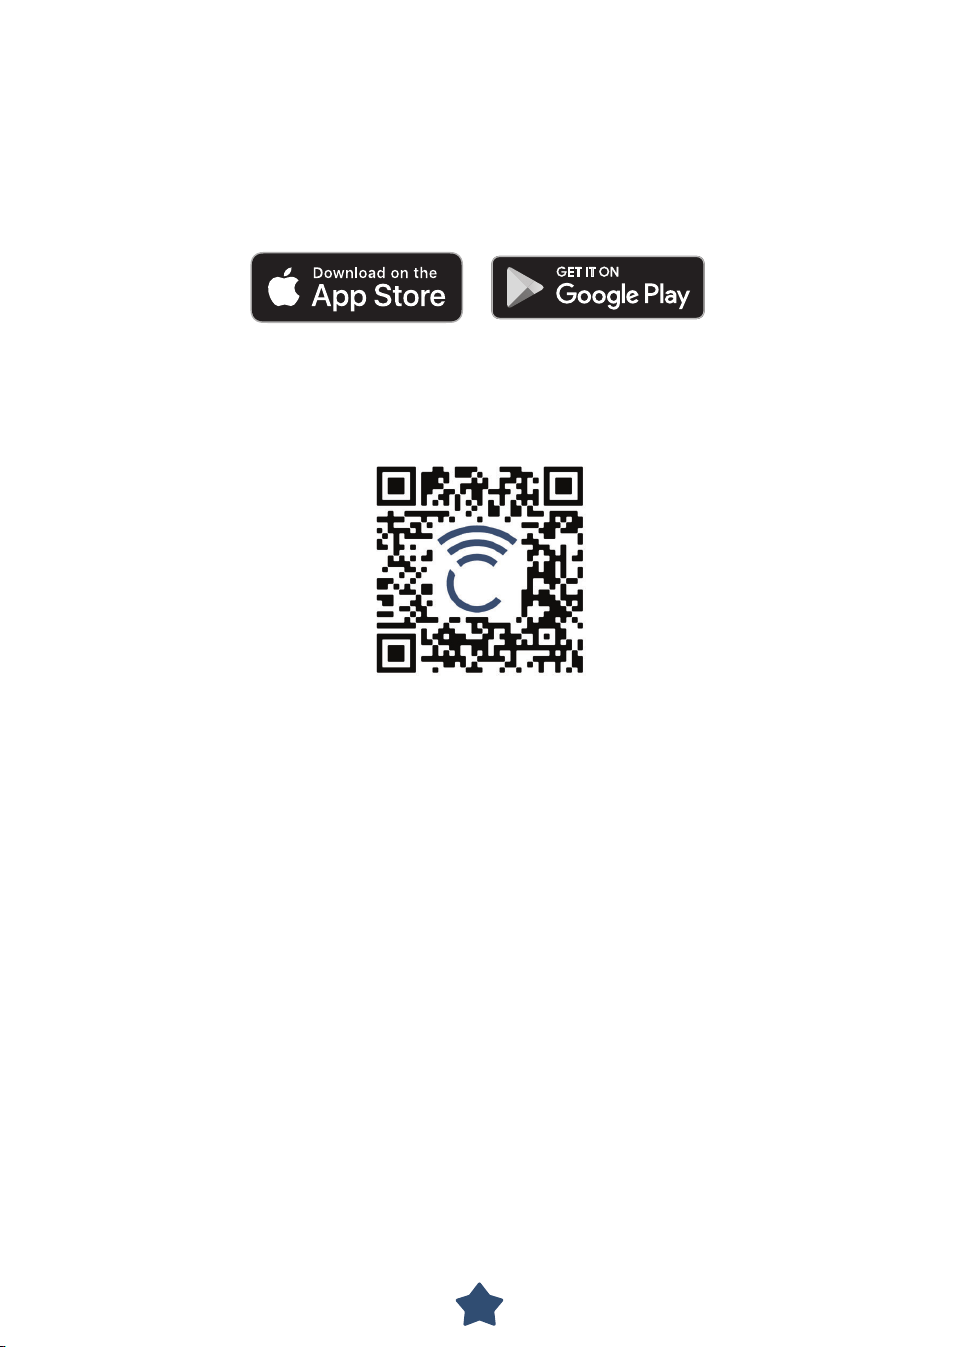
DOWNLOAD THE APP
Most features of this product only work with the Fisher-Price®
Smart Connect™ app.
Download the Fisher-Price® Smart Connect™ app to create routines,
set sleep and wake times and music and light color from your smart device
(not included). The app is available on the App Store® and Google Play™.
We reserve the right to terminate digital applications after April 30, 2022
scan for compatibility
6
MOUNTING INSTRUCTIONS
Be sure to check that the Lumalou™ unit is working. Fit the cord into
the socket in the adapter and plug it in. The clock should immediately
illuminate. Press the button on the remote. Music and light should start.
Next, choose an outlet near where you plan to mount the Lumalou™ unit.
The cord from the Lumalou™ unit should be at least three feet (about one
meter) from your child's crib or bed.
7
141.66 mm
(5,6 inches)
MOUNTING INSTRUCTIONS
1
2
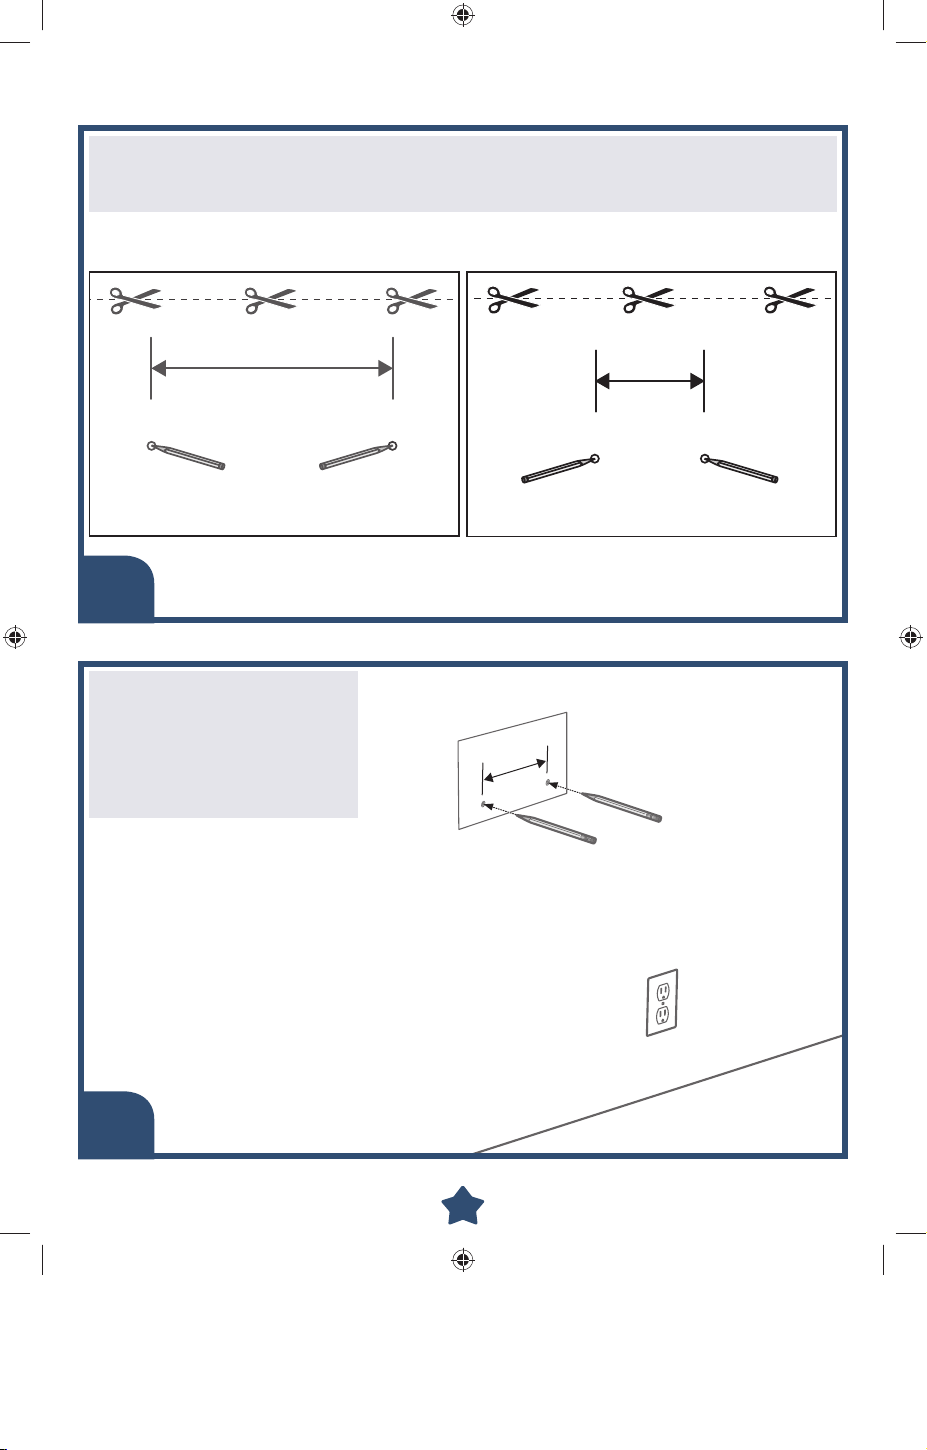
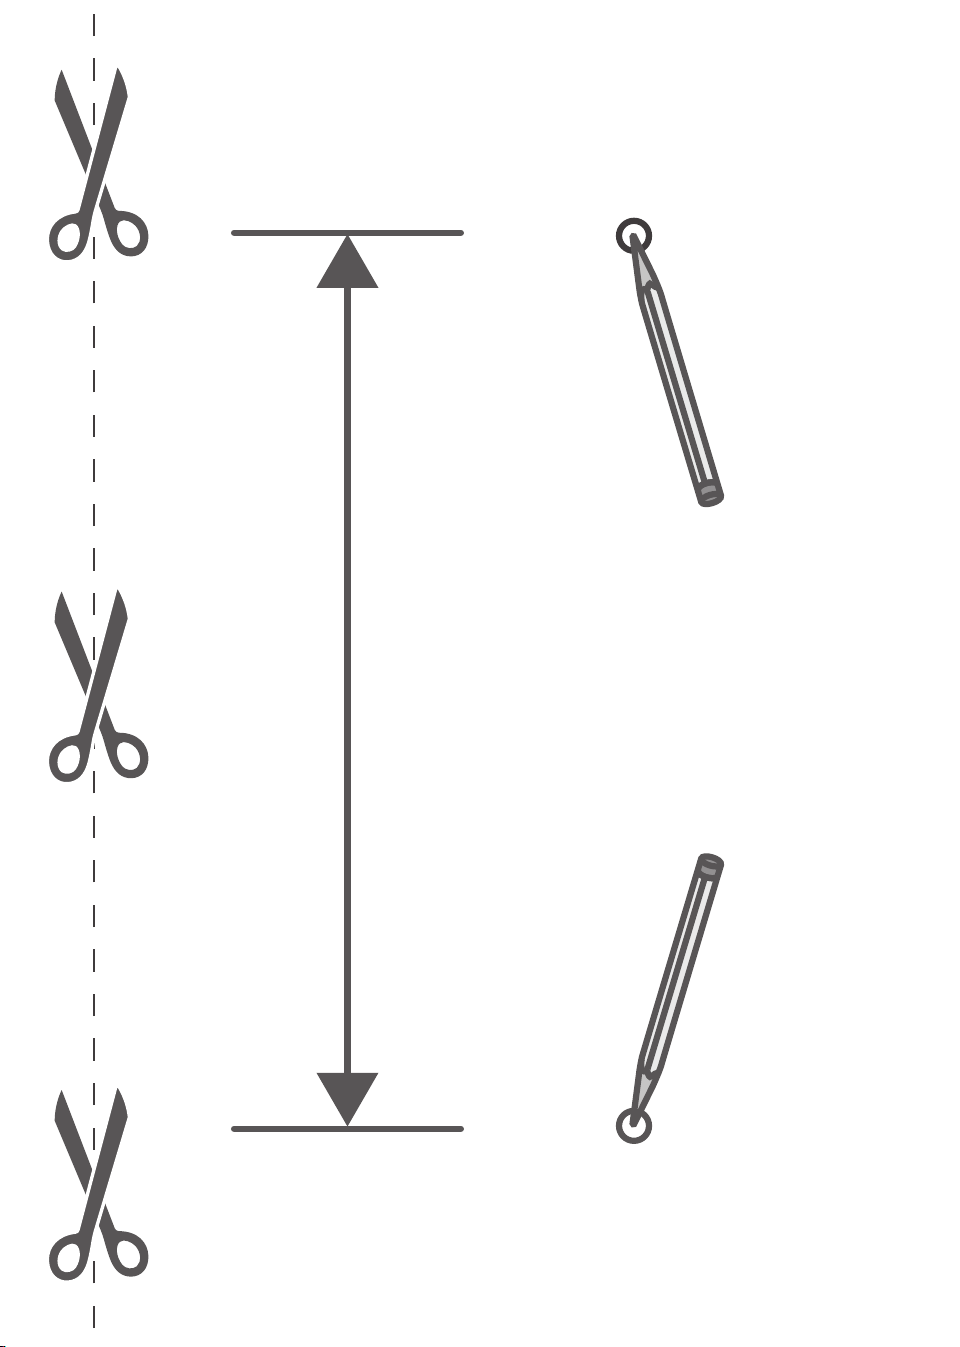
Locate the Lumalou™ unit and cord wrap cleat templates on pages
23 and 25. Using scissors, cut on the dotted lines to remove from
this manual.
141.66 mm (5,6 inches)
64.5 mm
(2,5 inches)
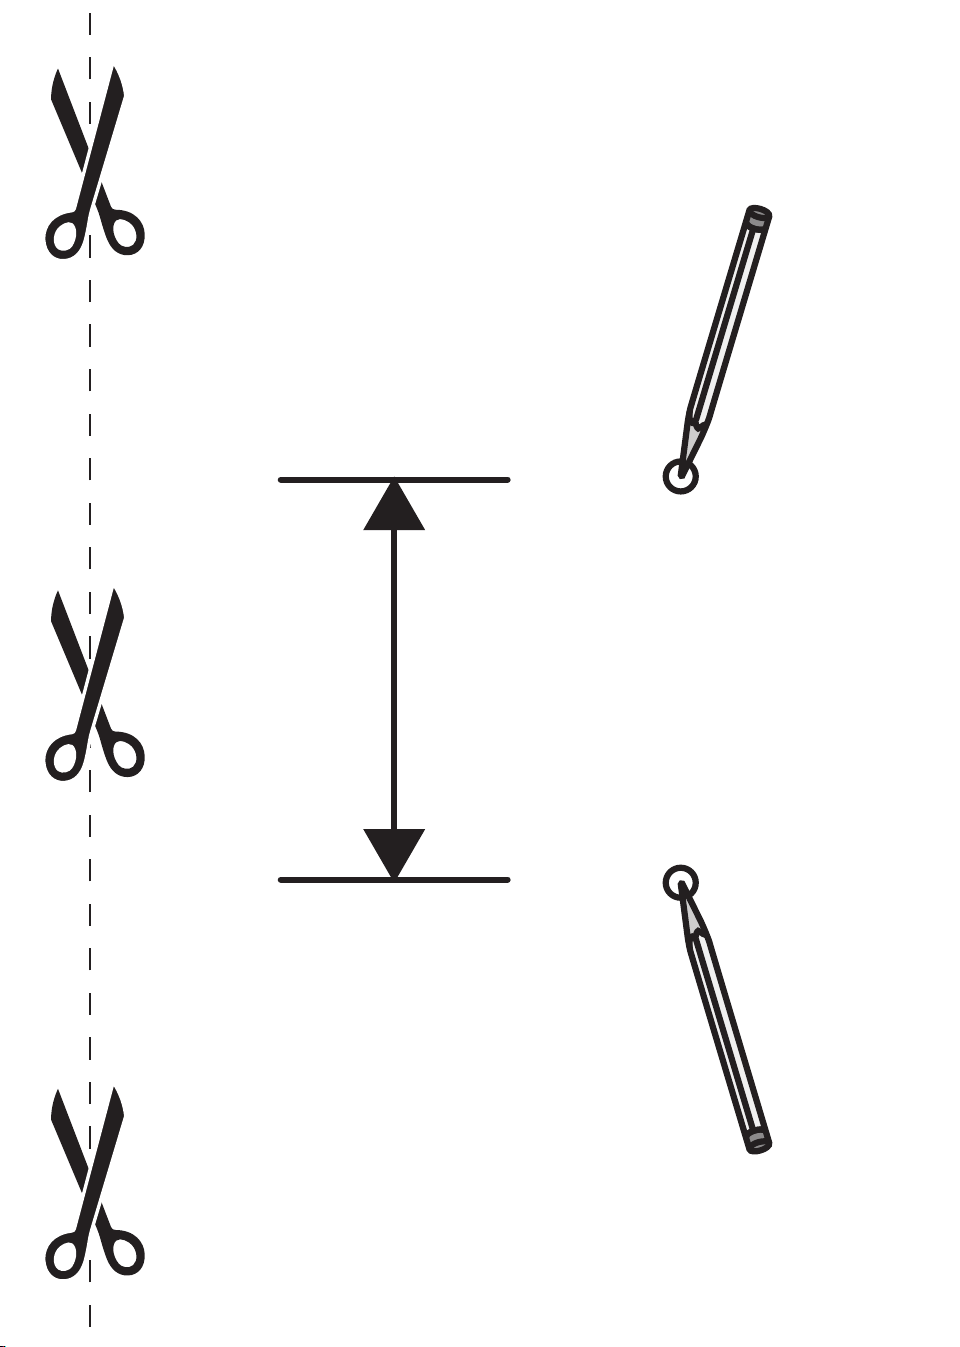
Lumalou™ Template Cleat Cord Wrap Template
Tack the Lumalou™
template to your wall.
Make sure it’s straight.
Using a pencil, make
a mark through both
circles.
8
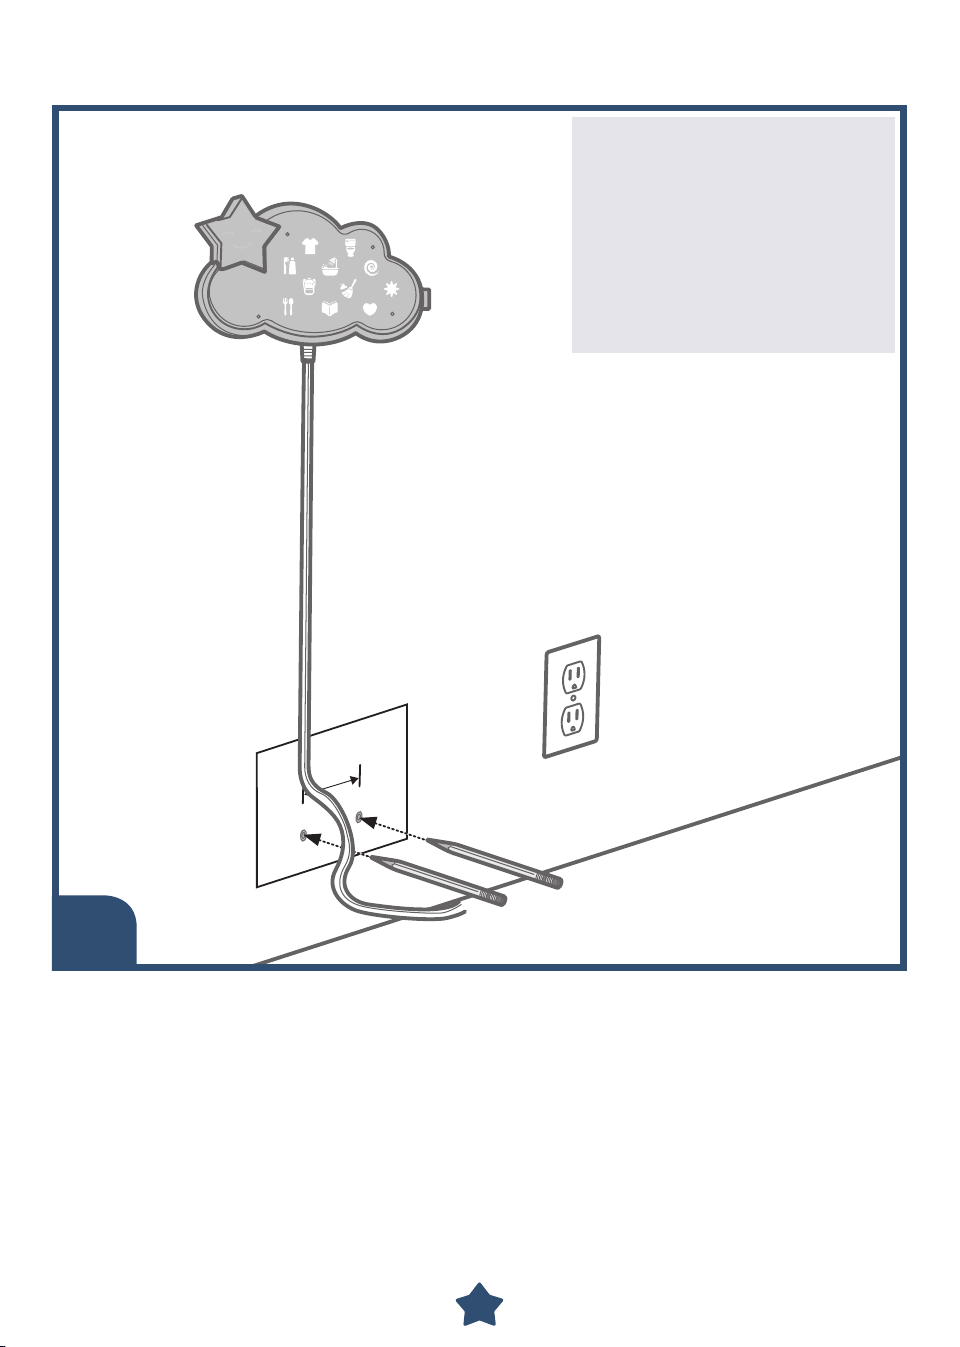
MOUNTING INSTRUCTIONS
3
4
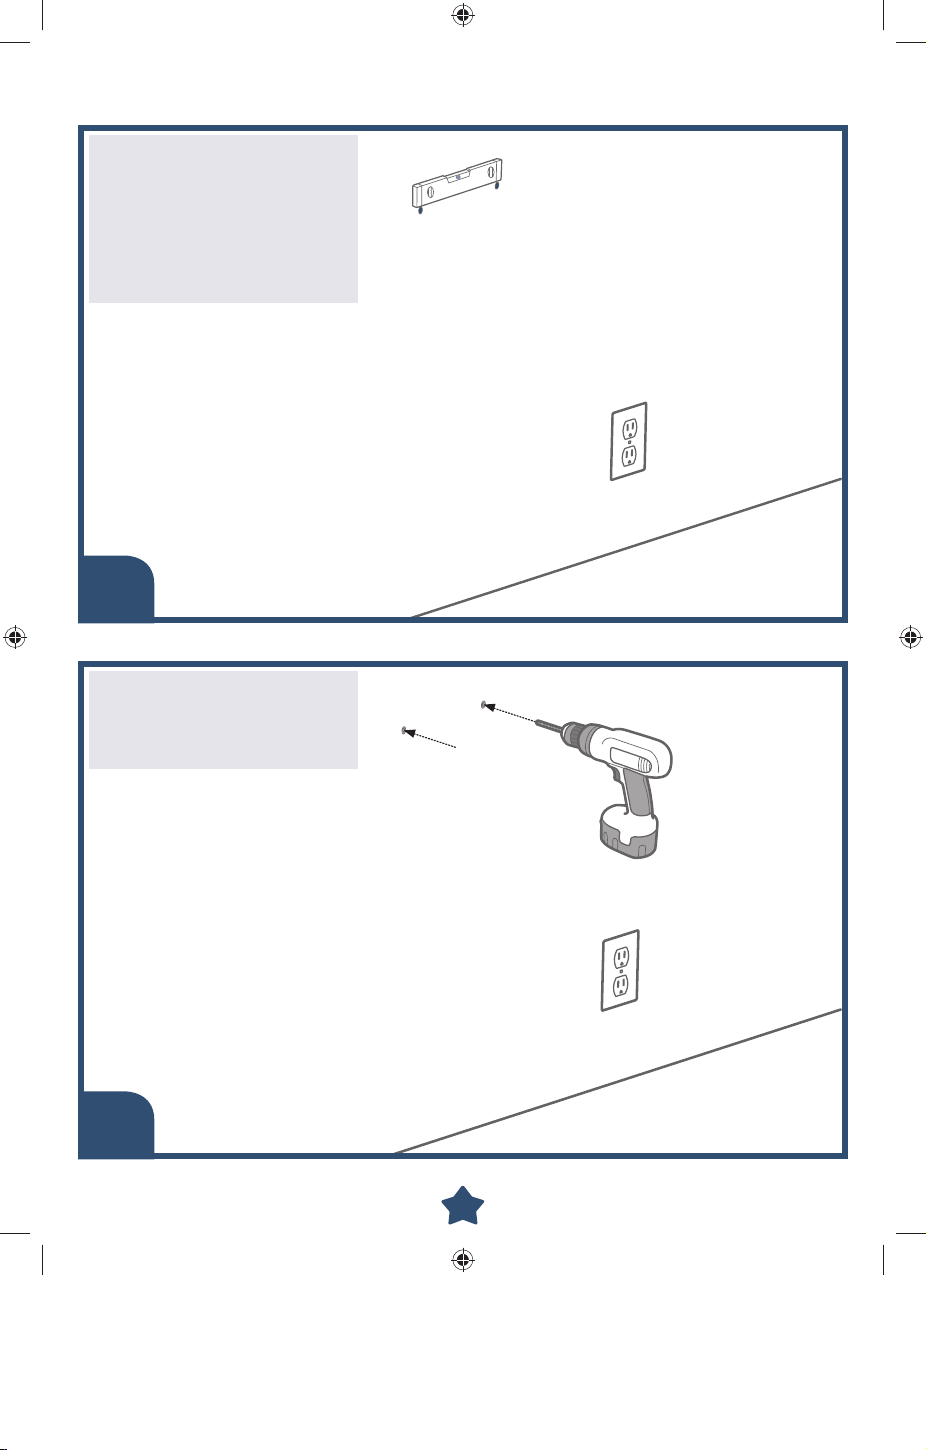
Check to be sure the
holes are level.
Place a level above both
pencil marks. The bubble
should be in the middle
to indicate the pencil
marks are level.
Using a
3
/16" (4,76 mm),
drill bit, drill one hole
through each pencil mark
you made on the wall.
9
MOUNTING INSTRUCTIONS
5
6
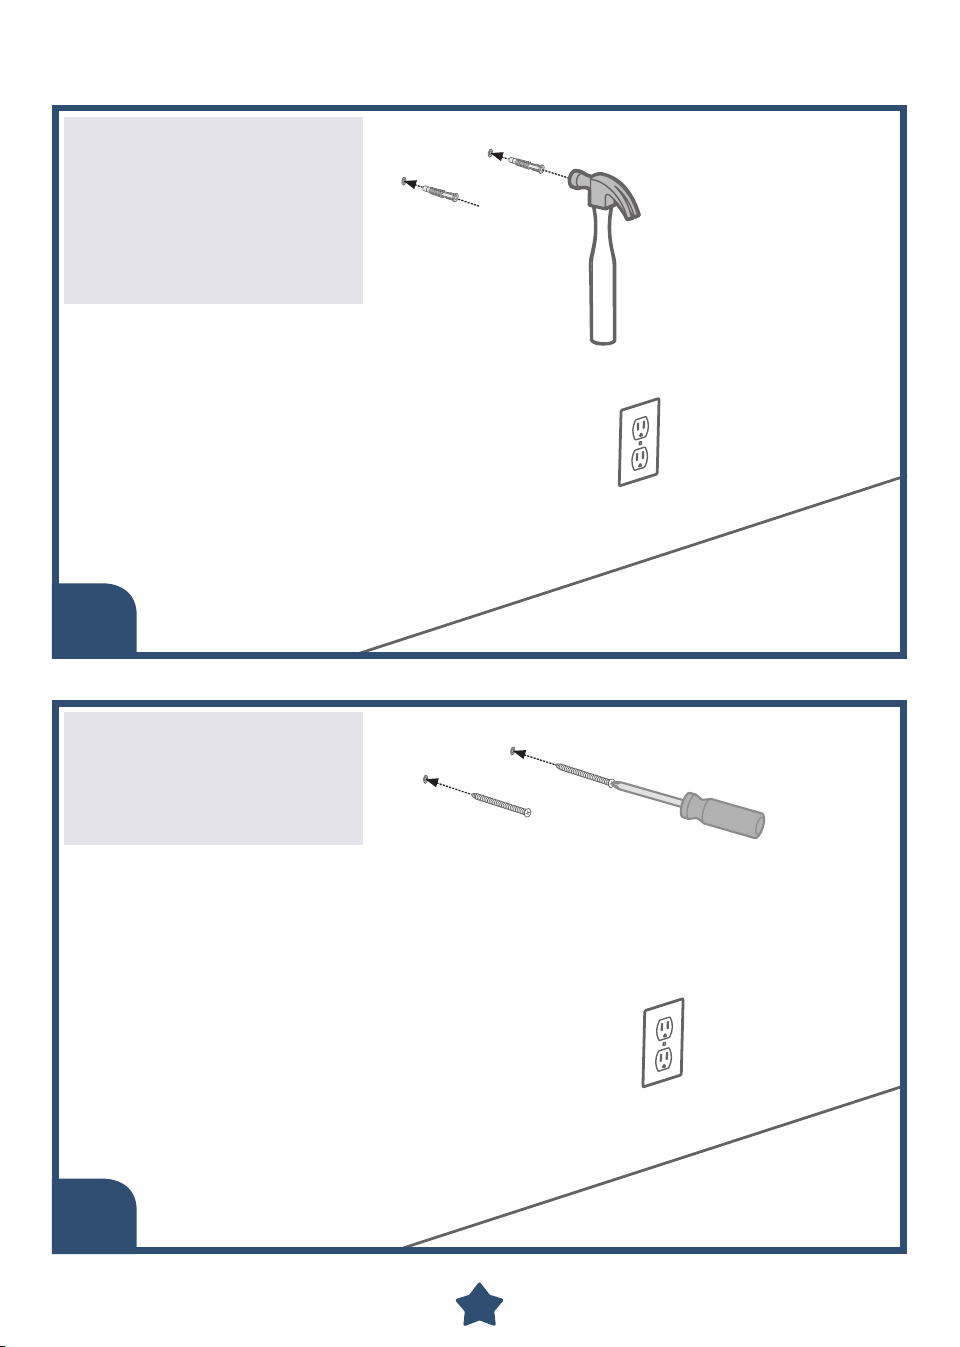
Fit a wall anchor into
each of the drilled holes.
Tap each wall anchor
lightly with a hammer
until the ends of each
wall anchor are even with
the surface of the wall.
Insert a screw into
each wall anchor and
tighten with a Phillips
screwdriver. Do not
over-tighten.
10
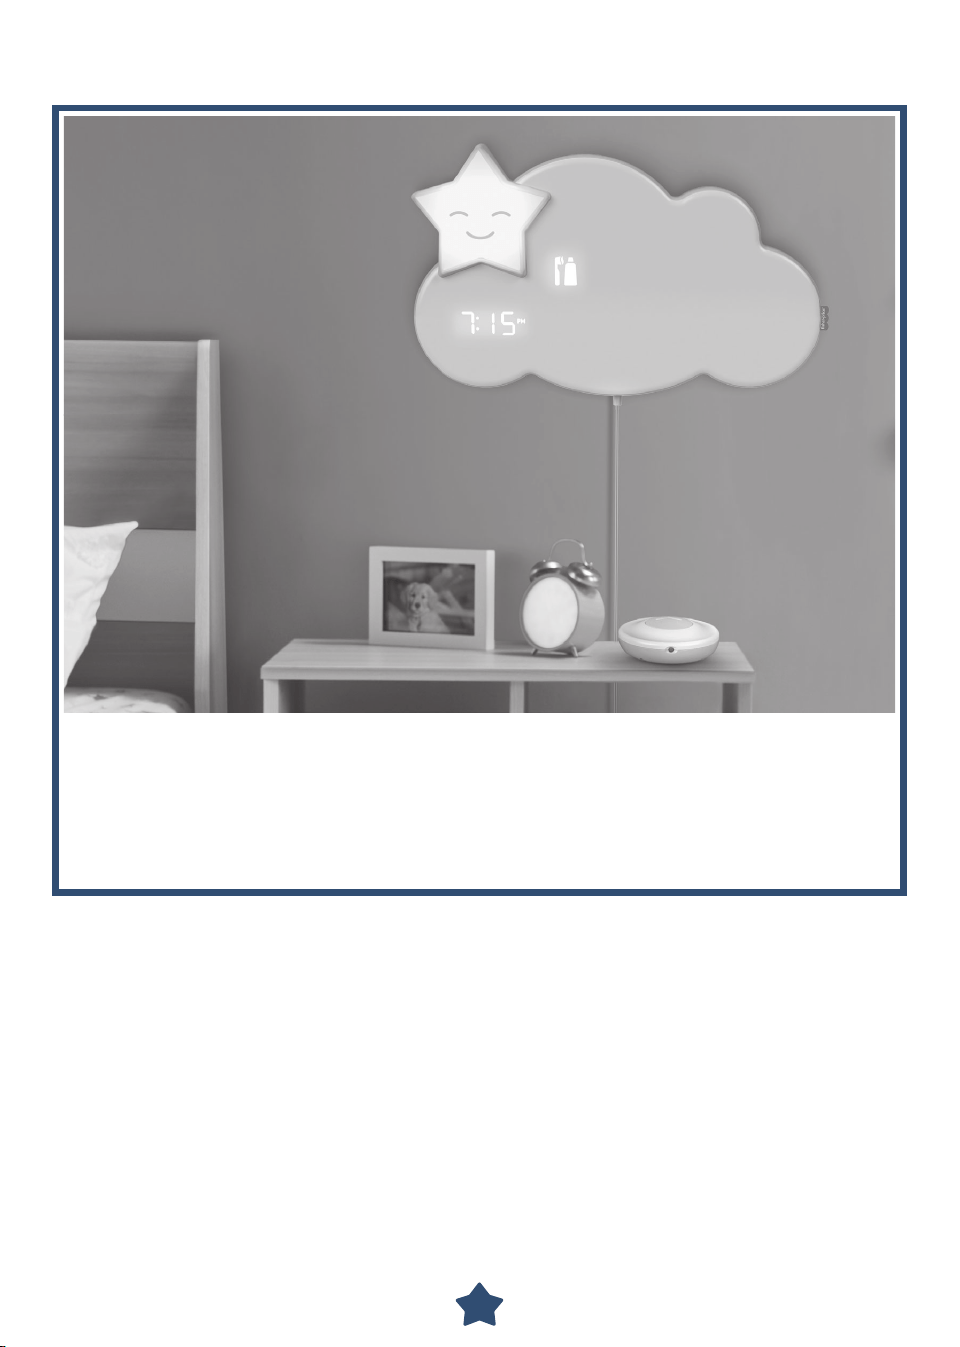
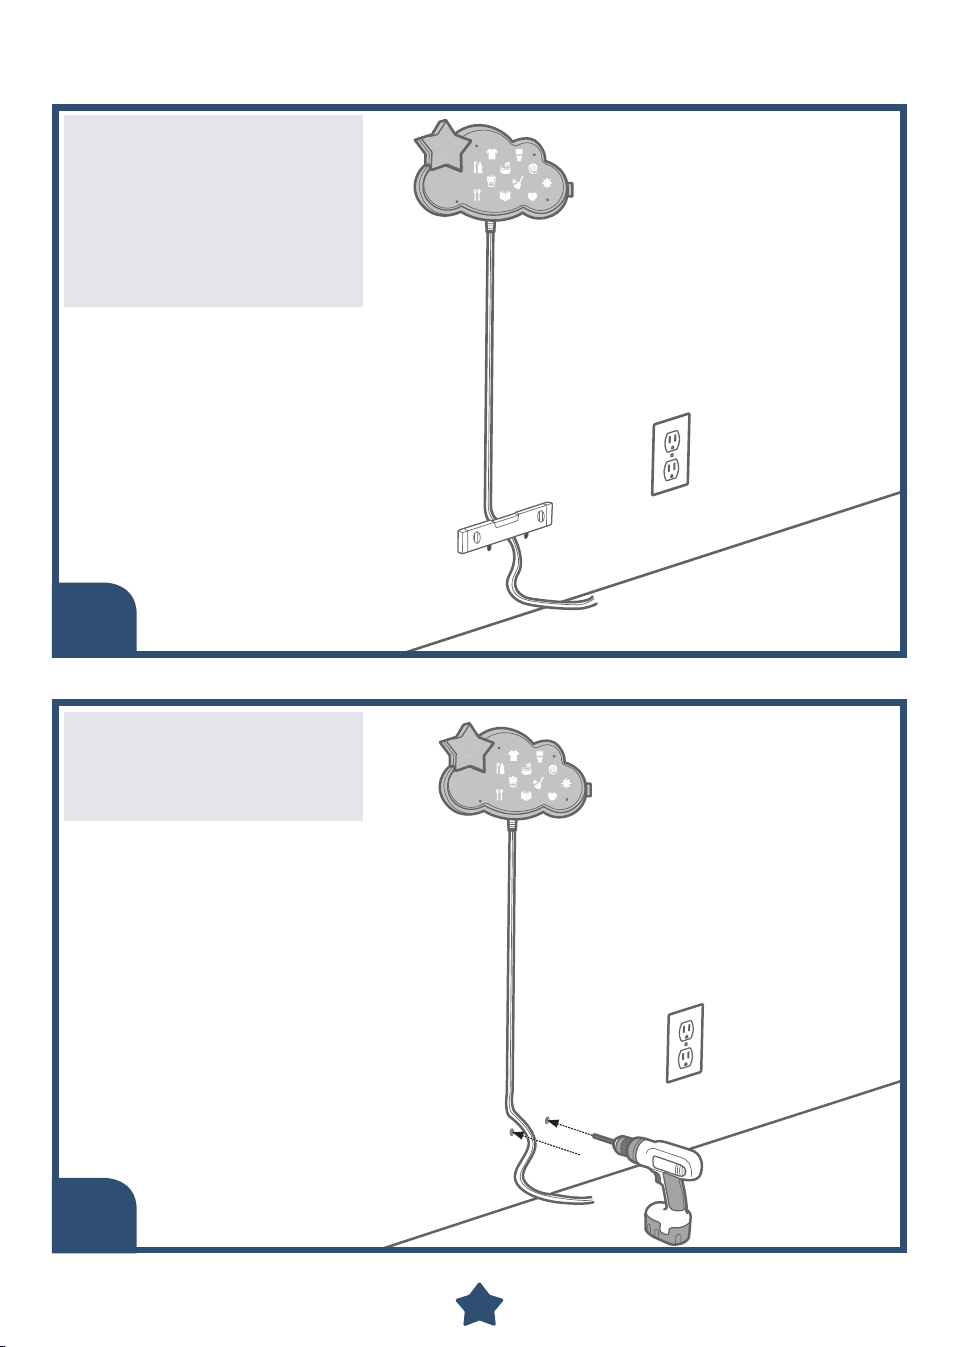
MOUNTING INSTRUCTIONS
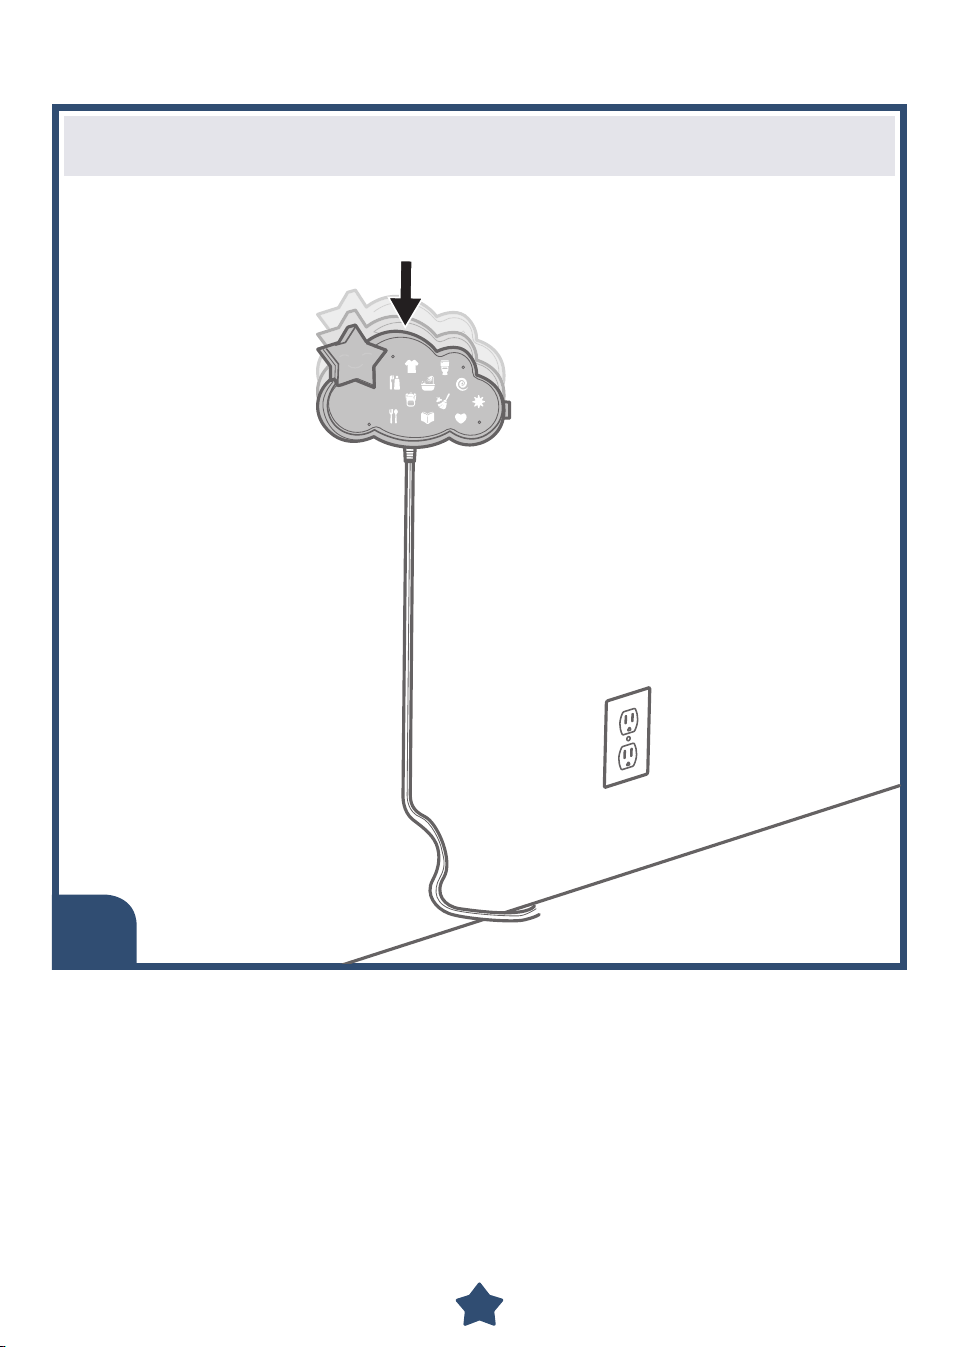
7
Attach the Lumalou™ unit to the screws. Gently slide the unit down
to secure.
11
64.5 mm
(2,5 inches)
MOUNTING INSTRUCTIONS
Tack the cord wrap cleat
template to the wall so
that it is centered below
the Loumalou™ unit and
as close to the floor
as possible.
Using a pencil, make
a mark through both
circles.
8
12
MOUNTING INSTRUCTIONS
9
10
Check to be sure the
holes are level.
Place a level above both
pencil marks.
The bubble should be in
the middle to indicate the
pencil marks are level.
Using a
3
/16" (4,76 mm),
drill bit, drill one hole
through each pencil mark
you made on the wall.

13
MOUNTING INSTRUCTIONS
11
12
Place a wall anchor into
each of the drilled holes.
Tap each wall anchor
lightly with hammer until
the ends of each wall
anchor are even with the
surface of the wall.
Align the holes on the
cord wrap cleat with the
wall anchors.
Insert two screws into
the holes in the cord
wrap and tighten with
a Phillips screwdriver.
Do not over-tighten.
14
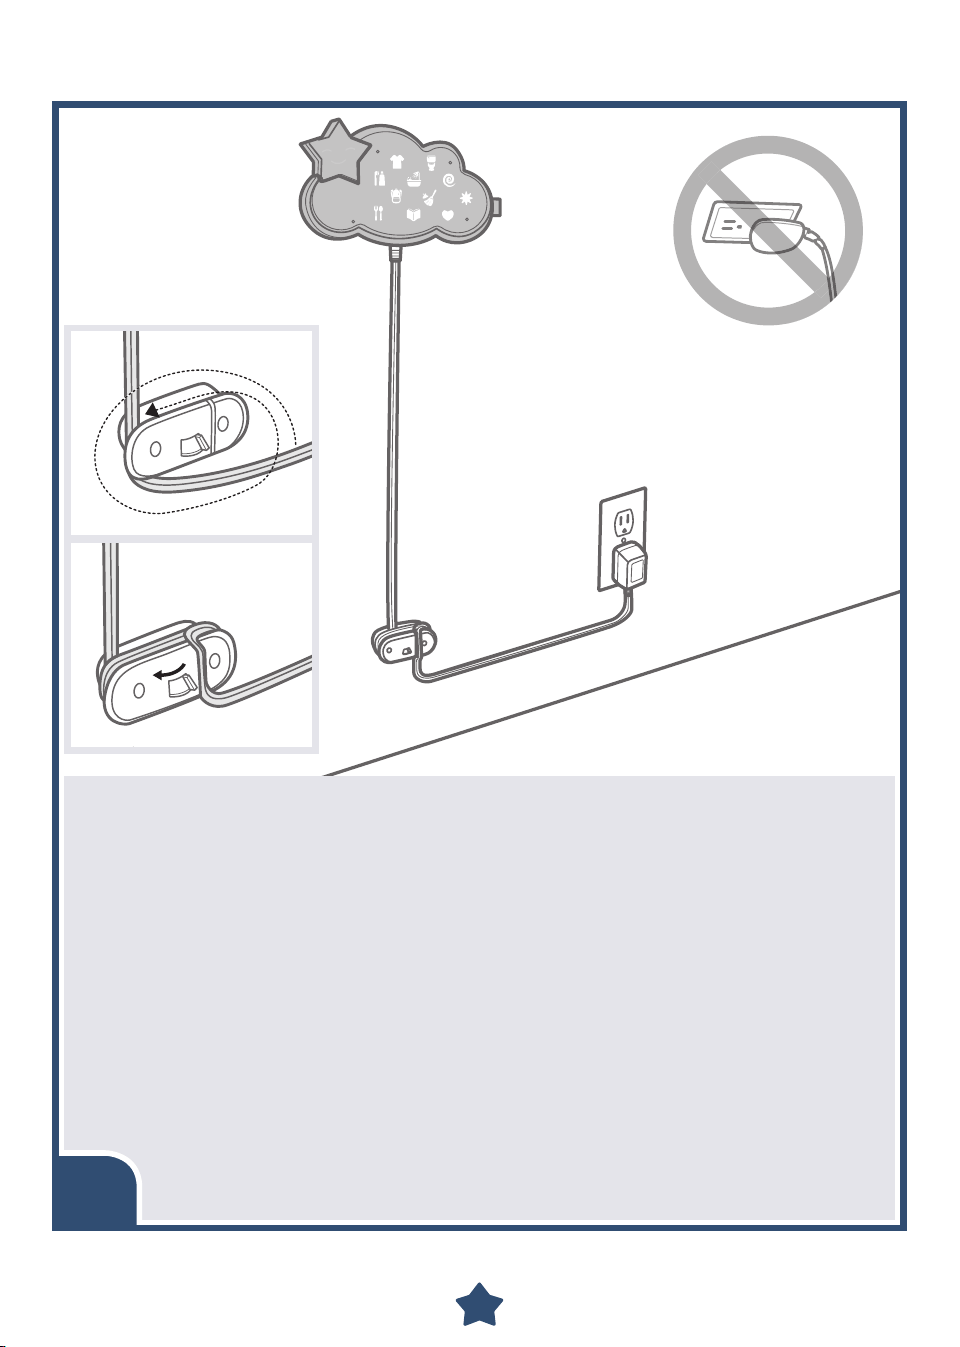
13
IMPORTANT! Make sure the cord is taught between the Lumalou™ unit
and cord wrap cleat. Excess cord can form loops and present
a strangulation hazard.
Extend the cord straight down the wall to the cord wrap.
Wrap the cord around the cord wrap, leaving just enough to reach the
wall outlet. Make sure there is no slack.
Slide the lever on the front of the cord wrap and thread the cord through
the groove in the front of the cord wrap. Make sure the cord is fully
inserted in the groove.
Plug the cord into the AC adapter.
Plug the AC adapter into the wall outlet.
Use the AC adapter only in a wall outlet. Do not plug the adapter into
a ceiling outlet.
If the Lumalou™ unit begins to operate erratically, you may need to
reset the electronics. Unplug the AC adapter for approximately 10
seconds and plug it back in.
MOUNTING INSTRUCTIONS
15
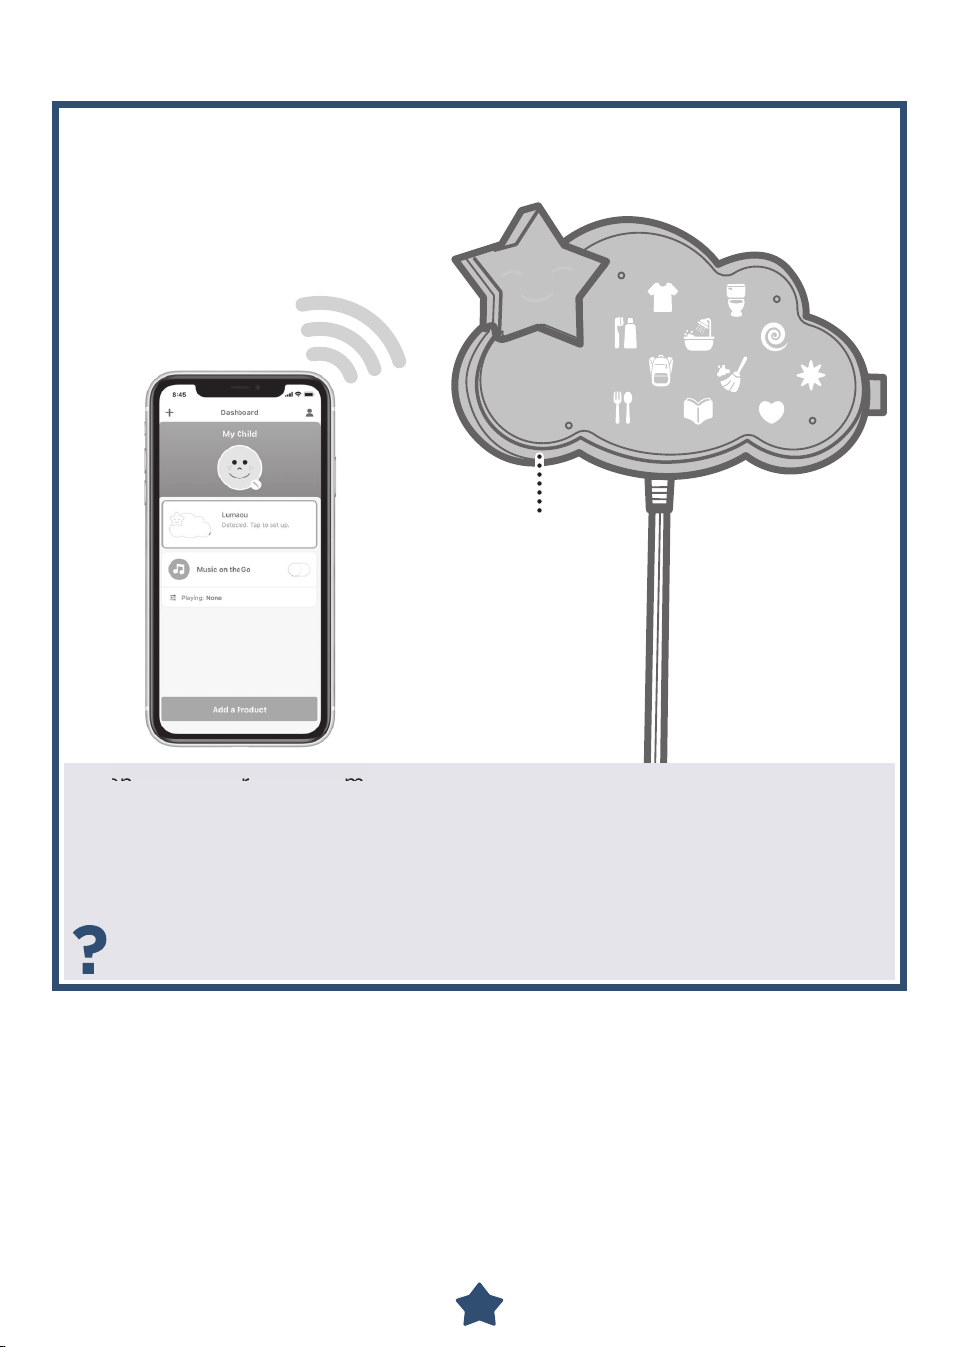
PAIR THE LUMALOU™ UNIT TO YOUR DEVICE
Open the Fisher-Price® Smart Connect™ app on your device (not
included) and touch the Lumalou™ icon on the Smart Connect™
dashboard. Be sure your device is within approximately 1,8 meters - 6 feet
of the Lumalou™ unit to pair.
Press the pairing button on the Lumalou™ unit. Once paired, the clock on
the Lumalou™ unit updates to the current time.
If you cannot pair your device with the Lumalou™ unit, try moving the
device closer to the unit.
Pairing
Button
en
t
he
F
is
he
r
Pr
ic
e®
S
ma
16
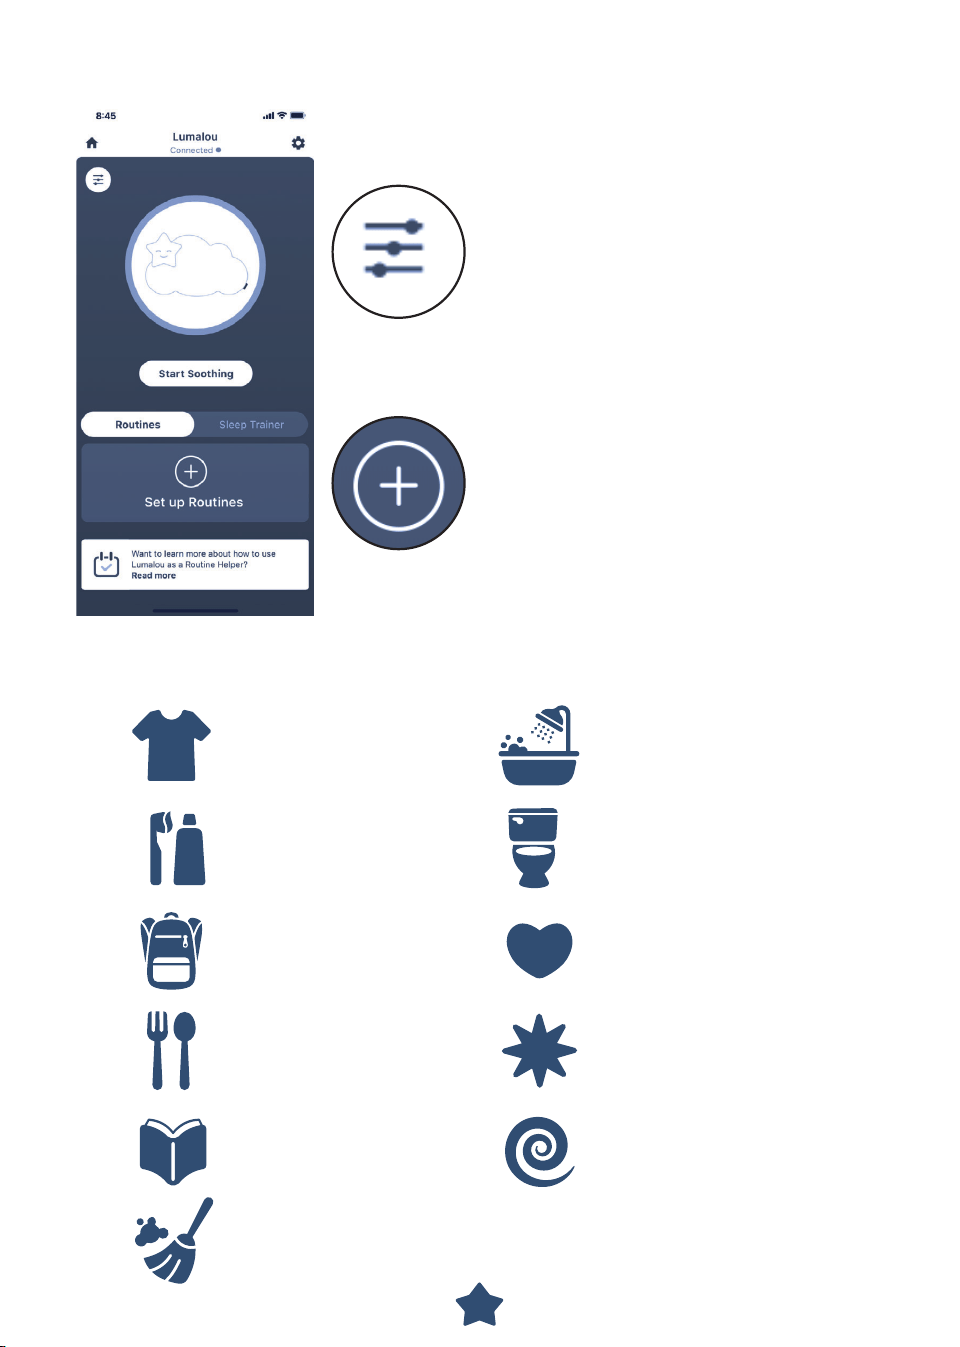
HOME SCREEN
Change Clothes
Brush Teeth
Pack Bag
Eat
Read
Clean Up
Wash Up
Custom Task 1
Custom Task 2
Custom Task 3
Go Potty
Customize settings like light colors
and light brightness, song and sound
choices, light and sound timers, volume,
and to turn ON/OFF Ready, Settle,
Sleep™ lights and sounds playlist.
Choose Routines or Sleep Trainer
and then touch this button to setup
a routine/sleep times for each day of
the week.
There are eight tasks and three custom tasks (you assign them) to
create a routine.

17
LET'S CREATE A ROUTINE
First assign a name to the routine. For example, you could name it "Morning".
Next, create the routine by selecting tasks in the order you would like them
completed.
Remember, you can create your own task. For example, you can assign "Brush
Your Hair to the asterisk icon. .
Then, choose each day of the week this routine should be followed. Use the pull
down menu to select a start time for the routine.
You can create multiple routines but only one routine can be saved per day.
18
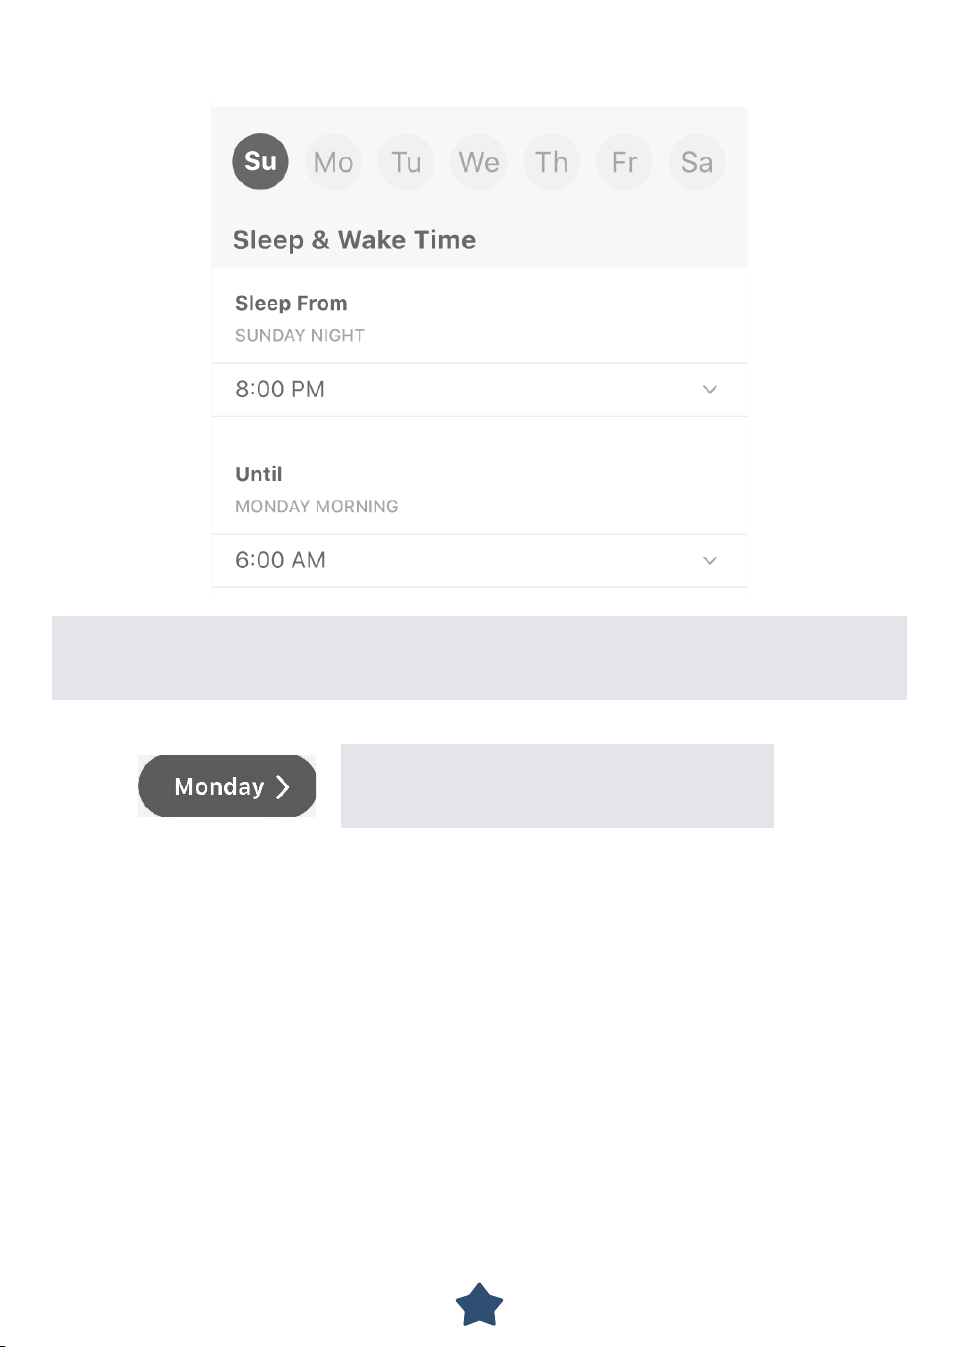
SLEEP TRAINING SCHEDULE
Starting with Sunday, add a bedtime and a wake time for each day of the week
by using the pull down menus to choose both times. You can also set up a nap
time too!
Touch to advance to the next day.
Make sure you enter times for each day
of the week!
19
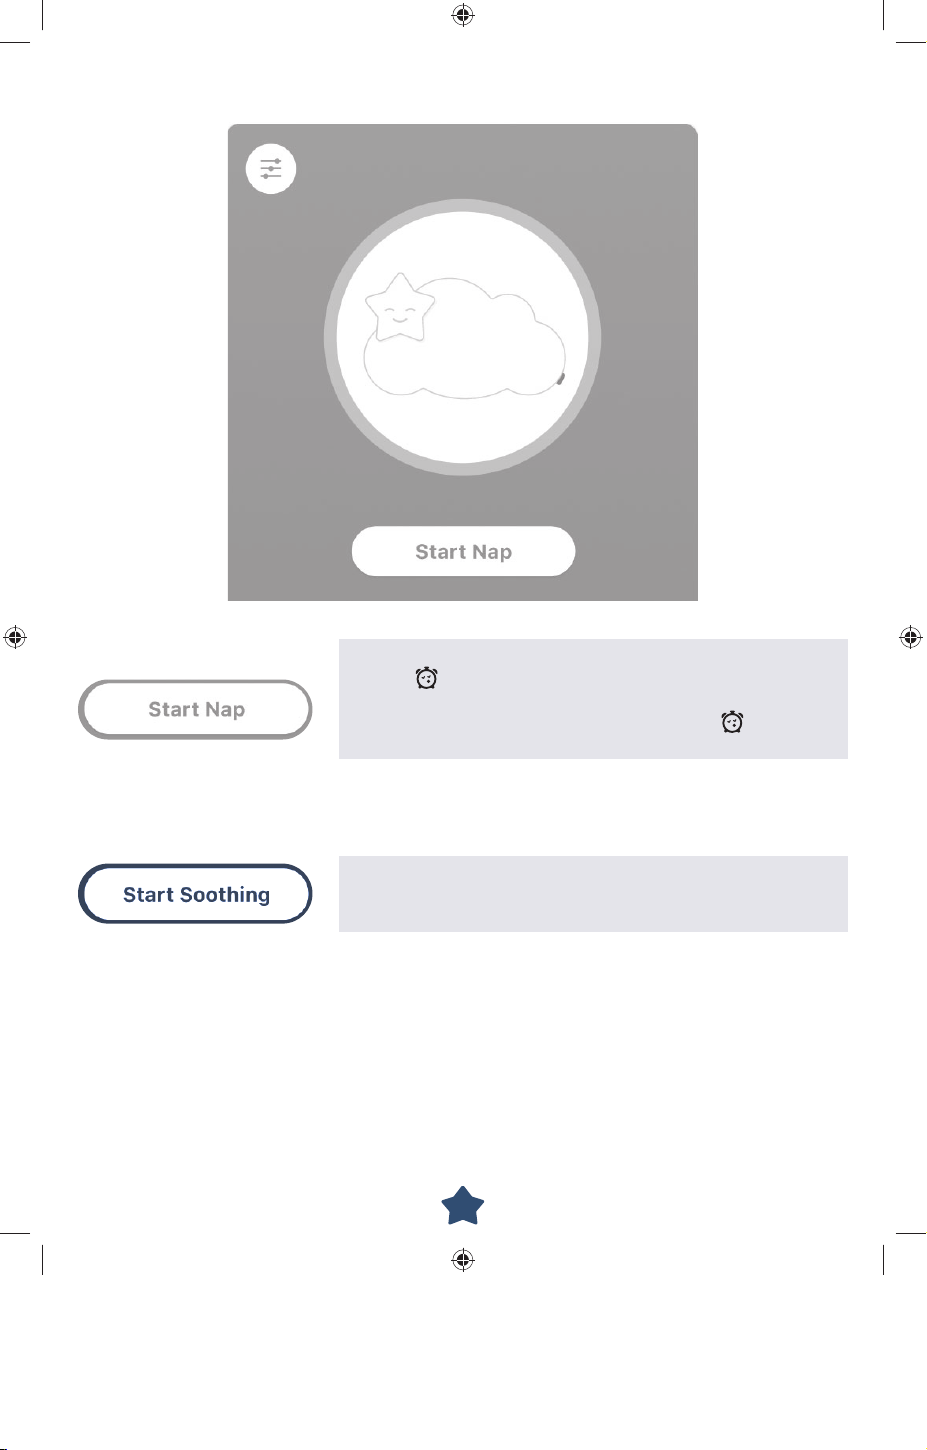
NAP TIME
Touch to start nap time on your device or press the
button on the underside of the remote. The start
button changes to a stop button if you'd like to stop
the nap timer or press the same button on the
underside of the remote.
Touch this button on the home screen to play your
light and sound choices during a nap. Or press the
top button on the remote.
20
START A ROUTINE
TASK COMPLETED
When it's time to start
a routine, all of the tasks will
pulse until your child presses
the button on the remote.
Then, only the first task lights.
You can end the routine at
any time using the app or by
pressing the button
on the
underside of the remote.
After completing a task, your
child must press the button on
the remote to move on to the
next task. Complete all tasks in
the routine for a fun reward.

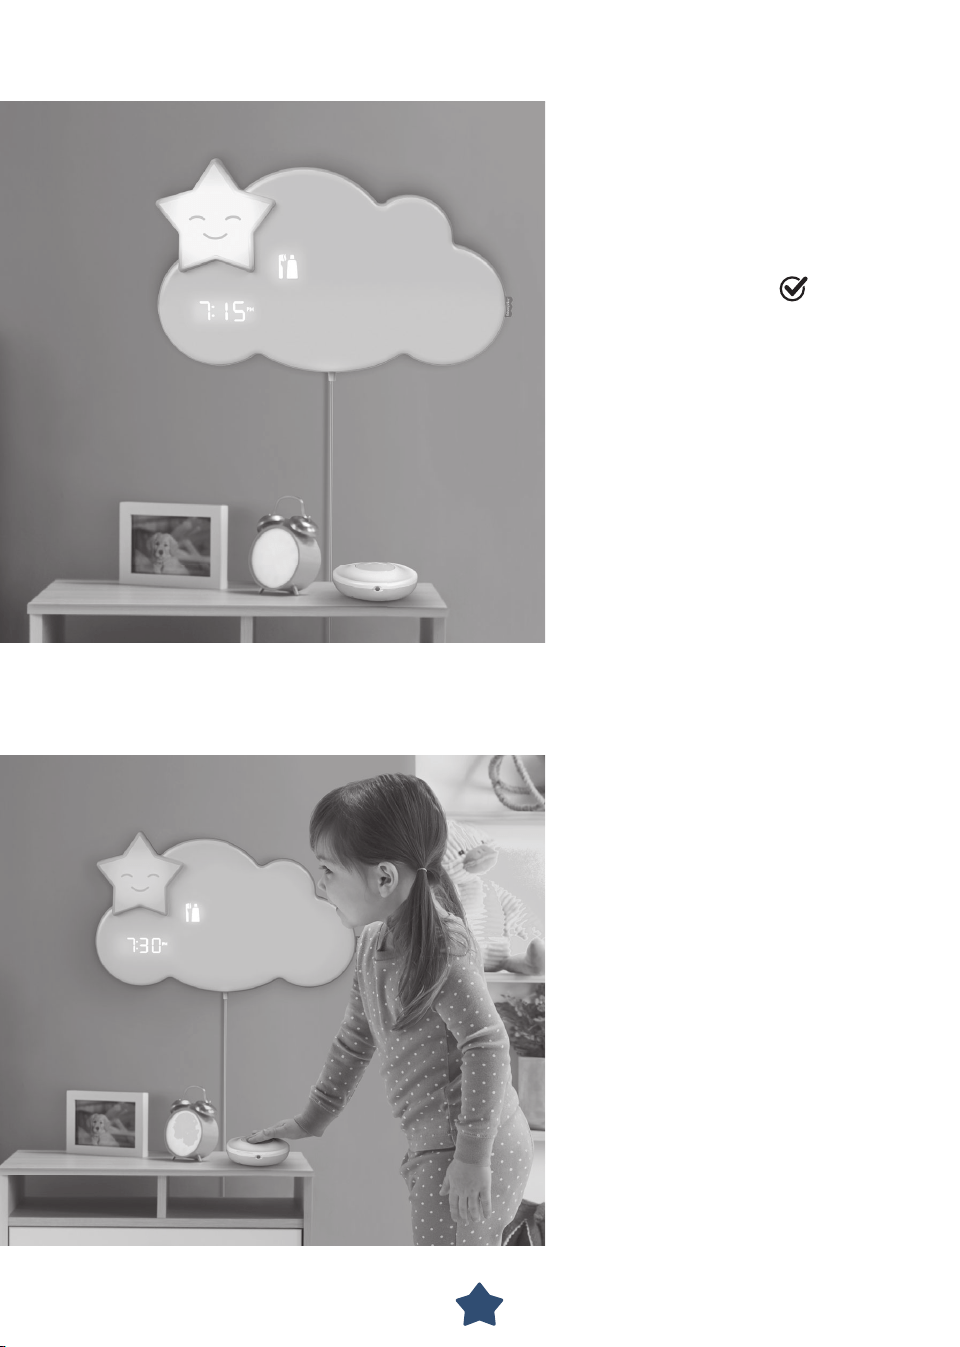
21
TIME TO GET UP
A press of the remote
button lets your child
know when it is time to
sleep or time to wake up.
Red star means it's time
to sleep. Green star means
it's time to wake up!
Here's some help:
If the Lumalou™ unit is unplugged or the power in your home goes
out, you will lose the current time. Without the current time, the
routine and sleep trainer functions will be disabled until you
re-connect the Lumalou™ unit to the app.
22
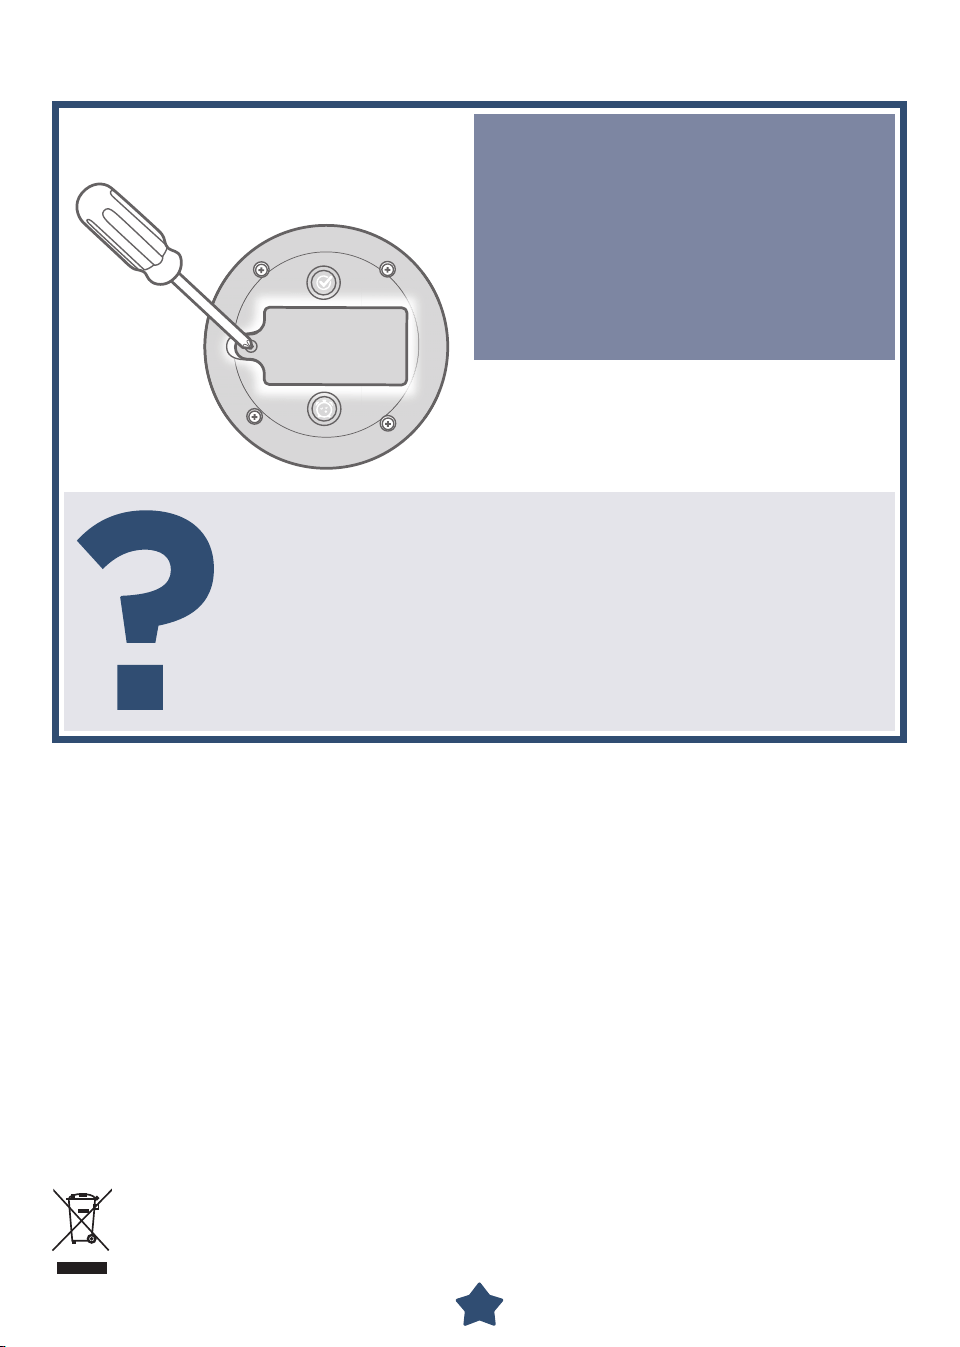
REPLACE BATTERIES IN THE REMOTE
Loosen the screw in the battery
compartment door and remove
the door.
Remove the exhausted batteries
and properly dispose.
Insert two AAA (LR03) alkaline
batteries.
Replace the battery compartment
door and tighten the screw.
Battery Safety Information
In exceptional circumstances, batteries may leak fluids that can cause a
chemical burn injury or ruin your product. To avoid battery leakage:
Do not mix old and new batteries or batteries of different types: alkaline,
standard (carbon-zinc) or rechargeable.
Insert batteries as indicated inside the battery compartment (+ and -).
Remove batteries during long periods of non-use. Always remove exhausted
batteries from the product. Dispose of batteries safely. Do not dispose of this
product in a fire. The batteries inside may explode or leak.
Never short-circuit the battery terminals.
Use only batteries of the same or equivalent type, as recommended.
Do not charge non-rechargeable batteries.
Remove rechargeable batteries from the product before charging.
If removable, rechargeable batteries are used, they are only to be charged under
adult supervision.
Protect the environment by not disposing of this product or any
batteries with household waste. This symbol indicates that this product
shall not be treated as household waste. Check your local authority for
recycling advice and facilities.
When replacing batteries,
use alkaline batteries for
longer battery life.
If the remote does not seem to work or works erratically:
• Check to see if the Lumalou™ unit power is on.
• Make sure there is a clear path between the Lumalou™ unit
and the remote.
• Remove and reinstall the batteries.
• Check to see if the light on the remote turns on when
you press the button. If it does not, it’s time to replace
the batteries!
23
141.66 mm (5,6 inches)

24
25
64.5 mm
(2,5 inches)

26

2727
FCC STATEMENT (UNITED STATES ONLY)
This equipment has been tested and found to comply with the limits for a
Class B digital device, pursuant to Part 15 of the FCC rules. These limits are
designed to provide reasonable protection against harmful interference in
a residential installation. This equipment generates uses and can radiate
radio frequency energy and, if not installed and used in accordance with
the instructions, may cause harmful interference to radio communications.
However, there is no guarantee that interference will not occur in a particular
installation. If this equipment does cause harmful interference to radio or
television reception, which can be determined by turning the equipment off
and on, the user is encouraged to try to correct the interference by one or
more of the following measures:
• Reorient or relocate the receiving antenna.
• Increase the separation between the equipment and receiver.
• Consult the dealer or an experienced radio/TV technician for help.
NOTE: Changes or modifications not expressly approved by the manufacturer
responsible for compliance could void the user’s authority to operate the
equipment.
This device complies with Part 15 of the FCC Rules. Operation is subject
to the following two conditions: (1) This device may not cause harmful
interference, and (2) this device must accept any interference received,
including interference that may cause undesired operation.
This device contains licence-exempt transmitter(s)/receiver(s) that comply
with Innovation, Science and Economic Development Canada’s licence-exempt
RSS(s). Operation is subject to the following two conditions: (1) This device may
not cause interference. (2) This device must accept any interference, including
interference that may cause undesired operation of the device.
L’émetteur/récepteur exempt de licence contenu dans le présent appareil est
conforme aux CNR d’Innovation, Sciences et Développement économique
Canada applicables aux appareils radio exempts de licence. L’exploitation est
autorisée aux deux conditions suivantes : (1) L’appareil ne doit pas produire
de brouillage; (2) L’appareil doit accepter tout brouillage radioélectrique subi,
même si le brouillage est susceptible d’en compromettre le fonctionnement.
GENERAL INFORMATION
Always use this product where there is adequate ventilation. To prevent
overheating, keep the product away from heat sources such as radiators,
heat registers, direct sunlight, stoves, amplifiers, or other appliances which
produce heat.
Never use extension cords with the AC adapter.
Never use the product near water (ie.: bathtub, sink, laundry tub or wet
basement, etc.).
Do not connect to more than the recommended number of power supplies.
The Lumalou™ unit must only be used with the recommended AC adapter.
Disconnect the AC adapter from the plug before cleaning.
Adults Note: If you use this product with the AC adapter, periodically
examine the AC adapter for damage to the cord, housing or other parts
that may result in the risk of fire, electric shock or injury. If the AC adapter is
damaged, do not use the product with the AC adapter.

28
©2020 Mattel.
PRINTED IN CHINA
GLD09-0970-1102345604-DOM
UNITED STATES
Fisher-Price, Inc., 636 Girard Avenue, East Aurora, NY 14052.
Consumer Services: 1-800-432-5437.
CANADA
Mattel Canada Inc., 6155 Freemont Blvd., Mississauga,
Ontario L5R 3W2 Consumer Services/Service à la clientèle :
1-800-432-5437. www.service.mattel.com.
GREAT BRITAIN
Mattel U.K. Limited, The Porter Building, 1 Brunel Way, Slough SL1 1FQ, UK.
www.service.mattel.com/uk.
NEDERLAND
Mattel Europa B.V., Gondel 1, 1186 MJ Amstelveen, Nederland.
AUSTRALIA
Mattel Australia Pty. Ltd., 658 Church Street, Locked Bag #870, Richmond, Victoria
3121 Australia. Consumer Advisory Service 1300 135 312.
NEW ZEALAND
16-18 William Pickering Drive, Albany 1331, Auckland.
SOUTH AFRICA
Mattel South Africa (PTY) LTD, Office 102 I3, 30 Melrose Boulevard,
Johannesburg 2196.
Apple, & the Apple logo are trademarks of Apple Inc., registered in
the U.S. and other countries. App Store is a service mark of Apple Inc.,
registered in the U.S. and other countries.
Google Play and the Google Play logo are trademarks of Google LLC.
Remark:
Revision Date ID# Changes
Primary - pr 07/31/2020 GLD09-0970-1102345604-DOM NA