
Loading ...
Loading ...
Loading ...
-34-
Adjustments
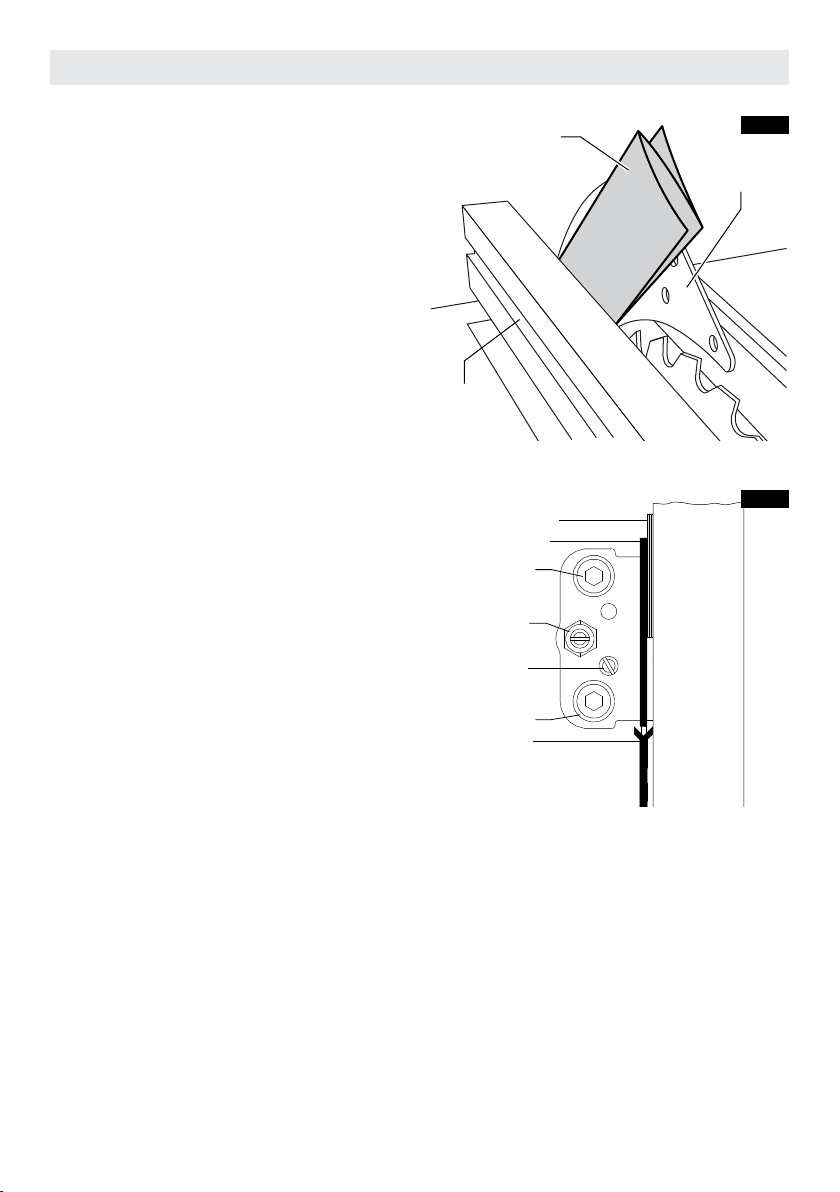
4. Using the rip fence as a guide, check the riv-
ing knife alignment with the plane of the saw
blade. Since the riving knife is thinner by ap-
proximately three thicknesses of paper on
each side, than the width of the blade’s KERF
(Fig 32) you must make a temporary paper
“spacing gauge“. Make two folds in a small
piece (6" X 6") of ordinary newspaper to
make three thicknesses. Place the paper
spacing gauge between the riving knife and
the rip fence (Fig 34).
5. Repeat step 4 with the rip fence on the right of
the blade and check with the paper spacing
gauge.
6. If the paper spacing gauge does not t be-
tween the rip fence and the riving knife per
steps 4 and 5 above, the riving knife is not cor-
rectly aligned with the blade and must be ad-
justed. If the riving knife needs adjustment
proceed to section “Adjusting Riving Knife.” If
the riving knife is correctly aligned with the
blade then no adjustment is necessary.
NOTE: The riving knife has been properly aligned
at the factory - Check the alignment before
making any adjustments.
ADJUSTING RIVING KNIFE
1. Raise the saw blade to maximum height and
set the bevel angle to 0°.
2. Remove the barrier guard assembly and
anti-kickback device.
3. Remove the table insert.
4. Place the rip fence on the right side and po-
sition 1 and move the fence until it touches
the tips of the saw blade, then lock the rails
in place.
5. Loosen the hex nut with a 10mm open end
wrench. Slightly loosen the clamping screws
(1/4-1/2 turns) using the 5mm Allen wrench
provided. Loosen the set screw using a at
screwdriver (Fig. 35).
6. Make two folds in a small piece of paper (6" x
6") to form three layers (Fig. 32). This folded
paper is used as a “spacing gauge.”
Riving
Knife
Fence
Three Thicknesses
of Paper
Set Screw2
Set Screw1
Clamp Screw
Clamp Screw
Riving Knife
Blade
Paper
Fence
NOTE: The spacing instructions above are based
on using a standard kerf blade (.128" kerf on the
blade included). If a smaller kerf blade is used,
adjust the paper spacer. For instance, if the kerf of
the replacement blade is near .100," use 1 thick-
ness of paper as a spacer; if the kerf is near .110,"
use 2 thicknesses.
FIG. 34
FIG. 35
Loading ...
Loading ...
Loading ...